

Time Mysteries: The Ancient Spectres
Platform: Mac, Windows
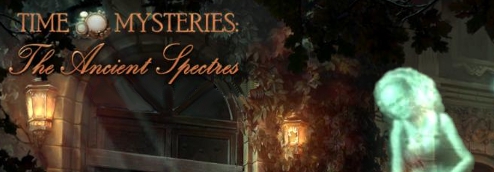
![]() Storylines in the adventure/hidden object hybrid genre of casual games contain a massive range of scenarios. Some are set in the past, some feature magic and curses, some feature an orphan on a quest to find their family, some feature time travel, etc. But what do you think about a game having all of the above? And more? Check out Time Mysteries: The Ancient Spectres by Artifex Mundi to see how that's possible!
Storylines in the adventure/hidden object hybrid genre of casual games contain a massive range of scenarios. Some are set in the past, some feature magic and curses, some feature an orphan on a quest to find their family, some feature time travel, etc. But what do you think about a game having all of the above? And more? Check out Time Mysteries: The Ancient Spectres by Artifex Mundi to see how that's possible!
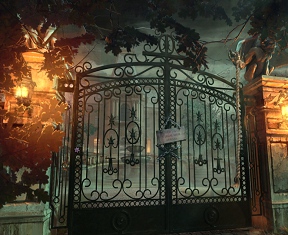 A sort of prequel to Time Mysteries: Inheritance, Time Mysteries: The Ancient Spectres begins in 1830 where you, a young orphan, receive a visit from a mysterious stranger carrying an even more mysterious package. Inside is a letter from an unknown aunt and news of an inheritance: a mansion. Our heroine travels to said mansion to discover it run down and abandoned. Once inside things become even stranger, such as the broken seal that was containing an evil sorceress, and a time machine that allows you to travel back and forth between the mansion and Venice, Italy during different eras. The story eventually incorporates a cursed mansion, the cursed family who lives there, Merlin himself, his evil apprentice Viviana, and a lot of time hoofing it out to make things right.
If you've ever played an adventure/hidden object hybrid you know the drill: changing cursors indicate navigable areas, places of interest, and things to pick up; sparkles indicate things that need a closer inspection (absent in the expert mode). There's also a bottom-loading inventory, a refillable hint feature, and an ever-present notebook to keep track of the story and various clues. To this mix are added a few new features. Once you've found the time machine it goes into your inventory and can function as a map to show locations from the various eras as well as allowing the player to instantly travel from one place to the next. The notebook tracks not only the story and the clues but has an objectives area as well that organizes the main goals of each chapter of the story.
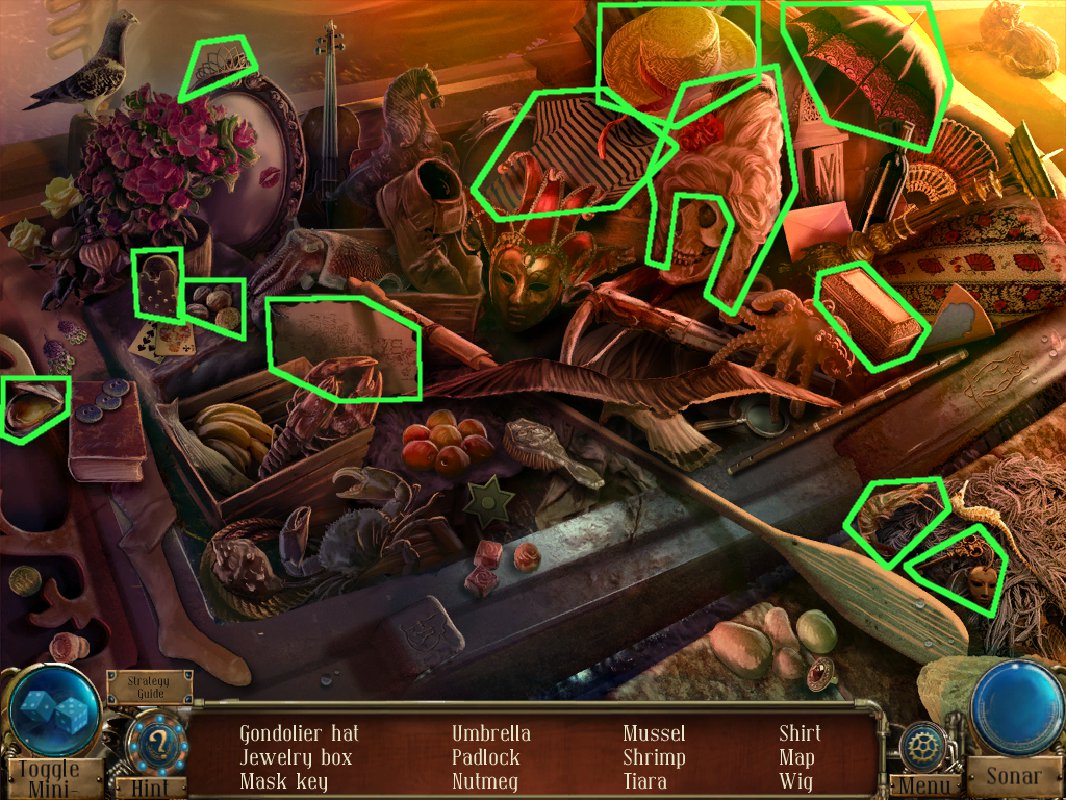
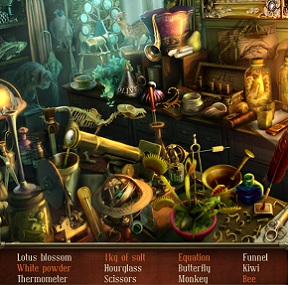 Time Mysteries: The Ancient Spectres has a nice mix of puzzles, mini-games, and hidden object scenes scattered throughout the locations. The puzzles are of the logic variety and vary from easy to difficult, and the mini-games, though familiar, are beautifully done up in the style of the period (1830). The standouts in this game, though, are the hidden object scenes. The scenes themselves are cluttered and a little dark. The lists of items include things that must be manipulated or otherwise interacted with to find. There is both a refilling hint timer and a "sonar" device that shows the outlines of various items that need to be found. What makes the hidden object scenes so unique, though, is the mini-game toggle that each contains. To the left of the hint button is the mini-game button, allowing the player to fight their way through a "cluster" version of a match-3 game in order to find the list items rather than straining the eyes to spot objects in the "junk-pile". For those who don't have the patience for object finding the match-3 alternate is a nice way to keep the game rolling.
Analysis: With its gorgeous graphics and haunting music Time Mysteries: The Ancient Spectres is a visual and aural feast, but that's not what makes it stand head and shoulders above the crowd. There are a lot of pretty looking hybrids out there, but very few that feature as much attention all of the elements of the game, be it the story or the mini-games and puzzles as well as the hidden object aspects.
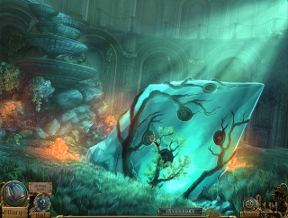 The visuals are lush and inviting and with two modes of play (regular and expert) a wide range of adventure players can enjoy Time Mysteries: The Ancient Spectres. Artifex Mundi has created a fun balance of exploration and gameplay that will appeal to a wide audience. What makes the game really unique, however, is that ability to completely play through the hidden object scenes with a match-3 game, giving a nice choice to those who don't perhaps have the patience to deal with finding over a dozen objects in the crowded backgrounds.
There are a few minor flaws, such as the clickable areas to pick up objects being either too small or too large in some of the scenes. Unfortunately, the game has also succumbed to the practice of putting a chapter that completes the story as the "extra" adventure in the collector's edition. Fine if you spring for the bigger release, but not so fine if you're not interested in the other extras.
Time Mysteries: The Ancient Spectres is a pretty hefty adventure in these days of incredibly shrinking gameplay. A meaty story, stunning visuals, amusing and entertaining gameplay all add up to a fun ride through time and space.
A Collector's Edition is also available. It includes wallpapers, an extra adventure, the ability to replay some of the mini-games, and a built-in strategy guide. Remember that Big Fish Game Club Members pay only $13.99 for Collector's Editions (or 2 club credits), and collector's editions count 3 card punches of 6 total needed for a free game.
![]() Windows:
Windows:
Download the demo
Get the full version
Also available: Collector's Edition
![]() Mac OS X:
Mac OS X:
Also available: Collector's Edition


Walkthrough Guide
(Please allow page to fully load for spoiler tags to be functional.)
Time Mysteries: The Ancient Spectres Walkthrough
General Info/Tips
The items of a hidden-object scene are randomized, so the screenshots provided are intended as basic references.
Hidden-object scenes are used more than once, so if you're stuck, check back to those areas.
Hidden-object scenes alway sparkle green when they're available, making it quick to check on them.
There are often several things you can do at once, so this walkthrough attempts to take you through with the least backtracking.
Main Walkthrough
GOAL: Exploring the Mansion
Home
Open the wooden box on the right.
Examine it and collect the medallion.
Back up and open the door.
Speak to the coachman.
Take the package and set it on the counter.
Examine the package.
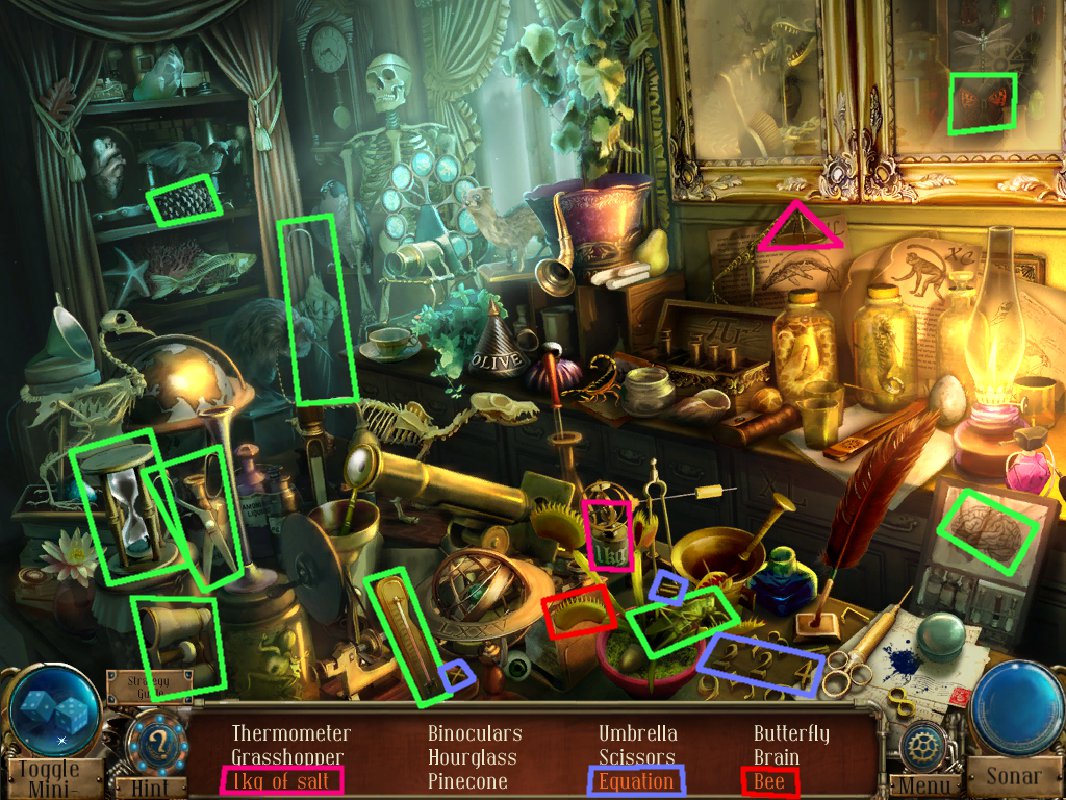
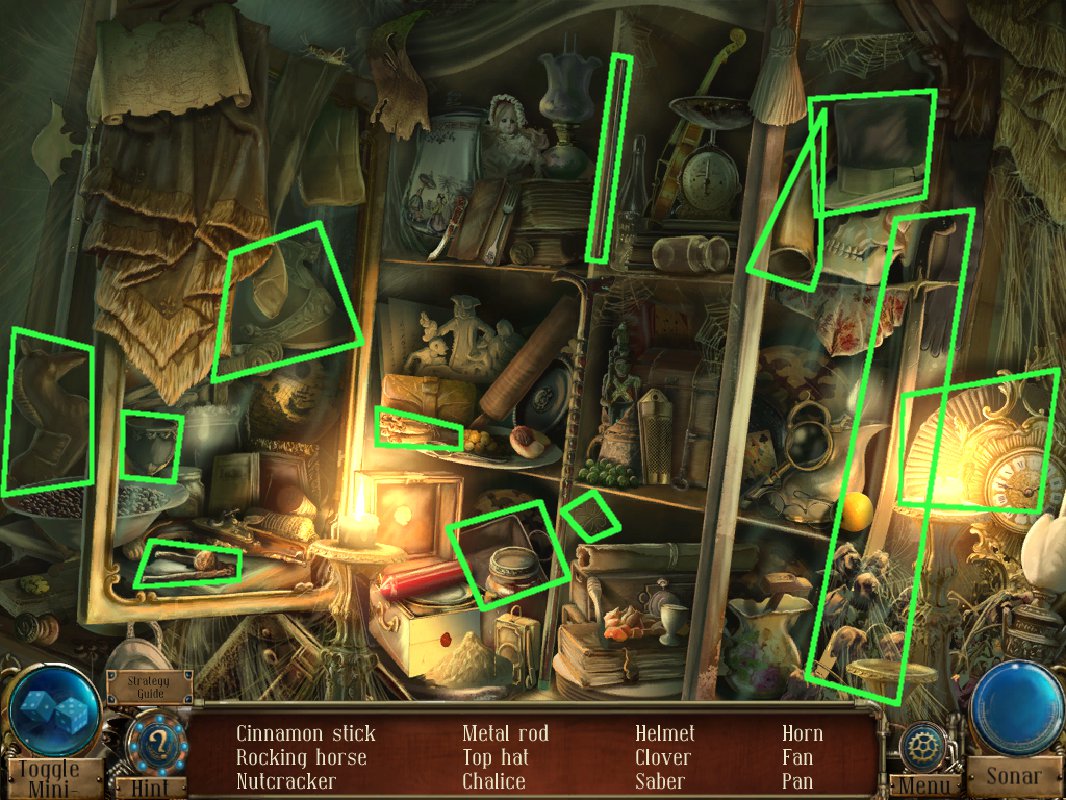
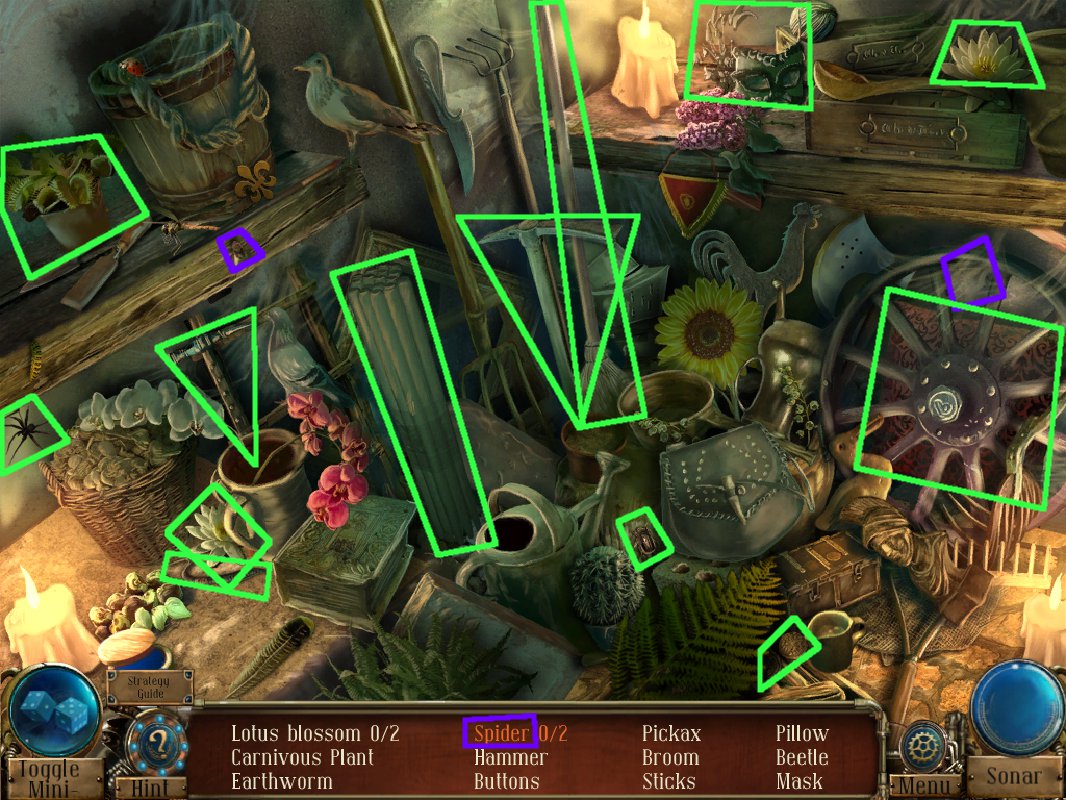
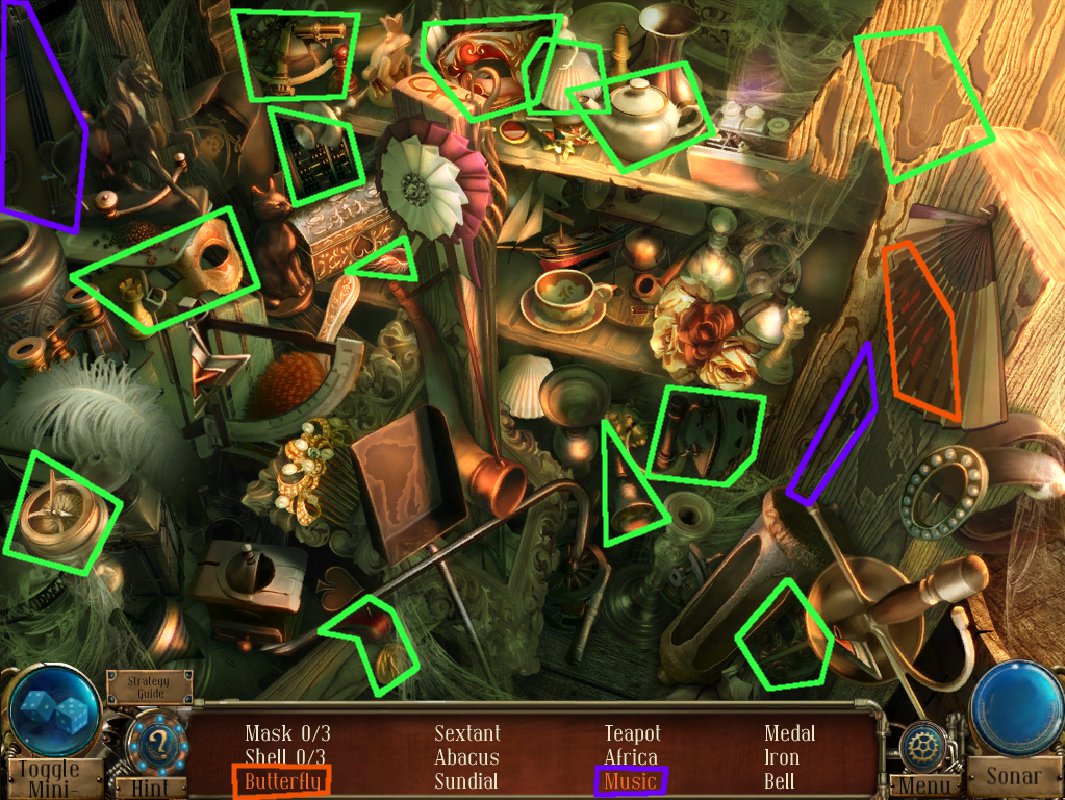
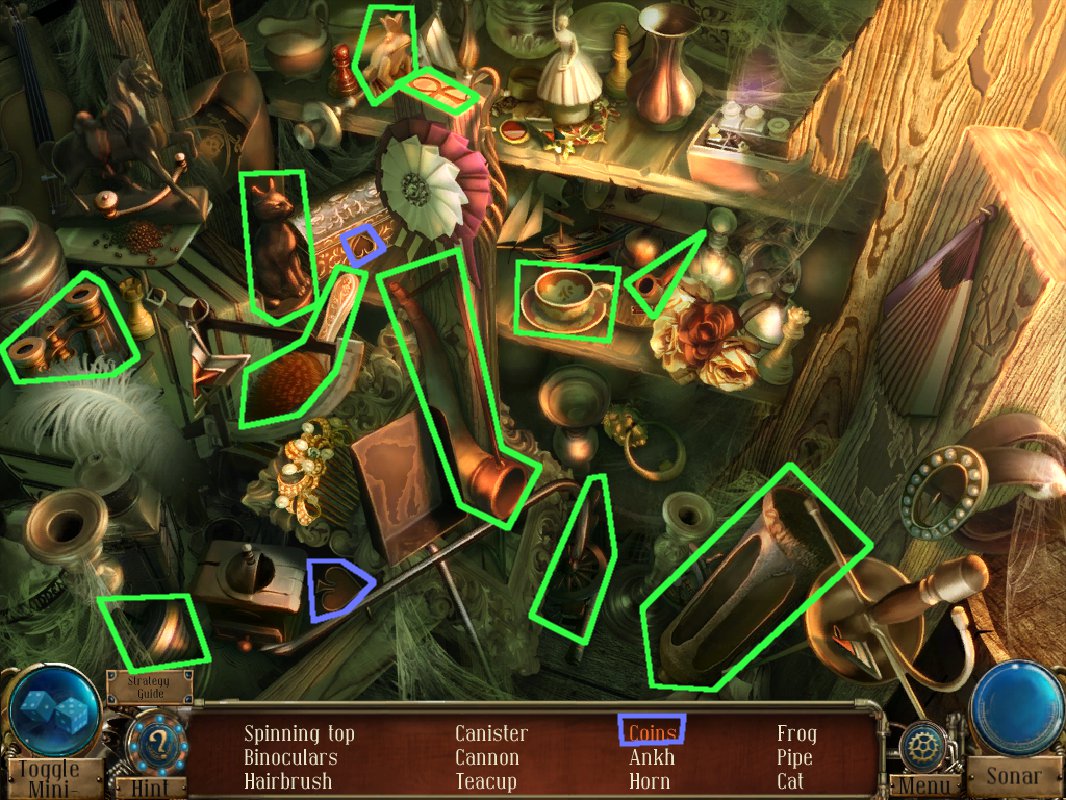
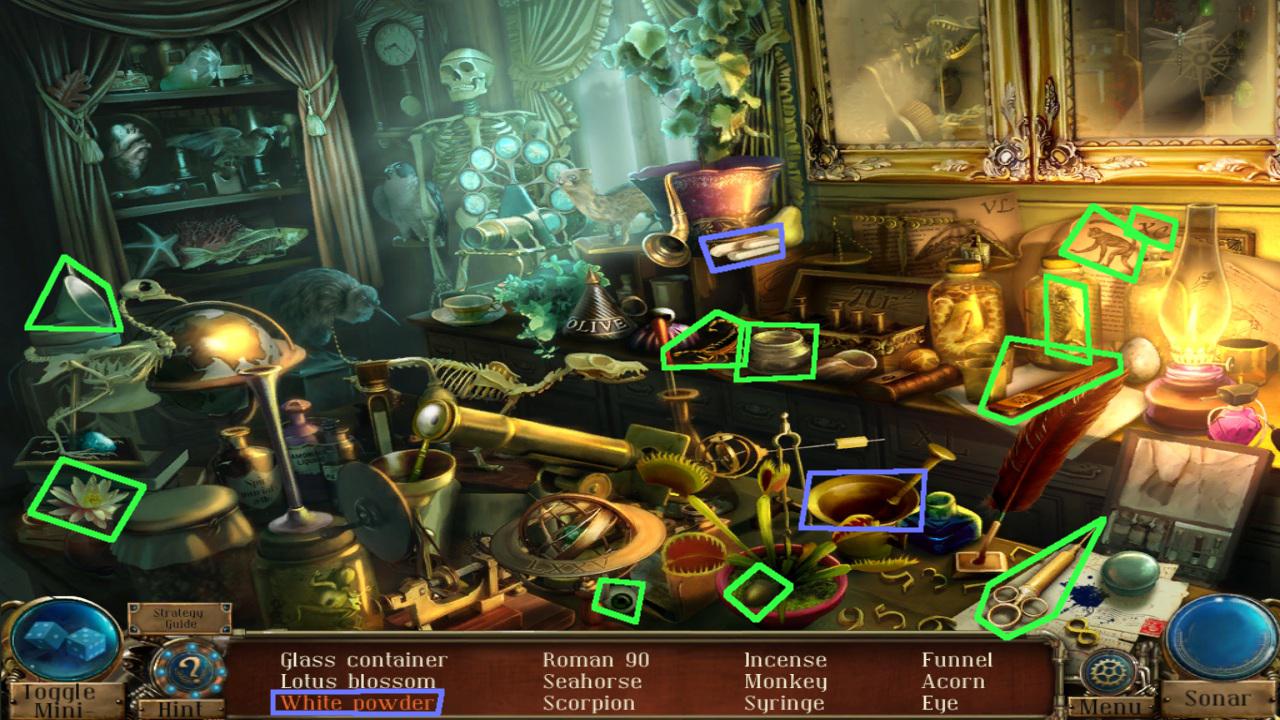
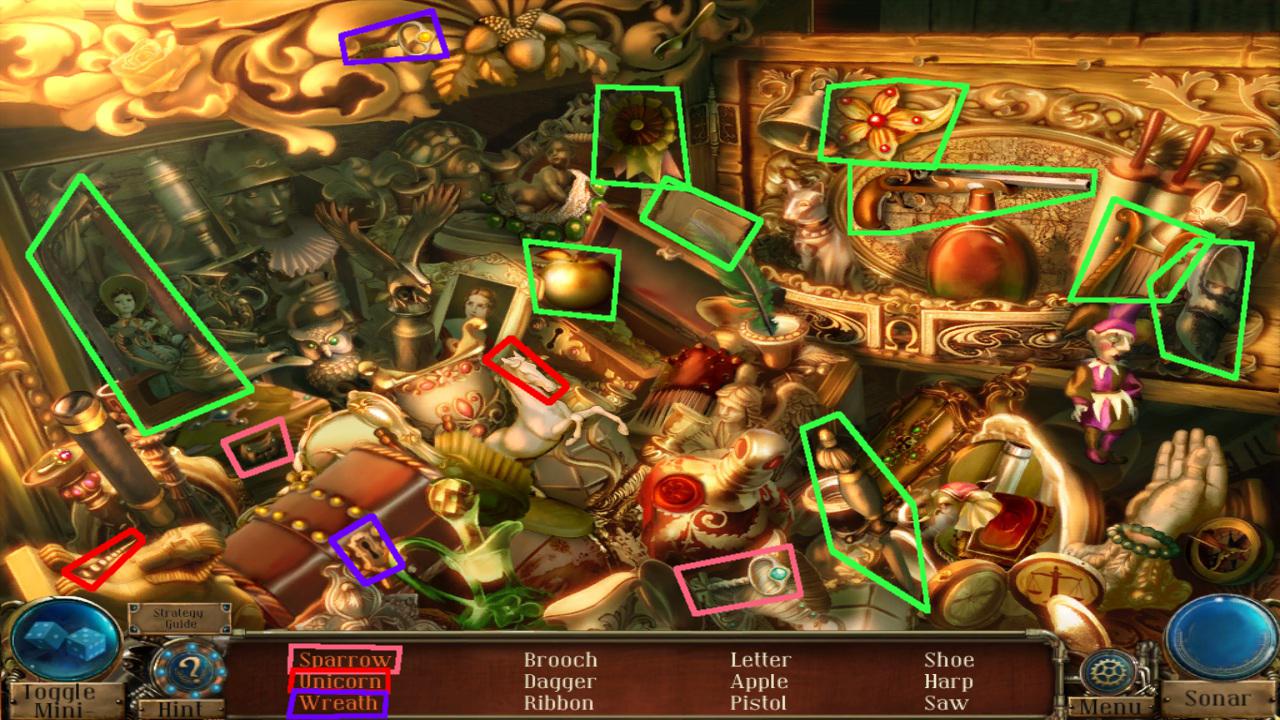
Back up and solve the hidden-object puzzle, using the screenshot below for help.
Screenshot
You acquire the scissors.
Examine the box and use the scissors (from the hidden-object puzzle) on the string.
Examine the contents of the box.
Use your medallion (from the wooden box) on the impression.
Collect the seal and crystal handle.
Collect the umbrella by the door and head outside.
Enter the coach to head to the mansion.
Mansion Gate
Collect the knife handle below the right gate.
Use the umbrella (from home by the door) to collect the short rope from the tree.
Use the short rope on the right gargoyle and enter the mansion grounds.
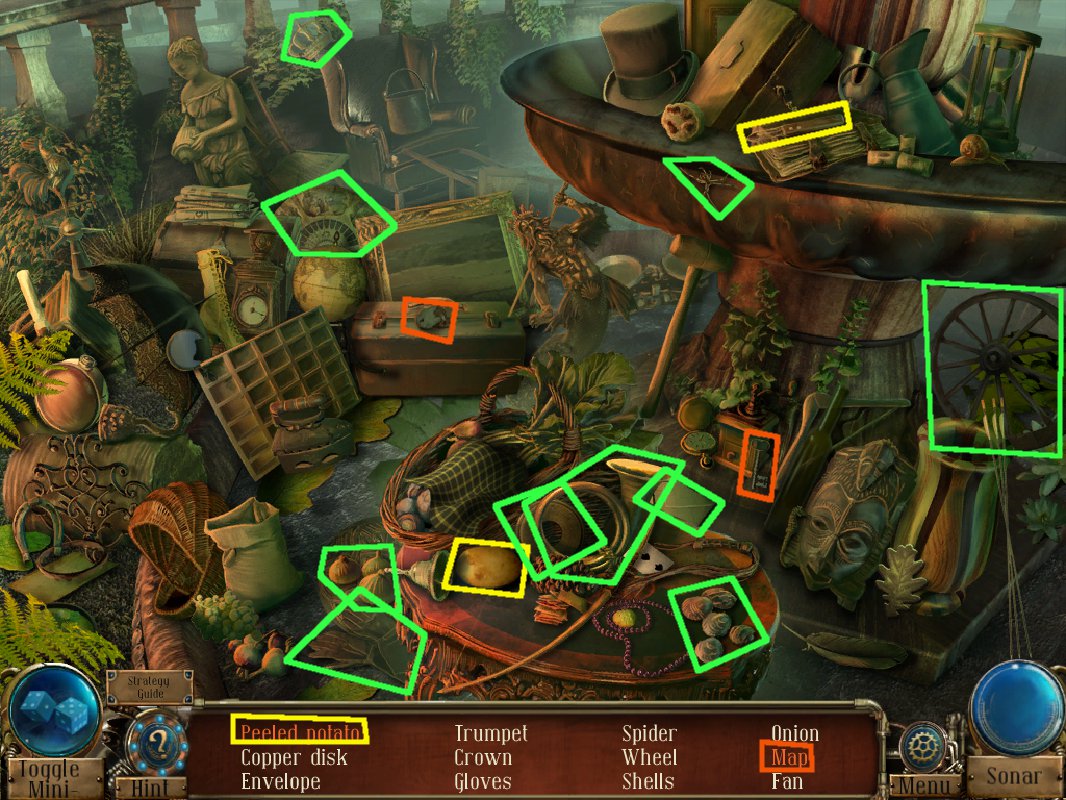
Fountain, 1830
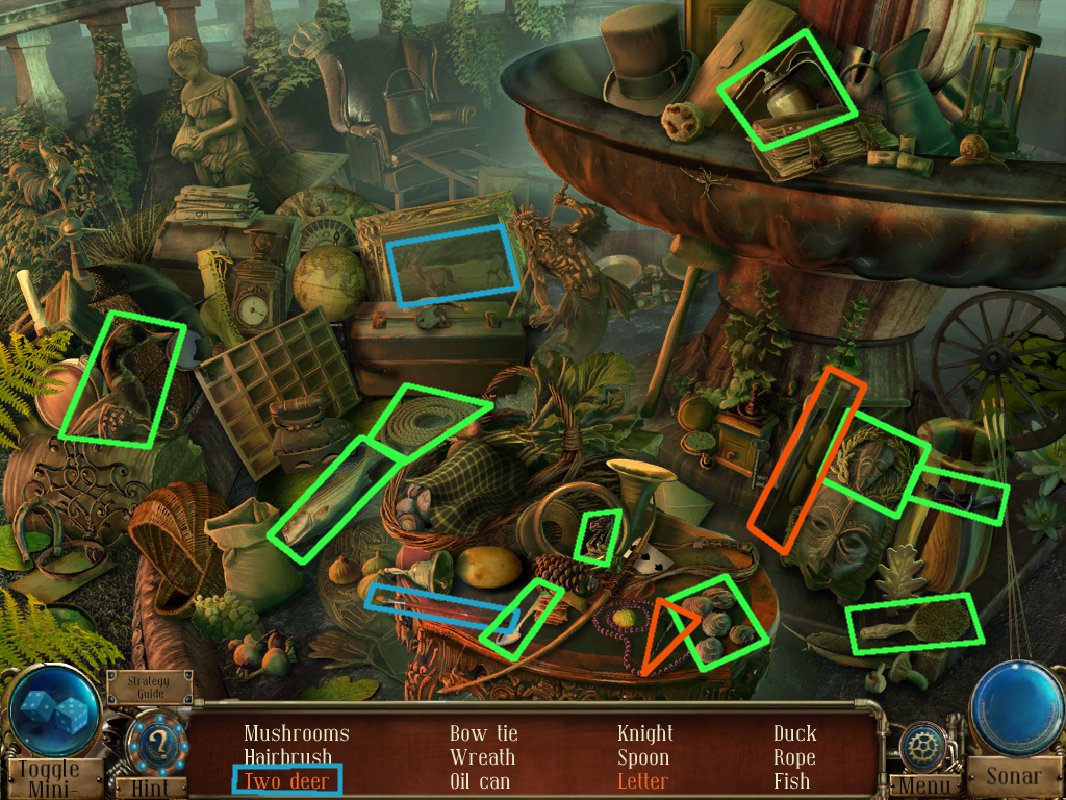
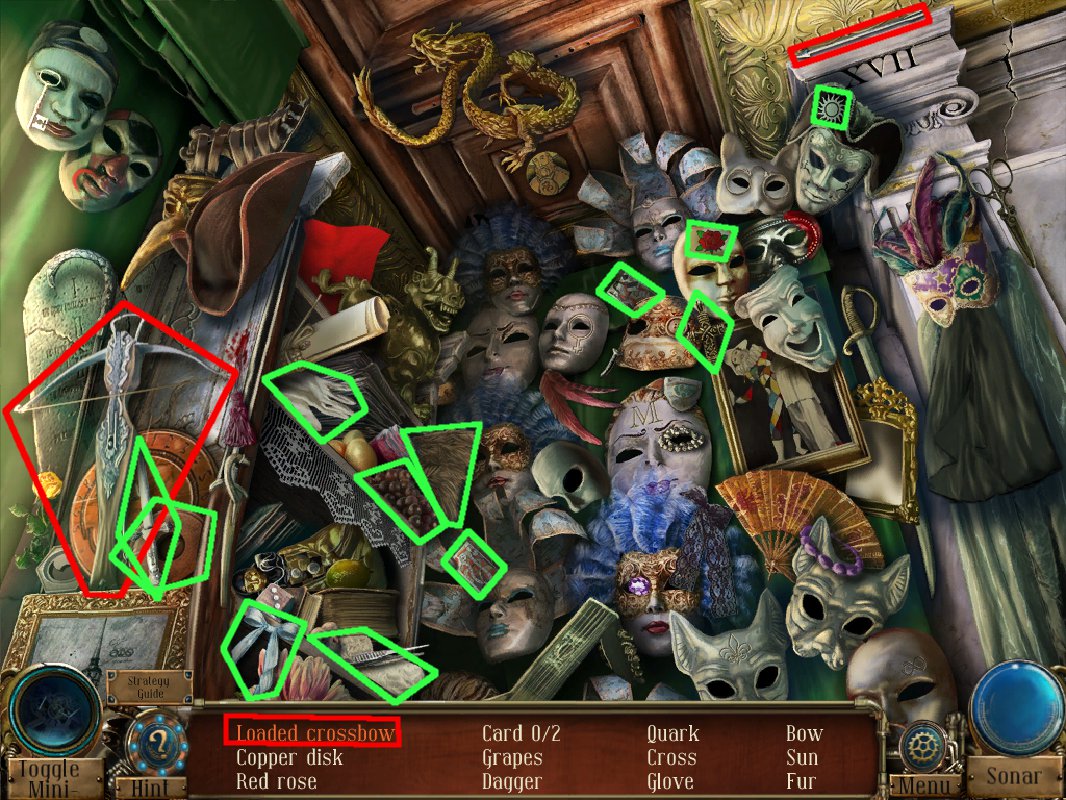
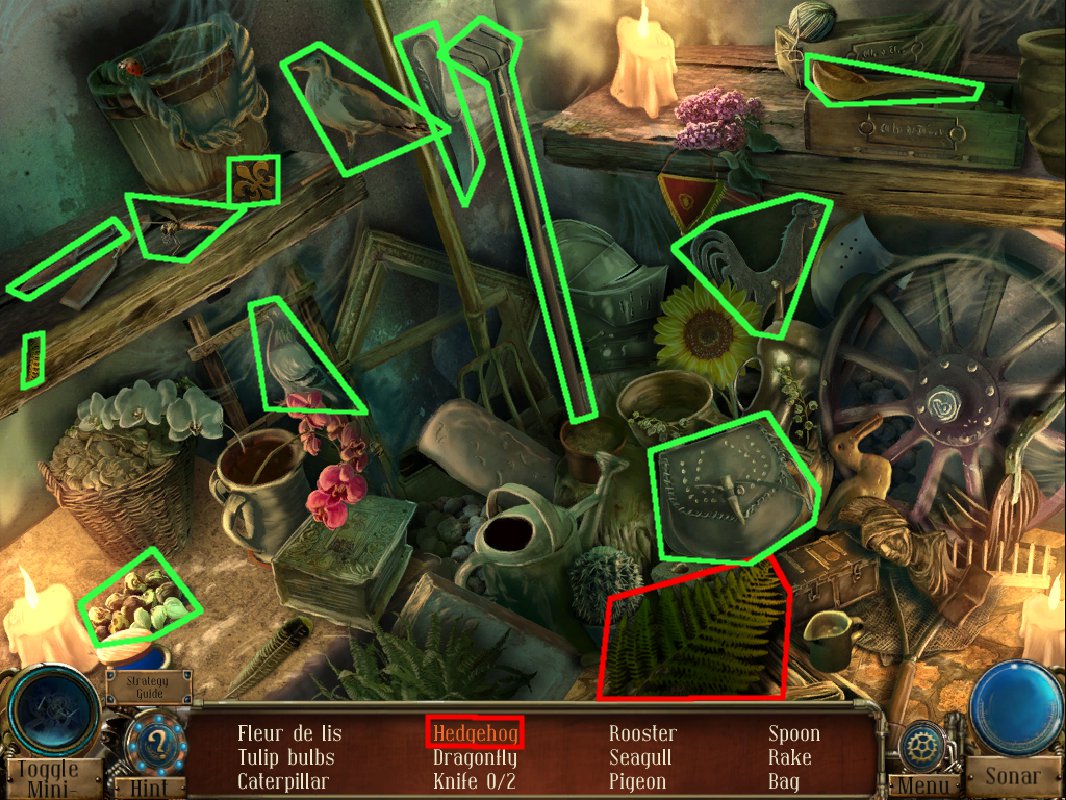
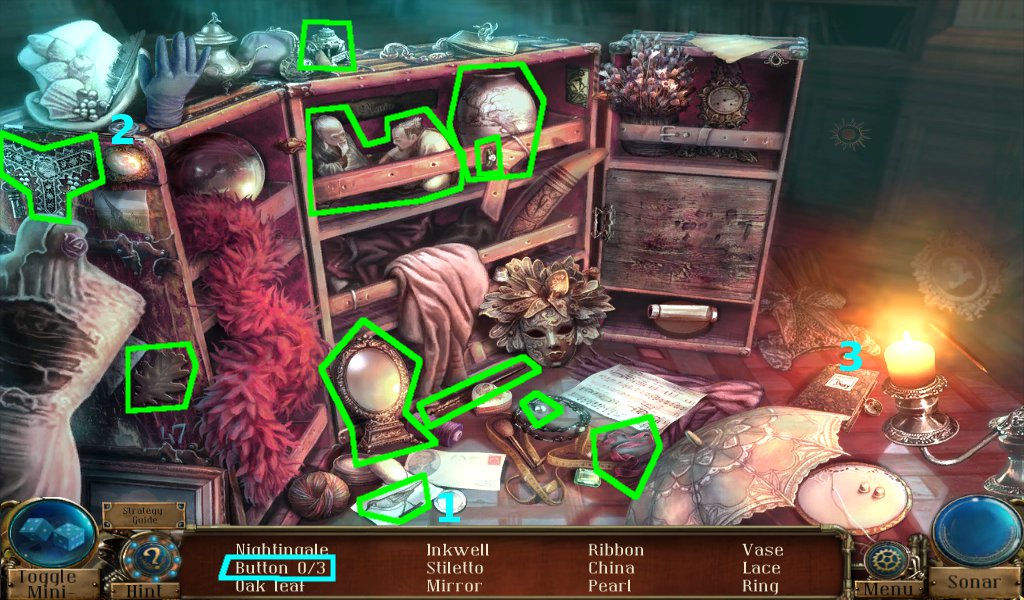
Solve the hidden-object puzzle, using the screenshot below for help.
Screenshot
You acquire oil.
Examine the lamp and collect the matches.
Head to the main entrance.
Main Entrance, 1830
Examine the shuttered window and shoo the bird.
Examine the ledge and collect the screw.
Go back to the fountain.
Fountain, 1830
Examine the railing.
Use the knife handle (from below the right mansion gate), then the screw (from the window ledge at the main entrance) on the blade.
Collect the knife.
Head back to the main entrance.
Main Entrance, 1830
Re-examine the window, then examine the latch.
Use the knife (assembled on the fountain railing) on the latch.
Head inside the mansion.
Dining Room, 1830
Use the matches (from the lamp at the fountain) on the candles.
Examine the table.
Collect the strange mechanical part and dining room key.
Back up, then examine the door.
Use the dining room key (from the table) on the lock, turn it and open the door.
Enter the corridor.
Corridor 1, 1830
Examine the doors.
Solve the rotation puzzle.
The goal is to change all the pieces to green.
Rotate the pieces by clicking the buttons on either side, which indicate by how many pieces it rotates and in which direction.
Solution:
2, 2, 2, 3, 2, 2, 3, 3
Enter the study.
Study 1, 1830
Open the curtains and examine the doors.
Use the crystal handle (from the box inside the mysterious package at home) on the opening.
Turn the handles and enter the balcony.
Balcony, 1830
Examine the ladder mechanism on the left.
Use the oil (from the hidden-object puzzle at the fountain) on the gears.
Lower the ladder and head down to the crystal.
Crystal, 1830
Examine the symbol on the crystal toward the bottom.
Use the seal (from the box in the mysterious package at home) on the symbol.
Examine the seal and make note of the combination given.
2-5-9
Back up and collect the plank.
Head back to the study.
GOAL: Finding the Water Seal
Study 1, 1830
Examine the lower right desk drawer.
Examine the lock and enter the combination from the crystal.
2-5-9
Use your medallion on the impression.
Examine the book and collect the wooden face.
Head back to the corridor and on to the main hall.
Main Hall, 1830
Examine the corner of the stonework on the left.
Collect the rusty screw.
Use the plank (from the ground by the crystal) on the gap and enter corridor 2.
Corridor 2, 1830
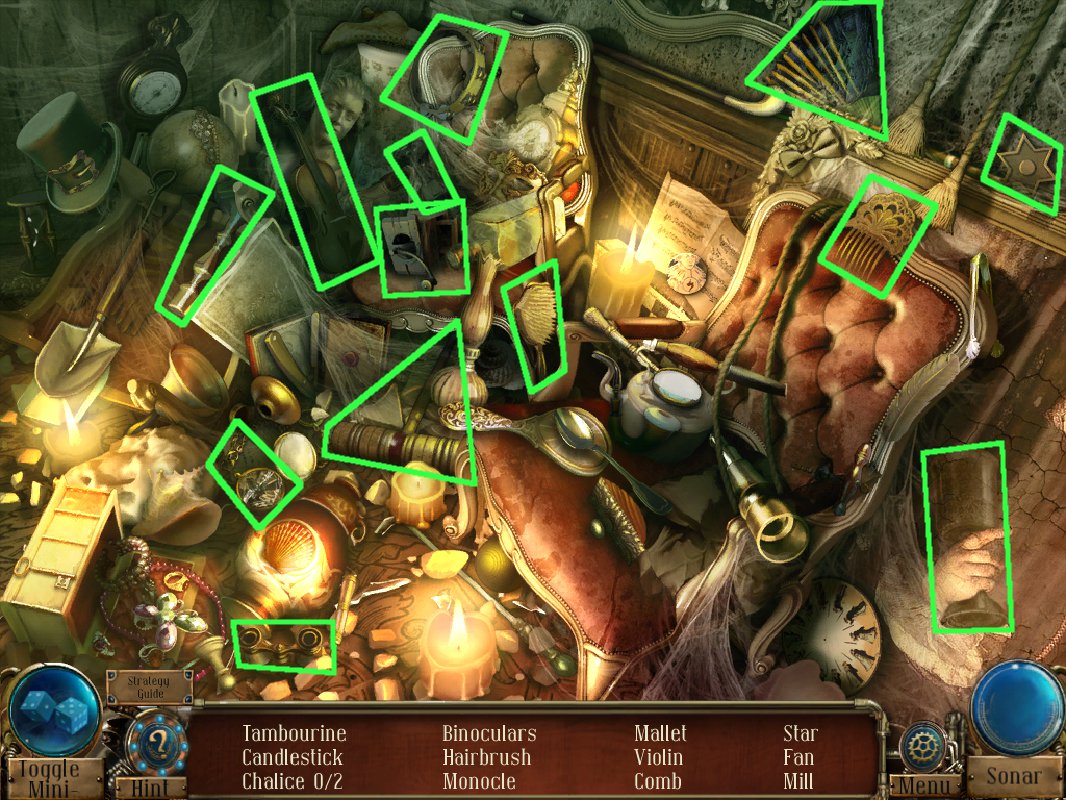
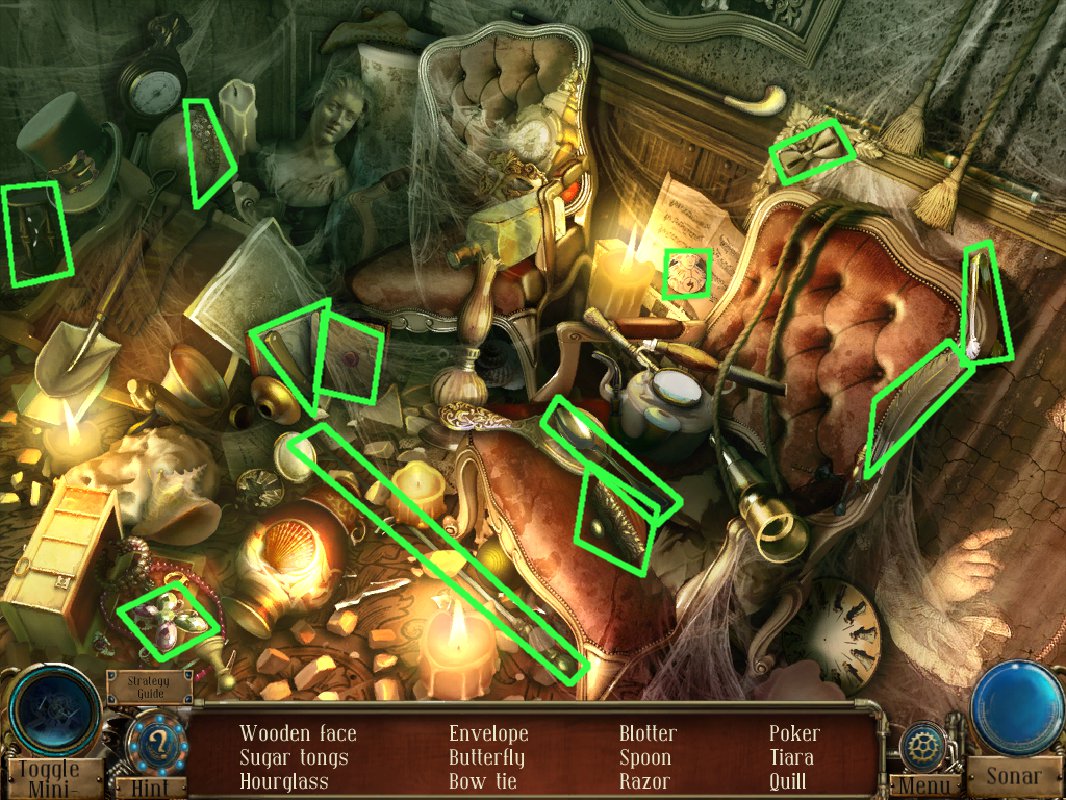
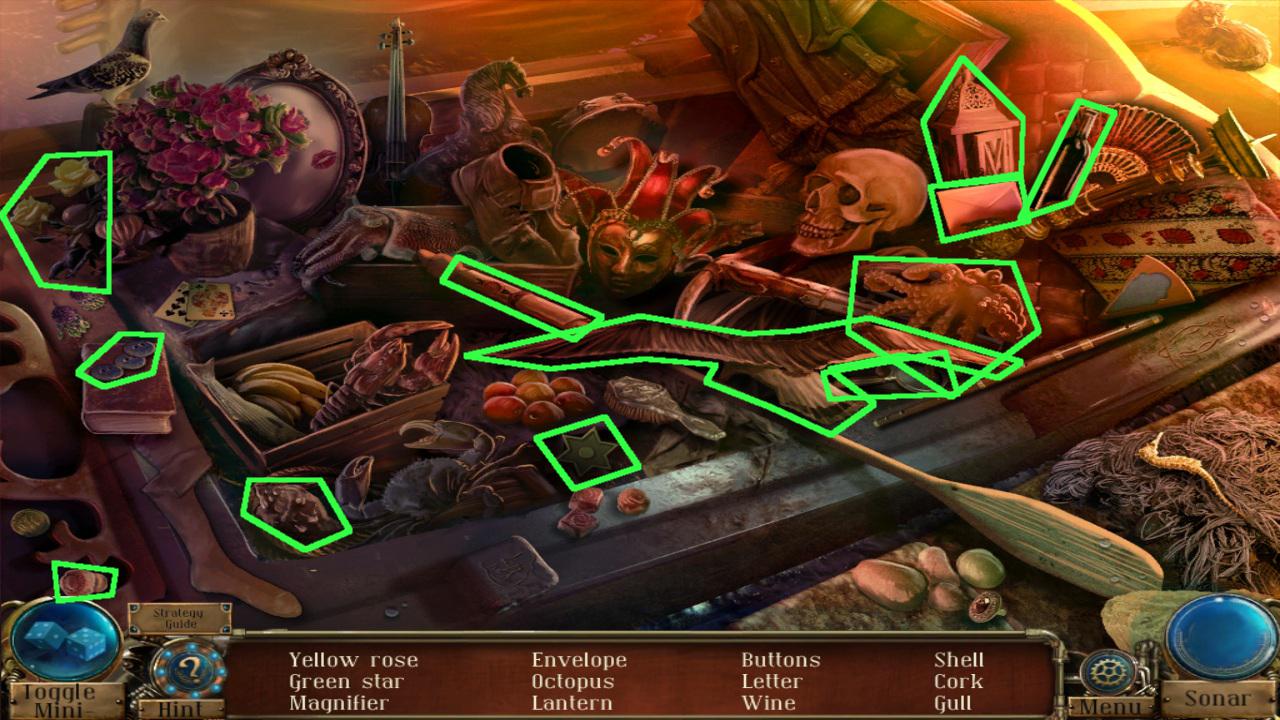
Solve the hidden-object puzzle, using the screenshot below for help.
Screenshot
You acquire an ornament star.
Collect the rag on the floor to the right.
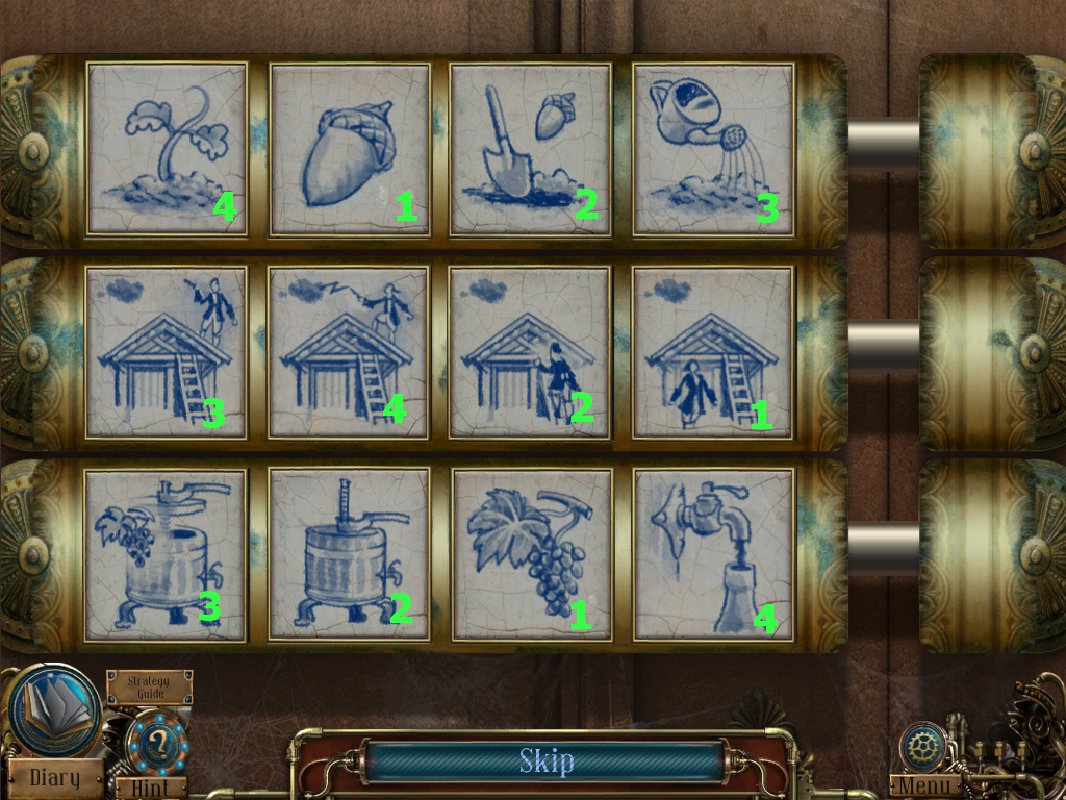
Examine the doors and solve the sequence picture puzzle.
Change each picture by clicking it: the goal is for the pictures to create a story reading left to right.
The pictures are actually on each block in order, you just have to figure out which one is first.
The rods on the right will draw back when the sequence in its row is correct.
Use the screenshot below for help, the order placement (1-4, counting left to right) is indicated by each picture.
Screenshot
Enter study 2.
Study 2, 1830
Open the curtains and examine the window.
Collect the strange mechanical part.
Use the rag (from the floor in corridor 2) on the window.
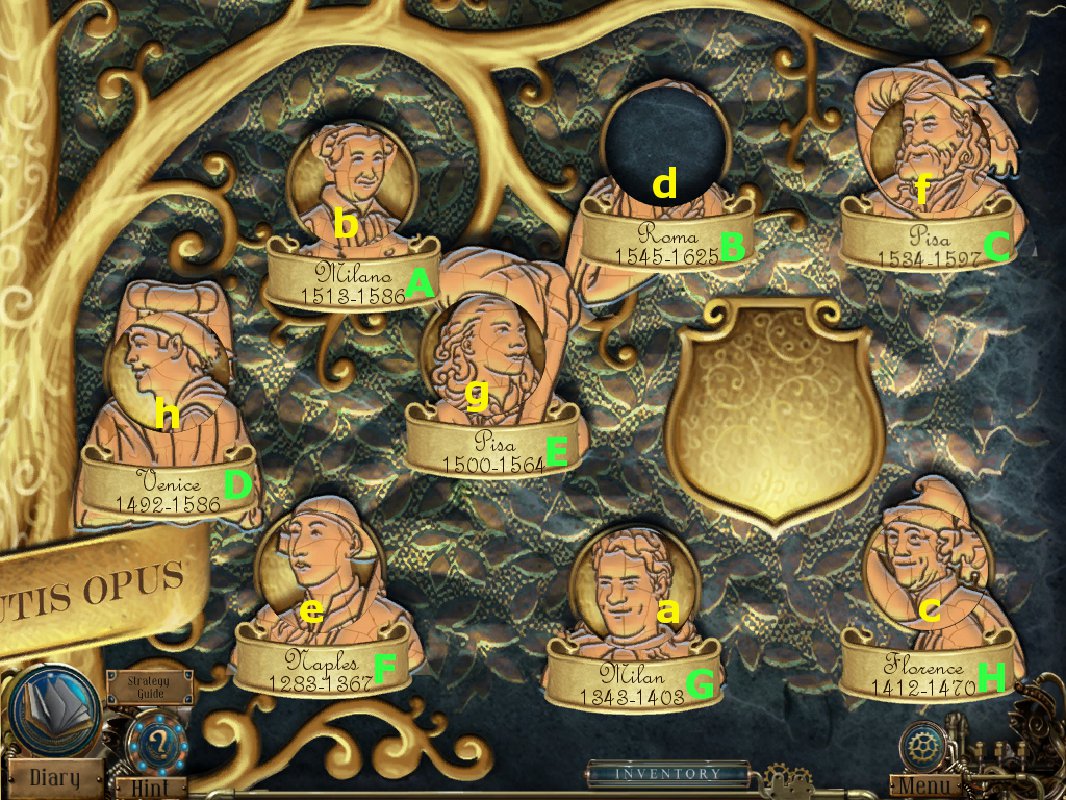
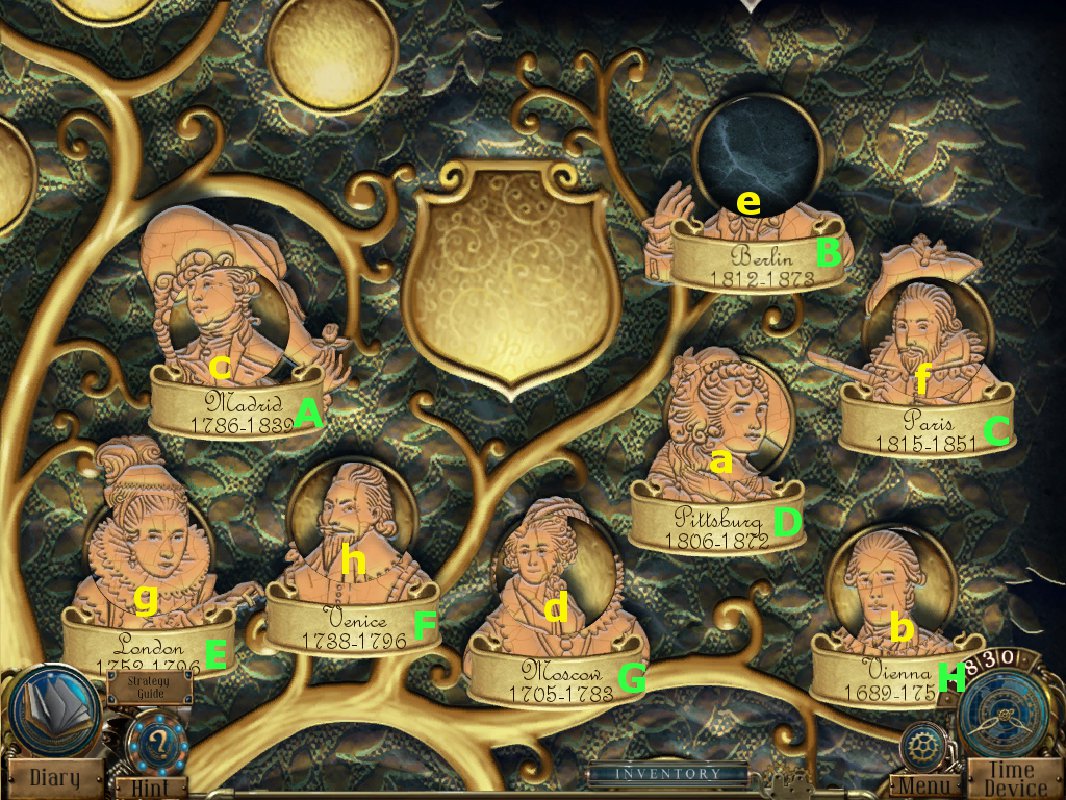
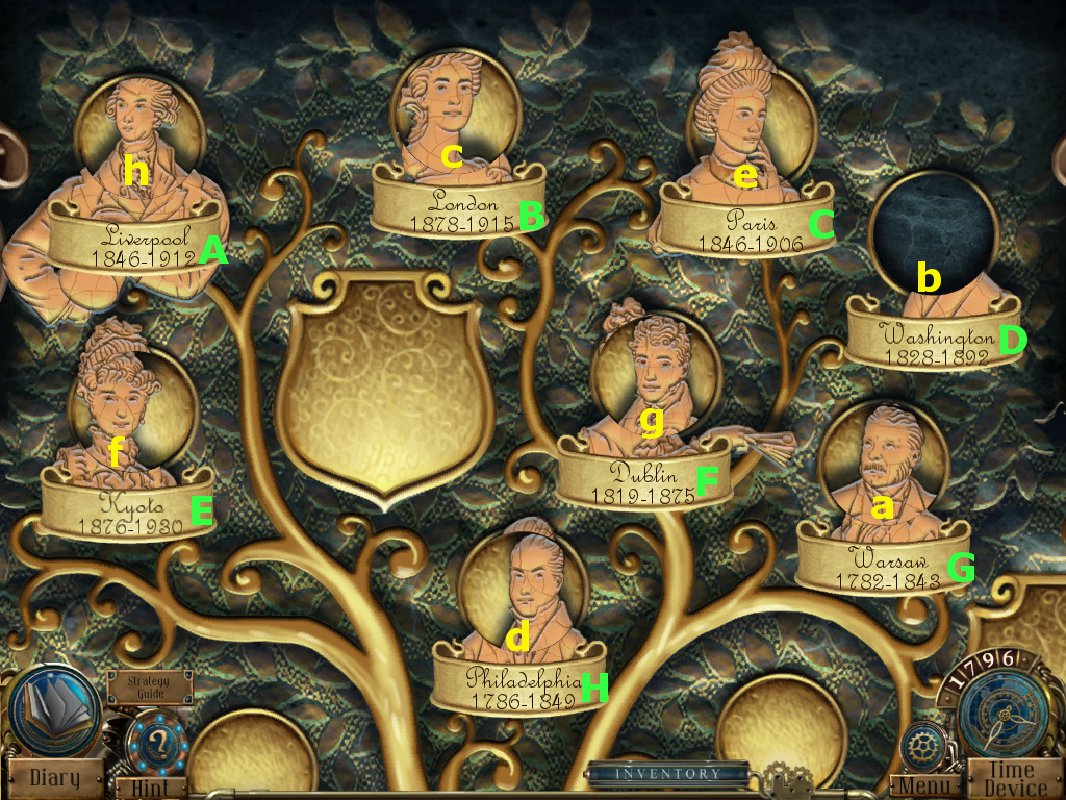
Back up and examine the family tree above the fireplace.
Examine the lower right area and use the wooden face (from the desk drawer in the first study) in the opening.
Solve the face match puzzle.
Swap out the faces by clicking one face and then clicking another.
Use the surrounding features to match the faces correctly.
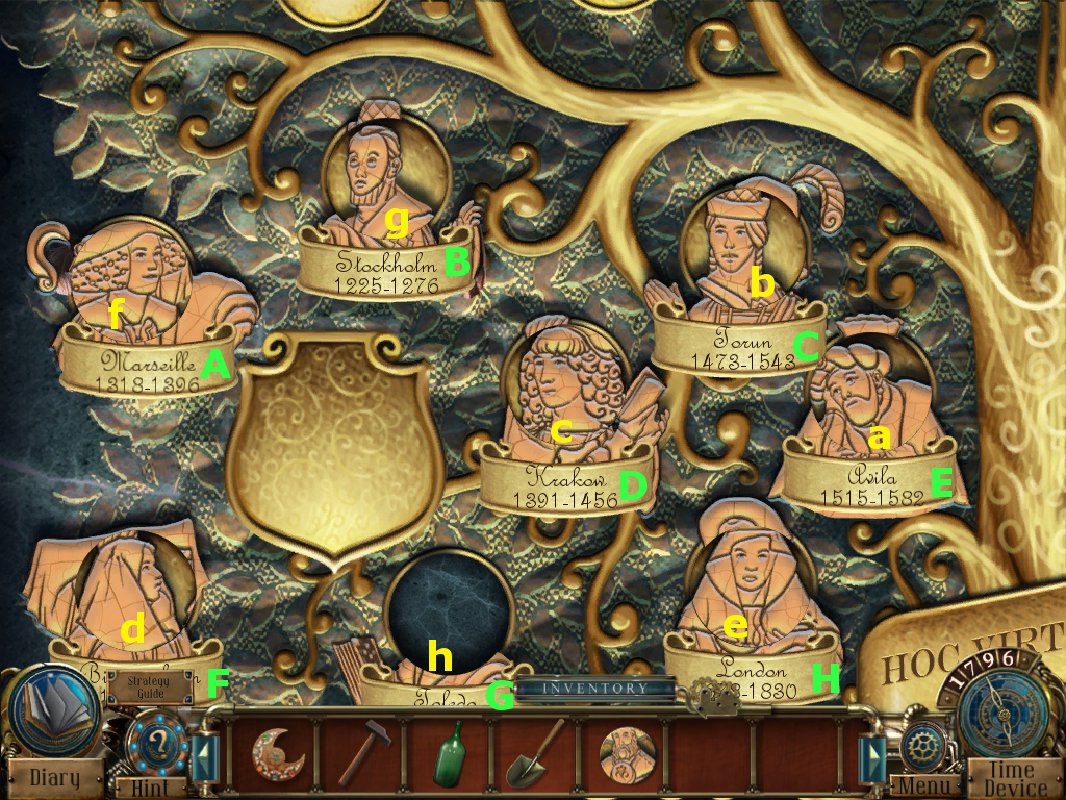
Use the screenshot below for help. The settings are indicated A-H in green, the matching faces are a-h in yellow (A goes with a, B with b, etc.).
Screenshot
Press the water seal button and collect the Venice 1576 crystal.
Read the paper and make note of the password.
H-I-T-S
Back up twice and examine the lower left desk drawer.
Examine the lock and enter the code.
H-I-T-S
Use your medallion on the impression.
Collect the time device and follow the directions to the dining room.
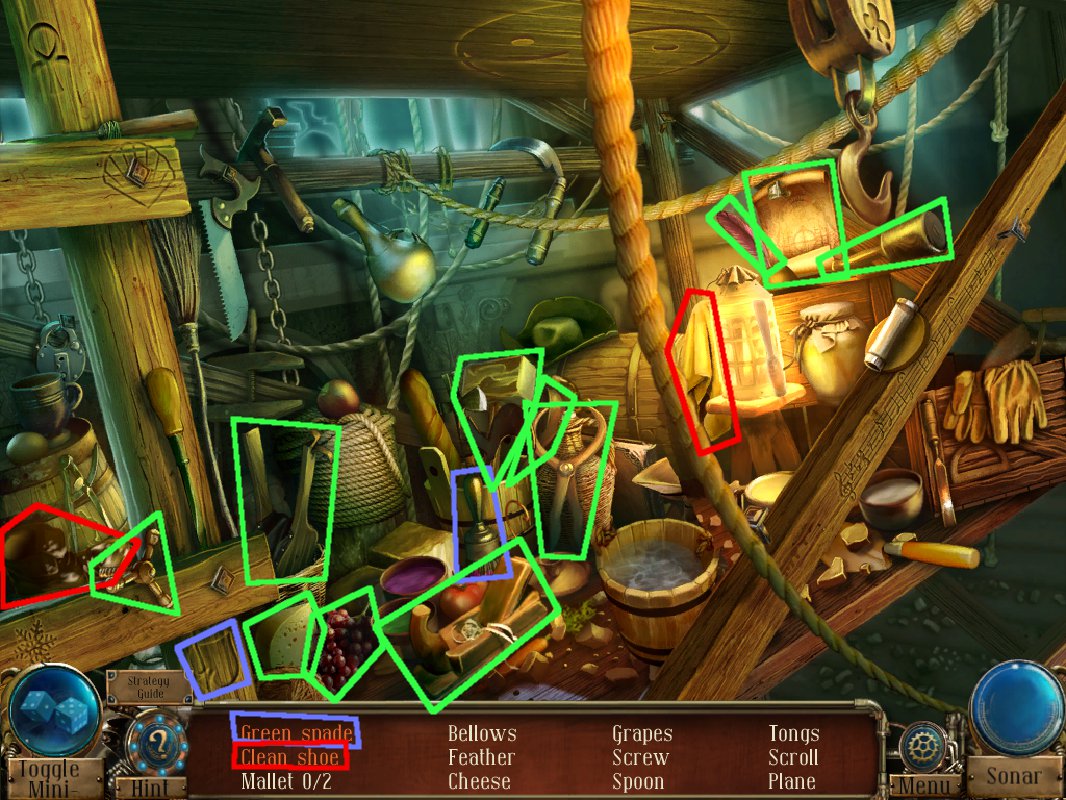
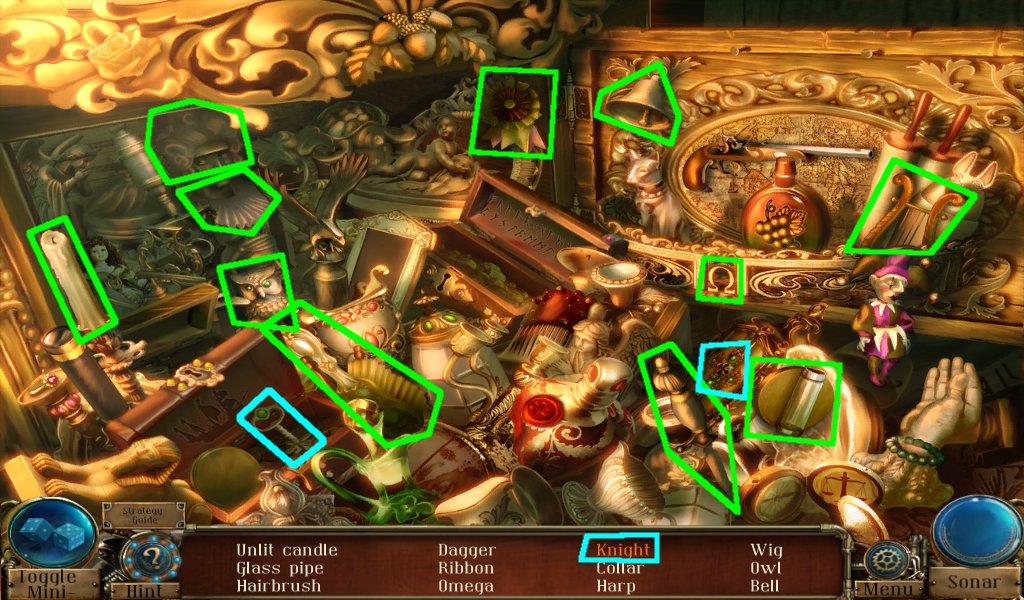
Dining Room, 1830
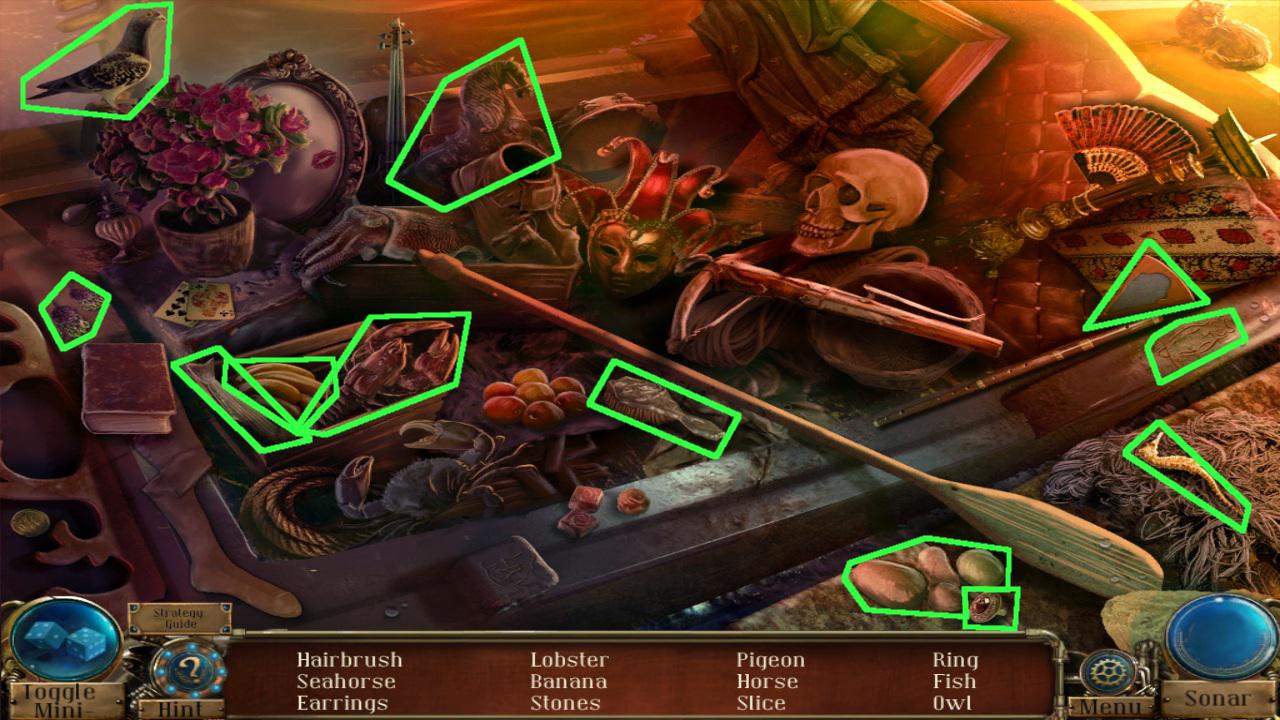
Solve the hidden-object puzzle, using the screenshot below for help.
Screenshot
You acquire a carved clover.
Head to the main hall.
Main Hall, 1830
Examine the chest across the gap.
Collect the strange mechanical part.
Use the ornamental star on the first impression.
Collect the carved clover.
Examine the time device and use the strange mechanical parts on the lower right.
Location of the strange mechanical parts:
On the dining room table.
On the window ledge of study 2.
On the chest across the gap in the main hall.
Use the Venice 1576 crystal (from the water seal family tree opening) on the blue slots.
Travel to 1576.
Garden, 1576
Examine the fallen pillars.
Use your medallion on the impression.
Open the box and examine it.
Collect the 1410 Venice crystal.
Examine the time device and use the 1410 Venice crystal on the blue slots.
Head to 1410.
Garden, 1410
Examine the tub of water, then back up.
Solve the hidden-object puzzle, using the screenshot below for help.
Screenshot
You acquire a hatchet.
Re-examine the tub of water and use the hatchet on the leg.
Examine the soil and collect the carved clover.
Travel to the garden, 1576.
Garden, 1576
Examine the steps to the left and collect the screw.
Examine the pedestal on the right, then back up.
Enter the workshop.
Workshop, 1576
Remove all the sheets.
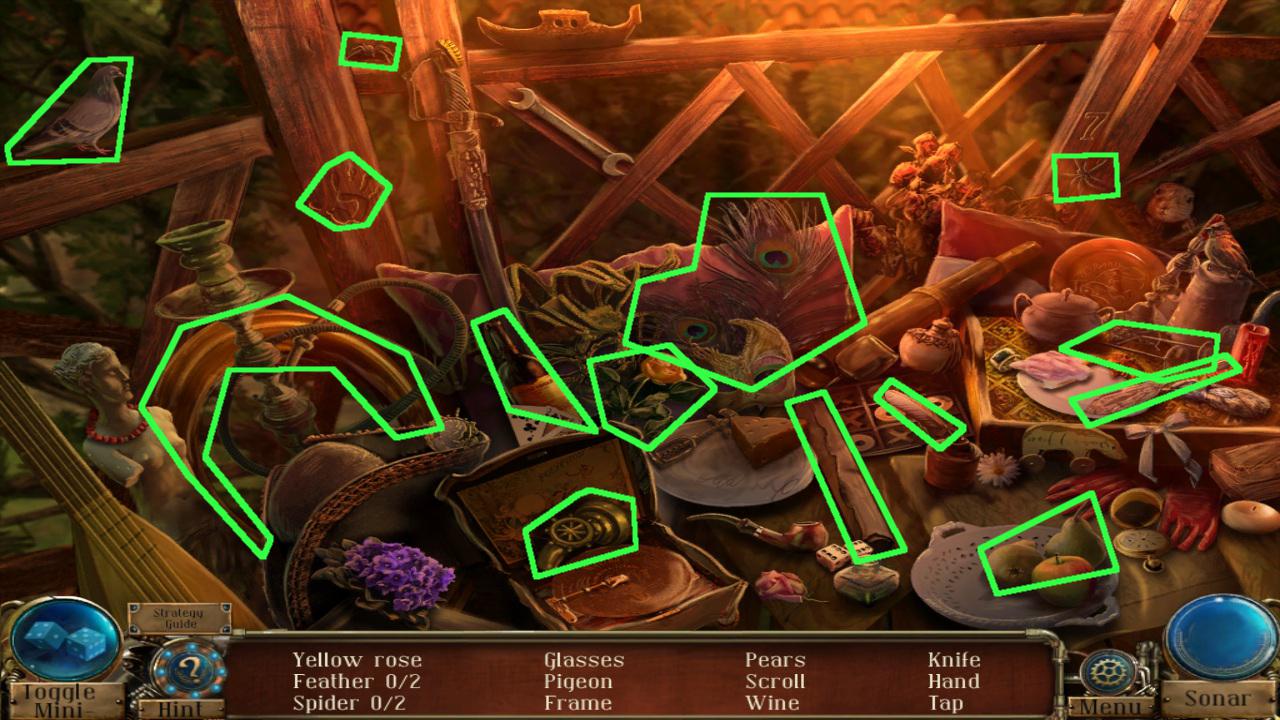
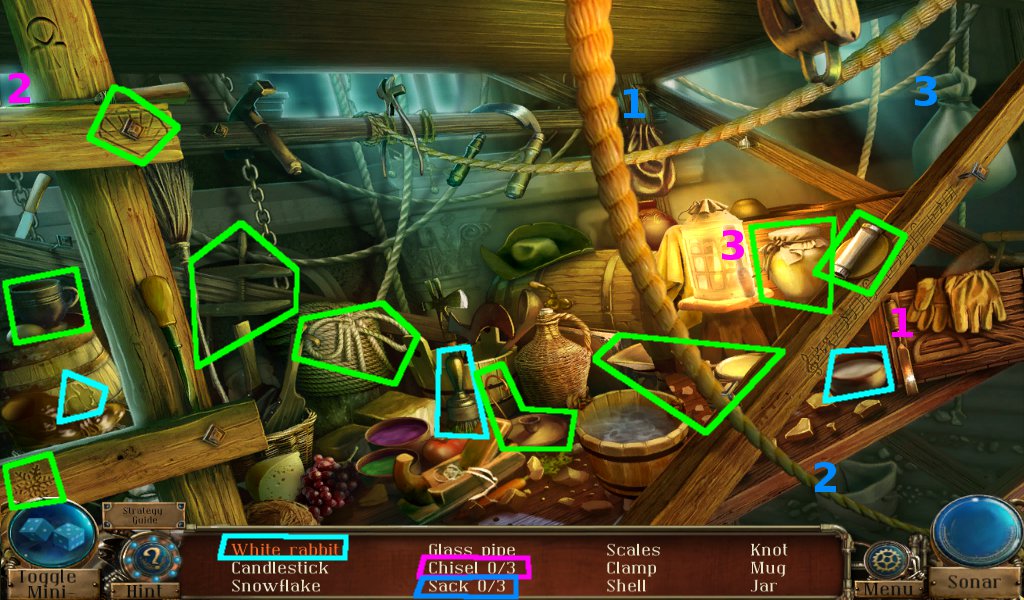
Solve the hidden-object puzzle, using the screenshot below for help.
Screenshot
You acquire a copper disc.
Examine the raised part of the desk and collect the carved clover.
Examine the desk and collect the sun.
Travel to study 1, 1830.
Study 1, 1830
Examine the chest and use the sun (from the workshop desk, 1576) on the impression.
Collect the carved clover.
Head back to the garden, 1576.
Garden, 1576
Examine the pedestal and use the carved clovers on the impressions.
The locations of the carved clovers:
From the dining room hidden-object puzzle.
From inside the chest in the main hall.
From the soil in the garden, 1410.
From the desk of the workshop, 1576.
From the chest in study 1.
Solve the lights out puzzle.
The goal is to get all the clover lights off.
Clicking a clover will change the status of itself and the surrounding clovers.
Solution (clovers numbered 1-7, left to right):
2, 3, 4, 7
Collect the water seal.
Travel to the crystal, 1830.
Crystal, 1830
Examine the water symbol.
Use the water seal (from the pedestal at the garden, 1576) on the symbol.
Head to corridor 2, 1830.
GOAL: Finding the Lightning Seal
Corridor 2, 1830
Solve the hidden-object puzzle, using the screenshot below for help.
Screenshot
You acquire a wooden face.
Enter study 2, 1830.
Study 2, 1830
Examine the family tree, then the 2nd family set.
Use the wooden face (from the hidden-object puzzle in corridor 2, 1830) on the open slot.
Solve the face match puzzle.
Swap out the faces by clicking one face, then another.
Use the screenshot below for help. The settings are A-H in green, the matching faces are a-h in yellow.
Screenshot
Press the lightning seal button.
Collect the Mansion 1796 crystal.
Examine the time device and use the Mansion 1796 crystal on the open orange slot.
Travel to the fountain, 1796.
Fountain, 1796
Collect the nail on the railing.
Head to the main entrance, 1796.
Main Entrance, 1796
Collect the rung by the front doors.
Enter the dining hall, 1796.
Dining Hall, 1796
Examine the table and collect the lightning device and nail.
Back up and examine the fireplace.
Collect the nail and back up.
Enter corridor 1, 1796.
Corridor 1, 1796
Collect the rung in front of the doors.
Collect the small lamp from the hand of the statue.
Now examine its base and collect the screw.
Walk to corridor 2, 1796, passing through the main hall.
Corridor 2, 1796
Examine the lightning pedestal and collect the rung.
Back up and examine the base of the statue on the left.
Collect the nail and back up.
Travel to the garden, 1410.
Garden, 1410
Solve the hidden-object puzzle, using the screenshot below for help.
Screenshot
You acquire a hammer.
Travel to the dining hall, 1830.
Dining Hall, 1830
Solve the hidden-object puzzle, using the screenshot below for help.
Screenshot
You acquire an old cloth.
Travel to the main hall, 1796.
Main Hall, 1796
Solve the hidden-object puzzle, using the screenshot below for help.
Screenshot
You acquire a screwdriver.
Examine the ladder and collect the nail on the step below.
Examine the bucket of grease.
Collect the nail and use the rusty screw (from the corner of the stonework in the main hall, 1830) on the grease.
Collect the cleaned screw.
Use the rungs, then the nails on the ladder.
Location of the rungs:
By the front doors at the main entrance, 1796.
In front of the doors in corridor 1, 1796.
By the lightning pedestal in corridor 2, 1796.
Location of the nails:
On the railing at the fountain, 1796.
On the table in the dining room, 1796.
At the fireplace in the dining room, 1796.
At the base of the left statue in corridor 2, 1796.
On the steps below the ladder in the main hall, 1796.
By the bucket of grease in the main hall, 1796.
Use the hammer (from the hidden-object puzzle in the garden, 1410) on the nails.
Use the old cloth (from the hidden-object puzzle in the dining room, 1830) on the bottom rung.
Collect the ladder and travel to the workshop, 1410.
Workshop, 1410
Examine the spool on the desk.
Use the screwdriver (from the hidden-object puzzle in the main hall, 1796) on the screws.
Collect the spool of wire.
Head to the garden, 1410.
Garden, 1410
Use the ladder (from the main hall, 1796) on the scaffolding.
Use the spool of wire (from the desk in the workshop, 1410) on the 2nd floor ladder.
Examine the bottom level of the scaffolding.
Set down the lightning device (from the dining room table, 1796) and connect the wire to the device.
Back up, then re-examine the scaffolding and collect the lightning device.
Travel to corridor 2, 1796.
Corridor 2, 1796
Examine the lightning pedestal and set the lightning device (from the dining room table, 1796 and charged at the garden, 1410) on the floor to the left.
Connect the wire to the pedestal.
Collect the lightning seal and travel to the crystal, 1830.
Crystal, 1830
Examine the lightning symbol.
Use the lightning seal (from the pedestal in corridor 2, 1796) on the symbol.
Travel to the workshop, 1576.
GOAL: Fixing the Fire Seal
Workshop, 1576
Solve the hidden-object puzzle, using the screenshot below for help.
Screenshot
You acquire a hex.
Travel to the workshop, 1410.
Workshop, 1410
Examine the book by the window.
Use the hex (from the hidden-object puzzle in the workshop, 1576) on the impression, then the medallion.
Collect Viviana and the wooden face.
Back up and examine the front of the desk.
Collect the small lamp, then travel to study 2, 1830.
Study 2, 1830
Examine the globe.
Collect Merlin.
Travel to the dining hall, 1796.
Dining Hall, 1796
Examine the fireplace and put Viviana (from the book in the workshop, 1410) and Merlin (from the globe at study 2, 1830) in the impressions.
Collect the rod and firewood.
Travel to the main hall, 1796.
Main Hall, 1796
Solve the hidden-object puzzle, using the screenshot below for help.
Screenshot
You acquire a screw.
Examine the door and use the screws on the corners.
The location of the screws:
On the steps in the garden, 1576.
By the base of the statue in corridor 1, 1796.
From the rusty screw (cleaned in the can of grease at the main hall, 1796) on the corner of the stonework in the main hall, 1830.
From the hidden-object puzzle in the main hall, 1796.
Tighten all four screws.
Solve the maze puzzle.
The rod that appears will follow the movement of your mouse.
Your goal is the hole to the right.
Run along the top first to open a path on the bottom.
Be aware of the direction of the arros.
Travel to the fountain, 1830.
Fountain, 1830
Solve the hidden-object puzzle, using the screenshot below for help.
Screenshot
You acquire a copper disc.
Head to the closet, 1830.
Closet, 1830
Collect the bottle of water on the left.
Collect the tile with hole from on top the books.
Travel to corridor 2, 1796.
Corridor 2, 1796
Examine the door and use the tile with hole (from on the books in the closet, 1830) on the missing space.
Solve the picture match puzzle by cycling through the tiles until the inside and outside match.
Enter study 2, 1796.
Study 2, 1796
Collect the infinity from the chalkboard.
Examine the family tree, then the top area.
Use the wooden face (from the book in the workshop, 1410) on the opening.
Solve the face match puzzle.
Swap out the faces by clicking one face, then another.
Use the screenshot below for help. The settings are A-H in green, the faces are a-h in yellow.
Screenshot
Click the fire seal button.
Collect the small lamp and back up twice.
Examine the desk and collect the tin goblet.
Head to corridor 1, 1796.
Corridor 1, 1796
Examine the base of the statue.
Use the infinity (from the chalkboard in study 2, 1796) on the impression.
Solve the hidden-object puzzle, using the screenshot below for help.
Screenshot
You acquire a copper disc.
Head to the Storeroom, 1796.
Storeroom, 1796
Collect the tin disc on the books.
Collect the small lamp from the piping above.
Examine the door and use the small lamps on the map.
The location of the small lamps:
From the hand of the statue in corridor 1, 1796.
From the desk in the workshop, 1410.
From the family tree in study 2, 1796.
From off the piping in the storeroom, 1796.
Solve the lighting puzzle.
The goal is to have all eight lamps light up all parts of the streets.
A lamp will light all sections horizontal and vertical to it until the light is blocked by something.
It is a good idea to place the lamps at intersections.
Use the screenshot below for help: the locations of the lamps are indicated by #1-8.
Screenshot
Enter the basement, 1796.
Basement, 1796
Collect the matches on the floor.
Collect the tin disc to the right.
Travel to the closet, 1830 then head into the basement.
Collect the axe and head back to the closet, 1830.
Closet, 1830
Use the axe (from the basement, 1830) on the broken cabinet.
Solve the hidden-object puzzle, using the screenshot below for help.
Screenshot
You acquire petrol.
Travel to the workshop, 1576.
Workshop, 1576
Examine the desk and use the tin goblet (from the desk in study 2, 1796) on the anvil.
Use the hammer (from the hidden-object puzzle in the garden, 1410) on the goblet.
Collect the tin disc.
Travel to the basement, 1830.
Basement, 1830
Examine the machine on the right.
Use the copper and tin discs on the first rod.
The location of the copper discs:
From the hidden-object puzzle in the workshop, 1576.
From the hidden-object puzzle in the fountain, 1830.
From the hidden-object puzzle in corridor 1, 1796.
The location of the tin discs:
On the books in the storeroom, 1796.
To the right in the basement, 1796.
From the tin goblet (on the desk in study 2, 1796), made at the workshop, 1576.
Solve the disc puzzle by rearranging the discs so they create a pattern of copper/tin/copper etc. on the middle rod.
Then solve the number addition puzzle to the left.
Click each disc to have it rotate and reveal the next number.
All four numbers around a 34 must add up to 34.
There may be more than one combination for any given 34, but only one combination that fits the whole board.
It may help to start with the middle numbers first, then the corners.
The solution:
16-5-2-13 6-7-11-8 9-15-1-8 3-7-9-16
Examine the furnace and open the hatch.
Use the firewood (from the fireplace in the dining hall, 1796), the petrol (from the hidden-object puzzle in the closet, 1830) and the matches (from the floor in the basement, 1796).
Back up and go to the closet, 1830.
Closet, 1830
Solve the hidden-object puzzle, using the screenshot below for help.
Screenshot
You acquire an empty gas can.
Travel to the basement, 1796.
Basement, 1796
Examine the furnace and use the empty gas can (from the hidden-object puzzle in the closet, 1830) on the opening.
Pull the lever and collect the gas.
Travel to the basement, 1830.
Basement, 1830
Examine the furnace and use the gas (from the basement, 1796) on the opening.
Back up and examine the ledge by the far door.
Collect the gypsum, then examine the tools on the floor.
Collect the chisel, then head to the crystal, 1830.
Crystal, 1830
Examine the broken fire seal.
Use the chisel (from the floor of the basement, 1830) on the seal to acquire seal fragments.
Travel to the workshop, 1576.
Workshop, 1576
Examine the desk and use the gypsum (from the ledge in the basement, 1830) on the tray.
Use the bottle of water (from the closet, 1830) on the tray.
Pick up the stick to stir the mixture.
Use the seal fragments (chiseled off the crystal, 1830) on the plaster.
Travel to the basement, 1830.
Basement, 1830
Examine the tools and use the seal fragments (chiseled off the crystal, 1830) on the bucket.
Use the rod on it and collect the crucible.
Examine the furnace and use the crucible on it to acquire the melted crucible.
Travel to the workshop, 1576.
Workshop, 1576
Examine the desk and use the melted crucible (from the basement, 1830) on the mold.
Collect the seal.
Travel to the crystal, 1830.
Crystal, 1830
Examine the fire symbol.
Use the seal (created in the workshop, 1576) on the symbol.
Head to corridor 2, 1830.
GOAL: Finding the Nature Seal
Corridor 2, 1830
Solve the hidden-object puzzle, using the screenshot below for help.
Screenshot
You acquire a shovel.
Travel to the workshop, 1576.
Workshop, 1576
Solve the hidden-object puzzle, using the screenshot below for help.
Screenshot
You acquire a wooden face.
Travel to study 2, 1796.
Study 2, 1796
Examine the family tree, then the lower left area.
Use the wooden face (from the hidden-object in the workshop, 1576) on the empty slot.
Solve the face match puzzle.
Swap out the faces by clicking one face, then another.
Use the screenshot below for help. The settings are A-H in green, the faces are a-h in yellow.
Screenshot
Press the nature seal button.
Collect the acorn, then travel to the garden, 1410.
Garden, 1410
Solve the hidden-object puzzle, using the screenshot below for help.
Screenshot
You acquire a brass leaf.
Examine the soil and use the shovel (from the hidden-object in corridor 2, 1830).
Plant the acorn (from the family tree in study 2, 1796), then travel to corridor 2, 1796.
Corridor 2, 1796
Examine the base of the statue on the left.
Use the brass leaf (from the hidden-object in the garden, 1410) on the impression.
Open the box and collect the Venice 1797 crystal.
Examine the time device and use the Venice 1797 crystal on the last slot.
Travel to 1797 and enter the workshop.
Workshop, 1797
You acquire the oak key.
Solve the hidden-object puzzle, using the screenshot below for help.
Screenshot
You acquire the mask key.
Collect the feather box, then travel to the workshop, 1410.
Workshop, 1410
Examine the masks on the chest.
Use the feather box (from the workshop, 1797) on the masks.
Put the masks in the box.
Clear off the doily, then use the mask key (from the hidden-object in the workshop, 1797) on the chest.
Collect the red star and robot heart.
Travel to the basement, 1830.
Basement, 1830
Use the robot heart (from the chest in the workshop, 1410) on the opening of the robot.
Enter the oak hall, then head to the storeroom, 1830.
Storeroom, 1830
Solve the hidden-object puzzle, using the screenshot below for help.
Screenshot
You acquire a crowbar.
Head to the main entrance, 1830.
Main Entrance, 1830
Use the crowbar (from the hidden-object in the storeroom, 1830) on the front door.
Collect the planks with nails and the stick.
Travel to the garden, 1576.
Garden, 1576
Examine the tree and use the planks with nails (from the main entrance, 1830) on the trunk.
Use the hammer on the planks.
Head to the treetop and collect all five acorns.
Travel to the garden, 1797, then head up into the treehouse.
Treehouse, 1797
Solve the hidden-object puzzle, using the screenshot below for help.
Screenshot
You acquire the blue star.
Examine the rope on the lattice.
Solve the untangling puzzle by dragging the knots until none of the ropes cross.
Use the screenshot below for a solution.
Screenshot
You acquire a rope.
Head up into the bedroom.
Bedroom, 1797
Collect the torn page on the floor.
Collect the cork on the jewelry box.
Travel to the bedroom, 1576.
Bedroom, 1576
Remove the sheets you can.
Collect the secateurs on the table.
Examine the cabinet and collect the wooden face.
Travel to study 2, 1796.
Study 2, 1796
Examine the book on the desk.
Use the torn page (from the bedroom, 1797) on the book and make note of the ingredients and order.
5 acorns, a peacock feather, green dye, old wine
Back up and examine the family tree.
Examine the middle left family area.
Use the wooden face (from the cabinet on the bedroom, 1576) on the opening.
Solve the face match puzzle.
Swap out the faces by clicking one face, then another.
Use the screenshot below for help. The settings are A-H in green, the faces are a-h in yellow.
Screenshot
Press the nature seal button.
Collect the crystal heart half.
Travel to the dining hall, 1830.
Dining Hall, 1830
Solve the hidden-object puzzle, using the screenshot below for help.
Screenshot
You acquire a dye bottle.
Travel to the workshop, 1576.
Workshop, 1576
Examine the desk and set the dye bottle (from the hidden-object in the dining hall, 1830) next to the others.
Pick up the blue dye and add it to the bottle.
Pick up the yellow dye and add it.
Collect the green dye.
Travel to your home, 1830.
Home, 1830
Solve the hidden-object puzzle, using the screenshot below for help.
Screenshot
You acquire a glass container.
Examine the window and use the shovel on the grape seedling.
Now use the glass container to collect the seedling.
Travel to the garden, 1576
Garden, 1576
Examine the patch of dirt.
Use the shovel on the dirt.
Plant the seedling (from the windowsill in your home, 1830) and use the shovel again to replace the dirt.
Now use the stick (from the main entrance, 1830) to hold up the plant.
Travel to the garden, 1797.
Garden, 1797
Examine the grapes in the upper left.
Use the secateurs (from the tabel in the bedroom, 1576) on the three bunches of grapes to collect them.
Travel to the workshop, 1797.
Workshop, 1797
Solve the hidden-object puzzle, using the screenshot below for help.
Screenshot
You acquire the green star.
Travel to the main hall, 1830.
Main Hall, 1830
Examine the chest across the gap.
Use the red star (from the chest in the workshop, 1410) and green star (from the hidden-object puzzle in the workshop, 1797) in their respective openings.
Collect the peacock feather.
Use the blue star (from the hidden-object puzzle in the treehouse, 1797) on its opening.
Collect the glove.
Travel to the treehouse, 1797.
Treehouse, 1797
Solve the hidden-object puzzle, using the screenshot below for help.
Screenshot
You acquire a spigot.
Travel to the storeroom, 1796.
Storeroom, 1796
Examine the wine press and use the grapes (from the garden, 1797) on the barrel.
Use the spigot (from the hidden-object in the treehouse, 1797) on the opening.
Now use the empty bottle on the spigot.
Turn the handle to squeeze the grapes, then turn the spigot to dispense it into the bottle.
Examine the bottle and use the cork (from the jewelry box in the bedroom, 1797).
Collect the bottle of wine and place it on the wine rack.
Travel to the storeroom, 1830, collect the bottle of wine, and head to the oak hall, 1830.
Oak Hall, 1830
Examine the basin in front of the tree.
Use the four ingredients on the basin in order.
5 acorns, a peacock feather, green dye, old wine
Location of the ingredients:
5 acorns from the tree in the garden, 1576.
Peacock feather from the chest in the main hall, 1830.
Green dye made in the workshop, 1576.
Old wine made in the storeroom, 1796.
Use the glove (from the chest in the main hall, 1830) on the mixture to acquire a magic glove.
Use the rope (from the treehouse, 1797) on the tree.
Examine the glowing orb and use the magic glove to acquire the earth seal.
Head to the crystal, 1830.
Crystal, 1830
Examine the nature symbol.
Use the earth seal (from the oak hall, 1830) on the symbol.
Head to the fountain, 1830.
GOAL: Finding the Heart Seal
Fountain, 1830
Solve the hidden-object puzzle, using the screenshot below for help.
Screenshot
You acquire a brass leaf.
Travel to the workshop, 1797.
Workshop, 1797
Solve the hidden-object puzzle, using the screenshot below for help.
Screenshot
You acquire a slice.
Travel to corridor 1, 1796.
Corridor 1, 1796
Solve the hidden-object puzzle, using the screenshot below for help.
Screenshot
You acquire a file.
Examine the door and use the slice (from the hidden-object in the workshop, 1797) on the opening.
Solve the rotation puzzle.
The goal is to change all the pieces to green.
Rotate the pieces by clicking the buttons on either side, which indicate by how many pieces it rotates and in which direction.
Solution:
3, 3, 4, 3, 3, 3, 4, 4, 4, 3
Enter study 1, 1796.
Study 1, 1796
Solve the hidden-object puzzle, using the screenshot below for help.
Screenshot
You acquire a brass leaf.
Travel to the treehouse, 1797.
Treehouse, 1797
Solve the hidden-object puzzle, using the screenshot below for help.
Screenshot
You acquire a wrench.
Travel to the mansion gate, 1830.
Mansion Gate, 1830
Examine the star on the left of the gates.
Use the wrench (from the hidden-object in the treehouse, 1797) on the nut to acquire the violet star.
Head back to your home.
Home, 1830
Solve the hidden-object puzzle, using the screenshot below for help.
Screenshot
You acquire a knob.
Examine the drawers of the bookcase and replace the missing knob.
Open the drawer and collect the acid.
Head back to the mansion gate.
Mansion Gate, 1830
Examine the chains and use the acid (from the bookcase drawer at home) to melt them.
Re-collect the time device.
Head to the main hall, 1830.
Main Hall, 1830
Examine the chest and put the violet star (from the mansion gate) on the impression.
Use the file (from the hidden-object scene in corridor 1, 1796) on the bars.
Collect the crystal heart half and head home.
Home, 1830
Examine the wooden box to the right.
Set both halves of the crystal heart (from the family tree in study 2, 1796 and in the chest from the main hall, 1830) in the rattle.
Collect the heart seal and head to the crystal, 1830.
Crystal, 1830
Examine the heart symbol.
Put the heart seal (from the rattle in the wooden box at home) in the symbol.
Head to the oak hall. Then, from the main hall, collect the brass leaf.
Now go into the basement.
Basement, 1796
Examine the far door and use the brass leaves on the openings.
The location of the leaves:
From the hidden-object scene from the fountain, 1830.
From the hidden-object scenefrom study 1, 1796.
From the main hall, 1796, after visiting the oak hall.
Solve the lock puzzle.
Press the top green button.
Press the white buttons in a specific order until they're all lit.
Counting left-to-right: 4, 1, 5, 3, 2
Press the lower green buttons and exchange the gears so the color/shape of the gear match the the color/shape of the shaft.
Now press the top green button again and pull the red rods below to line up the the cracks above.
Click and drag the rings, to line up the picture of a tree.
Set the rings in this order, numbered inside-out: 1st, 4th, 2nd, 3rd
Enter the oak hall.
Oak Hall, 1796
Examine the chest on the left.
Use the oak key (from your relative in the workshop, 1797) on the impression.
Collect the pentagram key.
Head to the balcony.
Balcony, 1796
Examine the mechanism on the left.
Use your medallion on the impression.
Use the pentagram key (from the chest in the oak hall) on the impression.
Back up to study 1.
Study 1, 1796
Solve the hidden-object puzzle, using the screenshot below for help.
Screenshot
You acquire a glass pipe.
Head to corridor 1.
Corridor 1, 1796
Solve the hidden-object puzzle, using the screenshot below for help.
Screenshot
You acquire a glass pipe.
Head to the main hall.
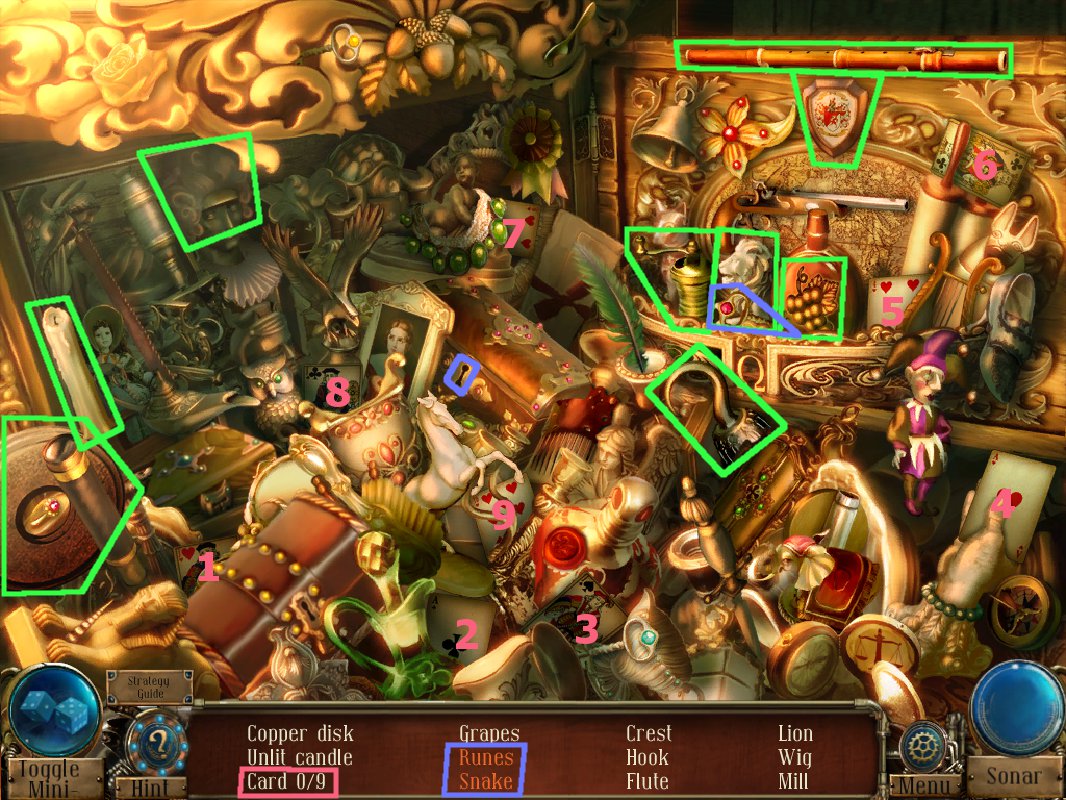
Main Hall, 1796
Solve the hidden-object puzzle, using the screenshot below for help.
Screenshot
You acquire a glass pipe.
Head back to the balcony.
Balcony, 1796
Examine the mechanism on the left.
Use the glass pipes on it.
The location of the glass pipes:
From the hidden-object scene in study 1.
From the hidden-object scene in corridor 1.
From the hidden-object scene in the main hall.
Solve the pipe puzzle by starting in the upper-left and rotating the pipes to connect to the lower right.
Use the screenshot below for help, it shows the correct path.
Screenshot
Congratulations, you've completed the game!
Thanks to Kyh for the walkthrough!
Posted by: Mike |
November 20, 2011 10:30 PM
|
November 20, 2011 10:30 PM