

![]() Once upon a time it was a dark and stormy night, and there was this guy pondering away in his study. He had just broken up with his girlfriend or something and was getting all lamenty when this bird flies in and starts taunting him. The guy goes crazy, because the bird is quothing the same thing over and over again. So the moral of the story is to not answer the knock at your chamber door or else a pigeon will drive you insane.
Once upon a time it was a dark and stormy night, and there was this guy pondering away in his study. He had just broken up with his girlfriend or something and was getting all lamenty when this bird flies in and starts taunting him. The guy goes crazy, because the bird is quothing the same thing over and over again. So the moral of the story is to not answer the knock at your chamber door or else a pigeon will drive you insane.
 That's how the story goes, right? Maybe. Well, the point is, you are now prepared for Midnight Mysteries: The Edgar Allan Poe Conspiracy, the latest hidden object game from Mumbo Jumbo, creator of the Samantha Swift series. Even if you've never heard of Poe (meaning you spent your life living at the bottom of the sea), all you need to know for the game is he wrote scary stuff and he's dead. Now his ghost can't rest until his death is avenged, so you have 24 hours to solve the mystery or his soul will be dragged down to the underworld. Sure, the real Edgar Allen Poe died under suspicious circumstances, but we won't get all speculative and take the game for more than a piece of fiction, will we?
With the help of a supernatural pocket watch you can travel into Poe's stories and explore them for objects that have been, well, hidden. Some of these items will go into your tool bag to be used later, whether you need wood planks to light a fire, or a sponge to clean a dusty window. You'll also need to solve some puzzles, play mini-games, and talk with the fictional characters scattered about.
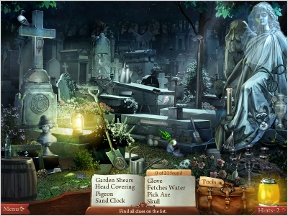
Analysis: Midnight Mysteries: The Edgar Allan Poe Conspiracy offers up a solid and enjoyable ghost story based on actual history. Some knowledge of Poe's works makes the game especially fun. Find ravens in the scene and your hint counter goes up. Click around randomly and the ravens are scared away by an angry one-eyed black cat. The storyline becomes clearer if you know why there's a skeleton behind that brick wall or the reason that Captain Kidd makes an appearance. However, if you're unfamiliar with Poe, it won't hinder your enjoyment of the game one bit.
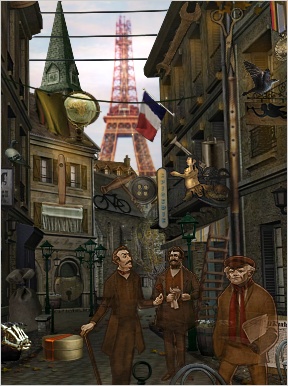 Want a great-looking hidden object game? Midnight Mysteries: The Edgar Allan Poe Conspiracy is one of the best candidates out there. Ripples on the water with fish swimming below? Check. Wind rustling the trees? Check. The pseudo-realistic style of visuals sits between a hand-drawn comic and a meticulously detailed still life, and you won't mind drinking in all of the visual nuances throughout the game.
Midnight Mysteries stumbles a bit with clue descriptions and click detection, the plague of most hidden object games. When you're tasked to find a bottle and there are several candidates in the scene, you need a bit of luck to find the right one on the first try. Some of the mini-games could also use clearer instructions.
Midnight Mysteries: The Edgar Allan Poe Conspiracy stamps its way into the hidden object scene and holds its ground with well-integrated story and gameplay, great artwork, and logical hiding places for items. It's perfect for casual audiences who aren't looking for a lot of challenge but want a good gaming experience nonetheless.
![]() Windows:
Windows:
Download the demo
Get the full version
![]() Mac OS X:
Mac OS X:
Not available.
Try Boot Camp or Parallels or CrossOver Games.


Walkthrough Guide
(Please allow page to fully load for spoiler tags to be functional.)
Midnight Mysteries: The Edgar Allan Poe Conspiracy - Walkthrough
General
There is no time limit, play in your own pace
Most of the objects are random.
Not random are the inventory- and puzzle - objects.
These ones you will find marked in the screenshots as well as the ravens.
Click all ravens you see in a scene. They are additional hints.
You can accumulate your hints with you as you go. Use them sparingly since they are hard to find.
Click the glass in the low right corner to get a hint.
You also can click the object on your list - inside the glass you will see the shape of this object.
Object written in blue need an inventory object.
The bag, right to the list, will open, when an inventory object is requiered.
It is possible that you do not need all inventory objects in the same scene.
Not needed objects will be used for interaction in later scenes.
Some objects have only text clues as for example "presses clothes" and you will have to find an iron.
Click to fast or randomly wrong items will make the raven go away. Instead a cat appears.
As long as the cat stays, you will not get any hints or be able to see the shape of an object.
The cat leaves after a while. As less wrong objects you click while its staying as faster she disappears.
When the raven is back, you can get hints and the shapes of the objects as usual.
Blue highlighted scene, which show feet while hovering over with the mouse, are showing the way to the next location.
A green skeleton hand with an eye means, that you have to further investigate this area.
A blue skeleton hand with gears means, that an inventory item to interact is need.
Chapter 1
The Begin
Click the balcony door, the raven is highlighting and follow him outside.
Pay attention to Edgar Allan Poe's words.
Click the sealed letter.
You will be brought to the first scene automatically
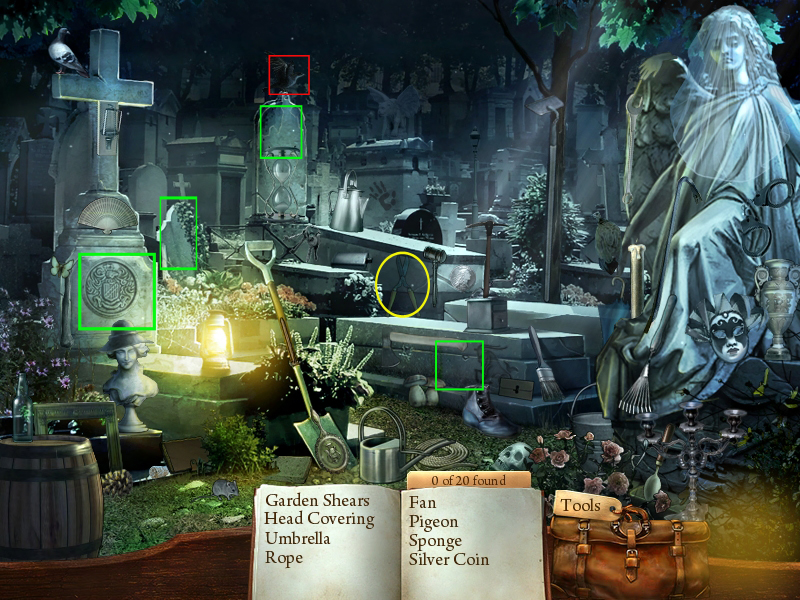
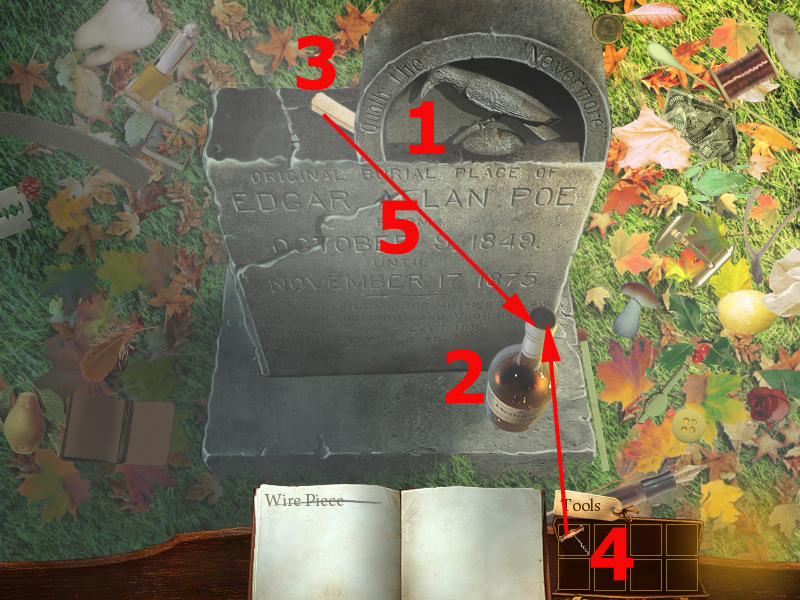
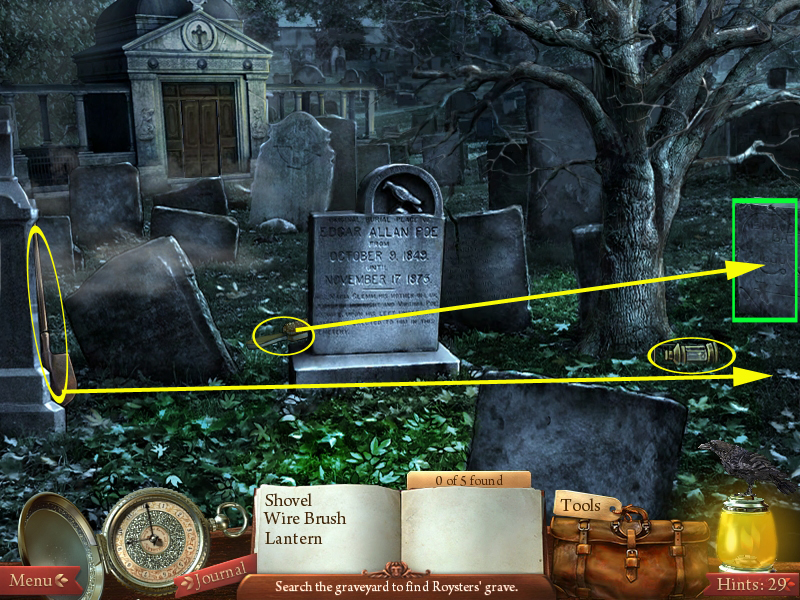
Cemetery - Poe's Grave
Find the listed objects.
For the 2 ravens please have a look at the screenshot.
The lantern stands in the middle of the grave stone.
Take it first, as it contains your hints.
The scrub brush is located on the ground right next to the grave stone.
With this clean the inscribing at the bottom of the gravestone.
Leave the scene to the left.
Screenshot
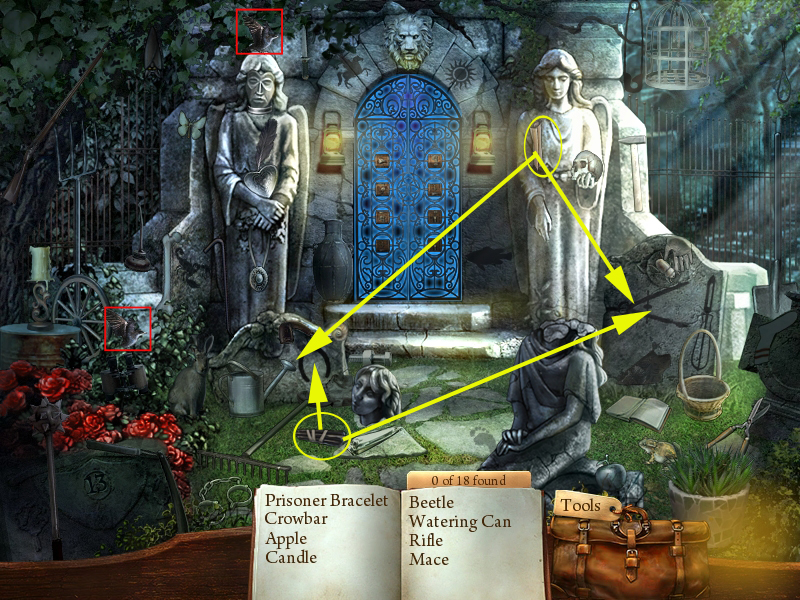
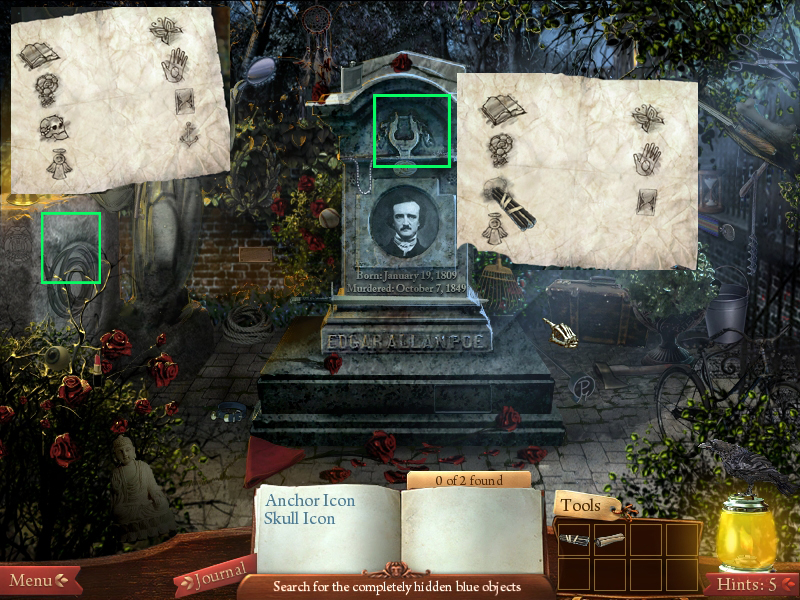
Cemetery - In front of the gate
Click the gate in the back - the door will be sealed after a earth quake.
For the 2 ravens please have a look at the screenshot.
Find the listed objects.
The charcoal sticks are laying on the ground in front of the left grave stone.
The paper you will find at the arm of the statue right side.
Screenshot - Scene
To find the blue written symbols, click one of the grave stones.
You will get a nearby look.
Get the paper out of your inventory and drag it onto the stone. Do the same with the charcoal sticks.
The charcoal sticks will automatically draw the symbols onto the paper.
Do the same at the other gravestone.
Screenshot-grave stones
Move on to the left.
Cemetery - The graves/Grave of E.A. Poe
Find the listed items.
For the 1 raven please have a look at the screenshot.
The garden shears are hanging a the sidewall of the sarcophagus in the middle.
Screenshot
After finding all, you have to find four more symbols.
Find the right gravestones, click them and draw the symbols as before.
Screenshot
Now back to the grave of Edgar Allen Poe.
His stone and the one left side contains a symbol
Screenshot
Go left to the gate, you have been before.
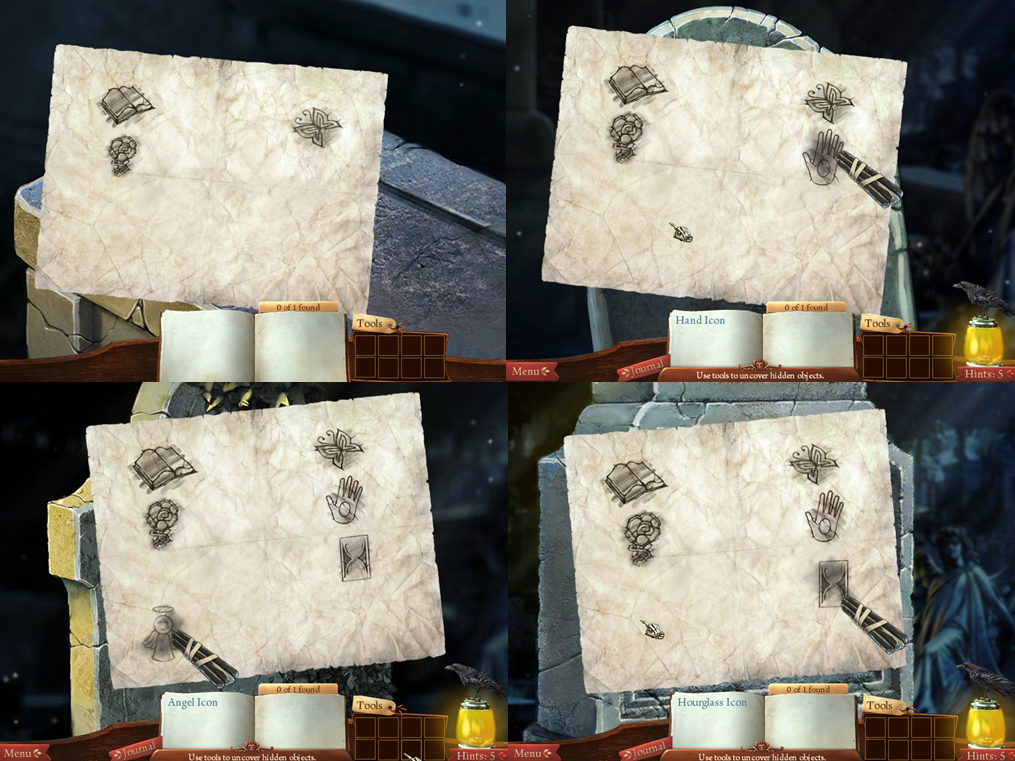
Cemetery - Crypt Door
Click on the door to get a closer view.
Arrange now the icons on the door according to the diagram on the left side of the page.
Click on each icon on the door until you can match up the diagrams on the page.
The right piece will be locked.
Seen from top to bottom:
Left side: Book, Flower, Skull, Angel
Right side: Butterfly, Hand, Hourglass, Anchor
The door will open. Enter.
Screenshot
Chapter 2
Cemetery - The original grave of E.A. Poe
Find the listed items.
The raven is sitting on top of Poe's gravestone.
The sponge is laying right side in front of Poe's gravestone.
To find the face etching, sweep the sponge over the dirt spot on the grave stone left next to Poe's.
Find the rake right next to Poe's grave stone.
Use the with the leaves on the ground in front of the grave stones and you will find the newspaper.
Screenshot
Click the gravestone to get a nearby view.
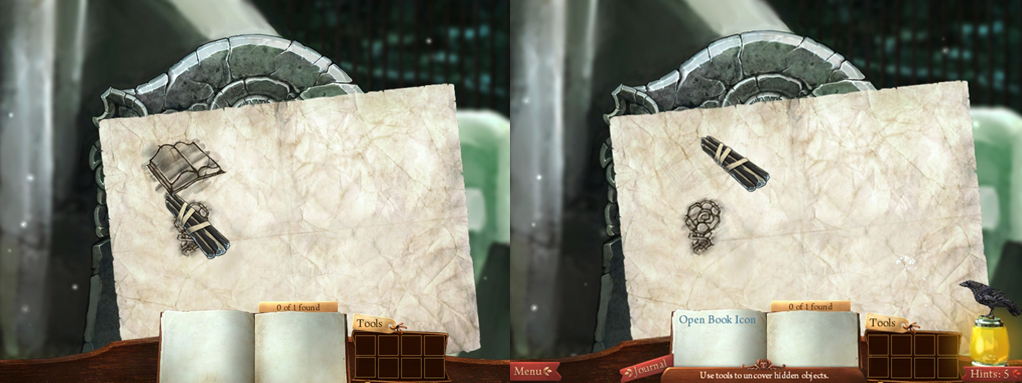
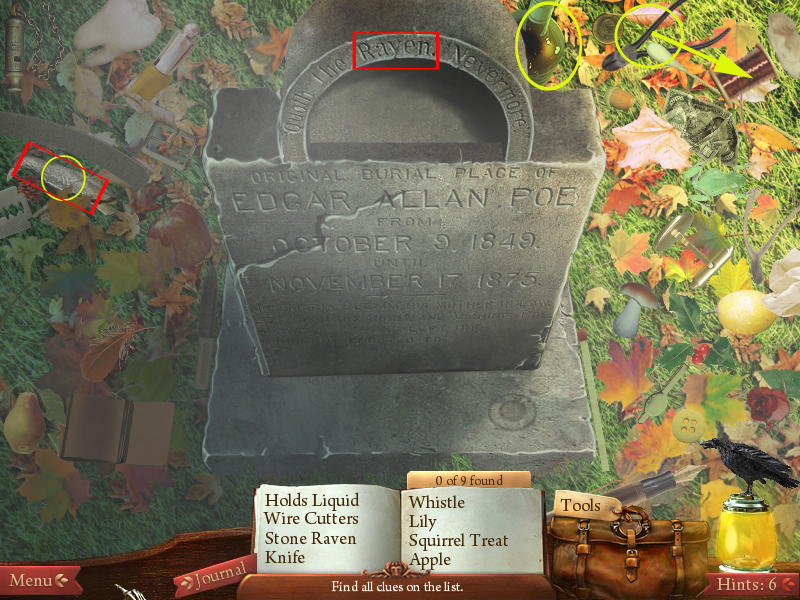
Cemetery - The grave stone
Find the listed objects.
The stone raven next to the gravestone, left side, is tip and inventory object.
The word "raven", middle top of the grave stone is also a tip.
"Holds Liquid" is the bottle, half hidden behinde the grave stone, right side.
The wire cutter lays right next to it.
With this you will cut a part wire of the spool under the wire cutter
Find the objects on the list.
Screenshot
Now place the stone raven on top of the grave stone,
Place the bottle at the bottom right, where you see the circle.
The top of the grave stone moves to the side and you can grab the scroll.
Now open the bottle with the corkscrew.
Place the scroll into the bottle.
Click the blue highlighted gate in the back to move on.
Screensho
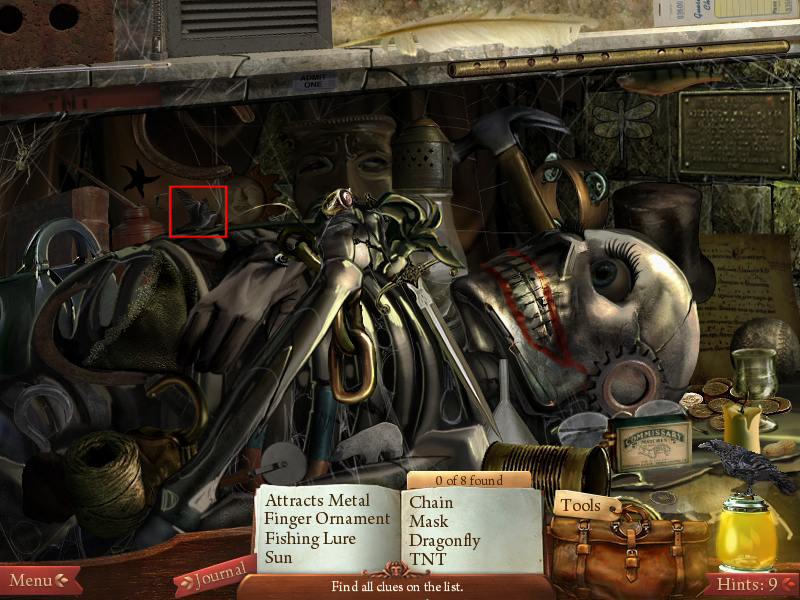
Inside the crypt
Find the listed items.
For the raven please have a look at the screenshot.
The weight is located top left, left shelf.
Use the weight to pull down the lever that is in the center of the back wall.
The Family Crest will come down from the ceiling - grab it.
Screenshot
Click the skeleton in middle shelf, left side, to get a nearby view.
Screenshot
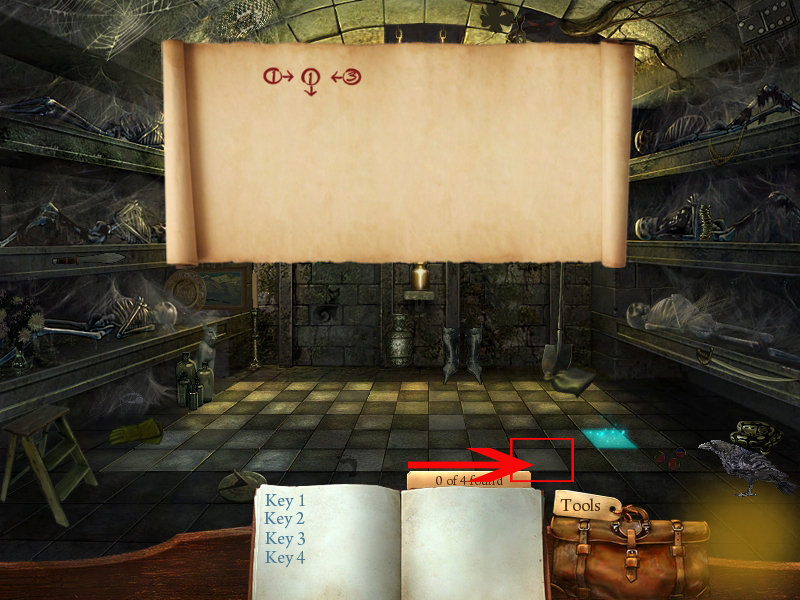
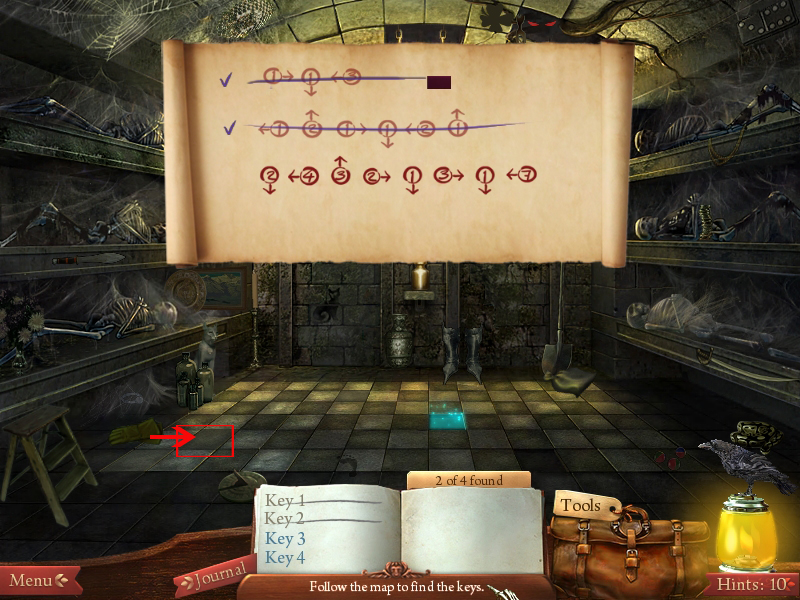
Back in the crypt click the cask right side.
Now you have to solve a puzzle to find the required keys.
Underneath the cask you will see a blue highlighted tile.
On top of the screen you will have the the secret map.
The blue tile on the floor shows you where you have to start.
Follow the tiles in the order and the direction that are shown on the map.
The arrows give you the direction, the numbers telling you how many steps (tiles) to go.
Count carefully and click the last tile.
If you see a ghost appear on the screen it means that you clicked on the wrong spot.
If that happens, just count again and click on a different spot.
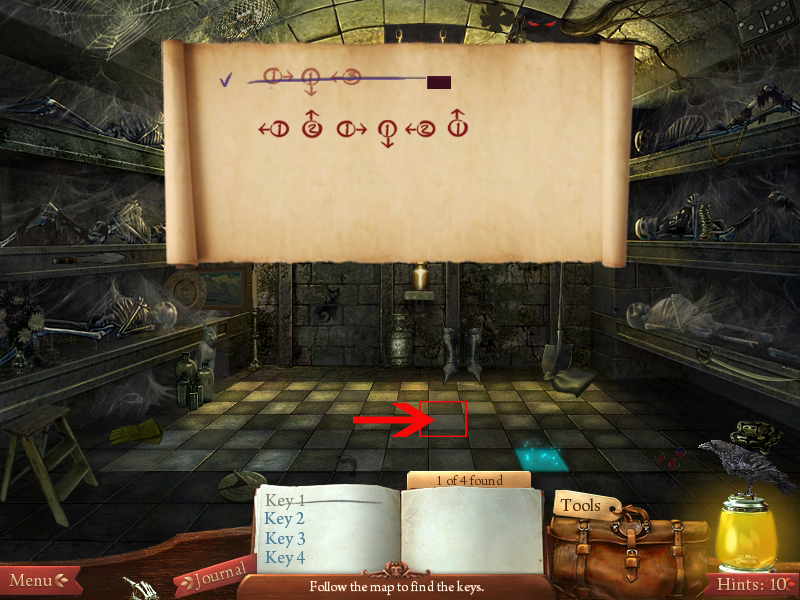
The right tile will reveal a key - grab it and on the paper appears the next line.
Start counting again and start with the tile which is now highlighted.
Screenshot - Key 1
Screenshot - Key 2
Screenshot - Key 3
Screenshot - Key 4
After finding all keys, a skeleton falls out the shelf on the right side
Grab the hammer, laying where before the skeleton has been.
You now have to find the last key.
Use the hammer to smash the right stone door.
Smashing the left one will only bring a cat out.
Behind the left one, you will find another skeleton.
Click it and you can grab the key in a nearby view.
Click the blue highlighted background.
You found Poe's secret room.
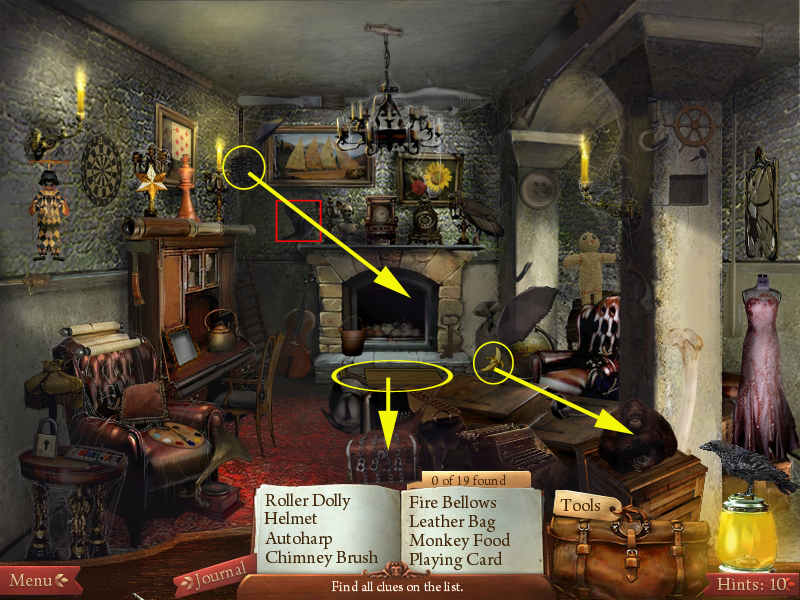
Poe's secret room
Find the listed items.
The chimney brush, left at the wall next to the fireplace, you will use to clean the chimney.
You will find a book and therefore a new suspect.
Give the banana to the monkey low right on the crate.
He will eat it and go off the crate. The crate opens, get out the cloth.
Use the roller dolly to lift the trunk, that was revealed in the middle by finding the other items.
Screenshot
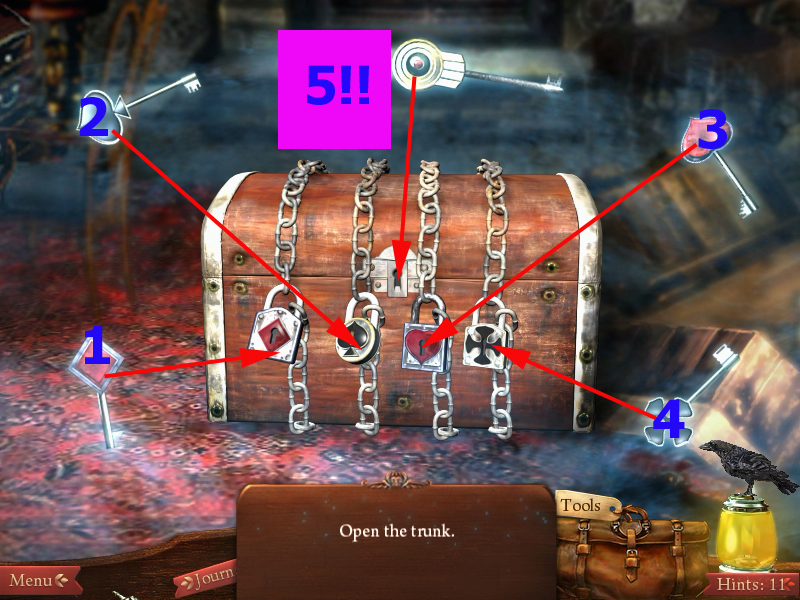
Click the trunk - a puzzle opens.
Get one of the keys and place it in the according keyholes.
The key on the top for the keyhole on the top has to be the last one, other wise it will not work.
Screenshot
After the cut scene, you can choose on Poe's watch, which location you want to go to.
The walkthrough follows here and in the following chapters the pictures from left to right (9 o'clock to 3 o'clock)
Choosing another order has no influence on story or gameplay.
Chapter 3 - The Mystery of Mary Roget, Part 1
9 o'clock
Talk to all people, standing around.
When they said, what they had to say, they will disappear.
For the raven please have a look at the screenshot.
Look for the listed items.
The gold coin, laying on the street lower right side goes into the chewing gum machine next to the window at the right.
The diamond ring will fall out. Pick it up.
Use the scissor, at the house right top, to cut open the hat box on the street.
Grab the hat out.
Screenshot
Move on to the 7 o'clock - location.
7 o'clock
Talk to the people.
All will disappear but the girl behind the desk. She will have to tell you later more.
Look for the listed items.
For the raven please have a look at the screenshot.
Screenshot
Move on to the 5 o'clock location.
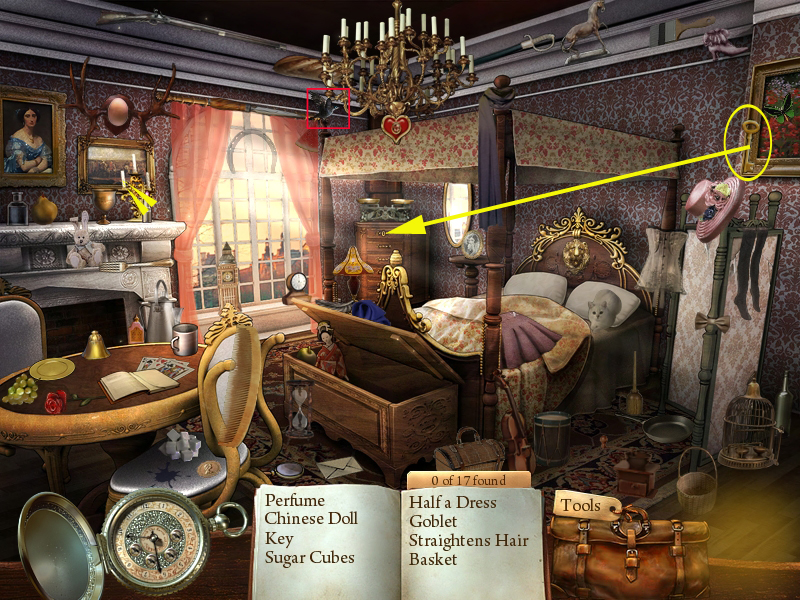
5 o'clock
Find the listed items.
Use the golden key, located top left at the painting frame, to open the top drawer in the back.
Get the sailing boat out of the drawer.
For the raven please have a look at the walkthrough.
Screenshot
Go to 3 o'clock.
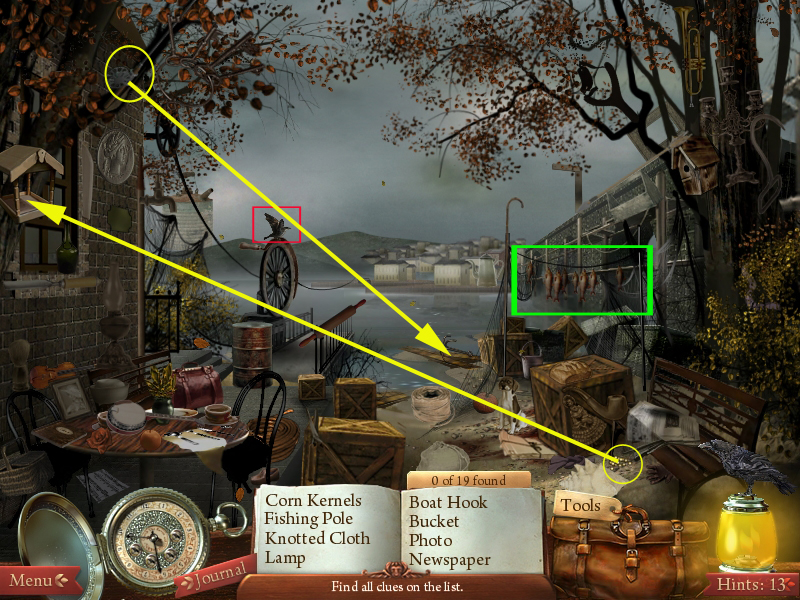
3 o'clock
Speak to the people.
Start with the boatman, left in the back.
Find the listed items.
Please have a look at the screenshot for the raven.
Get the rod from top of the tree left side.
Use the fishing rod at the water, right side where you can see the anchor.
You will fish out the missing rudder.
Pick up the corn kernels from the ground right side in front of the crates.
Place them at the birdhouse right side.
A bird will come along and the necklace will fall onto the table.
Grab it.
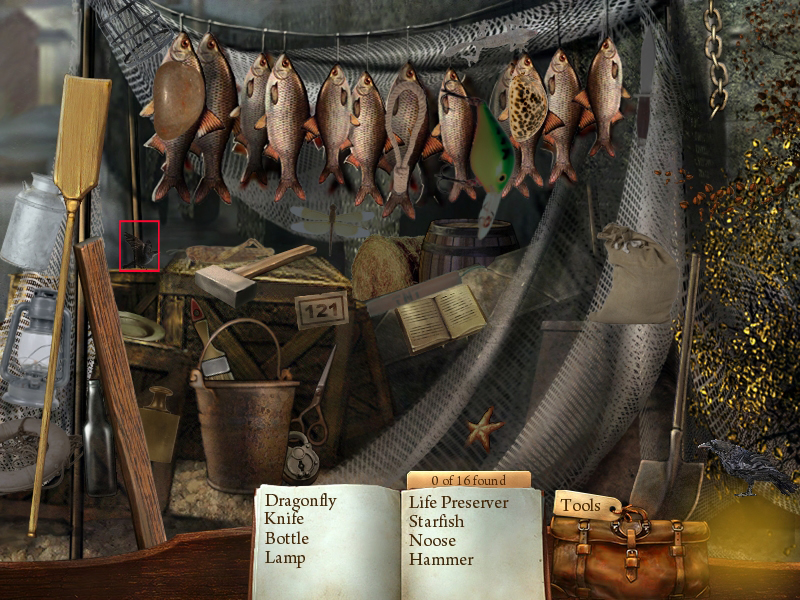
Click the fish net for close examination
Screenshot
Find the listed items.
The raven is marked on the screenshot.
Screenshot
Talk to the people, till you will be brought to the puzzle scene.
3 o'clock - Ferry puzzle
Everyone has to go to the other side but you have to think about:
Only three can use the ferry at a time time.
The boatman always has to be in the ferry.
The boys cannot be left without an adult.
The sailors must always be under the guard of Dupin or the policeman.
To place people on or off the ferry, click them.
To move the ferry, click the arrow on the water in front of the ferry.
While moving the people, a cut scene will suddenly appear. After it ends, you will be brought back to the ferry.
There are different solutions possible. This is one example.
For this solution you can switch policeman and Dupin as you wish.
1. Boatman, you (pink) and one of the boys - the boatman goes back alone.
2. Boatman, policeman, one of the sailors - you go back together with the boatman, you leave the boat on the other side.
3. Boatman, Dupin, the other sailor - boatman goes back alone.
4. Boatman, you and the second boy.
Everyone is on the other side.
Don't forget to get everyone off the ferry to end the scene.
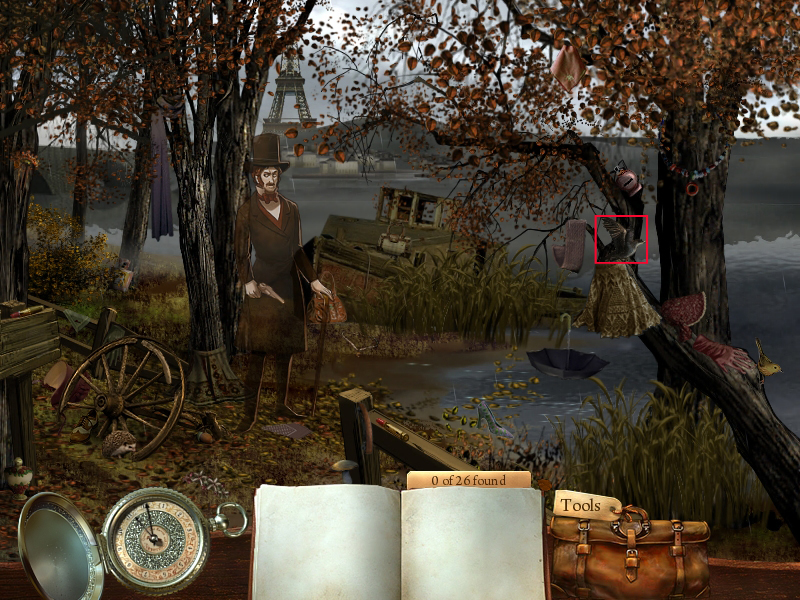
3 o'clock - forrest, 2 scenes
Look for the listed items in both scenes
The ravens are marked on the screenshots.
Screenshot Scene 1
Screenshot Scene 2
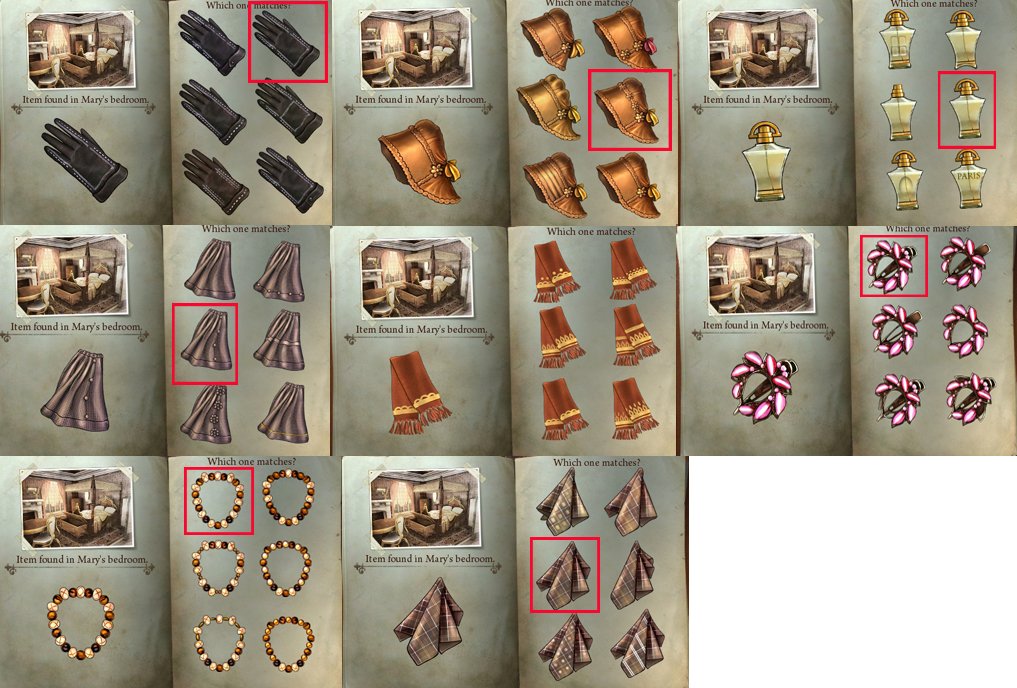
After finding all, you will have to compare all with the stuff, founded in Mary's room.
Click the equal items on the right side according to the picture on the left side.
See all items on the screenshot.
Screenshot
3 o'clock - station
Talk to all people and find the listed items.
Please look at the screenshot of the raven.
Grab the key at the top of the lantern and place it on the postbox, left side of the house, left next to the door.
Screenshot
Click the mailbox again to get the mail.
You will be brought back to the forest again.
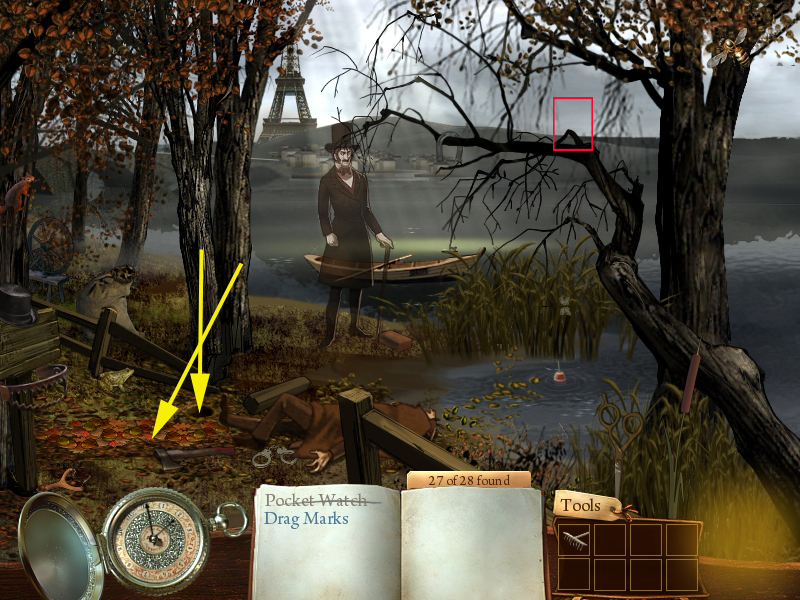
3 o'clock - forest
Look for the listed items, you will find the raven same place as before.
The hole digger and the rake are both leaning at the two trees left next to Dupin.
Use the hole digger at the hole in front of the trees.
Use the rake to move away the leaves in front of the trees.
You will be brought back to the jewelery, location 7 o'clock.
Screenshot
7 o'clock
Talk with Dupin and get the Statue of Liberty from the desk left side.
A cut scene follows, click the pocket watch to come to the next chapter.
Chapter 4 - The mystery of Mary Roget, Part 2
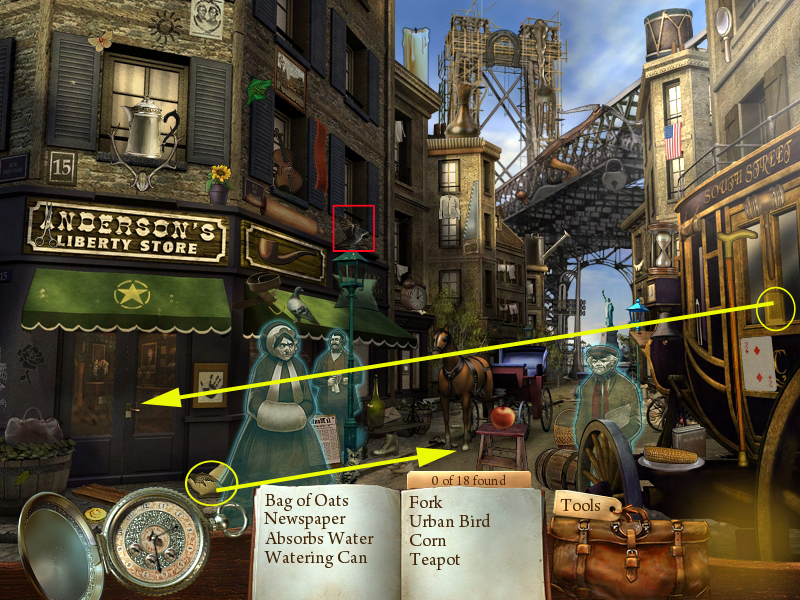
9 o'clock
Talk to the people.
Find the listed items.
Grab the sponge from the lower window, left side.
You want to clean the shop door at the right side with it.
The bag of oats lays in front of the shop door on the ground.
Place it on the ground in front of the horse right back.
It will move its head down to eat and you can grab the note from tree behind it.
Screenshot
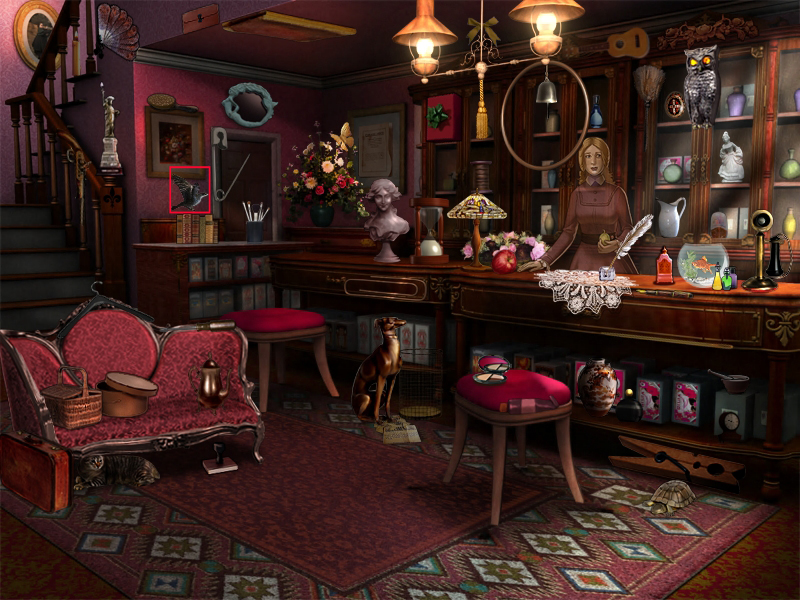
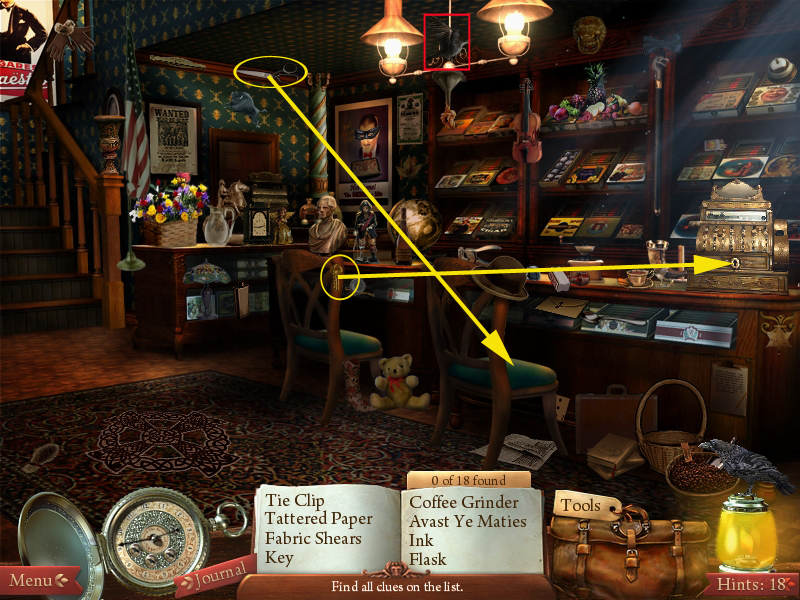
7 o'clock
Speak with the people.
Find the listed items.
With the fabric shears, at the ceiling, right above the "Wanted" - poster in the back, you can cut open the seat of the right chair. The diamond ring falls on the floor, pick it up.
With the key, at the left chair, you can open the cash register, right side on the desk. Take out the billing.
Screenshot
5 o'clock
Find the listed items.
With the nail file, on the left side of the bed's headboard, you can open the top drawer of the cabinet left side.
Both blue items are in the drawer.
Screenshot
Find all 12 parts of cloth, according to dess' pattern on the right side.
Screenshot
You will be automatically brought to Andersons office.
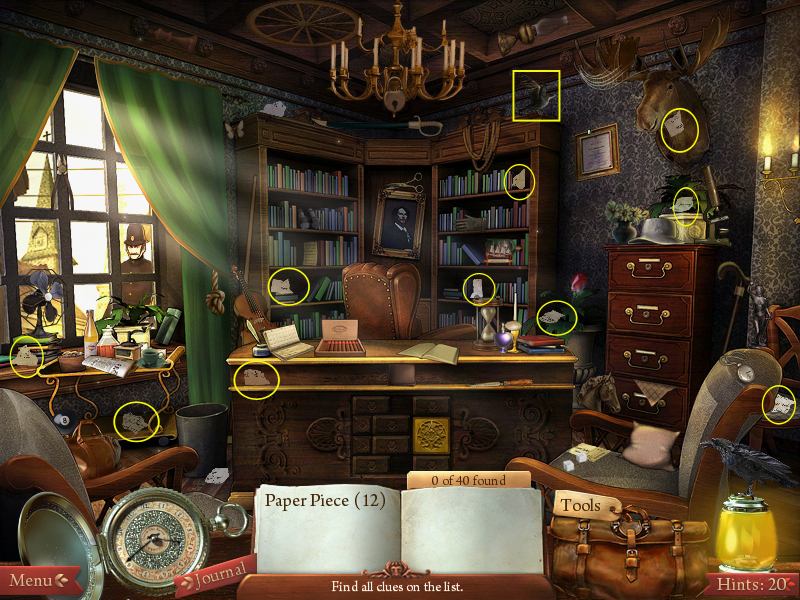
Mr. Anderson's office
Find the 12 pieces of paper.
Screenshot
Find the other listed items as well.
The policeman stands outside, right side of the window.
Get the tack pliers from the middle window frame.
Grab the atomizer from the desk, left side.
Screenshot
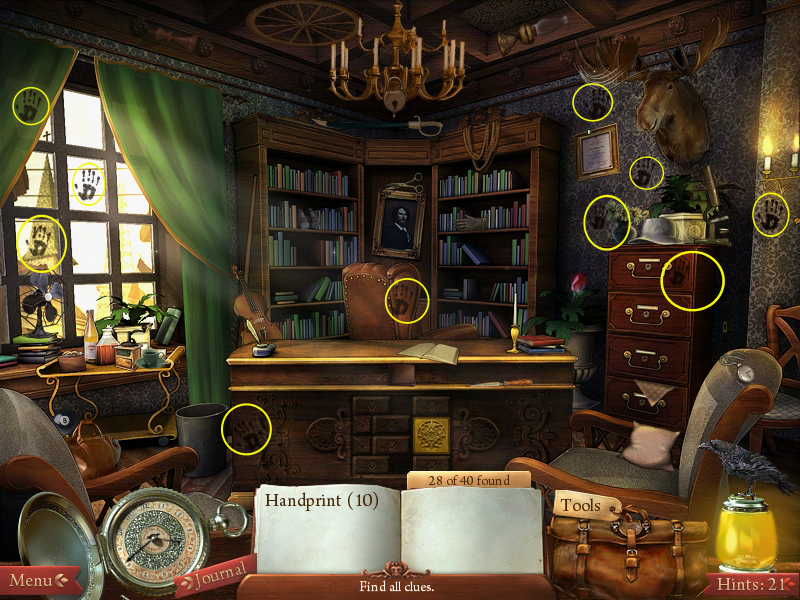
Click the atomizer anywhere in the room. It will make the 10 hand prints visible.
Screenshot
Click the diploma at the wall, left to the book shelf and you will find the photo behind.
Now click the tile pattern at the front of the desk. You will need to find three paper pieces and a key.
Screenshot
It is a slider puzzle. You have to slide the pieces to find all hidden items.
Have a look at the screenshot to understand the following numbers.
1 to the right and get the paper - move it back.
2 to the left and get the paper - move it back.
3 to the right and get the paper.
4 up, 5 down
6 and 7 left
Gold to the left, get the key.
Screenshot
Use the key at the file case, second drawer from top.
Get the three papers and the secret note.
Screenshot
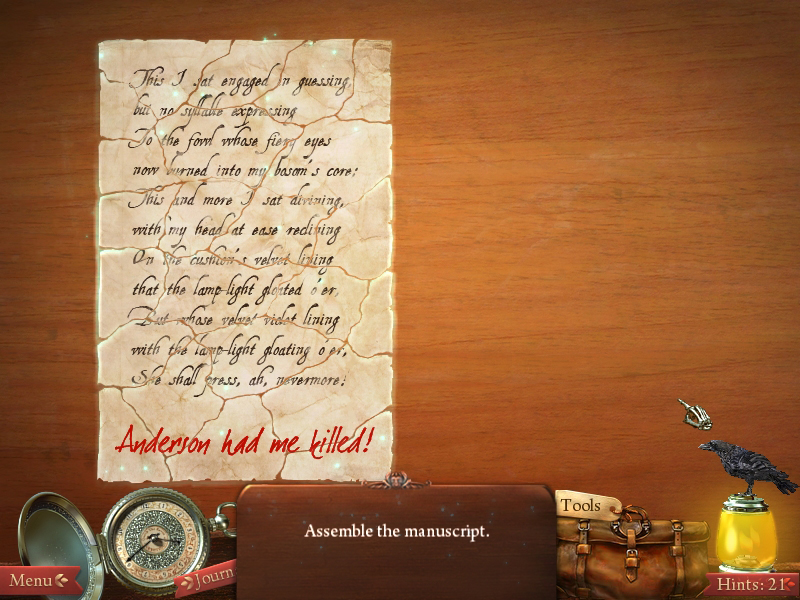
Click the paper pieces on the desk and reassemble the secret message.
Screenshot
Use the tack plier to remove the nails at the leather chair and get the money out.
Place the policeman at Mr. Anderson.
You will be brought to Mr. Anderson's bed room.
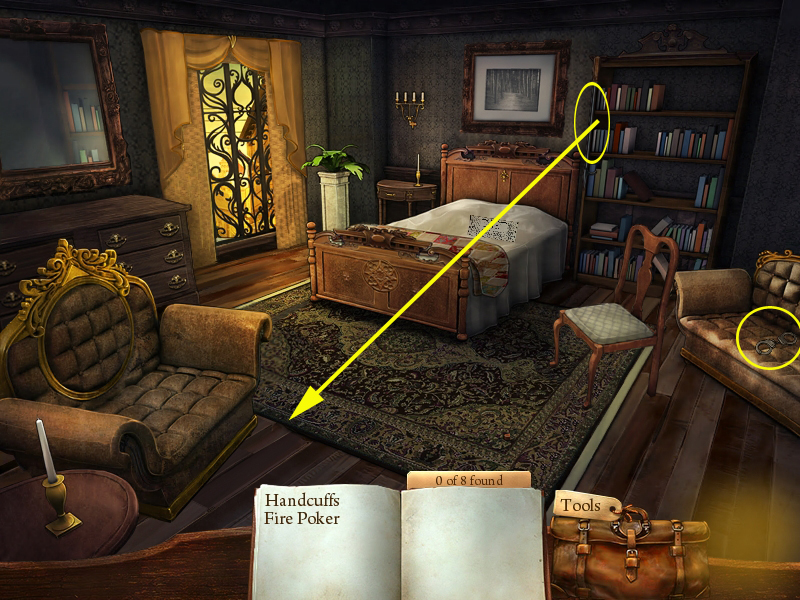
Mr. Anderson's bedroom
Get the handcuffs from the couch, right side, and the fire poker at the left side of the book shelf.
You will be asked to find different items.
Click the badge at each item.
Nothing will happen until you click the padded chair.
Use the fire poker to remove the floor boards.
Place handcuffs at Mr. Anderson.
Screenshot
After the cut scene, you will be brought automatically to the next location.
Chapter 5 - The golden bug
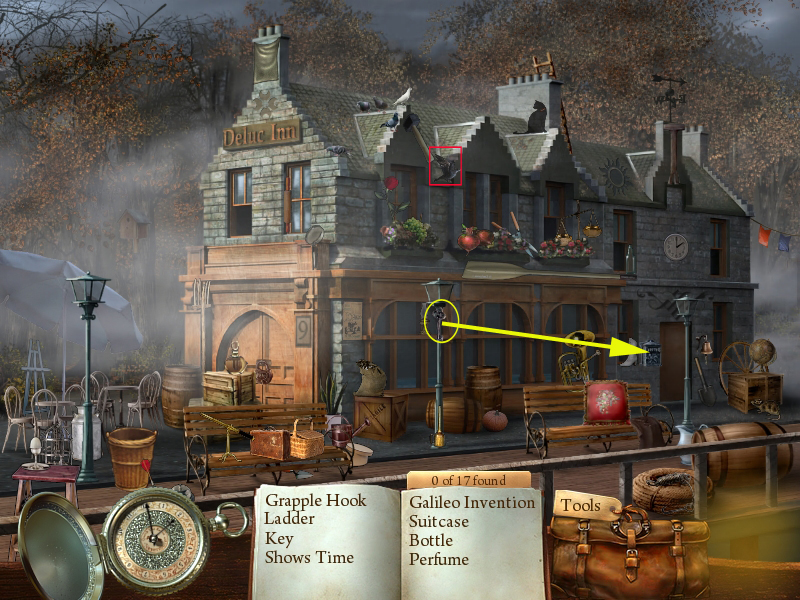
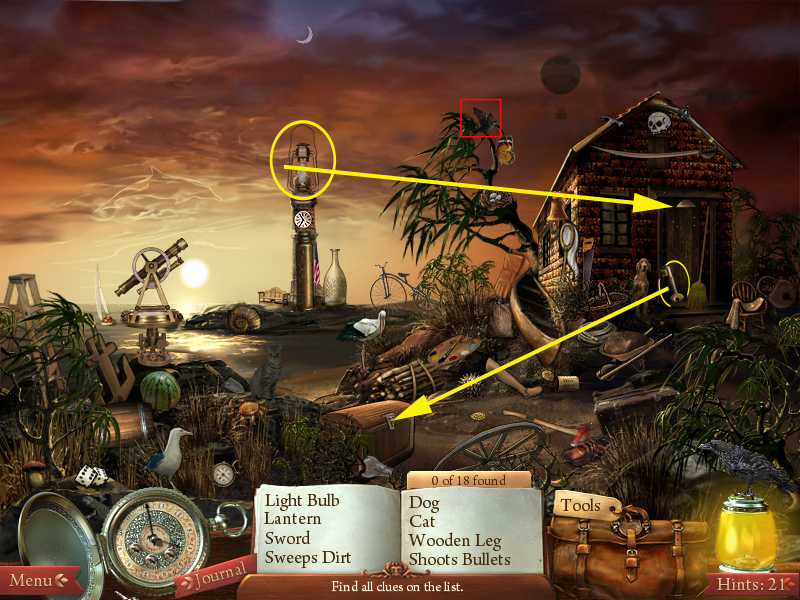
9 o'clock
Find the listed items.
Grab the lantern from the top of the lighthouse in the back.
Place it above the door, a key will fall down.
Grab it and open the trunk left side on the ground to get the bug collection.
Screenshot
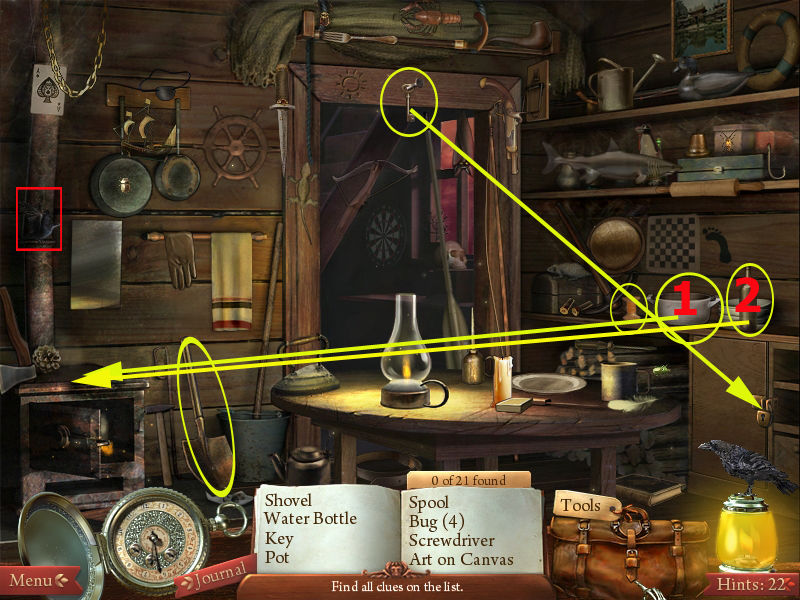
7 o'clock
Find the listed items.
The pot is on the right side of the scene, on the counter. It has to be placed on the oven left side.
Pour the water from the bottle, left next to the pot on the counter, into the pot on the oven.
The steam will make a hand print appear on the mirror above.
The Key is in the top center of the scene, above the doorway. Open the drawer with the lock right side with it and grab the blue print.
The Shovel is on the left side of the back wall and the spool on the right side of the scene, on the shelf. Both items you will need in a later scene.
Screenshot
5 o'clock
Find all listed items.
Use the knife, right side top of the ship, to open the shell in the sand, left. You can grab the pearl.
Screenshot
A mini game opens.
Move all the bugs that are on the right side of the page onto the left side
Just drag the pieces onto the matching silhouette on the left side of the page.
When you place a bug in the right spot, it will lock into place.
Once all the pieces have been placed, the Golden Scarab will appear in the middle of the page on the left, right side the needed paper.
Grab both to finish the level
Screenshot
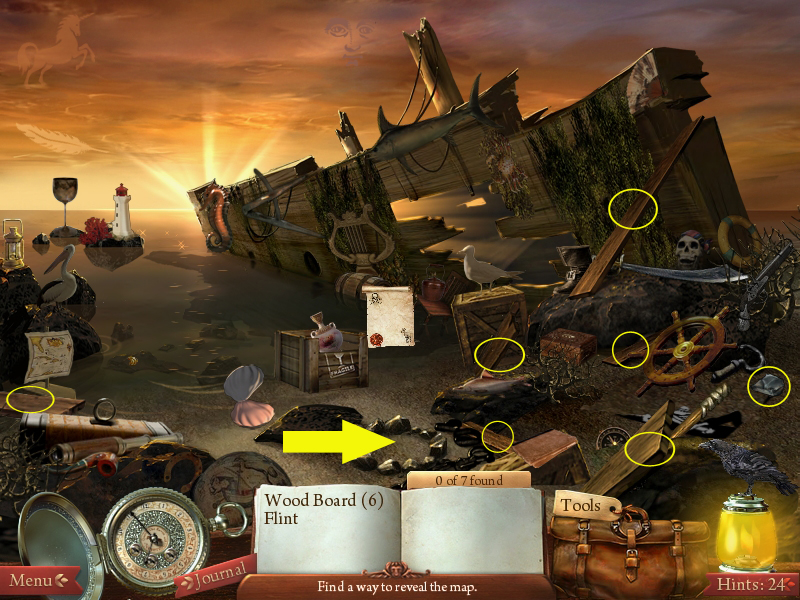
You will be brought back to the ship wreck.
Please have a look at the screenshot for the location of wooden boards and the flint.
Place all boards in the stone circle in the middle and light the fire with the flint.
The steam will reveal the complete treasure map.
Screenshot
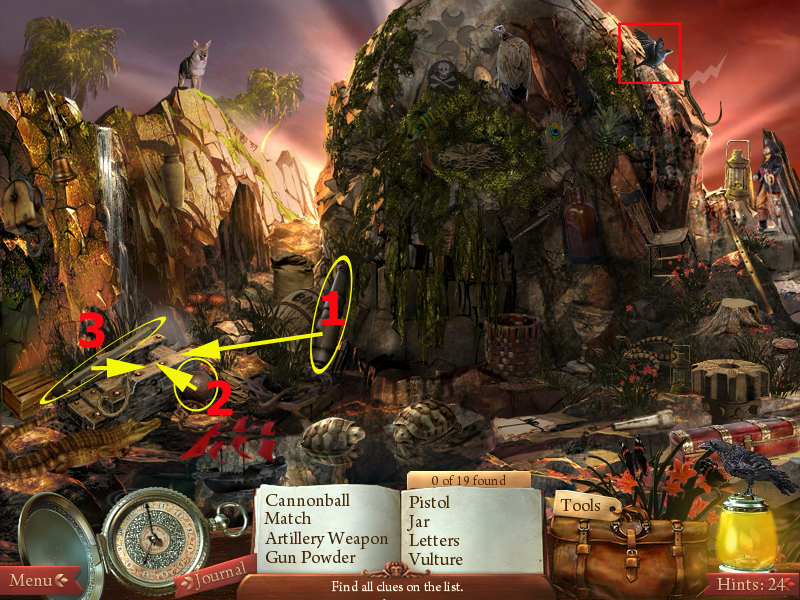
5 o'clock - at the huge rock
Find the listed items.
The artillery weapon you will find leaned at the rock, left side of it.
The match and the cannon ball are laying right and left next to the wooden parts of a cannon, left side.
Place first the artillery weapon on the wooden part, then the cannon and light the fuse with the match.
Screenshot
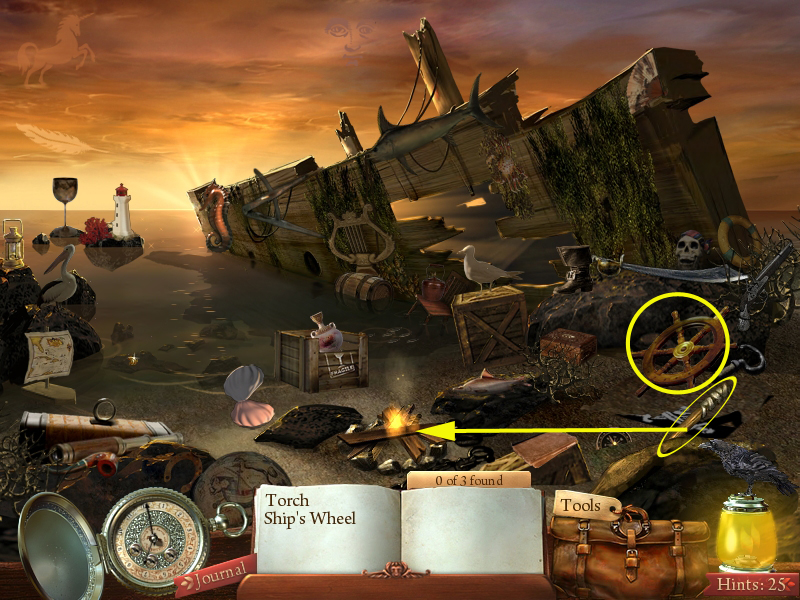
You will be brought back to the shipwreck.
Get the ship wheel and the torch, both right side of the scene, and light the torch at the campfire.
Screenshot
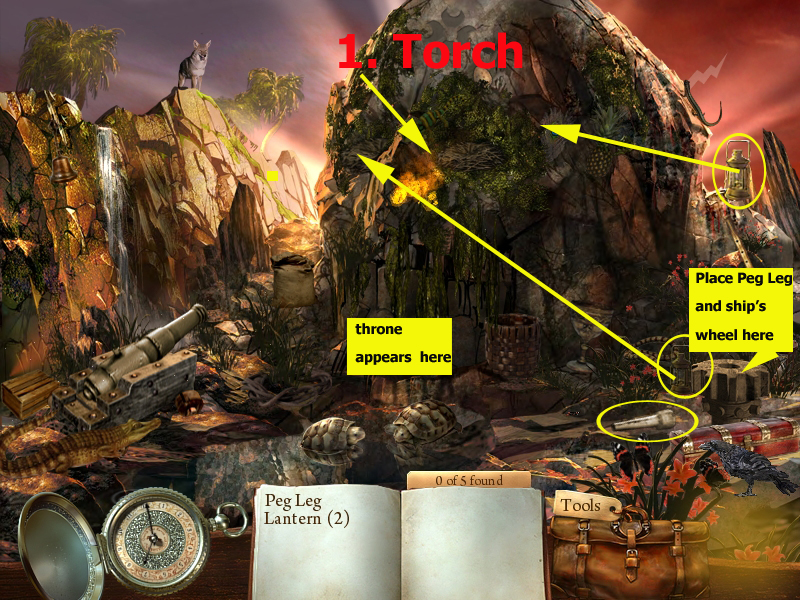
Back to the huge rock.
Find the two lantern and the peg leg.
The peg leg lays on the ground in the lower middle of the scene.
One lantern stands above the peg leg, the other one right next to the huge rock, in the middle.
Place the torch at the top of the skull's nose.
It will burn away the hay from the skull's eye holes
Place the lantern into the eye holes.
Place the peg leg and the ship's wheel on the wooden gear on the ground low right side.
The throne will appear at the skull's mouth.
Click the throne to finish this level.
Screenshot
You will be brought to the next scene automatically.
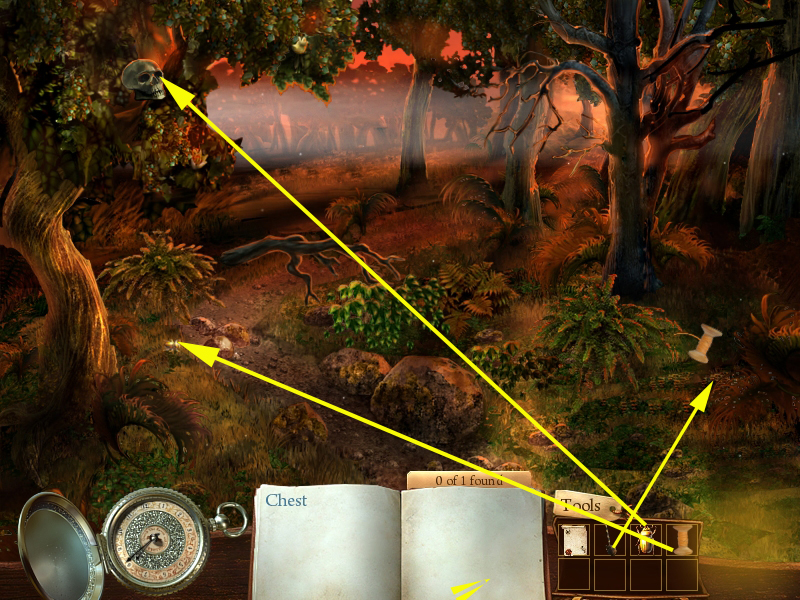
5 o'clock - in the forest
Place the golden scarab at the skull, left upper corner on the branch.
It will fall down, place the spool now at the scarab on the ground.
The spool will measure the way to the place to dig. Use the shovel there.
Screenshot
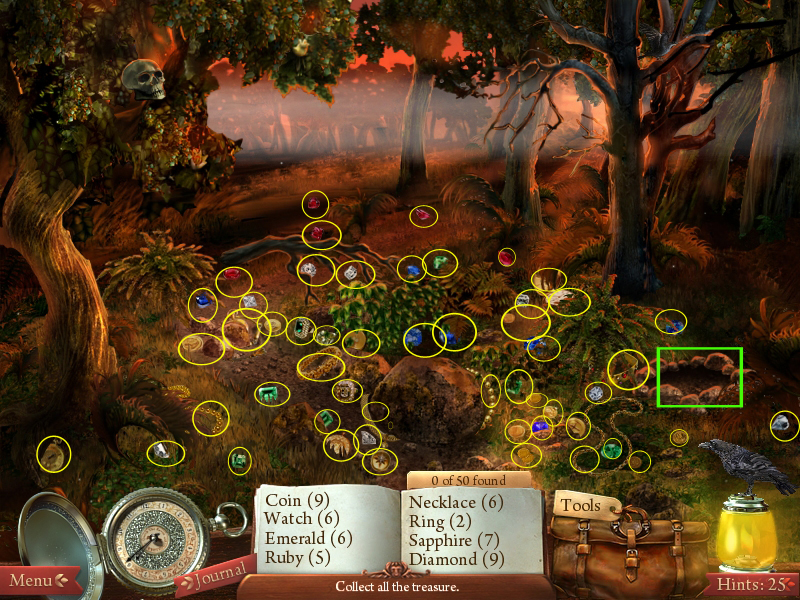
Captain Kidd will give you a document to sign, just click the pencil and the document.
Collect all treasures.
Screenshot
Click the hole on the ground right side and you will be brought to the last scene of the chapter.
Find all listed items.
Screenshot
After the cut scene click the pocket watch, you will automatically be brought to the next location.
Chapter 6
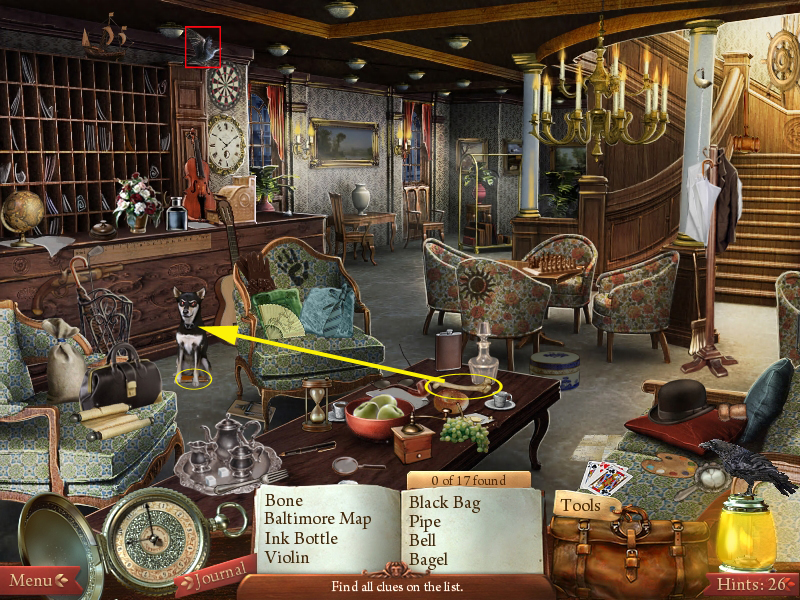
Lobby
Talk to the people.
Give the bone, laying on the table, to the dog.
Now you can get the register book.
Screenshot
You will be brought to Poe's room automatically.
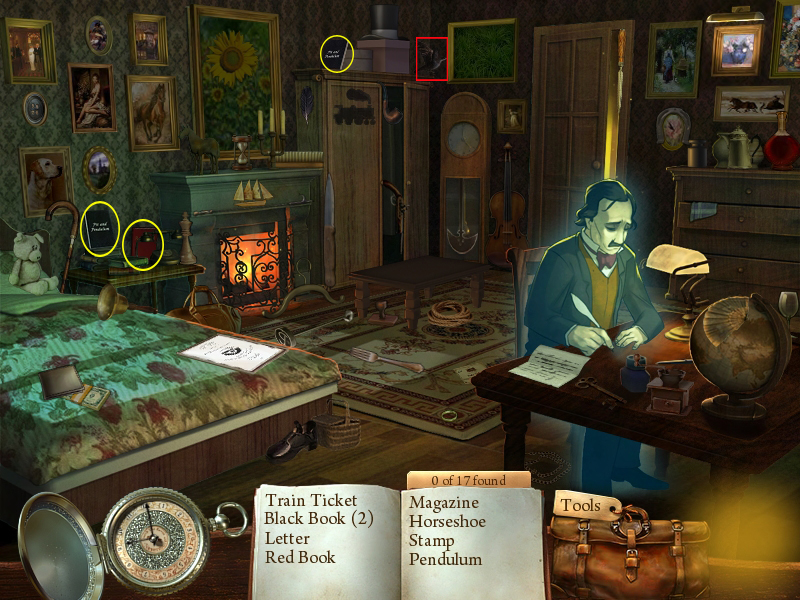
Poe's room
Find the listed items.
Two books are on the table, left side, next to the closet.
The third book you will find on top of the closet, left side.
You will need them later.
Screenshot
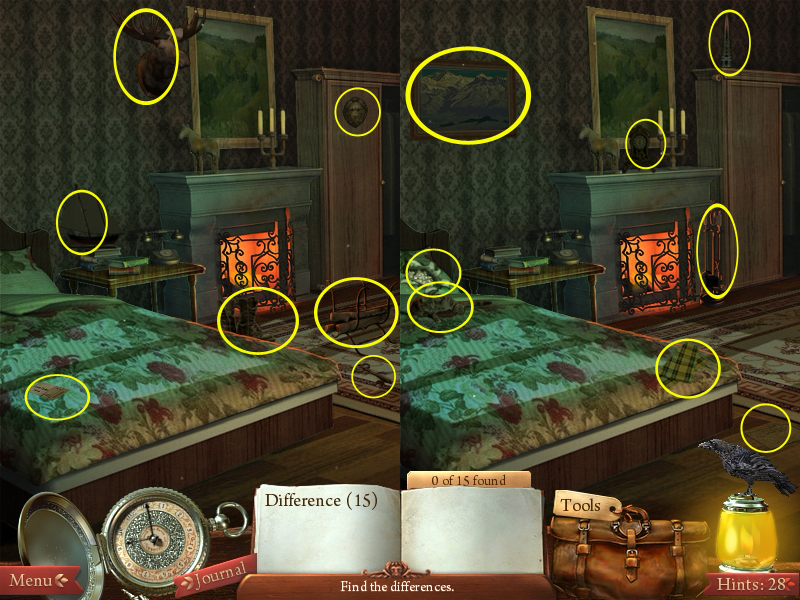
After the cut scene, you will have to find in two scenes the 16/15 differences.
Screenshot
Screenshot
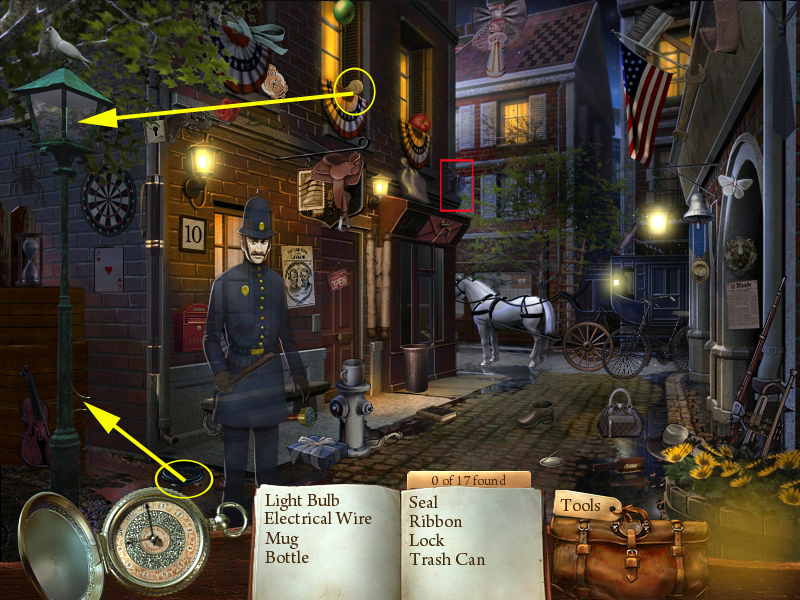
On the street
Find the listed items.
Talk with the policemen.
Get the light bulb from the left window of the left house.
The wire is laying on the street, left next to the policeman.
Place the light bulb at the street lantern, left
Use the electric wire to fix the lantern's cable at the lower part of the lantern.
Screenshot
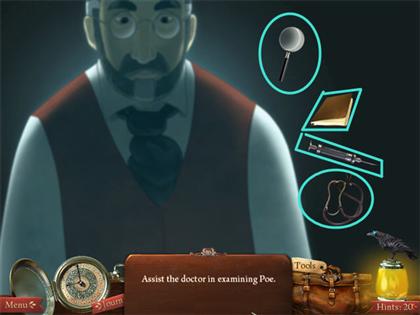
You will find Poe - click him to bring him to the doctor.
To help the doctor examine poe, just click the items to the right.
It does no matter, in which order you click the items.
Just click them at the doctor.
Screenshot
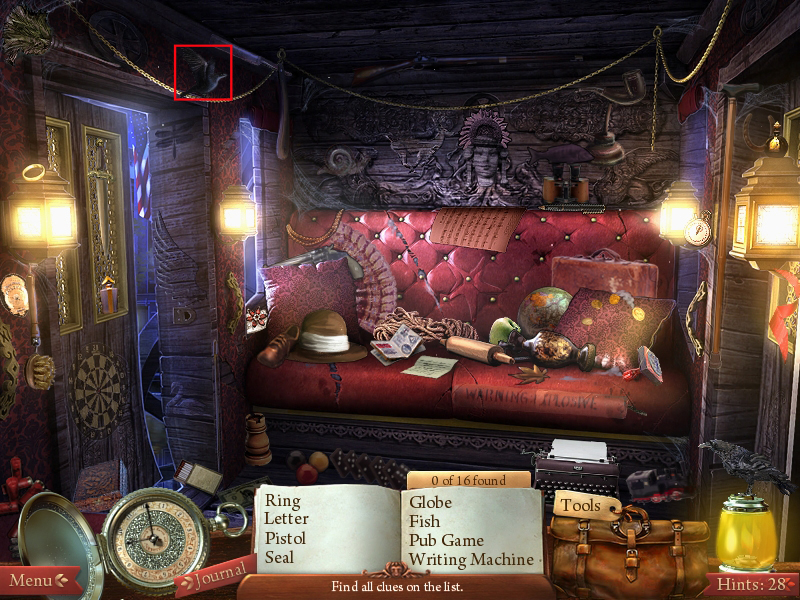
Inside the caravan
Find the listed items.
Screenshot
You will be automatically brought back to Poe's grave.
Poe's grave
After the cut scene:
Look for the listed items.
The brush is right behind Poe's grave stone.
The lantern you will find in the grass, right side.
The shovel leans at the gravestone left side.
Click the grave stone right side and clean it with the wire brush. This is the grave of the Royster brothers.
You can click several other grave stones as well and clean them, but you do not have to.
Use the shovel and dig in front of the Royster brother's grave stone.
Screenshot
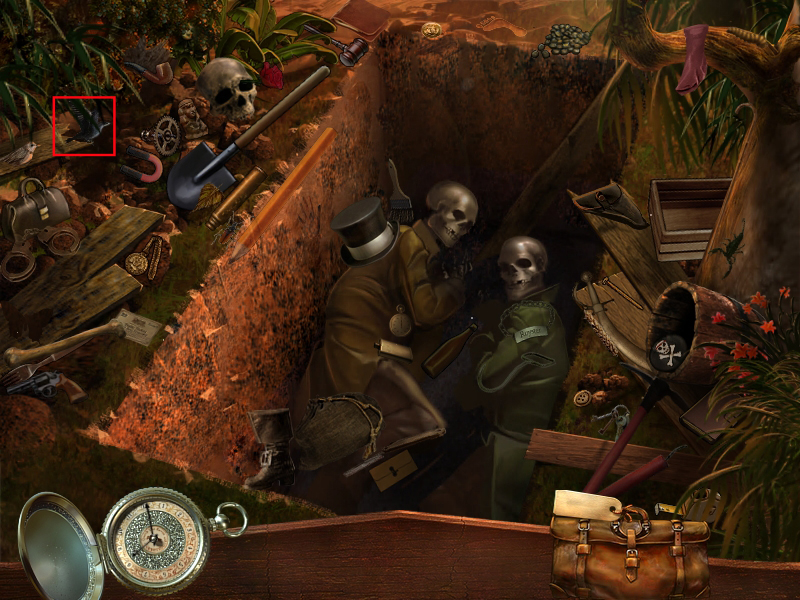
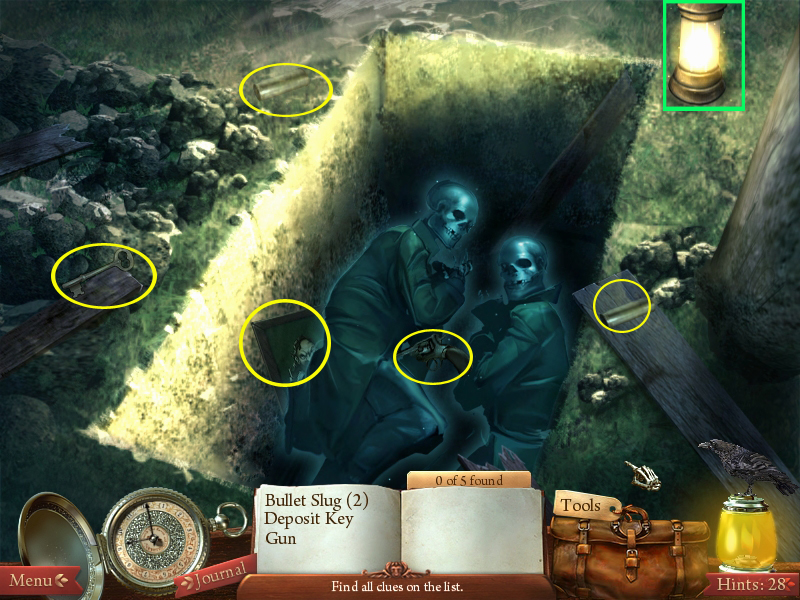
Royster brother's grave
Place the lantern top right next to the grave so you can see.
Find the listed items.
You will see them all marked on the screenshot.
The picture you will have to pick up at last.
Screenshot
You will be brought to the next scene.
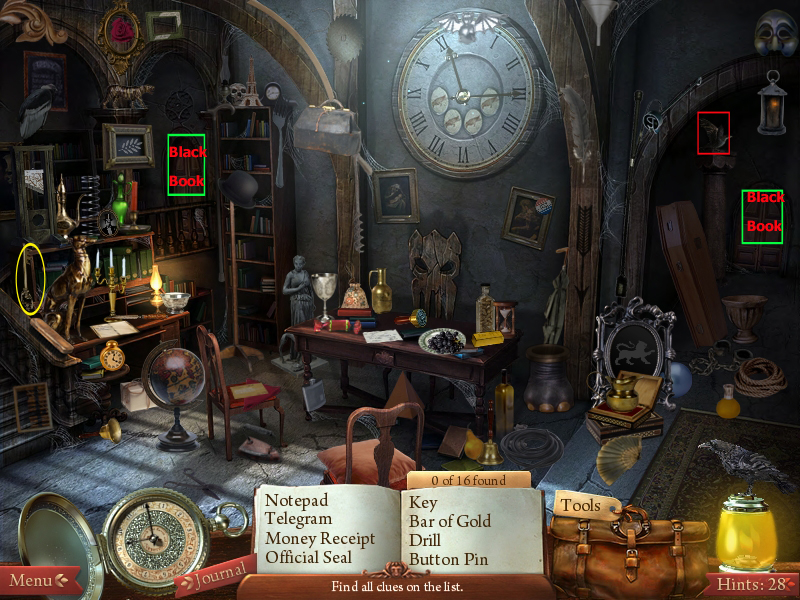
Room
Find the listed items.
The key you will find left side, left side of the desk.
After the brothers appear, place the books at the two doors right and left side.
Screenshot
Arrest
You will be brought automatically to the scenes.
Click the policeman in the second scene.
In the third scene click the policeman on one of the two brothers to arrest him.
It does not make a difference, which one you choose.
Final
To prevent the ghost from escaping, place the red book on the secret panel that opened in the middle back.
Screenshot
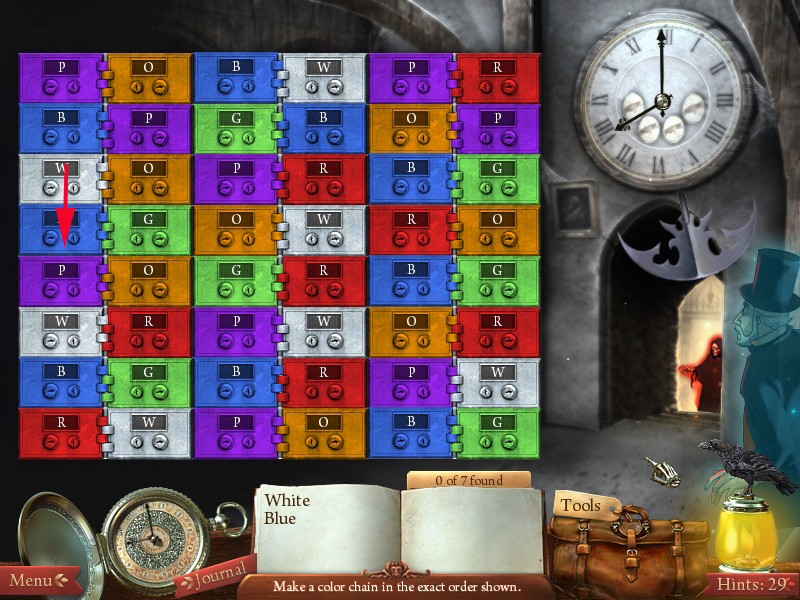
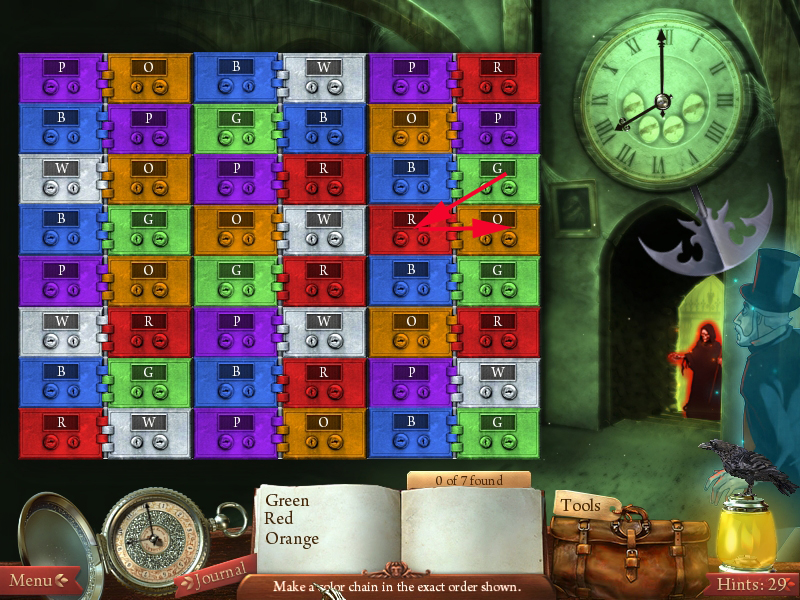
Now you have to solve a puzzle.
You have to make chains according to the instructions at the bottom of the page.
The colors have to be clicked in the exact order shown.
Click on the first color of the chain and that block will light up.
The next number you click has to be placed horizontally, vertically or diagonally from your last block.
If the next block you click on is incorrect, the block will not light up.
If you want to undo a move, simply retrace your steps and click on the last block(s) you selected.
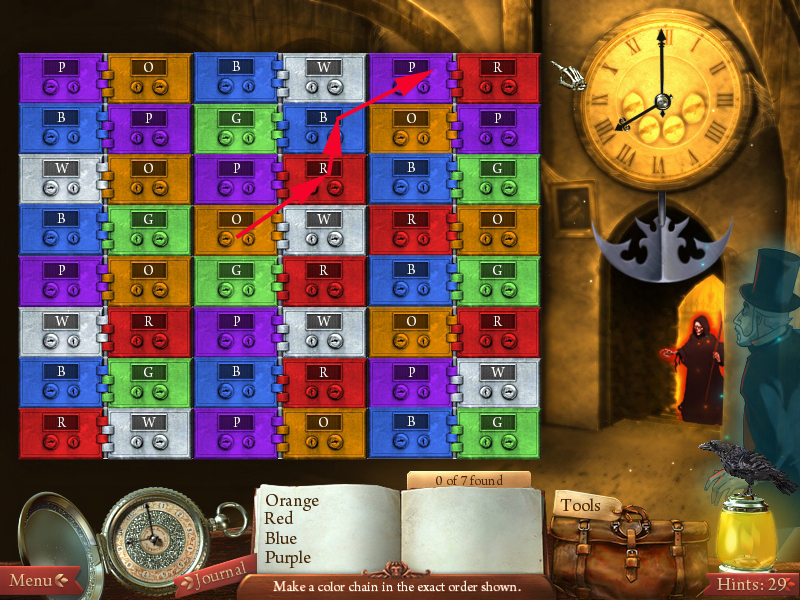
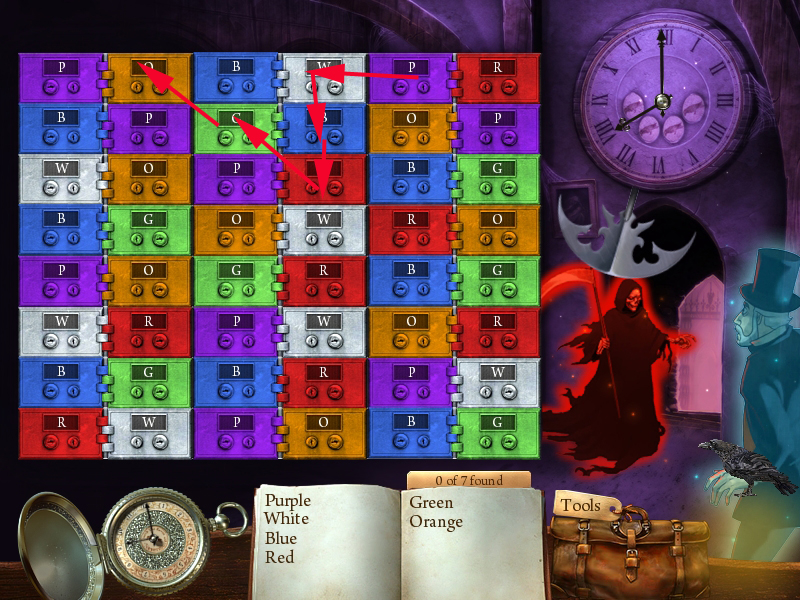
There is more than one solution possible for this puzzle. The screenshots shows one example for each puzzle.
Screenshot
Screenshot
Screenshot
Screenshot
Screenshot
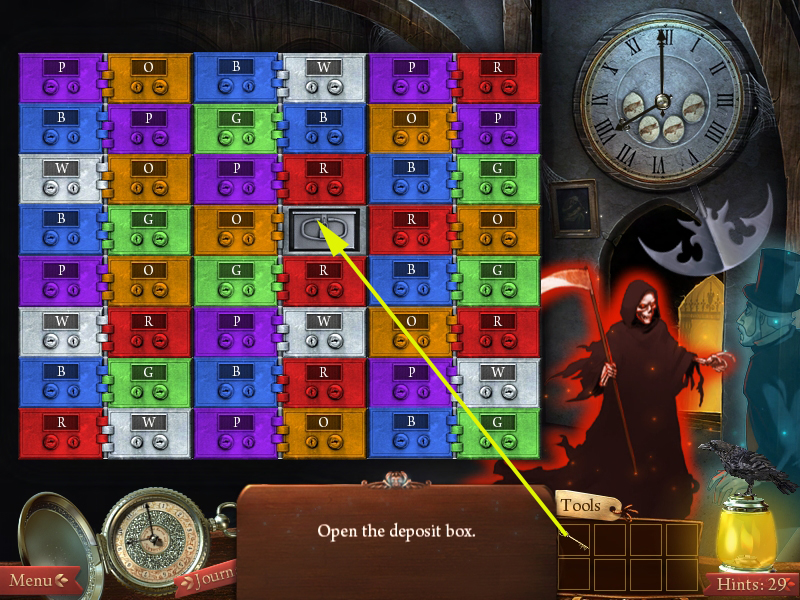
After solving the last chain, grab the key out of the inventory and open the deposit box.
Screenshot
Enjoy the finale
As always Kayleigh as put together a wonderful walkthrough for us \o/!!
Posted by: Kero |
July 19, 2009 12:38 PM
|
July 19, 2009 12:38 PM