

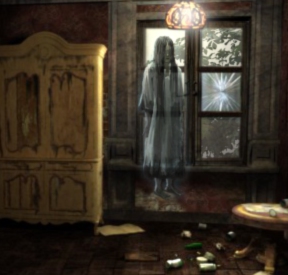
![]() A rash of murders plaguing a small town brings an FBI agent back home for the first time in years. Haunted by memories of vague, unsettling nightmares that plagued her as a child, she doesn't suspect that she has a deeper connection to these disturbing incidents than she could ever imagine. Mystery Valley is a hidden-object adventure game with one of the moodiest, creepiest atmospheres you'll ever come across... and jump scares. A whole bushel of 'em. While it has its flaws, it's still a lot of fun. It also proves what I've always said; never trust a bathtub.
A rash of murders plaguing a small town brings an FBI agent back home for the first time in years. Haunted by memories of vague, unsettling nightmares that plagued her as a child, she doesn't suspect that she has a deeper connection to these disturbing incidents than she could ever imagine. Mystery Valley is a hidden-object adventure game with one of the moodiest, creepiest atmospheres you'll ever come across... and jump scares. A whole bushel of 'em. While it has its flaws, it's still a lot of fun. It also proves what I've always said; never trust a bathtub.
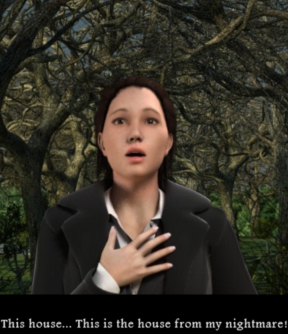
 As Special Agent Yournamehere, you quickly discover the latest victim in these brutal slayings, a reclusive professor, had quite an interest in one place; Mystery Valley. As it happens, our Agent's hometown is none other than Mystery Valley, which is a bit less on charming tourist-trap bed-and-breakfasts, and a bit more on ancient, unspeakable evil. Much of the story plays out in cutscenes, so be sure not to skip them or you won't have any idea what's going on. Depending on your preferred level of difficulty, you'll have tutorials present throughout the game, and hint/skip buttons that recharge slower or faster. You'll still use your mouse to play, and the cursor changes to mark areas or items you can interact with. If you don't know where to go, click on the journal in the lower left corner; it keeps track of the things you find and usually points you in the right direction.
Analysis: I know I talk a lot about atmosphere. If I had to pay royalties every time I used the word, I'd probably be putting someone's kids through college. But friend, this is one creepy game. The areas are shabby and neglected, full of subtle ambient sound and environmental effects, and the soundtrack is lovely. It's actually because of this great moody pacing and quiet environments that the jump scares are all the more effective when they happen. Sure they're not the most elegant of methods, and not everyone enjoys them, but darned if they won't make you jump even when you see them coming.
 The hidden-object scenes fare worse. Not only are they dull, they're out of place. They feel like they've been tacked on just to make the game longer, or maybe to appeal to a broader audience. It doesn't really negatively impact the game, but it does sort of make you long for the days when an adventure game could just be a good ol' fashioned "use key on door" adventure game and not make you pick up a crab, a bowtie, and six canaries before you could get the key in the first place. Thankfully, most of the game relies on standard point-and-click play and is better for it. The pacing is quick, there is typically very little backtracking, and the solutions for item-based puzzles are always logical and clear.
For a game to put the word "mystery" right there in the title, it better darn well intrigue, and happily, the story is creepy and interesting from the get-go. Don't get me wrong, we're not talking Steinbeck here; it's definitely a little cheesy and the stiff, almost terse writing sort of feels like it might be due to translation issues. The game definitely would have been stronger overall if the writing had been beefed up a little. Still, the way the bits of story and weird happenings are revealed in such a way that you want to find out more, and the different locations keep you from feeling bored or stuck.
Think back to your childhood. Were you the sort of kid who, during a scary movie, had to sit with a blanket over your head (everyone knows monsters can't get you through blankets), but were still having the time of your life? Then Mystery Valley might be right up your proverbial alley. While it doesn't break any molds and won't cause any gameplay epiphanies, it's a thoroughly entertaining and enjoyable title that fans of BOOGEY-BOO scares and fanged doll heads will definitely find fun.
![]() Windows:
Windows:
Download the demo
Get the full version
![]() Mac OS X:
Mac OS X:
Not available.
Try Boot Camp or Parallels or CrossOver Games.


Walkthrough Guide
(Please allow page to fully load for spoiler tags to be functional.)
Mystery Valley - Walkthrough
General
There is no time limit.
An open hand cursor allows you to grab items from a scene.
To move from one scene to the other use the arrows at the side, bottom or top of the scene.
When gears appear over an item it means you need to place another item over it.
Some inventory items will merge automatically once all the components are found.
The hint (lower right corner) only works in the hidden object scenes.
The hidden object scenes are so random, that not even the inventory objects are by definition on your search list.
Different players/profiles will have in parts different yellow written objects.
Items written in yellow in hidden-object scenes need an action to be performed before they can be revealed.
Hidden-object scenes are random - the yellow written objects as well as there is no "must" that you will find your inventory item on your search list.
Mini-games can be skipped once the skip button is fully charged.
You can view instructions for mini-games by clicking on the word "Instructions" in the lower left corner.
Check your clue book in the lower left corner to get puzzle hints along with information uncovered during the game.
Most puzzle solutions are random; make sure to read your clue book to find the correct solutions for your particular game.
In this game certain actions trigger hidden-object scenes to appear or the ability of inventory items to be picked up.
In hidden-object scenes you do not see all objects at once. Finding the first ones will bring up new items.
Introduction
Entrance Hall
Pick up the key on the left in front of the door and use the key with the door. Click the door handle to enter.
Click the scene at the left of the hall- it is a hidden-object scene.
To get the half apple you will need to get the knife from the dresser and cut it in half.
Click the upper drawer - it will open and you can find another yellow-written object.
The screwdriver will go into your inventory.
Click the crumpled cloth on the floor on the far left to learn about the blood spatters.
Click the metal panel on the wall above the bloody cloth.
Use the screwdriver to remove all screws. You will have to click each screw.
The panel opens. You see a fuse box, but all fuses fall out.
Pick them up.
Now place the fuses to match the pattern on the left.
Don't forget to flip the switches and move the green lights in their proper position by clicking them
The door opens.
Enter the Hall.
Hall
Enter the bathroom to your right and click the bath tub to get a close up view.
Click the chain to drain the water and take the door knob after the tub is empty.
Click the doll's head.
Exit the bathroom and go straight forward.
Click the table to the left and pick up the lock dial.
Click the newspaper clippings.
Leave the close up and go to the right.
Click the closet on the right to get another close up view.
Click the left door and grab the key from the lower shelf.
Exit the close up and click the door lock to get another close up.
Place the door knob on the door and the key into the knob.
Click the door knob to open the door.
Enter the office.
Office
Click the desk to trigger a puzzle.
Assemble the paper pieces to find out about the actual safe code.
Click the safe on the far right two times to get a close up view.
Place the lock dial on the bottom spot.
Change the numbers as seen on the note of the desk - numbers are random
Day 1: Welcome Home
Museum - Entrance
Click the desk to play a hidden-object scene.
Take the key on top of the briefcase and use it to open the drawer. Take the trophy.
Click the computer tower - the hourglass will appear for you to take.
The paintbrush will go into your inventory.
Go to the right and talk with the cleaning lady.
Go back to the Entrance and get the painting colors from the "Welcome"-board on the right side.
Go right again.
Get the skeleton key
Go into the room on the left and click the pile on the ground.
Click and drag the items around until you find the pliers.
Grab the bow on the left side and leave the room again.
Leave the room and enter the room on the right.
Zoom into the teepee to trigger a puzzle.
Drag the circles around until they form the proper image. Correct pieces will lock in place.
After the puzzle has been solved you will receive a dagger.
Take the tomahawk on the left using the pliers from your inventory.
Exit the room and go one step forward.
Click the left entrance to trigger a hidden-object scene.
For the horse man drag the figure at the uprights on the right onto the horse on the shelf, left side.
Move the square stone plate at the wall to find the idol in the compartment behind - the round stone plate at the wall is the amulet.
The spear will go into your inventory.
Click the pile on the floor.
The paintbrush and the colors will be placed there automatically.
Color the mask the same way as shown on the example, upper left.
To use a color click it with the paintbrush.
Dip the brush into the paint you want and then place it on the part of the mask you want to color.
To place a new color on the brush, dip it into a different color.
To change a wrong place color, click it with another one.
The mask will go into your inventory.
Click the showcase at the wall and place your inventory items on the corresponding spots.
Talk with the lady and the key will go into your inventory.
Use it on the door to your right and enter the room.
Light
Click the person with his back turned to you twice.
Leave the room and click the entrance on the left as you triggered a hidden-object scene.
Find the nine light bulbs; four will go into your inventory.
Go back into the other room.
Place the bulbs onto the lamps: one on the desk, one next to the grandfather clock and two at the shelf on the right.
Click the shelf to end the scene.
Day 2: Manor
Outside the manor
Click the trunk at the car on the left side.
Some objects are hidden behind the cover on the top part of the trunk.
To get the loaded revolver drag the bullets from the crate on the right to the revolver on the left.
A flashlight will go into your inventory no matter if you had it on your list or not.
Take the ladder standing at the right side against the fence.
Go two times forward and click the front door to learn that you will have to find another way inside the house.
Use the arrow to head to the right. Click the basement door to trigger the search for a crowbar. Click the lamp above to trigger the search for a light bulb.
Go to the right and take the crowbar from the board on the left.
Play the hidden-object scene at the corner of the house.
If you have the rose on your list, drag the watering can on the left to the dripping water tap. Use the full water can to water the flower on the low left side.
You can open the closet on the far back, the upper drawer on the far right, and the cupboard on the left, depending on which objects you have on your list.
The light bulb will go into your inventory.
Go two times back and use the crowbar to open the basement door. You will need to click each board with it.
Click the door to open and place the bulb on the lamp.
Place the letter on the hatch and climb down.
Basement
Pick up the bowl from the floor.
Go two times left and play the hidden object scene.
If you have the M in your search list, use the blue marker on the bottom to write on the paper on the back wall.
The tape will go into your inventory.
Go one time back and click the wall with the running water to trigger the search for an axe.
Exit this scene with the arrow at the bottom and click the fuse box on the side behind the ladder.
In the close up view use the crowbar to break it open and click the lever to turn off the lights.
Go forward and repair the cable hanging in the middle of the room with the tape.
Go back and turn on the light again.
Go two times forward and take the axe from the wall on the right. You will have to click a few times before it goes into your inventory.
Go back two times and to the left.
Use the axe to break the wall with the running water.
Go forward through the hole and click the left pipe to trigger the search for a valve.
Go one time back and play the hidden-object scene to the left.
Look for the object shown as silhouette; the valve will go into your inventory.
Go back to the pipe and place the valve.
Now go back twice and then forward until you are out of the basement and in the hall.
The Wall
Click the dresser on the right side to get a close up view.
Take the jacket.
Open the dresser doors with the crowbar and take the sponge.
Go straight ahead and click the white wall to trigger the search for gloves and a solvent.
Click the painting to notice the blue apple.
Click the window shutters on the left and they will open.
Go through the window; you will end up at the corner of the house. Play the hidden-object scene.
Find all gloves; one pair will go into your inventory.
Click the barrel on the right and place the bowl on the ground in front of it.
Use the crowbar to remove the tap.
Take the bowl with solvent, it will merge with the gloves and the sponge.
Use the window on the right to go back into the house.
Click the white wall and use the cleaning kit to clean the wall.
Day 3: Family and Friends
Click the door on your right to trigger the search for the key.
Go forward and pull the rope - the ladder comes down and activates a hidden-object scene on the attic.
Open the drawer in the lower left to take the trowel.
Drag the corkscrew in the upper right on the bottle in the lower right to obtain the cork.
If you have a lollipop on your list look for a sugar cane.
A magnet will go into your inventory.
Go back and enter the left door.
Click the edge of the carpet and use the magnet to get the key out of the crack in the wood.
Take the oil can from the shelf on your right.
Exit to the hallway and use the key at the door on the right and enter.
Click the painting on the right and note the numbers of birds and dogs (random).
Use the oilcan on the floor in front of the dresser.
Click the dresser to move it. Click the safe that shows up at the wall.
Change the dials by clicking - the upper dial needs to be change to the number of dogs; the lower to the number of birds.
Day 4: Buried alive
Repair the elevator
Click the pile on the floor to play a hidden-object scene.
Use the screwdriver to open the vent - you will find a grenade.
The jerry can will go to you inventory.
Click the red cable on your right to trigger the search for a wire cutter.
Go to the right and click the water dispenser on the far right.
Grab the cup and fill it with cold water.
Go to the right.
Read the note at the elevator on the far right.
Use the jerry can with the water pump on the far left to drain the water.
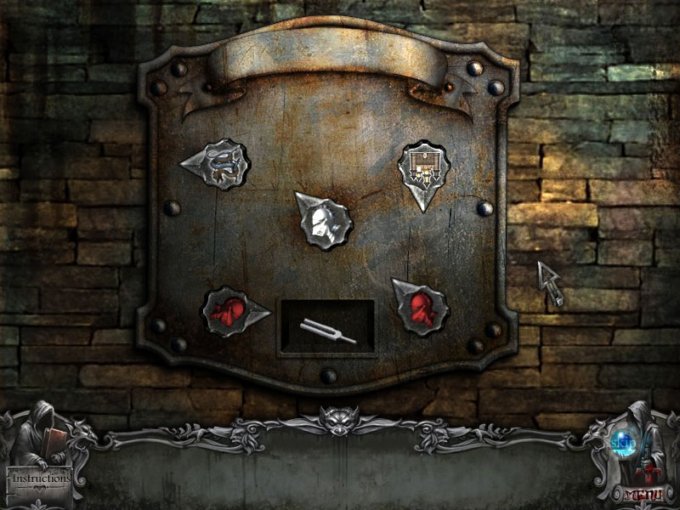
Click the fuse box on the ground to play a mini game.
You will need to replace the fuses in the right order.
Green and Red lights indicate correctly placed fuses.
Make a connection between the green and red wires at the top and bottom of the puzzle.
The red fuses will go from the top right to the left, then straight down.
Note that the red fuses with the green crossing have to be placed in the second row from the top and bottom row.
The one only showing a green spot goes in the middle.
Use the elevator.
The Door
Click the miner on the floor and give him the water.
After the miner gives you the key, go down and right.
Use the key on the door that says "TOOLS," next to the water dispenser.
Enter the room and grab the iron bar on the right.
Click on the left to play the hidden-object scene.
Use the wire cutter on the right and place it on the grid on the left.
Grab the shovel on the lower left and dig in the black dirt pile on the the ground to find the elephant.
A toolbox will go into your inventory.
Go back and give the toolbox to the miner.
The Fan
Click the vent on the right to trigger the search for a screwdriver.
Go back into the storage room (inside the tools room).
Find the screwdriver - an electric screwdriver will go into your inventor.
Go back to the Miner and click the vent to get a close up view.
Remove the four screws with the screwdriver and use the iron bar to block the fan.
The Camera
Talk with the miner to get the code for his locker padlock.
Go back and click the pile on the ground to play the hidden-object scene.
Find the items shown as silhouette.
A wire cutter will go into your inventory.
Use it to cut off the red cable to your right.
Go back to the tools room and click the locker.
Click into the next to last locker and turn the dial to the number you received from the miner to obtain the camera.
If you don't know the numbers anymore, you can look into your book.
The camera will go into your inventory.
Go to the elevator.
Go forward and use the red cable on the broken wires on the left.
Place the camera into the light.
Day 5: Under Attack
The Fire
Find 5 water bottles to extinguish the fire.
Find 2 of them by clicking the couch and getting a close up view. One is standing on the couch, one right next to the couch.
Click the cabinet door in the middle to find another one.
Go forward.
Use the water bottles to extinguish the fire. As this does not work, grab the fire extinguisher low left corner.
Click the fire extinguisher onto the flames; you will need to click several times.
The Elevator
Click the metal panel with the lock right next to the elevator door to trigger the search for a key.
Go back and click the desk area to play the hidden-object scene.
The key will go into your inventory.
Go forward, zoom into the panel and use the key to open the lock.
Exit the close up view to find 5 fuses and 5 wires.
You will find one fuse (1) above the elevator door, one on the low left side (2).
Go back and click the sitting area to get a close up view.
One fuse (3) is laying on the left chair.
Move the left pillow on the couch to find another fuse (4).
Move the right seat cushion to find the last fuse (5)
Get the wire (1) from the right lamp.
Move the papers on the table to find another wire (2).
Click the left lamp to trigger the search for a scissors.
Exit the close up view.
Pick up the wire from the ground on the left side (3)
Play the hidden object scene at the desk area.
The scissors will go into your inventory.
Zoom into the sitting area and click the left lamp to get a close up view.
Use the scissors to cut the two upper wires (4 +5)
Click the fuse box again - the wires and fuses will be added automatically.
Click on each wire to rotate it until you have a connection between all the fuses and the wire.
Not all wires are needed.
For the only possible solution please have a look at the screenshot.
Screenshot
Night...Is paved with good Intentions
Escape the Cell
Click the door to learn that you need something to remove the screws.
Click the window. After the cut scene you will receive a dagger.
Click the door again and remove all screws to activate a puzzle.
Your goal is to slide all wooden tiles so that the silver hatch can move to the right.
The little square tiles with the cross can be moved in any direction.
For the solution please see screenshot.
Screenshot
The door opens.
The White Knight Puzzle
Click the table on the right and play the hidden-object scene.
For the grand helmet, find the three colored feathers and click them at the helmet in the lower left.
For the burning candle, grab the lighter on the right side of the table and click it on one of the candles in the candelabra.
For the golden tooth, use the pliers below the table and use them at the skull's head.
The yellow liquid will go into your inventory.
Go forward.
Move the shield in the niche on the right side. Click again to find a note.
Read the note to learn that holy water can be made by placing a cross into a glass or jar of water.
Grab the torch on the left.
Go to the left and click the left entrance to play a hidden-object scene.
The flask will go into your inventory.
Click the wall on the left, next to the middle entrance.
In the close up view click the light colored stone and click the note.
Read "The Tale of the White Knight"
"The White Knight and his suite of Red Knights were traveling to the White Castle. A few more hours to the South and they would finally be there.
That's when they saw the Dragon. The Dragon was flying towards the setting sun as if it was going to eat it.
The White Knight did not hesitate and charged straight at the Dragon. One of the two Red Knights revealed his true face and tried to attack the White Knight from behind. Luckily the other Red Knight ran towards his treacherous brother and stopped him."
Go into the middle entrance.
Click and play the hidden-object scene on the far right.
A faucet will go into your inventory.
Take the stone on the ground below the puzzle on the wall on the left.
Click the puzzle.
Clicking the parts will make them rotate.
Your goal is to rotate them so that all arrows are pointing in the right direction.
The hint for the solution can be found in "The Tale of the White Knight".
The White Castle has to be in the south - rotate the arrow downwards.
The Dragon was fly towards the setting sun/The White Knight charged straight at the Dragon - the White King in the middle has to follow the Dragon, so his arrow has to go diagonally top left and the only direction the Dragon can now go to let the White Knight charge straight at him is to the left.
One of the two Red Knights revealed his true face and tried to attack the White Knight from behind - this is only possible for the Red Knight on the right. Rotate the arrow to point on the White Knight.
Luckily the other Red Knight ran towards his treacherous brother - the arrow of the left White Knight has to point on the left White Knight.
For the solution you might also want to look on the screenshot.
Screenshot
When everything is in the right order, the little compartment opens and you can take the tuning fork.
Holy Water
Click down twice, go forward and turn left.
Click the pedestal on the left for a close up view and read the alchemy book.
"If metal is your problem, do not think twice. Mix red and green and it will melt like ice".
Take the firewood in the lower right.
Click the bookcase on the wall in the far middle and grab the red liquid from the upper shelf.
Exit the close up and click the distiller on the right.
Place the yellow liquid from your inventory onto the test tube with the blue liquid - it will turn green.
Take the green liquid.
Place the green and the red liquid from your inventory on the distiller.
Place the firewood below the distiller and click it with the torch.
Click the fire again to learn that you need more firewood.
Click four times down and play the hidden-object scene on the right and find the nine logs.
The logs will go into your inventory.
Go 2x forward, 1x left and then right to zoom into the distiller.
Place the firewood under the distiller. and use the torch on it.
Place the faucet on the pipe on the left above the sink.
Place the empty flask in the sink - the flask with water will take its place on the table.
Take the acid from the distiller.
Go 3x down, left and enter the left entrance.
Use the acid on the chest lock in front of you.
Another chest appears - use the torch with it.
Another chest appears - use the tuning fork.
The cross will go into your inventory.
Go 2x down, 1x forward, 1 time left and right to zoom into the distiller.
Place the cross on the flask with water.
Take the holy water.
Final
Click down twice and go forward.
Throw the stone on the armor on the left.
Zoom into the table on the right.
Place the holy water on the glass.
Wait and see what happens.
Click the altar in the far middle
Click the latin words - you will need help to translate.
Exit this close up and click the table on the right to obtain a key.
Click down three times and use the key to open the right cell.
Go back to the altar and zoom in again.
Read the translation and change the letters below to the code word.
BLOOD
Zoom out and go forward.
Click the steps on the right.
Click the vampires once and then the stalactites to trigger a search for dynamite.
Exit this scene and use the right entrance.
Find the dynamite; it will be added to your inventory.
Go back to the vampires and place the dynamite on the stalactites.
Enjoy THE END
Thanks to Kayleigh for the walkthrough!
Posted by: Mike |
November 11, 2010 9:16 AM
|
November 11, 2010 9:16 AM