
Death at Fairing Point: A Dana Knightstone Novel
Platform: Mac, Windows
![]() While lots of people love romance novels, few things can pique someone's interest more than a good murder mystery. Dana Knightstone sets off to write the former, and ends up stumbling into the latter. She's been hoping that a trip to Scotland will provide her with the inspiration she needs to finish her latest historical romance (and finally propel her to the coveted status of "best-selling author"), but the old hotel she checks into has more than its share of secrets... some of them nastier than others. Death at Fairing Point: A Dana Knightstone Novel is part adventure, part puzzle, and a dash of hidden-objects, all wrapped up in one beautiful package.
While lots of people love romance novels, few things can pique someone's interest more than a good murder mystery. Dana Knightstone sets off to write the former, and ends up stumbling into the latter. She's been hoping that a trip to Scotland will provide her with the inspiration she needs to finish her latest historical romance (and finally propel her to the coveted status of "best-selling author"), but the old hotel she checks into has more than its share of secrets... some of them nastier than others. Death at Fairing Point: A Dana Knightstone Novel is part adventure, part puzzle, and a dash of hidden-objects, all wrapped up in one beautiful package.
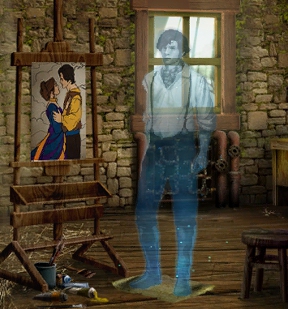
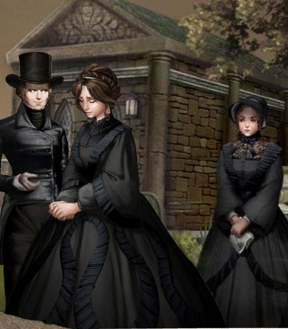 Following a silent apparition in her room one stormy night (all apparitions are contractually obligation to appear on only stormy nights), Dana quickly begins to uncover a two-hundred year old love story with a very unhappy ending. As Dana, you'll explore not only the manor, but the surrounding countryside and village as you slowly begin to piece together the story of romance, betrayal, and murder. While there are some hidden-object elements, and even a hidden-object scene or two, gameplay is largely puzzle based. As you investigate your environments, you'll gather up various objects and clues that you'll need to use to solve puzzles impeding your progress. A changing cursor denotes an area you can interact with, and Dana's journal keeps track of certain important objects or events, so make sure to refer to it if you find yourself lost. A hint function helps provide some direction, and puzzles also come with the ability to be skipped if you find yourself butting heads with them for too long.
Analysis: Less The Turning of the Screw and more Murder, She Wrote, Death at Fairing Point is a refreshing, light adventure with a gorgeous presentation. While it doesn't hold any real surprises as far as the plot goes, the game does a great job about uncovering details bit by bit the farther you go, and the locations you feature are wonderfully detailed with an appealing, hand-drawn aesthetic. The gameplay design is very well done, and since items and hints tend to be revealed to you just when you need them, you'll never find yourself frustrated as to where to go next. The decision to move to a new location with each chapter means that the game neatly sidesteps the boredom that could have set in with wandering around the same places for the whole game. Instead you get to travel all over the lush countryside and interact with a Who's-Who of quaint Scottish Stereotypes. The only real downside is that it won't pose much of a challenge to most players.
 I'd like to tell you that my brain has evolved over the years to the point where the twitch of an eyebrow causes puzzles to swoon at my feet, but the fact of the matter is that Fairing Point just doesn't try very hard to challenge you. Certain puzzle types are repeated over and over throughout the game, and Dana's journal always records the answers to any riddles you might come across. Areas are also very tightly designed so that you'll never find yourself confused as to where to go, or what to do. It's a shame, because it feels like in an effort to make the game accessible to everyone, it misses its chance to provide a really substantial experience from all angles.
Still, for players who aren't looking for a real brain twister and just want something to enjoy, Death at Fairing Point easily exceeds expectations. Death at Fairing Point: A Dana Knightstone Novel is the casual gameplay equivalent of beach reading, something light and enjoyable that's easy to sink into for an afternoon or two. I'd love to see a sequel that gave a bit more of a voice to Dana, making her a more dynamic presence within the story and someone you really want to adventure with again. Until then, Death at Fairing's Point is a solid, fun title with a demo that any fan of mystery and romance should check out.
A Collector's Edition is also available. It contains a bonus chapter to play, wallpapers, strategy guide, and more. Remember that Big Fish Game Club Members pay only $13.99 for Collector's Editions (or 2 club credits), and collector's editions count 3 card punches of 6 total needed for a free game.
![]() Windows:
Windows:
Download the demo
Get the full version
Also available: Collector's Edition
![]() Mac OS X:
Mac OS X:
Download the demo
Get the full version
Also available: Collector's Edition


Walkthrough Guide
(Please allow page to fully load for spoiler tags to be functional.)
Death at Fairing Point: A Dana Knightstone Novel
General Information and Tips
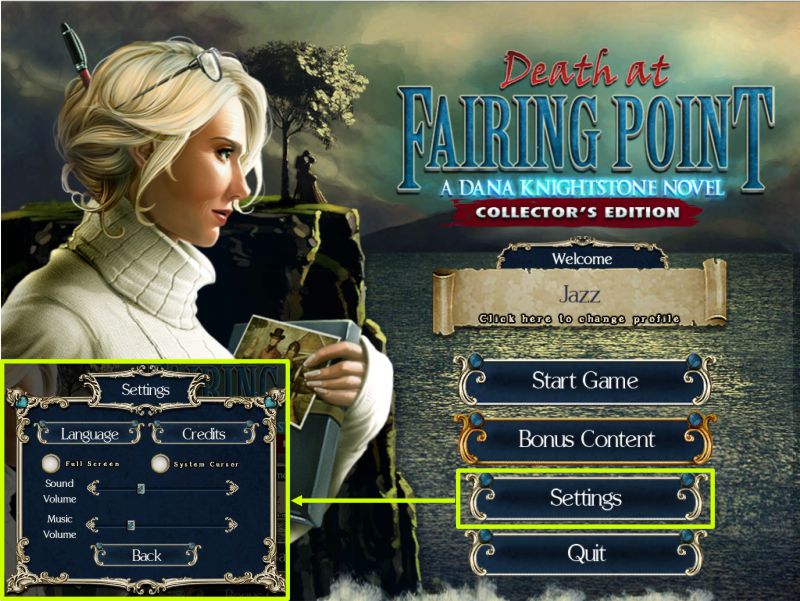
On the Main Menu you can choose your profile, play or exit the game, select your settings which include Music and Sound volume, full screen or windowed, and a Custom Cursor or not.
If you purchased the Collector's Edition, Bonus Content will be available once you have completed the novel.
When you first begin the game, you will have a choice of playing the Tutorial.
When you Exit the game, your progress is automatically saved.
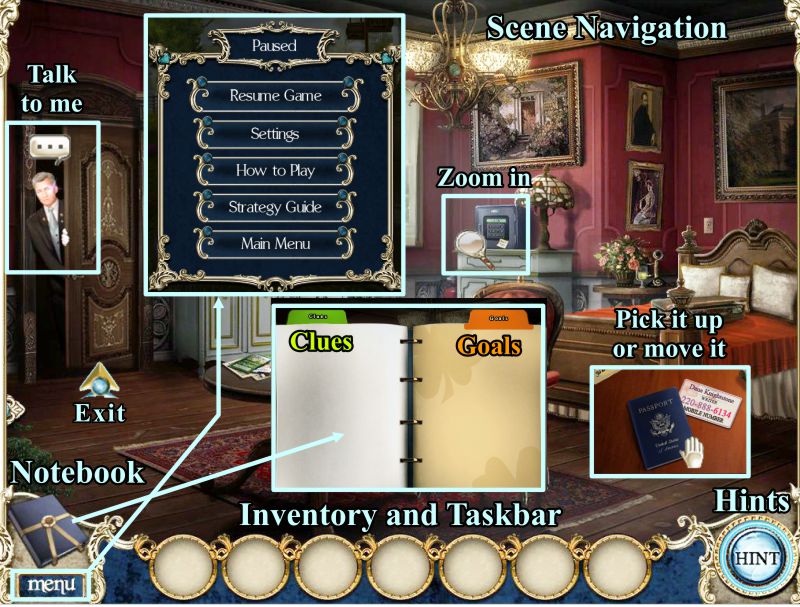
Screenshot
Scene Navigation
There is no click penalty in the main scenes so click as much as you'd like there.
There is a click penalty in the Hidden Object Scenes, so if you click too much, your cursor will swing around in a bunch of blue smoke.
Magnifying glasses mean you can zoom in on something for a closer look or, in the case of the ghosts, cause them to perform an act.
Magnifying glasses will also give you additional information about an object or person, so be sure to check out all of them so notations will be made in your notebook.
A hand means you can pick something up, or that you need to move it.
Hidden Object Scenes are items to find or items to return to the scene.
Hidden Object Scenes are semi random, so they will probably have several different items than those marked in the screenshots.
An arrow with a blue circle means you can exit to another location.
A balloon with dots indicates the person has something to tell you.
The Notebook in the lower left corner contains important clues and story notes, so check it when it becomes animated.
The Goals page in the Notebook lists your current tasks, so if you don't know what to do next, check there.
Menu will pause the game to give you the choices shown in the screenshot.
Your Inventory or Taskbar for Hidden Object Scenes is in the bottom center of the scene.
Hints will find items for you in Hidden Object Scenes or give you a clue as to your next task in the main scenes.
Many screenshots have been lightened to enable you to better see the objects.
Mini Games and Puzzles are slightly different than what you are use to because an item from your Inventory mostly needs to be placed on the area before you are given the close up.
Be sure to check the screenshots for additional information.
Screenshot
Walkthrough Part 1
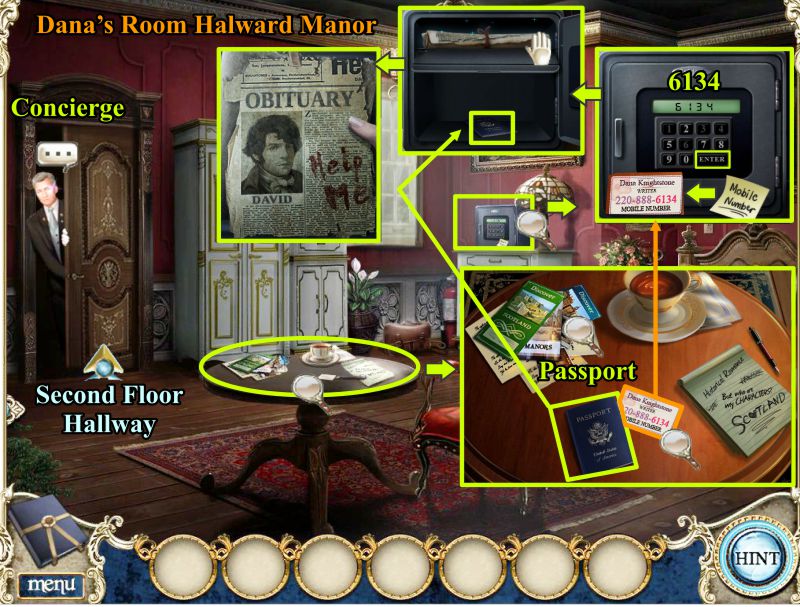
Chapter 1: Halward Manor
Dana's Room
Talk to the Concierge.
Zoom in on the table and then the safe.
Enter the last 3 numbers of Dana's business card shown in the screenshot and press enter to open the safe.
Place the passport in the safe and touch the paper to read it.
Screenshot
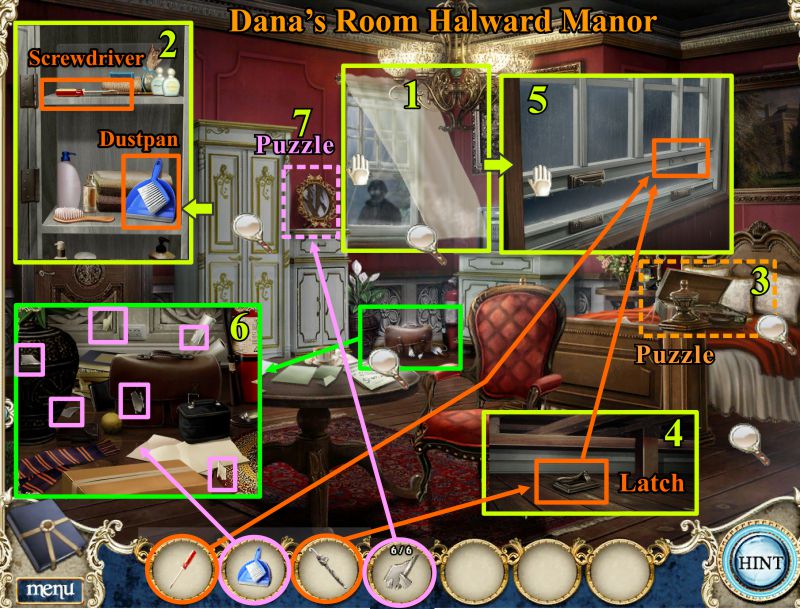
The window flies open and there is a shadow outside.
Try to close the window. One latch is missing.
Click on the cabinet next to the door and take the Screwdriver and Dustpan.
Click on the suitcase on the bed for a puzzle that will get you an umbrella.
Look under the bed and use the umbrella to get the Latch.
Zoom in on the window, attach to latch and use the screwdriver to tighten it. Close the window.
Click on the green area marked in the screenshot for a close up of the mirror shards and use your dustpan to collect them.
Place the shards on the mirror to trigger a puzzle.
Screenshot
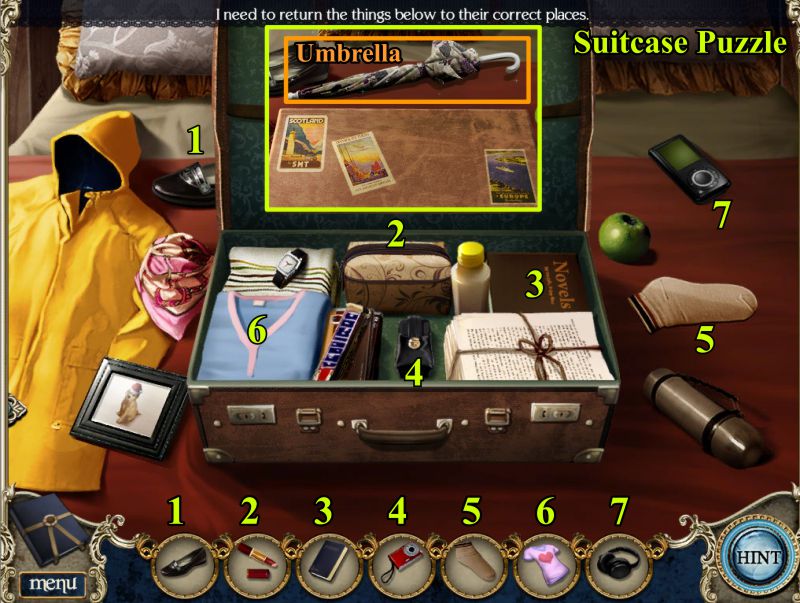
Suitcase Puzzle
Place the items in your Inventory in the scene as numbered in the screenshot.
The lid on the suitcase will close, revealing an Umbrella behind it. Pick it up for your Inventory.
Screenshot
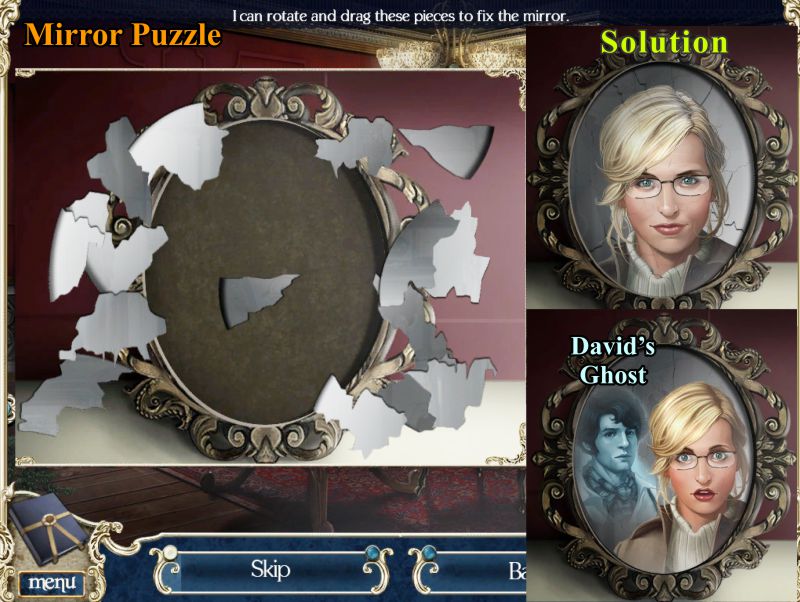
Mirror Puzzle
Assemble the shards into the mirror, rotating them if necessary, until you have the solution shown in the screenshot.
After the mirror is complete, Dana sees David's ghost behind her.
Screenshot
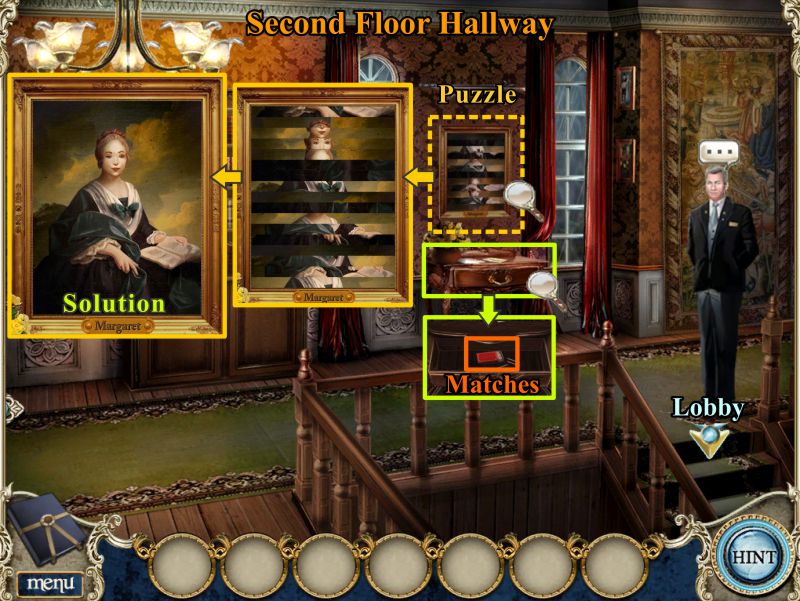
Second Floor Hallway
Go through the door to the Second Floor Hallway and talk to the Concierge.
Click on the side table and take the matches from the drawer.
Click on the painting and swap the pieces until you get the solution shown in the screenshot.
Take the stairs down to the Lobby.
Screenshot
Lobby
Click on David's ghost. He points to the Parlor door.
Check out the magnifying glasses and enter the Parlor.
Screenshot
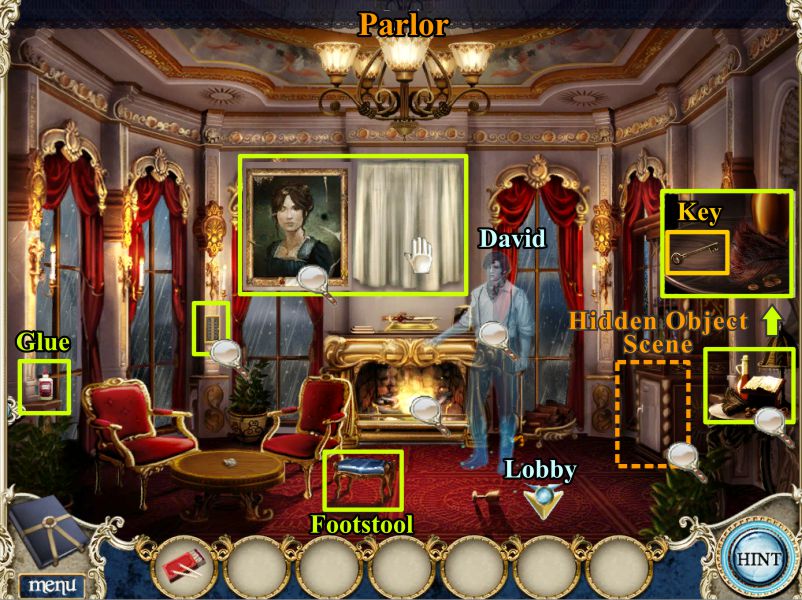
Parlor
David is in the Parlor. Click on him and he will first point to the cloth over the fireplace and then to the fireplace.
Remove the cloth to find a very old painting in need of repair.
Take the Glue and the Footstool marked in the screenshot.
Zoom into the side table and take the Key.
You need to put out the fire so play the Hidden Object Scene.
Screenshot
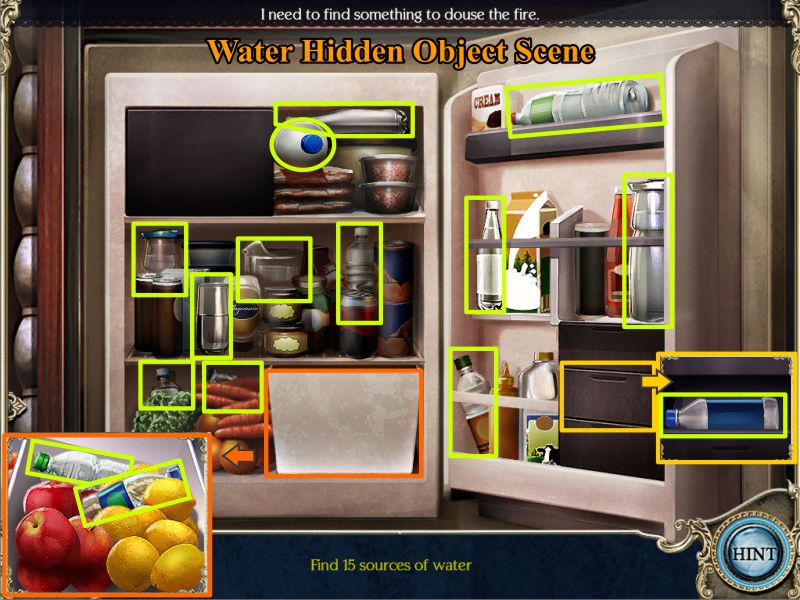
Water Hidden Object Scene
Collect the 15 sources of water marked in the screenshot.
Screenshot
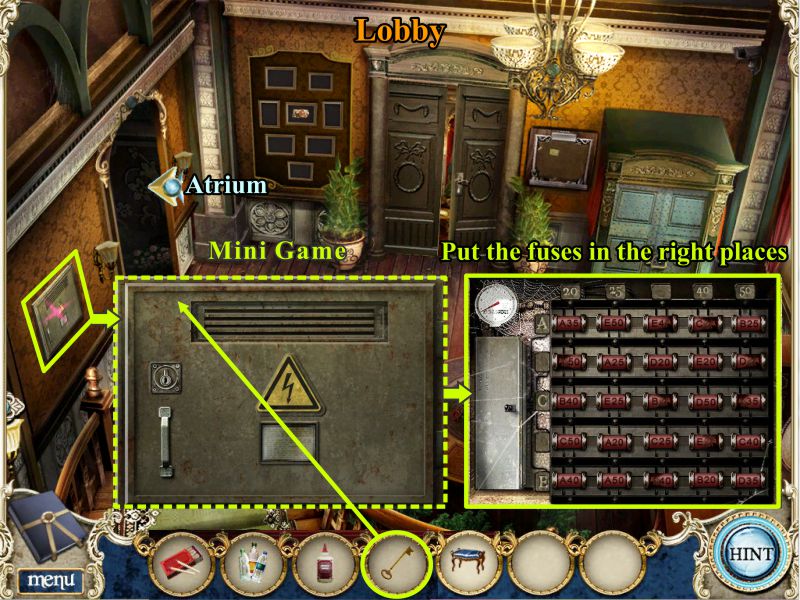
Lobby
Go to the Lobby and click on the electric box on the left wall.
Use the key to open the box and trigger a Mini Game.
Screenshot
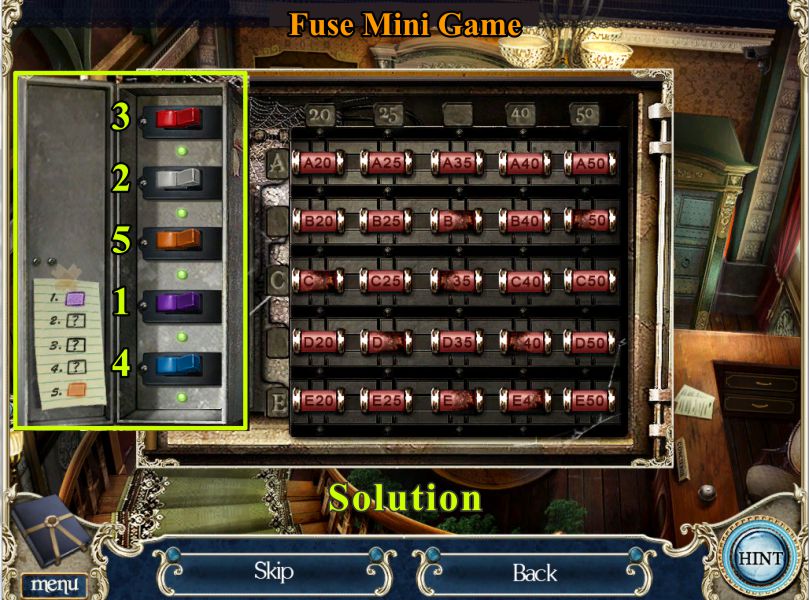
Fuse Mini Game
Your goal is to put the fuses in their proper places.
The rows progress from A through E and the fuses are 20, 25, 35, 40, and 50 for each alphabetical row.
See the screenshot for the solution.
Screenshot
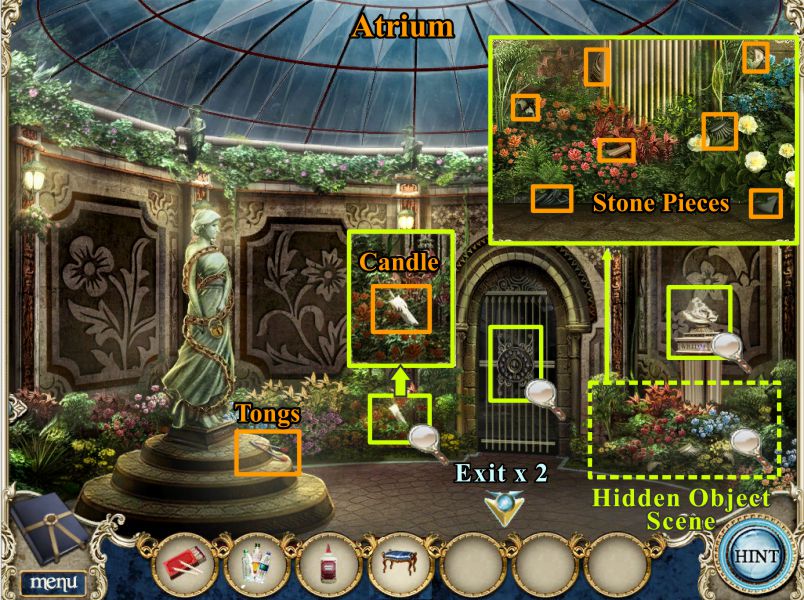
Atrium
Go to the Atrium and pick up the tongs on the statue. Click for the close up shown in the screenshot to get the Candle.
Play the Hidden Object Scene to find all the Stone Pieces.
Check the gate to see you are missing something, then go to the Second Floor Hallway.
Screenshot
Second Floor Hallway and Parlor
Place the Footstool near the side table and check above the portrait to find the Fireplace poker.
Go back to the Parlor and douse the fire with the water you collected.
Rummage through the fireplace with the poker and click for a close up after the fire is out.
It's still hot in there, so use your tongs to pick up the pieces of paper shown in the screenshot.
Screenshot
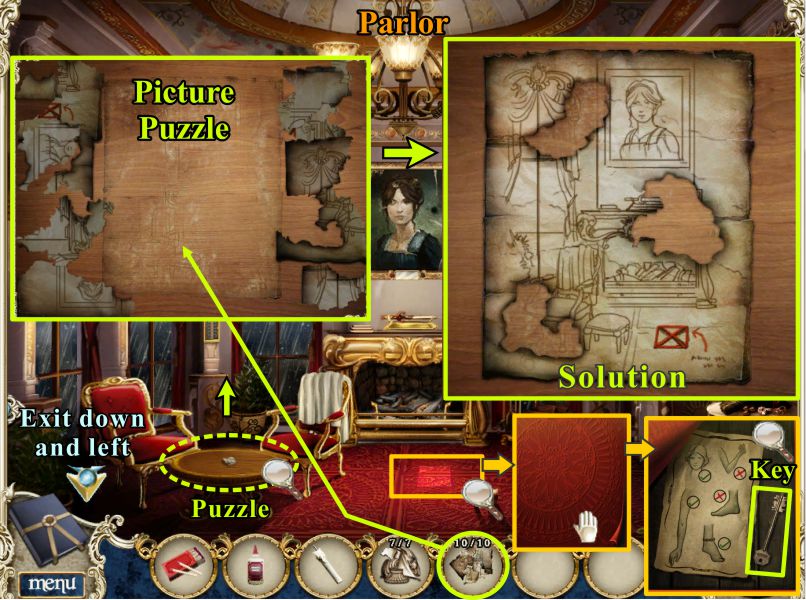
Parlor
Place the pieces of paper you picked up on the table as shown in the screenshot.
You have triggered a puzzle to assemble a picture so place and rotate the pieces to produce the picture seen in the screenshot solution.
The solution show an "X" on the floor by the fireplace, so check out the floor for a hidden place.
Zoom in and lift the carpet where it is curled.
Take the Key and make a note of the diagram that will be recorded in your notebook.
Screenshot
Atrium
Go to the Atrium and zoom in on the statue of William.
Place the glue on the statue before placing the stone pieces that will automatically create the statue.
Place the Statue Key on the statue with chains and zoom in for a puzzle.
Her chains will disappear. Your goal will be to arrange her moveable joints.
The diagram you previously found will help you, as will the picture with the number of times you need to move which body part. Check the screenshot.
When you have completed your task, you will get a Lever and Slide to collect.
Screenshot
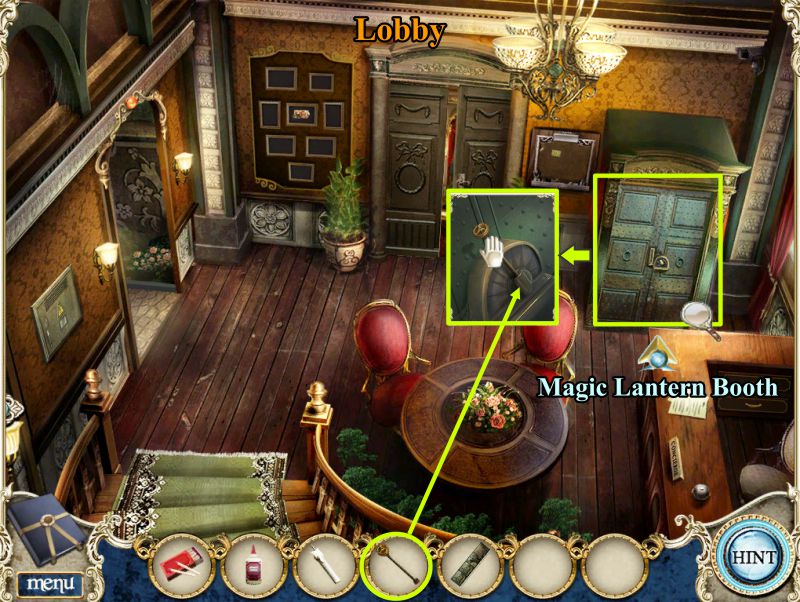
Lobby
Go back to the Lobby and zoom in on the Magic Lantern booth.
Place the Lever, pull it down and go inside the booth.
Screenshot
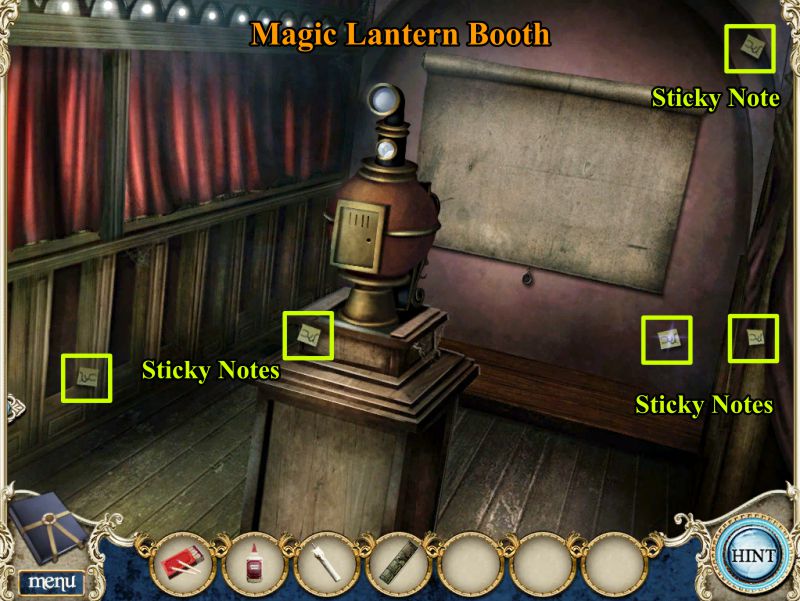
Magic Lantern Booth
Collect all the Sticky Notes marked in the screenshot.
Screenshot
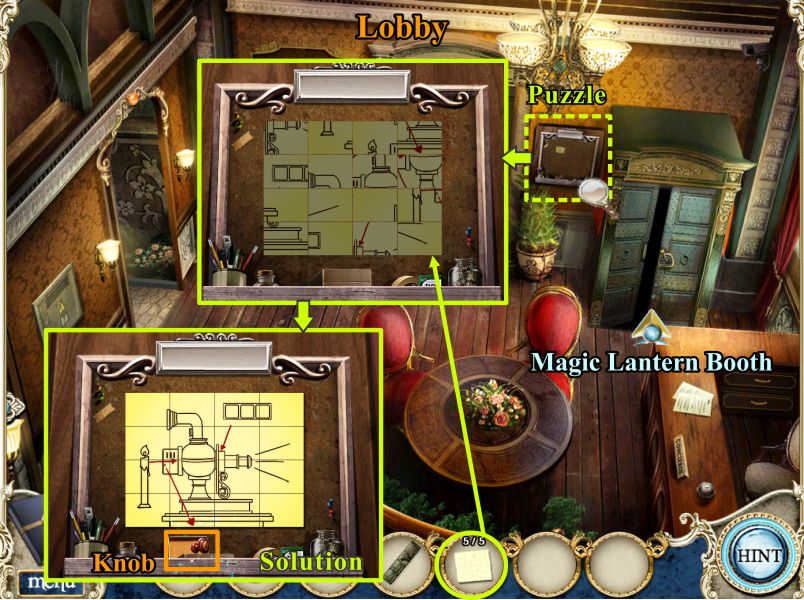
Lobby
Go out to the Lobby and click on the bulletin board next to the booth.
Place the Sticky Notes on the board and swap the pieces until you get the solution shown in the screenshot.
Take the Knob and go back into the Magic Lantern Booth.
Screenshot
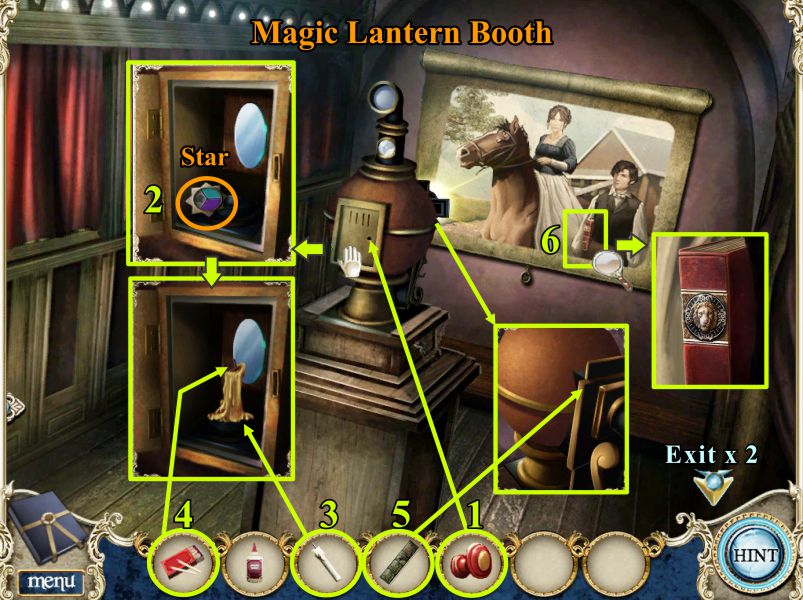
Magic Lantern Booth
Your goal is to assemble the lantern according to the diagram you just pieced together.
The screenshot shows the order in which to assemble the parts.
Place the Knob on the door and open it.
Take the Star that is inside the compartment.
Place the Candle inside and light it with your Matches.
You will get a close up of the front part of the lantern to place the slide.
View the slide and then zoom in on the book David is holding.
Screenshot
Second Floor Hallway
Go upstairs to the Hallway and click on the bookcase.
Open the book with the emblem on its spine.
Note the drawing and take the Lion Emblem.
Return downstairs and go to the Atrium.
Screenshot
Atrium
Zoom in on the Conservatory gate and place the Lion Emblem in the center.
Press all of the surrounding gems other than the ones in the drawing in the book.
The solution is shown in the screenshot.
Screenshot
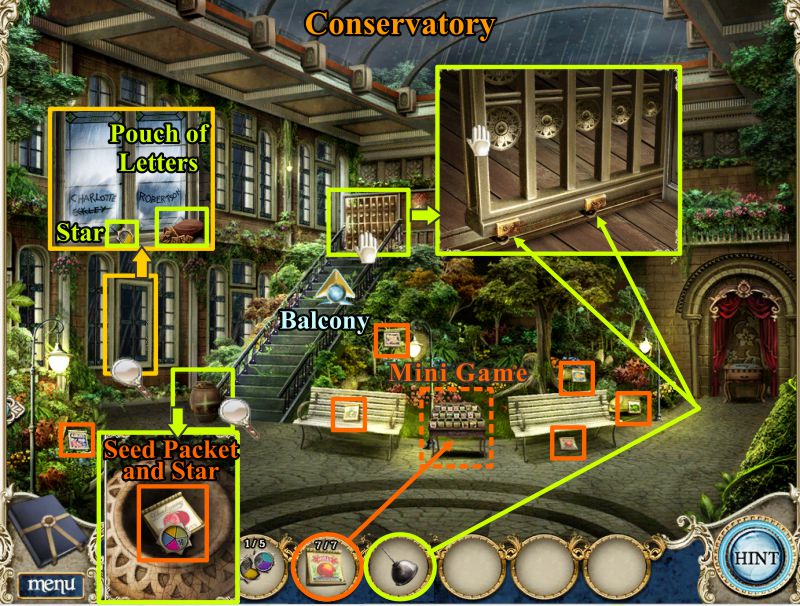
Conservatory
Enter the Conservatory and collect the Seed Packets shown in the screenshot.
Zoom in one the planter next to the stairs and take the Seed Packet and Star inside it.
Click for a close up of the window marked in the screenshot and take the Star and Pouch of Letters.
Place all of the Seed Packets on the table of seeds to trigger a Mini Game to get an Oil Can.
Try to open the Balcony gate; it stops.
Once you have the Oil Can, oil the gate and then push it all the way open.
Screenshot
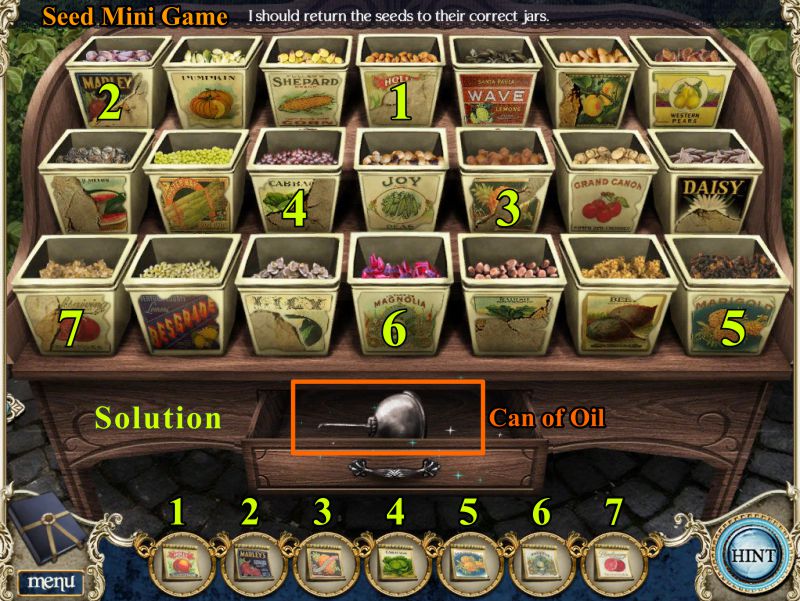
Seed Mini Game
Fill up the seed containers as marked in the screenshot to get the Can of Oil.
Your seeds may be slightly different than the ones marked in the screenshot.
Screenshot
Conservatory Balcony
Once the gate is open, go up to the Balcony.
Pick up the Star and note the diagram in the screenshot.
Go back downstairs and exit down 2 more times and go into the Parlor.
Screenshot
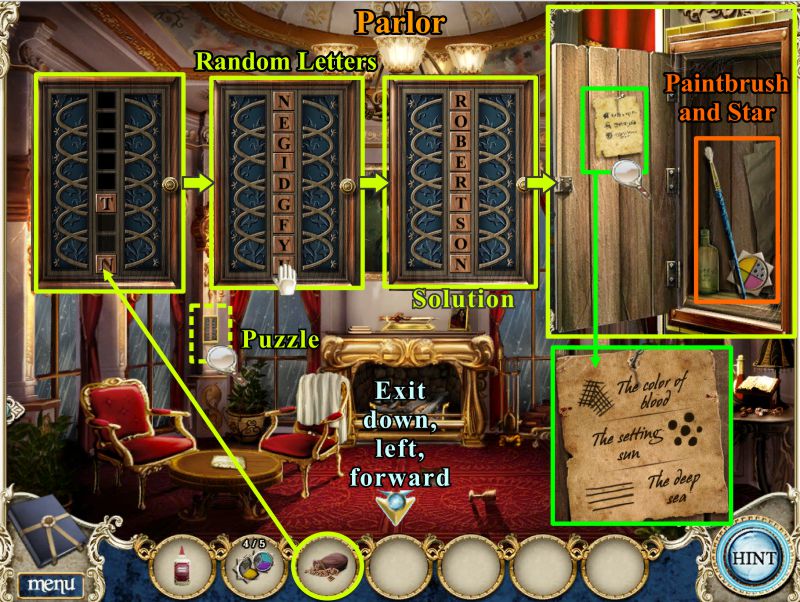
Parlor
Click on the puzzle shown in the screenshot and place your Pouch of Letters.
The letters will randomly arrange themselves on the door
Your goal is to form a recognizable word to open the door.
The solution is Robertson, which is David's last name.
When the door opens, read the note and take the Paintbrush and Star.
Exit back to the Conservatory.
Screenshot
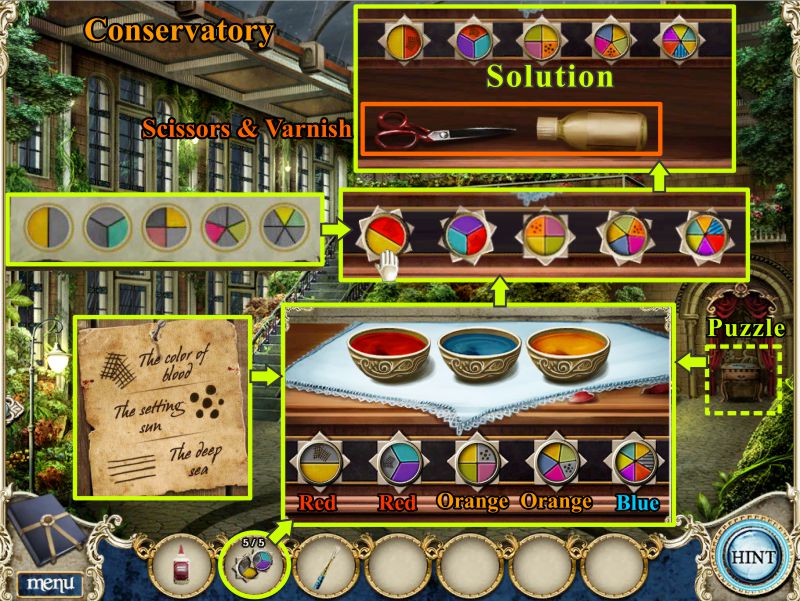
Conservatory
Click on the side table at the right back and place the Stars.
Take the eyedropper out of the bowls and place the color as indicated on the diagram you found.
Next, you need to rotate the stars according to the note you found on the box on the balcony.
See the solutions in the screenshot. Take the Scissors and Varnish from the drawer.
Screenshot
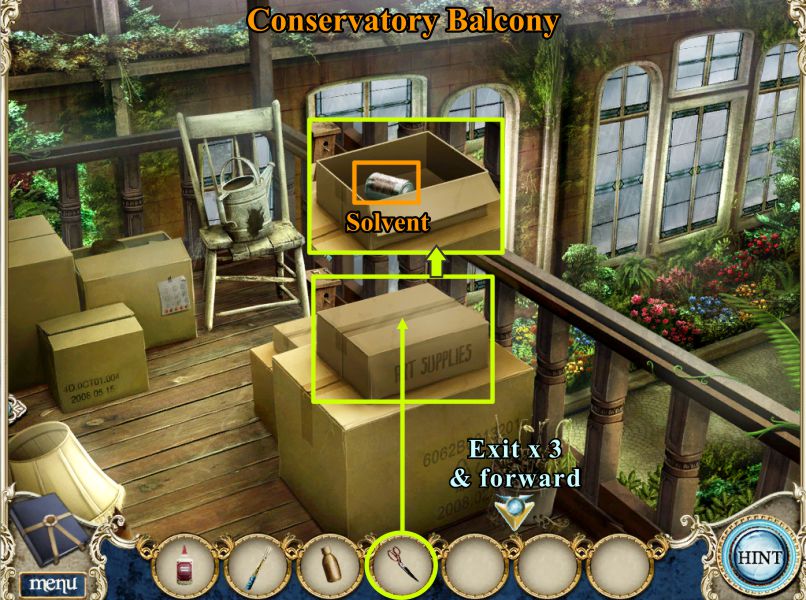
Conservatory Balcony
Go upstairs to the Conservatory Balcony and use your Scissors to cut open the box marked in the screenshot.
Take the Solvent, exit down 3 times and enter the Parlor.
Screenshot
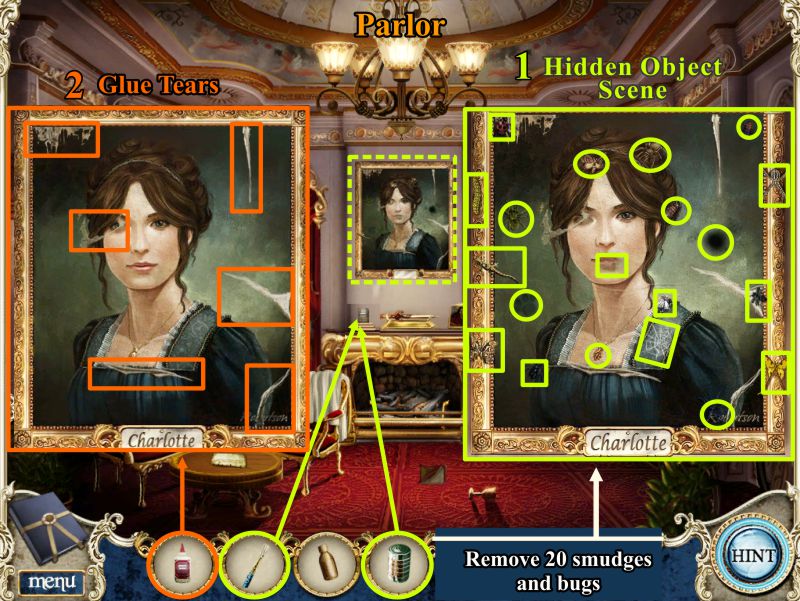
Parlor Painting Restoration
Place the Solvent on the fireplace mantel as shown in the screenshot.
Dip the Paintbrush in the Solvent and place the brush with solvent on Charlotte's portrait to trigger a Hidden Object Scene.
Remove 20 smudges and bugs from the portrait.
Use the glue to repair the 6 tears.
Screenshot
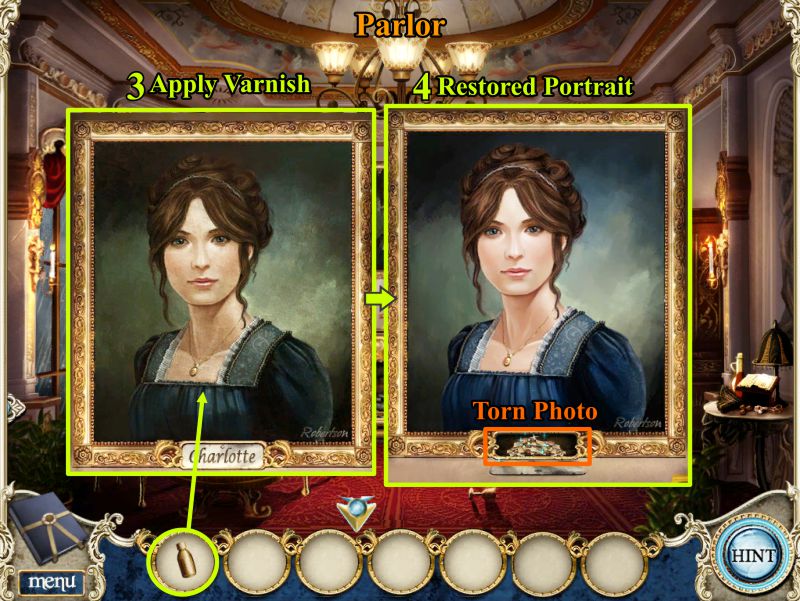
Apply the Varnish to the repaired portrait.
Take the Torn Photo shown.
Screenshot
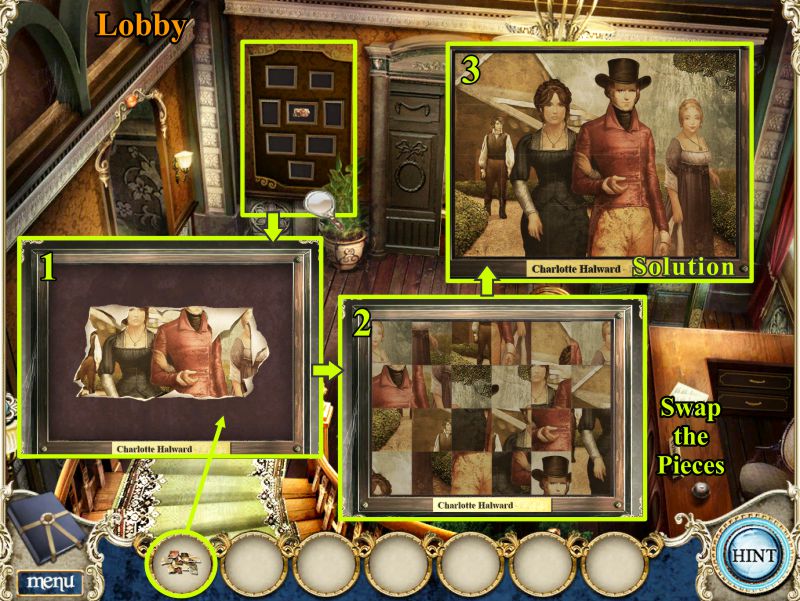
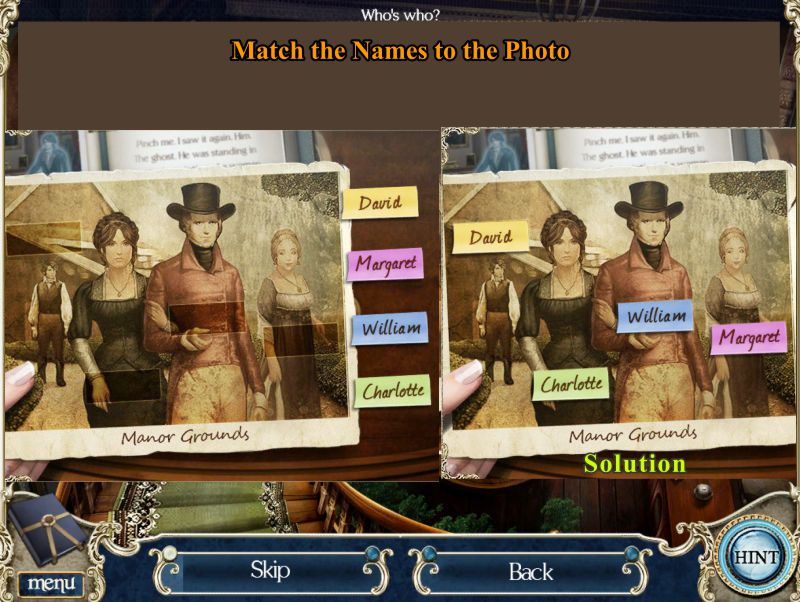
Lobby Picture Puzzle
Go out to the Lobby and click on the group or photos to the left of the door to the Parlor.
Place the torn photo pieces on the close up to trigger a puzzle.
Swap the pieces of the puzzle to produce the solution shown in the screenshot.
Screenshot
Place the correct names where they belong on the photo as shown in the screenshot.
Screenshot
Chapter 2: The Manor Grounds
Outside Cuckoo's Nest Pub
Dana is hungry, so decides to go visit the pub in town.
Pick up the 2 Shot Glasses, take a look at the magnifying glasses and enter the pub.
Screenshot
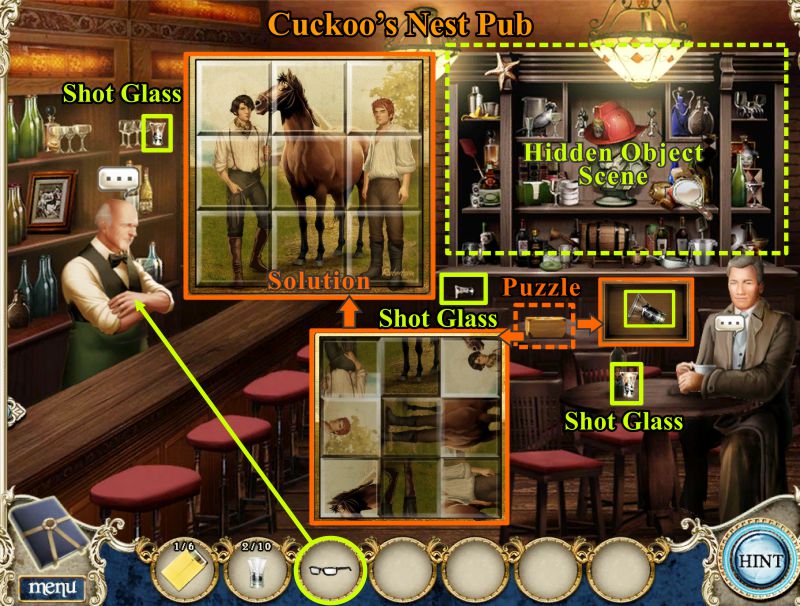
Cuckoo's Nest Pub
Talk to the pub owner and the Concierge and collect the 3 Shot Glasses.
Play the Hidden Object Scene and click the box on the table for a puzzle.
Swap and rotate the tiles until the picture looks like the solution in the screenshot.
Once you have his glasses, give them to the pub owner.
Screenshot
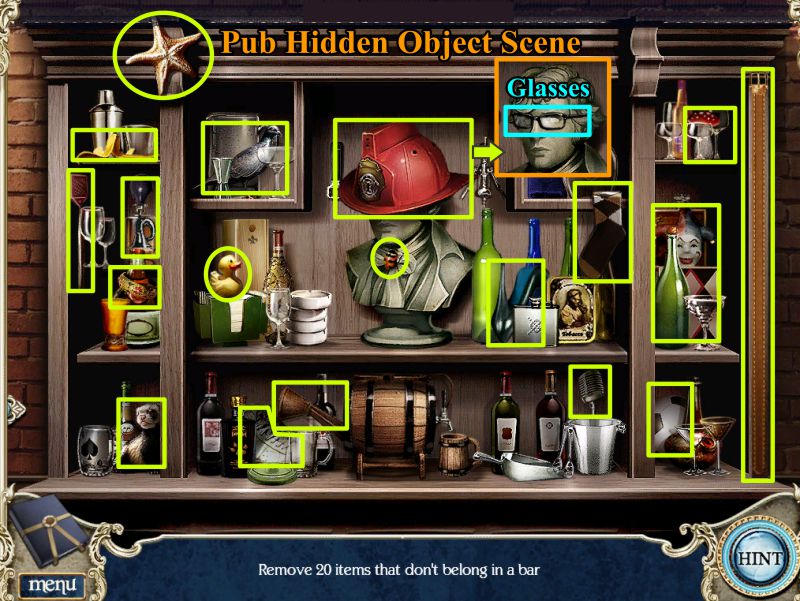
Pub Hidden Object Scene
Collect everything and you will find the pub owner's glasses.
Screenshot
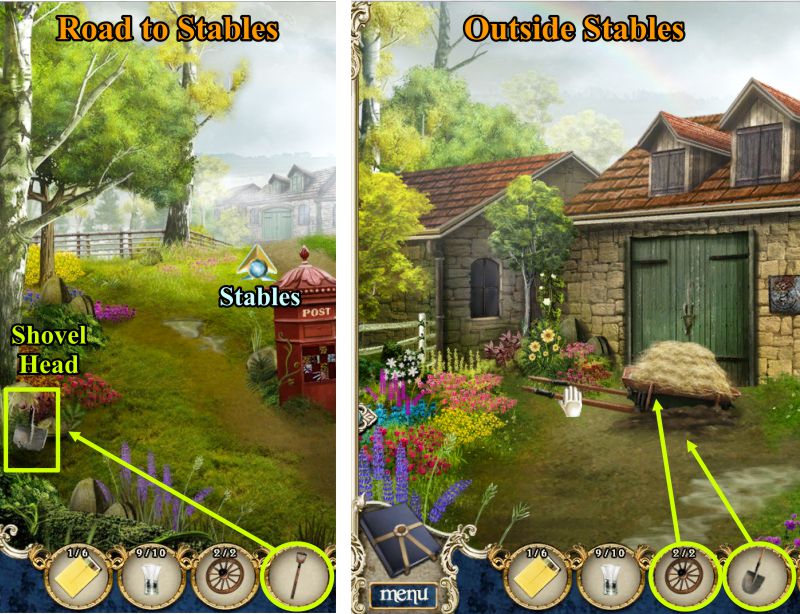
Road to Stables
Exit the pub and take the Road toward the Stables.
Collect the Shot Glasses and click the puzzle.
There is more that one solution to untangle the rope. A sample solution is shown in the screenshot.
The wheel will go into your Inventory.
Continue up the road to the Stables.
Screenshot
Outside Stables
Check all the magnifying glasses in the screenshot.
Pick up all the Spokes and the Shovel Handle.
Zoom in on the far left window, pick up the Shot Glass and notice David is inside.
Place the Spokes you have collected on the Wheel and take it for your Inventory.
Screenshot
Road to Stables and Outside Stables
Click once to go down the road.
Place the Shovel Handle on the Shovel Head and collect the completed Shovel.
Go back up the road toward the Stables.
Dig the hay cart out of the mud and place the two wheels on it.
Pull the cart away from the door.
Screenshot
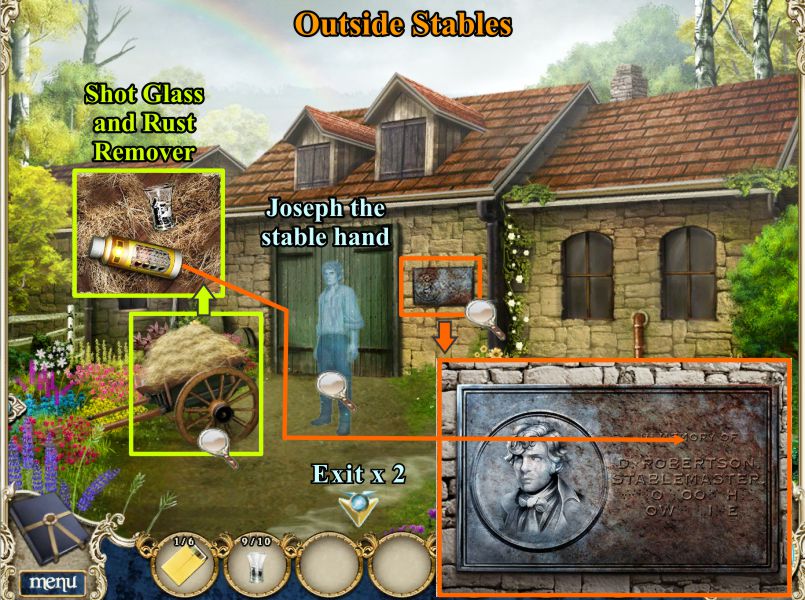
Outside Stables
The ghost of Joseph the stable hand appears.
Click on him; he points to the hay. Zoom in and take the Shot Glass and Rust Remover out of it.
Click the plaque next to the door and use the Rust Remover as shown in the screenshot.
Exit down twice to the outside of the pub.
Screenshot
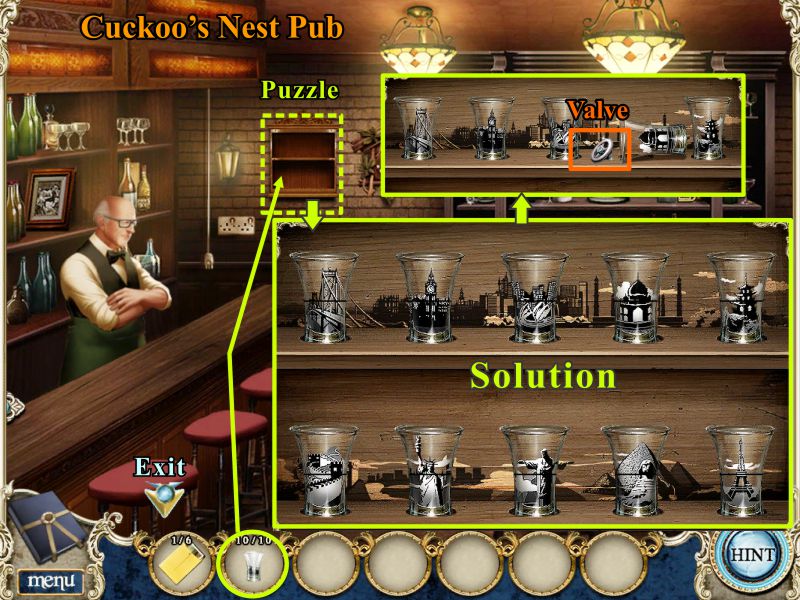
Cuckoo's Nest Pub
Go inside the pub and talk to the owner and Concierge to see if they have any new information for you.
Place the 10 Shot Glasses on the shelves shown in the screenshot to trigger a puzzle.
The original placement of the shot glass parts is random but the screenshot shows the solution.
The Taj Mahal glass tips over and presents you a Valve to pick up.
Screenshot
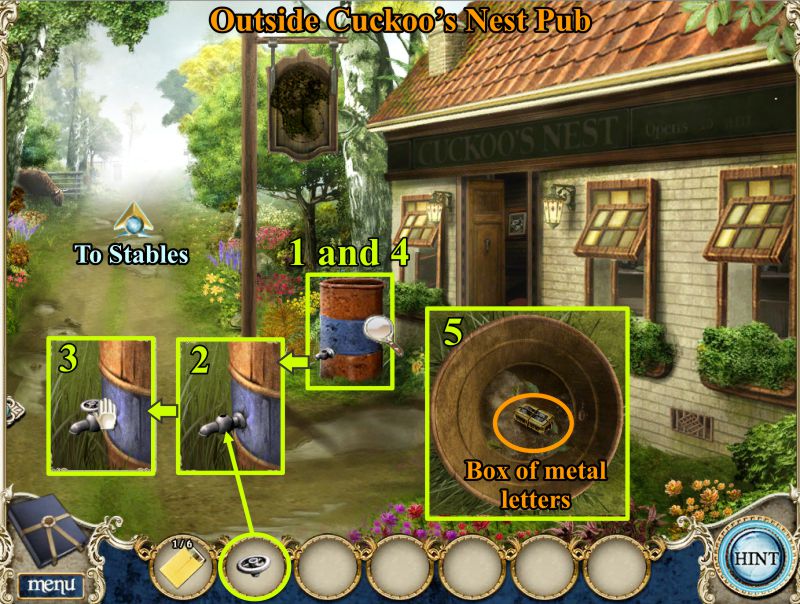
Outside Cuckoo's Nest Pub
Go outside and zoom in on the barrel.
Place the Valve as shown in the screenshot and turn it on to drain the barrel.
Click the barrel again and take the box of metal letters.
Take the road to the Stables.
Screenshot
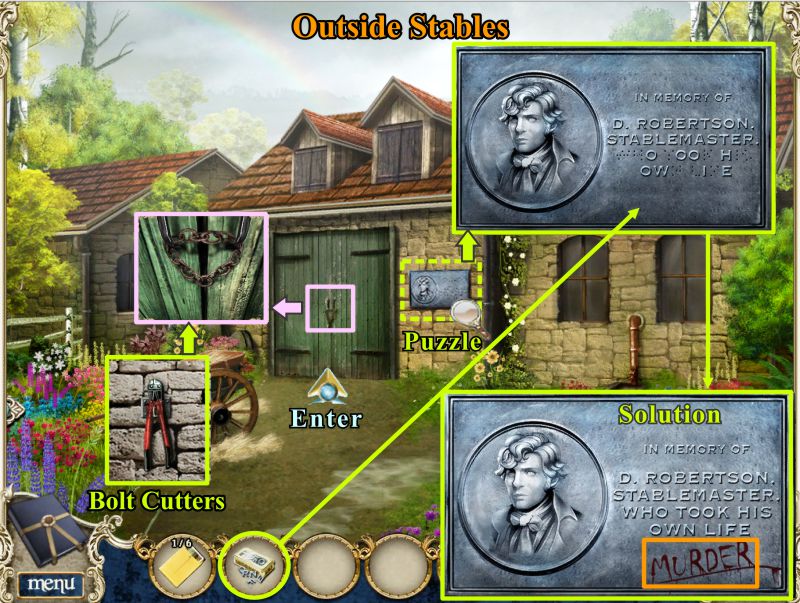
Outside Stables
Zoom in on the plaque and place your box of metal letters on it for a puzzle.
Place the letters so the plaque reads like the solution shown in the screenshot .
The plaque will open for you to take the Bolt Cutters.
When it closes, the word "Murder" is written on the plaque.
Zoom in on the Stables door. Use the Bolt Cutters to remove the chain so you can enter.
Screenshot
Stables
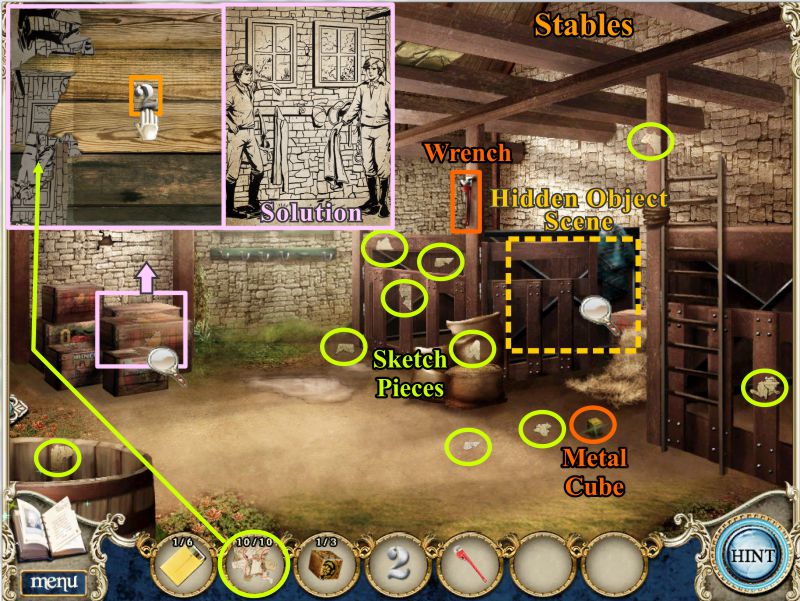
Collect the 10 Sketch Pieces marked in lime on the screenshot.
Pick up the Wrench and Metal Cube.
Click on the crates, pick up the "2" and place the Sketch Pieces on the crate.
Put the jigsaw sketch together as shown in the solution.
Click to start the Hidden Object Scene.
Screenshot
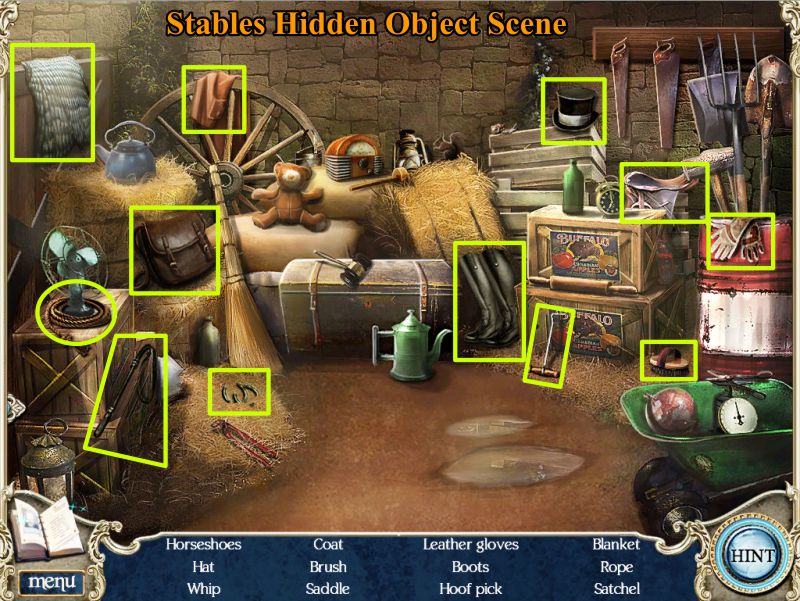
Stables Hidden Object Scene
Collect everything to come away with the Stable Gear.
Screenshot
Stables
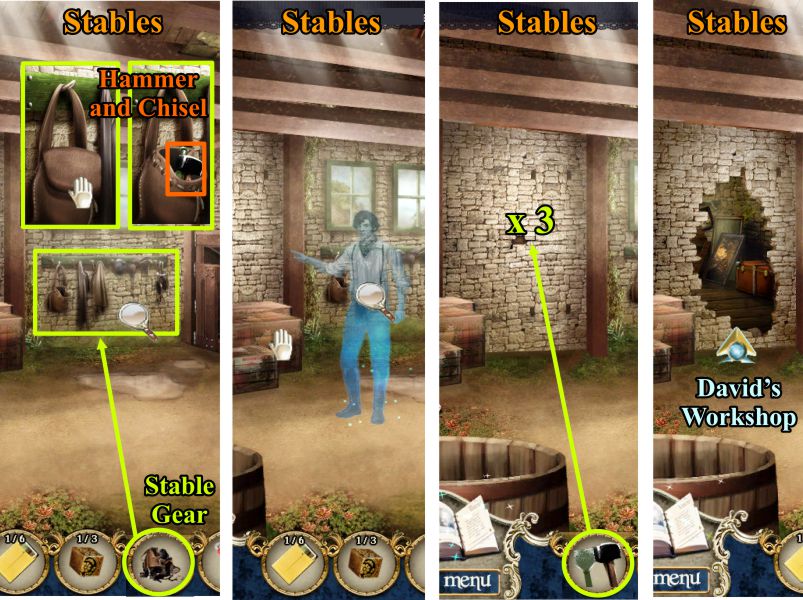
Place the Stable Gear on the hooks marked in the screenshot and zoom in.
Open the saddlebag and take the Hammer and Chisel.
David appears and points at the wall and crates. Move the crates.
Use your Hammer and Chisel 3 times on the wall and enter David's Workshop.
Screenshot
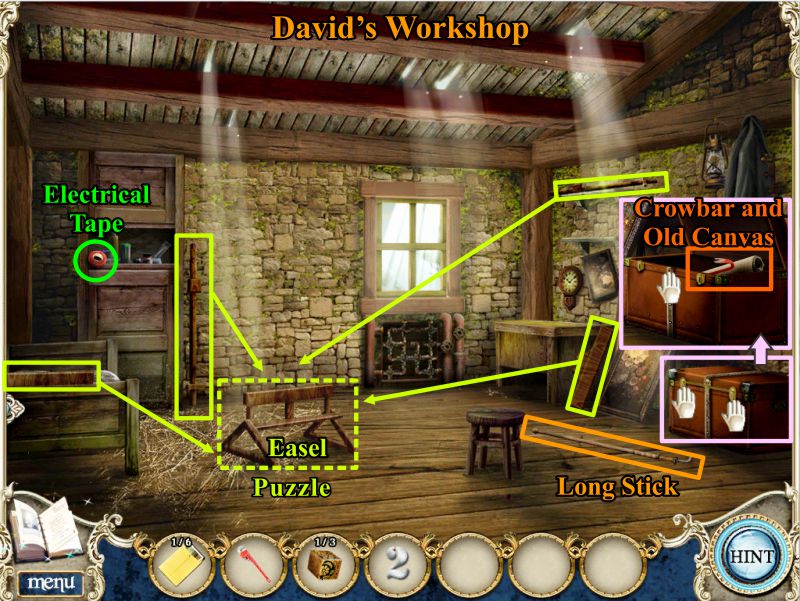
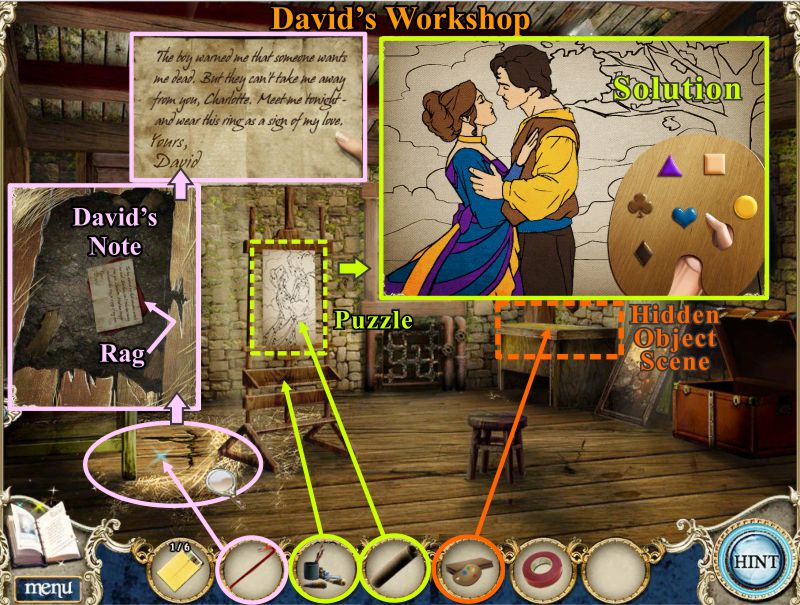
David's Workshop
Pick up the Electrical Tap and Long Stick.
Lift the latches on the trunk and open it up to find a Crowbar and Old Canvas.
Collect the 4 easel pieces marked in the screenshot and place them on the easel to trigger a puzzle.
Screenshot
Easel Puzzle
The puzzle pieces have been arranged and numbered so you can identify them and place them as shown in the screenshot.
Screenshot
David's Workshop and Stables
Click on the pipes marked in the screenshot for a puzzle.
Arrange the pipes as shown to make the water flow.
Go into the Stables and use your Long Stick on each of the boards in the ceiling.
An artist's pallet and box will fall to the ground. Pick them up as well as the Metal Block.
Go back to the Workshop and place the palette and box on David's desk to trigger a Hidden Object Scene.
Screenshot
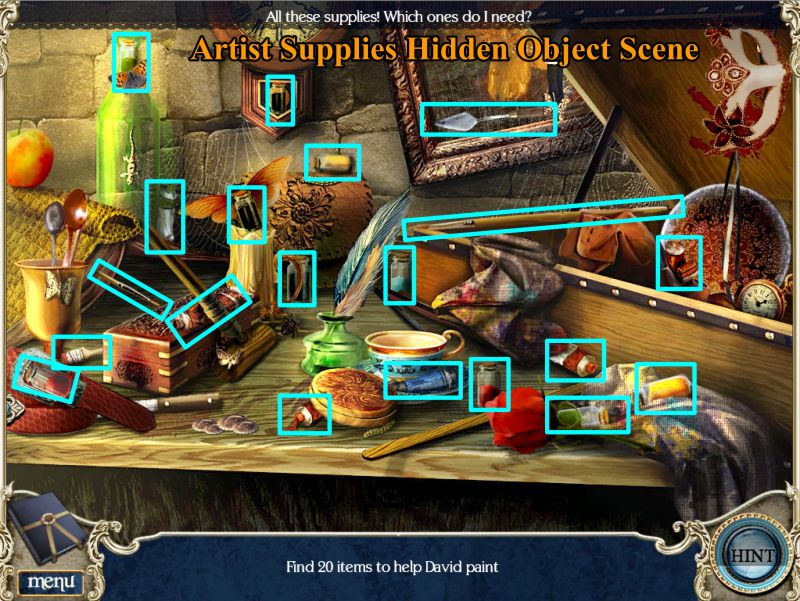
Artist Supplies Hidden Object Scene
Collect 20 supplies you can find in the scene...some scenes have a palette on the left side rather than the small brush.
Screenshot
David's Workshop
Place the old canvas and artist supplies on the easel to trigger a puzzle.
The puzzle is a paint-by-symbol canvas.
You cannot make a mistake because the game won't let you. Click on a color shape and apply it all the places you find symbol on the canvas.
Make certain your cursor touches the section and not just the symbol.
David's ghost will appear when you have completed this portion of the painting.
He wants you to use your crowbar on some loose boards as shown in the screenshot.
Take David's note and the Dry Rag under it.
Screenshot
Outside Stable and Mailbox Puzzle
Go outside the Stables and click on the water trough.
Take the Metal Block and dip your rag into the water to get it wet.
Go down the Road to the mailbox and click on it.
Place your 3 Metal Blocks on it to trigger a puzzle.
The blocks are random. Click each block however many times necessary to create the solution shown in the screenshot.
When the mailbox opens, take the number 7.
Screenshot
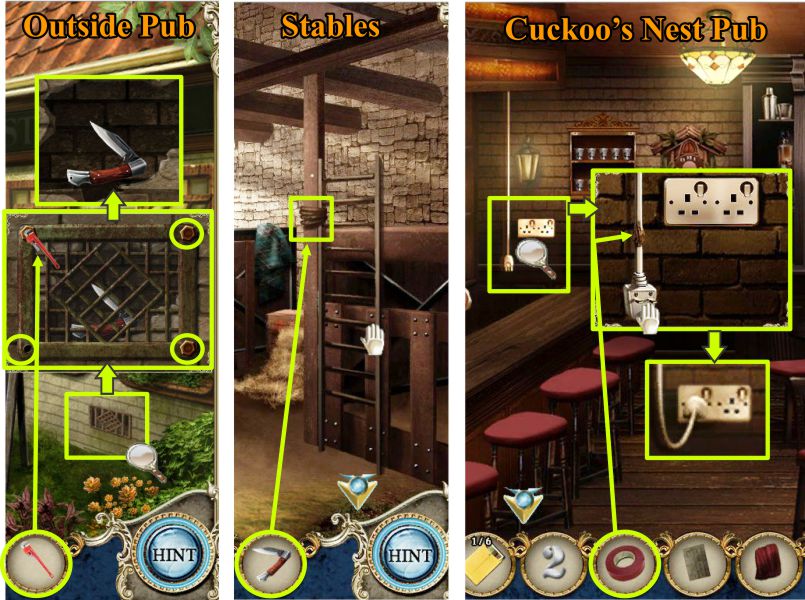
Outside Pub, Stables and Cuckoo's Nest Pub
Continue down the Road to the pub and click on the grate shown in the screenshot.
Use your wrench to undo all 4 nuts so you can collect the knife.
Go back to and inside the Stables.
Use your knife to cut the rope holding the ladder, then take the ladder.
Go back to and inside the pub.
Zoom in on the plug with the frayed cord and place some electrical tape on it so you can plug it into the wall socket.
Screenshot
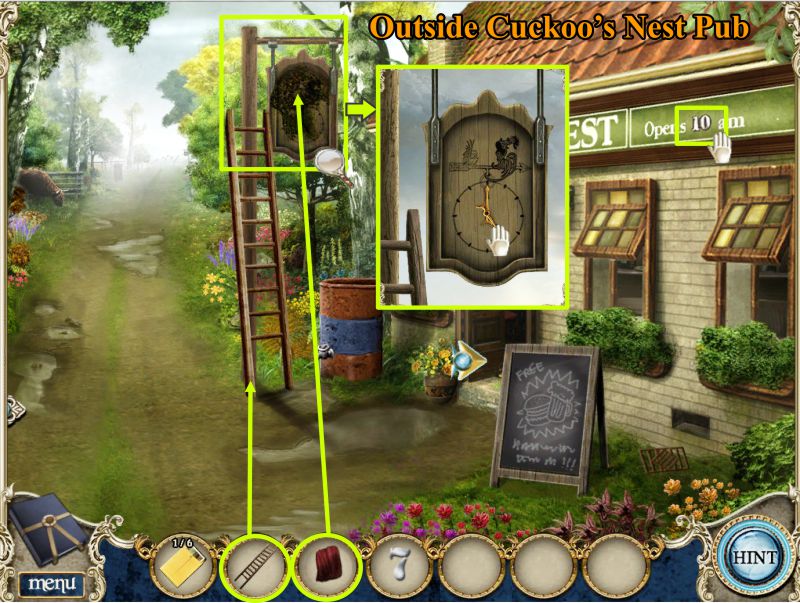
Outside Cuckoo's Nest Pub
Go outside and place your ladder at the bottom of the pole with the sign.
Climb up and clean the sign with your wet rag.
Note that the time on the sign is 5:00. Take the hands off the sign.
You turned on the neon sign on the building, so take the 10 marked in the screenshot off the sign.
Screenshot
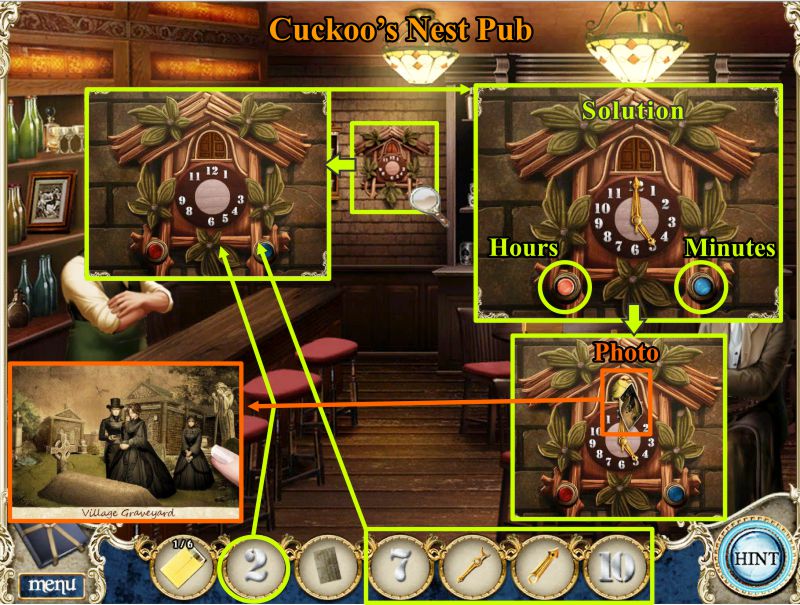
Cuckoo's Nest Pub
Go back into the pub and click on the cuckoo clock.
Place the numbers from your Inventory on the clock, as well as the 2 clock hands.
The time will be random but your goal is to set the time to 5:00.
Use the hour and minute buttons shown in the screenshot to set the correct time.
The cuckoo will appear with a Photo. Take the photo that shows David's funeral.
Screenshot
Posted by: Jazz |
January 22, 2011 1:34 PM
|
January 22, 2011 1:34 PM
Death at Fairing Point: A Dana Knightstone Novel
Walkthrough Part 2
Chapter 3: Baltoun Village
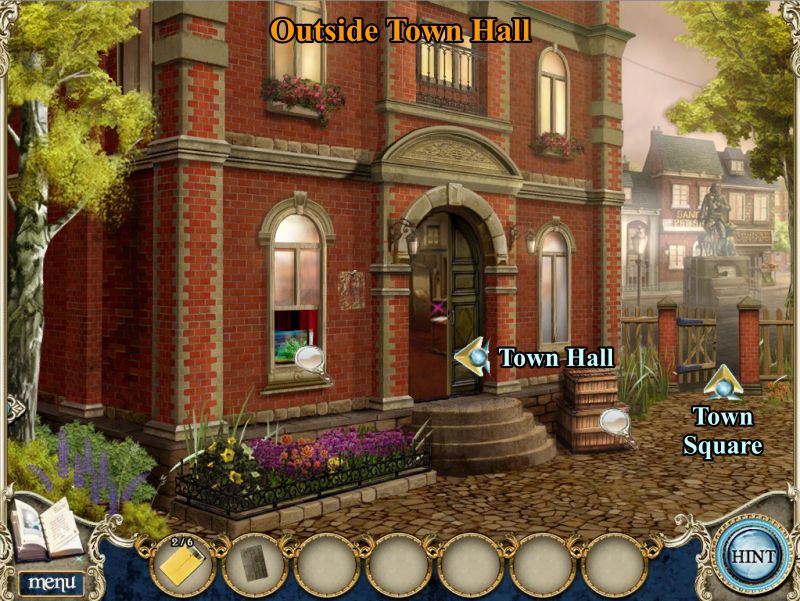
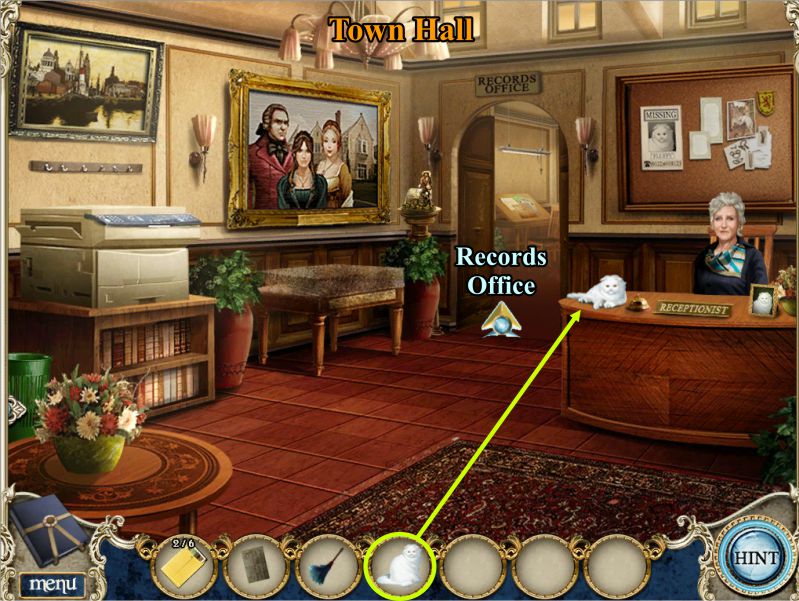
Outside Town Hall
Check the Aquarium. Note the way to the Town Square and go inside the Town Hall.
Screenshot
Town Hall
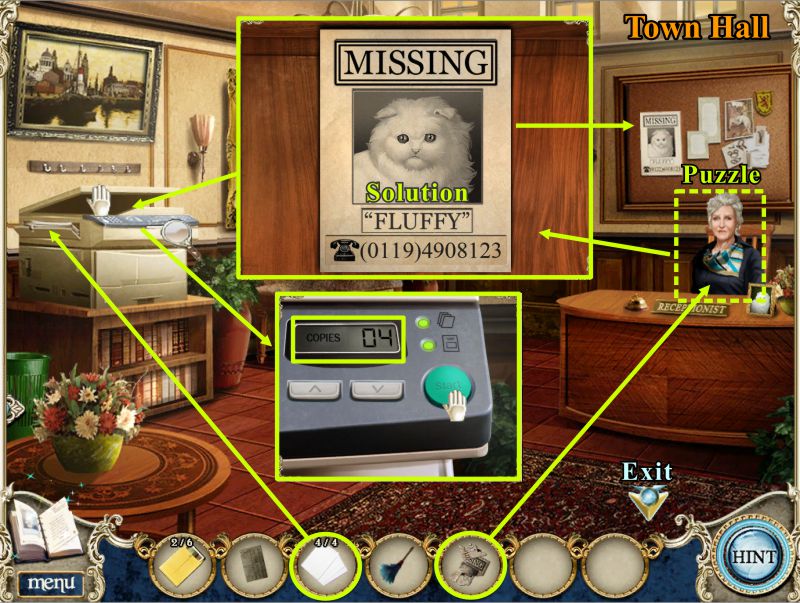
Talk to the receptionist, pick up the Feather Duster, and check out the magnifying glasses in the screenshot.
Collect the pieces of paper for the copy machine.
Click on the copy machine for a puzzle to untangle the cord.
The puzzle is random as is the solution. A sample solution is shown in the screenshot.
Screenshot
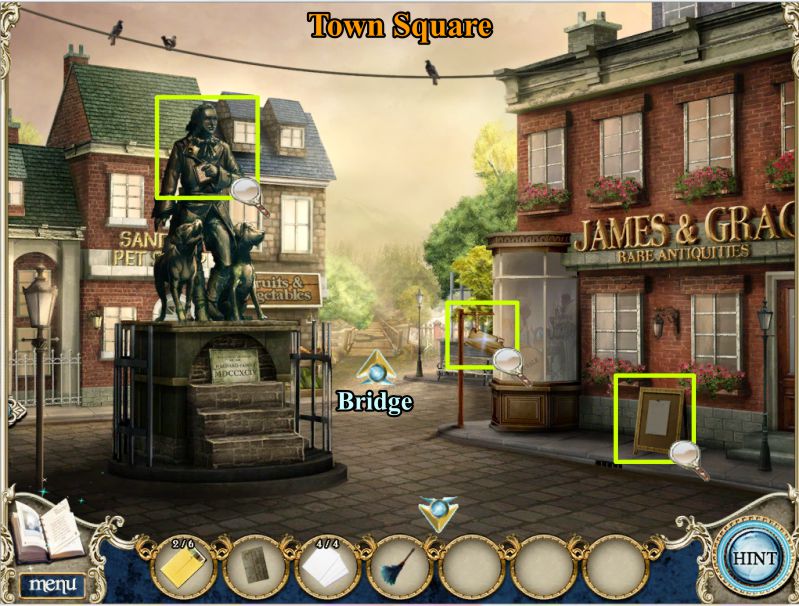
Town Square
Go outside the Town Hall and forward to the Town Square.
Check out all the magnifying glasses and go forward to the Bridge.
Screenshot
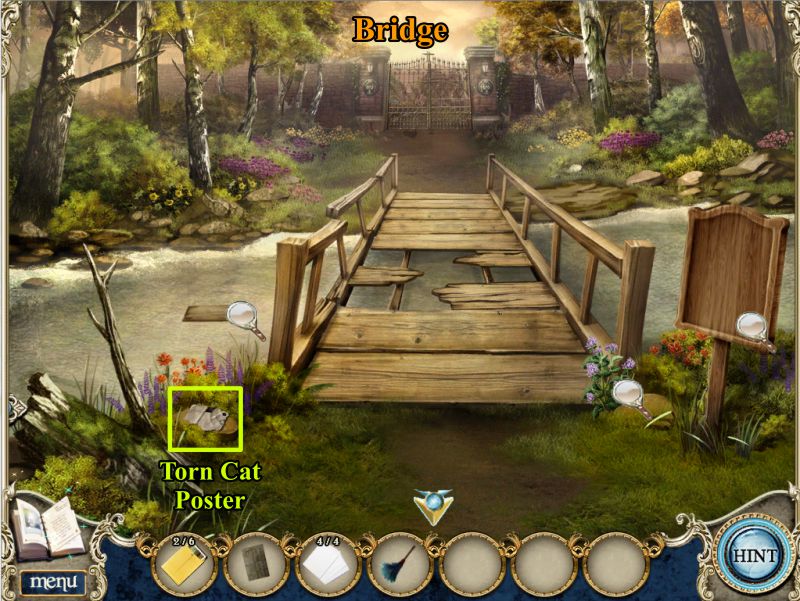
Bridge
The Bridge is broken so you can't cross, but check out the magnifying glasses and pick up the Torn Cat Poster.
Screenshot
Town Hall
Go back to the Town Hall and give the torn poster to the receptionist.
She needs your help to put the poster back together. See the solution in the screenshot.
She wants to make copies, so place your 4 pieces of paper in the copier, lift the lid and place the poster to be copied.
Zoom in on the panel, set the number of copies to "04" and press start.
Before you leave, put one of the copies on the bulletin board.
Screenshot
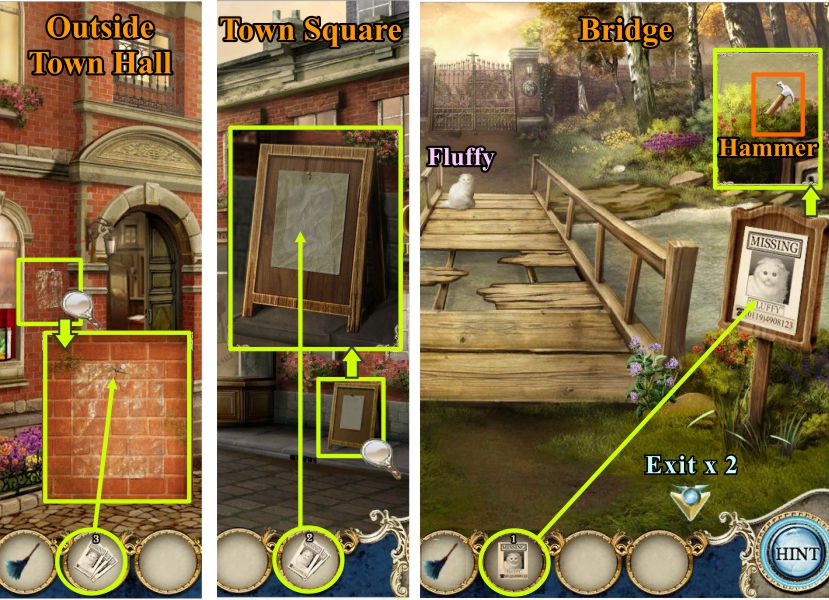
Outside Town Hall, Town Square, Bridge
Click on the posting area next to the Town Hall door and place a poster there.
Go to the Town Square and place a poster on the board there.
Head on over to the Bridge and place a poster there.
When you post the picture, a pop up with a Hammer appears, so take it. Fluffy then shows up on the other side of the Bridge.
You can't get to Fluffy, so go back to the Town Hall.
Screenshot
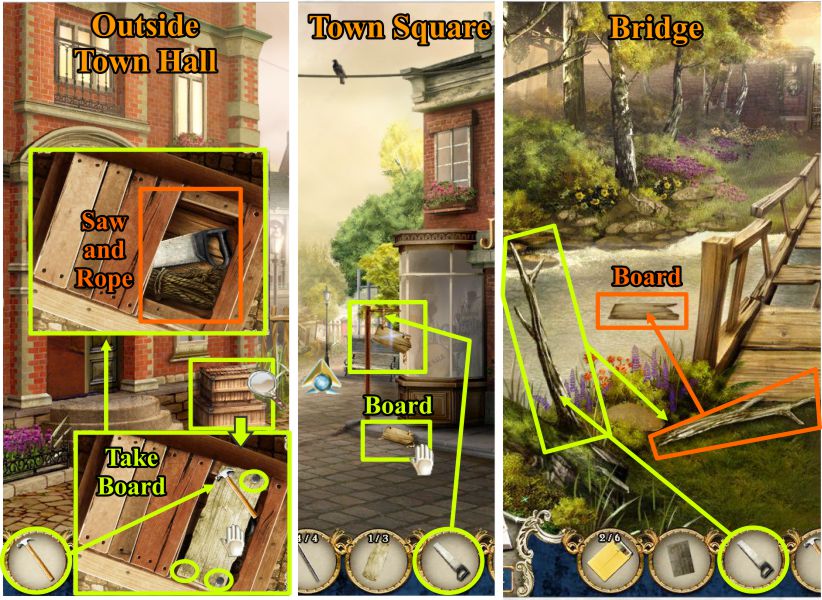
Outside Town Hall, Town Square, Bridge
Click on the crates and use your Hammer to remove the nails from the board.
Take the board and collect the Saw and Rope in the crate.
Go to the Town Square, saw off the hanging sign (see screenshot) and pick up the board.
Go to the Bridge and saw off the branch at the left.
Pick up the branch and use it to reach the board in the river.
Screenshot
Bridge
Click on the gap in the bridge and place your boards and nails on the close up.
Hammer in the 4 nails and cross the Bridge to catch Fluffy, who runs away.
Continue on to the Graveyard.
Screenshot
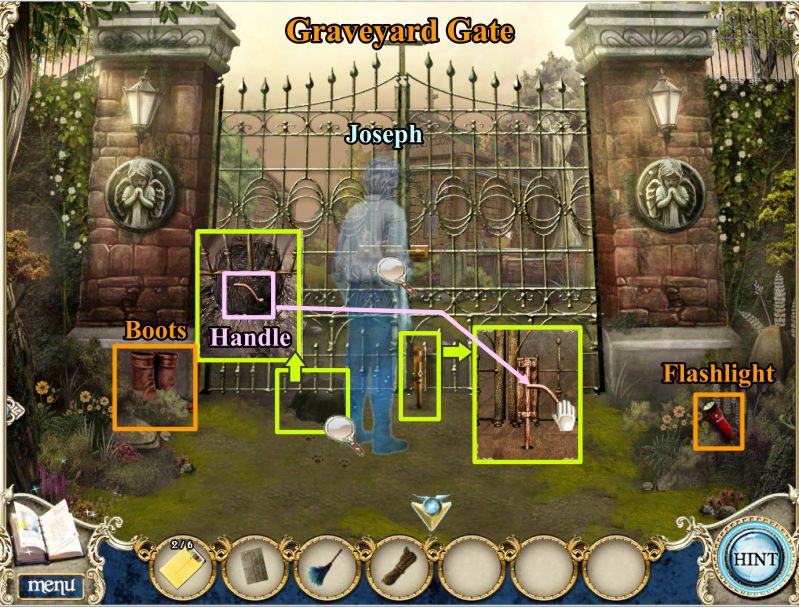
Graveyard Gate
Joseph appears at the gate. Click on him, and he will turn around and disappear through the locked gate.
Pick up the Boots and Flashlight, zoom in on the hole marked in the screenshot and pick up the handle.
Click on the lower lock, place the handle and pull down on it.
Screenshot
Bridge
Go back to the Bridge and place the Rain Boots in the water in front of the mud to trigger a puzzle.
See screenshot for location.
Screenshot
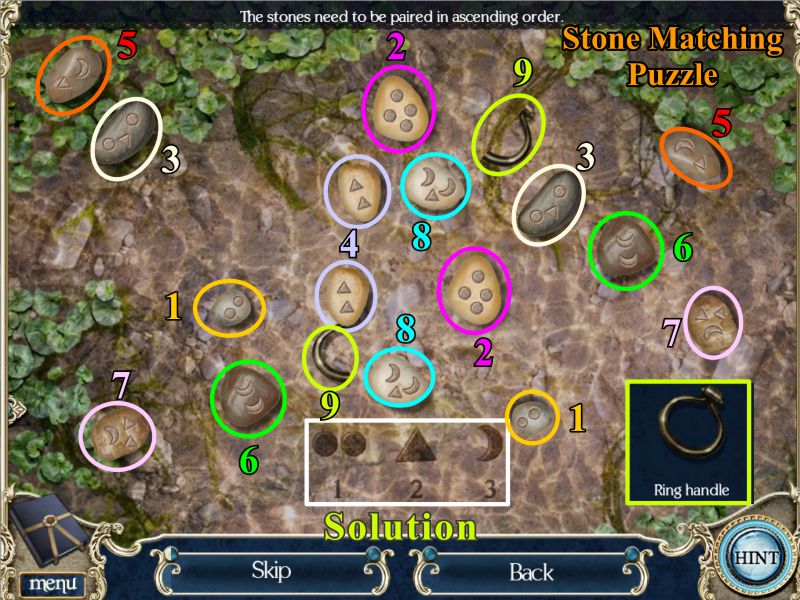
Stone Matching Puzzle
The stone and ring placement are random but your goal is to match the stones in ascending order.
2 dots are the lowest denomination, a triangle is next, and the highest is a crescent.
The stone pairings are color coded and numbered in the screenshot.
You last match is the Ring Handle which puts itself together for you.
Screenshot
Graveyard Gate
Go back to the gate and zoom in on the slider lock.
Place the Ring Handle and slide the lock open so you can enter the Graveyard.
Screenshot
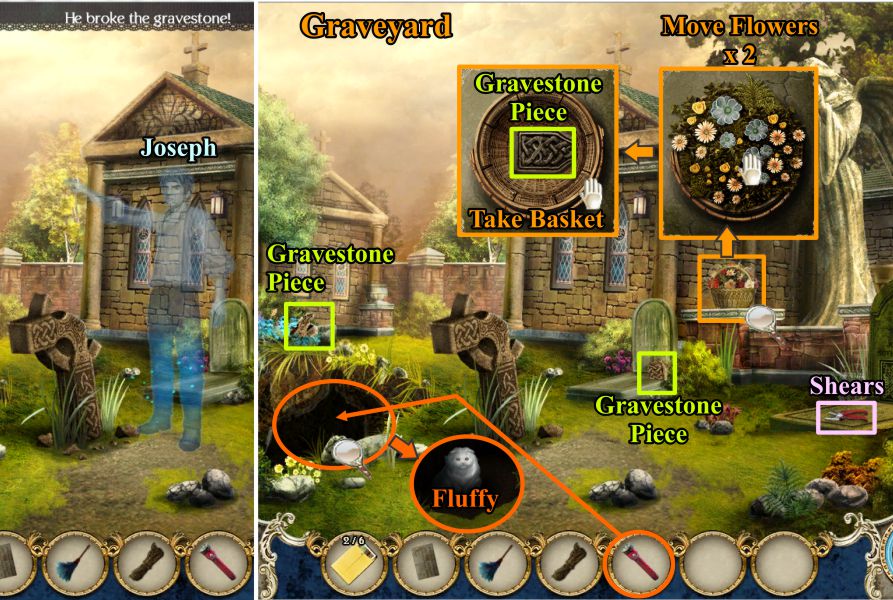
Graveyard
Joseph appears. Click on him and he will raise his arm, breaking what may be David's gravestone.
Collect the Shears and gravestone pieces marked in the screenshot.
Click on the basket of flowers, move the flowers out of the way twice so you can pick up the gravestone piece and collect the basket.
Shine your flashlight down the dark hole and discover Fluffy, who cannot get out without your help.
Screenshot
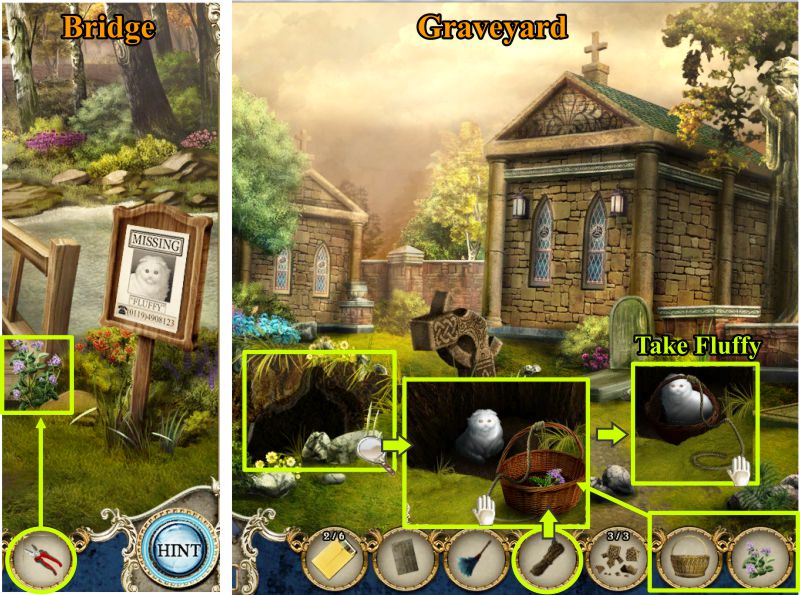
Bridge and Graveyard
Go back to the Bridge and cut some catnip.
Return to the Graveyard and zoom in on the hole.
Place the basket and catnip inside it, as shown in the screenshot.
Attach the rope to the basket and lower it into the hole.
Pull the basket back up to get Fluffy.
Screenshot
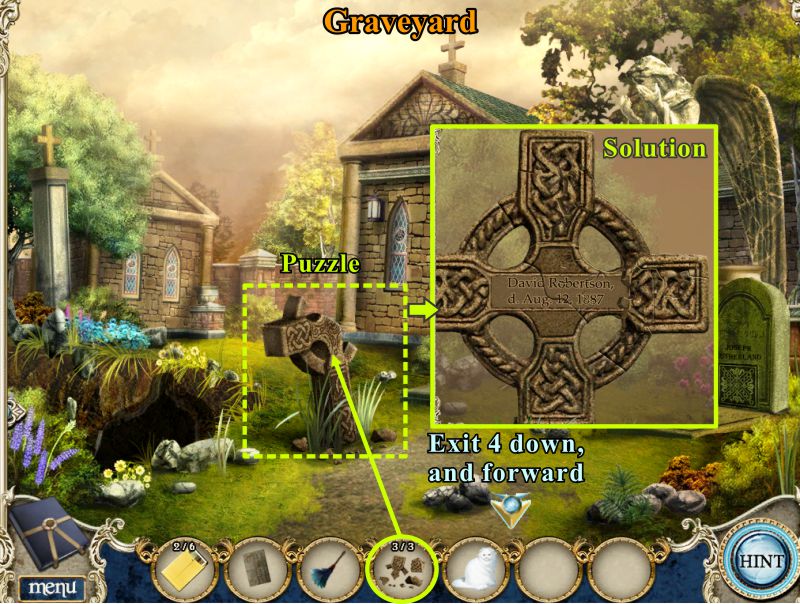
Graveyard
Place the gravestone pieces on the gravestone to trigger a puzzle.
Put the gravestone back together as shown in the screenshot.
Exit down 4 times and go forward into Town Hall.
Screenshot
Town Hall
Give Fluffy to the receptionist. She will let you in the Records Office while she goes off to find food for Fluffy.
Screenshot
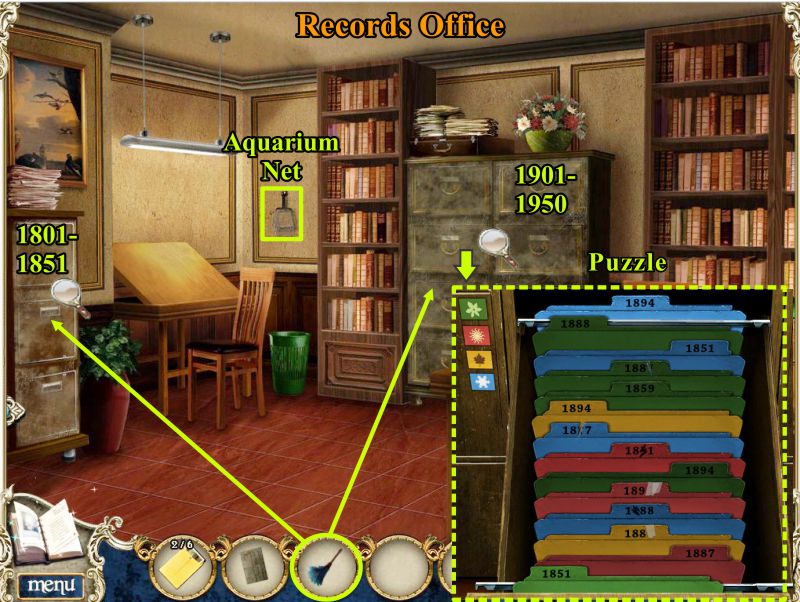
Records Office
Pick up the Aquarium Net and dust off all the file cabinets with your Feather Duster.
Choose the one shown in the screenshot for a puzzle.
Screenshot
File Puzzle
Your goal is to put the files in order by year and the colors shown to the left of the drawer in the screenshot solution.
David's File will automatically go into your Inventory.
Screenshot
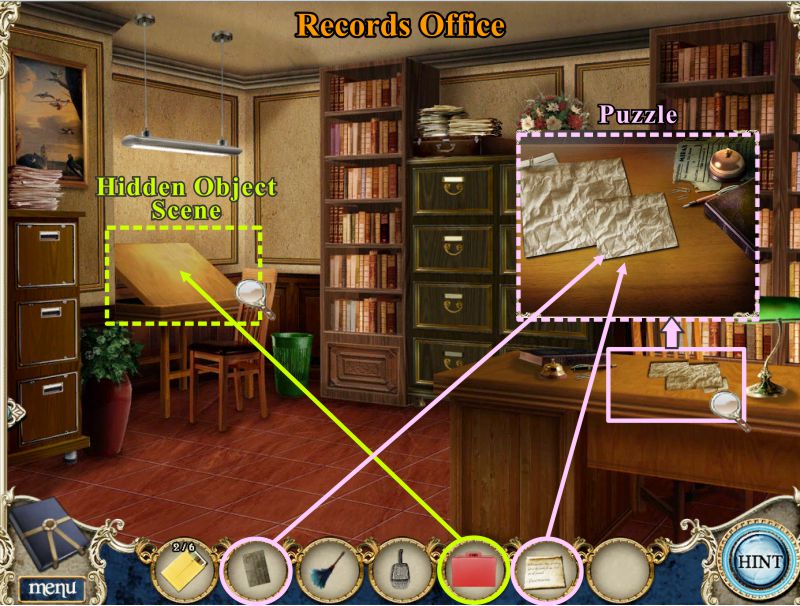
Records Office
Place David's file on the table to the left to trigger a Hidden Object Scene.
Once you have the suicide note, place it and David's note to Charlotte on the desk and a puzzle.
Screenshot
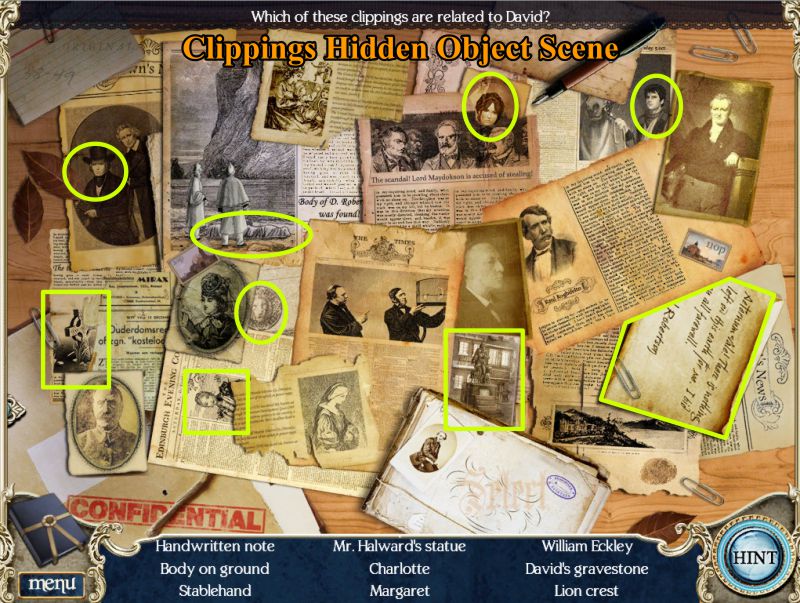
Clippings Hidden Object Scene
Identify the items on the list that are marked in the screenshot to get the suicide note.
Screenshot
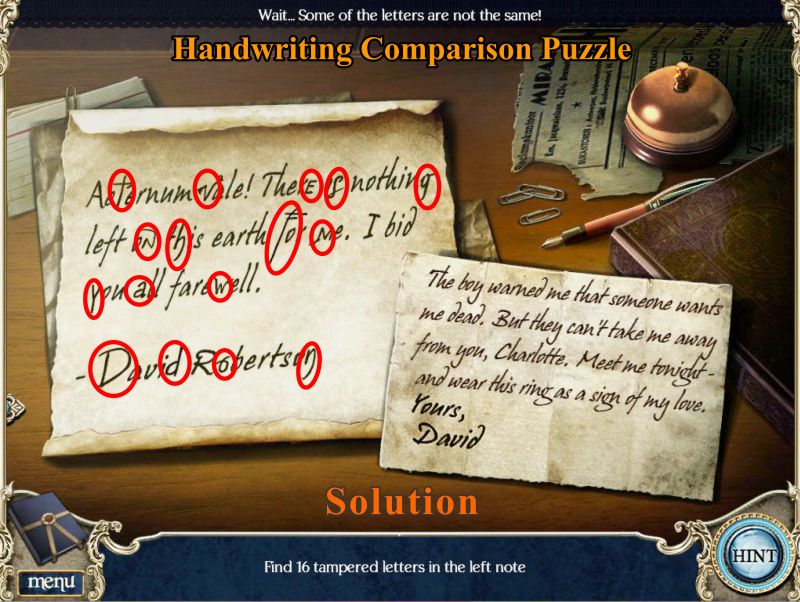
Handwriting Comparison Puzzle
Mark the 16 letters on the suicide note on the left that are different than in David's note on the right.
Screenshot
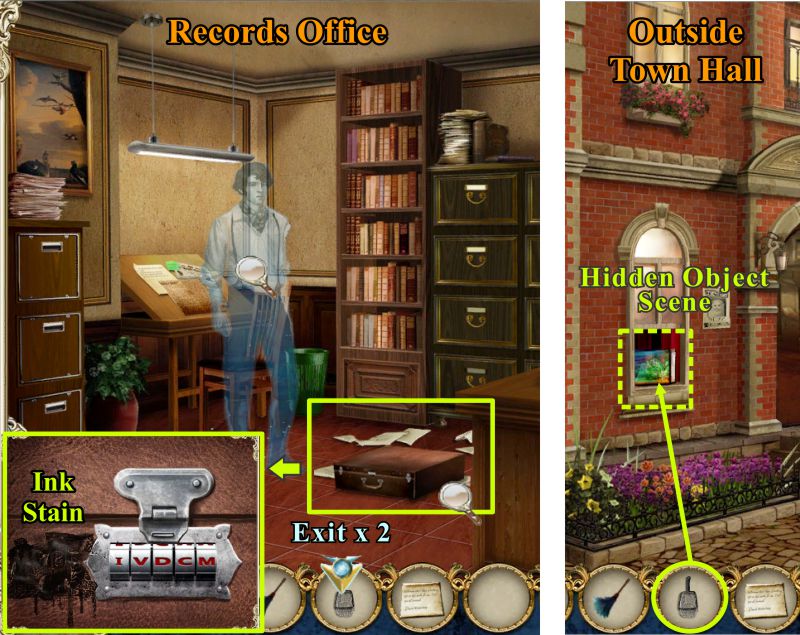
Records Office and Outside Town Hall
David appears, so click on him. A suitcase and papers appear.
Click on the suitcase and note the ink stain covering up something.
Go outside Town Hall and place the net on the aquarium for a Hidden Object Scene.
Screenshot
Aquarium Hidden Object Scene
Collect the 20 gold coins shown in the screenshot.
Click on the chest to take the 3 there.
Click on the rock to find 2 more.
Screenshot
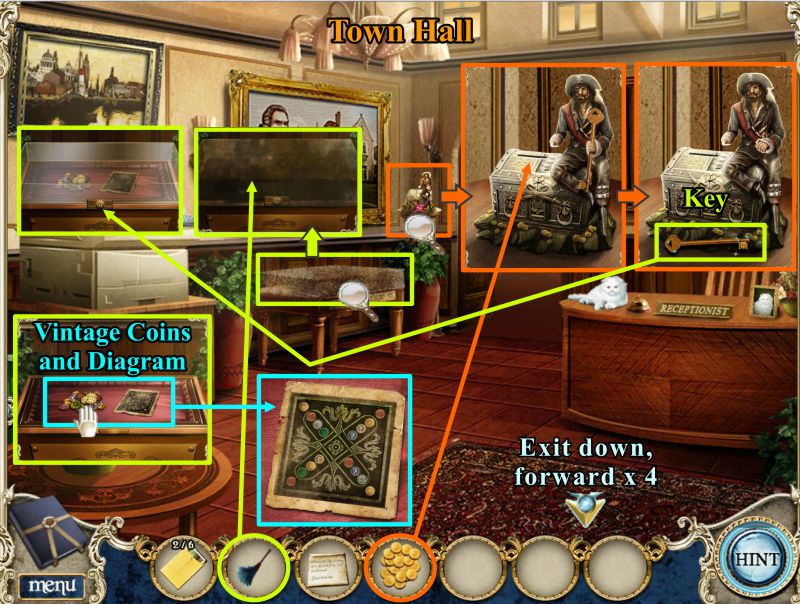
Town Hall
Go back inside Town Hall, zoom in on the pirate and give him the coins in exchange for the key he is holding.
Click on the display case and dust it off with your Feather Duster.
Unlock the case with the key from the Pirate, then take the Vintage Coins
Click on the diagram as seen in the screenshot.
It will be recorded in your Notebook, so click out of it to continue.
Exit down and go forward 4 times to the Graveyard.
Screenshot
Graveyard
Click on Joseph's gravestone and place the Vintage Coins.
Swap the coins to match the diagram in your Notebook and the solution shown in the screenshot.
Take the Special Screwdriver, make note of all the coins, and head back to Town.
Screenshot
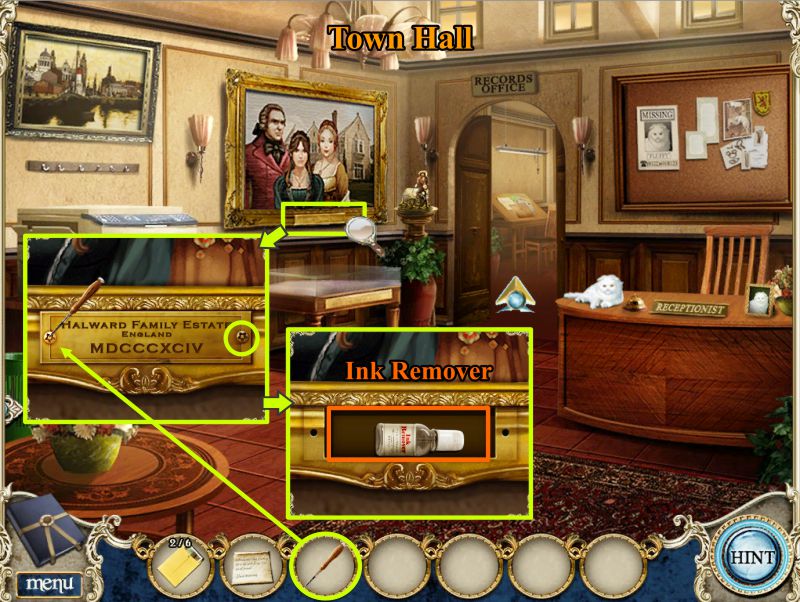
Town Hall
Go into the Town Hall and zoom in on the Halward family portrait.
Remove the screws with the special screwdriver and take the Ink Remover.
Screenshot
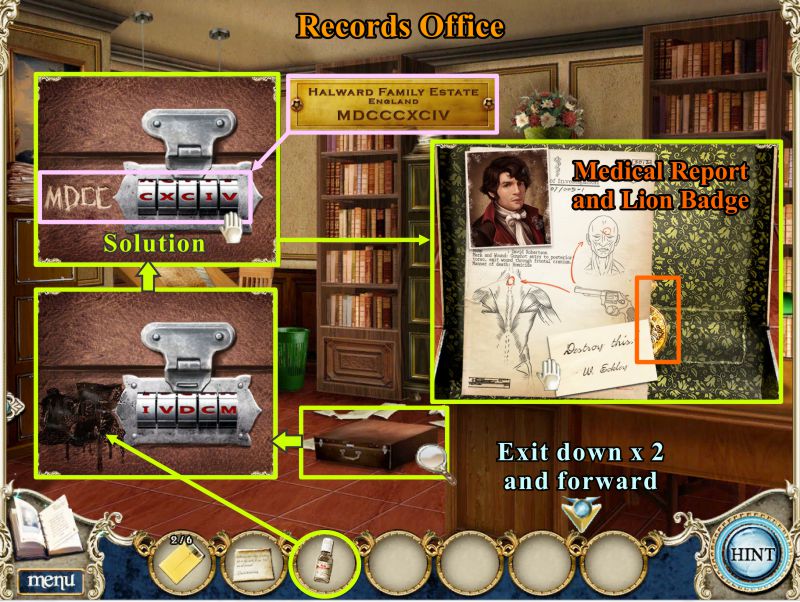
Records Office
Go into the Records Office and click on the suitcase.
Use the ink remover to uncover the letters MDCC that are the first 4 letters of the year under the Halward portrait.
Enter the remainder of the date on the combination lock (see screenshot) to open the suitcase.
Take David's Medical Report that shows he was shot twice and the Lion Badge hidden behind it.
Exit down twice and go to the Town Square.
Screenshot
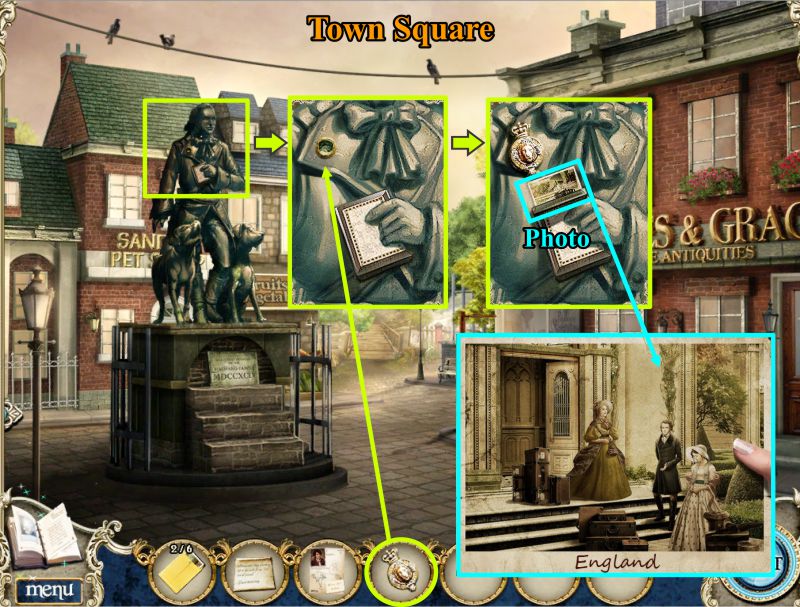
Town Square
Zoom in on Halward's statue and place the Lion Badge.
Take the photo of England that appears and pack your bags for the trip.
Screenshot
Chapter 4: England
Halward Estate Gate
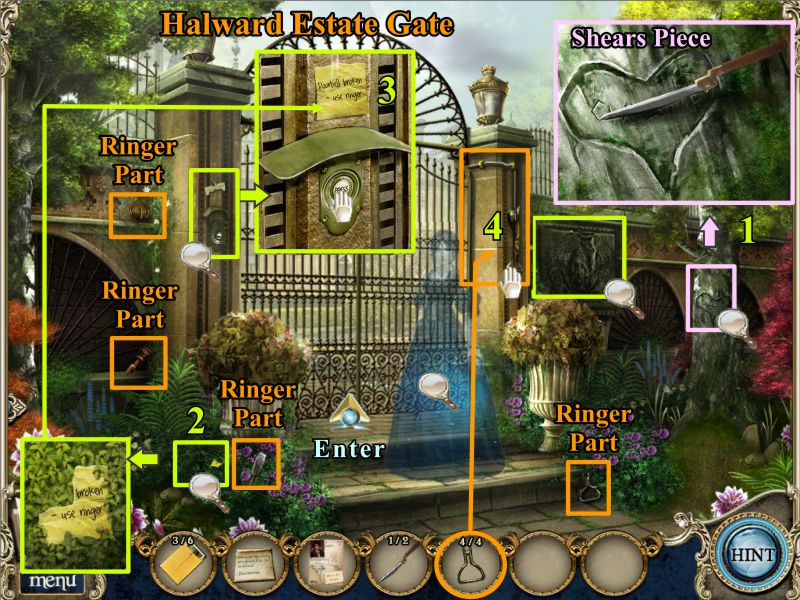
Check out all the magnifying glasses in the screenshot.
Take the piece of shears from the tree at the right.
Zoom in on the shrubbery and pick up the Sticky Note.
Click on the doorbell and place the Sticky Note to complete the message.
Click on the doorbell, and pieces of the ringer will appear in the scene.
Collect the 4 Ringer Parts, place them on the ringer, and pull down on it.
Charlotte will appear by the tree. Click on her and she will move to the gate.
Click on her again and she will open the gate for you to enter.
Screenshot
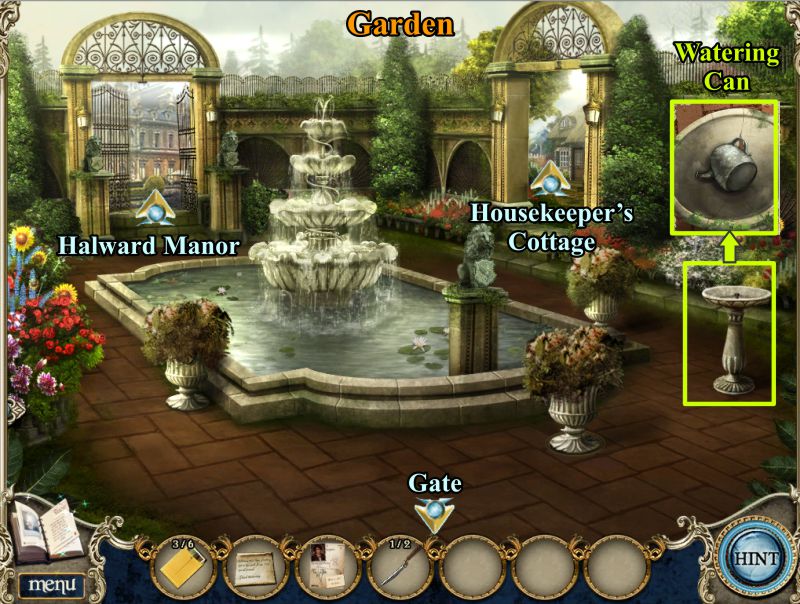
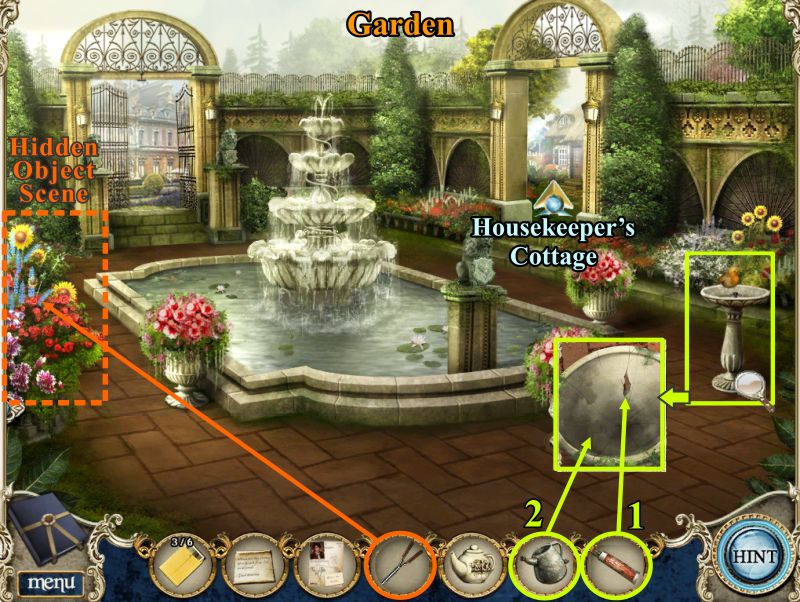
Garden
Click on the birdbath and pick up the Watering Can shown in the screenshot.
Go through the gate to Halward Manor.
Screenshot
Manor Door
Click on the door and the Butler will appear.
Pick up the 5 pieces of the Chore List.
Zoom in on the tea table and click on the pieces of the broken teapot.
Put the teapot back together as shown in the screenshot.
The butler suggested you see the housekeeper, so go back to the Garden and through the gate on the right.
Screenshot
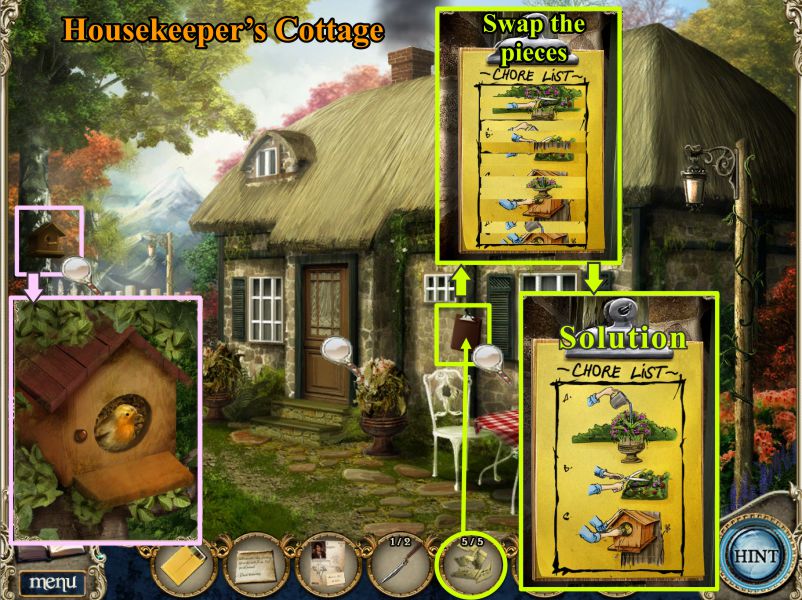
Housekeeper's Cottage
Click on the door and the housekeeper will talk to you from inside.
She can't find her Chore List. Put the pieces you found on the clipboard and swap the pieces until the list looks like the solution in the screenshot.
Check the birdhouse in the tree at the left to find out it is occupied at the moment. Click on the door again and the housekeeper will appear.
Screenshot
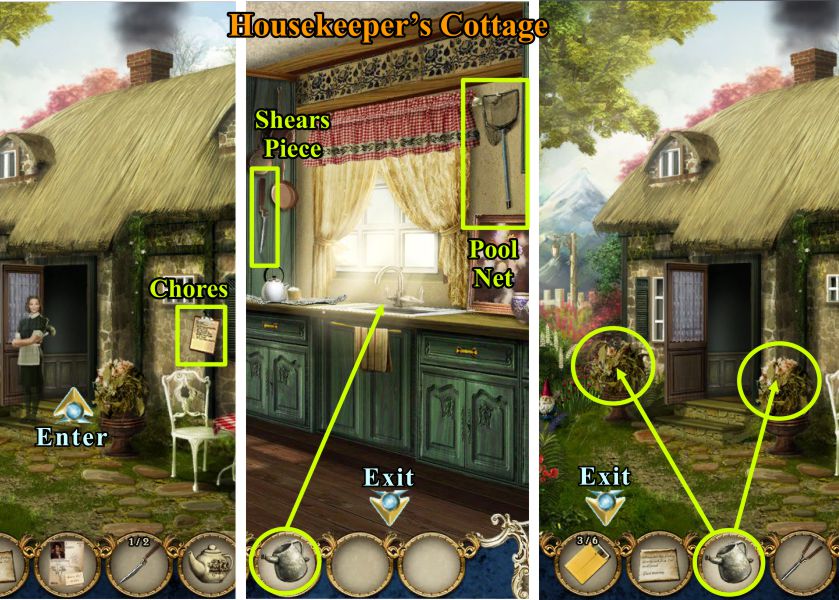
Since you offered to help with the chores, she is off to see the Butler on your behalf. Enter the cottage.
Take the other piece of the shears hanging on the cabinet, and it will combine with the other piece in your Inventory.
Grab the Pool Net off the wall and fill your watering can in the sink.
Go outside and water the two plants marked in the screenshot.
Screenshot
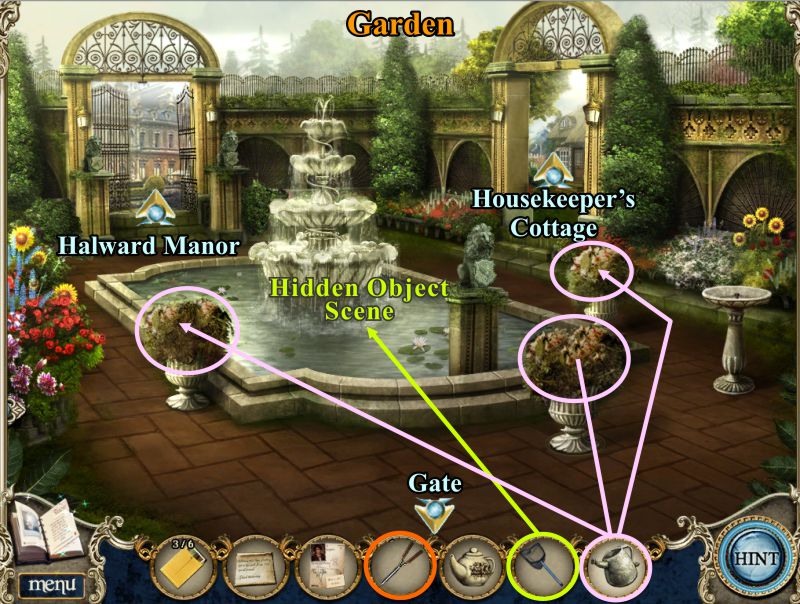
Garden
Go to the Garden and water the 3 plants shown there.
Use your Pool Net to trigger a Hidden Object Scene.
Screenshot
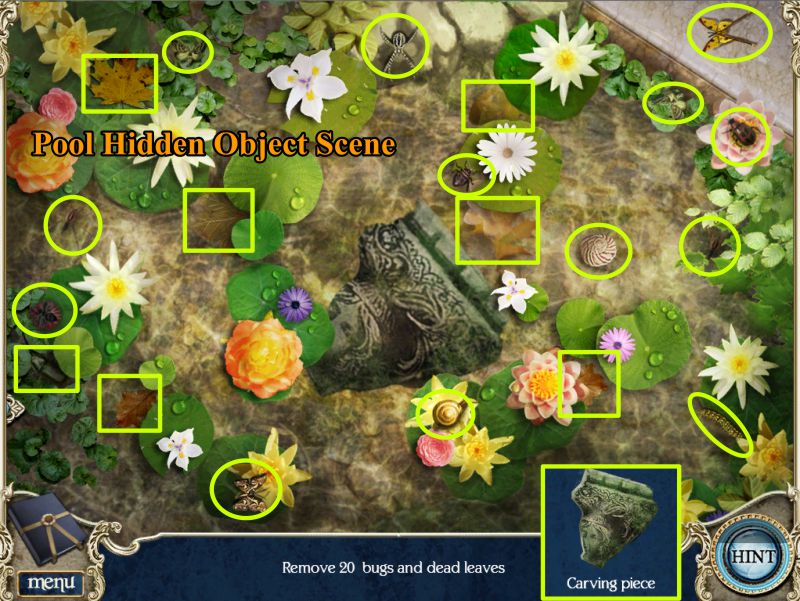
Pool Hidden Object Scene
Remove the 20 bugs and dead leaves marked in the screenshot and you will get a Carving Piece.
Screenshot
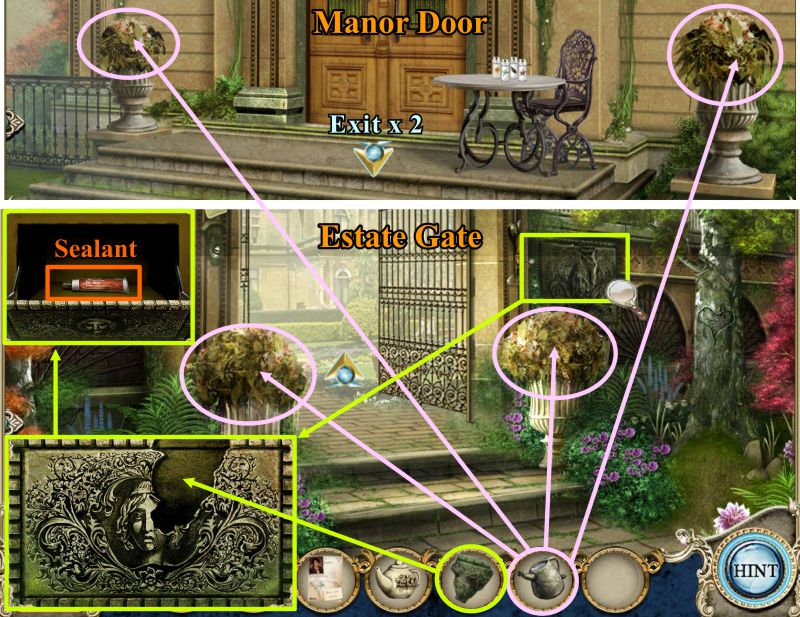
Manor Door and Estate Gate
Go to the Manor Door and water the 2 plants there.
Head off to the Estate Gate and water the 2 plants shown there.
Click on the plaque to the right of the Gate and place the Carving Piece on it.
Pick up the Sealant and head back to the Garden.
Screenshot
Garden
Click on the birdbath and use the Sealant.
Fill the birdbath with water from the Watering Can and the little bird from the birdhouse will come to the birdbath.
Place the Shears on the flowers marked in the screenshot to trigger a Hidden Object Scene.
Screenshot
Flower Hidden Object Scene
Collect 7 each of the bluebells, blood-colored roses, and sunflowers marked in the screenshot.
Screenshot
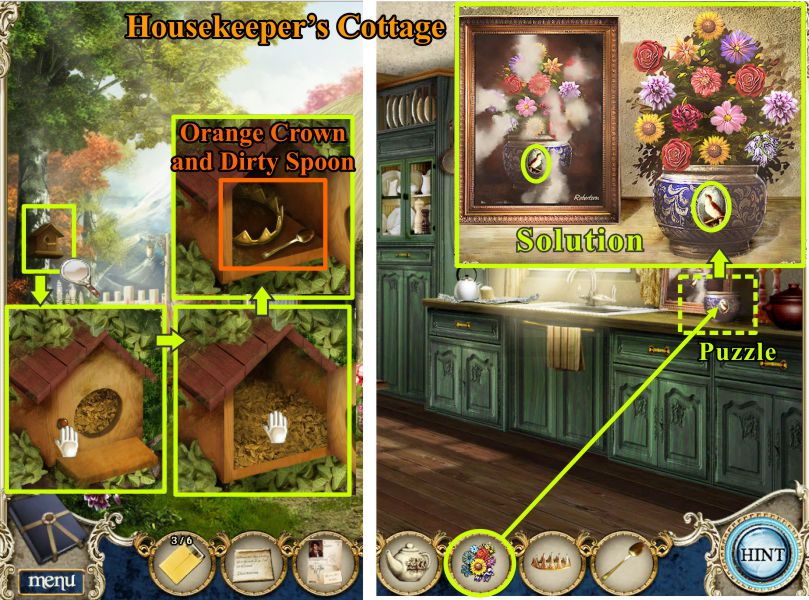
Housekeeper's Cottage
Go back to the Housekeeper's Cottage, click on the birdhouse, open it and remove the leaves to find an Orange Crown and Dirty Spoon.
Go inside the cottage and place your flowers in the pot on the counter to trigger a puzzle.
Arrange the flowers like the painting, but note the difference in the direction the bird on the flowerpot is facing.
Make sure you arrange them as a mirror image to the painting, as shown in the screenshot solution.
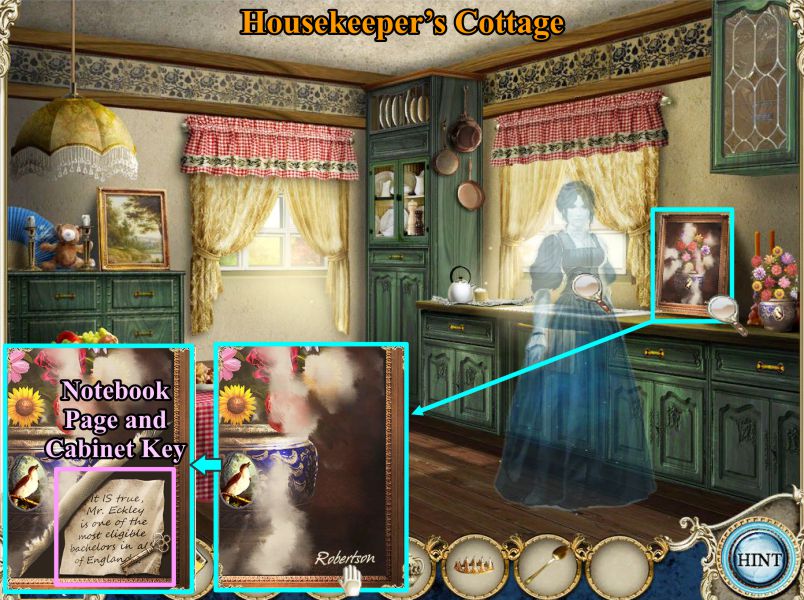
Screenshot
Charlotte appears. Click on her and then on the painting.
It was painted by David, so touch his name to lift the corner of the painting.
There is a note from Charlotte that will go into your notebook and a cabinet key to collect.
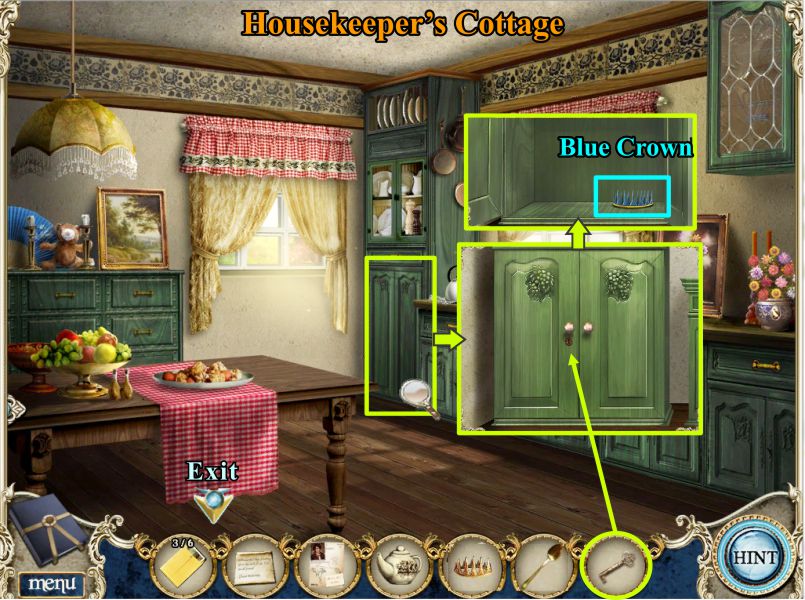
Screenshot
Zoom in on the cabinet marked in the screenshot and open it with the key.
Take the Blue Crown and go outside.
Screenshot
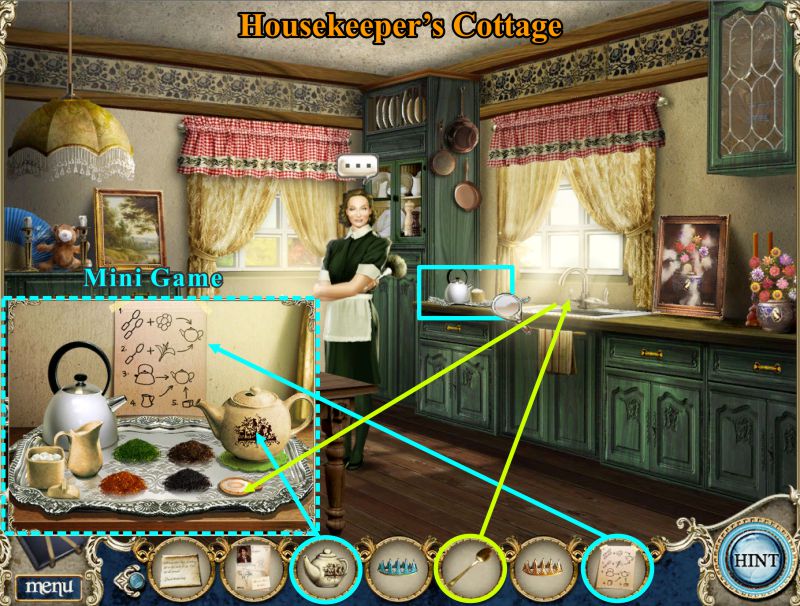
The housekeeper meets you and says she talked to the butler. Follow her back inside and talk to her again to get instructions as to how to make Wilfred's favorite tea.
Wash your dirty spoon in the sink and click for a close up of the tea tray.
Place the clean spoon and teapot on the tray and the instructions on the wall.
Screenshot
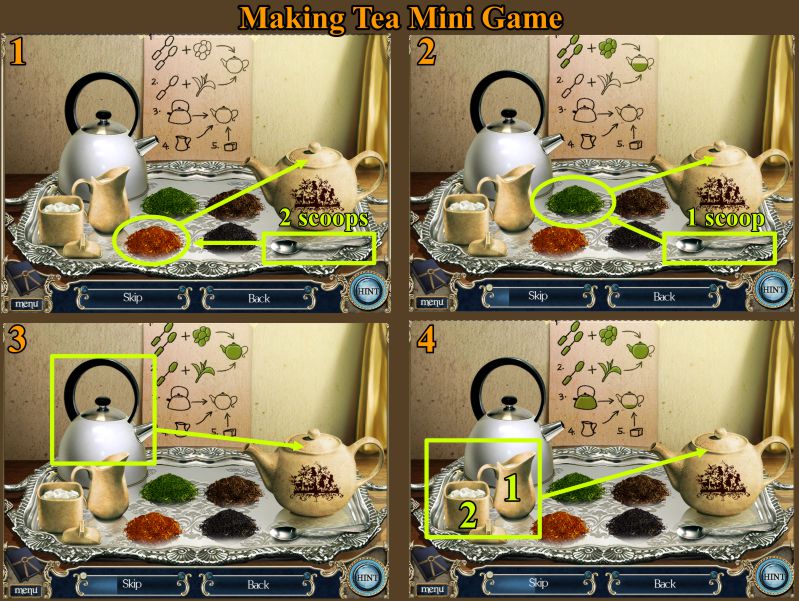
Making Tea Mini Game
Place 2 scoops of the red tea in the teapot.
Place 1 scoop of the green tea in the teapot. Note how the instructions turn green when you have the right combination.
Pour water from the kettle into the teapot.
Place the cream and then the sugar in the teapot and you are done.
The teapot tea tray will go into your Inventory.
Screenshot
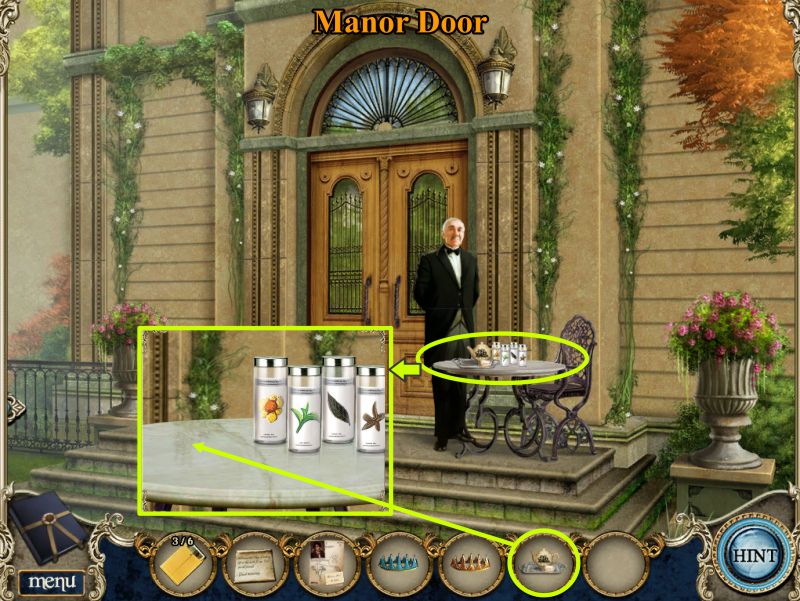
Manor Door
Take the tea to the Manor Door and click on the table.
Place the tray on the table and Wilfred will appear.
He will give you a Green Crown. Go off to the Garden while he prepares the Manor for your visit.
Screenshot
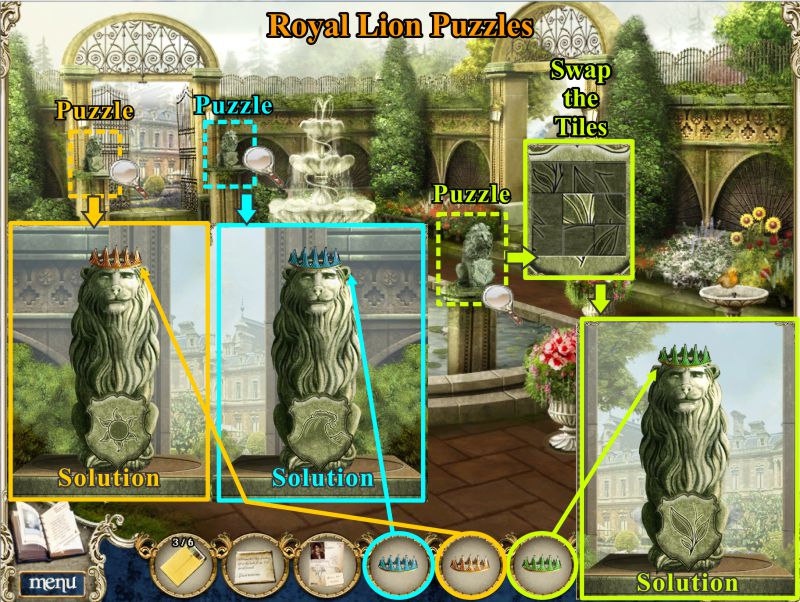
Royal Lion Mini Game
Click on each of the Royal Lions one at a time for a puzzle.
The plaque in front of each Lion has tiles that you can swap and rotate until the pictures match those shown in the screenshot.
The plaques are a clue as to which crown belongs on which Lion: leaves are green, waves are blue, and the sun is a golden orange.
Screenshot
Compass Puzzle
When you have crowned all of the Royal Lions, the compass on the ground in front of the green lion will sparkle, so click on it.
Take Charlotte's note to trigger a puzzle.
Rotate the rings of the compass until they look like the solution in the screenshot.
The compass will lift to reveal the Compartment Key. Take it, then head back to the Manor Door.
Screenshot
Manor Door
Click on the compartment by the door and open it with the key.
Click on the photo inside to see William's proposal to Charlotte.
Take the photo. Wilfred will appear to welcome you to Halward Manor and open the doors for you to enter.
Screenshot
Chapter 5: The Halward Estate
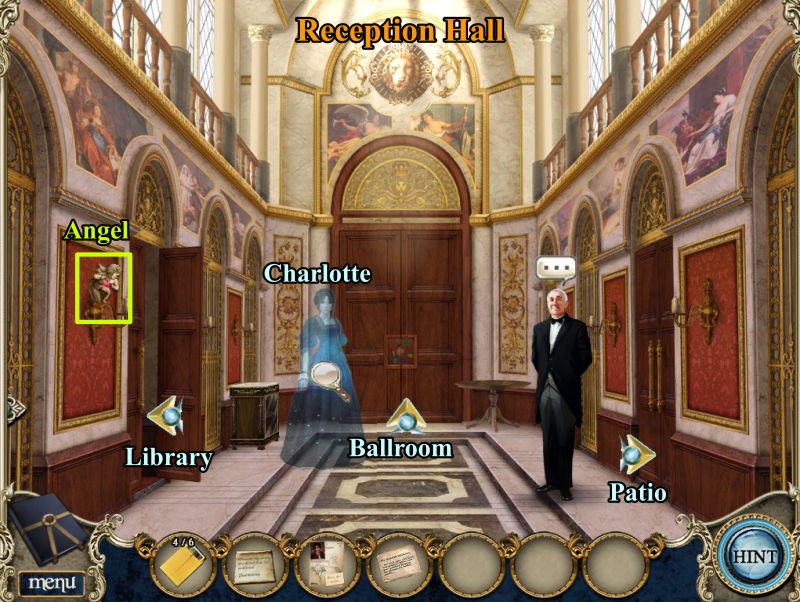
Reception Hall
Wilfred invited you inside the Manor and has offered to help with your research. He goes off to the Library and leaves the door open for you to follow.
Charlotte appears. Click on her and she will be off to the Ballroom, but the door is locked. Grab the Angel and go to the Library.
Screenshot
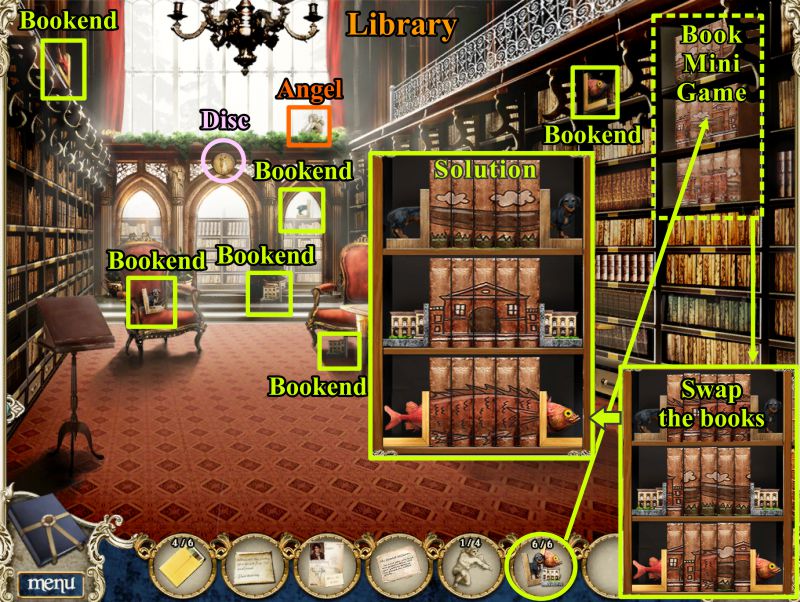
Library
Collect all the Bookends marked in the screenshot, as well as the Disc and Angel.
Place the Bookends on the Bookcase where marked to trigger a Mini Game.
Swap the 3 rows of books to place the eel on the top row, the architecture on the second row, and the fish on the bottom row.
You will receive a book when you have solved the game.
Screenshot
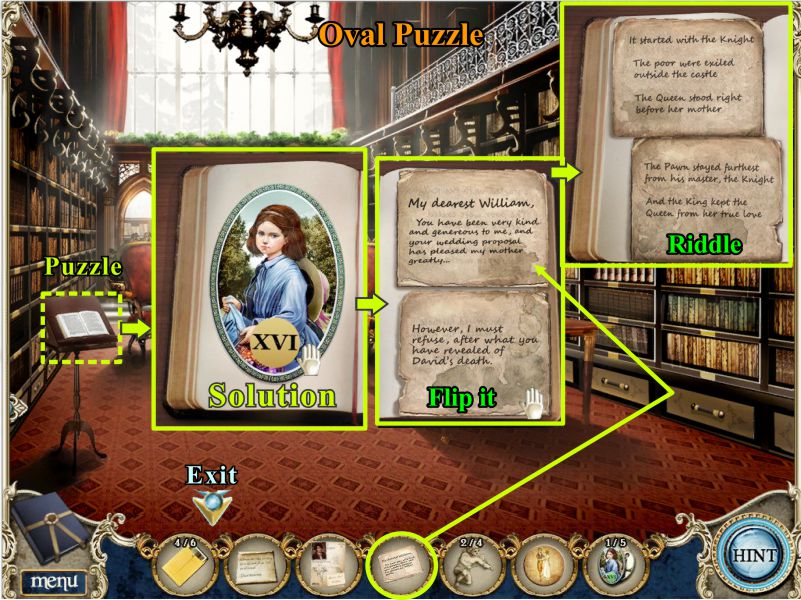
Place the book on the bookstand marked in the screenshot to trigger a puzzle.
Complete the puzzle of a young Charlotte and take the Oval.
Turn the page and place the first part of the letter from William from your Inventory.
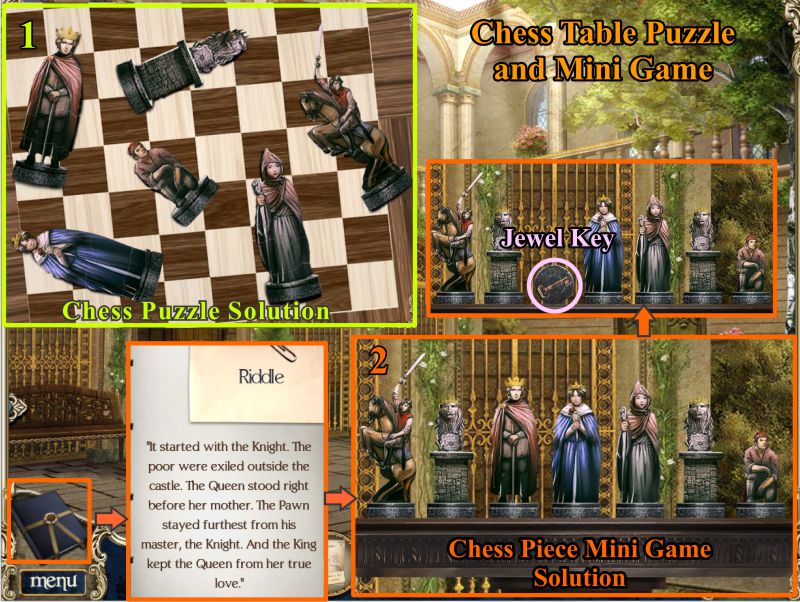
Flip the letter over to find a Riddle that will be recorded in your Notebook for later use.
Screenshot
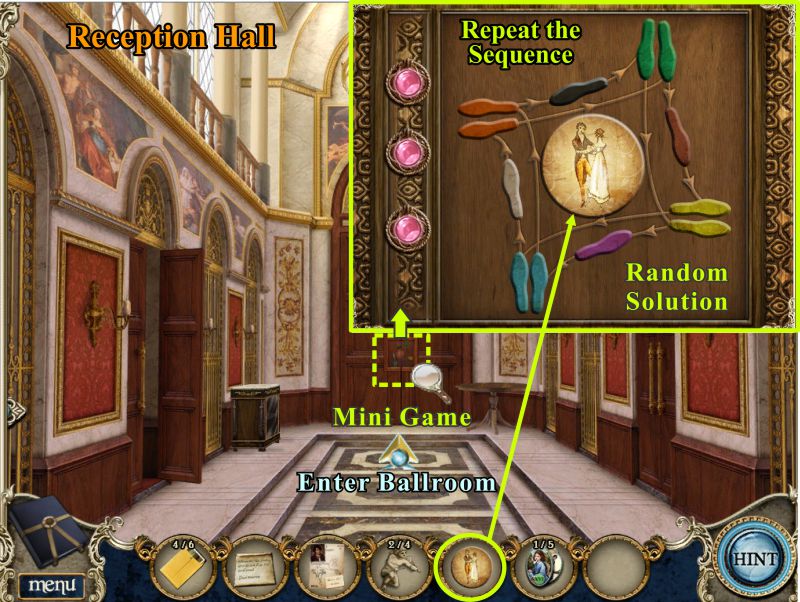
Reception Hall
Go out to the Reception Hall and click on the door to the Ballroom for a Mini Game.
Place the disc to trigger the Repeat the Sequence game to open the door.
The sequences are random. You must complete 3, or skip the game for the door to open so you can enter.
Screenshot
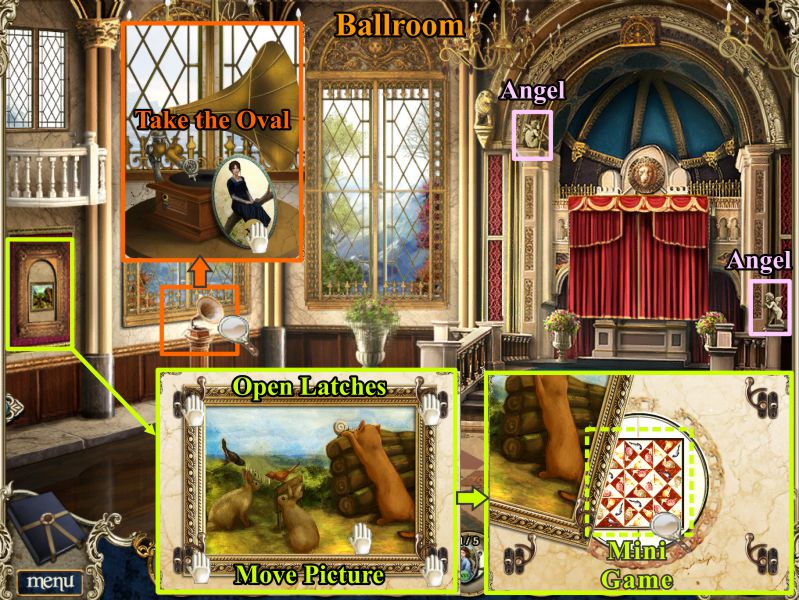
Ballroom
Collect the 2 Angels and click on the Gramophone to pick up the Oval.
Click on the picture at the left and open the latches to be able to move the picture.
There is a Mini Game inside, so click on it to play.
Screenshot
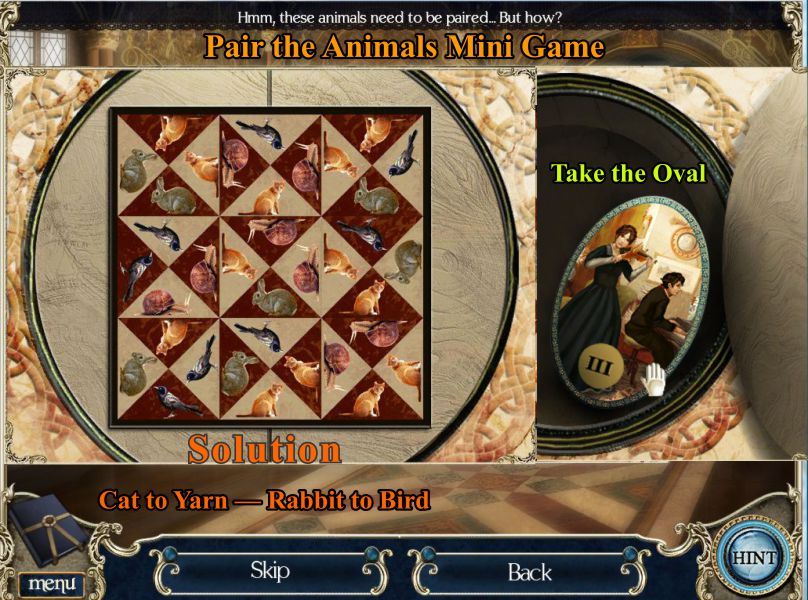
Pair the Animals Mini Game
Your goal is to pair up the animals as shown in the screenshot.
The cat goes with the yarn and the rabbit with the bird.
When the secret compartment opens, take the Oval.
Screenshot
Match the Angels Puzzle
You now have all of the Angels. Go back out to the Reception Hall and click on the Patio door at the right.
Place the 4 Angels on the door lock.
Your goal is to align the top row of Angels that you just placed to look like their reflection on the bottom row.
Move the heads to the proper position as shown in the screenshot.
Screenshot
Patio
Enter the Patio and check out all the magnifying glasses shown in the screenshot.
You cannot deal with the carving or open the door to the Music Room, so click on the Armoire for a Mini Game.
When you are finished with the Armoire, check out the Chess Table for a Puzzle and Mini Game.
Screenshot
Armoire Mini Game
Your goal for the to make the inside picture complete by using the outside buttons to move the circles.
In the screenshot the buttons are color coded to the inside circles to show you which circle they move.
Complete the picture as shown in the screenshot to get the Oval for your Inventory.
Screenshot
Chess Table Puzzle and Mini Game
Put the puzzle pieces together to make the chess figures shown in the screenshot.
Click on the chessboard for the Mini Game and align the figures as shown in the Riddle and solution.
William will turn into a Jewel Key; pick it up.
Screenshot
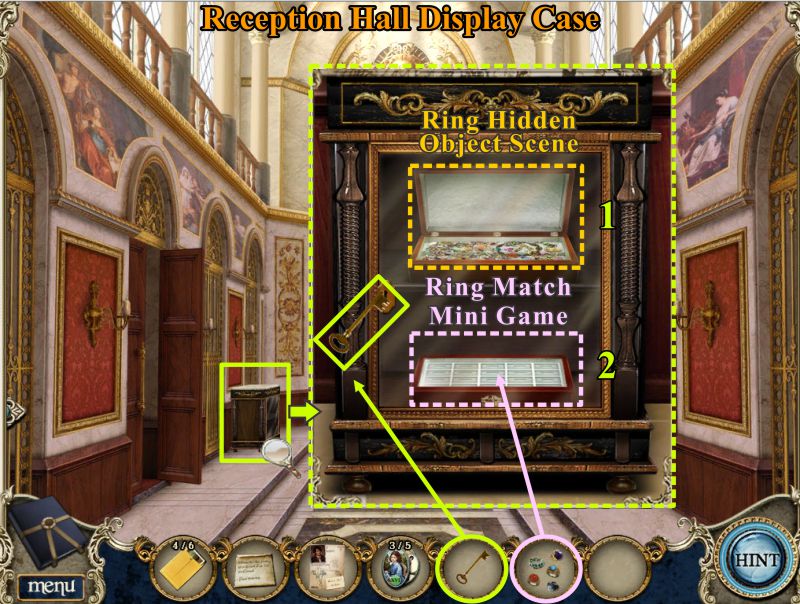
Reception Hall Display Case
Go to the Reception Hall and use the Key on the Display Case to open it.
Click for the Hidden Object Scene. Once you have the 20 rings, place them in the ring box to trigger the Mini Game.
Screenshot
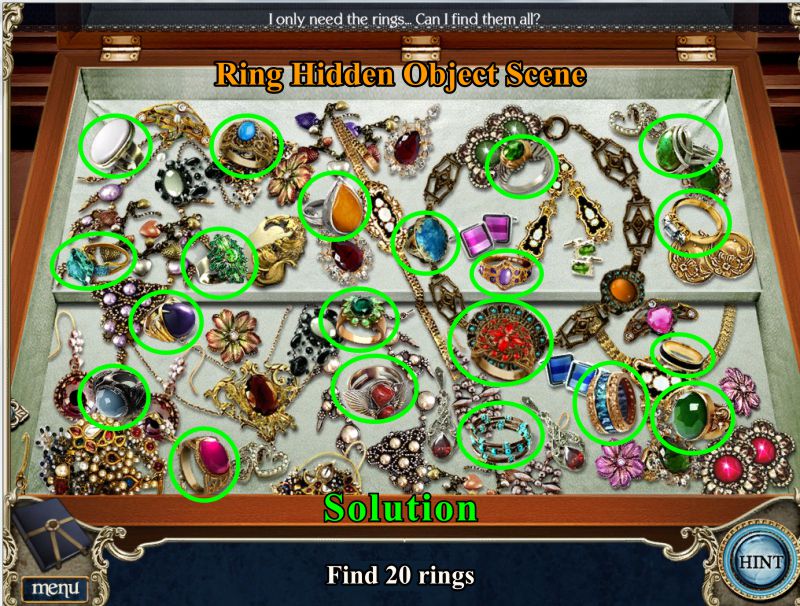
Ring Hidden Object Game
Collect all 20 rings marked in the screenshot.
Screenshot
Ring Match Mini Game
When you have placed the rings in the ring box, match them up by their corresponding ring.
The identical rings are color coded in the screenshot. The remaining ring will be William's as is marked.
Screenshot
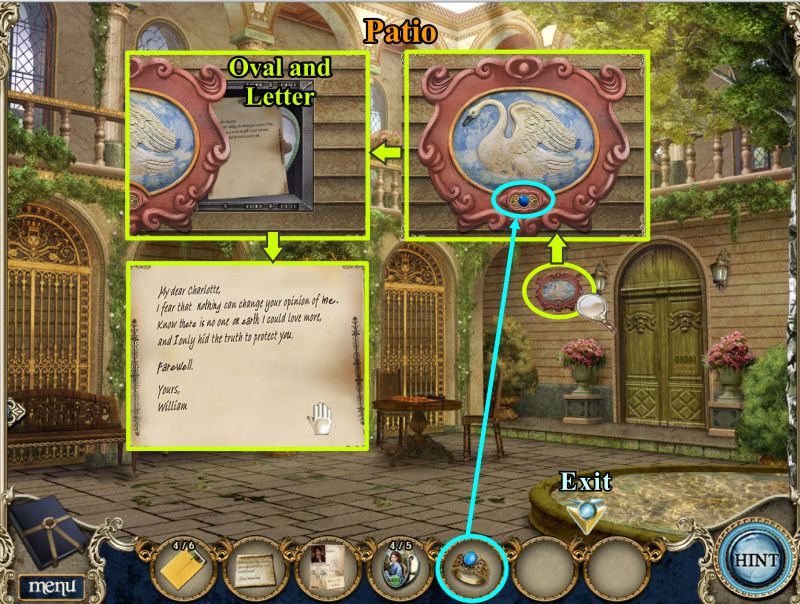
Patio
Go to the Patio and click on the swan carving.
Place William's ring in the slot to open the compartment.
Take the Oval and William's letter.
Screenshot
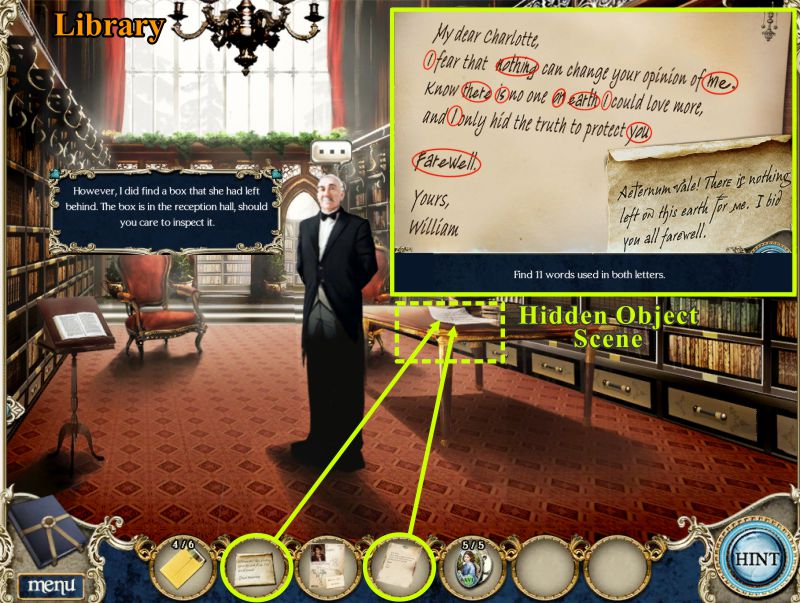
Library and William's Letter Hidden Object Scene
Go to the Library so you can compare the handwriting from William's Letter and the Suicide Note.
Place both letters on the table and find the 11 words in William's Letter that do not match the Suicide Note.
The solution is shown in the screenshot.
Wilfred will appear with news of what he has found, so go to the Reception Hall.
Screenshot
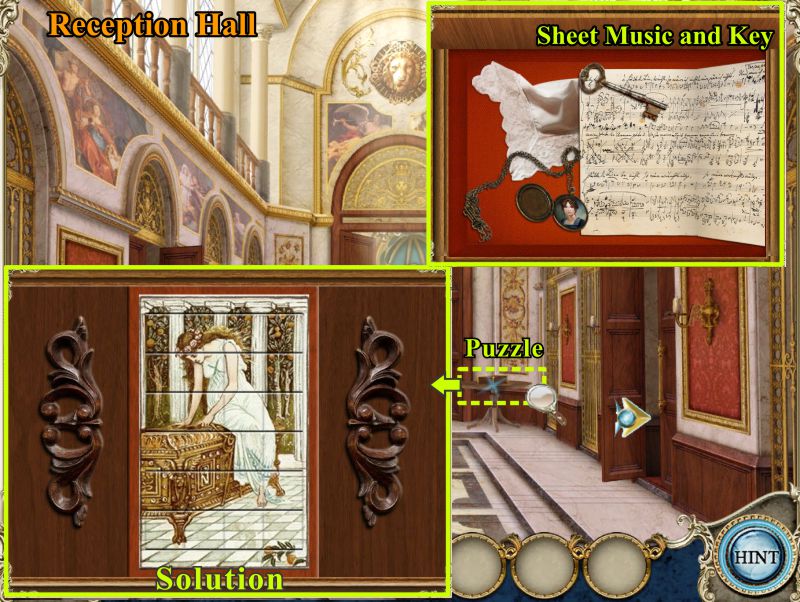
Reception Hall and Charlotte's Box
Click on the table with Charlotte's Box and rotate the tiles to complete the picture shown in the screenshot.
The box will open. You need to take the Sheet Music and Key from it.
Screenshot
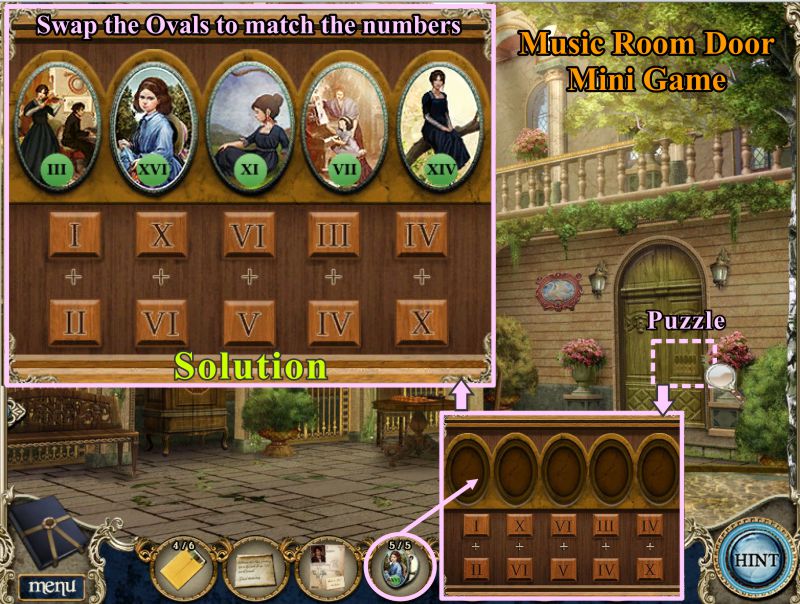
Music Room Door Mini Game
Go back through the door to the Patio and click on the Music Room Door for a Mini Game to open it.
Place all of your Ovals on the door to trigger the Mini Game.
Your goal is to swap the Ovals to equal the numbers listed below, such as I + II = III (see screenshot)..
Screenshot
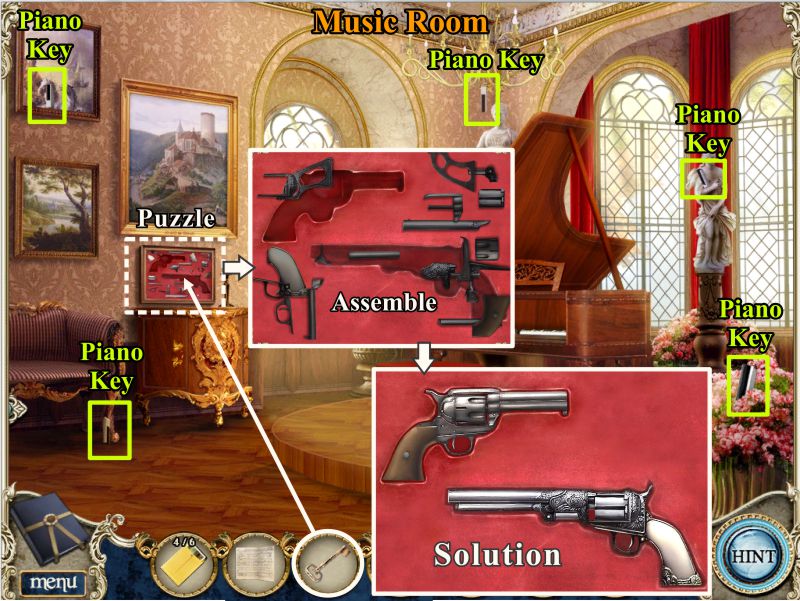
Music Room
Enter the Music Room and pick up all the Piano Keys shown in the screenshot.
Place your key on the Gun Display to start a puzzle.
Assemble the guns as shown in the screenshot solution.
Screenshot
Place your Medical Report on the guns to determine if one of the guns was the murder weapon.
Joseph appears, and when you click on him, he destroys the evidence by trashing the gun display.
Click on the fallen gun display and take the Dagger.
Screenshot
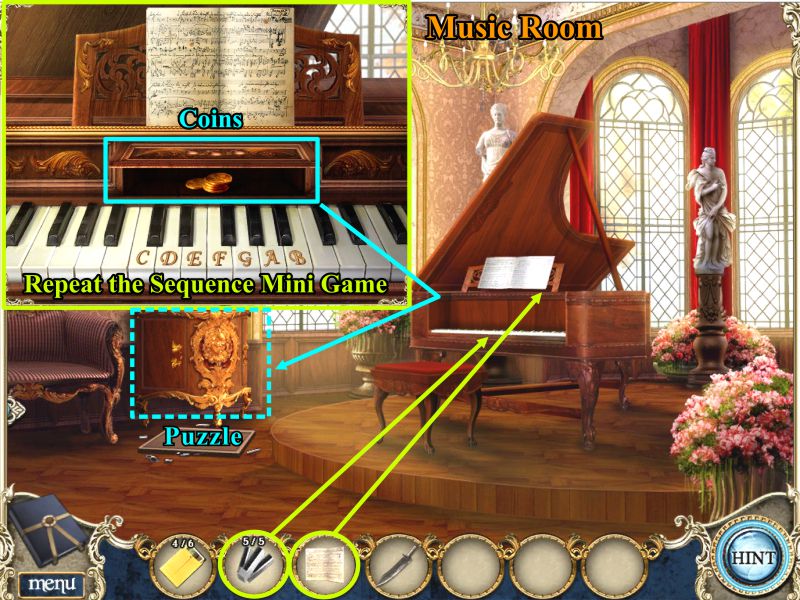
Place the missing piano keys and sheet music on the piano as shown in the screenshot.
You have triggered a Repeat the Sequence Mini Game.
The game is random. Complete the 3 sequences and you will be rewarded with some Coins.
Screenshot
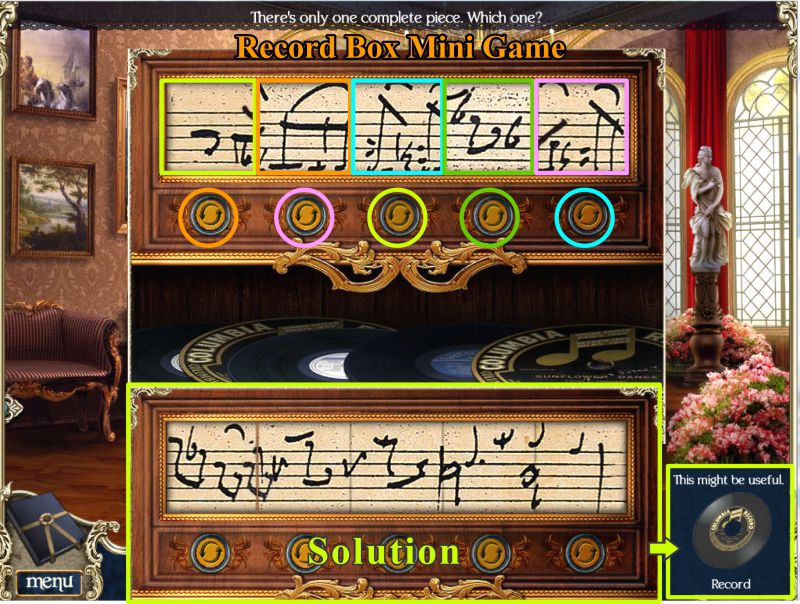
Record Box Mini Game
Insert your coins in the Record Box for another Mini Game.
Your goal is to find the one complete piece of music.
The buttons below the music turn each panel, as color coded in the screenshot.
Turn the buttons until you create the shown solution and receive a record.
Screenshot
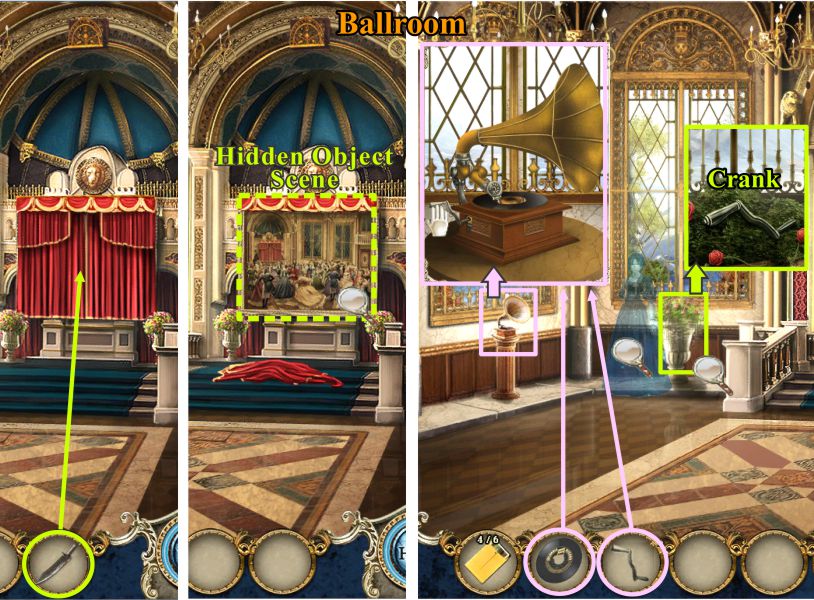
Ballroom
Go to the Ballroom and use your Dagger to cut the ropes on the curtains.
Click on the mural that is revealed for a Hidden Object Scene.
Once you have completed the Hidden Object Scene, Charlotte will appear.
She apparently wants to dance, so will show you how to find the crank for the Gramophone.
Put the record and crank on the Gramophone and pull down the handle.
Screenshot
Mural Hidden Object Scene
Find all the people and other items that are color-coded in the screenshot.
Screenshot
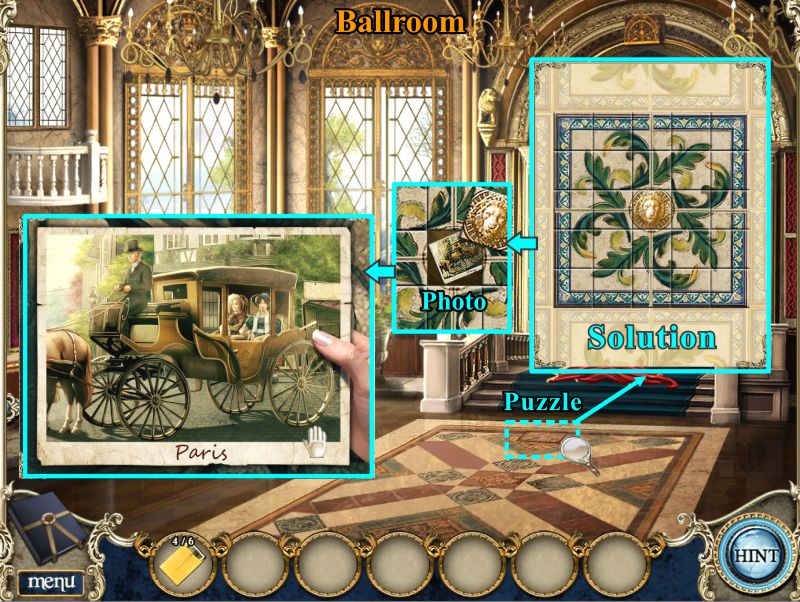
Ballroom
Charlotte has led you to a floor tile she wants you to investigate. Click on it for a puzzle.
Complete the puzzle as shown and take the Photo of the carriage to Paris.
Screenshot
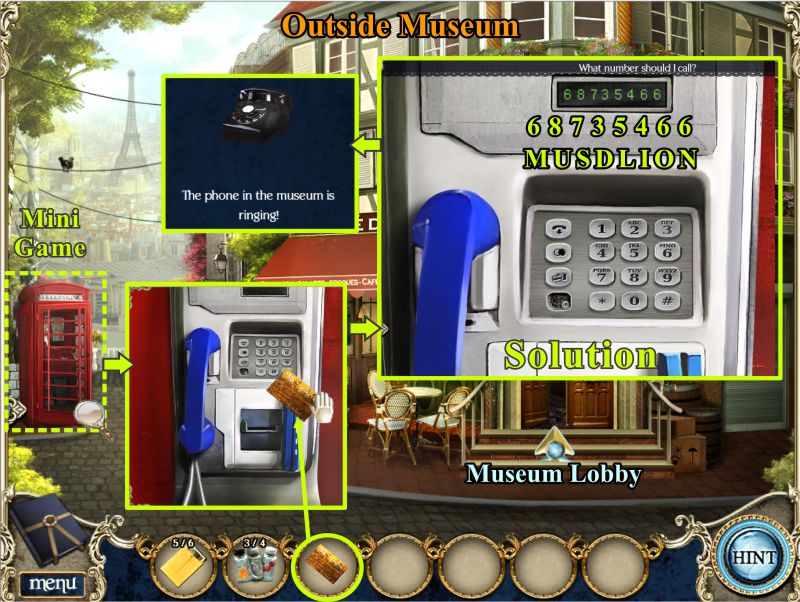
Chapter 6: France
Outside Museum
Check out the magnifying glasses and click on the phone booth.
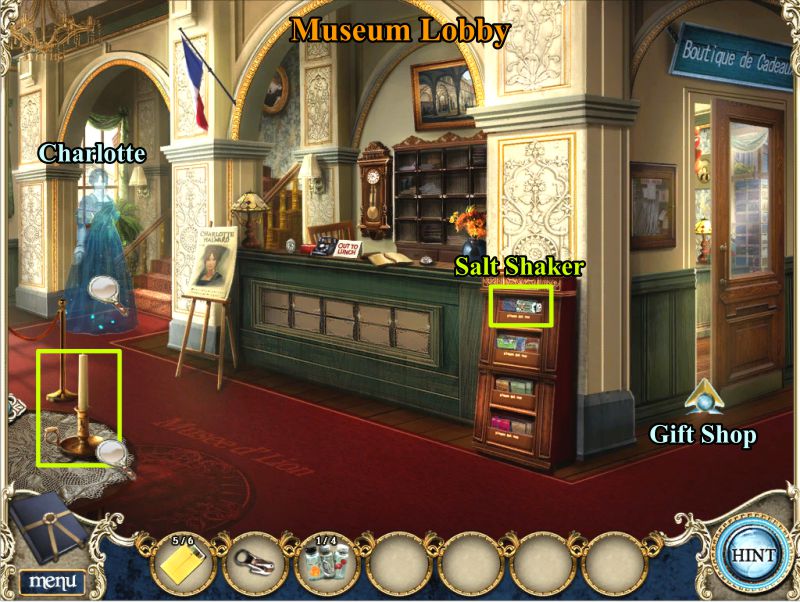
Take the Zipper Pull and Salt Shaker and enter the Museum.
Screenshot
Museum Lobby
Pick up the Salt Shaker and click on Charlotte, who goes up the stairs.
Note the candle, then enter the Gift Shop.
Screenshot
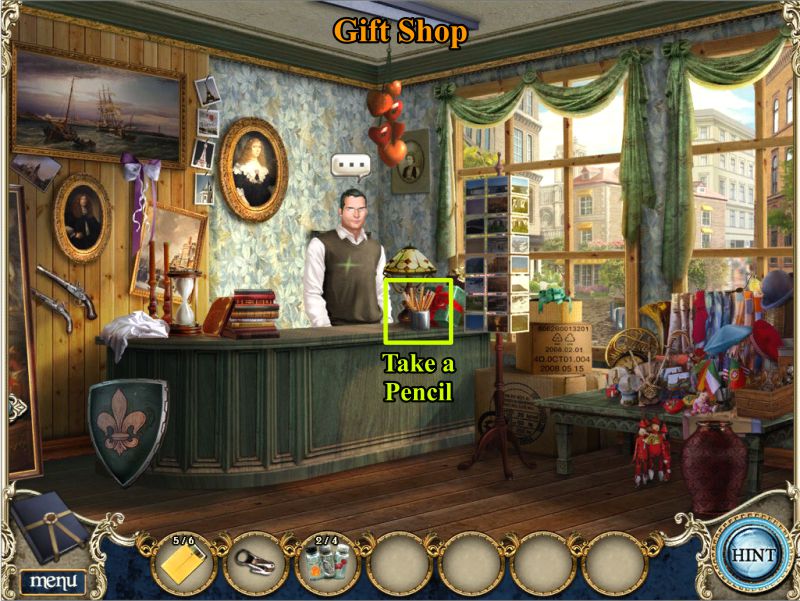
Gift Shop
Talk to the clerk and take a pencil before returning to the Lobby.
Screenshot
Museum Lobby
Zoom in on the counter and click the pencil sharpener for a puzzle.
Align the rings to form the solution shown in the screenshot.
Place the zipper pull on the bag, open it and pick up the Cutter.
Sharpen your pencil and use the pencil on the card in front of the phone to reveal the phone number.
Screenshot
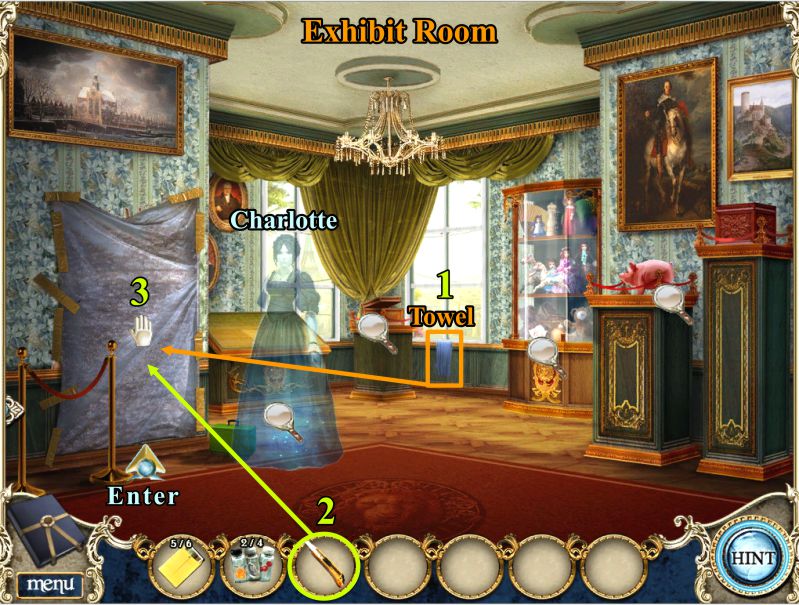
Exhibit Room
Go upstairs to the Exhibit Room. Click on Charlotte, who disappears through the tarp.
Check the magnifying glasses in the screenshot, take the Towel and use it to clean the plastic tarp.
Slit the tarp open with the Cutter, remove the section of the tarp and enter the Gallery.
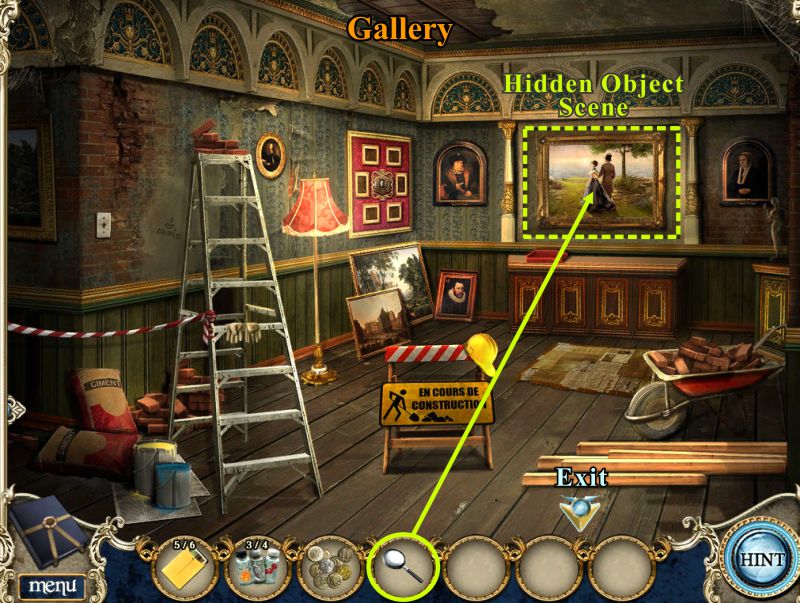
Screenshot
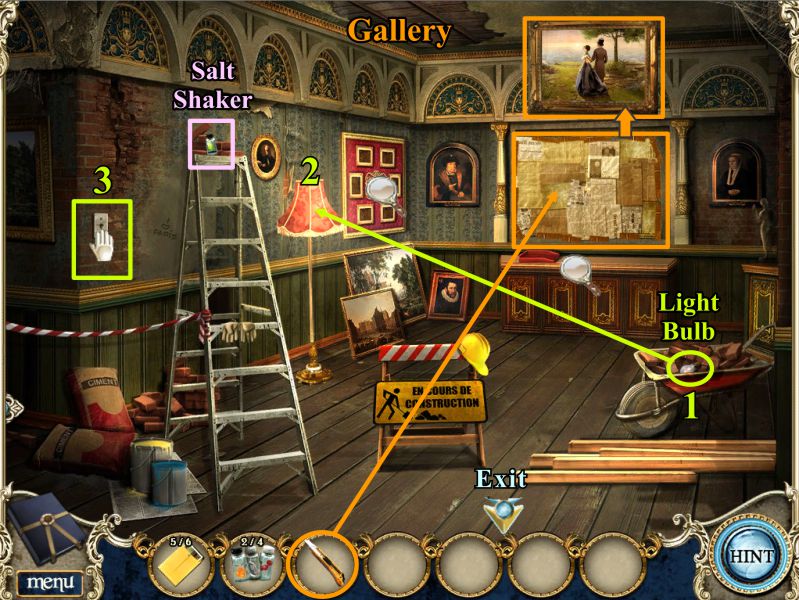
Gallery
It's dark, so grab the light bulb from the wheelbarrow, place it in the lamp, and flick the light switch.
Take the Salt Shaker, then use the Cutter to remove the paper from the painting.
You need a magnifying glass to examine the painting, so go down to the Gift Shop.
Screenshot
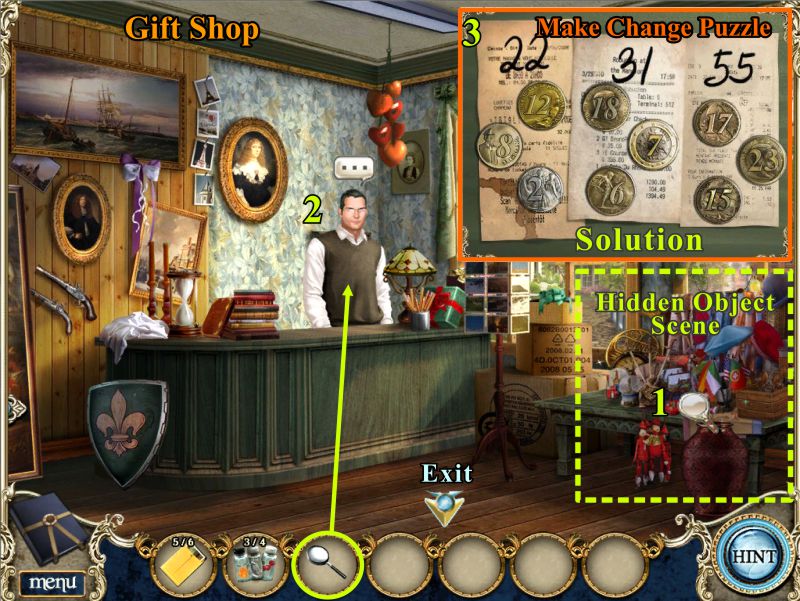
Gift Shop
Click on the souvenirs to play the Hidden Object Scene and get the magnifying glass.
Hand the magnifying glass to the clerk, who doesn't have change. Play the puzzle to make change.
Place the coins on the correct receipt as shown in the screenshot.
12, 8, and 12 make 22; 18, 7, and 6 add up to 31; 17, 23, and 15 total 55.
Once you have paid for the magnifying glass, you will end up with a bunch of coins.
Screenshot
Souvenir Hidden Object Scene
Collect everything on the list to get the Magnifying Glass.
Screenshot
Gallery
Go back to the Gallery and place the magnifying glass on the painting to trigger a Hidden Object Scene.
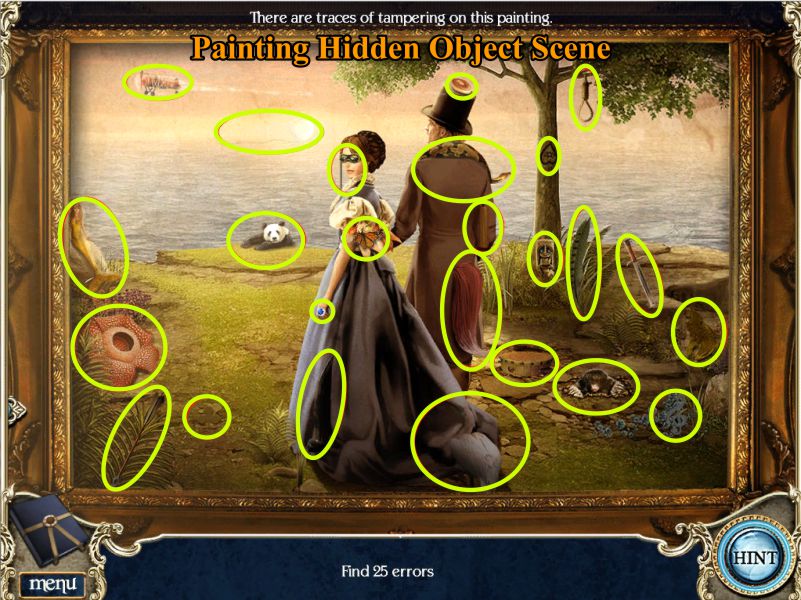
Screenshot
Painting Hidden Object Scene
Find the 25 error in the painting that are marked in the screenshot.
Screenshot
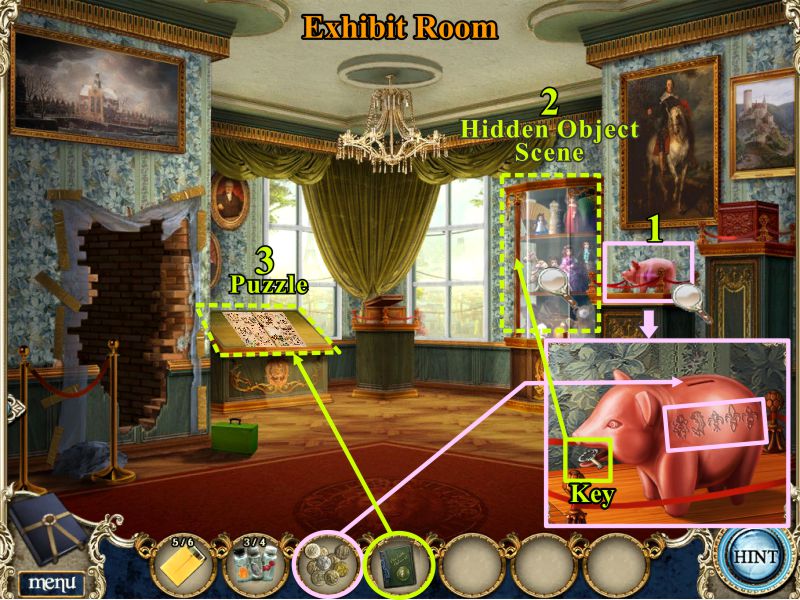
Exhibit Room
Go out to the Exhibit Room and click on the piggy bank.
Place your coin collection in the bank. The pig will open his mouth for you to take the key to the Toy Display.
Use the key to open the display to trigger a Hidden Object Scene to get Charlotte's Scrapbook.
Once you have the scrapbook, place it on the book stand to trigger a puzzle.
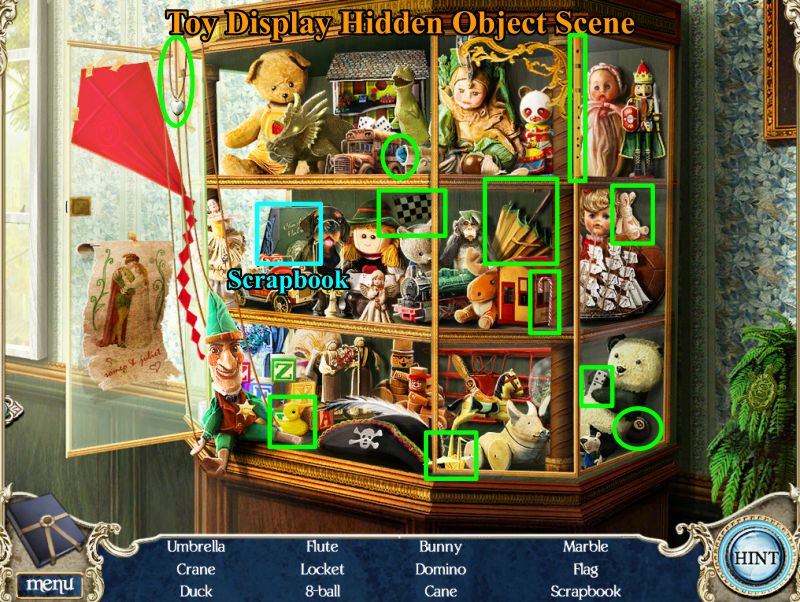
Screenshot
Toy Display Hidden Object Scene
Collect all the toys on your list to get the Scrapbook.
Screenshot
Charlotte's Scrapbook Puzzle
Your goal is to swap the moveable piece in the scrapbook to show the progression of Charlotte's life.
See the screenshot for the solution. You can pick up the phone card when the puzzle is complete.
Screenshot
Outside Museum
Go downstairs and outside the Museum to the phone booth.
Click for a close up of the phone and swipe the phone card.
Dial 68735466, which is the numerical translation of the letters MUSDLION on the card on the Lobby counter.
Screenshot
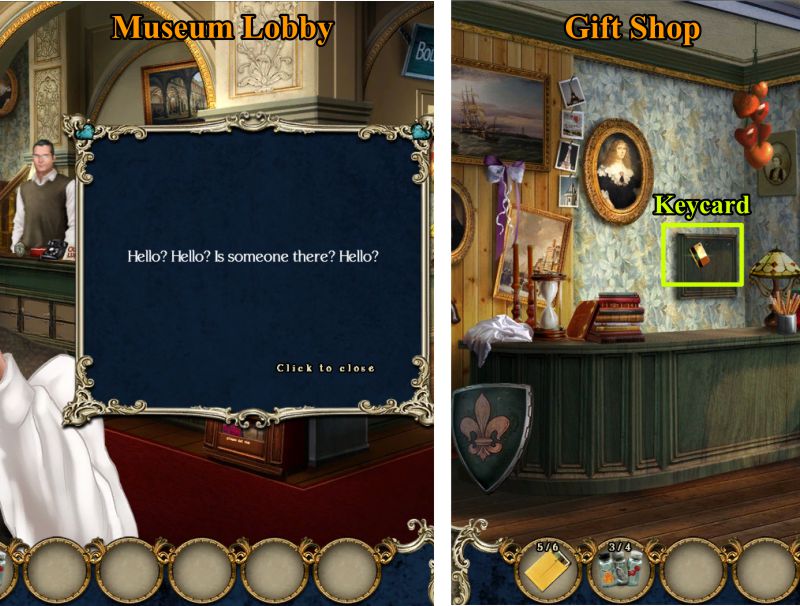
Museum Lobby and Gift Shop
Go back inside the Museum where the phone is ringing at the counter.
Go into the Gift Shop. The clerk needs to go answer the phone, so grab the Keycard while he is gone.
Screenshot
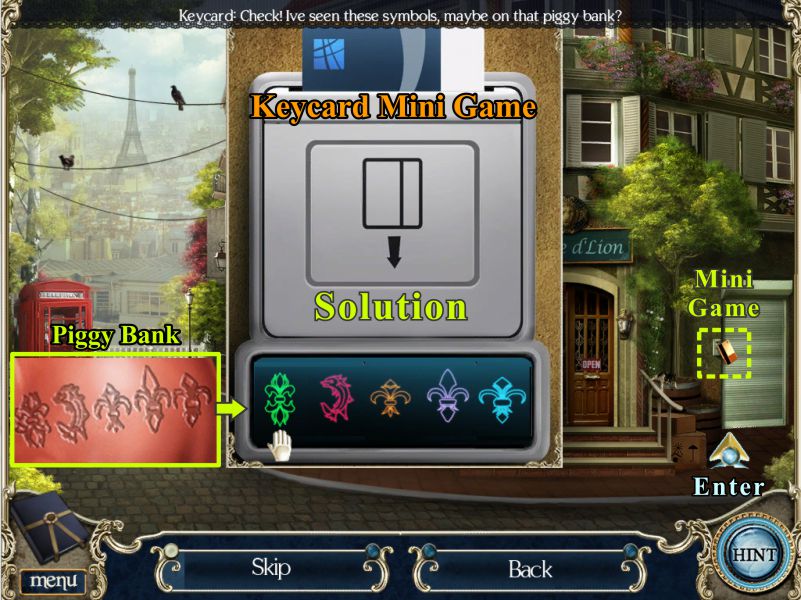
Keycard Mini Game
Go outside to the Storage Room and swipe the Keycard to trigger a Mini Game.
Rotate each symbol so they look like the symbols from the Piggy Bank.
Check the screenshot for a comparative solution.
Screenshot
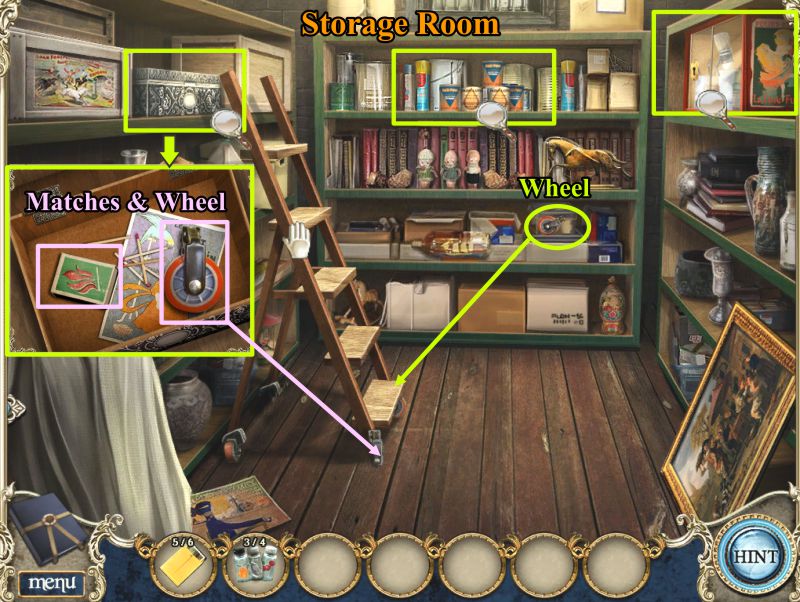
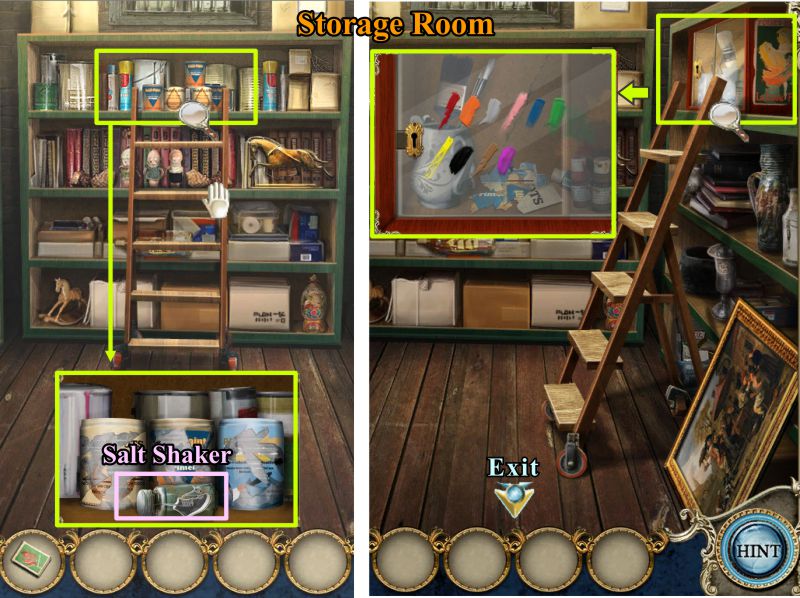
Storage Room
Enter the Storage Room and grab the ladder wheel from the back shelves.
Click on the silver box at the left and take the Matches and other wheel.
Place the wheels on the ladder and push it to the back shelves.
Screenshot
Zoom in on the cans on the top shelf and take the Salt Shaker.
Move the ladder to the right shelves and click on the cabinet on the top shelf to see the paint samples.
Screenshot
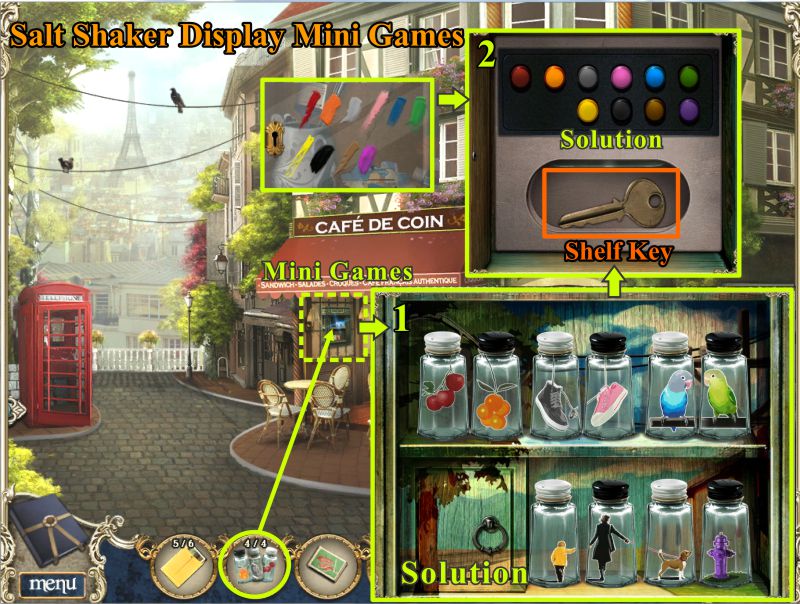
Salt Shaker Display Mini Games
Go outside and place the Salt Shakers on the display to trigger the first Mini Game.
Arrange the Salt Shakers as shown in the screenshot.
The compartment will open up for another Mini Game to get the Shelf Key.
Press the buttons in the same order as the paint swatch colors on the Storage Room cabinet and take the key.
Screenshot
Storage Room
Go back into the Storage Room, open the cabinet with the paint swipes and take and Paintbrush and Label pieces.
Push the ladder twice to get it to the back shelves.
Screenshot
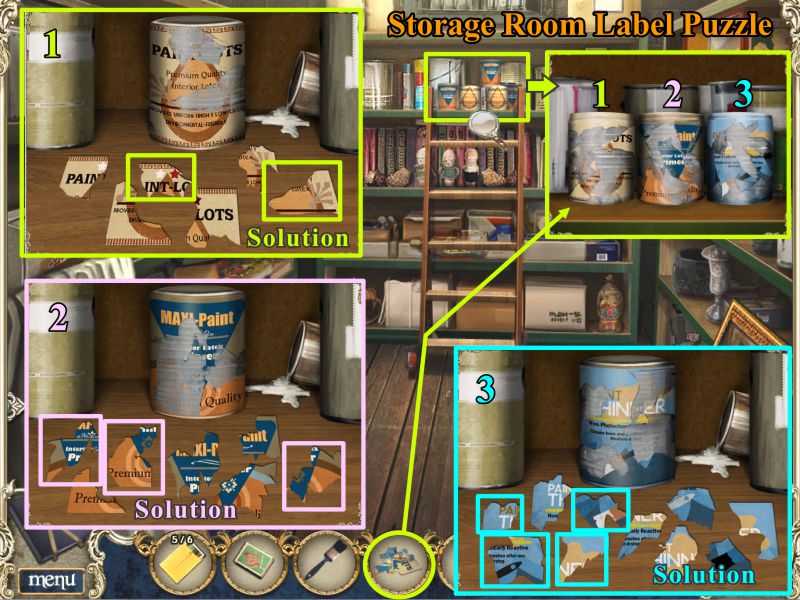
Storage Room Label Puzzle
Zoom in on the cans on the top shelf and place the label pieces to trigger a puzzle.
First can needs 2 pieces to complete its label.
Second round requires 3 pieces and the third can needs 4 pieces. See the screenshot for help in identifying the pieces.
You will come away with a can of paint thinner.
Screenshot
Gallery
Go inside the Museum and up to the Gallery.
Place the paint thinner on the cabinet under the painting and dip your brush into it.
Use the brush with the thinner on the lifted edge of the painting until you have recovered the picture of Charlotte that is underneath.
Screenshot
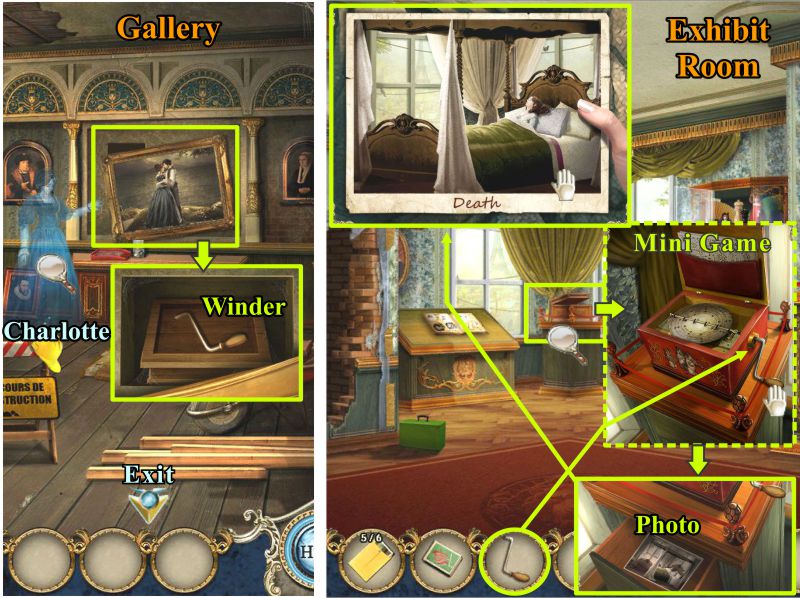
Gallery and Exhibit Room
Charlotte appears and moves the painting when you click on her.
Take the Winder and go to the Exhibit Room.
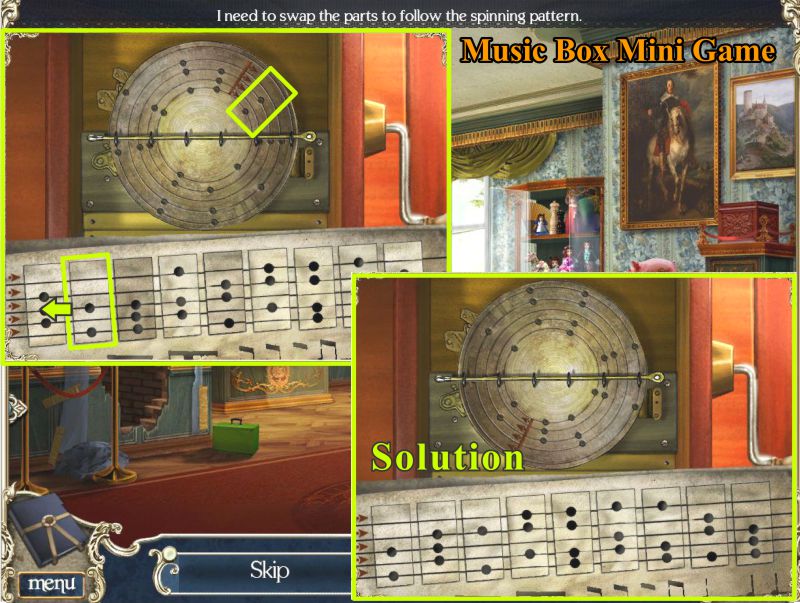
Zoom in on the Music Box, place the Winder on it, and turn it to trigger a Mini Game.
When you have completed the Mini Game, the Music Box will open. Click on the Photo of Charlotte on her death bed.
Take the Photo and go back to the Gallery.
Screenshot
Music Box Mini Game
Your goal is to make the notes under the wheel match the spinning pattern.
The screenshot shows where it starts and what the final solution should look like.
Screenshot
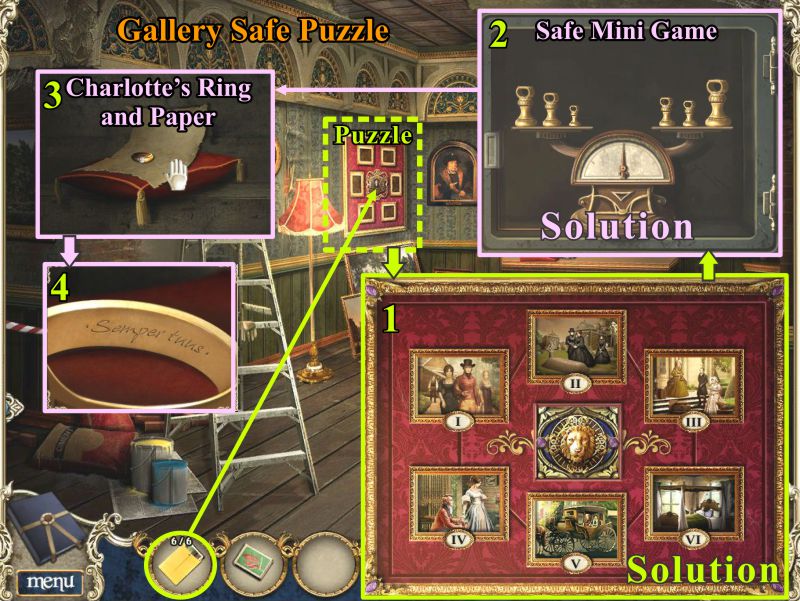
Gallery Safe Puzzle and Mini Game
Now that you have all of the photos, place them on the frame with the small picture frames to trigger a puzzle.
Arrange the photos in the order you received them at the end of each chapter in the game.
The solution is shown in the screenshot. The frame will open to show the safe behind it.
In order to open the safe, you will have to balance the scale (see screenshot).
Click on Charlotte's Ring, read the inscription and collect it along with the piece of paper.
Screenshot
Museum Lobby
Go to the Lobby and light the candle with your matches.
Hold the paper up to the candle and the invisible ink will appear, so that you can now read Joseph's letter.
Screenshot
Chapter 7: Fairing Point
Fairing Point Cliff
Dana has gone back to Scotland and to Fairing Point.
Talk to the Concierge who brought the items Dana requested.
Once he leaves, you will be able to collect the cloth that is on the ground in back of the car.
Pick up the Canvas and Easel and click on the art supply box for a Mini Game.
Screenshot
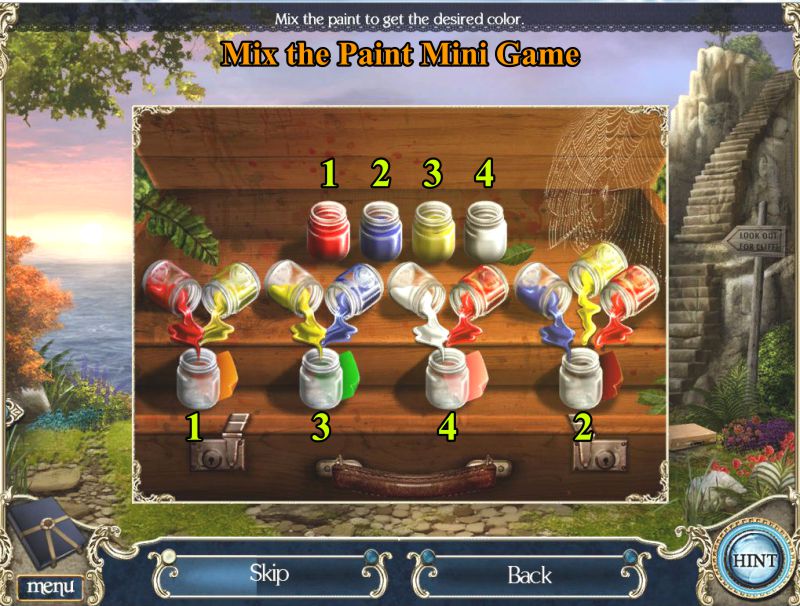
Mix the Paint Mini Game
Your goal is to use the 4 jars of paint in the back row to create the colors in the front row.
Place the paints numbered in the screenshot in the empty jars in the middle row so they can drip into the jars in the bottom row.
When you are finished, the jars will go into your Inventory.
Screenshot
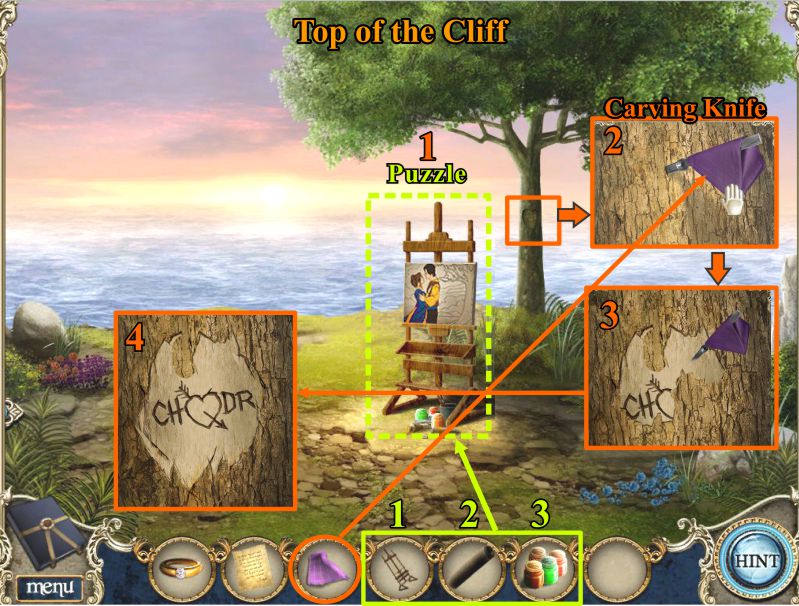
Top of the Cliff
Go up the stairs to the Top of the Cliff.
Place the Easel, Canvas and Paints as shown in the screenshot.
Click on the pile of leaves at the right and move the leaves until you uncover a box.
Place Joseph's confession letter on top of the box for David to find.
Screenshot
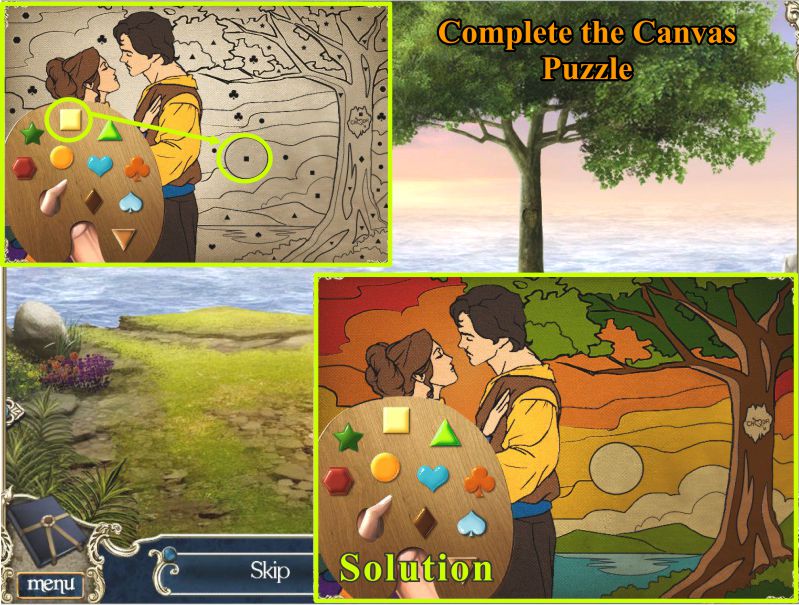
Complete the Canvas Puzzle
Click on the easel to trigger a puzzle to complete the painting you started earlier in the game.
Use the shapes of the colors as shown in the screenshot in order to get the solution.
Screenshot
Top of the Cliff
Dana decides the tree in the picture must be the one in the painting, so click for a close up.
Use the cloth to take the blade and then use the blade to remove the bark as shown in the screenshot, until the carving says Charlotte loves David.
Screenshot
David appears. Click on him and he will take the letter from the box and read it.
He will open the box for you so you can take the Lion Emblem. He then goes to the edge of the cliff, as if he is waiting for something or someone.
Go back down the stairs.
Screenshot
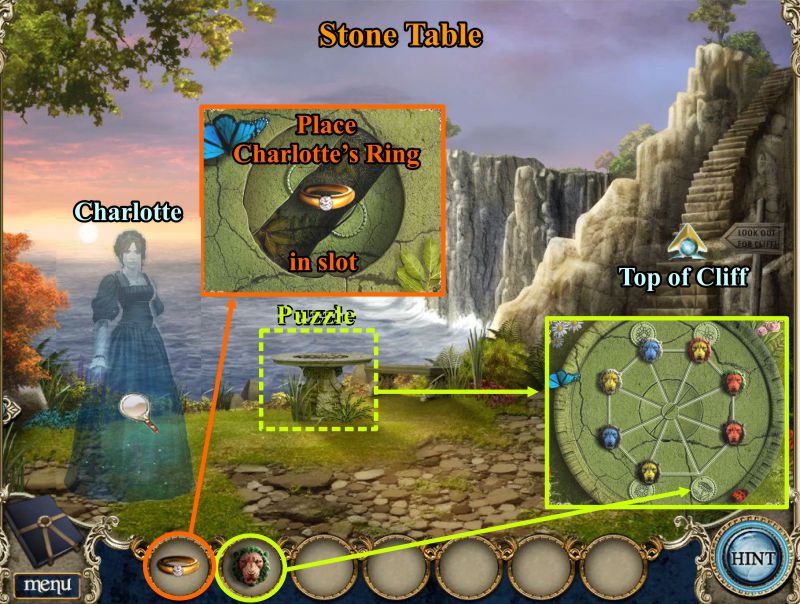
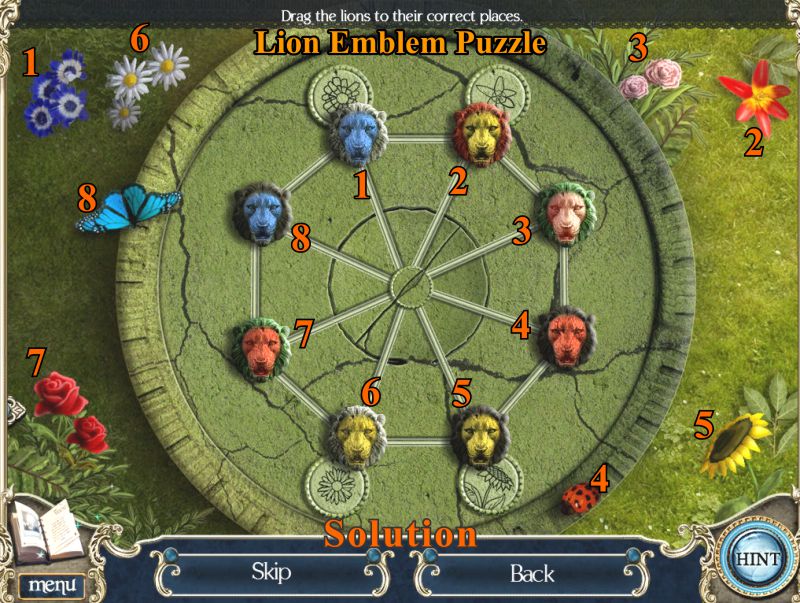
Lion Emblem Puzzle
Click on the stone table and place the missing Lion Emblem to activate the puzzle.
Swap the lions to match the pictures as shown in the screenshot.
The center will open, and that is where you need to place Charlotte's Ring.
Screenshot
Charlotte and David
Charlotte will appear. Click on her and she will go up the stairs and stand next to David.
Click on both of them to tell them their time has come to be together.
Screenshot
Congratulations, you have helped Dana to finish her novel.
Posted by: Jazz |
January 22, 2011 1:36 PM
|
January 22, 2011 1:36 PM
Death at Fairing Point: A Dana Knightstone Novel Epilogue Walkthrough
General Information
Once you have completed the basic gameplay, you will no longer be able to play it again without choosing a new profile.
If you purchased the Collector's Edition, you will now have access to the Bonus Content. Select it from the Main Menu to begin the epilogue.
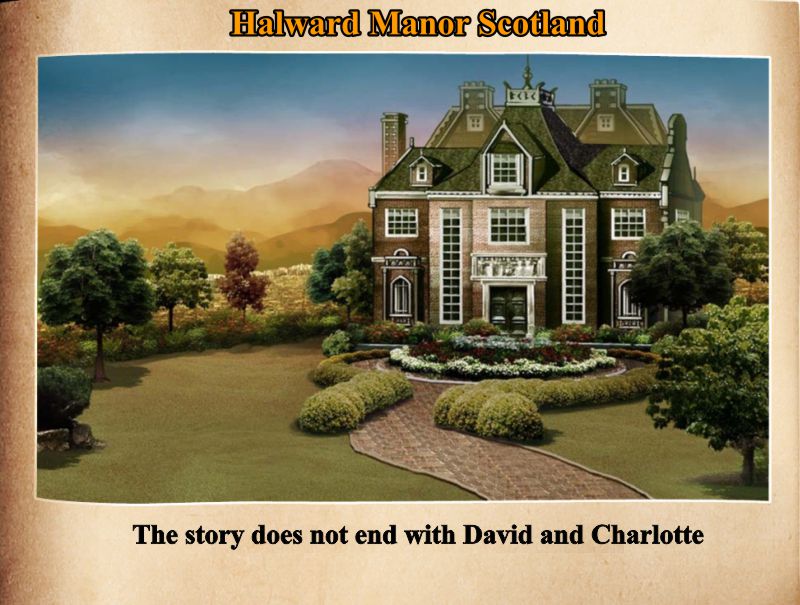
Halward Manor in Scotland
Dana returns to Halward Manor in Scotland to learn the rest of the story.
Screenshot
Dana's Room
Check the cabinet and pick up the Tack Remover.
Zoom in on Dana's laptop and read all the notes.
Click on the teacart and take the Bell.
Screenshot
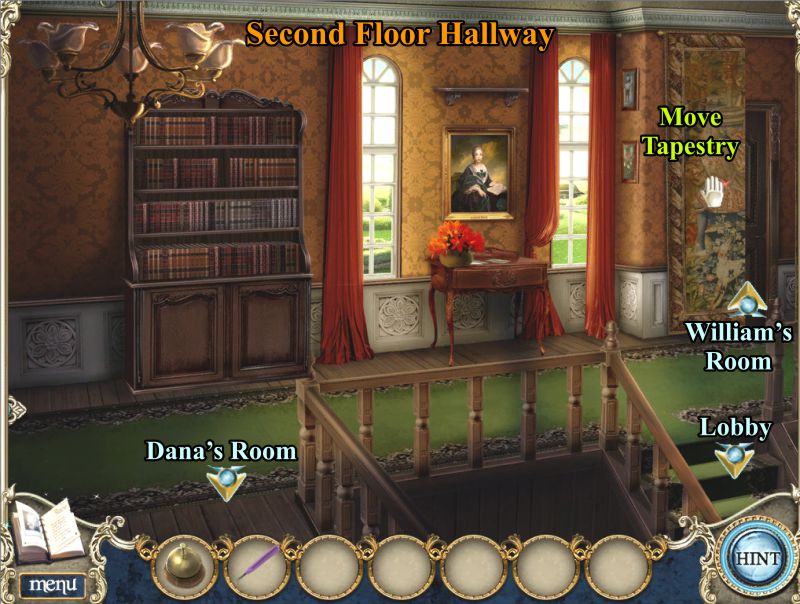
Second Floor Hallway
Go out to the Hallway and move the tapestry to discover a door with a rusty lock.
Go downstairs to the Lobby.
Screenshot
Lobby
Place the Bell on the counter and ring it for the Concierge to appear.
Talk to him and he will give you a box to open.
Swap and rotate the tiles until you get the picture shown in the screenshot.
Take the Mysterious Key that is inside the box.
Screenshot
Take the Magnet that is on the chair, then open the top drawer behind the desk to pick up the Hammer and Chisel.
Use your Tack Remover to take the 6 tacks, shown in the screenshot, so you can collect the New Floor Plan from the bulletin board.
Pick up the ball of yarn on the bulletin board shelf. It will combine with the magnet in your Inventory.
Zoom in on the flowers on the table, collect the 3 Gems, and head back upstairs to Dana's Room.
Screenshot
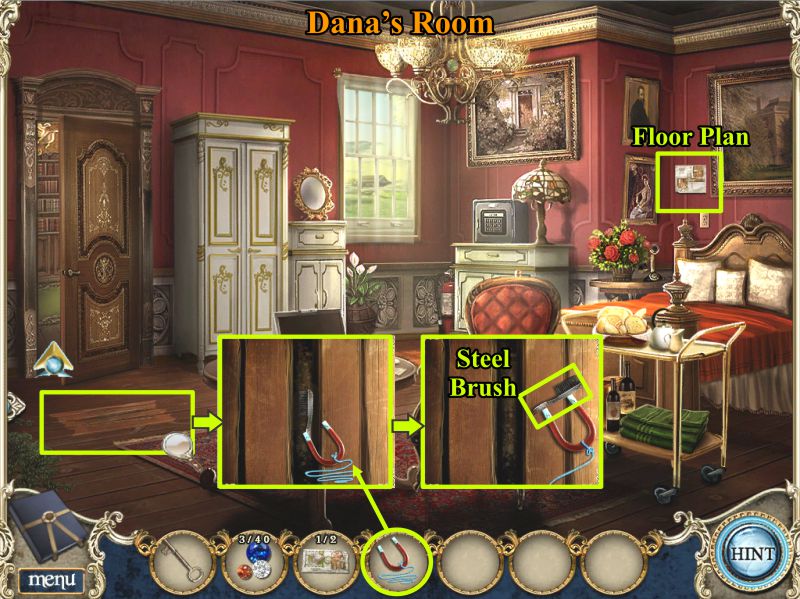
Dana's Room
Take the Floor Plan off the wall, then zoom in on the loose floorboards.
Use the magnet to retrieve whatever is under the boards.
Once the magnet attaches itself, grab the yarn and yank the magnet and Steel Brush out of the crack.
Take the brush from the magnet.
Screenshot
Second Floor Hallway
Go out to the Hallway and click on the rusty door lock.
Use the steel brush to make it all shiny, then open the door with the key and enter.
Screenshot
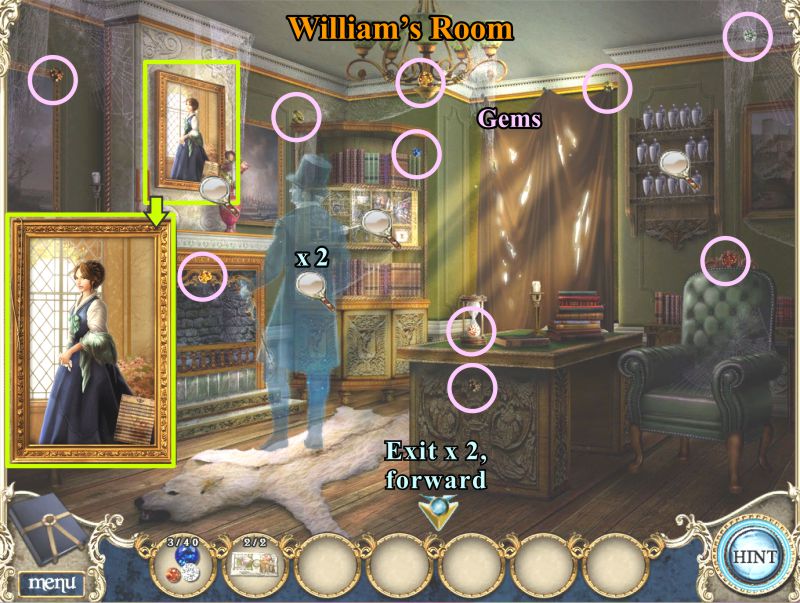
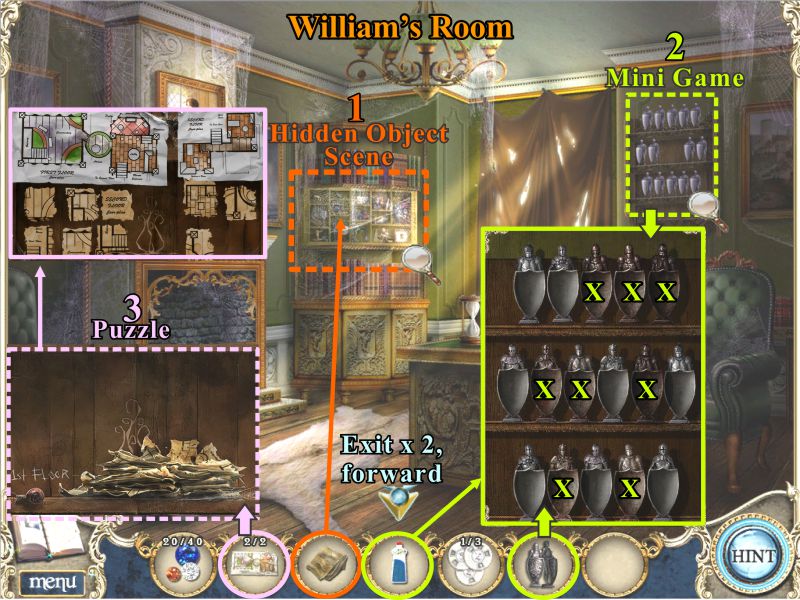
William's Room
William's ghost is staring at a portrait of Charlotte.
Click on him and he will turn around.
Click on him again and he will disappear.
Collect all the Gems marked in the screenshot and go downstairs to the Parlor.
Screenshot
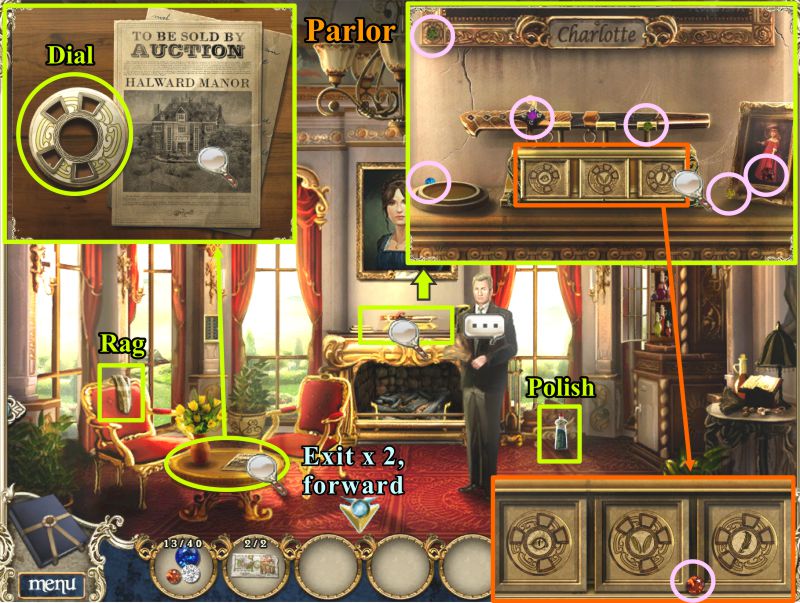
Parlor
Collect the Rag and Polish, talk to the Concierge, and click on the table to read about the auction.
Pick up the Dial on the table, then click on the fireplace mantle.
Collect the Gems marked in pink in the screenshot and click on the symbols under the dagger to collect another Gem.
Screenshot
William's Room
Go back up to William's Room. Use the rag to clean up the cabinet for a Hidden Object Scene.
When you finished that, click on the knights on the wall for a Mini Game.
In order to trigger the Mini Game you need to first place the knights from your Inventory on the shelf.
Next, you need to clean the dirty knights, marked with an "X" in the screenshot, with the polish from your Inventory.
Once you have finished with the knights, you will get a pile of floor plan pieces to match up with the 2 new floor plans in your Inventory, so click to start another puzzle.
Screenshot
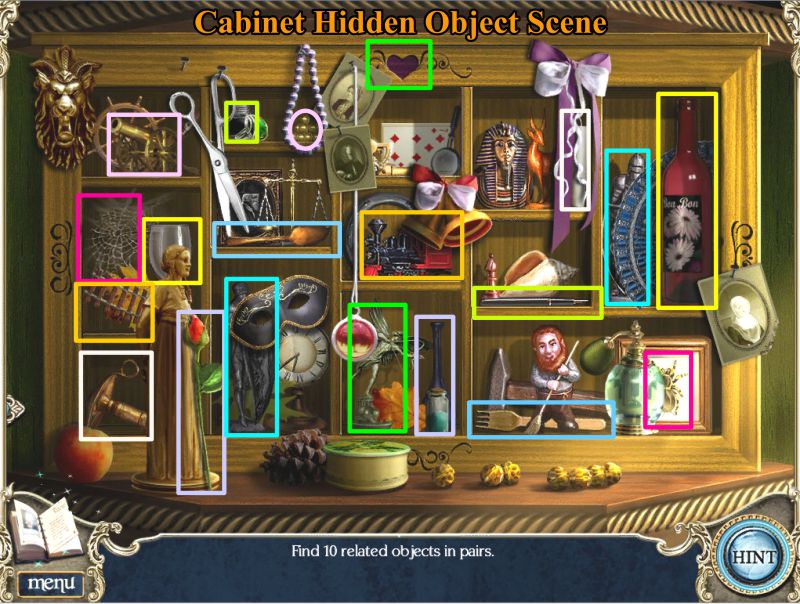
Cabinet Hidden Object Scene
Your goal is to match up 10 sets of objects that are somehow related.
All of the pairs are marked in the screenshot.
Screenshot
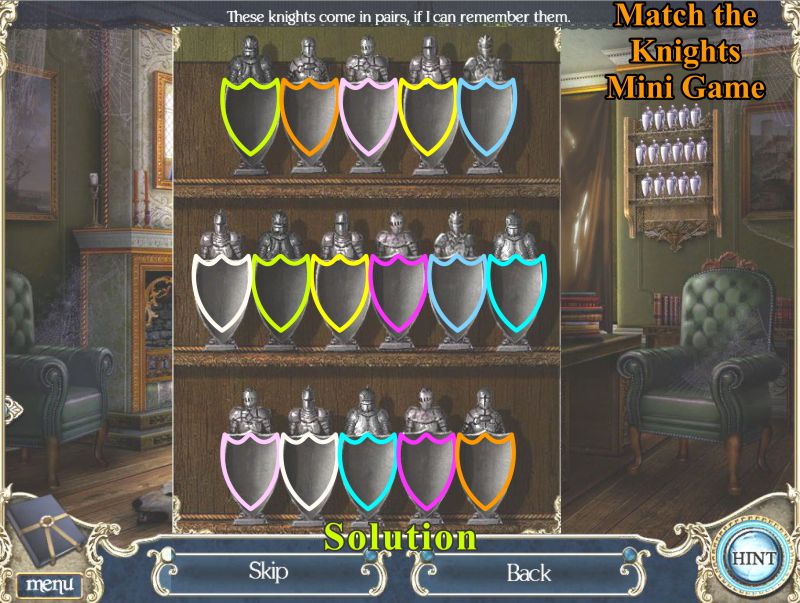
Match the Knights Mini Game
The matching knights are color-coded in the screenshot solution.
Screenshot
Floor Plan Puzzle
Your goal is to place the old floor plan puzzle pieces for the First Floor on the left and the Second Floor on the right.
Swap the pieces to match the solution in the screenshot.
Screenshot
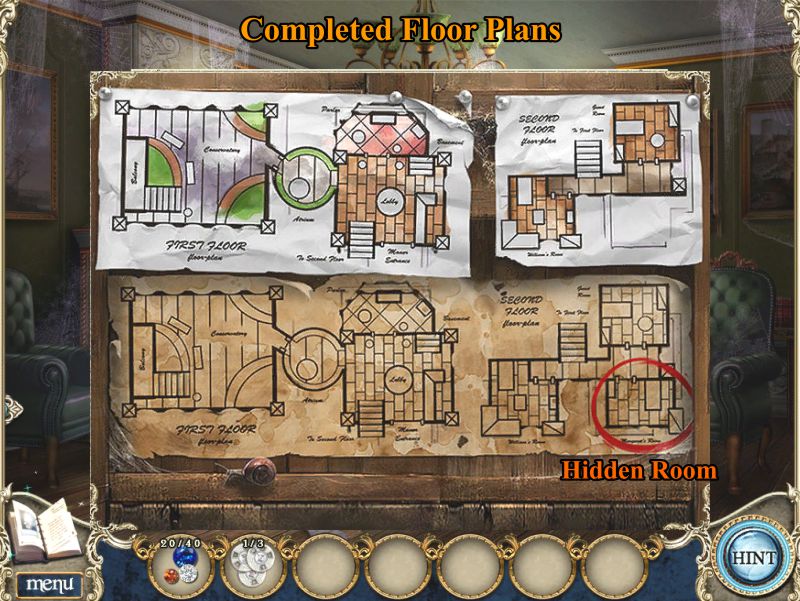
Part 2 gives you more of the older pieces to match up. Arrange the First Floor on the left and Second Floor on the right as shown in the screenshot solution.
Screenshot
Once you have matched all the pieces to the proper floor, the older plan will automatically combine all the pieces into a completed floor plan.
The old plan reveals there is a hidden room on the second floor.
Screenshot
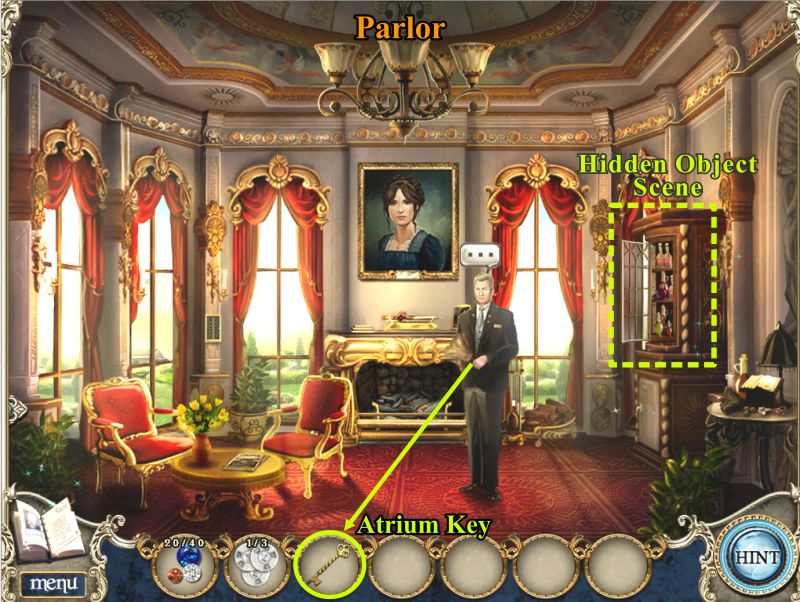
Parlor
Go to the Parlor and talk to the Concierge, because Dana has volunteered to help setting up the breakfast table for the guests.
The Concierge gives you the key for the Atrium, but says you must first find the dishes in the cabinet.
Screenshot
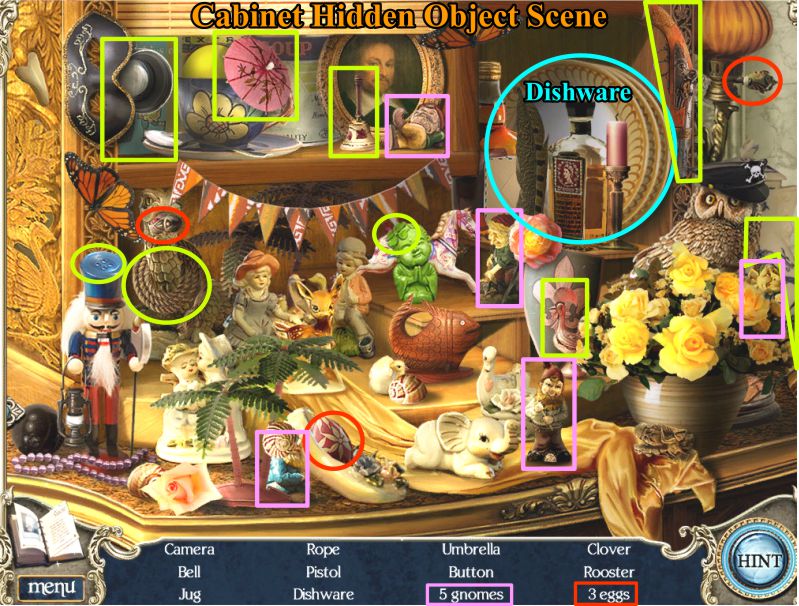
Parlor Cabin Hidden Object Scene
Play the Cabinet Hidden Object Scene to get the Dishware.
Screenshot
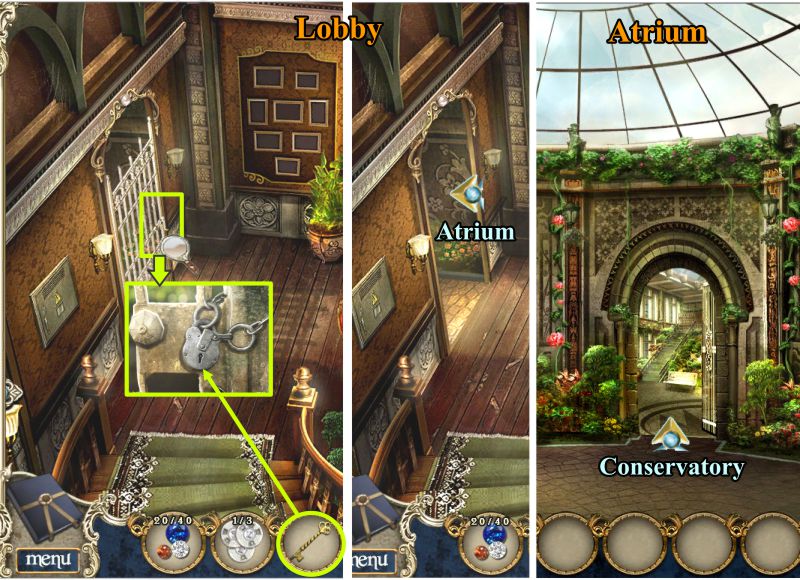
Lobby and Atrium
Go to the Lobby and click on the Atrium door so you can use the key the Concierge gave you to unlock the chain.
Enter the Atrium and go through the door to the Conservatory.
Screenshot
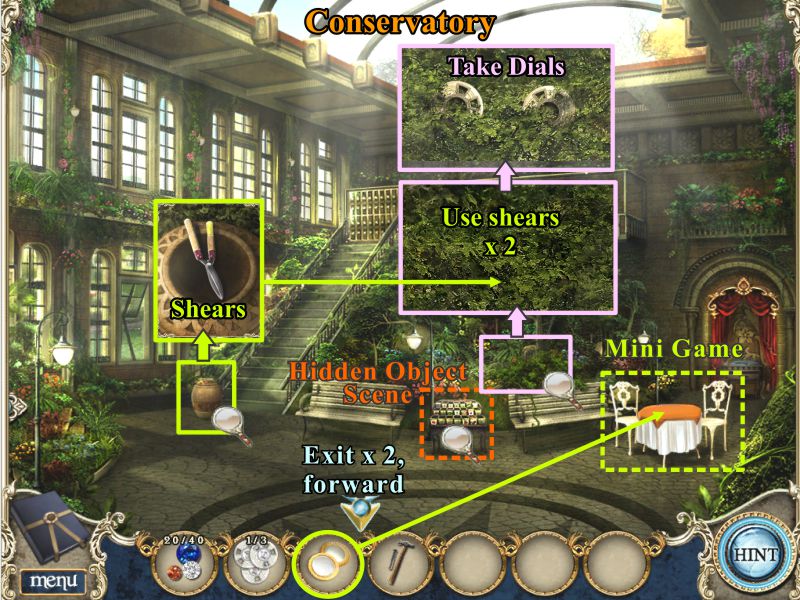
Conservatory
Zoom in on the pot and take the shears.
Use the shears twice on the foliage marked in the screenshot so you can take the Dials.
Play the Hidden Object Scene at the Seed Rack to collect the Gems.
Place the Dishware on the table to activate a Mini Game.
Screenshot
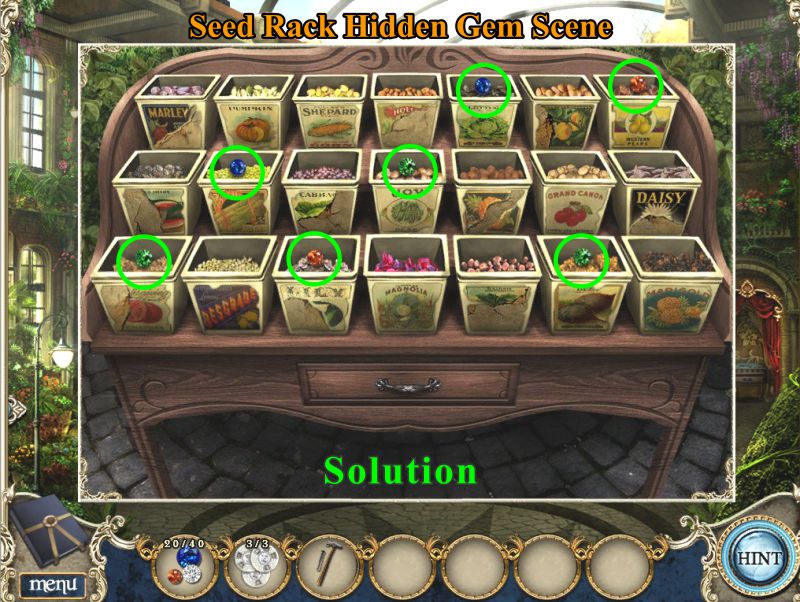
Seed Rack Hidden Gem Scene
There are 7 gems hidden in the seed containers.
The easiest way to find them is to just click on every one of them, but if you want a shortcut, check the screenshot.
Screenshot
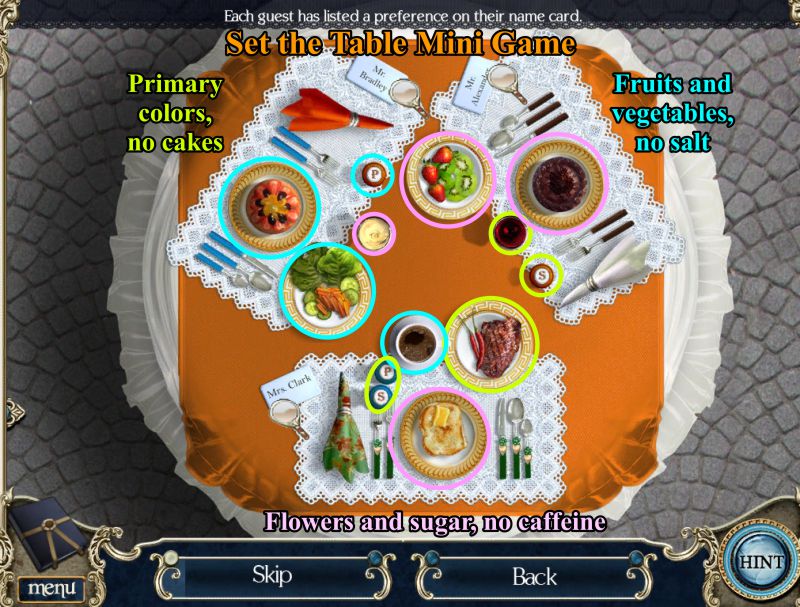
Set the Table Mini Game
The Concierge wanted you to set the table for the guests, but each guest has specific needs as shown in the screenshot.
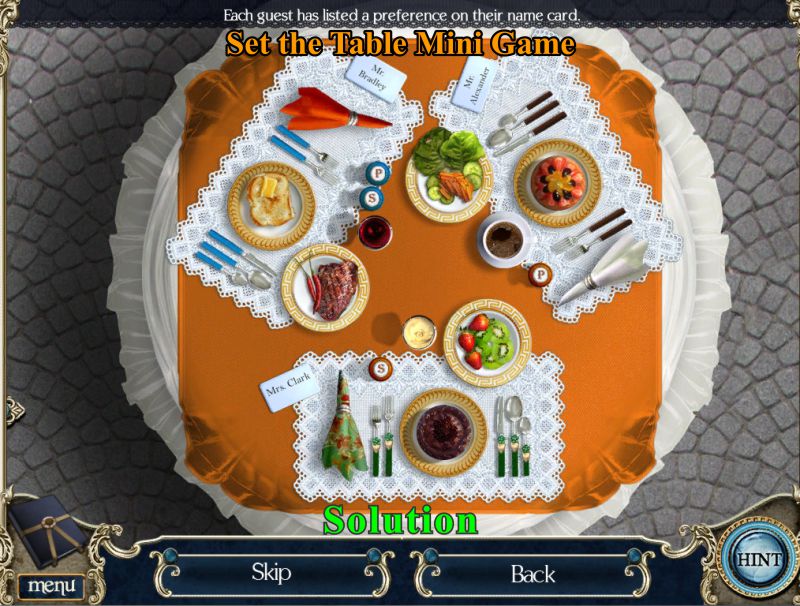
The needs for each guest are marked and the solution is shown in the following screenshot.
Screenshot
This is the solution to your table setting.
Screenshot
Go back to the Parlor and tell the Concierge you set up the table. He will give you a book he found.
Second Floor Hallway
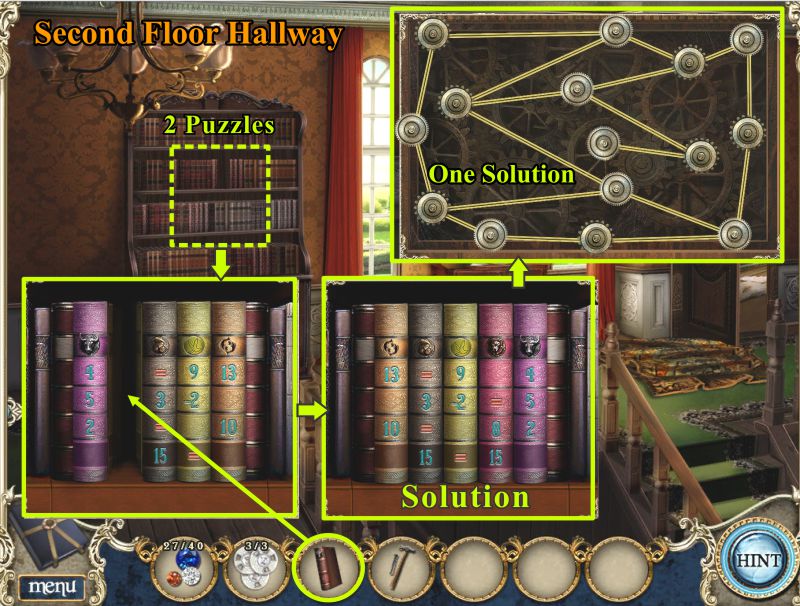
Click on the bookcase to place the book you got from the Concierge to trigger a puzzle.
Arrange the books as shown in the screenshot and you will get another puzzle to untangle some gears.
There is more than one solution for the gears. One possible solution is shown in the screenshot.
Screenshot
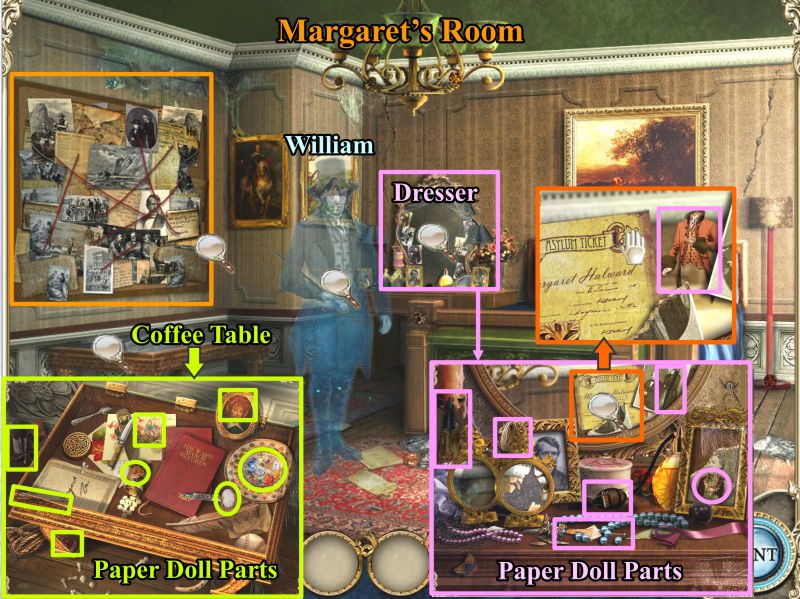
Margaret's Room
You have opened the door to Margaret's Room. William appears after you enter.
Click on William and he disappears. Click on the wall next to him with all the pictures to trigger what you need to do next, which is to find a whole bunch of paper doll parts.
Click on the Coffee Table and collect the paper doll parts there.
Click on the dresser and collect all those paper doll parts.
Check out Margaret's Asylum Ticket and move it so you can collect the last paper doll part.
Screenshot
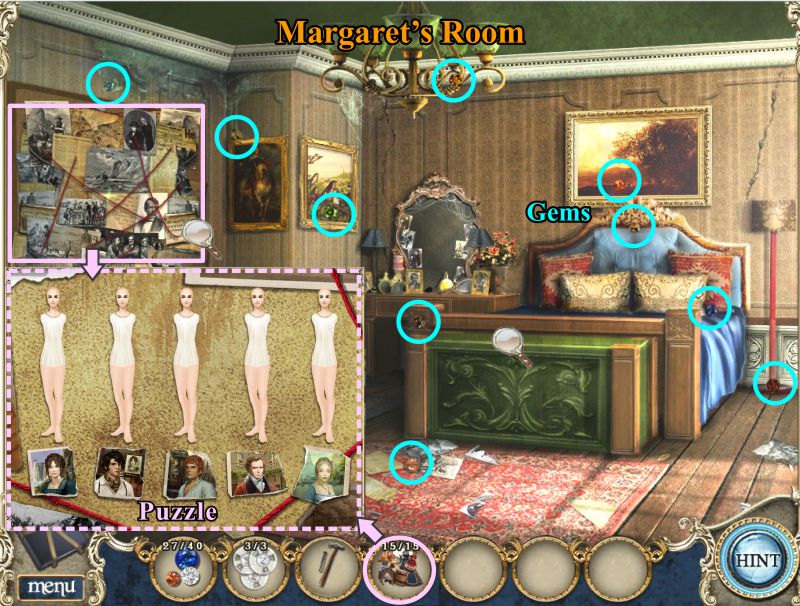
Collect all the Gems in Margaret's Room as shown in the screenshot.
Click again on the collage on the left wall and view the paper dolls.
Place the clothes you collected to activate the Puzzle.
Screenshot
Paper Doll Puzzle
Place all the Paper Doll parts on Margaret's characters to complete the puzzle, as shown in the screenshot.
When you have completed the puzzle, William's picture changes into a photo of his statue in the Atrium, and it has moved. Go to the Atrium to see what is going on.
Screenshot
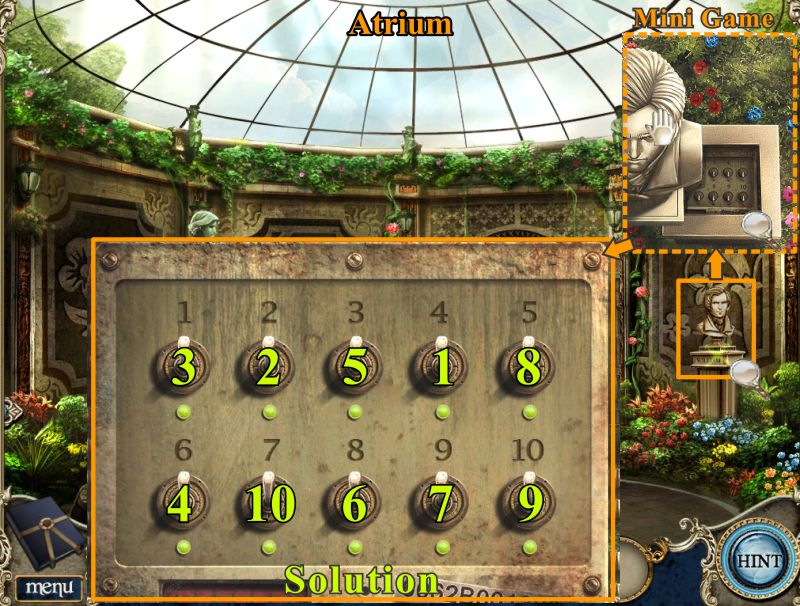
Atrium
Click on William's statue and move it over.
Click on the switches underneath to activate a Mini Game.
Your goal is to click on the switches in the correct order, as shown in the screenshot, to turn on the spotlight.
Screenshot
First, click on the statue that has moved to turn toward you and collect the Gems on her.
The spotlight is shining on the flower on the way. Click on it and use your Hammer and Chisel 3 times to crack the wall.
Take the Scroll that appears and take it after you read it.
Screenshot
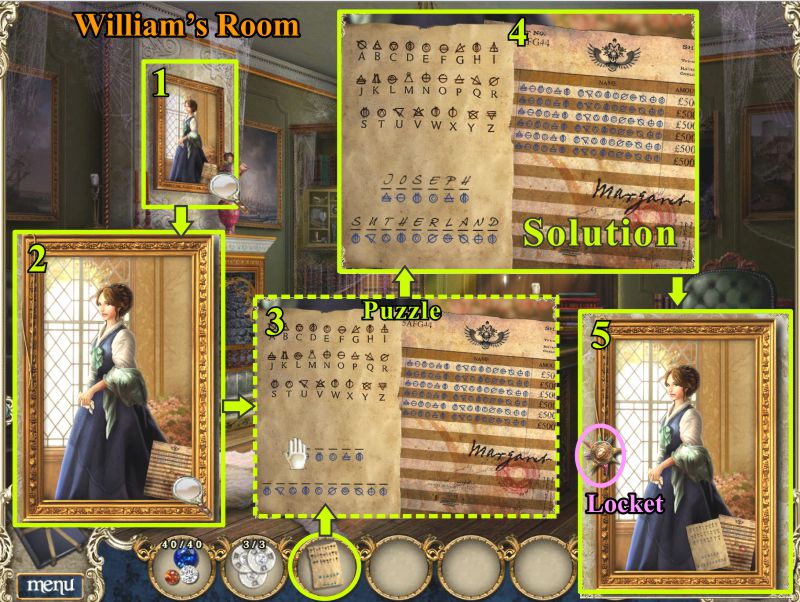
William's Room
Go to William's Room and click on Charlotte's portrait.
Zoom in on the corner or the portrait as shown in the screenshot.
Place the code note with the bank statement.
Individually click above each character and keep clicking until with bottom part of the note says Joseph Sutherland.
When you have completed the puzzle, a locket will appear on Charlotte's portrait. Take it.
Screenshot
Margaret's Room
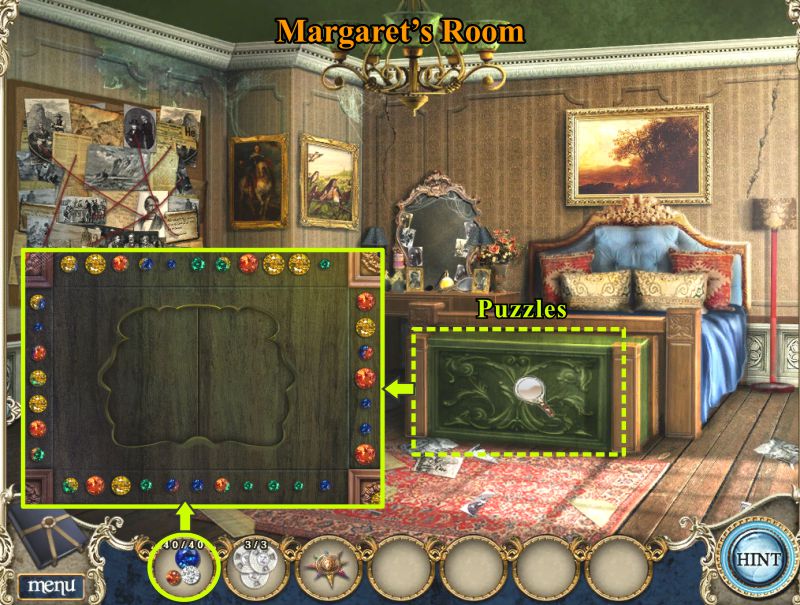
Go to Margaret's Room and click on her trunk.
Place all of the Gems there to trigger the first puzzle.
Screenshot
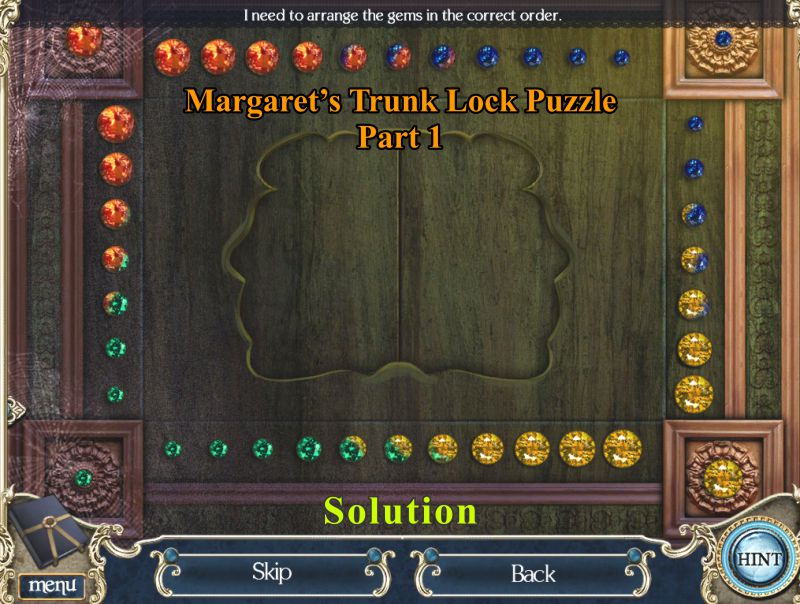
Margaret's Trunk Lock
Your goal is to arrange the gems in the correct order according to the colors on each of the corners.
You will need to segue from one corner to the other with the changing colors, as shown in the screenshot.
Screenshot
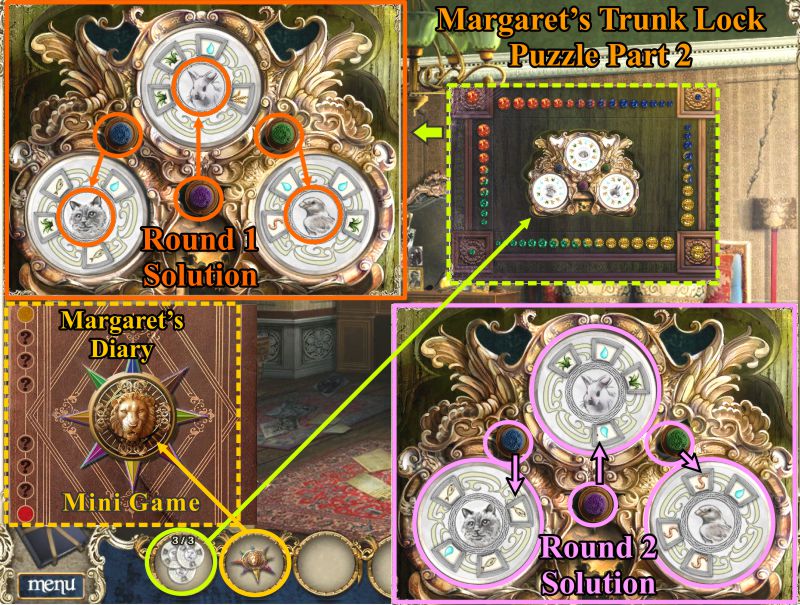
When you have completed the first part of the lock, you will need to place your Discs from your Inventory in the middle of the next part of the lock.
Round 1 requires you to use the buttons to change the middle picture of the animals to match the outer pictures.
Round 2 requires you to change the outer pictures to match the inner pictures of the animals.
The solutions are shown in the screenshot.
When you have completed this portion of the lock, the trunk will open to give you access to Margaret's Diary.
Place the Lion Emblem on the Diary to activate another Mini Game.
Screenshot
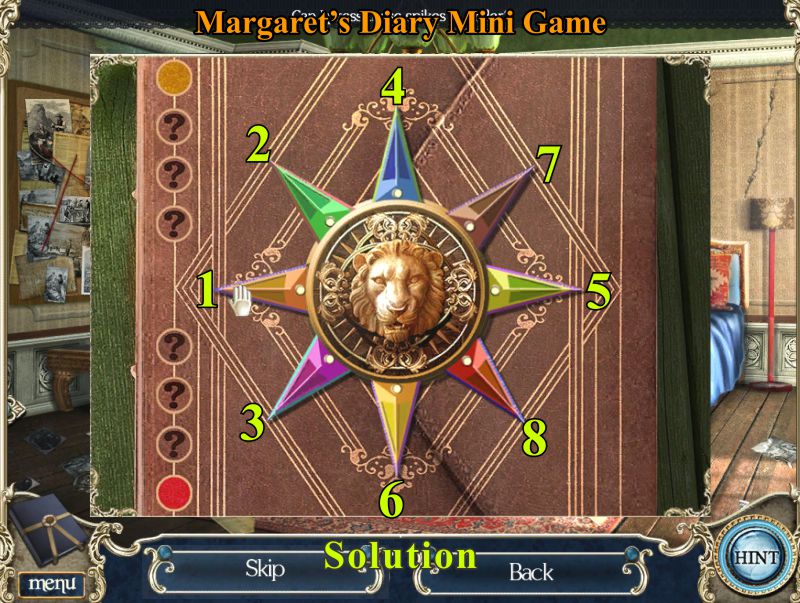
Margaret's Diary
In order to open Margaret's Diary, you will need to press the spikes surrounding the Lion Emblem in the correct order as shown in the screenshot.
Screenshot
Once Margaret's Diary is open, you will need to exchange the tiles in both images to create the pages in her diary.
The screenshot solution shows the completed puzzles of what happened at Halward Manor.
Screenshot
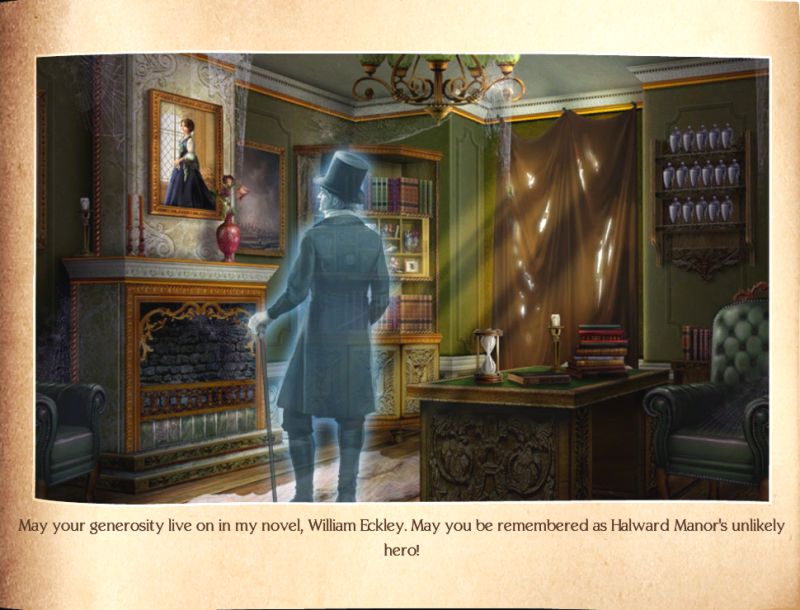
William Eckley
William saved Halward Manor after Margaret went insane from her guilt about Charlotte's death, so he became the final hero in the story.
Screenshot
Posted by: Jazz |
January 25, 2011 8:19 PM
|
January 25, 2011 8:19 PM