
Dark Parables:
The Exiled Prince
Platform: Mac, Windows

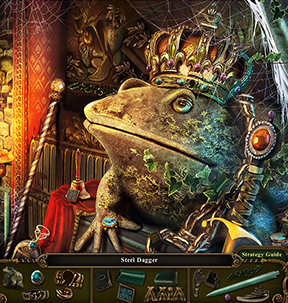
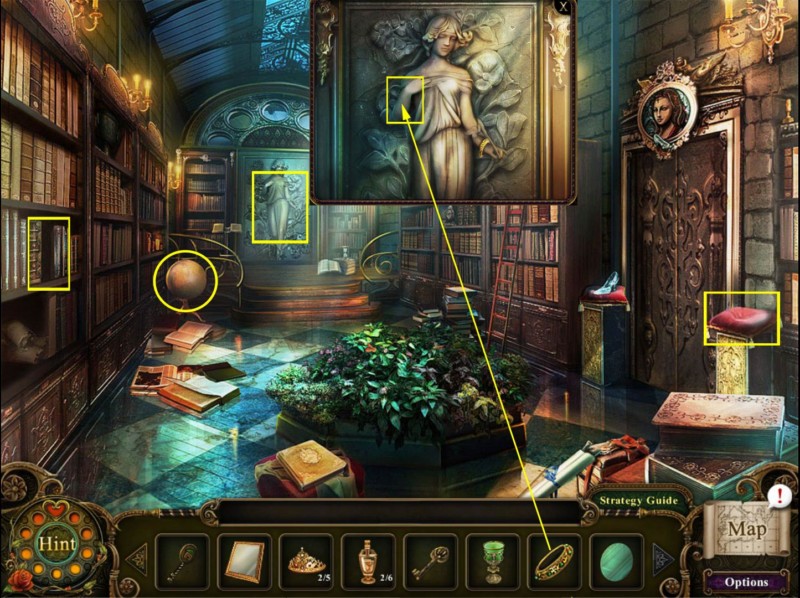
![]() Last year, Blue Tea Games gave us a not-so-happily ever after look at the legend of Sleeping Beauty in the game Dark Parables: Curse of Briar Rose. Players took on the role of a fairy tale detective who brilliantly solved the case. You know how it is when you solve one supernatural mystery, your name gets passed around. In the Black Forest of Germany, the chancellor's daughter has mysteriously vanished in an area where, legend has it, the Frog Prince claims those unwise enough to wander into his territory. (Her bodyguard disappears too, but he's treated more like an afterthought.) Who would they call but you? You'll need to find hidden objects and solve puzzles to rescue them in Dark Parables: The Exiled Prince.
Last year, Blue Tea Games gave us a not-so-happily ever after look at the legend of Sleeping Beauty in the game Dark Parables: Curse of Briar Rose. Players took on the role of a fairy tale detective who brilliantly solved the case. You know how it is when you solve one supernatural mystery, your name gets passed around. In the Black Forest of Germany, the chancellor's daughter has mysteriously vanished in an area where, legend has it, the Frog Prince claims those unwise enough to wander into his territory. (Her bodyguard disappears too, but he's treated more like an afterthought.) Who would they call but you? You'll need to find hidden objects and solve puzzles to rescue them in Dark Parables: The Exiled Prince.
 If you've only ever played regular hidden object games (say, finding a banana, a wallet, seven roses etc in a bathroom that looks like an antiques store exploded in it), the Dark Parables series might throw you for a bit of a loop. You're searching for item fragments rather than intact items in each scene, with each completed hidden object scene rewarding you with an assembled object. These assembled objects will then be used as part of the adventure gameplay. Some people refer to these games as FROGs for "fragmented object games" (as opposed to HOGs which are "hidden object games"). At first glance this seems like an attempt to improve realism, but FROGs have their own set of problems in that arena. This is still a genre that is best accepted on its own terms, without asking troublesome questions like "How come I can take a bunch of metal pieces and reassemble them into a hammer, but I can't figure out some way to break this china urn without using said hammer?"
In addition to assembling objects and using those objects to solve adventure-style puzzles, as with all nefarious supernatural villains, rather than putting his valuables in a safe deposit box, the Frog Prince favors the "puzzle that can be solved in five minutes" approach to home security. You'll swap objects into the correct order, manipulate images and machinery, attempt to assemble arbitrary groups of objects, and more. If I ever become an evil villain of a video game, I'll set up a puzzle at the entrance to my lair's locked door. Anyone who correctly solves the puzzle will receive ten thousand volts. Add that to the evil overlord list, please.
As the last game did, you have the ability to collect 20 "cursed objects" as a bonus. The cursed objects are scattered throughout the game map and may not be activated the first time you visit a room. They flip back and forth between two equally suitable objects for the scene, for example, if the game had a scene taking place at a cafe, the object might switch between a coffee cup and a sugar bowl. When you notice one, click on it to collect it and also to increase the speed your hint meter regenerates. Collecting all twenty gives nothing but a sense of satisfaction.
 Analysis: The Exiled Prince is strong on drama and generally goes for whatever plot development would have the strongest emotional impact, skimming past any logical gaps, inconsistencies, or outright contradictions. By the end of the game and bonus game, rationality-focused players may be scratching their heads over many of these plot holes. If that kind of thing tends to drive you crazy, this game may not be for you. If you were to put the key events of the game down on paper, you'll find it doesn't make a lot of sense, but the game has emotional cohesion. Pain, loss, grief, fear, resentment; these things mean a lot to the game. The game's translation issues have improved massively over the previous game, which may soothe the writing champions somewhat.
Despite being a "dark" game both emotionally and atmospherically, for the most part the game avoids the pitfall of having its hidden object scenes too dark to distinguish objects. Objects can indeed sometimes be extremely difficult to find, but this is generally when a fragment is hidden in a place where it's literally impossible to distinguish from the surroundings. For example, in one scene, ivy leaves were hidden in A POT OF IVY. I actually said out loud "Really, game? Really?" I used a hint to find them and I just stared at them for a minute after using the hint. They looked identical to the surrounding leaves! That particular example crossed the line into full-blown "unfair" in my perspective. That was the only incident that was quite that bad, thankfully. The hint meter refills quickly, even if you haven't been collecting cursed objects to increase its speed.
The game has some great puzzles and a good variety of them. My favorites were the ones that were almost like point-and-click webtoys, where you basically just push and pull and experiment until the device does something interesting that seems to be towards your target. It gave a kind of freewheeling feeling that perhaps fit the game's emotions over reason style, and the gorgeous, detailed art really shone in those puzzles.
Improving on its predecessor while preserving its strengths, The Exiled Prince shows that Dark Parables is on track to become a very strong series, and with a third game already in the works (the bonus game in the Collector's Edition is in part a sneak peek), hidden object adventure fans have many happy hours ahead of them.
A Collector's Edition is also available. It includes a bonus adventure and extra puzzles to solve. Remember that Big Fish Game Club Members pay only $13.99 for Collector's Editions (or 2 club credits), and collector's editions count 3 card punches of 6 total needed for a free game.
![]() Windows:
Windows:
Download the demo
Get the full version
Also available: Collector's Edition
![]() Mac OS X:
Mac OS X:
Download the demo
Get the full version
Also available: Collector's Edition


Walkthrough Guide
(Please allow page to fully load for spoiler tags to be functional.)
Dark Parables: The Exiled Prince - Walkthrough
General
You will walk inside the game - there is no possibility to click a location on the map.
After completing the game once the "hard mode" will be unlocked. In hard mode you have no hints, and mini games can't be skipped. The hard mode comes with a few additional tasks.
The journal will provide you with hints about tasks to fulfill.
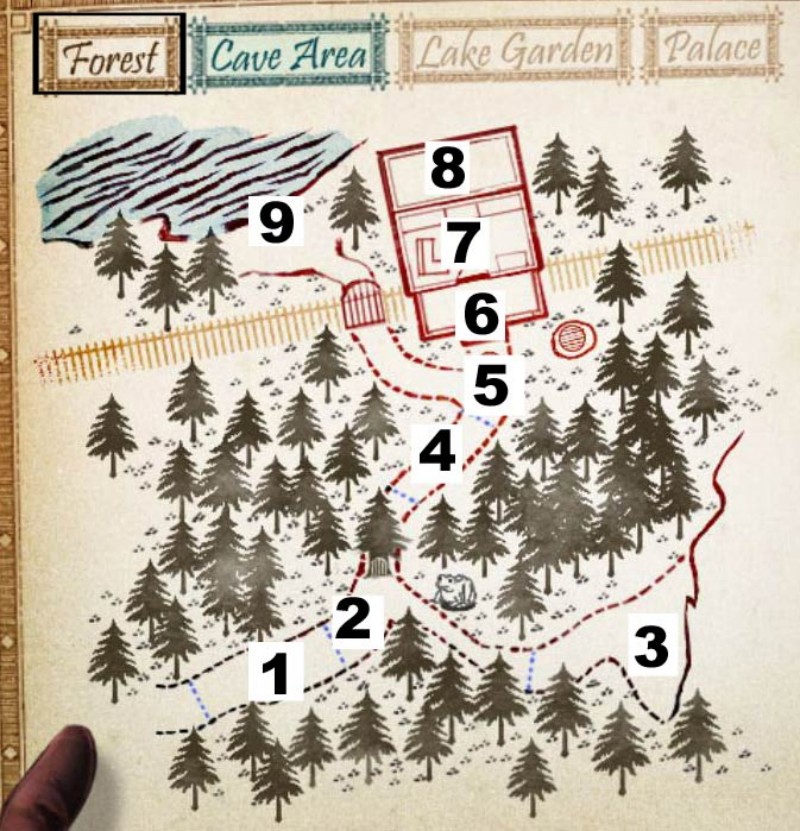
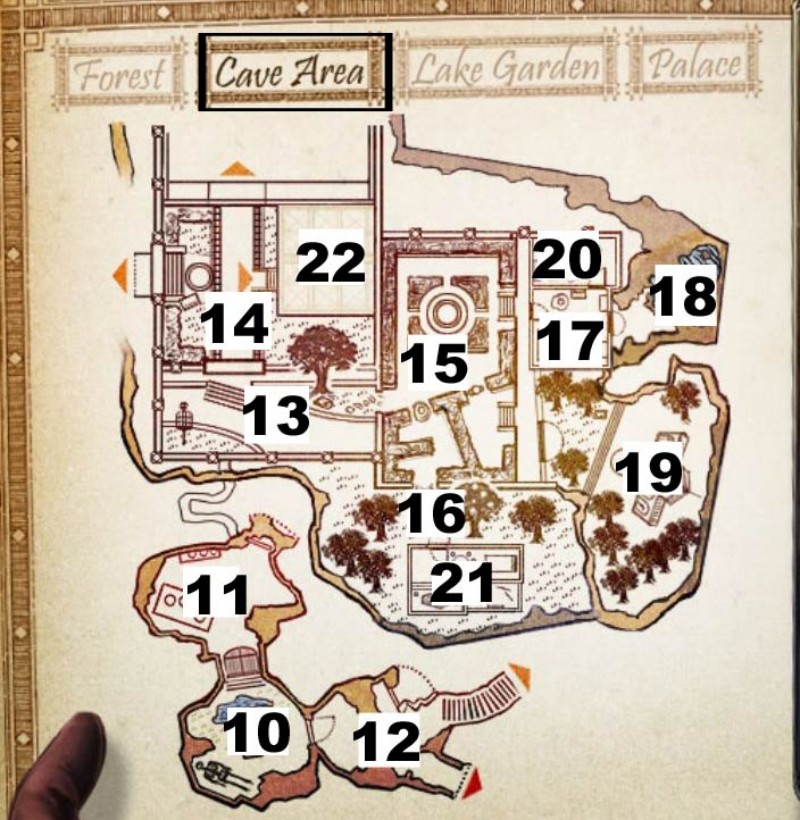
Each of the four main location has a map - red markings on the map are showing active search scenes.
A question mark indicates a location where you can find a hidden inventory item.
Reading the hints in the journal carefully is recommended. Newly found inventory objects can activate new search scenes.
New hints in the journal are shown by a glowing journal symbol in the lower left of the scene.
There are 20 morphing objects hidden during the game.
Morphing objects do not always morph the first time you enter a location.
With each found morphing object, the hint button in normal mode will recharge faster.
After finding 15 objects, the hint is practically endless with no waiting time.
The hint can only be used when playing a search scene.
Outside the search scenes, your journal and the map will give you hints.
The cursor will change to a magnifier to show information or a zoomable scene.
Glittering indicates a search scene or puzzle.
Mini games can be skipped after waiting a short time - skipping a game will disable the hint for the next five minutes (but the five minutes contain also the time outside of search scenes).
To reset a puzzle, click the back button in the puzzle scene - zooming in again will enable you to start from the scratch.
A list of all morphing objects can be found under the spoiler named "List of morphing objects".
All inventory items for each chapter - where to find them and where to use them - can be found in the spoiler "List of inventory objects".
Maps (labeled)
Forest
Starting Point
Crossroad
Cliff
Way to Cottage
Cottage
Cottage Entrance
Cottage Parlor
Cottage - Secret Room
Pond
Screenshot
Cave Area
Cave with skeleton
Back cave
Cave Crossing
Garden Entrance
In front of the Palace
Fountain
Snow White's house
Parlor Swanlake Princess
Underground Lake
Fairytale Garden
Puppet theater (Swanlake Princess)
Snow White's Parlor and Mirror room
Greenhouse
Screenshot
Lake Garden
Greenhouse
Laboratory
Garden lake
Mountain lake
Landing stage
Treasure vault
Gazebo
Screenshot
Palace
Palace Hall
Kitchen
Grand Staircase
Cinderella's Library
Cinderella's Treasure Room
Auditorium
Portrait Room
Carriage
Shoe Closet
Armor Room
Cave Hall
Root
Bedroom
Screenshot
List of all morphing objects
Cave with skeleton (Spoiler 9)
Back cave (Spoiler 11)
Fountain (Spoiler 14)
Parlor Swanlake Princess (Spoiler 15)
Underground Lake (Spoiler 16)
Palace Hall (Spoiler 19)
Puppet theater (Swanlake Princess) (Spoiler 21)
Mountain Lake (Spoiler 27)
Landing stage (Spoiler 31)
Kitchen (Spoiler 32)
Cinderella's Library (Spoiler 38)
Palace Hall (Spoiler 41)
Grand Staircase (Spoiler 41)
Cinderella's Treasure Room (Spoiler 44)
Portrait Room (Spoiler 50)
Cave Hall (Spoiler 51)
Starting Point (Spoiler 52)
Cottage - Parlor (Spoiler 55)
Armor Room (Spoiler 62)
Fairytale Garden (Spoiler 65)
List of all inventory objects
The numbers indicate the spoiler numbers in which the object is mentioned.
You will find the object in the first location mentioned and use it in the second.
Prologue
ONLY HARD MODE: golden frog crown - already in inventory: Door Cave Crossing (A)
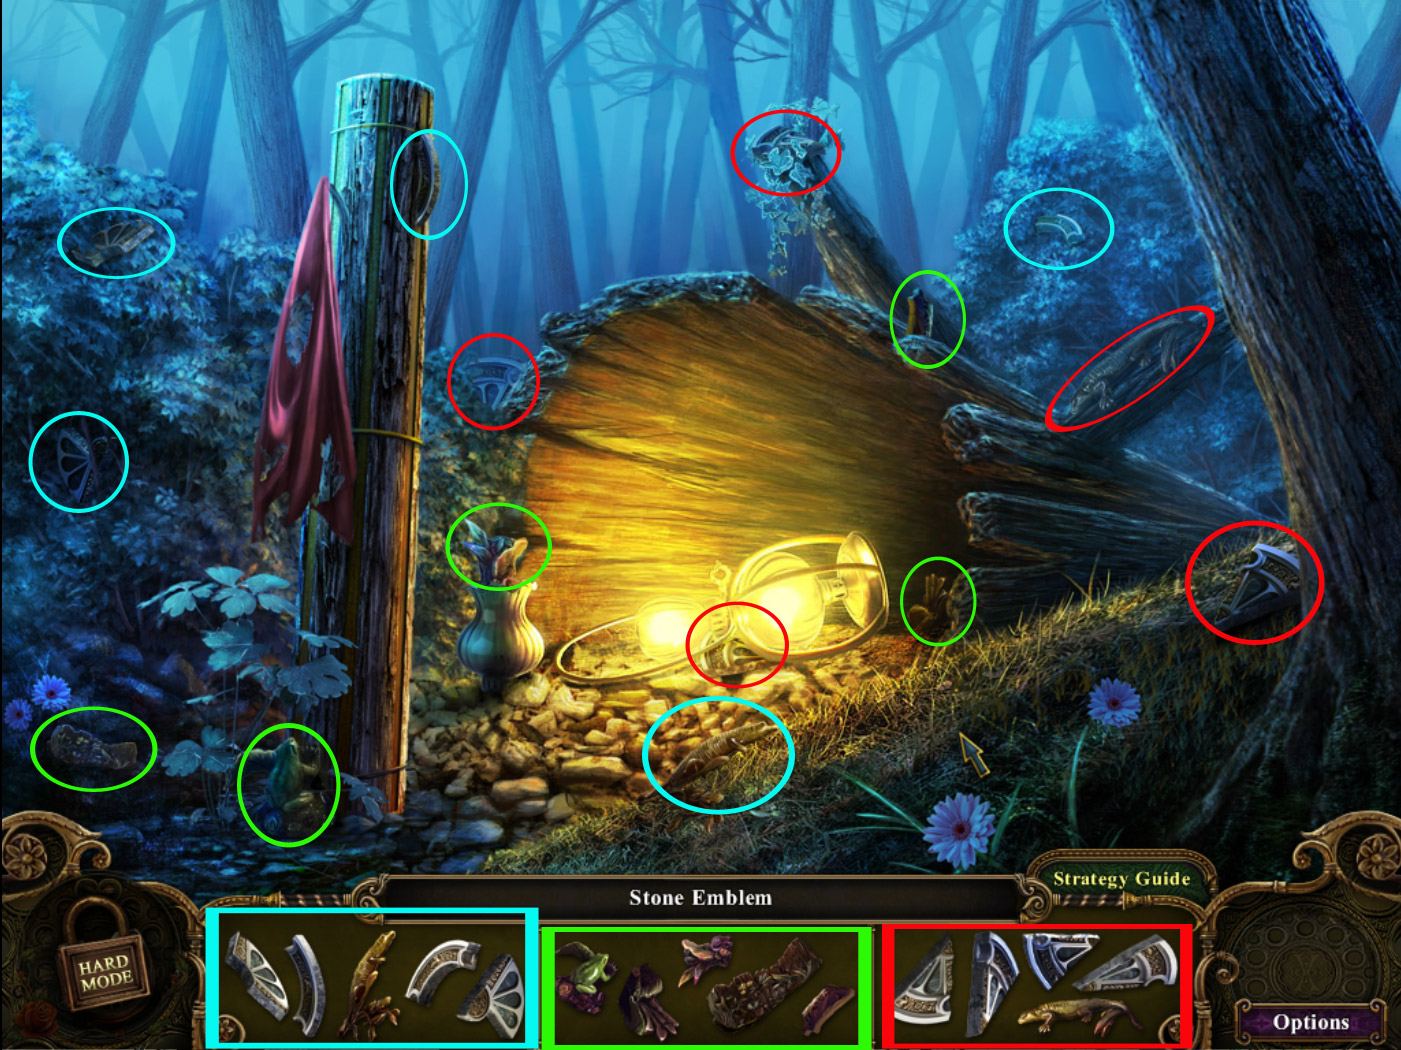
Stone Emblem - Search-scene starting point (1): Gate, Crossroad (3)
Decorative Jar 1/5 - Crossroad (2): Puzzle, Way to Cottage (53)
Sickle - Puzzle Cliff(3): Gate, Crossroad (3)
Chapter 1
Net - Search-scene Starting Point (4): Pond (6)
Key for Gate- Search-scene, Cottage Entrance (5): Cottage Gate (5)
Cloth - Cottage Entrance (5): Frog, Crossroad (7)
Dragonfly-Gem - Search-scene Pond (6): Frog, Crossroad (7)
Ladybug-Gem - Pond (6): Frog, Crossroad (7)
Cottage-Key - Frog, Crossroad (7): Cottage Entrance (54)
Mechanical handle - Search-scene Back Cave (8): Cave with Skeleton (9)
Lakeside-Disk - Back Cave (8): Parlor Swanlake Princess (15)
Rose Emblem - Puzzle, Cave with Skeleton (9): Cave with Skeleton (9)
Chapter 2
Silver apple - Cave Crossing (10): Cinderella's House (34)
ONLY HARD MODE: Secret tree disk - Room to the left, Cave Crossing (A): Root (B)
Knight - Back Cave (11): Cave with Skeleton (11)
Shovel - Search-scene Back Cave (11): Back Cave (11)
Square Mirror - Puzzle, Garden Entrance (12): Armor Room (62)
Royal Scepter - Search-scene, Palace Hall (13): Fountain (14)
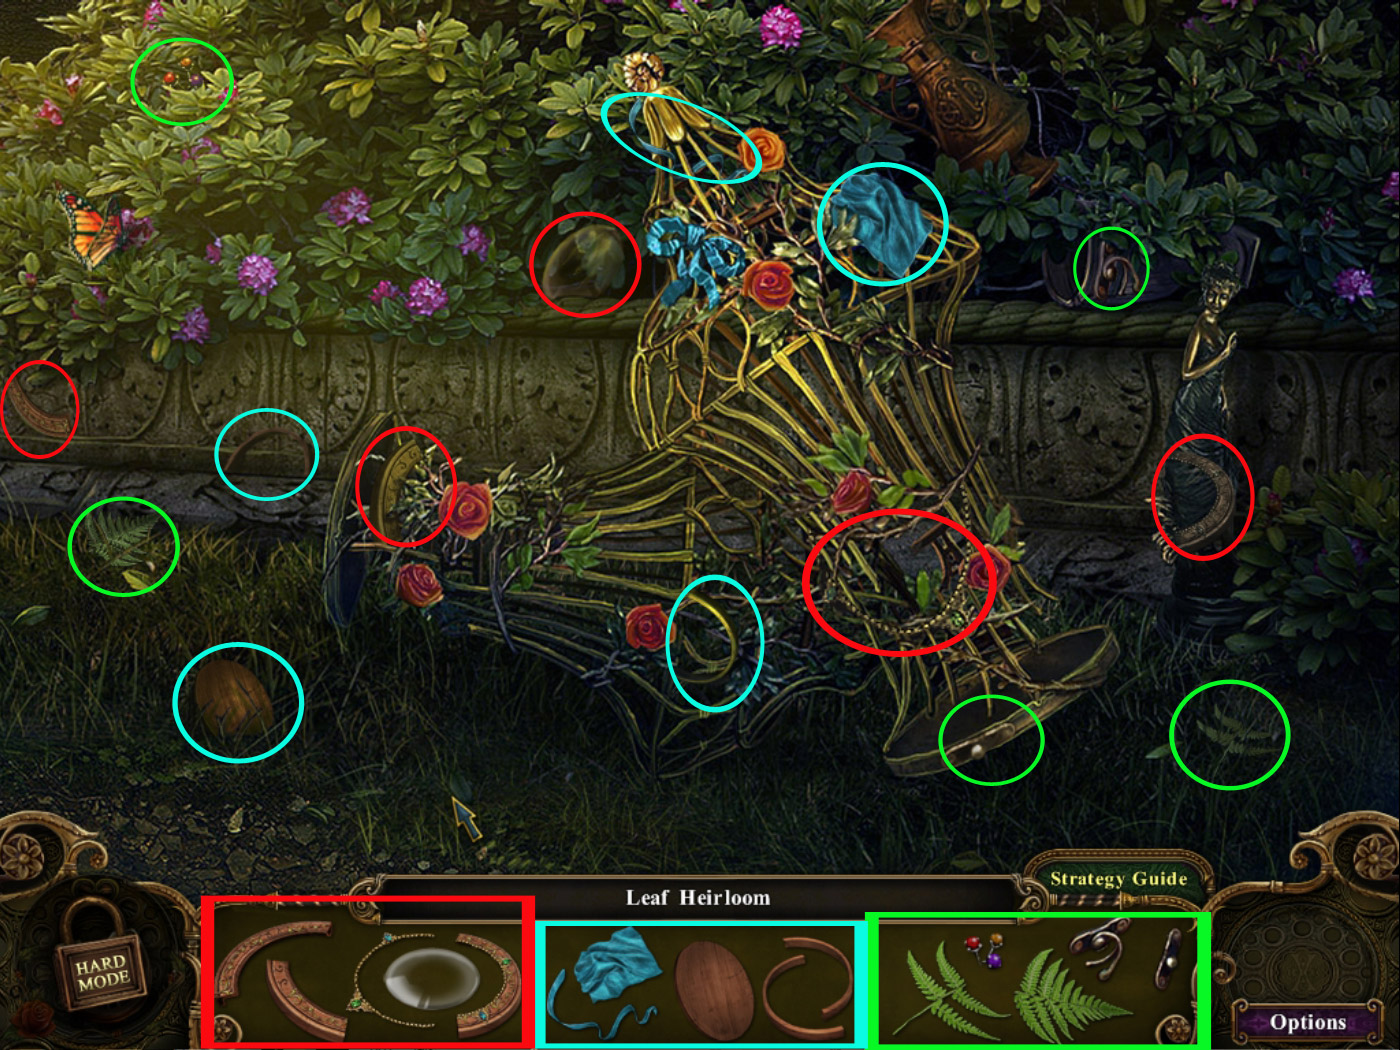
Leaf Heirloom - Search-scene Fountain (14): Greenhouse (20)
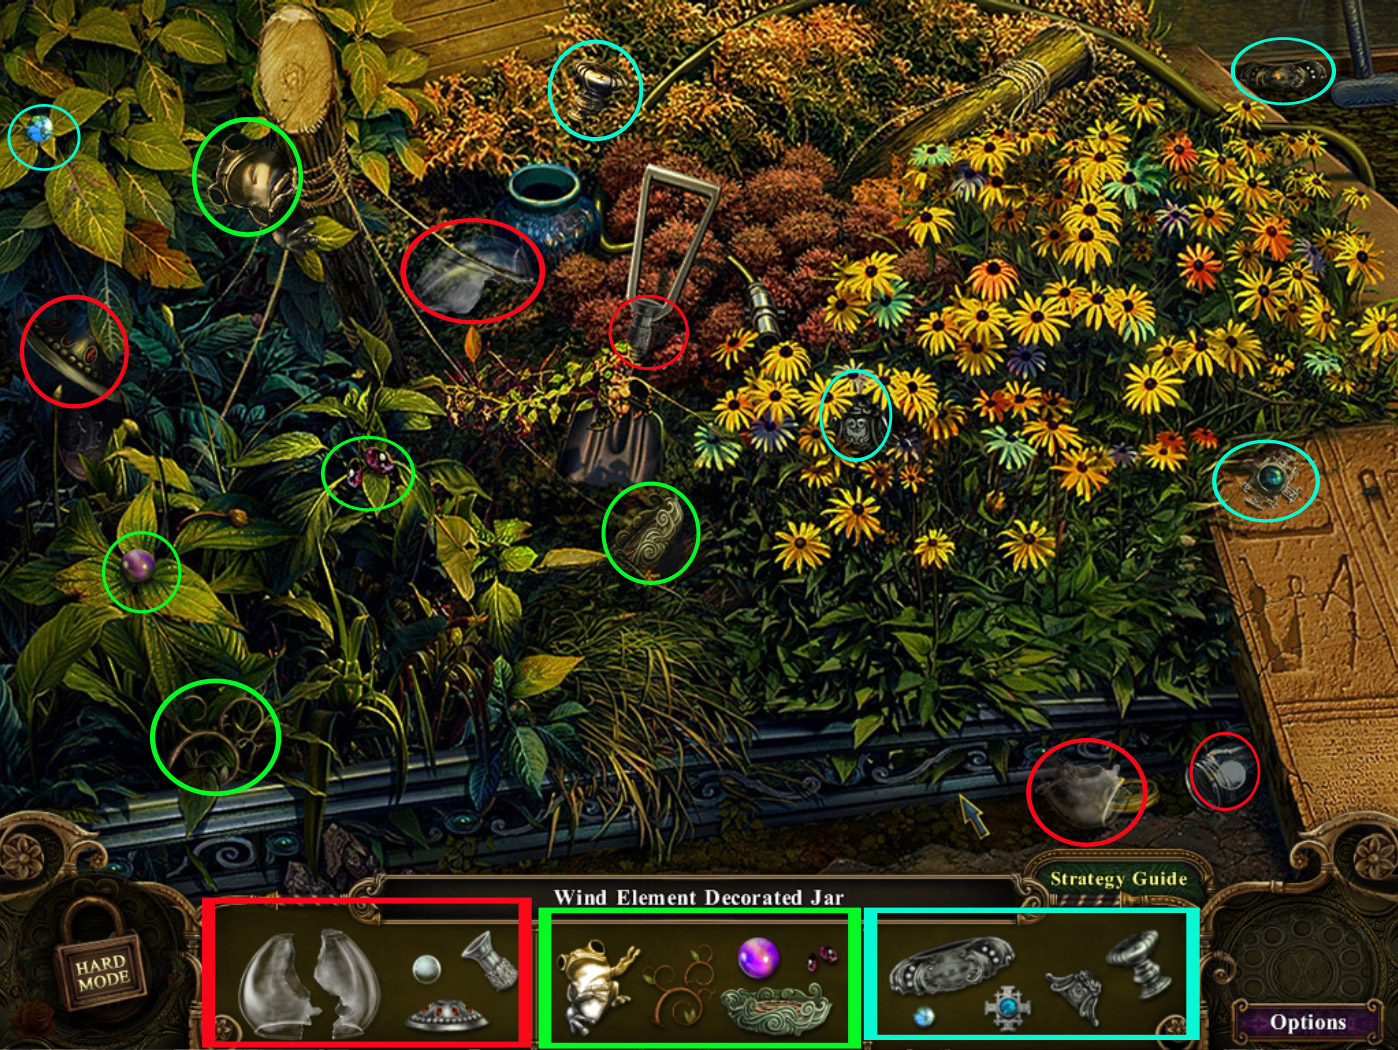
Decorative Jar 2/5 - Search-scene Fountain (14): Puzzle, Way to Cottage (53)
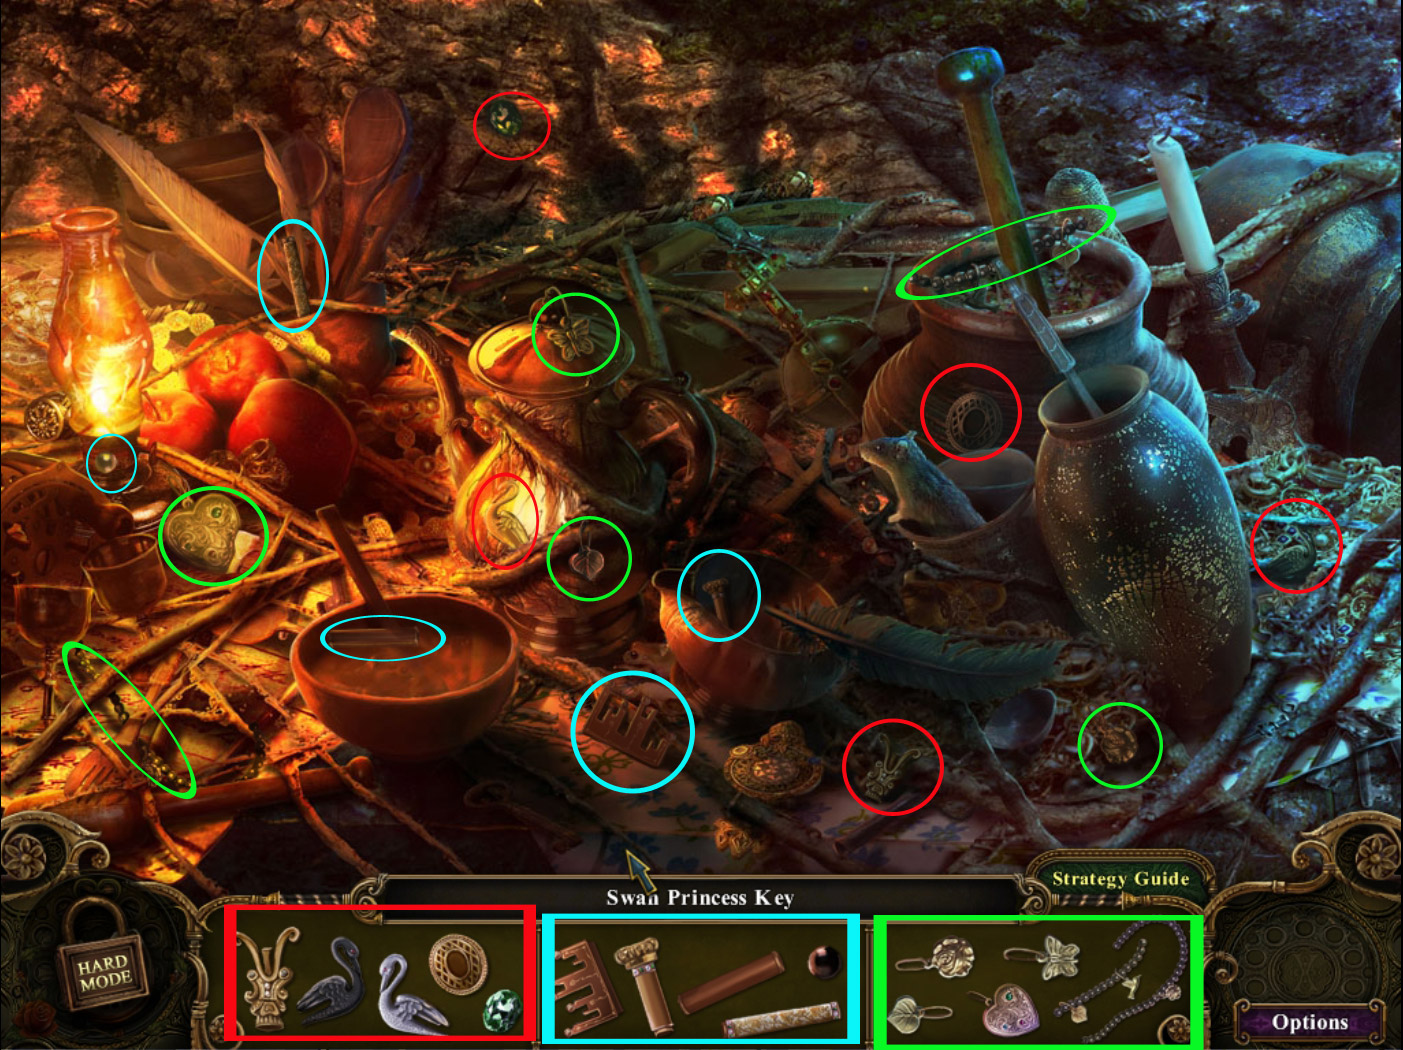
Swanlake Princess Key - Search-scene Back Cave (14): Fountain (14)
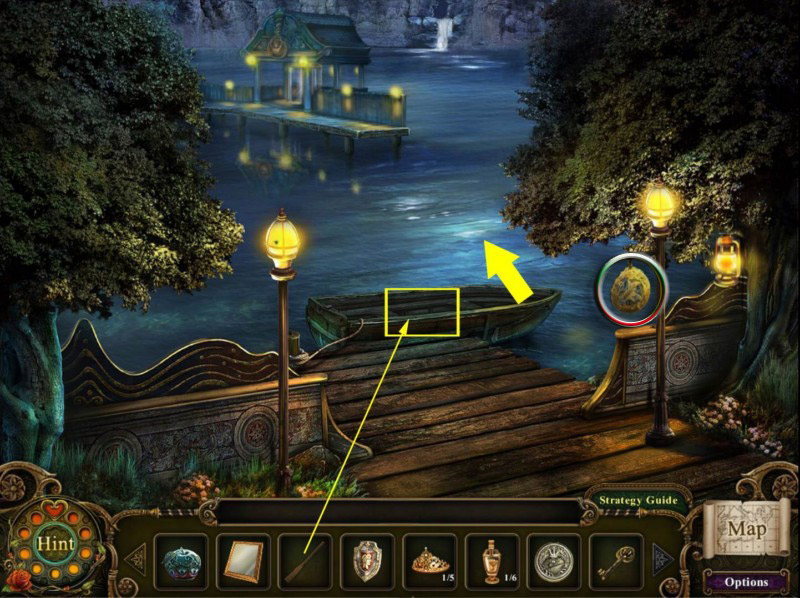
Oar - Parlor Swanlake Princess (15): Mountain Lake (27)
Moon-Gem - Parlor Swanlake Princess (15): Puppet Theater Swanlake Princess (21)
Sledge Hammer - Underground Lake (16): Garden Entrance(17)
Ship in Bottle 1/5 - Underground Lake (16): Puzzle, Palace Hall (26)
Sword - Garden Entrance (17): Garden Entrance(17)
Greenhouse-Key - Cut scene Fairytale Garden (17): Palace Hall (19)
Chapter 3
Shield-Emblem - Search-scene, Fairytale Garden (18): Palace Hall (30)
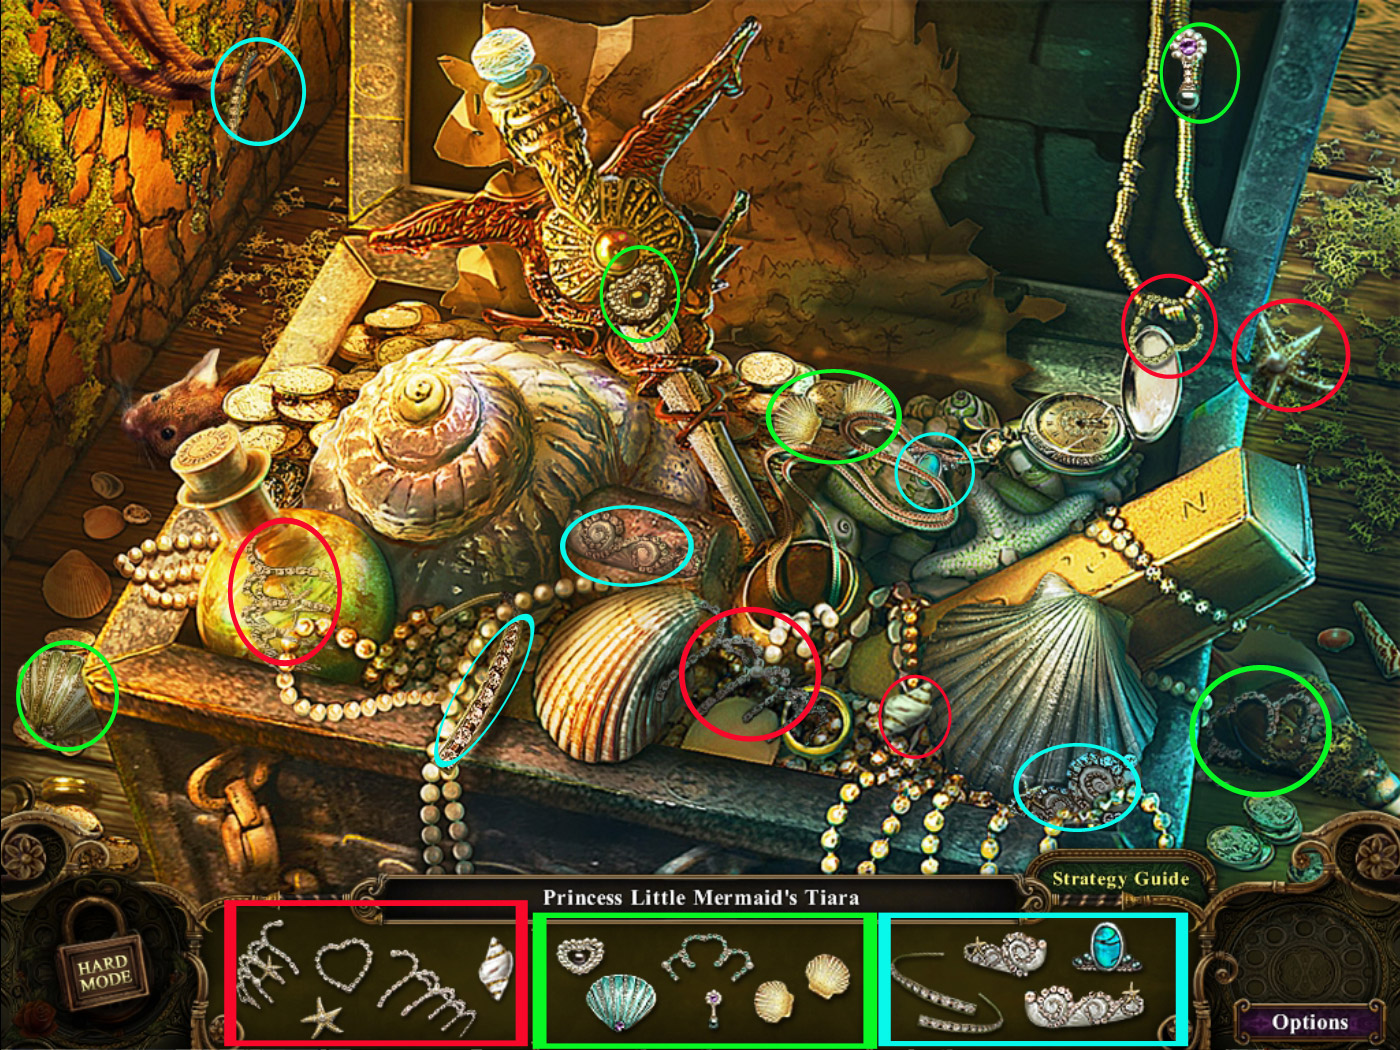
Princess-Tiara 1/5 - Search-scene Underground Lake (18): Fairytale Garden (65)
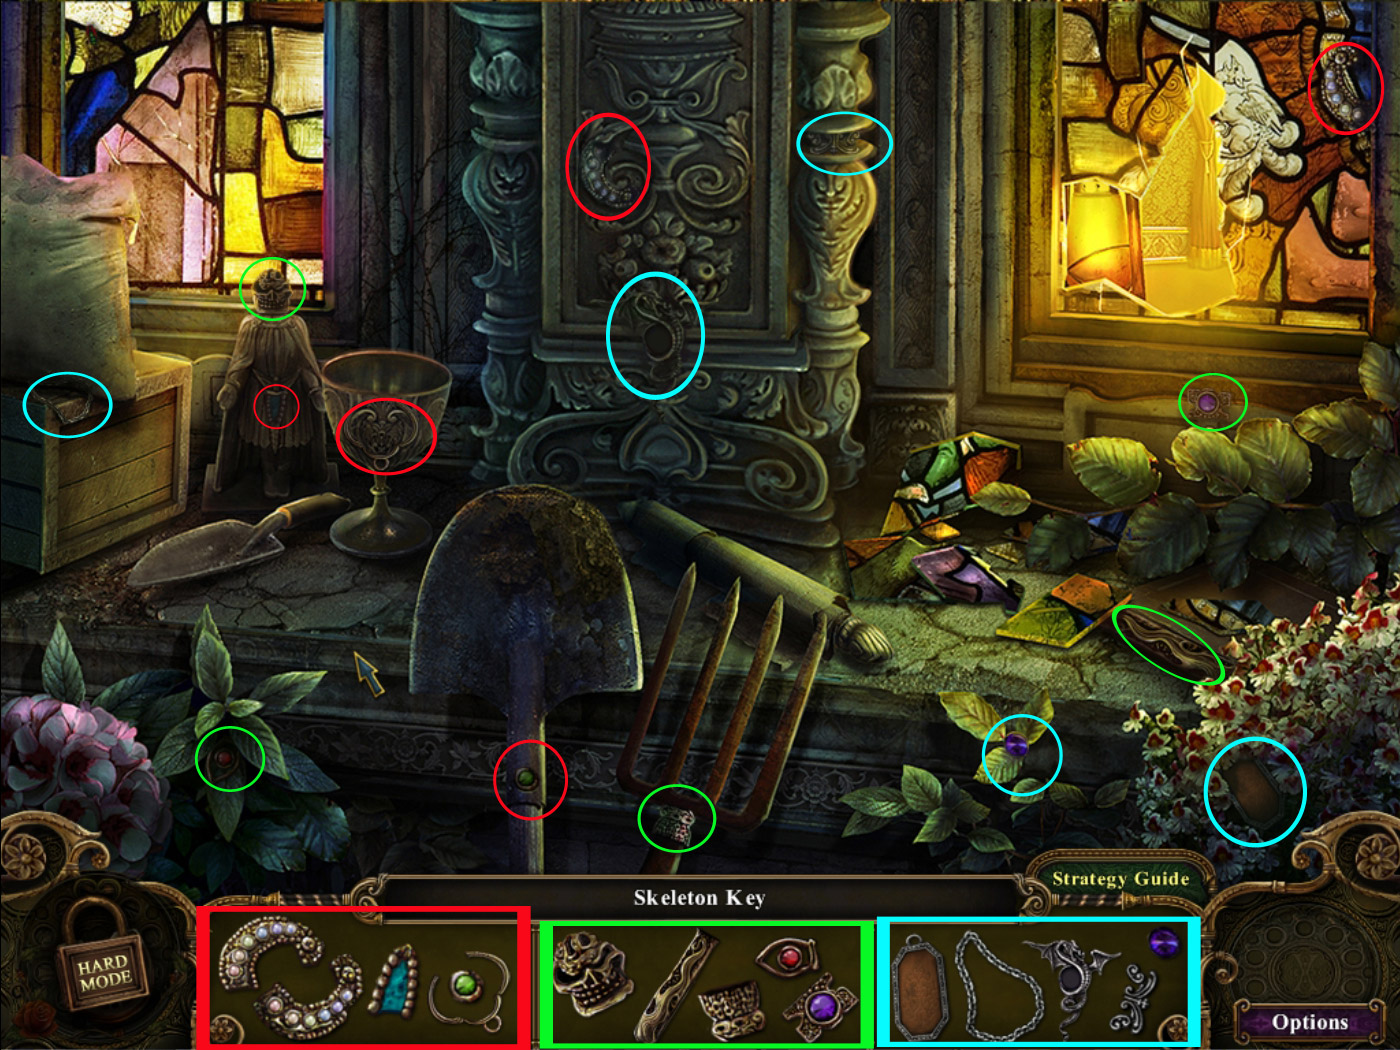
Skeleton Key - Search-scene Palace Hall (18): Garden Entrance(19)
Bolt cutter - Garden Entrance (19): Palace Hall (19)
Lightning-Gem - Greenhouse (20): Puppet Theater Swanlake Princess (21)
Plant-Potion 1/6 - Search-scene Greenhouse (20): Garden Lake (64)
Ship in Bottle 2/5 - Greenhouse (20): Puzzle, Palace Hall (26)
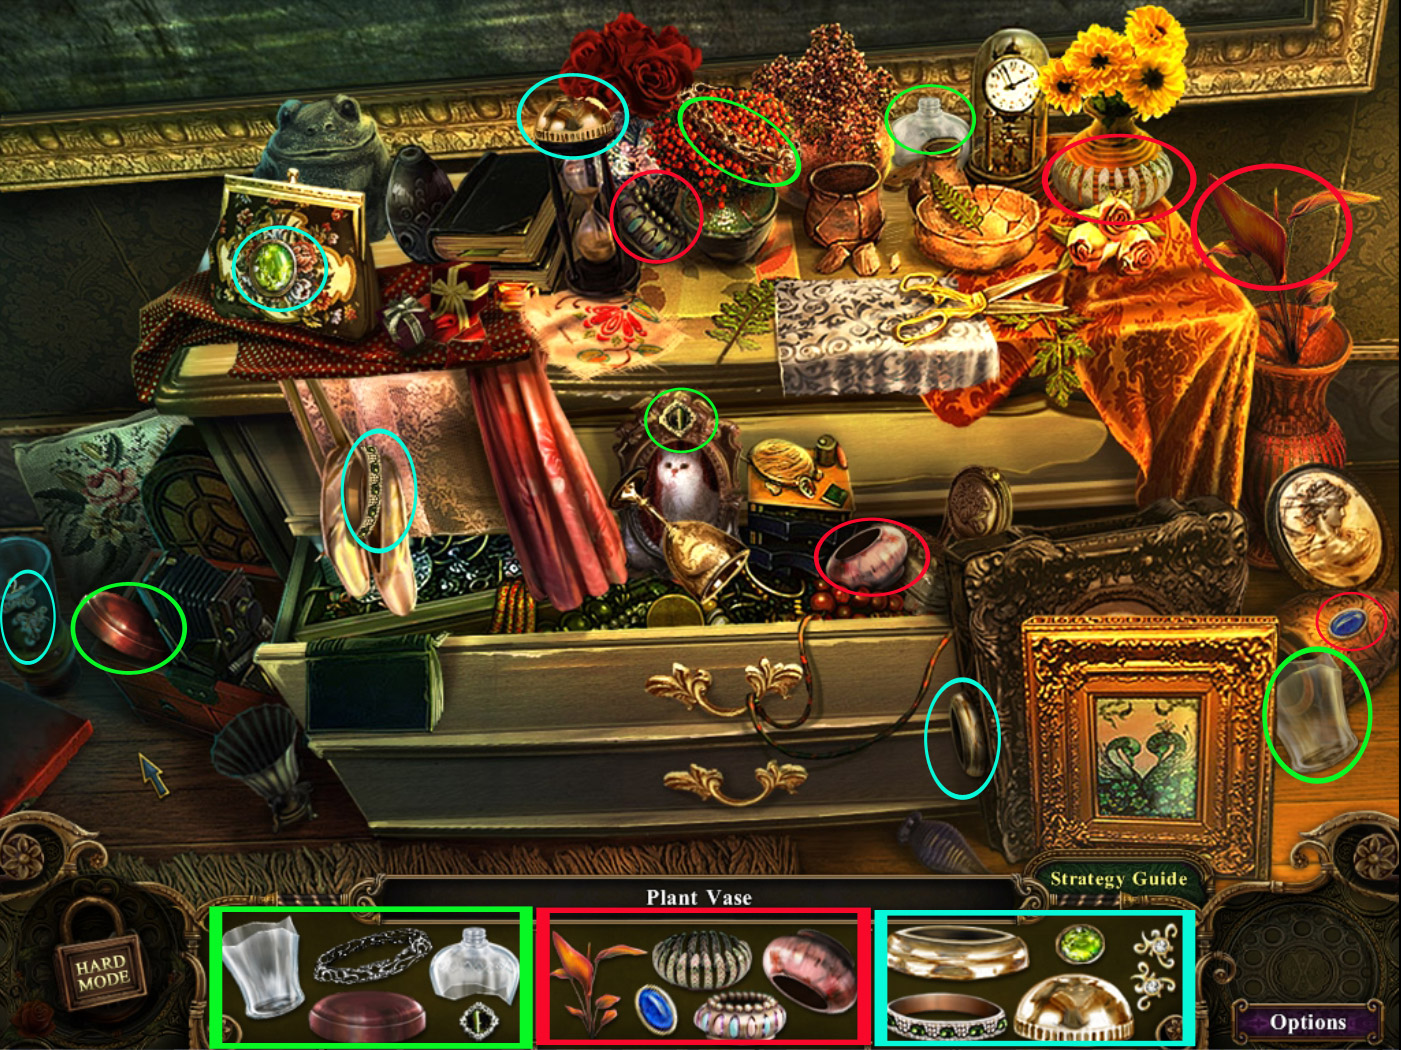
Plant Vase- Search-scene Puppet Theater Swanlake Princess (21): Greenhouse (22)
Silver Coin - Book, Lab (22): Palace Hall (30)
Elegant crank - Search-scene Fountain (22): Puppet Theater Swanlake Princess (23)
Chapter 4
Ship in Bottle 3/5 - Puppet Theater Swanlake Princess (23): Puzzle, Palace Hall (26)
Ship in Bottle 4/5 - Search-scene Puppet Theater Swanlake Princess (23): Puzzle, Palace Hall (26)
Plant-Emblem - Search-scene Fairytale Garden (24): Greenhouse (24)
Decorative Jar 3/5 - Search-scene Greenhouse (24): Puzzle, Way to Cottage (53)
Rusty Cave key - Garden Lake (25): Cave Crossing (52)
Ship in Bottle 5/5 - Search-scene Palace Hall (26): Puzzle, Palace Hall (26)
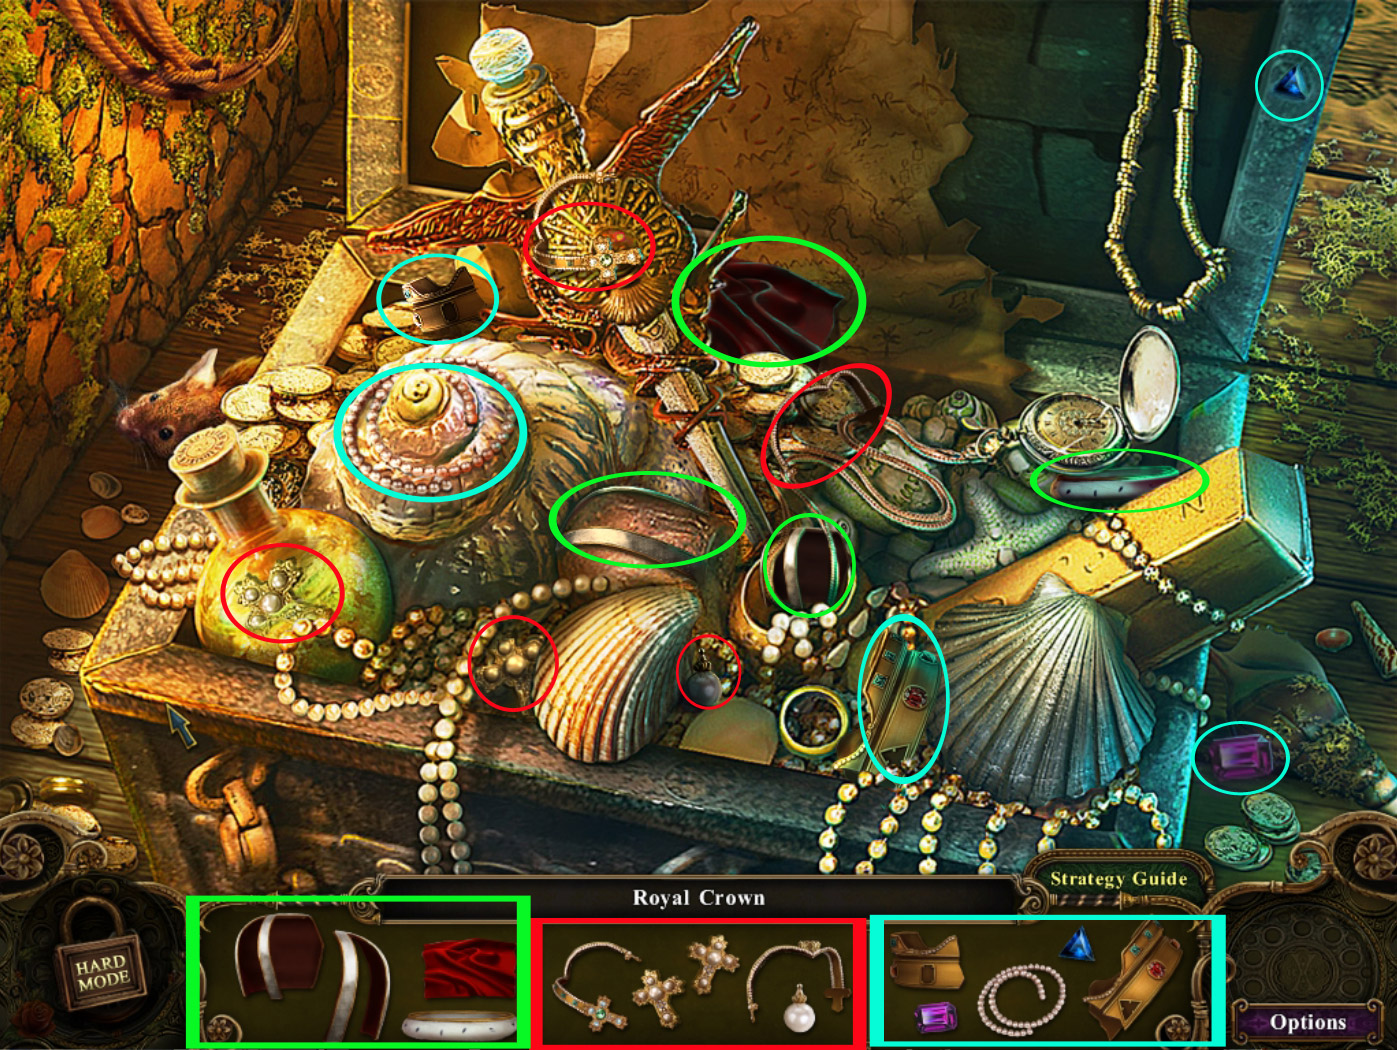
Royal crown - Search-scene Landing stage (28): Landing stage (28)
Big Shell - Puzzle, Treasure Room (28): Landing stage (29)
Chapter 5
Gold coin- Gazebo (29): Palace Hall (30)
Chemical ink - Palace Hall (30): Lab (31)
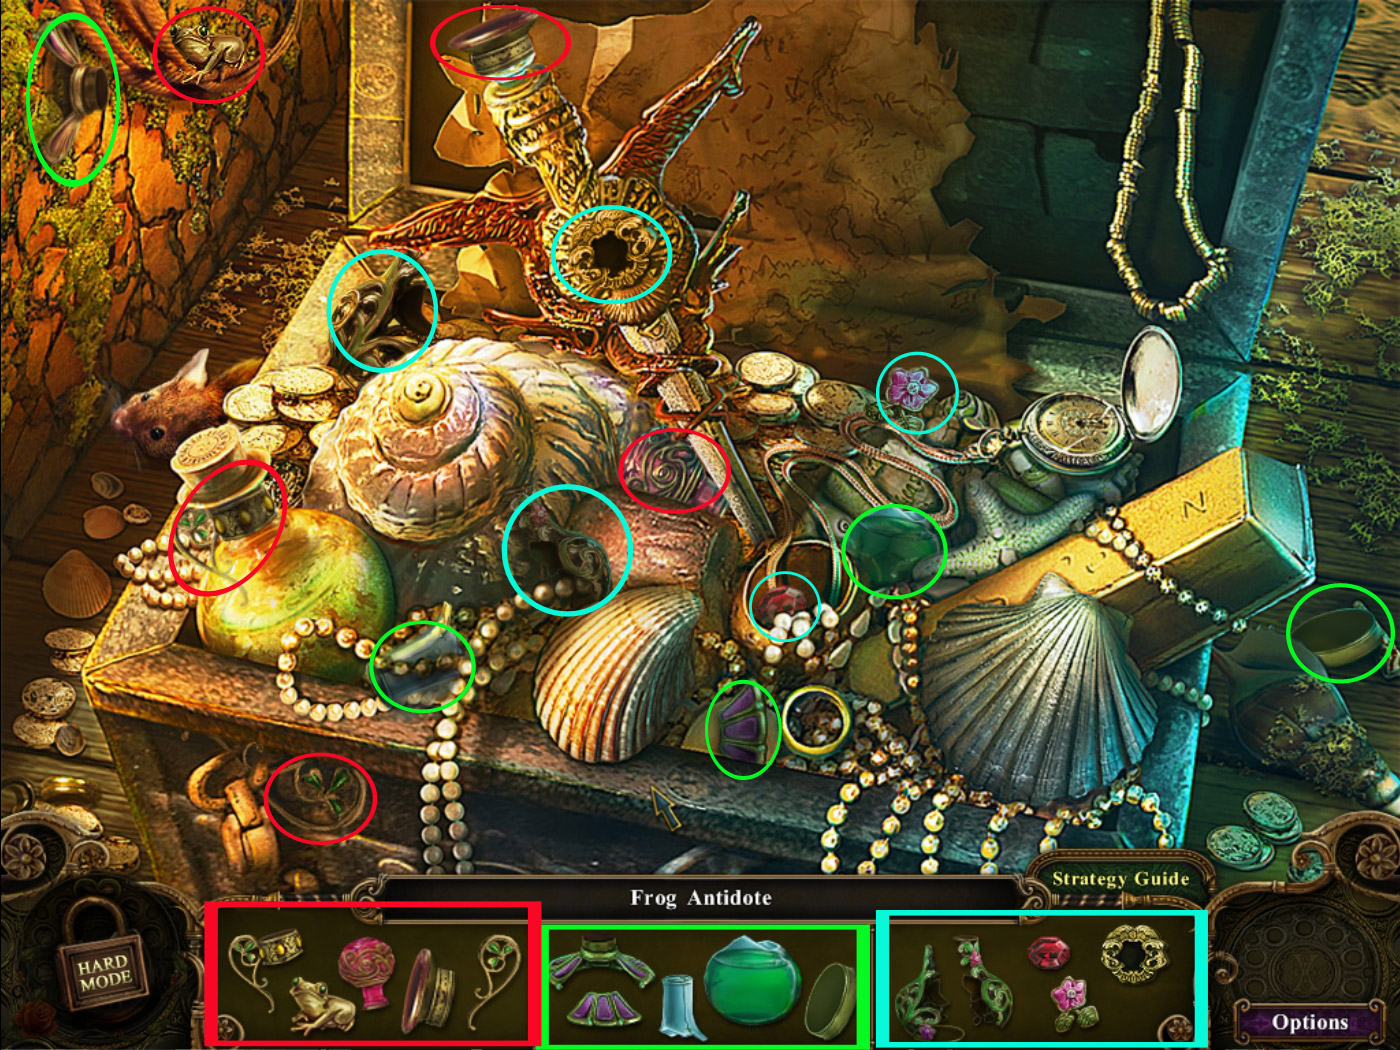
Frog-Antidote - Search-scene Landing stage (31): Kitchen (32)
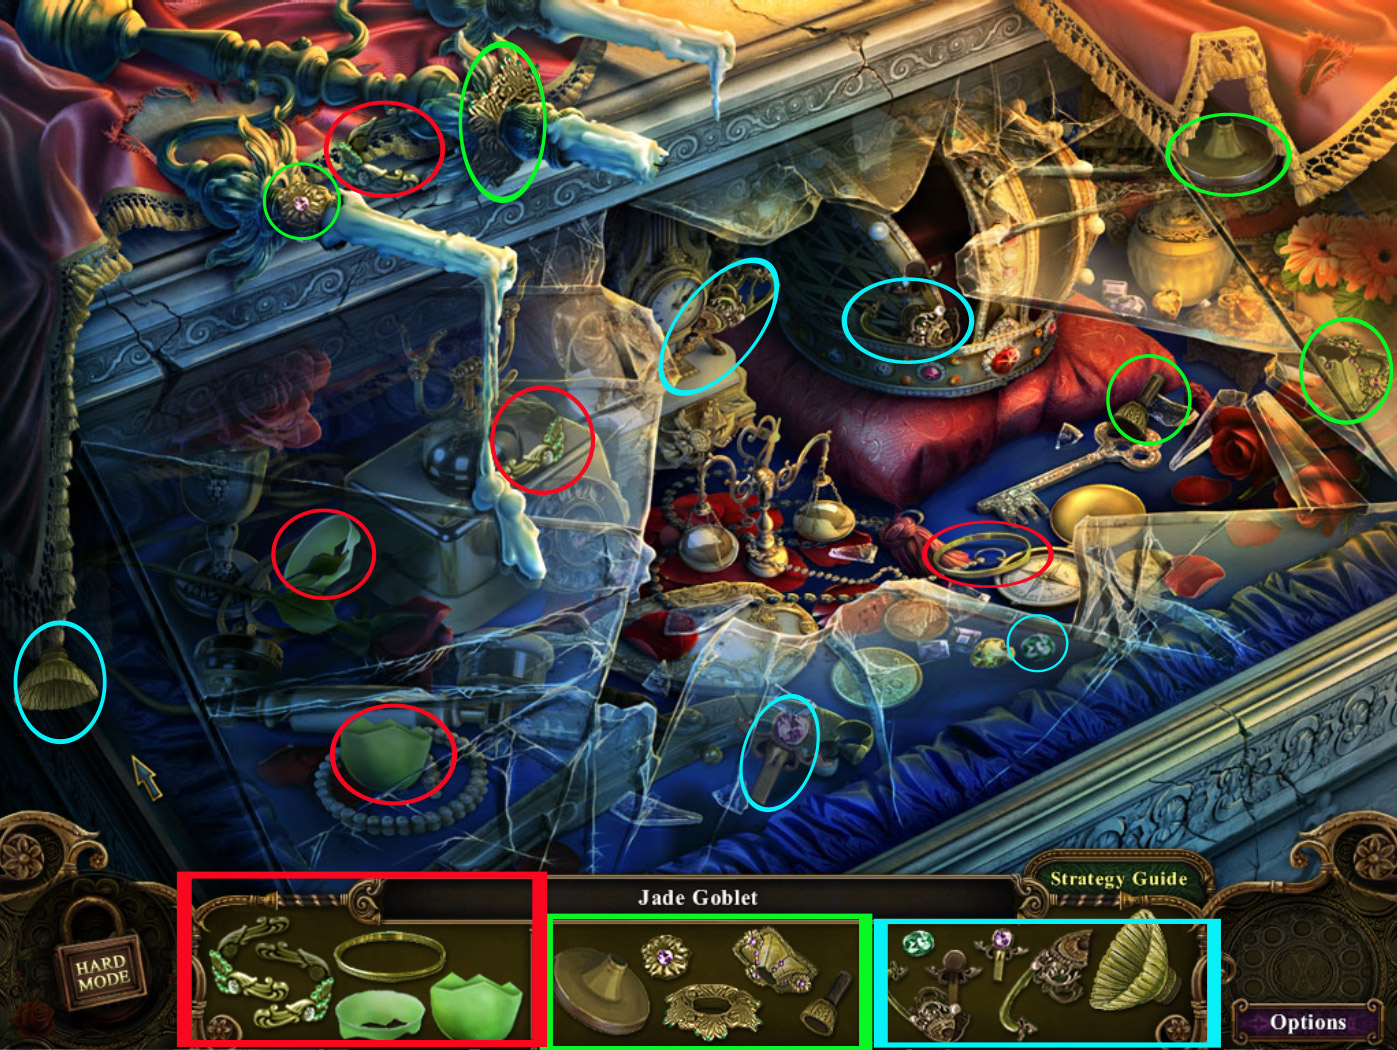
Jade Goblet - Search-scene Grand Staircase (32): Fairytale Garden (40)
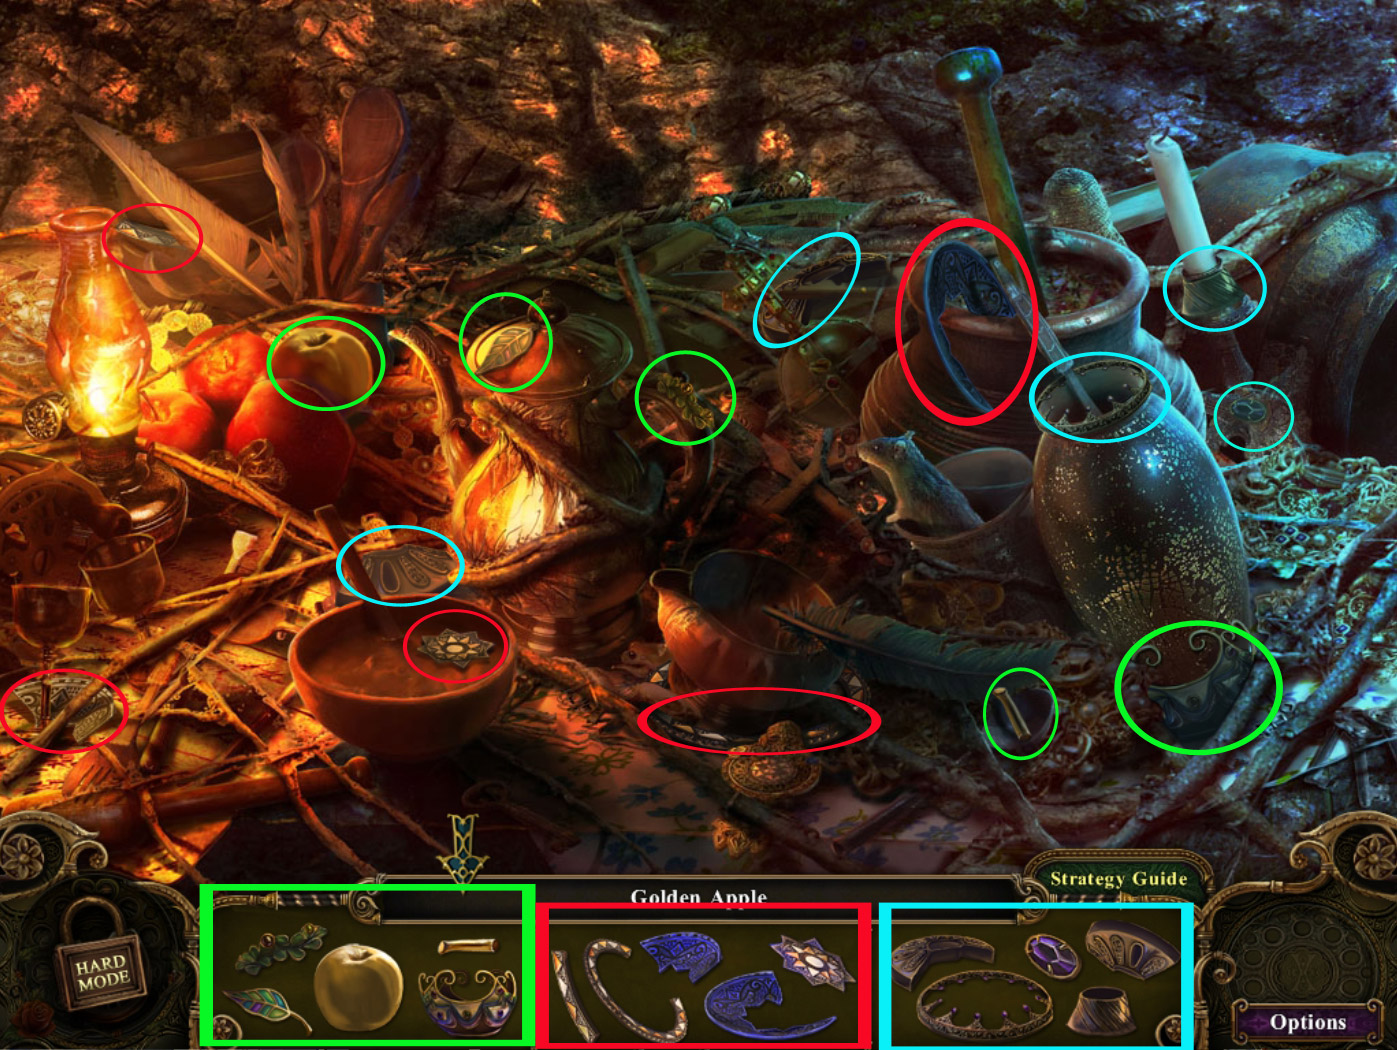
Golden apple- Search-scene Back Cave (33): Snow White's house (34)
Princess-Tiara 2/5 - Search-scene Landing stage (33): Fairytale Garden (65)
Plant-Potion 2/6 - Search-scene Puppet Theater Swanlake Princess (34): Garden Lake (64)
Chapter 6
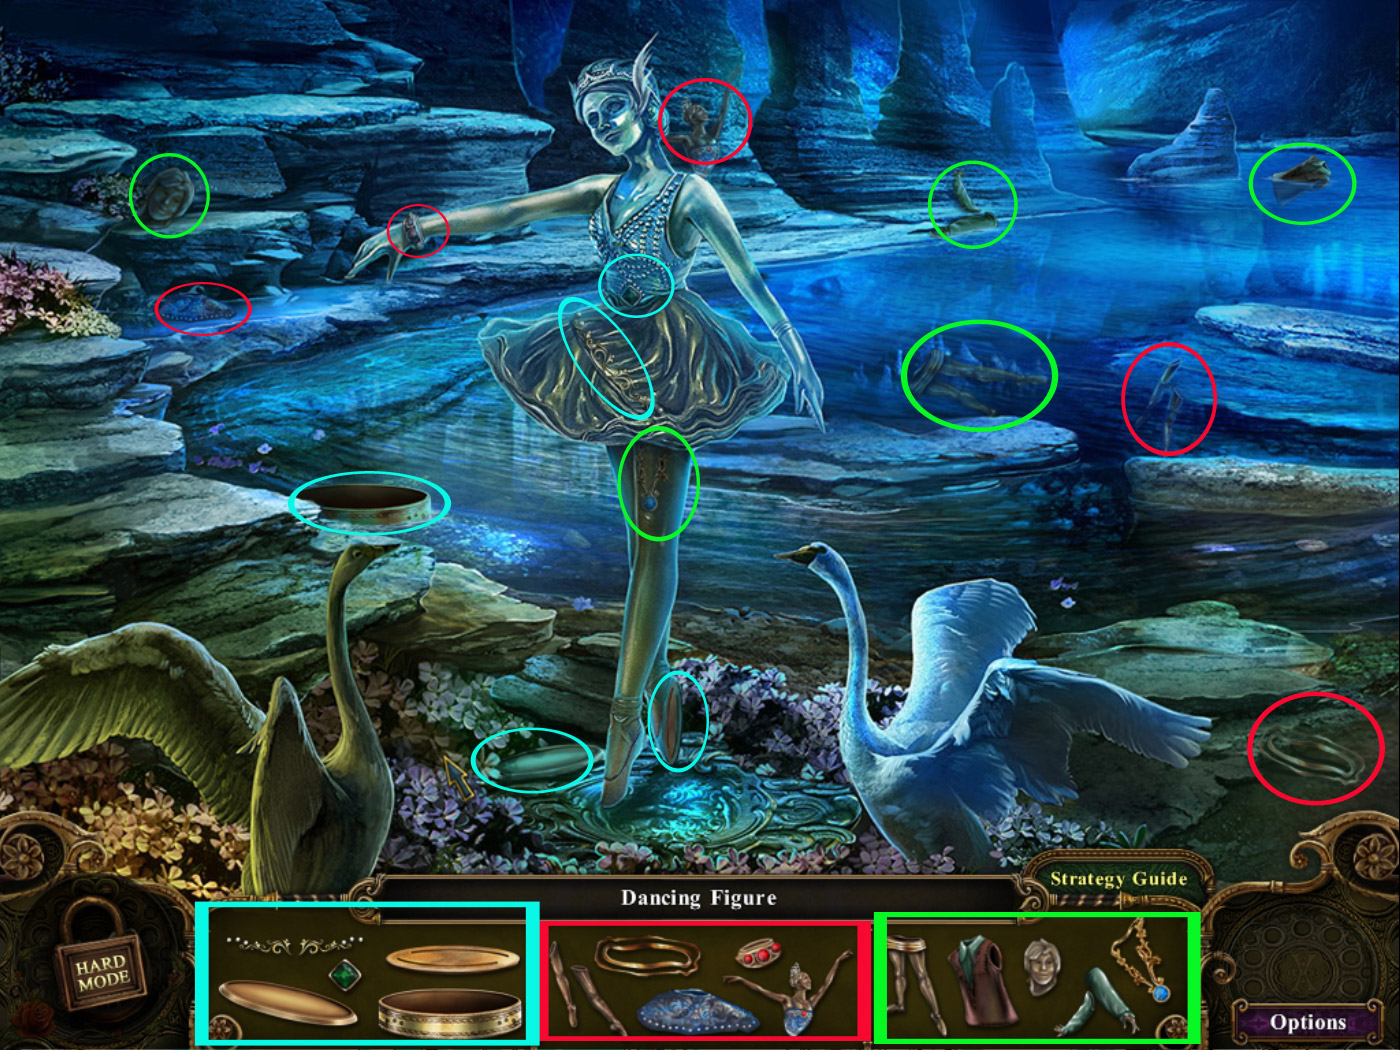
Dancing Figure - Search-scene Underground Lake (35): Mirror Room Snow White
Mysterious Bracelet - Parlor, House Snow White (35): Library (38)
Decorative Jar 4/5 - Search-scene Parlor, House Snow White (35): Puzzle, Way to Cottage (53)
Round Mirror - Mirror Room Snow White (36): Armor Room (62)
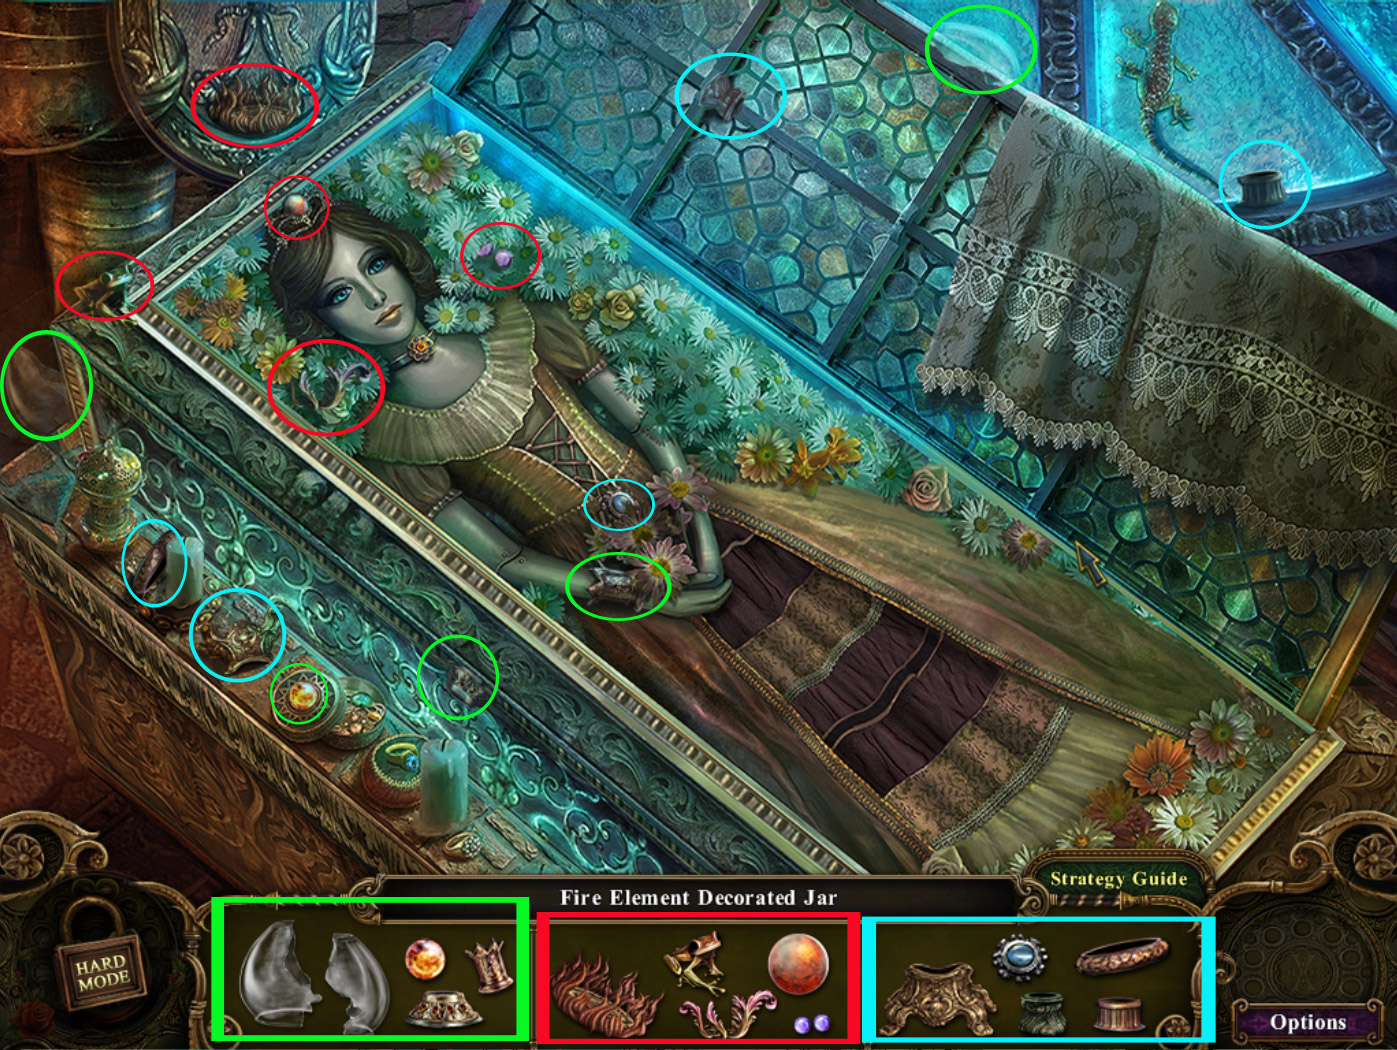
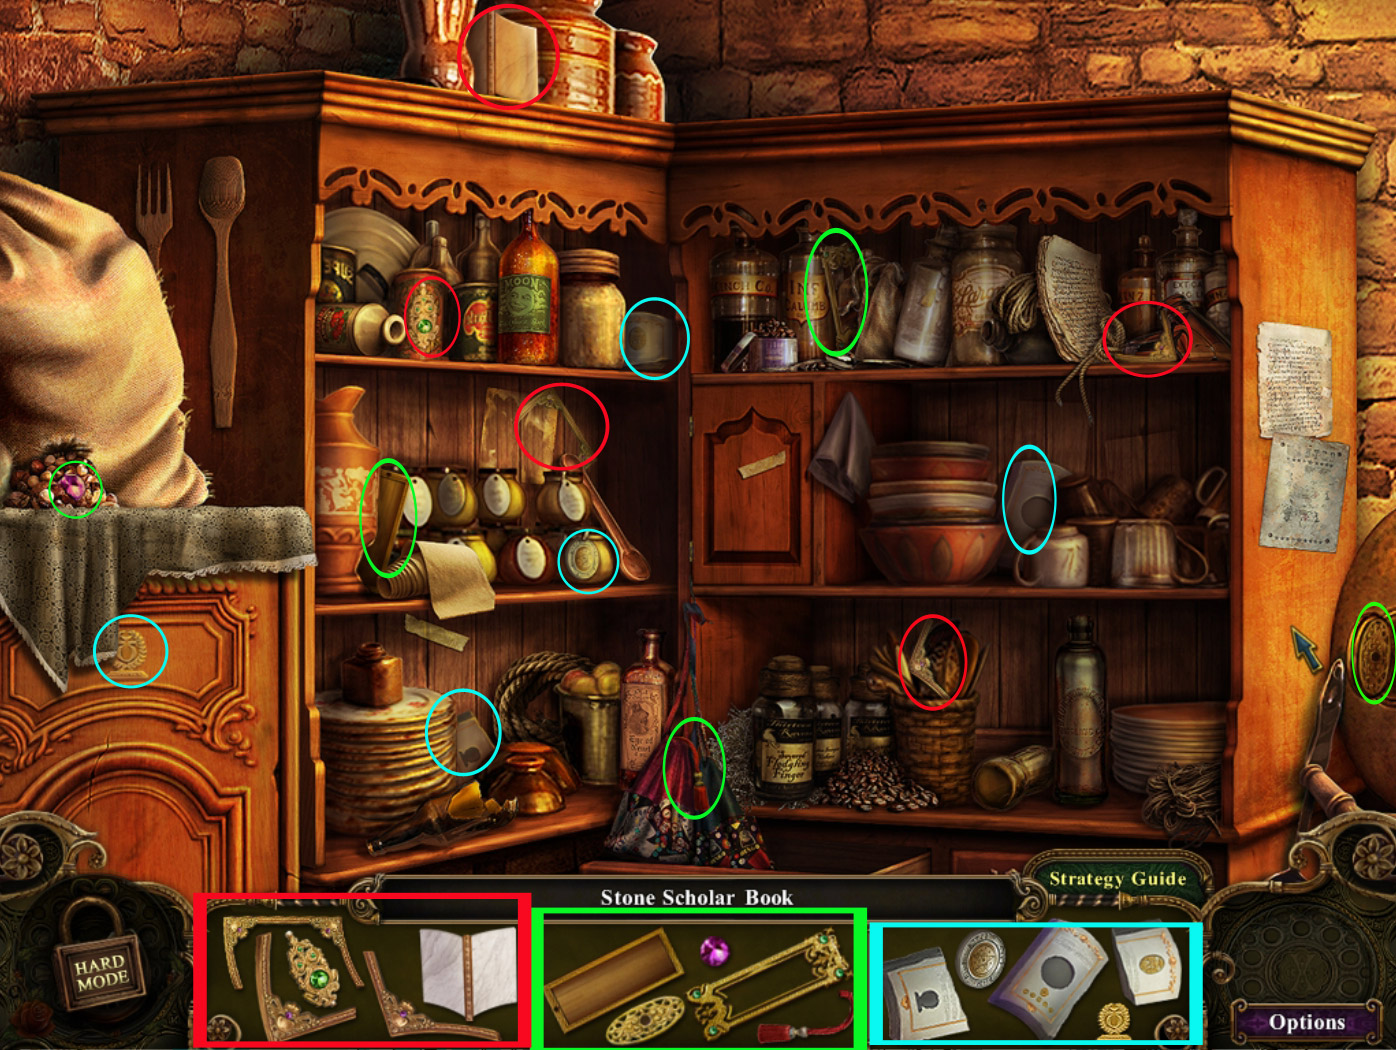
Stone Scholar Book- - Search-scene Kitchen (37): Grand Staircase (37)
Portrait of the Princess - Cinderella's Treasure Room (38): Portrait Room (50)
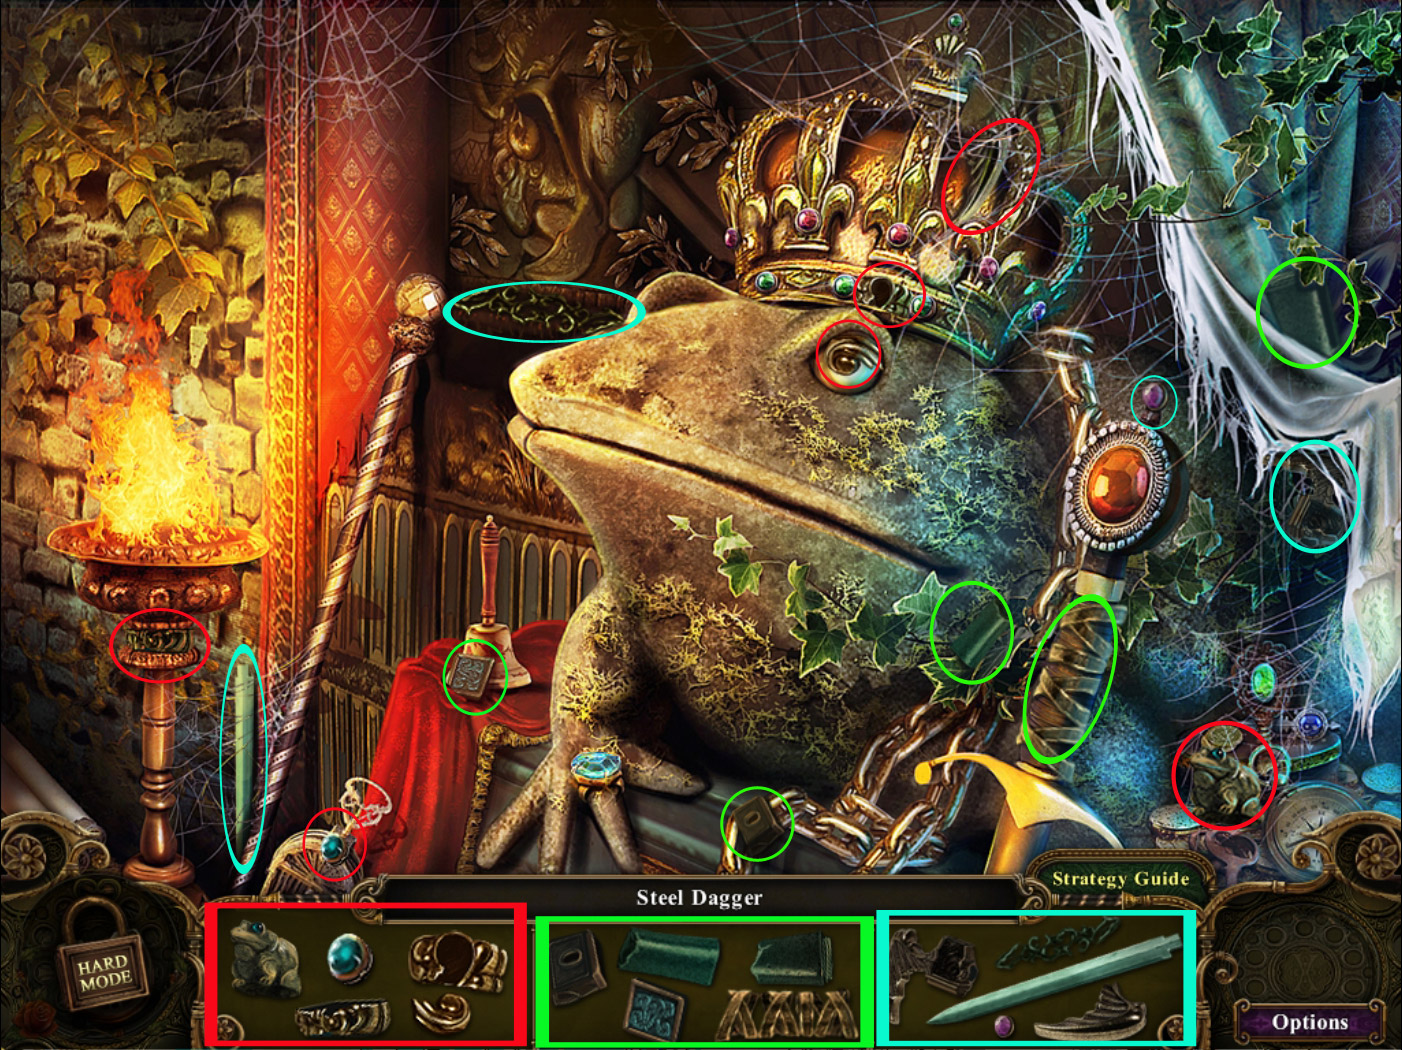
Steel Dagger - Search-scene Cinderella's Treasure Room (38): Auditorium (43)
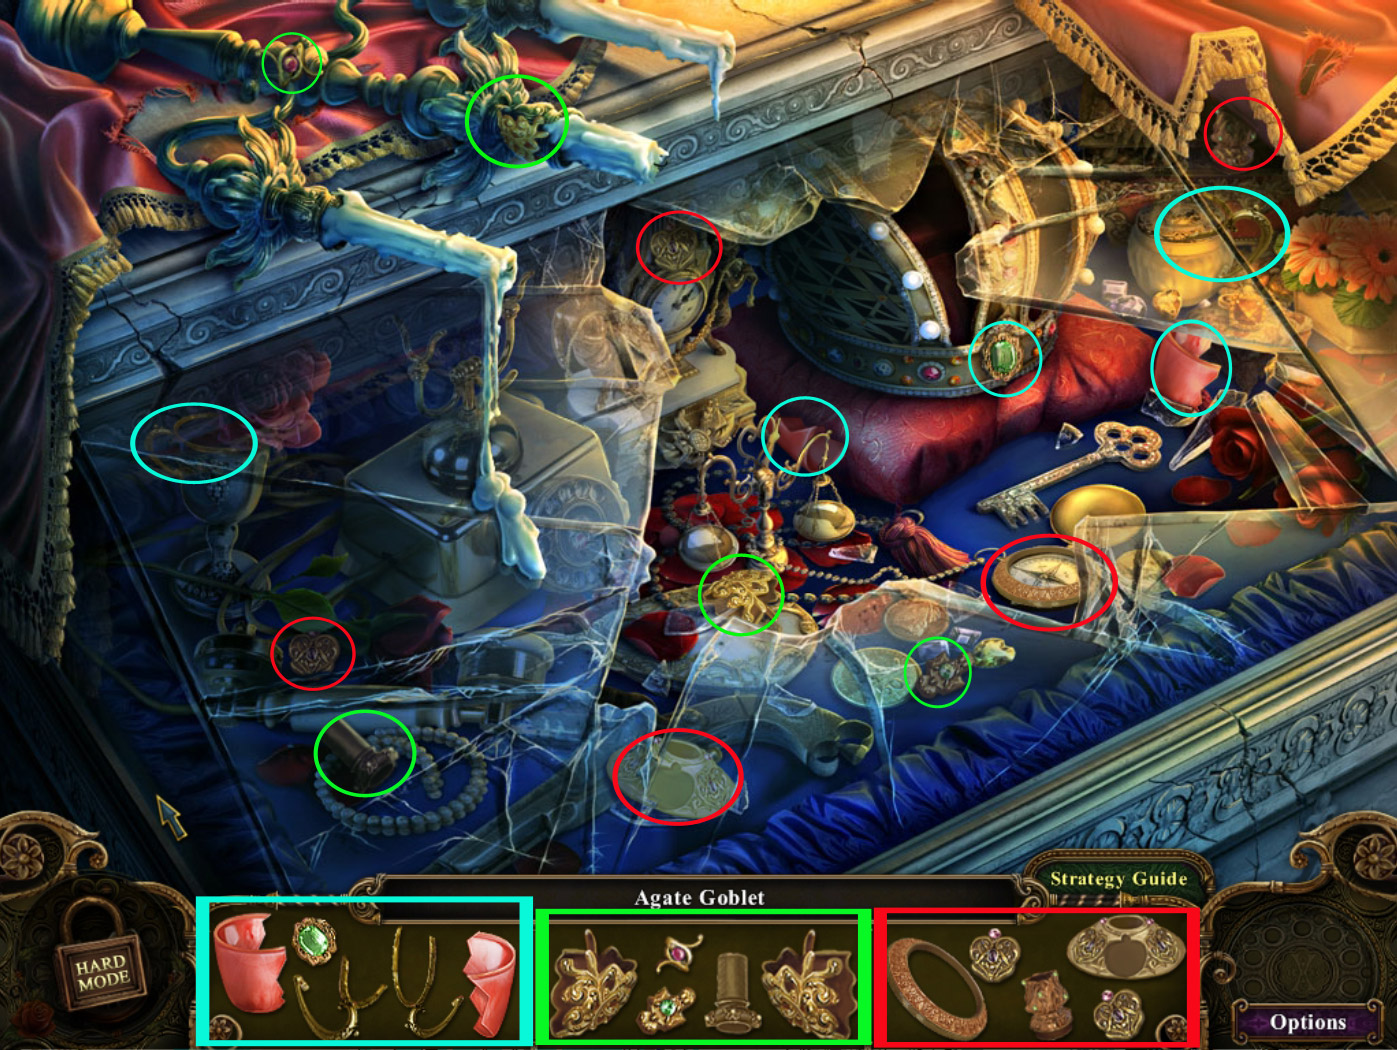
Agate goblet - Search-scene Grand Staircase (39): Fairytale Garden (40)
Princess-Tiara 3/5 - Search-scene Parlor, House Snow White (39): Fairytale Garden (65)
Chapter 7
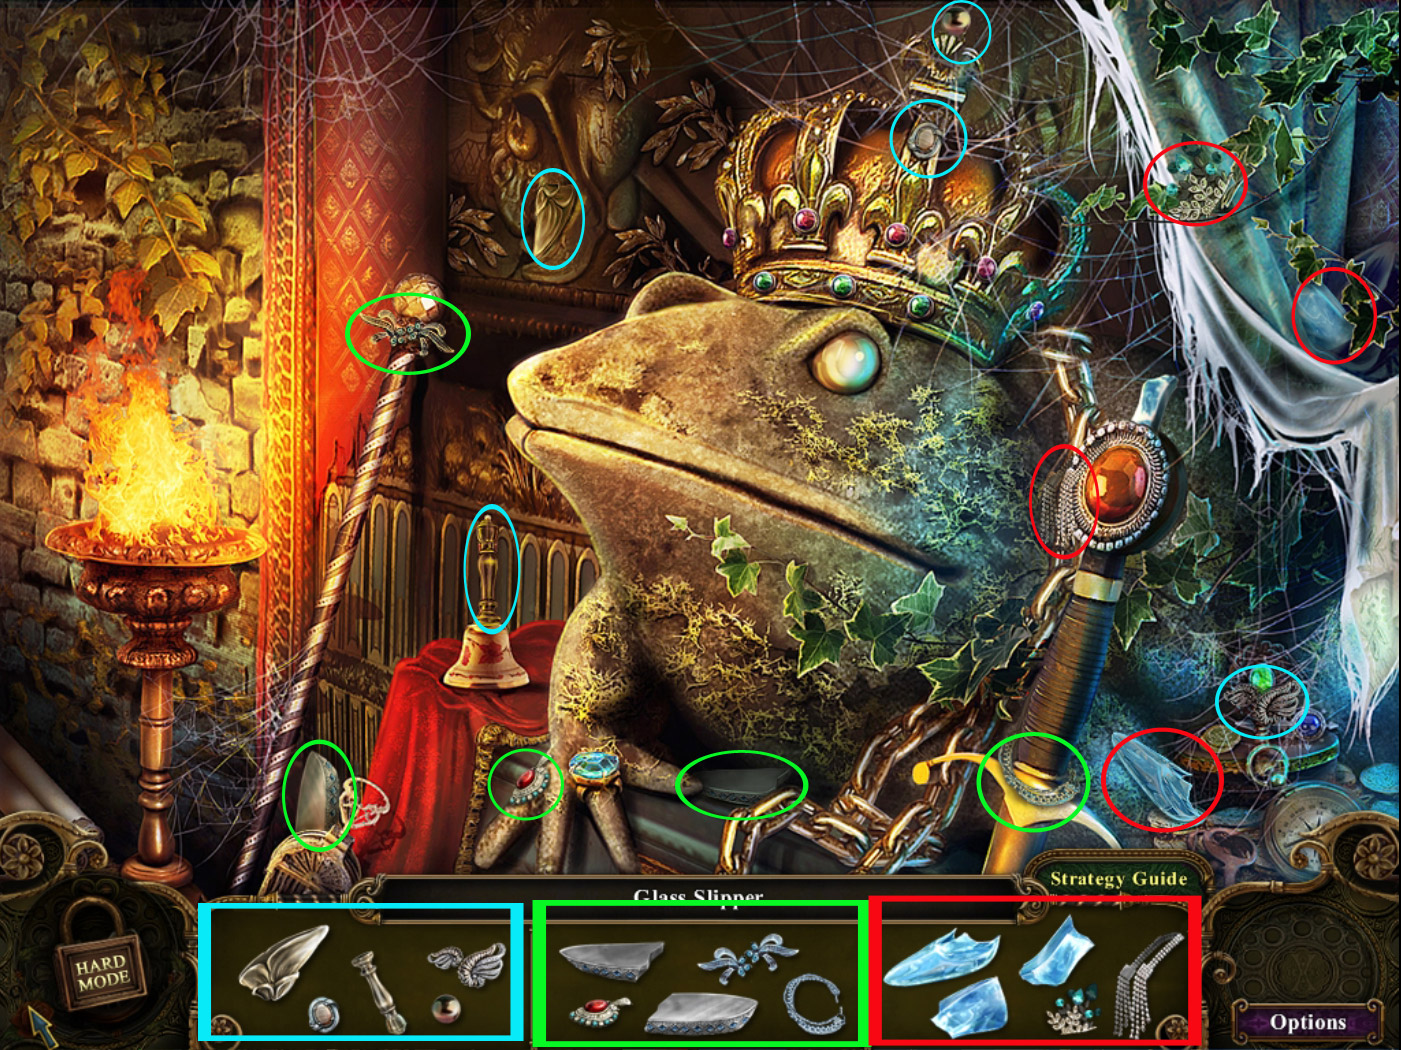
Prince Display Sword - Fairytale Garden (40): Grand Staircase (41)
Knight Shield - search scene Fairytale Garden (40): Grand Staircase (47)
Plant-Potion 3/6 - Search-scene Greenhouse (41): Garden Lake (64)
Book of Mortality - Search-scene Auditorium (42): Cinderella's Library (43)
Princess Diary- Cinderella's Library (43): Auditorium (43)
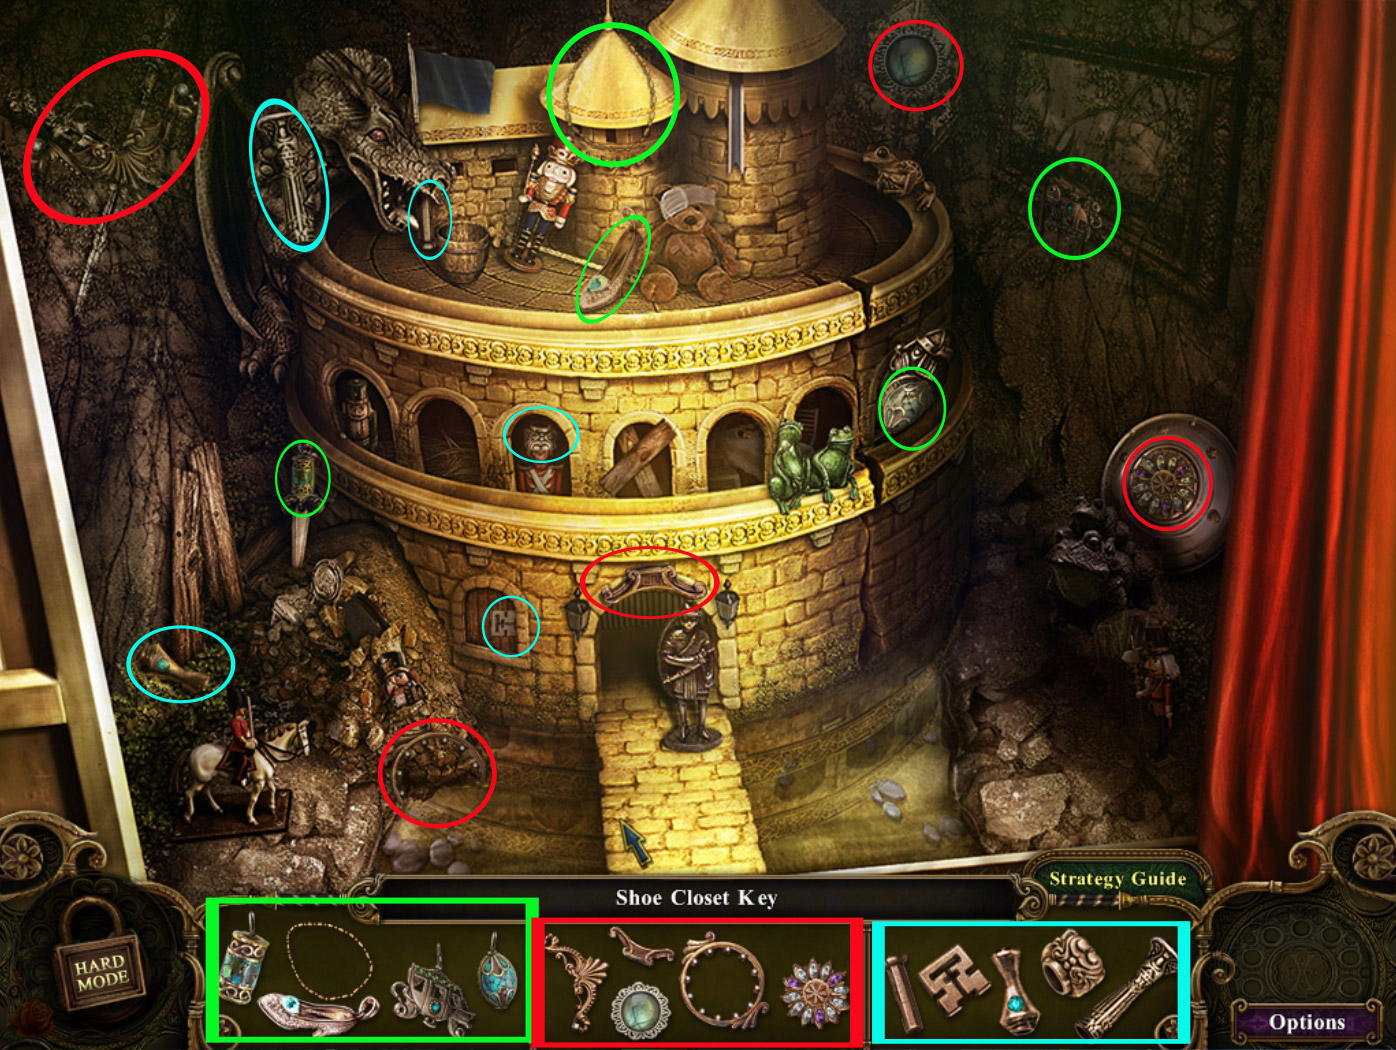
Shoe closet key - Search-scene Auditorium (43): Carriage (45)
Glass shoe- Search-scene Cinderella's Treasure Room (44): Cinderella's Library (45)
Plant-Potion 4/6 - Carriage (45): Garden Lake (64)
Marbles - Search-scene Carriage (45): Cliff (56)
Chapter 8
Princess-Tiara 4/5 - Search-scene Carriage (46): Fairytale Garden (65)
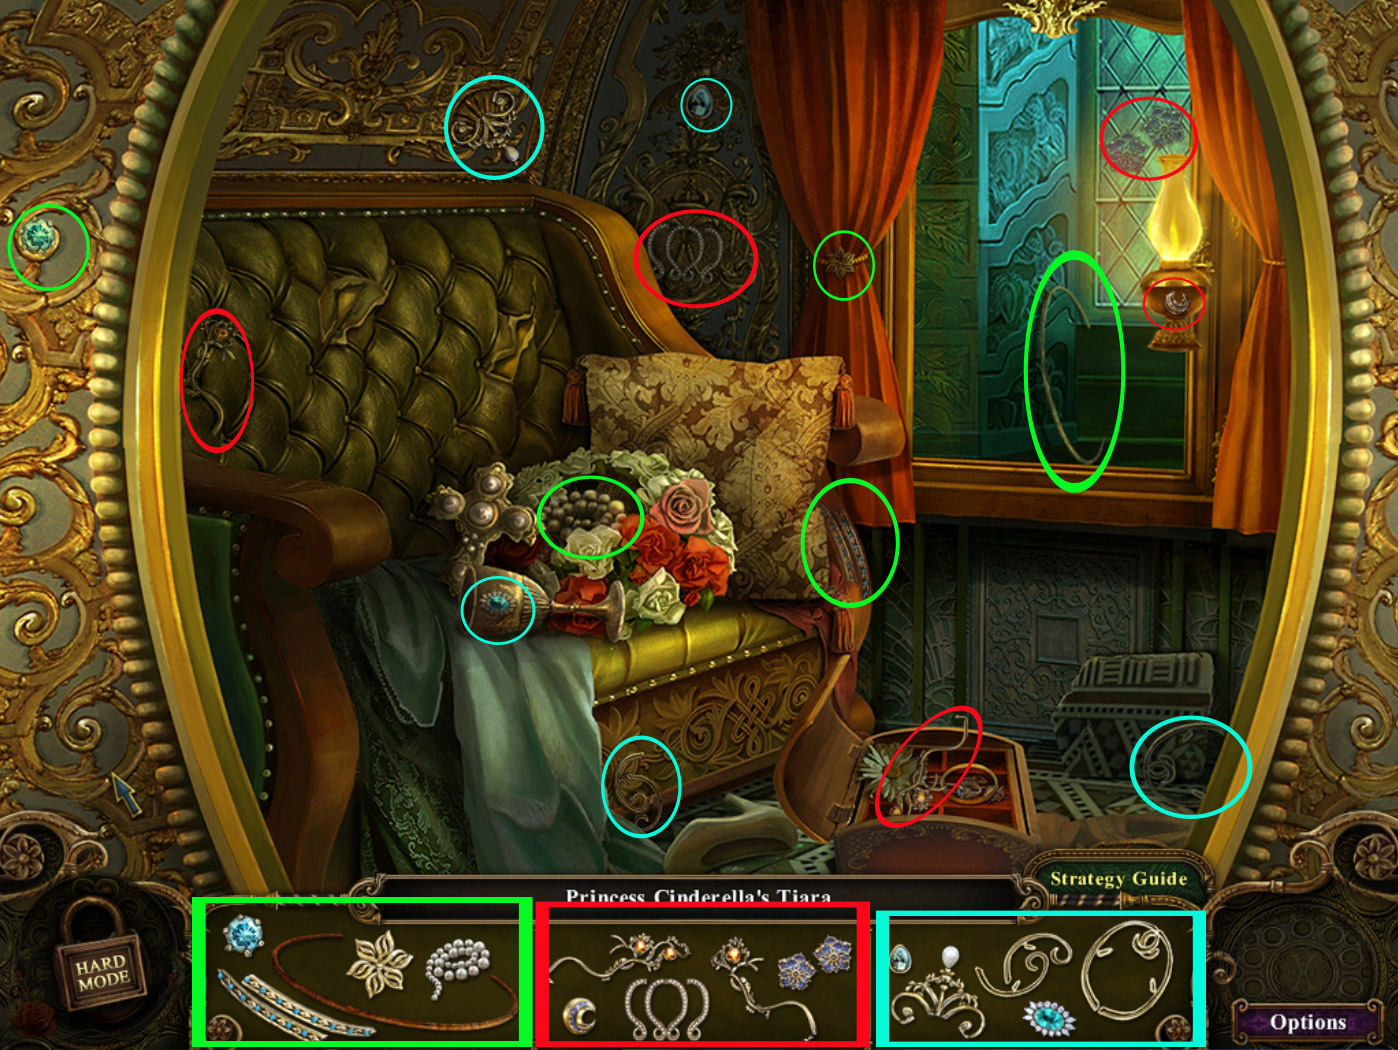
Stone halberd - Search-scene Carriage (46): Grand Staircase (47)
Sturdy Axe - Armor Room (47): Shoe closet (48)
Golden switch handle- Shoe closet (48): Auditorium (49)
Prince portrait - Search-scene Armor Room (49): Portrait Room (50)
Decorative Jar 5/5 - Search-scene Starting Point (52): Puzzle, Way to Cottage (53)
Metal frog plating - Puzzle, Way to Cottage (53): Bedroom (61)
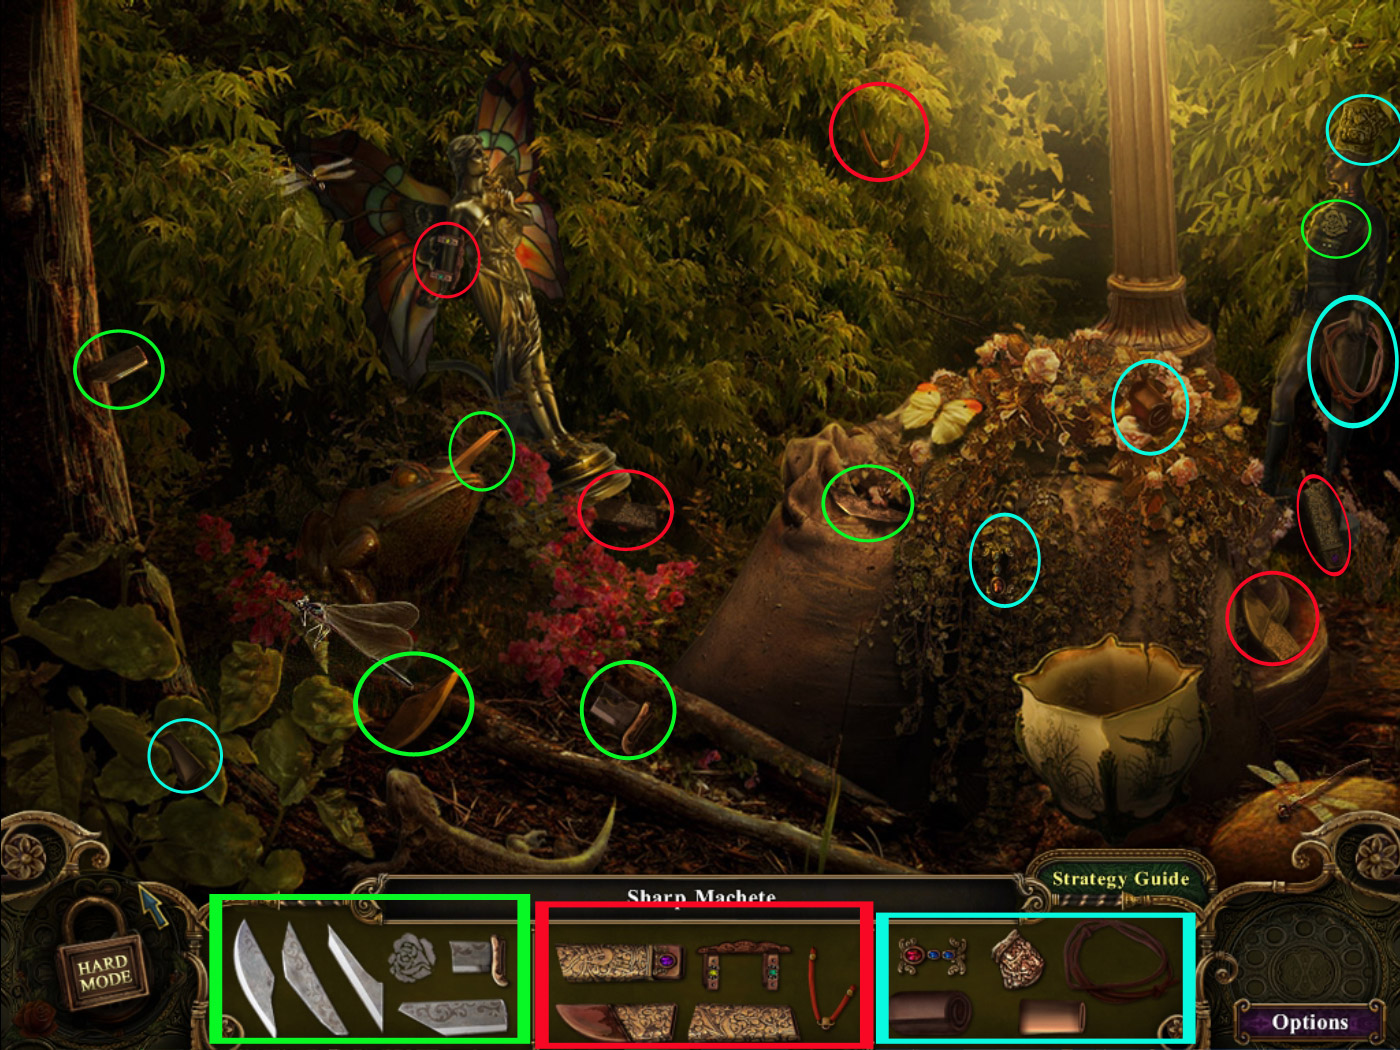
Sharp Machete - Search-scene Pond (53): Entrance Cottage (54)
small hammer - Search-scene Entrance Cottage (54): Root (60)
Chapter 9
Tongs - Parlor Cottage (55): Cliff (56)
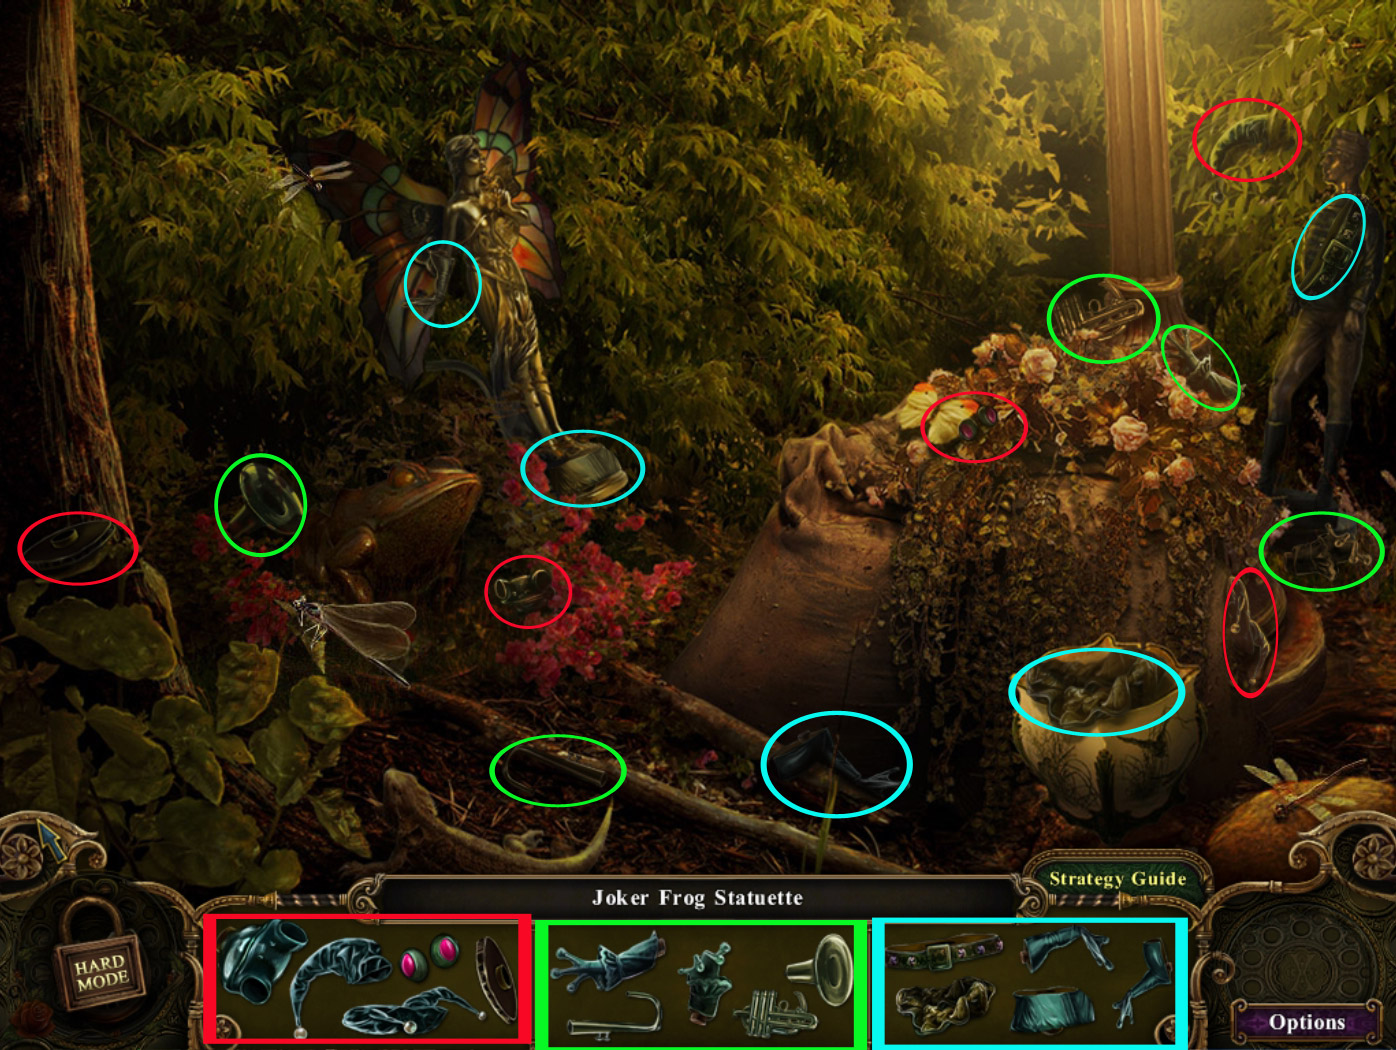
Joker Frog Statuette - Search-scene Pond (56): Parlor Cottage (57)
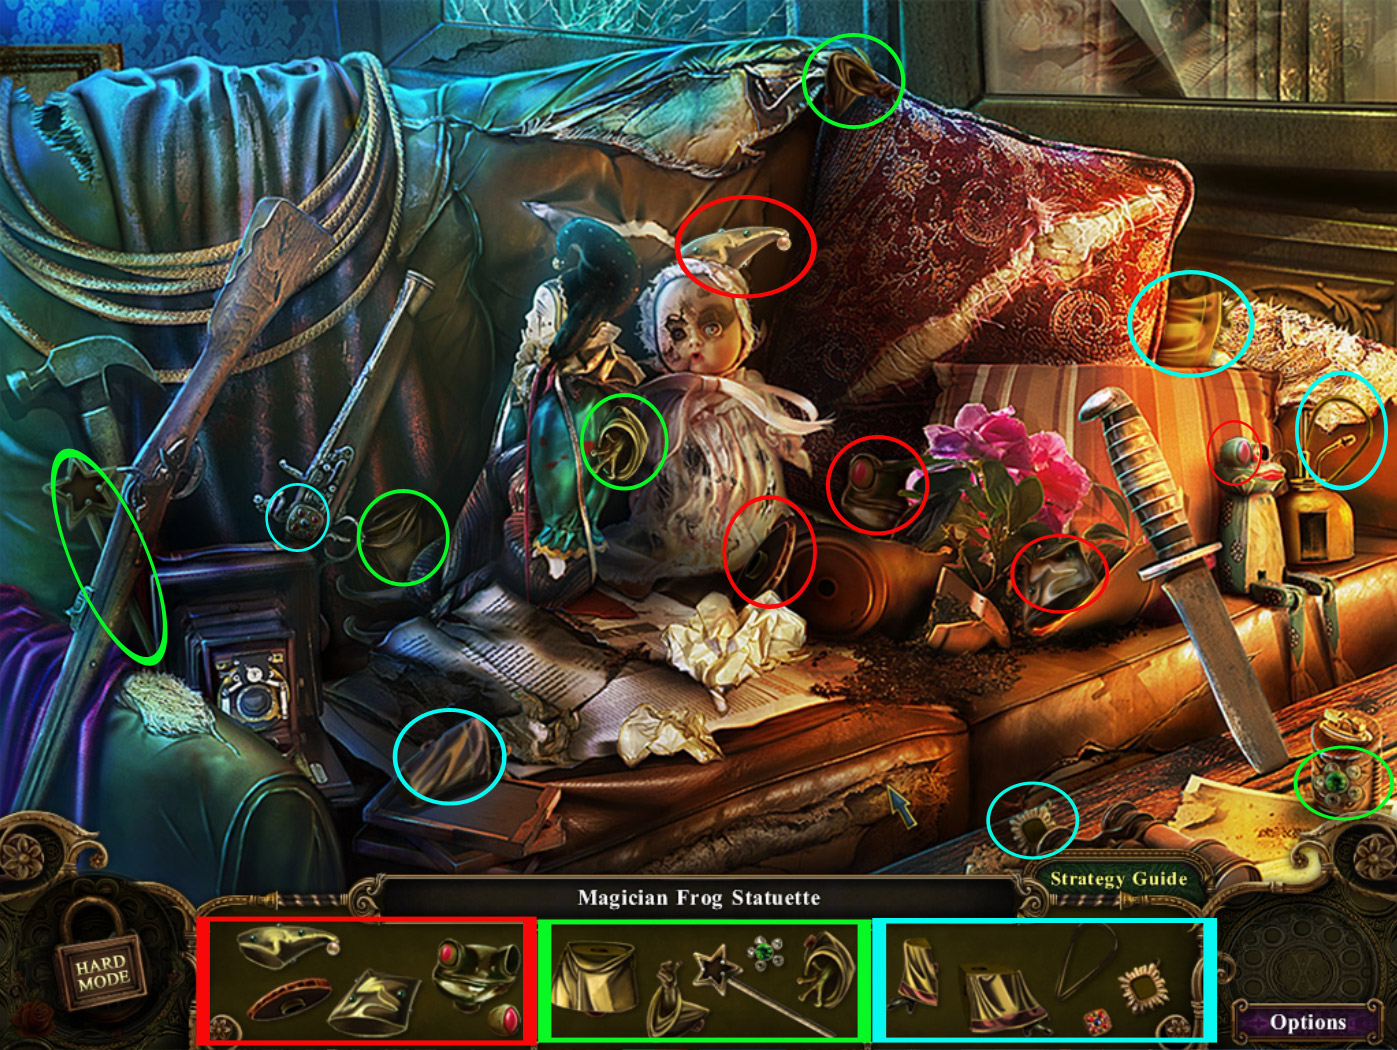
Magician Frog Statuette - Search-scene Parlor Cottage (57): Parlor Cottage (57)
Ivy Key - Search-scene Parlor Cottage (57): Portrait Room (61)
Plant-Potion 5/6 - Search-scene Entrance Cottage (58): Garden Lake (64)
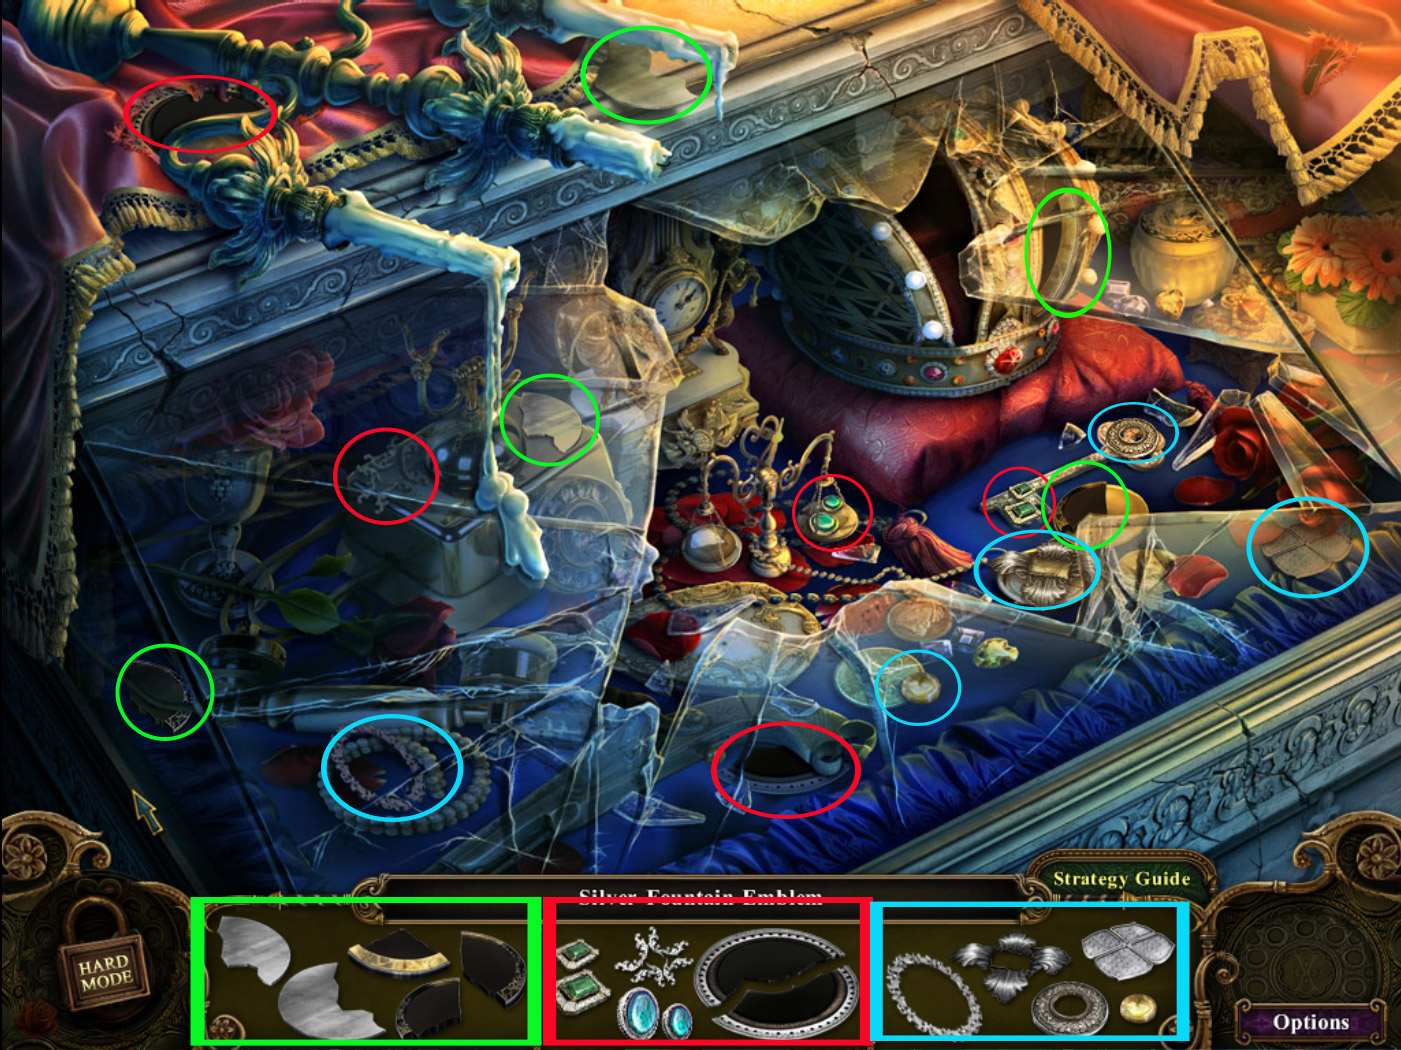
Silver Fountain-Emblem - Search-scene Grand Staircase (58): Portrait Room (59)
Crystal Ball - Root (60): Armor Room (62)
Armor key - Bedroom (61): Armor Room (62)
Chapter 10
Antique wand- Armor Room (62): Fairytale Garden (65)
Plant-Potion 6/6 - Armor Room (62): Garden Lake (64)
Princess-Tiara 5/5 - Search-scene Cinderella's Treasure Room (63): Fairytale Garden (65)
Transformation key - Search-scene Parlor, House Snow White (63): Fairytale Garden (65)
Curse remove potion - Puzzle, Garden Lake (64): Fairytale Garden (65)
Everlasting wand - Puzzle, Fairytale Garden (65): Fairytale Garden (65)
Prince medallion - Fairytale Garden (65): Secret Room, Cottage (66)
Prologue
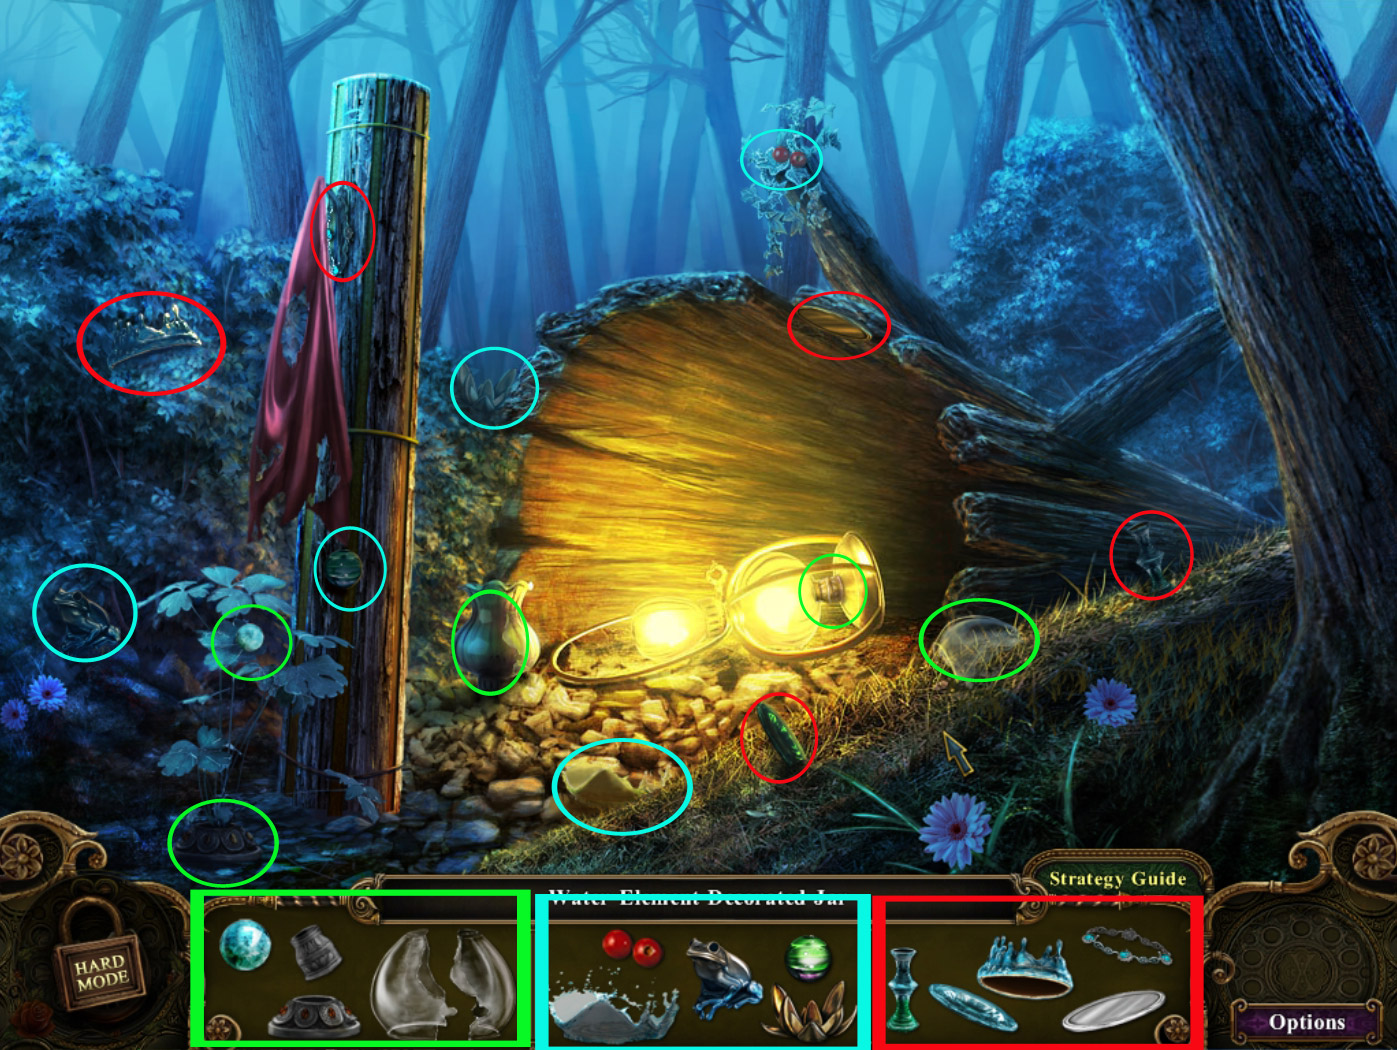
1. Starting Point
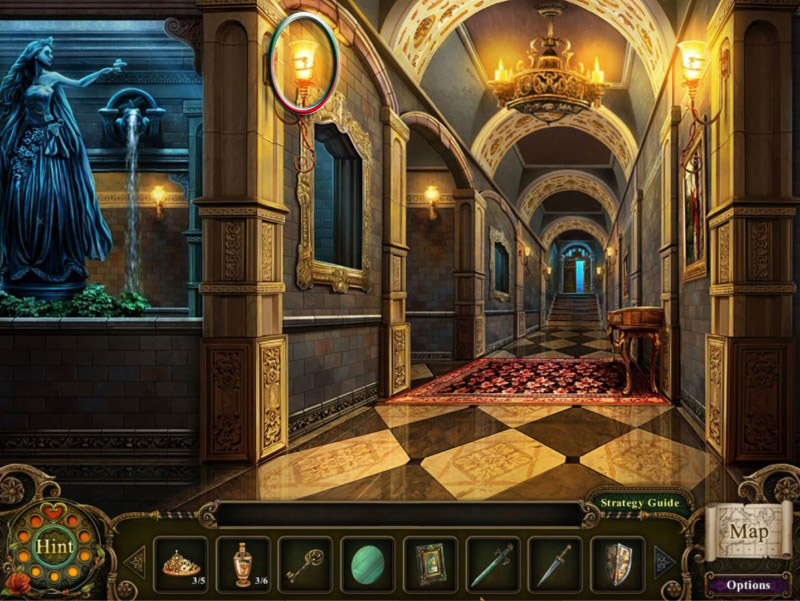
Play your first search scene at the hollow stump on the right side.
Find all objects to obtain a stone emblem.
Screenshot
You may click the raven on the tree but you do not have to.
Go forward to reach the crossroad.
2. Crossroad
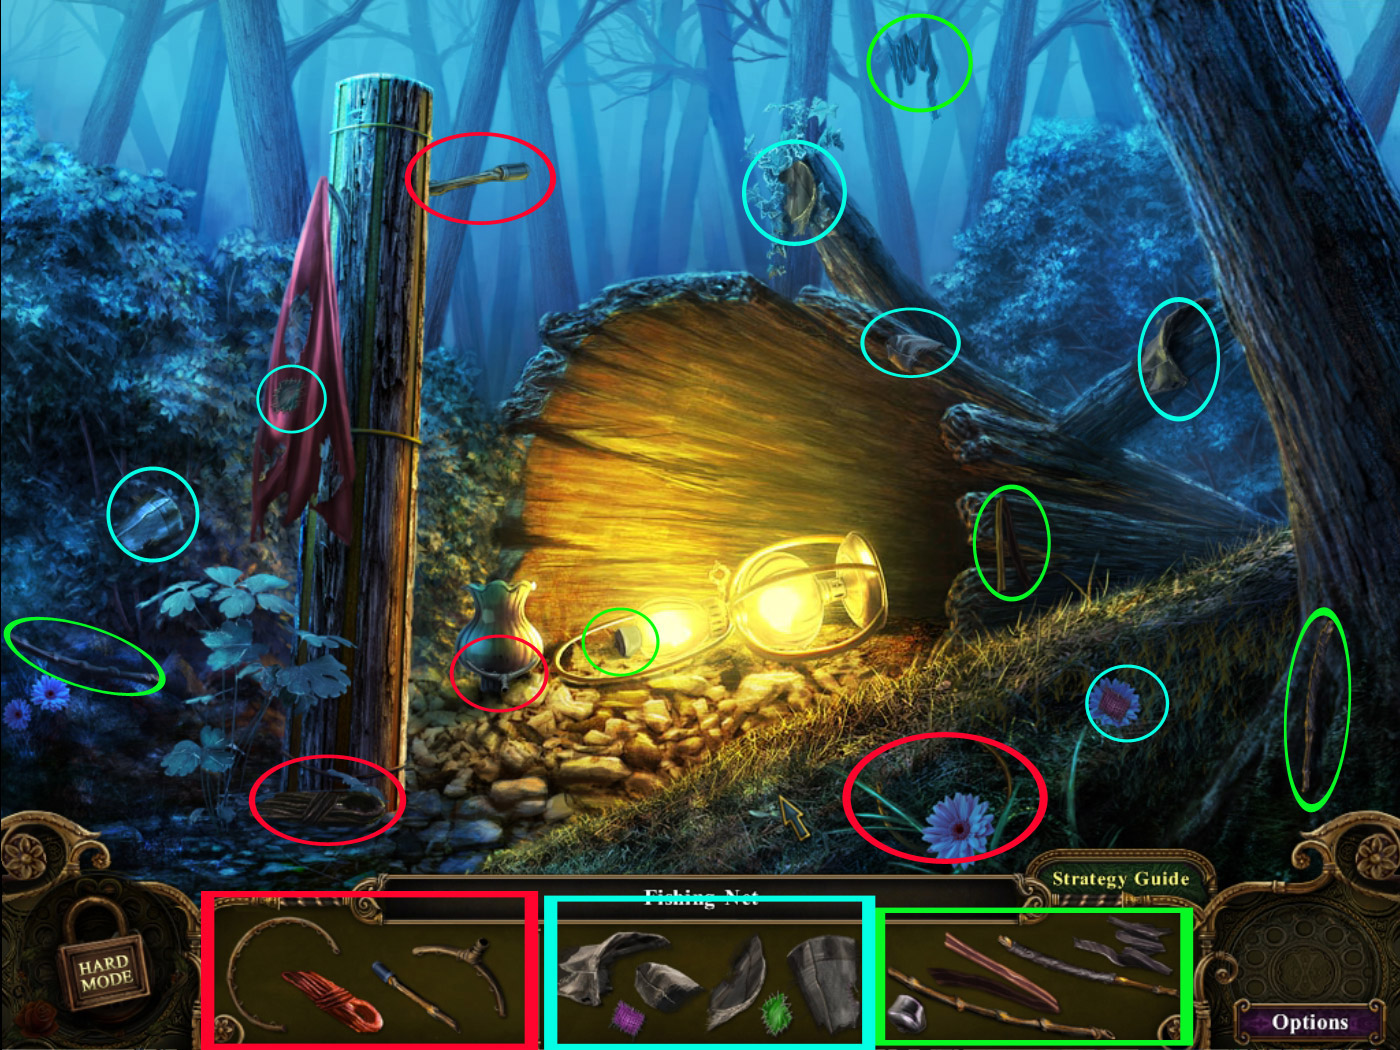
Click the frog on the left, next to the tree, to learn that you will need a cloth to clean.
Take the decorative jar (1/5) from the ground left in front of the tree.
Click the book on the other side of the the tree to learn that the girl really was here.
Screenshot
Click left to learn that you need a tool to cut off the vines.
Go right to the cliff.
3. Cliff
Click the round disc on the tree, right side, to learn that you need something for it.
Zoom in on the yellow fog at the stump on the left.
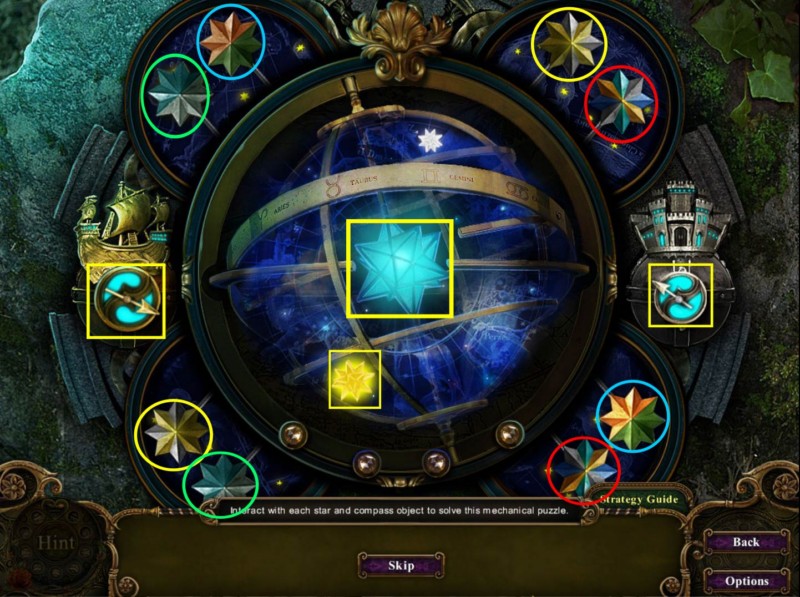
Click the two compasses a couple of times, until the arrow is pointing to a shiny star.
Click the blue star in the middle to make it shine. Now all the stars around are outside.
Look for identical stars and click them. When you found all pairs, the middle will open and you can grab a sickle
Go back to the crossroad.
Screenshot
Use the sickle to remove the vines from the gate on the left.
Zoom in on the gate and place the stone emblem (Spoiler 1) in the empty spot.
Go through the now-open gate.
You now have access to your map - three search scenes are activated by going through the gate.
Go back twice to the starting point.
4. Starting Point, Way to the Cottage
Play the search scene to obtain a fish net.
Screenshot
Go straight ahead to the crossroad and there to the left through the open gate.
At the tree on the left you will have to put down the 5 decorated jars later.
Go forward to the cottage - the gate on the left is locked, the hatch on the low right side also.
Zoom in on the Cottage Entrance.
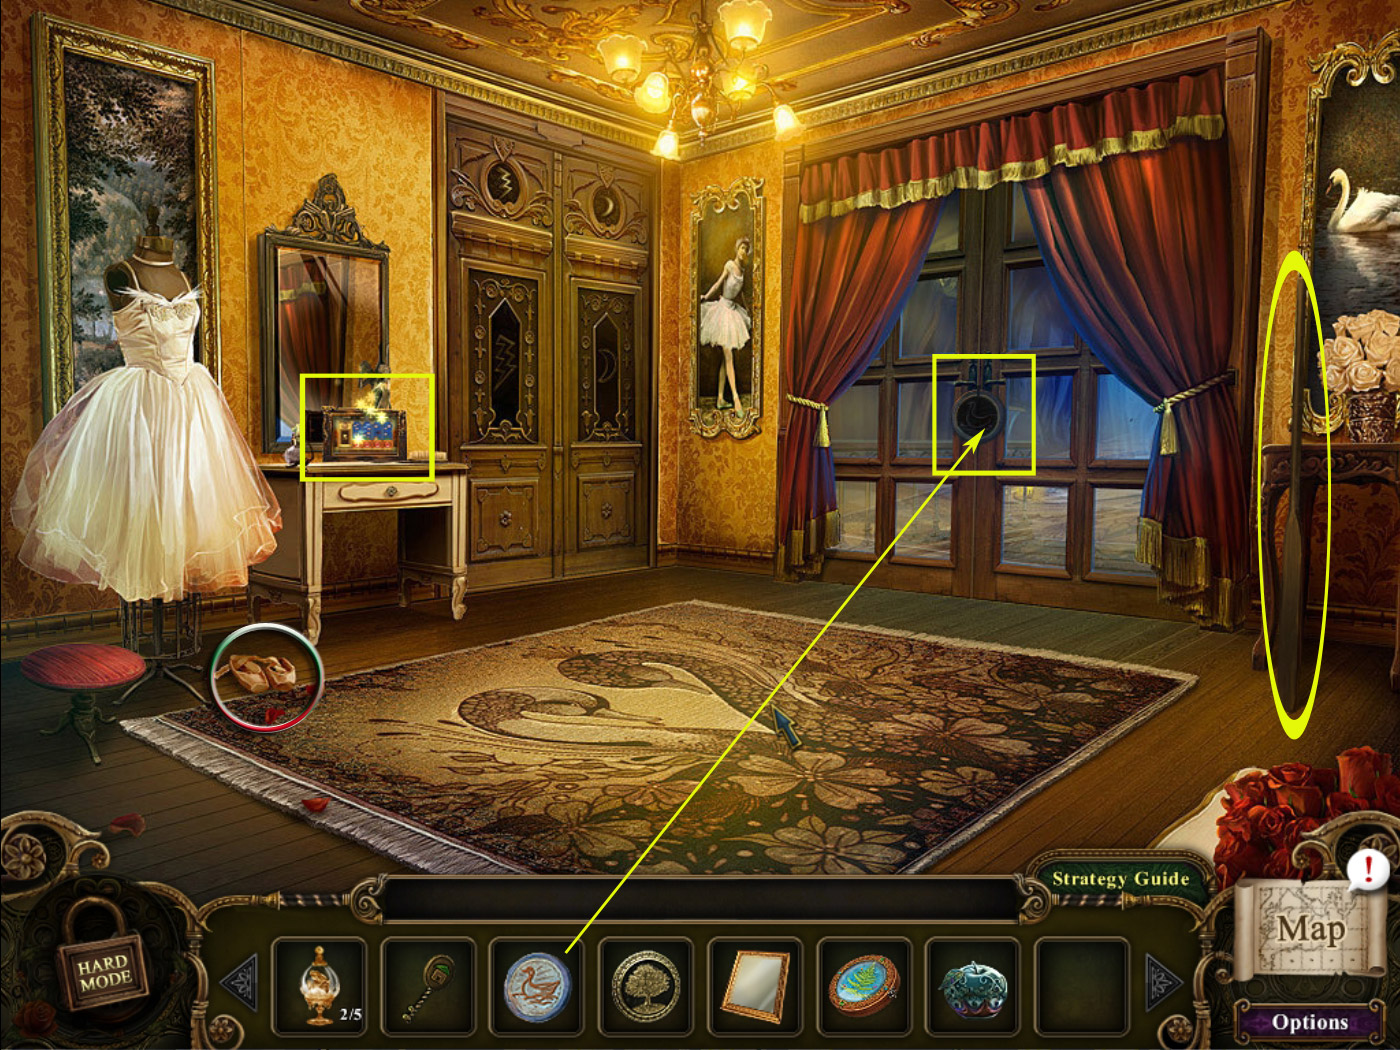
5. Cottage Entrance
Play the search scene in the right cottage window.
Screenshot
The gate key will go into your inventory.
Grab the cloth on the left.
Screenshot
Go back 1x and zoom in on the gate left to the cottage.
Use the gate key and go forward to reach the pond.
6. Pond
Play the search scene to obtain a dragonfly gem.
Screenshot
Use the fish net (Spoiler 4) to catch the object in the pond.
A ladybug gem will go into your inventory.
Go back twice to reach the crossroad.
7. Crossroad (fixing the huge frog)
Zoom in on the huge frog and use the cloth (Spoiler 5) to clean the pedestal.
Place the lady bug gem and the dragonfly gem (both Spoiler 6) in the empty spots.
The frog's mouth opens - take out the cottage key.
Screenshot
Go forward 3x.
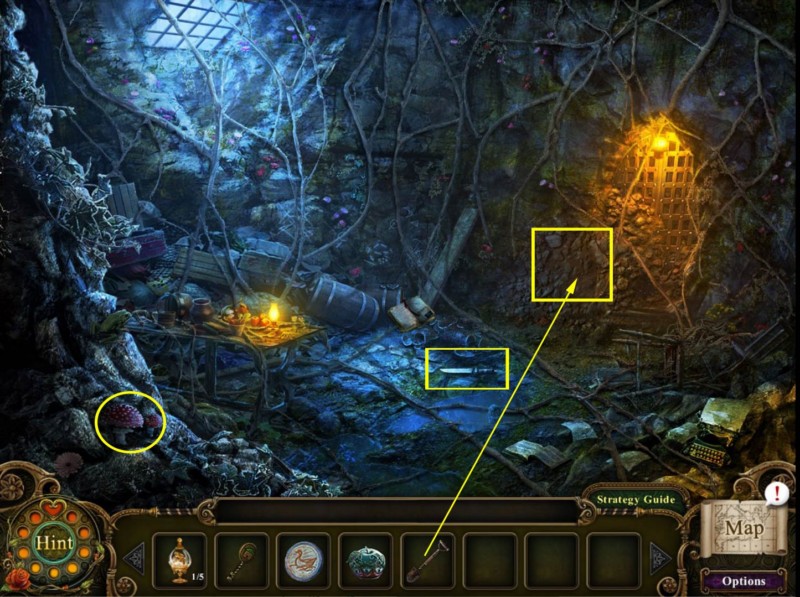
8. Back Cave
Go forward into the back cave.
Play the search scene to obtain a mechanical handle.
Screenshot
Grab the lakeside disc on the ground right next to the gate on the right side.
Zoom in on the shelf on the back wall and read the information in the book.
Screenshot
Go back into the cave with the skeleton.
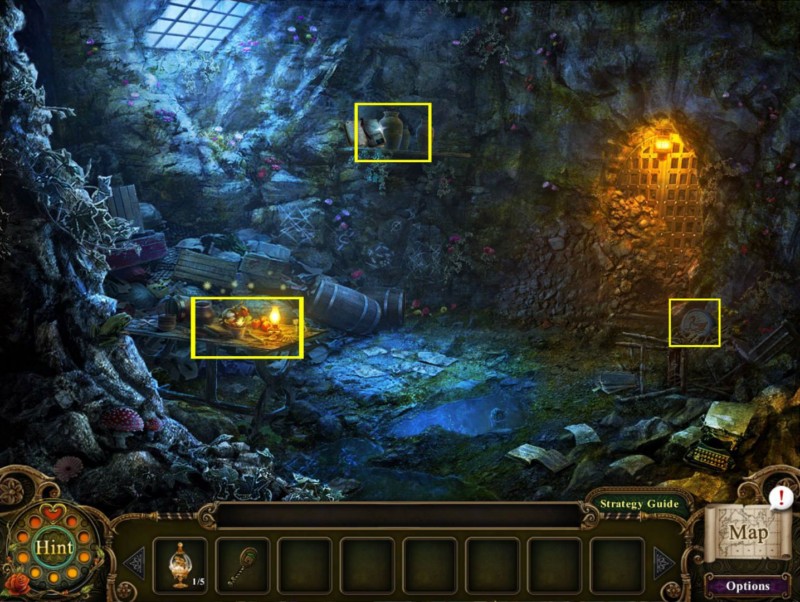
9. Cave with Skeleton
Click the device in front of the gate on the right side to find your first morphing object (1/20).
Click the skeleton to learn that you will need a sharp tool.
Read the newspaper laying on the ground right next to the chest.
Click the chest to activate a mini game.
You will see discs with dots, some are linked by numbers. Your goal is to adjust the dot discs by clicking so that the dots of the connected disc will add up the number link.
The panel will raise, and you can take a rose emblem.
Screenshot
Use the mechanical handle (Spoiler 8) at the slot on the wall to the left, next to the gate on the right side, and click to open the gate.
Zoom in on the door behind the gate and place the rose emblem.
Go through the door.
Screenshot
Chapter 2
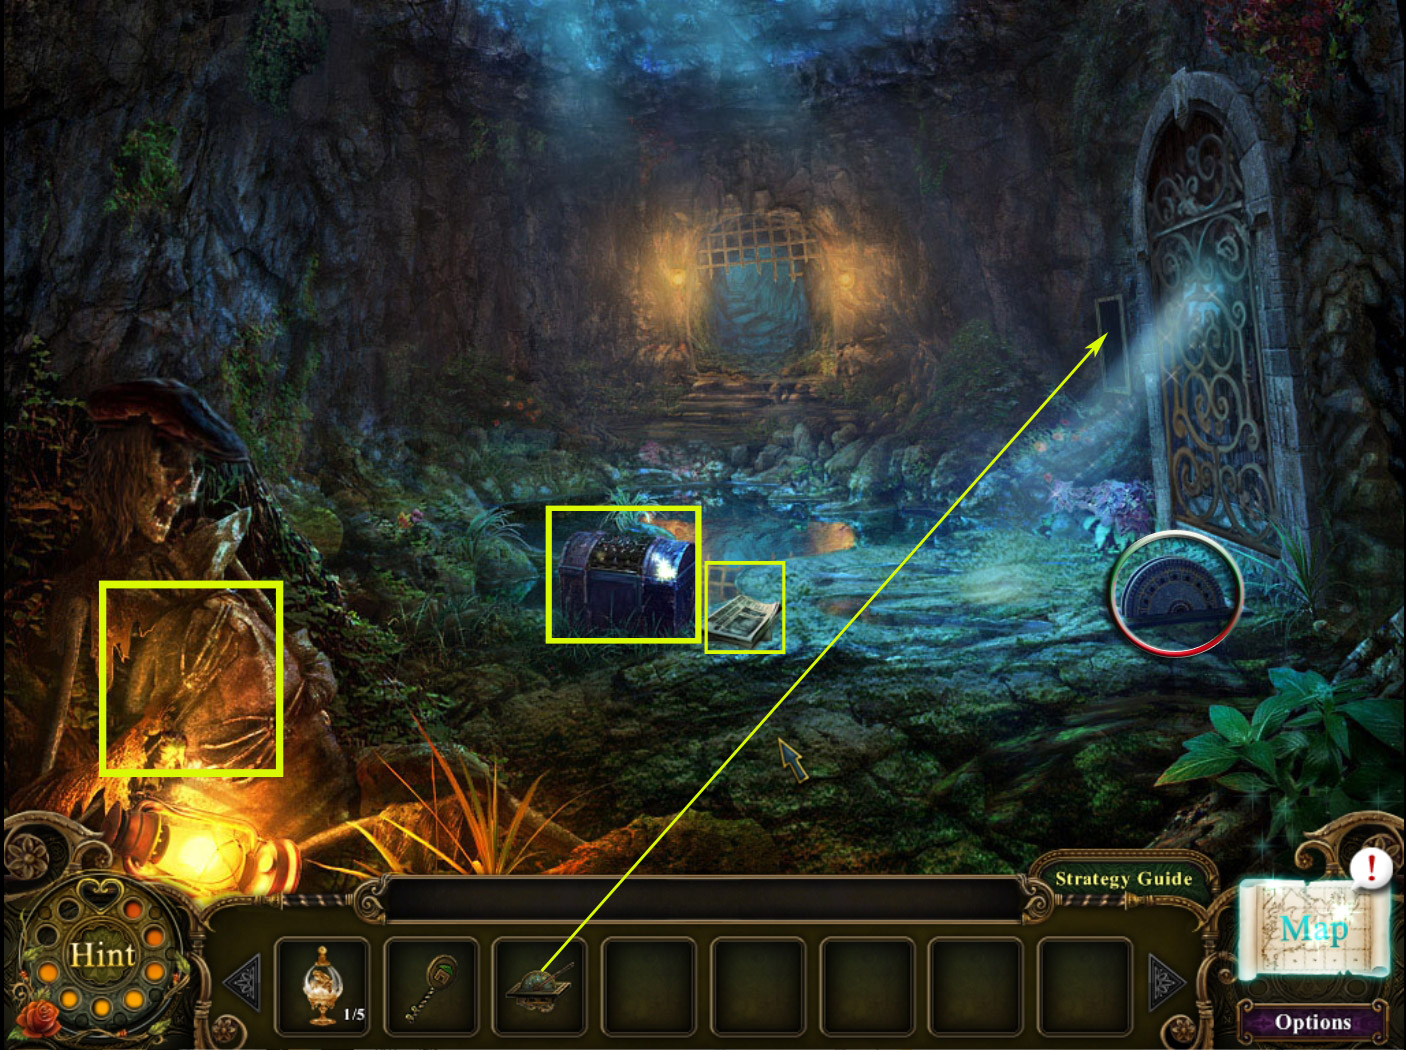
10. Cave Crossing
Click vines straight ahead and on the right to learn that there is nothing you can do right now.
Grab the silver apple inside the ivy on the lower left side.
Go back into the back cave.
Screenshot
CAVE CROSSING - HARD MODE ONLY
Zoom in on the door on the left and place the golden crown on the frogs head.
The door will open - enter the secret room and take the secret tree disc from the ground on the right side.
Leave the secret room and return to the back cave.
11. Back cave/Cave with Skeleton
Click the mushrooms in the low left corner in the back cave - they are a morphing object (2/20).
Grab the knife on the ground in the middle of the cave.
Go 1x back to the cave with the skeleton.
Zoom in on the skeleton and use the knife at the stitches.
You will find a map that will be added to your journal. This activates new search scenes.
Return to the back cave and play the search scene on the left to obtain a shovel.
Screenshot
Use the shovel to remove the stone heap in front of the gate and go through the hole.
Screenshot
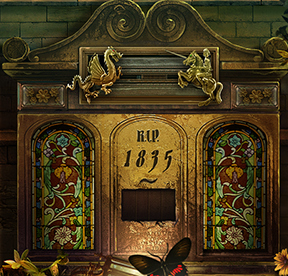
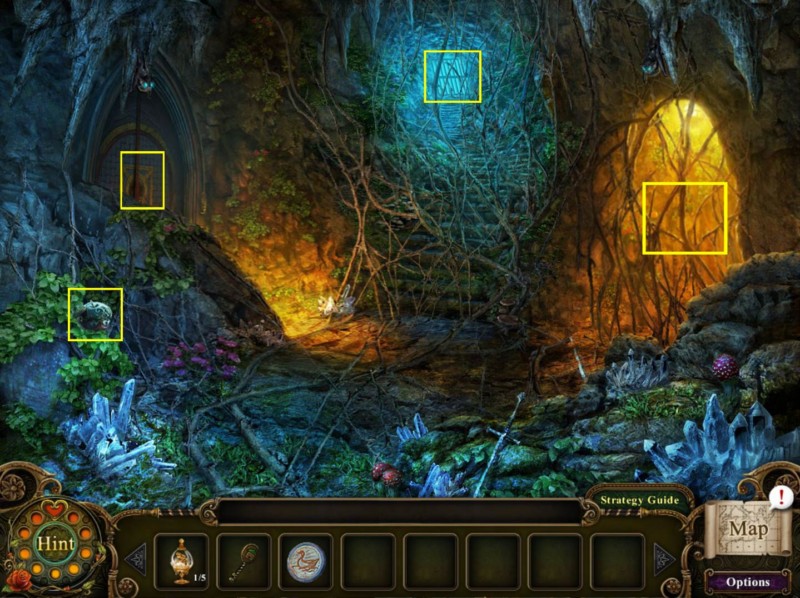
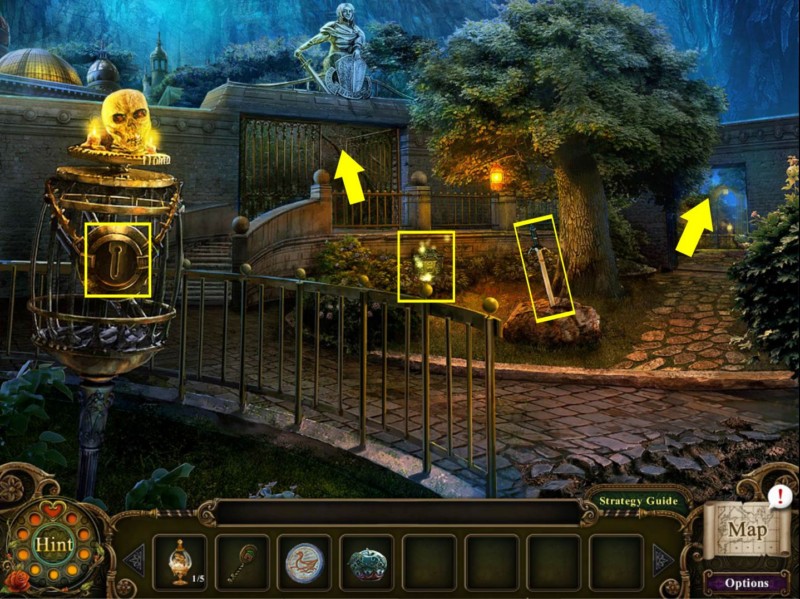
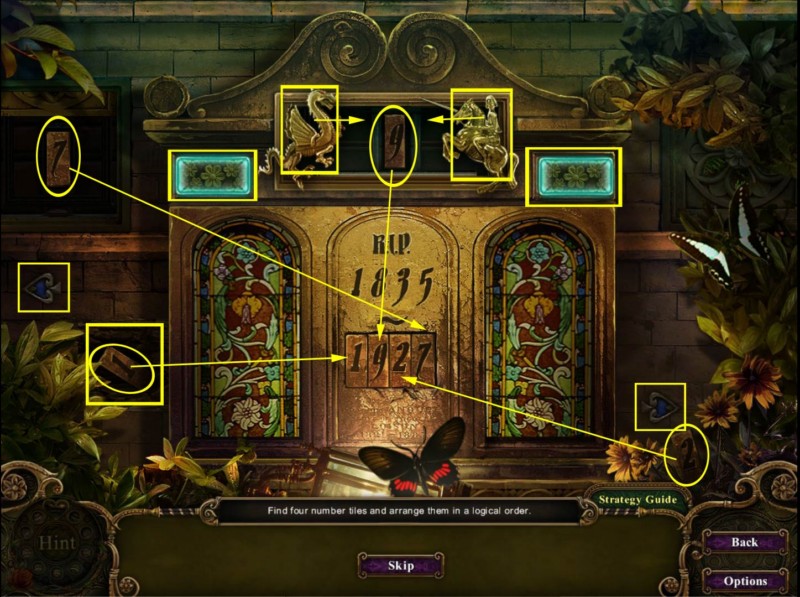
12. Garden Entrance
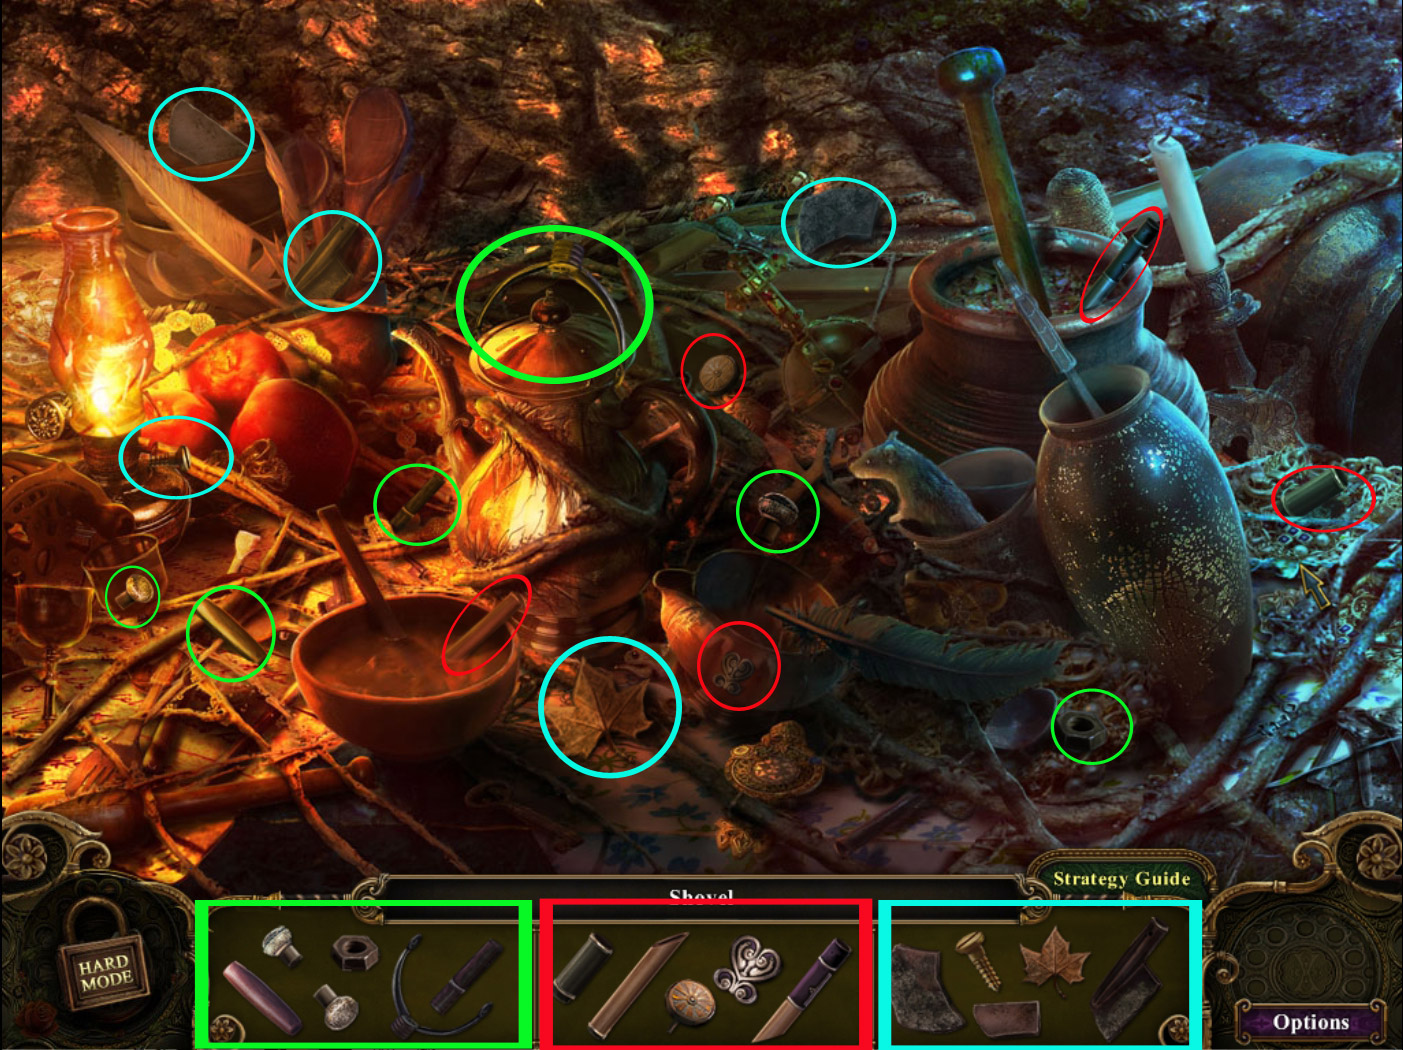
Click the cage on the left and the sword at the tree in the middle to learn that you are missing objects to solve the tasks.
Zoom in on the mini game at the stone wall behind the tree.
Screenshot
Your goal is to find four number plates and add them in a logical order.
The number plates have to be placed in the empty spot below the birth date.
Number 2 you can find below the blue arrow in the low right corner.
Click the cracked stones at the wall on the left side to find the number 1
Number 9 will appear when you first click the dragon above the RIP and then the knight at the right moment.
Click the two square buttons next to dragon and knight.
Reassemble the image that appears on the left side - to do so click the blue arrows (below the image and low right corner). When you have the right image, the number 3 will appear.
Click and place each number.
As the 1835 indicates the birth date, you know that the date of death has to be later.
There are not many possibilities: It has to be 19 - so only 72 or 27 can indicate the year.
It is 1972.
The grave stone moves and you can grab a square mirror.
Screenshot
Enter through the gate left behind the tree.
13. In front of the Palace
Click the green spirit in front of you to make it disappear.
There is nothing you can do at the left gate, the door to the right, or the palace entrance.
Play the search scene at the left stained-glass window to obtain a royal scepter.
Screenshot
Go one step back and go through the right arch to the Fountain.
14. Fountain/Back Cave
The small lamp on the left, on the Greenhouse on the far left side, is a morphing object (3/20).
Zoom in on the search scene in front of the morphing lamp and find all parts to obtain a leaf heirloom.
Screenshot
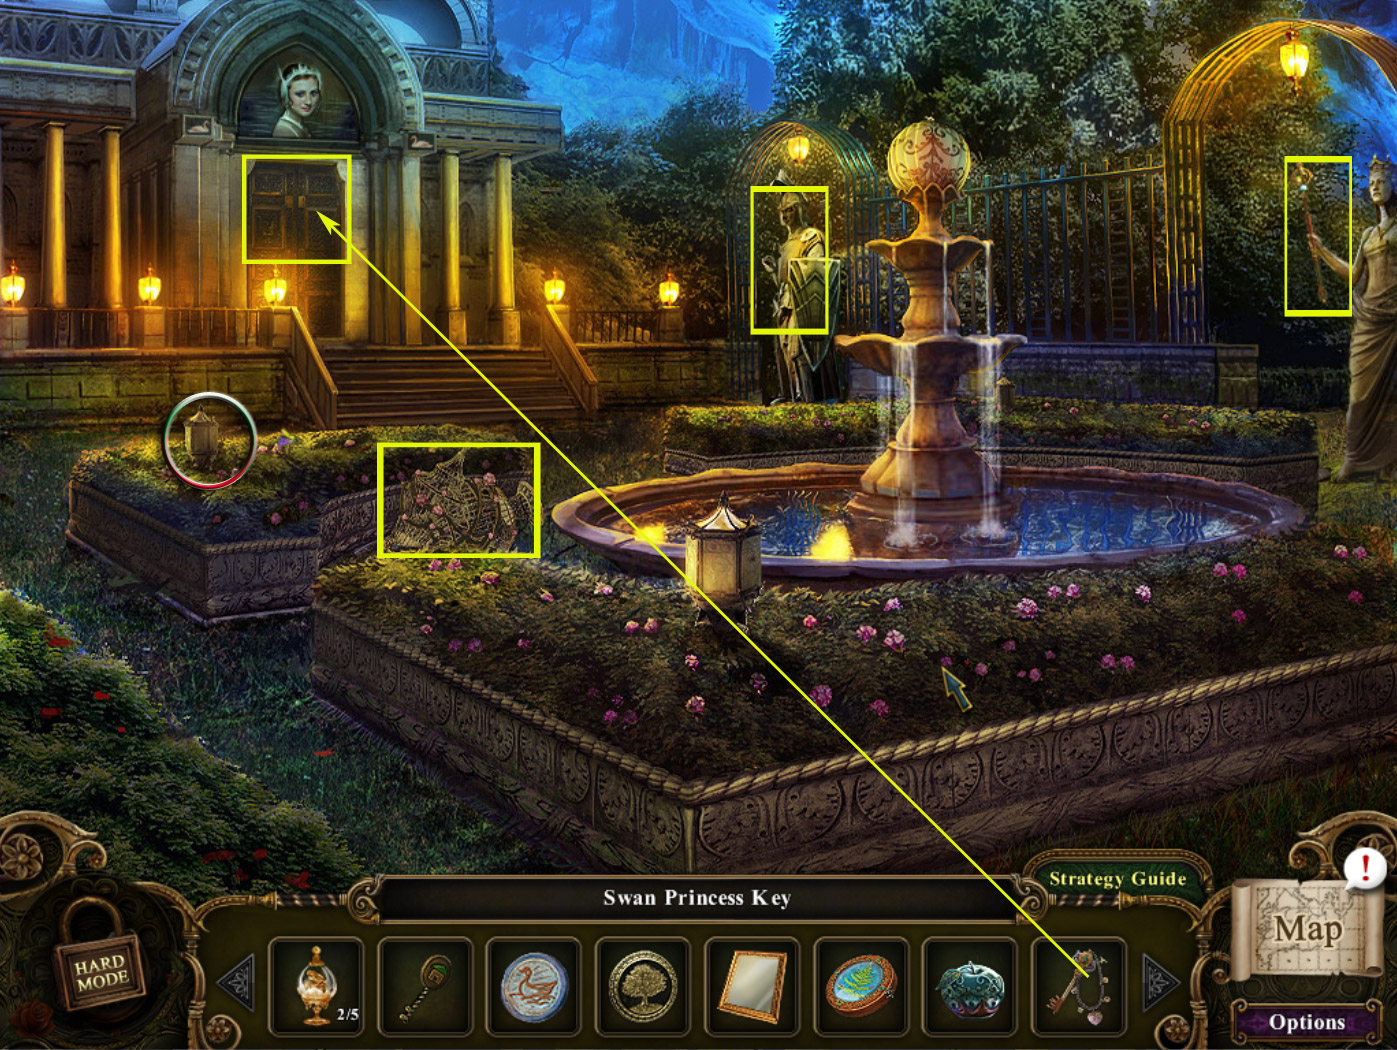
Use the royal scepter (Spoiler 13) on the statue on the right - she will reveal the way to the house of Snow White.
Go there and come back, as this activates a new search scene at the fountain.
Play it obtain the decorated jar (2/5)
Screenshot
Go back twice to enter the back cave and play the search scene there.
Find all parts to obtain the swanlake princess key.
Screenshot
Return to the fountain.
Zoom in on the door of the swanlake princess' house, use the key to open it and enter.
Screenshot
15. Swanlake Princess - Parlor
Click the ballet shoes (morphing object 4/20) on the left side below the dress.
Grab the oar leaning at the wall on the right side.
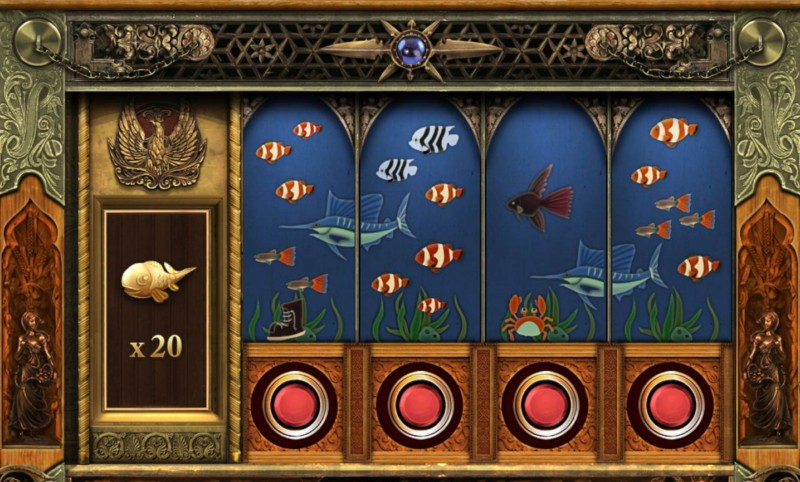
Zoom in on the box on the dresser on the far left to activate a mini game. Your goal is to have a sum of 20 fishes on the four parts of the image.
To change the image parts, click the buttons below each part until you find the right combination.
The image moves and you can take the moon gem.
Screenshot
Click the door on the right, next to the dresser, to learn that you are missing a lightning gem.
Zoom in on the door on the right and place the lakeside disc (Spoiler 8) into the empty spot to open the door.
Screenshot
Go through the door to the Underground Lake.
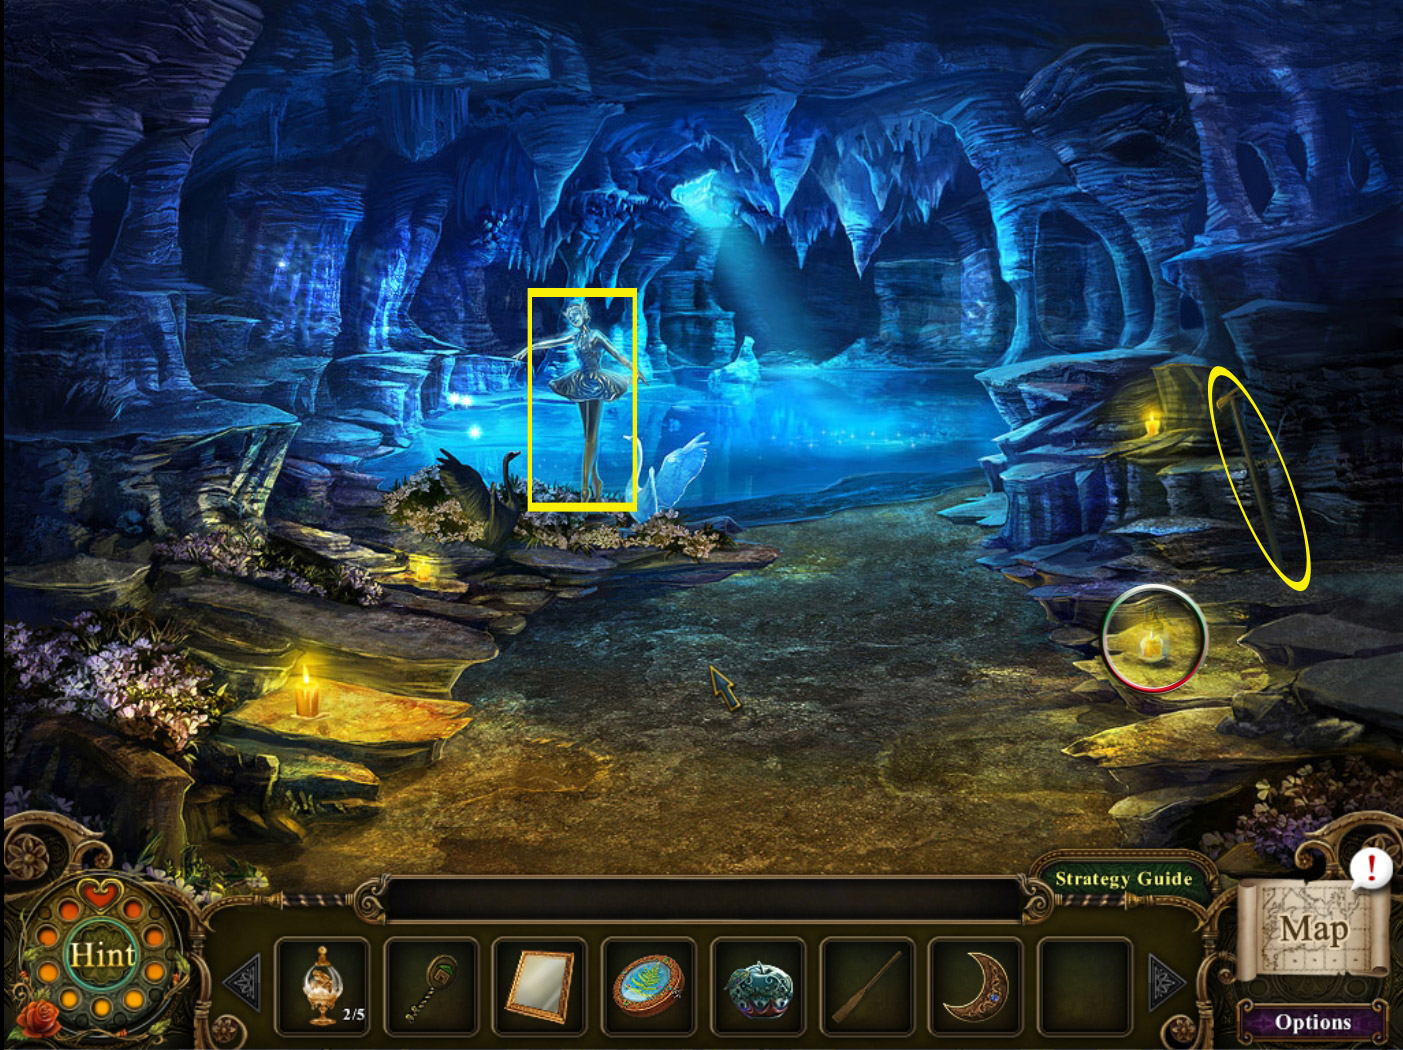
16. Underground Lake
Click the candle on the low right side (morphing object (5/20).
Grab the sledge hammer leaning against the rocks on the right side.
Screenshot
Zoom in on the ballerina figurine to play the search scene.
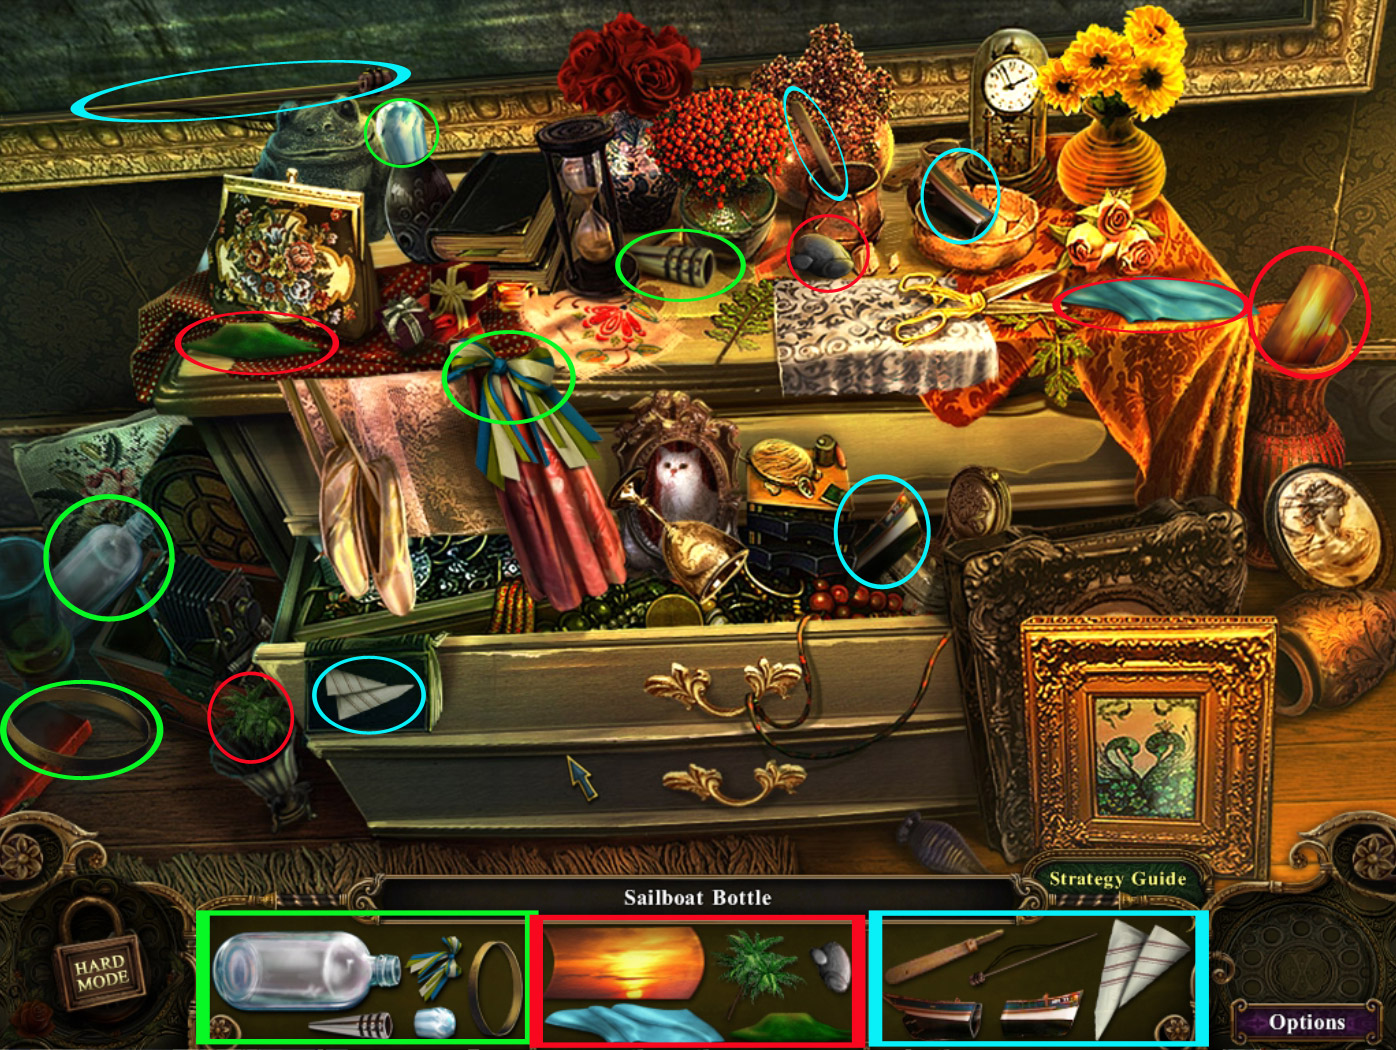
Find all parts to obtain a ship in bottle (1/5).
Screenshot
Go back 3x to the Garden Entrance.
17. Garden Entrance/Fountain
Use the sledge hammer (Spoiler 16) and use it on the stone with the sword.
Grab the sword and go 1x forward to the Fountain.
Hand the sword over to the knight statue and enter the fairytale garden.
Follow the cut scene and receive the greenhouse key from Princess Ivy.
Chapter 3
18. Fairytale Garden/Underground Lake/Palace Entrance
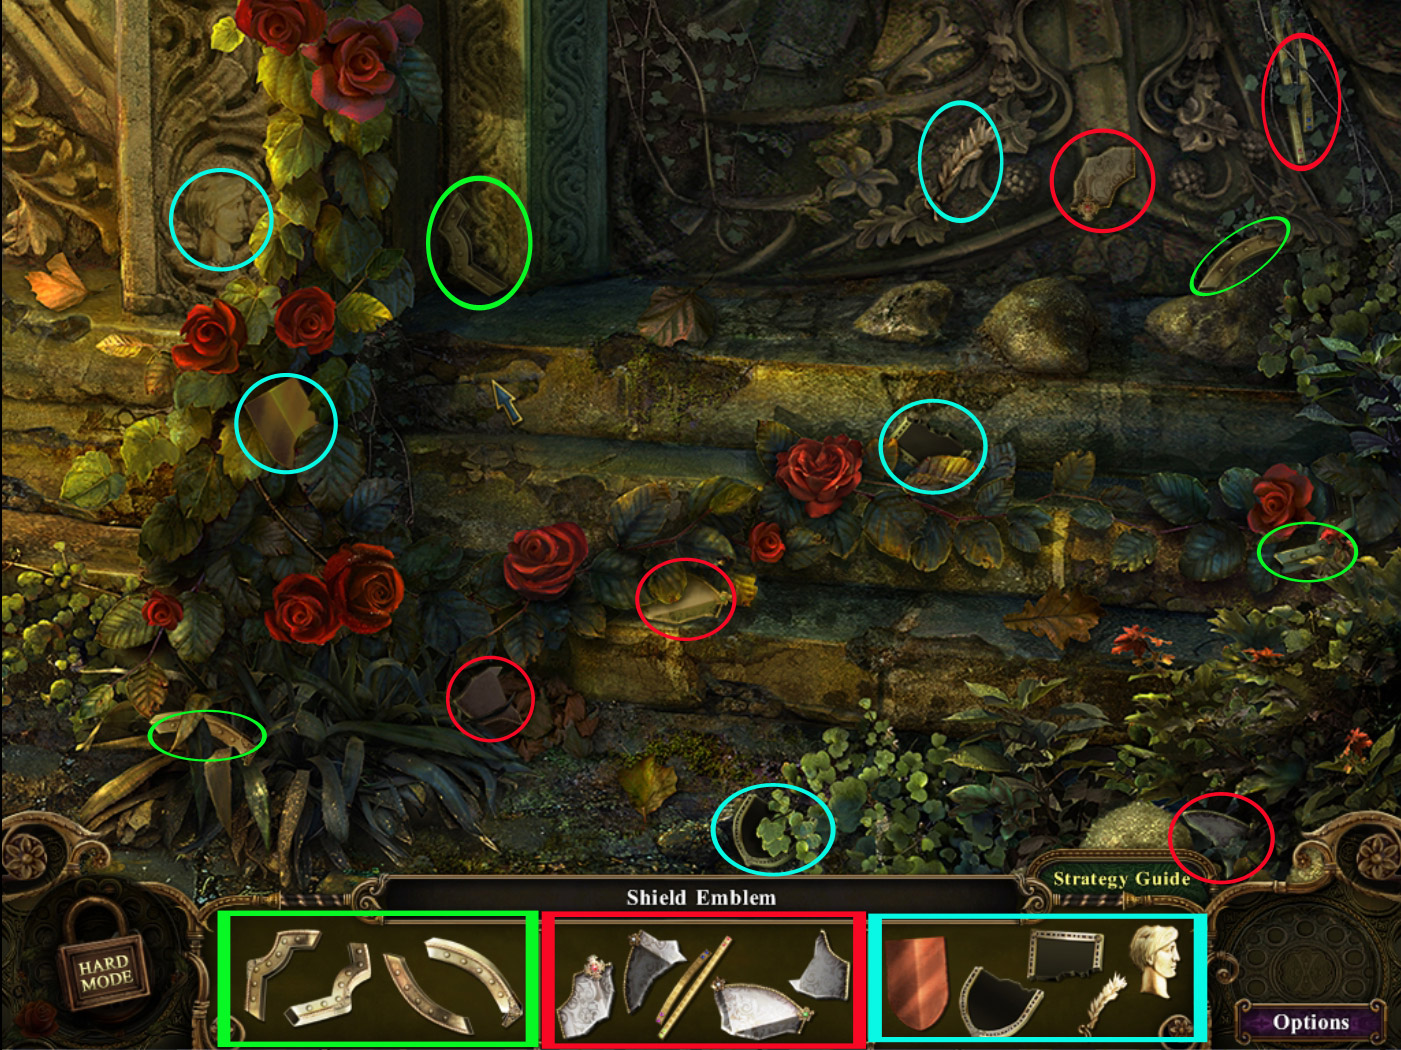
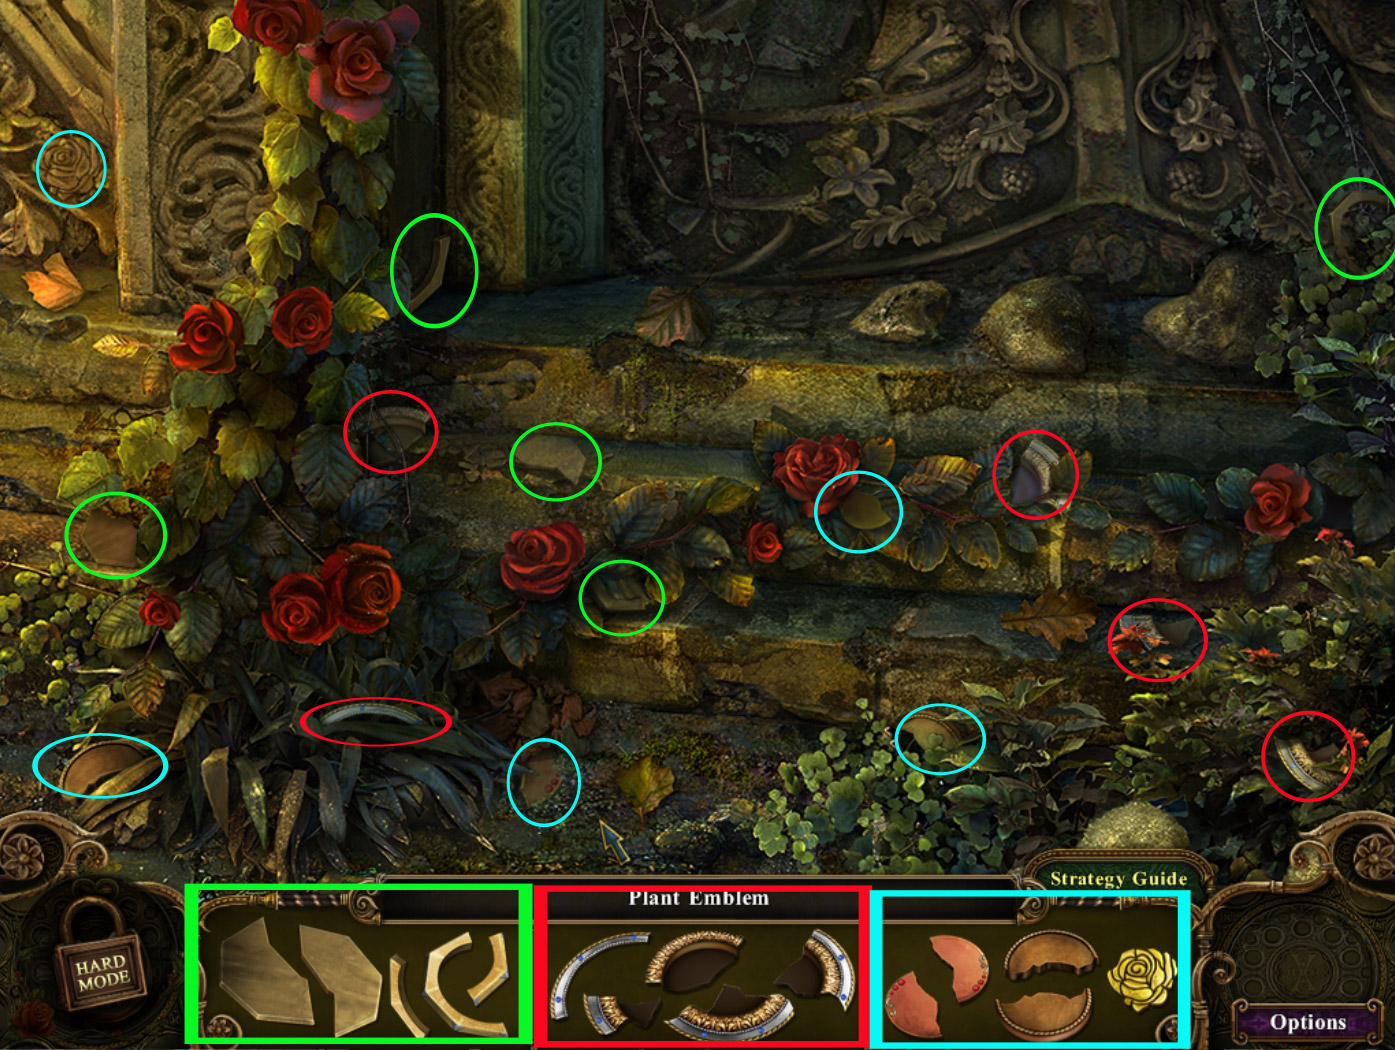
By entering the fairytale garden you activated some search scenes. Play the one at the right princess statue to obtain a shield emblem.
Screenshot
Go back 1x, enter the house of the Swanlake Princess and go to the Underground Lake.
Play the search scene to obtain a princess tiara (1/5)
Screenshot
Go back 3x to the Garden Entrance and then left, in front of the palace.
Zoom in on the search scene and find all parts to obtain the skeleton key.
Screenshot
Return to the Garden Entrance.
19. Garden Entrance/In front of the Palace
Use the skeleton key (Spoiler 18) to open the cage on the left and take the bold cutter.
Go left in front of the palace and click the emblem (morphing object 6/20) above the door of the Greenhouse on the right side.
Zoom in on the Greenhouse door and use the bold cutter to cut the chains.
Open the lock with the Greenhouse key (Spoiler 17) and enter.
Screenshot
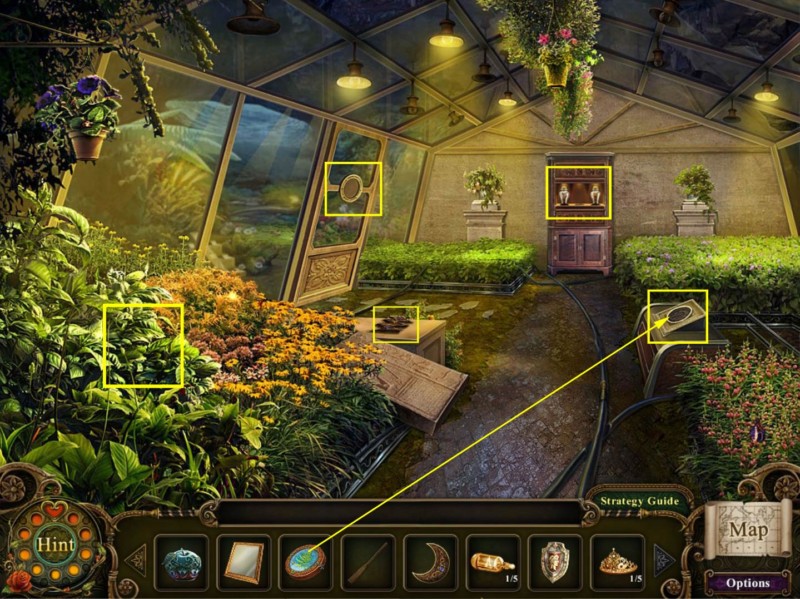
20. Greenhouse
Get the lightening gem from the chest on the left side.
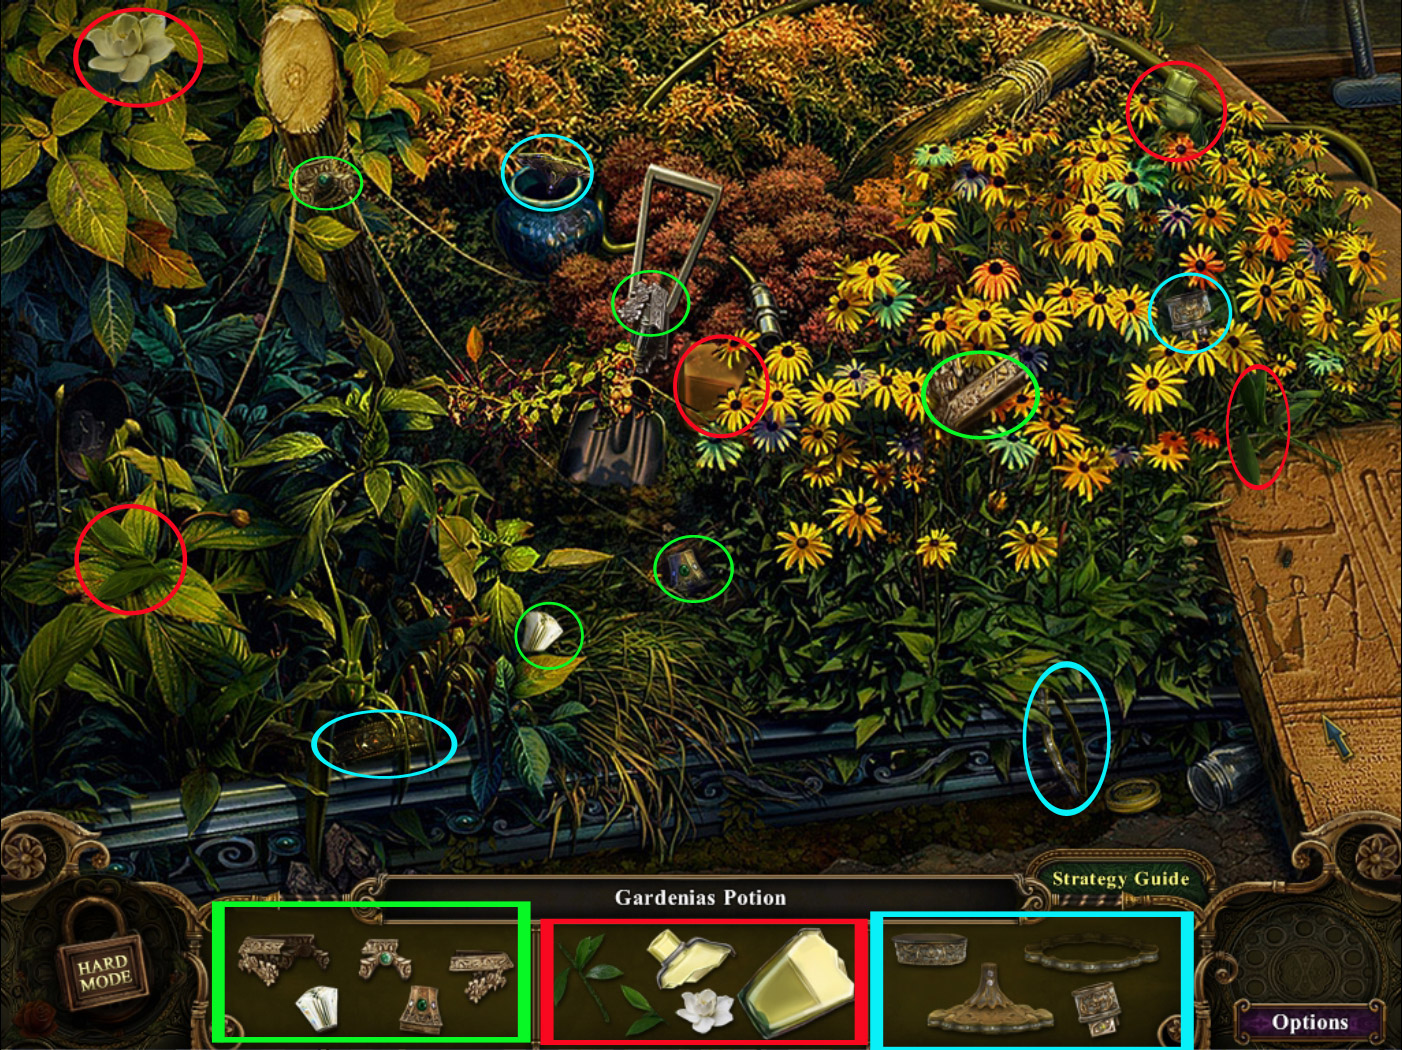
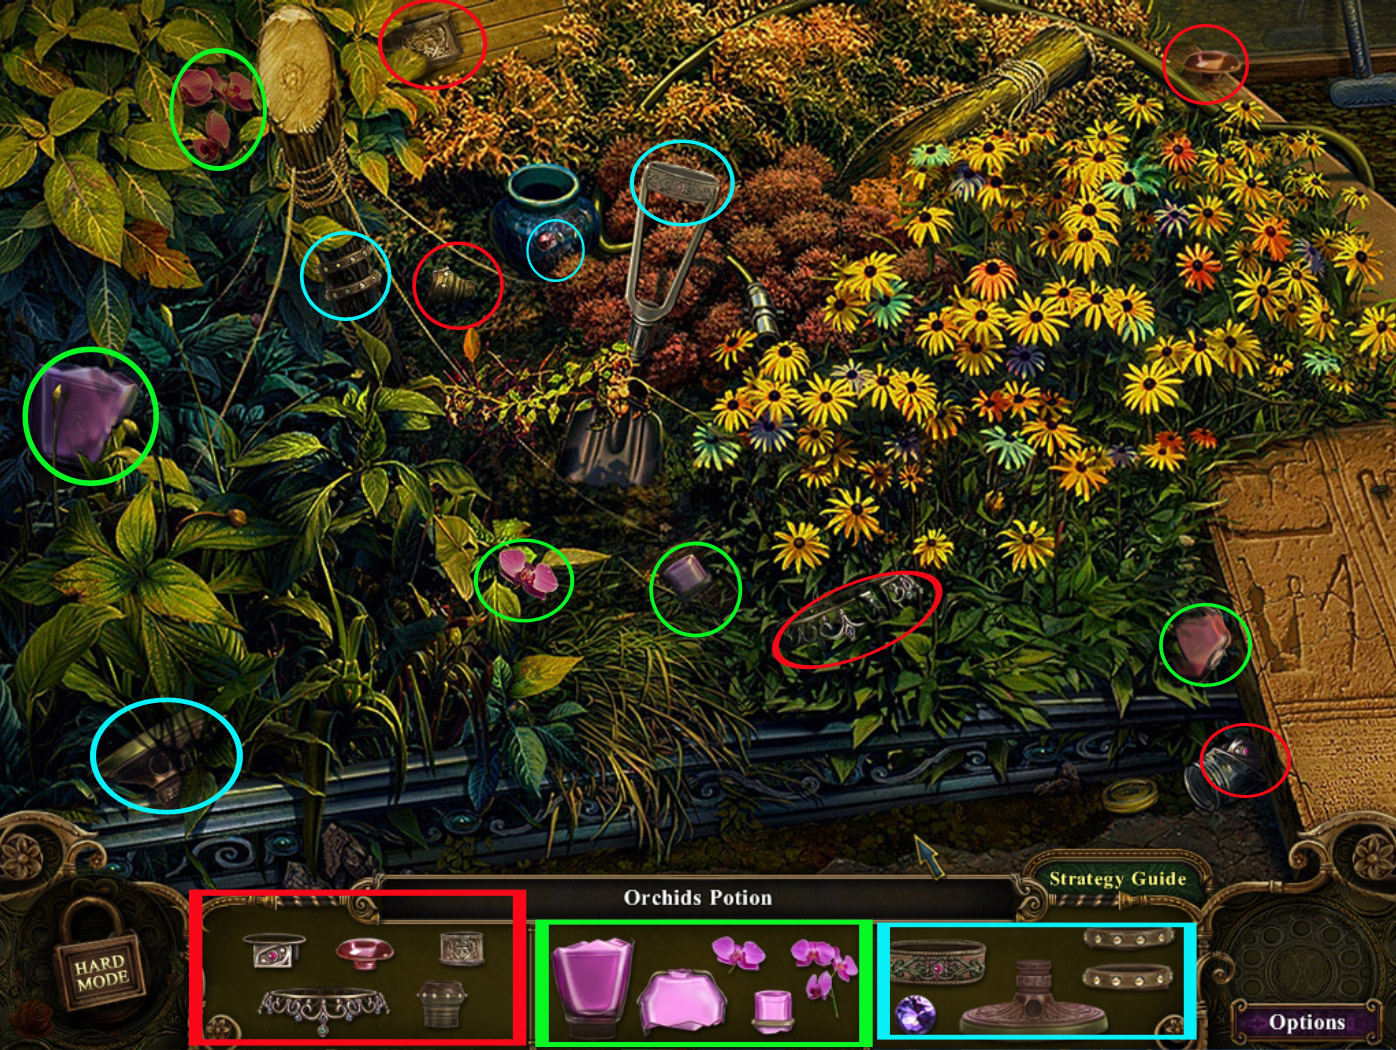
Play the search scene to obtain a plant potion (1/6).
Screenshot
Use the leaf heirloom (Spoiler 14) to open the chest on the right side and take the ship in bottle (2/5).
Click the glass door on the left and the shelf on the back to learn that there is nothing more to do here right now.
Screenshot
Go back twice to the Garden Entrance, then to the right and enter the house of the Swanlake Princess at the Fountain.
21. Puppet Theater of the Swanlake Princess
When you are inside the House, place the lightening gem (Spoiler 20) at the left side of the door in the back and the moon gem (Spoiler 15) at the right side.
The door opens - enter.
Click the round painting (morphing object 7/20) on the top right side.
Play the search scene to obtain a plant vase.
Screenshot
Click the right side of the puppet theater to learn that a theater crank is missing.
Screenshot
Go back 3x (Garden Entrance), through the gate and right into the Greenhouse.
22. Greenhouse/Lab/Fountain
Place the plant vase (Spoiler 21) on the shelf on the back, where the middle vase is missing.
The shelf will move; go forward into the Lab.
Click the book in the low left corner to open it and take the silver coin.
Click the parchment on the table to learn that you will need something to make the ink visible.
Zoom in on the gear board at the right wall to activate a mini game.
Screenshot
Your goal is to show the life of a tree from the beginning to the end. To do so you want to use the gears below.
All gears are connected which each other and will move one of the pictures above.
The pictures on far right and left can't be moved.
Clicking the red button in the middle of a gear will take it out - this is important to break the connection.
Clicking the gear itself will change the according picture.
Removing another gear will replace the one before automatically.
Think about the gears numbered from top left to low right 1-4 (or look at the screenshot).
Click red button from gear 3 to remove it.
Rotate gear 2 -> 1x
Click red button from gear 2 to remove it.
Rotate gear 1 -> 1x and gear 3 -> 1x
Click red button from gear 3 to remove it.
Rotate gear 1 -> 2x
Click red button from gear 3 to replace it.
Rotate gear 3 -> 1x
Click red button from gear 4 to remove it.
Rotate gear 3 -> 3x
Picture and gears will move - click the blueprint. The blueprint will go as evidence into your journal and activates a search scene.
Screenshot
Go back 3x and then right to the Fountain.
Play the search scene to obtain an elegant crank.
Enter the house of the Swanlake Princess and go into the Puppet Theater.
Chapter 4
23. Puppet Theater of the Swanlake Princess
Place the elegant crank (Spoiler 22) into the hole on the right side of the theater.
The curtains will open; grab the ship in bottle (3/5) from the stage.
Play the search scene to obtain ship in bottle (4/5).
Screenshot
Go back to the Fountain and use the left arch into the fairytale garden.
24. Fairytale Garden/Greenhouse
Play the search scene to obtain a plant emblem.
Screenshot
Go back to the Garden Entrance. Enter the gate and go to the right into the Greenhouse.
Play the search scene to obtain a decorative jar (3/5).
Screenshot
Use the plant emblem at the round spot on the door to the left.
Go through the door to the Garden Lake.
25. Garden Lake
Grab the rusty cave key from the bench on the right.
Click the note on the ground.
Zoom in on the box on the left to learn that you will need all plant potions here.
Return to the place in front of the palace.
26. Place in front of the Palace
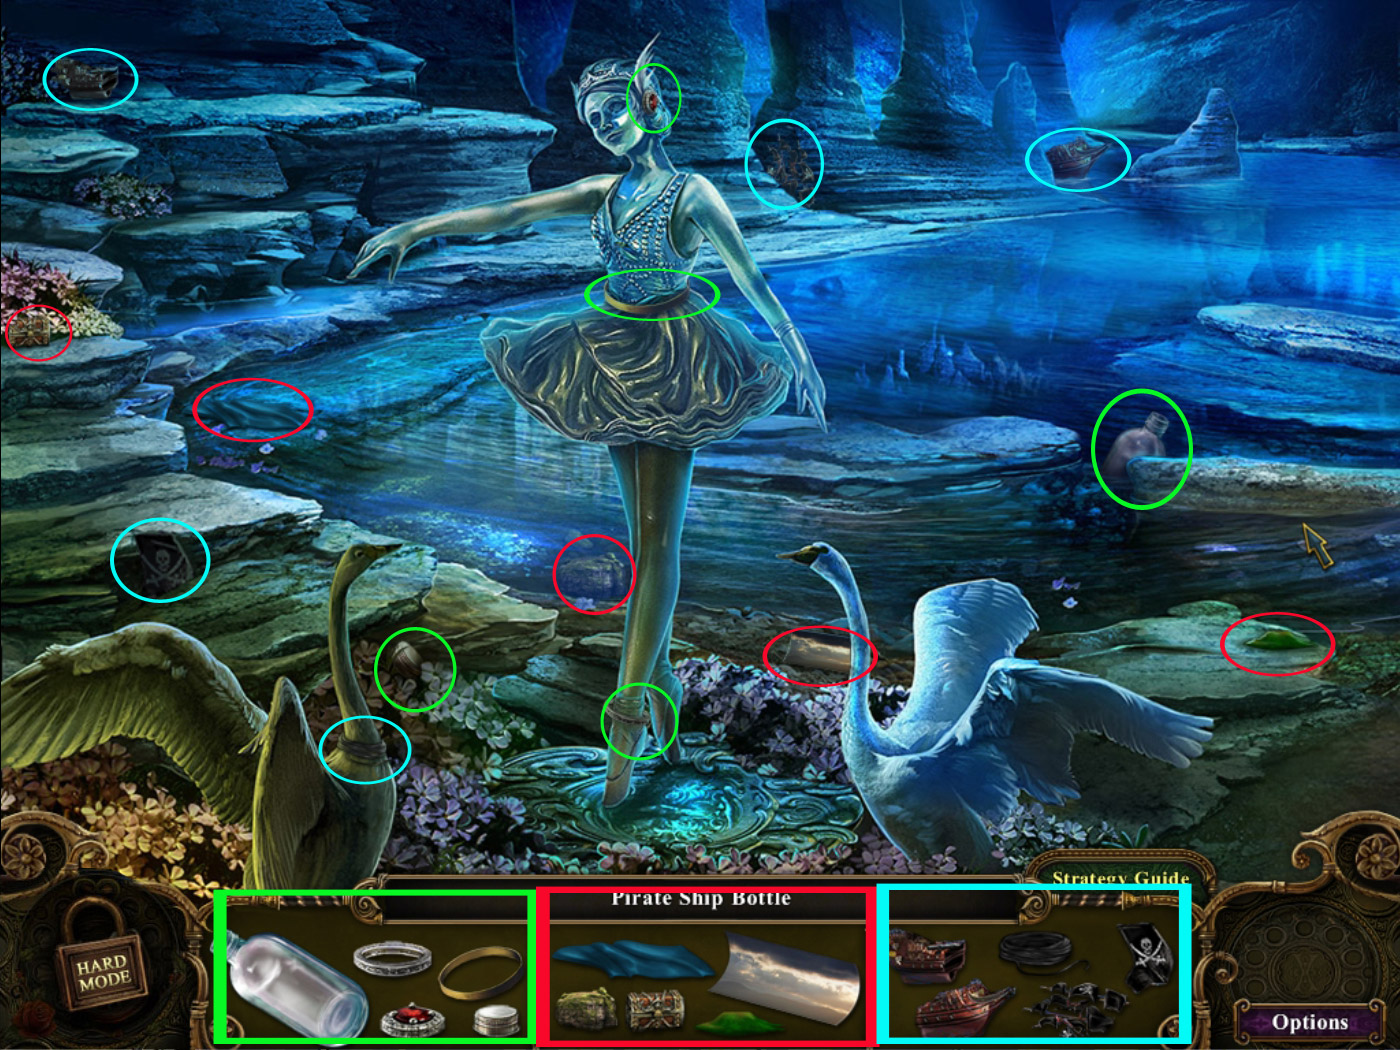
Play the search scene to obtain the last ship in bottle (5/5).
Screenshot
Zoom in on the mini game on the left side - the ships in bottles (Spoiler 16, 20, 23, 26) are already placed but not in the right order.
Swap places by clicking two bottles and use the signs above or the pictures itself as an indication of which bottle goes where.
Top row from left to right: Sailboat, Expedition Ship, Pirate Ship
Bottom row from left to right: Battle Ship, Steam Ship
Screenshot
The door opens - go through it to the Mountain Lake.
27. Mountain Lake
Click the sign (curse object 8/20) below the street lantern on the right side.
Place the oar (Spoiler 15) on the boat and click to reach the landing stage on the other side.
The arrow to move forward will only appear when you hold your cursor on the boat.
Screenshot
28. Landing Stage/Treasure Vault
Play the search scene to obtain the royal crown.
Screenshot
Use the royal crown on the dolphin - it will move and reveal the way to the treasure vault. Go down.
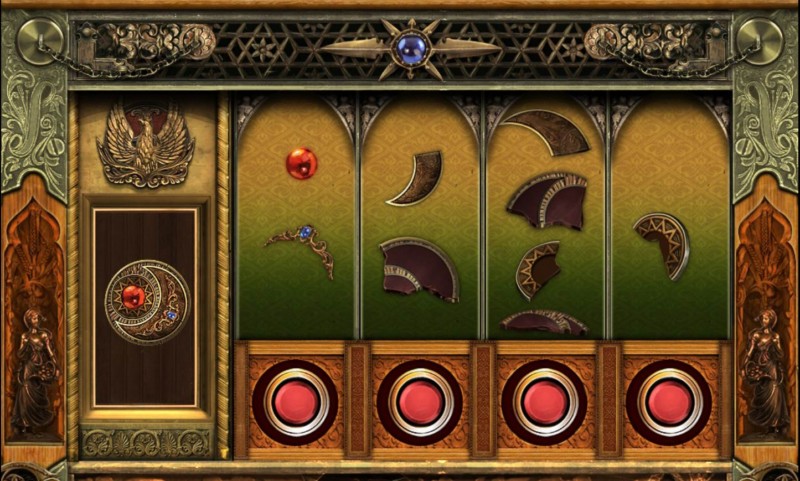
Zoom in on the box in front of the glass showcase to access a mini game.
Click the red buttons to get an image that contains all parts of the picture on the left.
Seen from left to right and the buttons from 1-4:
Do not touch the first one.
Click the second one twice.
Click the third one once.
Click the fourth one twice
This will open the showcase.
Screenshot
Grab the big shell from the display case and go upstairs.
Chapter 5
29. Gazebo
Place the shell (Spoiler 28) on the shell-shaped spot on the ground. Now you can go down to the gazebo.
Take the golden coin from the display case right in front of you.
Go back 3x to the place in front of the palace.
30. Place in front of the Palace/Palace Hall
Zoom in on the palace gate.
Place the silver coin (Spoiler 22) in the left spot, one the gold coin (Spoiler 29) in the right, and the Shield (Spoiler 18) Emblem in the middle.
Enter the Palace Hall and grab the chemical ink from the table on the right side (looks like a red flower bouquet).
Go back and right through the Greenhouse into the Lab.
31. Lab/Landing Stage
Click the chemical ink (Spoiler 30) on the parchment on the table.
Click again to get it as evidence in your journal that will activate new search scenes.
Go back twice and left to the Mountain lake, head over to the landing stage.
Click the shell (morphing object 9/20) on the left, next to the dolphin.
Screenshot
Play the search scene to obtain the Frog Antidote.
Screenshot
Go back twice and forward into the Palace Hall - go there into the kitchen on the right.
32. Kitchen/Grand Staircase
Click the plate (morphing object 10/20) on the table, left side.
Give the frog antidote to the frog (Spoiler 31) on the tablet on the right.
The frog turns into a pig - don't worry, this is how it should be ;).
There is a recipe on the back wall to look at.
Screenshot
Exit the kitchen and go forward to the Grand Staircase.
Play the search scene to obtain a jade goblet.
Screenshot
Go back 4x to come to the back cave.
33. Back Cave/Landing stage
Play the search scene in the back cave to obtain a golden apple.
Screenshot
Go forward to the Garden Entrance, up to the place in front of the palace and left to the mountain lake and head over to the landing stage.
Play the search scene to obtain the Princess Tiara (2/5).
Screenshot
Go 3x back, then right at the Garden Entrance - enter the Swanlake Princess' house and go into the Puppet Theater.
34. Swanlake Princess Puppet Theater/House of Snow White
In the Puppet Theater, play the search scene to obtain a plant potion (2/6)
Screenshot
Go back twice to the Fountain and through the right arch to Snow White's house.
Read the note on the tree left.
Place the golden apple (Spoiler 33) on the right pedestal in front of the entrance. Place the silver apple (Spoiler 10) on the left one.
The door opens - enter Snow White's house.
Chapter 6
35. House of Snow White/Underground Lake
The cut scene activated new search scenes.
Leave the house for a moment and go back to the Underground Lake (2x back to the Fountain, enter house of the Swanlake Princess and go through the door straight ahead).
Play the search scene to obtain a dancing figure.
Screenshot
Return to the House of Snow White.
Grab the mysterious bracelet from the dresser.
Play the search scene to obtain a decorative jar (4/5).
Screenshot
Zoom in on the painting above the dresser and push the button in the low left corner.
The wall opens - enter the Mirror Room.
Screenshot
36. Mirror Room (Snow White's House)
From inside the square mirror on the far right, you can obtain a round mirror.
Place the dance figure (Spoiler 35) on the box on the dresser.
Zoom in on the box for a mini game.
Screenshot
Your goal is to change the images by clicking the red buttons until there is a complete path through the red tiles, from the blue tile on the left side to the green tile on the right.
Seen the red buttons from left to right, A-D you will need to push: A - 2x/ B, C - 1x/D - 3x
The chest opens. Click the paper about a Stone Scholar Book - it will become evidence in your journal.
Screenshot
A search scene in the kitchen was activated, so go back 4x to the Garden Entrance, forward into the Palace and then left.
37. Kitchen/Grand Staircase
Find all parts in the kitchen search scene to obtain a Stone Scholar Book.
Screenshot
Exit the kitchen and go forward to the Grand Staircase.
Give the Stone Scholar Book to the right statue - she will move.
Enter Cinderella's Library.
38. Cinderella's Library/Cinderella's Treasure Room
Click the globe (morphing object 11/20) on the far left in front of the shelf.
Click the pillow on the right to learn that you are missing a shoe.
Zoom in on the shelf on the low left to learn that a book is needed.
Zoom in on the statue on the far back and place the mysterious bracelet (Spoiler 35) on the left (seen from your point of view) arm.
The statue will move and reveal the way into the Treasure Room.
Screenshot
Grab the portrait of the princess from the ground on the left side.
Play the search scene to obtain a steel dagger.
Screenshot
Read the note on the column on the right side.
Go back twice to the Grand Staircase.
39. Grand Staircase/Snow White's Parlor
Play the search scene on the Grand Staircase to obtain a agate goblet.
Screenshot
Go back 3x to the Garden Entrance, to the right and then through the right path to the house of Snow White.
Enter the Parlor and play the search scene to obtain a Princess Tiara (3/5).
Screenshot
Go back twice to the Fountain and use the left arch to the Fairytale Garden.
Chapter 7
40. Fairytale Garden
Place the jade goblet (Spoiler 32) and the agate goblet (Spoiler 39) on the base in front of the sword on the left side.
Grab the Prince Display Sword, which will activate some search scenes.
Play the search scene on the right statue to obtain a Knight Shield.
Screenshot
Go back twice up to the place in front of the Palace and into the Greenhouse on the right.
41. Greenhouse/Palace Hall/Grand Staircase
Play the search scene to obtain the plant potion (3/6).
Screenshot
Exit the Greenhouse and enter the Palace.
In the Palace Hall, click the lamp (morphing object 12/20) on the right wall.
Screenshot
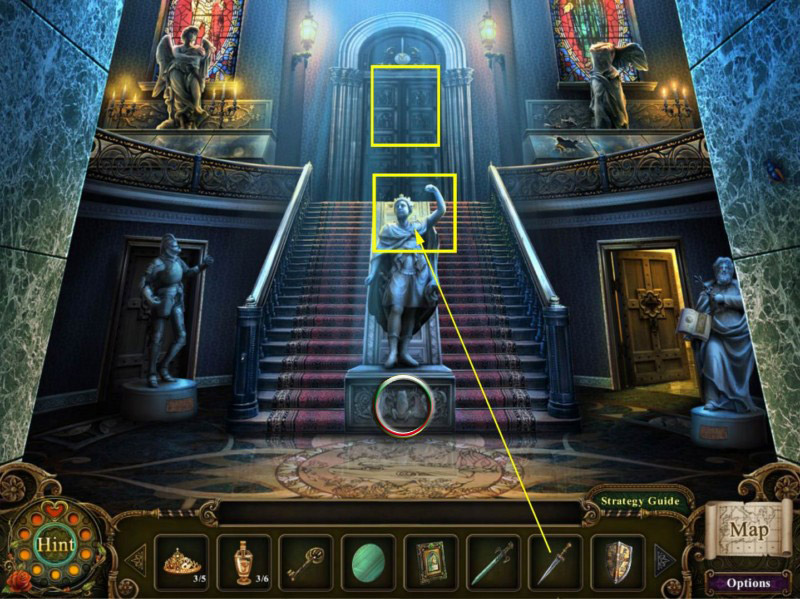
Go forward to the Grand Staircase and click the frog (morphing object 13/20) on the base of the statue in the middle. Also, give this middle statue the Prince Display Sword (Spoiler 40).
Screenshot
The door on top of the stairs opens and you can enter.
42. Auditorium
Read the note on the right column.
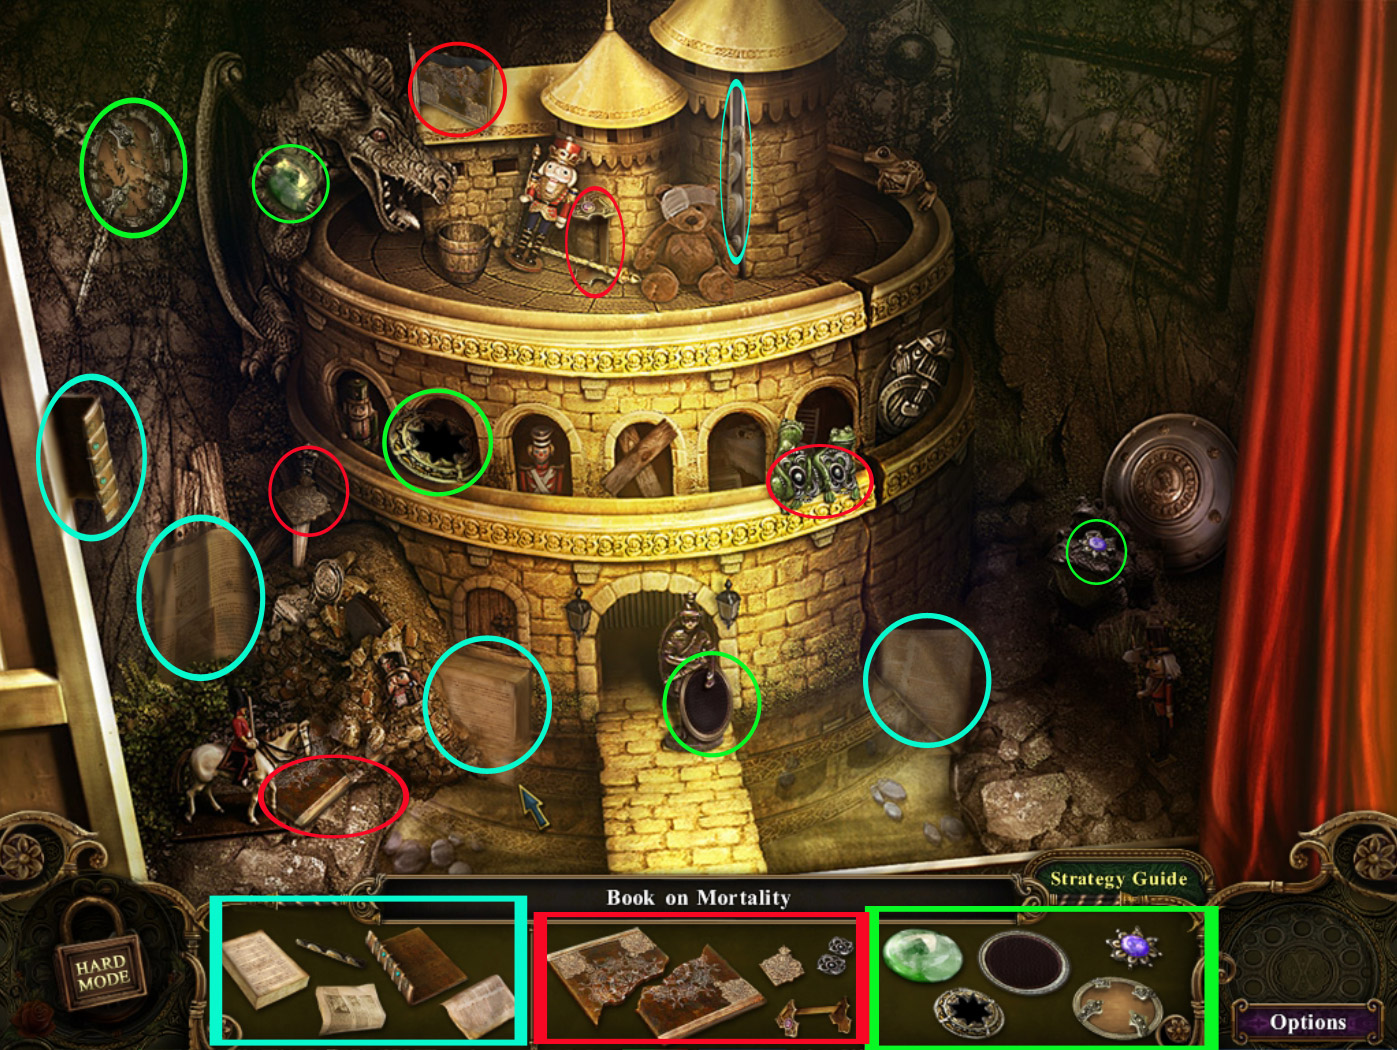
Play the search Scene to obtain the Book of Mortality.
Screenshot
Zooming in on the door or clicking the showcase on the right side will tell you that there is nothing more to do right now.
Screenshot
Go back 1x and enter Cinderella's Library to the right.
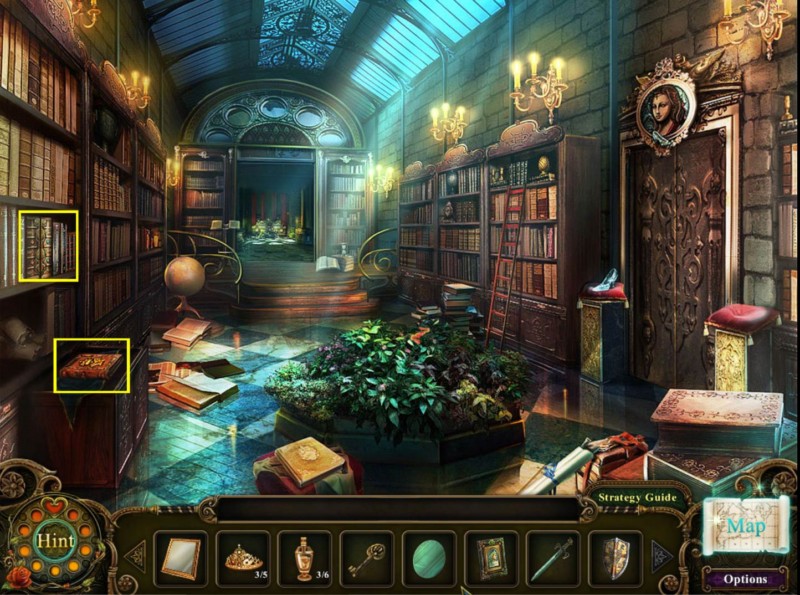
43. Cinderella's Library/Auditorium
Zoom in on the shelf on the low left and place the Book of Mortality (Spoiler 42) into the empty spot.
On the dresser below, you now can take the Diary of the Princess.
Screenshot
Exit the Library and return to the Auditorium.
Place the Diary of the Princess on the display case on the right side.
Zoom in on the door and place the steel dagger into the slot.
The door opens. Enter the Portrait Room and leave at once - this will activate new search scenes.
Play the search scene here in the Auditorium to obtain the shoe closet key.
Screenshot
Go back 1x, to the right into Cinderella's Library and straight ahead into her Treasure Room.
44. Cinderella's Treasure Room
Click the lamp (morphing object 14/20) to the left column.
Screenshot
Play the search scene to obtain a glass shoe.
Screenshot
Exit into the Library.
45. Cinderella's Library/Carriage
Place the glass shoe (Spoiler 44) on the pillow on the right, next to the door on the right side.
The door opens - enter.
Grab the plant potion (4/6) standing on the drawer below the painting.
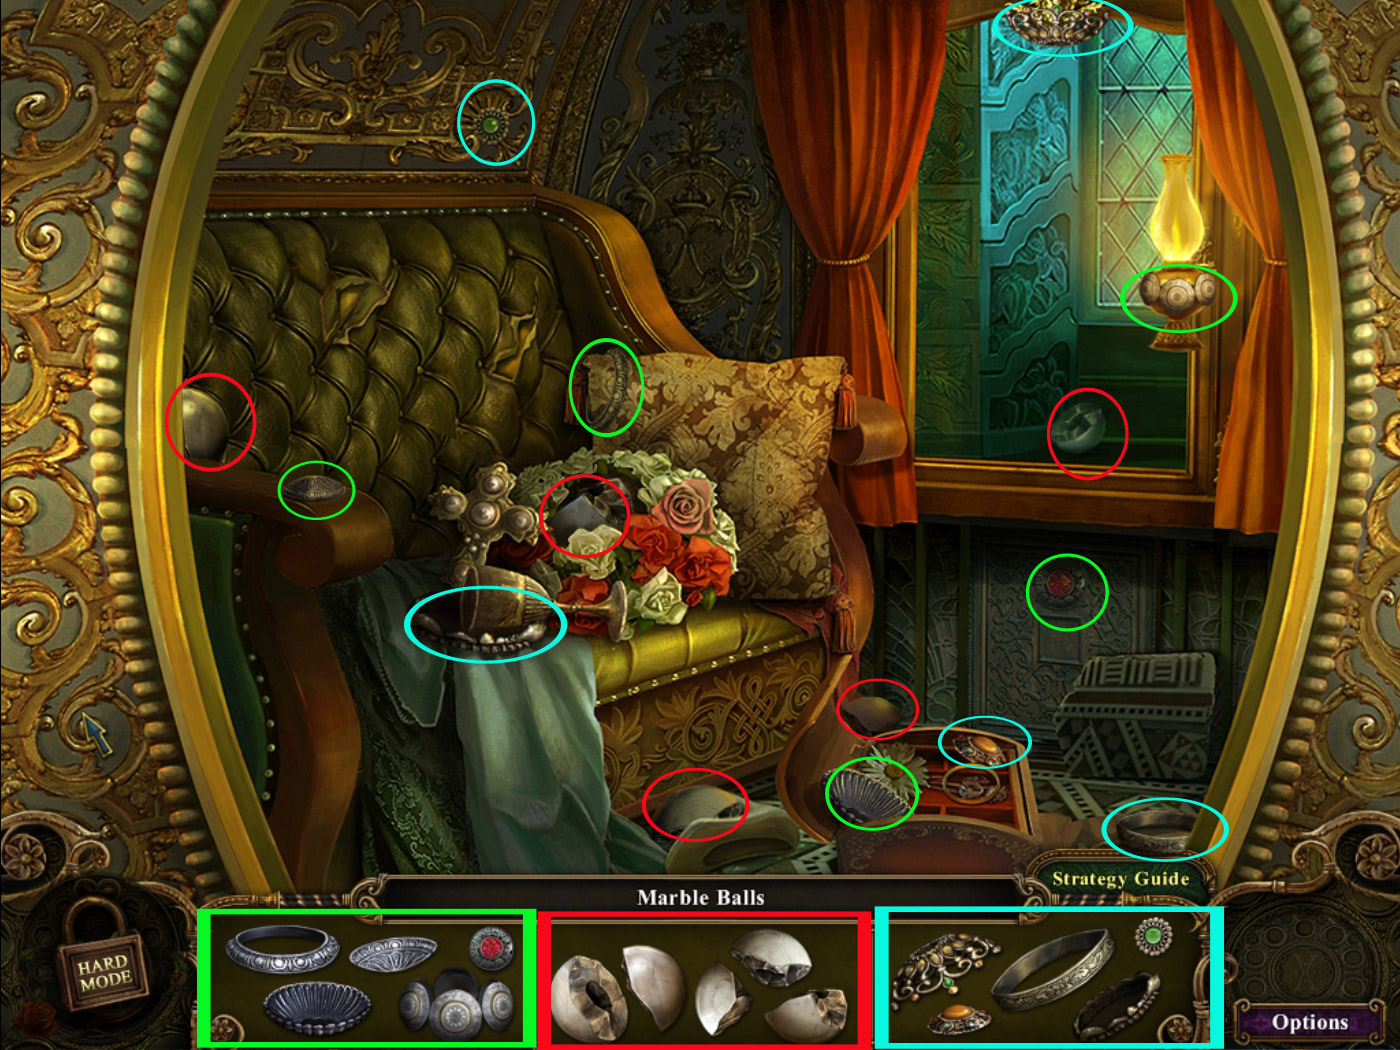
Play the search scene at the carriage to obtain marbles.
Screenshot
Zoom in on the door in the back and use the shoe closet key (Spoiler 43) to open it.
Screenshot
Chapter 8
46. Shoe Closet/Carriage/Auditorium
Enter the shoe closet and leave at once - this will activate new search scenes.
Play the search scene at the Carriage to obtain a Princess Tiara (4/5).
Screenshot
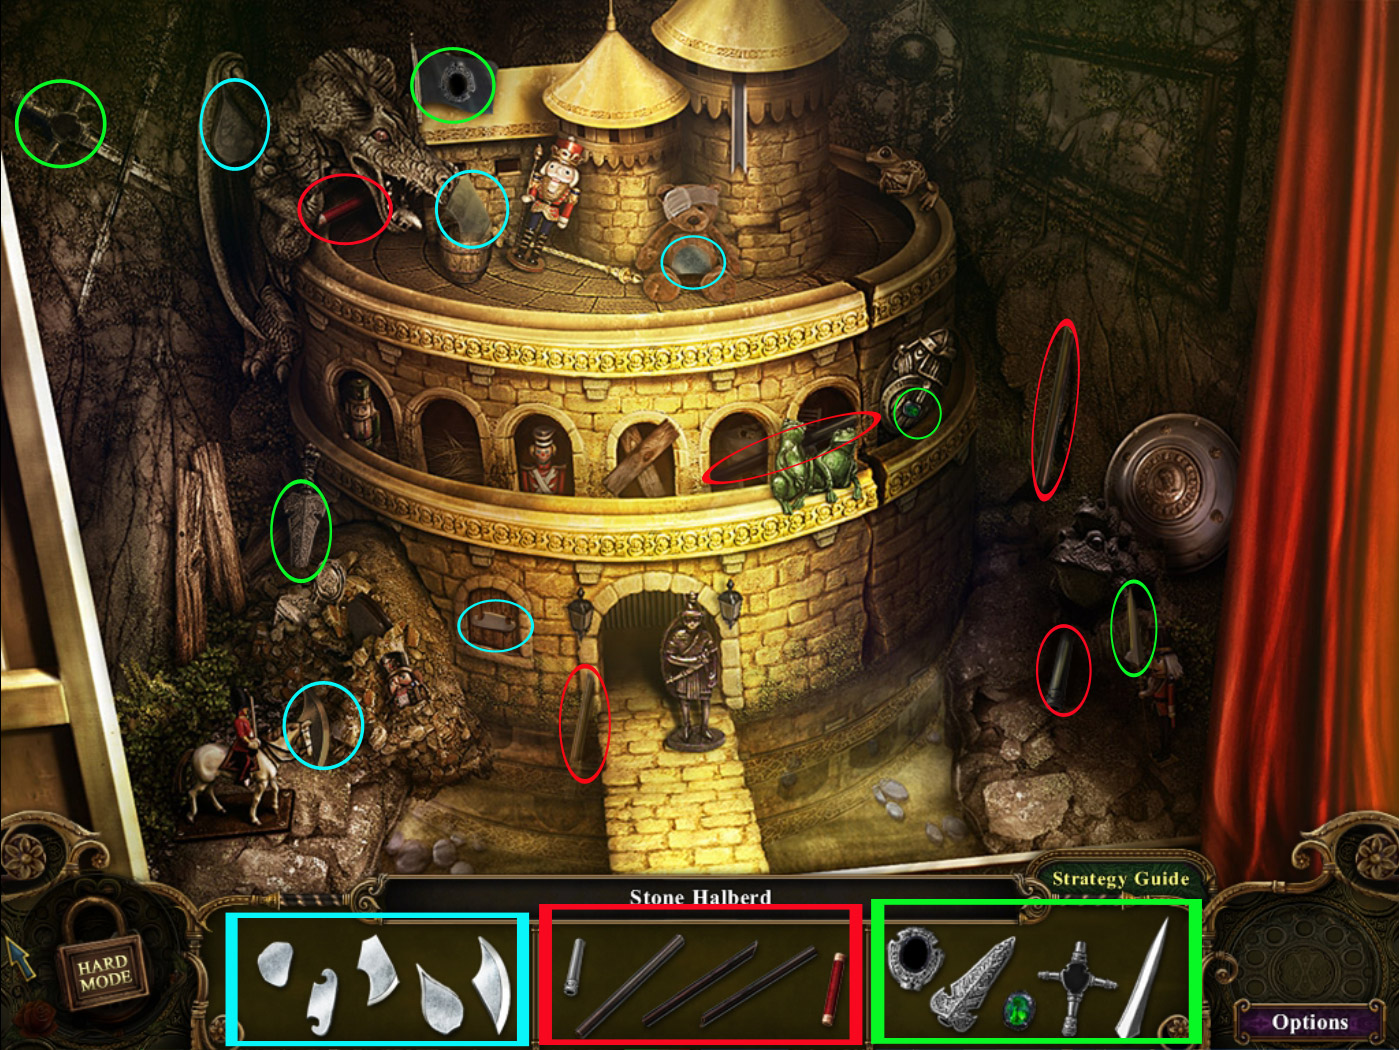
Go back twice and upstairs. Play the search scene at the Auditorium to obtain a stone halberd.
Screenshot
Go back 1x to the Grand Staircase.
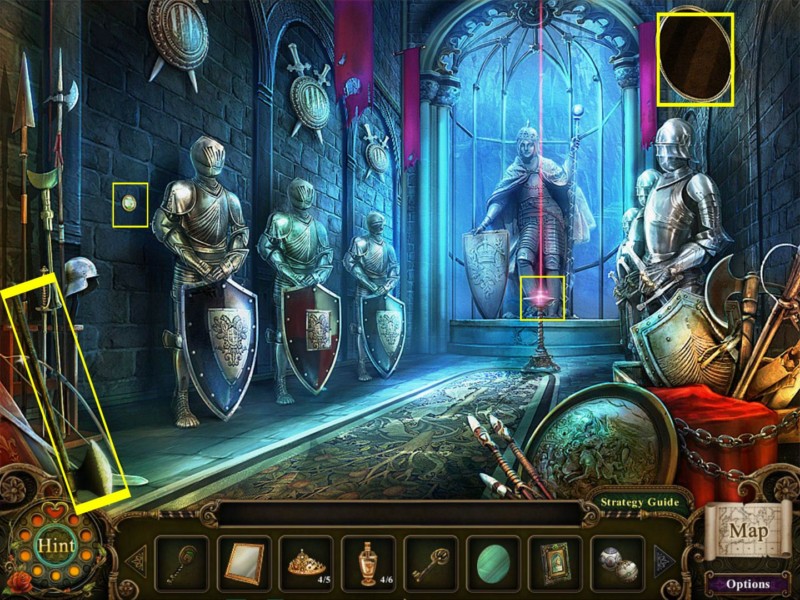
47. Grand Staircase/Armor Room
Place the Stone Halberd (Spoiler 46) and the Knight Shield (Spoiler 40) at the statue on the left.
Enter the Armor Room.
Take the sturdy axe in the low left corner.
Screenshot
Exit the room and return through Library und Carriage to the shoe closet.
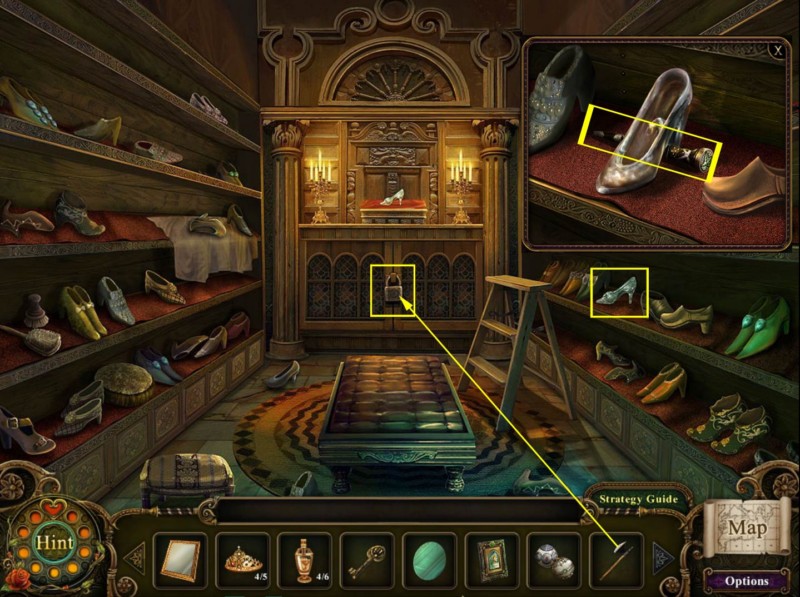
48. Shoe Closet
Zoom in on the glass shoe on the right shelf and take the golden switch handle.
Use the sturdy axe (Spoiler 47) to open the padlock of the closet doors in the back and zoom in for a mini game.
Screenshot
To assemble the correct image, press the red buttons in the following order from left to right.
Do not touch button 1, button 2 -> 1x, button 3-> 2x, button 4-> 3x
The closet will open and you will find evidence for your journal.
Screenshot
Go back 3x to the Armor room.
49. Armor Room/Auditorium
Play the search scene to obtain the portrait of the prince.
Screenshot
Exit the room and go upstairs to the Auditorium.
Place the golden switch handle (Spoiler 48) in the slot left next to the door.
Clicking the switch handle will change the vine growth in the Portrait Room. For now the handle has to be in the upper position.
Enter the Portrait Room.
50. Portrait Room
While the handle outside is in the upper position, there will be no vine growth in the Portrait room (also see Spoiler 49)
Click the base of the right column (morphing object 15/20) next to the right statue.
Place the Portrait of the Prince (Spoiler 49) into the hands of the left statue, and place the Portrait of the Princess (Spoiler 38) into the hands of the right statue. This will open the door between the statues.
Screenshot
NOTE: Only when you go through this door into the caves will the vines, normally blocking your way, be gone. Using the way through the garden will get you stuck in the caves again!
Go through the door on the cave way.
51. Cave Way
Click the little flower (morphing object 16/20) in the low left corner.
To the right you can return to the Portrait Room. The stairs on the left will bring you to the cave crossing.
Screenshot
52. Cave/Starting Point
Use the rusty cave key (Spoiler 25) to open the grate on top of the stairs.
Screenshot
Go up and you will end up in front of the cottage.
Go back 3x times to the Starting Point.
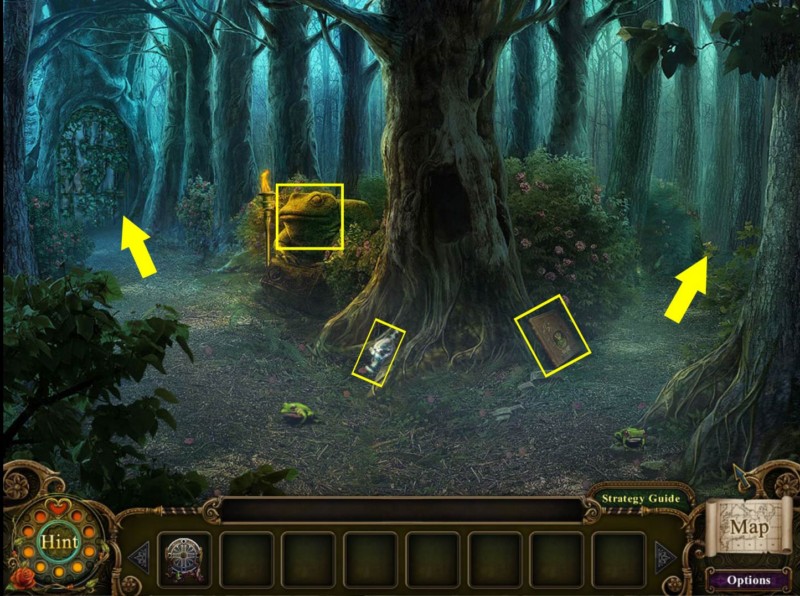
Click the flowers (morphing object 17/20) at the tree on the left.
Play the search scene to obtain the decorative jar (5/5).
Screenshot
Go ahead to the crossroad and 1 step to the left.
53. Way to the Cottage
Zoom in on the tree on the left to play a mini game. The decorated jars (Spoiler 2, 14, 24, 35, 52) are already placed but you will need to put them in the right order.
Clicking one jar and then another one will make them swap places.
The pattern of the plates the jars are standing on will indicate the proper orientation.
Hovering over the jars will also give you the name of the jar.
Place the jars in the following order from left to right:
Ice, Earth, Fire, Wind, Water
The cover behind opens; grab the metal frog plating.
Screenshot
Go forward and then left to the pond.
Play the search scene to obtain the sharp machete.
Screenshot
Go back and zoom in on the Cottage Entrance.
54. Cottage Entrance
Play the search scene to obtain a little hammer.
Screenshot
Use the sharp machete (Spoiler 53) to remove the spoilers in front of the door.
Open the door with the cottage key (Spoiler 7) and enter.
Chapter 9
55. Cottage Parlor
Click the clock (morphing object 18/20) on the shelf upper right.
Take the tongs from the dresser in the low right corner.
Screenshot
Go back 4x and then right to the cliff.
56. Cliff/Pond
Zoom in on the tree on the right side and place the marbles (Spoiler 45) into the empty spots.
Use the tongs (Spoiler 55) to get the blueprint out - this will go as evidence into your journal and activate additional search scenes.
Go 1x back, forward and then left to the pond.
Play the search scene to obtain a Joker Frog Statuette.
Screenshot
Go back and enter the Cottage.
57. Cottage Parlor/Cottage - Secret Room
Play the search scene to obtain a Magician Frog Statuette
Screenshot
Place the Magician Frog Statuette on the right, the Joker Frog Statuette (Spoiler 56) on the left base on the shelf at the back wall.
The shelf moves and reveals a passage. Enter the Secret Room.
This activates additional search scenes; leave the Secret Room again as there is nothing you can do here right now.
Play the search scene in the Parlor to obtain the ivy key.
Screenshot
Exit the cottage.
58. Cottage Entrance/Grand Staircase
At the Cottage Entrance, play the search scene to obtain a plant potion (5/6)
Screenshot
Go one step back and then right down into the cave.
Go 2x right and 2x back to reach the Grand Staircase.
Play the search scene to obtain a silver fountain emblem.
Screenshot
Go upstairs to the Auditorium.
59. Auditorium/Portrait Room
Switch the handle in the Auditorium into the lower position (you see ivy at the door).
Go into the Portrait Room. The waterfall changed you can see a door there now.
Place the silver fountain emblem (Spoiler 58) into the spot on the floor in front of the door.
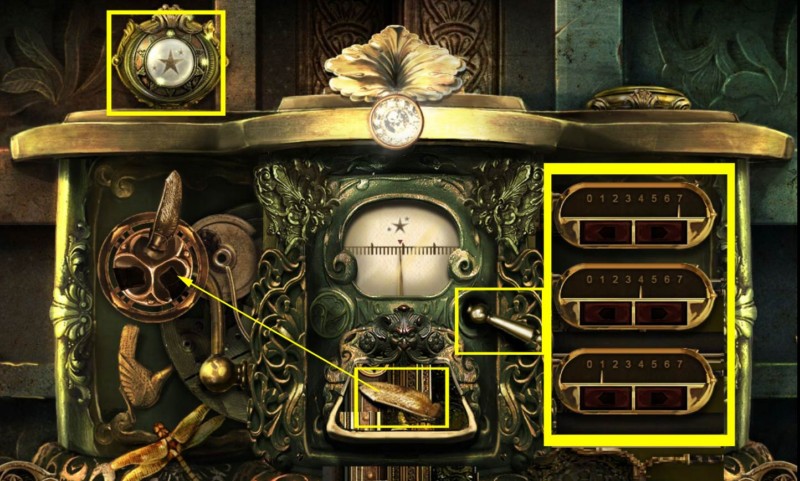
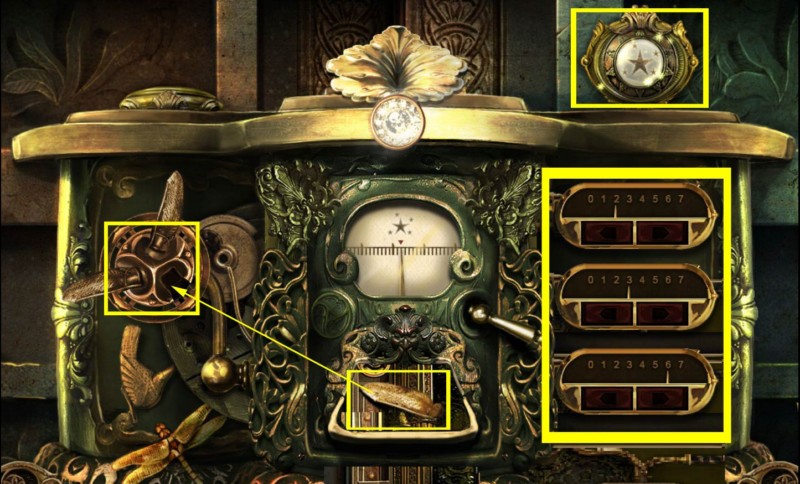
Zoom in on the door to play a mini game.
On the left you see a propeller missing two wings, and there is kind of a dial in the middle. To start the game, click the lever on the right.
Top left you see a star and three dials. Your goal is to find the exact location of the top left star in the middle.
To do so, use the arrows on the dial. This will move the dial in the middle.
The upper dial will move 1 line forward/backwards per click.
The middle dial will move 10 lines forward/backwards per click.
The bottom dial will move 50 lines forward/backwards per click.
Now press the buttons back and forth until you see the same star in the middle as on the top left.
The upper dial has to stand on 7, the middle one on 4, the bottom one on 1.
A cover opens and you can take a wing.
Place the wing with the propeller on the left.
Screenshot
Now you get another star on the top right. Do the same as before.
This time the upper dial has to stand on 2, the middle on 3, the bottom one on 6.
You can take a second wing. Place it with the propeller and the door will open.
Screenshot
Go through the door to the huge root.
60. Root
There is nothing you can do at the door or the pedestal right now.
Use the little hammer (Spoiler 54) at the grate at the bottom of the root.
Take the crystal ball and go back to the Auditorium.
ROOT - HARD MODE ONLY
Use the little hammer (Spoiler 54) at the grate at the bottom of the root.
Take the crystal ball.
Place the secret tree disc (Spoiler under Spoiler 10 (Hard Mode only)) on the pedestal on the left, next to the door.
The door will open, and you may look at the portraits of the Swanlake Princess, Cinderella, the Little Mermaid and the Ivy Princess.
The portrait of Snow White is frozen and gives a hint about the next "Dark Parable" Adventure.
Go back 3x to the Auditorium.
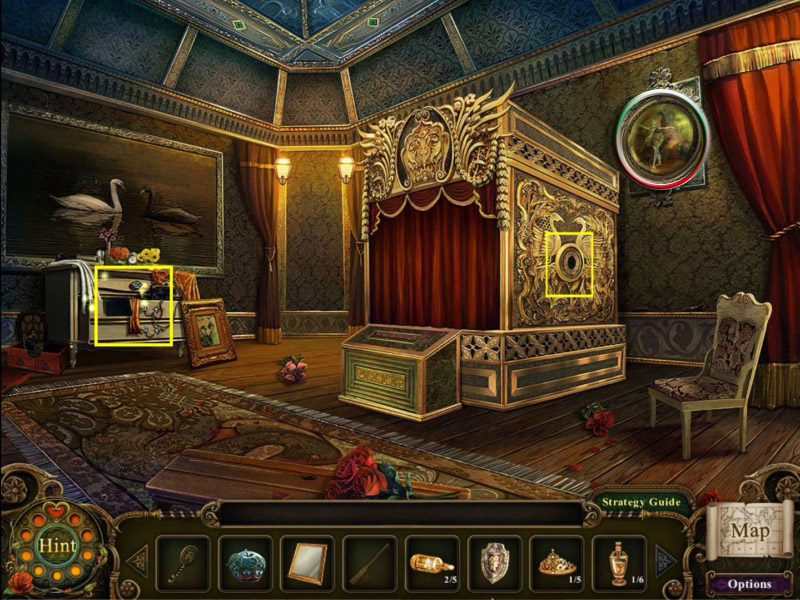
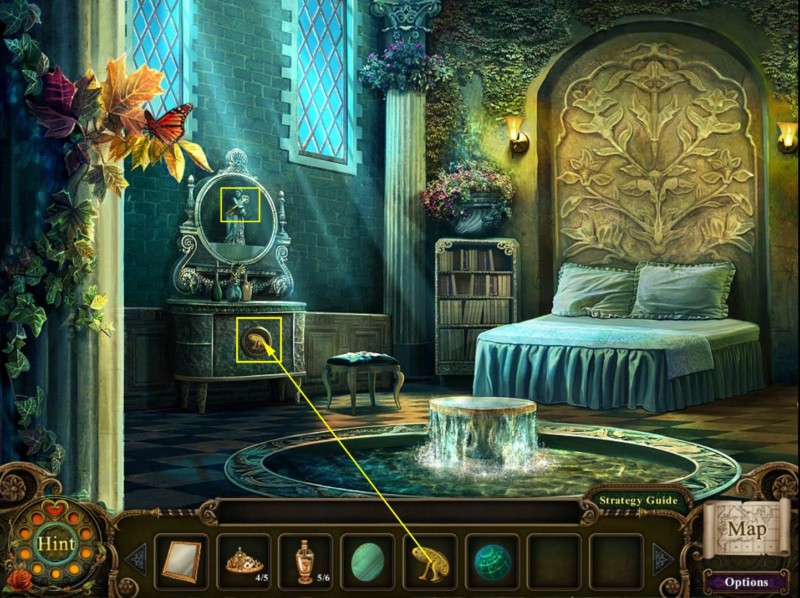
61. Auditorium/Portrait Room/Bedroom
Switch the handle in the Auditorium into the upper position.
Go into the Portrait Room and use the ivy key (Spoiler 57) to open the door on the left.
Enter the bedroom and place the metal frog plating (Spoiler 53) in the empty spot at the dresser.
Grab the armor key that appears inside the mirror.
Screenshot
Go back 3x and then left into the Armor Room.
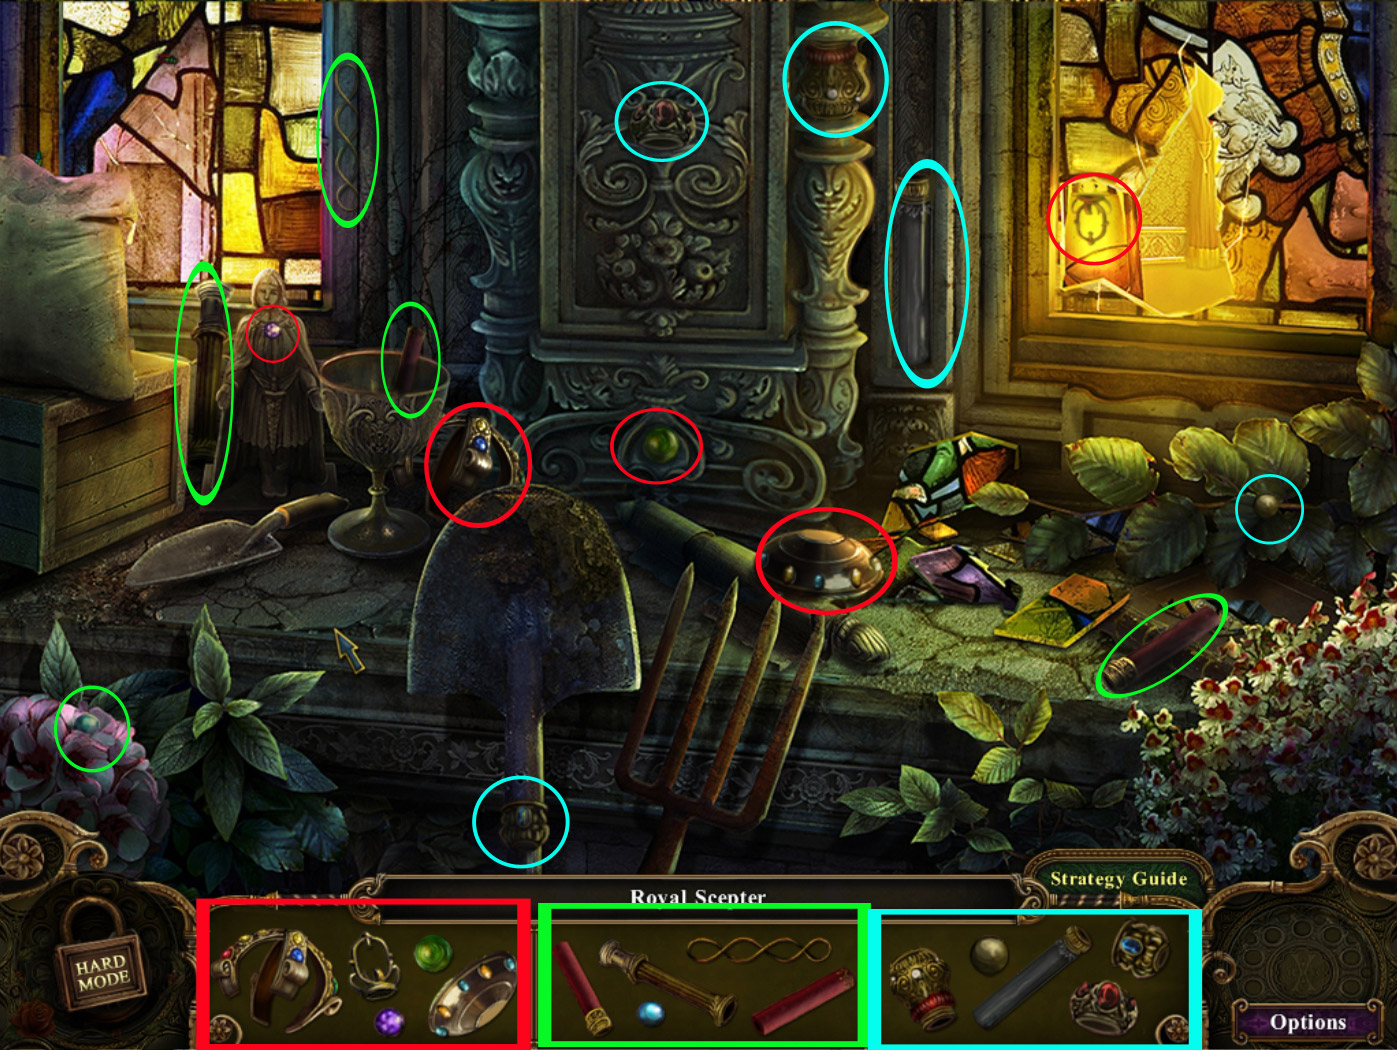
62. Armor Room
Click the helmet (morphing object 19/20) from the knight on the far left.
Place the crystal ball (Spoiler 60) onto the stand in front of the huge knight in the back to guide the beam.
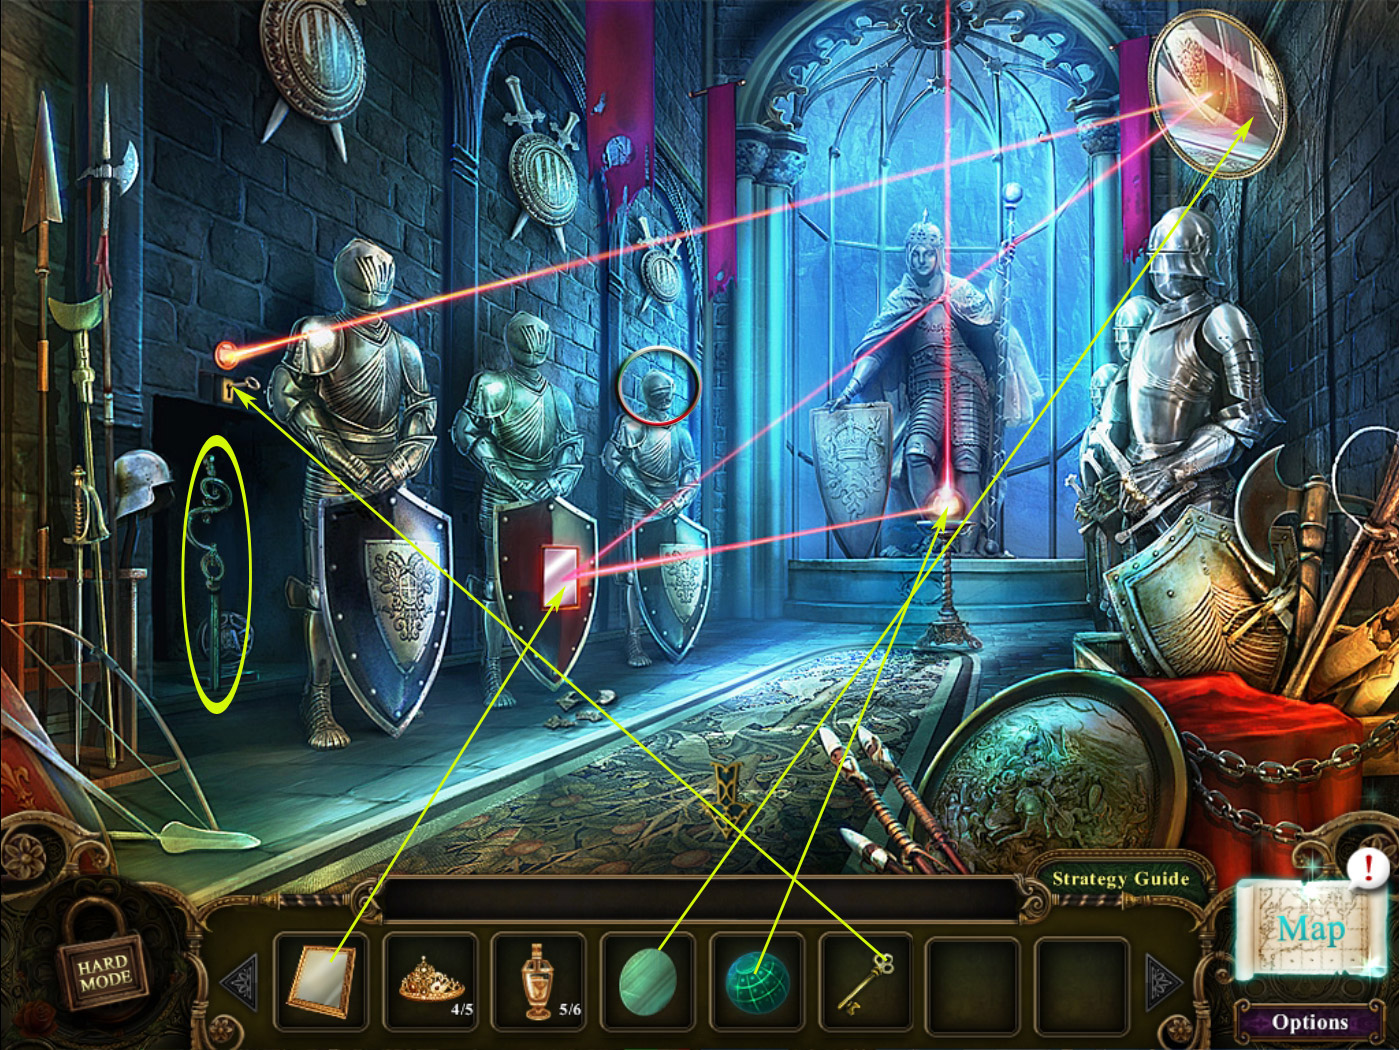
Follow the beam and place the square mirror (Spoiler 12) on the shield of the knight on the left.
Follow the beam and place the round mirror (Spoiler 36) on the empty frame on the top right.
Follow the beam and use the armor key (Spoiler 61) with the keyhole the beam is pointing on.
A part of the wall opens; take the antique wand.
New search scenes are activated. Exit and return in the Armor Room.
Screenshot
Play the search scene to obtain a plant potion (6/6).
Screenshot
Leave the Armor Room and head over to the Library to enter Cinderella's Treasure Room.
Chapter 10
63. Cinderella's Treasure Room/Snow White's Parlor
Play the search scene in the Treasure Room to obtain a Princess Tiara (5/5)
Screenshot
Go 5x back to the Garden Entrance and to the right to Snow White's house.
Enter and play the search scene to obtain a transformation key.
Screenshot
Go back 3x times and through the gate, enter the Greenhouse and got left to the Mountain Lake.
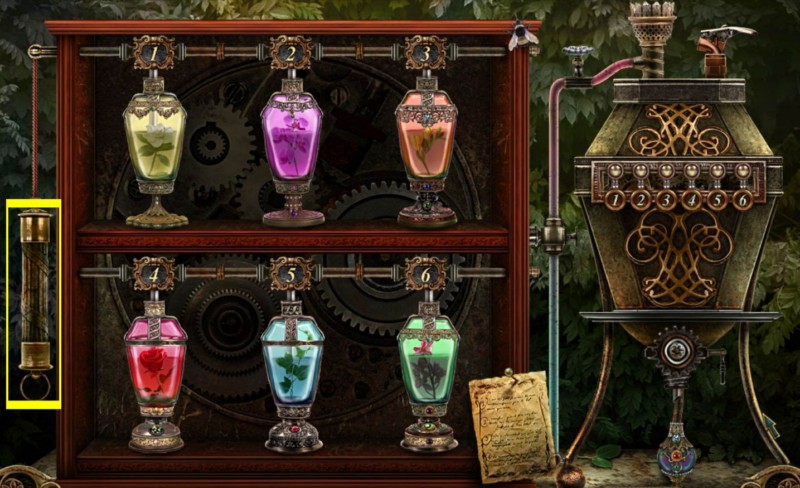
64. Mountain Lake
Zoom in on the mini game on the left side.
All plant potions (Spoiler 20, 34, 41, 45, 58, 62) are already placed, but in the wrong order. By clicking two potions they will swap places.
Click the handle on the left and correct placed potions will show a light up button above.
Top left to low right:
1-yellow, 2 - pink, 3 - orange, 4 - red, 5 - blue, 6 - green.
Screenshot
Your reward is an uncursed potion.
Go 3x back, at the Garden Entrance to the right and left at the fountain to enter the Fairytale Garden.
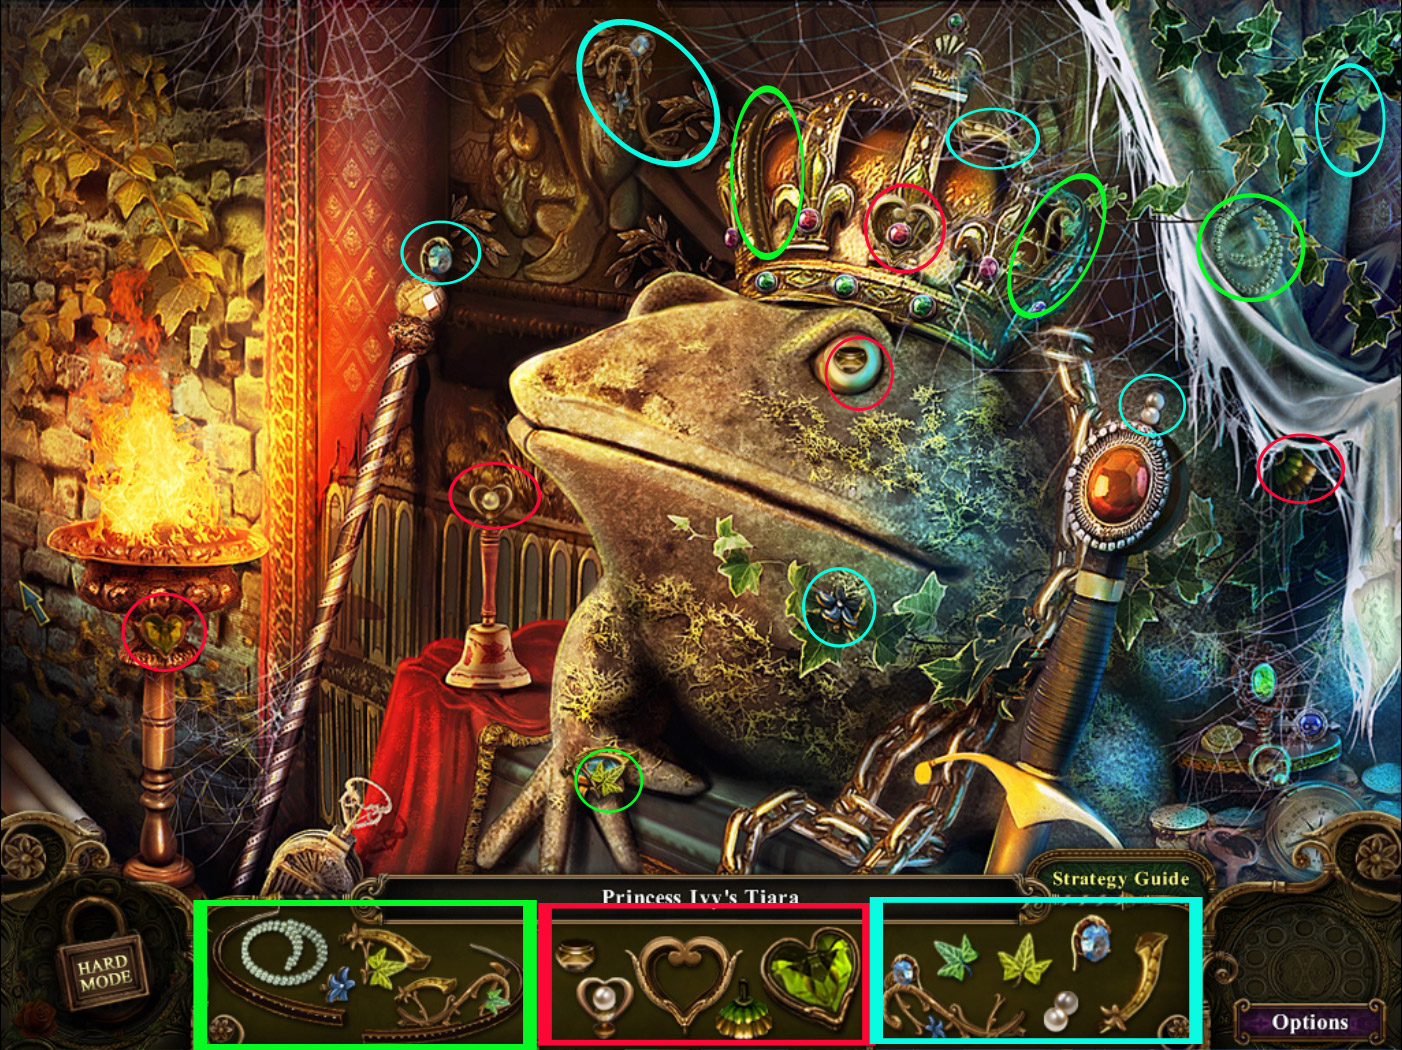
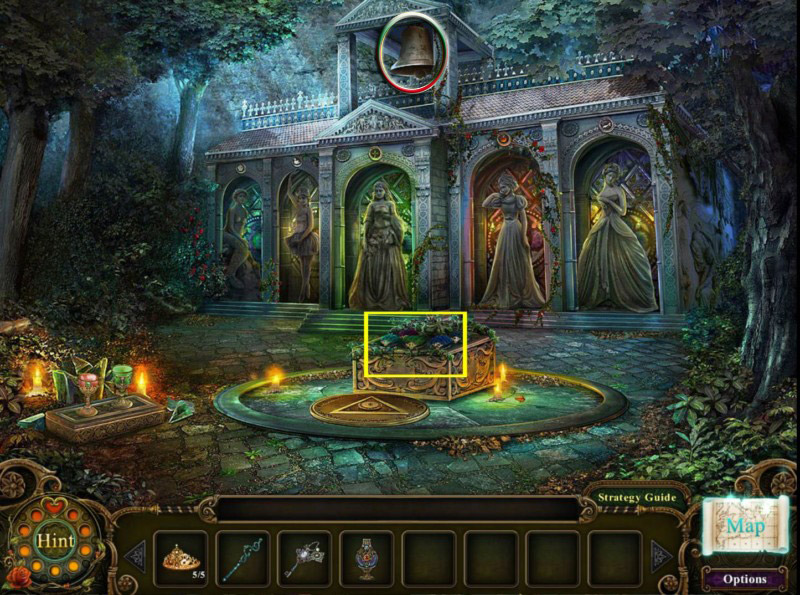
65. Fairytale Garden
Click the bell (morphing object 20/20) above the middle statue.
Zoom in on the base on the ground for a mini game.
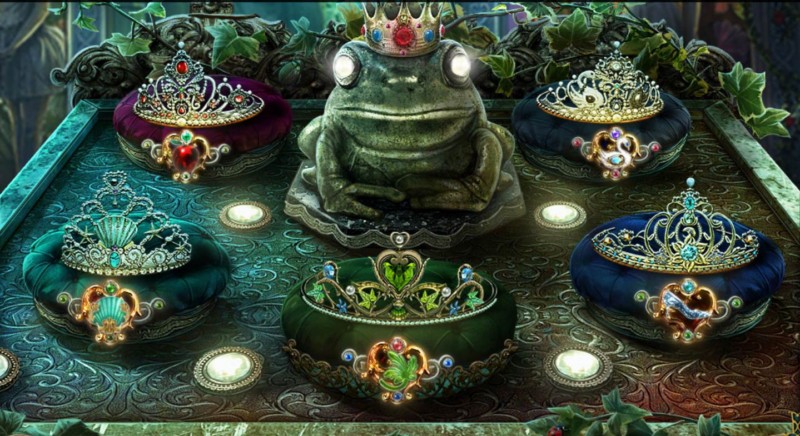
All Princess Tiaras (Spoiler 18, 33, 39, 46, 63) are already placed. Click two tiaras to swap places.
Screenshot
The pillows will show an element that can also be found on the correct tiara - use this as clue. This symbols will light up when the correct tiara is placed.
From top left to bottom right:
Tiara from Snow White, Little Mermaid, Ivy, Cinderella, Swanlake Princess.
Screenshot
Now place the transformation key (Spoiler 63) into the slot and place the antique wand (Spoiler 62). Then use pour the uncursed potion (Spoiler 64) over it.
After the cut scene, take back the wand, which is now an everlasting wand.
Use the wand with the prince and you will get the prince medallion.
Go back 2x and head over to the Grand Staircase. Go upstairs and through the Auditorium into the Portrait Room. Make sure that the handle is in the upper position in the Auditorium so you can use the door in the Portrait Room to enter the cave.
Go straight ahead and then upstairs to be outside again. Enter the Cottage and go into the Secret Room.
66. Finale (Cottage - Secret Room)
Place the prince medallion (Spoiler 65) at the base between the two tanks.
Zoom in on the base to play a mini game. Your goal is to place the tiles on their correct places by
Posted by: Kayleigh |
March 13, 2011 11:05 AM
|
March 13, 2011 11:05 AM