
Escape from the Lodge

![]() There are often questions (or complaints) about the fact that we tend to stick with certain game designers for Weekday Escape. While we are always looking for something new, it is true that we go back to certain designers again and again for our room escaping pleasure. The reasons for this are two-fold: (1) Most of the designers we feature heavily are good designers, which means that you'll get a fun escape for your mid-week pleasure, and (2) It's nice to see the progression in a designer's work as they create more and more. This week's room escape is by Tesshi-e, a name that should be familiar to our regular readers. Escape from the Lodge marks yet another milestone in the development of Tesshi-e's design, and it's a cracking good way to take a mid-week break.
There are often questions (or complaints) about the fact that we tend to stick with certain game designers for Weekday Escape. While we are always looking for something new, it is true that we go back to certain designers again and again for our room escaping pleasure. The reasons for this are two-fold: (1) Most of the designers we feature heavily are good designers, which means that you'll get a fun escape for your mid-week pleasure, and (2) It's nice to see the progression in a designer's work as they create more and more. This week's room escape is by Tesshi-e, a name that should be familiar to our regular readers. Escape from the Lodge marks yet another milestone in the development of Tesshi-e's design, and it's a cracking good way to take a mid-week break.
 While some great designers have only managed a handful of games (Place of Light), and a few more have managed more than a dozen or so (Neutral, 58 Works), Escape from the Lodge is Tesshi-e's 56th escape game effort. That's a staggering number, you have to admit. You would think that with so many games, each coming out so quickly (for a room game designer, that is), that the quality would suffer but au contraire! The thing that impresses most with Tesshi-e's designs is that while the difficulty level may fluctuate from game to game (from light to complex), the game design itself constantly improves. The first 30 or so games in Tesshi-e's oeuvre are barely worth looking at other than for curiosity's sake; they're all pretty standard, simple room escapes, not much to distinguish them from the crowd. But they have progressed and improved. And then, a breakthrough came with Escape from the Dome Room, Tesshi-e's first big foray into three dimensional space (although there were previous games in 3D, those were very simple in scope). The space became pretty nice to look at, but along with the new graphics came a new appreciation for puzzle design. Ever since then although we have seen some puzzles recycled (and that "wobbly picture" puzzle has been seen in dozens of games, not just Tesshi-e), Tesshi-e has put a lot of effort into creating new and improved ways to cause a casual gamer to bang their head in frustration at yet another new type of puzzle.
Along with the improvement in visuals and puzzle design Tesshi-e has come a long way in terms of the basic structure of the games themselves. The originals were all in Japanese, so you had to solve without verbal clues, depending entirely on logic. These days, with the fantastic translations by idahhh, the games are accessible to everyone in the English-speaking world as well. Now Tesshi-e has included an entirely new feature: the ability to switch to either an all Japanese or all English version of the game. You just have to remember to make the switch before you start the game, or else you might get stuck in a version you don't necessarily understand.
 The setup is, of course, typically Tesshi-e. Worn out and exhausted from all of the recent escaping shenanigans, you the escaper have decided to take a little vacation to a quaint lodge where you can sit back, relax, and enjoy the stunning views of the stars at night. Unfortunately you have managed to get yourself locked into the space, and once again you have to figure your way out if you want to commune with the night sky. Poke around the room, pick up and examine objects, solve a lot of puzzles (some of them color based), and see if you can find one of the four escape scenarios (two involving the standard "happy coin" escape that Tesshi-e games feature). Navigate around the room by bars at the sides and bottom of the screen, use your imagination with a bit of MacGyver-like construction, and soon you'll be enjoying the stunning views from the outside porch.
Analysis: It's nice to see a room escape designer that doesn't rest on their laurels, but who continues to improve and expand with each game that they put out, and Escape from the Lodge is no exception. This is not "Tesshi-e light" by any stretch of the imagination. With lots of puzzles, keys, and other objects to find and solve, this is one of Tesshi-e's longest games, especially if you go back and see if you can find all of the various escape combinations available. This is the reason why we keep featuring Tesshi-e, the games just keep getting better and better.
Not only do the visuals and puzzles keep improving, but Tesshi-e has evolved one of the best control structures around in room escape games. There's the new ability to switch between the Japanese and English version along with a save button, the ability to mute the very familiar music or sound effects, and a very easy and intuitive inventory control. Escape from the Lodge still doesn't feature a changing cursor, but frankly you almost won't miss it, as there is very little pixel hunting this time around. Every clickable area is pretty obvious visually without the need for a changing cursor indicator.
Okay, it has to be said, Escape from the Lodge is Tesshi-e's best effort to date. Complex, amusing, gorgeous to look at, and with easy to understand and use controls this is one fantastic room escape, perfect for the mid-week break. Join Tesshi-e on their vacation from escaping and be prepared for...more escaping fun than ever before.


Walkthrough Guide
(Please allow page to fully load for spoiler tags to be functional.)
I saw this a few days ago so thought I'd try my first walkthrough. I think there's some endings missing, though. Hope the rest of it works all right.
First, if you don't speak Japanese, make sure you change the language to English before you click start! Also, for the color-based puzzles, the captions will tell you the color of whatever you click on.
Stuff to pick up:
knife:
top left drawer
block of ice:
freezer
bottle of water:
fridge
pyramid:
under the left hand pillow on the plaid couch
remote:
under the right hand pillow on the plaid couch
sphere:
Click on the table to the left of the colored cubbies.
The sphere is back in the corner.
First puzzles
Center cubby puzzle (the scale):
What you'll need:
a pyramid
under the left pillow on the couch
and a sphere
in the corner behind the compass table
Where it is:
Click on the colored cubbies, and then on the center one to look at the scale.
You should note:
the symbols on each side of the scale.
What to do:
Place the pyramid on the left and the sphere on the right and take the TRIANGLE KEY.
Use the triangle key to open the top of the green cabinet.
Take the coffee cup from the top shelf and the coasters from the bottom shelf.
Gentlemen puzzle:
You'll need the remote
under the right hand pillow on the plaid couch.
What to do:
While facing the gentlemen paintings, hit the button on the remote, and then put the remote away.
Note the number/color associations.
The second clue is from:
the arrangement of the colors in the cubbies.
Then put the two clues together:
With the lights back on, click on the table.
Match the arrangement of the colors to the numbers on the colored gentlemen and take the CLOVER KEY.
It goes to the bathroom.
The right-hand drawers of the kitchen counter
The top right drawer:
The code can be found
in the bathroom, which is located
on the same wall as the kitchen counter, to the left of it
and which you access with
the clover key.
More specifically, the code is in
The sink on the left, but you can't read it until you
fill the sink with water
which is only possible if you've
closed the drain
by
pressing the button on the bottom right of the sink.
Use this code to open the drawer on the top right of the kitchen counter.
Take an empty plastic bottle.
The bottom right drawer:
The code is given by
the four flasks above the kitchen counter, just below the window, but you can't see it until you
fill the flasks with water.
To be able to see the code, you'll use
the coffee cup, which is in
the top of the green cabinet, which you open with
the triangle key, which you got from
the scale puzzle.
But you won't be able to put anything in it until you
Take the matches out.
Now you're ready to
Turn on the kitchen tap and then place the coffee cup under it to fill it. Fill the flasks with the water
to get a code for the bottom right drawer.
Hmm, the code doesn't seem to work?
Do not enter the numbers in the order they appear, left to right.
Enter them largest to smallest.
Great, now we have the right code and we can
open the drawer and get the pot.
The block of ice:
What you'll need:
The ice
from the freezer
and the pot
from the bottom right drawer of the kitchen counter
What to do:
Okay, so clearly we're trying to
melt the ice, probably on this nice hot
stove, on the right of the kitchen counter
using our
pot.
To do this, we need to first
bring up the pot, then place the block of ice inside it.
Then to heat it we'll
go over to the stove on the right of the kitchen counter. Place the pot and block of ice on the stove. Turn on the stove
and then make time pass in the game by
backing up, then going back to get the pot.
We did it, but we can't get the key out due to
it being filled with hot water
so we'll
pour the water in the kitchen sink and take the CIRCLE KEY.
Great! now we can
sse the circle key to open the bottom of the green cabinet and get the coffee and string.
Freeing the ladder:
General idea:
The letters to the ladder code are scattered around the room. Each letter appears surrounded by circles. The placement of the letter within the circles indicates its position. For example, if you found 00R0, that would mean the third letter is R.
First letter:
Bottom of coffee mug.
If it won't turn over:
Is your cup filled with water?
dump out the water in the sink
Is your cup filled with coffee?
This happened to me, and I never did find a way to turn it over. I just found this letter by guessing.
It's an A.
Second & third letters:
Get the plastic plate from right hand cabinet in bathroom. This fits over
The words "MILD ESCAPE" on the right side of the red headboard of the bed.
and so the code letters are
The uncovered ones.
ES
Fourth letter:
Enter the bathroom and turn left.
Click on the long window on the right.
Enter the code to get the ladder.
Making coffee:
IMPORTANT: If you don't know the first letter of the code for the ladder yet, don't make yourself a cup of coffee.
What you'll need:
Necessary:
Mineral water:
Fridge
Coffee:
Bottom of green cabinet, which you open with
the circle key, which you get from
the block of ice.
If you want to drink the coffee (not necessary to escape, but delicious), you'll need:
Coffee cup:
Top of green cabinet, which you open with
the triangle key, which you get from
the center cubby puzzle.
Matches:
In the coffee cup.
What to do:
Put the mineral water in the coffee maker.
Add the coffee.
Note: I think you can stop at this point? I never found a use for the actual brewed coffee (even to get the happy coin), but you do get to drink it at the end. If you want to keep going:
Use the match on the coffee machine.
Back up until it tells you it's ready.
Go back and fill your coffee cup. This is the step you shouldn't do unless you know the first letter of the ladder code. Hint hint.
Bottom left drawer of kitchen counter:
We've got a ladder, so we'll place it by standing
in the center of the room facing the colored cubbies and the bed
and then climb up to
the kayak.
and get
the SPADE KEY
which we can use to
Open the drawer and take the tape and the screwdriver.
The secret door:
To open the secret door, we're going to need
a handle, which is currently
screwed to the kayak
but we can remove it
using the screwdriver.
Now we'll place this new object
on the left of the rightmost picture above the plaid couch.
and we can open the door.
Won't open? Then you should
Secure it with the screwdriver.
Once you've opened the door,
click the top dark rectangle to turn on the monitor. Note the key.
Let's get the rest of the stuff:
Metal sticks:
Click on the empty coffee can.
Wooden stick:
Enter the bathroom and turn left.
Click on the door to close it.
Take the stick.
Clothes pegs:
Click under the left hand cabinet in the bathroom to see the screws.
Unscrew the screws and open the cabinet to get the clothes pegs.
L-shaped hook:
You need the wooden stick first. If you have it, then
Click under the bed and use the stick to get the L-shaped hook.
You should also already have:
String:
Bottom of the green cabinet.
Two empty water bottles:
fridge (poured into coffee machine)
& top right drawer of kitchen counter.
Coasters:
Bottom shelf of top of green cabinet.
Tape:
Bottom left desk drawer.
Knife:
Top left desk drawer.
What to do with all this stuff?
Put it together
Cut each of the bottles in half.
Place them next to each other.
Secure with tape.
Attach clothes pegs.
Add sticks.
Add coasters.
Insert hook.
Attach string.
Cut a hole with the knife.
Cool, I made a cool thing! Now what?
We're going to use it to get that key behind the secret door, so first
Place the bottle car inside the room behind the painting.
and then
Click on it to send it off, and then click some more to get it back.
Then to get the key out
Bring it up and click on it.
Escape
Happy coin:
After pulling the bottle car out, click on the monitor (the top rectangle). Then note
the order of the colors
and get the next clue by going back to
the gentlemen wall, where you should once again
turn out the lights
and note
the letter/color correspondence.
Then put the two clues together and get
COIN.
Now that you have the code,
go back to the ladder holder and enter "COIN."
Take the happy coin!
Leave the room
Use the heart key on the door and leave!
Posted by: ore | March 2, 2011 2:07 AM
Escape from the Lodge Walkthrough
General Information
Remember to switch to the English version before you hit the "opening start" button. You will find the language button underneath the "load data" button on the beginning screen. Make sure it says "English" before you hit "opening start".
Remember to closely examine everything you pick up. Some items may conceal clues, or other items, or both.
There are several color puzzles, so there will be directions for the colorblind in this walkthrough.
Can you find all 4 endings?
Good luck!
Exploration
You begin in a gorgeous wooden a-frame type lodge, facing a sink. Also on the wall to the left of the sink is a door, and to the right is a refrigerator and a tall green cabinet.
You can click on the door for a close up. Click on the door again and you will find that it is locked. Back up.
Click on the sink/counter area for a close up.
Click on the drawers to the left and below the sink for a close up.
The top drawer appears unlocked, the bottom drawer needs a key.
Open the top drawer and take the object (knife). "A knife. Mine!" Teehee!
Back up and click on the lower right drawers (underneath the cook top) for a close up.
The upper drawer has a three digit code, and the code lock is light green.
The lower drawer has a four digit code, and the code lock is a shade of pink and the numbers appear graduated.
Back up.
Click on the sink itself for a close up and you will find a clean sink and the ability to turn the water on and off. Back up.
Click on the object on the counter to the left of the sink and you will find a very fancy coffee maker. Back up.
Click on the cook top to the right of the sink and you will find that you can turn the left burner on and off. Back up.
There's a shelf above the coffee maker with what look like beakers. Click on the shelf for a close up.
There are four beakers here of different sizes, each with a pink ball in them. Back up.
Click on the refrigerator for a close up.
Click on the refrigerator door to open it and take the object on the door shelf (bottle of mineral water).
Open the freezer and take the object inside (block of ice). Looks like the ice has something in it.
You can try to open the doors of the green cabinet, but they are both locked.
Back up twice and turn right.
You are now facing a table with four pictures of men in colored suits above it. To the left of the table is a ladder, secured to the wall with a four letter lock. To the right of the table is another door, also locked.
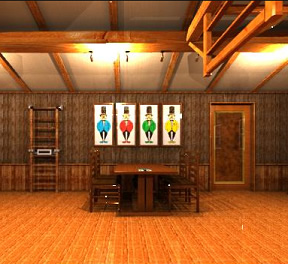
Click on the pictures of the men above the table for a close up. As you click on each one, it will tell you the color (left to right, blue, red, green, yellow). Back up.
Click on the table top for a close up.
There's a key under glass in the middle of the table, and a puzzle with a four digit code, each of the digits arranged around a central picture that looks like the men in the pictures on the wall. Back up.
Turn right.
Above you is a loft attic with a canoe in it that you cannot reach.
Click on what looks like a small table to the left of the wall for a close up.
Not a table, but a table compass with the arrow pointing north. Look on the ground to the left of the compass and you will see an object on the floor, take it (spherical object).
Back up, then click on the shelves to the right of the compass for a close up.
There are colored lamps here, in the same pattern as the puzzle on the table. Clicking on each lamp will tell you the color (top: yellow, left: green, right: blue, bottom: red).
In the center shelf, between the lamps, is an odd mechanism. Click on it for a close up.
Looks like a scale. Back up twice to the long view.
Click underneath the bed to look closer.
There's something under there, but you can't see it or reach it. Back up.
Turn right.
You are now facing a couch, with three pictures on the wall above the couch. You can now see the bed in a head-on view.
Click on the bed for a close up and see the words "Mild Escape" carved into the headboard. Back up.
Click on the left side of the couch for a close up, then click on the pillow on the arm to lift it up.
Take the object from underneath (pyramid shaped object) then back up.
Click on the right side of the couch for a close up. Again click on the pillow to lift it and take the object (remote control). NOTE: The remote will not work while you are in the close up.
Back up, then click on the pictures on the wall for a close up.
There are three pretty pictures on the wall. Click on the right picture (a girl holding a crescent moon) for a close up and you can see faint holes in the left side of the frame.
Back up twice and turn right (facing the sink).
Time to solve some puzzles!
The Scales
Turn right twice to face the lighted shelves.
Click on the shelves for a close up and click again on the center shelf for a close up of the scale.
Note the design on the face, a triangle on the left and a circle on the right.
Place the pyramid shaped object from your inventory on the left scale, and the spherical object from your inventory on the right scale.
When both objects are placed a door will open up, revealing a triangle key. Take the key and back up twice.
The Colorful Gentlemen
Turn left to face the table and the pictures of the guys in the colored suits.
Pull up the remote from your inventory and click on the button. Lights out!
Close down the remote and you will see that the pictures have lights on them. Click on the pictures for a close up.
In close up you will see that the lights are now highlighting numbers on each of the pictures. Blue is 7, red is 1, green is 3, and yellow is 5.
Back up and turn right.
You can see the lighted shelves very clearly in the dark. Amazing that they are the same colors as the pictures, and in the same pattern as the table puzzle...
Turn left to face the pictures, pull up the remote, and use it to turn the lights back on.
Once the lights are on click on the table for a close up.
Time to solve the table puzzle.
The pictures (when the lights are out) show the numbers associated with each color, and the lighted shelves show which color goes where around the central picture on the table.
According to the shelves yellow on top, green on the left, blue on the right, and red on the bottom. Since yellow is 5, green is 3, blue is 7, and red is 1 (from the pictures), then enter the numbers as indicated (5 on top, 3 on the left, 7 on the right, and 1 on the bottom).
When the numbers are entered correctly the glass will pop open and you will receive a clover (club) key.
Take the key and back up.
The Bathroom
Turn left to face the sink.
Click on the door to the left of the sink for a close up and use the club key on it.
Congratulations, you have found the bathroom.
Click on the open doorway to go in.
On the left is a pretty pink sink. Click on the sink for a close up.
There's something written on the sink stopper, but it's too small to read.
To the right and below the sink basin is a button, push it to drop the stopper down into the sink.
Now click on the faucet to turn the water on and fill the sink. The refraction of the water allows you to read what was written on the stopper, the numbers 635 in green.
Back up.
Above the toilet are two sets of cabinets. Click on the left set for a close up.
There's no keyhole, but you can't open them. Click underneath the doors for a close up and you will see that they are screwed into place.
Back up and click on the doors on the right. They will open to reveal an object. Take the object (a plastic plate) and back up.
Now turn either right or left, and you will be facing the doorway from inside the bathroom.
There's a clue written on the window, click on it for a close up and see the clue o o o T.
Back up.
Now click on the door to close it.
Behind the door, on the left, is a stick. Take it.
Click on the door to open it and click on the open doorway. This will switch you to the view of looking into the bathroom.
Back up twice.
The Green Code Drawer
You now have the code to open the green code drawer underneath the cook top.
Click on the top drawer underneath the cook top for a close up, then enter the code you got from the bathroom sink (635).
Click on the drawer to open it and take the empty water bottle.
Back up twice.
The Green Cabinet (Top Doors)
Click on the green cabinet to the right of the refrigerator twice for a close up.
Use the triangle key on the upper doors (the glass doors).
Click on the bottom shelf of the open cabinet and you will get four cork coasters.
Click on the upper shelf of the open cabinet and you will get a coffee cup.
While the coffee cup is in close up click on it and you will see a matchbox. Take the matchbox.
Pull up the coffee cup from your inventory again and click it again. This time you will see a clue on the bottom of the cup (A o o o).
Back up twice.
The Pink Code Drawer
You now have everything you need to solve the pink code drawer underneath the cook top.
Click on the sink twice for a close up.
Turn on the water, then use the coffee cup on the water to fill it up.
Back up once, then click on the shelf above the coffee maker for a close up.
Use the cup of water on the beakers and you will see the balls expand to numbers. From left to right, 3 7 8 2.
Remember the code lock, though. It appears to be going from tallest to shortest.
If you look at the beakers and arrange the numbers from the tallest beaker to the shortest, the order is 7 3 2 8.
Back up and click on the bottom drawer below the cook top.
Enter the code from the beakers (7328) and click on the drawer to open it.
Take the pot and back up.
Cooking for Beginners, How to Boil Water
Now that you have the pot, you can melt the block of ice to get whatever is inside.
Pull up the pot from your inventory.
Place the block of ice in the pot.
Click on the cook top for a close up.
Place the pot (with the ice already in it) onto the left burner.
Click on the dial below to turn on the cook top.
Back up once and then click on the cook top for a close up again. The ice should have melted. Take the pot.
Of course, it's too hot to get the key out of the water.
Back up once, then click on the sink for a close up.
Use the pot of hot water on the sink to empty it and you will get a circular key.
Back up.
The Green Cabinet (Bottom Drawers)
Click on the green cabinet to the right of the refrigerator for a close up.
Use the circular key on the bottom doors (the wooden ones) to open them.
Take the objects from inside (can of coffee and a string).
Back up twice.
The Canoe
If you are still facing the sink, turn left to face the couch.
Click on the headboard of the bed for a close up.
This is the only place in the room where there is text, so let's put the plastic plate over the words "Mild Escape" and see what we get.
We get a clue that is o E S o.
Back up and turn left (or right) twice to face the table.
Click on the ladder to the left of the table for a close up.
We need a four letter code to get the ladder. Good thing we have all of the clues.
The first clue is the coffee cup, A o o o.
The second clue is the headboard, o E S o.
The last clue is on the window of the bathroom, o o o T.
Put it all together and you get the code, AEST.
Enter the code and take the ladder.
Once you have the ladder, back up and turn right.
Now you can see the canoe in the loft above. Place the ladder against the canoe.
Click on the canoe and you can now go up the ladder.
Notice the name of the canoe, "Moon Light". This is a clue, and not an homage to a crappy book.
On the rafter just below the bow of the canoe is a spade key, take it.
There is also a handle on the canoe, but it is screwed in place. Looks like we need a screwdriver.
Back up.
The Last Drawer
There is still one drawer we haven't gotten into, the bottom left drawer below the sink.
Turn left (or right) twice to face the sink.
Click the bottom left drawer twice for a close up and use the spade key on the drawer.
Open the drawer and take the two objects inside (tape and a screwdriver).
Back up twice.
The Screwdriver
There are two places we need to use the screwdriver (for now), the left cabinet in the bathroom and the handle on the canoe.
Click on the bathroom door for a close up, then click on the door to open it.
Go into the bathroom then click on the left cabinet above the toilet.
Click underneath the cabinet doors to see the screws below. Use the screwdriver to remove the screws.
Back up once and click on the doors to open them and take the clothes pins.
Back up three times to the long view of the sink.
Turn left (or right) twice to face the ladder to the loft.
Click on the canoe to go up the ladder, then use the screwdriver to remove the handle from the canoe.
Back up.
Now what?
The Moon Picture
Turn right to face the couch.
Click on the pictures above the couch for a close up, then click on the far right picture (the girl holding a crescent moon).
Place the handle on the small holes on the left side of the frame.
Once the handle is in place, use the screwdriver to secure it.
Click on the handle and you will find a hidden passageway!
Above the dark passageway is a black screen. Click on the screen to activate a video monitor and the lights.
Look closely at the monitor, it is showing the end of the small passageway.
Down there is a heart key above a handle and the word pull.
Looks like we need to build something that will fit inside, will go down the passageway, that will pull on that handle, and that can bring back the key.
Yes, it's construction time!
Back up twice from the close up of the corridor.
We Have Now Entered the Construction Portion of Our Evening
Before we even start, is there anything we have forgotten to do?
First, we never got that object out from underneath the bed.
Turn left to face the ladder to the loft. This is also the side view of the bed.
Click underneath the bed for a close up. There's still an object way back in the back there.
Use the stick to get the object from underneath the bed (a hook).
Back up.
Turn right (or left) twice to face the sink.
We will probably be using the bottles to construct something, but one of them has water in it.
Let's empty it, shall we?
You can try to empty the mineral water into the sink, but that doesn't work.
Click on the coffee maker to the left of the sink for a close up, then click again for a closer close up.
Use the bottle of mineral water on the coffee maker and it will empty into the coffee maker. Now we have two empty bottles!
I can see the beginnings of a wheeled vehicle here, but we need some sort of sticks for axles.
Is there anything in the inventory we haven't used yet?
Maybe there's something in the coffee can we can use?
You can call up the coffee can from your inventory, but you can't open it.
Instead, use the coffee can on the coffee maker.
Now pull up the coffee can from your inventory and you will see that it is open. Click inside and you will get two sticks.
Back up twice and turn left to face the couch.
Time to make a vehicle!
First pull up each bottle from your inventory and use the knife on it. When you are done you will have two half bottles.
Pull up one half bottle from your inventory, then use the other one on it to stick them together.
Once they are positioned together use the tape to seal them together.
Now use the clothes pins on the ends (the bottle caps).
Use the metal rods on the clothes pins to make axles.
Use the cork coasters on the metal rods to make wheels.
Insert the hook into the bottle cap closest to you.
Use the string on the back of the bottle car (the bottle cap at the back).
Almost there, but there's something wrong. The car is round, if the key falls down it will slide off of the top.
Use the knife on the bottle car to cut a hole in the top.
You now have a functioning tool!
Click on the moon picture twice for a close up.
Open the picture and place the bottle car into the corridor.
Click on the car once to send it to the end, then click it twice, once to snag the key and once to pull it back.
Click on the bottle car to take it, then click on the heart key to take it.
Time to escape!
Regular Escape
The heart key is always the end key in a Tesshi-e game, this is the key that will open the door.
Back up twice from the picture.
Turn left (or right) twice to face the table and the other door.
Click on the door for a close up, use the heart key on the door, then click on the open doorway to escape.
Enjoy the stars!
Coffee Escape
The view of the night sky is spectacular, but all that escaping makes you tired.
How about some coffee to accompany the night sky?
You should have the heart key from the corridor.
Back up twice from the picture.
Turn right to face the sink.
Click on the coffee maker twice for a close up.
There's already water and ground coffee in there, you just need to light it.
Use the matches on the burner underneath and back up twice.
Click on the coffee maker twice again and the coffee should be ready.
Use the coffee cup on the coffee maker to get a cup.
Then back up twice, and turn right.
Click on the door for a close up, use the heart key, then click on the open door to escape.
Enjoy the full moon and your lovely cup of coffee!
Happy Coin Escape
Follow the regular escape directions until you unlock the door.
Instead of going through the door, back up.
Pull up the remote control from your inventory and turn the lights off.
Click on the lit pictures for a close up and notice that they now have letters.
Blue is O, red is C, green is N, and Yellow is I.
Back up, pull up the remote, and turn the lights back on.
Click on the code key on the left wall where the ladder was.
Unscramble the letters and you get the word COIN. Enter COIN into the code key.
The code key will open up to reveal the happy coin. Take the coin and back up.
Click on the door for a close up, click on the door to open it, then click again to go through.
Enjoy the stars. Happy Coin will bring happiness to you!!
Complete Ending
Although you're happy to get the happy coin, it's just not enough, is it?
Once you have the heart key, follow the directions to get a cup of coffee (see the Coffee Escape).
Use the heart key to unlock the door, but don't go through. Instead, back up and follow the directions to get the happy coin (see Happy Coin Escape).
Once you have both the Happy Coin and a cup of coffee, then go through the door.
Enjoy the moon, the stars, and the lovely chocolate cake!
Happy Coin, coffee, and chocolate will bring lots of happiness to you!!
Posted by: grinnyp |
March 2, 2011 4:02 AM
|
March 2, 2011 4:02 AM