
![]()
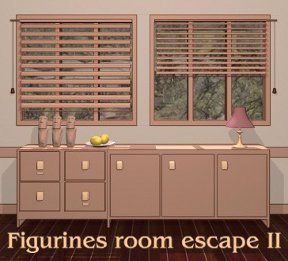 When it's time for a break there's nothing like a soothing room escape game to calm the overworked mind, and Tomatea has just the panacea in Figurines Room Escape 2, a perfect sequel to the original. The navigation and controls are easy to master. Hovering your mouse over items that you can interact with provides a nice little glow, and moving it to the sides of the screen produces navigation bars for different views of the room. You know the routine; locate objects and solve puzzles to find your way out of the room.
You may well ask, what's so relaxing about puzzling your way out of a room? Once you immerse yourself in the surrounds of this warmly decorated room and experience the ease and familiarity of pointing and clicking, as well as solving beautifully logical puzzles, it's practically guaranteed you'll feel that warm glow of self-satisfaction and triumph that only a successful room escape artist can feel. What can be more relaxing than that?


Walkthrough Guide
(Please allow page to fully load for spoiler tags to be functional.)
Figurines Room Escape II Walkthrough:
The wall with windows:
Hey, look, figurines! Click on the three figurines on the left side of the dresser to zoom, then click on each figure.
Note the color and shape on the bottom of each one:
Red Circle, Blue Starburst, Green Square.
Drawers:
Click on the drawers in this view- note that the top left drawer needs a 4-color code, and the bottom right drawer needs a 4-letter code, but you don't have a clue yet. The other drawers never open.
Back up once, then click on the right hand window.
Pull on the cord, and the blind closes- and something falls out! Pull on the cord again to let in some light!Back up once, then click on the right hand side of the dresser.
If you click on the top edge, you'll get a view of the crack between the dresser and the wall. There is a piece of paper stuck there, but you can't reach it- yet.Back up to see the close-up of the right side of the dresser.
Note that the middle door needs an entry code with a 5x5 gride of red squares- but you don't have a clue yet.
Back up to the first view of the windows, then click on the urn full of scrolls.
Pick up the scroll with a red band, then click the "i" to look at it.
Click on the scroll to unroll it, and you'll see a map divided into a grid of colored squares, numbered with letters on the left and numbers across the top.
Close the map and back up to the first view, then turn right to see the desk.
The Wall with the Desk:
The Desk:
Click on the desktop to zoom in.
Hey, another figurine! Pick it up. look closer, and you can turn it around to see a little circle on the back. Nothing to do with it now, so just hold on to it.
Among the books lined up on the desk, click on the one labeled "Diary."
Click on the cover to page through the book and take note of a couple of clues:
Over a blurred-out picture, there is a track of footprints. But whoever walked across this page skipped a step! That could be important.
Two pages on, you'll see a list of Roman numerals and their Arabic counterparts. As if experienced room-escapers didn't know this already!
The diary has revealed all it can- click until it closes, then go back to the view of the wall with the desk.
Let's try the desk drawers.
Left hand drawers:
The bottom drawer does nothing, but the top one opens! Pick up the box in the drawer and inspect it closely: It has a figure on top that looks a bit like the first 3 figurines we looked at! And the code to open it uses the shapes you saw on the bottom of the 3 figures:
Circle, Starburst,Square.
There's a blue gem in the box!
Pick it up, and one of your inventory spots will show three jewels- red, green and blue. When you look at that inventory box, the one blue jewel appears in a box with 9 spaces. I guess you need to find 8 more jewels!
Let's try the right hand drawers:
Again, the bottom drawer does nothing. The top drawer needs a 3 number code- which you don't know. Back up to the view of the wall with the desk.
Above the Desk:
Over the desk are more books and something hanging from a beam.
click for a closeup, and you'll see a red and black pendant that you can't remove from the beam. I guess you'll need to cut that cord. . . Unfortunately for us, none of the books on the top shelf are clickable.
The Chair and the Plant:
Back up to the view of the wall with the desk, then click on the chair to the right of the desk. Hey! there's a shiny green gem under the tree for you to pick up!
That chair looks a little funny.
Click on the right-most narrow slat in the back- you've just picked up a stick! Very useful.
Back up to the full view of the wall and turn right.
The Wall with the Sofa:
The picture on the wall:
Pick up the green gem on the frame!
Take a look at the picture- one of those creatures has a funny nose you can click on, but nothing happens.
Back up.
The Sofa:
This sofa is very strange for room-escape furniture- none of the cushions move to reveal any clues!
Click the sofa to see underneath it. There's a red gem you can't reach.
Use your trusty stick to get the gem!
Back up, then click on the crates with another potted plant on top.
The Crates and the other Plant:
What do the letters on the top crate say?
Move the potted plant to see better.
Pick up another red gem! Then notice that the word "CARE" in the usual "handle with care" stamp is underlined with an arrow- could be important.
Nothing more to see here- back up and turn right to see:
The Wall with the Door:
If you must, try the door-
it is locked, of course!
Examine each of the glass cases.
Left case:
the door is stuck, but you can see a row of three stars with one conspicuously empty hole.
Middle case:
This case needs a key, and it looks like there might be spots to place your jewels inside.
Right case:
The picture inside is hard to see, so try the door. It's locked with a two-button puzzle, and the game is not telling you you don't have a clue!
What clue do you have that would help with a left - right button puzzle?
The footprints in the diary!
Following the direction of the walking feet, the code is:
Right, Left, Right, Right, Left, Right, Left, Right.
The doors opens, revealing a tile puzzle.
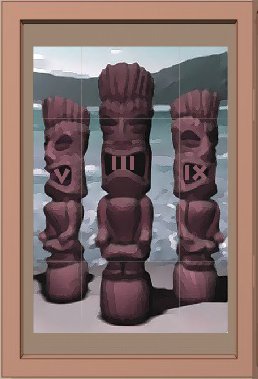
When you solve the tile puzzle, you'll see three columns with tiki-like figures-
each figure has a Roman number in its mouth:
V III IX
Where do you need a 3 digit code?
The right-hand desk drawer!
use the code 539 on the drawer
You get a magnifying glass and a compass.
Opening closed doors:
The Compass:
Turn to the first view- the windows and dresser
Click twice near the lamp on the dresser to see the crack between the dresser and the wall.
Use your stick to pick up that white piece of paper!
Aw, someone wants to see you soon- but they have a funny way of writing it.
Why do they capitalize the letters W,N,S, and E?
If you try to move the compass around the room, you'll see that the compass doesn't work that well- the arrow doesn't move.
But hey- if you click on the letters the arrow does move!
Use the letters in the oddly-capitalized white note!
Ignore the I and the uncapitalized letters: W N N S E E s N
Hooray, a red gem!!
Opening the right hand drawer under the three figurines
Where can we use the magnifying glass?
Turn to look at the sofa and picture. zoom in on the picture and use the magnifying glass on the funny nose:
R --> G
Those stencilled letters and the arrow look familiar . . .
Like the words on the crate! Where do you need a letter-based code?
The right-hand drawer under the three figurines.
Combine the clue from the crate with the clue from the monkey-nose:
"CARE" + "R --> G" = CAGE
The drawer opens to reveal a knife! Pick it up- it's a multipurpose tool!
Opening the middle door of the dresser:
Turn to the desk and zoom in on the black and red pendant. Use the knife to get the pendant.
Inspect it- the design is a 5x5 grid of red and black squares.
It's also a locket you can open to find a gem and some writing: 180 degrees.
The 5x5 grid on the pendant looks like the code pad on the middle door of the credenza!
Use the pattern on the locket, shifted 180 degrees- upside down.
Get a key and a pink piece of paper.
Opening the left hand drawer of the dresser:
The pink paper gives you letter-number pairs:
b4 b5 c2 c4 That lettering looks familiar. . .
The map scroll!
The letter-number pairs are coordinates for the colored grid on the map.
The squares b4 b5 c2 c4 are yellow, red, yellow, blue respectively.
zoom in on the left-hand drawer of the dresser
Enter the code from the map & coordinates:
yellow, red, yellow, blue
Pick up the star-shaped knob- where can we use this?
The left glass case:
Use the knife to pry open the door.
Put the star-shaped knob in the hole.
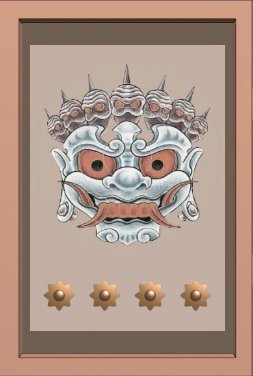
Each knob controls one ring of a ring picture puzzle- twiddle them until you get an image of an Asian demon- and it will give you a blue gem in its right eye.
The figurine from the desk:
You need one more jewel to complete the set!
Inspect the figurine from the desk and look at the back.
Use the knife on the little circle and uncover the last gem.
The final puzzle:
Use the key on the middle glass case on the wall by the door.
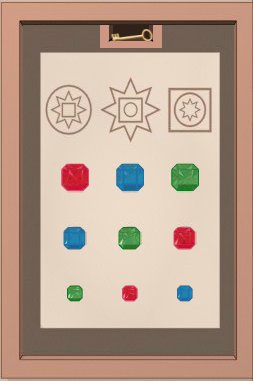
Use your gems on the case, and . . .
nothing happens.
What do those symbols above the gems mean?
They match the colored symbols on the bottoms of three figurines (Red Circle, Blue Starburst, Green Square), but they are nested.
Swap the gems until the smallest gem in a column matches the smallest or innermost shapes in the symbol above, according to the colors/shapes from the figurines.
First column, top to bottom: Red, Blue, Green
2nd column: Blue, Green, Red
3rd column: Green, Red, Blue
key pops up!
Use the key on the door to escape.
Posted by: Koh I Noor |
December 6, 2011 1:54 PM
|
December 6, 2011 1:54 PM
Figurines Room Escape 2 Walkthrough
Exploration
Window View
Click on the three figurines on the cabinet for a close-up view.
Click on each figurine and note the shapes on their bases.
Left = Red Circle
Middle = Blue Star
Right = Green Square
Click on the top left drawer and note that a 4-colour code is needed.
Click on the bottom right drawer and note that a 4-letter code is needed.
Click back out to main view and click on the 3 cupboards.
Click on the middle cupboard and note the grid puzzle.
Back in the main view, click on the shades cord at right. Note the piece of paper that falls.
Click on the 3 cupboards, then click on the lamp to get a view of the paper that's fallen behind the cabinet. Nothing more to do yet.
Back in the main view, click on the scrolls in the pot at right and click to take the scroll with the red ribbon.
Click on the scroll in the inventory and click the info button to bring it up. Click again to reveal a map with co-ordinates.
Desk View
Click on the top left drawer and take the box that requires a 3-shape code.
Click on the top right drawer and note a 3-digit code is required.
Click on the desk for a close-up and click on the book with DIARY written on its spine.
Click to open the diary and note the footprints clue. Click to turn the page and note the roman numerals clue.
In the close-up view of the desk, take the figurine next to the books. In the inventory, click on the figurine to see a circle inscribed on its back.
In the main view, click on the top shelves to the right and note the pendant hanging on the wall post.
In the main view click on the chair at right and take the rod.
In the same view take the large green gem from the potted plant.
Couch View
Click on the picture for a close-up and note the small clue that cannot be viewed for now.
In the same view take the medium green gem from the top of the picture frame.
In the main view, click on the couch and note the red gem that is out of reach.
Click on the potted plant at right and click again to move it. Take the small red gem and note the word clue CARE with an arrow underneath it.
Door View
It goes without saying that the door cannot be unlocked as yet.
Note the three glass panels on the wall.
The left one is stuck.
The middle one is locked.
The right one requires a Left-Right clue to open.
Puzzles
Box
The box requires a 3-shape code to open.
Where have we seen 3 shapes?
Remember the 3 figurines on the cabinet?
Enter the shapes into the box in the order of the figurines.
Circle
Star
Square
Open the box and take the large blue gem.
Getting the piece of paper
Use the rod that was on the chair on the piece of paper behind the cabinet.
Right Wall Panel
This one requires a Left-Right clue.
Remember the Diary from the desk?
Note the order of footprints in the diary and use on the buttons.
R,L,R,R,L,R,L,R
Click on the buttons in order of the clue in the diary to reveal a tile puzzle.
Click on each tile and then click on the tile that you want to swap it with to solve the puzzle.
Screenshot
The picture reveals a 3 digit roman numeral code.
Top Right Drawer of Desk
This drawer requires a 3-digit number.
So far, we haven't encountered any numbers, except for the Roman kind.
There's a 3-digit Roman numeral clue in the picture on the right panel of the door view.
V, III, IX
There's also a Roman numeral translation in the Diary on the Desk.
Enter the translated numbers into the desk drawer.
539
Open the drawer and take the Magnifying Glass and the Compass Box
The Compass Box
We need some directions for this one.
Where have we seen some W's, S's, N's and E's?
On the piece of paper we retrieved from behind the cabinet.
The piece of paper shows some capitals.
W,N,N,S,E,E,S,N
Use the capitals from the note and click on the compass box points to open it and take the medium red gem.
Bottom Right Drawer in Window View
A four-letter code is needed.
Where have we seen a four letter word?
On the crate under the potted plant in the couch view.
CARE
But there's also an additional clue on the framed picture.
Use the magnifying glass.
R --> G
Use the clue from the picture and enter the 4 letter word into the drawer.
CAGE
Open the drawer and take the letter opener/knife thing.
Grid Puzzle on Middle Cupboard
The red squares are similar to another object in the room.
The pendant hanging on the wall post.
Use the letter opener/knife on the pendant to add it to your inventory and note the shape. Entering the shape doesn't seem to achieve anything, so click on the pendant in the inventory and open it.
Take the small blue gem and note the 180 degrees scratched inside the pendant. Hm, maybe we need to turn this pattern upside down.
Enter the pattern into the grid, open the cupboard and take the key and piece of paper.
Top Left Drawer in Window View
You'll need the paper clue from the Middle Cupboard and the Map to solve this code.
The paper clue reads B4, B5, C2, C4. Use these co-ordinates when viewing the map.
Note the map has coloured squares for each co-ordinate.
Yellow, Red, Yellow, Blue. For the colour vision impaired: click the following number of times - 1,2,1,3.
Enter the colours into the drawer and take the handle.
Left Wall Panel in Door View
Use the letter opener/knife that you retrieved from the Bottom Right Drawer in the Window View to open the glass panel.
Use the handle that was retrieved from the Top Left Drawer in the Window View.
Now click on the handles to rotate the puzzle circles. The left handle turns the outer circle, the second from left handle turns the next circle inwards and so on.
Screenshot.
Take the medium blue gem that appears in the left eye.
Middle Wall Panel in Door View
Now it's time to place the gems.
At the top of each column is a clue involving a star, circle and square.
There are also 3 colours and 3 sizes of gems.
There was a clue early in the game relating to these colours and shapes.
On the base of the 3 figurines there are coloured shapes.
The first column shows a large circle, a medium star and a small square.
The second column shows a large star, a medium square and a small circle.
The third column shows a large square, a medium circle and a small star.
Remembering the figurines clues of Red Circle, Blue Star and Green Square, assemble the gems accordingly.
Click on the gems in the inventory and then click on the puzzle to add the gems. Now to swap them around.
Screenshot.
Take the key that appears at the top of the panel.
Gem Locations
Large Green
In potted plant next to the chair
Medium Green
Top of the picture frame
Small Green
In the back of the figurine taken from the desk. Use the letter opener/knife to prise it out.
Large Red
Use the rod from the chair to reach the gem under the couch.
Medium Red
In the Compass Box
Small Red
Behind the potted plant to the right of the couch.
Large Blue
In the figurine box that requires a 3-shape code.
Medium Blue
Solve the puzzle in the left glass wall panel in the door view.
Small Blue
Inside the pendant from the desk view wall.
Thanks, Chiktionary, for the walkthrough!
Posted by: Mike |
December 6, 2011 10:57 PM
|
December 6, 2011 10:57 PM