
Final Cut: Death on the Silver Screen
Platform: Mac, Windows

![]() When a loved one is in trouble, drugged and held captive by a crazed, vengeful extortionist, there is only one thing to do. Call the police? No. The FBI? Nope. The Navy SEALs then? Pfft. Why would you when you are aptly skilled at decoding enigmatic riddles, deftly spying shrewdly concealed objects and piecing together a multitude of clues thereby overcoming every obstacle contrived to prevent your rescuing him? That's the way it works in the world of hidden object adventure games. Of course it's logical to drive through a thunderstorm to a secluded mansion-slash-movie studio upon learning your father is dead and your brother has gone missing; you'd never blink an eye to see every door barred by elaborate locks or threatening notes from an unseen antagonist.
When a loved one is in trouble, drugged and held captive by a crazed, vengeful extortionist, there is only one thing to do. Call the police? No. The FBI? Nope. The Navy SEALs then? Pfft. Why would you when you are aptly skilled at decoding enigmatic riddles, deftly spying shrewdly concealed objects and piecing together a multitude of clues thereby overcoming every obstacle contrived to prevent your rescuing him? That's the way it works in the world of hidden object adventure games. Of course it's logical to drive through a thunderstorm to a secluded mansion-slash-movie studio upon learning your father is dead and your brother has gone missing; you'd never blink an eye to see every door barred by elaborate locks or threatening notes from an unseen antagonist.
 And so, here you are, giddily sleuthing through Eipix Entertainment's Final Cut: Death on the Silver Screen, seemingly in the grasp of a lunatic who has watched one too many murder mysteries without learning smart villains should never confess their nefarious plans. Is all this fun? You bet! Roll up your sleeves and jump right in to mini-games galore, hidden objects everywhere, Art Deco designs, over-the-top characters and B-movie antics. You're tasked with finding all the pieces of your father's physics-defying, army-coveted secret invention—and reassemble it—before the kidnapper goes even more berserk and offs your bro.
To help you along, the cursor changes to indicate items to grab or puzzles to interact with. When you pick something up, it lands in a very well-designed pop up inventory bar which quickly disappears to not obstruct your view of the superb scenery. It's not long before you're packing around oodles of tools, trinkets and pieces while making sense of a multitude of puzzles—you'll need a very organized mind or somewhere to store all this information. Lucky for me, then, there's an interactive diary to store clues and a map of the spacious premises. In the relatively few search scenes, you're presented with the standard list of objects: some easily spotted, others more obscure, and a few to be reconstructed before pick-up. Those sensitive to flashing lights should avoid the mis-click penalty; only a rapid succession of willy nilly clicking seems to activate it, though. Regular or expert game modes determine the presence of sparkles, the refill speed of hint/skip timers, and whether tasks are highlighted on the map.
 Along with large assortment of mini-games, plenty of detective work awaits you outside of the standard hidden object searches. Earn achievements by finding and turning on all the lights (not as simple as it sounds) or collect all of your father's cards (no changing cursor will help you there). There's even an achievement for finishing the game in less than five hours yet that task might mean non-experts will skip through some puzzles (thus losing other achievements) to do it.
Analysis: As you watch the credits roll, a grin still spread across your face after that cheeseball ending, what you suspected is confirmed: the creative team at Eipix Entertainment not only has a great sense of humor, they had a blast making this game, which helps account for why it's such a blast to play. But, if you start playing Final Cut: Death on the Silver Screen without checking your Detective Charlie Chan stoicism and are unwilling to rifle through piles of movie props, eschewing that handy telephone (which has a perfectly working "9" and "1" on the dial) in order to grab a makeshift lockpick, then you're coming at it all wrong! Here is a hidden object adventure that is all about having fun, especially when your idea of a good time is hours of solving clever puzzles and exploring a labyrinth of imaginative settings. Despite some of the strangeness involved, the effect is amusement not creeps, although I couldn't help jumping a little each and every time I walked into Father's study (you'll see what I mean).
 Are there cliché plot devices and the usual story twists? Yes and yes. Tongue is firmly planted in cheek and corniness ensues, but it's a riot to not only watch but be a part of this awkward suspense dramedy. Perhaps the production would not stand up to George Lucas' standard, but it's not meant to. The graphics show skillful artistry and a keen eye for design but too much seamless polishing in the story scenes would spoil the B-movie effect. Quality emanates everywhere it counts here: the puzzles are fun, not all too mentally taxing but quite a few will make you work for your reward; there's a wide variety of locales to explore to stave off boredom; plus, all the gameplay mechanics (even an overly-springy inventory bar) function intuitively so you can stay engaged with the adventure and not with fumbling controls.
You'll know before you begin how it's all going to turn out, yet Final Cut: Death on the Silver Screen will have you happily strung along, engaged in a battle of wits against a certifiable nutcase—more than enough to keep you on your toes. With all this set before you, it's no wonder you wouldn't want to turn over the glory to the authorities. Ready to get your hidden-object-finding, puzzle-solving and loved-one-rescuing game on? Then your walk-on role in Final Cut: Death on the Silver Screen is just a little ways down this winding, rain-slicked road.
A Collector's Edition is also available. It contains bonus content not found in the Standard Edition. Remember that Big Fish Game Club Members pay only $13.99 for Collector's Editions (or 2 club credits), and collector's editions count 3 card punches of 6 total needed for a free game.
![]() Windows:
Windows:
Download the demo
Get the full version
Also available: Collector's Edition
![]() Mac OS X:
Mac OS X:
Download the demo
Get the full version
Also available: Collector's Edition


Walkthrough Guide
(Please allow page to fully load for spoiler tags to be functional.)
Final Cut: Death on the Silver Screen Walkthrough
Starting Up
Achievements
Sharp Eye: Find three objects in three seconds.
Laser Eye: Find ten objects in ten seconds.
Good Listener: Do not skip intro or any dialogue for the first hour of game play.
Cool Clicker: No misclicks in a hidden object scene.
Master Clicker: Get through all hidden object scenes with no misclicks.
Independent Eye: Complete a hidden object scene without using a hint.
High Independence: Complete ten hidden object scenes without using a hint.
Master of Your Domain: Complete all hidden object scenes without using any hints.
Hide-and-Seeker: Complete three hidden object scenes in a row within three minutes each.
Master Hide-and-Seeker: Complete five hidden object scenes in a row within three minutes each.
Grand Master Hide-and-Seeker: Complete ten hidden object scenes in a row within three minutes each.
Speed: Complete one hidden object scene in less than a minute.
Ultimate Speed: Complete three hidden object scenes in less than ten minutes.
Coffee Break: Complete one puzzle in ten minutes.
Take it Easy: Complete one hidden object scene in ten minutes.
Learner: Complete the tutorial.
Mystery Solver: Complete the game in easy mode.
Quick Mystery Solver: Complete the game within five hours.
Hard Mystery Solver: Complete the game in hard mode.
Relaxed: Play the game for more than ten hours.
Mind Boggling: Complete five puzzles without skipping.
Supreme Intellect: Complete all puzzles without skipping.
Help: Complete one puzzle by skipping.
In a Hurry: Complete five puzzles by skipping.
Runner: Complete all puzzles by skipping.
Quick Mind: Complete one puzzle in less than one minute.
House Photographer: Find all twenty of the hidden estate photos.
Father's Secret: Find all ten of father's secret cards.
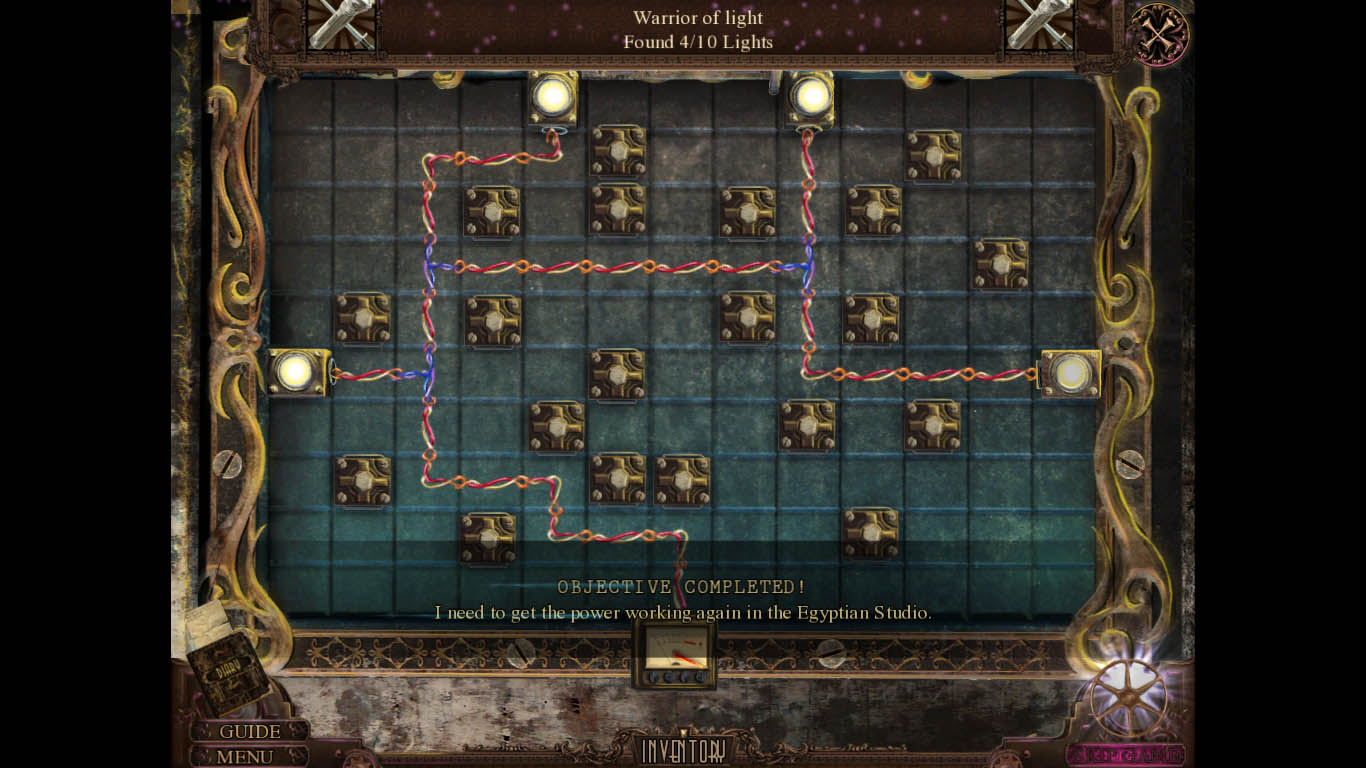
Warrior of Light: Turn on all the lamps in the game.
Search Complete: Find all the projector parts.
Heavy Reader: Spend more than three minutes looking at the diary.
Navigator: Complete the game without opening or using the map.
Immersion: Complete the game in one sitting.
Hoarder: Have ten items in your inventory at one time.
Mystery: Figure out what to do by yourself. It's a mystery.
Seeker: Find 100 objects.
Eagle Eye: Find 200 objects.
Master Locator: Find 300 objects.
Pianist: Play the piano.
Supreme Achiever: Collect all the achievements.
Starting Screen
You will be asked to choose a player name when first starting.
On the top left is the achievements tab so you may see what achievements you have or haven't gained.
On the top right is an extras tab. Items in the extras tab may only be accessed if you have purchased the Collector's Edition.
At the top of the middle column is the play game button. You will be asked to choose from one of two difficulties:
Regular Mode
Hint and skip buttons recharge quickly.
An active zone will glimmer.
Areas the require an action and all objectives will be shown on the map.
Expert Mode
Hint and skip buttons recharge very slow.
No active zones are indicated.
Only objectives will be shown on the map.
Under the play game tab is the Options tab which allows you to:
Change screen size.
Stop use of the custom cursor.
Change the sound, music, and effects volume.
View the credits.
Under the options tab is the profiles tab. This is where any game profile you create can be found and chosen or deleted.
The final tab is an exit tab.
Gameplay and Game Screen
On the bottom left of the screen is your diary. When you open the diary, there are multiple tabs that you may choose.
The far left tab is the journal, which keeps you updated with the story line.
There's a map tab. The map shows where you are located. If in regular mode, it shows activities as well.
There is an objectives tab which says what objectives you must complete.
Under the diary is the guide button which can only be used if playing with a Collector's Edition.
Under the guide is the menu which is the same as the options tab on the starter screen.
On the bottom middle is the inventory tab which only appears when you hover the cursor over it. It stays collapsed otherwise.
On the bottom right is the hint button.
Items written in orange in a hidden object scene are items that require extra work to reveal or create.
All items except for those written in orange are randomized in a hidden object scene.
Too much clicking will result in a penalty of having the cursor freeze.
Some puzzles cannot be completed until you retrieve information pertaining to it.
At the top of a puzzle is a question mark, which you can click to get information on how to complete the puzzle.
The game is not linear; however, certain steps still need to be completed first in order to gain different hidden object areas and puzzle information.
Throughout the game there are estate photos and father's secret cards to collect.
There are lamps that can be lit through the whole game as well.
For the mystery achievement, there are six cats to be collected.
The cursor changes depending on the part of the scene it points at
For an item that can be picked up, the cursor will change to a grasping hand when hovering over the item. This does not work for the photos, cards, cats, or lamps.
An item or area that needs to have an item used on it will turn the cursor into gears when the cursor hovers over it.
If you can zoom in on an area, the cursor will change into a magnifying glass.
If you hover the cursor over an area that leads to a new scene, the cursor will change to a large, bronze arrow.
Chapter One: Father's Mansion
Get Inside Father's Mansion
Pick up the hairpin that's in front of the fountain.
At the top of the fountain is the first father's secret card.
On the back rest of the bench is the first estate photo.
Inspect the fountain and use the hairpin on the button.
You receive a button and reveal a hidden object scene.
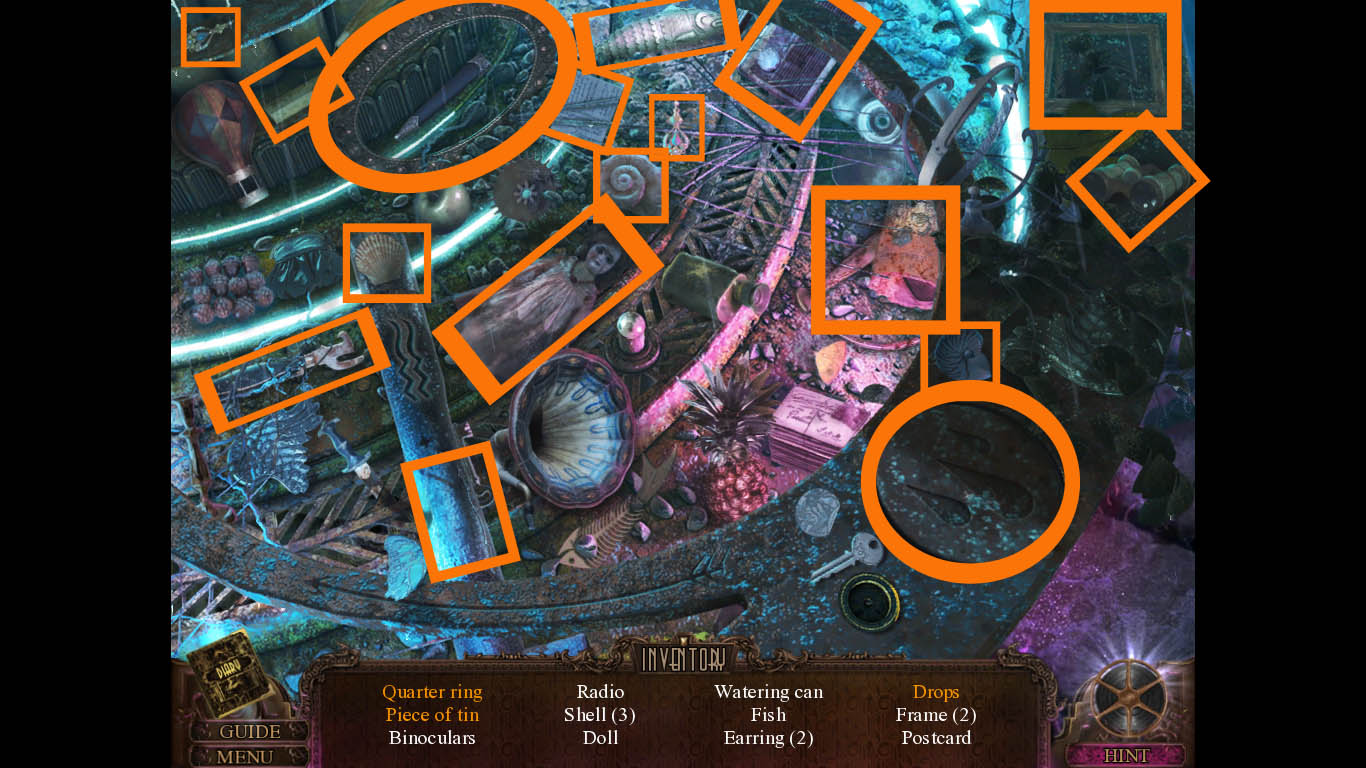
Click on the fountain to start the hidden object scene.
Pick up the trowel and use it on the lid with the rain drops. This will get the drops and reveal the quarter ring.
Grab the can opener and use it on the pipe to reveal the piece of tin.
Screenshot
You receive a quarter ring.
Move forward toward the Mansion Entrance.
On the right wall to the left of the lamp post is the second father's secret card.
Investigate the stone steps.
Pick up the help wanted ad and click on the empty spot of the stairs.
Inspect the doorbell to the right of the doorway.
Place the button in the empty doorbell spot.
Click on the doorbell to make the doors open.
Go forward into the Foyer.
Speak with the maid.
Get Into Father's Study
Inspect the table that's next to the maid.
Click on the prescription to remove it and reveal the proper medical chart.
Click on the picture on the table to reveal his identity.
Inspect the paintings at the top of the staircase.
Along the banister at the top right of the room is an estate photo.
Zoom in on the door to the left.
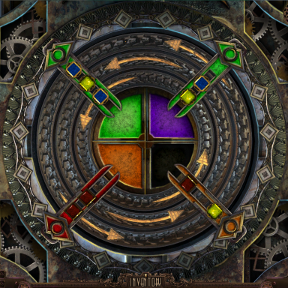
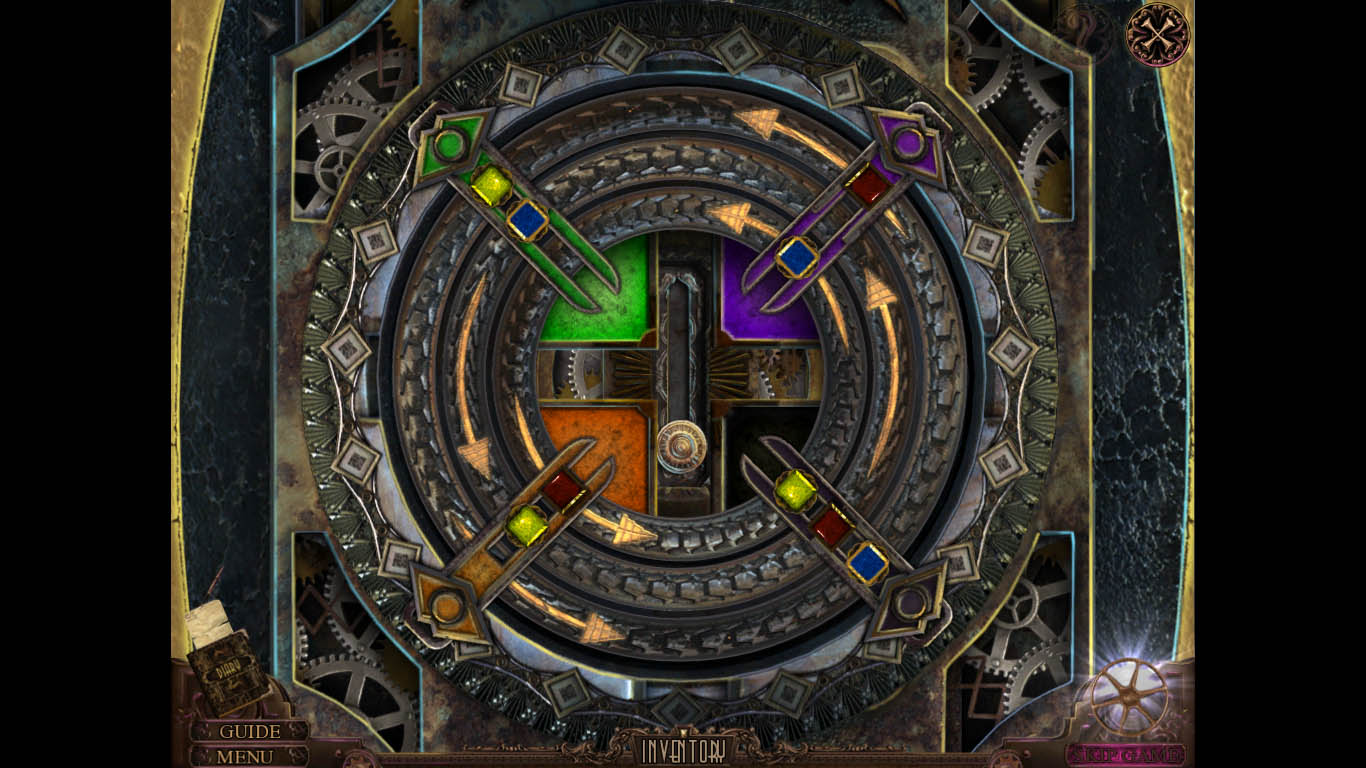
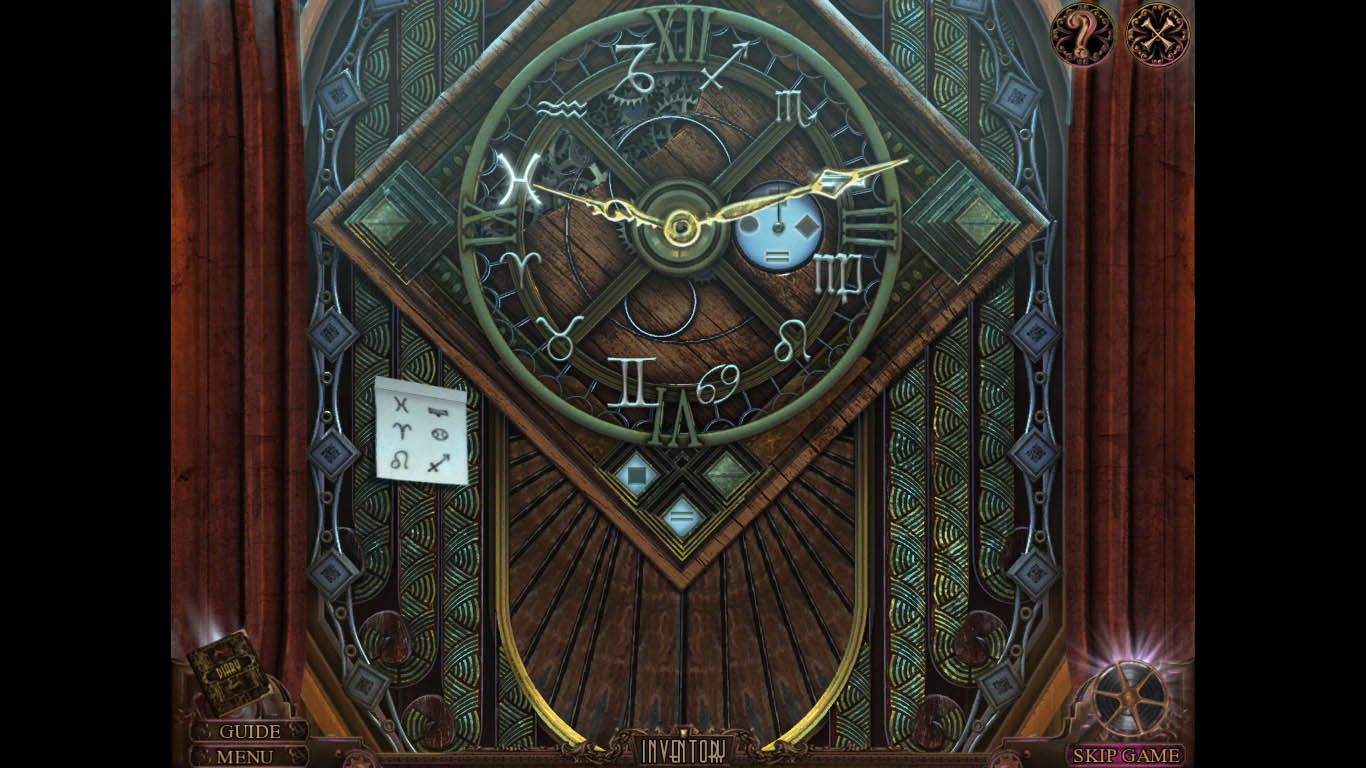
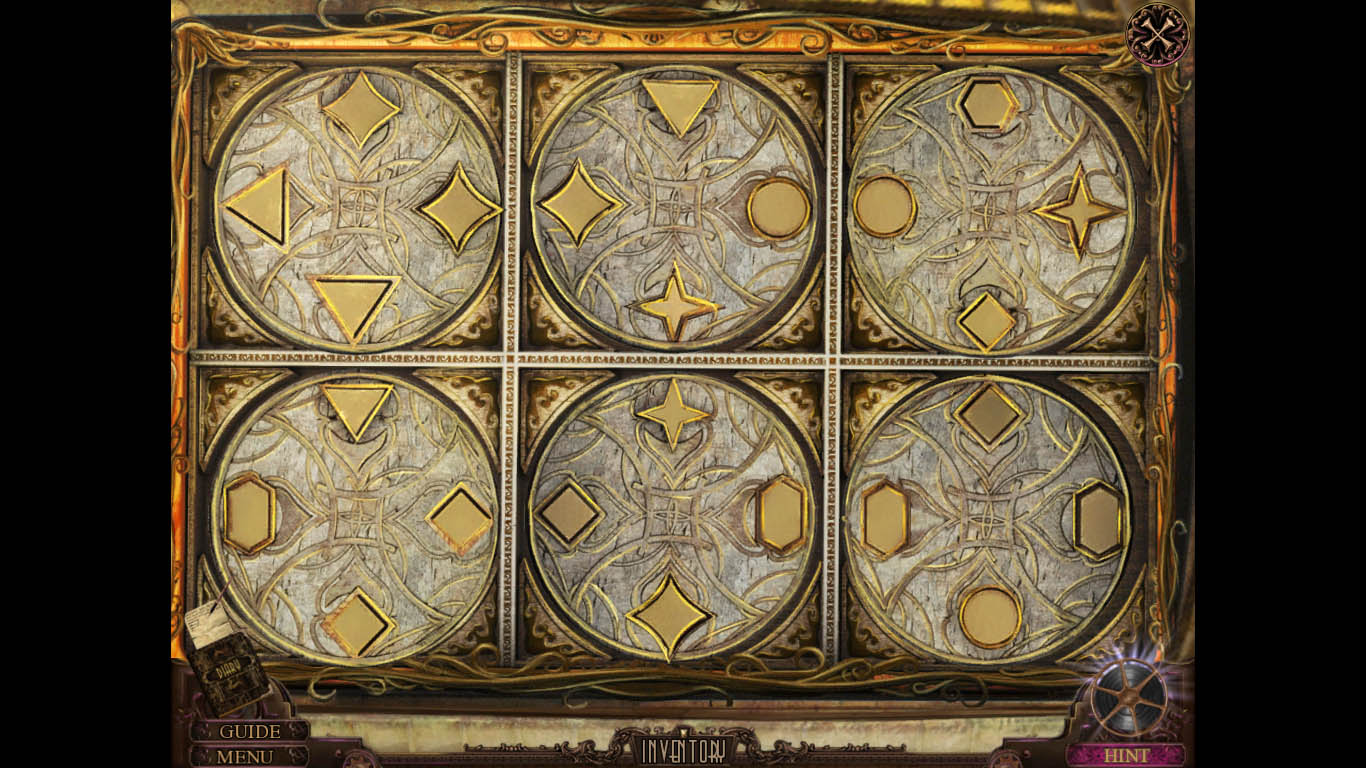
Place the quarter ring on the area missing the quarter to start a puzzle.
There are four colors in the center of the puzzle. Each color has a line sticking into it.
For each line, you must rotate the outer rings to put the correct color combination in a line. The colors in a line must combine to make the color that the line is attached to.
Turn the outer most ring to the left twice.
Turn the middle ring to the left once.
Turn the inner most ring to the left three times.
Screenshot
Click on the shell in the middle to open the door.
Go forward into Father's Study.
Inspect the desk. Click on the blanket on the figure.
Press on the recorder to hear the message.
Getting the Theater Key
Inspect the desk again and pick up the paper.
On the staircase towards the right is the third father's secret card.
Under the table on the right of the room is the third estate photo.
Inspect the frames on the left wall. Pick up the letter T.
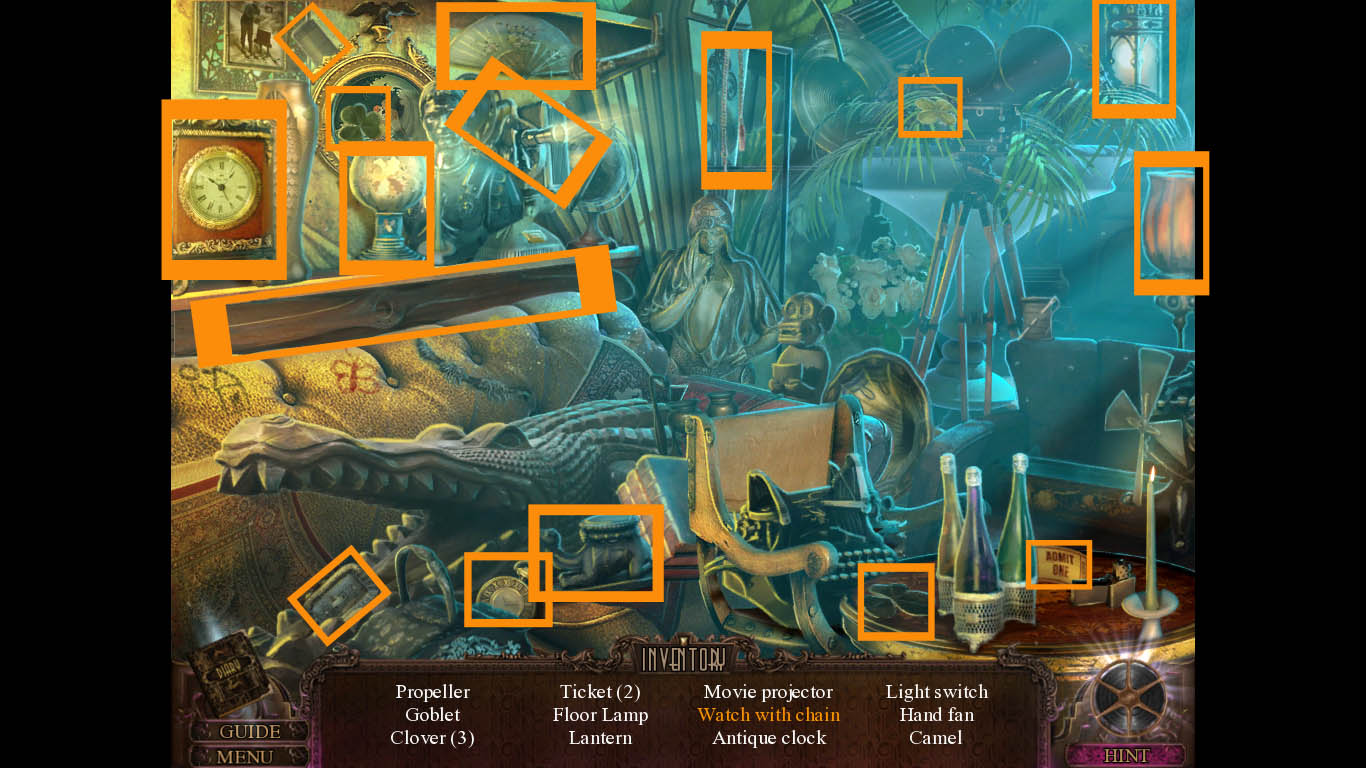
Start the hidden object scene located on the armchair on the left side of the room.
Click on the mouth of the alligator to reveal the light switch.
Pick up the chain and place it on the watch.
Screenshot
You receive a switch.
Go back once, then go right into the East Hall.
Place the switch on the right wall where the electrical wiring is, then click on the switch to turn on the lights.
Turning on the lights counts as one out of ten lights to turn on for the Warrior of Light achievement.
Investigate the movie poster on the wall and pick up the first small garden lock of three.
Go left into the Library.
At the top of the ladder on the right is estate photo three.
Investigate the table on the left. Click on the lantern to turn the light on, then click on the SFX book to open it.
Pick up the blunt pencil. Click on the page twice to get the recipe for making smoke powder.
Zoom in on the glove at the back of the room. Pick up the pincers.
Inspect the bookcase on the right.
Place the letter T on the book missing the gilded letter.
Left click on a book and move it to the proper place to spell out a word based on the picture shown at the bottom of the bookcase.
Theater
Click open the cupboard and pick up the theater key.
Getting into the Music Room
Go back once and zoom in on the statue to the left of the Theater Room.
Use the pincers to pick up the spade.
Go back once, then go left into Father's Study.
Zoom in on the desk and place the blunt pencil in the pencil sharpener.
You receive a sharpened pencil.
Examine the dresser to the right of the desk and place the spade in the top slot that is in the shape of a spade.
Pick up the note and the sticky tape.
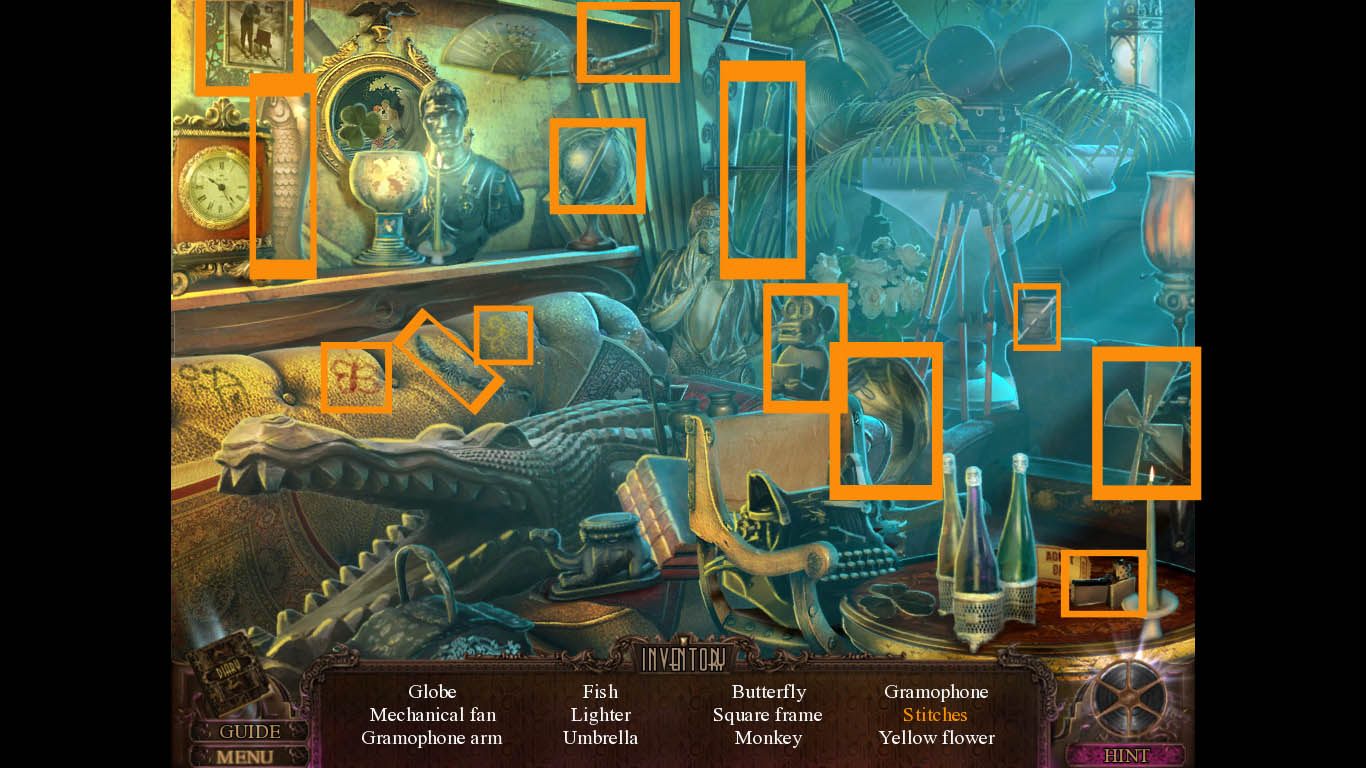
Start the hidden object scene.
Pick up the thread and use it to sew stitches on the couch.
Screenshot
You receive a gramophone arm.
Go back once, go right to the East Hall, then go forward to the East Hall End.
Above the theater door atop the title panel is the fourth estate card.
Beneath the runner rug on the right side is the fourth father's secret card.
Pick up the mouse toy.
Inspect the movie poster and pick up the second small garden lock.
Zoom in on the theater door and place the theater key in the lock. Click on the key to open the door.
Go into the Theater Room.
Click on the armrest of the first row of chairs. Click on the trash in the ashtray to remove it. Pick up the map piece (the first of five).
Inspect the jukebox and pick up the record.
Investigate the bottom of the door at the back. Click open the kitty door to reveal a key and person on the other side. Take notice of the cat prints.
Examine the screen on the left wall. Click on the scratchings on the wall.
Place the paper on the scratching, then use the sharpened pencil to get the imprint.
You get the music room code. Go back once then zoom in on the code box to the right of the music room. Put in the code.
3144.
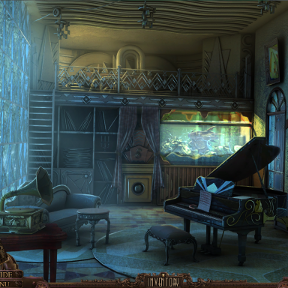
Go into the music room.
Get to the Maid
At the top of the panel on the right wall is the fifth estate photo.
Inspect the gramophone and place the gold record and gramophone arm on the gramophone.
Pick up the letter and the projector blueprint half.
Zoom in on the piano and pick up the magnet.
Examine the upper floor of the music room and click on all the valves.
Investigate the now-drained aquarium.
Click on the front of the aquarium and pick up the large garden lock.
Go back four times to the Mansion Entrance.
Zoom in on the bushes to the left and give the mouse toy to the cat.
Pick up the wooden handle.
Place the magnet on the collar of the cat, then place the sticky tape on the magnet.
Click on the cat to pick it up.
Go forward into the Foyer, then right into the East Hall and forward to the East Hall End. Go into the Theatre Room.
Zoom in on the bottom of the door and place the cat on the floor.
Pick up the Projector Room key.
Examine the top of the door and place the Projector Room key in the lock. Click to turn the key and open the door.
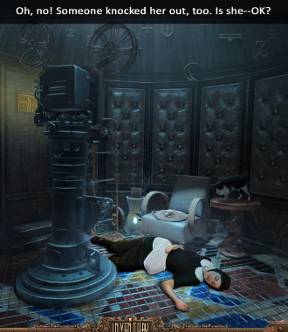
Go into the Projector Room.
Click on the maid to wake her.
Under the table with the cat on it is an estate photo.
Take the Rec Room key.
Sticking out from the top of the vase to the left of the chair is the fifth father's secret card.
Pick up the hand cart.
Go back four times to the Foyer.
Chapter Two: The Gardener
Talk with the Gardener
Use the hand cart to individually remove all four crates blocking the West Hall entrance.
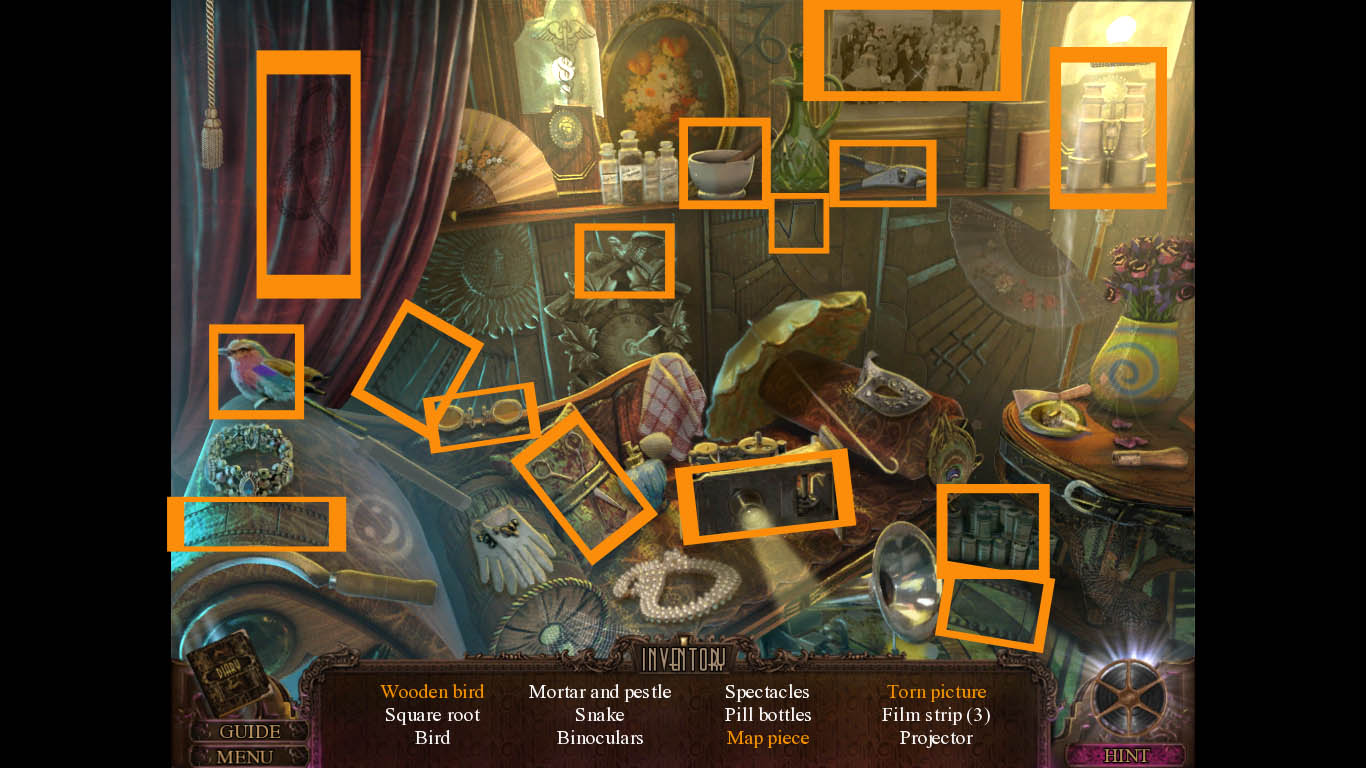
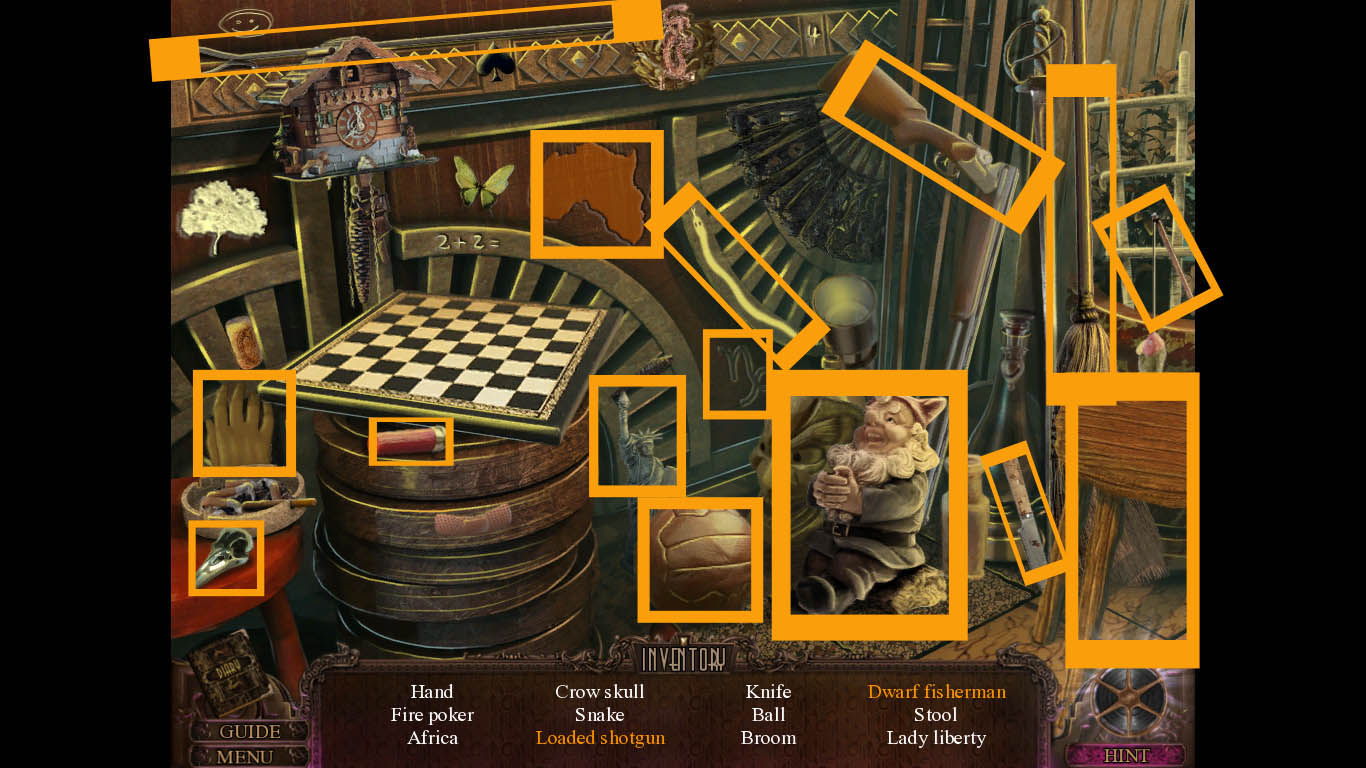
Before going through the door to the West Hall, start the hidden object scene that has appeared on the lounge chair to the right of the West Hall entrance.
Pick up the scissors and use them on the map to reveal the torn picture and map piece.
Use the pliers on the wooden bird to remove it from the art piece.
Screenshot
You receive a map piece (the second of five).
Go left into the West Hall.
Inspect the pirate statue and pick up the map piece (the third of five).
Zoom in on the door to the right and place the Rec Room key in the lock. Click on the key to open the door.
Go into the Rec Room. Move forward again into the Garden.
Speak with the Gardener.
Get to the West Hall End
On the wall behind the ladder is the sixth father's secret card.
Pick up the ladder.
Inspect the sun image in the back to reveal a new objective.
To the left near the grass obscuring the basement is an estate photo.
Go back into the Rec Room.
Under the table on the left is an estate photo.
On the table in the back is a light that can be lit.
Zoom in on the table.
Pick up the note and the transparent map.
Inspect the globe.
Click on the globe to open it and pick up the bottle, the first of three.
Investigate the sink to the right of the wet bar.
Pick up the thaumatrope, the first of five.
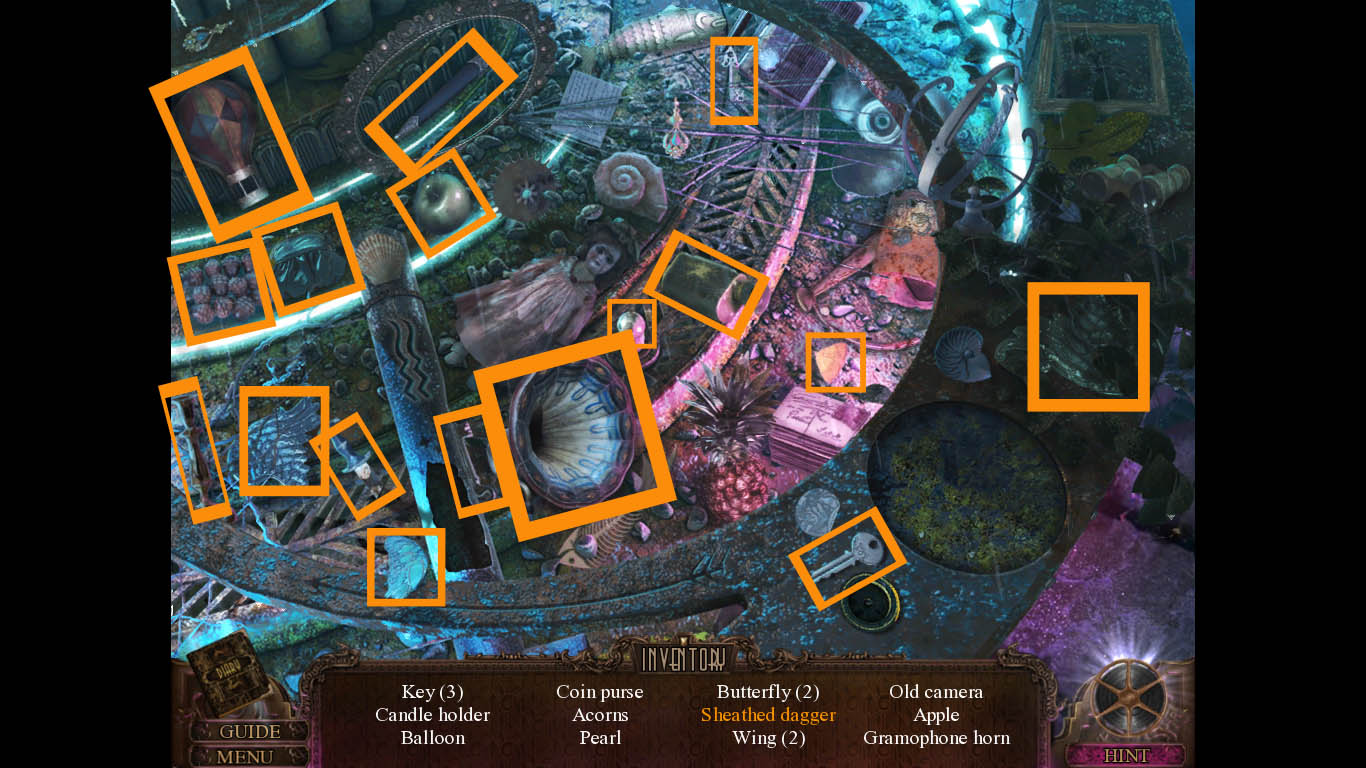
Go back until you are outside at the fountain. Click on the fountain to start a hidden object scene.
Pick up the knife and place it in the sheath.
Screenshot
You receive a candle holder.
Place the ladder against the light pole.
Click on the bird nest and pick up the wire.
Go forward twice, then go left into the West Hall.
Zoom in on the gated door and use the wire on the key hole.
Go through the door to the West Hall end.
Getting the Crowbar
Pick up the bottle at the bottom of the bust.
Inspect the bust of the woman and pick up the second thaumatrope.
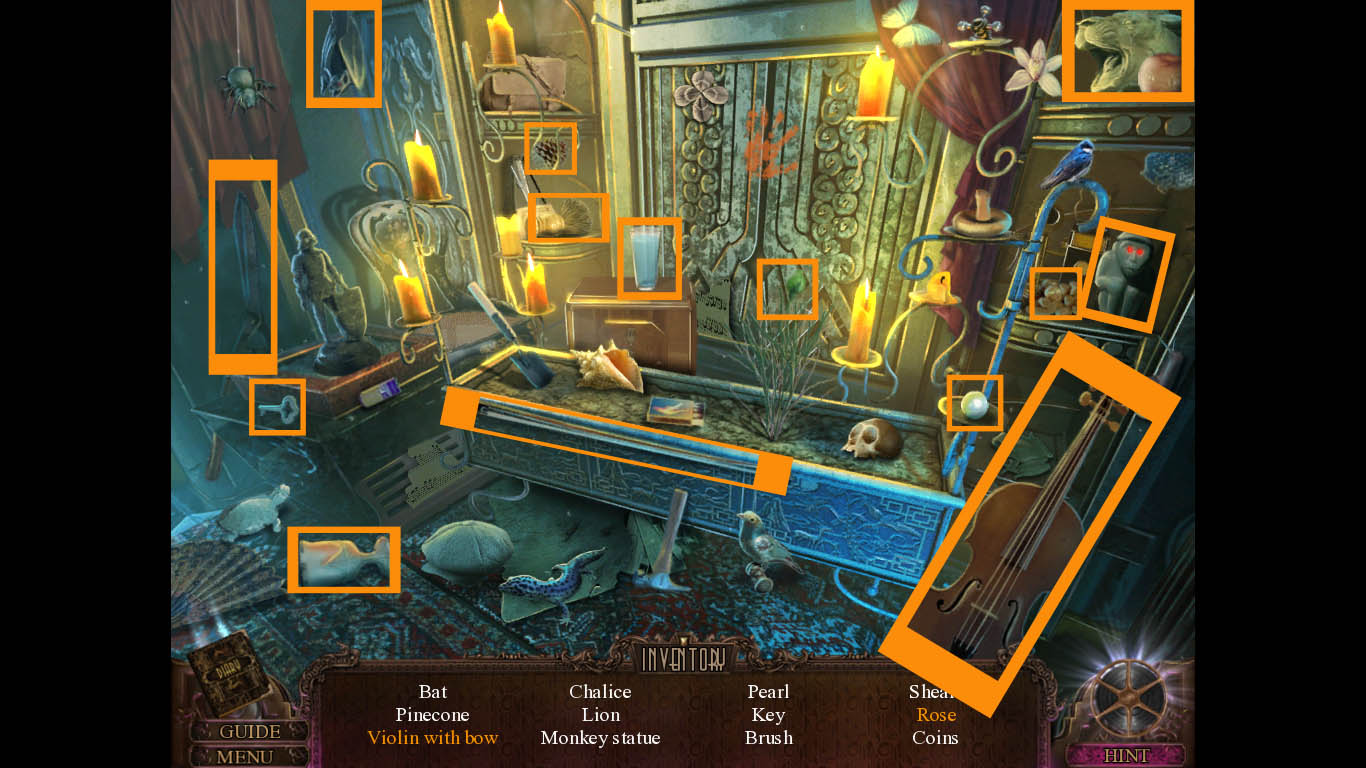
Click on the right corner to start the hidden object scene.
Pick up the glass of water and pour it on the flower bud to make the rose bloom.
Grab the bow and place it on the violin.
Screenshot
You receive shears.
Under the table to the right is the seventh father's secret card.
Pick up the third thaumatrope off the top of the table.
Inspect the glass case to the left with the spinning images. Pick up the third small garden lock.
To the right of the spinning case is an estate photo.
Go back twice, then go right into the Rec Room. Move forward to the garden.
Use the shears on the grass to the left blocking the basement.
Go left into the basement.
Examine the work table and place the wooden handle on the file. Pick up the file.
Click on the poster below the work table.
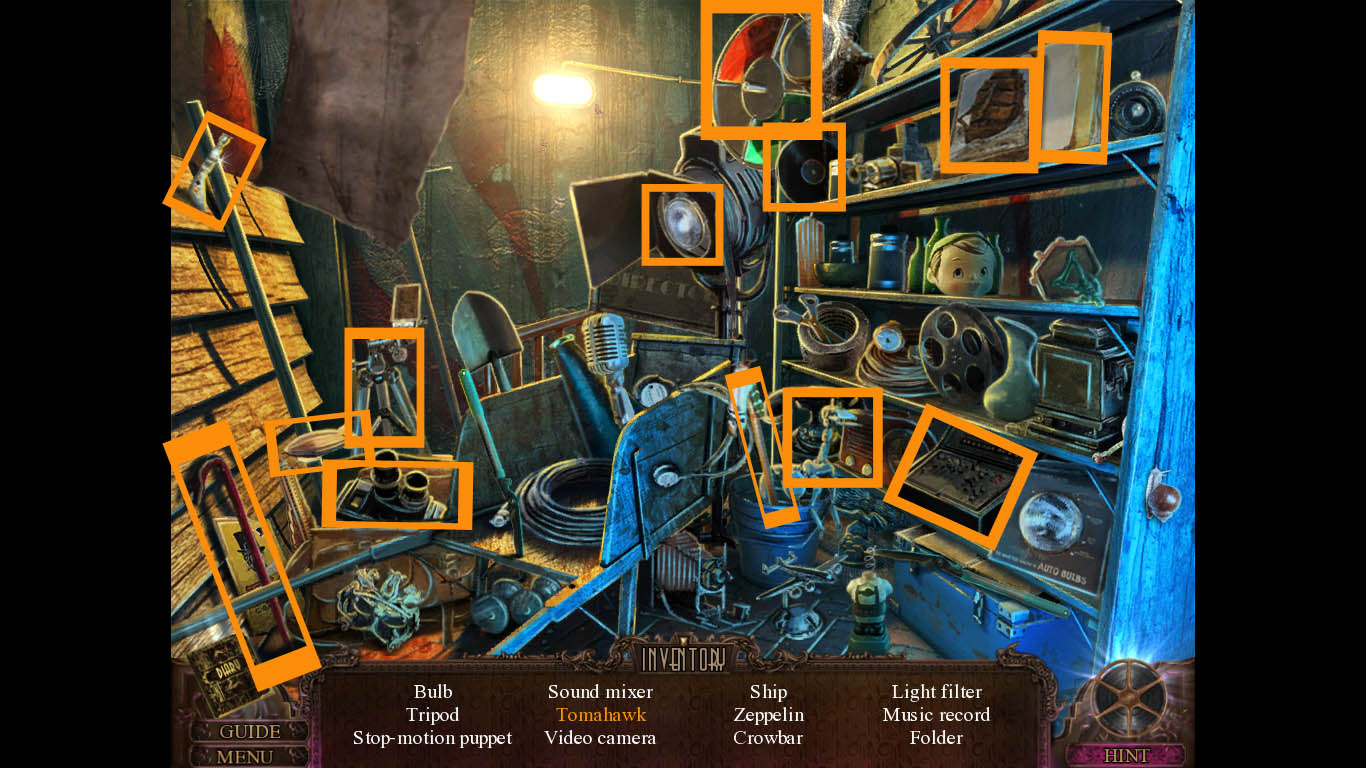
Start a hidden object scene by clicking on the doorway to the left.
Click on the lid of the camera to reveal the light bulb.
Pick up the handle and attach it to the tomahawk blade.
Screenshot
You receive a crowbar.
Getting to Your Brother
Examine the board on the left and place the projector blueprint half on the board.
Click on the blueprint half and pick up the map piece, the fourth of five.
Go back once and click on the back circle with the flower symbol.
Place the large garden lock down first. Use the file to remove the rust. Place the three small garden locks down.
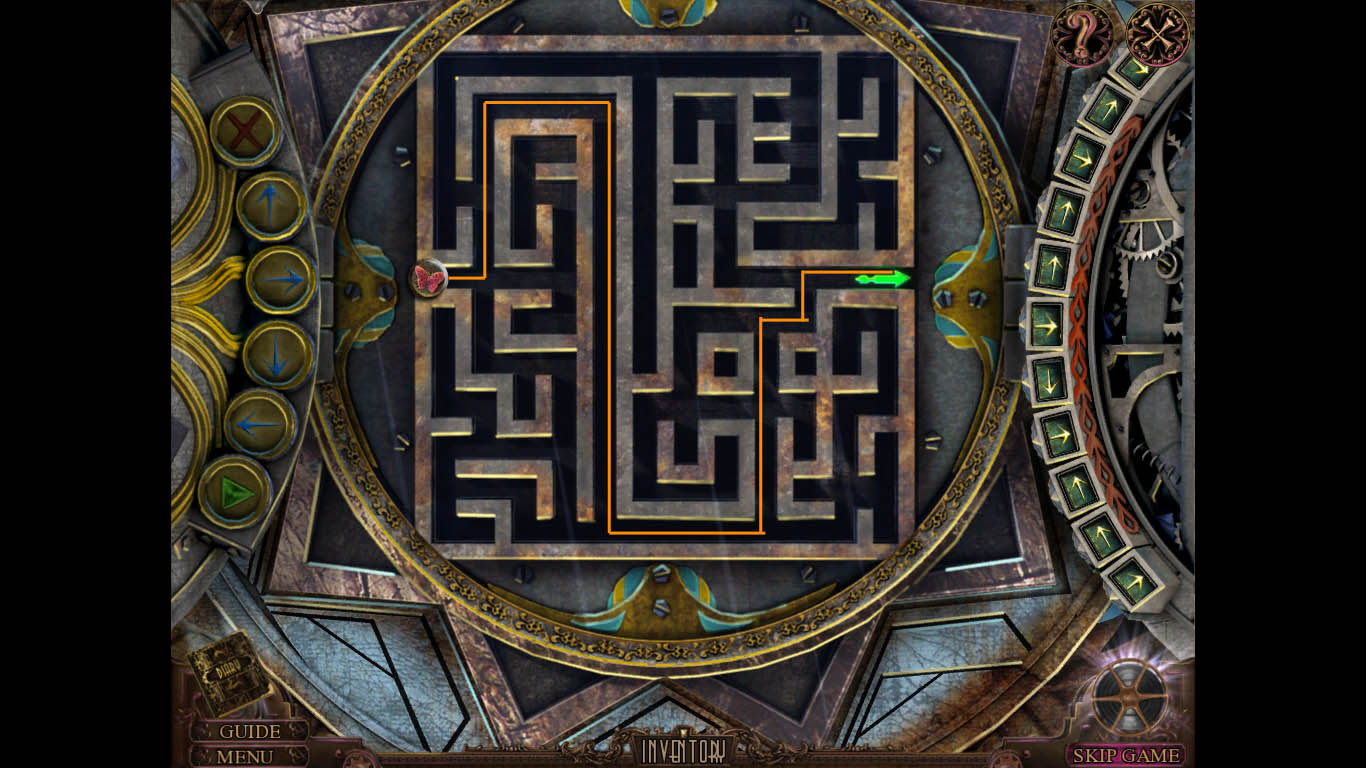
A puzzle will start where you must get the butterfly to the exit of the puzzle by choosing the directional arrows. You have a limit of eleven arrow commands.
Right.
Up twice.
Right.
Down.
Right.
Up twice.
Right.
Up.
Right.
Screenshot
Go forward through to the Studio Entrance.
Inspect the car and pick up the bird food.
Zoom in on the clock and use the candle holder to break the glass. Pick up the fourth thaumatrope.
Go back once and give the bird food to the gardener.
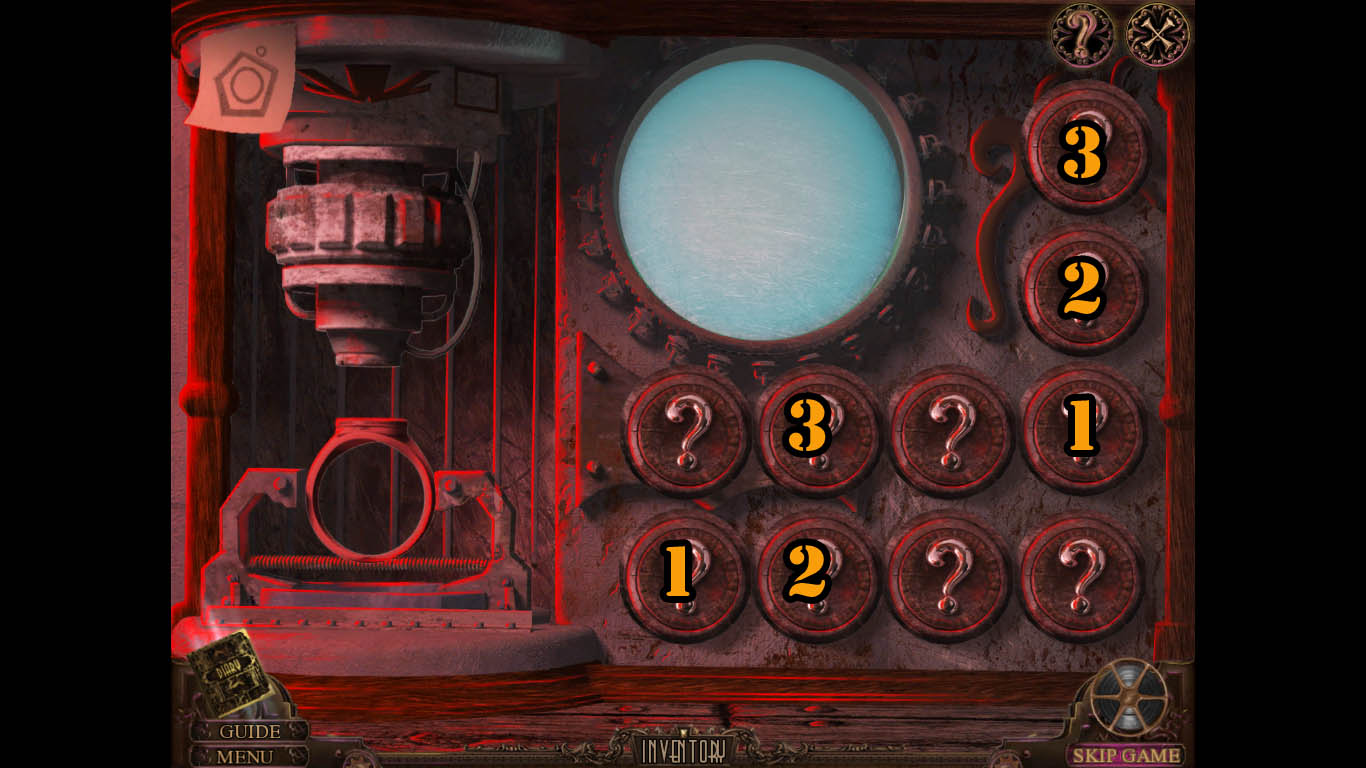
Take the bottle and go back once. Examine the wet bar and place the bottles in the wine holders to start a puzzle.
You must match the bottle label to the numbered spots on top of the table.
Screenshot
Pick up the fifth map piece.
Go back once and forward twice into the Elevator Room.
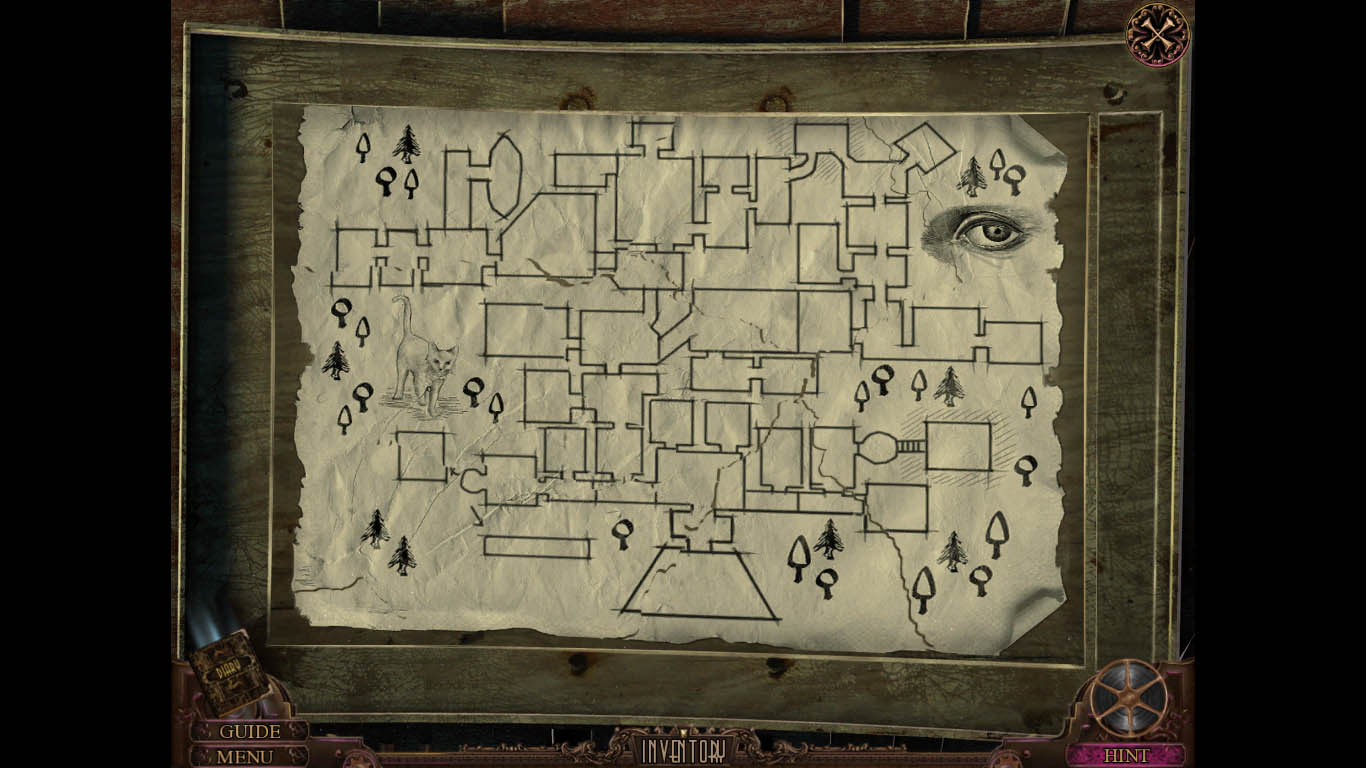
Examine the cork board on the right wall and place the map pieces on it to start a puzzle.
Screenshot
Once done, place the transparent map on top of the assembled map.
Press on the pull chain to the right.
Pick up the projector speaker and father's ring.
Use the crowbar to open the elevator cage.
Go forward into the elevator and read the note. Inspect the elevator buttons and use father's ring on the up button.
Chapter Three: Studio
Getting the Fifth Thaumatrope
Pick up the Egyptian symbol.
Examine the pictures at the back and click on the picture of the man. Press on the picture a second time to reveal the full picture. Pick up the diamond.
Pick up the note on the stool.
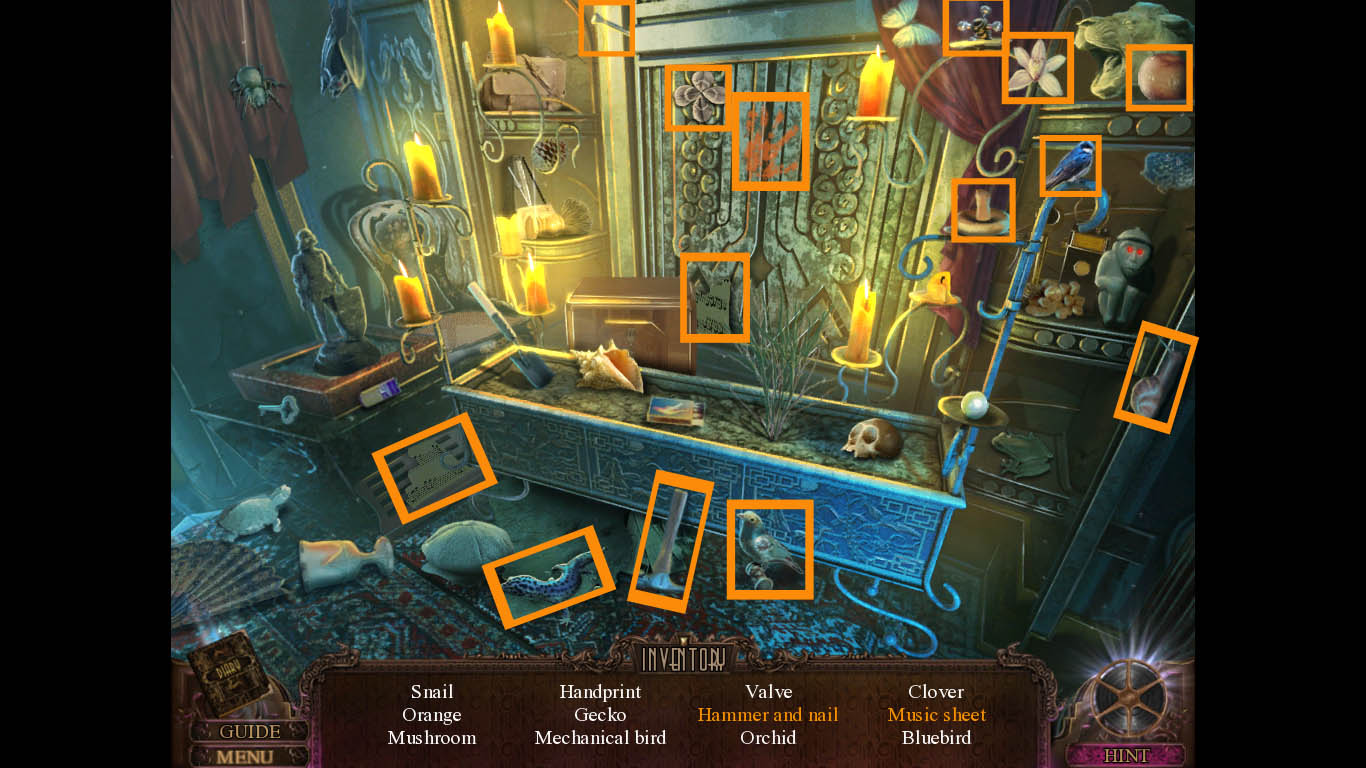
Go back twice and start the hidden object scene located in the right corner.
Pick up the music sheet half and attach it to the other half to make a full music sheet.
Grab the hammer and use it on the nail.
Screenshot
You receive a valve.
Inspect the bust of the woman and place the Egyptian symbol in the spot that has an empty indentation. This will start a puzzle.
Move the outer ring until the ball is the same color as the ball in the very center of the puzzle. Rotate the middle ring to an empty spot to allow the ball to drop into the slot.
Screenshot
Pick up the jar with thaumatrope.
Go to the Foyer and start the hidden object scene located on the lounge chair in the left corner.
Pick up the scraper to remove the bandage.
Take the file and place it on the wooden handle.
Screenshot
You receive a dish towel.
Go up into Father's Study and zoom in on the dresser at the back. Place the diamond in the diamond slot.
Read the note and pick up the second blueprint half.
Go back once, then left into the West Hall. Go into the Rec Room and zoom in on the sink.
Place the valve on the tap, then click to turn on the water.
Put the jar with thaumatrope under the water, then click to open the lid. You receive the fifth thaumatrope.
Getting the Skull
Go forward once, then left into the basement.
Start the hidden object scene in the left doorway.
Pick up the bobble head and attach it to the body.
Pick up the first shear half and attach it to the other half.
Screenshot
You receive a toy soldier.
Examine the board and place the second blueprint half.
Click it open and pick up the Studio 1 key.
Go back four times, then go into Father's Study.
Zoom in on the circle display on the right wall.
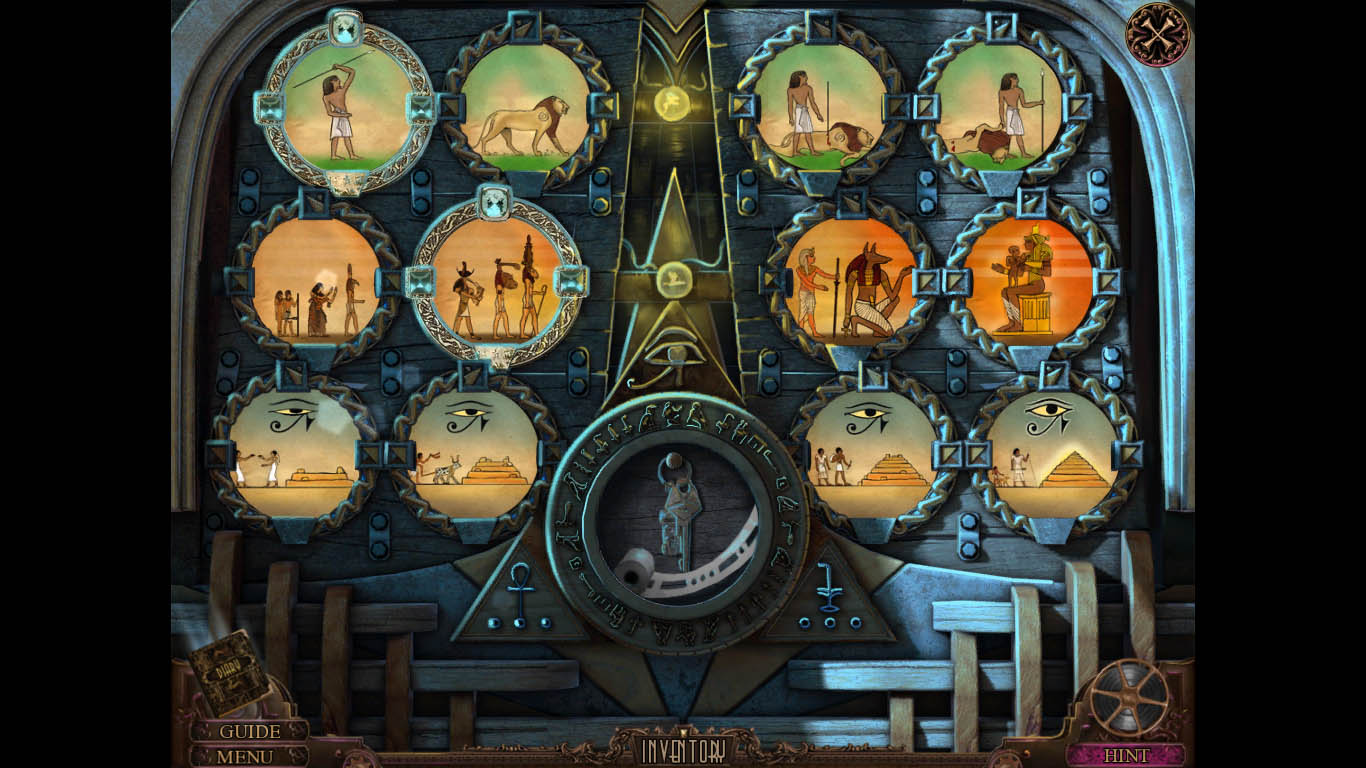
Place the thaumatropes onto the display to start a puzzle.
Reading from left to right, you must place the thaumatropes to create three individual stories.
Screenshot
Pick up the film and car keys.
Go back once, then left into the West Hall. Go through the Rec Room into the Garden, then onto the Studio Entrance.
Investigate the Studio 1 door at the back of the lot and use the Studio 1 key in the lock to open the door.
Go into the Ticket Hall.
Pick up the wood piece.
Zoom in on the switch on the wall to the left of the ticket booth and click it to switch on the lights.
Go left into the set of the Three Pirates.
Pick up the cable.
Inspect the vase to the left and pick up the skeleton hand.
Go forward to the Pirate's Gangway.
Pick up the wood piece.
Examine the barrels and pick up the bandana.
Grab the skull.
Getting the Cannonball
Go forward to the Pirate's Ship side.
Underneath the gang plank is an estate photo.
Click on the clipboard and read then click on it to take it.
Pick up the bandana.
Inspect the barrel and pick up the hook.
Go up the Pirate's Ship Deck.
Examine the treasure chest and pick up the bone.
Pick up the wood piece.
To the left of the mast is an estate photo.
On the cabin above the treasure chest to the left is a father's secret card.
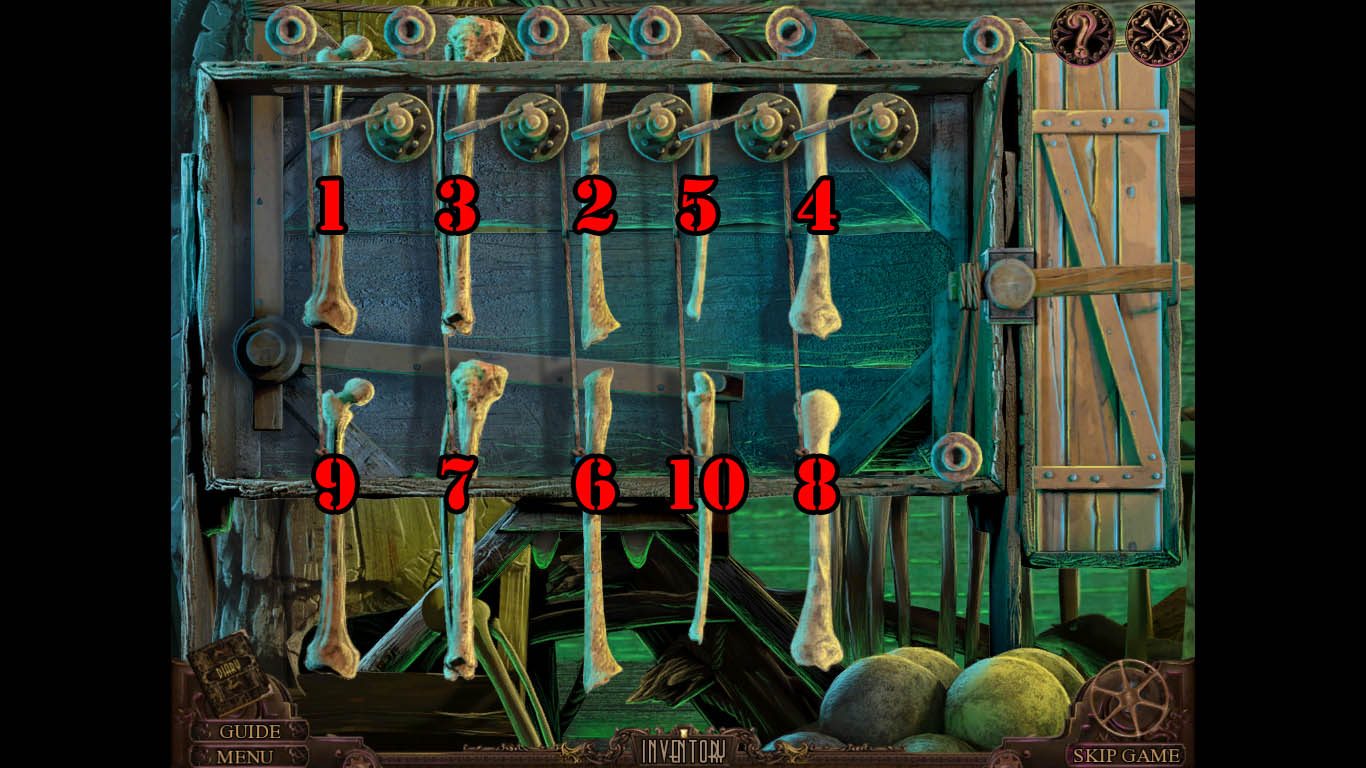
Go back once and zoom in on the hanging bones to the left of the cannonballs.
Place the bone on the hanging bones to start the puzzle.
Screenshot
Pick up the sword.
Go back once, then go left to the Pirate's Tower Base.
Against the rock on the left side is an estate photo.
Inspect the cannon and pick up the cannonball.
Getting into the Museum
Use the sword on the rope tied around the box. Pick up the rope.
Examine the box and click on the cover to open it. Read the note.
Place the wood pieces on the ladder and use the rope to keep them attached.
Go up the Pirate's Tower.
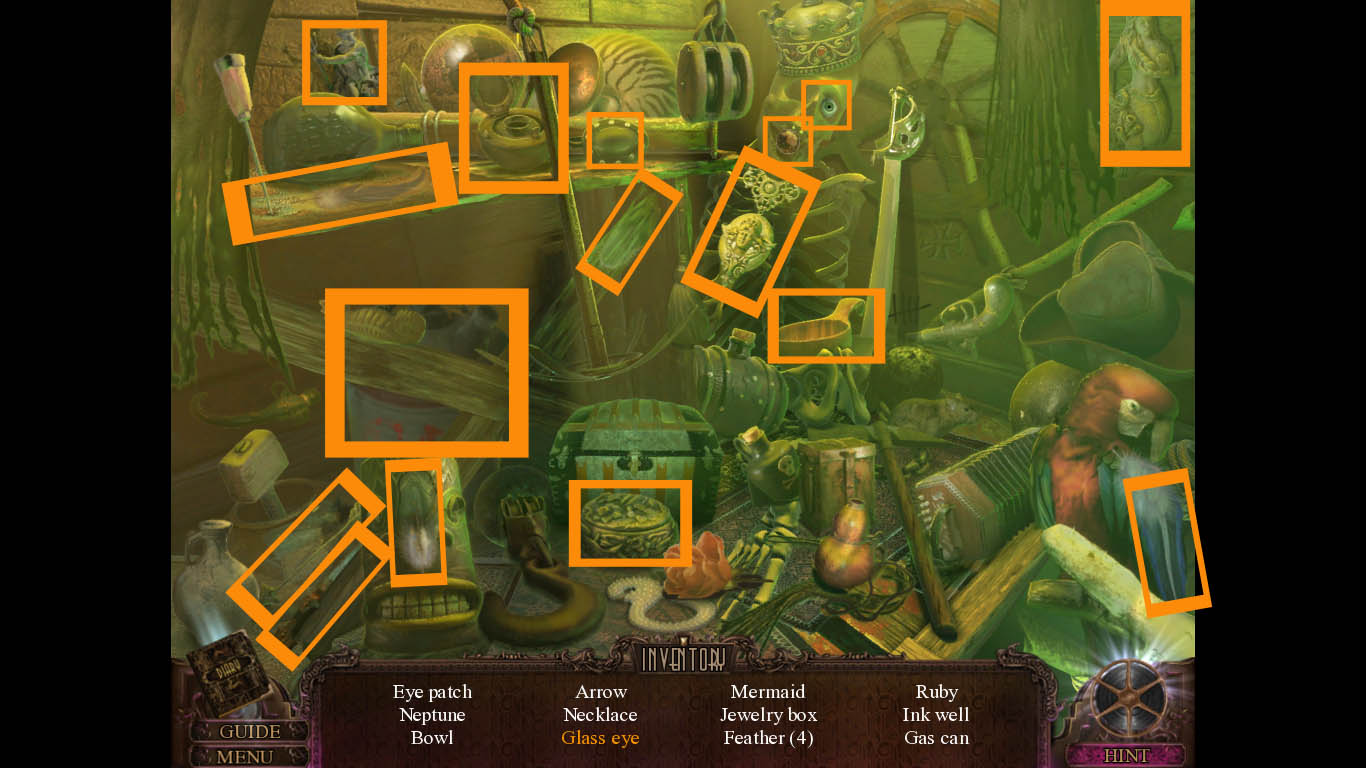
Start the hidden object scene located on the bench.
Open the jaw of the skull to reveal the ruby.
Pick up the knife and use it to pop out the glass eye.
Screenshot
You receive a gas can.
Go back all the way to the Studio Entrance and inspect the gas tank on the car.
Use the dish towel to take off the cap.
Place the gas can in the gas tank.
Attach the cable to the door of the Museum.
Zoom in on the inside of the car and place the car keys in the ignition.
Twist on the keys to start the car.
Go into the Museum.
Chapter Four: Museum
Draining the Water
Pick up the torn Jolly Roger.
Up above the table on the wall to the left is an estate photo.
On the wall above the shelf where the hidden object scene is located is a father's secret card.
Investigate the old camera and click on the switch to get the third light achievement.
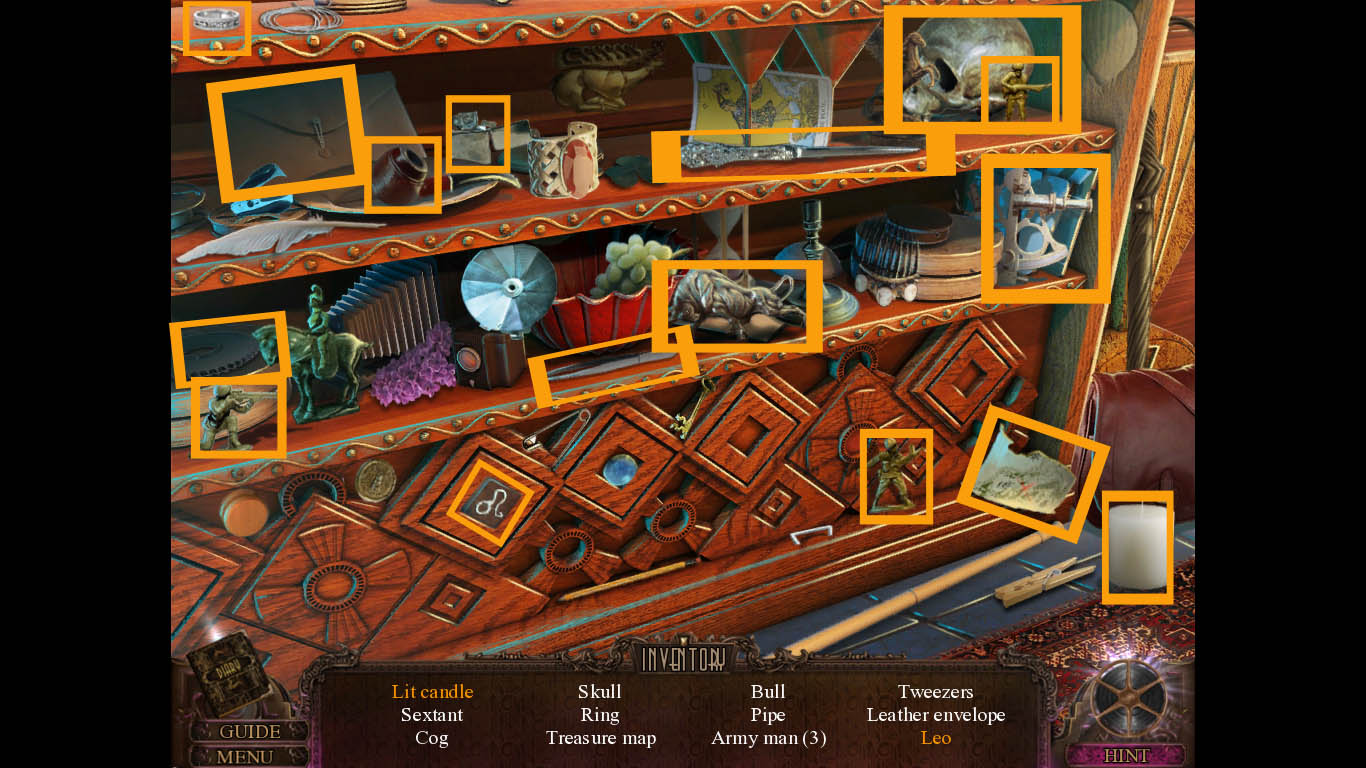
Start the hidden object scene located in the front left corner.
Pick up the lighter and use it to light the candle.
Take the knife and use it to pop the leo symbol out of the woodwork.
Screenshot
You receive a pirate map.
Go back once then move forward toward the Ticket Hall. Go left into the Pirate Set and move forward until you're at the Pirate Tower Base.
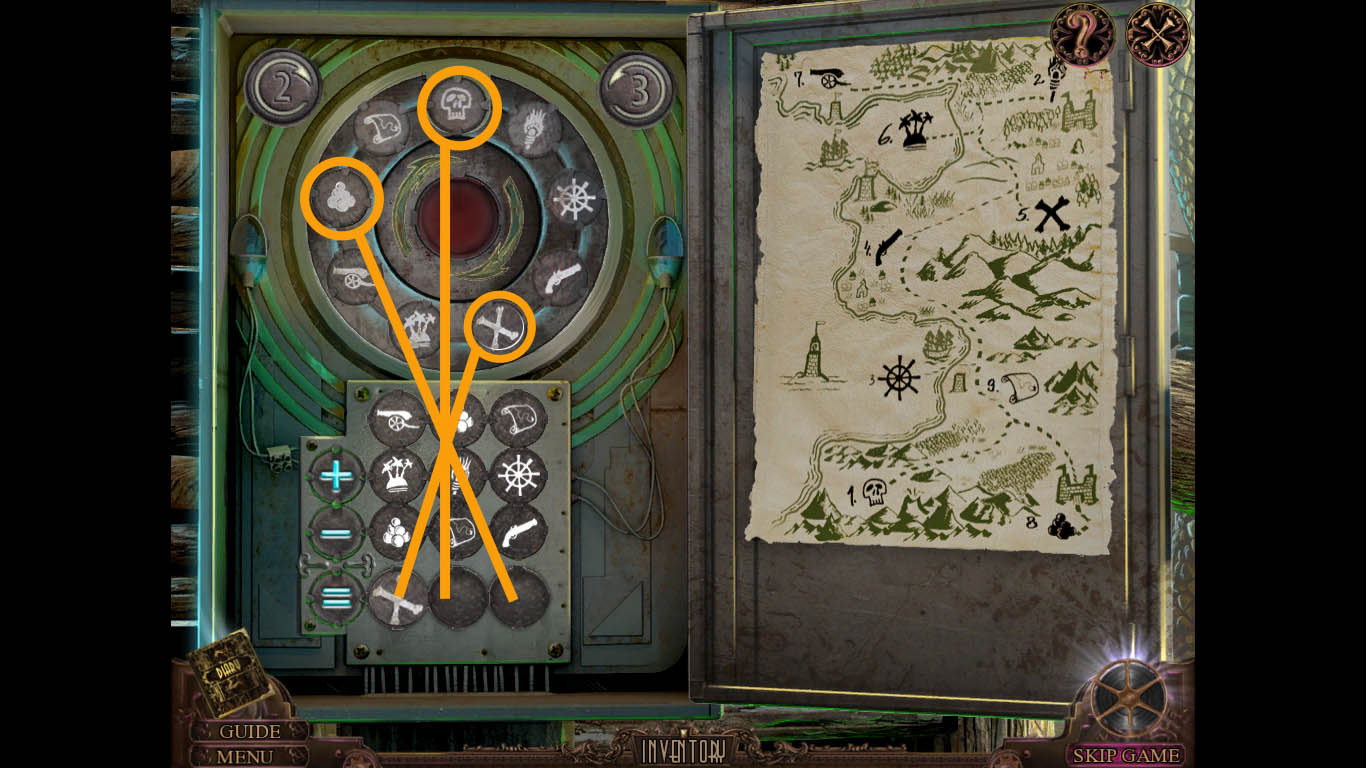
Zoom in on the box and place the pirate map on the right door to complete the map and start a puzzle.
Use the 2 and 3 buttons at the top of the left side to rotate left and right. Two rotates two times to the right and three rotates three times to the left.
Cannon + Island - Cannonballs= X (5). Press 3, then 2, then 3, and hit the red button.
Cannonballs + Torch - Scroll= Skull (1). Hit the 2 button twice, then hit the red button.
Scroll + Ship Wheel - Gun= Cannonballs (8). Hit the 2 button once, then press the red button.
Screenshot
The water in the surrounding area dissipates upon completing the puzzle.
Acquiring a Shovel
Go up the tower and place the torn Jolly Roger on the ripped flag to fix it.
Pick up the pink crystal, one of two.
Start the hidden object scene located on the bench.
Click on the vase to break it and reveal the gold.
Open the treasure chest to reveal the perfume.
Screenshot
You receive an ice pick.
Go back twice and zoom in on the bull figrehead on the ship.
Use the ice pick to remove and receive the second pink crystal.
Go back once and inspect the bottom of the ship. Pick up the third bandana.
Go back twice and go left into the museum.
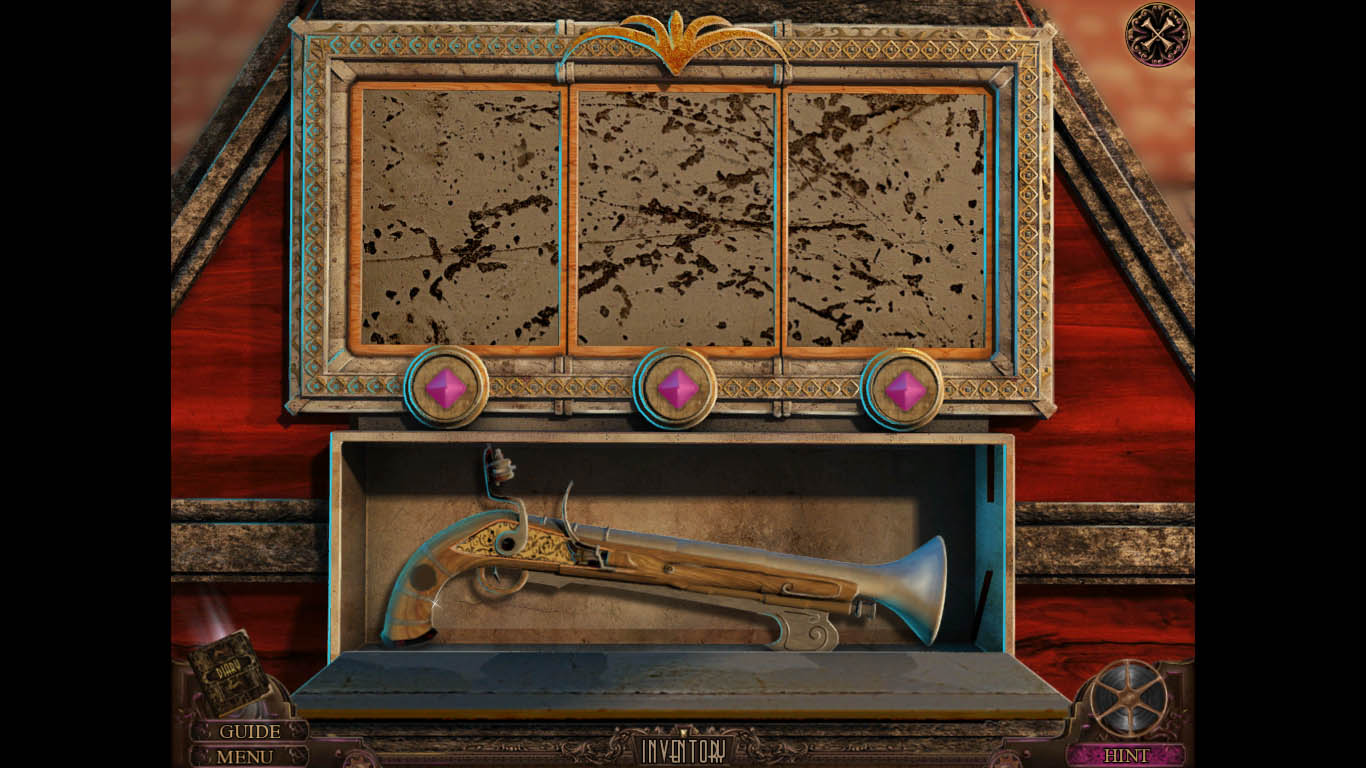
Zoom in on the box on the left pillar and place both pink crystals in the empty spots to start a puzzle.
You must press each crystal individually to get the correct flintlock.
Screenshot
Pick up the flintlock.
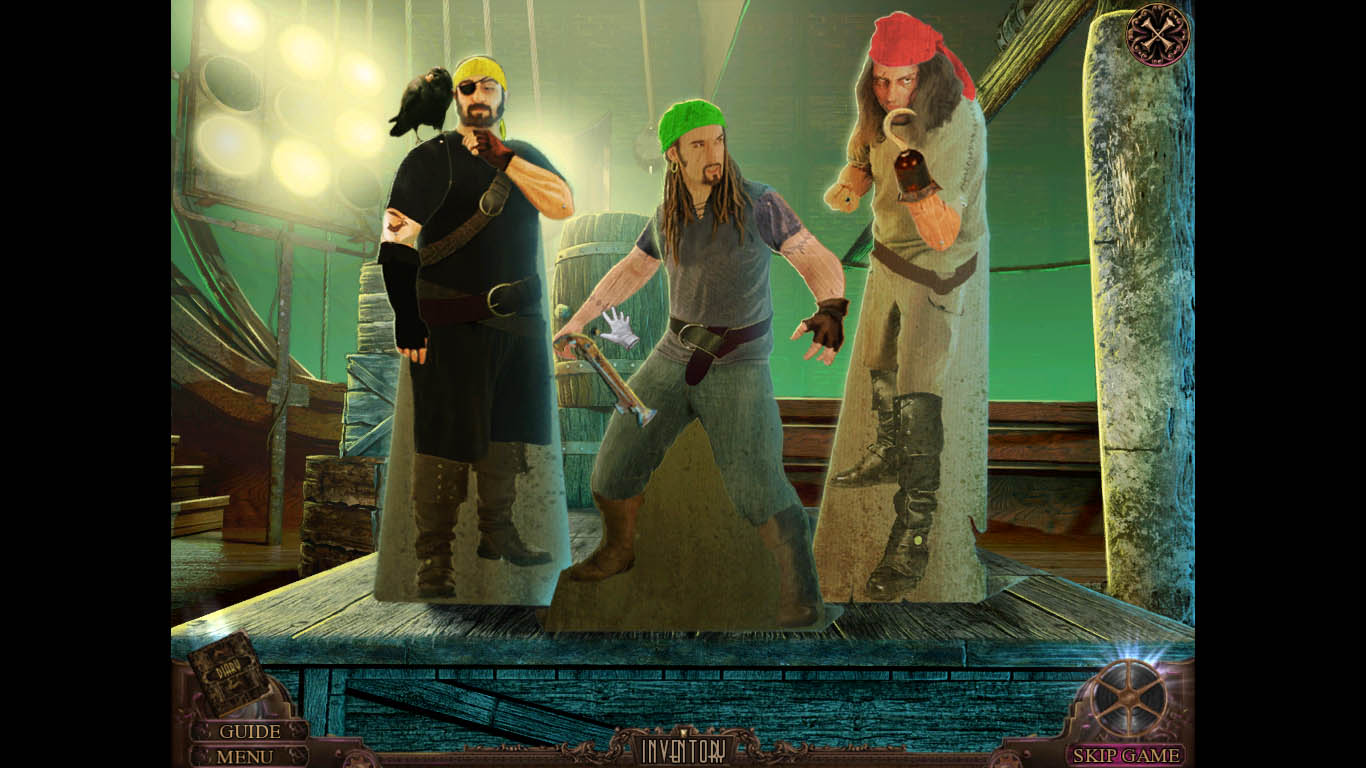
Return to the Pirate's Ship Deck and zoom in on the pirates.
Place the bandanas, flintlock, and hook on the pirates to start a puzzle.
You need to move the limbs of the pirates to match that of the poster you saw in the Foyer.
Screenshot
Examine the opened cabinet and pick up the clock hand and projector lamp. Read the note.
Go back to the Studio Entrance and zoom in on the clock.
Place the clock hand on the clock face and change the time to 9.
Go into the WW1 set.
Inspect the wheels of the tank and pick up the zodiac, the first of five.
Go into the WW1 Trench.
On the wall to the far right is an estate photo.
Pick up the shovel.
Getting into the Alley
Examine the crates to the left.
Pick up the leather gloves.
Go forward to the WW1 Trench End.
Pick up the binoculars.
On the wall to the left of the lantern is an estate photo.
Investigate the bag hanging from the post on the far right side.
Pick up the note and second zodiac.
Start the hidden object scene located on the top shelf.
Put the clip in the gun to load it.
Press on the patch to tear it and reveal the dollar.
Screenshot
You receive a trunk lever.
Go back twice and then move forward toward the WW1 Exit.
Examine the back door and use the cannonball on the glass pane.
Pick up the axe.
Go back twice and zoom in on the interior of the car. Place the trunk lever on the broken lever to fix it.
Click on the lever, then inspect the car hood. Click on the hood to open it.
Use the leather gloves to pick up the battery
Return to the WW1 set. Move forward to the WW1 Trench End.
Zoom in on the desk and place the battery on the machine to start it up.
Click on the tapper to transmit the morse code.
Move back twice, then go forward toward the WW1 Exit.
Go through the door.
Chapter Five: The Egyptian Room
Opening the Egyptian Set
Inspect the left corner with the newspaper and pick up the toy tank.
Examine the boarded up door and use the axe to chop the boards down and open the way.
Go back three times and go left into the museum.
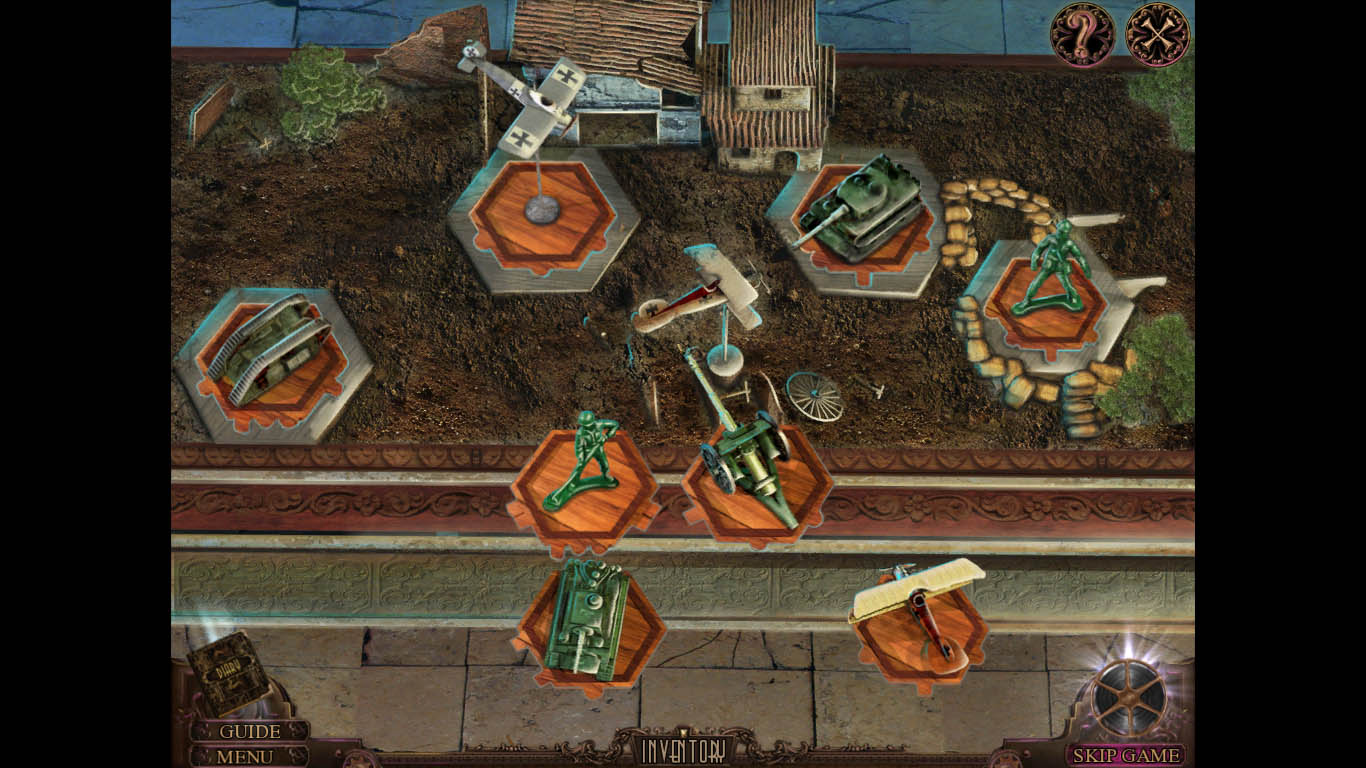
Zoom in on the table and place the toy soldier and toy tank on the table to start a puzzle.
You must place the correct toy piece in the slot that has the terrain the piece belongs to.
Screenshot
Pick up the buckle.
Go to the WW1 set, then go down to the WW1 Trench End.
Zoom in on the trunk and place the buckle in the empty slot.
Click on the lid to open it, then click on the pirate flag to move it. Pick up the fuse.
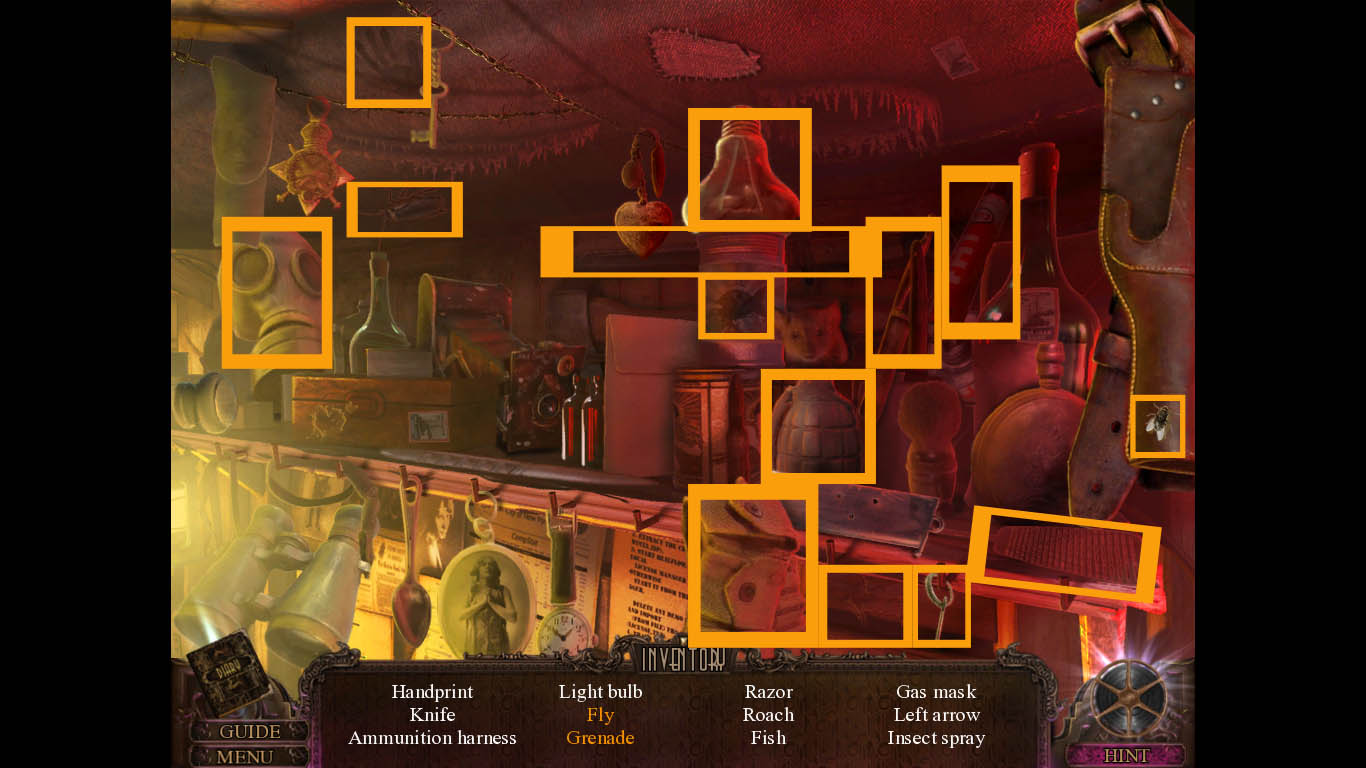
Start the hidden object scene located on the top shelf.
Pick up the pin and place it in the grenade.
Use the flypaper to grab the fly.
Screenshot
You receive a light bulb.
Go back twice, then move forward twice to the Alley.
Click on the lid of the fusebox, then zoom in on it once opened.
Place the fuse on the fuse box to start a puzzle.
Connect the fuses to the four lights without connecting to the blockers.
Screenshot
Upon completion, the Egyptian set is available.
Revealing the Sarcophagus
Go through the Backstage Down door to go to the set.
Pick up the third zodiac and the first of three of a sarcophagus part.
Inspect the clipboard and press on the paper. Click again, then pick up the lanterna magica slide.
Go to the left to Backstage Up.
On the crate to the right is an estate photo.
Examine the light and place the light bulb inside.
Inspect the top balcony and pick up the sarcophagus part.
Flip all the switches on the control board.
Go back once, then move forward to the Bazaar.
Zoom in on the anubis and read the paper saying they used a green light filter.
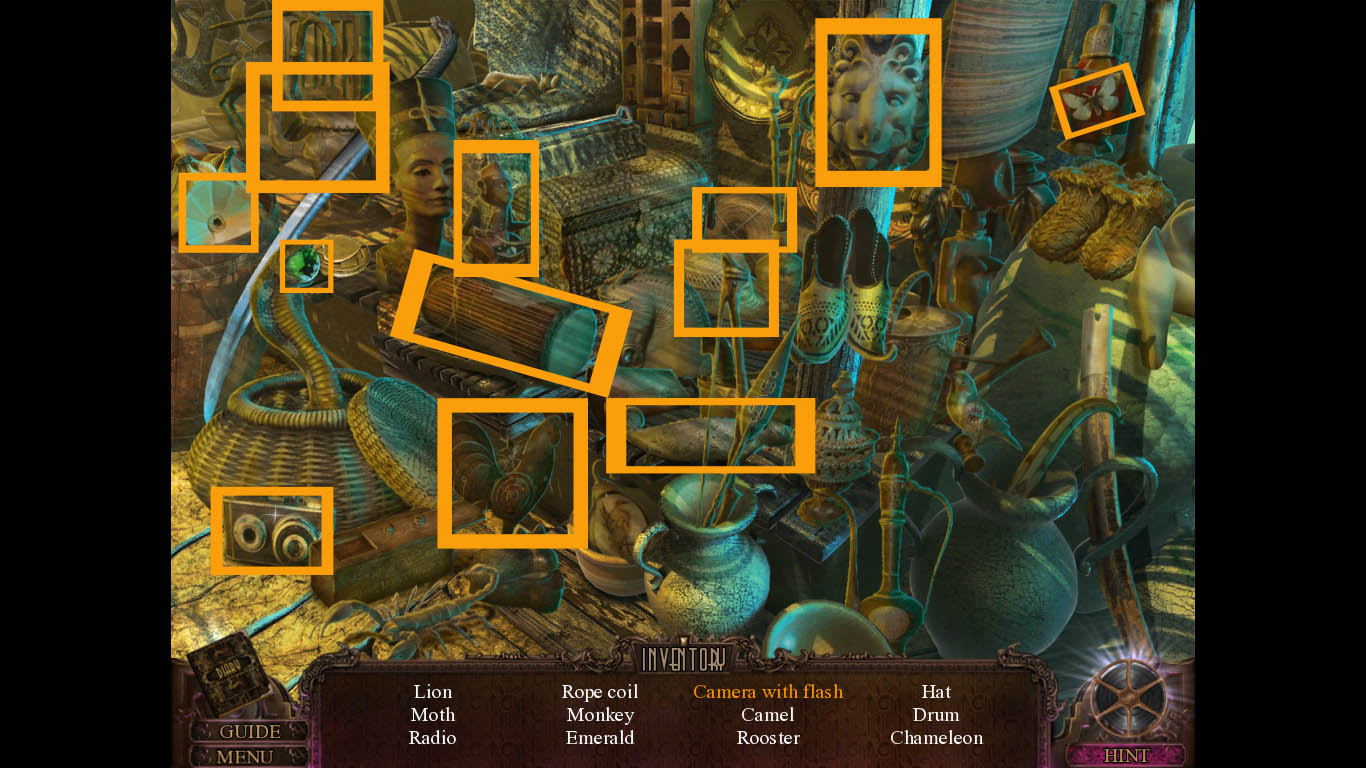
Start the hidden object scene located on the right platform.
Click open the basket to reveal the emerald.
Add the flash to the camera.
Screenshot
You receive an emerald, the first of four.
Move forward to the Tent Exterior.
Pick up the zodiac.
Use the shovel on the dirt to reveal a sarcophagus.
Getting the Lens
Go left into the Tent Interior.
On the wall to the left of the locker is an estate photo.
Inspect the cardboard box and use the air compressor to blow away the dust and reveal bones. Pick them up.
Examine the shelving at the back left and pick up the zodiac information and the saltpeter.
Go back seven times, then go into the Museum.
Inspect the old camera and place the lanterna magica slide on it, then click on the switch.
Start the hidden object scene that's on the shelving to the left.
Grab the string and place it on the yo-yo.
Pick up the stapler and use it on the staple.
Screenshot
You receive an umbrella.
Go back once, then right into the WW1 Set, then move forward until you're in the Alley.
Use the umbrella on the ladder to pull it down.
Go up to the Film Archive.
Pick up the empty film roll.
On the top shelving of the second case of films to the right is an estate photo.
On the top shelving of the third case of films to the right is a father's secret card.
Examine the table. Click on the light to turn it on. Click on the glasses case to open it, then pick up the soft cloth.
Go forward to the Props Archive.
Zoom in on the space under the spider web and pick up the third sarcophagus part.
Investigate the table at the back of the room and place the binoculars on the table top.
Click on the lid of the toolbox to open it and pick up the screwdriver. Use it on the binoculars.
Click on two more screwdrivers to dismantle the binoculars, then pick up the lens.
The Maid's Lair
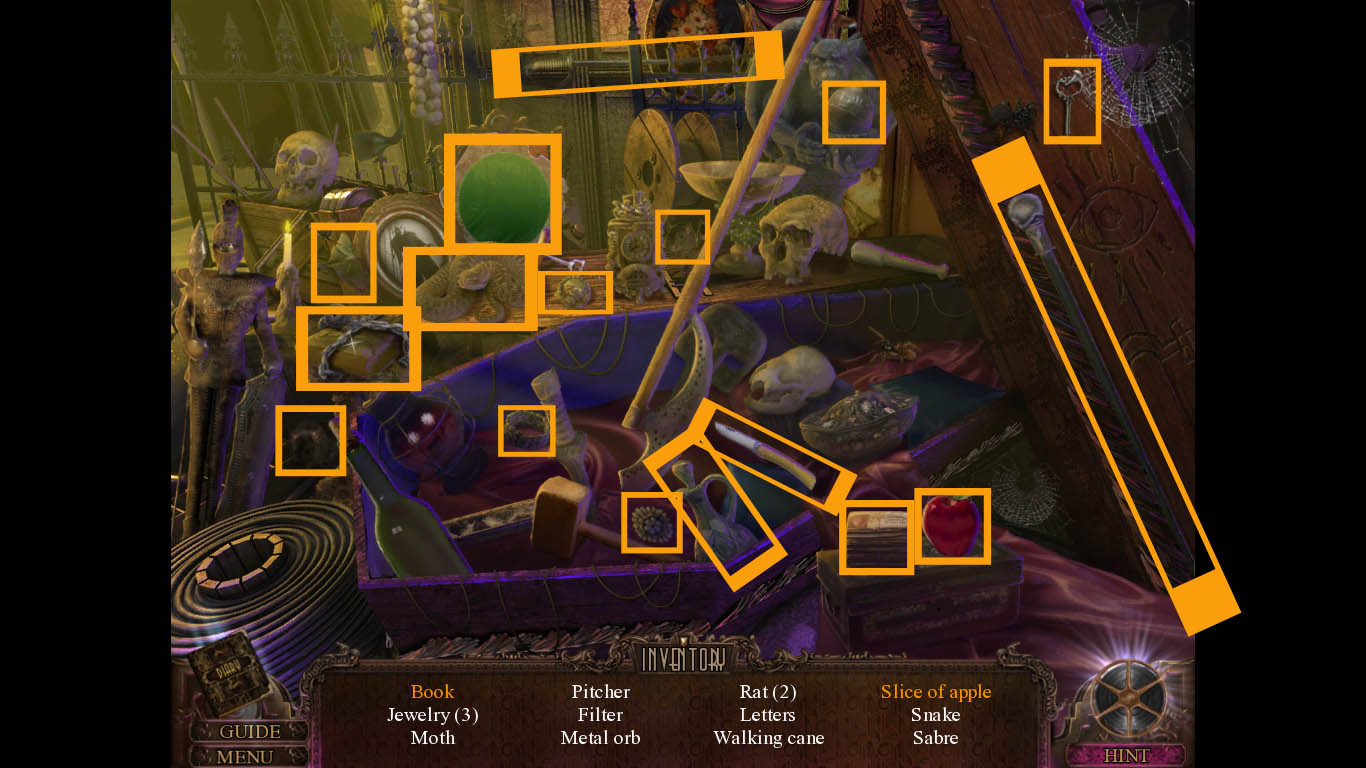
Start the hidden object scene located on the coffin.
Use the key to unchain the book.
Take the knife and use it on the apple to get a slice.
Screenshot
You receive a light filter.
Go back twice, then go left to the Backstage Down, then go left to Backstage Up.
Zoom in on the light and place the light filter on it.
Go down, then head forward to the Bazaar.
Pick up the emerald.
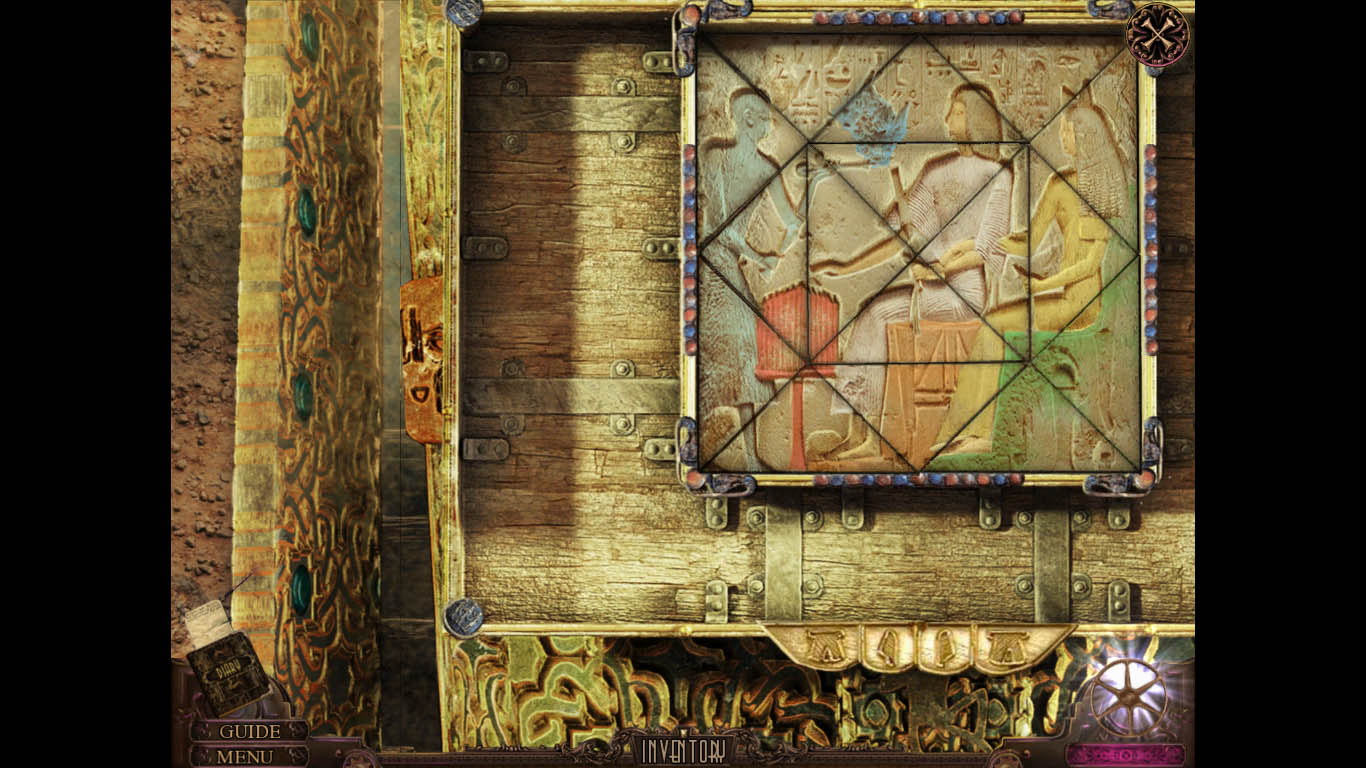
Move forward and examine the sarcophagus. Place the sarcophagus pieces down to start a puzzle.
Place the pieces in the right spot to form an image.
Screenshot
Go right into the sarcophagus to the Maid's Lair.
Examine the desk and read the book.
Chapter Six: The Maid
Obtaining the Projector Lens
Examine the desk and click on the box to open it.
Pick up the tape part.
Click on the natal chart to take it and then pick up the emerald.
Check out the chemist set and pick up the eye patch.
Go back once, then move forward into the Tent Interior.
Click on the crate with the skulls on it and place the skull, eye patch, and bones on the top to start a puzzle.
You must replicate the three jolly rogers seen through the game.
Screenshot
Pick up the optical device.
Go back once and put the optical device on the pedestal.
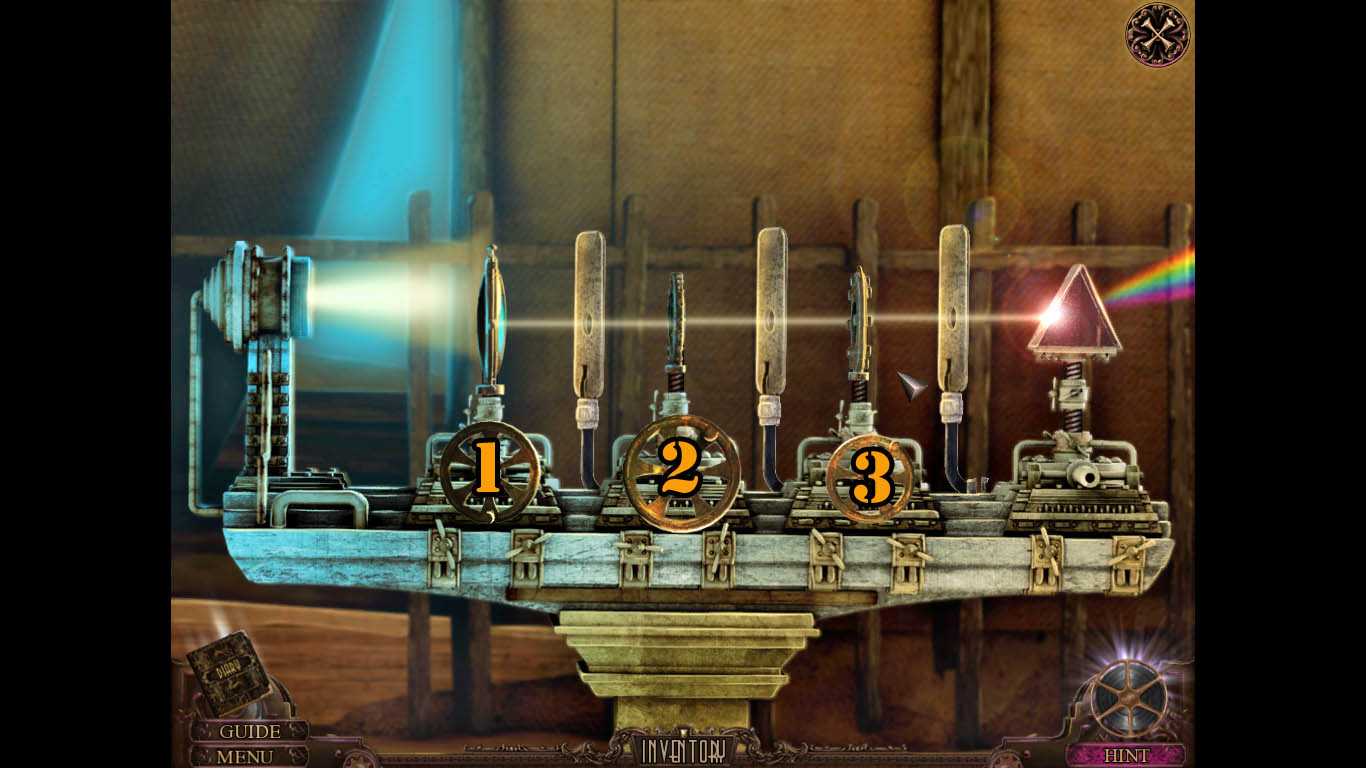
Zoom in on the optical device and use the soft cloth to clean the prism. Place the lens on the optical device to start a puzzle.
You must adjust each lens to make the light pass through the prism.
Press on valve 1 three times.
Press on valve 2 five times.
Press on valve 3 four times.
Screenshot
Inspect the statue and pick up the fourth emerald.
Read the note and pick up the projector lens.
Getting Father's Photo
Go right into the Maid's Lair and click on the curtain hiding the altar. Zoom in on the altar.
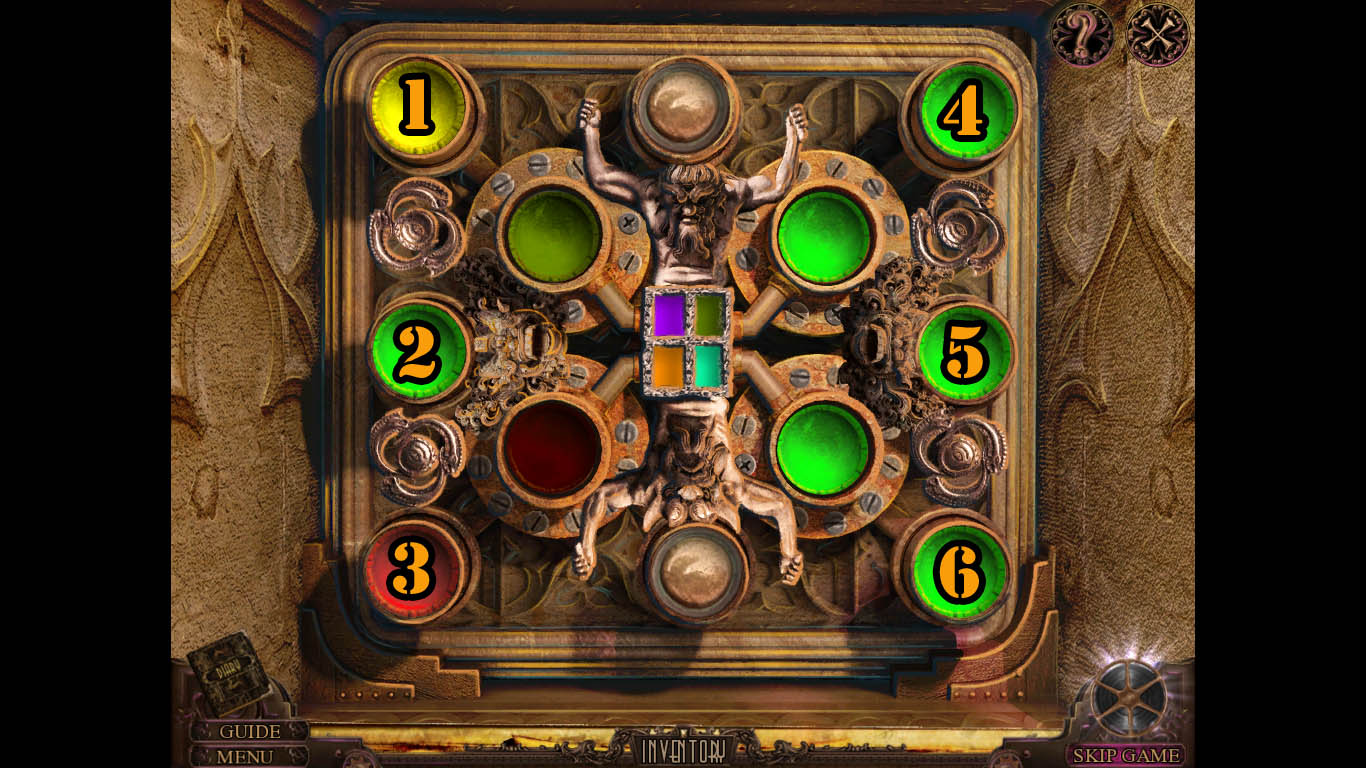
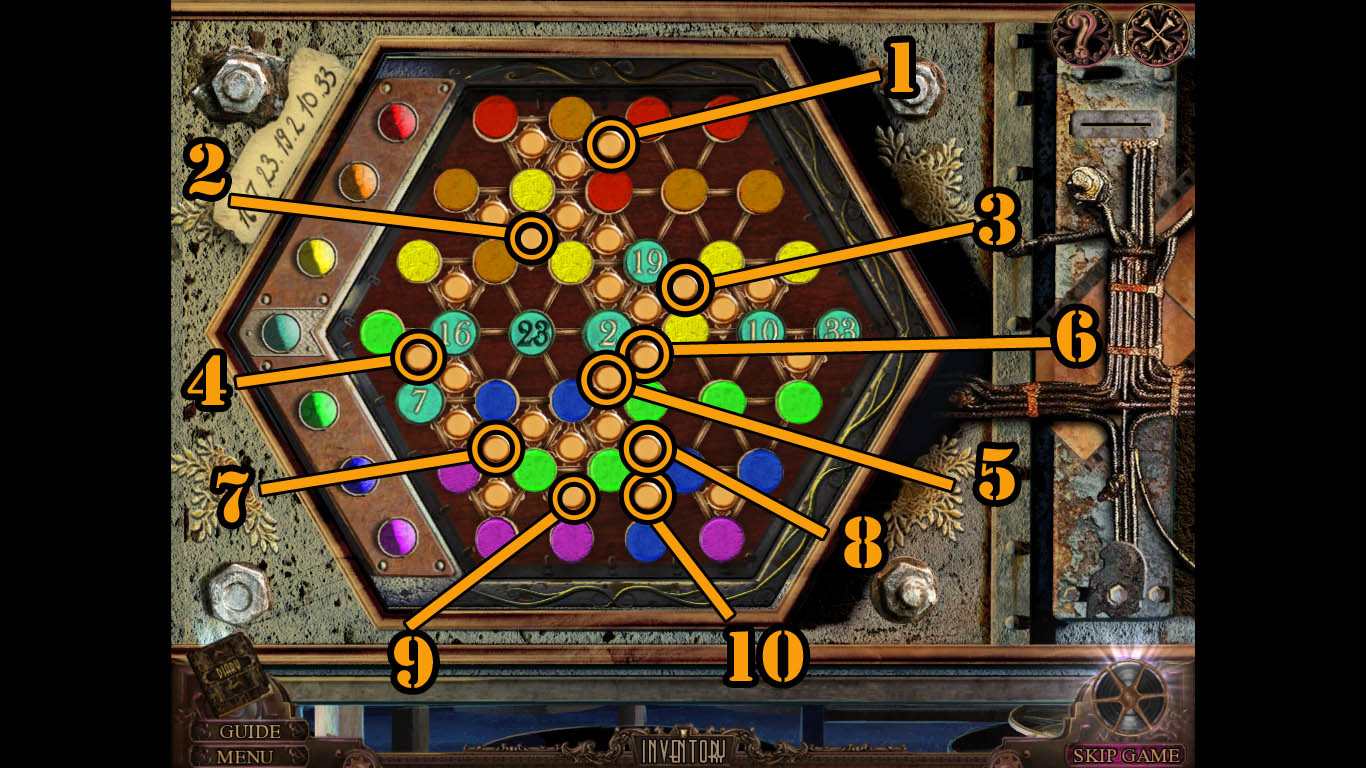
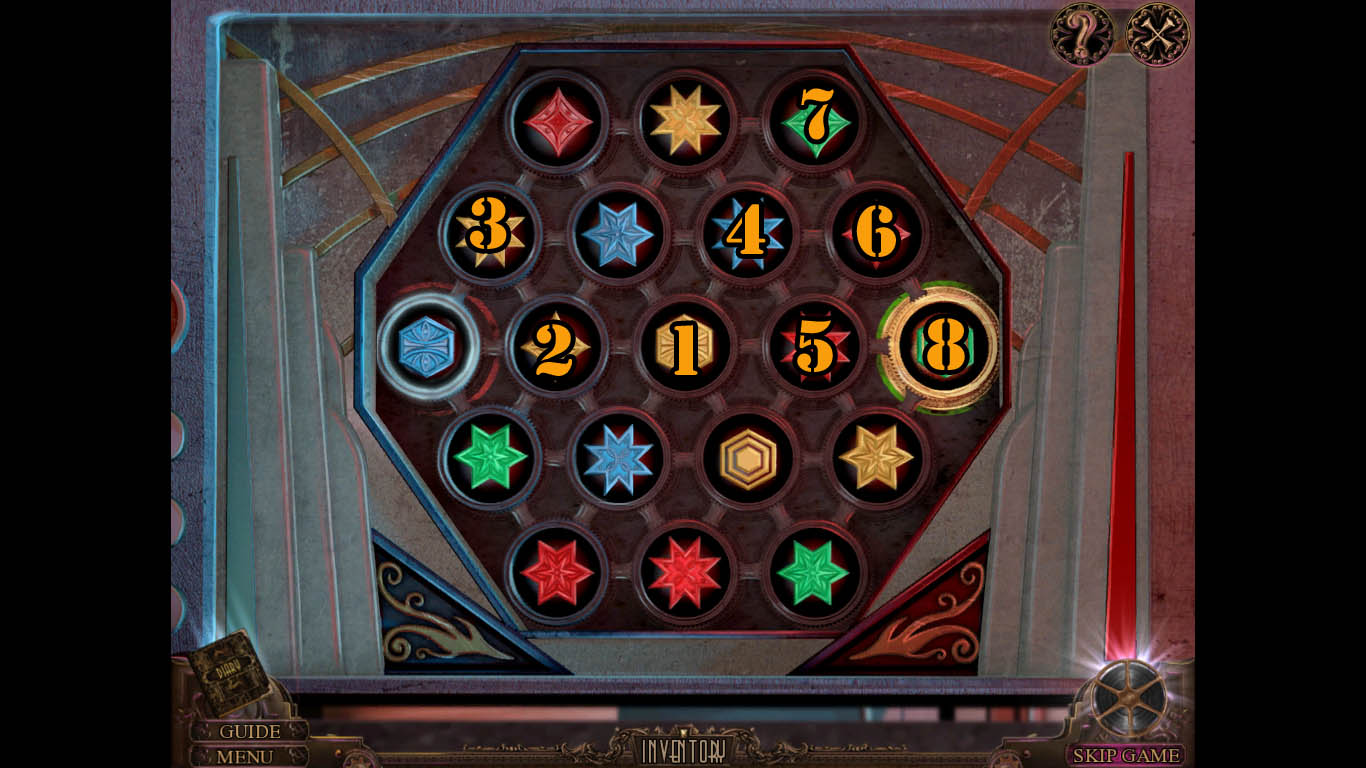
Place the emeralds on the altar to start a puzzle.
Puzzle One:
Press 1 twice.
Press 2 twice.
Press 3 once.
Press 4 once.
Press 5 three times.
Press 6 once.
Screenshot
Puzzle Two:
Press 1 twice.
Press 2 twice.
Press 3 once.
Press 4 three times.
Press 6 once.
Screenshot
Puzzle Three:
Press 2 once.
Press 3 twice.
Press 5 three times.
Press 4 once.
Screenshot
Pick up the projector iris and the zoetrope bottom.
Go back four times, then go up the ladder to the Film Archives. Go forward once more to the Props Archive.
Inspect the zoetrope and place the zoetrope bottom on it.
Click on it twice to reveal a tape part and pick up the tape part.
Take your Father's photo.
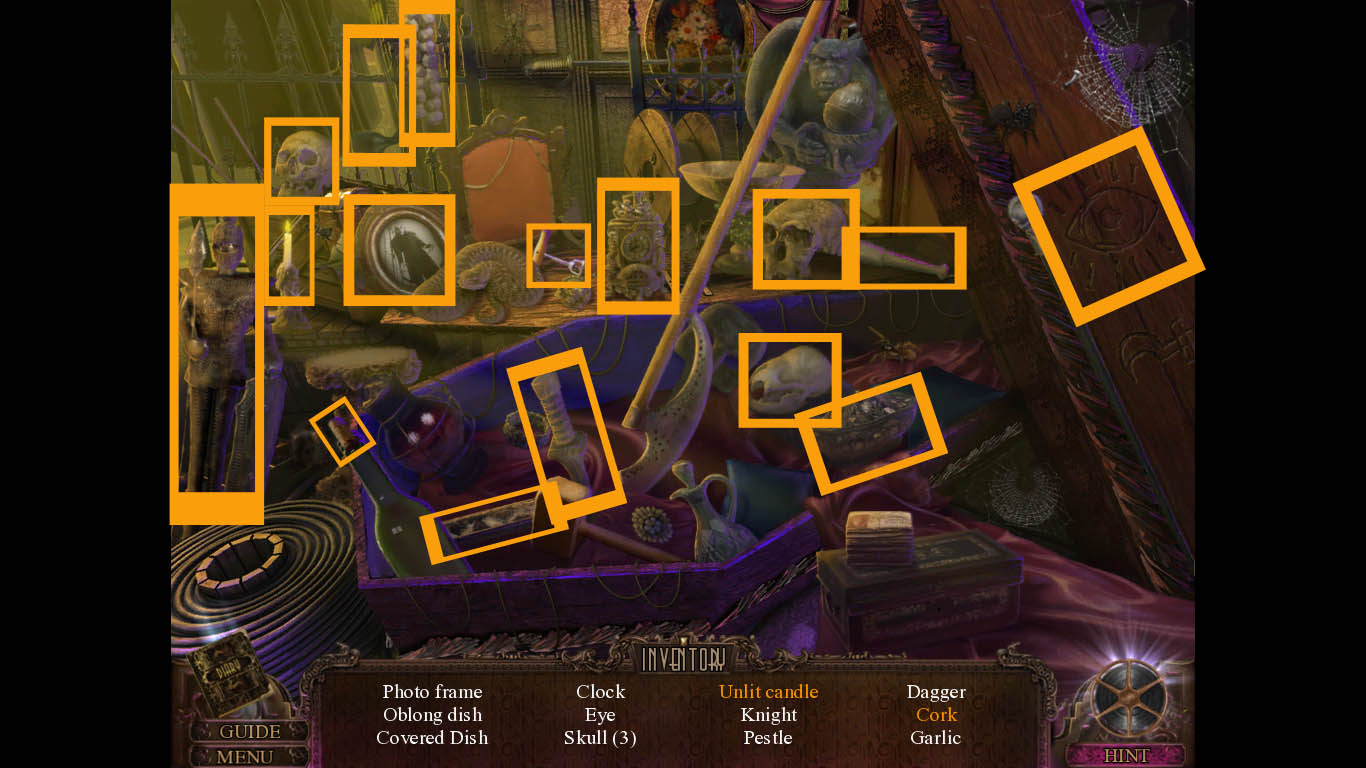
Making Smoke Powder
Start the hidden object scene located on the coffin.
Take the corkscrew and use it to pop the cork from the bottle.
Pick up the candle snuffer and use it to put out the candle.
Screenshot.
You receive a pestle.
Go back once and investigate the desk with the magnifying glass. Place your Father's photo beneath the magnifying glass.
Select the film archive machine and click on the lid to start a puzzle.
Press button 1 once.
Press button 2 twice.
Press button 3 once.
Press button 4 once.
Press button 5 twice.
Press button 6 once.
Press button 7 once.
Press button 8 twice.
Press button 9 once.
Press button 10 once.
Screenshot
Pick up the sugar and tape part.
Go back once and go left into the Backstage Down area. Move forward until you are in the Maid's Lair.
Inspect the chemistry set area and place the sugar and saltpeter in the bowls.
Use the pestle to grind the sugar.
Pick up the smoke powder.
Obtaining the Padlock Dial
Go back twice to the bazaar.
Start the hidden object scene located on the right platform.
Pick up the bell hammer and add it to the bell.
Take the sword and put it in the sheath.
Screenshot
You receive a heart.
Go back three times and zoom in on the tank.
Click on the front compartment and place the smoke powder in it to start a puzzle.
Shoot down the planes. You must shoot the plane twice to complete the puzzle.
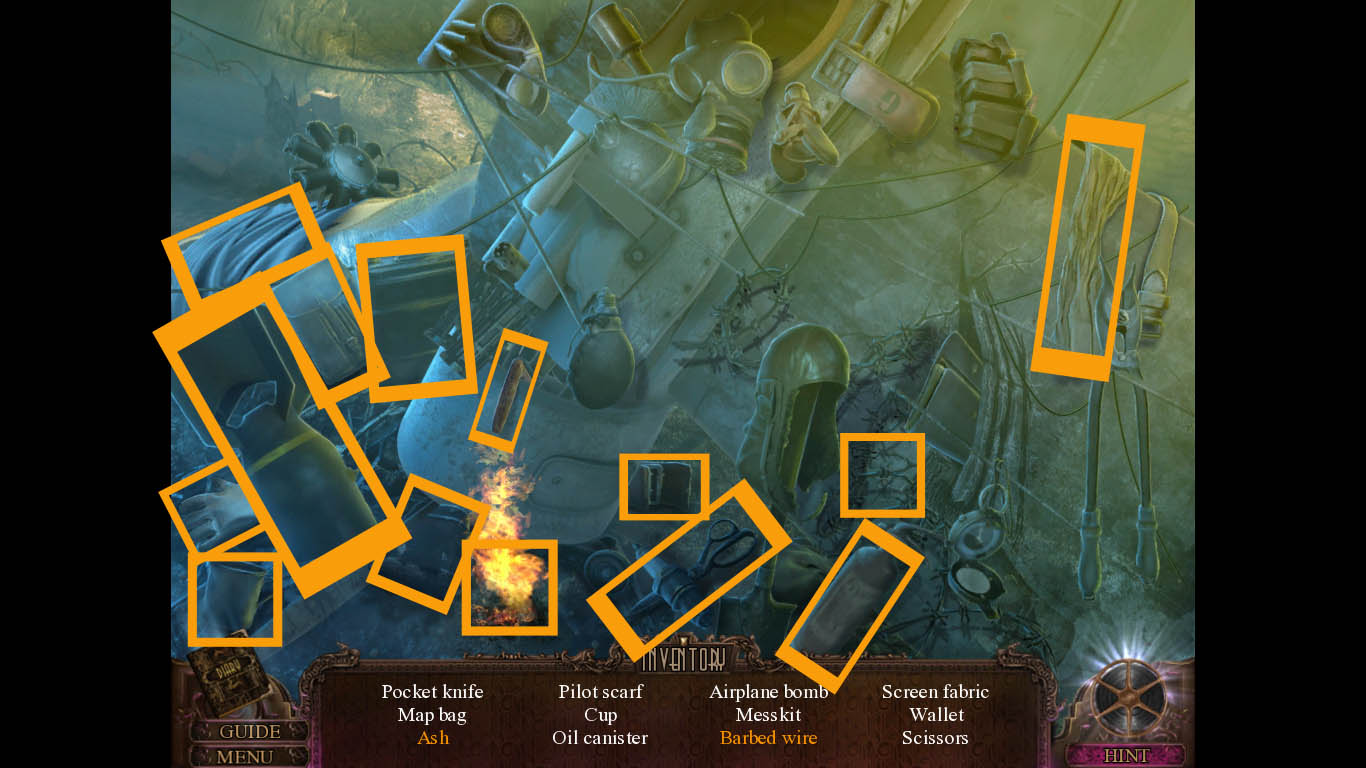
Go back once and start the hidden object scene by clicking on the plane.
Pick up the fire extinguisher and use it on the fire to make ash.
Use the glove to get the barbed wire.
Screenshot
You receive screen fabric.
Go back five times, then go to the top left into Father's Study.
Examine the dresser in the back and place the heart in the heart shaped spot.
Read the note and pick up the moon shape.
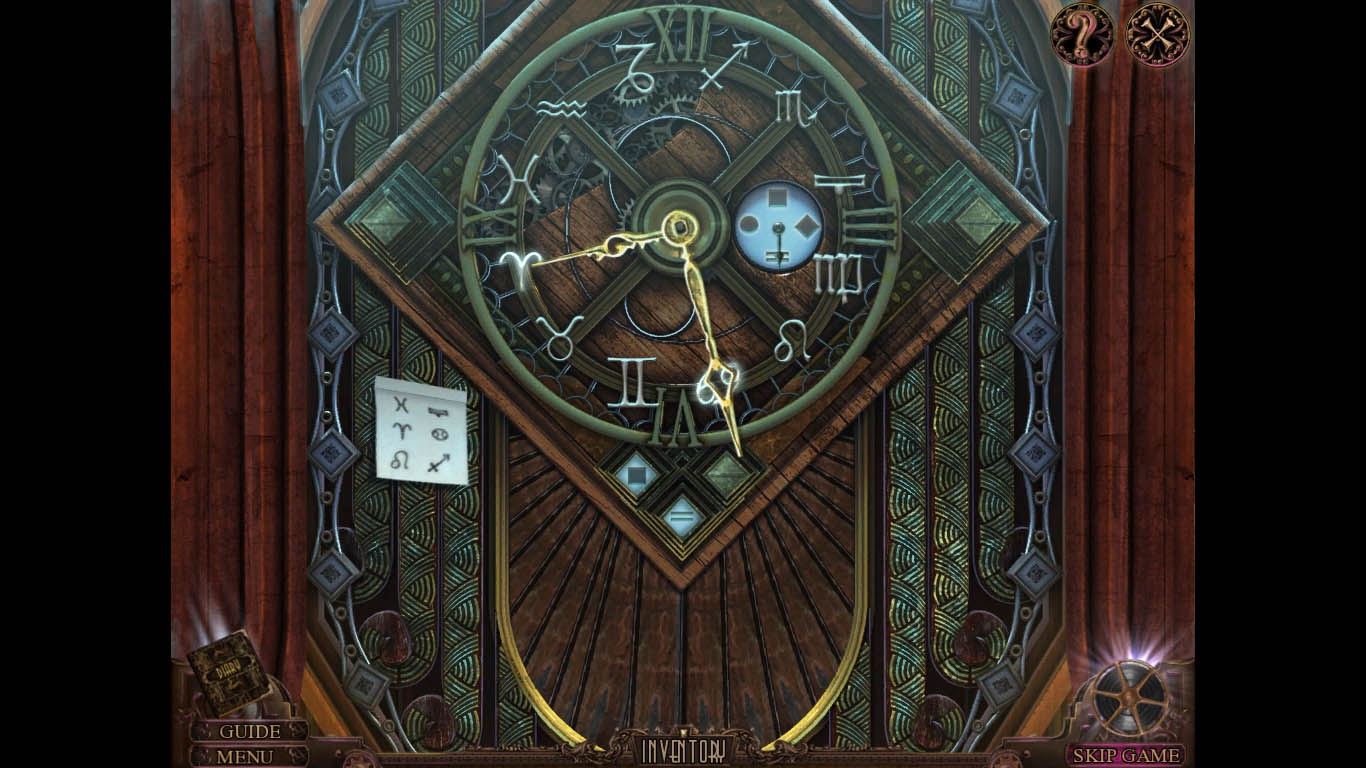
Go back once, then zoom in on the door in the middle at the top of the staircase. Place the moon shape on the door to start a puzzle.
Screenshot
Screenshot
Screenshot
Pick up the padlock dial.
Into the Editing Room
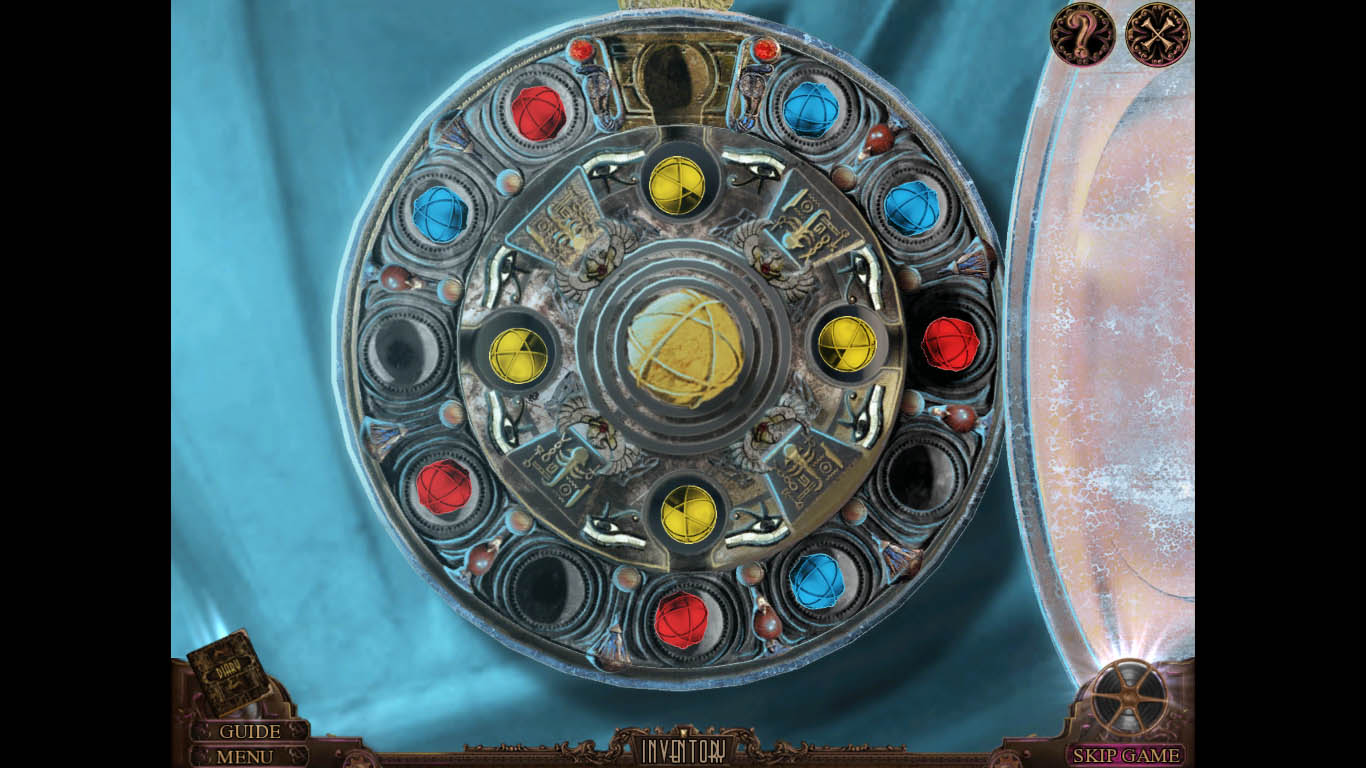
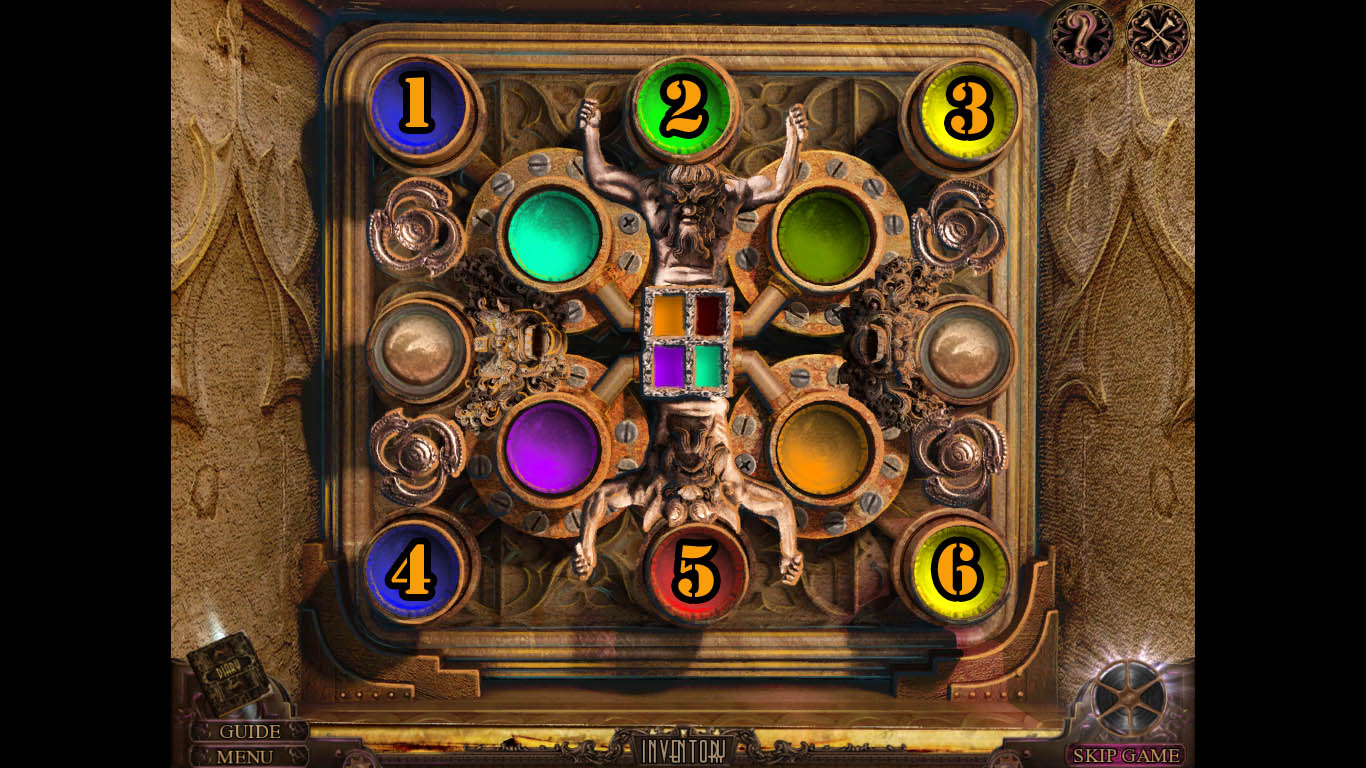
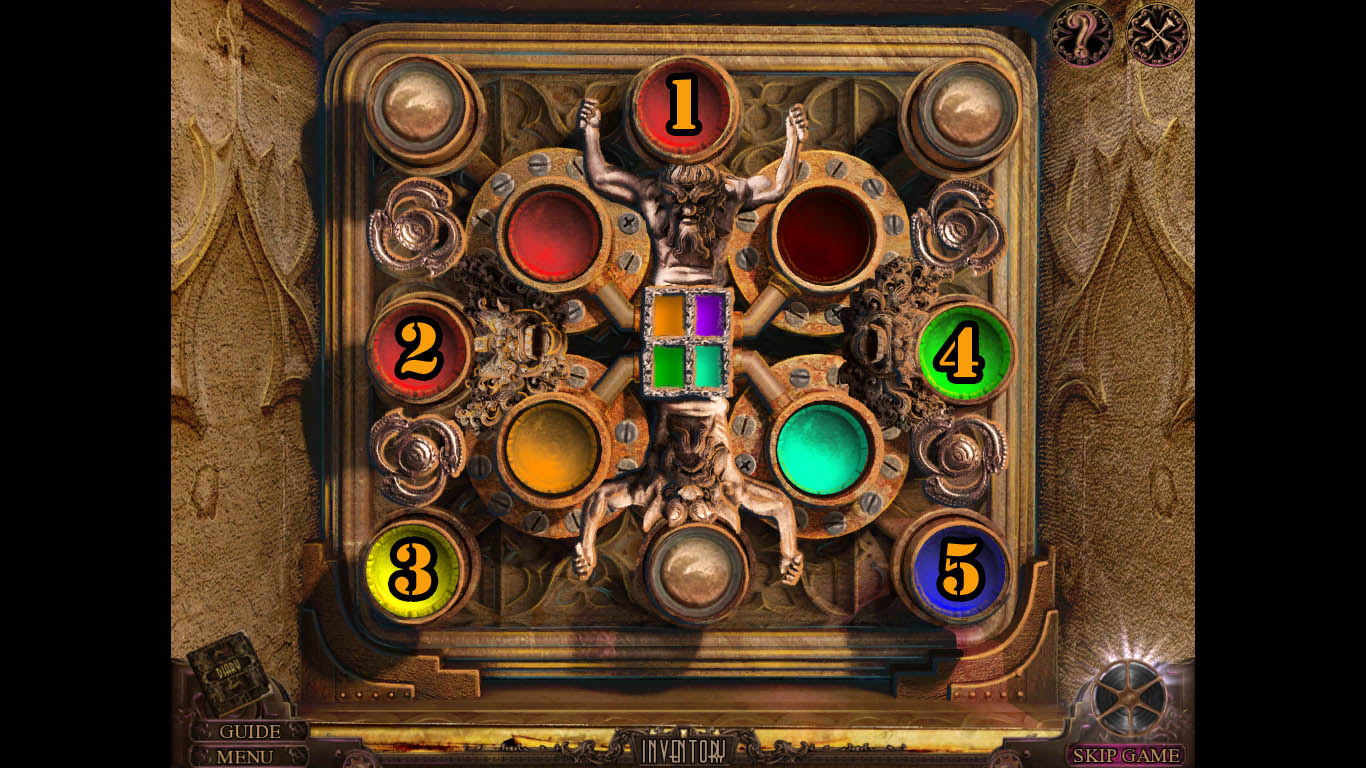
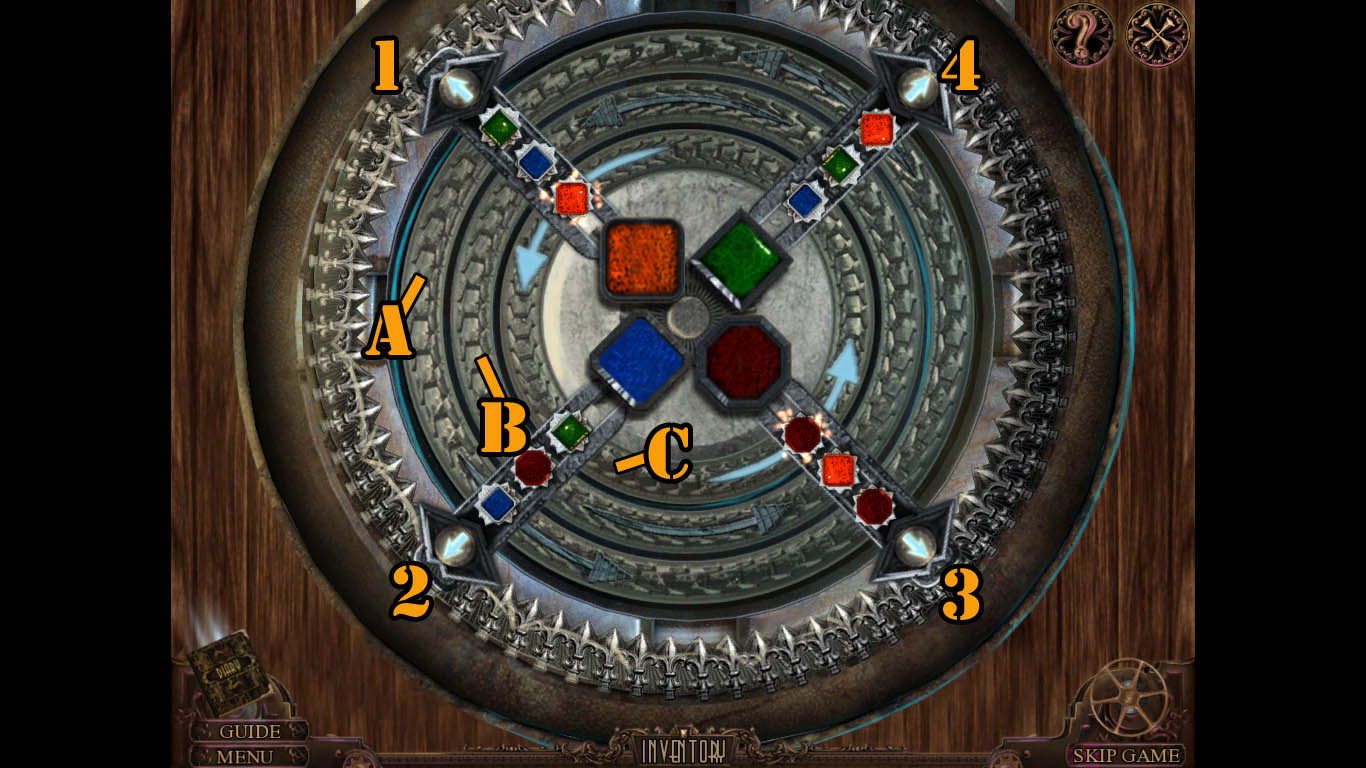
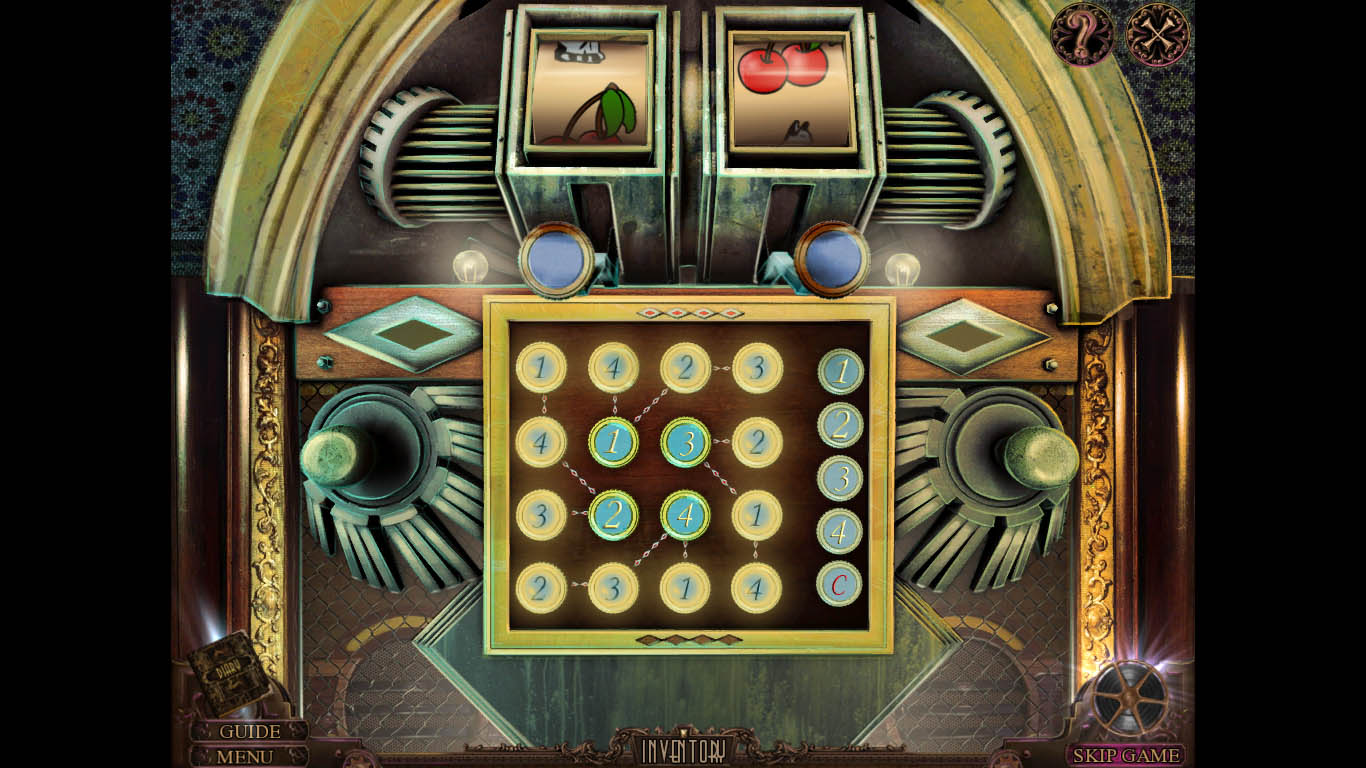
Zoom in on the door at the top right and place the padlock dial on it. Click the padlock to start a puzzle.
Move the circles to make each line have the colors it needs to create the color in the middle of the puzzle.
Hit spot 1 once.
Hit spot 4 once.
Hit circle C twice.
Hit spot 1 once.
Hit spot 4 once.
Hit spot 3 once.
Hit circle B once.
Hit spot 2 once.
Hit spot 4 once.
Hit circle B once.
Hit spot 3 once.
Hit spot 2 once.
Hit spot 4 once.
Hit spot 3 once.
Hit spot 4 once.
Hit circle A once.
Hit spot 1 once.
Hit circle A twice.
Hit spot 1 once.
Hit spot 2 once.
Hit spot 4 once.
Screenshot
Go through the door into the Editing Room.
Chapter Seven: The Antidote
Getting Father's Second Ring
Pick up the coin.
Click on the lamp above the desk on the left.
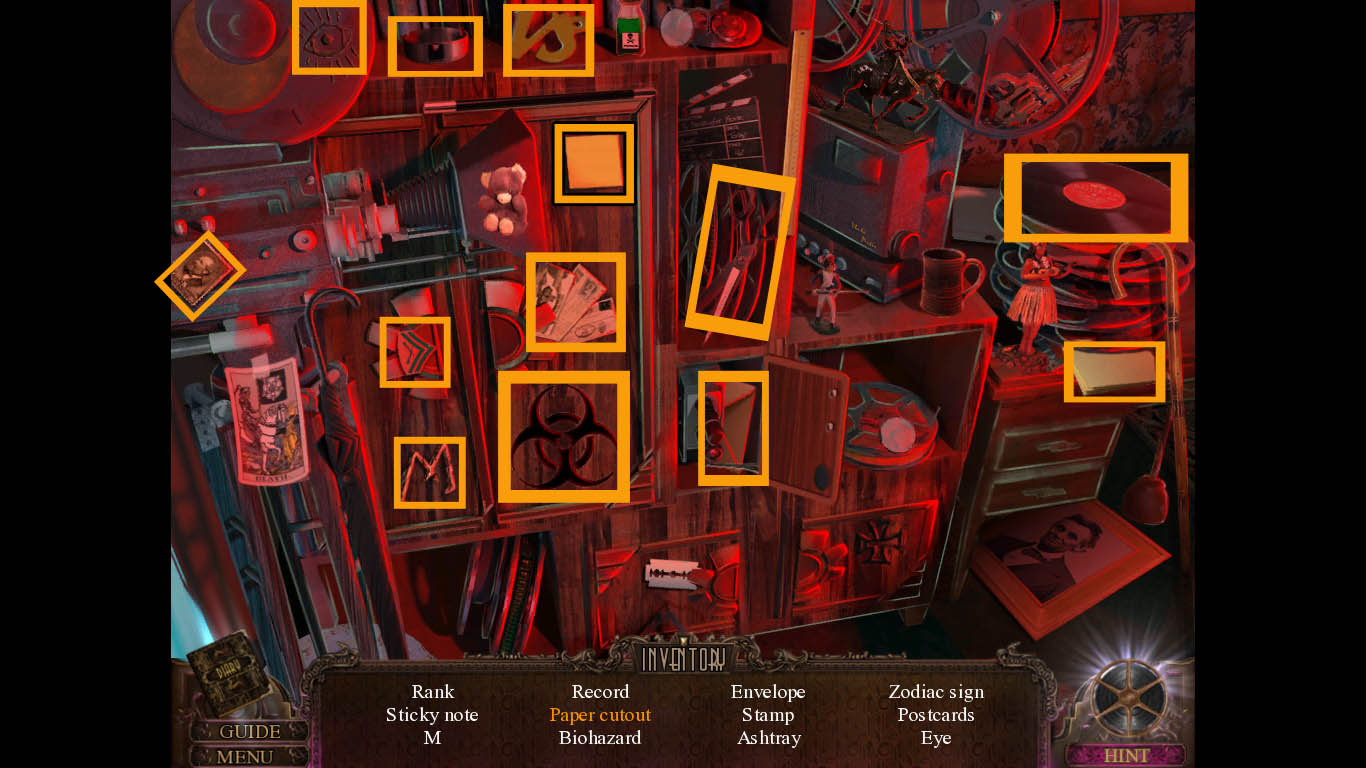
Start the hidden object scene located on the shelving to the left.
Pick up the scissors and use them on the paper to get the paper cut out.
Open the cabinet to reveal the envelope.
Screenshot
You receive the fifth zodiac.
Go back once, then go right into the East Hall. Go left into the Library.
Zoom in on the globe and place all the zodiacs on the surface to start a puzzle. You want to rotate each circle so that matching symbols are next to each other.
Screenshot
Pick up the color shape and projector sprocket.
Go back twice, then go into the Editing Room.
Zoom in on the machine to the left of the dummy in the chair.
Place the color shape and the ring with no symbol inside the machine to start a puzzle.
You must match three pairs to make the engraving shape shown to the left.
Screenshot
You receive father's ring 2.
Obtaining an Electric Cable
Go back once, then go left into the West Hall. Go to the Elevator.
Zoom in on the panel and place father's ring 2 in the bottom circle.
Examine the switch on the left wall and click it to turn on the lights.
Start the hidden object scene located on the stool under the light switch.
Pick up the shot and place it in the shot gun.
Grab the fishing pole and give it to the gnome.
Screenshot
You receive a stool.
Move forward to the Lower Projector.
Pick up the club.
Zoom into the desk and enter in the lock combination.
Square-equal sign(=)-diamond.
Pick up the projector coil.
Go left to the connecting door and zoom into the peephole of the door.
Click on the cover and pick up the revealed coin.
Go back six times and go into Father's Study.
Zoom into the dresser in the back right and place the club in the club shaped slot.
Read the note and pick up the butter knife.
Go back and go right into the Editing Room.
Click on the bottom of the projector and place the tape parts and the empty film roll on the machine.
Use the butter knife to unjam it and start a puzzle.
Screenshot
Pick up the projector tape and the electric cable.
Getting the Spyglass
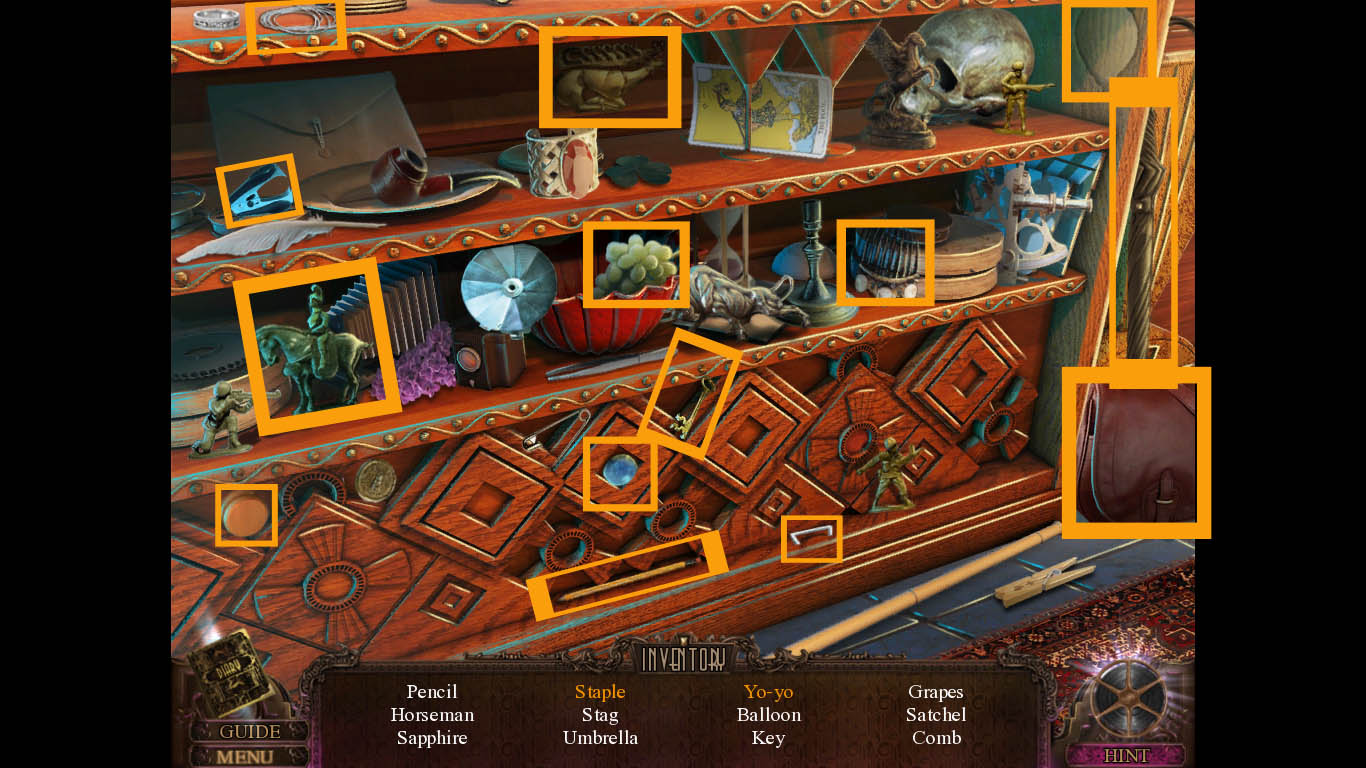
Start the hidden object scene located on the shelf to the left.
Reattach the two glasses halves.
Pick up the razorblade and use it on the bear sticker.
Screenshot
You receive oil.
Go back once and go to the East Hall. Go forward once more, then turn left into the Theatre.
Place the screen fabric on the empty wall to the left.
Inspect the jukebox and place the electric cable in the scoket.
Click on the jukebox once more to start a puzzle.
Screenshot
Go back three times then go through the West Hall. Go to the Elevator and go down. Go forward into the Lower Projector Room.
Put the stool down next to the projector machine.
Zoom in on the machine and put the projector tape and projector sprocket in the machine.
Place the projector coil in the metal tube.
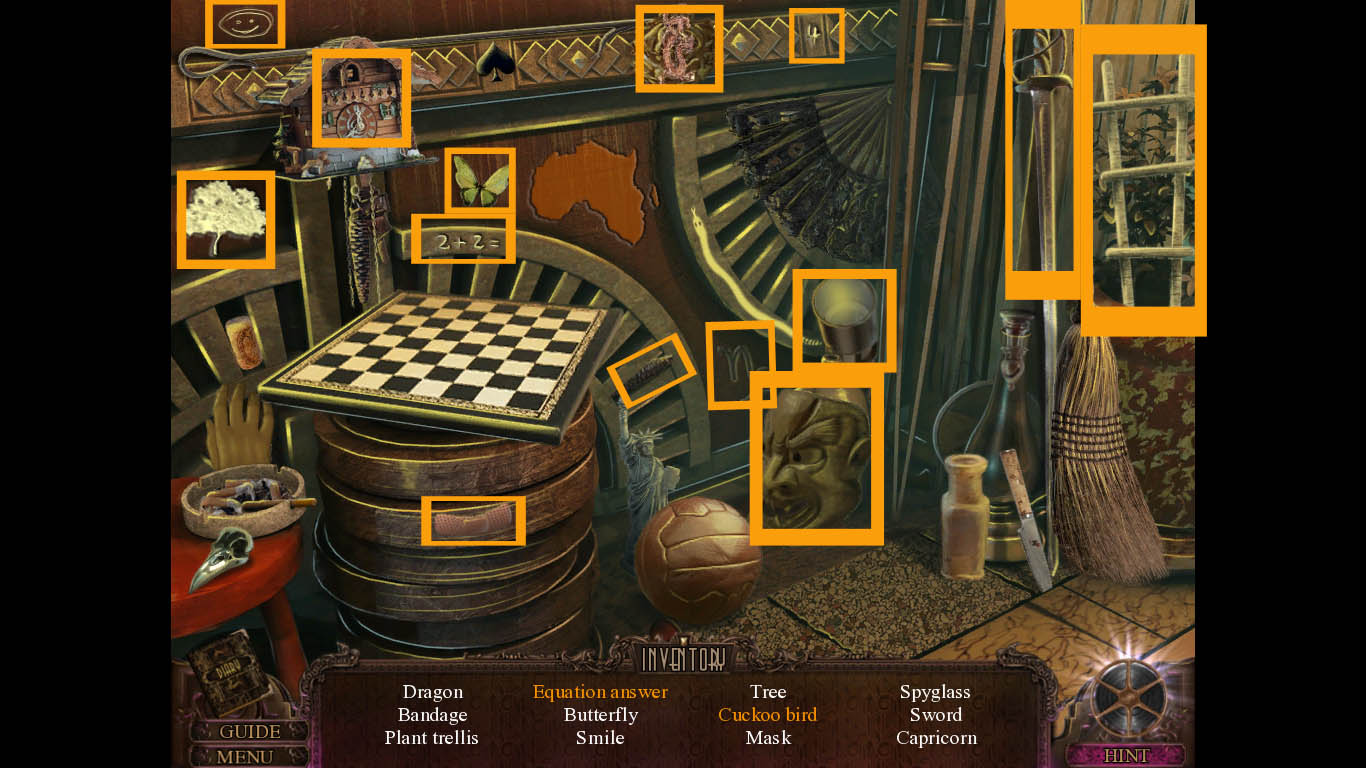
Go back once and start the hidden object scene located on the stool.
Place the four at the end of the equation.
Put the weight on the clock to reveal the cuckoo.
Screenshot
You receive a spyglass.
Saving the Day
Go back once, then go forward into the Elevator. Go up the Father's Room.
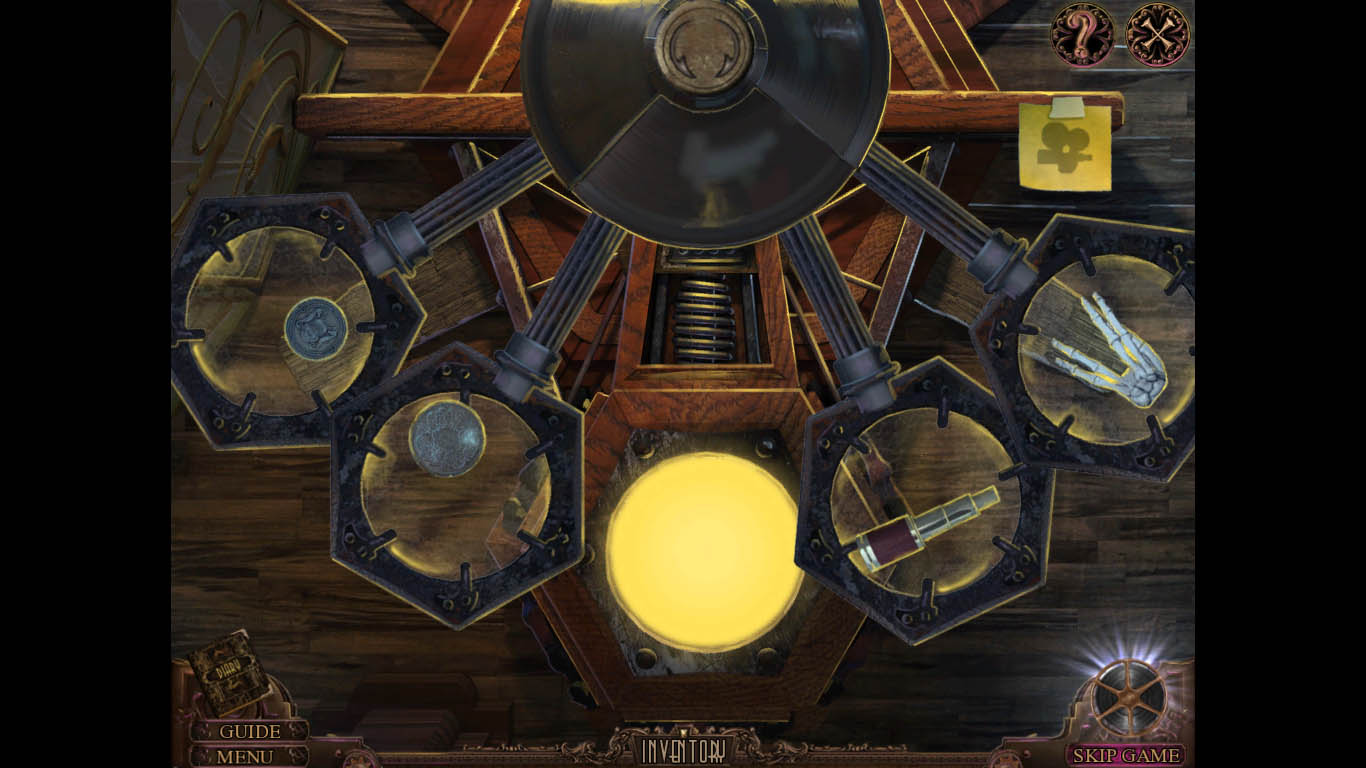
Click on the machine next to the divider.
Place the spyglass, both coins, and skeleton hand on the machine to start a puzzle.
Move the slides to make the image of a projector.
Screenshot
Pick up the goggles and secret key.
Go back once, then move forward into the Elevator and go down.
Move forward twice and zoom in on the lock on the door. Use the secret key in the lock and click to open the door.
Go forward into the Projector Room.
Examine the projector and place the projector iris, projector speaker, and projector lens on the projector.
Open the compartment on the sde and place the projector lamp inside.
Click the switch to turn it on.
Go into the theater and inspect the maid.
Pick up the Workers' Quarters key and antidote.
Go back three times and then go left into the West Hall. Go forward once more and zoom in on the Workers Quarters door.
Use the Workers' Quarters key on the lock and click to open the door.
Go forward into the room and give Freddy the antidote.
Posted by: Meaghan |
May 30, 2012 6:18 PM
|
May 30, 2012 6:18 PM