

![]() Even more difficult than creating an exciting, logical, entertaining full size room escape is the art of creating a mini-escape, one that has less locations and puzzles yet still encapsulates the challenge and excitement of a larger game. Robamimi manages this balancing act in their One Scene escape games, and TomaTea can as well as with their 5 minute escapes. Isn't it lucky, then, that TomaTea has just released another? Say hello to Blue Sunset.
Even more difficult than creating an exciting, logical, entertaining full size room escape is the art of creating a mini-escape, one that has less locations and puzzles yet still encapsulates the challenge and excitement of a larger game. Robamimi manages this balancing act in their One Scene escape games, and TomaTea can as well as with their 5 minute escapes. Isn't it lucky, then, that TomaTea has just released another? Say hello to Blue Sunset.
 Similar to their previous 5 minute escape, Waiting for the Sun, Blue Sunset doesn't have a deliberate theme like their larger escapes have. What Blue Sunset does contain are features common to all TomaTea escapes: lovely serene backgrounds, charming music, challenging puzzles, a gently glowing changing cursor, easy navigation, and a lock on any puzzle where you haven't yet seen the clue. With a nicely balanced mix of logic problems, use of found objects, and at least one color-based puzzle, Blue Sunset is a perfectly delectable mini-escape treat.


Walkthrough Guide
(Please allow page to fully load for spoiler tags to be functional.)
Blue Sunset Walkthrough
General Information
There is only one ending.
There are at least two color based puzzles, so directions for the color-blind will be included in this walkthrough.
If a puzzle tells you that you have no idea how to solve it, you haven't seen the clue yet.
The changing cursor is a glowing light at the tip of the arrow rather than a hand, so watch for the glowing light to determine clickable areas.
Good luck!
Exploration
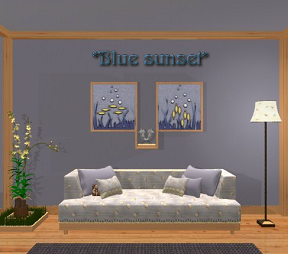
You begin facing a wall with an elaborate shelving unit. There are four open "shelves" on the top, bottom, right, and left side of the unit. The center part of the unit is wood and appears to be missing 8 tiles.
If you click on the top open shelf you will see a small compartment in the lower left corner that needs a key. Back up.
If you click on the bottom open shelf you will find another small compartment, this one with an elaborate lock involving a 3 x 3 grid with small colored circles. Back up.
If you click on the right shelf you will find a clamshell in a snow globe-like display case. The case has two buttons, a left and a right button.
If you click on the left shelf you will find another snow globe, this one with two buttons in a top/bottom position.
Turn right.
You are now facing a wall with two paintings and a sofa.
Click between the two paintings for a close up.
Notice that the left painting has fish swimming in a horizontal pattern, and the right painting has fish swimming in a vertical pattern.
Between the paintings is a small double fish figurine. If you click on it for a close up you will see that there are two small holes below the figurines.
When you click on each painting they will move and reveal some colored lines against a black background. A clue!
Back up.
Notice that there is something in the left pillows on the couch, but you can't click on it.
Click on the plant that is to the left of the couch.
Once the plant is in close up you can see two tiles, one in the couch cushions, one behind the plant. Take the tiles (Tile 1 and Tile 2) and back up.
Turn right.
This time you are facing a door. To the left of the door is a vertical sequence of seashell pictures, although one appears to be missing.
Turn right.
You are now facing a wall of windows. Below the windows is a large furniture unit that is a combination of window seat, display table, and storage drawers.
Click on the right side of the unit where the pillow is for a close up.
In close up you will see a tile partially hidden by the curtains (Tile 3) and a book on the cushion. Take the tile.
Click on the book to pull it up and then click on the pages to read it.
Page 2 has a picture of a fish about to swallow a small ball.
Page 4 is blank.
Page 5 has some colored circles.
Page 7 is blank.
close down the book and back up.
Now click on the basket to the left of the cushion.
To the left of the basket (which has a bottle of wine and glasses in it) is a tile, take it (Tile 4).
Below the basket is a large drawer with a lock that has four buttons on it. We have no idea how to solve this puzzle at this time.
Back up.
Click on the two smaller drawers on the left for a close up.
The top drawer needs a four digit code, the drawer underneath it requires a four letter code.
Back up and turn right. You should now be back at the shelving unit where you started.
Time to solve some puzzles!
The Snow Globes
Click on the left shelf of the shelving unit to see the snow globe with the up/down buttons.
Have we seen a clue for this in the room?
The clue for both of the snow globes is in the two paintings above the couch.
Once of the paintings showed fish swimming vertically, one horizontally.
In this case the buttons are up/down, so we need to refer to the picture with the vertical fish.
From left to right on the picture the fish were swimming up, down, up, up, down, and up, which is the combination to the snow globe.
Click the up/down buttons in the correct order then click the smaller button beneath them to open the snow globe.
Take the small pearl and back up.
Now click on the snow globe on the right shelving unit.
This globe has left/right buttons.
We've seen the clue for this, haven't we?
The clue for this one is the other painting, the one with the horizontally swimming horizontally.
From left to right the fish are swimming right, left, right, right, left, which is the combination.
Push the buttons in the correct order, then click on the smaller button below to open the globe.
Take the gold pearl and back up.
Feeding the Fishies
Turn right to face the sofa and the two paintings.
Click between the paintings for a close up, then click on the fish figurine between the paintings for a close up.
These fish look like the picture in the book, don't they?
The clue is in the book, the picture of the fish trying to eat a small ball.
Drop a golden pearl into each fish's mouth.
If you complete the puzzle correctly a small drawer will pop out with a key, take the key.
Back up twice.
The Shelving Unit (Top)
Turn left to face the shelving unit.
Click on the top shelf, the one that needed a key.
Once the shelf is in close up use the key you just got from the fishes.
Take the tile from inside (Tile 5) and back up.
The Shelving Unit (Bottom)
Now click on the bottom shelving unit for a close up.
Click on the puzzle to open the unit for a close up. You should have four red circles in a grid.
If you click on the pieces of the circles you will see that they change colors.
Now where have we seen colored circles?
The clue for this is on page 5 of the book, the page with the colored circles.
The first step is to make each circle the color that matches the solid circles in the book.
The upper left circle should be red, so there is no need to click on any of the segments.
The upper right circle should be yellow, so click each segment 2 times to get to yellow.
The lower right circle should be blue, so click each segment 3 times to make them blue.
The lower left circle should be green, so click each segment once to make it green.
Now you have to add the colors from the fifth circle, the one with different colored quadrants.
Since the upper left segment of the middle circle is blue, you need to make the upper left segment of the upper left circle blue, so click it 3 times to make it blue.
The upper right segment of the middle circle is red, so click the upper right segment of the upper right circle 2 times to turn it red.
The lower right segment of the middle circle is green, so click the lower right segment of the lower right circle 2 clicks to turn it green.
The lower left segment of the middle circle is yellow, so click the lower left segment of the lower left circle once to make it yellow.
Here's a screenshot of what the completed puzzle should look like.
Once you have the colors set correctly push the small button below the puzzle.
Inside is another tile, take it (Tile 6) and back up.
The Two Smaller Drawers
Turn left to face the windows and the strange furniture unit with the drawers.
Click on the two smaller drawers on the left for a close up.
Click on the top drawer, this is the one that needs a four digit code.
Now where do we find the code?
The answer is in the book.
To be specific, in the book's pages. Did you notice that the pages are numbered oddly?
There is a page 2, a page 4, a page 5, and a page 7.
That is the clue for the code, 2457.
Enter the four digit code and push the small button below to unlock the drawer.
Inside is another brown tile (Tile 7) and a white tile, take them both.
Now let's solve the drawer below.
Click on the middle drawer to see the lock and it needs a four letter code.
Where in the heck do we find this one?
The clue is in the fish pictures on the wall above the sofa.
When you click on the fish pictures, you get two pictures of colored lines.
If you combine the two pictures of colored lines, green to green, yellow to yellow, red to red, etc., you see a word emerge.
The word is "FISH".
Here's a screenshot of what the completed puzzle should look like.
Enter the code and push the small button to open the drawer.
Inside you will find the eighth and last of the brown tiles, take it.
Back up.
The Shelving Unit (Middle)
Turn right to face the odd shelving unit again.
This time click on the center of the unit for a close up.
Note the tiles on the unit, don't they look like the ones we picked up?
Use the eight brown tiles you picked up on the unit, you will now have a puzzle on a 4 x 4 grid.
The trick is to rotate the tiles until they are mirror images of the tiles that are already there. You can see which ones are which as the ones already there will not rotate.
Here's a screenshot of what the completed puzzle should look like.
If you did the puzzle correctly, the upper left tile will pop open to reveal a wind-up key, take the key and back up.
The White Tiles
Turn right (or left) twice to face the door out.
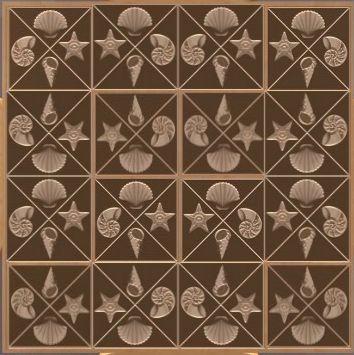
Notice the white tiles on the wall of seashells? Notice one is missing?
Click on the missing tile area for a close up. To the right of the empty area is another small panel, this one with a small circle.
Place the white tile on the open space.
Now place the wind-up key in the hole in the small panel to the right.
Click on the key and it rotates, turning the tiles.
Now the largest, "open" part of the shells are in different positions.
Back up so that you can see the entire wall.
Note that those positions are either on the left, right, top, or bottom.
Going from top to bottom, those positions are: top, right, left, left, right, bottom.
Getting Out
Turn right to face the unit with the drawers.
Click on the large bottom drawer for a close up.
Click on the handle of the bottom drawer to pull up the lock.
This lock involves four buttons that are top, bottom, right, or left.
Good thing we know this, right?
The pattern is the one we just learned from the white tiles, top, right, left, left, right, bottom.
Push the buttons in the correct order, then push the smaller button at the bottom.
The drawer will open, revealing a key, take the key.
Back up and turn left.
Click on the door for a close up, then use the key on the door to escape.
Enjoy the wine and the blue sunset!
Posted by: grinnyp |
June 27, 2012 2:35 AM
|
June 27, 2012 2:35 AM