
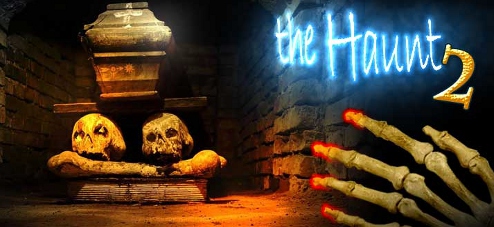
![]() Just in time for that scary late October holiday, The Haunt 2 from Furious Apps arrives with a serious dose of point-and-click adventure-style puzzle solving! Following the same set-up as The Haunt, you take on the role of a paranormal investigator who has come to rid the town of its little ghost problem. You'll sift through houses and barns, train stations and a dark forest in search of clues, and what you end up discovering may not be as "little" as the town would have you believe.
Just in time for that scary late October holiday, The Haunt 2 from Furious Apps arrives with a serious dose of point-and-click adventure-style puzzle solving! Following the same set-up as The Haunt, you take on the role of a paranormal investigator who has come to rid the town of its little ghost problem. You'll sift through houses and barns, train stations and a dark forest in search of clues, and what you end up discovering may not be as "little" as the town would have you believe.
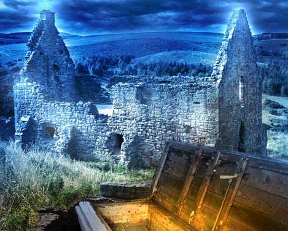 The town has been dealing with a ghost problem for the past 150 years, largely due to the historic battleground located in the nearby forest. Recently, the paranormal happenings have been much more frequent, so mayor Martin Townley has invited you to come and take care of things. Travel through the town by tapping on possible points of interest or the edges of the screen. A convenient "back" option often appears to make retracing your steps easier. To investigate items or objects, simply give them a tap. Your inventory stashes itself neatly at the bottom of the screen, and to use any of its items, simply tap one followed by where you want to use it.
Much of your time in The Haunt 2 will be spent locating items you'll need to advance through to different parts of the town and its surrounding land. In addition to the puzzle-specific items, you'll also need to keep an eye out for coins, moths, and jigsaw pieces, all of which are stashed around the scenes in some cunning ways. Moths give you in-game hints and are probably the most useful things to look for, coins are there just for fun, and the puzzle pieces must be found in order to complete the game.
 Analysis: Just like The Haunt, The Haunt 2 manages to fit a lot of entertainment into a single well-illustrated package. Not only is the adventure a lengthy one, but the puzzles are tricky, often involving multiple steps using clues and objects found throughout the game. All of this is tied together with a nice and easy interface that never gets in the way, allowing you to jump right in to the mystery.
The only real shortcomings in the game are minor at best, and they're issues you very quickly learn to work around. Sometimes bits of white text are obscured by particularly bright pieces of scenery, for example, but rarely is there anything vitally important hidden by the light. Also, it's not always clear which spaces you can investigate and which are just pieces of scenery. The solution is to try visiting everywhere, tapping the ends of corridors, trail heads and the edges of every screen. Missing a room will be the number one reason you get stuck in The Haunt 2, so be thorough!
Can't get enough of The Haunt 2? Try The Haunt!
Another superb point and click game from Furios Apps, one that is filled with enough content and intrigue that it would feel right at home as a casual download, but made to fit quite elegantly on your mobile device.
NOTE: This game was played and reviewed on an iPad. Game was available in the North American market at the time of publication, but may not be available in other territories. Please see individual app market pages for purchasing info.


Walkthrough Guide
(Please allow page to fully load for spoiler tags to be functional.)
The Haunt 2 Walkthrough
Collectibles Locations: Puzzle Pieces/Moths/Coins/Photos/War Letters/Guns
Jigsaw Puzzle Pieces
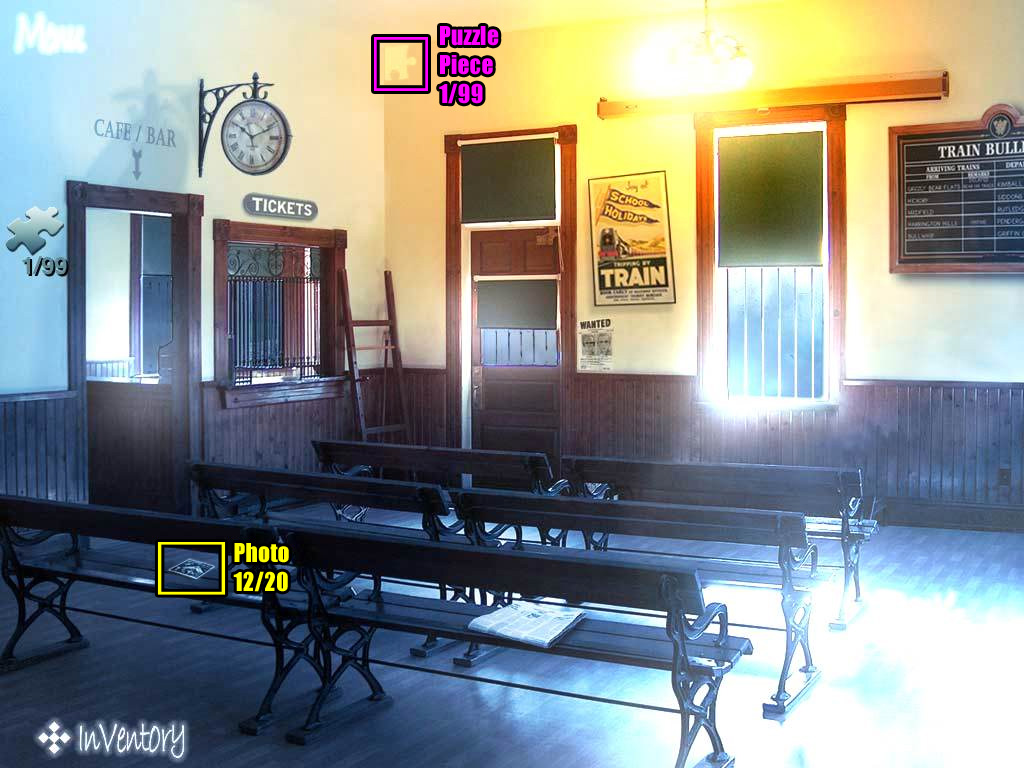
Station Lobby - Puzzle Piece 1/99.
Storage Room - Puzzle Piece 2/99, 3/99.
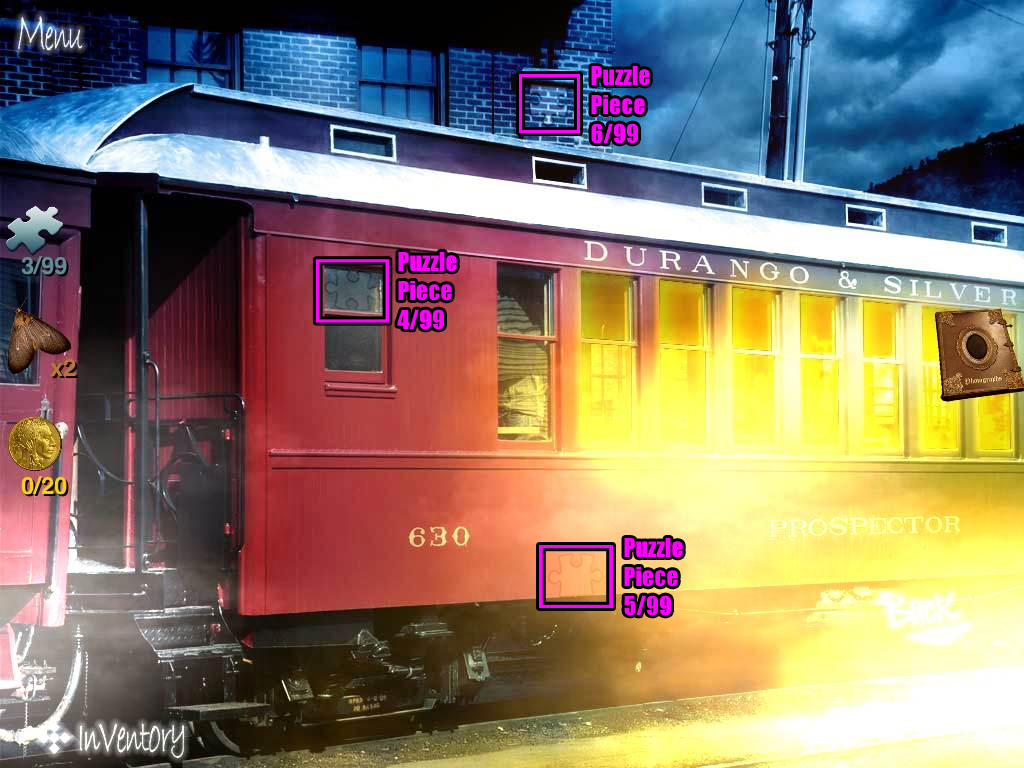
Railway Platform - Puzzle Piece 4/99, 5/99, 6/99.
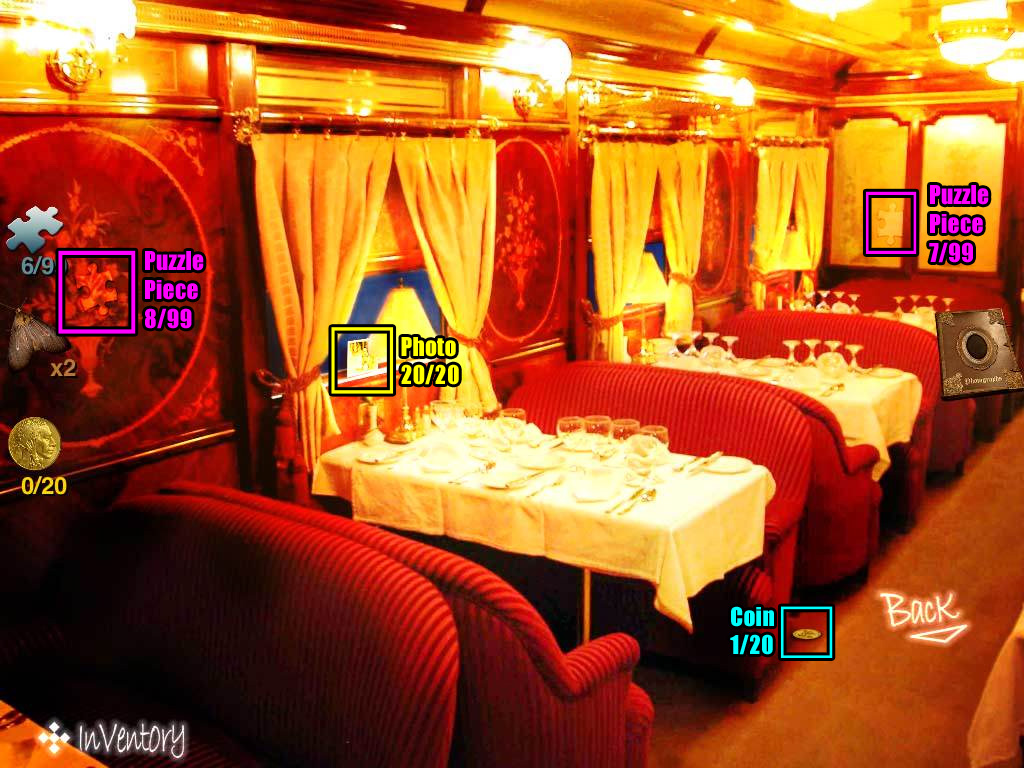
Train Car - Puzzle Piece 7/99, 8/99.
Motel Entrance - Puzzle Piece 9/99, 10/99, 11/99.
Reception Desk - Puzzle Piece 12/99, 13/99.
Motel Room - Puzzle Piece 14/99, 15/99.
Motel Bathroom - Puzzle Piece 16/99.
General Store - Puzzle Piece 17/99, 18/99, 19/99, 20/99, 21/99.
Left Forest Path - Puzzle Piece 22/99, 23/99.
Field - Puzzle Piece 24/99, 25/99, 26/99, 27/99.
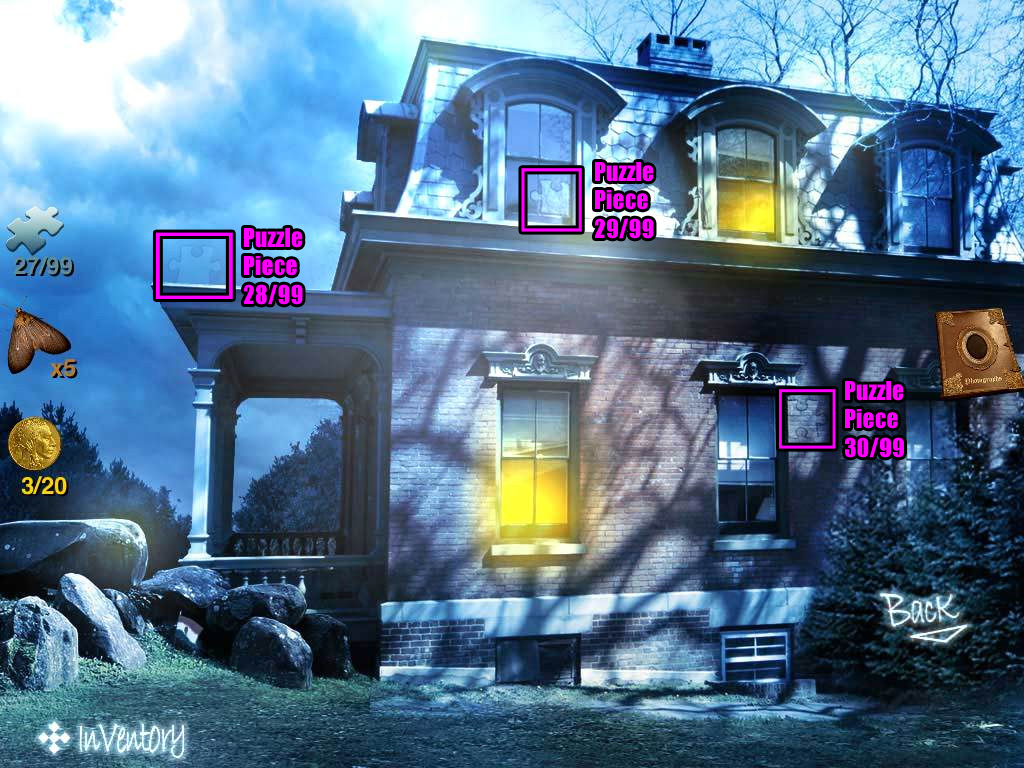
Brick House Entrance - Puzzle Piece 28/99, 29/99, 30/99.
Right Antechamber - Puzzle Piece 31/99, 32/99.
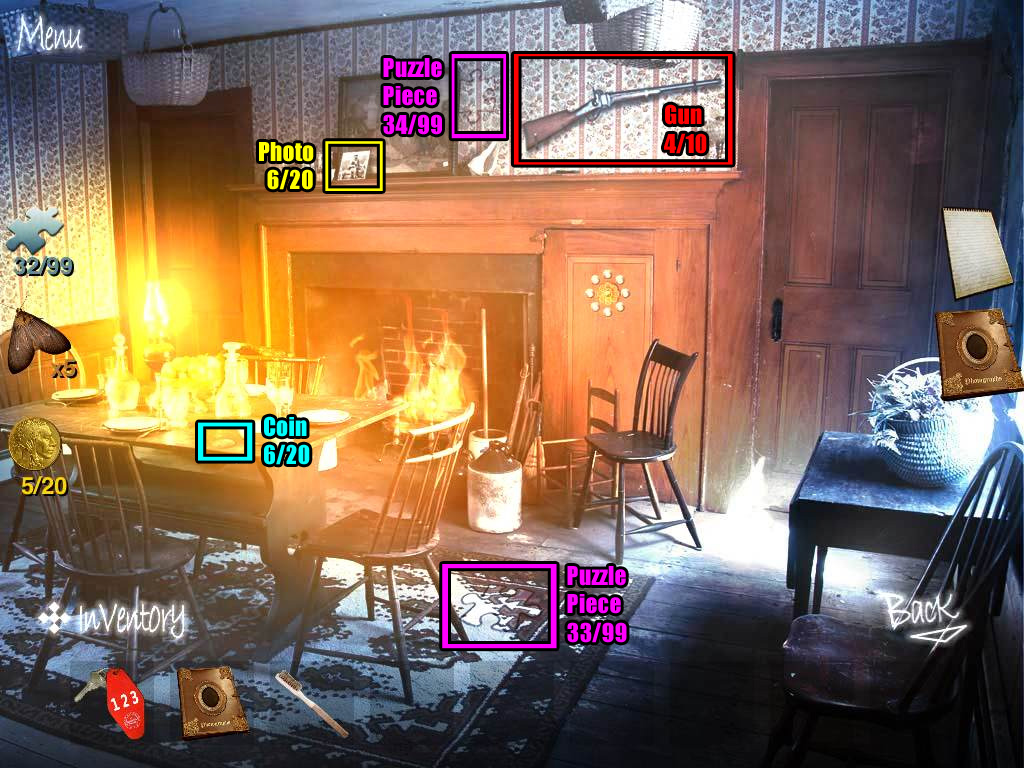
Lounge - Puzzle Piece 33/99, 34/99.
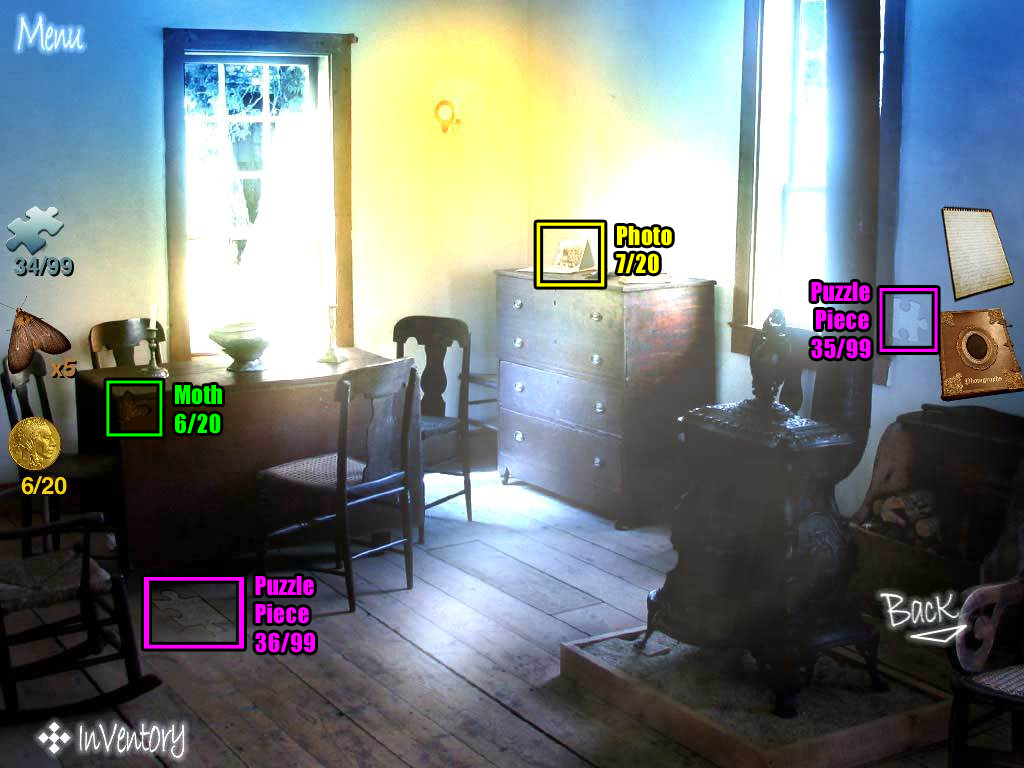
Study - Puzzle Piece 35/99, 36/99.
Small Bedroom - Puzzle Piece 37/99, 38/99, 39/99.
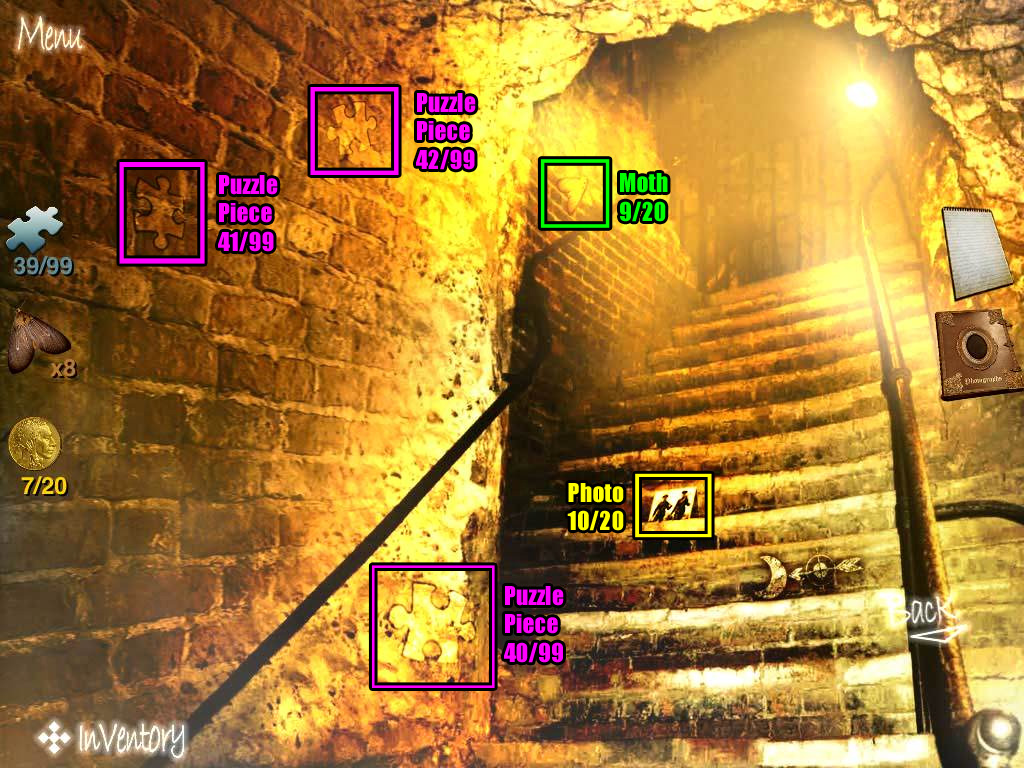
Basement Stairs - Puzzle Piece 40/99, 41/99, 42/99.
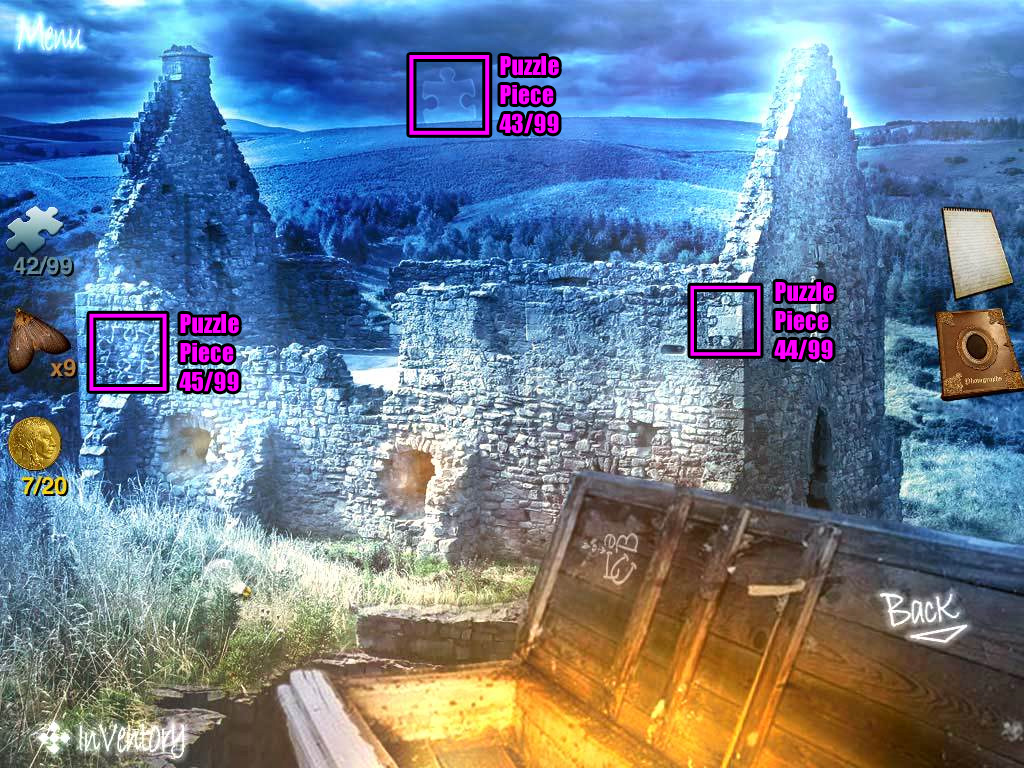
Church Ruins - Puzzle Piece 43/99, 44/99, 45/99.
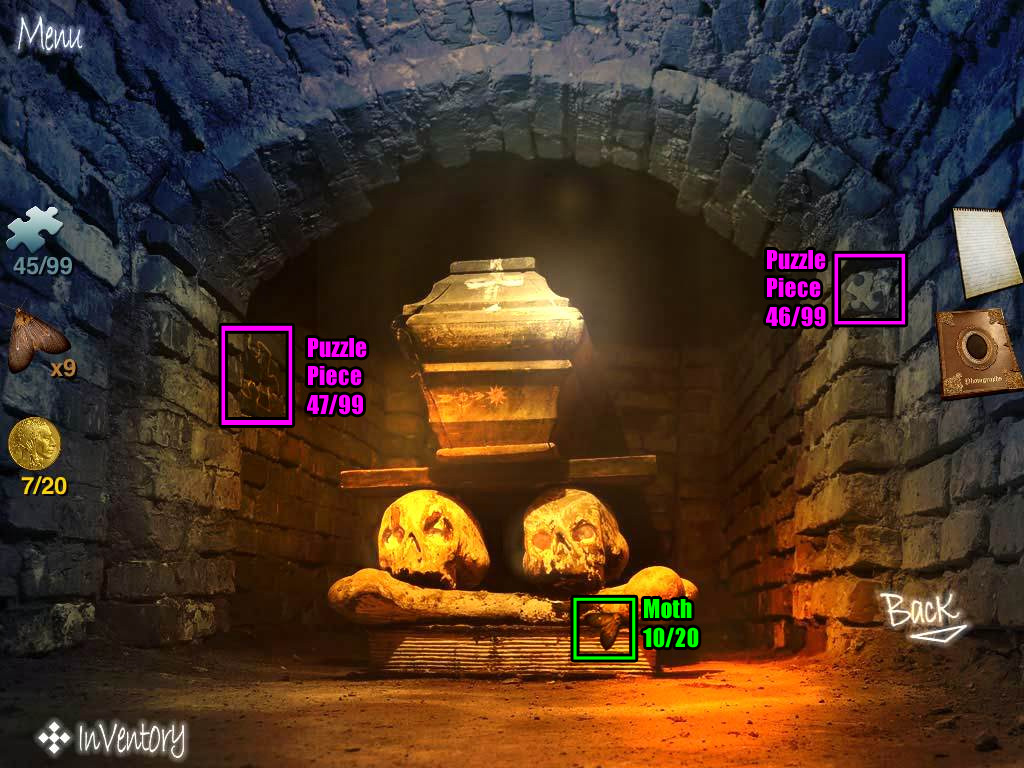
Left Crypt - Puzzle Piece 46/99, 47/99.
Middle Crypt - Puzzle Piece 48/99, 49/99.
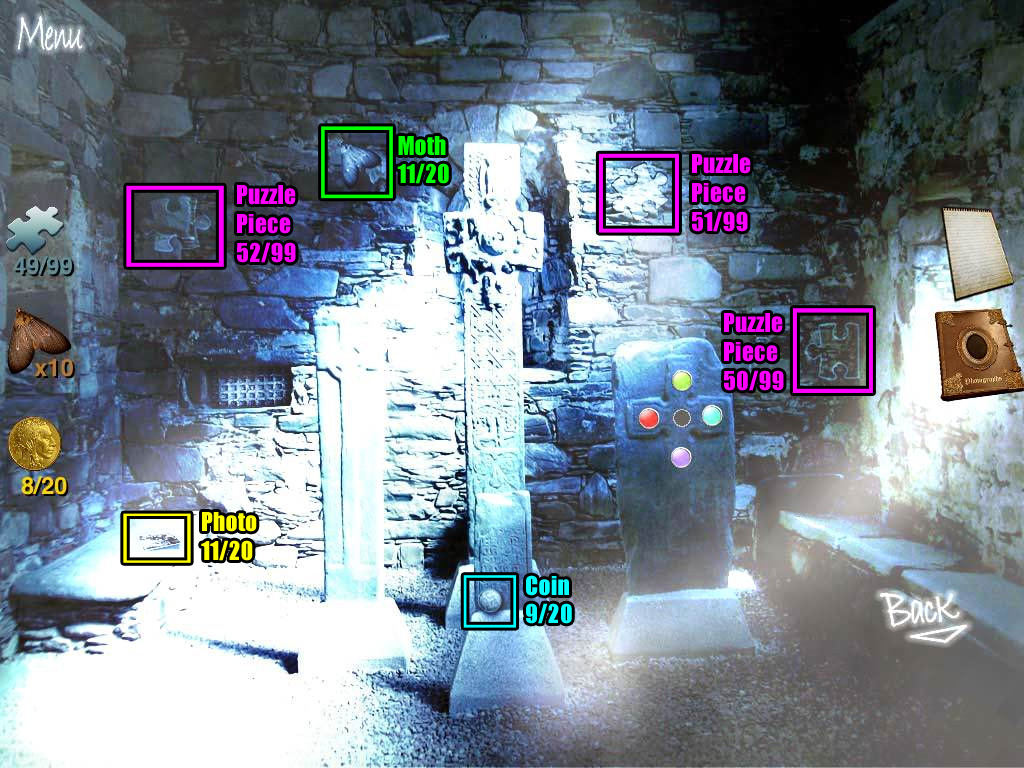
Right Crypt - Puzzle Piece 50/99, 51/99, 52/99.
Back Lot - Puzzle Piece 53/99, 54/99, 55/99.
Cafe - Puzzle Piece 56/99, 57/99, 58/99, 59/99.
Manor Entrance - Puzzle Piece 60/99, 61/99, 62/99, 63/99.
Foyer (Left Side) - Puzzle Piece 64/99, 65/99, 66/99, 67/99, 68/99.
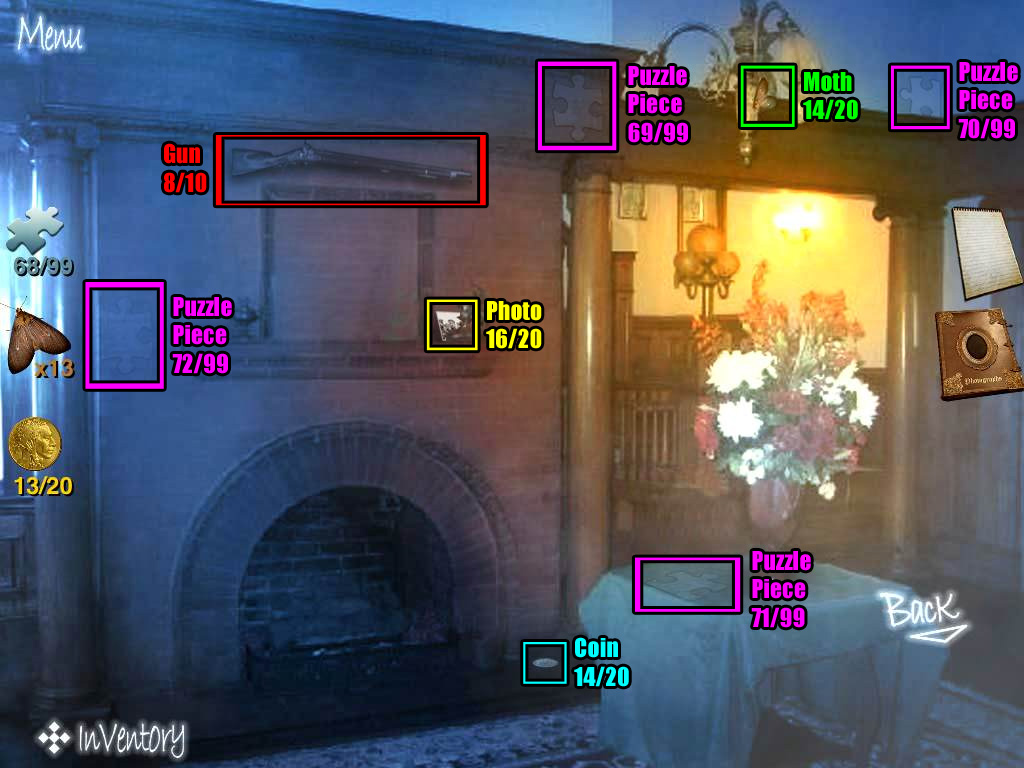
Living Room - Puzzle Piece 69/99, 70/99, 71/99, 72/99.
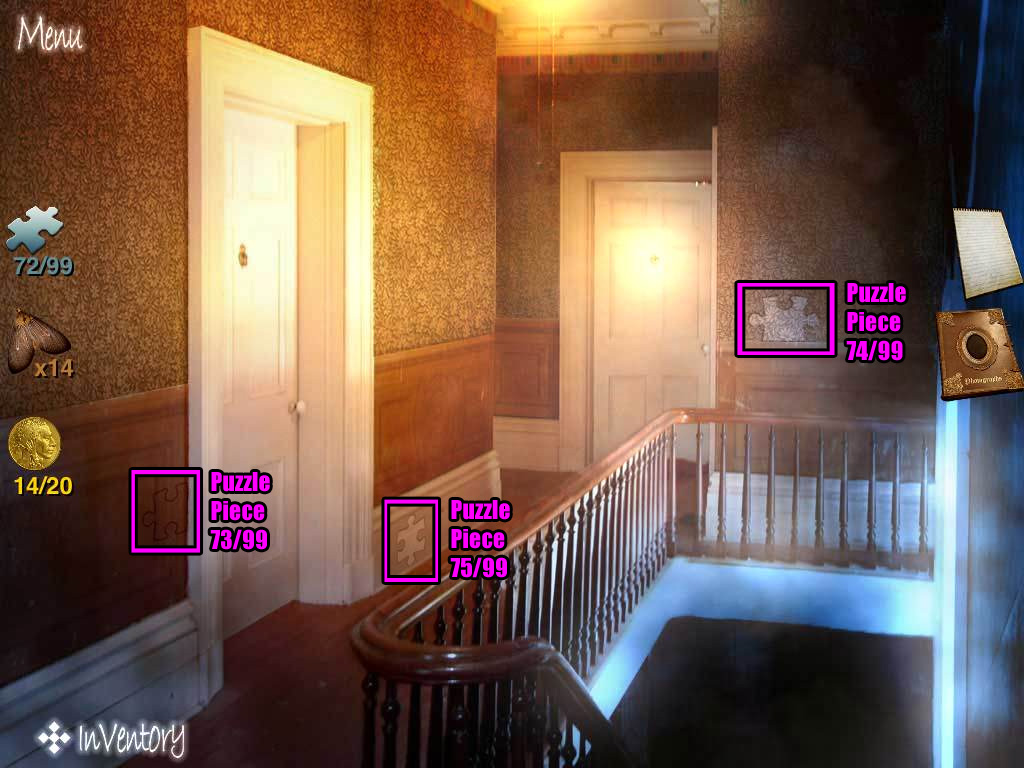
Upstairs Landing - Puzzle Piece 73/99, 74/99, 75/99.
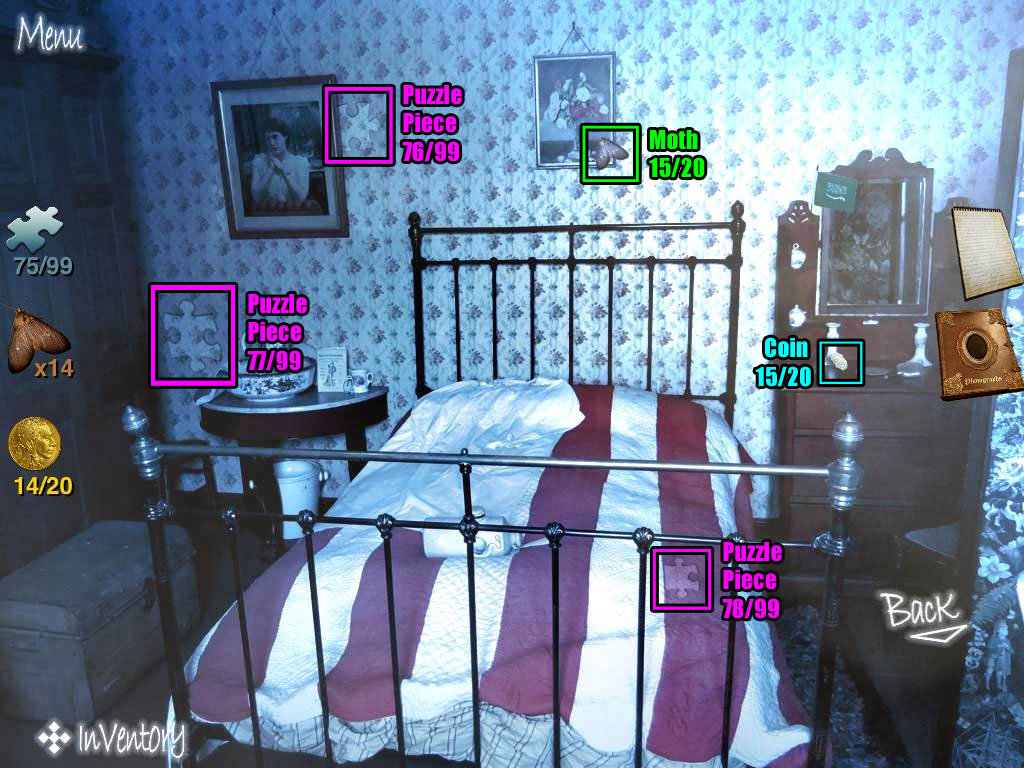
Guest Room - Puzzle Piece 76/99, 77/99, 78/99.
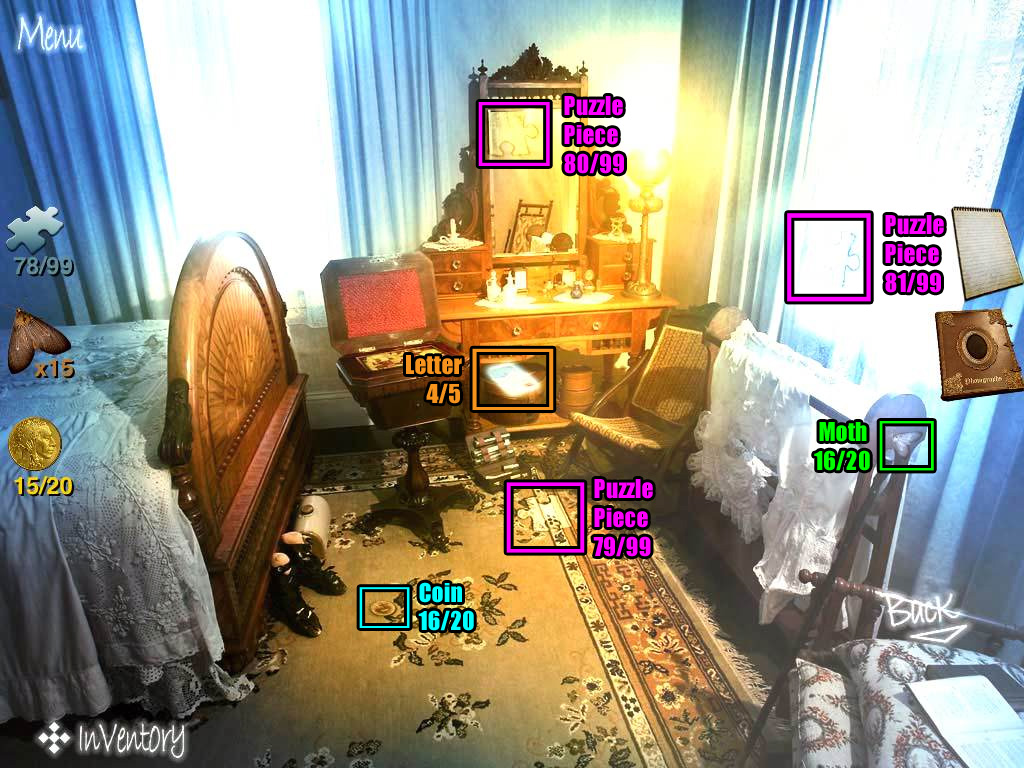
Matron's Bedroom - Puzzle Piece 79/99, 80/99, 81/99.
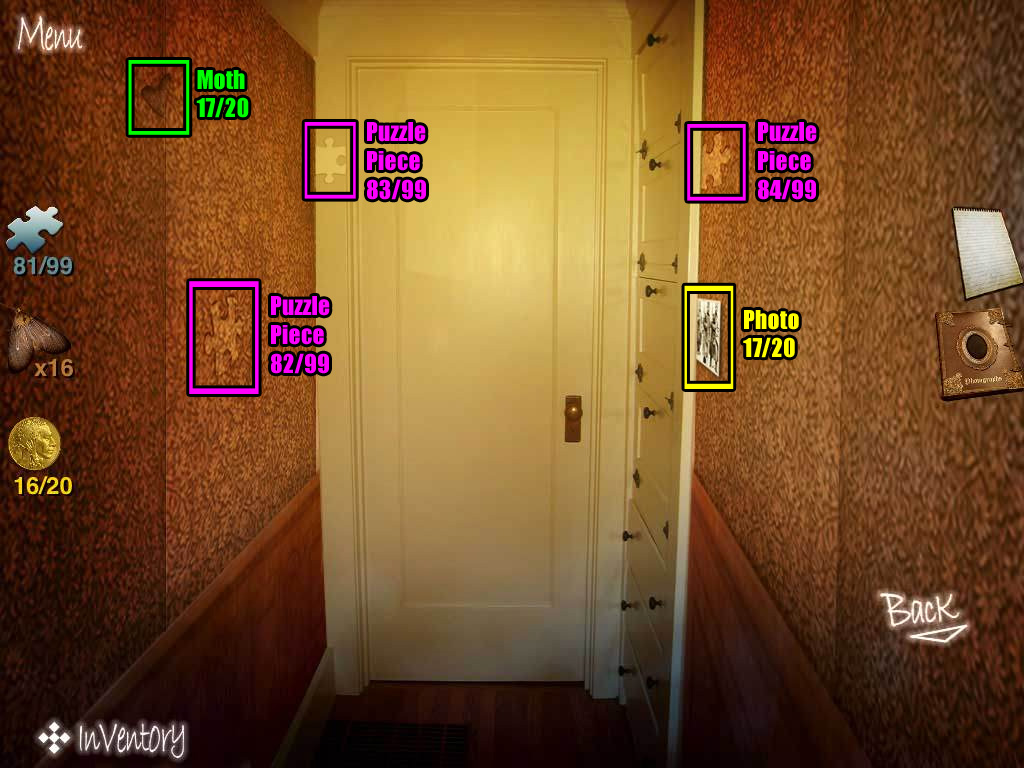
Hallway Dead End - Puzzle Piece 82/99, 83/99, 84/99.
Foyer (Right Side) - Puzzle Piece 85/99, 86/99, 87/99.
Dining Room - Puzzle Piece 88/99, 89/91, 90/99, 91/99.
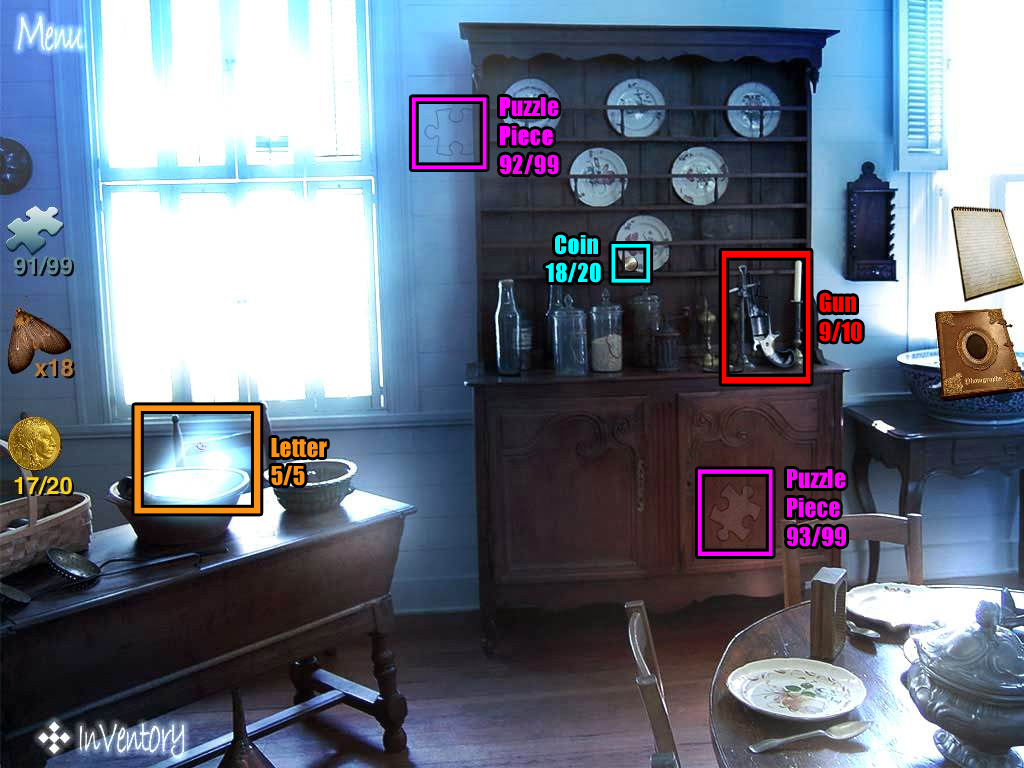
Kitchen - Puzzle Piece 92/99, 93/99.
Right Forest Path - Puzzle Piece 94/99, 95/99.
Meadow - Puzzle Piece 96/99, 97/99, 98/99, 99/99.
Moths
Train Station Entrance - Moth 1/20.
Storage Room - Moth 2/20.
Motel Entrance - Moth 3/20.
Motel Bathroom - Moth 4/20.
General Store - Moth 5/20.
Study - Moth 6/20.
Small Bedroom - Moth 7/20.
Left Antechamber - Moth 8/20.
Basement Stairs - Moth 9/20.
Left Crypt - Moth 10/20.
Right Crypt - Moth 11/20.
Cafe - Moth 12/20.
Manor Entrance - Moth 13/20.
Living Room - Moth 14/20.
Guest Room - Moth 15/20.
Matron's Bedroom - Moth 16/20.
Hallway Dead End - Moth 17/20.
Foyer (Right Side) - Moth 18/20.
Right Forest Path - Moth 19/20.
Meadow - Moth 20/20.
Coins
Train Car - Coin 1/20.
Motel Entrance - Coin 2/20.
General Store - Coin 3/20.
Middle Antechamber - Coin 4/20.
Right Antechamber - Coin 5/20.
Lounge - Coin 6/20.
Small Bedroom - Coin 7/20.
Middle Crypt - Coin 8/20.
Right Crypt - Coin 9/20.
Left Forest Path - Coin 10/20.
Cafe - Coin 11/20.
Manor Entrance - Coin 12/20.
Foyer (Left Side) - Coin 13/20.
Living Room - Coin 14/20.
Guest Room - Coin 15/20.
Matron's Bedroom - Coin 16/20.
Foyer (Right Side) - Coin 17/20.
Kitchen - Coin 18/20.
Right Forest Path - Coin 19/20.
Meadow - Coin 20/20.
Photographs
Motel Room - Photo 1/20.
Motel Bathroom - Photo 2/20.
Motel Entrance - Photo 3/20.
General Store - Photo 4/20.
Middle Antechamber - Photo 5/20.
Lounge - Photo 6/20.
Study - Photo 7/20.
Small Bedroom - Photo 8/20.
Left Antechamber - Photo 9/20.
Basement Stairs - Photo 10/20.
Right Crypt - Photo 11/20.
Station Lobby - Photo 12/20.
Back Lot - Photo 13/20.
Cafe - Photo 14/20.
Manor Entrance - Photo 15/20.
Living Room - Photo 16/20.
Hallway Dead End - Photo 17/20.
Foyer (Right Side) - Photo 18/20.
Storage Room - Photo 19/20.
Train Car - Photo 20/20.
Old War Letters
General Store - Letter 1/5.
Field - Letter 2/5.
Middle Crypt - Letter 3/5.
Matron's Bedroom - Letter 4/5.
Kitchen - Letter 5/5.
Guns
Tomb Stairs - Gun 1/10.
Tomb StairsBlue Chamber - Gun 2/10.
Vault Entrance - Gun 3/10.
Lounge - Gun 4/10.
Small Bedroom - Gun 5/10.
Middle Antechamber - Gun 6/10.
Foyer (Left Side) - Gun 7/10.
Living Room - Gun 8/10.
Kitchen - Gun 9/10.
Storage Room - Gun 10/10.
Chapter 1
Train Station Entrance
When the game begins, follow the tutorial instructions by tapping on the gap between the the train car and the building to move to the Railway Platform, then tap the "Back" button to return to the station entrance.
Next tap the right edge of the screen to go around the building to the Parking Lot, then tap "Back" again.
Now that the movement section of the tutorial is complete, tap the front doors of the building to enter the Station Lobby.
Station Lobby
Tap the newspaper on the back bench to read it.
Continue through the left door to the Cafe.
Cafe
Pick up the DOOR KEY next to the dishes on the nearest table.
Go back to the Station Lobby.
Station Lobby
Tap the PUZZLE PIECE 1/99 at the upper left corner of the ceiling.
There are 99 total jigsaw puzzle pieces hidden in various locations throughout the game.
You must find all the pieces in order to complete the game.
You can find the current number of pieces you've found by checking the number under the jigsaw puzzle piece icon at the far left side of the screen.
Refer to the Collectibles section of the Walkthrough to view the locations of all 99 puzzle pieces.
Move back to the Train Station Entrance
Train Station Entrance
Tap the MOTH 1/20 on the corner of the building beside the far right window.
Like the puzzle pieces, moths are hidden in different locations throughout the game.
Tap the moth icon on the far left side of the screen to access the Hint & Cheats Window.
From there, you can spend the moths you've collected to receive helpful hints and information.
At the top of the window you will also see how many hidden puzzle pieces are available in that scene.
Refer to the Collectibles section of the Walkthrough to view the locations of all 20 moths.
Move right to the Parking Lot.
Parking Lot
Tap the door under the light on the side of the train station building to zoom in.
Use the DOOR KEY to open the lock, then tap the door to open it and enter the Storage Room.
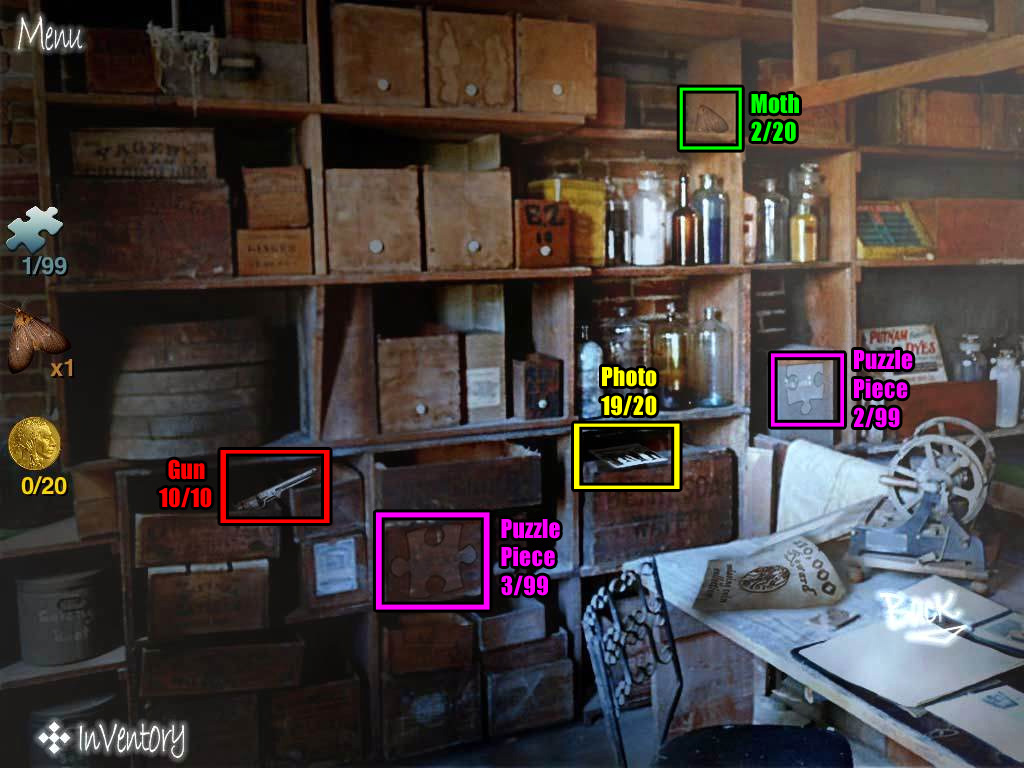
Storage Room
Read the reward poster on top of the table.
Take the DISPLAY CASE hanging in front of the shelves to receive the missing coin objective.
Find and collect all 20 Coins hidden at various locations in the game.
Coins are bonus collectibles that are not required to complete the story.
Refer to the Collectibles section of the Walkthrough to view the locations of all 20 coins.
Collect:
Moth 2/20 is at the empty space of the top shelf beside the row of three square boxes.
Puzzle Piece 2/99 is on the grey box to the left of the Putnam Dyes sign.
Puzzle Piece 3/99 is on the crate to the left of the back of the chair.
Return to the Railway Platform.
Railway Platform
Collect:
Puzzle Piece 4/99 is at the top of the far left window.
Puzzle Piece 5/99 is at the bottom of the train car, between the number 630 and the word "Prospector".
Puzzle Piece 6/99 is on the brick wall of the building behind the train, beside the right window.
Continue through the door on the left to enter the Train Car.
Train Car
Tap Martin Townley to speak with him. He will instruct you to travel to your room at the motel.
The Mayor's body is blocking some of the collectibles, so move back once and re-enter the Train Car to make them visible.
Collect:
Puzzle Piece 7/99 is on the left panel behind the farthest back sofa.
Puzzle Piece 8/99 is in the middle of the design on the wall above the nearest sofa.
Coin 1/20 is on the floor to the left of the Back button.
Go back to the Parking Lot, then tap the door on the porch of the right building to reach the Motel Entrance.
Motel Entrance
Collect:
Puzzle Piece 9/99 is at the bottom of the right window, below the "Open" sign.
Puzzle Piece 10/99 is on the wall below the left window.
Puzzle Piece 11/99 is in the bush in front of the left side of the porch.
Moth 3/20 is at the top left corner of the roof.
Coin 2/20 is on the ground at the right side of the bottom step.
If you've spoken with the Mayor, the door should be unlocked, so continue forward to the Reception Desk.
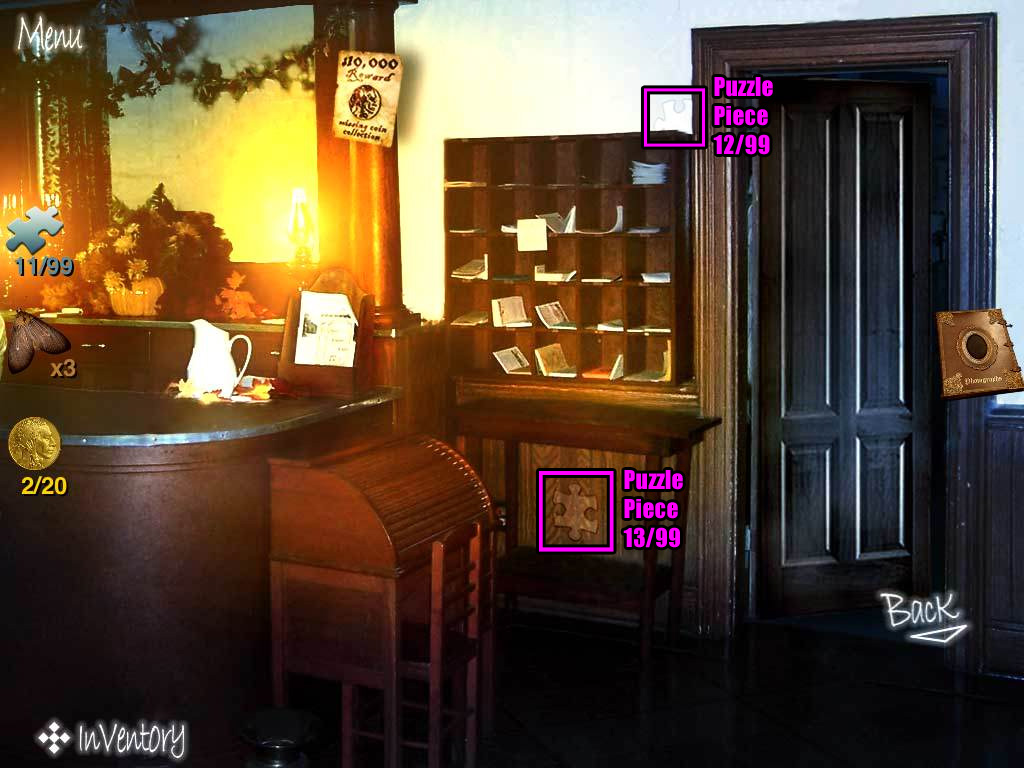
Reception Desk
Take the ROOM KEY 123 from the middle of the mail boxes.
Collect:
Puzzle Piece 12/99 is on the white section of the wall above the upper right corner of the mail boxes.
Puzzle Piece 13/99 is on the wooden section of the wall under the mailboxes.
Go back out to the Parking Lot.
Parking Lot
Click the doors at the right end of the motel building to zoom in.
Use the ROOM KEY to unlock the right door labeled "123".
Enter the Motel Room.
Motel Room
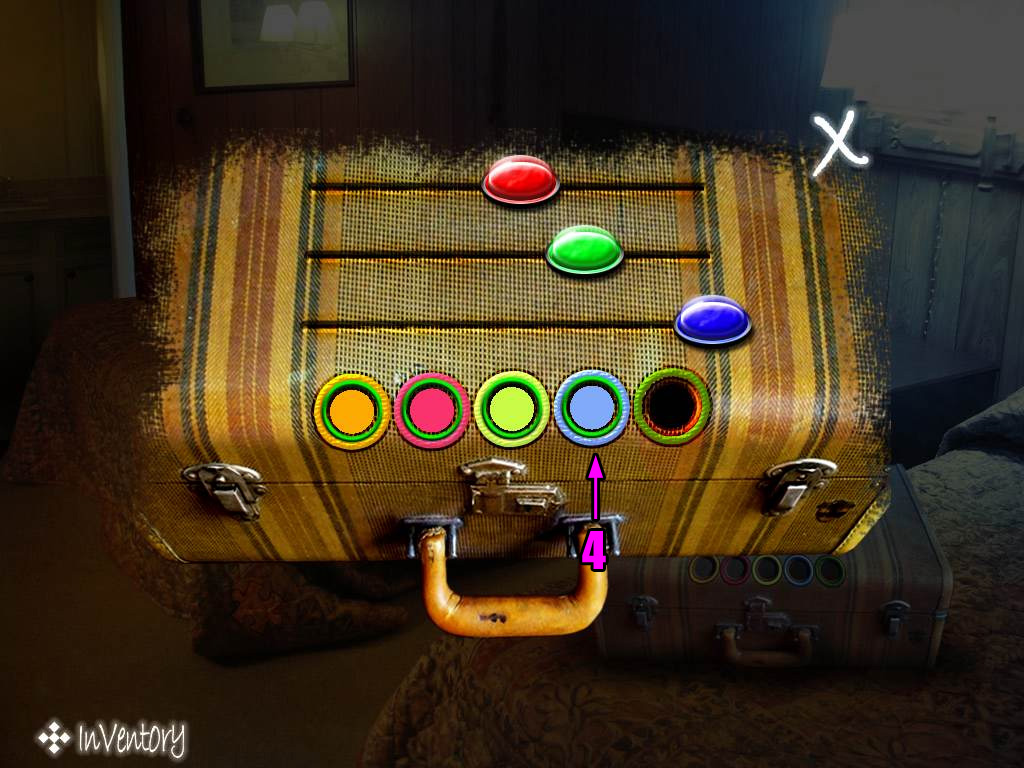
Tap the corner of the suitcase sticking out from under the bed to pull it out.
Tap the buttons on the top of the suitcase to start the puzzle.
Move the sliders to match the colors of the rings above the suitcase handle.
First, tap a ring to select it; a selected ring is indicated by a white border around the center.
Next, tap and drag the red, green, or blue slider to move it from side to side.
Moving a slider towards the right will increase the intensity of the selected color, while moving it to the left will decrease it.
When the sliders are correctly positioned and the color in the center matches the color of the ring around it, the white border will change to green.
Tap the next slider and repeat the same process until you have solved all 5 rings.
Solution Part 1
Solution Part 2
Solution Part 3
Solution Part 4
Solution Part 5
After the puzzle is solved, take the WAR PHOTO ALBUM from the opened case.
An icon for the album will appear on the right side of the screen; tap the album to look inside.
The album is incomplete. You must find the 20 missing photographs, which are hidden throughout the game.
When looking for photos, don't forget to check previously visited locations, as the photos located there are only visible after you've received the WAR PHOTO ALBUM.
Refer to the Collectibles section of the Walkthrough to view the locations of all 20 photos.
Collect:
Puzzle Piece 14/99 is at the bottom of the blanket hanging off the corner of the bed.
Puzzle Piece 15/99 is at the lower right corner of the framed picture on the wall.
Photo 1/20 is on the floor with the corner of the picture sticking out from under the blanket at the foot of the bed.
Tap the doorway at the back of the room to enter the Motel Bathroom.
Motel Bathroom
Take the TOOTHBRUSH on the counter behind the sink faucet.
Collect:
Puzzle Piece 16/99 is on the lid of the toilet seat.
Moth 4/20 is on the wall between the mirror and towel rack.
Photo 2/20 is at the lower left corner of the mirror.
Go back out to the Motel Entrance.
Motel Entrance
Collect Photo 3/20 at the middle of the far left post.
Move forward to enter the Reception Desk area, then open the door and continue right to the General Store.
General Store
Collect:
Puzzle Piece 17/99 is at the middle of the floor.
Puzzle Piece 18/99 is on the side of the display cabinet against the right wall.
Puzzle Piece 19/99 is at the back wall on the Columbus poster.
Puzzle Piece 20/99 is on the back wall to the left of the door.
Puzzle Piece 21/99 is on the side of the glass case at the left side of the room.
Moth 5/20 is on the metal bin on top of the display cabinet.
Coin 3/20 is on the second highest shelf of the display cabinet.
Photo 4/20 is on the floor beside the stacks of red root beer boxes.
Go out the back door to the Battle Monument, then continue left to the Left Forest Path.
Left Forest Path
Tap the open truck door to look at the driver's seat.
Press the red button labeled "Hood" to unlock the hood of the car.
Tap the hood of thetruckto lift it, then tap it again to zoom in.
Take the SEALED BATTERY to the right of the engine.
Collect:
Puzzle Piece 22/99 is in the grass to the left of the road.
Puzzle Piece 23/99 is between the two trunks of the birch trees.
Continue forward to the Field.
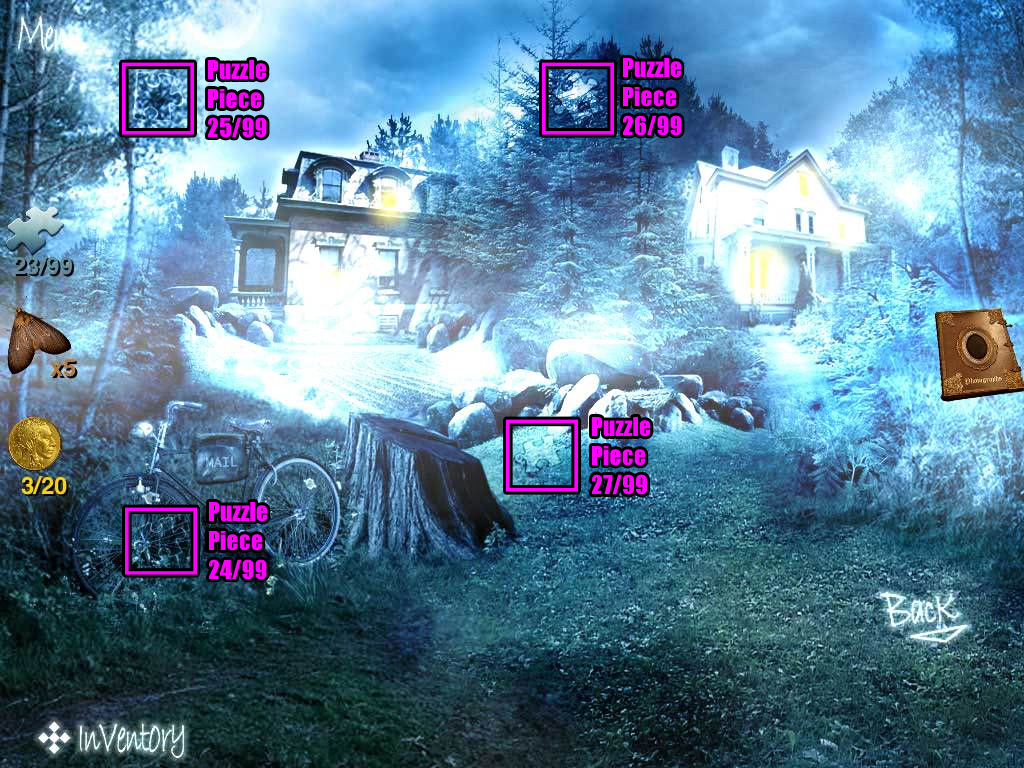
Field
Collect:
Puzzle Piece 24/99 is on the front wheel of the bicycle.
Puzzle Piece 25/99 is in the leaves near the top of the left tree.
Puzzle Piece 26/99 is at the top of the largest tree between the two buildings.
Puzzle Piece 27/99 is on the ground in front of the pile of rocks.
Follow the left path to the Brick House Entrance.
Chapter 2
Brick House Entrance
Collect:
Puzzle Piece 28/99 is just above the roof of the porch.
Puzzle Piece 29/99 is in the top left window.
Puzzle Piece 30/99 is on the wall to the right of the middle window on the first floor.
Tap the small window with the white frame at the bottom level of the building to enter the Basement.
Basement
Tapping on the snake blocking the left alcove will make it attack you.
Pick up the right burning TORCH from the wall sconce.
Drop the TORCH on the ground in front of the snake to make it back up a little.
Tap the markings on the floor to the right of the pit to zoom in, then tap them a second time to create a diagram of the image in the Notebook.
The Notebook will appear above the Photo Album on the far right side of the screen.
You can tap it at any time to view the important markings and information noted during gameplay.
Tap the area on the wall behind the pit to travel to the Middle Antechamber.
Middle Antechamber
Inspect the markings on the right wall to add a second diagram to your Notebook.
Collect:
Coin 4/20 is on top of the pile of rubble.
Photo 5/20 is on the ground in front of the back wall.
Go back once, then continue through the right doorway into to the Right Antechamber.
Right Antechamber
Examine the markings on the left wall to add a third diagram to the Notebook.
Collect:
Puzzle Piece 31/99 is on the wall above the small pile of rocks.
Puzzle Pice 32/99 is above the curved bars blocking the brick wall.
Coin 5/20 on the floor by the lower left corner of the curved bars.
Go all the way back to the motel Parking Lot.
Parking Lot
Pick up the WOOD STICK lying on the middle of the ground.
Return to the Brick House Entrance.
Brick House Entrance
Use the WOOD STICK on the bottom left window to hold it open.
Go through the window to enter the Lounge.
Lounge
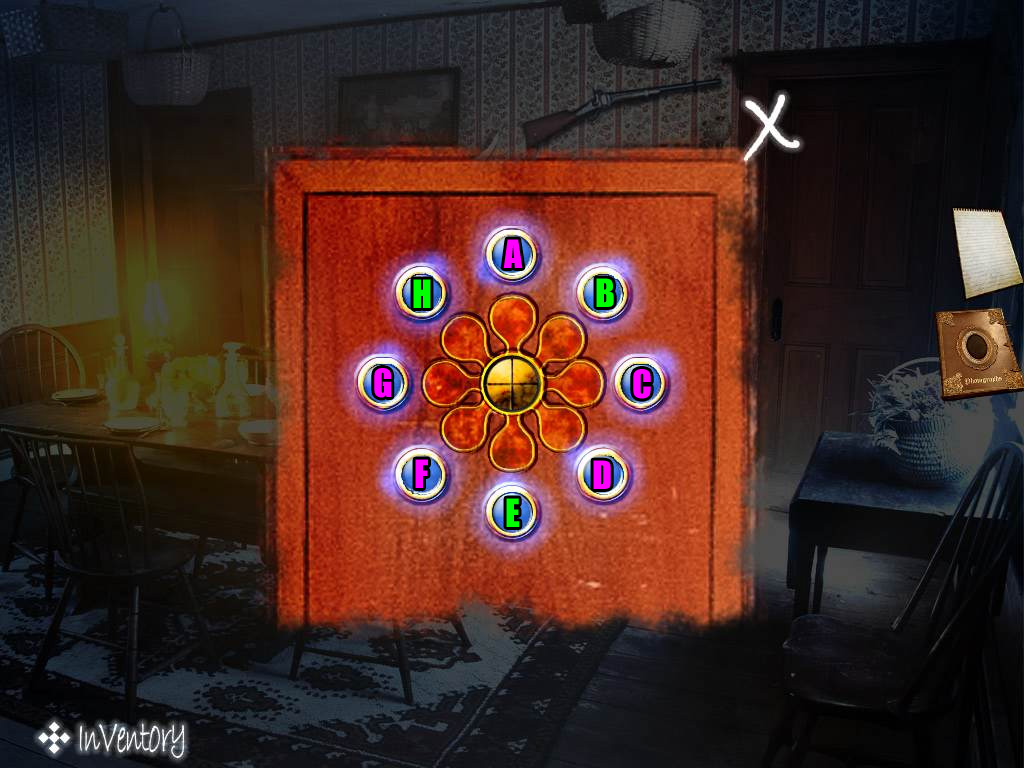
Tap the ring of buttons on the right side of the fireplace to zoom in and start the puzzle.
Press the buttons in the correct order so that all the white buttons are changed to blue.
Press the yellow, flower-shaped button in the center to reset all of the buttons.
Tapping one button can also affect other buttons in the ring:
Tapping Button 1 will change Buttons 1, 2, 5, and 8.
Tapping Button 2 will change Buttons 2, 3, 4, and 8.
Tapping Button 3 will change Buttons 2, 3, 4, and 7.
Tapping Button 4 will change Buttons 4, 6, and 8.
Tapping Button 5 will change Buttons 1, 3, 5, and 7.
Tapping Button 6 will change Buttons 2, 4, and 6.
Tapping Button 7 will change Buttons 2, 4, and 7.
Tapping button 8 will change Buttons 2, 4, 6, and 8.
Refer to the screenshot below and press the buttons in the following order to solve the puzzle:
B - E - B - H
Solution.
After the puzzle is solved, take the SAPPHIRE GEMSTONE from the center of the flower design.
Collect:
Puzzle Piece 33/99 is on the corner of the rug on the floor.
Puzzle Piece 34/99 is on the wall between the framed picture and the rifle.
Coin 6/20 is on the left side of the surface of the dining table.
Photo 6/20 is on the fireplace mantle and in front of the framed picture.
Go through the right door into the Study.
Study
Take the WASH TUB on the floor behind the stove.
Collect:
Puzzle Piece 35/99 is on the wall beside the right window and the stove pipe.
Puzzle Piece 36/99 is on the floor between the chair at the desk and the rocking chair on the far left side of the room.
Moth 6/20 is on the front left corner of the desk.
Photo 7/20 is on the top of the chest of drawers and leaning against the wall.
Move back once to the Lounge, then go through the left door into the Small Bedroom.
Small Bedroom
Collect:
Puzzle Piece 37/99 is on the framed picture on the wall.
Puzzle Piece 38/99 is at the middle of the drape hanging beside the bed.
Puzzle Piece 39/99 is on the blanket hanging over the side of the bed.
Moth 7/20 is on the left side of the vanity mirror.
Coin 7/20 is on the left side of the left rug.
Photo 8/20 is on the floor under the right side of the left rug.
Exit the house and return to the Basement.
Basement
Use the WASH TUB on the snake to capture it, clearing the way to the left path.
Move left to the Left Antechamber.
Left Antechamber
Take the STEEL PRY BAR leaning against the left wall.
Tap the markings at the top of the left wall to add the fourth drawing to your Notebook.
Collect:
Moth 8/20 is on the right wall, just to the left of the Notebook icon.
Photo 9/20 is at the bottom of the right wall.
Continue forward to the Basement Stairs.
Basement Stairs
Inspect the markings on the third step from the bottom to add the fifth drawing to the Notebook.
Collect:
Puzzle Piece 40/99 is at the bottom of the left wall underneath the hand rail.
Puzzle Piece 41/99 is near the upper left corner of the wall.
Puzzle Piece 42/99 is at the top of the left wall to the right of Piece 41.
Moth 9/20 is on the wall above the left hand rail near the top of the stairs.
Photo 10/20 is on the middle step of the stairway.
Move forward to reach the Church Ruins.
Chapter 3
Church Ruins
Pick up the LIGHT BULB lying in the grass.
Examine the markings on the hatch door leading to the Basement Stairs to add the sixth drawing to the Notebook.
Collect
Puzzle Piece 43/99 is on the horizon in the background.
Puzzle Piece 44/99 is on the wall at the right side of of the church, just under the base of the right pointed section.
Puzzle Piece 45/99 is on the wall at the left side of the church under the base of the left pointed section.
Tap the flickering lights in the left doorway to enter the Left Crypt.
Left Crypt
Take the KNIFE sticking out of the right skull.
Inspect the markings at the bottom of the coffin to make the 7th drawing in your Notebook.
Collect:
Puzzle Piece 46/99 is at the upper right side of the archway.
Puzzle Piece 47/99 is on the left wall at the back of the crypt.
Moth 10/20 is on the large bone under the right skull.
Move back once, then go through the right doorway with the flickering light into the Middle Crypt.
Middle Crypt
Read the message inscribed on the plaque in the middle of the bone wall and note the indentations made for three skeletal pieces: a femur, a jaw bone, and a hand.
Zoom in on the markings at the upper left side of the wall and tap them to add the 8th drawing to the Notebook.
Collect:
Puzzle Piece 48/99 is at the top of the right wall.
Puzzle Piece 49/99 is on the far left side of the wall of bones.
Coin 8/20 is on the floor beside the basin.
Go back once, then tap the dark doorway on the far right side of the church building to enter the Right Crypt.
Right Crypt
Tap the buttons at the top of the right tombstone to zoom in and start the puzzle.
First note the color pattern at the center of the cross: Red, Pink, Green, and Blue.
This icon indicates that if you tap the buttons now, it will change their color.
Refer to the 8 drawings in your Notebook to find the correct order of the colors.
Each arrow points to a cardinal direction, and beside four of those arrows is a group of jumbled letters.
Unscramble each word to find that they spell the same colors as seen on the cross.
The letters above the arrow pointing North spell "Pink".
The letters below the arrow pointing South spell "Yellow".
The letters beside the arrow pointing West spell "Red.
The letters beside the arrow pointing East spell "Blue."
Now that you've found the location of each color, tap the buttons to change them accordingly.
Up = Pink.
Down = Yellow.
Left = Red.
Right = Blue.
Next, tap the center button to change it to a fleur-de-lis icon.
If you tap the large buttons now, it will change their symbols instead of their colors.
Change the center button again if you need to fix any of the colors.
Refer to the 8 drawings in your Notebook to find the correct order for the symbols.
Each arrow points to a cardinal direction, and beside four of those arrows is a group of jumbled letters.
Match the large buttons on the cross with the symbols next to the arrows.
The arrow pointing North is also pointing to a group of 5-pointed stars. Change the Top button to a 5-pointed star.
The arrow pointing South is also pointing to a group of snowflakes. Change the Bottom button to a snowflake.
The arrow pointing West is also pointing to a crescent moon. Change the Left button to a crescent moon.
The arrow pointing East is also pointing to 10-pointed star. Change the Right button to a 10-pointed star.
The puzzle will close automatically if you've set the correct symbol and color for each button.
Solution.
After the puzzle is solved, tap the small grate in the recess at the left side of the wall to lift it.
Take the revealed HUMAN JAW BONE from the cache.
Collect:
Puzzle Piece 50/99 is on the far right side of the back wall.
Puzzle Piece 51/99 is at the middle of the back wall, above the top of the right tombstone.
Puzzle Piece 52/99 is on the back wall above the small recess.
Moth 11/20 is on the back wall above the top of the left tombstone.
Coin 9/20 is at the top of the base of the front tombstone.
Photo 11/20 is on the seat of the bench against the left wall.
Go all the way back to the broken-down truck at the Left Forest Path.
Left Forest Path
Use the KNIFE to cut the rope tied to the far left tree.
Collect the Coin 10/20 from the sack that falls to the ground.
Move back once to the Battle Monument.
Battle Monument
Tap one of the ghosts to speak with them. They will request that you find "5 Letters".
Locate and collect each Old War Letter hidden around the game.
Refer to the Collectibles section of the walkthrough for the location of each Letter.
Return to the Train Station Lobby.
Station Lobby
Collect the Photo 12/20 on the seat of the rear left bench.
Go through the back door to the Back Lot.
Back Lot
Add the SEALED BATTERY to the front of the fork lift.
Tap the controls of the vehicle to zoom in.
Press the "Start" button to turn on the engine.
Pull the lever to lift the stack of crates, revealing a gate.
Use the STEEL PRY BAR to open the small door at the corner of the wall directly above the lifted crate.
Take the HUMAN HANDS BONE from the revealed compartment.
Collect:
Puzzle Piece 53/99 is on the back wall above the pile of stacked crates.
Puzzle Piece 54/99 is on the upper right corner of the wall, beside the top right window.
Puzzle Piece 55/99 is at the middle of the farthest left stack of crates.
Photo 13/20 is on the ground beside the wheel of the forklift.
Go back once and continue left into the Cafe.
Cafe
Collect:
Puzzle Piece 56/99 is on the wall beside the right door.
Puzzle Piece 57/99 is on the wall beside the left door.
Puzzle Piece 58/99 is at the base of the large pole in front of the back table.
Puzzle Piece 59/99 is on the window above the left door.
Moth 12/20 is on the right side of the frame around the large, square panel of windows.
Coin 11/20 is on the seat of the left stool at the bar.
Photo 14/20 is on the floor under the legs of the stool.
Return to the General Store at the motel.
General Store
Take the glowing blue OLD WAR LETTER 1/5 from the wooden bucket hanging next to the cabinet.
Travel to the Field past the forest.
Field
Tap the mail bag attached to the bicycle to look inside.
Take the OLD WAR LETTER 2/5 from the satchel.
Return to the Study in the brick building.
Study
Use the STEEL PRY BAR to lift the loose floor board between the chairs at the desk and the stove.
Take the HUMAN LEG BONE from the uncovered hole in the floor.
Go to the Middle Crypt of the ruined church.
Middle Crypt
Place the HUMAN LEG BONE in the left space of the plaque on the bone wall.
Place the HUMAN JAW BONE in the middle space of the plaque.
Place the HUMAN HAND BONES on the right space of the plaque.
Take the EMERALD GEMSTONE from the small hole at the bottom of the plaque.
Tap the bowl on top of the pedestal to zoom in and take the OLD WAR LETTER 3/5 inside.
Go back to the Field, then move right to the Manor Entrance.
Chapter 4
Manor Entrance
Collect:
Puzzle Piece 60/99 is at the upper left corner of the building, just below the chimney.
Puzzle Piece 61/99 is on the wall between the two small windows on the second floor.
Puzzle Piece 62/99 is at the top of the right column of the porch.
Puzzle Piece 63/99 is at the middle of the shrub to the left of the steps.
Moth 13/20 is at the upper left corner of the porch roof.
Coin 12/20 is at the base of the left column.
Photo 15/20 is near the top of the middle column.
Go through the front door of the house into the Foyer (Left Side).
Foyer (Left Side)
Collect:
Puzzle Piece 64/99 is at the bottom of the piano.
Puzzle Piece 65/99 is on the floor between the two rugs.
Puzzle Piece 66/99 is in the middle of the round picture frame on the wall.
Puzzle Piece 67/99 is on the blanket folded over the top of the sofa.
Puzzle Piece 68/99 is at the upper left corner of the wall.
Coin 13/20 is on the seat of the sofa.
Continue forward into the Living Room.
Living Room
Collect:
Puzzle Piece 69/99 is at the top of the middle column, just left of the chandelier.
Puzzle Piece 70/99 is at the upper right corner of the wall.
Puzzle Piece 71/99 is on the green table cloth beside the vase of flowers.
Puzzle Piece 72/99 is on the wall beside the middle of the left column.
Moth 14/20 is at the center of the chandelier.
Coin 14/20 is on the floor at the right side of the fireplace.
Photo 16/20 is on the fireplace mantle behind the right figurine.
Move forward to reach the Upstairs Landing.
Upstairs Landing
Collect:
Puzzle Piece 73/99 is at the middle of the wood paneling beside the frame of the left door.
Puzzle Piece 74/99 is on the wall above the railing.
Puzzle 75/99 is on the white wall moulding to the right of the left door.
Go through the left door into the Guest Room.
Guest Room
Take the NATION FLAG 1/3 from the small mirror at the top of the dresser.
Collect:
Puzzle Piece 76/99 is on the wall beside the left framed picture.
Puzzle Piece 77/99 is on the wall to the left of the wash bowls on the end table.
Puzzle Piece 78/99 is on the right red stripe of the blanket.
Moth 15/20 is at the lower right corner of the right framed picture.
Coin 15/20 is beside the left small ceramic decoration at the top of the dresser.
Move back once, then continue through the door at the end of the hall into the Matron's Bedroom.
Matron's Bedroom
Take the OLD WAR LETTER 4/5 is at the top of the bucket under the dressing table.
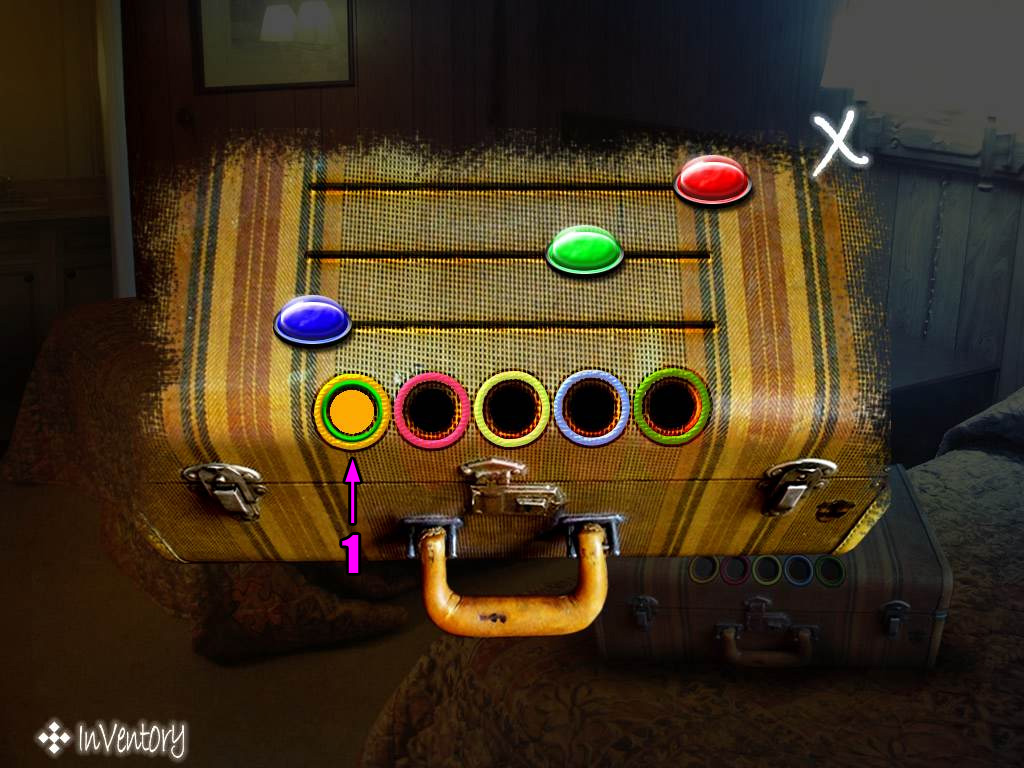
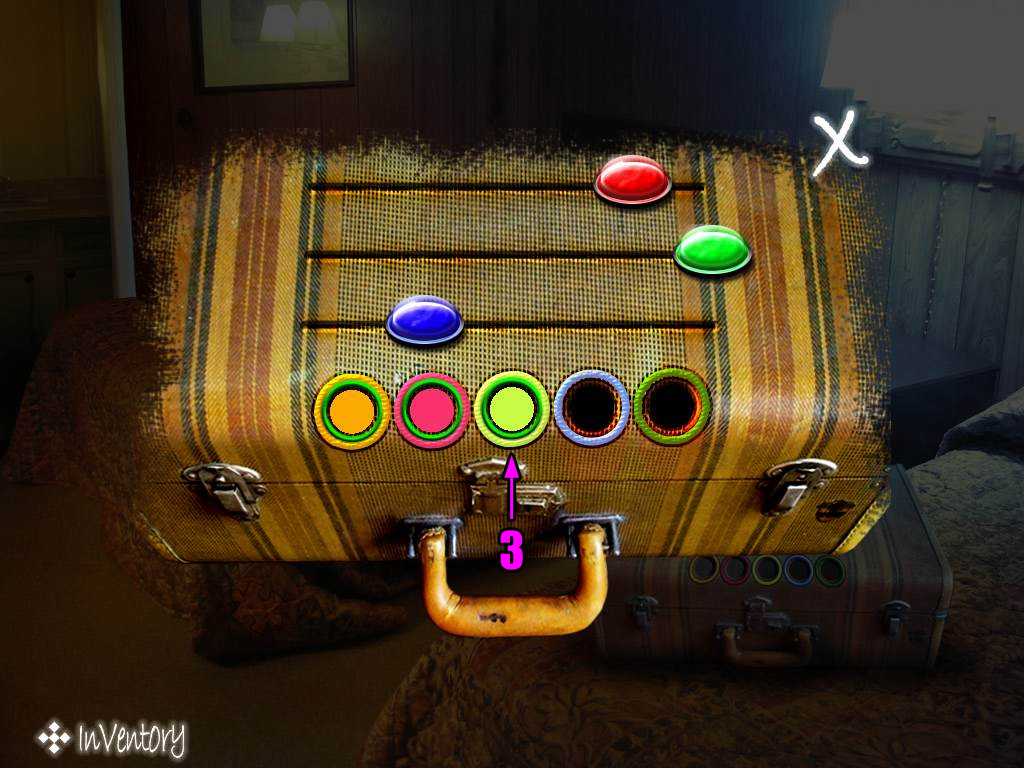
Tap the wooden box on top of the stand to start the puzzle.
Arrange the tiles correctly to complete the picture.
Tap a tile to slide it into an adjacent empty space.
Solution.
After the puzzle is solved, take the RUSTED SKELETON KEY from the box.
Collect:
Puzzle Piece 79/99 is on the floor in front of the rocking chair.
Puzzle Piece 80/99 is at the top right corner of the vanity mirror.
Puzzle Piece 81/99 is on the lower left side of the right window.
Moth 16/20 is at the top of the right side of the clothing rack.
Coin 16/20 is on the floor to the right of the black boots.
Move back once to the Stairway Landing, then go around the left corner to the Hallway Dead End.
Hallway Dead End
Use the RUSTED SKELETON KEY to unlock the door at the end of the hall.
Collect:
Puzzle Piece 82/99 is at the middle of the left wall.
Puzzle Piece 83/99 is beside the upper left corner of the door.
Puzzle Piece 84/99 is on the right wall near the top of the row of drawers.
Moth 17/20 is at the top of the line going through the left wall.
Photo 17/20 is on the right wall under Puzzle Piece 84.
Go through the door to enter the Attic.
Attic
Tap the window shade to pull the screen down over the window.
Add the LIGHT BULB to the middle projector to start the puzzle.
Each projector shines a piece of a pattern onto the window. Tap the projectors to cycle through their images.
Combine the correct three sections from each projector to complete an image.
Every time you make an image, a diagram will be added to your Notebook.
There are 8 total pictures made by the projectors.
Solution.
Go back to the Foyer downstairs, then tap the right area to move to the other side of the room.
Foyer (Right Side)
Collect:
Puzzle Piece 85/99 is on the wall above the bookcase.
Puzzle Piece 86/99 is at the top of the seat of the chair.
Puzzle Piece 87/99 is near the upper left side of the bookcase.
Moth 18/20 is on the wall above the top of the door.
Coin 17/20 is on the mantle beside the right oil lamp.
Photo 18/20 is on top of the clock between the two oil lamps.
Go through the door into the Dining Room.
Dining Room
Tap the framed picture on the wall to reveal a hidden safe.
Inspect the safe to start the puzzle.
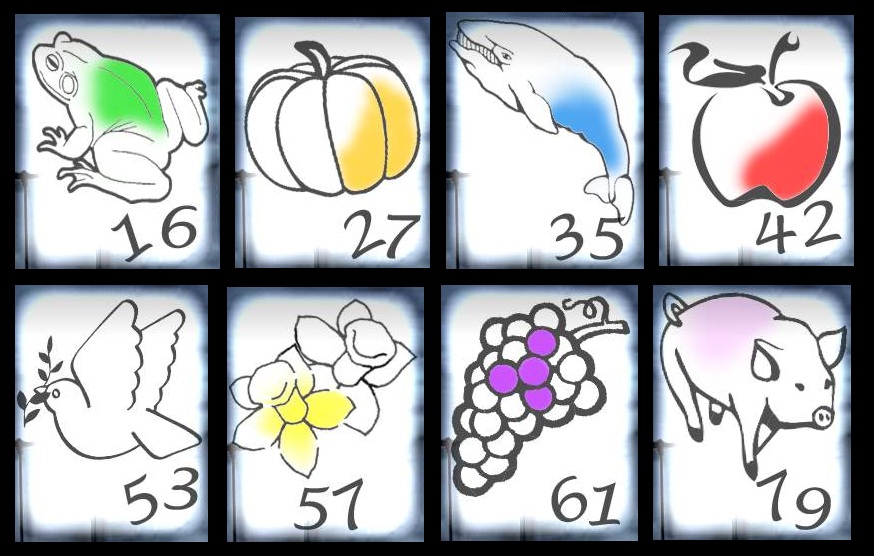
Use the drawings in your Notebook taken from the projected images of the Attic puzzle to find the correct combination.
Note that each slider on the safe has a uniquely colored gemstone.
The top gem is orange, the middle gem is green, and the bottom gem is pink.
There were three projected images seen in the Attic that contained those same colors.
The pumpkin was orange, the frog was green, and the pig was pink.
Each projected image also contained a corresponding number.
Pumpkin = 27, Frog = 16, Pig = 79.
Tap and drag the colored sliders or click the left and right arrows to set the correct numbers of the combination.
Solution.
After the puzzle is solved, tap the handle to open the safe.
Take the RUBY GEMSTONE from inside.
Collect:
Puzzle Piece 88/99 is below the right wall shelf holding three plates.
Puzzle Piece 89/99 is on the right side of the rug under the dining table.
Puzzle Piece 90/99 is on the base of the fireplace.
Puzzle Piece 91/99 is at the front left corner of the dining table.
Go through the next door to enter the Kitchen.
Kitchen
Collect the glowing OLD WAR LETTER 5/5 from the middle bowl on the left table.
Collect:
Puzzle Piece 92/99 is on the wall near the upper left corner of the cupboard.
Puzzle Piece 93/99 is on the right drawer at the bottom of the cupboard.
Coin 18/20 is in front of the dish on the lowest shelf of the cupboard.
Return to the Brick House Entrance.
Chapter 5
Brick House Entrance
Take the NATION FLAG 2/3 on the ground in front of the pile of stones.
Go all the way back to the Storage Room at the side of the station building.
Storage Room
Collect the Photo 19/20 on top of the box labeled "Bethesda Water" on the shelf.
Exit the room and travel to the inside of the Train Car.
Train Car
Take the Photo 20/20 on the left windowsill behind the lamp.
When the last Photo is collected, the COMPLETED PHOTO ALBUM will be added to your inventory.
Return to the Battle Monument in the forest.
Battle Monument
Give all five OLD WAR LETTERS to the ghostly soldiers standing around the monument.
The ghosts will disappear once they've received all the letters, unblocking the right path.
Follow the road to the Right Forest Path.
Right Forest Path
Speak with the ghostly photographer and give him the COMPLETED PHOTO ALBUM.
The ghost will disappear and unblock the rest of the path through the forest.
Collect:
Puzzle Piece 94/99 is in the leaves on the far right side of the screen, just beside the Notebook icon.
Puzzle Piece 95/99 is on the large tree trunk at the left side of the path.
Moth 19/20 is at the top of the fern leaves growing out of the lower left side of the area.
Coin 19/20 is on the ground near the start of the path.
Continue forward to reach the Meadow.
Meadow
Take the NATION FLAG 3/3 in the grass in front of the left side of the pile of rocks.
Collect:
Puzzle Piece 96/99 is on the grass at the left side of the area.
Puzzle Piece 97/99 is on the ground in front of the pile of rocks.
Puzzle Piece 98/99 is in the branches of the tree behind the far right rock.
Puzzle Piece 99/99 is in the leaves above the pile of rocks.
Moth 20/20 is at the top of the far left boulder.
Coin 20/20 is on the grass under the gap between the pile of rocks and the far right stone.
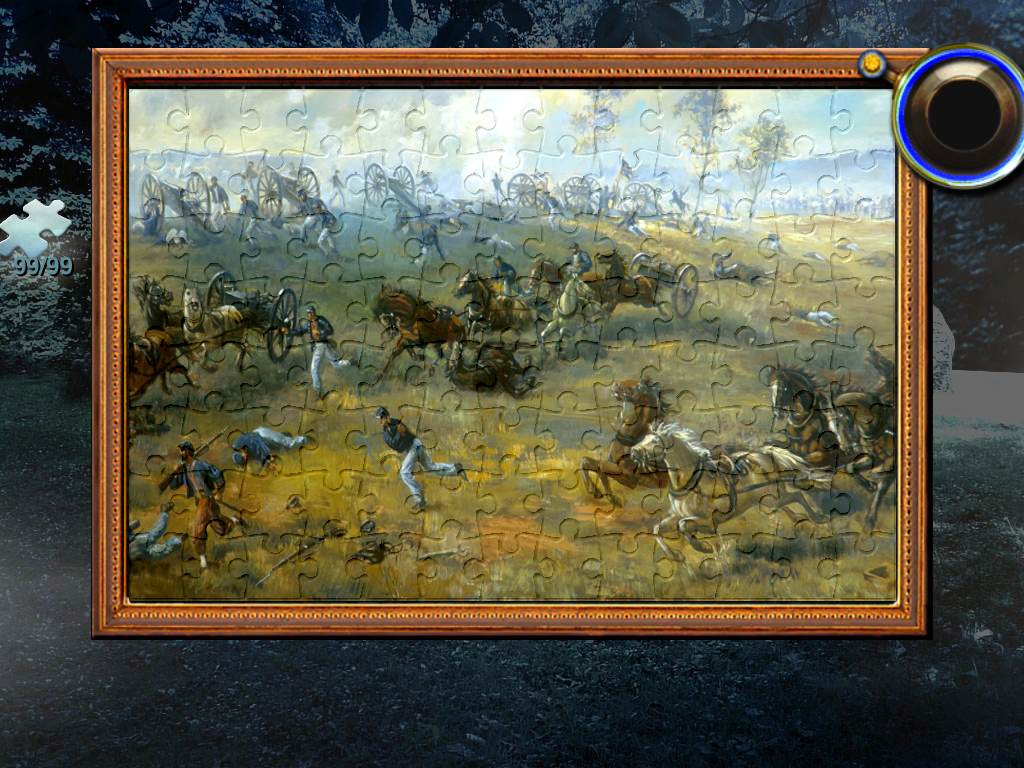
Now that all 99 Puzzle Pieces have been collected, tap the icon on the left side of the screen to start the puzzle.
Assemble all the Jigsaw Puzzle Pieces on the board to complete the picture.
Tap and drag a selected puzzle piece to move it around the board, then release the piece to place it.
If a piece is released in the correct location, it will lock in place.
The easiest way to solve the puzzle is to find and place the corner pieces, then the top/bottom/left/right borders, and then finally the middle section.
Solution.
After the puzzle is solved, the SKELETON KEY WITH RED RIBBON will be added to your inventory.
Go all the way back to the right side of the Foyer in the manor house.
Foyer (Right Side)
Tap the globe between the door and the bookcase to zoom in.
Add the three NATION FLAGS from your inventory to the ring at the top of the globe to start the puzzle.
Identify the nation that each of the four flags belong to, then locate those nations on the globe.
The first flag on the left is the flag of Spain (A).
The second flag is the country Sweden (B).
The third flag is the country Saudi Arabia (C).
The fourth flag is the country Niger (D).
Tap each country on the globe in the same order as their flags.
Solution.
After the puzzle is solved, take the WHITE DIAMOND from the revealed compartment between the four countries.
Return to the Meadow past the right path in the forest, then continue forward to the Vault Entrance.
Vault Entrance
Tap the two valves in front of the pool of water, then tap the third valve hidden beside the right stone and the bush.
The pool of water will disappear, revealing a secret passageway.
Go down into the Vault.
Vault
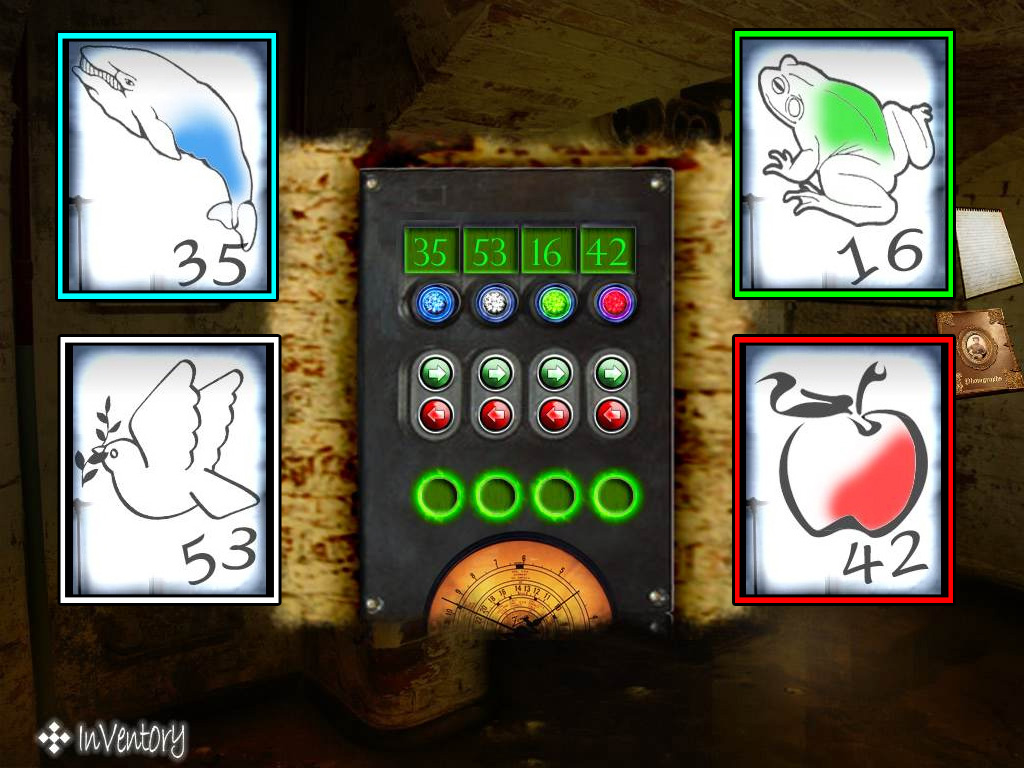
Tap the large, black button panel on the side of the wall to start the puzzle.
Note the four numbers in the squares at the top.
Each number can be found from one of the eight projected images from the Attic puzzle.
35 = the Whale.
53 = the Dove.
16 = the Frog.
42 = the Apple.
Tap the left or right arrows below the gems under each number to change the gem color to match the color of its corresponding animal.
For example, the Whale is blue, so change the gem under 35 to the color Blue.
Change the gem under 53 to White.
Change the gem under 16 to Green.
Change the gem under 42 to Red.
Solution.
After the puzzle is solved, place each gemstone from your inventory into the slots at the bottom of the panel in the same order as the colored gems at the top.
Place the SAPPHIRE GEMSTONE in the first slot on the left, the WHITE DIAMOND in the second slot, the EMERALD GEMSTONE in the third slot, and the RUBY GEMSTONE in the last slot on the right.
Continue through the opened door at the right to the Bunker.
Bunker
Tap the lever on the left wall to pull it down and to the left.
Tap the gun display case to zoom in.
Note the spaces for ten missing guns and one staff-like object.
You've probably seen a few of the guns already.
Locate and collect all 10 firearms, then place them on their matching space in the display case.
Refer to the Collectibles section of the Walkthrough for the locations of the Guns.
Use the SKELETON KEY WITH RED RIBBON to unlock the iron gate.
Continue forward to the Corridor.
Corridor
Tap the lever on the right wall to pull it down.
Go through the left doorway to the Tomb Stairs.
Tomb Stairs
Tap the lever on the ceiling to pull it from the right to the left.
Take the OLD HANDGUN 1/10 lying on top of the steps.
Go down the stairs to the Tomb Entrance.
Tomb Entrance
Pull the lever at the top of the left column down and to the left.
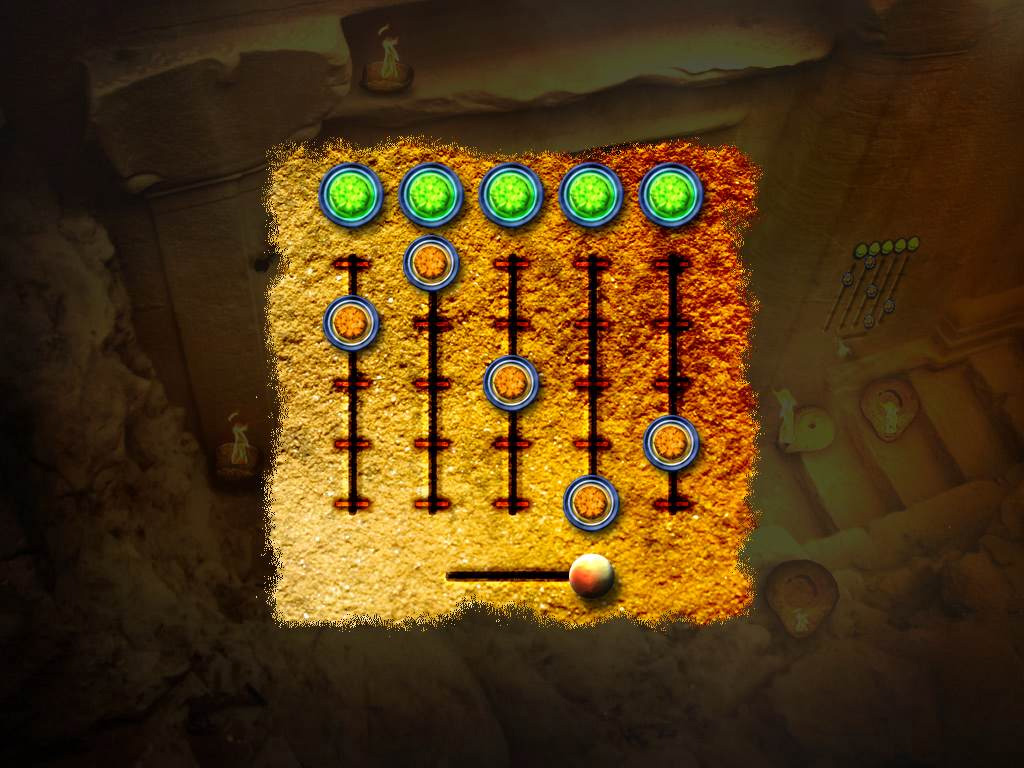
Inspect the sliders on the wall above the stairs to start the puzzle.
Find the correct position of each slider to solve the puzzle.
Drag a slider up or down to one of the five notched points on each bar.
Tap the round button at the bottom to test your solution.
If a slider is in the correct position, the gemstone above it will change from the color white to green.
Use trial-and-error to find each correct slider position.
Solution.
After the puzzle is solved, go through the opened doorway into the Tomb.
Tomb
Pick up the BLACK SKELETON KEY on the ground to the left of the gold coffin.
Go back to the Corridor.
Corridor
Use the BLACK SKELETON KEY to unlock the doors at the end of the hall.
Move forward into the Blue Chamber.
Blue Chamber
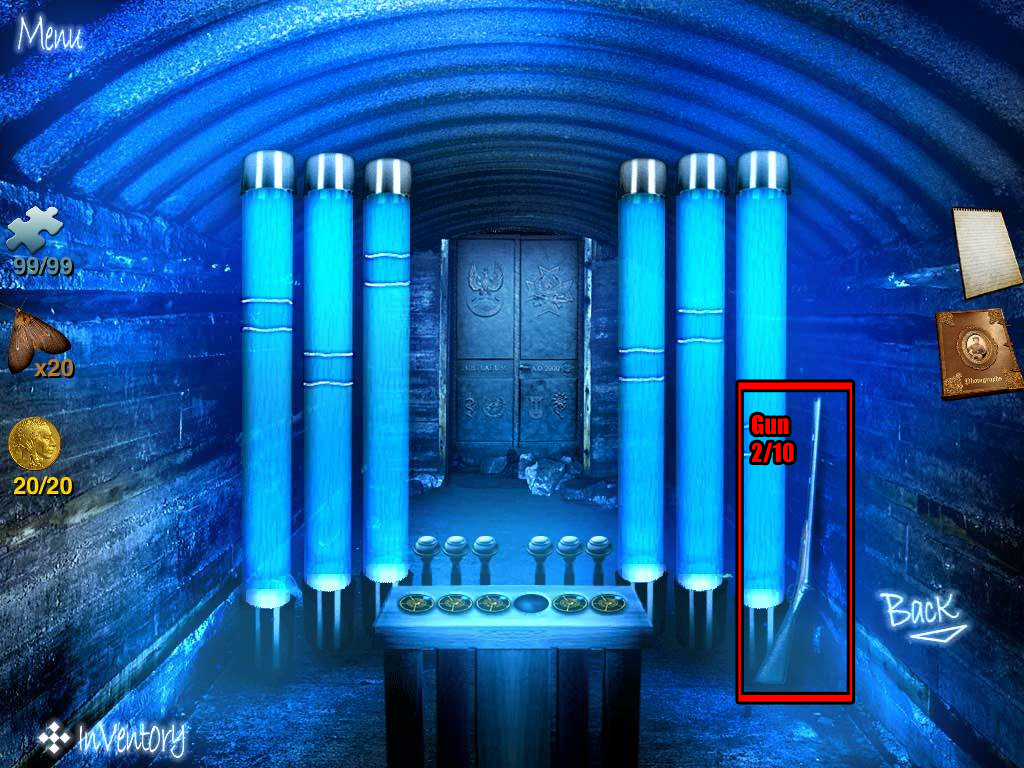
Take the ANTIQUE RIFLE 2/10 leaning against the far right tube.
Go back three times and up the ladder to return to the Vault Entrance.
Vault Entrance
Take the OLD HANDGUN 3/10 in the grass in front of the rocks.
Return to the Lounge in the brick building.
Lounge
Collect the ANTIQUE RIFLE 4/10 mounted on the wall above the fireplace mantle.
Go through the left door into the Small Bedroom.
Small Bedroom
Take the ANTIQUE RIFLE 5/10 leaning against the wall behind the right side of the dressing table.
Exit the building, go down into the Basement, then continue forward into Middle Antechamber.
Middle Antechamber
Pick up the OLD HANDGUN 6/10 from atop the pile of rocks.
Return to the Foyer in the manor house.
Foyer (Left Side)
Collect the ANTIQUE RIFLE 7/10 on top of the piano.
Move forward into the Living Room.
Living Room
Take the ANITQUE RIFLE 8/10 hanging at the top of the wall above the fireplace mantle.
Go back, right, and then forward twice to enter the Kitchen.
Kitchen
Pick up the OLD HANDGUN 9/10 between the candle and the scales on the cupboard.
Go all the way back to the Storage Room at the side of the station building.
Storage Room
Collect the OLD HANDGUN 10/10 poking out of the top of the crate at the lower left side of the row of shelves.
Travel to the Bunker inside the underground vault.
Bunker
Tap the weapons display case to zoom in.
Place all 10 firearms from your inventory onto their respective display racks.
Take the glowing MYSTIC SCEPTER that appears in the last space at the lower right corner of the display case.
Return to the Tomb.
Tomb
Use the MYSTIC SCEPTER on the socket in the ground between the two lower left braziers.
Tap the scepter to pull it to the right like a lever.
The chains at the top of the gold coffin will pull it upwards.
Take the GEAR WHEEL from the revealed side of the gold coffin.
Go back three times and forward once to return to the Blue Room.
Blue Room
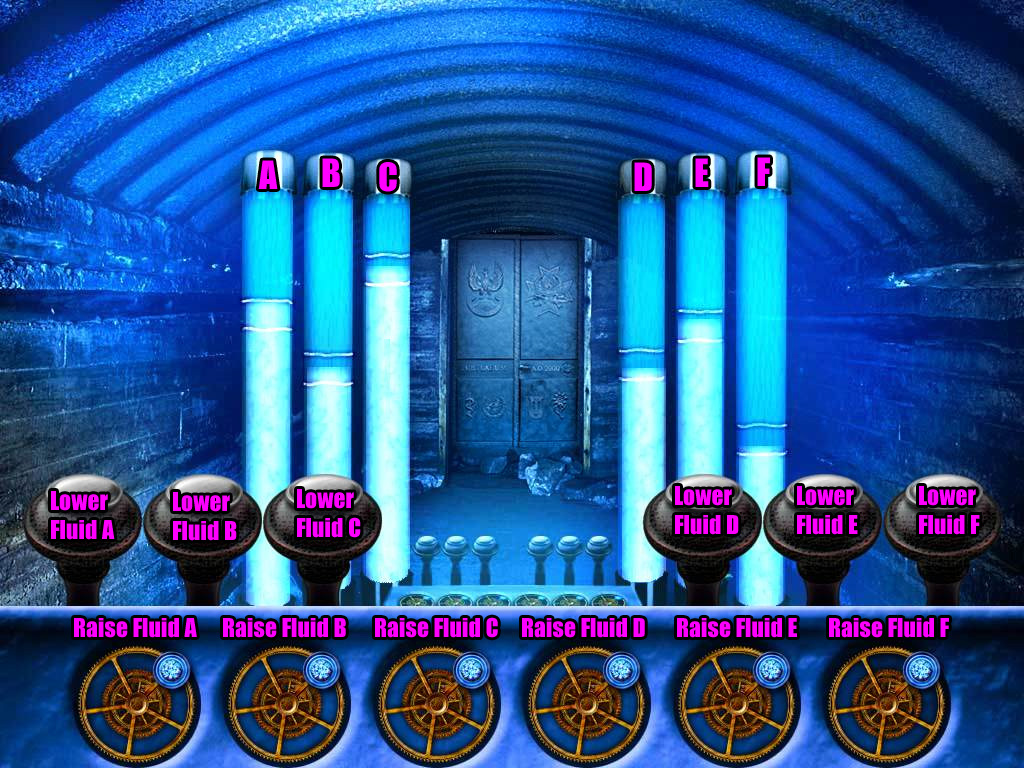
Inspect the button panel at the front of the room.
Add the GEAR WHEEL to the missing space between the matching gears to start the puzzle.
Match the level of liquid inside each tube to the area between white lines on the tube.
Tap a wheel to raise the fluid level of its corresponding tube, and tap a lever to lower its fluid level.
The first wheel and lever on the left affect the first tube, the second wheel and lever affects the second tube, etc.
You must work quickly, as the amount of fluid in every tube will incrimentally lower every second.
Solution.
After the puzzle is solved, go through the opened door into the Altar Room.
Altar Room
Place the COMPLETED PHOTO ALBUM onto the pedestal in front of the golden statue.
Congratulations! You've exorcised the town.
Thanks to Trinn for the walkthrough!
Posted by: Mike |
October 20, 2012 3:42 PM
|
October 20, 2012 3:42 PM