
Primordia
Platform: Windows
![]() I've got a confession to make: I'm actually an android. That's right, I'm not human at all — I'm a human-like robot programmed solely to write reviews. It's not the easiest existence, but I can afford oil and a recharging station with a little honest work. That's more than you can say for the down-on-their-luck robotic protagonists of Primordia, a new adventure game developed by Wormwood Studios and published by Wadjet Eye Games, the adventure mavens who brought classics like Emerald City Confidential, Gemini Rue and Resonance.
I've got a confession to make: I'm actually an android. That's right, I'm not human at all — I'm a human-like robot programmed solely to write reviews. It's not the easiest existence, but I can afford oil and a recharging station with a little honest work. That's more than you can say for the down-on-their-luck robotic protagonists of Primordia, a new adventure game developed by Wormwood Studios and published by Wadjet Eye Games, the adventure mavens who brought classics like Emerald City Confidential, Gemini Rue and Resonance.
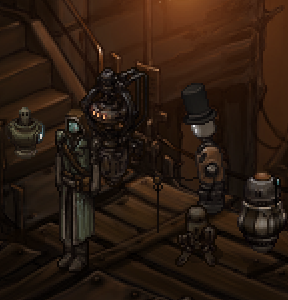 As Horatio Nullbuilt Version Five, you and your floating spherical partner Crispin Horatiobuilt need to explore a post-apocalyptic world while searching for your stolen power core. Along the way you'll encounter plenty of other robots both good and bad, but not the mythical Man, the original builders who vanished from the world in ages past. Maybe you'll even find out what happened to them during your search... assuming you don't end up in the scrap heap!
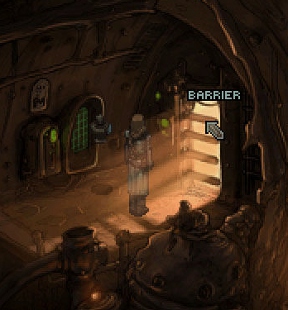
You control Horatio with the mouse and little else. You'll talk to fellow robots to dig up clues using a dialogue tree and, true to the adventure genre, you'll also need to collect items to use and combine from your inventory. You also have a Datapouch, a handy-dandy map/diary/notepad system that allows you to take notes and fast travel between locations to minimize the pain of backtracking. Finally, your most useful tool might actually be your partner Crispin, who can be used like an inventory item to solve puzzles or offer hints in a manner reminiscent of the Lucasarts classic Sam and Max Hit the Road.
Also like the Lucasarts games, there's no death or failure state in Primordia. You're free to explore and experiment without fear of getting destroyed for being curious, though it might still behoove you to keep multiple save slots in case you want to play around with alternate puzzle solutions.
 Analysis: Like many other Wadjet Eye-published games, Primordia is essentially a love letter to adventure games of decades past. In this case, the clear inspiration is the aforementioned Sam and Max Hit the Road. Horatio and Crispin, like the dog and rabbity-thing protagonist of that title, serve as a straight man and comic relief duo when it comes to their commentary. They've got tons of personality and spice up the game quite a bit, which otherwise would be fairly bleak and dreary. The setting and backstory are post-apocalyptic, after all, and this theme is conveyed by the fantastic setting art and music. It's hardly a spoiler to say that the tone becomes more serious toward the end of the game but the characters are endearing enough to keep things entertaining all the way to the end.
As adventure games go, Primordia is fairly simple to work through, as there aren't any instances of bizarre game logic when it comes to puzzles, and if you're stuck for too long in one place you can always ask Crispin for hints... if he doesn't just pipe up and offer them himself! One unique feature is that several puzzles have alternate solutions available, which offers a bit of replay value. Primordia is also a fairly short game, clocking in at perhaps five hours, though there are multiple endings to uncover. The length is hardly a strike against the game, however, as the story is told remarkably well and without any instances of padding out the length with needless backtracking and nonsensical puzzles.
Primordia's a great choice for fans of the genre, and those new to adventure games should be pleased with the moderate difficulty, ample guidance and intriguing plot. It's certainly a visual and aural tour-de-force that's easy to recommend. Humans, cyborgs and androids alike are bound to find something to enjoy here.
![]() Windows:
Windows:
Download the demo
Get the full version (GOG.com)
![]() Mac OS X:
Mac OS X:
Try Boot Camp or Parallels or CrossOver Games.


Walkthrough Guide
(Please allow page to fully load for spoiler tags to be functional.)
Primordia walkthrough
The Dunes: Part One (Emergency Generator)
We open on our heroes standing on top of the UNNIIC. You hear a sound from Engineering, so head down via the hatch, then the hatch on the far wall wall, then the next hatch on the far wall. You'll meet a nasty robot who lasers Horatio and absconds with the UNNIIC's power core.
When you wake up, you're outside the ship. There's a Datapouch on the ground, so grab it - it's brown and looks like a woman's purse. Head to the exit to the northeast - you'll end up under the ship. Right click the generator to look at it. Take the putty from the spark plug connector on top. You need to fix the generator to avoid running out of power, and to do that you'll need a conduit and a spark plug.
Out of the generator screen, grab the cable to the right and the conduit piece (which is kind of small and might be hard to see) next to the grease puddle - that's one of five pieces. Now climb the ladder up to the side of the ship. There's another conduit piece - 2/5 - and use Crispin to get the lantern from the top shelf. Head east, and you'll end up on top of the ship; use the lantern on the hatch to head inside.
In here, grab the Gospel of Man from the nightstand, then right-click on the bed to get the plasma torch.
Use the Datapouch's map feature to head to the Junk. There are three conduits here...well, two, since one of them doesn't work, so that's four of five pieces. Thankfully you can just send Crispin into the tube in the lower right, and he'll get the last piece for you! Next, use the plasma torch on the lockbox to get a spark plug.
You have everything you need to fix the generator now! First, use the plasma torch with the conduit pieces to get a fused conduit. While you're at it, use the plasma torch on the cable to cut some cable off. Next, use the putty with the small bit of cable. We'll use this later. For now, hook up the conduit and spark plug to the emergency generator to get it running again.
The Dunes: Part Two (The Bomb and the Dome)
You end up in the recharging station in the UNNIIC. Head back into the power room, use the radio and take the plug, then combine the plug with the remaining long cable. We'll use this later too. Also grab the LCD. The plans for the energy sensor you're trying to build are on the floor, for reference.
Head back to the bedroom and grab the crystal - it's small and hard to see, but glimmers periodically so you can find it that way. Combine the crystal with the putty'd short cable, then the plasma torch with the long cable/plug. You end up with a putty/crystal and short cable/plug. You end up with a crystal/cable/plug. Take this apparatus and plug it into the interface in the power room.
You'll get a readout:
652
817
608
671
212
159
We'll be using this momentarily. Step out the east side of the power room and use the rag to make it blow away. Then head back up to the top of the UNIIC and use the telescope. One of these will point to a robot, while the other will point back to the junk pile, and a third will point to a device.
You can now travel to the robot with the Datapouch, but before you go, make sure you get your sensor array back from the interface in the power room. Next, head back to the first screen of the game where you found the Datapouch to get the rag that blew away a second ago, which you can take to mop up the grease near the generator and get a sticky rag. Finally you can travel.
Go to the robot first. Use the plasma torch on the hand to the far right of the screen to get a rusty fingertip. Use the vents - the robot's nose - to have Crispin go up and get a bigger view. Now shove the fingertip in the robot's nose by using it on Crispin. Yes, really. Also use the the sticky rag on Crispin to shove that up the other nostril. Again, really. The robot's mouth opens, and you can enter.
Talk to Alpha and Beta, the small robots, about all the available topics. The most important information you get is the Bomb Detonation Prefix: 6 and the System Reboot Code: 9876.
Next, send Crispin up into the hatch. When he gets back, use the cable on him, and he'll tie it up in the hatch so you can climb it. In the hatch, talk to the floating robot - it'll give you a code: 001011010. Use the panel on the CPU, then click again to look at it. Enter the code from top to bottom using the buttons; in other words, push the 1s and don't push the 0s. Then push the red button. This should stop the sparking from the brain.
Head back down. The keypad should be working now, so use it and enter 9876 to activate the elevator. Use Monitor 3 here. Gamma will move between monitors to try to avoid you - keep an eye on them and hit the monitor that flashes last to catch him...or that's how it's supposed to work, but even if you do it right you're not actually going to win now. You can come back later to succeed, which will affect your ending. If you don't care, just use the plasma torch on the monitors. You'll end up killing Gamma off, but he'll call you Horus before going. Go tell Alpha and Beta what happened, then leave and head to the device.
You'll find a preacherbot named Ever-Faithful here. Talk to it and go through the various conversation options - you'll end up with the coordinates for the dome. You'll also have to answer a quiz. The answers are: We are here because Man built us, Man is a perfect machine and our duty is to maintain the world. He'll then ask your name; it's Horus, and you wouldn't know this unless you'd done the previous segment with Gamma. Ever-Faithful will then allow you to take a bomb from the shell, so do so. You'll get B-325. Take this back and try to power the UNNIIC with it by placing it on the pedestal in the power room. Unfortunately, it won't work.
Head to the Dome next. There's a corpse laying against the dome's wall - examine it, then get the transmitter from the pocket. Also get the CPU from the AA gun. Combine that with the LCD monitor and the result with the sensor array to make a mobile sensor.
To "properly" finish the quest with Delta, you can use the mobile sensor. Go back to Delta and use the sensor to ensure you only break the monitors with no energy reading. You'll eventually trap him and win a decryption module for your trouble.
To actually enter the door, we can play around with a supposed voice-activation system...or just blow the thing up. Let's go with the latter. Go back to the UNNIIC, use the bomb with the grease to make it sticky, then head back to the door. You can stick the bomb to the door, but that's not enough, as you need a way to detonate it.
Head back to the junk pile. Take your mobile sensor and wave it around a bit onscreen - you'll find a part of the junkpile toward the top of the screen where it glows. Click it, then use Crispin on that spot to get the battery. use the battery on the transmitter then head back to the dome. Use the transmitter on the trapped door then enter 6325. Boom. Enter the dome.
Use the ticket machine, follow its instructions to use the scanner, then get the ticket. Use the ticket on the control panel and enter the station. Use the train when it arrives.
Metropol: Part One (The Courthouse)
When you arrive in Metropol, head through the door and follow the path. After a scene, you'll lose the Gospel of Man and the mobile energy sensor will be damaged. Right click the burnt sensor in your inventory to get the crystal and plug back. Head left to meet Leopold - talk to him about everything available. You can browse his wares if you want, but it's not a big deal; we'll be back here later. Further left still you'll see a computer terminal; use it and enter the command LAWS to get a printout.
Continue to the left; you'll reach a path with a cable in the way. Use Crispin on it to move it so you can proceed. Talk to the repairbot about all possible options, then continue left. Talk to the robots and you'll eventually be tested - the answers are 4, 3 and 1. Don't mess this up, as you only get two attempts before the robots refuse to test you any further. Afterwards, settle their dispute - I chose option 3. You'll get a coin. Also talk to the military bot near the door and go through all the options.
With that done, head back to Leopold. Trade him your coin for the memory access device - combine it with the plug, then with your datapouch. Also trade him the crystal for the crowbar, which you can use on the metal plate nearby to remove it.
Go down the hatch and use the crowbar on the hood of the car nearby to remove the rust and get to the engine and fan belt, both of which you should get. Take the engine back up and trade it with Leopold for the small motor.
Head back over to the repair bot and his floating companion - the floater has the copper wire you need to fix the motor. Use Cripsin on her to find out he's afraid of talking to lamps, then step back to the other screen and use the lamp on him so he can practice. Go back again and use Crispin on her again to get the wire. Use the wire with the motor and complete the (simple) minigame to fix it.
Now put all this on hold, go north from Leopold and right-click on the door. Head back to the military bot at the courthouse and tell him that the damage was superficial; when he asks for laws, give him the printout. He'll leave.
Next, use the signal transmitter on the antenna robot. Run through the various options with him and eventually you can give him the motor. He'll leave and you'll have gotten a record out of the deal. The door to the courthouse is now clear...but we still can't get in without a keycard.
Head back down the hatch, then go all the way right and talk to Primer. Exhaust all the options with him, finding out that Primer is #137. Head all the way left to the bridge, then use Crispin on the keypad. The code, naturally, is 137. The drawbridge goes down and you can cross. Do so, watch the scene and meet Clarity. Exhaust all the dialogue options with her. You'll end up with the keycard. Use it to get into the courthouse.
Turns out that after all that work, Arbiter's not in any condition to help. Approach Arbiter, then look at Charity's corpse in the back corner. Remember how you added that memory access device to your datapouch? Use it on the hole in Charity's head.
After the scene, you're cornered with Scraper nearby - use the signal transmitter on the reporter robot. This will get you outside, but Scraper will catch up. You can use the law printout on Scraper to try and stop him...but it won't work. Give up and wait until the countdown is over instead.
Metropol: Part Two (The Tower)
After the scene, you'll still be alive. Go see Clarity back across the drawbridge. After the scene, she'll join you. Head back to the area with the cars, then head to the lower right exit. This area would be blocked off by a Shell normally, but Clarity will take it out for you. Continue to the exit. Take the hatch.
Use the crowbar on the panel. Take the small and large gears and remove the belt. We'll be back here in a bit. For now, go back up to the street near Leopold and talk to Oswald. Exhaust all the options with him, then go to Clarity's camp again. Look at her collection of skulls and get Laurence's skull from the stake. Use the Datapouch on it to get a code - 518 - which Oswald will reveal is a distress call used by Factorbuilt robots when you ask him about it. Use the Signal Transmitter on Rex to get him to run off, which will allow you to get Oswald's oil. Naturally, the oil will clean the gears. Go back and fix the gearbox using the clean gears and the fan belt from earlier.
Press the button above the gearbox. This will reveal Factor and also drop a disc that you should grab. You need to contact Factor now - use the signal transmitter to transmit 518. Factor's partial will appear. Exhaust the conversation options with him, then in the following scene, give Laurence's skull to the partial. You'll get a couple parts of the code. You can now leave, but on the way out examine the junk on the way leading to Factor to get Laurence's gold chain and the Gospel of Man. Head back up to the street and give Laurence's chain to Oswald; he'll give you his monocle.
Go to the information kiosk and use the monocle. This part is probably the best puzzle in the game, incidentally, and it's fun to figure out for yourself why you enter the codes:
Enter MEMORIOUS, OBLIQUE, REDLIEN (sic), ART, CREATED, LIES, ESCAPE, ORACLE.
Go through the conversation with the construct when you're finished entering codes. You'll get a couple more parts of the code. Next, use your Gospel of Man on Leopold. You'll get more parts still. With all these parts, you can go talk to Primer, and he'll give you the fully assembled code. Go use the code on the door to open it up and enter.
Use the elevator button and enter, then hit the dial. After the scene, you'll be told to go to Calliope Station. Head back to the courthouse and get Scraper's arm from the rubble by using the crowbar. Next, go to the subway station you were at way back when you arrived at Metropol and use the subway map. Calliope Station is on the left, on the Blue Line - when you click it, you find a secret button that opens a nearby door. Go through it, head down the hall. The next door is locked. Use the plasma torch to cut the cables on the floor. Hook up Scraper's arm to the cable and it'll open the door so you can enter.
Metropol: Part Three (The End)
After the scene, take Crispin's Matrix from his wreckage and the datachip from the ground. Go to MetroMind's lair in the tower again. Go through the conversation tree, but stop when you have the chance to say you'll think about it.
You can end the game by talking to MetroMind and saying you'll join her or not, but you can also leave the way Clarity pushed you before she was destroyed and climb up the girders. You can jump off the ledge and end the game that way. You can use the plasma torch on the power core for a couple more options there; my vote for the 'best' ending, the one that was intended, is if you use the plasma torch on the core then choose to leave. There's a couple more options if you have the decryption module from way back when during the sequence with Delta as well, since you can get the virus off the data chip using it. Either way, you're done!
Posted by: corygalliher |
December 8, 2012 6:58 AM
|
December 8, 2012 6:58 AM