
![]() While there are no shortages of short escape-the-room games out there, lengthier adventures with enigmatically coded locks and multiple adjoining rooms, especially ones that hold up to the test of logic, are a rarer find. Among those few that manage to both confuddle and delight with seamless logic and an impeccably clean design, stands Kotorinosu with Room Γ as a one-in-a-million (nearly) flawless escape. Inexplicably locked inside these space age surroundings, with no narrative and the only words nearly invisible in the abstract, your goal is to search around, connecting what you see to what you can do, progressing forward until the last door swings open to set you free. Perhaps it doesn't sound like much, but in Kotorinosu's hands, it means you can happily while away a large chunk of your afternoon in this weekday escape.
While there are no shortages of short escape-the-room games out there, lengthier adventures with enigmatically coded locks and multiple adjoining rooms, especially ones that hold up to the test of logic, are a rarer find. Among those few that manage to both confuddle and delight with seamless logic and an impeccably clean design, stands Kotorinosu with Room Γ as a one-in-a-million (nearly) flawless escape. Inexplicably locked inside these space age surroundings, with no narrative and the only words nearly invisible in the abstract, your goal is to search around, connecting what you see to what you can do, progressing forward until the last door swings open to set you free. Perhaps it doesn't sound like much, but in Kotorinosu's hands, it means you can happily while away a large chunk of your afternoon in this weekday escape.
 To get started in the first room, point and click to explore and navigate, following arrows on the side of the screen to change views, or clicking a doorway or hallway to move that direction. The cursor doesn't change over active areas, leaving you to rely on other visual indicators while looking under furniture and around corners. Sometimes those details are inconspicuous or miniscule or camouflaged by our eyes' tendency to overlook the forest in the trees. Inventory is kept in the side bar where you can highlight to use (the item will follow your cursor) or click the tiny "i" to view an item in detail (which you'll need to do from time to time). Helpful is how inventory items disappear only when they're no longer usable.
Typical of Kotorinosu's style, Room Γ is full of puzzles that rely on figuring out how or where to use objects and decoding ciphers, no bouts of arithmetic or too obvious answers. It's like Device or a Neutral creation in its level of challenge. Among multiple puzzles and rooms, you'll find yourself going back and forth a lot, repeatedly opening and closing your inventory, and reusing items. It can be a bit irritating to have to fiddle with so many items, especially because that tiny "i" for each inventory item means some precision clicking, making you wish for double-click method of opening detail screens that Detarou uses. Although there's no true pixel hunting, because this escape is challenging, anyone who gets stuck will probably spend a long time fruitlessly clicking anywhere and everywhere, wondering if they missed a pixel somewhere. More likely, it's just easy to miss the spot where an item is used. The visuals are so serene and aesthetically pleasing that there are at least two hide-in-plain-sight moments with the potential to trick us. But as lovely as it is to look at, the best part of Room Γ is its use of puzzles. They fit the theme and feel original even as they're not completely unique, making the experience feel like more than a simple escape—it's easy to overlook the flaws and dub Room Γ a perfect break out adventure.


Walkthrough Guide
(Please allow page to fully load for spoiler tags to be functional.)
Room Gamma Walkthrough
Note: You must complete all steps and view all clues before a puzzle can be solved.
Room 1 Exploration
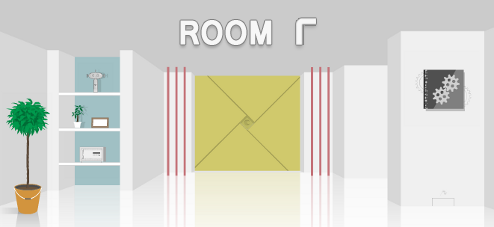
When you start, you'll be facing a wall with a green inset and a triangular table. Take a better look at everything in this scene:
Note that one of the track lights is out; something brown is up there but you can't reach it.
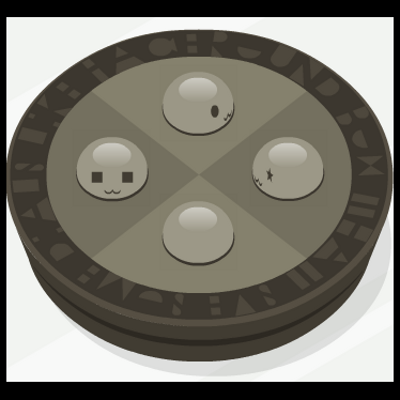
On the table is a round box with four mochi-like characters it. They can be turned in various directions.
There is an alien-like figure on the green wall. He has red stripes and his eyes look two different directions.
To the right of the alien guy is a brown box with some peg holes on its lid as well as a keyhole on its front.
To the left of the green inset and triangle table is a blue control panel in the wall:
Very abstract lettering indicates this is the "Air Conditioner" and "Room Light" controls. Note the lines going down from each control to the battery compartment.
Open the battery compartment and find a BATTERY (1/5). Take it!
Turn left to face the red sofa and explore this view:
Under the star pillow is a YELLOW MARBLE. Get it.
You can get a BLACK MARBLE from the clock-like wall decor thing.
The blue bird picture is bolted down.
The red/green dragonflies picture is wobbly.
Lastly, take note of the eyes on the green-striped alien guy on the end table.
Go left again to face a slender triangle window and a planet-design door...
Examine the pink fish and see it is a thermometer. Note the little arrow at 7 degrees.
The canister by the window is screwed closed.
The planets door is locked and the panel next to it has four quadrants, each needing a number.
Your last left turn has you facing a black'n'white door and an entertainment center. More useful things can be found in this view, too:
Look at the snail figurine and get the GREEN MARBLE.
Examine the purple-striped alien dude and note his eyes.
There is a white box under the alien dude that you could open now, but let's look at a few more things first.
There is a drawer under the TV but you need a key.
Notice that the left corner of the rug is raised up a little? Something is under there...
Look under the rug to find a hatch. Open the hatch to get a REMOTE CONTROL.
Open up the REMOTE CONTROL and put the BATTERY inside it.
Now you're ready to start solving puzzles and opening locks.
White Box by the TV
If you've seen the three alien-type figures around the room, you're ready to solve the white box by the TV. It's on the shelf under the purple-striped alien.
Zoom in on the top of the box and you'll see six switches: two green, two red and two blue.
To open the box, set the switches either up or down according to their color.
SOLUTION:
The answer is in each alien's eyes...
down-down-up-down-down-up
When the switches are set correctly, you'll hear a clicking sound and will automatically step back from the box top.
Open the box to get...
A CAMERA.
There's another battery in the back of the camera, but you'll need a screwdriver to open it up.
Round Box on the Triangle Table
If you haven't already, get a BATTERY from inside the air conditioner/room lights control panel and put that battery inside the REMOTE CONTROL.
Use the REMOTE on the TV and observe the image on Ch. 1.
(While you're at it, look at channel 2 and 3, making a mental note of what you see for later actions.)
Turn left from the TV and examine the round box on the triangle table:
You need to turn the mochi-like characters to match the image you saw on TV. One character is left out, so you can assume its point of view for solving the puzzle.
SOLUTION:
Screenshot: Round Box
You'll hear an unlock sound when they're all turned the right direction.
Open the round box and get:
a SCREWDRIVER.
The Brown Box (part 1)
Once you obtain the SCREWDRIVER, use it to open two things:
The back of the camera to get the second BATTERY (2/5)
and the canister by the fish to get a GREEN BOOK.
After getting the battery from the camera, open the remote and get the other BATTERY out of it.
Next, turn back to the blue air conditioner control panel:
Insert BOTH BATTERIES into the left side of the panel, as indicated by the brackets under the A/C control buttons. Then click the "on" button (third button from the left).
Now that the A/C is working, what's next?
Remember the markings on the back of the fish thermometer?
SOLUTION:
Set the temperature to 7 degrees as indicated by the arrow on the back of the fish.
Before leaving, TAKE THE TWO BATTERIES BACK OUT OF THE A/C.
With the A/C set to the correct temp, head over to the fish by the window. Now, when you click on it, the fish pulls apart and you can get:
the FISH
and a KEY to the brown box.
Go over to the green wall and zoom in on the brown box:
Use the KEY, open it up, and get a CAMERA MEMORY CARD.
The Dragonfly Picture
Insert the MEMORY CARD into the camera.
If you haven't already, also retrieve the two batteries and put them in the camera and the remote control.
Go over to the TV and turn it on to Ch.2
Take a picture of the screen with the CAMERA and then examine the camera to retrieve a PICTURE CLUE.
Now go to the dragonfly picture and use the clue to know which corners to click on.
SOLUTION:
The triangles on the picture clue indicate which corner to click on the dragonfly picture.
TOP RIGHT
BOTTOM LEFT
TOP LEFT
BOTTOM RIGHT
BOTTOM LEFT
TOP RIGHT
You'll hear a click when you get it right. Click on the picture again to open it up:
Get the SNOWMAN.
The Snowman, White Drawer and White Panel
Examine the SNOWMAN in your inventory:
Use the SCREWDRIVER to replace the snowman's missing arm.
The other arm will pop out...it's a KEY to the white drawer.
Go over to the drawer under the TV and use the KEY to unlock it.
Get the BOOK CARD.
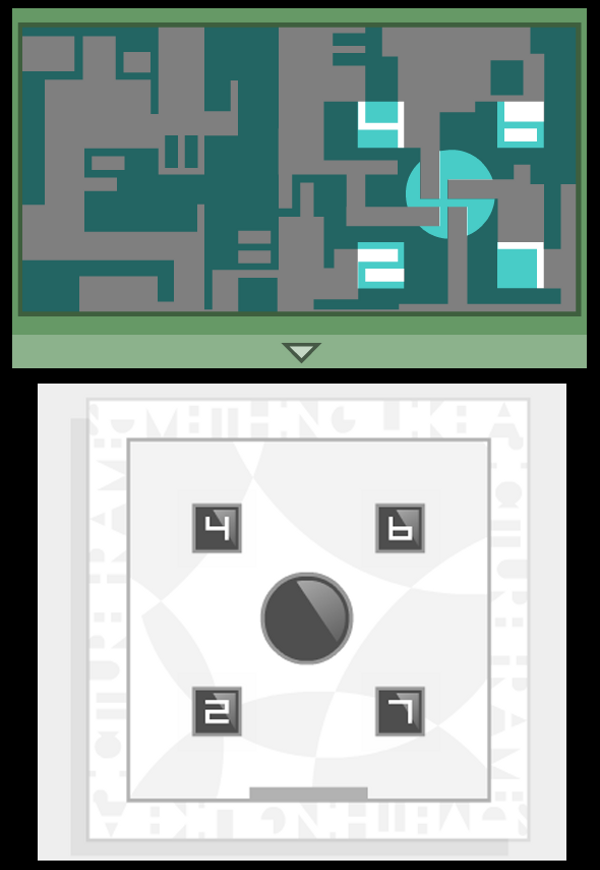
Open the GREEN BOOK (the one from the canister by the window) in your inventory:
Open the lid and insert the BOOK CARD.
Now close the lid to solve a puzzle.
SOLUTION:
Screenshot: 4-Numbers Squares
When the puzzle is solved, you'll have 4 numbers.
Go over to the planets door and zoom in on the white panel on the wall:
Enter the correct numbers (see screenshot above) to open the panel.
4 - 6
2 - 7
When you get the white panel open, you'll get:
the other SNOWMAN ARM.
Black'n'White Door and Room 2
Put both the right and left ARMS into the snowman, taking back the screwdriver.
Next, push the snowman's belly and a pattern of pegs will pop up.
Go over to the green wall again and zoom in on the brown box.
Put the peg-belly SNOWMAN on top of the brown box and open it up.
Get the KEY to the black'n'white door.
Use the KEY to unlock the black'n'white door and go inside room 2.
Examine the box on the floor, under the pink wig picture:
get the RED BOOK
then notice that a wrench is needed for the bottom of the box.
Read the RED BOOK.
The first few pages explain that the red flowers open up when it's warm out. So go back to the first room and set the temperature up to about 20 degrees.
Return to the second room, examine the red flowers and get the RED MARBLE.
Next, look at the items on the left wall:
The black box needs a key
and you can move aside the avocado plant sprout to get a BLUE MARBLE.
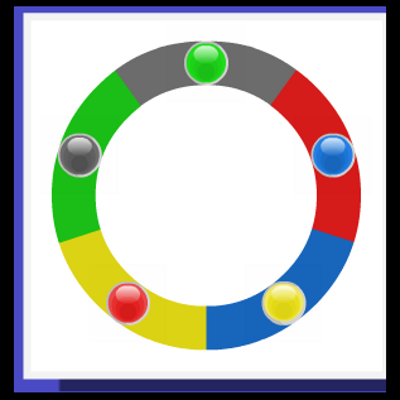
Examine the white box on the lower shelf, under the red flowers:
Notice there is something missing on the lid, but for now, you can still open the box by clicking the left edge.
Inside, there's a ring of five colors. Place each of the colored marbles in the correct place then close the lid again.
Get the KEY to the closet.
Open the closet and inside you'll see a clue and a LADDER.
The Robot and the Black Box
Remember the brown thing up in the lights? Take the ladder back out to the first room and set it up under the missing light (above the green wall).
Then, climb up to get the ROBOT HEAD from the light fixture.
Return to room 2 and examine the robot:
Put the ROBOT HEAD back on the robot and its arm will lift up, creating another screwdriver.
Look at the top of your screwdriver: it has a screw on it. So, use the robot arm to open your SCREWDRIVER...
Get the PENCIL from the top of your screwdriver.
Use the PENCIL inside fourth page of the RED BOOK for another clue./li>
Now you can solve the robot's arm puzzle:
Click the left or right arms of the robot as indicated.
SOLUTION:
Remember that "L" (left) refers to the robot's left not your left, so click the robot arms in this order...
RIGHT-LEFT-RIGHT-RIGHT-LEFT-RIGHT-LEFT
When done correctly, the head pops back up but this time it's a KEY to the black box.
Turn left from the robot and examine the black box on the shelf. Use the KEY to open it:
Get the CAN OPENER.
Pink Hair, More Marbles and the Wrench
Once you get the can opener, look at the pink hair picture:
The shape of the "face" under the pink hair should seem familiar...
SOLUTION:
Insert the FISH into the pink hair's face.
With the correct piece in place, you can open the picture to find a CAN OF PINEAPPLE.
Use the CAN OPENER to open the PINEAPPLE.
"Eat" the pineapple until you find a DISK.
Go back to the white box on the lower shelf:
Put the DISK on the top of the box, then solve a puzzle for another clue.
Turn the disk until the lines match up to make a sort of star pattern. Those lines have arrows showing how to re-arrange the marbles.
Use that clue to rearrange the marbles...
SOLUTION:
Screenshot: Marbles 2
Close the lid again and get the WRENCH.
There are three places you can use the wrench. First, examine the box on the floor under the pink hair picture:
Use the wrench on the bolt and move the box aside. There's some sort of starting line here.
Next, go into the first room and examine the blue birds picture above the sofa:
Use the wrench, open it up and get a yellow RACE CAR.
Lastly, get the LADDER back from under the track lights:
Use the wrench to remove the brackets from the ladder.
Next, examine the ladder and click on its middle to expand its length.
Exploring Downstairs
Remember the hatch under the rug? Turn to the TV scene, lift up the rug, open both lids to the hatch and use the LADDER there. Now you can go downstairs.
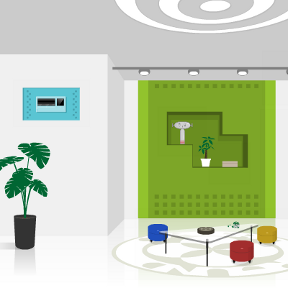
Once downstairs, go down the hallway on the right to see another room (it's pictured in this review's banner).
Examine the plant on the left side of the screen:
Get the BUCKET and the CAR CONTROLLER
Examine the CAR CONTROLLER to find a third BATTERY (3/5).
Then lift the panel under the plant to see a well of water; something's down there that you can't reach.
Back up and examine the alien guy on the top shelf of the blue inset:
Turn him around and you'll see three switches....
You can infer from the antenae on its head and the numbers, that these control the TV channels...
Ch 3 was offline. So, switch the 3rd switch to blue for "on".
On the middle shelf is a picture frame..
something needs to be inserted in back to complete the picture
On the bottom shelf is a silver safe box; it needs a 5-digit code to open.
The big yellow wall in the middle has an insert for a crescent moon shape.
On the right side are some gears and a piece of paper stuck under it.
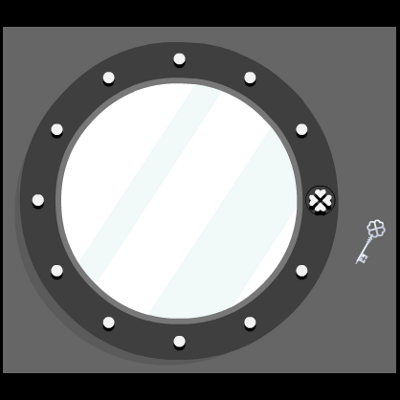
Finally, notice that there appears to be an alcove off to the right (between the gears and the yellow wall). Click there to go to a new view: a sink and a porthole window.
The sink is missing a knob and the porthole has a clover design on its right edge.
On the floor is a yellow CRESCENT MOON but if you pick it up, the door closes, locking you in the alcove. In this dark room, you can see a 6 glowing on the moon.
Go back upstairs to solve another puzzle.
Safe, Knob, Crank Handle and Gears
Channel 3 on the TV should be working now (if not, explore the downstairs again). So go back to the TV and turn it on to channel 3...
Make a note of the symbols you see on the screen:
Star-Moon(facing right)-Planet-Star-Moon(facing left)
Now take the batteries out of the TV REMOTE and the CAMERA.
Go over to the air/room lights control panel by the green wall:
Insert all three BATTERIES and turn out the lights.
Turn around the room and look for things that glow:
First, notice the light from the window points to a spot on the wall...examine there and you see a square hole.
Turn left and look at the star pillow: 3 .
Turn left again and look at the planet on the door: 4 .
Turn back to the control panel and turn the lights back on.
Go downstairs and examine the "silver safe box":
Enter the correct 5-digit code to open the safe.
SOLUTION:
the symbols on channel 3 represent the numbers you saw on objects upstairs when the lights were out plus the crescent moon in the downstairs alcove. Remember the crescent moon is turned around at the last digit...
3 6 4 3 9
After entering the correct code, press "E" for enter. It will read "OPEN".
As you click the knob to open the unlocked safe, though, the KNOB breaks off.
Go back to the sink in the alcove...
use the KNOB to turn on the water
Then fill up the BUCKET with water.
Now go back to the water well under the plant:
Pour the bucket full of water into the well and the jar will rise up to where you can reach it.
Open the jar to get a CRANK HANDLE.
Return to the first room and turn out the lights...
Follow the point of the window's light to the square hole. Use the CRANK HANDLE here.
Turn the lights back on and take back the 3 BATTERIES.
Downstairs again, examine the area behind gears picture:
get a SCOOP.
Look at the floor below the gears picture:
get a TRANSPARENCY paper with a HEART design.
Take the SCOOP over to the plant and use it to unbury the fourth BATTERY (4/5).
Heart Picture, Race Car and Sun Box
Insert the HEART TRANSPARENCY into the picture on the second shelf...
Then turn the picture frame back to the front (the background will be white).
Put a battery back into the camera and take a picture of the HEART again.
Get the PICTURE from the camera for another clue.
Then take the BATTERY back out of the camera.
Go back upstairs, go into room 2...remember the opening behind the box on the floor? There's a starting line there.
Put the BATTERIES into the RACE CAR and the CAR CONTROLLER.
Then, put the RACE CAR on the floor by the starting line.
Use the CAR CONTROLLER and the race car will drive off.
Go back downstairs and look at the spot under the gears again:
The race car has pushed out the panel. There you find a CLOVER KEY.
Pick up the RACE CAR again.
Now go into the alcove and examine the porthole above the sink:
Use the CLOVER KEY here to open it up and get the SUN BOX.
Screenshot: Clover Key
Go upstairs with the sun box and do everything as shown in the picture to get it open:
Re-insert batteries, turn the A/C down to cold (7 works) so that the flowers will close and turn off the lights to make the room dark, as shown in the clue.
Then, go over to the triangle window and hold the SUN BOX in the light.
It will glow and you can open it to get the gold SAFE KNOB.
Turn the lights back on and take back the 3 BATTERIES.
Hammer, Crescent Moon and Wires Puzzle
Take the new gold SAFE KNOB downstairs and use it to open the safe...
get the HAMMER.
Go back into the sink alcove. Examine the crescent moon on the floor:
Pick up the moon and the wall will close.
Use the HAMMER to break the cracked spot in the bottom right corner of the wall.
Back up and put the MOON back in its spot.
Reinsert the batteries into the CAR CONTROLLER then set the RACE CAR on the starting line behind the moon.
Now you can use the race car to push the moon out through the hole in the wall without getting trapped behind it.
See that drawing on the wall? You saw it before, so you know where the wall came from.
Back up and put the MOON into the yellow wall.
The yellow wall's panels shift, revealing some wire circuits. A small compartment also opens along the right edge:
Get the fifth BATTERY (5/5).
Go upstairs and into room 2. Look inside the closet to see a new puzzle:
First, insert the 5 BATTERIES into the podium below the wires puzzle and press the ON button.
Then, turn the tiles until all colors are linked up correctly.
SOLUTION:
Screenshot: Wires Puzzle
When it's all lined up properly, go back downstairs. Press the button in the middle of the yellow wall....
Get the GOLD KEY.
Head back upstairs, turn to the planets door, use the GOLD KEY and escape!
Congratulations!
Posted by: elle |
June 12, 2013 12:17 AM
|
June 12, 2013 12:17 AM