
Escape from Mr. M's Room
Platform: Mac, Windows, Linux
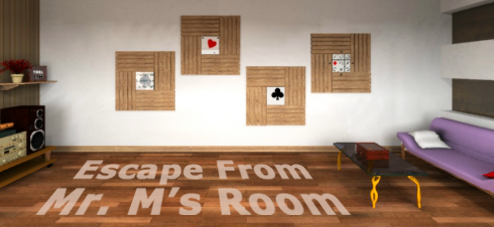
![]() Your friend Mr. M and you share a common interest: love of a nice cup of tea. Therefore, when he invites you to drop by his new place with a great view, you go there at once. Here, inside this lovely mod style flat, you learn that Mr. M and you share another common interest: locking friends up and requiring them to solve a slew of tricky puzzles in order to get out. Thusly begins Tesshi-e's 89th escape game and first paid download game, Escape from Mr. M's Room.
Your friend Mr. M and you share a common interest: love of a nice cup of tea. Therefore, when he invites you to drop by his new place with a great view, you go there at once. Here, inside this lovely mod style flat, you learn that Mr. M and you share another common interest: locking friends up and requiring them to solve a slew of tricky puzzles in order to get out. Thusly begins Tesshi-e's 89th escape game and first paid download game, Escape from Mr. M's Room.
 After purchasing and downloading the Flash file, Escape from Mr. M's Room is played the same as any other Tesshi-e game. Point-and-click to explore each scene, gather clues, operate devices and utilize inventory. Mr. M is rather more guileful than Tesshi-e's other friends, so puzzle solutions require much more diligence to come by while the lack of changing cursor or a hint system leaves you without extra assistance. Still, textual descriptions—choose English or Japanese before starting—keep confusion down. Despite a couple abstruse puzzles, made more challenging by subtlety, complicated computations in mathematical logic and a profusion of "clues" that aren't actually cluing you into anything, once you get past a couple rough spots, the rest should roll smoothly.
As a download, the graphics are higher definition and Mr. M takes advantage of this fact with extra touches of animation. It's fun to behold these details yet they distract from the real clues and can cause frustration. Just note that not everything you see will have a purpose beyond looking good. Is it worth the download? If you love escape games, the answer is a resounding yes! There is no disputing Tesshi-e is a star author when it comes to room escape games. A mastery of puzzle design and a true talent for building charismatic game environments makes any Tesshi-e creation a must play. We've been extremely fortunate to be treated to an abundance of free browser games from this author, even at a time that others are slowing down their output. That should be reason enough to purchase Escape from Mr. M's Room, to support an artist who has provided countless hours of enjoyment to escape fans everywhere and to ensure we continue to get quality games to play. Other than that, Escape from Mr. M's room is just what you expect from a Tesshi-e game, nothing more and, gladly, nothing less. For Tesshi-e fans and friends everywhere, that is a very good thing indeed.
![]() Windows:
Windows:
Get the full version
![]() Mac OS X:
Mac OS X:
Get the full version
![]() Linux:
Linux:
Get the full version


Walkthrough Guide
(Please allow page to fully load for spoiler tags to be functional.)
Escape from Mr. M's Room Walkthrough
Explore the Room & Solve the Mr. Birdy Puzzle
You start the game facing the exit door and the television area. Turn left once towards the windows.
Click the left end of the long shelf under the windows to inspect the stack of books beside the bed.
If you lift the books at the top of stack, you'll find a NOTE. Examine the note in your inventory.
The words "Cut off" are written between a series of four symbols: a circle, an upright triangle, an upside-down triangle, and a square.
Hmm... These clues may not seem relevant yet, but let's keep them in mind for later.
Click the edge of the bed to look over the right side and into the gap between the bed and the wall.
Take the sneakily hidden TV REMOTE leaning against the bottom of the wall.
Back up twice to zoom out completely, then turn left for a full view of the back of the room.
Click the pillow on top of the bed for a closer look.
Lift up the yellow pillow and you'll see the word "YELLOW" written at the top.
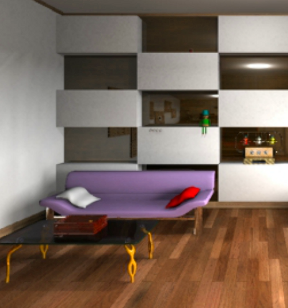
Back away from the bed and then click the couch to zoom in.
Inspect the two pillows on the couch. The white pillow on the left is labeled "WHITE" and the red pillow on the right is labeled "RED".
These clues seem a bit obvious, I wonder what the significance of writing the words out on each pillow is?
Click the back button to move away from the couch, then take a step towards the checkered back wall. Examine the three Mr. Birdys on swings found in the lower middle panel of the wall.
If you zoom in on the red Mr. Birdy at the left, you'll see the number 3 on his hat.
Similarly, the white Mr. Birdy in the middle has the number 3 on his hat and the yellow Mr. Birdy has a hat with the number 1 written on it.
In the box under the birds you'll find three buttons that cycle through a list of letters that are not in alphabetical order and a compartment that looks like it might dispense something. We've found our first puzzle!
HINT:
I'm sure you've noticed by now that the colors of the three birds are identical to the colors of the three pillows you inspected earlier. But what could the numbers on their hats mean and how do they relate to the 3-digit combination box below the birds?
SOLUTION:
Remember how the word for each color was written out on the pillows? The number on the matching colored Mr. Birdy refers to the position of the letter in those words.
For example, the number 3 on the red bird indicates the 3rd letter of the word "red" which is "D".
Since the red bird is on the left swing, enter the letter D into the left button.
The white Mr. Birdy also had the number 3 on its hat. The 3rd letter of the word "white" is "I".
Enter the letter I into the middle button of the box.
Lastly, the yellow Mr. Birdy's hat was numbered 1. The first letter of "yellow" is "Y".
Press the right button on the box to enter the letter Y.
After the combination "D-I-Y" has been set, a BOTTLE OPENER will appear in the dispenser at the bottom of the box. Click it to add it to your inventory.
We're all done here for now. Move back twice and then turn right twice to return to the view of the exit door and television set.
Solving the TV Puzzle
Examine the TV REMOTE in your inventory.
Remove the panel at the bottom of the remote and take out the batteries.
There's a strange, hourglass-shaped white pattern inside the battery compartment. Jot the clue down in your memory bank, then close the item window to return the item to normal.
Click the clock hanging on the wall above the TV for a close-up view.
Ah-ha! It's that same hourglass shape you saw inside the remote, this time it's on the clock's hour hand. Take note of the time the clock has rather suspiciously stopped on, 7:00.
Back out, then click the television to examine it next.
Notice that the TV REMOTE from your inventory appears at the left side of the screen while you're viewing the television.
Press the red power button at the upper left side of the remote to turn on the TV. You can watch several different channels, but only a few have important clues for you.
First push the 4 button on the remote to go to Channel 4.
On this channel you'll see a green doll wearing a hat move to one of four locations in a pattern that's repeated on loop.
The doll starts at the inner right location, from there it jumps to the inner left position, then the outer right spot, back to the inner right, then to the outer left, and lastly at the outer right again.
In short, the pattern of the doll's movements is: Inner Right - Inner Left - Right - Inner Left - Left - Right.
Next, go to Channel 7. The doll's here again with a brand new pattern!
Watch it carefully and note the unique order: this time it's: Inner Left - Left - Inner Right - Left - Right - Inner Right.
That's enough TV for now. Let's see if we cant put those clues to use.
Back away from the television and turn left twice to view the back wall again. Click the wall to view it more closely, then click the doll sitting in the left glossy panel to zoom in.
Well, this doll should look plenty familiar, you just saw the little celebrity on TV!
To the left of the doll are four small, white buttons that light up when pressed. Now you just need to figure out what order to click them!
HINT:
Only one of the codes is correct. Use the information from the clock & remote to determine which pattern is the one you need.
SOLUTION:
The hourglass shape inside the TV remote indicates the "time" and the time on the clock that had a matching hourglass symbol on its hour hand was stopped at 7:00.
Therefore, you need to press the buttons in matching order of the doll's movements in the pattern that you saw on Channel 7. You can ignore the red herring on Channel 4 completely.
For example, if the doll appeared in the far left position, you would push the far left button. If it moved to the inner right position after that, then you push the inner right button next, etc.
On Channel 7, the doll appeared in this order:
Inner left - Left - Inner right - Left - Right - Inner right.
So all you need to do is simply push the buttons in the exact same order, and voila! Another puzzle bites the dust.
Once the right combination is entered, the panel will pop open. Take the PACHINKO MACHINE (a slingshot) from the revealed cache.
There seems to be something else inside the compartment in the wall, but it's too dark to see. You'll have to return later when you've found a way to light the area.
"Cut Off" - The Shapes Puzzle
Examine the NOTE that you found earlier in the middle of the stack of books.
Click the BOX CUTTER in your inventory to select it. Don't worry, you're not going to have to cut anything off! But you do need to cut something out...
Use the BOX CUTTER on the NOTE to cut out the green shapes, leaving four geometric holes in the piece of paper.
Turn left towards the four framed pictures on the wall. Examine the spade picture at the far left first.
There sure are a lot of numbers here, let's single out the important ones. Place the NOTE on top of the center of the picture.
The paper covers most of the numbers, but the four in the middle of the circle shape are plain to see: 5859. You can ignore the cut off combination in the square shape, it's another red herring.
Back up, then click the framed heart picture next.
Place the NOTE over the picture and take a look at what's visible inside the shape cut-outs.
Specifically, you can see "/12" in the upright triangle at the lower right corner of the picture. Ignore the numbers in the square again, this herring is even redder than the last one.
Move back again and then click the club picture to take a closer look.
Well, this is an easy one. Put the NOTE on the picture and you can plainly see the number 16 is tucked neatly into the center of the upside-down triangle shape.
Back away, then click the last framed picture on the right, the diamond picture.
Place the NOTE over the game of tic-tac-toe to see what appears inside the shapes.
Inside the circle shape is... a circle, so we can ignore that.
But inside the square shape you'll find a big "X". This looks a little more important, so keep it in mind!
You may have noticed that there are some screws around both the diamond picture and the heart picture. They're stuck on tight for now, so we'll have to come back again later when we have something to get rid of them.
Step back from the wall and turn left towards the television set. Click the box beside the flower vase on the wall shelf to take a closer look.
On this box are the four shapes you've seen a lot of in the past few minutes as well as a combination lock that you can click the cycle through the numbers 0-9.
The first shape on the left is the upside down triangle, then the square, then the circle, and lastly the upright triangle. But what does it mean? You'll need to put together all the clues to figure it out!
HINT:
You're not looking for a single digit number that corresponds with each shape. Rather, you need to put all the shapes together. Order is important!
SOLUTION:
Combine the values you found inside each shape when you placed the NOTE on the framed pictures to create an equation. Solve the equation to find the final combination.
First on the box is the upside-down triangle. When you put the note on the club picture, the number 16 appeared inside the upside-down triangle. There's your first part of the equation.
Next is the square. The X shape you found inside the square when you placed the note on the diamond picture is actually a multiplication symbol.
The third shape on the box is the circle. In the spade picture you found the number 5859 inside the circular cut-out.
The last shape is the upright triangle, which is the trickiest one. When you placed the NOTE over the date in the heart picture, both the number 12 AND the "/" symbol, indicating division, appeared in the upright triangle.
Put it all together and you're left with this equation:
16 x 5859 / 12 = 7812.
Enter 7812 into the box to solve the puzzle.
Once the puzzle is solved, take the HEART PANEL from the opened puzzle box.
Now that that's out of the way, let's start putting some of our inventory to good use.
More Exploring & The Diamond Puzzle
Click on top of the left speaker beside the TV to zoom in on a glass bottle.
The bottle's shut tight with a cork, but you've got just the tool to take care of that!
Remove the cork with the BOTTLE OPENER. Take the BOX CUTTER inside the opened bottle as well as the popped CORK that is placed beside the bottle.
Step back from the bottle and then turn around towards the back of the room. Click the glass coffee table for a closer look.
The wooden box on the table has a key with a string which keeps it just out of reach of the lock.
Cut the string with the BOX CUTTER, then use the freed SPADE KEY to unlock the box and take the SCREWDRIVER.
Back up from the table and turn left towards the framed pictures on the wall. First click the heart picture to inspect it.
Use the SCREWDRIVER to remove the two screws at the center.
Remove the heart panel to reveal a hidden compartment behind the picture, then take the CAMERA inside.
Move back from the picture, then turn right. Click the checkered wall to get closer, then zoom in on the left panel where you solved the doll puzzle earlier.
Click the panel to open it and look inside the wall cache. Use the CAMERA to light the dark area.
A picture of a red diamond surrounded by a series of numbers will appear inside the CAMERA. Take note of the numbers and which corner they appear in, you're gonna need this info very soon!
Once it's been lit, you can click the inside of the cache to take out the CLUB KEY.
Back away from the wall and turn left to return to the view of the framed pictures. Click the diamond picture to check it out.
Remove the four screws at the center of this picture with the SCREWDRIVER. The picture won't come off the wall, but it is loosened enough that you can move the corners.
Ohhh, it's one of those puzzles, isn't it?
SOLUTION:
Simply click the corners of the picture frame in numeric order as they appear in the CAMERA clue.
Examine the CAMERA in your inventory. 4 and 6 are in the upper left corner, 2 and 3 are in the upper right, 1 is in the lower left corner, and 5 is in the lower right.
Therefore, the order you need to click the corners of the frame is: Lower Left, Upper Right, Upper Right, Upper Left, Lower Right, Upper Left.
If you clicked the corners in the correct order, the diamond picture at the center of the frame will pop open, allowing you to take the SPADE PANEL inside.
The Pachinko Machine & The Hippo Puzzle
Turn right to face the back wall. Click the right side of the couch to look underneath it.
Use the CLUB KEY to open the red box under the side of the couch, then take the HANDLE from the opened box.
Back up and move towards the wall again, then click the top right section of the wall to look upwards.
Near the very top of the wall you'll see a clear plastic ball just out of reach. You have just the right tool to get that ball down.
Examine the PACHINKO MACHINE in your inventory.
Select the CORK and add it to the band of the slingshot to load the weapon.
Use the PACHINKO MACHINE on the plastic ball to shoot it down from the wall. Now let's find where it landed!
Move back twice to zoom out, then click the bottom of the bed to look underneath it.
Pick up the PLASTIC BALL on the floor under the bed, then inspect the ball in your inventory.
Click the ball to open it, leaving you with a wind-up key SPRING.
Back away from the bed, then turn right twice to return to the view of the television. Click the trio of miniature hippos on top of the DVD player between the tv and the right speaker to zoom in.
Insert the SPRING into the socket at the lower left side of the green box under the hippos.
Pay close attention to the order in which the hippos open their mouths: Middle - Right - Left - Left - Right - Right.
Back up and turn left once to face the windows. Examine the wheel on the floor underneath the shelf.
Attach the HANDLE to the side of the wheel, then click the handle to turn it.
Take the white BALL that rolls out of the wheel and on to the tray.
Inspect the PACHINKO MACHINE in your inventory again.
Load the white BALL into the slingshot to ready your weapon with another round.
Zoom out and turn left towards the wall again. Click the top left section of the wall to look up.
You can see a small diamond shape near the top of the wall, but it's just out of reach again.
Use the PACHINKO MACHINE to shoot the tile down.
Back up, then click the right side of the purple couch to look underneath it, where you'll find the fallen DIAMOND PANEL on the floor behind the couch.
Back away and turn right to face the windows once again. Click the small wooden hippo at the right end of the shelf under the window.
Here's a simple puzzle. The small hippo is standing on a box that has three buttons which you can click to light. All you need to do is push them in the correct order.
SOLUTION:
Press the buttons in the same order that the three hippos by the television opened their mouths.
For example, since the middle hippo opened its mouth first, you would therefore push the middle button first.
Push the buttons in the following order to complete the puzzle: Middle, Right, Left, Left, Right, Right.
After the puzzle is solved, take the DIAMOND KEY from the hippo's opened mouth.
The Panel Puzzle
Turn towards the back wall. Click the section of the wall above the headboard of the bed for a closer look.
Use the DIAMOND KEY on the keyhole in the wall to open the glossy panel above it, revealing a strange digital box.
Note the equation currently showing on the box (Diamond + Club = 6) then remove the CLUB PANEL from the lower left side of the box.
Next, insert the HEART PANEL into the empty socket on the box.
Study the new equation that appears: Heart + Diamond = 8.
Take back the HEART PANEL, then place the DIAMOND PANEL into the box.
There's another equation: Diamond + Spade = 11.
Remove the DIAMOND PANEL. Put the SPADE PANEL in its place.
Memorize this final equation: Heart + Spade = 9.
Take the SPADE PANEL back and step away from the wall.
Turn right once, then click the odd box on the wall between the two windows for a closer look.
This strange little box has four sockets which the HEART, CLUB, DIAMOND, and SPADE PANELS all fit nicely into.
Once a panel is inserted, its shape appears at the left side of the box and a digital number appears at the center.
The right and left buttons beside the numbers can be pressed to cycle forwards and backwards through the numbers, respectively.
But what order should the panels be inserted into the box? We'll have to take another look around the room to find out.
Step away from the box and turn around to face the four framed pictures on the opposite wall.
At the center of each picture is one of the four all-important symbols: spade, heart, club, and diamond.
But we don't need them in order of left to right! We need them from top to bottom.
Look closely at the position of the frames and note them in order of highest to lowest frame on the wall: Heart - Diamond - Spade - Club.
Now you're all set to get started on the puzzle! Turn back around and click the box between the windows to zoom in.
SOLUTION PART 1:
Insert the panels from your inventory into the box in the order you observed from the framed pictures on the wall.
At the top is the HEART PANEL, followed by the DIAMOND PANEL, and then the SPADE PANEL, and finally at the bottom is the CLUB PANEL.
SOLUTION PART 2:
Now that all the panels are in place, you'll need to set the right number beside each shape.
Solve the equations from the digital box where you used the panels earlier to find the value of the four shapes.
With some mathematics and the help of the substitution method, you end up with the following equations.
Diamond = D, Heart = H, Club = C, Spade = S.
Solving for Heart:
H + D = 8.
D = 8 - H.
H + S = 9.
S = 9 - H
D + S = 11.
8 - H + 9 - H = 11.
17 - 2H = 11.
17 = 11 + 2H.
6 = 2H
H = 3
Solving for Diamond:
3 + D = 8
D = 5
Solving for Spade:
5 + S = 11.
S = 6.
Solving for Club:
5 + C = 6.
C = 1.
Enter the numbers into the box to complete the puzzle:
Heart - 3, Diamond - 5, Spade - 6, Club - 1.
Once the puzzle is solved, take the HEART KEY that's dispensed at the bottom of the box.
You can turn right and use the HEART KEY to unlock the exit door, but don't go out the door just yet!.
If you leave now, you will receive the Normal End. There's still work left to do if you want the Happy Coin End!
Happy Coin End
Inspect the HEART KEY in your inventory.
Click and hold the key to look at the back side. Note the number 10 inscribed at the top.
Now that's a vague clue! But there is one place where 10 is an important number. You'll just have to channel your inner Room-Escape-Guru (hint, hint).
Go to the TV and press the power button on the remote to turn it on.
Press the button to go to Channel 10, where you'll see the word "ROW" spinning across the screen.
I don't see any boats, so where else would a three-letter word like "ROW" come in handy? (wink, wink)
Turn around to face the back wall. Click the Mr. Birdy box to take another look.
Press the buttons to set the letters R-O-W into the box.
Yay! Take the HAPPY COIN that appears in the dispenser at the bottom of the box.
Go to the exit and walk out the door, HAPPY COIN in hand, to complete the game and receive the Happy Coin Ending. Hooray for you!
Posted by: Trinn |
August 7, 2013 12:43 AM
|
August 7, 2013 12:43 AM