

![]() It's spring cleaning time in some parts of the world. Shaking out the dust and sweeping away the cobwebs isn't the most fun way to spend your week, but the resulting fresh, pretty rooms are so worth the effort. Speaking of rooms that are worth the effort, if you're feeling it's time your home got a new look, check out these three distinctly different design styles from Hottategoya, FunkyLand and Kamokichi. They might be all the inspiration you need, whether you're going for an interior overhaul or just need to escape-the-room you're in for a few moments.
It's spring cleaning time in some parts of the world. Shaking out the dust and sweeping away the cobwebs isn't the most fun way to spend your week, but the resulting fresh, pretty rooms are so worth the effort. Speaking of rooms that are worth the effort, if you're feeling it's time your home got a new look, check out these three distinctly different design styles from Hottategoya, FunkyLand and Kamokichi. They might be all the inspiration you need, whether you're going for an interior overhaul or just need to escape-the-room you're in for a few moments.
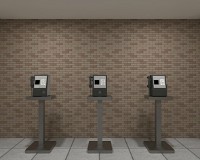 Escape from the Room with Public Phones - Hottategoya has this minimalism thing in the bag, and they know it. The mantra being: if you have a style that works for you, then work it for all it's worth. In the same vein as other Hottategoya games, such as Escape from the Room with 10 Safes, Escape from the Room with Public Phones is quite clever, even if rather austere looking. Using little to go on, you must solve a series of codes before you can find freedom, making this quite appealing to those who want some mental challenge without a lot of extraneous fluff. Colors, scenery, birds in top hats? Bah! Who needs 'em?
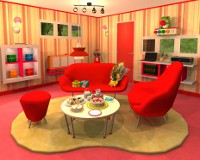 Candy Rooms No.7: Carmine Pop - There was once a time in my life that, when I heard someone say "FunkyLand," I thought of cruising on my roller skates under the disco lights. Now FunkyLand is synonymous with whimsical mini-escapes and a very sweet motif. The bummer is, it's more eye candy than gameplay, somehow managing more puzzle-solving simplicity than the scrumptious scenes and smoothly-designed interface promise—whether there are plump green apples or pieces of candy involved. Even so, it remains immensely gratifying while it lasts. So, if you're looking for a speedy fun fix, why don'cha groove to these snazzy tunes while finding five yum bombs?
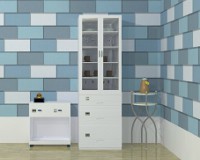 Yana Escape - by Kamokichi is a delightfully puzzle-y escape that is perfectly pleasant in all regards. Until you hit a pixel hunt that is anything but. In a symbiotic contrast to Hottategoya's minimalism, Yana Escape's clean design is certainly eye-catching, such a beautiful setting it's almost a shame to leave it. But as you casually poke around, browsing the pretty decorations and stylish furniture with as much bemused regard as on a trip through IKEA, you'll discover clues and hints, guiding you toward open locks and, eventually freedom. Hmm. Makes me crave some Kanelbullar and elderflower juice.
We love escape games, and our readers love talking about them and sharing hints! How about you? Let us know what you think, ask for clues, or help out other players with your walkthroughs in the comments below.


Walkthrough Guide
(Please allow page to fully load for spoiler tags to be functional.)
Yana Escape Walkthrough
This is basically a coin-collecting game: you need 15 coins to open the door next to the couches. (There's another door, and it's even labeled "Exit", but I think that's the "I give up" ending. Or something. But I don't read Japanese, so what do I know.)
There are 7 coins in plain view (well, OK, you know what I mean - you don't have to solve anything to get them):
Top of wire shelf
Bottom of rolling cart (the one with the bird clock)
Behind the bird clock
In the bird teapot
Top shelf of hutch, in the left-hand scalloped basket/tray/bowl/whatchamacallit
On the coffee table, in among the cookies
Back of couch (door view)
The remainder of the coins are in the various drawers and cabinets around the room.
Box on wavy shelf:
The clue is on top of the bookshelf to the right, but it's upside-down.
After putting in the code, turn the box upside-down, too.
Note that the box is just the little tan rectangle, not the whole gray & white thing; the gray & white part is the top of the three-door cabinet.
Pink (top) door with four colored buttons:
Examine the right side of the wire shelf.
Colorblind help:
The buttons on the pink door are arranged in the same order as the "columns" of the shelf, so you don't actually need the colors here.
Solution:
Green-Yellow-Pink-Blue-Yellow-Green-Blue-Pink, aka 24134231
Blue (bottom) door with 3x3 shape puzzle:
First, you need to collect four puzzle clues.
Yellow (middle) door
Behind blue vase on bookshelf
Left side of left-hand couch
In brown cabinet next to the other door
Combine the clues to solve the puzzle. The spaces with the black border can't be changed, and are thus a good hint about where to start.
Solution:
Circle-Circle-Triangle
Diamond-Triangle-Diamond
Triangle-Triangle-Diamond
Left-hand drawer under the bird-clock:
The clock is the clue to the drawer, so it seems pretty straightforward. The problem is that the arrows on the drawer control both the drawer and the clock, so if you try to use the arrows, you'll change the code.
Instead, just click on the numbers on the drawer to change them, matching whatever code the clock is currently set to. (And if you've been struggling with this puzzle for a while, the clock will almost certainly not say 871.)
Right-hand drawer under bird-clock (square and hexagon buttons):
Look at the shapes on the wire shelf. Ignore which hand the shapes are in.
Solution:
hexagon square hexagon square square hexagon hexagon square, or RLRLLRRL
Top drawer of hutch (buttons with girls holding sticks):
Look at the figures on the wire shelf again, this time noting which hand is holding the flag.
Solution:
L L R L R R L L
Middle drawer of hutch (buttons with glasses/cups):
Count the items of each shape.
Don't forget to count the wine glass on the coffee table.
Solution:
945
Bottom drawer of hutch (plain number buttons):
Look at the white table between the wire shelf and the brown cabinet.
It doesn't seem like enough information, but it really is.
Solution:
240
Once you have all the coins, put them into the slot next to the door, and exit to your just reward.
Posted by: Reka |
April 16, 2014 3:56 PM
|
April 16, 2014 3:56 PM
Candy Rooms 7: Carmine Pop Walkthrough
Gumball
1. Get the book from under the gumball machine.
2. Put the book with the others like it on the right wall. Get the lever.
3. Put the lever on top of the contraption with the men in top hats. Push it down to reveal a four-digit code.
4. Put the code into the box above the four presents on the left wall. Get the knife.
5. Use the knife to cut a slice of cake (coffee table). Get the coin.
6. Use the coin in the gumball machine.
Taffy
Check the wall lamp above the gumball machine.
Lollipop
Check the bouquet on the couch.
Wrapped wafer
Look closely at the blue present.
Colorblind help:
The blue present is on the top right.
Hard candy
Look at the presents on the left wall; note the location of each color. Set the dials on the frog (right wall) to point to those locations, then press the square button.
Colorblind help:
The presents are arranged like so:
Green BlueYellow Red
The buttons under the frog are, left to right, red, blue, green, and yellow.
Posted by: Reka |
April 16, 2014 4:14 PM
|
April 16, 2014 4:14 PM
Escape from the Room with Public Phones Walkthrough
Examine all five payphones.
The lone phone on the left has square unlabeled buttons. If you press them, different designs appear on the display.
If you combine the designs from each button press, you get some sideways numbers: viewed one way, it says 68, and viewed the other way, it says 89.
The leftmost of the three phones has round buttons labeled 0-9CE, and it needs a keycard.
The middle phone has octagonal buttons labeled 0-9CE, and it needs a coin.
The rightmost of the three phones has square buttons labeled 0-9CE. If you press them, some of them show colors on the display.
2 = blue, 6 = green, 8 = white, 9 = red
The lone phone on the right has octagonal buttons labeled 0-9*#. They don't seem to work, even though the phone doesn't have a coin or card slot.
Look at the box next to the door.
How are the buttons arranged? Do they remind you of anything?
The buttons are arranged like the phones in the room. Make each button match the button shape of the corresponding phone. Get the keycard.
Solution:
(Left to right) square, circle, octagon, square, octagon
Use the keycard on the appropriate phone.
It's the left-hand one of the three along one wall.
Note the colors.
green, red, blue, white
Plug in the numbers you found on the right-hand phone; get the coin and note what the display says now (six # signs).
Solution:
6928
Only one phone has a # button: the lone one on the right.
Press the # button six times. The display will reveal a clue.
It has to do with the lone phone on the left.
Combine the two clues to get a four-digit number.
Multiply the number you get if you look at the display one way - 68 - by the number you get if you turn your head the other way - 89.
Turn to the middle phone. Put in the coin, then the number you just figured out. Get the key.
Solution:
6052
Turn to the door, use your key, and you're outta there!
Posted by: Reka |
April 17, 2014 4:21 PM
|
April 17, 2014 4:21 PM