
Cactus McCoy
You'd think it'd be clear by now that you shouldn't pick up a shiny gem when the statue holding it warns you of a curse. Sadly, Cactus McCoy, the titular protagonist of the new platformer from Flipline Studios, does just that, and the result is that he's been transformed into a walking, talking, punching Saguaro. So now, if he ever wants to make balloon animals again, he must return the gem to its proper location across the beautiful landscapes of the old west... all the way pursued by the mercenary gang that hired him to swipe the gem the first place. An excellent game for fans of westerns or beat-em-up adventures in general.
Read More70 Comments
So THIS is the reason skystone hasn't been updated in months...

Was quite fun, will get a lot of play out it. Reminds me a lot of Bubsy.
This is a really fantastic title. I've already put in more than few hours worth of play, and I could easily see this taking up quite a lot of my time. Really great to come back to when there's nothing else to do or good to play.
I love this game!
I can't find the number 2 and 3 treasures in level 4.
I tried about 10 times and I can't see where they could be.
Any help?
for treasures 2 and 3 level 4:
On the second screen, go past the building with the arrow pointing right all the way to the arrow pointing up/right. Jump to the left, there will be a rope there to grab on to. Continue to the left jumping on roofs until you get to a spot where you can go no further, continue left and you will change screens, there is a room with both treasures 2 and 3 in them.
is there a map of all the treasure?
where is the treasure 4 in level 10?
this is the last one for me to get "Treasure Compleationist" badge
Help! I can't get the link to work anymore (after completing 20% of the game)
This game is bugging me! lol. I don't know if it's a glitch in my computer, or my brain, but I can't figure out how to use the
water gun to squirt the torch (in the mines, level 2) that is at a downward angle (as if down some stairs.)
I can get the water gun to point that way by pushing left and then down, but it won't shoot.
Help?
I, too, can't get treasure 2 in level 4. I've found it, I just can't get to it. Any help would be appreciated. (It's driving me crazy!)
Does anyone know the locations of the statues AND pedestals in level 11?
@fafeoffice - This was the last one for me too.
In the final section of level ten, go right as far as you can, then down past the Gatling and Bazooka Enimigos, then head left. Just before you drop down to the lower part of the level and just after you meet the Longsword Enimigo, there's a spot with two Crushers and a slight step in between. When you stop between them, you'll notice a different colored shaft right below you. Drop down and you'll land in a little room with the fourth treasure (along with a wanted poster and one of the chairs from the train!).
Good luck!
This is an awesome game - love the animation.
For Level 4, Treasure 2:
Try jumping and throwing a chicken up each step. Then float to the treasure.
Can't seem to find the fifth treasure on level two. I think
you get it by jumping up the ledges on the left on the second to last screen
but I can't jump on it, I just go through. Any help, or is that just the wrong place?
Sorry for the double post, just figured out how to get the treasure.
I'm trapped at the beginning of the second level. I'm in a mine but it's all dead ends and no exit. There is really very little room, only about 2 screens worth. Tried restarting. Any thoughts?
Stuck at beginning of 2nd level. I can see enemies below me, but can't drop down to them, can't use shovel.
Glitch? Mac related issue? keyboard problem??
I have one main problem with this game...
It's too addictive! I only just moments ago got my 80th badge. Add onto that 60 challenges and 60 chests, plus maxed out upgrades. I can't believe I couldn't just leave it alone. If only all platform games were this involved and involving.
Awesome game... but I never want to see another cactus as long as I live. Well, at least until the sequel.
Here is how to get that pesky torch that's at a downward angle.
Jump off the ladder and stand at the top of the area facing left. Hold the right arrow then the down arrow. This will point the squirt gun at a downward angle.
@fruitysheep
"Stuck at beginning of 2nd level. I can see enemies below me, but can't drop down to them, can't use shovel.
Glitch? Mac related issue? keyboard problem??"
You can drop down levels by using the down arrow and the "jump" button at the same time. This can be done where the floor is thin.
Are there any other endings?
Or is the one I got a sequel hook?
Where is the rope weapon? That's the only one I haven't found...
LOL I killed the big Boss using only the squirt gun!!
How do I get the 3rd treasure on Level 7 on
Cactus McCoy because I couldn't even find it.
Cactus McCoy - Hints and Tips
Tips
-
Achievements counts get tracked during the level, but resets at the end. Badges are tracked throughout the game and do not reset.
-
Keep hitting character for more coins.
-
Hold two neighboring movement keys to aim at an angle.
-
There is no way to regain health or gain extra lives. Use what you have sparingly.
-
Every time you hit an Enemigo after defeating him, there's a random chance he might drop his weapon. Repeated hits increase the odds of a weapon drop. It also drops money.
-
You can backtrack throughout the level. Use this to keep track of specific weapons to beat challenges.
-
Each weapon has a badge tied to it, all involving beating a certain number of Enemigos.
-
Holding a chicken while jumping will keep you in the air longer.
Levels
Level 1: Cactus Canyon
To get the Sheriff badges, pick up a bramble bush or get the weapon off a pointy-hat Enemigo.
Level 2: Prospector Mines
To get the torches achievement, finish the fight at the end, then go back when the doors open. The squirt gun will now be accessible. Backtrack and kill all the torches. Several are hidden off the beaten path.
The best way to hit an enemy five times is with a swinging weapon, like a shovel.
Level 3: Rustler Railroad
One suitcase is hidden in crates.
Level 4: Shady Springs
To get the chicken challenge and one treasure, you will need to go to the secret area. The entrance is at the top left of the second area.
Getting to the high chicken: In the secret area, throw a chicken up the area where you can climb, then jump from the top holding the chicken. When the other area comes in range, throw the chicken. Grab the rope, climb left then up, and then jump towards the left while holding the chicken.
Level 5: Powderkeg Pass
To get the Enemigos hiding in the pass, shooting roman candles, reach the top and break the create. You'll find a shotgun.
To blow up all the boulders, use the nearest TNT keg, else you might find yourself stuck.
Level 6: Midnight Express
The Rumble: Go to the top of the second carriage and pick up the chicken. Run to the back end of the train and jump (from the roof). Float until you land on the train.
To get the Crack That Whip challenge, take a whip into the final fight. At least three whip-wielding Enemigos will appear. You can find a bullwhip in one of the suitcases.
The number of guitar-wielding Enemigos are exact, so beat each with a banjo.
To reach all of the luggage, to throw off the train, you will need to stand on luggage as well. So be careful what you throw off when.
Level 7: Rattler Ravine
To hit certain gun and scorpion targets, you will need to shoot/throw at an angle.
Level 8: Brimstone Mines
The Ramble: When you spot a rope hanging on the lowest point of the level, drop onto it and keep moving left. You will find the entrance to the hidden ramble area.
Level 9: Deadbridge Railway
The grenade to destroy all the TNT barrels can be found in a suitcase above the log truck with all the Gatling gunners.
Level 10: Sunset Gulch
The floating bombs can be punched to disable them.
Level 11: Emerald Temple
Several of the Statues, Vases and Enemigoes with longswords are hidden look for areas where you can drop down or for platforms off the beaten path.
The statues are tricky as you cannot always move a statue to any point in the game. When you find a statue or a place to put it (a green circle with an X), locate the other part nearest to you.
Level 12: Emerald Shrine
The boss has three attacks: slashing, firing his pistols and leaping from above. Keep out of range for his slash attacks and duck during a volley of bullets. When he leaps out of the screen, he is likely to slam down from above. The best method is to duck his bullets, then punch him as he moves in close.
To get to the secret area, use the vases to get onto higher area (you'll need most of them. In the secret area (top left of main map) you will find the remaining treasures, as well as the squirt gun and torches.
Weapons
A note about weapons: This game has a lot of weapons and the effectiveness of each is dependent on its level, the enemy's difficulty and Cactus McCoy's proficiency - derived from the stats you can upgrade at the end of each level. This list attempts to organise them from lowest to highest, but advises that you try them all out.
Thrown Weapons
-
Darts: What it says on the box.
-
Sheriff Badges: Low-tech ninja stars.
-
Playing Cards: Surprisingly non-non-lethal.
-
Cherry bombs: Fast, but drops off. Effective up close.
-
Scorpions: They crawl along the floor and attack what they stumble into. Can be thrown.
-
Daggers: Like darts, except they are knives. Fast and deadly.
-
Lanterns: Starts brief fires.
-
Tear Gas: Does a lot of damage, because it lands multiple hits.
-
Tomahawks: Deadly, but doesn't last long.
Punching Weapons
-
Boxing Gloves: Packs a punch.
-
Brass Knuckles: They make pain easy.
-
Clothes Iron: This hits hard, good for a brawler.
Firearms
-
Derringer: The most basic firearm.
-
Revolver: Now you are a real cowboy.
-
Crossbow: Slow, but hurts.
-
Blunderbuss: Less than a shotgun, but still devastating.
-
Gatling Gun: Great with crowds.
-
Tommy Gun: Also great with crowds.
-
Harpoon Gun: Slow shooter, but boy it hurts.
Ordinance
-
Roman Candle: Direct fire, reasonable damage.
-
Bazooka: Powerful, but slow.
-
Flamethrower: Used quickly, but powerful
Striking Weapons
-
Stick: Better than nothing.
-
Cactus: Better than a stick.
-
2x4: Better than a cactus.
-
Bone: Good for a blunt weapon.
-
Shovel: As you can imagine, in a fight.
-
Nightstick: Good for riot control.
-
Banjo: Fast and surprisingly deadly.
-
Guitar: Deadlier than a banjo.
-
Mallet: Powerful strike, but slow.
-
Pool Cue: Fast with a good reach.
-
Sickle: Fast, Powerful - one up from Machete.
-
Cutlass: No pirate would fight without it.
-
Morningstar: Thumping good time.
-
Scythe: Death's preferred method.
-
Longsword: Slow but brutal.
-
Katana: Recommended by 9 out of 10 samurai.
Whips
-
Rope: No whip without it.
-
Bullwhip: I bet it stings.
-
Chain: fair speed, lots of damage.
-
Rattlesnake: Fast, very powerful.
-
Thorn Whip: Hurts less than barbed whip.
-
Barbed Whip: Hurts more than a Thorn Whip.
-
Tow Chain: Also used to tow heavy vehicles.
-
Cat O' Nine Tails: Hits Hard and Looks Pretty .
-
Meteor: Fast and hurts.
Treasures
All levels
Level 1: Cactus Canyon
-
After beating up the two dummies and the door opens, walk to the left into the hidden area.
-
Just past the bottomless pit.
-
After dropping from the rope ladder down past the wooden ladder, keep going down (one drop) and then run left.
-
Before exiting the fourth screen, instead of going right, go left and jump off the edge. You will grab a rope. Follow it to the chest.
-
In the fight arena, go to the top right.
Level 2: Prospector Mines
-
After dropping into the first large area you encounter, keep going left. You will see two wooden grips at the top-left corner. Use a crate to reach them.
-
At the end of the first screen, there is a series of wooden grips leading upwards. Carry a mine cart to the spot then jump from it to reach the grips. Climb to the top.
-
In the second screen, when you encounter the wooden grips running downwards towards the right (near the end), drop down below. At the bottom, go left.
-
Near the exit of the second screen, jump up to grab the wooden grip, then jump to the second. From there keep moving up until you are on a ledge with a chain-barrier in the background. Jump to the right, onto a platform with the treasure.
-
After the arena fight, take the crate at the left entrance to the right exit. You will see a series of wooden struts stick out from the building. Use the crate to reach these struts, then climb up.
Level 3: Rustler Railroad
-
Run to the third carriage and get on to of the train. Run back to the roof of the first carriage.
-
Head to the fifth carriage and climb down the metal struts on its left side. Jump into the fourth carriage.
-
From the log wagon (sixth carriage) jump at the left to inside the fifth carriage.
-
On the eight carriage (the tanker), drop down on the right-hand side.
-
On the ninth carriage, head to the top-right, where you can access the roof.
Level 4: Shady Springs
-
At the start, grab the chicken and climb to the top - where the Enemigo with the iron is. Jump to the left while holding the chicken.
-
In the secret area (top-left of second screen - reach it via the directions for the third treasure), throw the chicken up the steps near the entrance, climbing up after it. Then, holding the chicken, step off the ledge on the left and drift down to the small enclave.
-
At the start of the second screen, climb up until you see a diagonal arrow point Up/Right. To your left is a rope. Jump for it and go left. Jump towards the left at the end.
-
At the bottomless pit (second screen), drop down the left-hand side.
-
On the third screen, just before the exit, there is a spot where you can drop down. Do that and go right.
Level 5: Powderkeg Pass
-
When you reach the upwards-pointing arrow, next to the wooden grip ladder, instead go left and jump down, to the left.
-
Climb up and go right until you pass the first wooden grip; beyond it will be two TNT barrels. Run to the right until you stand over a section you can drop down from. Stand roughly in line with the right-hand side of the platform behind you, then drop down.
-
Once you reach the top of the third screen (near the exit), take a barrel and place it two ledges above the wooden grip ladder. Then jump from the top of the barrel to the ledge on the top left. Keep jumping left.
-
Near the Third screen exit you can drop down a set of ropes. Take a barrel down and go to the right. Use the barrel to reach the ladder.
-
After the final fight, take a barrel as high to the right as you can to reach the wooden grip. Then take the rock just outside the exit and take it up. Throw it into the higher ledge, then climb on it to reach the rope. Go left.
Level 6: Midnight Express
-
Take the chicken on the second cart's roof and jump from the end of the train to reach the rumble train. The chest is along the way.
-
On the roof of cart four, go left and jump to cart three. Move left along the chain.
-
On the coal truck, the second low platform has metal struts leading down. Drop down.
-
Take a chest onto the roof of cart seven. Use it to jump over the large box.
-
After the final fight, use a chest to reach the top left. Climb onto the roof and go left.
Level 7: Rattler Ravine
-
Past the first crusher (screen one), climb up the ledges, using a crate to reach the highest ledge. Then hold the chicken (found to the right of the ledge, past the ladder) and jump towards the left from the highest ledge. When you reach the ladder, drop the chicken.
-
After passing the third crusher (first screen), keep going left.
-
When you reach the two crunchers on the second screen, crouch under the second crusher and drop down. Keep leaning left and you will land on an outcrop. Go left.
-
At the exit of the second screen, go right and climb on the rope. Follow the rope to its end, then drop down.
-
As you enter the fourth screen, there is an Enemigo shooting at you from a higher ledge. Use the metal crate to reach it. Find the other two metal crates and throw them onto the higher ledges to reach the top. Climb on the rope and move to the far left.
Level 8: Brimstone Mine
-
After climbing up the ledges with the flamethrowers (on the first screen; the first flamethrower has an ore rock next to it), climb to the top of the left platforms. Holding a chicken (found further in the level), jump to reach the next platform. Do this until you hit a wall. Fall to the left.
-
After dropping down past the two opposing flamethrowers (near the start o the second screen), go past the first solitary flamethrower and jump onto the platform above the flamethrower shooting upwards. Go right.
-
Go to the rumble (pass the crusher with the two flamethrowers, screen one, then keep right and down until you encounter a low-hanging rope; follow it to the left).
-
At the exit of the second screen, go left along the rope. Drop down the right-hand shaft.
-
At the start of the third screen, take the mine cart and carry it up. Throw it over the highest ledge. Go back and climb across the rope. Then take the mine cart and run to where the flamethrowers fire down in a sequence. Run to the gap between the two sets of flamethrowers, then use the cart to reach the higher ground.
Level 9
-
In the third carriage, just before the highest point of the crates you can drop down. Drop down again to reach the chest.
-
Throw a chest up on the platform between the third and fourth carriages. Use it to reach the higher platform.
-
Head to the fifth carriage. Use a chest to reach the chains and use another chest to reach the gap above the main platform.
-
Grab a chicken on the roof of carriage seven, then head over carriage eight (the tanker). Holding the chicken, drop between carriages eight and nine, landing on nine's platform. Then jump left.
-
From the roof of the final carriage, jump back until you run into the black smoke pipe. Use a crate or chest to jump to the top and then follow the chain.
Level 10
-
At the start, drop down from the rope you are hanging from.
-
After reaching the rooftops just beyond the second screen's entrance, keep going until you see a building that forms a series of steps going down and right. Move down them carefully, then jump across the gap.
-
After entering the second screen, keep fighting towards the right. Along the way you will pass an iron crate. Use that further on where the route narrows to a gap (just beyond it are a series of ropes you drop down from). Put the box on the left side of the narrow area and use it to reach the wooden strut above. Reach the ledge and jump to the rope. Carry on left - keep going and the bombs will miss you. Watch out for the flamethrowers, using the gap between them to pass (no need to jump). Keep left until you reach the chest.
-
In the third screen, stand on the gap between the two crushers taking turns crushing. Drop down.
-
At the exit of the third screen, climb onto the higher platform (with the stovepipe in the background). Jump to the wooden struts on the far left. Climb up.
Level 11
-
Climb up in the first screen until you reach two ropes strung above each other. Climb up and jump to the ledge on the right. Jump up and climb the wooden struts.
-
Run past the multiple crushers, but drop down in the area halfway down the run. Drift to the right as you fall to land in a hidden area.
-
Just before the second screen's exit there is a space to drop down (just before the large step towards the exit ladder). Drop down close to the right. Jump to the right and grab the rope. Go right.
-
After reaching the cross-shaped-channels with the statue X in the center (third screen), climb the ladder and head left. Jump up and left until you reach a series of platforms and wooden struts going up. To the left is an area you can drop down. Drop to the left.
-
After reaching the cross-shaped-channels with the statue X in the center (third screen), climb the ladder and head left. Jump up and left until you reach a series of platforms and wooden struts going up. Go up. At the top, go right (to the left is a statue). Go right along the struts and rope to reach the treasure.
Level 12
-
Near the exit of the first screen, take a vase and use it to get onto the inverted T platform. Take another vase up and place it on the top of the platform. Use it to reach the wooden strut on the right.
-
Near the exit of the first screen, take a vase and use it to get onto the inverted T platform. Take another vase up and place it on the top of the platform. Use it to reach the platform on the left. Keep moving left.
-
Near the exit of the first screen, take a vase and use it to get onto the inverted T platform. Take another vase up and place it on the top of the platform. Use it to reach the platform on the left. Keep moving left. Use another vase to reach a higher spot after the second treasure. Continue left until you use a wooden ladder to reach a hidden area. Drop down until you reach the bottom, then head right. At the wall head up, then take the first left. Follow the route, taking the left-hand split.
-
Near the exit of the first screen, take a vase and use it to get onto the inverted T platform. Take another vase up and place it on the top of the platform. Use it to reach the platform on the left. Keep moving left. Use another vase to reach a higher spot after the second treasure. Continue left until you use a wooden ladder to reach a hidden area. Drop down until you reach the bottom, then head right. At the wall head down to the bottom, then go left.
-
Near the exit of the first screen, take a vase and use it to get onto the inverted T platform. Take another vase up and place it on the top of the platform. Use it to reach the platform on the left. Keep moving left. Use another vase to reach a higher spot after the second treasure. Continue left until you use a wooden ladder to reach a hidden area. Drop down and take the first left. Continue left and up. At the top of the climb, go left. At the first drop, go down, then at the bottom go left. Follow the path left and down. Once you hit the bottom, go left. At the wall, go up. At the top, go left, then down. Follow the path to its end.
Level 7, 3rd treasure
On the 2nd screen, there's a spot with 2 crushers and a space in between them. Standing in that space, drop down and go as far to the left as you can - there's a ledge that you follow to get to the 3rd treasure.
Has anyone found all of the weapons for the weapon badge? The only one I haven't found is the rope...help please!
Does anyone know how to get the
last of the 9 boulders that have to be mined to get a star achievement?
I can't figure it out and it's driving me mad.
Thanks!
@Miss Otis
To get the last of the boulders
requires pixel perfect jumping.
From the little platform, jump at the very, very edge and swing at the top of your jump. It looks like the pick axe doesn't actually make contact, but the popup for the bonus should appear.
James has appended his walkthrough to include a guide for getting all the treasures from Levels 1-9. He'll get the treasures for the last few levels up soon.
Area 8 - Brimestone Mine
To get the last gem boulder:
From the "boss" screen go up the ledges on the right side. Then go left until you reach the end. You will be on a screen with a rope just below you and a single Crusher off to the very left (off screen).
The last gem boulder is off to the left and in the air. From the last ledge (above the rope) run to the left and jump at the last moment. Swing as you are in the air and you'll hit the boulder. You will then land to the right of the Crusher.
Hope that helps.
Anyone on level 10?
Bombs falling form the sky and you get a bazooka!
(Bazooka - cool to hold it and look at but rubbish at aiming and killing precisely)
Stuck after finding 2 treasures. The level is just too difficult, 5 lives is not enough.
I'm in the same boat as 8th post- I can not get Cactus to shoot in a diagonal direction! I've tried both browsers to no avail. I can get him to aim diagonally up and down, but he just won't shoot. The torch achievement is haunting me.
Ideas?
treasures on level 10
-the first one is right on the beginning,
just drop from the rope and you'll find it.
-second: in the 2 screen after a metal box there's a hole, go down for the left side.
- the third is in the same screen, carry the metal box till the bazooka enemigo you'll see
a stick where you can grab the jump for a rope
n to the end.
- the fourth is on the third screen, between the two crushers go down (by pressing �" + a button).
-for the last one, just before pass to the next screen, get on the highest place then jump left
keep going n you'll find it.
a tip for the chicken challenge: on the third screen there's some "firethrowers"on the walls, to go down with the chicken, instead of going for that way, go right side. ( that was hard for me to find out so...)
At level 5, the first Whiping Enemigo has the rope, punch it out of him. That's the only place you can find the rope!
Hit the floating bombs to disable them, it's that simple!
P.S. Wear gloves or use a weapon!
Is there any special reward for getting 100% completion? And if there is, does that 100% include all the badges?
Yes, and yes it does.
If you keep playing after achieving 100%, you start every level with "Hatfield's Pistol," which is a blunderbuss with massive money damage and enough ammo to last the whole level.
the walkthrough doesn't have shotgun...
Does anyone know where the chain is? It's the only badge I'm missing.
I like the historical context of this game. There was actually a Hatfield-McCoy family/clan feud sometime ago. Here it continues with a walking cactus and a four-armed, skinny, tall dude.
Cerulean: Thank you very much.
So, any hints on getting the "Swap and Juggle" and "Five in the Air" badges? Because I don't think those are even possible.
Hooray! I finally got to 100% completion! Whew, that was a lot of fun.
Does anyone know where all the targets are in Rattler Ravine? How do you get to the one in the second screen that is below a walkway underneath a cruncher? Can't figure it out!!!
one of the challenges for area 10 sunset gulch is kill three enemigos with the same explosion, how do you do that?
oh, I love this game. Without looking at the spoilers, I managed to get all secret treasures in the 1st and 2nd stage.[only the 1st and 2nd because thats all I finished today, because right now I have to go to bed -_-]
Can any one help me? How to hit the scorpion target that's located near the 3 crusher??
nolana:
hold down two arrow keys (left/right + down) + s to obtain an angle while shooting. You can run in that position, so run under the crushers holding arrow keys and press s when you think you can reach the target. (you can use it as well shooting the enemigos who are above you, using left/right + up arrow keys + s)
me:
you should find an explosive weppon (i.e. obtain it from guys in spikey blue hats) and throw it in a group of three enemigos)
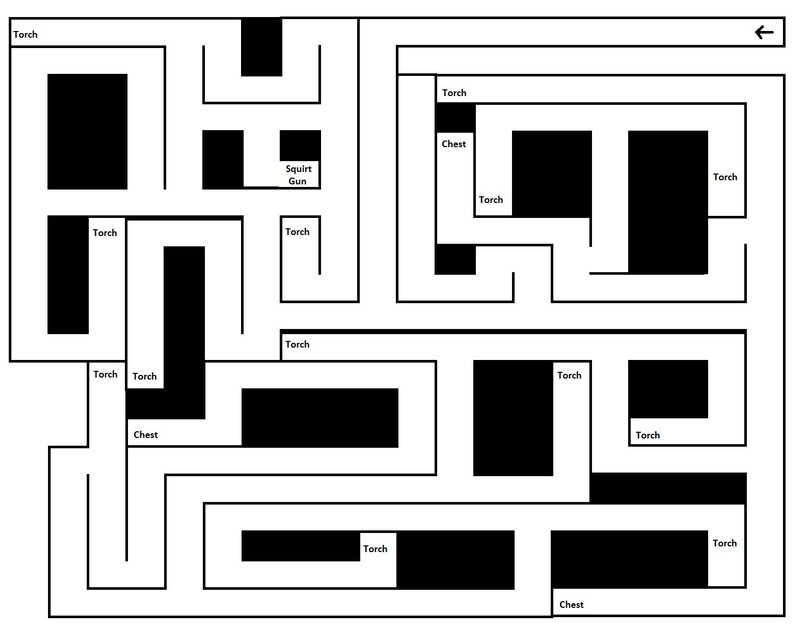
I have created a map of level 12. It's far from perfect but at least you can find the chests, the gun and the torches easily with it.
I hope the link to imageshack is not considered as link dropping - dunno how I could post the picture directly.
https://jayisgames.com/images/hs_cactus_mccoy_level_12_map.jpg
[Posting links to images is not considered link dropping, so no worries there. In fact, we may even upload your images to our servers so they stay here permanently. Thanks for posting your map! :) -Jay]
Good game, I enjoyed it for about a week on and off. :D
Hey again!
This time I wrote down all the locations of the torches for lvl 10 "Sunset Gulch"
Torch 01 - Right at the beginning above the rope.
Torch 02 - Left of the building with the two flames coming out of the ground.
Torch 03 - Two houses to the right from there, drop down after the Bazooka Enemigo
Torch 04 - At the beginning of the second screen
Torch 05 - Between the two Crushers you have to pass on a rope
Torch 06 - Right before exiting the second screen behind a Bazooka Enemigo.
Torch 07 - Between the two Crushers where you drop down to Chest4
Torch 08 - After the two Crushers jump up where the Bazooka Enemigo is.
Torch 09 - Drop down the space between the two areas below the Bazooka Enemigo. You'll avoid the drop with the flames that way.
Torch 10 - Directly after the drop with the flames. Jump up and you'll see it.
Torch 11 - Next to the Crusher with the Bazooka Enemigo on Top
Torch 12 - Climb to the Area with the Bazooka Enemigo, from there jump up the ropes.
Holly, thank you!!!!!!!
Does anyone know where all the chickens are that have to be thrown into the coop at Shady Springs? I can only find six! Help! Cool game!
nolana, there is how to find all the chickens on area 4:
1st: easy ;)
2nd: ditto
3rd: second screen, down the steps, under the arrow pointing up. Go back, kill the boxer on roof on your left side, and jump on the rope on your left. Jump on the roof, jump on the shelf with the treasure and go left. You'll find…
4th and 5th: …third screen with another two chickens. You will have to think out how to get one of them. Oh - there is another treasure.
6th: 7th: 8th: you've probably get them already ;)
yeah, this game's really great ;)
I know where treasure 5 is in level 4 but I can't seam to get to it can someone help me please
I just dont know how to do shoot the number 3 torche!
Can someone please help me?
I can't find the last vase, only 16 and this level (11) is driving me crazy. Some help will be great! Thanks.
Great game! Area 2, i can't get to the squirt gun, have tried many ways to jump to it. thanks for any help!
aljones:
Beat the boss fight and then go back for it. All those doors look the same for a reason!
Hope that helps. And this is a really fantastic game, I was honestly crushed when I lost my save file after switching operating systems! I was so invested! A ton of fun, extremely creative, I love it.
Thanx, the squirt gun worked! i agree, great game!
Where are the Prehistoric Clubs?
WHERE IS THE ROOOOOOOOPE?
Cheers
Does Anybody know where the barbwire weapon is I cant find it any where please help me
Cactus McCoy and The Curse of Thorns is the best flash game I have ever seen, and I finished it 3 times; but never got bored.
Note: You can get up to 350.000 points in Emerald Shrine if you continuously juggle Hex Hatfield with his pistol.
I'm trying not to whine. Any reason why my scores won't show in the score list? Last week, it was over 112,000 but never would show up. New game this week over 32,000, same thing. Thx for any info.
I still cannot get the gun badge! boo...hoo...i think that I have tried every key possible to see if that helps with an angle - I've gone back and forth seeing if there is a hidden way to get under the last three targets,but to no avail. HELP!
how do i kill 5 enemies using eggs in level 1 tumblewood
i changed my fire key in controls and now i can fire diagonally
Has anyone finished both Cactus McCoy games or I am the only one? Is there gonna be Cactus McCoy 3 or no?
Leave a comment [top of page]

Game of the week

Walkthrough Guide
(Please allow page to fully load for spoiler tags to be functional.)
Cactus McCoy - Hints and Tips
Tips
Achievements counts get tracked during the level, but resets at the end. Badges are tracked throughout the game and do not reset.
Keep hitting character for more coins.
Hold two neighboring movement keys to aim at an angle.
There is no way to regain health or gain extra lives. Use what you have sparingly.
Every time you hit an Enemigo after defeating him, there's a random chance he might drop his weapon. Repeated hits increase the odds of a weapon drop. It also drops money.
You can backtrack throughout the level. Use this to keep track of specific weapons to beat challenges.
Each weapon has a badge tied to it, all involving beating a certain number of Enemigos.
Holding a chicken while jumping will keep you in the air longer.
Levels
Level 1: Cactus Canyon
To get the Sheriff badges, pick up a bramble bush or get the weapon off a pointy-hat Enemigo.
Level 2: Prospector Mines
To get the torches achievement, finish the fight at the end, then go back when the doors open. The squirt gun will now be accessible. Backtrack and kill all the torches. Several are hidden off the beaten path.
The best way to hit an enemy five times is with a swinging weapon, like a shovel.
Level 3: Rustler Railroad
One suitcase is hidden in crates.
Level 4: Shady Springs
To get the chicken challenge and one treasure, you will need to go to the secret area. The entrance is at the top left of the second area.
Getting to the high chicken: In the secret area, throw a chicken up the area where you can climb, then jump from the top holding the chicken. When the other area comes in range, throw the chicken. Grab the rope, climb left then up, and then jump towards the left while holding the chicken.
Level 5: Powderkeg Pass
To get the Enemigos hiding in the pass, shooting roman candles, reach the top and break the create. You'll find a shotgun.
To blow up all the boulders, use the nearest TNT keg, else you might find yourself stuck.
Level 6: Midnight Express
The Rumble: Go to the top of the second carriage and pick up the chicken. Run to the back end of the train and jump (from the roof). Float until you land on the train.
To get the Crack That Whip challenge, take a whip into the final fight. At least three whip-wielding Enemigos will appear. You can find a bullwhip in one of the suitcases.
The number of guitar-wielding Enemigos are exact, so beat each with a banjo.
To reach all of the luggage, to throw off the train, you will need to stand on luggage as well. So be careful what you throw off when.
Level 7: Rattler Ravine
To hit certain gun and scorpion targets, you will need to shoot/throw at an angle.
Level 8: Brimstone Mines
The Ramble: When you spot a rope hanging on the lowest point of the level, drop onto it and keep moving left. You will find the entrance to the hidden ramble area.
Level 9: Deadbridge Railway
The grenade to destroy all the TNT barrels can be found in a suitcase above the log truck with all the Gatling gunners.
Level 10: Sunset Gulch
The floating bombs can be punched to disable them.
Level 11: Emerald Temple
Several of the Statues, Vases and Enemigoes with longswords are hidden look for areas where you can drop down or for platforms off the beaten path.
The statues are tricky as you cannot always move a statue to any point in the game. When you find a statue or a place to put it (a green circle with an X), locate the other part nearest to you.
Level 12: Emerald Shrine
The boss has three attacks: slashing, firing his pistols and leaping from above. Keep out of range for his slash attacks and duck during a volley of bullets. When he leaps out of the screen, he is likely to slam down from above. The best method is to duck his bullets, then punch him as he moves in close.
To get to the secret area, use the vases to get onto higher area (you'll need most of them. In the secret area (top left of main map) you will find the remaining treasures, as well as the squirt gun and torches.
Weapons
A note about weapons: This game has a lot of weapons and the effectiveness of each is dependent on its level, the enemy's difficulty and Cactus McCoy's proficiency - derived from the stats you can upgrade at the end of each level. This list attempts to organise them from lowest to highest, but advises that you try them all out.
Thrown Weapons
Darts: What it says on the box.
Sheriff Badges: Low-tech ninja stars.
Playing Cards: Surprisingly non-non-lethal.
Cherry bombs: Fast, but drops off. Effective up close.
Scorpions: They crawl along the floor and attack what they stumble into. Can be thrown.
Daggers: Like darts, except they are knives. Fast and deadly.
Lanterns: Starts brief fires.
Tear Gas: Does a lot of damage, because it lands multiple hits.
Tomahawks: Deadly, but doesn't last long.
Punching Weapons
Boxing Gloves: Packs a punch.
Brass Knuckles: They make pain easy.
Clothes Iron: This hits hard, good for a brawler.
Firearms
Derringer: The most basic firearm.
Revolver: Now you are a real cowboy.
Crossbow: Slow, but hurts.
Blunderbuss: Less than a shotgun, but still devastating.
Gatling Gun: Great with crowds.
Tommy Gun: Also great with crowds.
Harpoon Gun: Slow shooter, but boy it hurts.
Ordinance
Roman Candle: Direct fire, reasonable damage.
Bazooka: Powerful, but slow.
Flamethrower: Used quickly, but powerful
Striking Weapons
Stick: Better than nothing.
Cactus: Better than a stick.
2x4: Better than a cactus.
Bone: Good for a blunt weapon.
Shovel: As you can imagine, in a fight.
Nightstick: Good for riot control.
Banjo: Fast and surprisingly deadly.
Guitar: Deadlier than a banjo.
Mallet: Powerful strike, but slow.
Pool Cue: Fast with a good reach.
Sickle: Fast, Powerful - one up from Machete.
Cutlass: No pirate would fight without it.
Morningstar: Thumping good time.
Scythe: Death's preferred method.
Longsword: Slow but brutal.
Katana: Recommended by 9 out of 10 samurai.
Whips
Rope: No whip without it.
Bullwhip: I bet it stings.
Chain: fair speed, lots of damage.
Rattlesnake: Fast, very powerful.
Thorn Whip: Hurts less than barbed whip.
Barbed Whip: Hurts more than a Thorn Whip.
Tow Chain: Also used to tow heavy vehicles.
Cat O' Nine Tails: Hits Hard and Looks Pretty .
Meteor: Fast and hurts.
Treasures
All levels
Level 1: Cactus Canyon
After beating up the two dummies and the door opens, walk to the left into the hidden area.
Just past the bottomless pit.
After dropping from the rope ladder down past the wooden ladder, keep going down (one drop) and then run left.
Before exiting the fourth screen, instead of going right, go left and jump off the edge. You will grab a rope. Follow it to the chest.
In the fight arena, go to the top right.
Level 2: Prospector Mines
After dropping into the first large area you encounter, keep going left. You will see two wooden grips at the top-left corner. Use a crate to reach them.
At the end of the first screen, there is a series of wooden grips leading upwards. Carry a mine cart to the spot then jump from it to reach the grips. Climb to the top.
In the second screen, when you encounter the wooden grips running downwards towards the right (near the end), drop down below. At the bottom, go left.
Near the exit of the second screen, jump up to grab the wooden grip, then jump to the second. From there keep moving up until you are on a ledge with a chain-barrier in the background. Jump to the right, onto a platform with the treasure.
After the arena fight, take the crate at the left entrance to the right exit. You will see a series of wooden struts stick out from the building. Use the crate to reach these struts, then climb up.
Level 3: Rustler Railroad
Run to the third carriage and get on to of the train. Run back to the roof of the first carriage.
Head to the fifth carriage and climb down the metal struts on its left side. Jump into the fourth carriage.
From the log wagon (sixth carriage) jump at the left to inside the fifth carriage.
On the eight carriage (the tanker), drop down on the right-hand side.
On the ninth carriage, head to the top-right, where you can access the roof.
Level 4: Shady Springs
At the start, grab the chicken and climb to the top - where the Enemigo with the iron is. Jump to the left while holding the chicken.
In the secret area (top-left of second screen - reach it via the directions for the third treasure), throw the chicken up the steps near the entrance, climbing up after it. Then, holding the chicken, step off the ledge on the left and drift down to the small enclave.
At the start of the second screen, climb up until you see a diagonal arrow point Up/Right. To your left is a rope. Jump for it and go left. Jump towards the left at the end.
At the bottomless pit (second screen), drop down the left-hand side.
On the third screen, just before the exit, there is a spot where you can drop down. Do that and go right.
Level 5: Powderkeg Pass
When you reach the upwards-pointing arrow, next to the wooden grip ladder, instead go left and jump down, to the left.
Climb up and go right until you pass the first wooden grip; beyond it will be two TNT barrels. Run to the right until you stand over a section you can drop down from. Stand roughly in line with the right-hand side of the platform behind you, then drop down.
Once you reach the top of the third screen (near the exit), take a barrel and place it two ledges above the wooden grip ladder. Then jump from the top of the barrel to the ledge on the top left. Keep jumping left.
Near the Third screen exit you can drop down a set of ropes. Take a barrel down and go to the right. Use the barrel to reach the ladder.
After the final fight, take a barrel as high to the right as you can to reach the wooden grip. Then take the rock just outside the exit and take it up. Throw it into the higher ledge, then climb on it to reach the rope. Go left.
Level 6: Midnight Express
Take the chicken on the second cart's roof and jump from the end of the train to reach the rumble train. The chest is along the way.
On the roof of cart four, go left and jump to cart three. Move left along the chain.
On the coal truck, the second low platform has metal struts leading down. Drop down.
Take a chest onto the roof of cart seven. Use it to jump over the large box.
After the final fight, use a chest to reach the top left. Climb onto the roof and go left.
Level 7: Rattler Ravine
Past the first crusher (screen one), climb up the ledges, using a crate to reach the highest ledge. Then hold the chicken (found to the right of the ledge, past the ladder) and jump towards the left from the highest ledge. When you reach the ladder, drop the chicken.
After passing the third crusher (first screen), keep going left.
When you reach the two crunchers on the second screen, crouch under the second crusher and drop down. Keep leaning left and you will land on an outcrop. Go left.
At the exit of the second screen, go right and climb on the rope. Follow the rope to its end, then drop down.
As you enter the fourth screen, there is an Enemigo shooting at you from a higher ledge. Use the metal crate to reach it. Find the other two metal crates and throw them onto the higher ledges to reach the top. Climb on the rope and move to the far left.
Level 8: Brimstone Mine
After climbing up the ledges with the flamethrowers (on the first screen; the first flamethrower has an ore rock next to it), climb to the top of the left platforms. Holding a chicken (found further in the level), jump to reach the next platform. Do this until you hit a wall. Fall to the left.
After dropping down past the two opposing flamethrowers (near the start o the second screen), go past the first solitary flamethrower and jump onto the platform above the flamethrower shooting upwards. Go right.
Go to the rumble (pass the crusher with the two flamethrowers, screen one, then keep right and down until you encounter a low-hanging rope; follow it to the left).
At the exit of the second screen, go left along the rope. Drop down the right-hand shaft.
At the start of the third screen, take the mine cart and carry it up. Throw it over the highest ledge. Go back and climb across the rope. Then take the mine cart and run to where the flamethrowers fire down in a sequence. Run to the gap between the two sets of flamethrowers, then use the cart to reach the higher ground.
Level 9
In the third carriage, just before the highest point of the crates you can drop down. Drop down again to reach the chest.
Throw a chest up on the platform between the third and fourth carriages. Use it to reach the higher platform.
Head to the fifth carriage. Use a chest to reach the chains and use another chest to reach the gap above the main platform.
Grab a chicken on the roof of carriage seven, then head over carriage eight (the tanker). Holding the chicken, drop between carriages eight and nine, landing on nine's platform. Then jump left.
From the roof of the final carriage, jump back until you run into the black smoke pipe. Use a crate or chest to jump to the top and then follow the chain.
Level 10
At the start, drop down from the rope you are hanging from.
After reaching the rooftops just beyond the second screen's entrance, keep going until you see a building that forms a series of steps going down and right. Move down them carefully, then jump across the gap.
After entering the second screen, keep fighting towards the right. Along the way you will pass an iron crate. Use that further on where the route narrows to a gap (just beyond it are a series of ropes you drop down from). Put the box on the left side of the narrow area and use it to reach the wooden strut above. Reach the ledge and jump to the rope. Carry on left - keep going and the bombs will miss you. Watch out for the flamethrowers, using the gap between them to pass (no need to jump). Keep left until you reach the chest.
In the third screen, stand on the gap between the two crushers taking turns crushing. Drop down.
At the exit of the third screen, climb onto the higher platform (with the stovepipe in the background). Jump to the wooden struts on the far left. Climb up.
Level 11
Climb up in the first screen until you reach two ropes strung above each other. Climb up and jump to the ledge on the right. Jump up and climb the wooden struts.
Run past the multiple crushers, but drop down in the area halfway down the run. Drift to the right as you fall to land in a hidden area.
Just before the second screen's exit there is a space to drop down (just before the large step towards the exit ladder). Drop down close to the right. Jump to the right and grab the rope. Go right.
After reaching the cross-shaped-channels with the statue X in the center (third screen), climb the ladder and head left. Jump up and left until you reach a series of platforms and wooden struts going up. To the left is an area you can drop down. Drop to the left.
After reaching the cross-shaped-channels with the statue X in the center (third screen), climb the ladder and head left. Jump up and left until you reach a series of platforms and wooden struts going up. Go up. At the top, go right (to the left is a statue). Go right along the struts and rope to reach the treasure.
Level 12
Near the exit of the first screen, take a vase and use it to get onto the inverted T platform. Take another vase up and place it on the top of the platform. Use it to reach the wooden strut on the right.
Near the exit of the first screen, take a vase and use it to get onto the inverted T platform. Take another vase up and place it on the top of the platform. Use it to reach the platform on the left. Keep moving left.
Near the exit of the first screen, take a vase and use it to get onto the inverted T platform. Take another vase up and place it on the top of the platform. Use it to reach the platform on the left. Keep moving left. Use another vase to reach a higher spot after the second treasure. Continue left until you use a wooden ladder to reach a hidden area. Drop down until you reach the bottom, then head right. At the wall head up, then take the first left. Follow the route, taking the left-hand split.
Near the exit of the first screen, take a vase and use it to get onto the inverted T platform. Take another vase up and place it on the top of the platform. Use it to reach the platform on the left. Keep moving left. Use another vase to reach a higher spot after the second treasure. Continue left until you use a wooden ladder to reach a hidden area. Drop down until you reach the bottom, then head right. At the wall head down to the bottom, then go left.
Near the exit of the first screen, take a vase and use it to get onto the inverted T platform. Take another vase up and place it on the top of the platform. Use it to reach the platform on the left. Keep moving left. Use another vase to reach a higher spot after the second treasure. Continue left until you use a wooden ladder to reach a hidden area. Drop down and take the first left. Continue left and up. At the top of the climb, go left. At the first drop, go down, then at the bottom go left. Follow the path left and down. Once you hit the bottom, go left. At the wall, go up. At the top, go left, then down. Follow the path to its end.
Posted by: James Francis |
March 20, 2011 2:40 PM
|
March 20, 2011 2:40 PM