
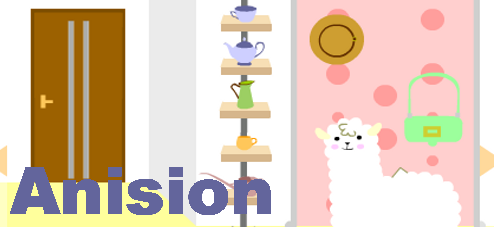
![]() One of the things I like most about escape games is that many of them can generally be counted on to put you in a good mood, and Detarame Factory's relentlessly adorable Anision definitely fits the bill. You find yourself trapped in a room for unknown reasons, likely lured by the promise of cuddling the ridiculously fluffy alpaca, and despite the fact that there is a bunny on the couch, a lightning bug in a terrarium, and a frog playing defense, you must resist the temptation to stay in this colourful, cute place forever and ever and find a way out. Just click to interact when the cursor changes, and click the arrows at the edges of the screen to navigate the room. You can also click on items in your inventory to view them up close, which is handy since some items can be manipulated this way to reveal their true purpose!
One of the things I like most about escape games is that many of them can generally be counted on to put you in a good mood, and Detarame Factory's relentlessly adorable Anision definitely fits the bill. You find yourself trapped in a room for unknown reasons, likely lured by the promise of cuddling the ridiculously fluffy alpaca, and despite the fact that there is a bunny on the couch, a lightning bug in a terrarium, and a frog playing defense, you must resist the temptation to stay in this colourful, cute place forever and ever and find a way out. Just click to interact when the cursor changes, and click the arrows at the edges of the screen to navigate the room. You can also click on items in your inventory to view them up close, which is handy since some items can be manipulated this way to reveal their true purpose!
 Anision is one of those games that's just an all around joy to play, packed with silly scenes and funny animations on top of its lovely design. For the most part, it's a very logical sort of experience... have a thing without a battery, so find a battery to go in it, for example. Many of the puzzles rely on finding and correctly interpreting clues in the area, so Anision is less about brutal difficulty and more about simple observation... though some of them are very subtle compared to others, making Anision far more clever than its simply sweet aesthetic implies. The changing cursor means there's no pixel hunting, and the clean visuals generally clearly indicate things you can interact with anyway, so you don't have to resort to slowly waggling your cursor over every inch of the screen looking for that magic hidden sweet spot. Anision is about as perfect a coffee break sized escape game can get, and it will give you just enough challenge in ways you won't expect to make it well worth your time.


Walkthrough Guide
(Please allow page to fully load for spoiler tags to be functional.)
Anision Walkthrough
You'll begin in the "Alpaca View". Zoom in on the alpaca; there's something stuck in its fur, but you can't get it.
Check the pots and pans to the left of the alpaca. They're facing in different directions, and that's definitely an arrow leading from top to bottom. What's the code?
Nothing left in this view but a locked door, so turn right for the "TV View".
Take the lightning bug from the shelf; it's in a blue-topped aquarium.
Check out the cabinets below the TV. Each one seems to be locked with a different kind of code. The leftmost needs a key, the upper right needs a combination of lefts and rights, the lower right needs four digits, the top drawer needs a color sequence, the middle drawer needs six on/off lights, and the bottom drawer needs three letters.
We already have the information required to solve the upper right cabinet. Remember the shelves? Some were facing left, others right, and their handles-- if you squint just right-- resemble the two buttons. The combination is left-right-left-right-right.
There's some cheese inside the cabinet. Take it, then close the cabinet. Oh, and before I forget, take that red thing under the cabinets; it's a sketch book.
Leaf through the sketch book; nothing to see but some white paper. Weird.
Enough of that. Turn right to see the "Rabbit View".
To the left is a painting of some abstract lines that almost look like numbers. To the right is a painting of the ocean... and its corners are vulnerable to clicking. Aha, it's one of THESE puzzles. Too bad you don't have the code yet.
Move the potted plant aside and take the coin underneath, then turn right.
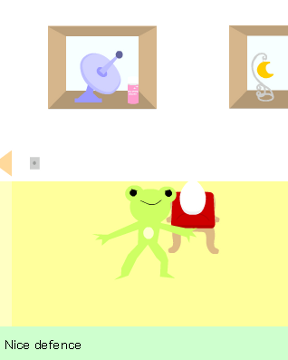
The "Frog View" welcomes you. The frog won't let you near the egg. Take the nail polish remover by the satellite antenna to the left. There's nothing else to do here yet, so turn right again.
Let's call this view the "Scale View". Note the key on the ground; you can't cut the string on it, so leave it alone for now.
Zoom in on the scale. It looks like something triangular goes on the empty platform... stick the cheese there. It's not quite enough to balance the scale, but we'll find something else later.
You can't open the drawer under the scale for want of a handle. Check out the aquarium next. The fish swim to the corners of the square in a particular order: upper right, lower right, upper left, lower left, lower right. I know where we can use that code...
Backtrack to the Rabbit View and jostle the corners of the ocean painting in the same order. The ocean painting will come off and go into your inventory. Turn it over to see some shapes.
We're not done looking around in the Scale View. Take the TV remote control beneath the aquarium. Examine it and turn it over... nuts, no battery.
Now, the cabinet to the right of the aquarium. The bottom drawer is empty (but keep an eye on it, you'll be dumping all your junk there as you finish using it). The next drawer up needs a three-digit code. Hmm, I think I might know what that is.
Remember the shapes on the back of the ocean painting? Count the corners: 5-3-0. Use that code to unlock the drawer, and take the straightening iron inside.
Now, the double doors. There are screws holding them shut, but that's nothing your coin can't take care of. Unscrew them with the coin, open, and take the carrot.
Turn right and we're back at the Alpaca View. Use the straightening iron on the alpaca, then take the 9 plate.
Go to the Rabbit View. Give the carrot to the rabbit and watch it make a fool out of itself.
Take the 4 plate, drawer handle, and battery under the sofa, then click the sofa to set it upright again. After that, click the rabbit to call it down.
Let's revisit the Scale View now. Put the drawer handle in the drawer under the scale, then open it up and take the transparency.
You've seen lines like that before. Stick the transparency on the left painting in the Rabbit View to reveal some numbers: 6283.
That's the code for the lower right cabinet in the TV View. Plug it in and take the green key.
While we're here, put the battery in the TV remote, then use it on the TV. Channel 1 shows some sort of spiral bread (I wish I could remember what it's really called), Channel 2 shows a train, and Channel 3 is out of service. Hmm...
Wait, that train on Channel 2 looks like something we've seen before. On-off-off-on-on-on. That's the code for the middle drawer! Plug it in and open it up.
...The lighter in the middle drawer is stuck in place? The nail polish remover will take care of that problem, and you'll have a trusty lighter.
Go to the Frog View. The green key unlocks the green door; take the mouse behind it. (If he doesn't cooperate, you forgot to put the cheese on the scale.)
Go to the Scale View and put the mouse on the scale where the cheese is. You can then take the clown key from the top of the scale.
While you're here, you can also use the lighter to burn away the string holding the key in place. After that, you can claim the blue key.
Let's unlock some stuff! The blue key unlocks the door in the Alpaca View... but beyond is nothing but darkness. Maybe our lightning bug can help with that. Use him on the darkness and watch the colors: yellow-blue-purple-green-purple.
That sounds like the code for the top drawer in the TV View, so try it. For the color blind, the buttons are purple, yellow, green, and blue, from left to right. Open sesame! You'll get some colored pencils and an 8 plate.
Use the colored pencils on the sketchbook to make a rather convincing snake picture.
Show the snake picture to the frog in the Frog View and he'll freak out. Take the egg he was guarding.
We've been ignoring the clown key for long enough, haven't we? It unlocks the door in the TV view. Go through there to enter the bathroom.
An alligator is bathing. Well, it's not the strangest thing I've seen today. Play with the thermostat towards the upper left; at 33 degrees, you'll hear a whistle. Leave it there and back away.
It seems the alligator likes that temperature. Stick the egg in the bucket on the floor, then leave the bathroom.
Go to the Scale View. Hey, the mouse ate the apple, too! Take the letters memo from that platform.
It's a simple progression sequence; with each step every letter is advanced by three. The missing "word" is PIG. Go try that code on the bottom drawer in the TV view, and you'll get a cable for your trouble.
Reenter the bathroom. The egg hatched! Take the pink key the baby alligator is holding.
The pink key unlocks the last cabinet in the TV view; it contains a Polaroid camera and a 5 plate.
Use the cable to hook up the antenna in the Frog View. Channel 3 should be in service now.
Flick through the channels on the TV again. Channel 3 now displays a strange array of letters, and Channel 1 has a time in the lower right: 18:03. Hmm...
The letters on Channel 3 are in a spiral; Channel 1's spiral-bread-thing is a hint for that. Read clockwise from the inside out: FOUR-FIVE-NINE-ONE-EIGHT.
Now, if there's anything I know from escape games, it's that Polaroid cameras are good for lighting dark areas. Take a picture of the dark room beyond the door in the Alpaca View, then look at the picture: there's a light switch towards the left. Turn on the light (the changing cursor should help).
You can't get past the sleeping bear? Zoom on on the alarm clock. Take the battery out of the remote control and put it in the back of the clock, then set it to the time from Channel 1: 18:03.
With the time set, push the button in the upper right. Wakey wakey!
Move the bear's sleeping mat aside and take the 1 plate underneath.
Remember the code from Channel 3? Put the five plates in the door: from top to bottom, 4, 5, 9, 1, 8. Unlock!
If you leave now, you'll get the Normal End. But there's a bit more to do to make things a bit happier...
Go back and revisit your animal friends. The mouse (back in the Frog View) gives you an H, the baby alligator gives you an A, the alpaca gives you a P, the rabbit gives you another P, and the bear gives you a Y. They'll only give you the letters in that order.
With all five letters in hand, leave through the door past the bear. Success!
Posted by: SonicLover |
September 24, 2013 10:36 AM
|
September 24, 2013 10:36 AM