
 I know it's been pretty quiet around here as far as updates go, but that will change now that I just submitted the SVG project I have been working on day and night to finish.
So, until I can get caught up with all my emails and game link suggestions that have been piling up, I'll leave you with this point-and-click game that Sun2dragon suggested.
Aquaria is a Flash adventure game created by So of Japan and featured at so-room.com along with several other Flash animations and fun interactive works. Yes, the game is in Japanese, and yet is filled with beautiful graphics and scenes like the one pictured. So far, I have not heard any sound at all in it. Here is what the author says about the game:
Escape from the mysterious ruin of Aquaria through solving puzzles and discovering the meaning of secret codes! Click to find the hints to solving the puzzles. Look closely for hints in simple objects.
Seeing a "pattern" in symbols, objects, etc. is the key to understanging the codes of Aquaria.
Use the comments to help get through this one. Make sure you sign into TypeKey if you want your comments to show up immediately. And with that, I'm gone. Click.


Walkthrough Guide
(Please allow page to fully load for spoiler tags to be functional.)
Narrative walkthrough for Aquaria (escape/exploration game by SO) - colorblind friendly. English version included! Just rewriting my old comment to re-introduce this excellent game.
A note from the creator.
I have several screenshots to assist the colorblind, and to reduce the amount of backtracking. However, the most complex symbol clues will NOT be pictured in this walkthrough. You will have to memorize, draw, or make up a mnemonic for them yourself. It's my belief that the art in this game represents familiar concepts, and this encourages you to come up with your own meaning. In short, to play an archaeologist and make guesses from the context. Challenge yourself! Explore!
And do try to resist the urge to open every single nested spoiler tag before trying it in the game.
The adventure begins...
The legendary lost civilization of Aquaria!
(Keep clicking to read the intro.)
Two archaeologists walk into a room, and their mysterious artifacts combine... You just got transported to Aquaria! The punchline is that now you have to figure out how to leave so you can publish.
"I recognize this symbol on the floor!! This is the symbol of AQUARIA!!!" (Use the buttons at the bottom to toggle the soothing music.)
THE EXPLORING SECTIONS MAY BE SKIPPED; they'll give a better narrative and contain notes to help the colorblind. The other sections fast-forward to the hints and answers.
Exploring in the Dark
The first room is dark except for windows and their underwater view. You decide you need to look for a power source to turn on the lights.
Arbitrarily, let's call this the HUB ROOM.
The curved U-turn arrow at the bottom will turn you around 180�. Behind you is a long DARK CORRIDOR. It's probably too dangerous to advance that way.
You turn around again. Between the windows, you barely make out an arched threshold. (Click on it to advance forward.)
You're at the center of the room; your eyes are adjusting to the poor light. In front of you is a wall sculpture (left), the arched threshold, and a window (right).
Click the LEFT arrow. There are 3 floating console-like things around another flat disk. In the window beyond you can see some bubble habitats.
Click the RIGHT arrow twice. Between two windows is what seems like a closed door. Another click RIGHT, and you're staring at the DARK CORRIDOR again, with a similar wall sculpture to its right.
You decide to leave the HUB ROOM. Go forward through the arched threshold (sculpture left, window right - click on the corridor again).
This LONG HALLWAY is somewhat intimidating. Fortunately, the path is lit.
Click forward again. The corridor comes to an end...
Large shapes are looming in the darkness. This cavernous room seems to house large sculptures. Let's call it the GALLERY.
Another step forward. Ahead you can see the inviting blue glow of the ocean through the next door. Finally you get to this next threshold.
As you suspected, Aquaria was an advanced civilization. This UNDERWATER TUNNEL is impressive! You're truly at the bottom of the ocean.
You stop in the middle to enjoy the view. To your LEFT is a better view of the bubble habitats. Are those shells inside them? Fascinating.
Turn around to the RIGHT. More habitats.
Finally, you turn LEFT and continue going forward to the Y-shaped door.
Above this door is a tall arrow with what looks like a chevron below it. Hopefully this is what you've been looking for. You touch the door... and it disappears!
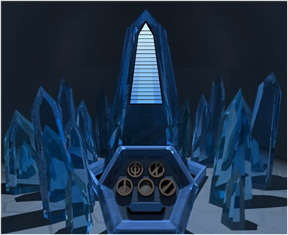
This room full of CRYSTALS seems like the terminal habitat, so this might be promising. Two steps in, you see a CRYSTAL formation to the RIGHT, and what seems like a dull ORB to the LEFT.
At the very end, the OBELISK-like crystal dominates the room. There's a line just before its pyramidal top.
In front of you is a console. A POWER CONSOLE?
Turning On the Lights
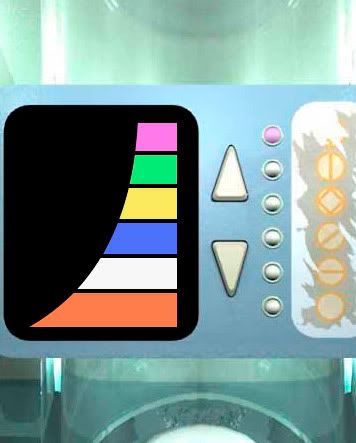
The POWER CONSOLE seems functional. Each button has a ring around its symbol. You press the 5 buttons, and blue lit bars appear on the OBELISK. The bars are cumulative, like filling a column with liquid. The bottom bar on the POWER CONSOLE seems to be a combination enter and cancel button. Starting from the top row, left-to-right, you begin to experiment.
Hints and Answers
(?)
6 bars.
(X)
8 bars.
(|)
5 bars.
( )
1 bar.
(/)
3 bars.
Screenshot. http://img.photobucket.com/albums/v126/shusu/play/aq-soroom-num01-bare.jpg
What could be the correct combination?
Perhaps the liquid levels must level with the line on the OBELISK, and precisely. That means...
You have to add up the levels...
to 15 bars.
?, X, and the empty O � the two buttons on the top row, and the middle button on the bottom row.
You press the bottom bar. The OBELISK begins to pulse, powerful pumps kick in, and the lights come on!
Exploring in the Light
Click the U-turn arrow. You turn around and take a closer look at the back of the POWER CRYSTAL room.
To your RIGHT, an ORB is suspended in midair.
Color note.
Screenshot. http://img.photobucket.com/albums/v126/shusu/play/aq-soroom-color01-yellow.jpg
It is a pale YELLOW.
You touch the ORB...
and a symbol seems to leap out at you!
The two parts of the symbol seem to branch generally upwards.
Click 'back'. Turn around; to your LEFT, you approach a HEXAGON POINTER. It sort of looks like a fish. The transparent blue 'head' points up. You touch it...
The 'eye' of the fish starts to glow! You touch it again, and it turns once. Every time you touch it, it turns in a new direction.
The sequence, with Up = North:
NorthWest
South
SouthEast
SouthWest
NorthWest
North
With a final touch, the lighted 'eye' dies. Pressing it again repeats the sequence. One could also call it a
FISH COMPASS.
Click 'back'.
You exit to the UNDERWATER TUNNEL.
It too is lit up, thankfully. So that did turn on the power generators for the whole place.
You can't help but admire the view. Standing in the center of the tunnel, you turn around a few times to take it in...
What's this? Not out the window, but...
Facing the POWER CRYSTAL room, you turn LEFT, and there seems to be a difference in the otherwise symmetrical structure.
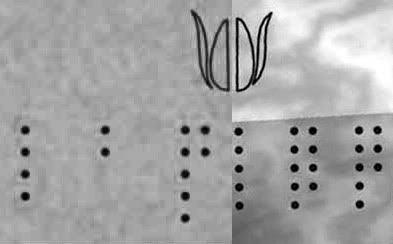
There's writing on the crosspiece!
Click for a closer view. You make a note of it.
It seems to be a flourish and a half-oval on the top right, with 3 sets of dots below.
From left to right, it's 4 dots, 2 dots, 7 dots.
Screenshot. http://img.photobucket.com/albums/v126/shusu/play/aq-soroom-num04b-cheat.jpg
You go towards the whiter light of the GALLERY.
It's more magnificent that you expected! One step inside, you note the pieces on display.
On the LEFT, facing the original HUB ROOM, you can see a sculpture of the habitats outside. Click the sculpture (it will be to the side, in your view). Click again to see a close-up. Click 'back' to reverse.
On the RIGHT is an amazing two-part tapestry. The top seems to depict... a land above water? Maybe even above the clouds. On the bottom is what looks like the habitat you're in currently.
There's a freestanding tunnel connecting to a large cylindrical chamber on the RIGHT. Then the main habitat with the windows in the CENTER? Is that the HUB ROOM? On the far LEFT is an egg-like chamber. You realize...
You've been back and forth along the long corridors, but if the tapestry is oriented with the habitats outside, that means this view is looking down that long corridor. So maybe there are passages perpendicular to the one you've traveled so far.
Click 'back'. You look down towards the LONG HALLWAY and the HUB ROOM.
Go forward another step.
On your LEFT (the SCULPTURE SIDE)
is another ORB floating above a sea anemone. Or FLOWER.
Color note.
Screenshot. http://img.photobucket.com/albums/v126/shusu/play/aq-soroom-color02-purple.jpg
It is light purple, or perhaps a shade of pink.
You touch the ORB...
and a symbol seems to leap out at you!
The three parts of the symbol seem to curl towards the bottom left.
Click 'back' twice.
There's a matching EMPTY FLOWER on the RIGHT (the TAPESTRY SIDE).
Pixel hunting...!
Being a good archaeologist, you examine it closely. Maybe you'll find a clue about the orbs... or...
Look closer at the base.
Click on the round, bulbous base of the tentacles / petals. It's like the ovule of a flower, or before it tapers into the skinnier column.
You can see symbols in the center of the EMPTY FLOWER. Click on it for a closer look.
It seems to be a half-oval and flourish on the top left, with 3 sets of dots below.
From left to right, it's 5 dots, 9 dots, 8 dots.
Screenshot. http://img.photobucket.com/albums/v126/shusu/play/aq-soroom-num04a-cheat.jpg
You move through the white-lit LONG HALLWAY, up an incline, and re-enter the HUB ROOM.
In the center of the room, you're facing what looks like the transporter where you started. Beyond is the DARK CORRIDOR. The sculpture on the right is unresponsive. You step into the transporter, but it doesn't work. Nor can you advance into the DARK CORRIDOR. Odd that turning on the power didn't open up this area.
You turn around and go to the center of the room. This sculpture is unresponsive as well. You turn LEFT (TAPESTRY SIDE) and note that the 3 floating consoles are like white half-eggs with blue orbs in the center. Or blue yolks! They are unresponsive.
You touch the dish, er, white disc in the center, and it clicks. Nothing happens, though.
There's one more view � the threshold between the two windows, behind you. Click left or right twice.
Now you're facing the door (SCULPTURE SIDE).
It's a door with what you might call a GREEN TULIP on it.
It looks familiar...
Maybe this leads to the perpendicular passages in the TAPESTRY.
Through the New Door
Click on the GREEN TULIP DOOR for a closer view.
Hmm, you're wondering if� you touch the door. Click on the door again.
The door opens!
The first step is into the (TULIP) FOYER.
The second step brings you to the entrance of an ORB ROOM.
The walkway here is more like a bridge over pools of water.
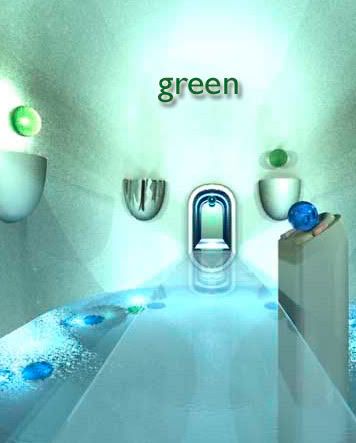
Color note.
Screenshot. http://img.photobucket.com/albums/v126/shusu/play/aq-soroom-color04-green.jpg
Blue orbs are in the water; green orbs are mounted on the walls.
You go forward.
Turn LEFT in the center of the room. Embedded in a console is another ORB!
You touch it, but nothing happens. Unlike the other orbs, it's not lit up.
The console has three buttons: the LEFT, the TOP RIGHT, and BOTTOM RIGHT. You play around with them...
The RIGHT BUTTONS seem to turn on lights.
The (darker) TOP RIGHT BUTTON turns on the light on the ORB.
Color note.
Screenshot. http://img.photobucket.com/albums/v126/shusu/play/aq-soroom-color03-blue.jpg
It's definitely a blue orb.
You touch the ORB...
and a symbol seems to leap out at you!
The five parts of the symbol (there are two on the bottom right curling together) seem to spray upwards.
The LEFT BUTTON turns off the lights.
The BOTTOM RIGHT BUTTON
logically enough, turns on the lights below. The submerged blue orbs were actually light sources.
You look around with the brighter illumination.
If you're to collect symbols from ORBS, then perhaps you need one of the green orbs. However, they're all too far away to touch.
Turn LEFT from the ORB CONSOLE, to face the FOYER where you came from. Hey...!
There's a broken pedestal. It's missing its orb...
Go towards the FOYER. You have a closer view of the broken pedestal. Maybe...
the orb isn't missing.
This is an old ruin; maybe the orb just fell off.
You peer over the edge. Click the water below the damaged pedestal. Sure enough, there's an ORB in the drink.
However, the water's too deep. You still can't touch it.
Make sure the underlighting is coming out of the water (use the ORB CONSOLE).
You squint at the ORB...
A symbol is being projected in the water!
It's a bit difficult to see through the rippling surface, but there seem to be five larger parts and one or two tiny bits in the center. The biggest one is on top, hooking to the right like a curly P.
Click 'back' and/or U-turn. On to the next chamber (splashes of light green in the distance.)
The chamber is the same size as the last. You find what looks like a giant open LOTUS on the RIGHT, and a clear column on the LEFT with a LIGHT CONSOLE attached.
Step to the center of the room. Turn RIGHT. The LOTUS has an ORB; once again, it is not lit up. It's unresponsive.
U-turn from the LOTUS. You examine the LIGHT CONSOLE.
There's a display on the LEFT, up-down arrows, round... lights?, and then a dirty PANEL on the RIGHT.
Those PANEL symbols look familiar...
From bottom to top, the symbols look like:
( )
(�)
(/)
(?)
(|)
You try to clean it for a better look, but it's no use.
Using the console...
You press the up arrow. The display lights up! It's activated a lotus with a central dot on the top left, along with one colored bar and a round light at the same level.
(You turn around... the ORB is still dark. Hmmm.)
You keep pressing the arrows and observing.
Where have you seen those colors before...?
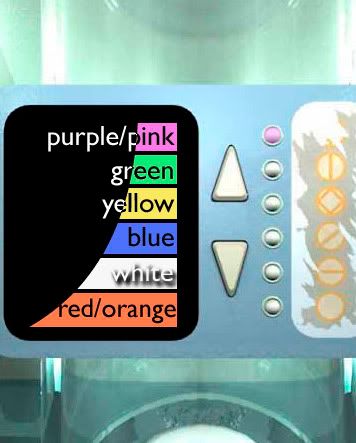
Color note.
From bottom to top, the colors are:
red/orange
white
blue
yellow
green
purple/pink
Screenshot. http://img.photobucket.com/albums/v126/shusu/play/aq-soroom-num02-color07.jpg
You turn around to check the LOTUS again.
The ORB is glowing! Just like the glowing dot on the LIGHT CONSOLE's display. Click on it for a closer look.
Color note.
Screenshot. http://img.photobucket.com/albums/v126/shusu/play/aq-soroom-color05-red.jpg
It is red, or orange. A reddish orange.
You touch the ORB...
and a symbol seems to leap out at you!
The three parts seem to curl in an upward direction.
Click 'back'. Turn LEFT.
You are now facing what looks like the end of the tulip corridor. Fittingly, there's a big green TULIP shape over the door...
Combining Clues at Flower's End
This TULIP ROOM is incredible. There's a green egg-like object suspended between the flowers! You're definitely using this in your thesis! But first, you have to figure out where you've seen all these symbols before...
Go forward.
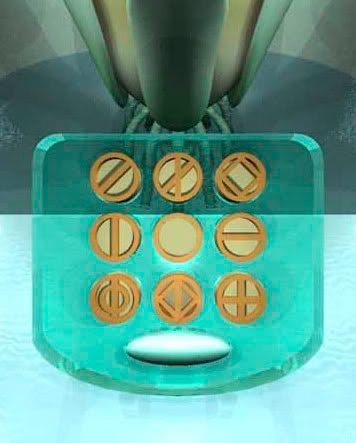
Click on the NUMERICAL CONSOLE for a closer view. Its buttons work just the same � it's clicking away, and there's a long bar at the bottom for entering.
The console looks like:
(/)(X)(?)
(|)( )(�)
(?)(<|>)(+)
WHERE TO LOOK for NUMBER SYMBOLS
LIGHT CONSOLE in the LOTUS ROOM
(next door)
POWER CONSOLE in the CRYSTAL ROOM
(way at the other end of the habitat)
The easy ones
Your parents always told you to take Logic for that elective... you guess that the NUMBER SYMBOLS match up with the number of light bars they activate. You can prove this by matching the ones in common with both consoles.
So if that's true, then you've figured out:
( ) = 1
(-) = 2
(/) = 3
(?) = 4
(|) = 5
(?) = 6
(X) = 8
That leaves the numbers
7 and 9.
The pattern of symbols is quite regular, of course.
6 looks like 1 + 5.
8 looks like 3 + 5.
So that means... 7 would look like 2 + 5?
(�) and (|) = (+).
That leaves 9... 4+5?
Yeah, that looks like ? and |.
Now the question is, what do you enter into that console?
Well, this does seem to be the TULIP ROOM...
Where have you seen that symbol before?
WHERE TO LOOK for the TULIP CODE
UNDERWATER TUNNEL
Stand in the center and look around...
No, NOT out the window.
GALLERY
Examine the flowers...
Specifically, the EMPTY FLOWER.
You can click for a closer view. To avoid pixel-hunting, read the Exploring portions of the walkthrough.
Time to combine...
those top symbols so they look like a TULIP! Put the two halves together.
Then 'read' the groups of dots (left to right).
What are the numbers?
Did you go look for them in the indicated areas, above?
4
2
7
5
9
8
Now that you have the code, and you can read the numbers, enter the code into the CONSOLE and press the bar button.
Everything fires up! It sounds like another generator. What did you just do?
Mapping New Depths
Nothing's changed anywhere in the TULIP wing, so you return to the HUB ROOM.
Is there anything else in the habitat that you haven't tried...?
The disc in the middle of the 3 white egg things! Go straight for it and click it.
The 3 egg things are actually 3D projectors! It's showing a map. You struggle to orient yourself.
Eventually you realize it's from the top looking down (or looking up). An aerial view, so to speak.
You just emerged from 3 identical chambers, so there they are towards the bottom. And now you're in the HUB ROOM with the two big windows flanking the TULIP DOOR... and wait, what is that?
There seems to be some sort of connection between the HUB ROOM and the GALLERY. Except that narrow passage is the LONG HALLWAY. So what's that diagonal tube above it, at the top of the schematic?
Suddenly you realize something about the room you're in.
The HUB ROOM is perfectly round. What's on the schematic is a longer shape, the size of one of the TULIP chambers. Or... maybe it's two shapes? Is something overlaid on the picture of the HUB ROOM?
You check around to see if there's any new way out from where you are.
No such luck. You decide to try the GALLERY.
The connection ought to be just as you exit from the LONG HALLWAY, on the LEFT. By the EMPTY FLOWER? Hmmm.
As you first enter the GALLERY, touch the EMPTY FLOWER at the edge of the screen to turn LEFT.
Touch the wall behind the EMPTY FLOWER and by the edge of the TAPESTRY (between them, basically).
Unbelievable. A hidden door!
You go forward into this newly discovered area.
The first thing you see is a brown round EARTH symbol on the wall. Or maybe it's... the center of the earth. Middle Earth? Egads. You turn LEFT.
Explore
Down the steep incline you go. Apparently the map was depicting a passage going under the HUB ROOM.
At the bottom of this SUB-AREA, you are beside yourself with glee. Look at these symbols! Your thesis is going to be epic. Maybe you should be more observant, though.
Your exploratory habits make you stop at the SUB-ANTEROOM. You look to your LEFT.
An unassuming square panel, the same brown color as the wall. It's unresponsive.
Then you turn around, and look to your RIGHT.
The same unassuming square brown panel, except a bit higher, more to your eye-level. You touch it. It clicks nicely. Is it powered down too?
No, it isn't. It works...
Turn around to the LEFT square panel.
Which is open.
It's an ORB!
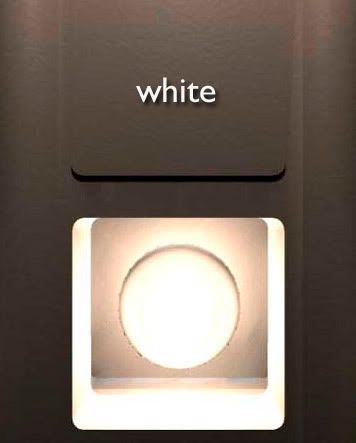
Color note.
Screenshot. http://img.photobucket.com/albums/v126/shusu/play/aq-soroom-color06-white.jpg
A white orb, in the last place you'd think to look.
You touch the ORB...
and a symbol seems to leap out at you!
The four parts are stacked up and seem to flow more horizontal.
That's well and good... on to the SUB-AREA! You're looking up at that impressive conglomeration of symbols on the wall. Click just below, in the white arc, to switch to the console view.
Now for a HEXAGONAL CONSOLE.
It has a black... display on the LEFT, a beehive of hexagons (one center hexagon) in the MIDDLE, and a green hexagon button on the RIGHT. One of the brown buttons has a dot on it.
Where have you seen a hexagon before?
The POWER CRYSTAL ROOM.
Run the HEXAGON POINTER there (aka FISH COMPASS) if you need to check it again. Or read the Exploring section in the walkthrough.
Now that you have the guide for the console, how do you enter the code?
This one's tough. Experiment a bit.
It's clearly got to do with compass directionals.
But why is there a working center hexagon if you're plugging in compass directions? What about the mysterious hexagon with the button?
BIG HINT:
Start with the green button and end with the green button (RIGHT).
Apparently this is exactly like the animated FISH COMPASS. So... copy your motions exactly?
Well, you've tried just about everything. But if you're copying the motions exactly from the POINTER / FISH COMPASS, then... isn't it a bit like orienteering? You knew you should have gone to sleep-away camp.
All right, so the FISH COMPASS first gets turned on = green button. (All the other bar buttons work as both 'enter' and 'clear' so that sort of makes sense.)
Hold on, what does that glowing 'fish eye' look like?
It looks like the black, beady dot on that one hexagon! It's worth a shot to start from there.
After hitting the green hexagon. So press green (RIGHT), then hit the dotted hexagon, then... pretend you're a fish.
Hop from one adjacent hexagon to the next, following the HEXAGON POINTER like a compass.
...top (center)
center
bottom right
bottom (center)
bottom left
top left...
and to finish...
Last but not least, finish with the green (RIGHT) button.
The black display lights up! (There's a flash of that weird EARTH symbol from the top of the ramp.) The big reddish brown globe lights up! Happiness is here again!
However, the EARTH symbol is unresponsive.
So... what just happened? You feel like you're close, but nothing seems to be different.
You leave the SUB-AREA to look around more...
The Mysterious Final Area
You eventually return to the HUB ROOM � after deciding to co-write the paper with your friend who showed you the transporter disc, so it's not wasted time.
You find that the DARK CORRIDOR beyond the transporter isn't dark anymore. This is pictured on both schematics! Eagerly you go down the short corridor.
To your LEFT is a towering brown capsule; in front of you are 3 smaller capsules with the familiar symbols. Let's just call them blue fish arrow, green tulip, and brown earth... thing.
You turn RIGHT. There are 2 other capsules opposite them. And directly before you is...
This could be the MAZE CONSOLE. This could be interesting. You touch it.
Clockwise from the top, 8 symbols appear! There's a center symbol with a dotted circle which pulses when you hover over it � another activation button, perhaps. As you enter symbols, they appear in green around that center button.
You've definitely seen these symbols before.
So you have the ORB SYMBOLS. You have the ORB COLORS.
How do you enter them into this console?
Is there some way to connect them to... numbers?
Alright, so there is a way to connect COLORS to NUMBERS. But what of the code?
Wait a minute. Either this is a test of your higher intellect, or they've picked this code like it's luggage on Spaceballs.
WHERE TO FIND the numerical order of COLORS?
The LIGHT CONSOLE in the LOTUS ROOM. Down the TULIP WING.
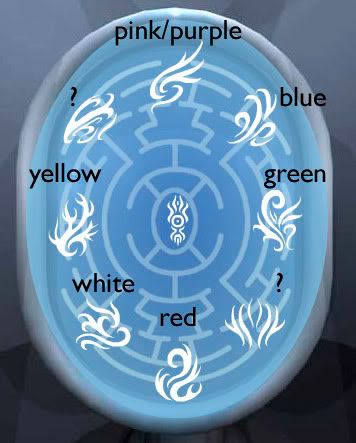
Final color note.
Screenshot. http://img.photobucket.com/albums/v126/shusu/play/aq-soroom-order-color08b-labeled.jpg
In order of appearance on the MAZE CONSOLE:
pink/purple
blue
green
?
red
white
yellow
?
So you have all those colors? Right?
WHERE TO LOOK for the WHITE ORB
Just before you enter the SUB-AREA, look around.
See the New Depths section for more.
It's in the ANTEROOM.
Yes, it's true.
Enter the corresponding ORB SYMBOLS in order, from least to most.
The code really is 1, 2, 3, 4...
That was more a test of visual memory than of pattern or puzzle solving.
Confident, you press the activation button...
and it reactivates the transporter!
Nobel Prize, here you come!
Posted by: Shudog |
May 8, 2012 8:47 PM
|
May 8, 2012 8:47 PM