
Aries Escape: Episode No.007

![]() In addition to the bad habit of napping just about everywhere, poor Yumi must have some frightening B.O. to make an entire salon staff seemingly abandon the building and lock her inside while she slept. Although her plans of being pampered and enjoying the seascape have been thrown out the window, she will not be able to escape quite so easily. Fortunately for us, her frustrating scenario translates into another enjoyable installment of Aries Escape: Episode No.007.
In addition to the bad habit of napping just about everywhere, poor Yumi must have some frightening B.O. to make an entire salon staff seemingly abandon the building and lock her inside while she slept. Although her plans of being pampered and enjoying the seascape have been thrown out the window, she will not be able to escape quite so easily. Fortunately for us, her frustrating scenario translates into another enjoyable installment of Aries Escape: Episode No.007.
 Libertechno maintains the clean and simple layout of previous episodes, relying on the usual controls. Point-and-click to pick up objects and interact with specific areas conveniently indicated by a changing cursor. Use the side arrows to navigate the room and the bottom arrow to leave a zoomed-in window. This time around, instead of colorful legos, you're on a scavenger hunt for a collection of cards. When found, they and other items can be examined or combined by selecting their respective icons in the boxes at the bottom of the screen. Despite the narrative text being in Japanese, the language barrier is avoided where it counts as the clues and codes are presented in English.
Once you have a feel of the room, it's time to get to the meat of the brain matter. The handful of puzzles you'll encounter are fairly logical, however the hints aren't always straight-forward and you may be tripped up by a couple red herrings. Sometimes even recognizing what is or is not a clue is a challenge, and applying the information you collect to the right puzzles can prove equally daunting. While the gameplay presents a variety of difficulty ranging from elementary to mentally engaging and some refreshing originality, Libertechno sadly leaves out the colorblind yet again with the presence of more than one color-based puzzle.
In addition to the regular ending, a second "perfect" ending provides extra gameplay to enjoy, because if you're like me, sometimes normal just isn't satisfying enough. Expect the pleasantly bright graphics and light, melodic background music befitting a beauty salon to provide a cheerful atmosphere and set a relaxing mood perfect for putting your mind to work. It only makes sense that people would come here to get their scalps scrubbed, now if only the manager would let you leave!
Note: to turn off sound, select the [tool] icon and adjust the bottom slider to the left. Keep the top slider, which controls click sensitivity, all the way to the right.


Walkthrough Guide
(Please allow page to fully load for spoiler tags to be functional.)
Aries Escape: Episode No.007 Walkthrough
Exploring the Room & Solving the Drawer Puzzle
You start the game facing the window and a row of chairs. Click the left chair to zoom in.
Turn the chair to the side and pick up the HAWK CARD revealed on top of the seat.
Examine the small sign on the shelf in front of the mirror.
Take note of the red heart with an arrow that pierces through its lower right side.
Back up twice, then inspect the middle chair.
Click the sign on the shelf under the mirror for a close-up view.
In this image, the arrow is in a new position. Now it points out of the upper right side of the heart.
Move back twice again and examine the chair on the right next.
Turn the chair to unblock your view of the lower shelf under the mirror and pick up the PANDA CARD.
Take a look at the last heart sign on the upper shelf.
This time, the arrow is pointing out of the lower left side of the heart.
Back up to a full view of the room and turn to the left to face the wall.
Inspect the metal ring hair dryers on the right side of the room.
Take the HIPPO CARD at the top of the right hair dryer.
Go back once, then click the rolling cart of supplies for a closer look.
Take the SPRAY BOTTLE on the top shelf.
Lift the handheld hair dryer on the middle shelf to uncover the LION CARD.
Move back and then examine the rows of drawers on the left side of the wall.
Open the third drawer from the top. Zoom in on the small purple box inside the drawer.
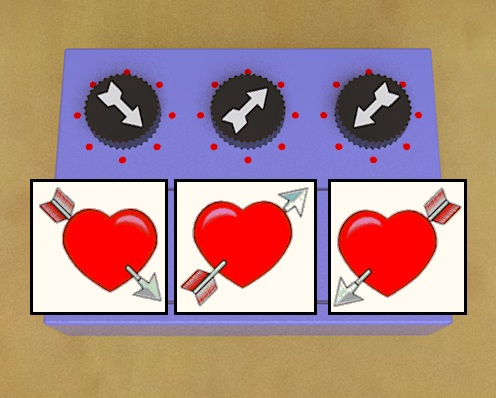
There are three buttons, each with a white arrow in the center and small red dots in a circle around the button.
You can click to rotate the arrows clockwise, but in what order?
SOLUTION:
Refer to the images on the three signs you viewed earlier, then simply repeat the direction of the arrows found on each sign
The arrow on the left sign points to the lower right, between 4 and 5 o' clock.
Click the left dial three times to set the white arrow in the same direction.
The arrow on the middle sign points to the upper right, between 1 and 2 o' clock.
Now, click the middle dial once to set the white arrow in the same direction.
The arrow on the right sign points to the lower left, between 7 and 8 o' clock.
Lastly, click the right dial five times to set the white arrow in the same direction.
Screenshot.
Slide open the panel at the bottom, then Take PAPER 1 found inside the compartment.
Click the paper in your inventory to inspect it.
Unfold the paper to view the whole sheet.
Although it looks totally blank, combine it with the SPRAY BOTTLE to reveal a hidden code: 4317 written vertically.
Also note that the numbers are oriented on the left side of the paper.
Back all the way out to the full view of the wall, then turn left to face the couch and the exit door.
Collecting More Cards & Opening 3 Square Boxes
Inspect the couch for a closer look.
Lift the left upper cushion to reveal the ALLIGATOR CARD above the seat.
Click the base of the potted plant to zoom in.
Pick up the BAT CARD on the floor behind the plant.
Go back and left to turn towards the front desk.
Examine the small alcove in the wall for a close-up view of the shelves.
Push the stack of colored folders to the side to reveal the OSTRICH CARD.
Move back once, then click the counter area by the register to zoom in.
Take the PENGUIN CARD from the small business card tray.
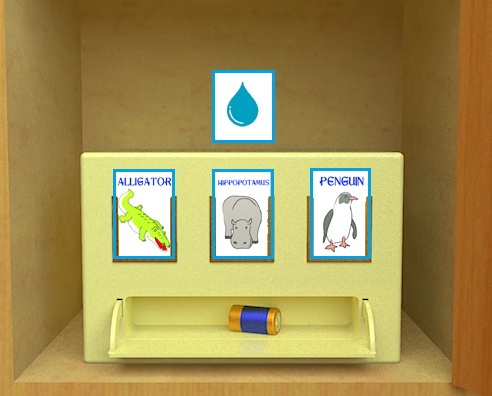
Have a look at the four square door at the left side of the wall.
Behind each small door is a box with three u-shaped holders and a row of three symbols, but what could they mean?
Start with the box behind the upper right door.
HINT:
Those animals cards sure fit nicely into those holders, but that's the easy part! Think about how each card relates to the water symbols inside each holder.
SOLUTION:
Place the three cards that have a picture of an animal that can live in the water.
They do not need to be in any particular order, so long as you have the following three animal cards inside the card holders:
First is the ALLIGATOR CARD.
Second is the HIPPOPOTAMUS CARD.
Third is the PENGUIN CARD.
Screenshot Water Box.
When the correct cards are inserted, a compartment at the bottom of the box will open to reveal a BATTERY.
Click the three cards to place them back in your inventory.
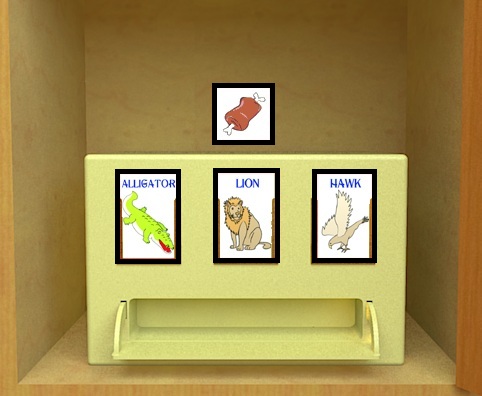
Next, look at the box inside the lower right door.
These cards have a picture of meat. Using the same logic as the solution for the water box, find the three cards that share the symbol in common.
SOLUTION:
Place the three cards depicting an animal that eats meat.
Again, the order in the following example is not important.
First is the ALLIGATOR CARD.
Second is the LION CARD.
Third is the HAWK CARD.
Screenshot Meat Box.
After the compartment at the bottom of this box opens, take the folded PAPER 2 inside.
Click the three cards to place them back in your inventory.
Inspect PAPER 2 in your inventory and then click it to unfold the note.
Select the SPRAY BOTTLE and use it on the paper to reveal the hidden message.
Just like before, a row of blue numbers appears, however this time there is a new combination oriented on the right side of the page: 6852 written vertically.
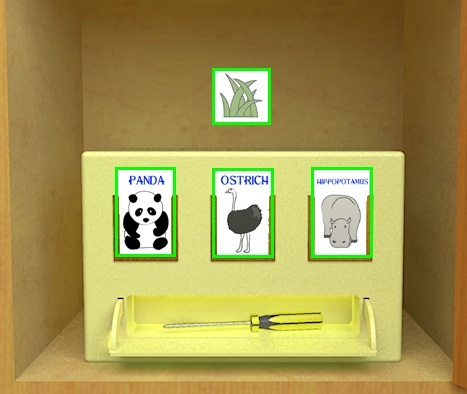
Now, take a look at the box inside the lower left door.
This time, the symbol inside each holder is a picture of grass. By now, this puzzle should be a piece of cake!
SOLUTION:
Place the three cards depicting an animal that eats grass.
Again, the order in the following example is not important.
First is the PANDA CARD.
Second is the PENGUIN CARD.
Third is the HIPPOPOTAMUS CARD.
Screenshot Grass Box.
Take the SCREWDRIVER from the opened compartment at the bottom of the box.
Click the three cards to place them back in your inventory.
Ignore the fourth door at the upper left for now. We'll come back to it later.
Turn right twice to return to the side of the room with the hair dryers and the row of drawers.
Opening the Sliding Blocks Cabinet & Solving the White Button Box
Click the large cabinet in the wall to zoom in, then inspect the rows of small wooden blocks just under the handles.
You can click each of the blocks to slide them out, but that doesn't seem to open the lock. There must be a certain order to how each block is moved.
HINT:
Use the two hidden message clues found on PAPER 1 and PAPER 2.
Pay attention to which numbers are left and which are right!
SOLUTION:
Combine the numbers found in the hidden messages on the pieces of paper. Remember that the list of numbers on PAPER 1 is oriented on the left side while the numbers on PAPER 2 are oriented on the right side.
When put together, the list of numbers now looks like:
4 6
8 3
5 1
2 7
With the list in order, you can see that each number from 1-8 corresponds to one of the 8 sliding blocks.
All you have to do now is move the blocks out in that same order.
Screenshot.
Back up to the full view of the cabinet.
Click the unlocked cabinet doors to look inside.
On the bottom shelf you'll find a small green box with four white buttons.
We don't yet have all the information needed to open the box. Time to search around the room!
Turn left twice to return to the front desk.
Examine the calendar hanging on the right side of the wall.
Lift the paper to find an interesting picture: a white circle with an arrow pointing upwards.
Back up and turn right once to face the couch.
Click the blue exit door for a closer look.
The first thing you might notice is that the same white circle found under the calendar appears five times on this door.
Also note that each circle is in a different position on its horizontal line.
The circle in the top line is oriented 2 spaces to the right.
The circle in the second line down is just 1 space to the right.
The circle in the next line is 3 spaces to the right.
The circle in the fourth line down is 4 spaces to the right.
The circle at the bottom line is 3 spaces to the right.
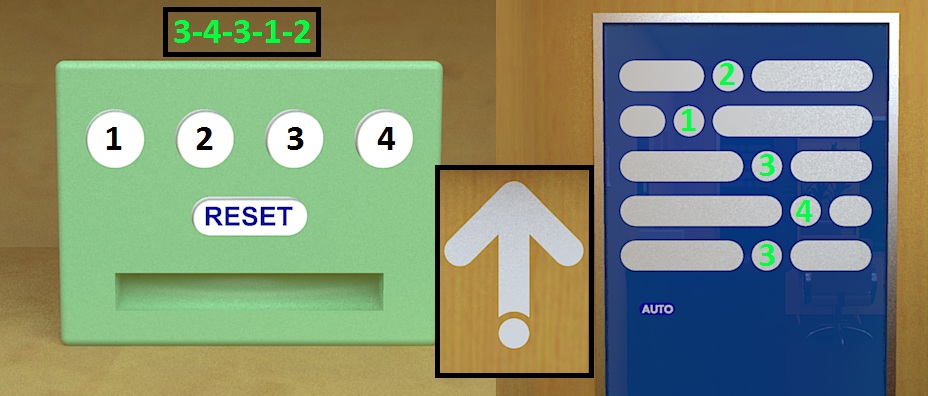
Return to the green box inside the cabinet. You should be able to get a close-up view of it now.
Click the right side of the box to rotate the view.
Insert the BATTERY into the empty slot at the side, then return to the front view of the box.
Now, you should be able to use the box. Press the buttons in the correct order to solve the puzzle.
HINT:
The white circles on the door had a distance in their line between 1 to 4 spaces long and there are 4 white buttons on the box.
Don't forget the clue from the calendar: a white circle with an arrow pointing upwards.
SOLUTION:
First find the order of the white circles on the door when read from bottom to top.
3-4-3-1-2.
Next, press the buttons from left to right in the same order.
Push the reset button if you need to re-enter your solution.
Screenshot.
Take the DIAMOND NOTE dispensed from the slot in the green box.
Solving the Pink Box and the Last Square Box
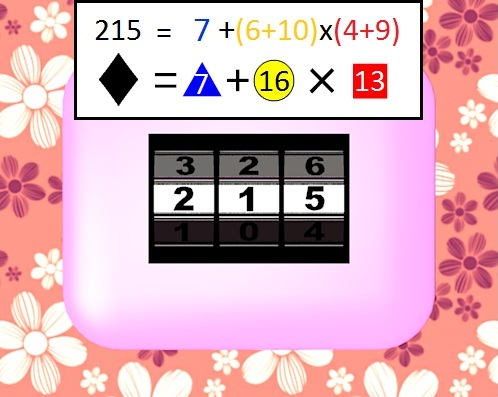
Inspect the DIAMOND NOTE in your inventory.
The equation on the paper shows a black diamond = a blue triangle + a yellow circle x a red square.
I'm no mathematician, but I can say you'll have hard time solving that problem without a few real numbers.
Look around the room to find the one thing that comes in all three colors.
There are red, yellow, and blue bouquets of flowers!
Find and count all of the colored flowers, then enter them into the equation.
Blue:
This one is the easiest to find. Simply go to the side of the room with the blue couch, then examine the vase on the table.
Count the number of blue flowers in the vase and substitute them into the problem.
Diamond = 7 + Yellow x Red.
Yellow:
First go to the side of the room with the cash register and the front desk.
Inspect the vase on top of the desk and count the number of yellow flowers.
Move right to return to the side of the room with the couch.
Click the middle vase to zoom in and count the yellow flowers here as well.
Combine the number of yellow flowers from both vases, then subsitute them into the equation.
Diamond = 7 + 16 x Red.
Red:
While at the alcove above the blue couch, count the number of red flowers in the left and right vases.
Add them together, then substitute them into the equation to find the math problem.
Diamond = 7 + 16 x 13.
Click the couch for a closer look.
Lift the middle seat cushion to reveal a wooden panel.
Use the SCREWDRIVER to remove the screws at the corner of the panel.
Take off the board to uncover a pink box in a cache under the seat.
Click the box to zoom in, then enter the combination into the lock.
HINT:
It's a diamond shaped box!
SOLUTION:
You've already found the values of all the flowers, so all you need to do is crunch the numbers into the equation from the DIAMOND NOTE and enter them into the lock.
7 + 16 x 13 = 215.
Screenshot.
Back up and open the box to find the BEETLE CARD.
Finally! Now that you have the last animal card, you can return to the four doors by the front desk.
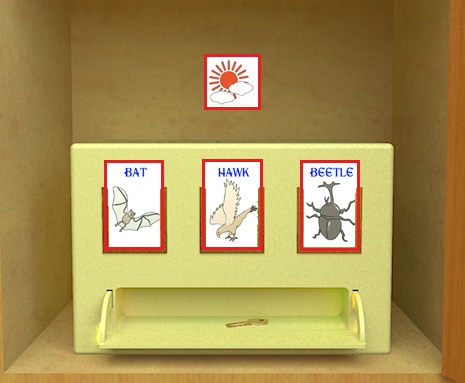
Click the upper left door to view the box inside.
This time, the symbol inside each holder is a picture of a sun and clouds.
Find and place the three correct animal cards related to that clue.
SOLUTION:
Place the three cards depicting an animal that can fly.
The order in the following example is not important.
First is the BAT CARD.
Second is the HAWK CARD.
Third is the BEETLE CARD.
Screenshot Sky Box.
Take the KEY from the opened compartment at the bottom of the box.
Click the three cards to place them back in your inventory.
Normal & Happy Escape!
Turn to the right to face the couch.
Click the blue exit door to zoom in, then examine the automatic lock on the left side of the door.
Insert the KEY into the keyhole to switch the light from OFF to ON.
WARNING: If you exit through the blue door now, you will receive the Normal Ending.
Follow the next steps to receive the Happy Ending.
Do NOT touch the door after unlocking it with the key. Just to be safe, save your game now!
Move back once to the full view of the blue door and the blue couch. Notice anything different?
The framed picture on the wall has a spotlight shining on it.
Click the picture to zoom in, then lift up the frame to find a small, hidden door in the wall.
Open the small door to look inside.
Place all nine animal cards from your inventory into the U-shaped holders (If any are missing, go back to the square doors at the front desk to retrieve them from the boxes).
Take the "perfect" GOLDEN TICKET that is discharged from the slot at the bottom of the card holder.
Move back twice, then click the blue exit door to escape with the happy ending.
Posted by: Trinn |
January 23, 2013 3:33 PM
|
January 23, 2013 3:33 PM