
Bluebeard's Castle
Platform: Mac, Windows

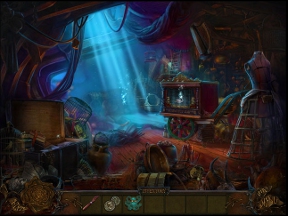
![]() If you're unfortunate enough to have the deserved nickname "Bluebeard", you'd better have a kickin' castle and a killer reputation to keep yourself from looking like a big lame-o. That's exactly the case with the antagonist in Bluebeard's Castle, a hidden object adventure release from Fanda Games. Focusing more on the adventure side of things, expect a full heaping of puzzles, unnerving settings, strange noises in the background, and ornate decorations that could use a serious tweaking from Dress My Nest.
If you're unfortunate enough to have the deserved nickname "Bluebeard", you'd better have a kickin' castle and a killer reputation to keep yourself from looking like a big lame-o. That's exactly the case with the antagonist in Bluebeard's Castle, a hidden object adventure release from Fanda Games. Focusing more on the adventure side of things, expect a full heaping of puzzles, unnerving settings, strange noises in the background, and ornate decorations that could use a serious tweaking from Dress My Nest.
 You poor little protagonist, you. Your sister wasn't blessed with an overabundance of caution. It seems Clarice has gone off and married Count Bluebeard, the mysterious figure who lives in a creepy castle and has already had six wives, each of whom vanished under mysterious circumstances. Clarice was given full roam of Bluebeard's castle save one room. And, naturally, she ventured in to that room. Time to go check out this guy's mansion to see if you can rescue your sister before she, too, disappears!
Bluebeard's Castle is one of those precious hidden object hybrids that all but ditches the laundry list of item scenes in favor of exploration, inventory puzzles, and good old fashioned casual adventure gaming. Most of your time will be spent looking around the place, checking areas for bits and bobs you can collect and use to progress to new locales. Areas of interest are noted by a small sparkle, so it's easy to find what you need. Figuring out how to use it is the real puzzler.
 While the main game is great and all, what really steals the show are the mini-games. Not only are they more numerous than your average casual adventure game, they're more creative, focusing on riddle-type puzzles as opposed to the standard battery of sliding tiles, jigsaws, and the like. You'll have to do some honest to Zeus thinking to solve a few of them, but if you get stuck, they're all skippable after a few moments. But, you know, try not to hit that button if you can help it!
Analysis: Newcomer Fanda Games didn't pull any tricks with its debut game, but Bluebeard's Castle doesn't suffer from a lack of attention. For the most part, it's a standard adventure/hidden object hybrid, featuring mini-games, puzzles, exploration, and a few hidden object areas here and there. Fortunately, its refusal to shine doesn't denote sloppy design, and from scene to scene you'll discover plenty of smart puzzles and interesting things to check out.
The only stumbling point with Bluebeard's Castle is on the technical side, and they're most likely quirks with the engine the game was built on. For some reason, loading screens appear just about every time you switch scenes. They only last a moment or two, but they're distracting and chop up the adventure, making it much less immersive.
The game doesn't ooze big-budget polish, but it's no poster child for the lackluster, either. Bluebeard's Castle is a solid, dependable hidden object adventure game that provides almost five hours of entertainment from beginning to end. The development team has a remarkable attention to detail, something you won't fail to notice once you enter Bluebeard's Castle on your own!
![]() Windows:
Windows:
Download the demo
Get the full version
![]() Mac OS X:
Mac OS X:
Download the demo
Get the full version


Walkthrough Guide
(Please allow page to fully load for spoiler tags to be functional.)
Bluebeard's Castle Walkthrough
General Information
Main Menu & Options
On the Main Menu screen, you can Start or Exit the game, change players and adjust options, which include music volume, sound effects volume, full screen or windowed, and custom cursors.
Multiple profiles can be stored so separate players can save their own games, or one player can save several games.
When you begin a new game, you are offered a choice of a tutorial, which will guide you through the first scenes.
When you exit the game, your progress is automatically saved.
Navigation:
When you can move to a new area, the cursor will change into a large arrow—usually at the bottom of the screen or near a door or entranceway somewhere in the scene.
If an item can be picked up, the cursor changes into a hand when you mouse over it.
To use an item, select it in your inventory, then click on the interactive area where you want to use it. If it doesn't belong, a message at the top of the screen will say so.
A magnifying-glass-shaped cursor appears over areas requiring closer examination; click there to reveal clues, important details or items to collect.
Puzzles and hidden object scenes will be indicated by either a jigsaw-piece-shaped cursor or a magnifying glass.
Certain puzzles or hidden object scenes will also be indicated by "sparkles."
Puzzles/Mini-games:
The "Skip Puzzle" button can be used if you want to skip past a puzzle; the solution will be briefly revealed before the puzzle screen closes.
The "Hint" button provides non-spoiler information to help you along in both the minigames and exploration, often indicating where or how to find the necessary clue(s). Sometimes it's extremely helpful, other times it is merely Captain Obvious.
Selecting "Info" during a mini-game will give directions on the puzzle's objectives.
Click on "Back" any time during a mini-game to leave it (you can return to it later).
Hidden Object Scenes:
During Hidden Object Scenes, items to be found are listed at the bottom of the screen. When an object is found, it disappears from the list.
Overclicking—or too many random clicks—during hidden object scenes are penalized by a gradually darkening screen and a message to focus "on the task at hand." The penalty is very brief, though.
Mouse over an object's name on your list to see a silhouette of it above the "Hint" button.
Click on "Hint" to reveal where the next item is hidden. The hint button gradually recharges and can be used multiple times during a hidden object scene.
There is no "Skip" for hidden object scenes, but you can use "Back" to take a break then return it later.
Hidden object scenes are randomized, so the list of what to find changes from game to game, player to player.
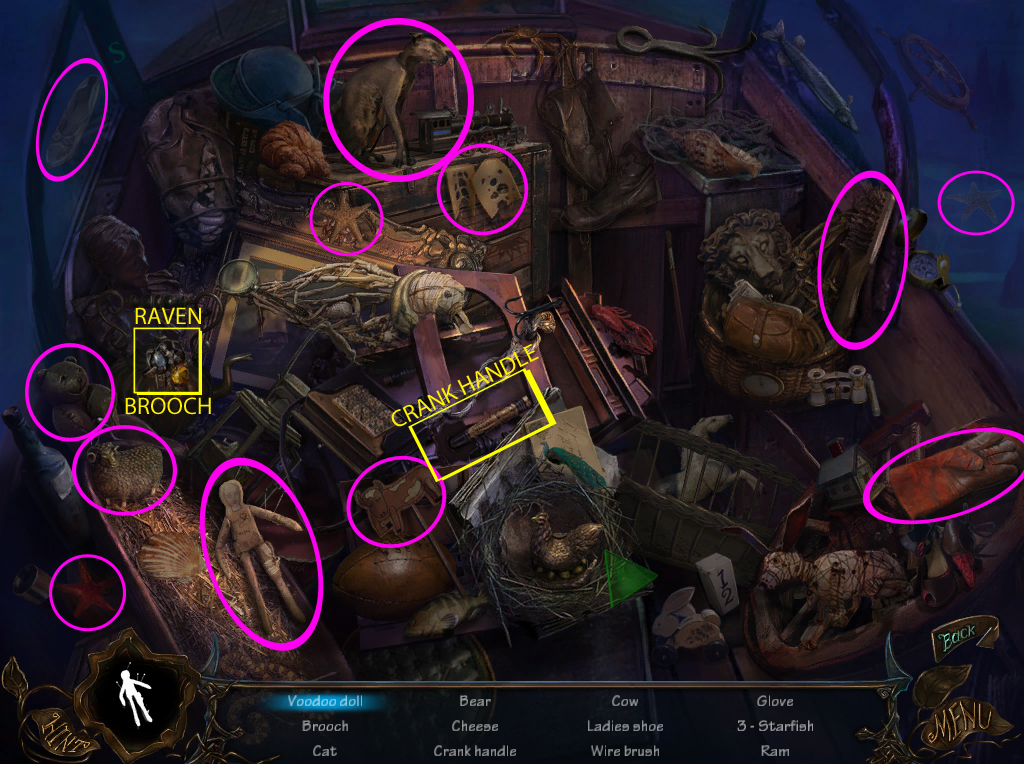
In this walkthrough, constant items will be circled on the hidden object scene screenshots.
Because hidden object lists are randomized, screenshots of hidden object scenes are intended for reference but cannot provide exact solutions.
When you've found all the objects in a hidden object scene, a final key item will often be shown; click it to take it into your inventory and close the hidden object scene.
First Key
Before Entering the Castle
Screenshot: Main Gate
You're standing outside the gate, having just arrived. First, Pick-up:
GARDEN SHEARS PART (1/2)
Then, read the paper; from there, you can take:
Scrap of paper with NUMBERS CLUE.
Now focus on the lever panel:
Open the numbers clue from your inventory.
Turn each row of dials until they match the numbers in your clue.
As a row of dials is turned to its correct settings, its lights will turn off.
When the dials are correctly set, the gate will automatically open.
Screenshot: Main Gate
Go through the gates then turn right;
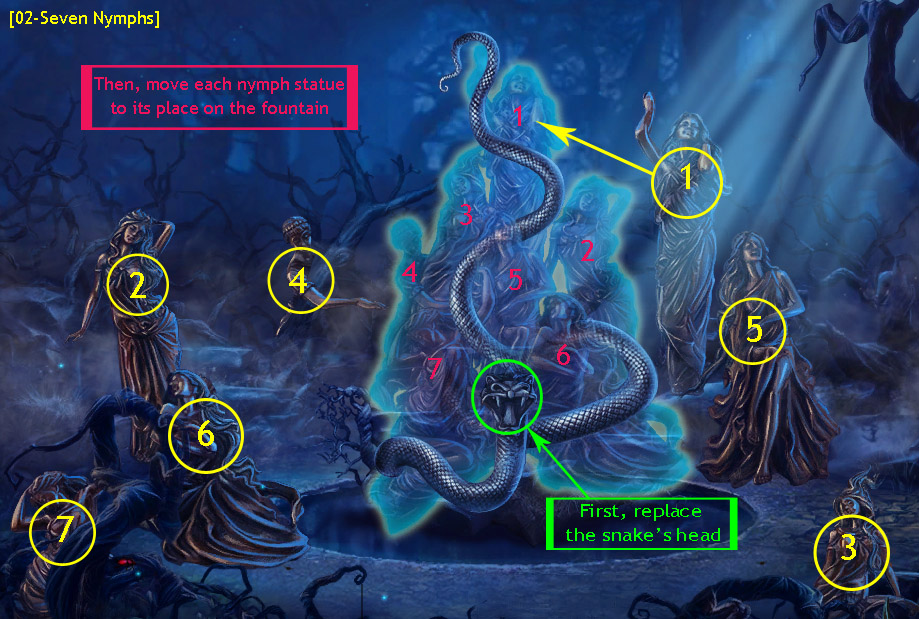
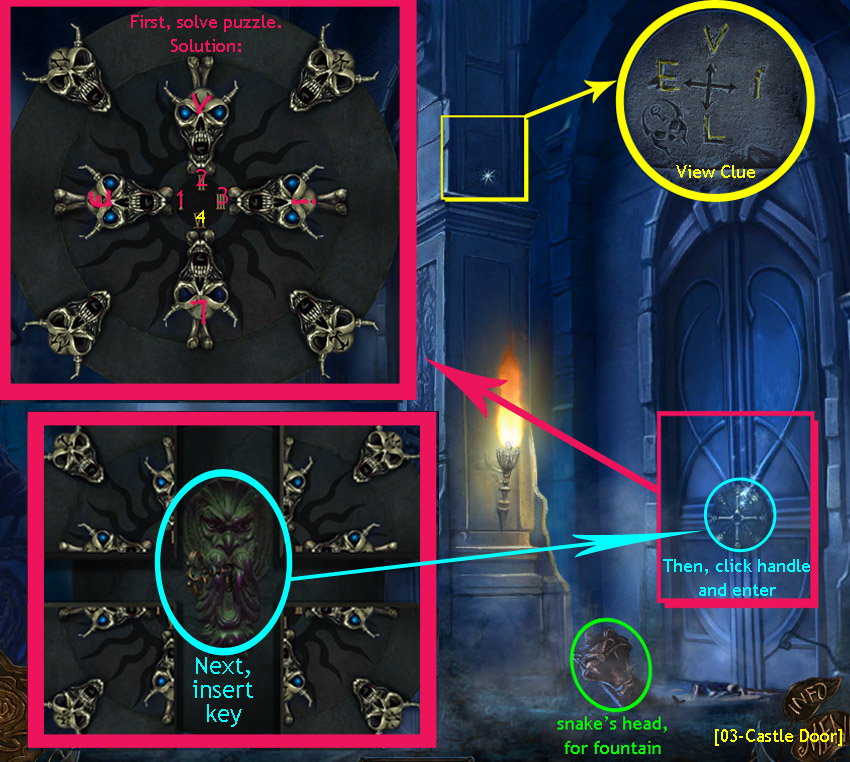
pick up the SNAKE HEAD from outside the castle door.
Return to the fountain:
Replace the SNAKE HEAD back on the fountain.
Now move the nymph statues back into position on the fountain:
When you click on the snake's head, a misty shadow of where the nymphs go can be seen.
Select a statue, then drag it to its correct position on the fountain.
If the statue is in the right spot, it will freeze into place.
Screenshot: Seven Nymphs
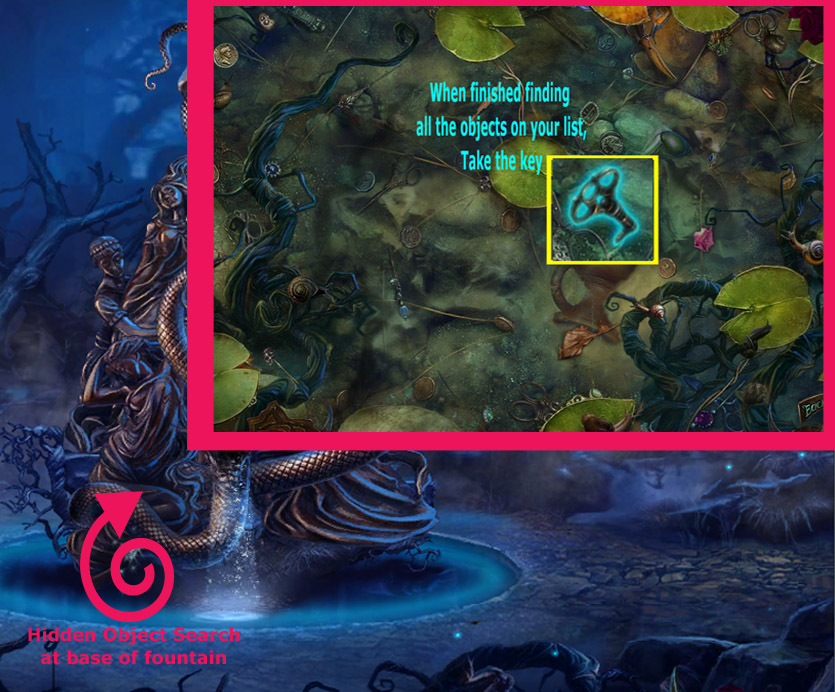
After you correctly reassemble the Nymph Fountain, a Hidden Object Scene will appear:
Click on the fountain's pond to begin the Hidden Object Search.
Your goal is to find a set number of either coins, snails, hat pins, or scissors (the required item varies according to profile).
Screenshot: hidden object scenes at Fountain
When you have found all the items on your list, you'll receive:
a FISH KEY
COINS
Go right again, back to the castle's front entrance.
Screenshot: Castle Entrance
Focus on the top left column and take note of the clue there.
Now zoom in on the door lock:
Use the clue from the column:
Clockwise, from 9 o'clock: I = E; II = v; III= i; IV = L
Click the circle's edge to spin it until the letters align with the correct roman numeral.
Then, press the demon skulls in that order. When done correctly, the circle will split, revealing the keyhole.
Select the fish key from your inventory and put it in the lock.
Click on the door handle to open it, and enter the castle.
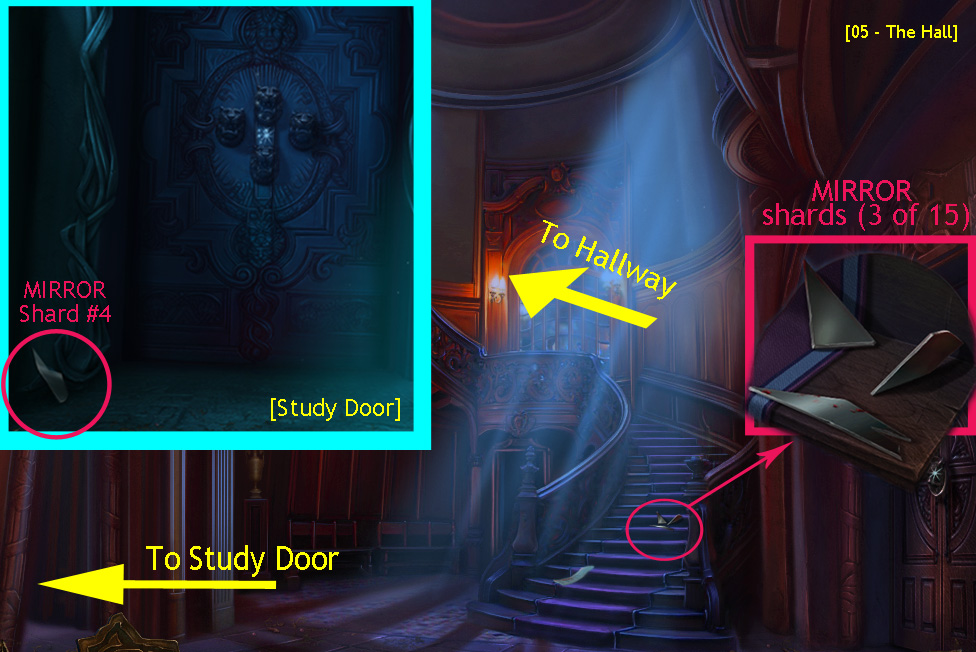
The Hall and Hallway (before Entering Clarice's Room)
Screenshot: The Hall
Exploring the room, there are two locked doors that you cannot open yet and a vase that seems to have something in it that you can't reach. Read the note at the bottom of the stairs for an important detail about a later puzzle. Before heading upstairs, there are a few items to gather down here:
First, zoom in on the 3 MIRROR shards midway up the stairs; pick them up.
Go left to "Study Door": pick up another MIRROR shard in the corner, by the door; return to The Hall
Now, with 4 of 15 mirror shards in your possession, go upstairs to "The Hallway."
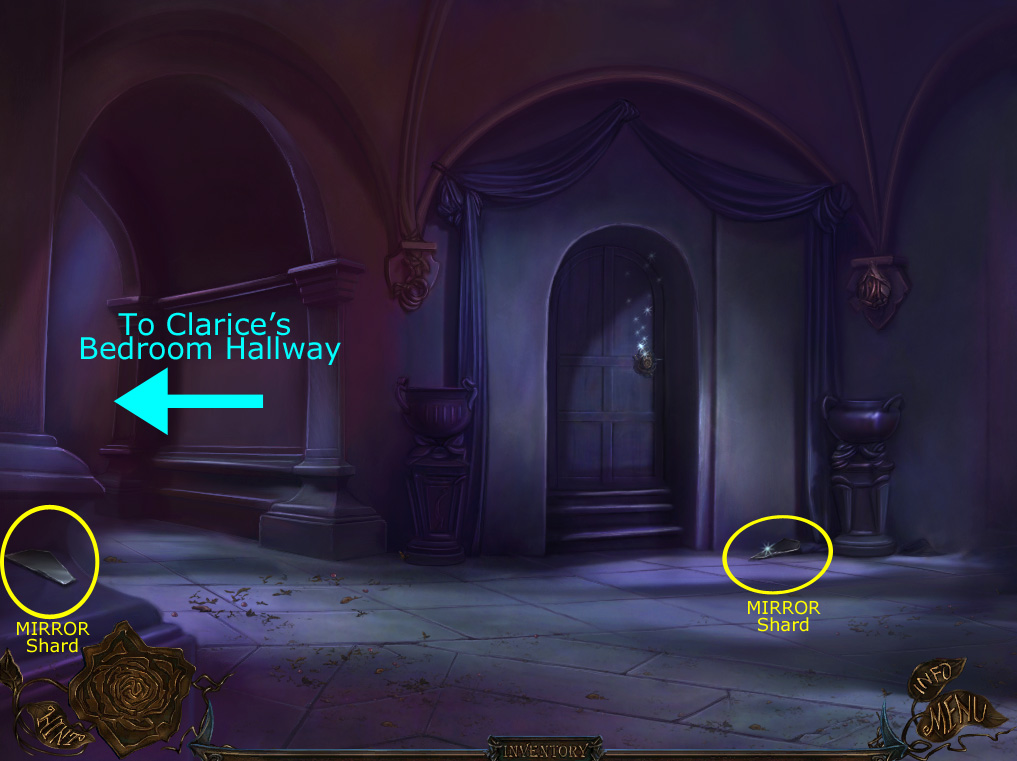
Screenshot: Hallway
Pick up 2 MIRROR shards.
Continue toward Clarice's Bedroom Hallway.
Pick up 5 MIRROR shards from around the room.
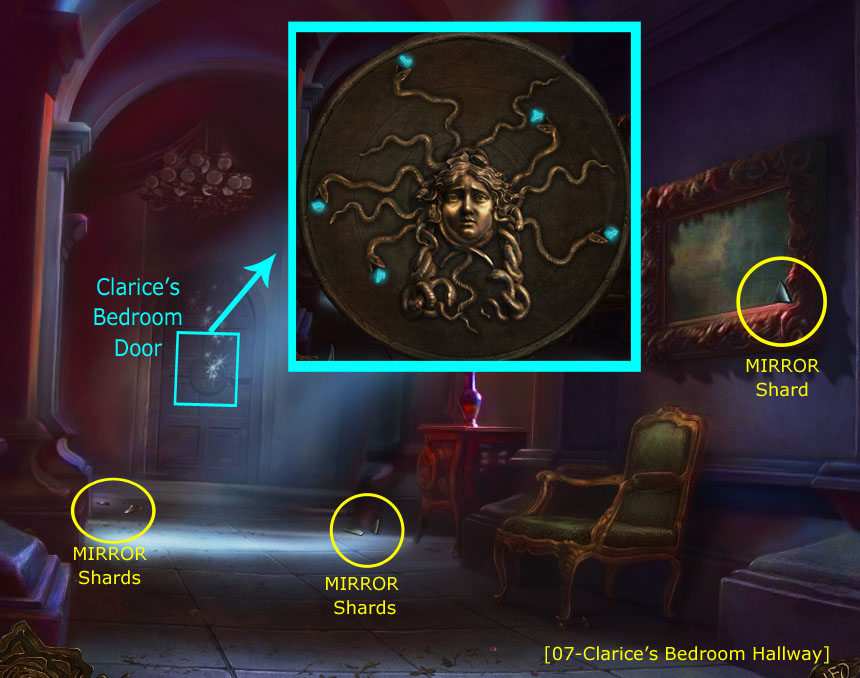
Screenshot: Clarice's Bedroom Hallway
Click on the door to open a new puzzle:
The object of this puzzle is to align the snakes.
First turn the outer ring to make the background indentations line up correctly; the woman's eyes open when this is done.
Then, click on the gold button to turn the snakes until each is place; when a snake is in the right spot, the gold button turns into a blue lit symbol.
(See screenshot.)
Go through the door into Clarice's room.
Clarice's Bedroom
Screenshot: Clarice's Bedroom, Mirror Fix
When you enter Clarice's Bedroom, you'll notice a broken mirror in the back of the room:
Gather the last four MIRROR shards from around the room; you should now have 15 pieces of the mirror.
Zoom in on the mirror and place the 15 MIRROR pieces onto the mirror; they'll move to the outer edges.
Put together the mirror by clicking on the piece you want to move, then clicking on the spot you want to move it to.
Pieces lock in place when they're in the correct spot.
(See screenshot above.)
When the mirror is fixed, the figure of a woman appears in it and gives you a pair of SCISSORS. Take the scissors.
Now, click on the pile of books at the bottom of the mirror:
Get the OCTOPUS.
Zoom in on the teddy bear:
Screenshot: Clarice's Room, Bear
Use the scissors on the bear to open the front of it's jumper.
Take the NOTE from inside the bear's jumper.
The note gives a clue about how to open the lock on the attic door.
Pick up the ARROW from the bottom of the note.
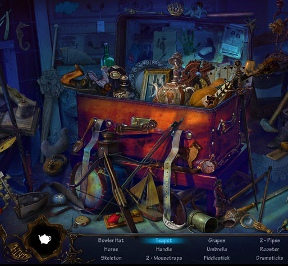
Finally, click on the clothes pile next to the bear to begin an hidden object scenes:
Screenshot: 1st hidden object scenes in Clarice's Room
Find all the objects on your list to get the GAVEL.
With the GAVEL, clue and ARROW, leave Clarice's room and go back down to The Hall
Getting into the Attic
Before you can enter the attic, you need something from The Hall:
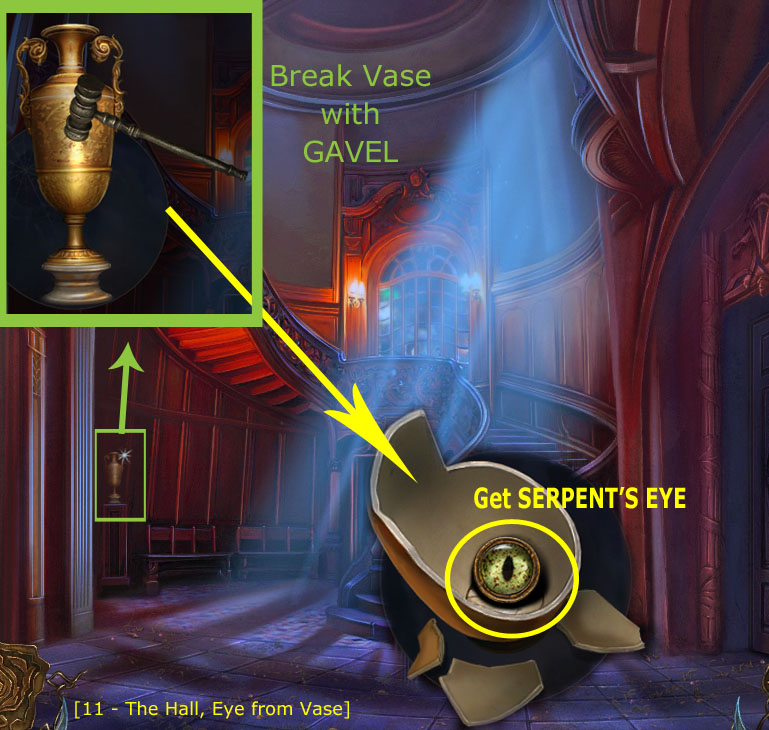
Screenshot: The Vase in the Hall
Use the GAVEL to break open the gold vase (see screenshot).
Get the SERPENT'S EYE.
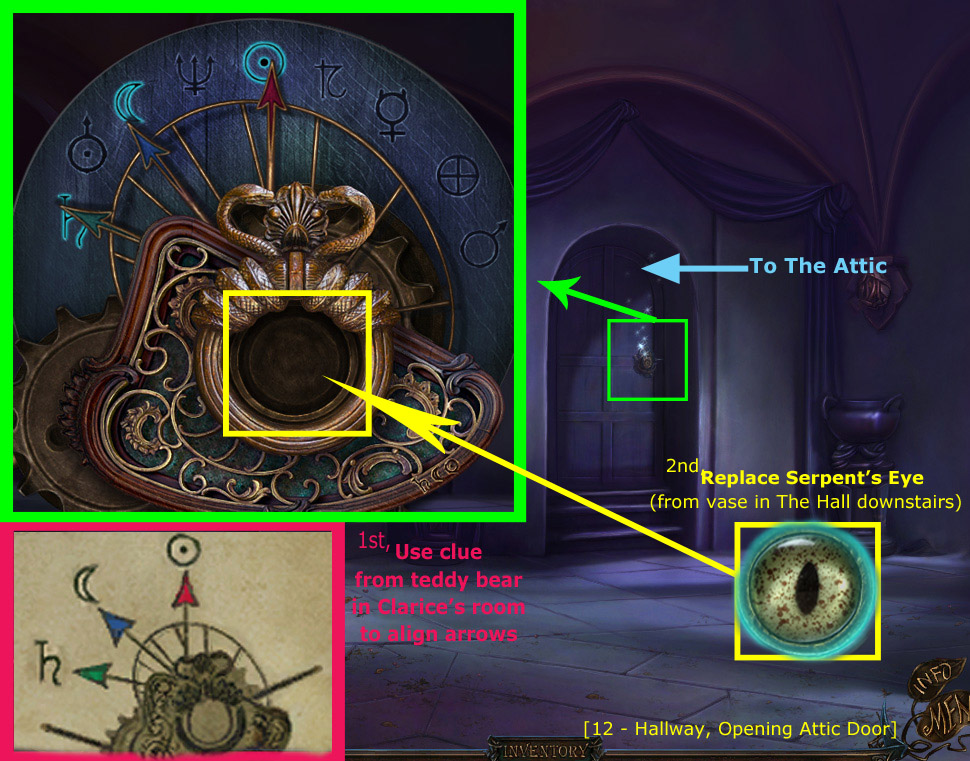
Go upstairs to the Hallway and click on the attic door to activate the next puzzle:
Screenshot: To the Attic
Replace the ARROW into its spot on the dial.
Use the clue found in the teddy bear in Clarice's room...
Line up the colored arrows to their matching astrology sign (see screenshot above).
When the three arrows are pointing at their signs, the signs will light up and the peek hole in the center will open.
Place the SERPENT'S EYE in the hole.
Go into the Attic through the now open door.
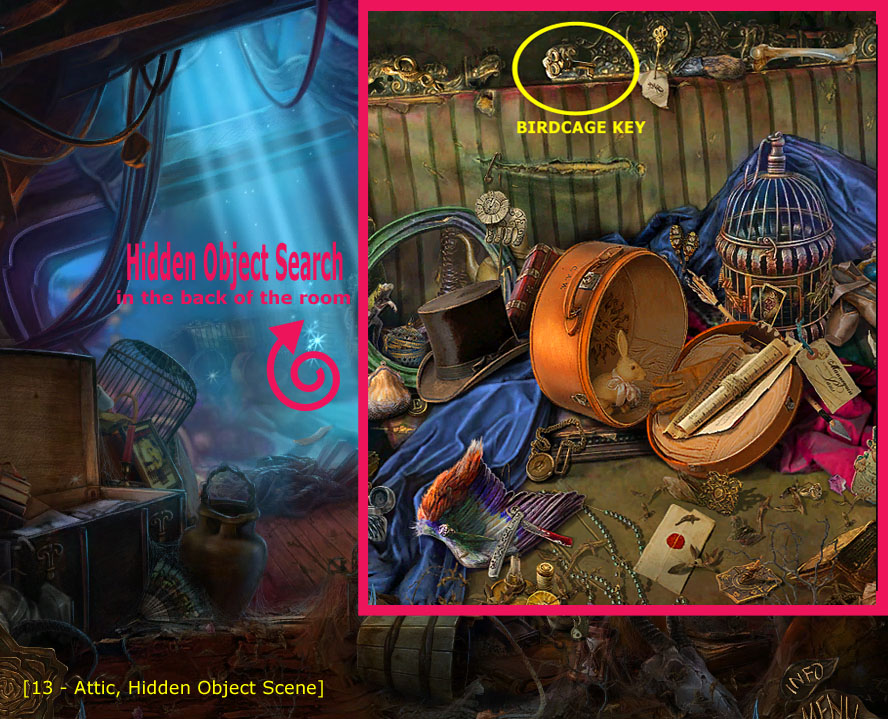
The Attic
As soon as you go in, click on back wall to begin another hidden object scenes:
Screenshot: hidden object scenes in the Attic
Find all the objects on your list to gain the BIRDCAGE KEY.
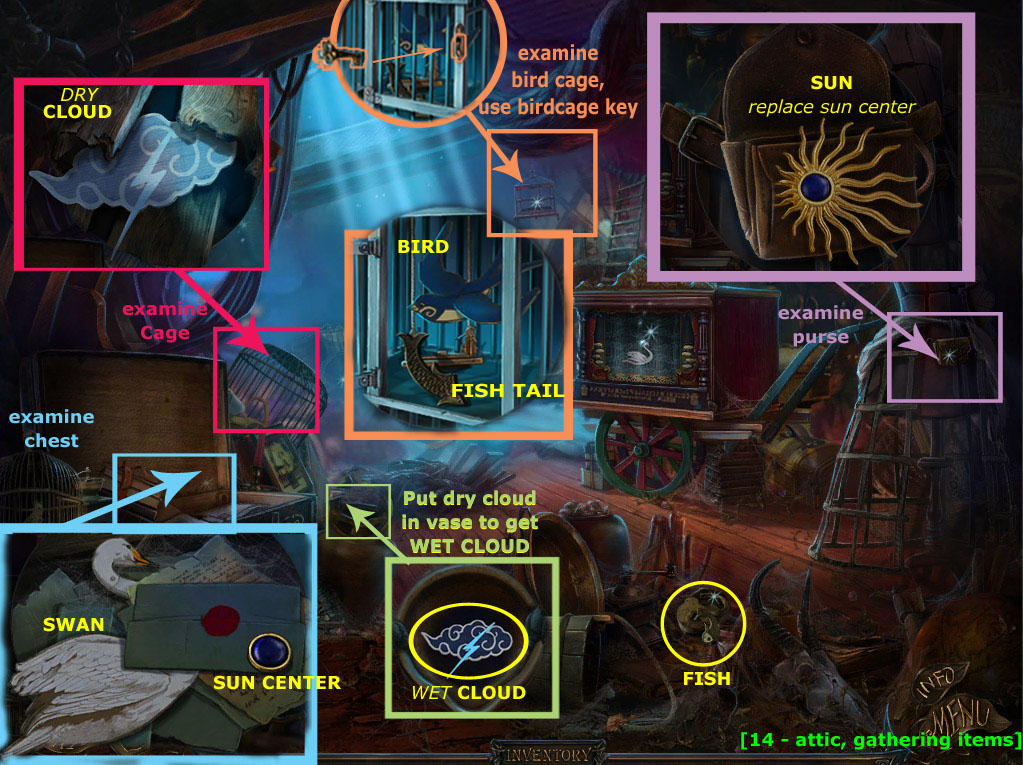
Screenshot: Gathering Items for the Puppet Play
Now use the Birdcage Key to open the birdcage in the back of the room and take:
The FISH TAIL
And the BIRD.
Examine the chest to get:
The SWAN
And SUN CENTER.
Examine a spot just above the cage that's next to the chest (nearer the front of the room):
Get the DRY CLOUD.
Examine the vase that's next to the chest; inside you'll see it has water...
Place the Dry Cloud in the water.
Take it back out of the vase to get a WET CLOUD.
Examine the purse on the dress form (right side of room):
Replace the Sun Center in the sun...
Then, take the SUN.
You need to go back to Clarice's room for a couple more items, but before leaving the attic:
Pick up the fish from the center of the pile in the foreground.
Go back to Clarice's room.
Return to Clarice's Room
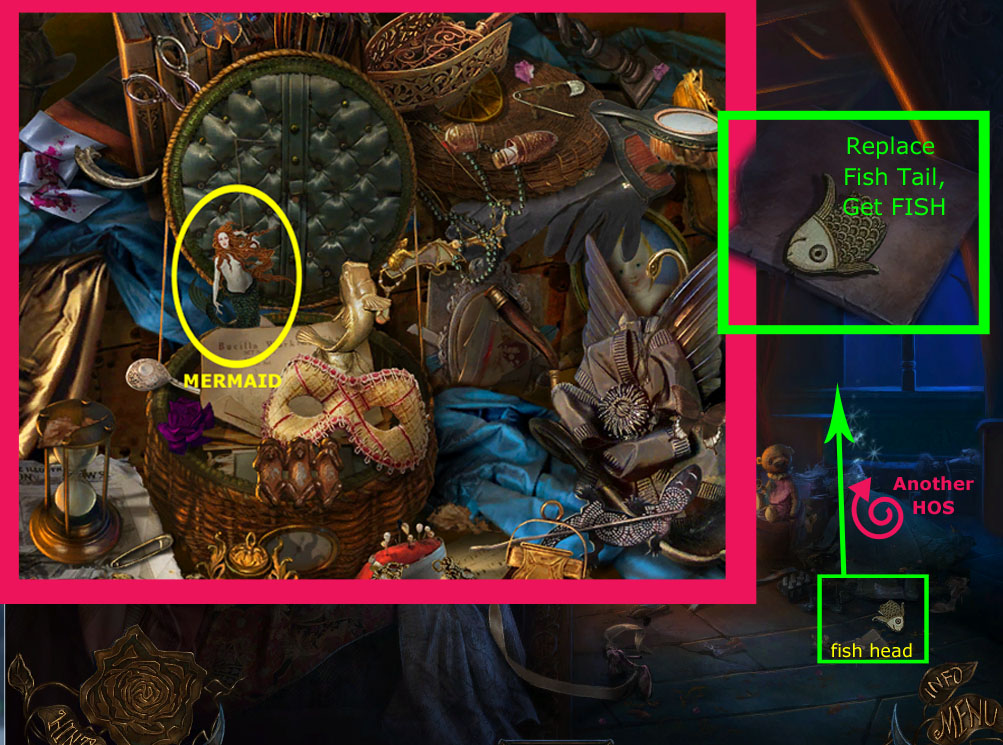
Click on the Fish Head on the floor (see screenshot below):
Take the Fish Tail from your inventory and place it on the Fish Head to complete the item.
Get the FISH.
Now click on the pile of clothes again for another hidden object scenes:
Screenshot: Last Items from Clarice's Room
Once you've found all the objects on your list, you'll get the MERMAID.
Now you have everything you need for the puppet play.
Go back down the hallway to The Attic.
Solving the Puppet Play in the Attic
Click on the Stage Box in the center of the room to begin another puzzle:
Screenshot: Puppet Play
Place all the pieces for the play into their spots on stage; when a piece is in the correct spot, it will lock in place and begin to move.
When all the pieces are in place, the play will begin.
Screenshot: Completed Play
At the end of the play, the curtain closes and a charmed key is lowered. Take the FIRST KEY.
When you complete the puppet play, a new hidden object scenes will be available in the back of the room.
Before leaving the attic, click on new hidden object scenes:
Screenshot: hidden object scenes in Attic
Find all the objects in your list to get BONE.
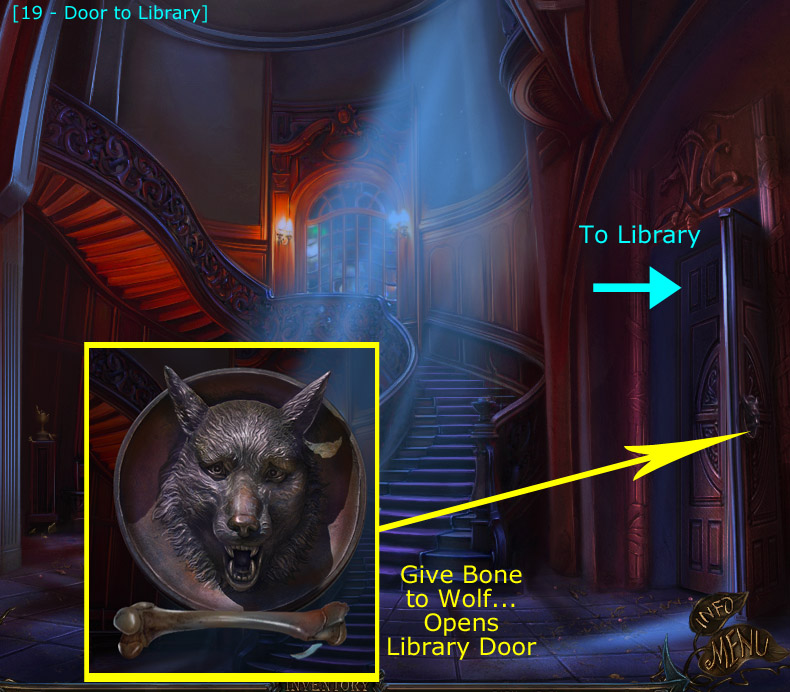
With the bone in your inventory, leave the attic and go back downstairs to The Hall.
Using the First Charmed Key
Screenshot: The Hall, Library Door
Back in The Hall, click on the door on the left of the room:
Place the Bone in the wolf's mouth; this will open the library door.
Go through the door to the Library.
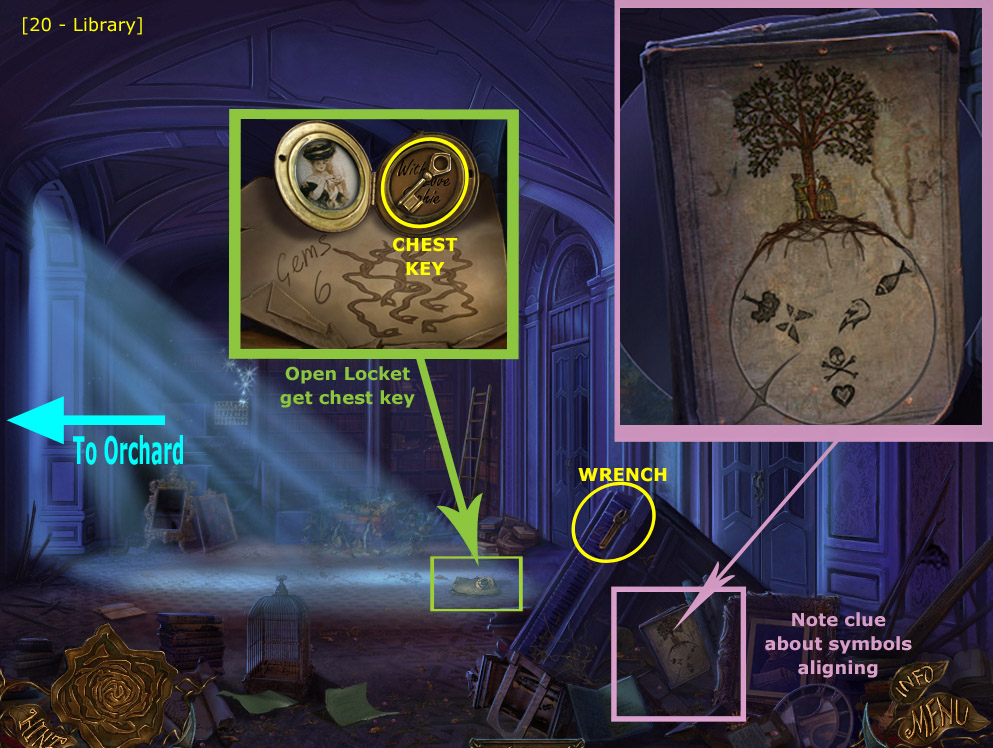
Screenshot: The Library, gathering items
Pick up the WRENCH laying on an overturned piano.
Click on the book in the foreground:
Make note of the clue you see there about how symbols are lined up.
Open a locket in the center of the room:
A note there indicates 6 gems are needed for snake's eyes.
Get the CHEST KEY.
Go through the left side door to The Orchard.
Screenshot: Orchard, Apple Tree and Dungeon Entrance
Read the sign: make note of the information on it.
Find 36 apples in the Apple Tree:
Move through the leaves to uncover apples, then click on the apple to pick it up.
You don't necessarily have to still see the apple to get it; if you know where it is, click there and it will be picked.
After finding all 36 apples, you'll be awarded 4 GOLDEN APPLES.
Now open the Dungeon Entrance using the clue you found in the library (see screenshot above):
Line up the images that go together; when they match, they'll light up.
When all six symbols are paired, the dungeon door will open.
Go into the Dungeon Entrance.
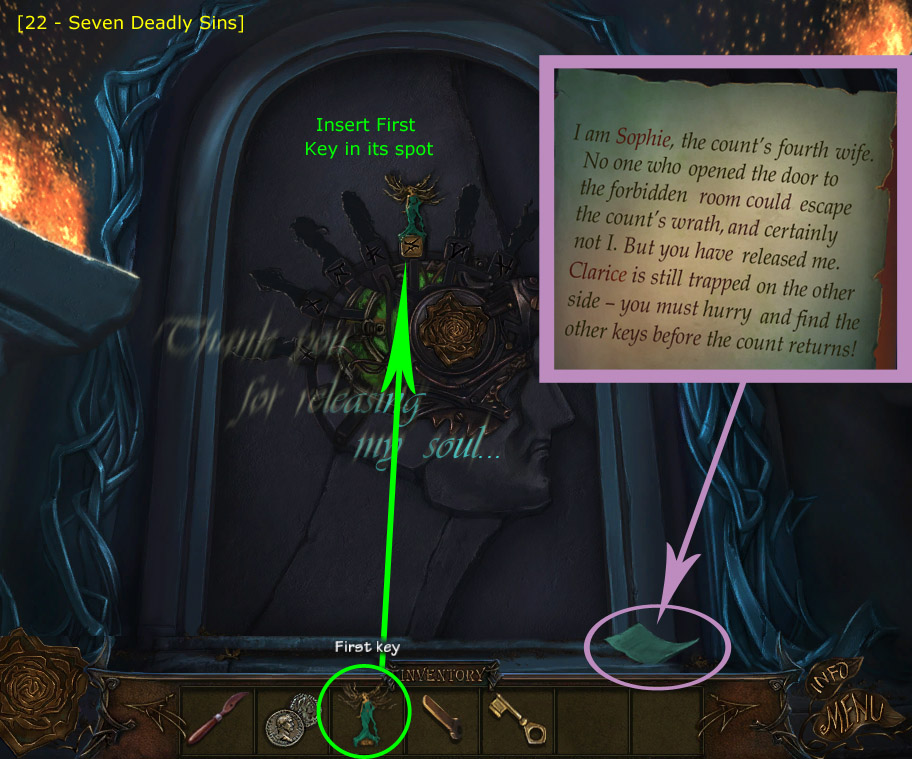
Pass through the dungeon entrance to the door of the Seven Deadly Sins:
Screenshot: Door of the Seven Deadly Sins
Insert the First Key into its spot on the door lock.
A spirit is released, thanking you, and dropping a note which gives you more information about the task you have before you in this game.
Second Key
Entering Bluebeard's Study
Through the left door of The Hall is The Door to Bluebeard's Study:
Screenshot: Door to Bluebeard's Study
Click on the door emblem to begin another puzzle:
Use the 4 Golden Apples from the tree in the orchard;
Each apple has a bite mark in it...
Match the number of bite marks to the number of whole teeth on the lions' heads.
(see screenshot)
When an apple fits, the lions mouth will close around it; the door will open when all four apples are matched to a lion's head.
Go through the door to Bluebeard's Study.
Bluebeard's Study, first visit
Screenshot: Bluebeard's Study, gathering items - 1
Pick up the MATCHES from the floor.
Examine the chest on the right corner of the desk:
Use the Chest Key (from Library) to open the chest.
From inside the chest, get:
2 GEMSTONEs
a FEATHER PEN
and a COG WHEEL
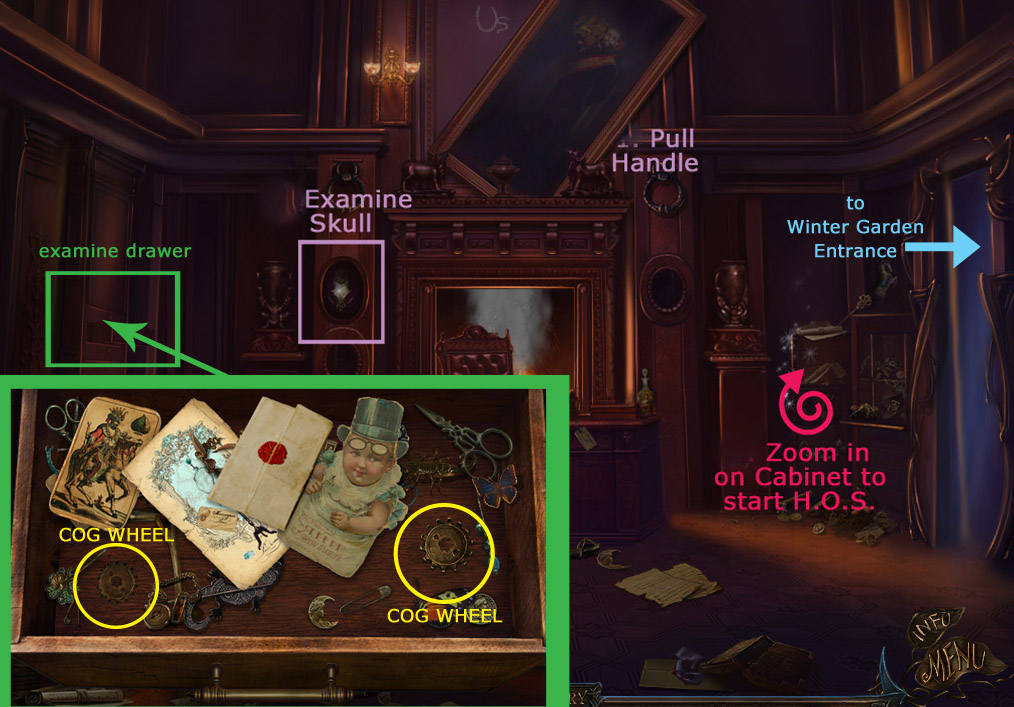
Examine the clutter on the left corner of the desk:
Pick up 2 GEMSTONES.
Notice the stamp pad, though there is nothing you can do with it yet.
Screenshot: gathering items - 2
Click on the drawer in the left wall to open it:
Move around the items to find: 2 COG WHEELS
(see screenshot)
Pull the handle on the right side of the fireplace to open a panel on the left side; click on the skull to look at it.
You'll notice it needs to be cleaned off; this will trigger a new hidden object scene to appear in the room.
Back out of the view of the skull.
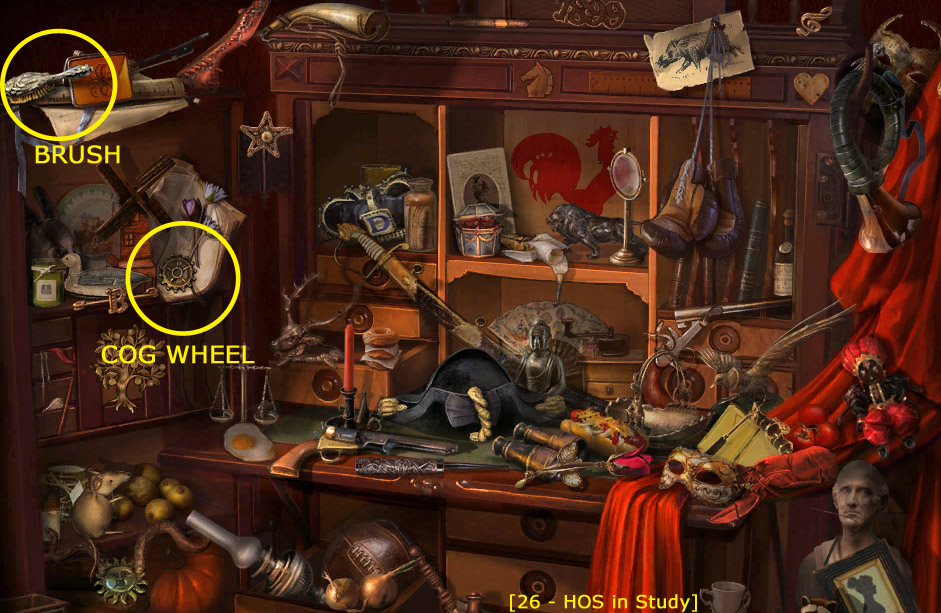
Click on the cabinet in the right corner of the room to begin another hidden object scene:
Screenshot: hidden object scene in Study
You'll get a BRUSH and another COG WHEEL upon completion.
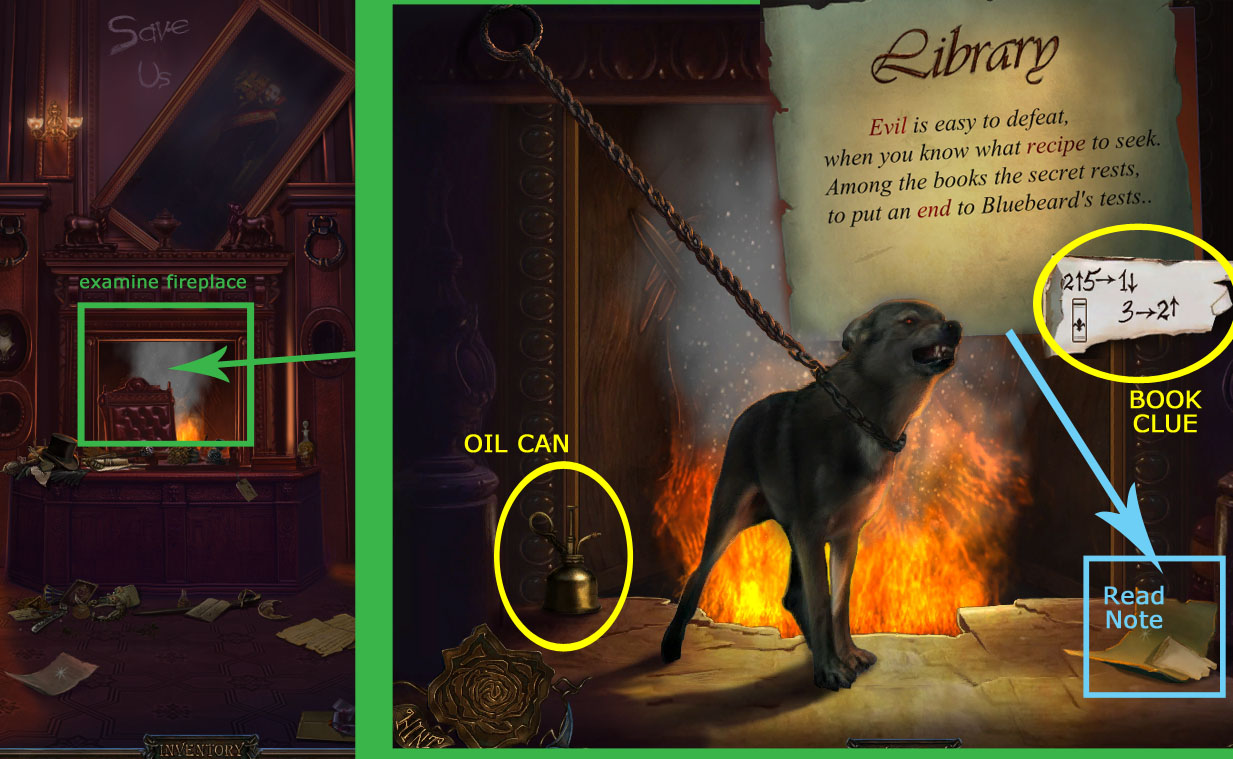
Take a closer look at the fireplace behind the desk:
Screenshot: Bluebeard's Study, Fireplace
Pick up the OIL CAN
Read the note in the right corner; it explains you need a recipe to get past the dog and that the recipe can be found in the books.
Take the BOOK CLUE from the corner of the note.
Leave The Study and go back to The Library.
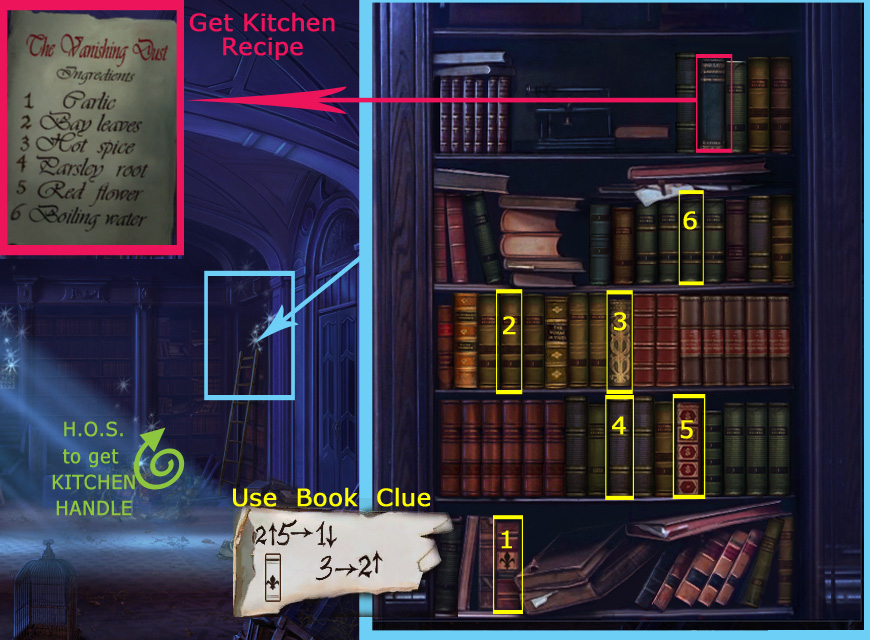
Library, Getting Recipe from Books
Screenshot: Bookshelves, Finding Recipe Book
Move the ladder and click on the bookshelves to start another puzzle:
Use the book clue to find the KITCHEN RECIPE.
(see screenshot above.)
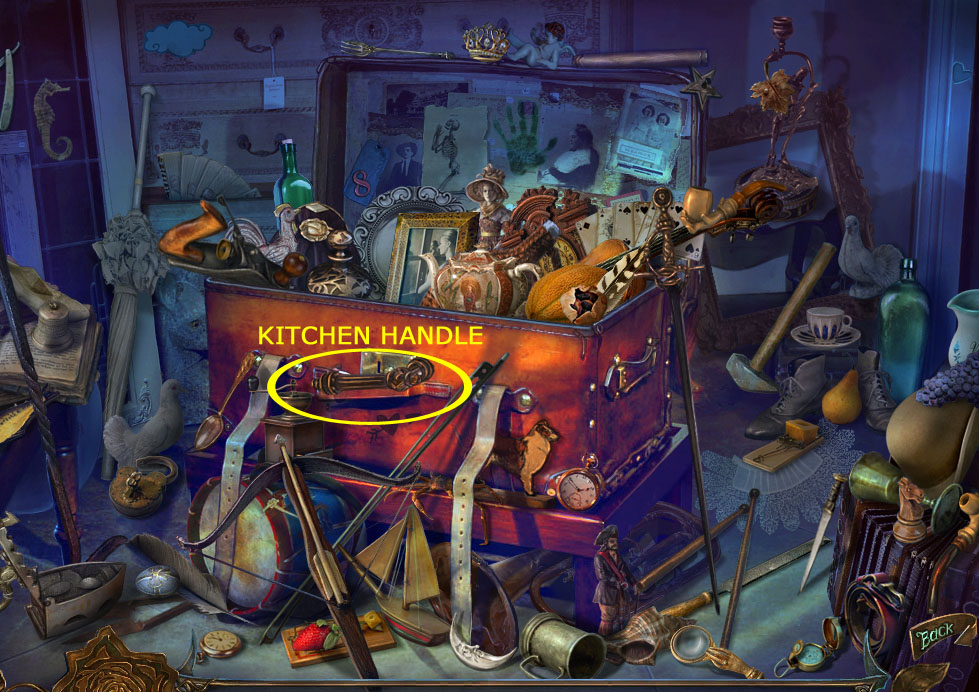
Click on the pile of junk at the base of the bookshelves to begin another hidden object scene:
Screenshot: hidden object scenein Library
Find all the objects on your list for the KITCHEN HANDLE
Leave the library and go out to The Hall
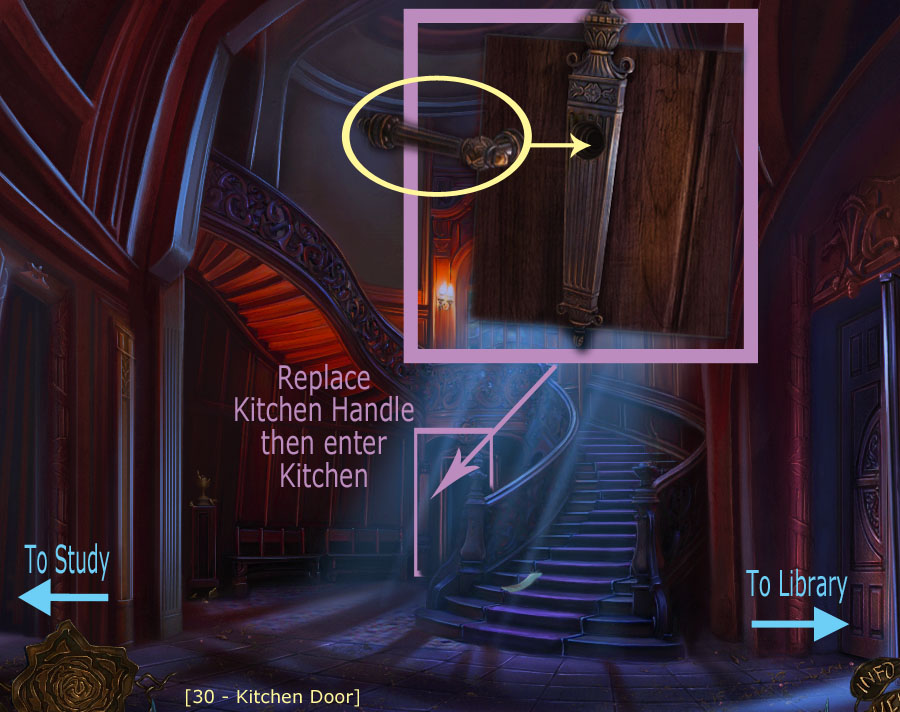
The Kitchen
In The Hall, click on the door in the back, under the stairs:
Screenshot: Kitchen Door
Use the Kitchen Handle found in the Library to open the door; go in.
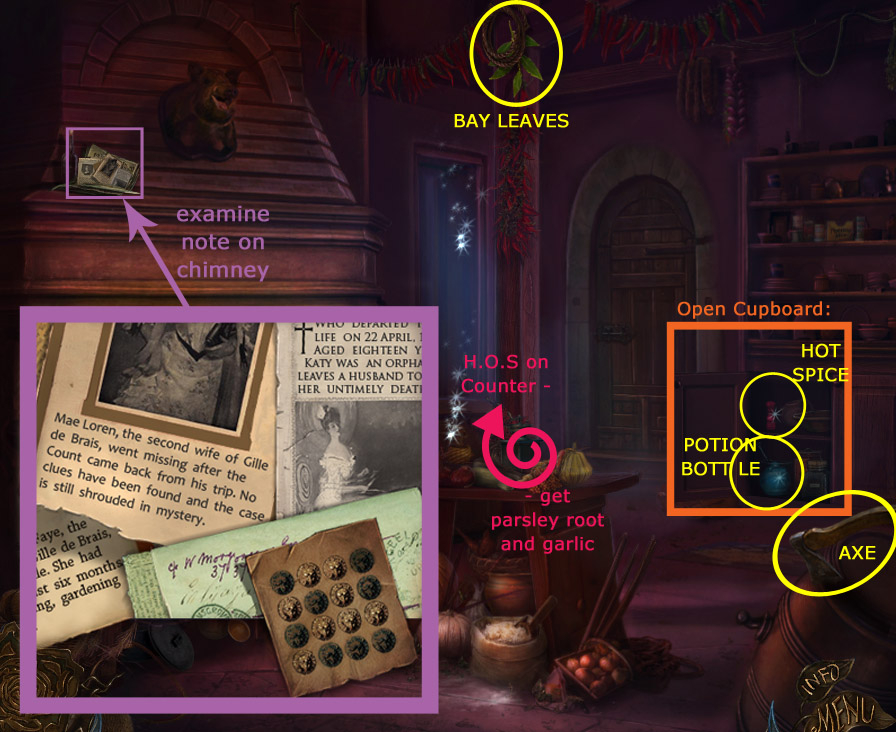
Inside the kitchen, gather some items:
Screenshot: In the Kitchen, gathering
Get the BAY LEAVES from near the ceiling.
Open the cupboard door to get: HOT SPICE and POTION BOTTLE.
Pick up the AXE from a keg in the foreground.
Examine the newspaper clippings on the hood of the stove:
Notice the pattern on the 4x4 grid of eagle heads
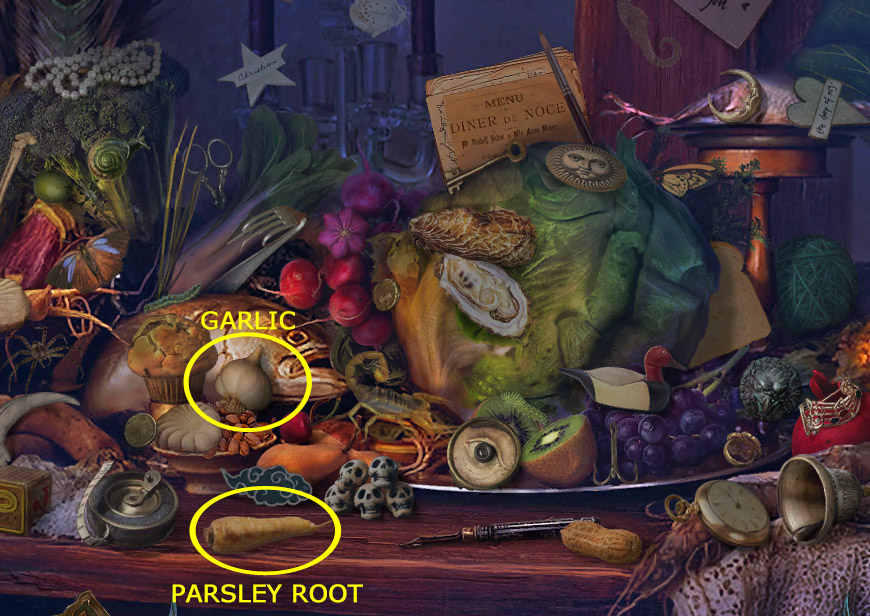
Click on the counter to begin another hidden object scene:
Screenshot: Kitchen hidden object scene
You'll find GARLIC and PARSLEY ROOT amongst the objects on your list.
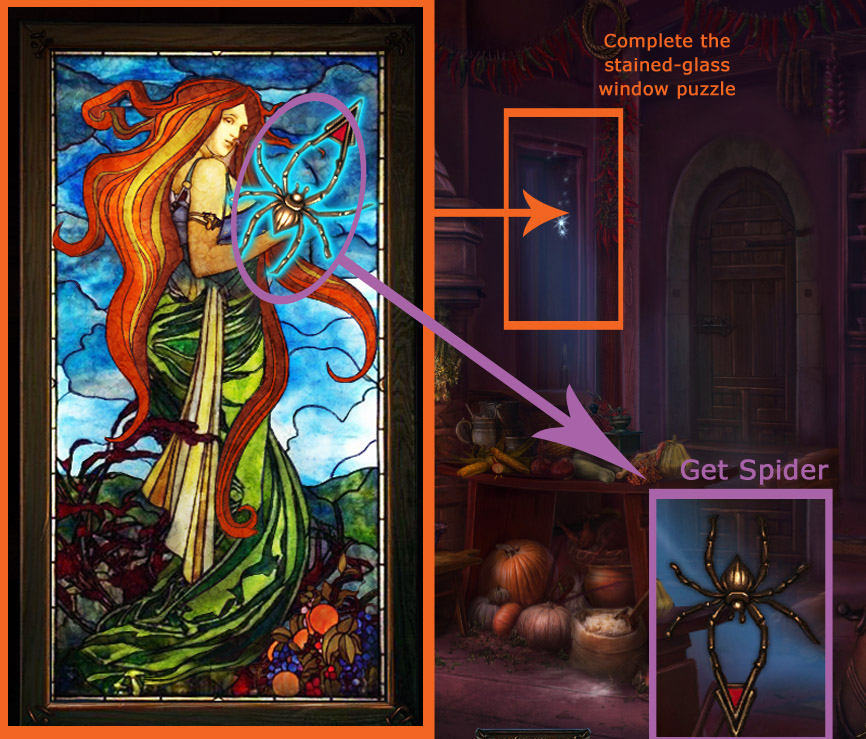
Now click on the stained glass window left of the back door.
Turn all the tiles until they're arranged into a complete picture (see screenshot).
Screenshot: Stained Glass Window
When the picture is complete, take the SPIDER.
Click on the back door...
Screenshot: door to the Kitchen Yard
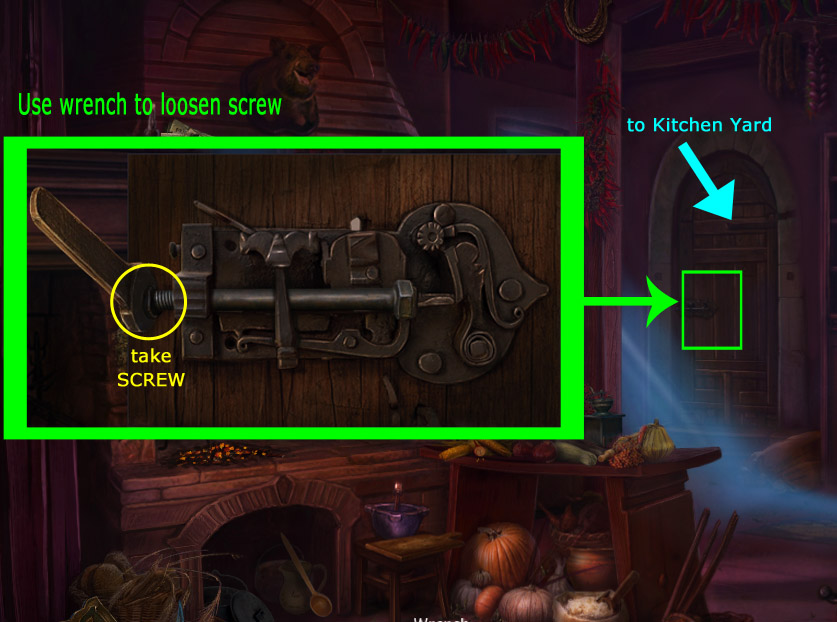
Use the Wrench to loosen and take the SCREW.
Pull the handle to open the door.
Go out to the Kitchen Yard:
Screenshot: Kitchen Yard, firewood
Pick up the EMPTY POT.
Use the AXE to cut off the limbs of the old tree (see screenshot).
Pick up the newly cut firewood from the bottom of the tree.
Head back through the house to the Library.
Library, Getting Paper Roll and Second Key
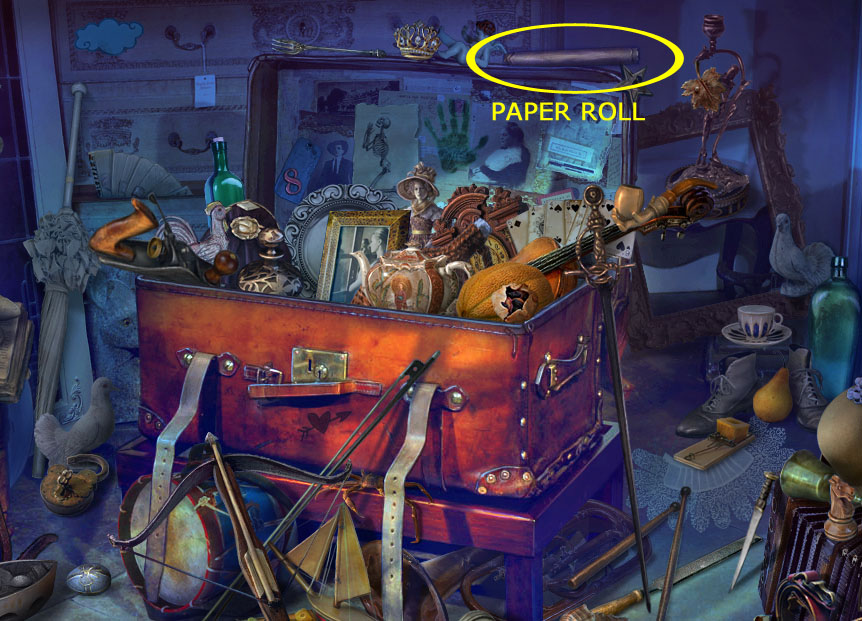
Inside the library, click on the junk pile again to start another Hidden Object Search:
Screenshot: hidden object scene in Library
Finding all the objects on your list gains the PAPER ROLL.
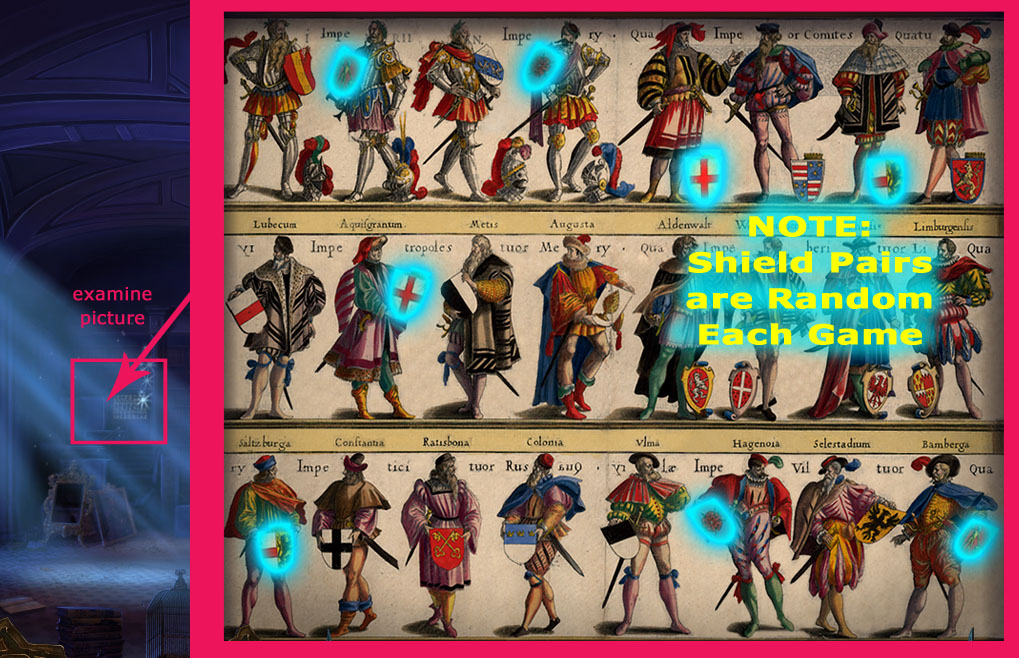
Click on the picture on the left side of the shelves to begin a minigame:
Find the matching shields.
Screenshot: Shield Matching
When all the shields are paired up, the panel will open, revealing another puzzle...
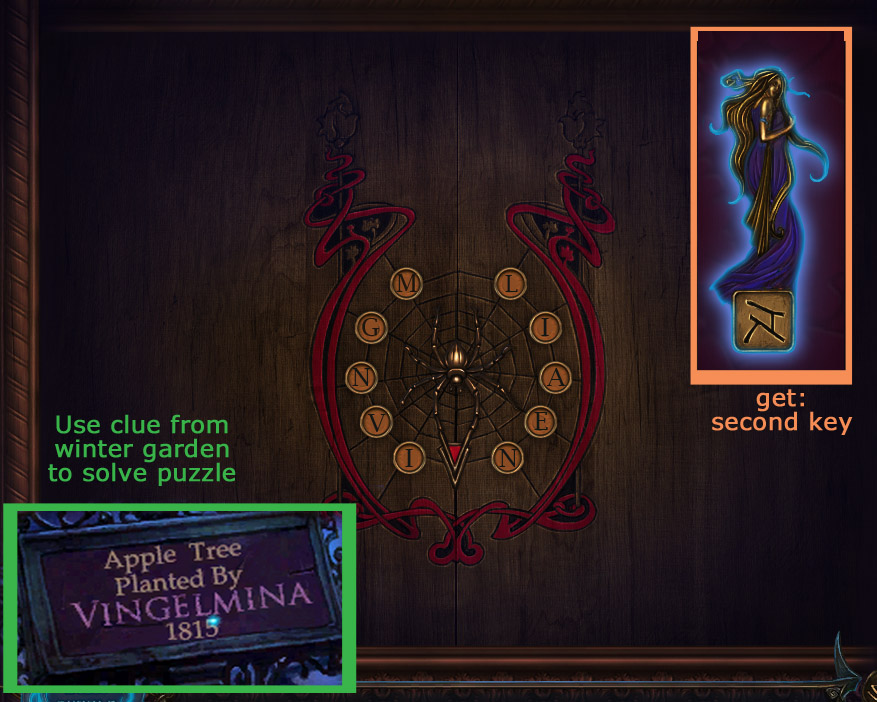
Use the clue from The Orchard to solve the riddle (see screenshot).
Screenshot: Getting Second Key.
When you've spelled out the name correctly, take the SECOND KEY.
Third and Fourth Keys
Getting into the Winter Garden
Go through Bluebeard's Study to the Winter Garden Entrance (on the right):
Screenshot: Winter Garden Entrance
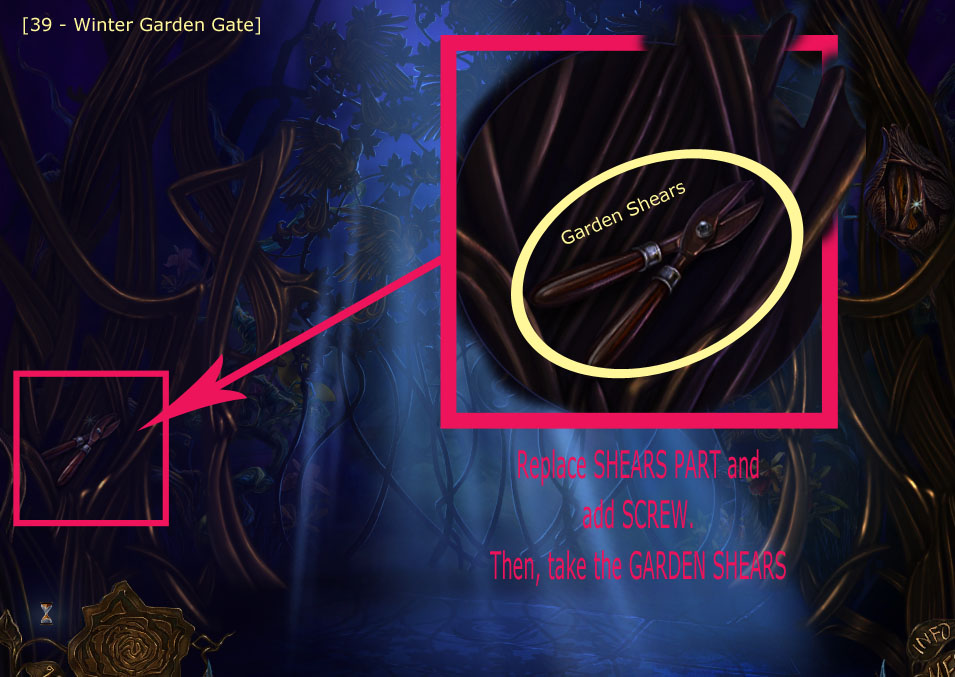
Zoom in on the left branch of the gate to see a partial garden shears...
Place the other Garden Shears Part on it.
Use the Screw to lock the two pieces together.
Now you can take the GARDEN SHEARS.
Go back into The Study and start another Hidden Object Search:
Screenshot: hidden object scene in Study
Find all the objects to get TREBLE CLEF and ROLLING STAMP.
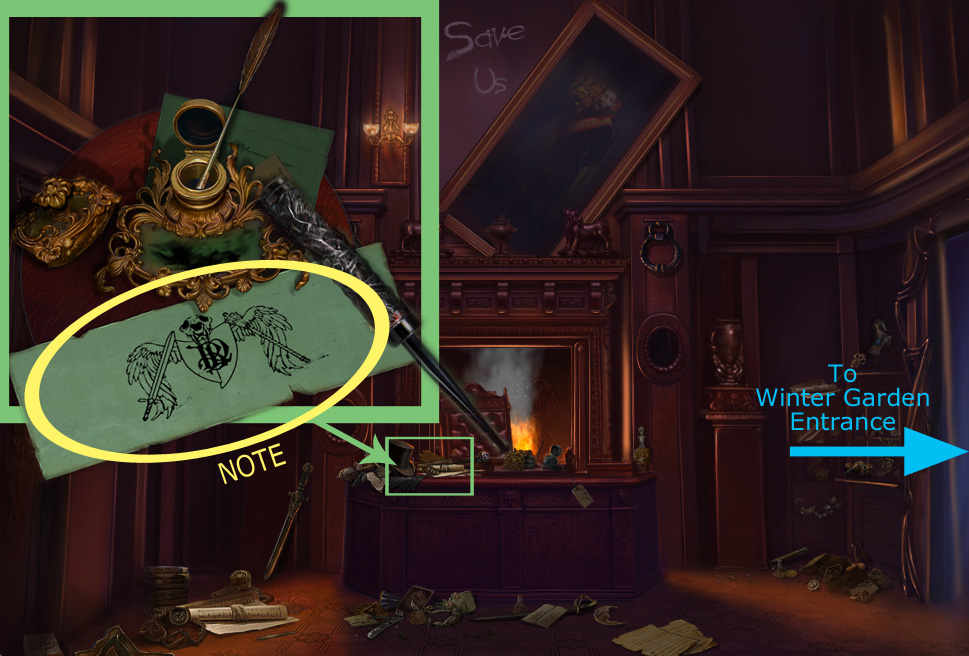
Zoom in on left corner of the desk:
Screenshot: On the Desk
Pick up 2 GEMSTONES (if you haven't already).
Open the Ink Bottle's cap.
Put the Feather Pen in the ink; it will automatically dribble ink onto the pad.
Next, set the Rolling Stamp onto the ink blotter. It should automatically roll out a stamp on the paper...if it doesn't, just move it slightly onto the paper.
Pick up the NOTE.
Return to the Winter Garden Entrance.
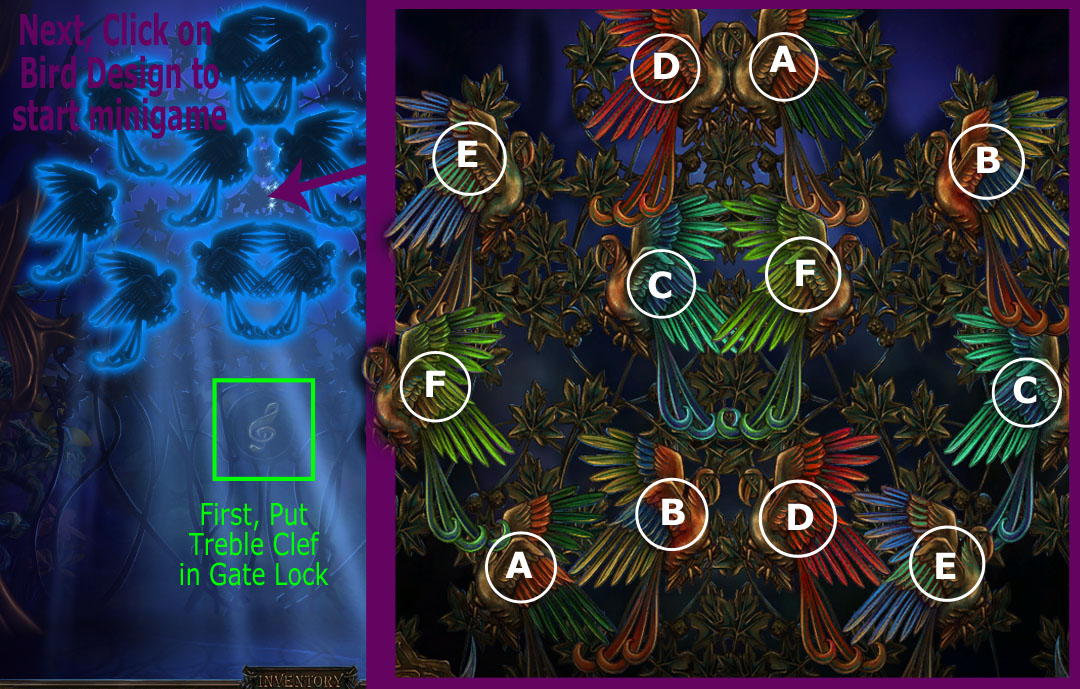
Put the Treble Clef in the gate lock.
Click on the bird design to start a new minigame:
Match pairs of birds by color, like a memory game.
Turn birds one at a time to reveal their colors.
(See screenshot)
Screenshot: Opening Garden Gate
When all the birds are matched up, the gate will open.
Go through the gate to the Winter Garden.
From Winter Garden to Cooking in the Kitchen
Screenshot: Winter Garden
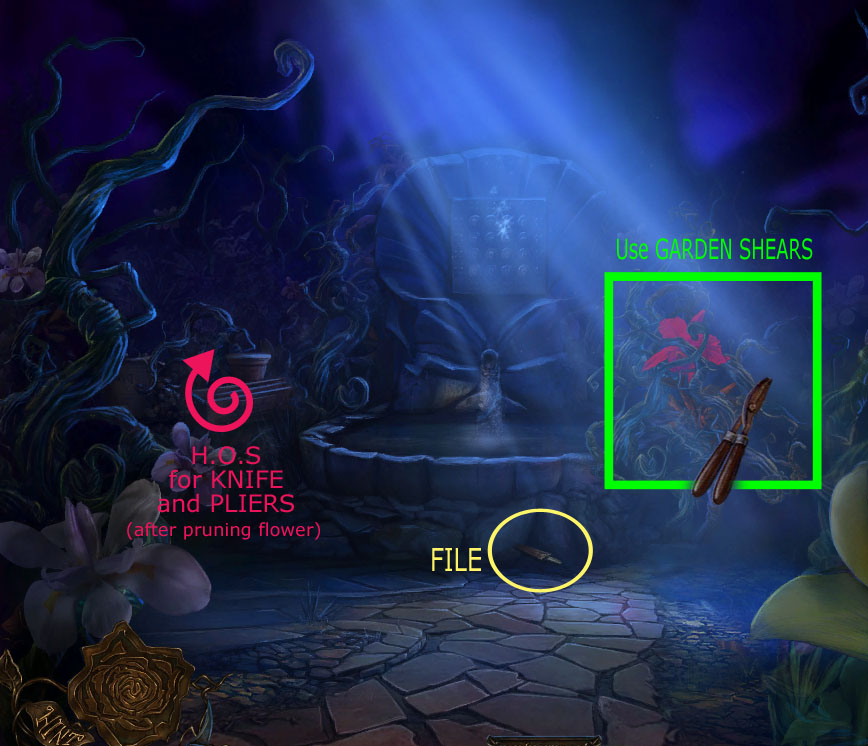
When you first enter the Winter Garden, focus on a crack in the base of the fountain:
Take the FILE.
Use the garden shears on the vines entangling the red flower on the right.
A hidden object scene will become available to the left of the fountain:
Screenshot: Hidden Object Scene in Winter Garden
You'll receive the KNIFE and PLIERS for finding all the objects on your list.
Go back to the entrance and zoom in on a metal flower bud sculture:
Screenshot: File Flower Bud in Garden Gate
Use the File to cut through the steel rods.
Take the PHOENIX.
Go back through the house to the Kitchen Yard:
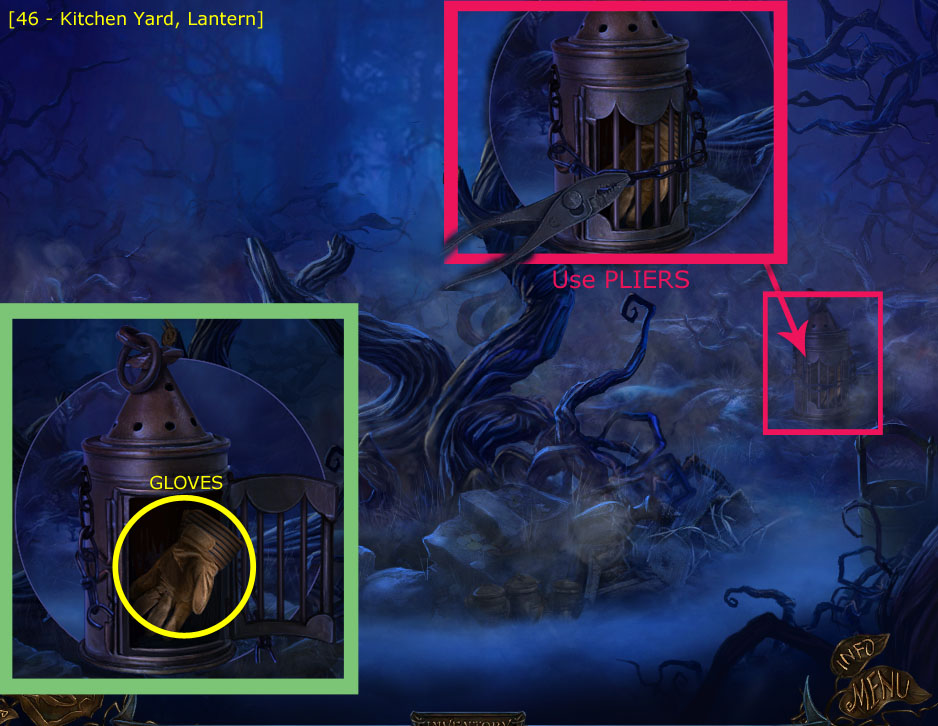
Screenshot: Kitchen Yard, Lantern
Zoom in on the lantern on the far right side of the Kitchen Yard...
Use the Pliers to remove the chain.
Open the lantern and take out the GLOVE.
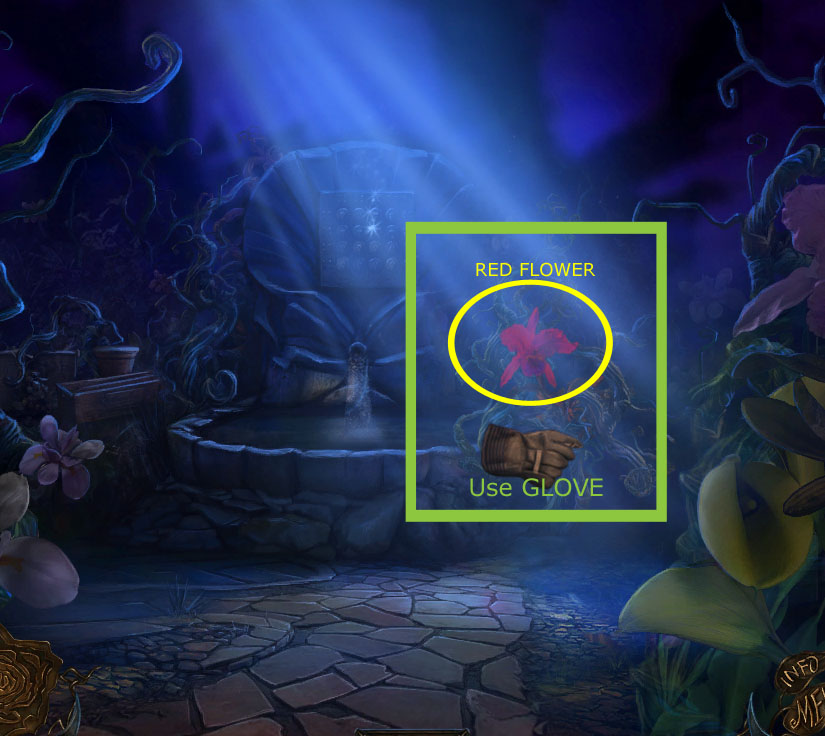
Now go back to the Winter Garden to get the Red Flower:
Use the Glove to pick up the RED FLOWER (see screenshot).
Screenshot: Getting Red Flower
(If you haven't already, use the garden shears to cut away the vines entangling the flower first.)
Return to the Kitchen; you're ready to start cooking.
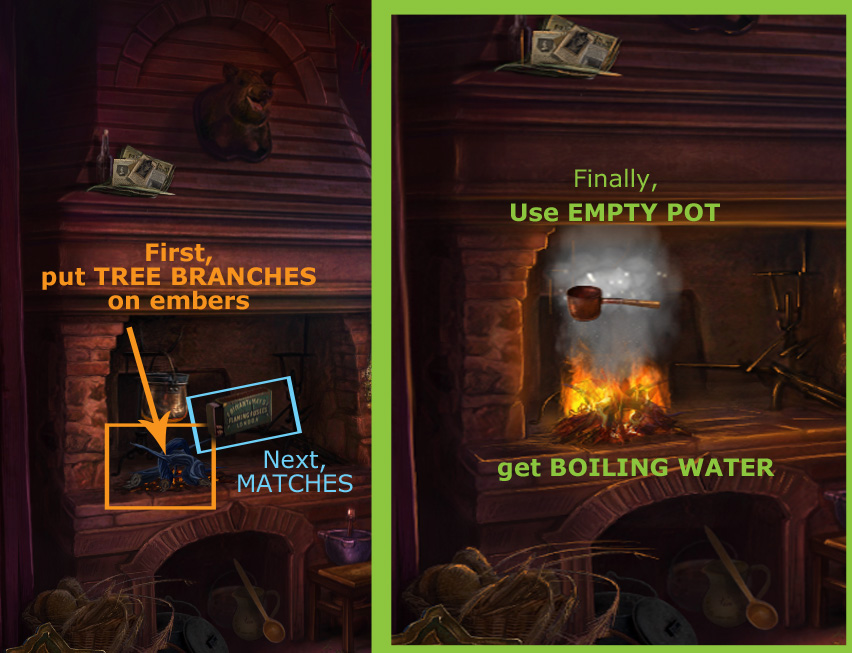
Screenshot: Boiling Water on the Stove
First, the stove...
Place the Tree Branches on the smoldering coals in the stove.
Use your Matches to light the flame.
Then scoop out scalding water from the cauldron with the Empty Pot to get FULL POT.
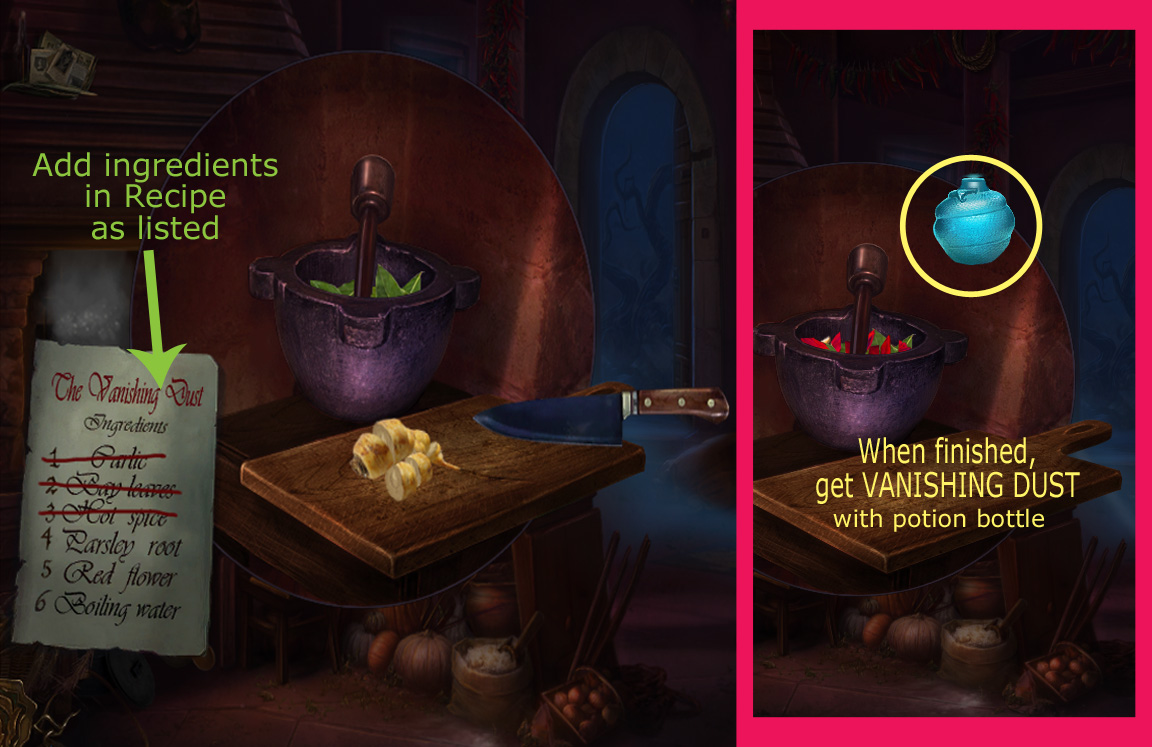
Next, prepare the ingredients and make the potion...Click on the mortar and pestle just below the counter to begin:
Screenshot: Preparing the Recipe
Take the KITCHEN RECIPE out of your inventory; it will appear next to your board and mortar. Add ingredients in the order listed.
Put the Garlic in the mortar.
Then the Bay Leaves...click on each leaf to add them.
Next comes the Hot Spice.
Chop up the Parsley Root on the board with your Knife, then put it into the mortar.
Do the same with the Red Flower.
Finally, pour in boiling water from the FULL POT.
Use your Potion Bottle to collect the finished VANISHING DUST from the bowl.
A new Hidden Object Scene will appear on the kitchen counter:
Screenshot: Hidden Object Scene in Kitchen
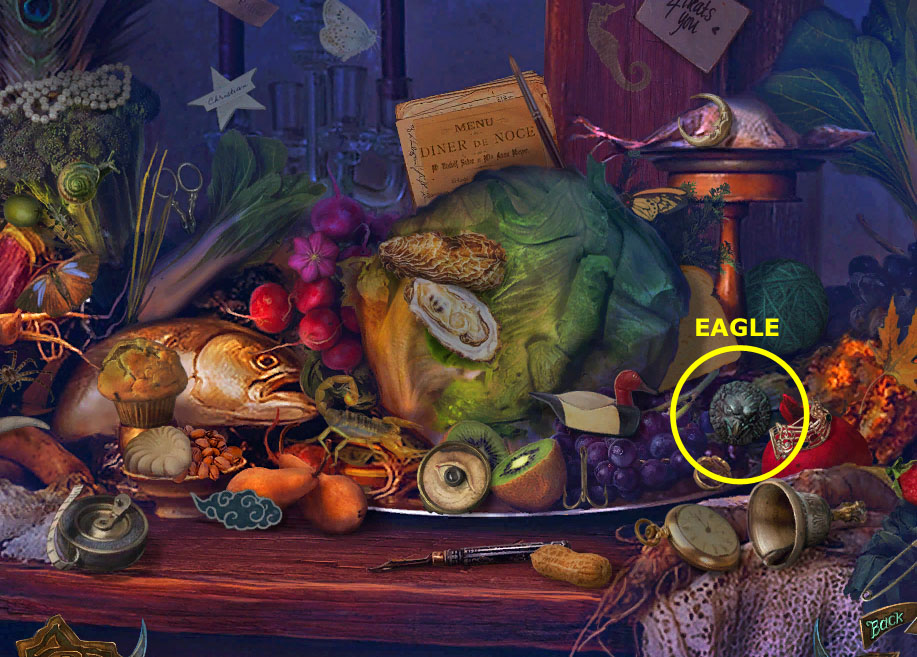
You'll obtain an EAGLE head for finding all the objects on your list.
Return to Bluebeard's Study
Secret Room, 3rd and 4th Keys
In Bluebeard's Study, click on the fireplace to zoom into it.
Screenshot: Fireplace Wolf
Use the Vanishing Dust on the wolf.
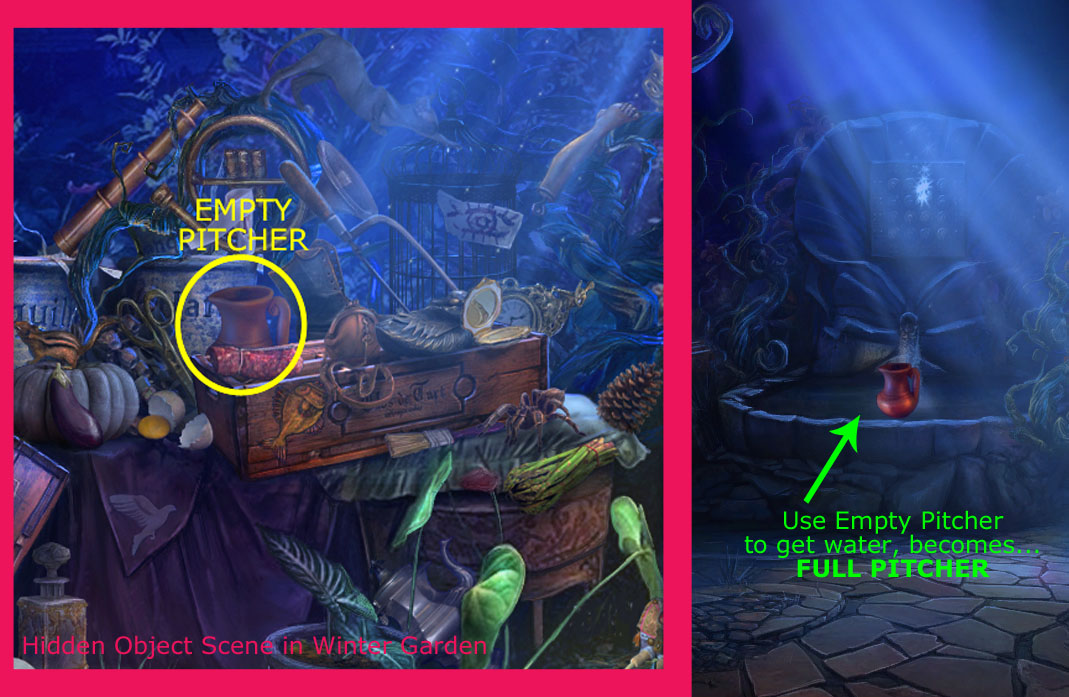
Go back out to the Winter Garden to complete a hidden object search:
Find all the objects on your list for an EMPTY PITCHER.
Screenshot: Hidden Object Scene for Water Pitcher
Fill the Empty Pitcher in the fountain to get a FULL PITCHER
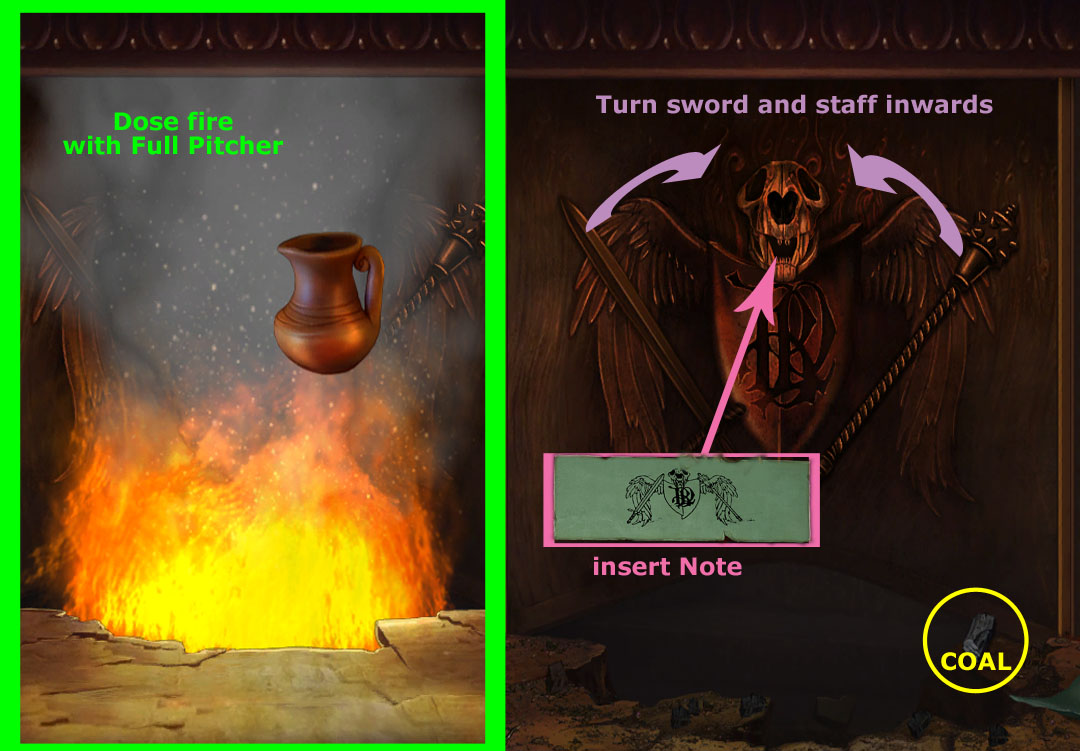
Go back to the fireplace.
Douse the fire with the Full Pitcher...
Screenshot: Opening the Secret Passage
Pick up the COAL from the bottom right edge of the screen.
Arrange the Sword and the Staff toward the skull; the skull's jaw will open.
Take the Note from your inventory and put it inside the open mouth; this will cause the crest to rise, revealing an entrance to the secret room.
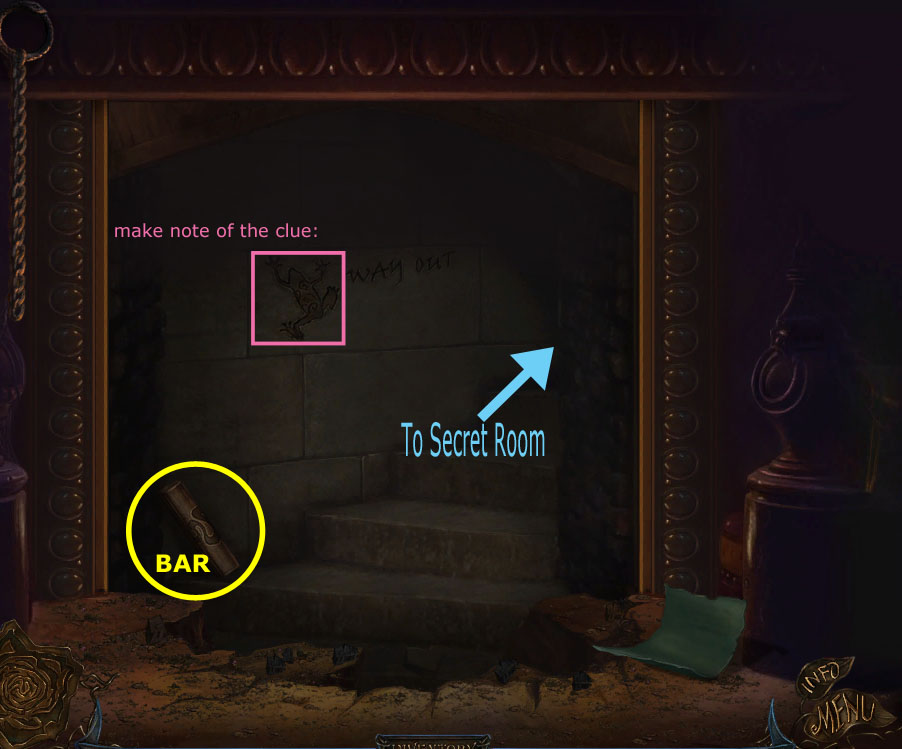
Screenshot: Entrance to Secret Room
Pick up the BAR and notice the clue on the wall, the continue forward to The Secret Room.
Pick up the SCREWDRIVER and a GEMSTONE.
Click on the slate to begin a minigame:
Screenshot: Secret Room and Minigame
Match the pattern that's briefly shown to you by clicking on the correct squares on the grid.
After correctly matching four patterns, a compartment will open on the slate, revealing a SECRET ROOM KEY. Take it.
Play two more rounds to get a COG WHEEL and another SECRET ROOM KEY.
When you've finished, an engraved image appears on the slate.
Screenshot: Map Rubbings
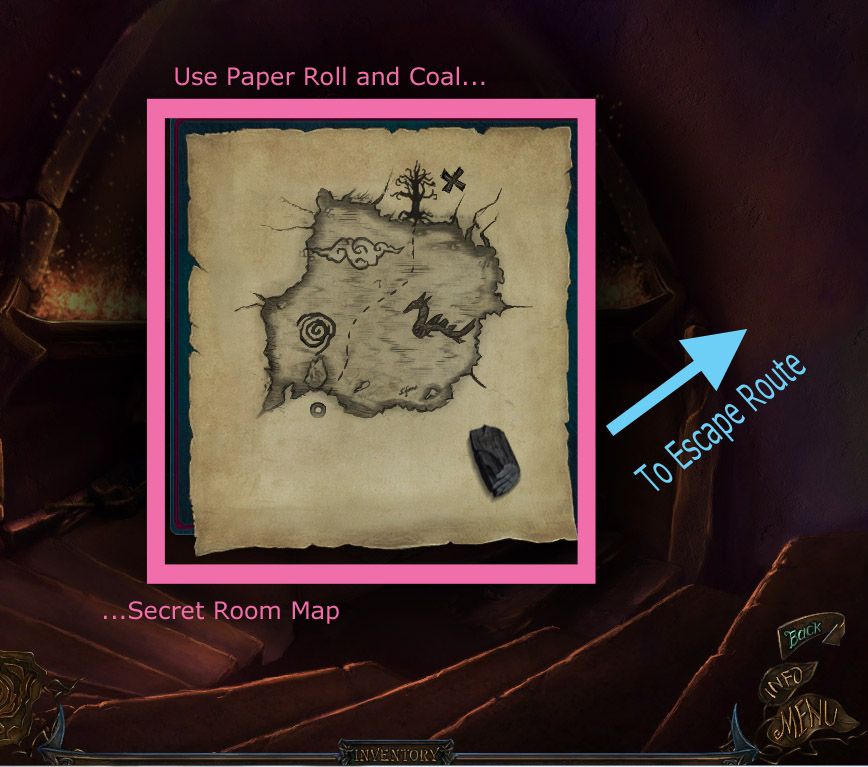
Take the Paper Roll from your inventory and put it on the image.
Use the Coal to rub an impression of the map onto the paper.
Take the SECRET ROOM MAP.
Go right, to the Escape Route.
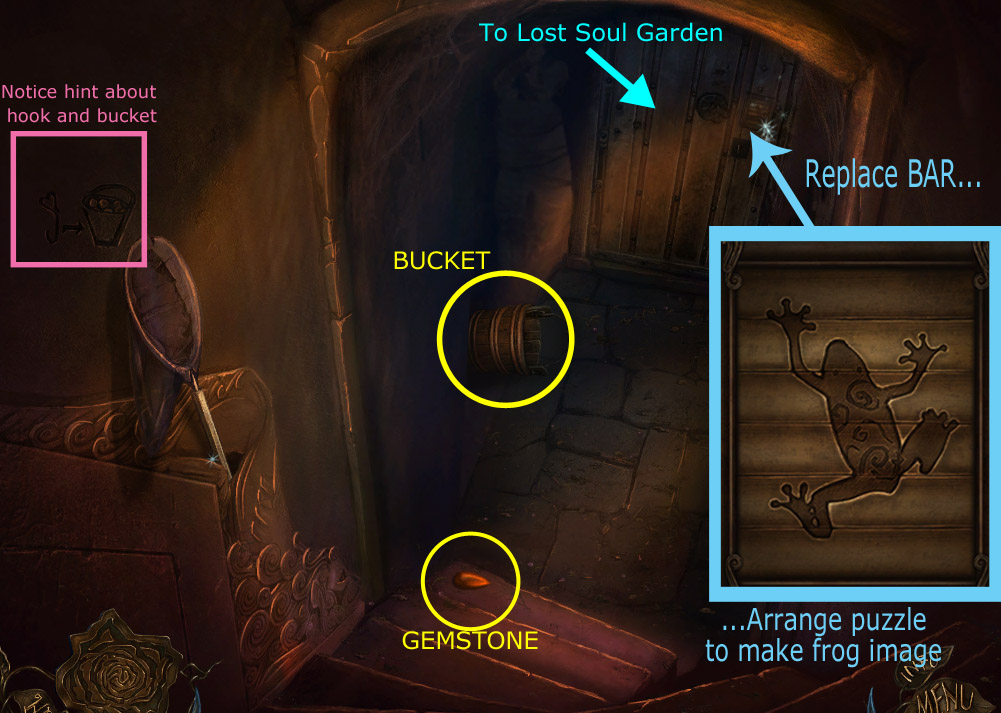
Screenshot: Escape Route
Notice the hint on the wall about a hook and bucket. Then, pick up a:
BUCKET
and a GEMSTONE.
Click on the door to start a puzzle:
Replace the BAR into the puzzle.
Arrange the pieces to recreate the image of the frog (as seen on the wall of the secret room entrance).
Go through the door to the Lost Soul Garden.
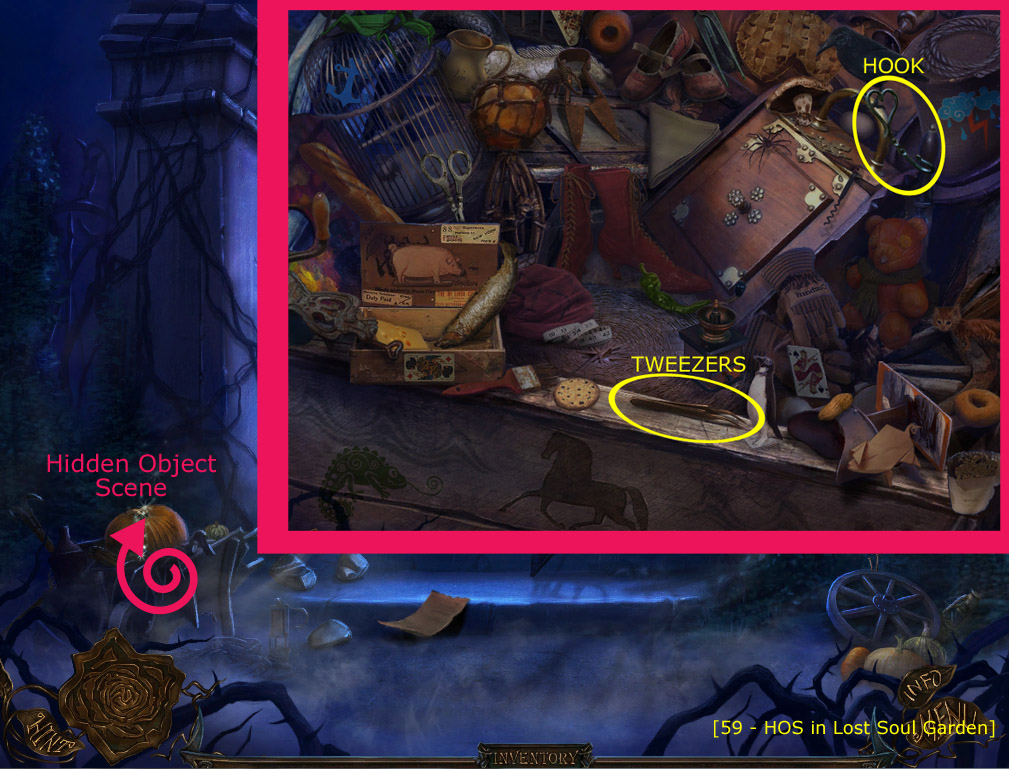
Screenshot: Hidden Object Scene in Lost Soul Garden
Read the note, then click on the pumpkin to start another hidden object search:
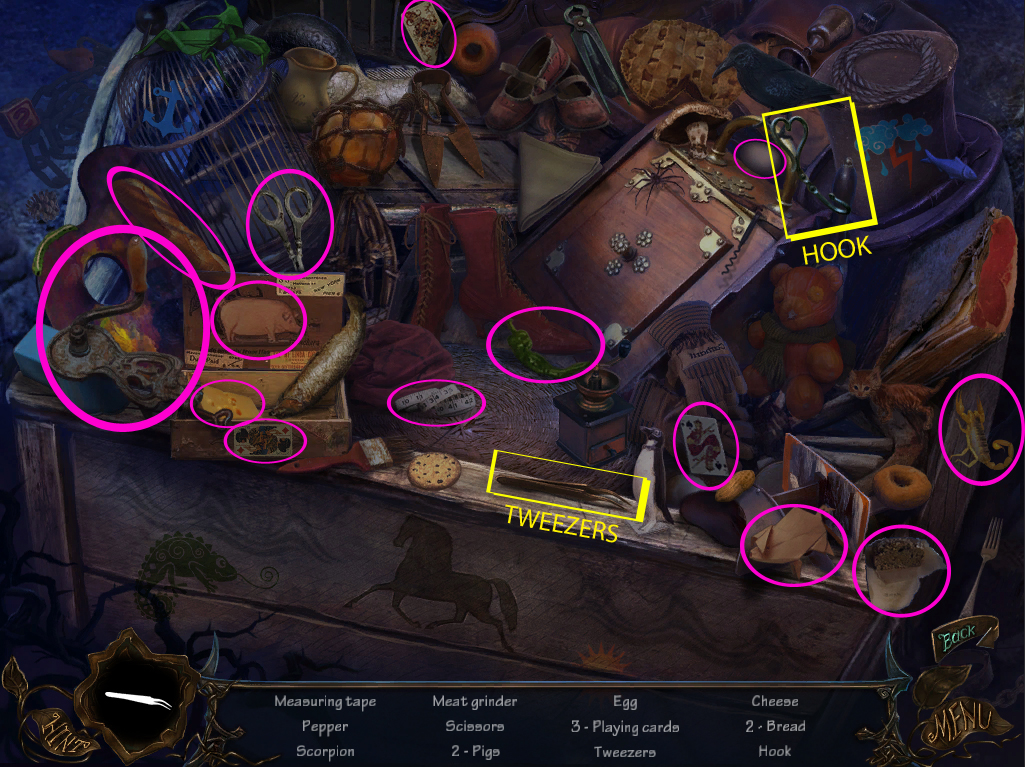
Find all the objects for a HOOK and some TWEEZERS.
Go back inside and to Bluebeard's Study.
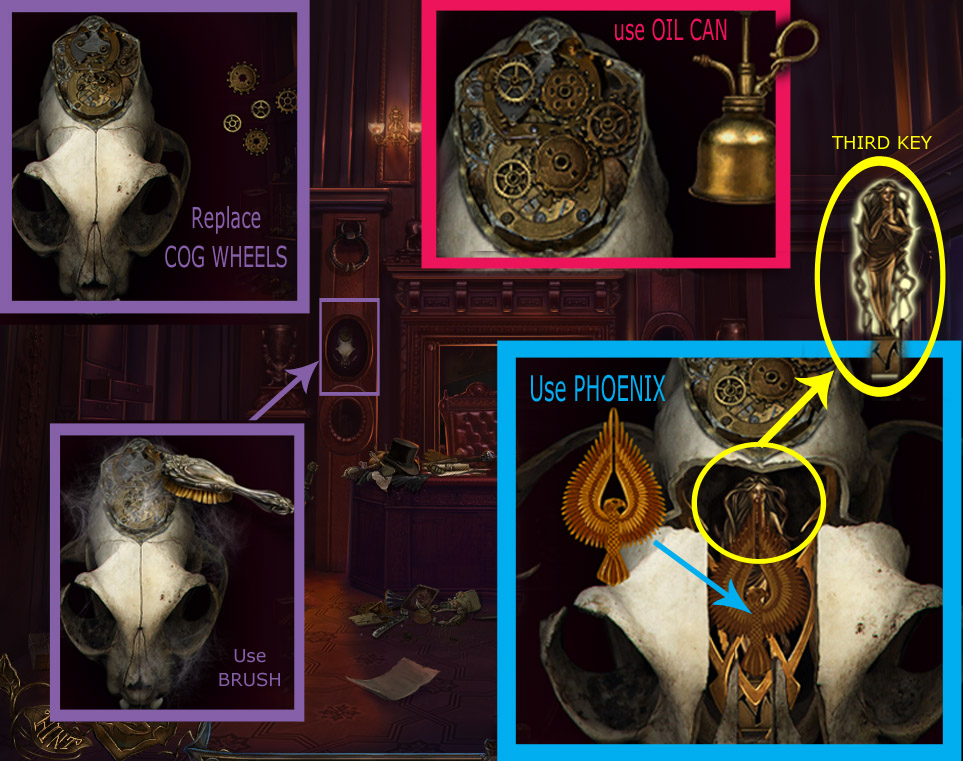
In Bluebeard's Study, click on the skull on the wall (left of the fireplace) to start another puzzle:
Screenshot: Skull and Third Key
1st, use your Brush to clean off the skull.
2nd, replace the Cog Wheels onto the top of the skull.
3rd, oil the cog wheels so they'll turn; this causes the skull to open up.
4th, place the Phoenix from your inventory on top of the phoenix in the skull; that will reveal the THIRD KEY - take it.
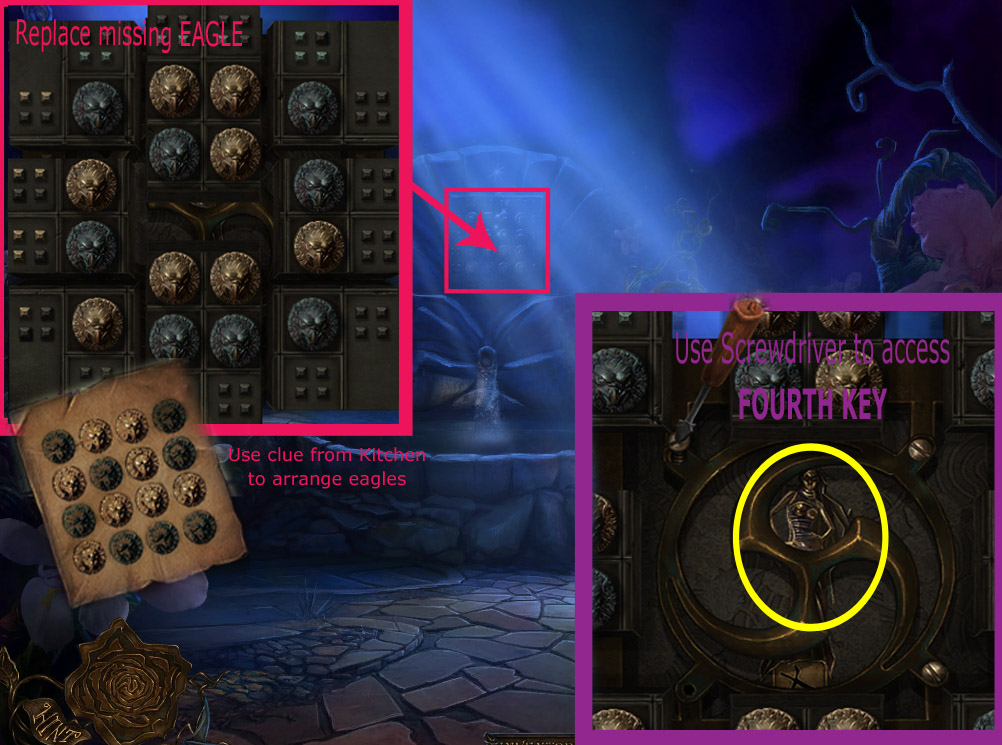
Now go back out to the Winter Garden; zoom in on the design at the top of the fountain:
Screenshot: Eagle Head Puzzle and Fourth Key
Put the EAGLE from your inventory into the spot where it's missing.
Click on the eagle heads to arrange them in the pattern as shown on the clue gathered from the Kitchen.
When the eagle heads are arranged in the correct order, the panel will open, revealing a lock on the Fourth Key.
Use your Screwdriver to unlock the FOURTH KEY - take it.
You have now have four charmed keys; go on to part three.
Fifth Key
Secret Room Escape Route
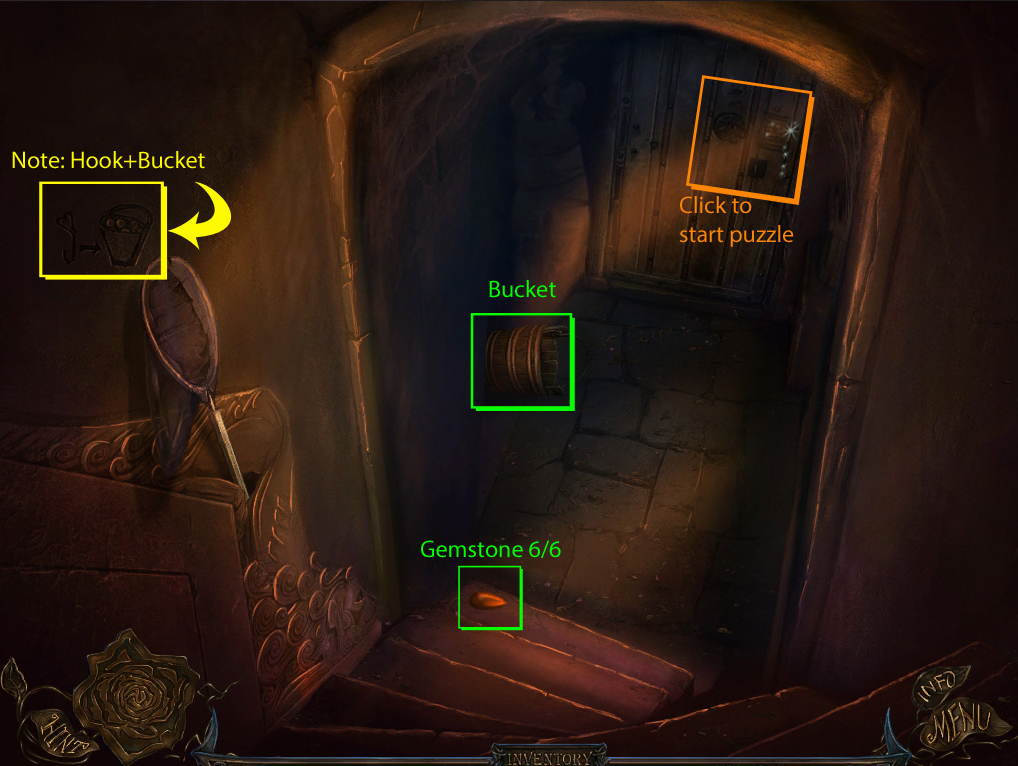
Screenshot: secret room escape route.
Note the carving above the net in the wall depicting an image of a hook and a bucket filled with stones.
Take the GEMSTONE (6/6) on the bottom step.
Take the BUCKET leaning against the left wall.
Click the lock on the door to zoom in.
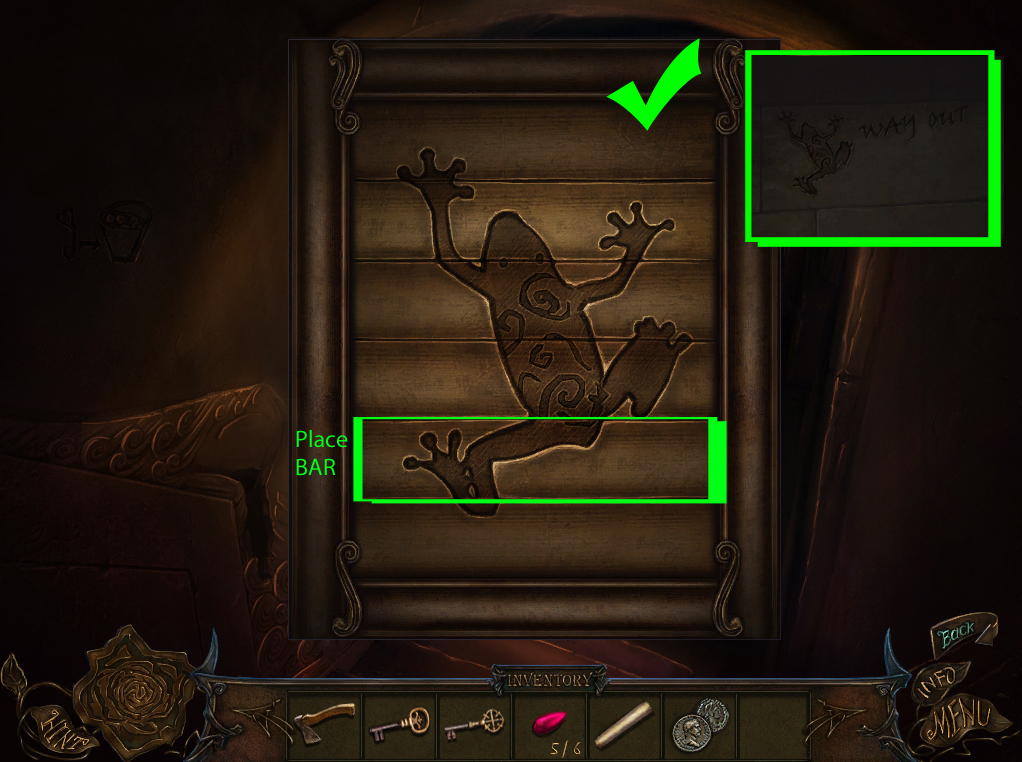
Add the BAR to the board to start the puzzle.
Click the bars to cycle through their images.
Arrange the bars to complete the picture of a frog first seen on the wall inside the fireplace.
Solution.
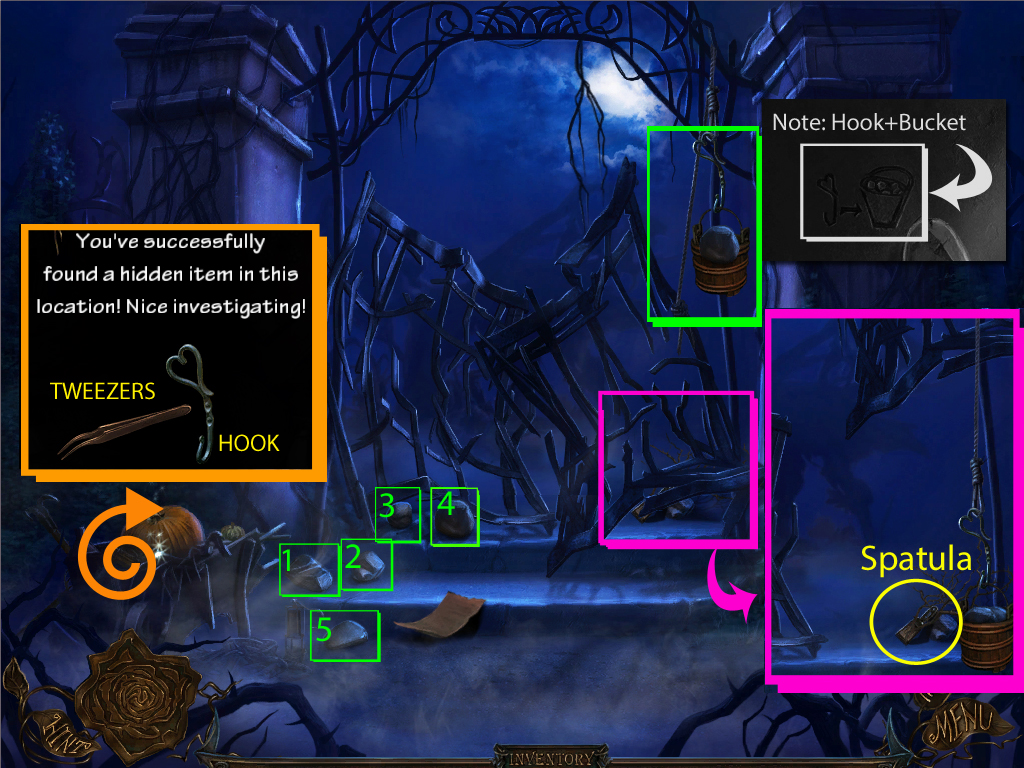
Go through the open door to the Lost Soul Garden Entrance.
Lost Soul Garden Entrance
Screenshot: lost soul garden entrance.
Click the pumpkin in the wheelbarrow to start the hidden object scene.
Screenshot.
Receive the HOOK and TWEEZERS.
Place the HOOK on the rope loop at the top of the broken gate.
Add the BUCKET to the hook.
Click and drag all 5 stones on the steps, then drop them in the bucket to lift the gate.
Click the dead branch on the top step to move it aside, revealing the SPATULA.
Continue forward to the Lost Soul Garden, then go up the right stairs to the Bridge.
Bridge
Screenshot: bridge.
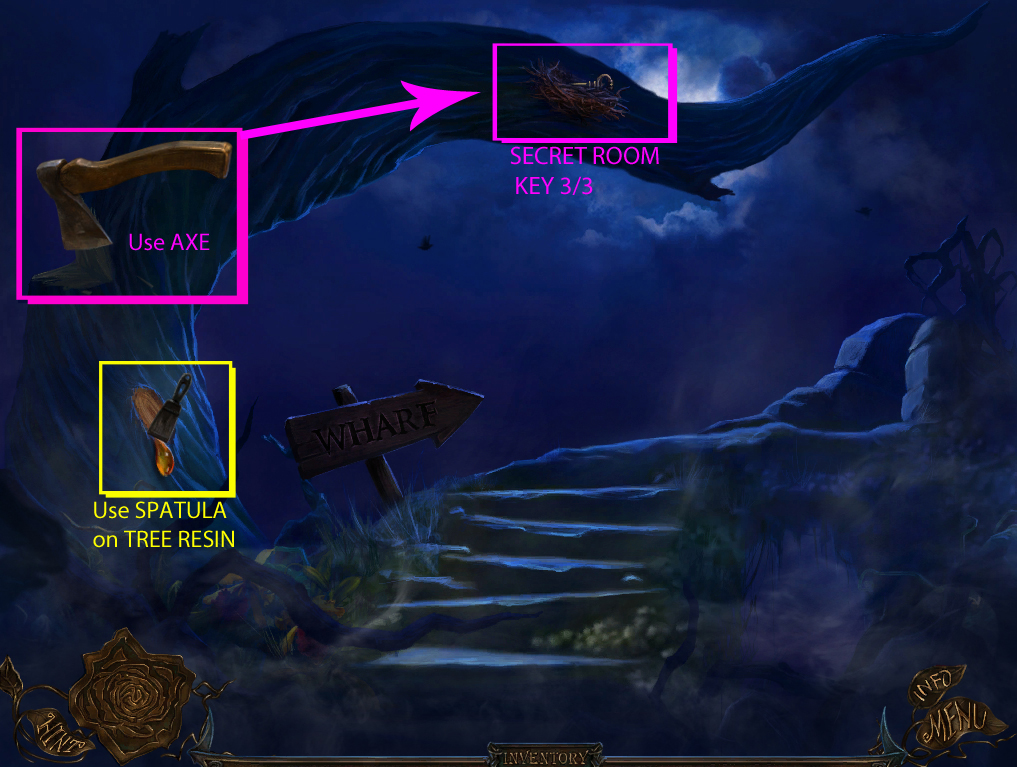
Use the SPATULA to scrape the RESIN off of the tree trunk.
Chop the tree down with the AXE.
Take the SECRET ROOM KEY 3/3 from the nest at the top of the tree.
Go back to the Lost Soul Garden.
Lost Soul Garden
Screenshot: lost soul garden.
Take the CHISEL at the bottom of the steps.
Use the RESIN on the statue's broken right side.
Click and drag the broken wing to the statue's side to attach it.
Take the FEATHER that floats to the side of the fountain.
Go back to the Secret Room Escape Route.
Secret Room Escape Route
Screenshot: secret room escape route.
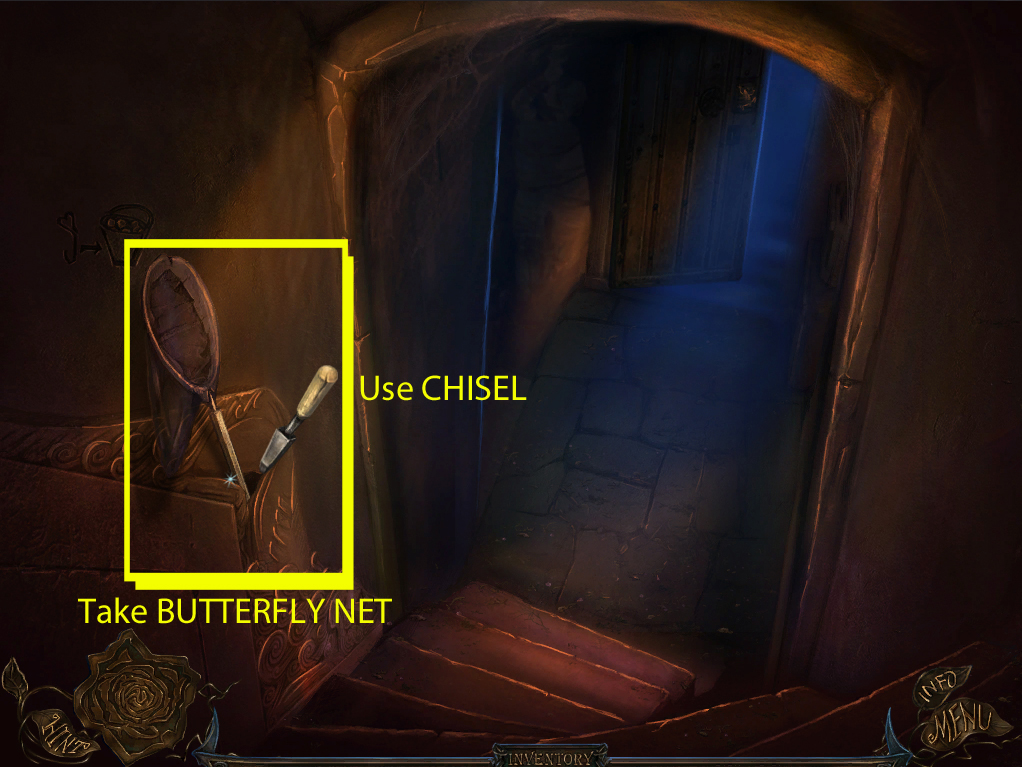
Use the CHISEL to break through the wall around the net.
Take the BUTTERFLY NET from the hole in the wall.
Go back to the Secret Room.
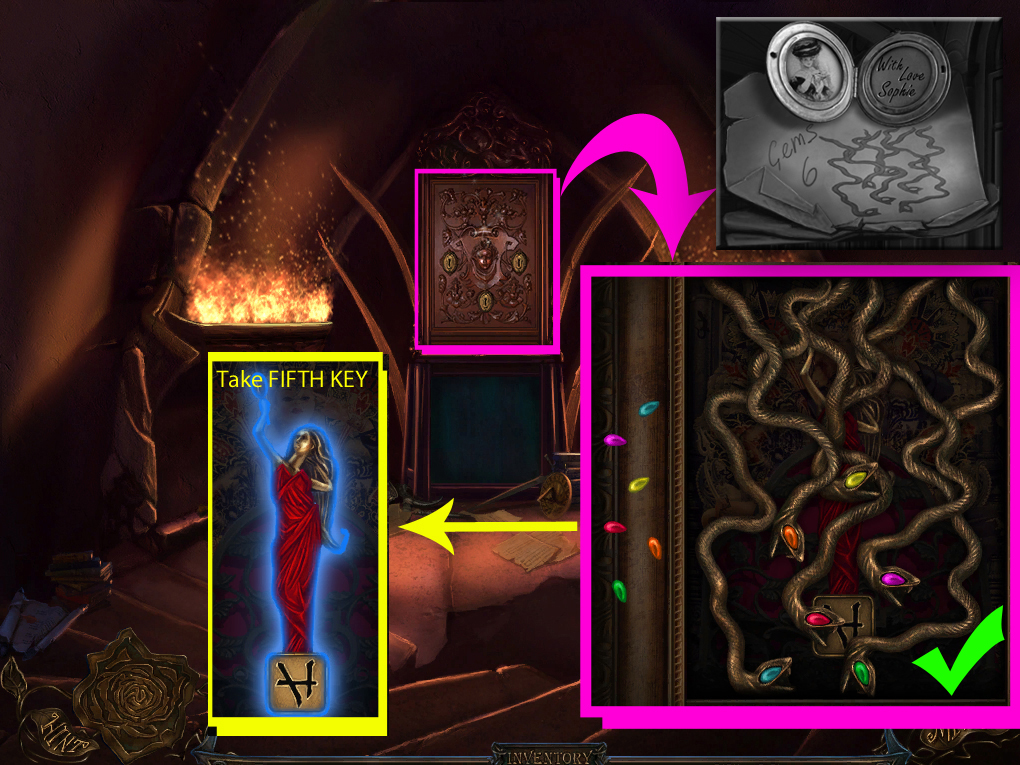
Secret Room
Screenshot: secret room.
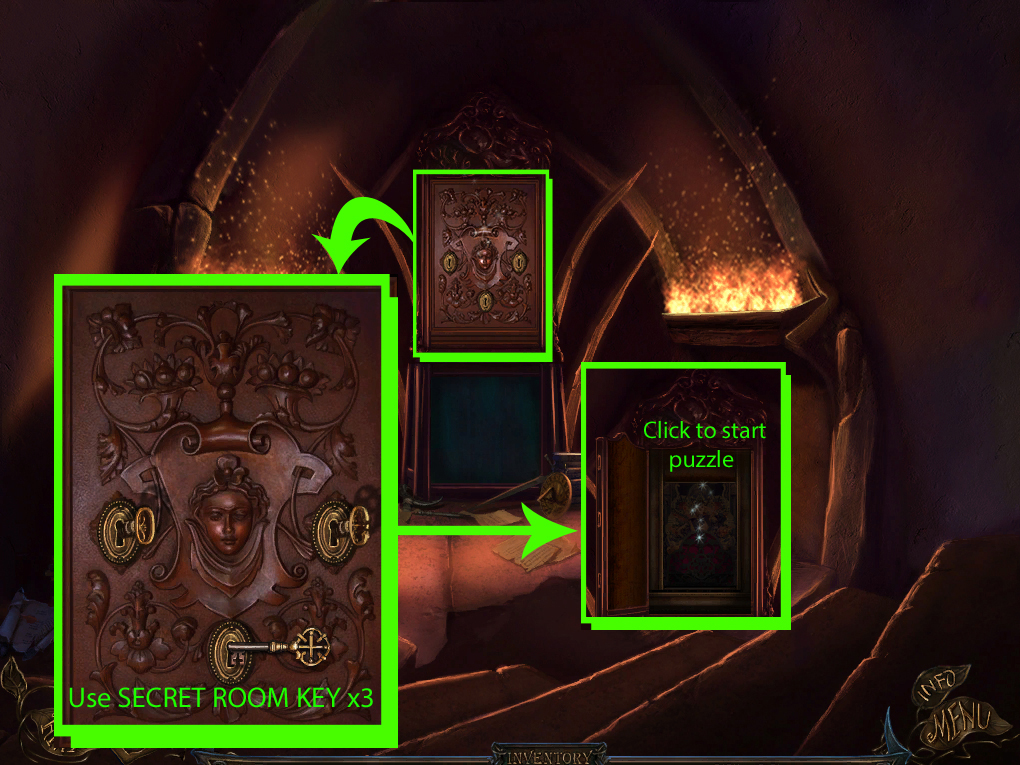
Click the engraved wooden door to zoom in.
Place all three SECRET ROOM KEYS into three keyholes.
Click the panel behind the open door for a closer look.
Add the 6 GEMSTONES to the side of the panel.
Click and drag each of the colored gems into the correct snake's eye.
Solution.
Take the FIFTH KEY from the panel.
Go back to the Door of Seven Deadly Sins.
Door of Seven Deadly Sins
Place the FIFTH KEY into the far right space on the Head of Life.
Return to the Bridge then continue across the bridge to the Wharf.
Sixth Key
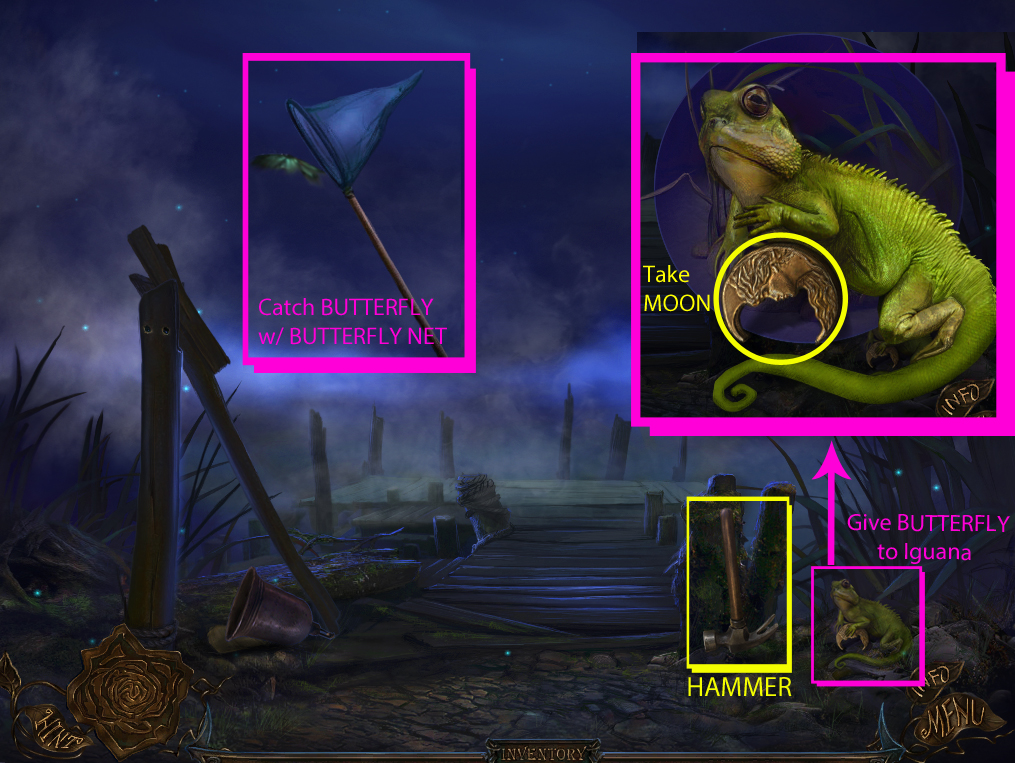
Wharf
Screenshot: wharf.
Take the HAMMER leaning on the post beside the iguana.
Use the BUTTERFLY NET to catch the BUTTERFLY flying around in the air.
Click the iguana to zoom in, then give it the BUTTERFLY.
Take the MOON from the iguana.
Go back to the Lost Soul Garden.
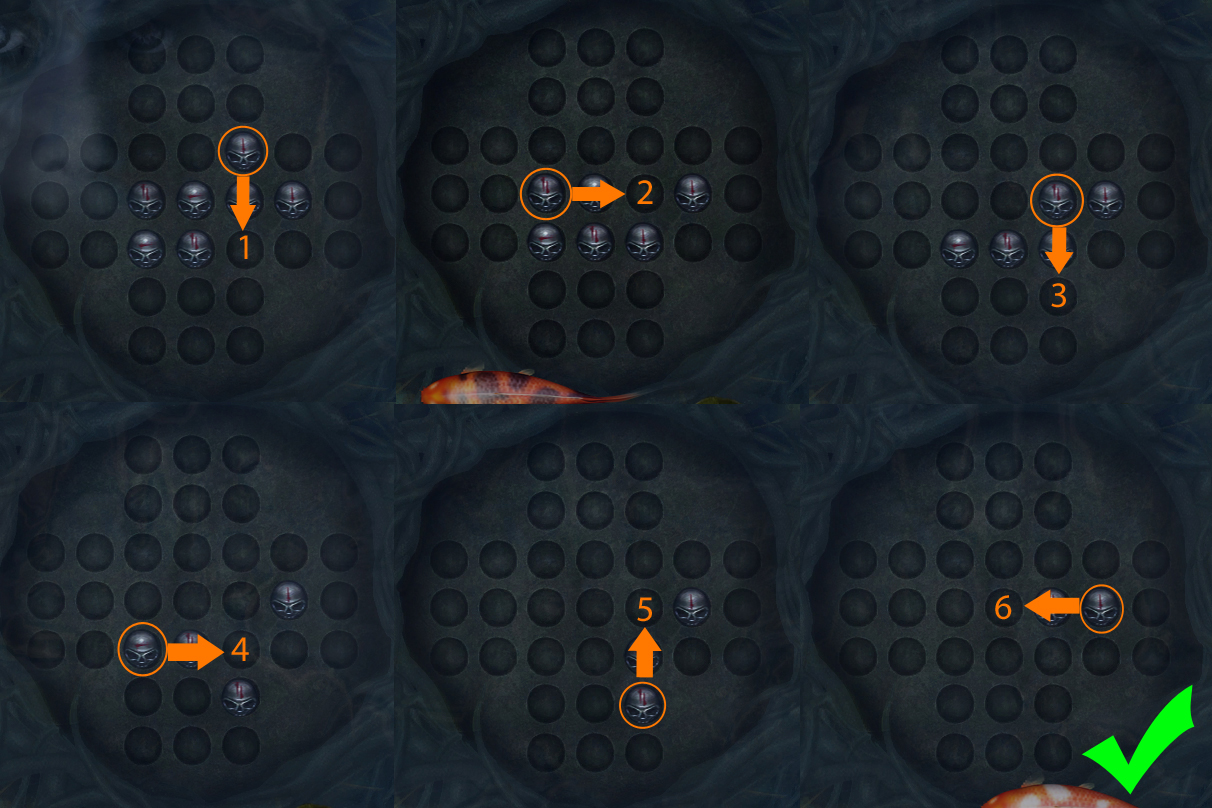
Lost Soul Garden
Click the glowing fountain water to start the puzzle.
Hop the skull tokens like checkers pieces until there is only 1 remaining.
Click a skull token to select it, then click an empty space to move it up, down, left, or right over another token.
When a token is jumped over, it will disappear from the board.
Solution.
While still looking inside the fountain, place the MOON into the sun-shaped lock.
Take the revealed SIXTH KEY.
Go back again to the Lost Soul Garden Entrance.
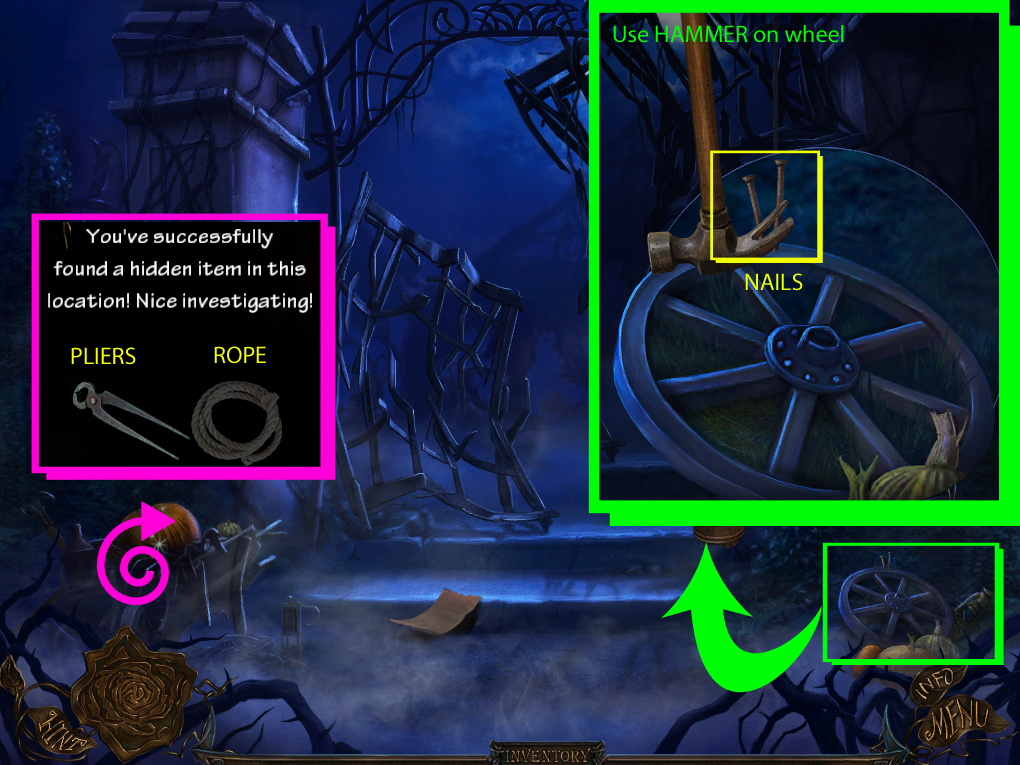
Lost Soul Garden Entrance
Screenshot: lost soul garden entrance.
Click the wheel above the pumpkins on the right to zoom in.
Use the HAMMER on the NAILS sticking out of the top of the wheel to add them to your inventory.
Click the pumpkin in the wheelbarrow on the left to start the hidden object scene.
Screenshot.
Receive the PLIERS and the ROPE from the hidden object scene.
Go back to the Door of Seven Deadly Sins.
Door of Seven Deadly Sins
Place the Sixth KEY into the middle space on the Head of Life.
Return to the Wharf.
Wharf
Screenshot: wharf.
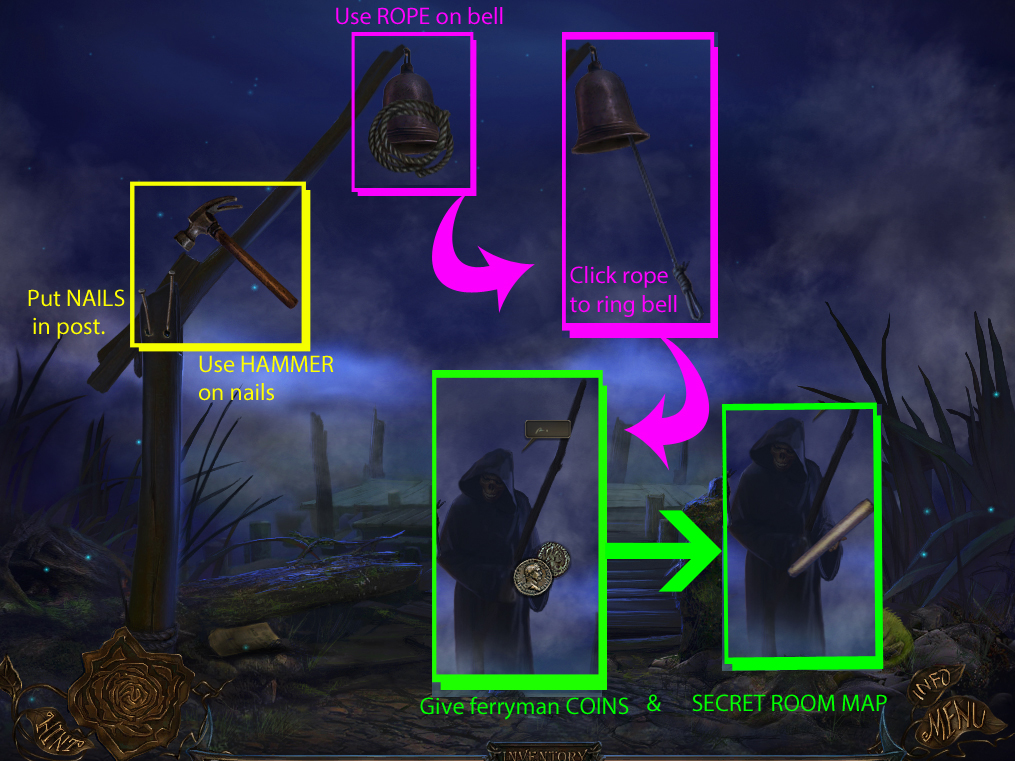
Put the NAILS into the holes in the middle of the broken bell post.
Click the post to turn it upright, then secure the nails in the post with the HAMMER.
Add the ROPE to the bell at the top of the post, then click the bell to ring it.
Speak with the ferryman when he approaches in the boat, then give him the COINS.
Next, give the ferryman the SECRET ROOM MAP.
After he has both items, he will take you to the Shaman's Hut Yard.
Seventh Key
Shaman's Hut Yard
Screenshot: shaman's hut yard.
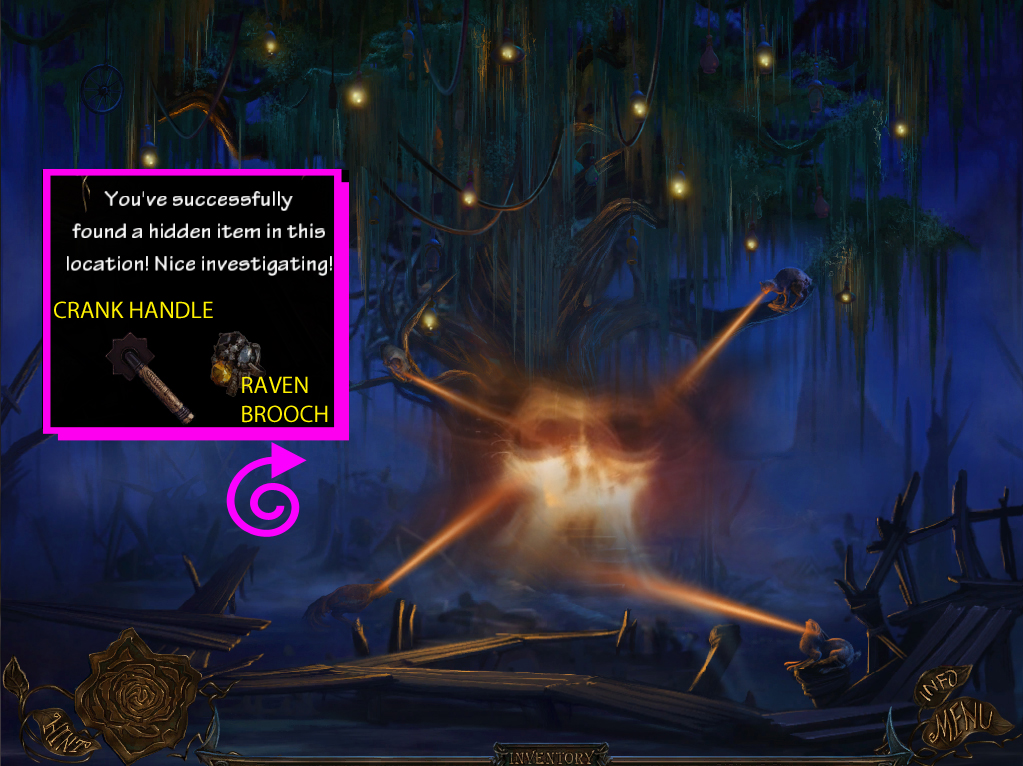
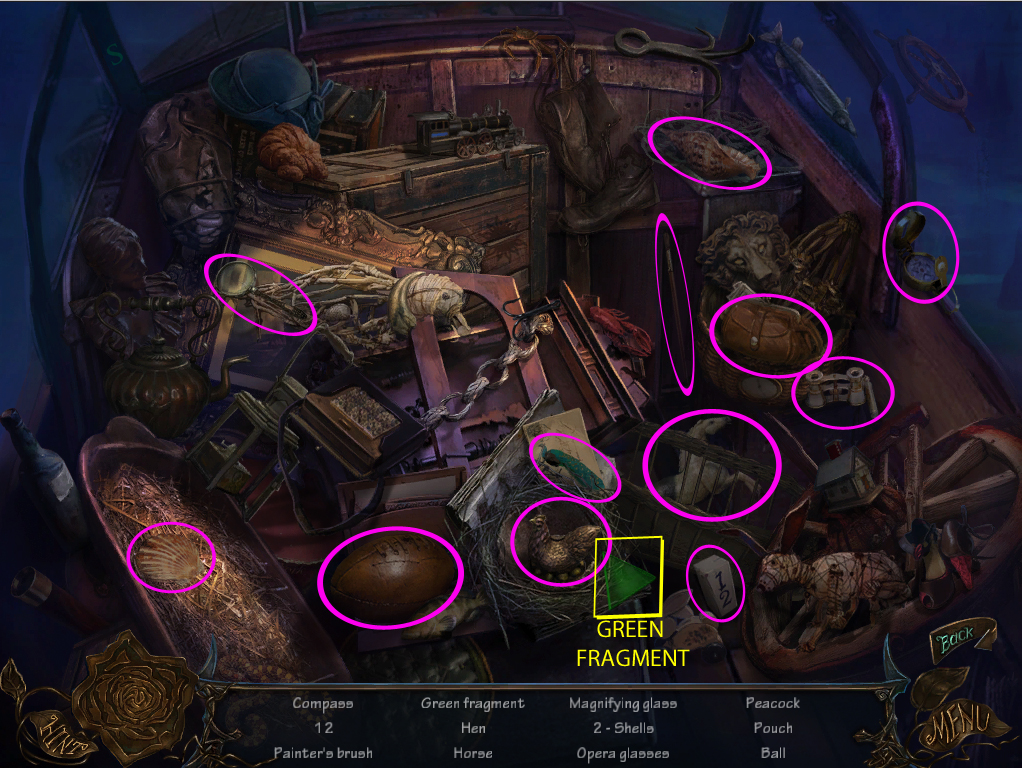
Click the sunken ship to start the hidden object scene.
Screenshot.
Receive the CRANK HANDLE and the RAVEN BROOCH from the hidden object scene.
Go right to the Dead Silence Garden Entrance.
Dead Silence Garden Entrance
Screenshot: dead silence garden entrance.
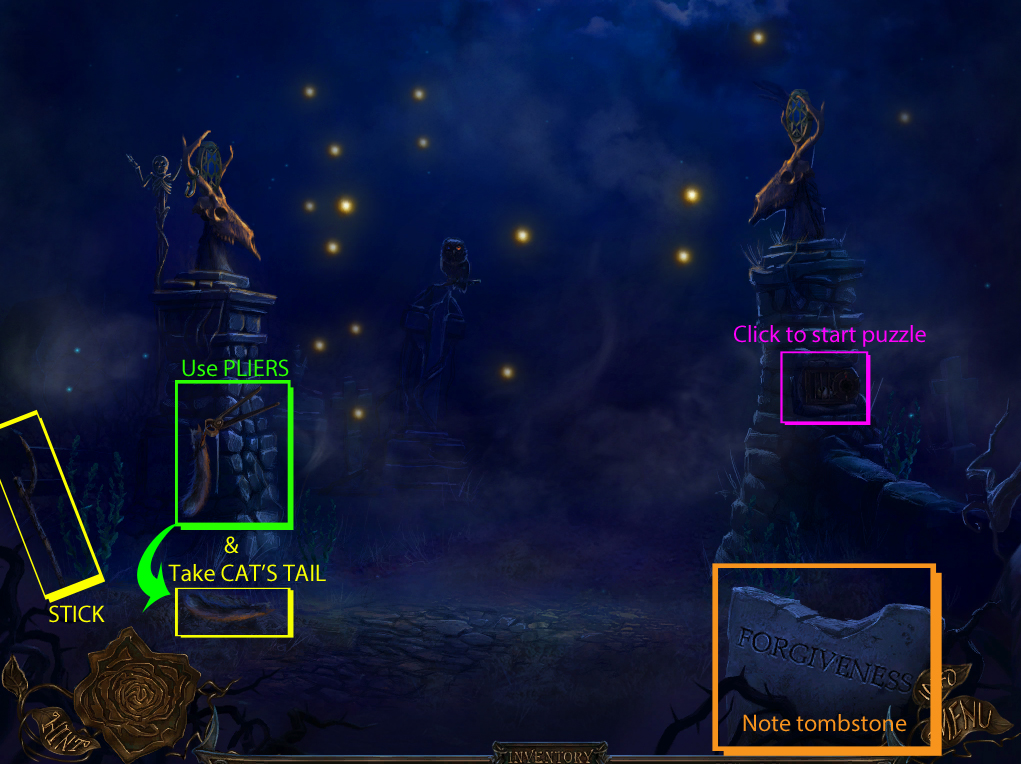
Take the STICK leaning on the fence beside the weeds.
Use the PLIERS on the tail nailed to the left column.
Take the CAT'S TAIL that falls to the ground.
Note the word "Forgiveness" on the tombstone in the lower right corner.
Click the small cage inside the right column to zoom in.
Add the CRANK HANDLE to the lock on the right side of the cage.
Note the numbers and arrows carved in the lower left side of the cage.
Turn the crank 10 spaces clockwise: the dial that the red arrow is pointing at should glow blue.
Next, turn the crank 6 spaces counter-clockwise, and a second dial will glow blue.
Lastly, turn the crank 2 spaces clockwise: the third dial will glow blue and the gate will open.
Solution.
Take the SKULL'S EYE and the CANDLE from the open cage.
Go back to the Shaman's Hut Yard, then go left to the Swamp.
Swamp
Screenshot: swamp.
Use the TWEEZERS on the glass bottle hanging from the treebranch to pull out the ROOSTER'S HEAD.
Click the raven's nest to zoom in.
Give the raven the RAVEN'S BROOCH.
Take the RABBIT'S EAR from the raven's nest.
Go back to the Shaman's Hut Yard.
Shaman's Hut Yard.
Screenshot: shaman's hut yard.
Give each of the four magic guards their missing items:
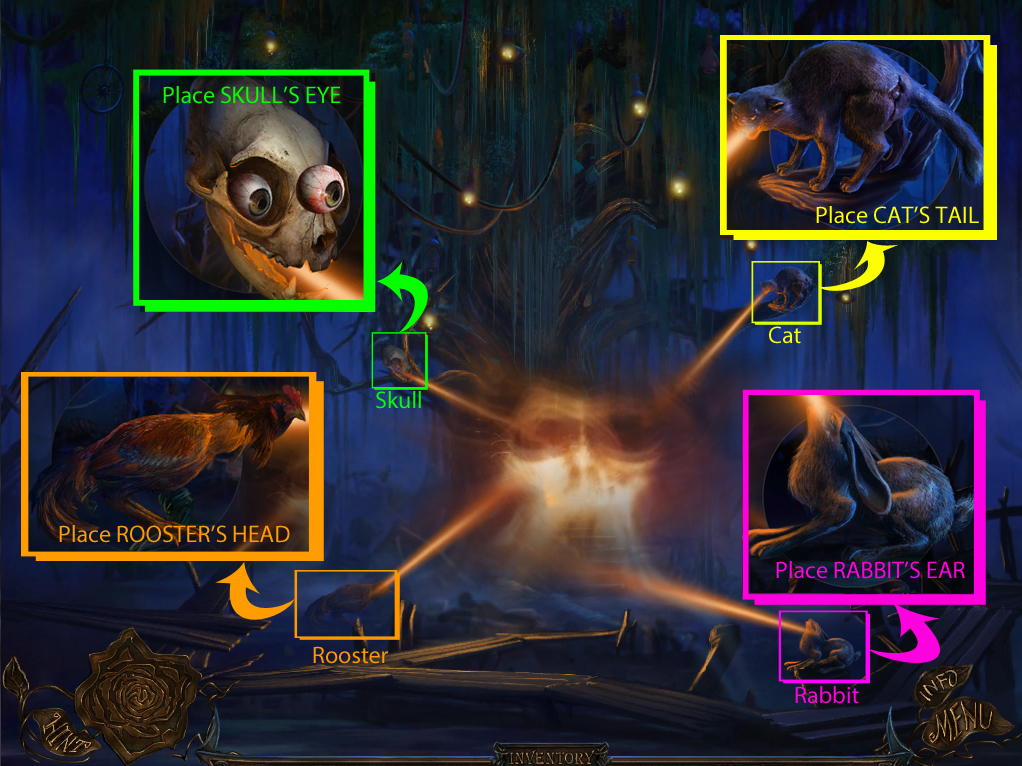
Put both SKULL'S EYE inside the skull.
Add the ROOSTER'S HEAD to the rooster's body.
Place the RABBIT'S EAR at the side of the rabbit's head.
Set the CAT'S TAIL at the back of the cat's body.
Go into the doorway in the tree to enter the Shaman's Hut.
Shaman's Hut
Screenshot: shaman's hut.
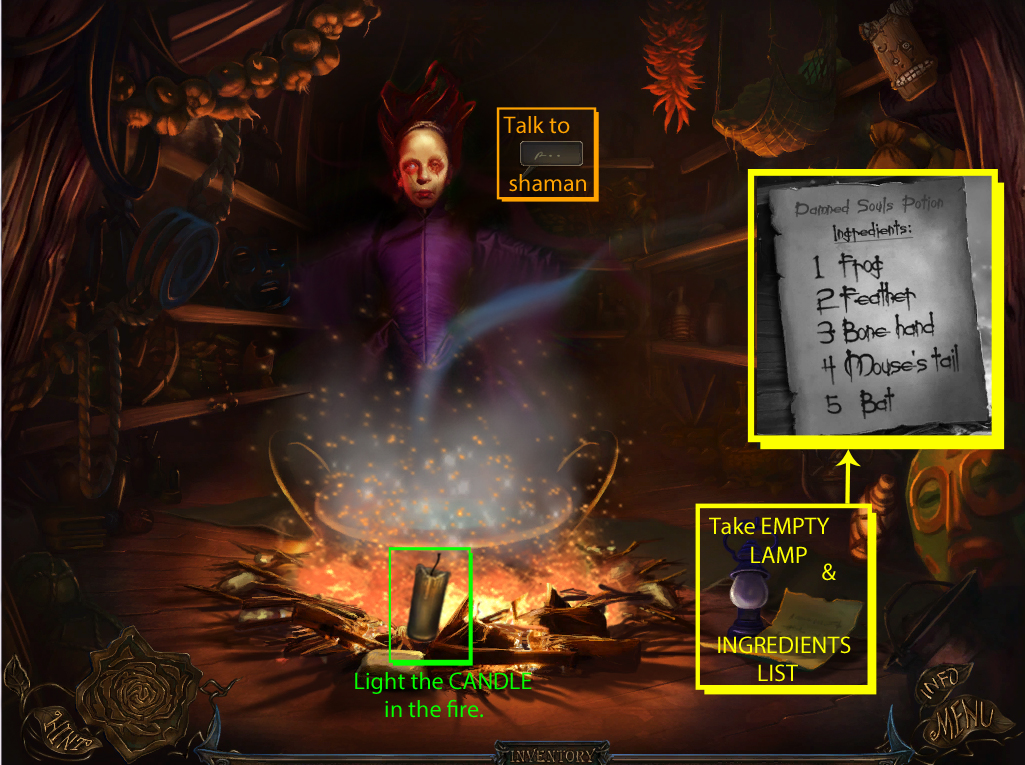
Speak with the Shaman.
Take the EMPTY LAMP and the INGREDIENTS LIST on the floor.
View the list in your inventory and note the needed ingredients:
Frog, Feather, Bone-Hand, Mouse's Tail, Bat.
Light the CANDLE on the fire under the cauldron.
Go back outside to the Shaman's Hut Yard.
Shaman's Hut Yard
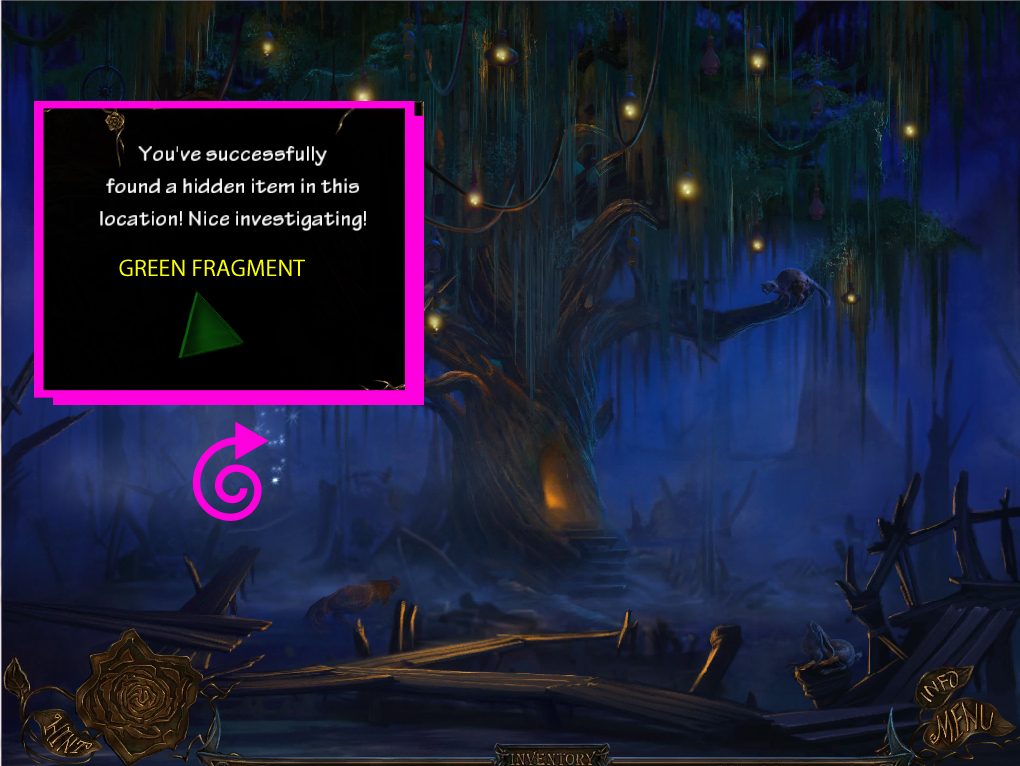
Screenshot: shaman's hut yard.
Click the sunken ship to repeat the hidden object scene.
Screenshot.
Receive the GREEN FRAGMENT.
Return to the Swamp.
Swamp
Screenshot: swamp.
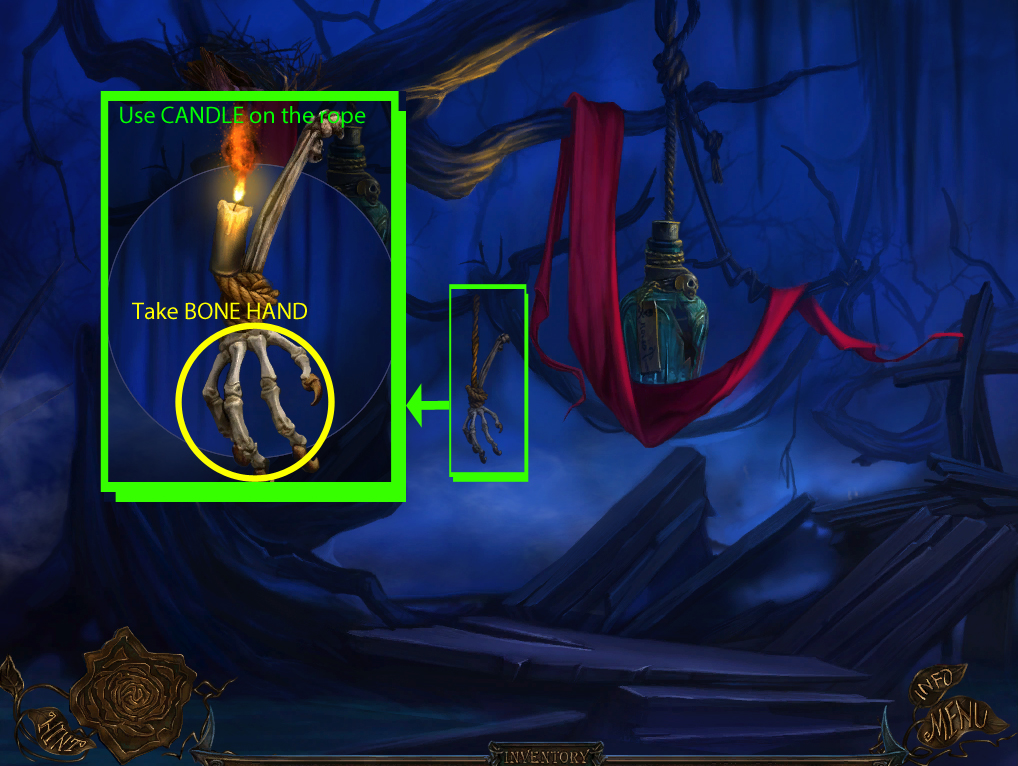
Click the skeleton arm hanging on a rope from the tree branch to zoom in.
Use the CANDLE to burn through the rope.
Take the BONE HAND from the severed rope.
Return to the Dead Silence Garden Entrance.
Dead Silence Garden Entrance
Screenshot: dead silence garden entrance.
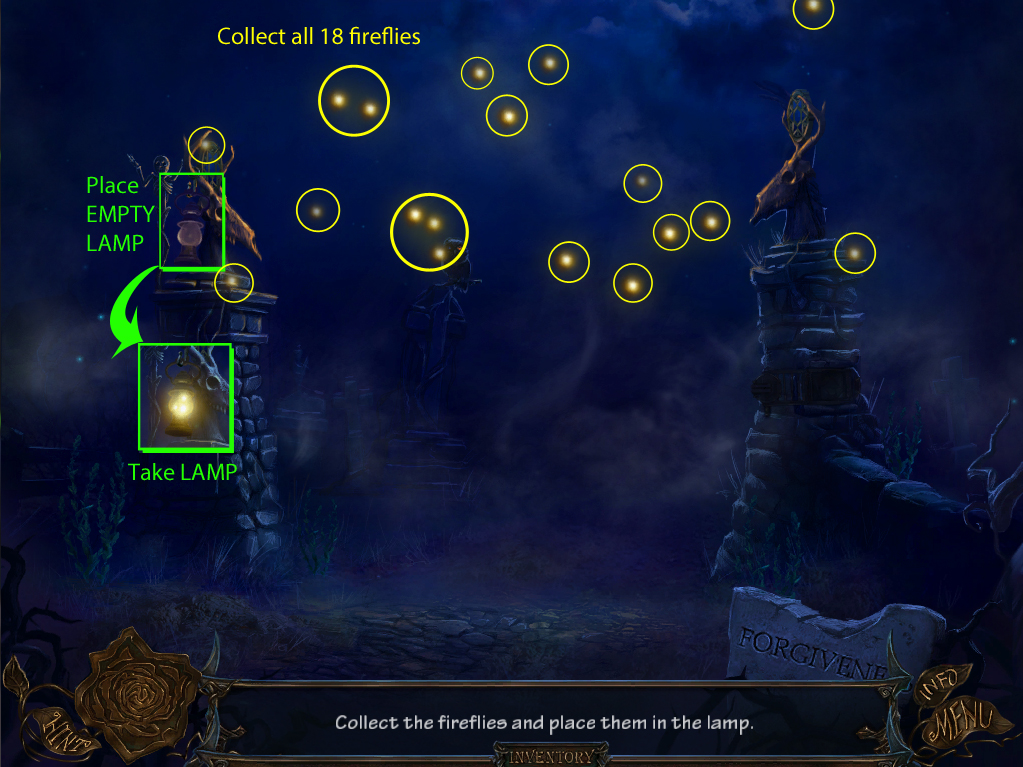
Place the EMPTY LAMP on the hook at the top of the left column.
Collect all of the glowing fireflies floating in the air to fill the lamp.
Take the LAMP off the hook.
Continue forward to the Cemetery.
Cemetery
Screenshot: cemetery.
Take the DARK-BLUE FRAGMENT on the steps of the tomb.
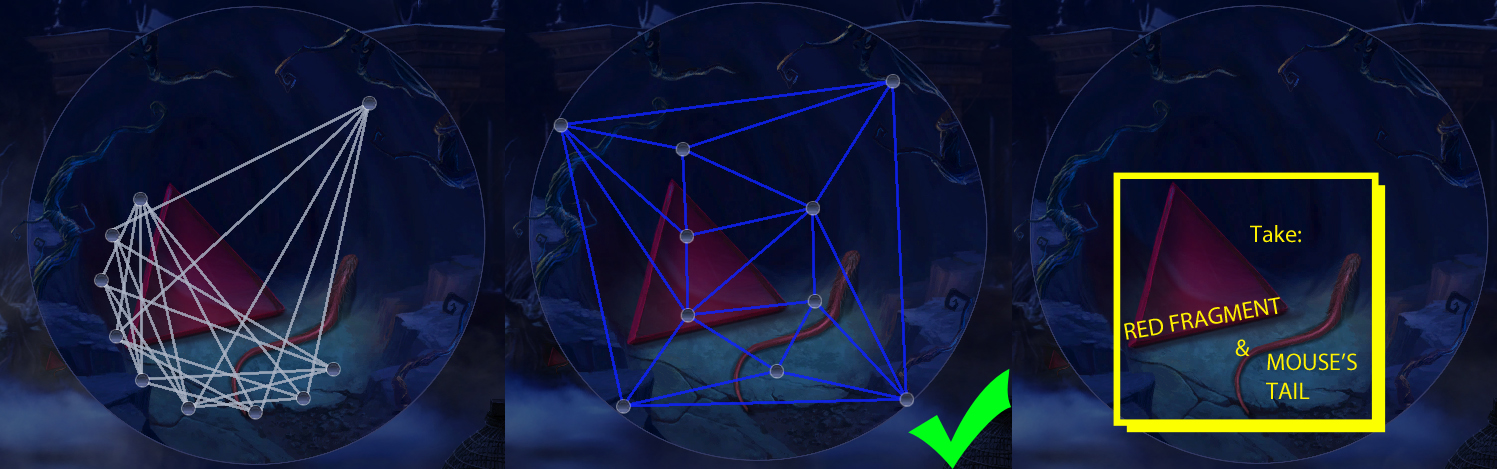
Click the red fragment at the left side of the stairs to start the puzzle.
Click and drag the strings apart so that none of the lines intersect.
Lines that cross each other are colored white, while lines that do not intersect at any point are colored blue.
Solution.
After the spider web puzzle is removed, take the RED FRAGMENT and MOUSE'S TAIL.
Click the coffin to the left of the tomb to start the hidden object scene.
Screenshot.
Receive the LETTER G.
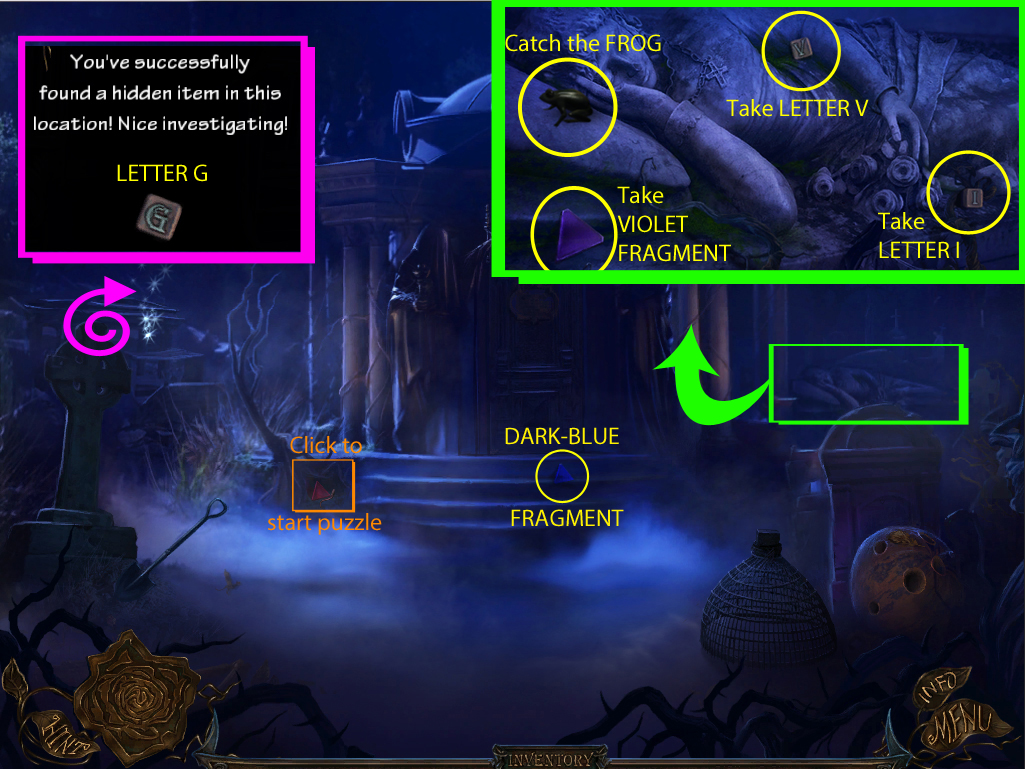
Click the sleeping statue on the coffin to the right of the tomb to zoom in.
Click the hopping FROG to catch it.
Take the VIOLET FRAGMENT at the side of the stone pillow.
Take the LETTER I to the right of the statue's flowers.
Take the LETTER V in the crook of the statue's arm.
Place the LAMP on the hook held by the left statue at the door of the tomb.
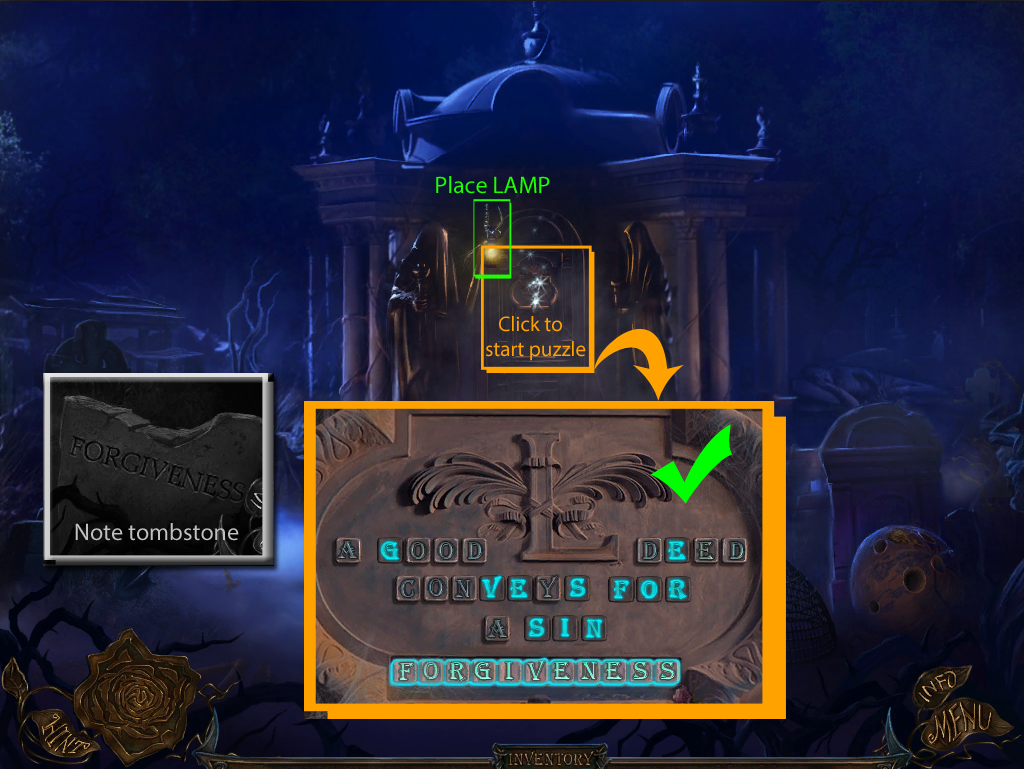
Click the tomb door to zoom in.
Use the LETTER G to finish the the second word "Good"
Use the LETTER V to finish the fourth word "Conveys"
Use the LETTER I to finish the the last word "Sin".
Click the letters in the sentence to write out the word "Forgiveness".
Solution.
Go through the open door into the Family Tomb.
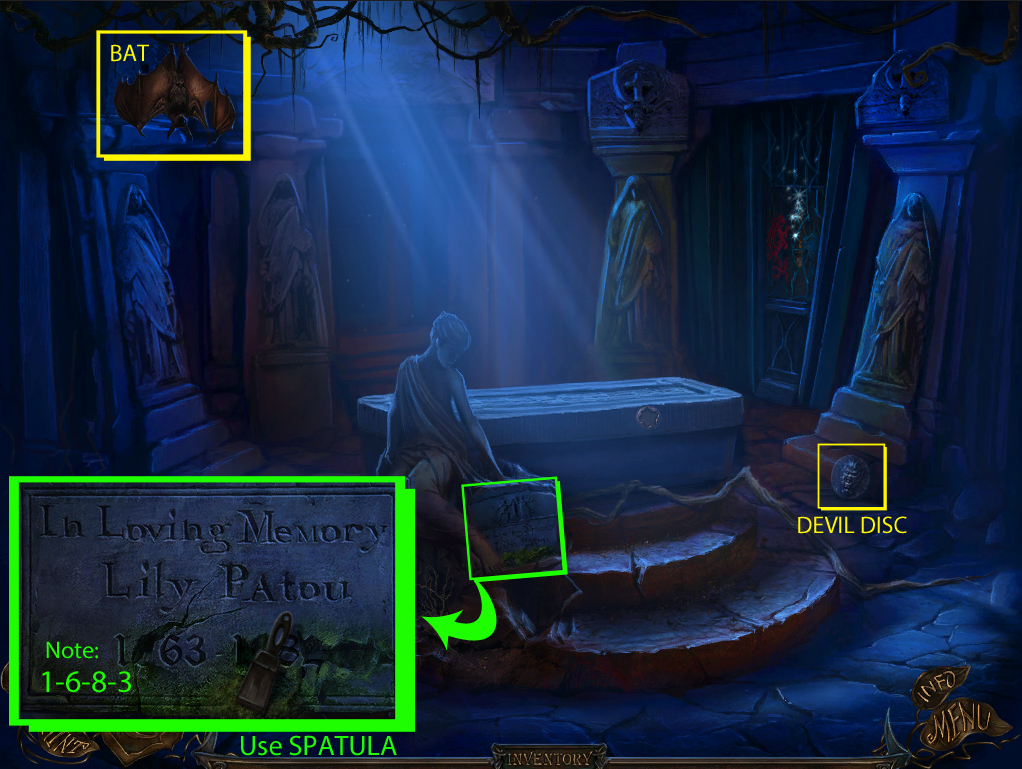
Family Tomb
Screenshot: family tomb.
Take the BAT hanging from the roots at the upper left side of the room.
Take the DEVIL'S DISC at the bottom of the statue on the right column.
Click the tombstone under the sitting statue to zoom in.
Use the SPATULA to scrape the moss off the bottom of the tombstone.
Note the four revealed numbers underneath the epithet: 1638.
Go back to the Cemetery.
Cemetery
Screenshot: cemetery.
Click the coffin to the left of the tomb to repeat the hidden object scene.
Screenshot.
Receive the CHEESE and YELLOW FRAGMENT.
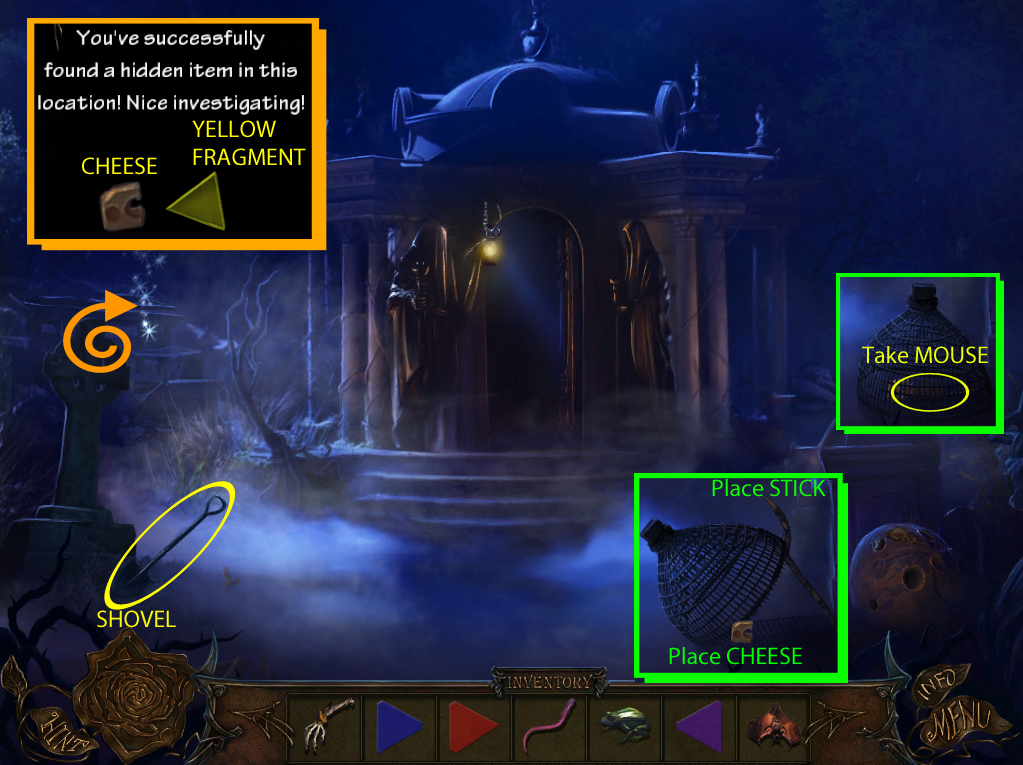
Take the SHOVEL by the left headstone.
Use the STICK on the cage beside the right headstone.
Put the CHEESE under the cage to set the trap.
Take the MOUSE from inside the cage trap.
Go back to the Dead Silence Garden Entrance.
Dead Silence Garden Entrance
Screenshot: dead silence garden entrance.
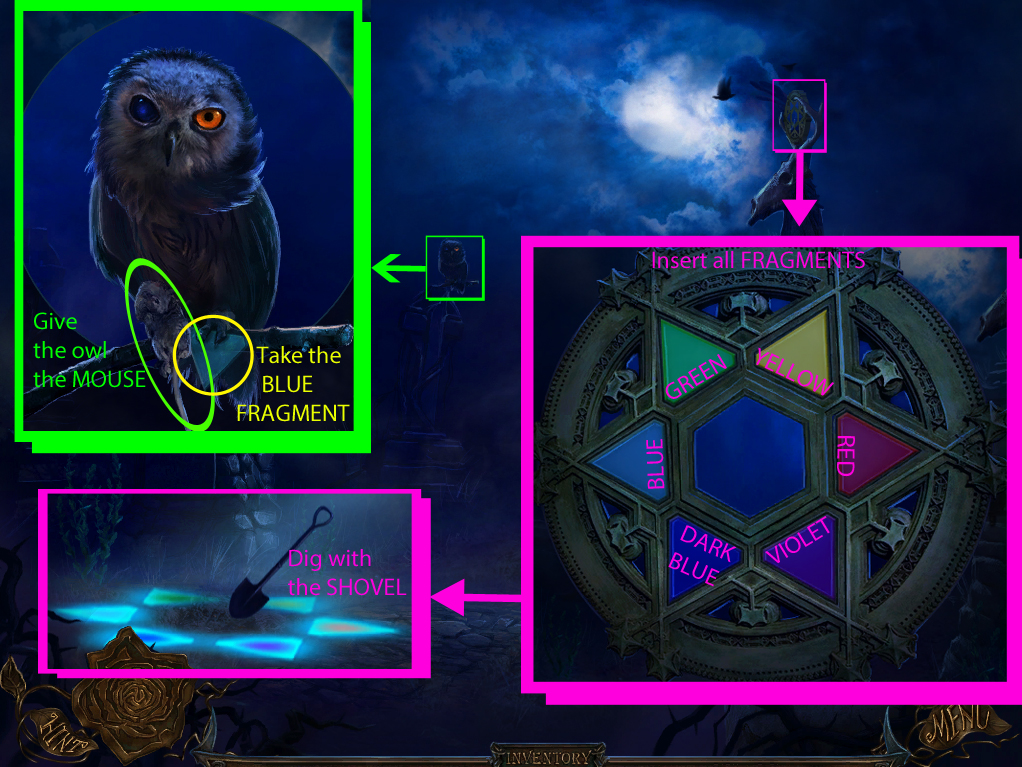
Click the owl perched on the cross to zoom in.
Give the owl the MOUSE.
Take the BLUE FRAGMENT from the owl's talon.
Click the stained glass disc on top of the skull on the right column to zoom in.
Place all six of the glass colored FRAGMENTS into the triangular spaces of the disc.
After the fragments are in place, a glowing star will be reflected on a part of the ground under the left column.
Screenshot.
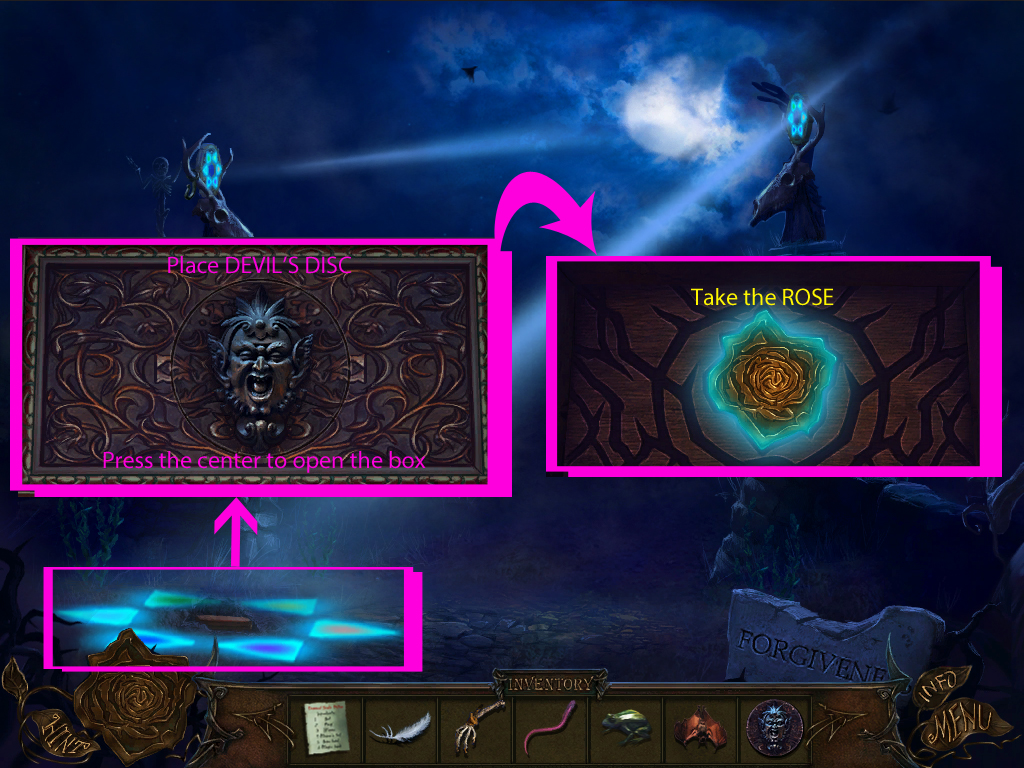
Use the SHOVEL to dig at the highlighted pile of dirt.
Click the uncovered box inside the hole to zoom in.
Place the DEVIL'S DISC into the round space in the center of the lid, then click the disc to open the box.
Take the ROSE inside the box.
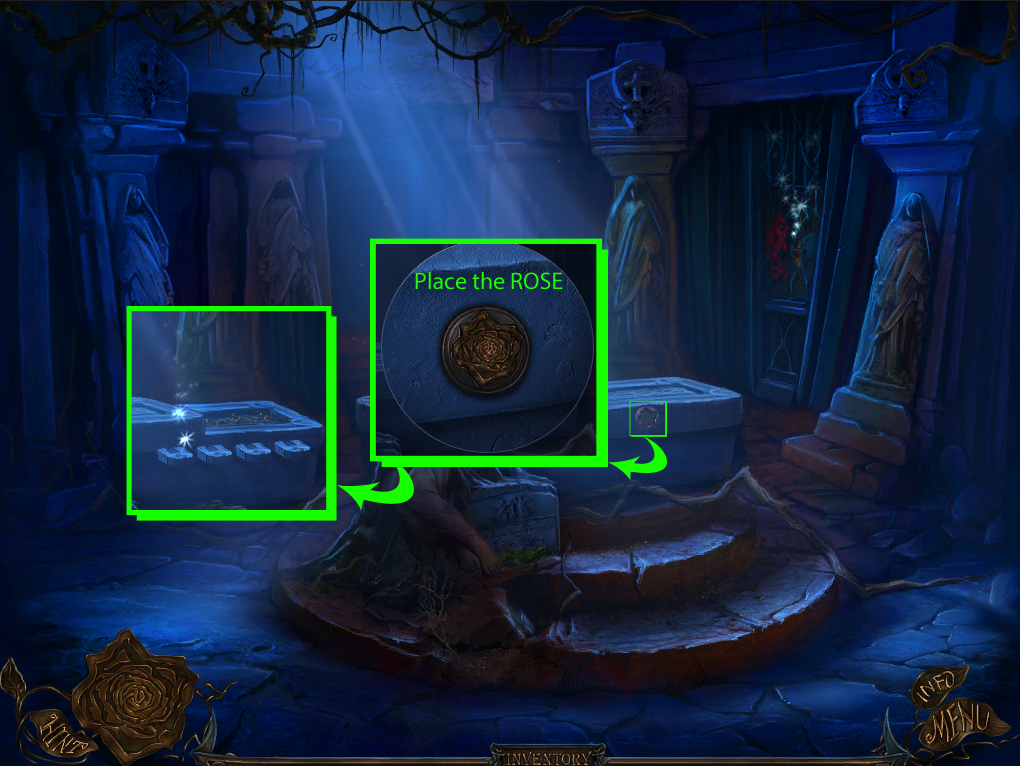
Return to the Family Tomb.
Family Tomb
Screenshot: family tomb.
Click the round inset at the side of the stone coffin to zoom in.
Place the ROSE inside the inset.
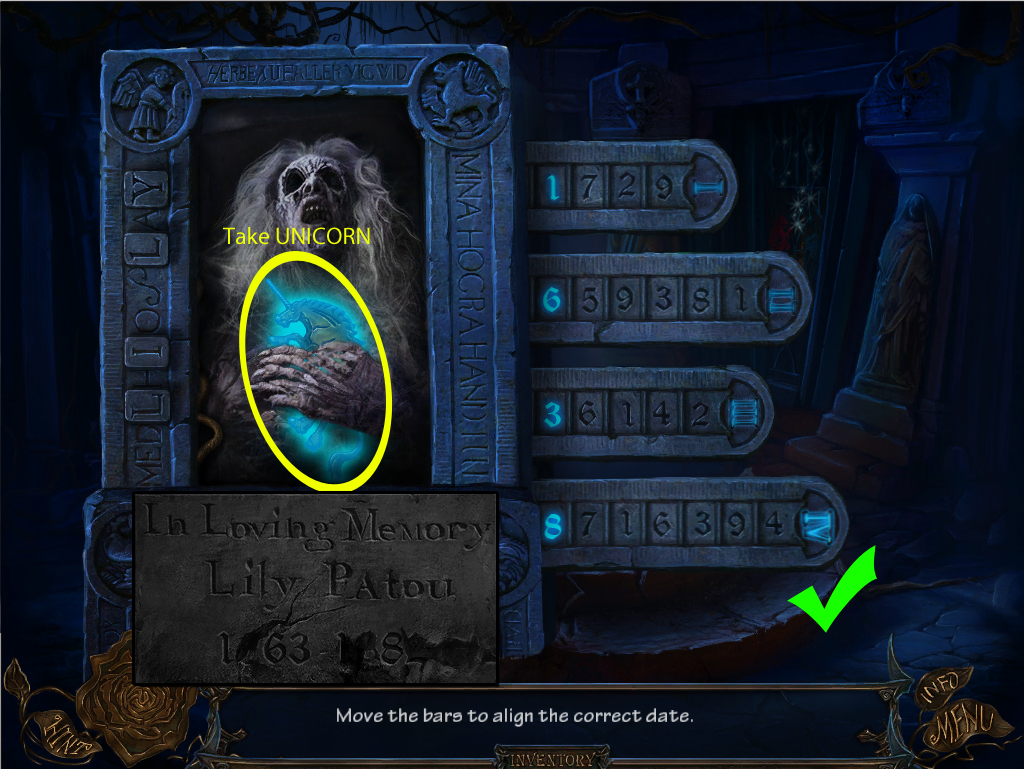
Click the open coffin to look inside.
Pull the tabs on the side of the coffin to set the numbers to the combination found on Lily Patou's headstone.
Starting from I at the top to IV at the bottom, click and drag each tab to align them in the correct order: 1-6-3-8.
Solution.
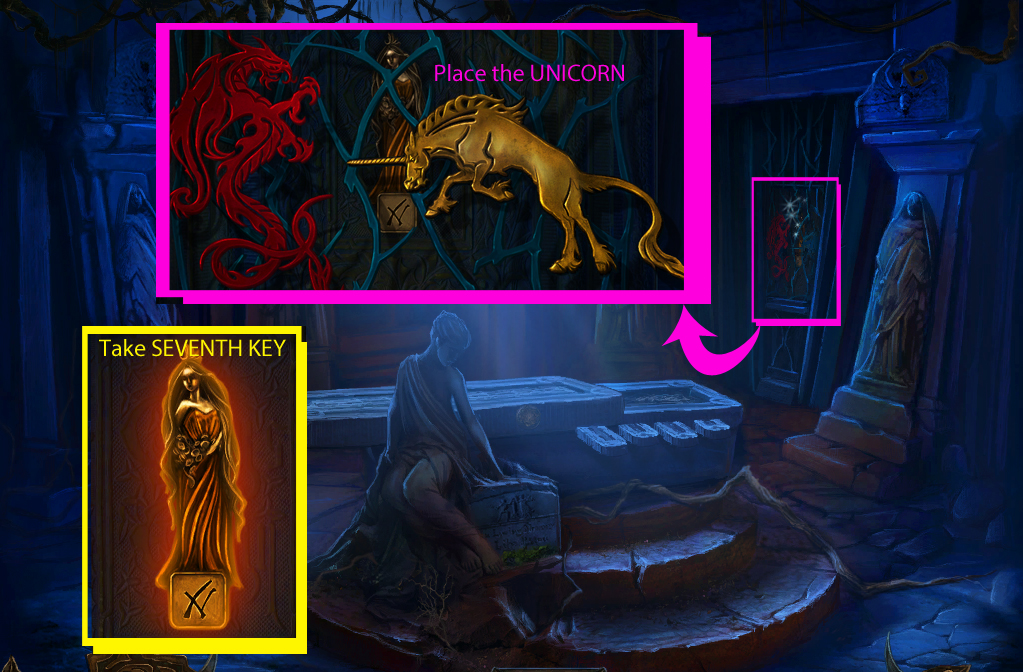
Take the UNICORN from the corpse.
Click the gate for a closer look.
Place the UNICORN in the right space.
Take the revealed SEVENTH KEY.
Screenshot.
Go back to the Shaman's Hut.
Shaman's Hut
Screenshot: shaman's hut.
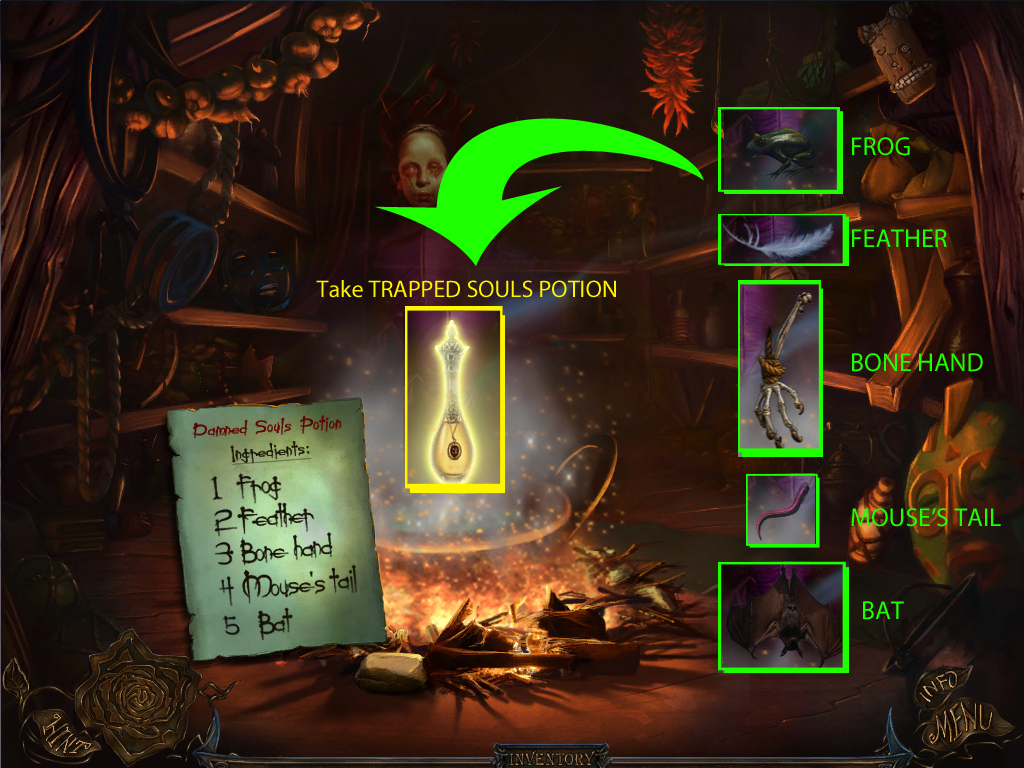
Click the Damned Soul Potion Ingredients paper from your inventory to view a list of all the needed ingredients.
Place the FROG in the cauldron.
Then put the FEATHER in the cauldron.
Next place the BONE HAND in the cauldron.
Put the MOUSE'S TAIL in the cauldron.
Finally add the BAT to the cauldron.
Take the complete TRAPPED SOULS POTION above the cauldron.
Go back to the Door of Seven Deadly Sins.
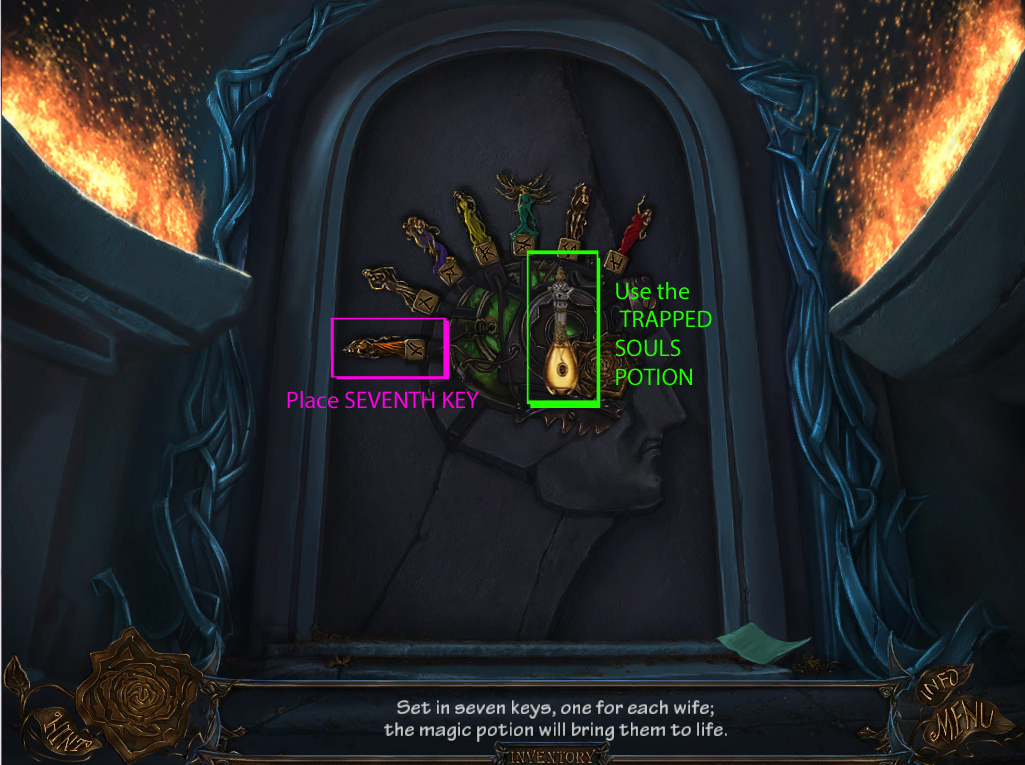
Door of Seven Deadly Sins
Screenshot: door of seven deadly sins.
Place the SEVENTH KEY into the last empty space on the head of life.
Use the TRAPPED SOULS POTION on the green hole in the middle of the head.
Go forward to enter Bluebeard's Dungeon.
Thanks to Trinn for her help in writing this walkthrough!
Posted by: elle |
December 10, 2011 6:58 PM
|
December 10, 2011 6:58 PM