An adventure of epic proportions. Perfect for young readers.

Chamber Door


  • Currently 4/5
  • 1
  • 2
  • 3
  • 4
  • 5
Rating: 4/5 (122 votes)
Comments (15) | Views (12,414)

Chamber Door

KimberlyAs the robot slave of some sort of mad scientist, you are tasked with finding and waking Lenore (whoever, or whatever that is) in Chamber Door. In this point-and-click adventure from Silver Stitch, you and your sidekick Eleven delve into dark forgotten chambers to begin your search. Use either [A] and [D] or left and right [arrow] keys to move, and press [S] or down [arrow] to interact with the switch boxes. After you activate a switch, use the mouse to control Eleven.
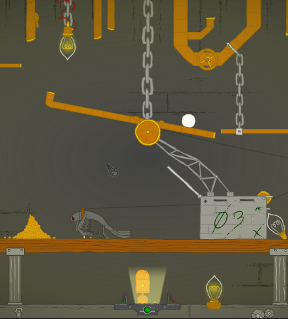
Chamber DoorInspired by The Raven by Edgar Allan Poe, the twisted story reveals itself through a series of scrolls found throughout the game. There is no inventory, so the puzzles are generally just a matter of clicking things in the right order on each screen. And although the cursor doesn't change for hot spots, various levers and knobs are fairly easy to spot. Chamber Door is great at setting a mysterious, somewhat creepy mood. The personality of the game reminds me somewhat of Windosill, but more spooky than whimsical. Short and simple, but with haunting piano tunes and wonderful atmosphere, Chamber Door offers up a solid little adventure even Poe would enjoy.

Play Chamber Door

Walkthrough Guide


(Please allow page to fully load for spoiler tags to be functional.)

Chamber Door Walkthrough

Starting Room

  1. The door on the right will open automatically after a few seconds.

  2. Walk right to enter the Music Room.

Music Room

  1. Position the robot over the control box in the middle of the floor.

    • The light on the control box should switch from red to green once you're in place.

    • Press the [down arrow] key or the [S] key to activate it, which will allow you to switch to your partner Eleven in cursor mode.

  2. Click the rod in the middle of the large wheel to turn on the generator which powers the building.

    • This also turns on the music box. If you'd like to mute the music at any time, just click music note below the rotating cylinder.

  3. Press down to release control of Eleven (which will deactivate your cursor and allow you to move the robot once again). Walk left twice to go to the Conveyor Belt Room.

Conveyor Belt Room

  1. Stand the robot over the control box and press down to switch to cursor mode.

  2. Click the third crate that comes down the conveyor to open it. A mechanical hand will shoot upwards from the crate and launch a white ball into the metallic raven head that is hanging above the conveyor belt.

    • Don't worry if you miss the crate the first time around, just open each crate until you find it.

  3. Click the spokes at the opposite end of the rod attached to the raven head to roll the ball into the next room.

  4. Click the scroll leaning against the wall on the right side of the conveyor belt to read Entry 1.

  5. Press down to return control to the robot. Move right twice to return to the Music Room.

Music Room

  1. Move the robot on top of the control box and press down to switch to cursor mode.

  2. Click the gold mechanism with a green gem on the wall (you'll find it just a little to the left of the ball itself), which will knock the ball to the antennae on the wheel.

    • Once the ball is caught in the wheel's electric field, click the ball to launch it into the next room. The right door will also open at the same time.

  3. Click the scroll on top of the music box to read Entry 2.

  4. Press down to leave the control box and continue right into Subject 3's Room.

Subject 3's Room

  1. Once again, position the robot on the control box and press down to switch to the cursor mode.

  2. First turn the three valves around the room:

    • One valve is in the middle of the pipe attached to the floor at the lower left area of the room.

    • Another valve is on the pipe at the top right corner of the room.

    • The last valve in at the center of the ceiling pipe between the two middle chains.

  3. Now flip the switch attached to the ceiling pipe (to the left of the upper glowing light bulb) to pour the bird seed onto the wooden platform below.

  4. Open the cage labelled "03" to release the bird.

    • As the raven moves towards the bird seed, the rope on its leash will pull the pipe it's attached to and roll the ball into the next room.

  5. Click the scroll on the far left end of the wooden platform to read Entry 3.

  6. Press down to release control of Eleven. Don't follow the ball into the room on the right just yet. Instead, go left four times to enter the Study.

Study

  1. Move the robot to the control box, then press down to go back to cursor mode.

  2. Click the scroll sticking out of the umbrella stand to read Entry 4.

  3. Next, click the scroll with the green ribbon on the right side of the work table to read the "Chemical Results".

    • Note that the first chemical, "Balm of Gilead" causes the subject to relax, while the chemical "Nepenthe" makes the subject flee.

  4. Press down to leave the control box and switch back to the robot. Move right five times to enter Subject 6's Room.

Subject 6's Room

  1. Stand the robot on the control box and press down to switch to cursor mode.

    • When you entered the room, the ball rolled into the left basket.

    • If you want to check the position of the ball, click a basket to shake it. If the ball is inside, it will peek out of the top of the basket.

  2. Click the small, grey switch at the bottom of the mutant raven's perch three times to move the ball's basket to the bottom position.

  3. Next, click the bottom basket to drop the ball into the metal bucket below it.

  4. Click the lever in the middle of the right wall to move the metal bucket further right.

    • Now you can click the metal bucket to catapult the ball into the next room.

  5. Click the scroll sticking out of the bottom of the large pipe in the right wall to read Entry 5.

  6. Press down to release control of Eleven. Walk right twice to reach the Window.

Window

  1. Go to the control box in the middle of the floor. Press down to switch to cursor mode.

  2. Click the latches at the left and right sides of the window frame to unlock and open the window.

  3. Click the ball, which has become trapped in the spiders web at the left side of the tree.

    • A spider will free the ball and move it on top of the nest at the right side of the tree. Click the ball to drop it into the nest.

  4. Click the ball one more time...

    • So it wasn't a ball after all - it was an egg!

    • Pull the lever that the hatchling from the egg lands on to open the door on the right.

  5. Press down to leave the control box. Move right once to enter Subject 9's Room, then continue right to reach the Laboratory on the other side of the room.

Laboratory

  1. As always, move the robot to the control box and press down to switch to the cursor mode.

  2. Examine the yellow and orange flasks hanging from the ceiling.

    • Remember the note from the study? You'll see the relaxant Gilead is in the yellow flask and the stimulant Nepenthe is in the orange flask.

    • But there's a section of the pipe missing underneath the orange Nepenthe flask.

    • Click the mechanical arm that's second from the right to fill the gap with the missing pipe.

  3. Before you go, click the scroll held by the mechanical arm that's second from the left to read Entry 7.

  4. Press down to release control of Eleven, then move left to return to Subject 9's Room.

Subject 9's Room

  1. Position the robot on the control box and press down to switch back to cursor mode.

  2. Click the right lever twice to drip the orange fluid on to the raven, which causes it run on the treadmill and powers the machine.

    • As a bonus, if you click the right lever one more time, the third drop of fluid will make the raven move fast enough to flee the treadmill.

  3. Click the scroll stuck in the pipes at the top left corner of the room to read Entry 6.

  4. Press down to leave the control box and switch back to the robot. Go right twice to reach the Chamber Door.

Chamber Door

  1. Stand the robot on top of the control box at the middle of the room. Press down to switch to cursor mode.

  2. Click the scroll on the table to read Entry 8.

  3. Pull the handle hanging from the ceiling to raise the magnet and knock on the door.

15 Comments

Guess I'll have to wait for a walkthrough :/ I've made it to the far right end with a wooden wall, and the far left end he leaves the scene. But nothing really said it's over. so I must be missing something.

Reply
Patreon Donator Infant Tyrone October 30, 2013 11:05 AM

Same as MtDewed. I /think I finished? There seems to be levels where more wanted doing, but once you tap that last bird it's just over. The mechanics of the game are good, but the plot and motives are a bit cloudy.

Reply

I guess I'll too have to wait for a walkthrough, just can't get past the first screen. It's too dark and I can't see a thing.

Reply

josemfdez -

On the first screen, just walk right. The door opens on its own.

Reply
https://www.google.com/accounts/o8/id?id=AItOawnrLT_DgOiK7Leoj0eRHY69GNEFT33XtTU October 30, 2013 1:08 PM

Okay, I'm stuck.

There's the room you start in, there are 2 rooms to the left of it (the study - far left & the conveyor belt that sets the ball off) then there are 7 rooms to the right. Room 4 right is pitch black (you initially see some eyes above you in the dark) and room 5 is also dark.

I am stuck in room 6, I've fixed the pipes (on the right of room 6) & got the bird walking which makes the red & green lights flash alternately.

Beyond that I am clueless.

Reply

For room 6:

Get the pipes fixed, then drop TWO orange drops on the bird. The first gets it walking, the second gets it walking faster and gives you a full green light.

For room 7:

Click the perch to bring the magnet up to the metal bird.

Reply

Chamber Door Walkthrough

Starting Room

  1. The door on the right will open automatically after a few seconds.

  2. Walk right to enter the Music Room.

Music Room

  1. Position the robot over the control box in the middle of the floor.

    • The light on the control box should switch from red to green once you're in place.

    • Press the [down arrow] key or the [S] key to activate it, which will allow you to switch to your partner Eleven in cursor mode.

  2. Click the rod in the middle of the large wheel to turn on the generator which powers the building.

    • This also turns on the music box. If you'd like to mute the music at any time, just click music note below the rotating cylinder.

  3. Press down to release control of Eleven (which will deactivate your cursor and allow you to move the robot once again). Walk left twice to go to the Conveyor Belt Room.

Conveyor Belt Room

  1. Stand the robot over the control box and press down to switch to cursor mode.

  2. Click the third crate that comes down the conveyor to open it. A mechanical hand will shoot upwards from the crate and launch a white ball into the metallic raven head that is hanging above the conveyor belt.

    • Don't worry if you miss the crate the first time around, just open each crate until you find it.

  3. Click the spokes at the opposite end of the rod attached to the raven head to roll the ball into the next room.

  4. Click the scroll leaning against the wall on the right side of the conveyor belt to read Entry 1.

  5. Press down to return control to the robot. Move right twice to return to the Music Room.

Music Room

  1. Move the robot on top of the control box and press down to switch to cursor mode.

  2. Click the gold mechanism with a green gem on the wall (you'll find it just a little to the left of the ball itself), which will knock the ball to the antennae on the wheel.

    • Once the ball is caught in the wheel's electric field, click the ball to launch it into the next room. The right door will also open at the same time.

  3. Click the scroll on top of the music box to read Entry 2.

  4. Press down to leave the control box and continue right into Subject 3's Room.

Subject 3's Room

  1. Once again, position the robot on the control box and press down to switch to the cursor mode.

  2. First turn the three valves around the room:

    • One valve is in the middle of the pipe attached to the floor at the lower left area of the room.

    • Another valve is on the pipe at the top right corner of the room.

    • The last valve in at the center of the ceiling pipe between the two middle chains.

  3. Now flip the switch attached to the ceiling pipe (to the left of the upper glowing light bulb) to pour the bird seed onto the wooden platform below.

  4. Open the cage labelled "03" to release the bird.

    • As the raven moves towards the bird seed, the rope on its leash will pull the pipe it's attached to and roll the ball into the next room.

  5. Click the scroll on the far left end of the wooden platform to read Entry 3.

  6. Press down to release control of Eleven. Don't follow the ball into the room on the right just yet. Instead, go left four times to enter the Study.

Study

  1. Move the robot to the control box, then press down to go back to cursor mode.

  2. Click the scroll sticking out of the umbrella stand to read Entry 4.

  3. Next, click the scroll with the green ribbon on the right side of the work table to read the "Chemical Results".

    • Note that the first chemical, "Balm of Gilead" causes the subject to relax, while the chemical "Nepenthe" makes the subject flee.

  4. Press down to leave the control box and switch back to the robot. Move right five times to enter Subject 6's Room.

Subject 6's Room

  1. Stand the robot on the control box and press down to switch to cursor mode.

    • When you entered the room, the ball rolled into the left basket.

    • If you want to check the position of the ball, click a basket to shake it. If the ball is inside, it will peek out of the top of the basket.

  2. Click the small, grey switch at the bottom of the mutant raven's perch three times to move the ball's basket to the bottom position.

  3. Next, click the bottom basket to drop the ball into the metal bucket below it.

  4. Click the lever in the middle of the right wall to move the metal bucket further right.

    • Now you can click the metal bucket to catapult the ball into the next room.

  5. Click the scroll sticking out of the bottom of the large pipe in the right wall to read Entry 5.

  6. Press down to release control of Eleven. Walk right twice to reach the Window.

Window

  1. Go to the control box in the middle of the floor. Press down to switch to cursor mode.

  2. Click the latches at the left and right sides of the window frame to unlock and open the window.

  3. Click the ball, which has become trapped in the spiders web at the left side of the tree.

    • A spider will free the ball and move it on top of the nest at the right side of the tree. Click the ball to drop it into the nest.

  4. Click the ball one more time...

    • So it wasn't a ball after all - it was an egg!

    • Pull the lever that the hatchling from the egg lands on to open the door on the right.

  5. Press down to leave the control box. Move right once to enter Subject 9's Room, then continue right to reach the Laboratory on the other side of the room.

Laboratory

  1. As always, move the robot to the control box and press down to switch to the cursor mode.

  2. Examine the yellow and orange flasks hanging from the ceiling.

    • Remember the note from the study? You'll see the relaxant Gilead is in the yellow flask and the stimulant Nepenthe is in the orange flask.

    • But there's a section of the pipe missing underneath the orange Nepenthe flask.

    • Click the mechanical arm that's second from the right to fill the gap with the missing pipe.

  3. Before you go, click the scroll held by the mechanical arm that's second from the left to read Entry 7.

  4. Press down to release control of Eleven, then move left to return to Subject 9's Room.

Subject 9's Room

  1. Position the robot on the control box and press down to switch back to cursor mode.

  2. Click the right lever twice to drip the orange fluid on to the raven, which causes it run on the treadmill and powers the machine.

    • As a bonus, if you click the right lever one more time, the third drop of fluid will make the raven move fast enough to flee the treadmill.

  3. Click the scroll stuck in the pipes at the top left corner of the room to read Entry 6.

  4. Press down to leave the control box and switch back to the robot. Go right twice to reach the Chamber Door.

Chamber Door

  1. Stand the robot on top of the control box at the middle of the room. Press down to switch to cursor mode.

  2. Click the scroll on the table to read Entry 8.

  3. Pull the handle hanging from the ceiling to raise the magnet and knock on the door.

Reply

Stop comparing other people's games with big indie titles. Those game are good, but your using them to smudge the originality the author was hoping for. It even looks like your advertising with links.

Reply

@AbstractMatter...

Smudge the originality? Kimberly only said the personality of this game reminded her of Windosill. No comparisons were drawn. Whenever a reviewer mentions a previously reviewed game not only does it help inform people of the type of game this is but it is always linked. Every time a title, developer, genre etc. is mentioned it is linked. So anyone that has played Windosill might be encouraged to play this game and anyone who hasn't may be encourage to go play Windosill. Where's the harm in that?

I enjoyed both games. They both are very different but have the same principle structure. This game is well designed and fun... but it is hardly original. That's not a bad thing. Let the reviewers do what they've always done.

Reply

the mechanic of having the robot move between screens seemed pointless. It had some cool potential, but its never utilized, its just a overly complex way to switch between screens.

Reply

ack. I woke Lenore but the end scene moved too fast while I was looking away from my screen and I missed it, so will have to play again to see what appeared when I awakened her..

Reply

Eh, I'm with AbstractMatter. For one thing, this very much does not remind me of Windosill, nor was there any actual detail cited to even mention it. (To be clear, I'm not picking on this review by itself, but to AbstractMatter's implication that this is a frequent occurrence.) If it's a *genre* like with the Grow games � that is informative. It tells us what to expect. It tells us how the gameplay goes. The tag and genre links are often very helpful.

But most of all, it gives us a benchmark by which to judge a game.

Game developers have a hard enough time trying to stand out in the crowd, and here's a *review site* that falls back on another game in part of the description? It's not going to be a long review, either � so that's a big percentage. I mean, a metaphor is great, but this is writing for a specific purpose, and there are real people who might benefit from it. And I don't mean us readers.

It sets up the game for failure if there are preconceived notions that it's going to be something it's not. In the past year, I have seen several games where the commenters went mad over misleading descriptions, and likely down-voted otherwise sturdy games. And because JiG is a high-volume site, the first couple of hours is when those 20 votes show up for mushrooms. We're not coming back to find out that the reviewer corrected themselves (and/or engaged with commenters, which is a fairly new thing in non-internet time).

It's just not productive for anyone involved to toss out reviews like they're Hollywood pitches. I don't think it's too much to ask to be specific and detailed instead of "It's like Die Hard, except with more snow." In this case, I would say this reminds me of Little Wheel

in that you have a vague mission, yet half the fun is in discovering the twisted sideways world and how it works. The mechanisms likewise hint of an underlying order, though this game has a trace of sadism instead of joyful wonderment.
Even if this description causes confusion, I don't have to defend *why* it reminds me of Little Wheel, because it's included. And persistent commenters�like me�don't latch on to the missing information, which in gossipy comment section terms eventually comes off as the game being confusing instead of the review.

I mean, I appreciate every day that JiG is churning out the volume that it does. However if there is a rubric for typing these out, and editing them, as a long-time reader I think the description section does need to be tightened up. Each review must take a long time to write, but they are still short enough to be edited thoroughly.

Or, y'know, if it really is Die Hard except with more snow, back it up with some substance. In this case the problem *is* that there weren't any concrete comparisons drawn. Put some meat on the metaphors, please.

Reply
illuminatus85 November 1, 2013 12:28 PM

Well I only bothered to play this because it was said to be similar to Windowsill and I got exactly what I expected. 'Windowsill' is excellent shorthand for explaining exactly how the game plays. Whether someone has played Windowsill doesn't matter, it's literally one line in the entire review and if Kimberly were to explain exactly how it was like Windowsill no doubt you'd all be whinging more was said about Windowsill.

Reply
hostiletakeover2 November 5, 2013 10:42 AM

Apparently nobody else has gone into the room at the far left, past the treadmill? It isn't necessary so is easily missed I guess. If you go there though, you'll get an extra diary entry. It seems the diary entries are numbered from when you read it rather than where.

To get there:

In the room you turn wheels and flip levers to drop bird seed, on the left is a lever on a pipe that loops back around the left. Flip that then head all the way back.

Reply

^ Scroll Up | Homepage >

Leave a comment [top of page]

Please consider creating a Casual Gameplay account if you're a regular visitor here, as it will allow us to create an even better experience for you. Sign-up here!
  • PLEASE UNDERSTAND SITE POLICIES BEFORE POSTING COMMENTS
  • You may use limited HTML tags for style:
    (a href, b, br/, strong, em, ul, ol, li, code, spoiler)
    HTML tags begin with a less-than sign: < and end with a greater-than sign: >. Always. No exceptions.
  • To post spoilers, please use spoiler tags: <spoiler> example </spoiler>
    If you need help understanding spoiler tags, read the spoiler help.
  • Please Preview your comment before posting, especially when using spoilers!
  • No link dropping, no domains as names; do not spam, and do not advertise! (rel="nofollow" in use)
chrpa Jayisgames needs your help to continue providing quality content. Click for details Hi! Weekday Escape and Weekday Puzzle are here! First we have two new cans from tomoLaSiDo and then two small rooms from isotronic. That's all for this...  ...
6,365 Views
0 Comments
chrpa Jayisgames needs your help to continue providing quality content. Click for details Welcome to Mobile Monday! We have another beautiful game from Nicolet and it's a winter game as it should be. Tasuku Yahiro have released another of their...  ...
8,746 Views
2 Comments
chrpa Jayisgames needs your help to continue providing quality content. Click for details We've got a new game from Rinnogogo's magical world and this time it really is magical.. Not only do you get to meet cute animals that express themselves...  ...
chrpa Jayisgames needs your help to continue providing quality content. Click for details After a few weeks of patient waiting, we have been rewarded - the new game from Ichima Coffeedo is here. We got a wonderful new game - it's...  ...

HELP Jayisgames.com

Recent Comments


Display 5 more comments
Limit to the last 5 comments

Game of the week


Dark Romance: Vampire Origins Collector's Edition

Your Favorite Games edit

add
Save links to your favorite games here. Use the Favorites editor.

Monthly Archives