JayisGames.com is now available ad-free!
Jay is Games recommends Cheat Happens with 8,000+ games and 35,000+ trainers!

Collider


  • Currently 4.2/5
  • 1
  • 2
  • 3
  • 4
  • 5
Rating: 4.2/5 (111 votes)
Comments (29) | Views (6,685)

zxoCollider
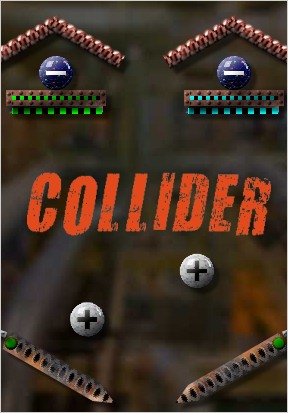
The unanticipated delay in firing up the ol' Large Hadron Collider has given people across the world a shot at being the first to observe the elusive Higgs Boson. Stepping up to the plate for the casual gaming crowd is Dan Russell-Pinson (Block Drop, Tipping Point), with his new game, aptly named Collider.

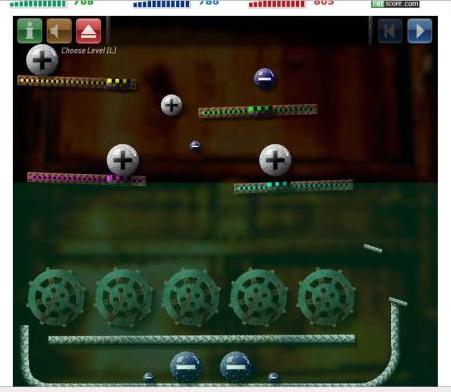
Using proprietary physics simulation technology, Collider lets you in on the particle-smashing action! Simply annihilate all charged particles by crashing the positive ones into the negative ones. Each of the 25 levels contains a number of positionable particles, which you must place above the eerie green overlay, as well as particles which cannot be moved directly. Once you've placed all the particles, click Play (or hit [Space]) to start them in motion, then just wait and watch. Hit [Space] again to reset if, like the LHC, your mission of collision is a vision of derision and you're wishin' for remission!

Watching particles drop may not exactly sound like a killer game waiting to happen, but Dan throws in a few quirks that quickly turn the game into a puzzle-solving endeavor along the lines of Color Infection. Rolling particles across colored switches activates various levers, platforms, pinwheels, and other moving elements, and colliding particles of different sizes will leave some leftovers after annihilation for you to clean up. Most levels are designed such that many solutions are possible, but there's one "intended" solution that's more elegant than the rest, which is exactly how physics puzzlers should be designed. Only a handful of levels require copious fine-tuning of particle positions, but that doesn't mean that the rest will be a breeze. Some thinking required, although no level should require a Ph.D. in high energy physics. However, in case you do get stuck there are links to the solutions available right in the game.

The spacey music and sound effects clash against the rusty patina of the pipes and the various dingy backgrounds, suggesting a post-apocalyptic environment in which all this colliding is perpetrated. The music is actually quasi-random and is regenerated at the beginning of each level, so it should never weary your ears.

Apparently, Dan never got the message that particles need to collide at velocities pretty durn close to the speed of light in order to be of any use. Often the particles just crawl along, and while it might be nice to have a magic button that speeds things up, such a feature — like the notorious Boson — remains elusive. Aside from that, there's really little to complain about with Collider, and a whole lot to like. So while he may not be out there finding a unified theory of everything, Dan does a pretty good job at making a superb casual game.

Play Collider

Thanks for the suggestion, David and Dan!

Walkthrough Guide


(Please allow page to fully load for spoiler tags to be functional.)

Many of these will take some tweaking. If at first it doesn't work, try a slightly different position.

Level 1

  • Place the green ball at the top of the screen, slightly left of the left plus, so that it falls on the left plus.

Level 2

  • Place both minuses on the grey platform with some space between.

  • Place the green ball above the right one, slightly left.

  • It should bounce off the right one into the left, sending both on the way.

Level 3

  • Place two pluses on the left end of pivoting bar at the upper left.

  • Place the minus at the far right edge of the screen.

Level 4

  • May not be the standard answer: there's room for a plus right next to each minus.

  • Put them close enough and it's done.

Level 5

  • Place the minus at the far left end of the double-thick bar.

  • Place the green at the opposite end of that same bar.

  • Place the plus just to the left of the green.

Level 6

  • Place the smallest ball over the opening at the left.

  • Place the largest ball as far to the right as you can.

  • Place the last ball midway between.

Level 7

  • Place the green ball above the top-right plus, slightly left of center and all the way at the top.

  • It should bounce off that plus and drop between the plus at the bottom and the minus to the left of it.

  • This may require tweaking.

Level 8

  • Place the green ball over the right end of the metal "cage" containing the minuses.

  • It should be centered over the right wall of the cage and drop as far as it can to collapse the cage quickly.

  • Layout the pluses across the left shelf at the top.

  • They should flow down onto the minus if everything goes right.

  • Adjust the timing by moving the pluses left to land later, right to land earlier.

Level 9

  • Place the minus on the right end of the center gray bar.

  • Place one small ball left of the left end of that bar, between the radiation line and the curved pipe.

  • Place the second small ball above the green switch pad as close to the top of the screen as you can.

Level 10

  • Place the green ball above the "dominos" one space to the right of center.

  • Place the minus on the top bar near the left end. Place one of the pluses next to it, with the second plus above the first.

  • Keeping all 3 as close together as you can. (They should merge into one small plus.)

  • Adjust the timing by moving the three balls at the top left or right.

Level 11

  • Place the larger plus near the center of the top left platform, over the opening of the pipe.

  • Place the minus near the right end of the right platform.

  • Place the green near the left end of the right platform.

  • Place the small plus next to the pipe which is below the larger one.

  • If this works, the green will knock over the short section of pipe.

  • The minus will bounce over it.

  • The larger plus roll through it.

  • Then the small plus will roll under.

Level 12

  • Place the small plus on the switch at the right.

  • Now you will place one ball in the upper left corner of each metal cross.

  • From left to right, they should be large plus, large plus, small plus, small minus, large minus, green.

  • On a slow machine, this didn't work.

  • Trying again might help.

Level 13

  • Place the large minus on the pink switch at the upper right.

  • Place the large plus on the cyan switch at the upper left.

  • Place a small plus over the lower right cross. (the one that's separated from the others)

  • Place the second small plus over the left arm of the cross right beside that first one.

  • On the left arm of the next cross to the left, place a small minus.

  • On the left arm of the very left cross, place the second small minus.

Level 14

  • Set the small plus near the left edge, right above the radiation line. (It will trigger the switch.)

  • In the four openings of the spiked wheel, from left to right, place:

    1. A large plus, near the hub.

    2. Both large minuses, side by side.

    3. Nothing

    4. The second large plus, near the tip. With the small minus right above it.

  • The two large minuses should combine to make an even larger minus.

  • The small minus will shrink the large plus and roll off the end.

  • Meanwhile, the small plus will trigger the switch, so the huge minus combines with two small pluses and a large plus.

  • The small plus will roll out and combine with the small minus at the left.

  • Finally, the huge plus and minus should come together in the bottom.

Level 15

  • There's a nearly level self at the upper right.

  • Arrange the balls across that shelf, plus, minus, plus, minus, plus.

  • Leave a little gap between so they don't annihilate each other.

Level 16

  • Place two small minuses on the upper left, one on each side of the yellow hub of the metal bar.

  • There is one complete "X" at the top of the screen.

  • Place the third small minus on top it and the large minus on the right.

Level 17

  • Look for the spot where the slope on the right side meets the horizontal metal bar across the bottom.

  • Place one plus directly above that, as close to the radiation line as you can.

  • Place another plus in the upper right corner.

  • Arrange the remaining pluses evenly spaced in a line between those two.

Level 18

  • I found it was simpler to only trigger the two switches on the left.

  • Place one large plus in the upper left corner, on the end of the yellow shelf.

  • Place another large plus above right end of the purple platform, at the same height as the green platform.

  • Place the larger minus on the green shelf, just to the left of the switch. Place the last large plus on top of it.

  • Place the smaller plus just right of the purple platform, and place the smaller minus above above the small plus.

  • The idea is, the small minus will land on the small plus, which will slip through the cogs before the purple shelf gets to it.

  • Then the tiny plus from the green platform will fall through the cogs behind the purple shelf.

Level 19

  • Place one ball in the upper left corner.

  • Make sure it's just as high as it can go and all the way at the outside. That maximizes its speed.

  • Place the other ball on the top shelf about halfway between the center and the right end.

  • This WILL require some tweaking to make sure the second ball arrives as the left strand is swinging to the right.

Level 20

  • Place the minus on the left switch, the plus on the right switch.

  • Place the large green ball on the top shelf, just to the left of the highest spot.

  • Place the smaller green ball halfway between the larger one and the plus.

Level 21

  • Place one ball on the top left trigger.

  • Place the second ball to the right of the top right trigger.

  • The gap between the ball and the trigger should be a bit smaller than the width of the ball.

  • Place the third ball at the left end of the lower shelf.

  • That should get the timing fairly close.

  • The left gear should start first and run for 2 links, then the right gear should start.

  • The center gears should reverse near the time the green links hit them.

Level 22

  • YAY! A level without timing problems.

  • Place the plus on the highest switch. It's yellow and purple (pink?)

  • Place the minus in the second set of "jaws" from the left, and place a green in the gap on each side of those jaws.

  • Oops. The third green is angry with me for telling you to put the other two first.

  • Now it hates me and wants you to fail.

  • Put it all the way against the right side, so it goes away without hurting you.

Level 23

  • Place the minus on the lower shelf, directly above the spinning gear.

  • Place a green on the top shelf and slightly to the right of the minus.

  • Place the plus on the switch - with one green above it.

  • Place the other two greens on the shelf near the switch, as far right as you can.

  • The minus should be destroying the last plus on the left.

  • You may need to adjust the position of the minus or the green above it to get the timing right.

Level 24

  • Numbering the rings from the outside in, there are 5 rings, but you can only place balls in the first four.

  • Ring 1: Place a minus near the top right part of the right.

  • Ring 2: Place a plus just to the left of the blockage in the upper left.

  • Ring 3: Place 3 pluses to the right of the blockage at top center.

  • The first one goes directly against the blockage.

  • The second goes as far right as you can place it.

  • The third one goes between the two, much closer to the first than the second.

  • Make sure all 3 are touching the metal below them.

  • Ring 4: Place one minus on the left side of the blockage, against the blockage, but not overlapping it.

  • Place the other one as far right as you can place it.

Level 25

Why spoil the last level? If you can't do it, just walk away.

Ok, if you really want to know...

  • Place the minus at the far left, at the opening to the pipe.

  • Place the larger plus to the right of the yellow switch, centered over the dynamite.

  • Place the smaller plus left of the yellow switch.

  • You'll need to move this a little left and repeat until the flipper flings the minus instead of capturing it.

29 Comments

Really enjoying this game... it's certainly not easy, and the atmosphere is great.

Reply
phdavoid April 14, 2009 1:42 PM

Ok I can't figure out level 12 any help?

Reply

how 10 level?

Reply

I love this game. The level design is fantastic. 5 shrooms, baby.

Reply

I don't like the puzzle games that depend on timing and nearly pixel-perfect placement. This is one of those.

Also, you can rerun the simulation without moving a single object and get vastly different results. So the simulation must not be deterministic.

Reply
ricainrico April 14, 2009 3:25 PM

for level 12

place the balls in the spokes of the wheels in the following order, from left to right:
medium +
medium +
small +
small -
medium -
dummy green
small + (so that this last small + will roll onto the yellow swith first)

Reply
mebesquee April 14, 2009 5:00 PM

Level 23 and I am stuck.

Reply
mebesquee April 14, 2009 5:12 PM

Wow, finished it all but 23, going to wait for someone to help me out now haha.

Reply
fuzzyface April 14, 2009 5:39 PM

unanticipated... did you know that originally on the first construction plans the collider was annonced to be operatable by 2002?

Reply
Anonymous April 14, 2009 7:09 PM

Level 23 spoiler

The top row should be a + followed by all four green balls, spaced out. The second row from the top will have the - ball. The goal is to get the + ball all the way down and hit both switches at the bottom when it lands and rolls to the target - ball. Then, as the + on the left and green balls on the right fall simultaneously, the + balls get knocked over to the target - ball. Time the - ball in your inventory to hit the top + ball on the left side. It takes a bit of trial and error to get the timing all right. I was having issues with the green balls on the right rolling down too quickly and getting under the + balls on the left.

Reply
mebesquee April 14, 2009 7:58 PM

Thanks to the guest who posted the 23 help. great game.

Reply

Can anyone help on 22?

Reply
Anonymous April 14, 2009 8:33 PM

My only complaint is that you have to place all elements before you start them moving.

Sometimes I just want to place something to see how it'll move and where it'll end up without having to drag and drop six other things.

Reply

Please help with level 18?

Reply

Well, I can't figure out level 7.
Tips?

Reply

Many of these will take some tweaking. If at first it doesn't work, try a slightly different position.

Level 1

  • Place the green ball at the top of the screen, slightly left of the left plus, so that it falls on the left plus.

Level 2

  • Place both minuses on the grey platform with some space between.

  • Place the green ball above the right one, slightly left.

  • It should bounce off the right one into the left, sending both on the way.

Level 3

  • Place two pluses on the left end of pivoting bar at the upper left.

  • Place the minus at the far right edge of the screen.

Level 4

  • May not be the standard answer: there's room for a plus right next to each minus.

  • Put them close enough and it's done.

Level 5

  • Place the minus at the far left end of the double-thick bar.

  • Place the green at the opposite end of that same bar.

  • Place the plus just to the left of the green.

Level 6

  • Place the smallest ball over the opening at the left.

  • Place the largest ball as far to the right as you can.

  • Place the last ball midway between.

Level 7

  • Place the green ball above the top-right plus, slightly left of center and all the way at the top.

  • It should bounce off that plus and drop between the plus at the bottom and the minus to the left of it.

  • This may require tweaking.

Level 8

  • Place the green ball over the right end of the metal "cage" containing the minuses.

  • It should be centered over the right wall of the cage and drop as far as it can to collapse the cage quickly.

  • Layout the pluses across the left shelf at the top.

  • They should flow down onto the minus if everything goes right.

  • Adjust the timing by moving the pluses left to land later, right to land earlier.

Level 9

  • Place the minus on the right end of the center gray bar.

  • Place one small ball left of the left end of that bar, between the radiation line and the curved pipe.

  • Place the second small ball above the green switch pad as close to the top of the screen as you can.

Level 10

  • Place the green ball above the "dominos" one space to the right of center.

  • Place the minus on the top bar near the left end. Place one of the pluses next to it, with the second plus above the first.

  • Keeping all 3 as close together as you can. (They should merge into one small plus.)

  • Adjust the timing by moving the three balls at the top left or right.

Level 11

  • Place the larger plus near the center of the top left platform, over the opening of the pipe.

  • Place the minus near the right end of the right platform.

  • Place the green near the left end of the right platform.

  • Place the small plus next to the pipe which is below the larger one.

  • If this works, the green will knock over the short section of pipe.

  • The minus will bounce over it.

  • The larger plus roll through it.

  • Then the small plus will roll under.

Level 12

  • Place the small plus on the switch at the right.

  • Now you will place one ball in the upper left corner of each metal cross.

  • From left to right, they should be large plus, large plus, small plus, small minus, large minus, green.

  • On a slow machine, this didn't work.

  • Trying again might help.

Level 13

  • Place the large minus on the pink switch at the upper right.

  • Place the large plus on the cyan switch at the upper left.

  • Place a small plus over the lower right cross. (the one that's separated from the others)

  • Place the second small plus over the left arm of the cross right beside that first one.

  • On the left arm of the next cross to the left, place a small minus.

  • On the left arm of the very left cross, place the second small minus.

Level 14

  • Set the small plus near the left edge, right above the radiation line. (It will trigger the switch.)

  • In the four openings of the spiked wheel, from left to right, place:

    1. A large plus, near the hub.

    2. Both large minuses, side by side.

    3. Nothing

    4. The second large plus, near the tip. With the small minus right above it.

  • The two large minuses should combine to make an even larger minus.

  • The small minus will shrink the large plus and roll off the end.

  • Meanwhile, the small plus will trigger the switch, so the huge minus combines with two small pluses and a large plus.

  • The small plus will roll out and combine with the small minus at the left.

  • Finally, the huge plus and minus should come together in the bottom.

Level 15

  • There's a nearly level self at the upper right.

  • Arrange the balls across that shelf, plus, minus, plus, minus, plus.

  • Leave a little gap between so they don't annihilate each other.

Level 16

  • Place two small minuses on the upper left, one on each side of the yellow hub of the metal bar.

  • There is one complete "X" at the top of the screen.

  • Place the third small minus on top it and the large minus on the right.

Level 17

  • Look for the spot where the slope on the right side meets the horizontal metal bar across the bottom.

  • Place one plus directly above that, as close to the radiation line as you can.

  • Place another plus in the upper right corner.

  • Arrange the remaining pluses evenly spaced in a line between those two.

Level 18

  • I found it was simpler to only trigger the two switches on the left.

  • Place one large plus in the upper left corner, on the end of the yellow shelf.

  • Place another large plus above right end of the purple platform, at the same height as the green platform.

  • Place the larger minus on the green shelf, just to the left of the switch. Place the last large plus on top of it.

  • Place the smaller plus just right of the purple platform, and place the smaller minus above above the small plus.

  • The idea is, the small minus will land on the small plus, which will slip through the cogs before the purple shelf gets to it.

  • Then the tiny plus from the green platform will fall through the cogs behind the purple shelf.

Level 19

  • Place one ball in the upper left corner.

  • Make sure it's just as high as it can go and all the way at the outside. That maximizes its speed.

  • Place the other ball on the top shelf about halfway between the center and the right end.

  • This WILL require some tweaking to make sure the second ball arrives as the left strand is swinging to the right.

Level 20

  • Place the minus on the left switch, the plus on the right switch.

  • Place the large green ball on the top shelf, just to the left of the highest spot.

  • Place the smaller green ball halfway between the larger one and the plus.

Level 21

  • Place one ball on the top left trigger.

  • Place the second ball to the right of the top right trigger.

  • The gap between the ball and the trigger should be a bit smaller than the width of the ball.

  • Place the third ball at the left end of the lower shelf.

  • That should get the timing fairly close.

  • The left gear should start first and run for 2 links, then the right gear should start.

  • The center gears should reverse near the time the green links hit them.

Level 22

  • YAY! A level without timing problems.

  • Place the plus on the highest switch. It's yellow and purple (pink?)

  • Place the minus in the second set of "jaws" from the left, and place a green in the gap on each side of those jaws.

  • Oops. The third green is angry with me for telling you to put the other two first.

  • Now it hates me and wants you to fail.

  • Put it all the way against the right side, so it goes away without hurting you.

Level 23

  • Place the minus on the lower shelf, directly above the spinning gear.

  • Place a green on the top shelf and slightly to the right of the minus.

  • Place the plus on the switch - with one green above it.

  • Place the other two greens on the shelf near the switch, as far right as you can.

  • The minus should be destroying the last plus on the left.

  • You may need to adjust the position of the minus or the green above it to get the timing right.

Level 24

  • Numbering the rings from the outside in, there are 5 rings, but you can only place balls in the first four.

  • Ring 1: Place a minus near the top right part of the right.

  • Ring 2: Place a plus just to the left of the blockage in the upper left.

  • Ring 3: Place 3 pluses to the right of the blockage at top center.

  • The first one goes directly against the blockage.

  • The second goes as far right as you can place it.

  • The third one goes between the two, much closer to the first than the second.

  • Make sure all 3 are touching the metal below them.

  • Ring 4: Place one minus on the left side of the blockage, against the blockage, but not overlapping it.

  • Place the other one as far right as you can place it.

Level 25

Why spoil the last level? If you can't do it, just walk away.

Ok, if you really want to know...

  • Place the minus at the far left, at the opening to the pipe.

  • Place the larger plus to the right of the yellow switch, centered over the dynamite.

  • Place the smaller plus left of the yellow switch.

  • You'll need to move this a little left and repeat until the flipper flings the minus instead of capturing it.

Reply
jasonz777z April 15, 2009 5:21 AM

'Aright, sorry for the double post, I don't think I can edit my post. here's the Finishing page:

Now,
http://img4.imageshack.us/my.php?image=colliderfinishlargenega.jpg

It shows some congratulations, two slightly angled spring-boards, random plus, negative and green balls and has open sides. There is also a email notification link and an area for feedback.

Reply

For 22:

Observe that there are seven positions. Counting from the left, place the particles as follows:
2: Green
3: -
4: Green
6: +
7: Green
And watch the chain reaction! :)

Reply

For 18:

This one may require some tweaking to get it to work, but this is how I got it.
Big + over the center of the purple switch.
Big + over the right edge of the cyan switch.
Big + at the far left edge of the yellow platform.
Small - at the far right edge of the green platform.
Medium + and - over the gaps on either side of the middle gear.

The mediums will cancel each other out soon enough. The platforms and gears should carry and/or push the large + particles towards the right without letting two of them combine. The little - will either combine with one of the + particles, or fall through the gears and get pushed left.

Reply

I've just made a video walkthrough for all levels. I hope it helps:

BTW, i really like this game, it's much harder than other puzzle games on Kongregate. :]

Reply
fuzzyface April 15, 2009 11:00 AM

I'm a little disappointed, so the review suggests, a game about collider physics, I think wow, what an idea, what a concept, what a great thing... then I go to the game, and it hasn't any collider physics at all, it just actually a pretty old collision eliminator, there were quite a number of other games just like this already.

In Collider physics, if two things crash, they should create a set of new things, based on the energy. This doesn't do anything at all.

Well I cross fingers, maybe I gonna see a game with collider physics one day, with spiraling electrons and myons.

Reply

Awesome game. I wish it were longer.

Writing that walk-through was fun because it's so hard to find a solution that someone else can recreate based on my description. I had someone beta-test the instructions. We found that the speed of your computer sometimes has a big affect on the outcome of the simulation.

The video is a nice idea. Am I the only one who can't access YouTube from the same network where I play Flash games?

Reply

This game is AWESOME. The concept is just okay, but the solutions to the puzzles are phenomenally clever. Great production values on top of that, too.

Reply
Bethany May 10, 2009 7:18 PM

On level 9:

probably not the intended solution, but you can put the minus between the yellow thing, the patterned steel thing, and the radiation line.

Reply
Anonymous May 12, 2009 6:08 PM

For level 25:

Minus on the far left by pipe opening.
Large plus on the right far but still on the platform.
Small plus on the far right not over the platform... let it fall down.

Reply

Here is the solution for all the levels:

Click the "i" in the upper left corner and then click "Show Solution".

Reply

19 is way easier than the spoiler. Just put the balls right on the edges of the ramps next to the top plus and minus (or touching them). Done.

Reply

Collider is now available on the iPhone with 56 levels to play and lots of enhancements. The graphics are updated, your progress is automatically saved and there's a new fast-forward button!

You can download it from iTunes now:
http://bit.ly/Collider-iPhone

Reply

^ Scroll Up | Homepage >

Leave a comment [top of page]

Please consider creating a Casual Gameplay account if you're a regular visitor here, as it will allow us to create an even better experience for you. Sign-up here!
  • PLEASE UNDERSTAND SITE POLICIES BEFORE POSTING COMMENTS
  • You may use limited HTML tags for style:
    (a href, b, br/, strong, em, ul, ol, li, code, spoiler)
    HTML tags begin with a less-than sign: < and end with a greater-than sign: >. Always. No exceptions.
  • To post spoilers, please use spoiler tags: <spoiler> example </spoiler>
    If you need help understanding spoiler tags, read the spoiler help.
  • Please Preview your comment before posting, especially when using spoilers!
  • No link dropping, no domains as names; do not spam, and do not advertise! (rel="nofollow" in use)
chrpa Jayisgames needs your help to continue providing quality content. Click for details Welcome to the Roundup 66 - Retro with four games! After you find the ten monkeys in the chapter, look in the inventory. You will find a...  ...
chrpa Jayisgames needs your help to continue providing quality content. Click for details Welcome to the Roundup 65 with three games! As mentioned in the previous roundups, only odd-numbered episodes are featured since even-numbered are for Robin Vencel's patrons (the...  ...
chrpa Jayisgames needs your help to continue providing quality content. Click for details Hi! Weekday Escape and Weekday Puzzle are here! First we have two new cans from tomoLaSiDo and then two small rooms from isotronic. That's all for this...  ...
6,365 Views
0 Comments
chrpa Jayisgames needs your help to continue providing quality content. Click for details Welcome to Mobile Monday! We have another beautiful game from Nicolet and it's a winter game as it should be. Tasuku Yahiro have released another of their...  ...

HELP Jayisgames.com

Recent Comments


Display 5 more comments
Limit to the last 5 comments

Game of the week


Dark Romance: Vampire Origins Collector's Edition

Your Favorite Games edit

add
Save links to your favorite games here. Use the Favorites editor.

Monthly Archives