
Dark Dimensions: City of Fog
Platform: Mac, Windows
![]() Every town has one; the pretty girl everyone seems to love... maybe a little too much. Lillian had a lot of admirers, but she also had enemies, and all it takes is the two to collide to set off a chain of events that will even impact you, over a century later. Dark Dimensions: City of Fog is a creepy and captivating hidden-object adventure game from Daily Magic Productions about love, obsession, hate, and forces best left undisturbed. How did Lillian die? What is the true source of the mysterious fog that appears to have warped the reality of the town? Whose cuisine reigns supreme?!... oh... uh. Sorry. Got carried away there.
Every town has one; the pretty girl everyone seems to love... maybe a little too much. Lillian had a lot of admirers, but she also had enemies, and all it takes is the two to collide to set off a chain of events that will even impact you, over a century later. Dark Dimensions: City of Fog is a creepy and captivating hidden-object adventure game from Daily Magic Productions about love, obsession, hate, and forces best left undisturbed. How did Lillian die? What is the true source of the mysterious fog that appears to have warped the reality of the town? Whose cuisine reigns supreme?!... oh... uh. Sorry. Got carried away there.
 When most of us hear about deserted ghost towns, we're content to take amusing photos of ourselves in the mayor or sherriff's office and call it a day. But not you; the only survivor of a horrific car accident as a child, you've since felt a "connection" to the spirit world, presumably a bit like Christopher Walken but a lot less inherently creepy looking. (I love you, Chris!) You've become obsessed with rumours of "dark dimensions", places on earth where extreme suffering has left a sort of permanent psychic wound large enough to swallow and distort whole towns. It may sound like something Sylvia Browne would force you to pay 5.99 a minute to listen to her make up, but when a mysterious letter brings you to an exceptionally shady looking town in the middle of nowhere, things start sounding a lot more plausible.
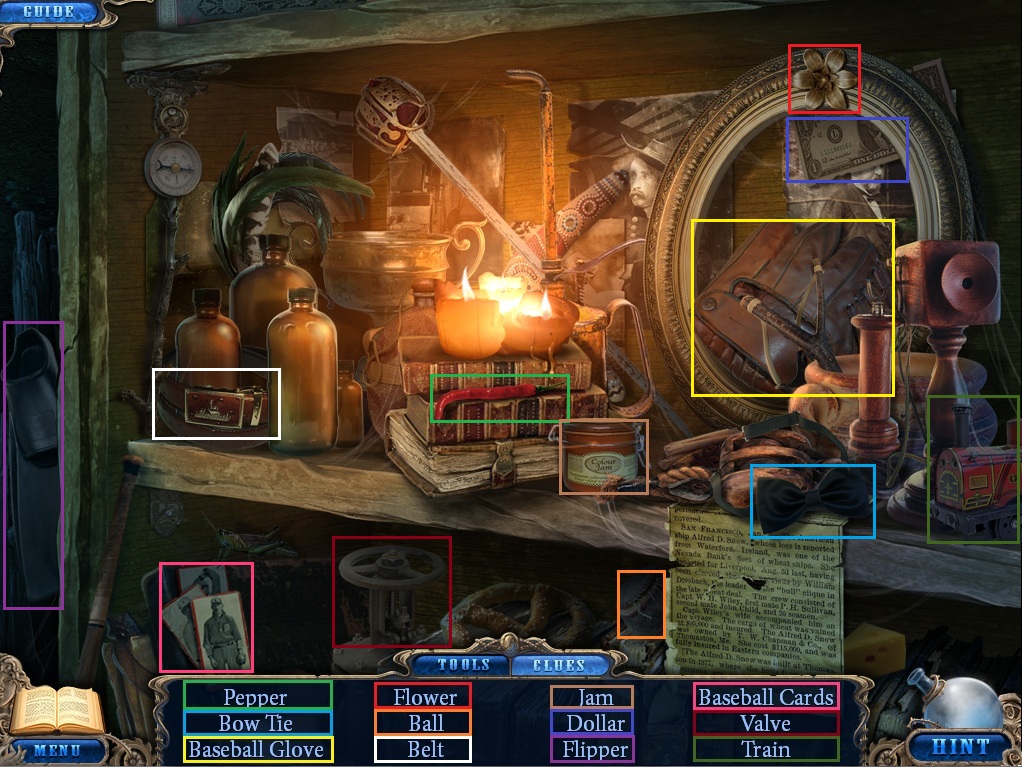
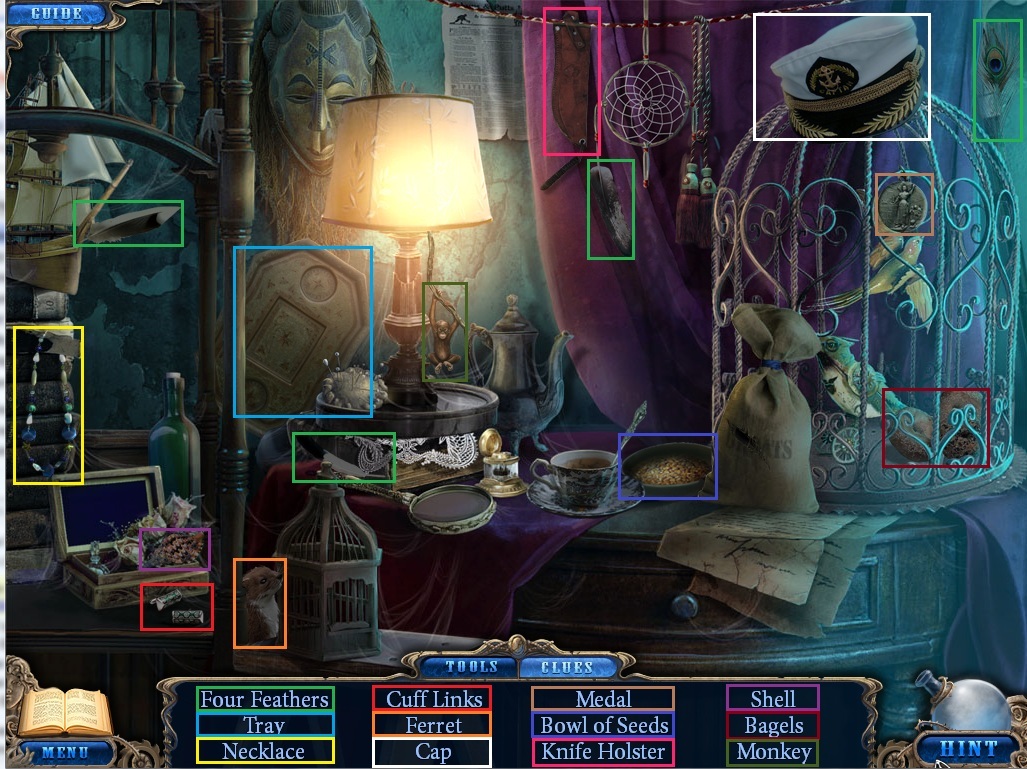
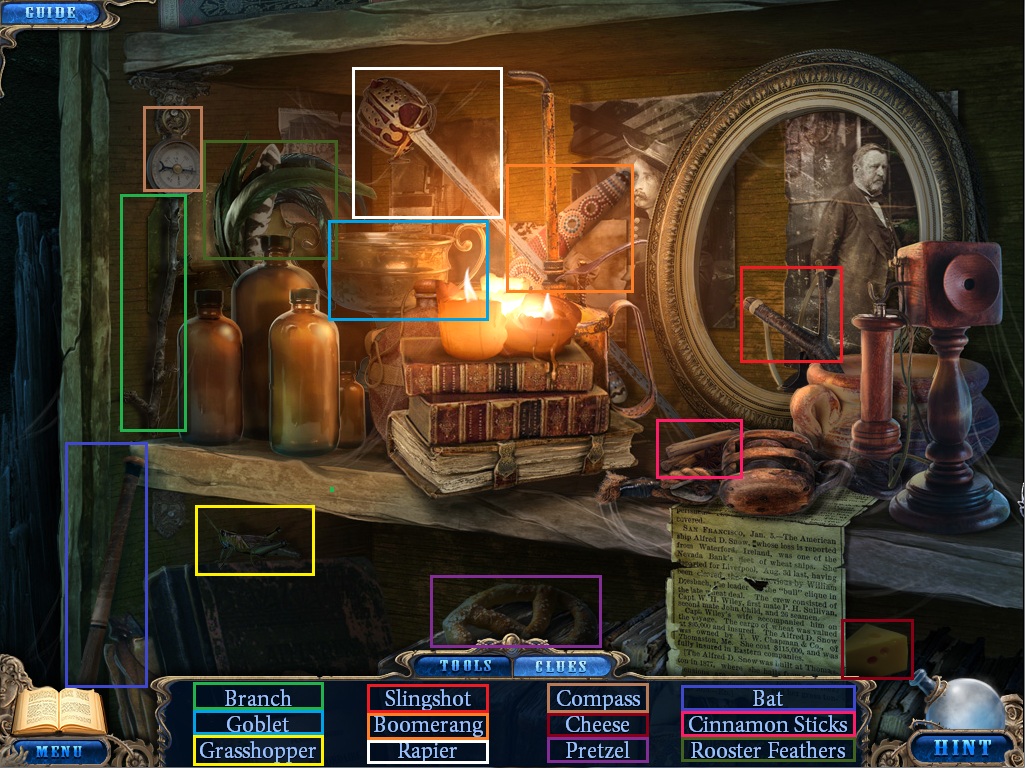
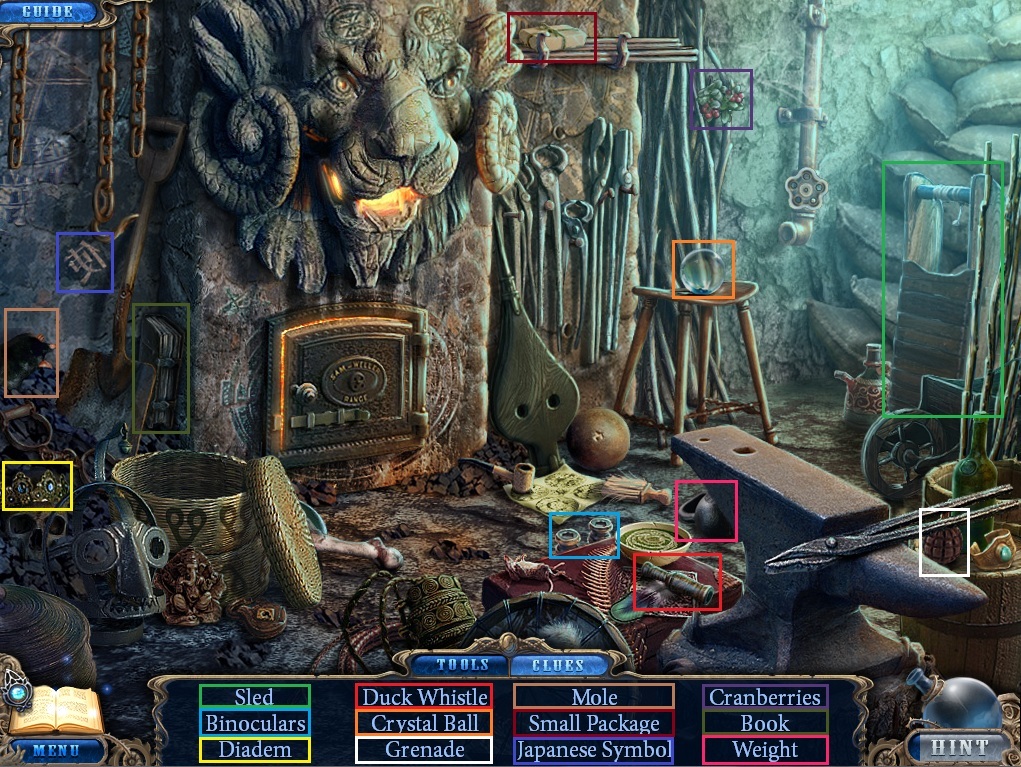
While Dark Dimensions plays largely like a typical hidden-object adventure, with play revolving around clicking to interact with things, it does have one thing that sets it apart from most other titles in the genre. While a few hidden-object scenes are straight-up scavenger hunts where you work from a simple list, most actually contain a handful of item puzzles within themselves. Items on your list displayed in gold are things you'll need special tools to find or obtain, and those tools are usually items that you'll also have to track down within the scene and use in the appropriate place. The hint and skip buttons also make an appearance as you'd expect, but the latter takes a fairly long time to charge, so you'll need to be really determined to skip over any puzzles troubling you. Click on "help" in the lower right corner for an explanation of whatever puzzle you're currently looking at.
 Analysis: Ah, I love the smell of murder in the morning!... well, uh, I mean, not literally of course, since that would be gross and probably get you on a government watch list or three. But there's nothing like a good tale of spite, betrayal, and otherworldly forces to get your imagination spinning, and Dark Dimensions: City of Fog offers this in spades. While some aspects of the plot will probably sound familiar, the game keeps you going with enough twists and clues to keep you guessing. What's great is that while you can rely on the in-game journal to clarify plot points and clues for you, there are hints and bits of story everywhere in the game, from photos and memorials and newspaper clippings, which helps the town feel more real. There are a few instances of what might be called "jump scares", but they're usually fairly tame and relatively easy to spot. (Seriously, what do you think is going to happen if you click on the dark tree hollow with glowing red eyes inside?)
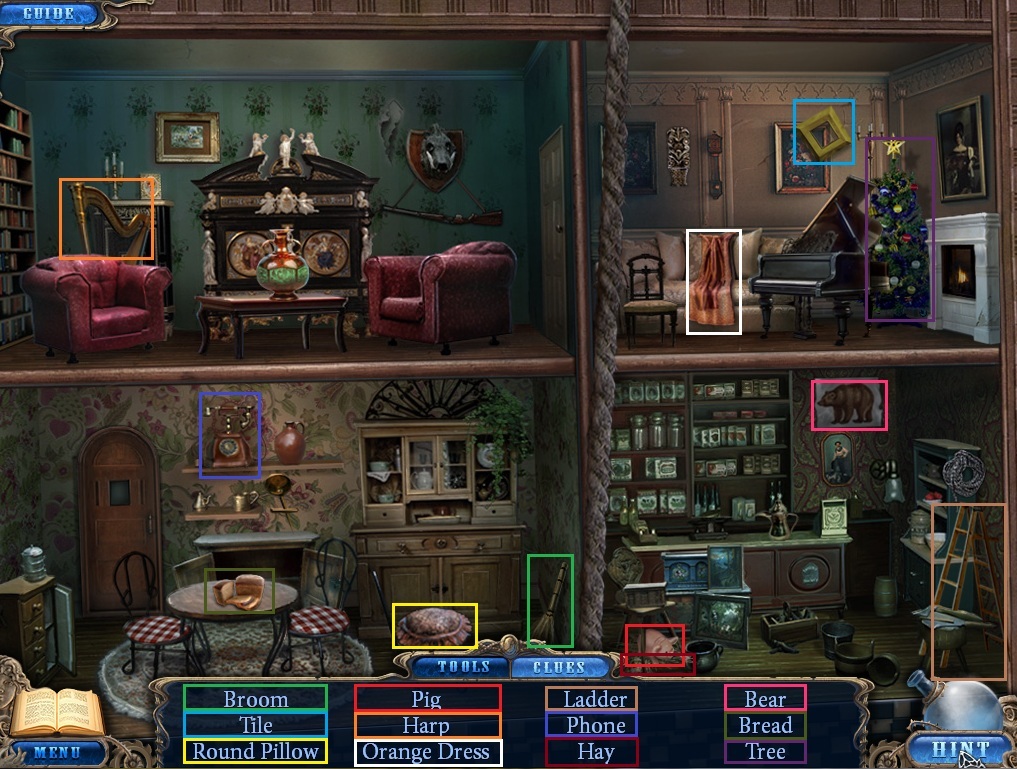
City of Fog is absolutely beautiful too, with a clean visual design and rich colour palette that really makes you feel like you're in a place completely sucked dry of joy and basic human goodness. (... that's a compliment.) The environments do a great job of passing along that sense of supernatural with subtle details so that when combined with the haunting soundtrack, areas never lose their creepy vibe. The hidden-object scenes themselves are beautifully drawn, and have a clean design that not only makes them appealing to look at, but keeps your object hunting from taking a detour at "muddy distorted object junction". (Don't drink the water there.)
 Adventure game logic still rears its head occasionally; at one point, for example, you need to find a specific tool to reach a ladder overhead... even though at the time you may already have a ladder you could use to reach that one in your inventory. On the whole, however, the gameplay is quite good despite a bit of backtracking and repetition; getting into the habit of having to go back through areas you've already visited to see if any new item or old hidden-object scene has "reactivated" is a little annoying, but hardly a dealbreaker. The mini item puzzles within the hidden-object scenes go a long way towards keeping you engaged; it's not exactly a new mechanic, since other titles have made use of it sparingly before, but it helps break up the tedium of staring at a picture for extended periods of time.
Dark Dimensions: City of Fog will probably run most players around five hours or so depending on their play style. (You know, whether or not you're dirty rotten puzzle skippers.) With the quality on offer here in every department, that's hardly a raw deal, and fans of the genre who were looking for a game built like a rock, but infinitely more appealing. It doesn't break any new ground and it isn't particularly scary, but it's exceptionally well made in virtually every aspect and if mysteries are your bag, you owe it to yourself to give the demo a try. Highly recommended.
A Collector's Edition is also available. It contains a bonus chapter to play, wallpapers, strategy guide, and more. Remember that Big Fish Game Club Members pay only $13.99 for Collector's Editions (or 2 club credits), and collector's editions count 3 card punches of 6 total needed for a free game.
![]() Windows:
Windows:
Download the demo
Get the full version
Also available: Collector's Edition
![]() Mac OS X:
Mac OS X:
Download the demo
Get the full version
Also available: Collector's Edition


Walkthrough Guide
(Please allow page to fully load for spoiler tags to be functional.)
Dark Dimensions: City of Fog Collector's Edition Walkthrough
General Information
The cursor will change to a magnifying class when hovering over an area where you can click to zoom in.
The cursor changes to a hand when over an object you can pick up or an item that contains important information you can add to your notebook. These areas will also occasionally glint.
Sparkling areas are zones that contain a hidden object scene.
When zoomed in to a hidden object scene, there are two tabs: a Clue tab, which is a list of all the hidden objects; and a Tool tab, which is an inventory list of items usable in that scene.
In the Clue tab, items in plain sight are written in blue letters. Items with yellow lettering are concealed and require a little extra work to reveal.
In screenshots, interactable areas are surrounded by a purple border.
In hidden object scenes, items and their Clues have matching colored borders.
Concealed Clues are surrounded by a purple border, and their location in the hidden object scene also has a purple border, with a colored line matching the Tool needed to reveal the Clue.
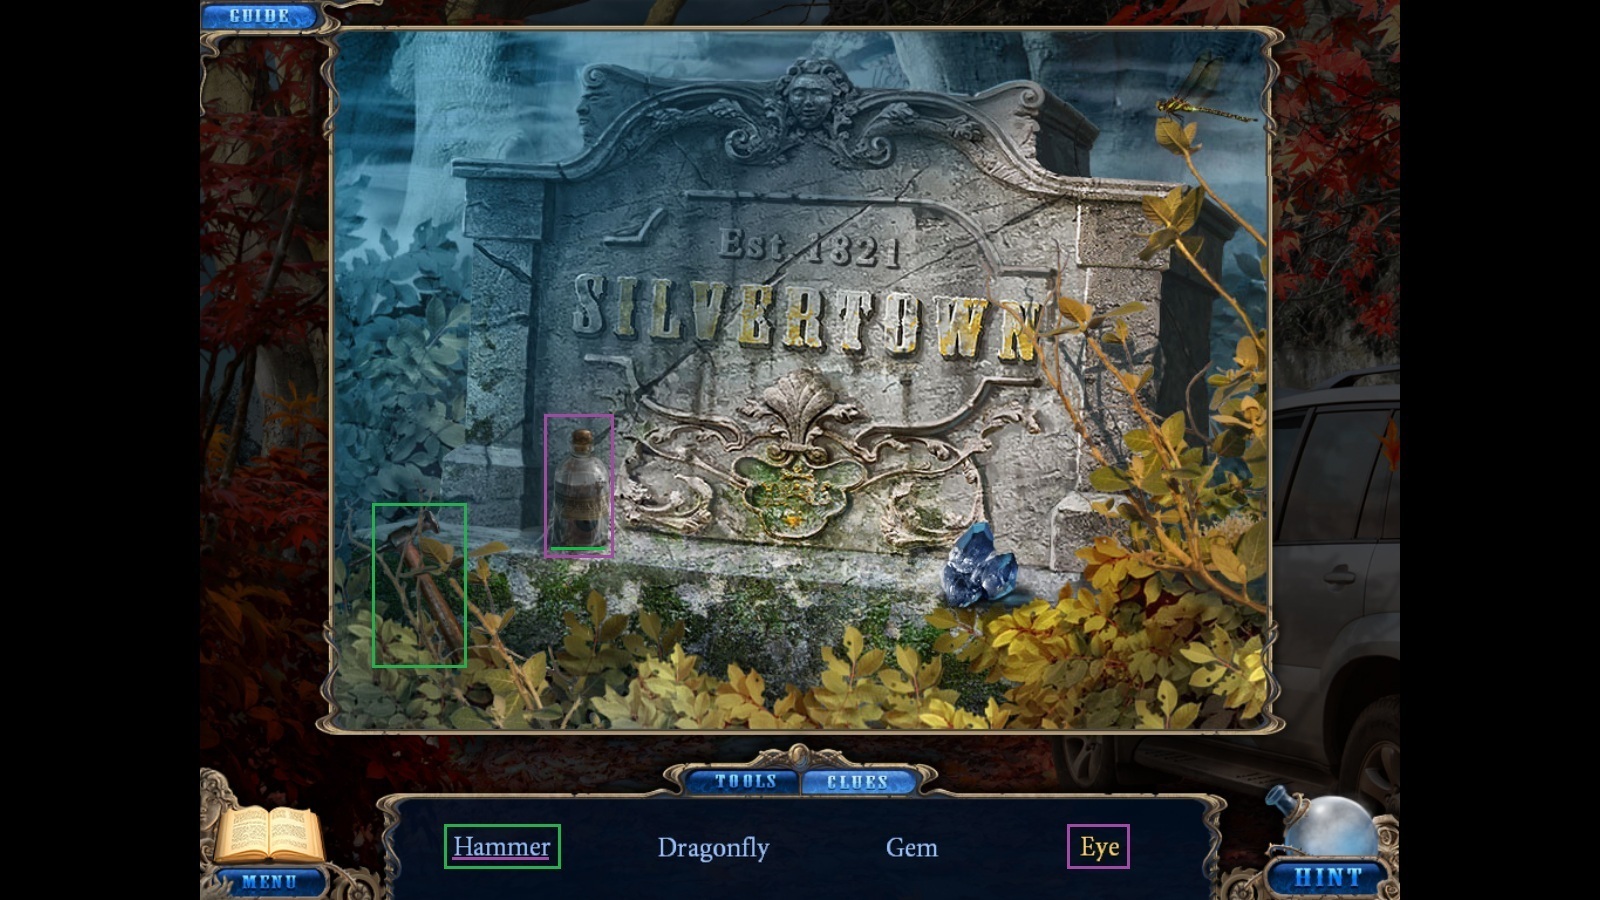
Screenshot.
Tutorial
Click on the notebook on the side of the open car door.
Click the notebook again to read about the history of Silvertown.
Click the sparkling area to examine the hidden object scene.
Collect all available items.
Use the Hammer on the bottle to break it open.
Screenshot.
Pick up the revealed eye.
Move forward to the gate.
Click on the sparkling area near the skeleton.
Collect all available items.
Screenshot.
Use the Handle on the locked box to reveal the Key.
Use the Watch Chain on the pocket watch and take the Watch Hand from the face of the watch.
Use the Gun Hammer on the pistol and pick up the Bullets.
Click the book to reveal the Hair Comb.
Use the Scissors on the shoe in the skeleton's hand to reveal the Bow.
Click the faucet to reveal the last of the Three Bugs.
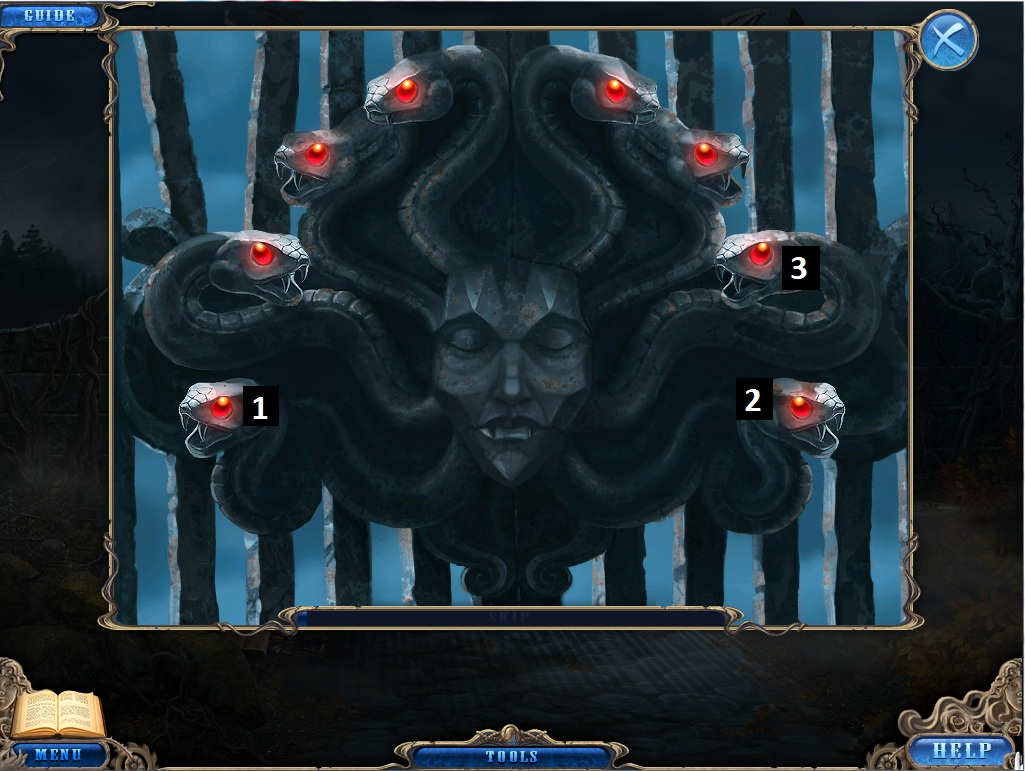
Click the center of the locked gate to begin the gorgon head puzzle.
In order to open the gate, all of the snakes on the gorgon's head must have their eye changed from the color blue to red.
Clicking one snake head can change the color of another, so this puzzle can be solved in just 3 moves.
Screenshot.
When the gorgon opens her mouth, use the Key from your inventory and turn it to unlock the gate.
Chapter 1
The Fountain Courtyard
Click on the dog next to the fountain.
Click on the fountain to zoom in.
Move the leaves aside and take the Coin from the water.
Click on the Photo building to get a view of the game map.
Enter the hotel.
The Hotel
Take the Stone at the bottom of the hotel desk.
Click on the key rack behind the hotel desk for a closer look.
Take the Spiral Key and the old letter from the envelope.
Warning:
There is a small jump scare behind the right-most door.
Move forward to the bedroom in the hallway.
Click the switch on the left wall under the lamp to turn on the lights in the room.
Click the drawer beneath the lightswitch and take the Puzzle Piece.
Use the Stone from your inventory on the mirror hanging above the bed.
Click on the bed to zoom in.
Take the paper with the date 1876 and the coin.
Click the hidden object scene at the bottom of the wardrobe.
In the hidden object area, move the leaf in the mug aside with your cursor to uncover the leaf.
Screenshot.
Leave the bedroom and return to the hotel lobby.
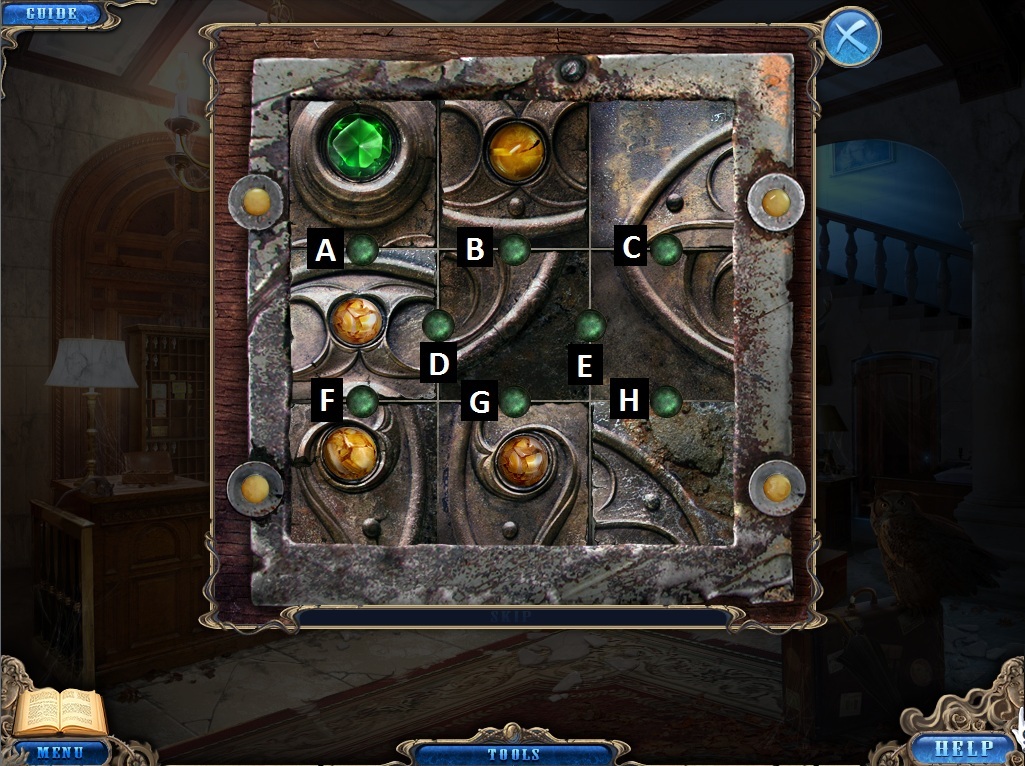
Click the large box next to the owl perched on a suit case to start the slider puzzle.
Add the Puzzle Piece from your inventory to the blank tile square.
To solve the puzzle, swap the tile pieces in the correct order to complete the picture.
Tiles are rotated by clicking on the green circle between two adjacent squares.
The order of the tiles from the start of the puzzle is randomized every game.
Tiles in the top and bottom rows can be rotated vertically, but only middle row tiles can be moved both vertically and horizontally. Thus, the easiest way I found was to solve the outside rows first.
Find the 3 tiles that comprise the bottom of the circle, move them into to the middle row, and arrange them correctly from left to right. Then, move them down to the bottom row.
Repeat this process for the top row, and then align the tiles in the middle row.
Screenshot.
Following the example in the screenshot, the order in which you would click the green circles would be:
E
D
B
F
G
H
C
E
D
A
E
D
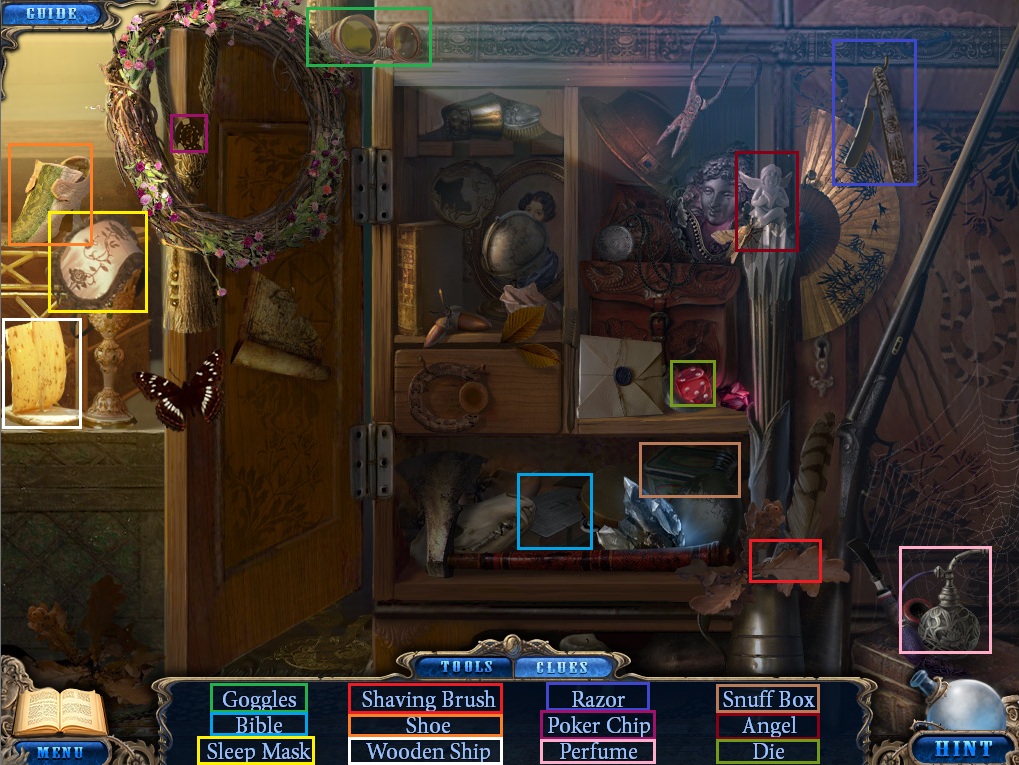
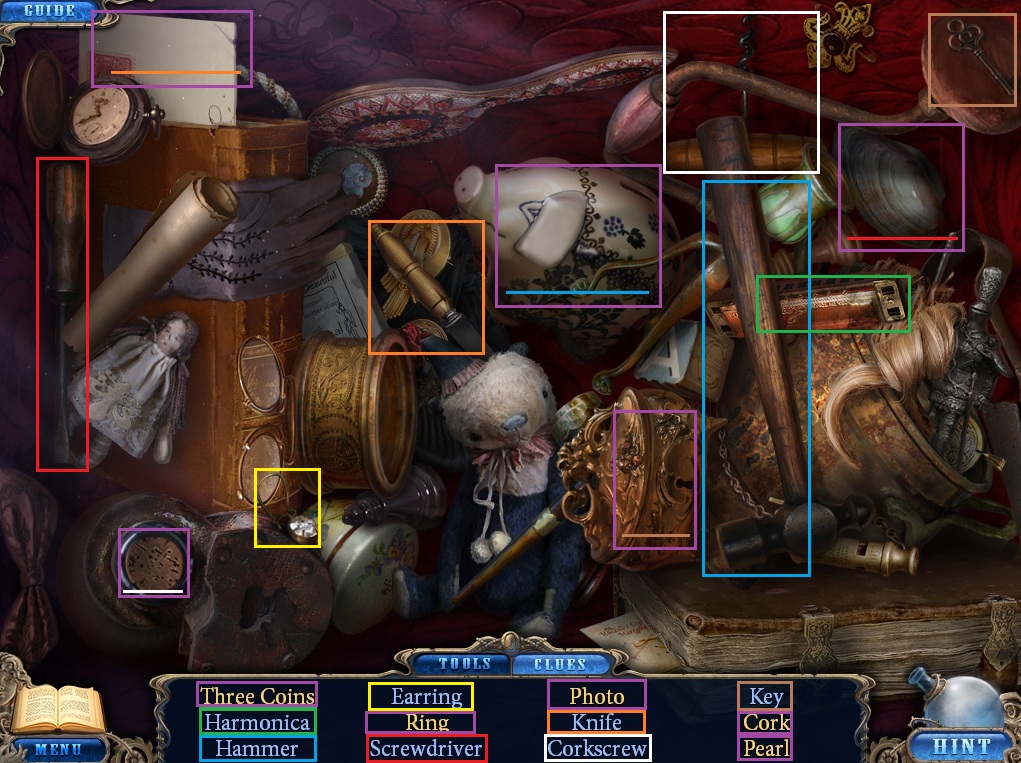
After you have solved the puzzle, click the box again to start a hidden object scene.
Screenshot.
Use the Hammer on the piggy bank and collect the Three Coins.
Use the Key on the jewelry box and take the Ring from inside it.
Use the Knife on the envelope and take the Photo.
Use the Corkscrew on the plugged bottle and take the Cork.
Use the Screwdriver on the clam to uncover the Pearl.
Leave the hotel and return to the fountain in the center of town.
The Fountain Courtyard
Move to the right side of the courtyard in front of the train station.
Click the glinting pile of leaves next to the lamppost to zoom in.
Take the Circle Key from the ground.
Click through the archway on the left to move to the crossroads.
Chapter 2
The Crossroads
Warning:
There are jump scares in the small tree hollows with glowing red eyes.
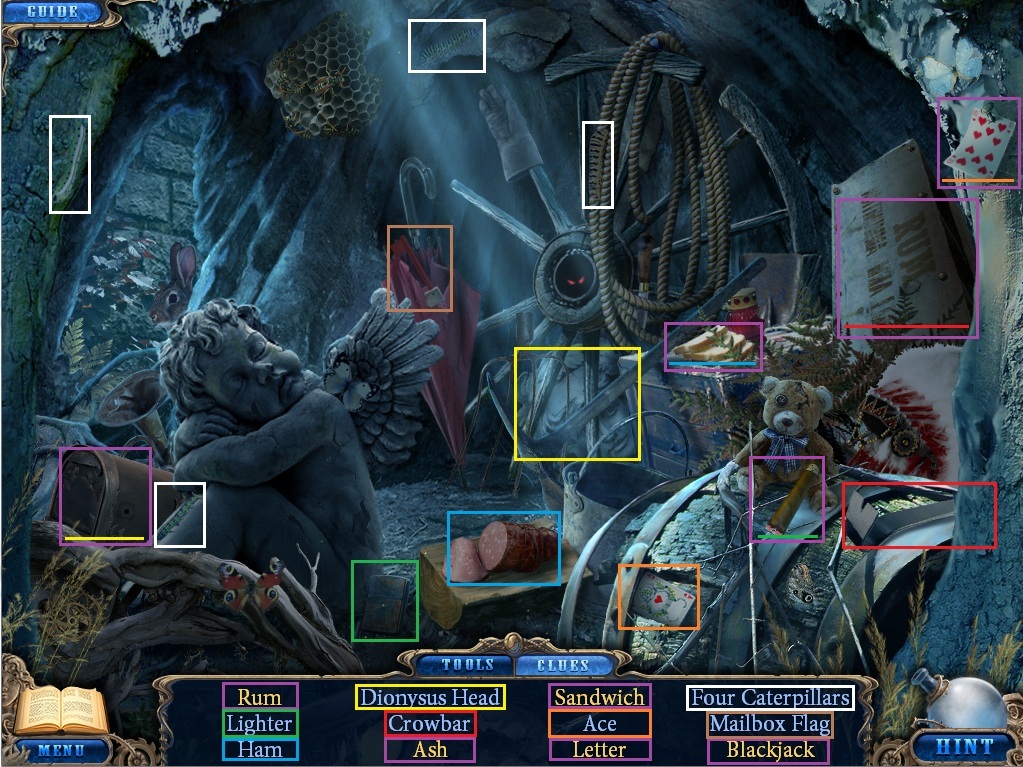
Click the large hollow in the large tree to start a hidden object scene.
Screenshot.
Use the Ham on the slices of bread to make a Sandwich.
Use the Ace on the 10 nailed to the tree to make Blackjack.
Use the Crowbar on the crate to uncover the Rum.
Use the Mailbox Flag on the mailbox to reveal the Letter.
Use the Lighter on the cigar to burn it into some Ash.
Click on the glinting pile of leaves at the foot of the stairs.
Take the Lever from the ground and head up the stairs to the gargoyle platform.
The Gargoyle Platform
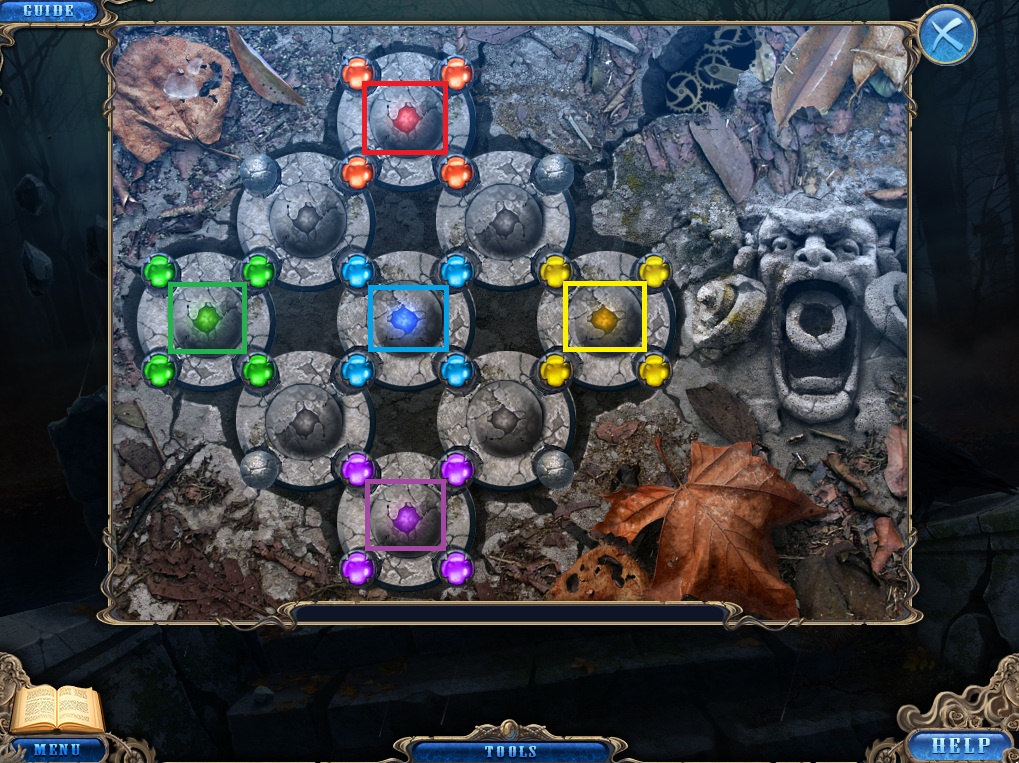
Click the large stone stair on the ground between the two broken pillars to begin the gems puzzle.
In order to solve this puzzle, all the colored gems must be separated into their respective colored circles.
Click the center of a circle to rotate the gems around it once clockwise.
Use the uncolored stones to your advantage. They make good placeholders when moving gems without messing up the arrangement of other nearby gems.
The order of the gems is randomized each game.
It's easiest to focus on one circle at a time and then move clockwise through the puzzle.
Solution.
After you've solved the puzzle, use the Lever from your inventory on the slot in the gargoyle's open mouth.
Click the lever to raise the bridge.
Click the red circle beneath the middle gargoyle.
Pick up the Cross Key.
Click the right gargoyle for a closer look.
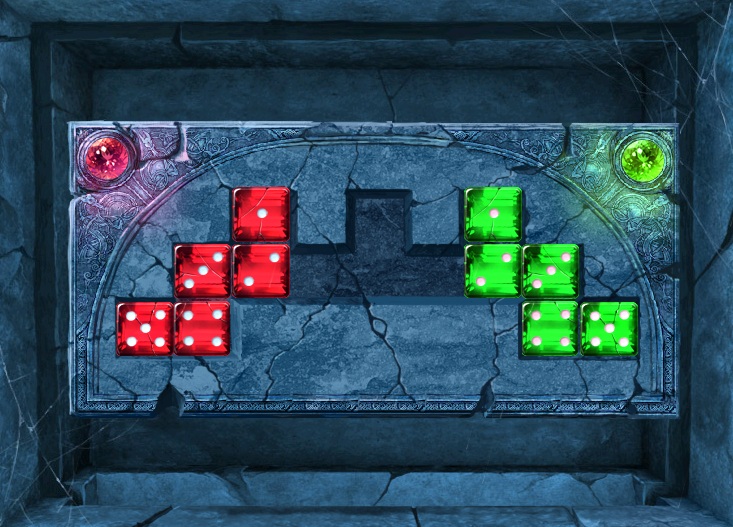
Add the red Die from your inventory to start the dice puzzle.
To solve the puzzle, the green and red dice must swap positions, red dice on the left and green dice on the right in numerical order.
Drag a die to slide it around the panel. Dice cannot move through each other, so use the open spaces to pass one die under another.
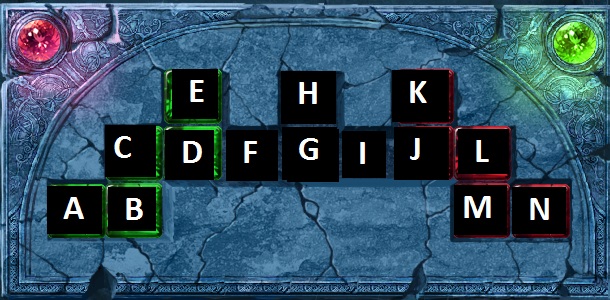
In this solution, each tile that can hold a die is lettered from A to N.
Screenshot.
Move Red 2 to H
Red 1 to F
Red 2 to K
Red 1 to H
Green 2 to J
Green 1 to I
Red 1 to E
Green 1 to H
Green 2 to D
Red 2 to F
Green 1 to K
Red 2 to H
Green 2 to J
Green 3 to I
Red 2 to C
Green 3 to H
Green 2 to D
Red 3 to F
Green 3 to L
Red 3 to H
Green 2 to J
Red 2 to I
Red 3 to C
Red 2 to D
Green 2 to H
Green 1 to F
Green 3 to G
Red 4 to K
Green 3 to M
Green 2 to L
Green 1 to H
Red 4 to F
Green 1 to K
Red 4 to J
Red 2 to I
Red 1 to H
Red 3 to E
Red 2 to C
Red 4 to D
Red 1 to J
Red 4 to I
Red 2 to H
Red 4 to C
Red 3 to I
Green 4 to F
Red 4 to B
Green 4 to E
Red 3 to C
Green 4 to I
Red 2 to E
Green 4 to H
Red 1 to D
Green 1 to F
Green 4 to K
Green 2 to H
Green 3 to G
Green 4 to M
Green 3 to L>
Green 1 to K
Green 2 to J
Red 1 to I
Red 2 to H
Red 3 to G
Red 4 to F
Green 5 to E
Red 4 to A
Red 3 to B
Red 2 to C
Red 1 to H
Green 5 to I
Red 1 to E
Green 5 to H
Green 2 to D
Green 3 to F
Green 5 to L
Green 1 to H
Green 5 to K
Green 4 to G
Red 5 to I
Green 5 to N
Red 5 to K
Green 4 to M
Green 3 to L
Red 5 to F
Green 1 to K
Red 5 to H
Green 2 to J
Red 1 to I
Red 5 to E
Red 2 to H
Red 3 to G
Red 4 to F
Red 5 to A
Red 4 to B
Red 3 to C
Red 1 to E
Red 2 to D
Solution.
When you have solved the puzzle, pick up the uncovered Photo Plate.
Leave the area and return to the hotel lobby.
The Hotel
Click on the open chest to repeat the hidden object scene.
Collect all available items.
Screenshot.
Click the door under the Bar Long sign.
Place the Dionysus Head from your inventory onto the door.
Add the Door Knocker to the Head and click it to open the door.
Go into the bar.
Take the Ladder leaning against the wall.
Click the folded napkin to reveal the Zigzag Key.
Click the jukebox to zoom in.
Put all 3 of the 25 Cents from your inventory into the coin slot to start the jukebox puzzle.
To solve this puzzle, you must select and play the correct record in the jukebox.
Each of the records has a 4 digit number. The correct number can be found recorded in your journal.
It's 1876, the date written on the note that was found earlier behind the mirror.
Use the arrows on the panel to the right of the record player to move the capture arm up and down.
Clicking the arrows will move the capture more than one space at a time.
The order is Down, Up, Up, Down, Up, Down.
Solution.
Press the green arrow button to collect the 1876 record.
Take the Tiara and the pictures from the opened jukebox compartment.
Leave the hotel and return to the crossroads.
The Crossroads
Use the Ladder from your inventory on the right pillar of the cemetery gate.
Click the bottom of the tree to repeat the hidden obejct scene.
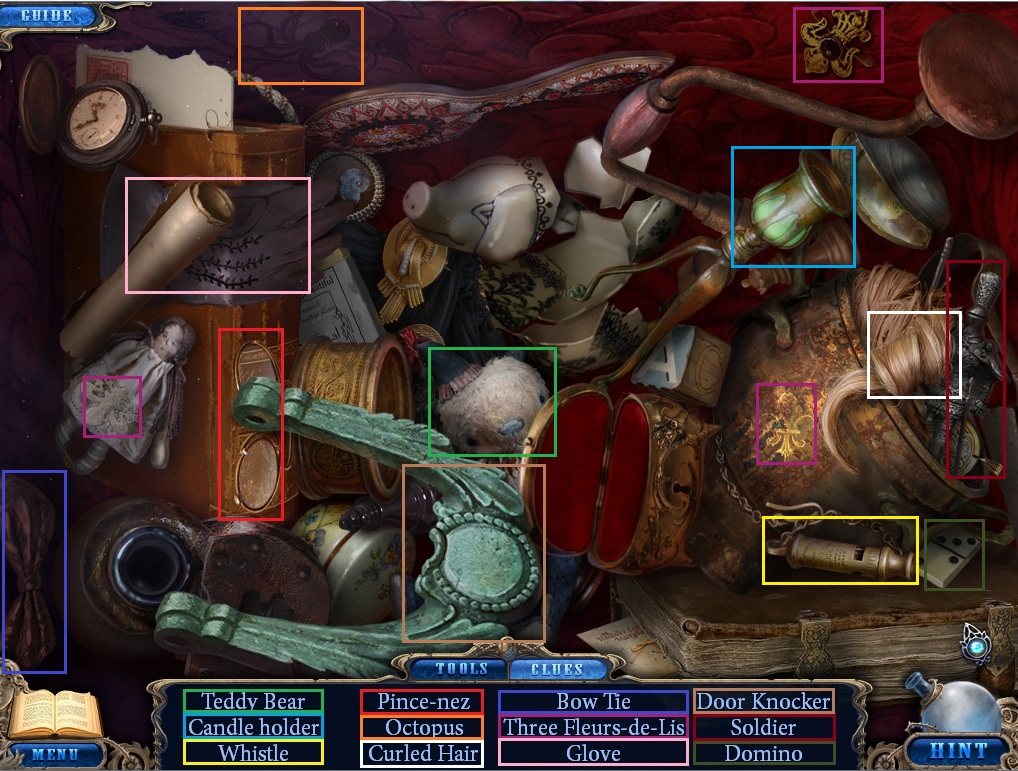
Screenshot.
Use the Horn on the glowing red eyes in the center of the wheel to reveal the bat.
Use the Glove on the beehive and click the extracted honey.
Use the Knife on the wooden log three times to carve it into the Wooden Cup.
Use the Shovel on the X on the ground to dig up the Treasures.
Click the owl perched on the tree branch.
Put the four keys from your inventory into the corresponding keyhole on the owl's stomach.
Solution.
Add the Gears from your inventory to the owl mechanism.
Retrieve the Ladder and go through the gates into the cemetery.
The Cemetery
Click on the large angel statue to zoom in.
Place the Tiara from your inventory on the angel statue's head.
Take the Shining Star from the angel's hands.
Click on the glittering area around the piano to start the hidden object scene.
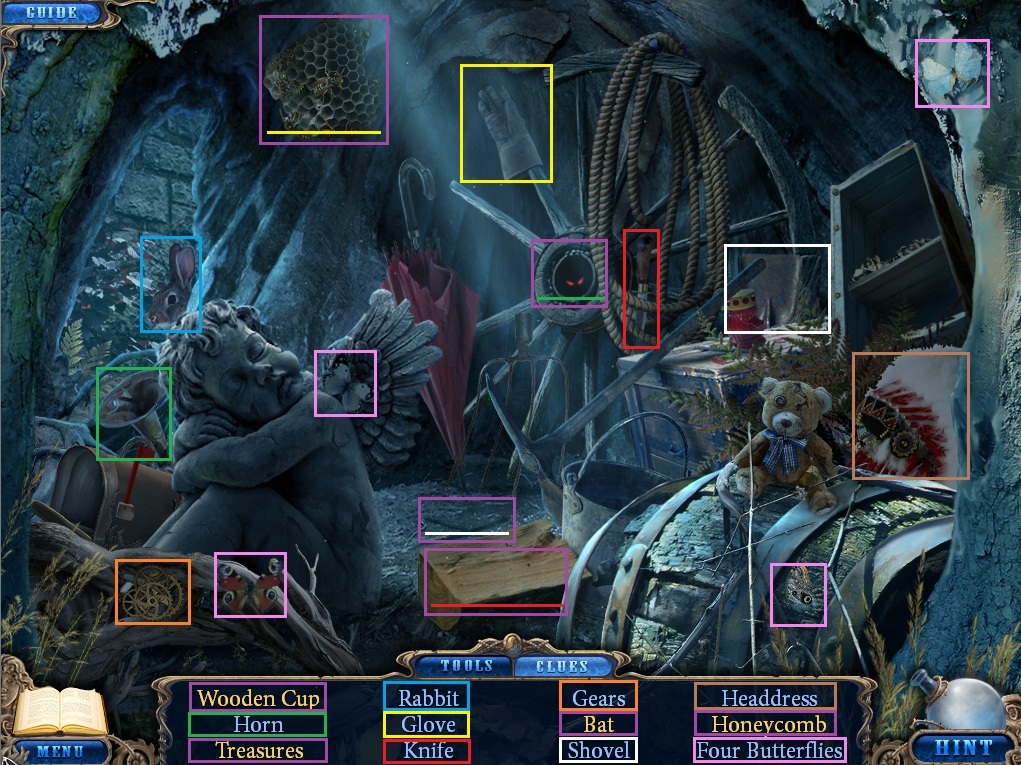
Screenshot.
Use the Watering Can on the potted plant and click the Lily that blooms.
Add the Wings to the Angel.
Use the Lighter on the candle to make the Candle Flame.
Add the Heel to the shoe to make it a High-Heeled Shoe.
Put the Wheel on the cart to complete the Wheelbarrow.
Leave the cemetery and return to the fountain courtyard.
The Fountain Courtyard
Move right to the train station.
Use the Knife on the vines growing over the shop window.
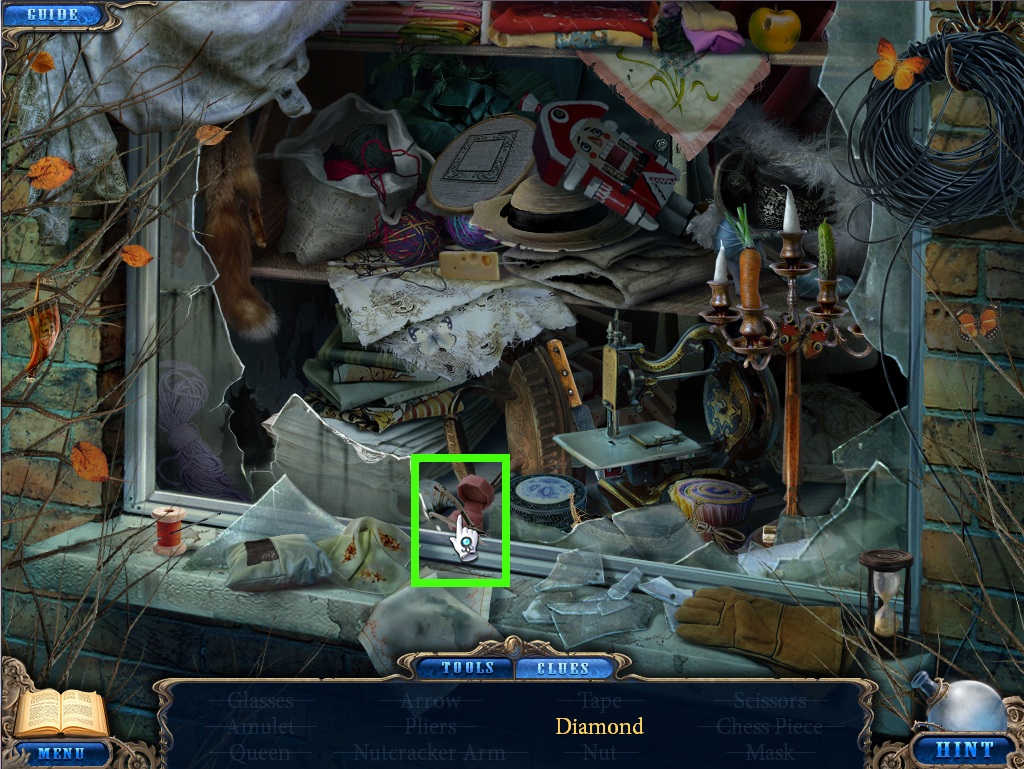
Click the window to start a hidden object scene.
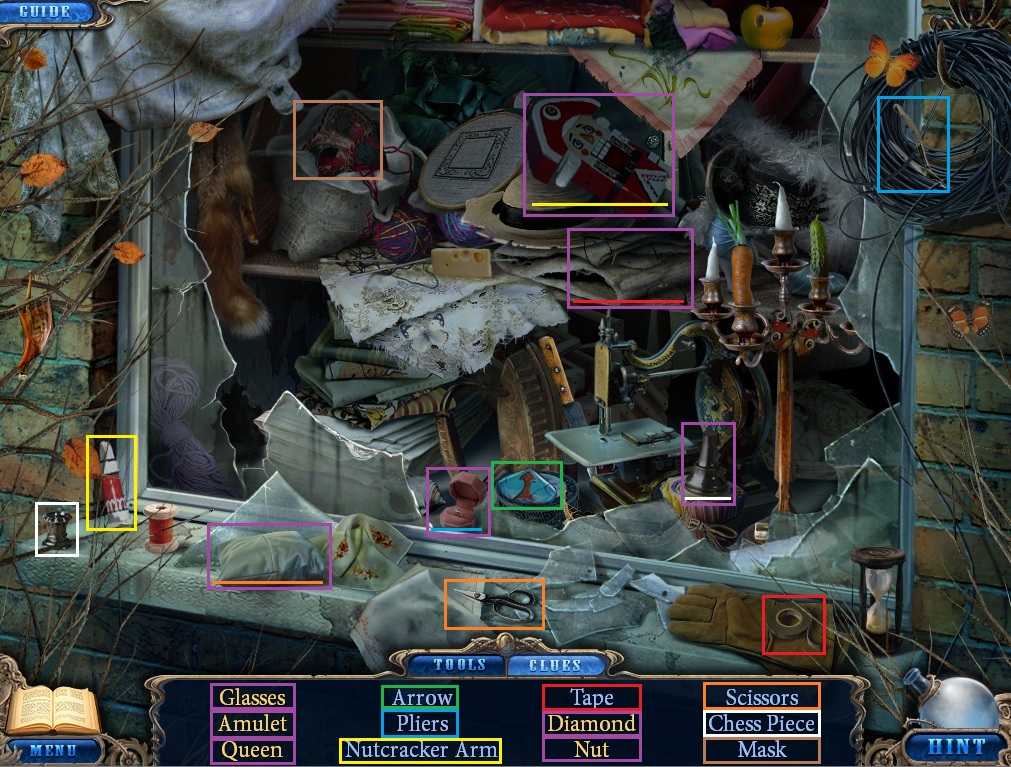
Screenshot.
Use the Tape to repair the broken frames of the Glasses.
Use the Forceps on the ring to pry out the Diamond.
Put the Crown on the broken chess piece to fix the Queen.
Cut open the small pillow with the Scissors and take the Amulet.
Add the Nutcracker Arm to the nutcracker and take the Nut out of its mouth.
Leave the fountain courtyard and go to the gargoyle platform.
The Gargoyle Platform
Click the pedestal of the left gargoyle.
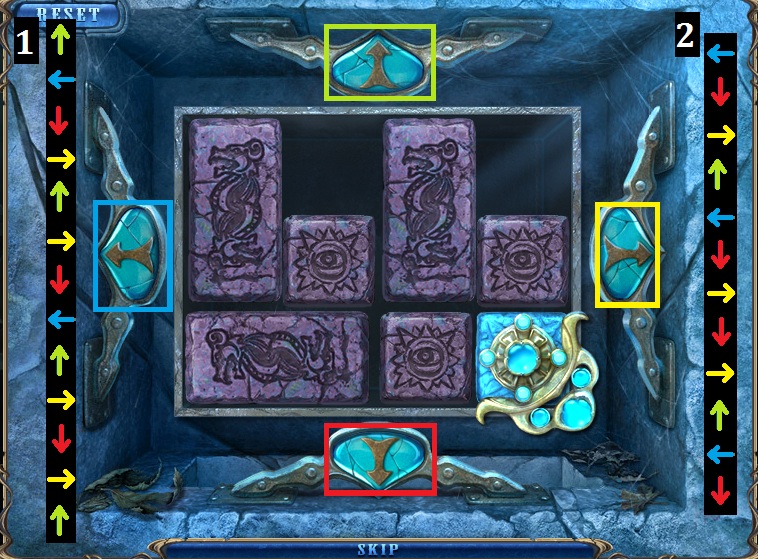
Add the Arrow from your inventory to start the sliding puzzle.
To solve the puzzle, move the gem block into the bottom right corner of the box.
Shift the sliders blocking the corner by clicking the up, down, left, or right arrows.
Moving one slider will also push the adjacent sliders if there is an open space.
The correct order is: Up, Left, Down, Right, Up, Right, Down, Left, Up, Right, Down, Right, Up, Left, Down, Right, Up, Left, Down, Right, Down, Right, Up, Left, Down.
Solution.
After you solve the puzzle, the panel will slide off, revealing a fan which you can pick up.
Leave the platform and return to the fountain courtyard.
The Fountain Courtyard
Use the High Powered Fan from your inventory on the alleyway next to the hotel to clear all the fog.
Go into the alley.
Chapter 3
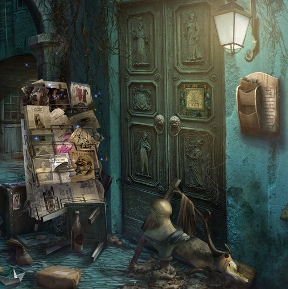
The Alley
Click on the takeout box on the wall next to the photo studio door.
Take the picture and the button from the bottom shelf.
Click on the newspaper stand next to the door to start a hidden object scene.
Collect all available items.
Screenshot.
Click the plate on the door of the photo studio to start the photo puzzle.
Add the Button from your inventory to the panel.
To solve this puzzle, you must create a series of reactions to make the girl in the picture match the photo you took from the dropbox.
Click the mouse button to lure the cat out from under the chair.
Click the dog button to scare the cat onto the girl's lap.
Click the light button to give the photo better lighting.
Click the candy bar button to cheer the little girl up.
Click the camera button to snap the photo.
Go through the door into the photo studio.
The Photo Studio
Click on the open chest in the lower left corner to start a hidden object scene.
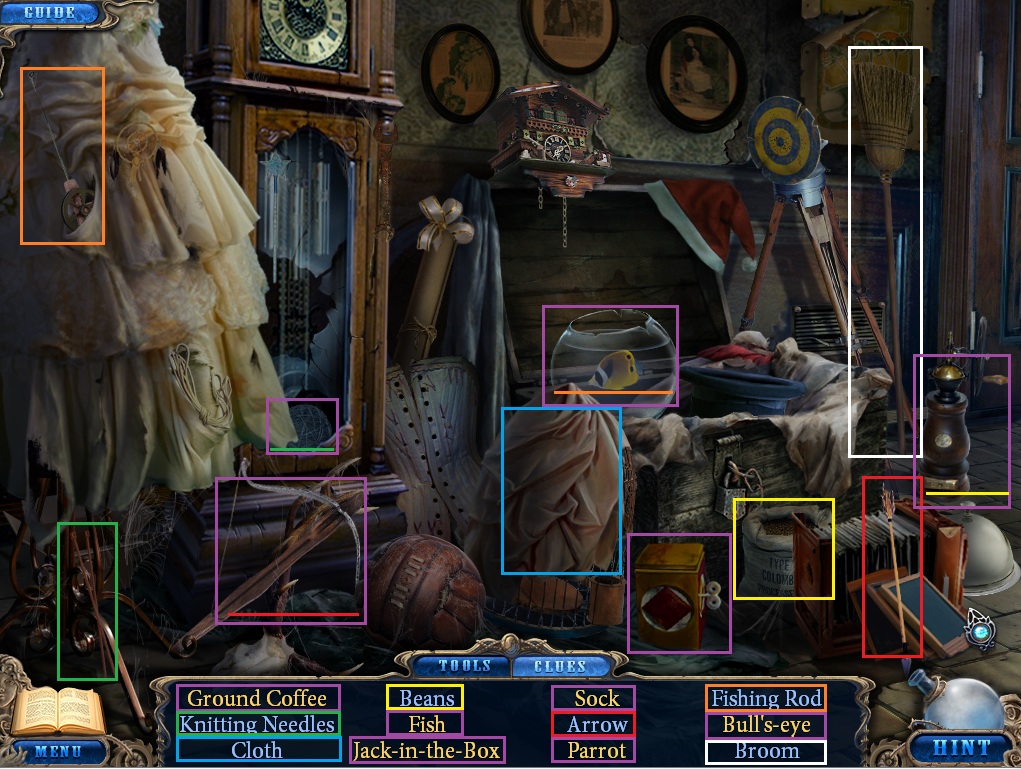
Screenshot.
Click the Cloth to uncover the cage of the Parrot.
Use the Knitting Needles on the ball of yarn inside the grandfather clock to knit a Sock.
Load the Arrow into the crossbow to fire a Bull's-eye at the target.
Click the wind-up handle on the box to reveal the Jack-in-the-Box.
Use the Fishing Rod on the fishbowl to get the tropical Fish.
Put the beans in the coffee grinder to get Ground Coffee beans.
Click the glinting framed photographs hanging on the left wall.
Take the Photo Knob from the frame of the botom-right photograph.
Click on the camera on the tripod.
Add the Photo Knob from your inventory to the right slider.
Adjust both sliders to focus the camera and snap a picture.
Insert the Photo Plate into the camera to get a Negative.
Leave the photo studio and go further down the alley to the bridge.
The Bridge
Use the Broom from your inventory to clear away all six scorpions.
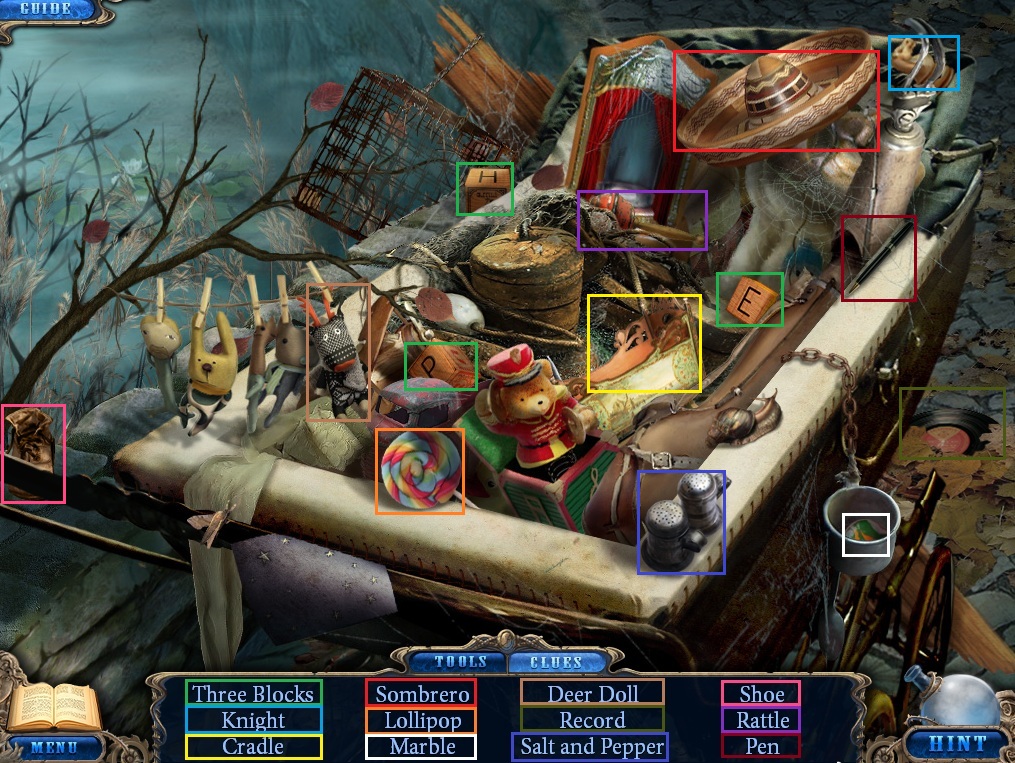
Click the baby carriage to start a hidden object scene.
Screenshot.
Use the Pizza Cutter on the dough to cut out a cookie outline. Add the Pastry Bag to make a Gingerbread Man.
Use the Pliers on the caged elephant.
Use the Paintbrush on the starry picture to paint a Moon.
Add the Rope to the red curtain to reveal the Ballerina.
Click on the paper boat floating in the river for a closer look.
Take the Paper and the Angel from the water.
Cross the bridge to reach the lawn of the house.
The Front Lawn
Click the garden gnome to start the gnome puzzle.
Add the Gnome Tile from your inventory to the puzzle.
To solve this puzzle, the tiles on the panel the gnome is holding must match the picture in the lower left corner.
Arrange tiles by clicking any tile that has adjacent tile pieces all around it. The tile that you click will not be moved, but everything around it will rotate once clockwise.
It looks complicated, but the solution is actually fairly simple.
In order from top to bottom and left to right, click the tile in the 4th column, 5th row one time.
Then click the tile in the 3rd column, 3rd row four times.
Solution.
Take the gem out of the revealed secret compartment inside the gnome.
Leave the front lawn and return to the alleyway.
The Alley
Click the newspaper stand to start a hidden object scene.
Screenshot.
After you've collected all the items, you will receive a Axe.
Leave the alleyway and return to the crossroads.
The Crossroads
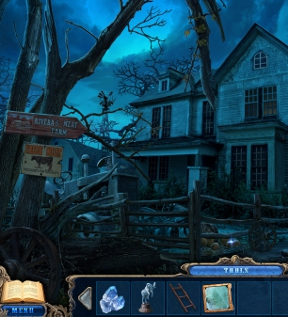
Use the Axe four times on the fallen tree blocking the northern path.
Move forward to Rivera's meat farm.
Chapter 4
Rivera's Meat Farm
Click on the glinting area at the middle of the fence.
Take Angel #2.
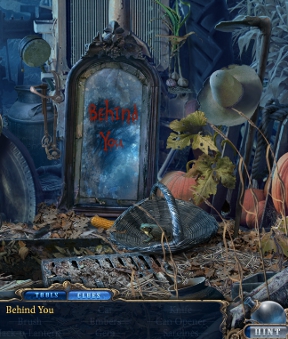
Click the broken tractor to start the hidden object scene.
Screenshot.
Use the Brush on the mirror to reveal the Behind You message.
Use the Can Opener on the tin box to get the Sardines.
Use the Matches on the pile of wood to burn some Embers.
Carve the pumpkin with the Knife to make a Jack-o-Lantern.
Lift the metal grate with the Crowbar to uncover the Car.
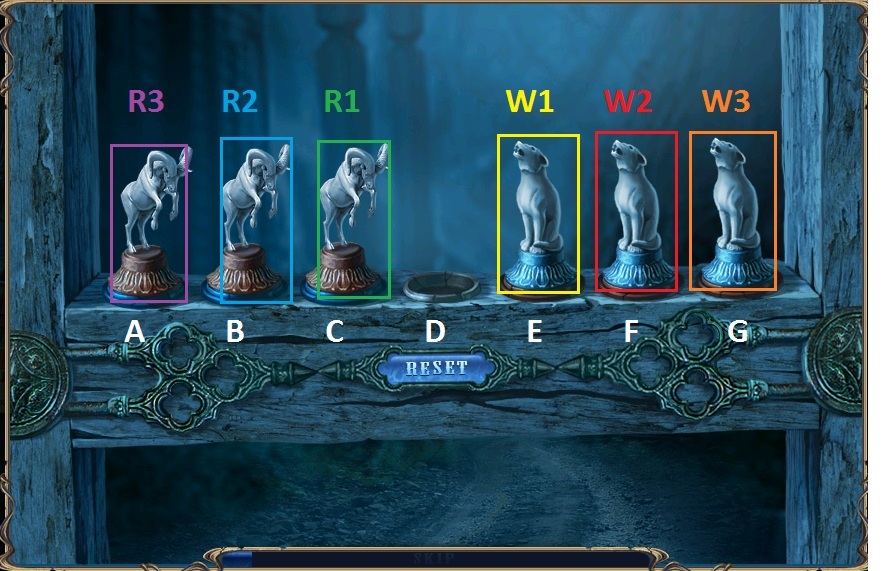
Click the wicket to start the figurines puzzle.
Add the Ram figurine from your inventory to the empty space with the other rams.
To solve this puzzle, the rams and the wolves have to switch places.
Click a figurine to move it forward into an empty space.
You can jump a ram over one wolf (or vice versa) but you cannot jump over an animal of the same type.
Screenshot.
The correct order is:
R1 to D
W1 to C
W2 to E
R1 to F
R2 to D
R3 to B
W1 to A
W2 to C
W3 to E
R1 to G
R2 to F
R3 to D
W2 to B
W3 to C
R3 to E
Go through the open gate to the backyard.
The Backyard
Click the broken boat to zoom in.
Take the Crowbar and the Rose.
Put the Ladder from your inventory under the treehouse to climb up inside.
Take the Kerosene and click the paper with the odd symbol written on it.
Leave the backyard and return to the cemetery.
The Cemetery
Click the piano to repeat the hidden object scene.
Screenshot.
Click Susan Bennet's tombstone.
Add the Rose from your inventory to the top and take the revealed Gem.
Return to the backyard.
The Backyard
Use the Scalpel from your inventory to unlock the wooden door to the basement.
The Basement Slaughterhouse
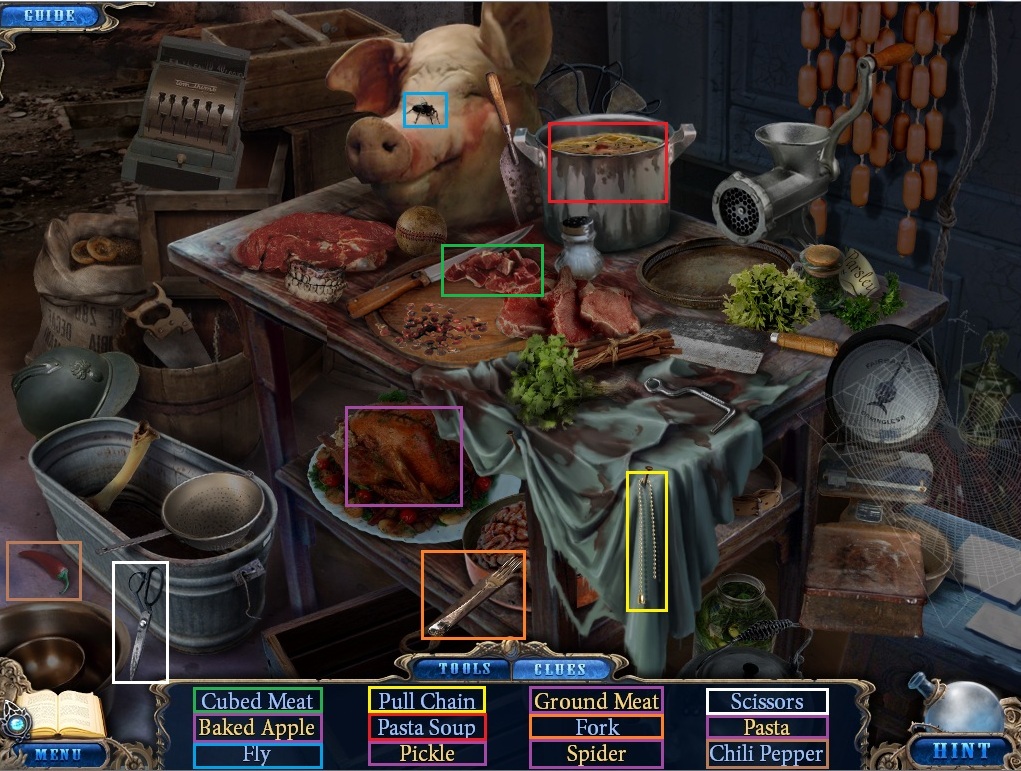
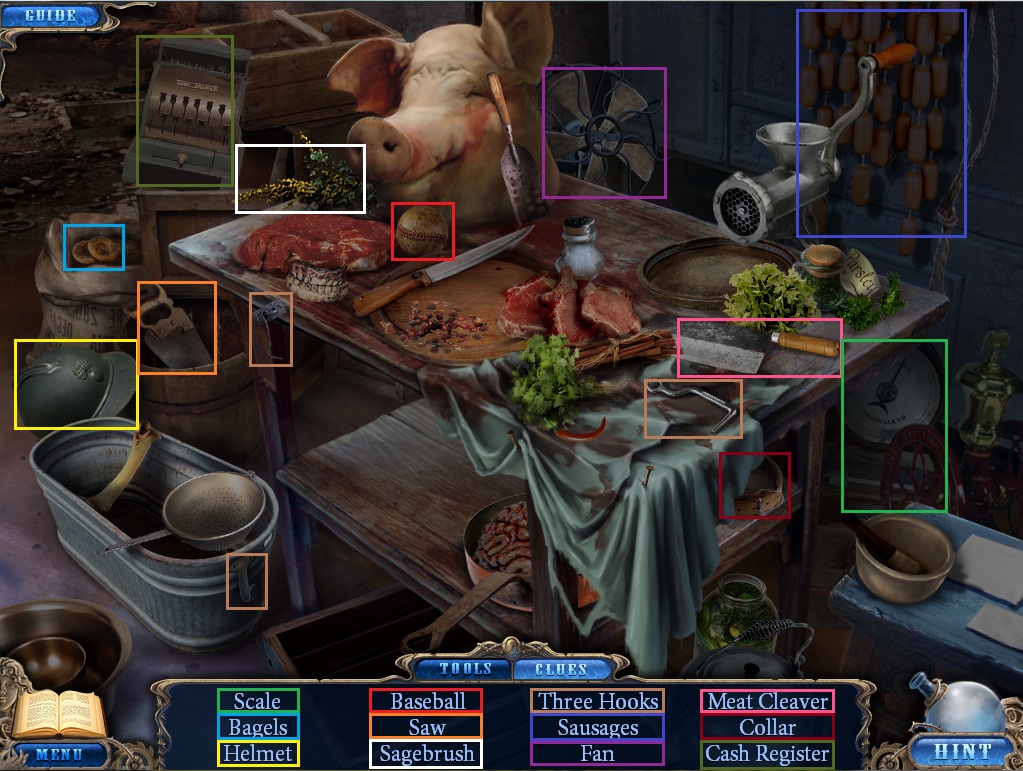
Click the glittering area around the severed pig's head to start the hidden object scene.
Screenshot.
Use the Fly on the web to lure out the Spider.
Cut the turkey with the Scissors to reveal the Baked Apple.
Use the Fork on the pickle jar to pull out a Pickle.
Put the Meat Bricks in the meat grinder to get Ground Meat.
Use the Pasta Soup on the strainer to get the Pasta.
Click the glinting trash bin next to the green door for a closer look.
Pick up the paper with instructions to develop film and the developer on the pile of trash.
Leave the basement and return to the photo studio.
The Photo Studio.
Click the open trunk to repeat the hidden object scene.
Screenshot.
Lift the serving tray cover off the dish to uncover the piece of Cake.
Use the Gift Wrap on the open box to the left of the grandfather clock (it's difficult to see behind the dress stand) to wrap the Gift.
Add the Lace to the bodice behind the bird cage to tie the Corset.
Use the Wand on the magician's hat to pull out a Rabbit.
Put the Clock Weight on the chain of the cuckoo clock to bring out the Cuckoo Bird.
Use the Wrench on the vent behind the tripod to reveal the Rat.
Go through the door on the left to enter the photo development lab.
Use the Pull Chain from your inventory on the hanging red lightbulb to light the room.
Click the book on the table for a closer look.
Examine the school photographs and pick up Angel #3.
Click the glinting cabinet door to zoom in.
Take the bottle of Fixer from the shelf.
Click the large table with all the developing trays to start the photo development puzzle.
Follow the instructions from your notebook step by step:
Add the Developer and Fixer from your inventory to their respective jars to dilute them with water.
Use the pipette on the jar of developer and then click the developer tray.
Use the pipette again on the jar of fixer and click the fixer tray.
Put the Negative from your inventory into the developer tray and wait 2 seconds for it to soak.
Rinse the Negative in the bottom water tray.
Place the Negative in the Fixer tray and let it soak for 2 more seconds.
Rinse the Negative again in the top water tray.
Pick up the developed photo from the water tray and note the 5 revealed symbols.
Leave the photo shop and go to the bridge.
The Bridge
Click on the baby carriage to repeat the hidden object scene.
Screenshot.
Click the fishing rod on the bridge.
Add the Spinning Reel from your inventory to the rod.
Click the spinning handle to reel in the Counterweight.
Leave the bridge and go to the backyard of the farmhouse.
The Backyard
Go into the tree house.
Add the Counterweight from your inventory to the rope.
Click the basket that is pulled over to pick up Angel #4.
Go down into the basement.
The Basement Slaughterhouse
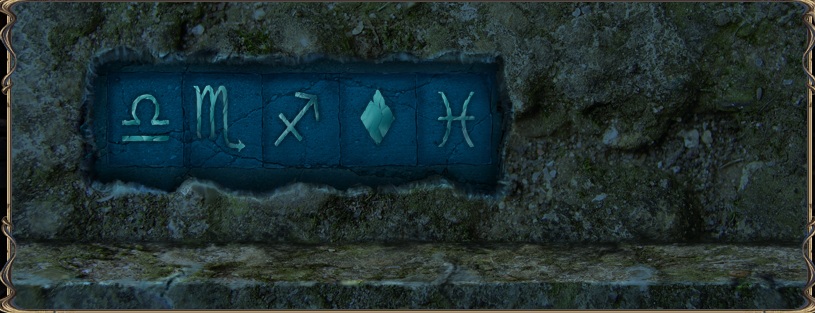
Click the glinting blue panel on the stairs to start the runes puzzle.
The pattern of the runes should match the developed photograph in your notebook.
Click the squares to rotate through the runes.
Solution.
When the panel lifts, take the Gem from the compartment.
Leave the basement and go to the cemetery.
The Cemetery
Click on Lillian Bennet's tomb for a closer look.
Add the five Gems from your inventory to the empty slots on the headstone.
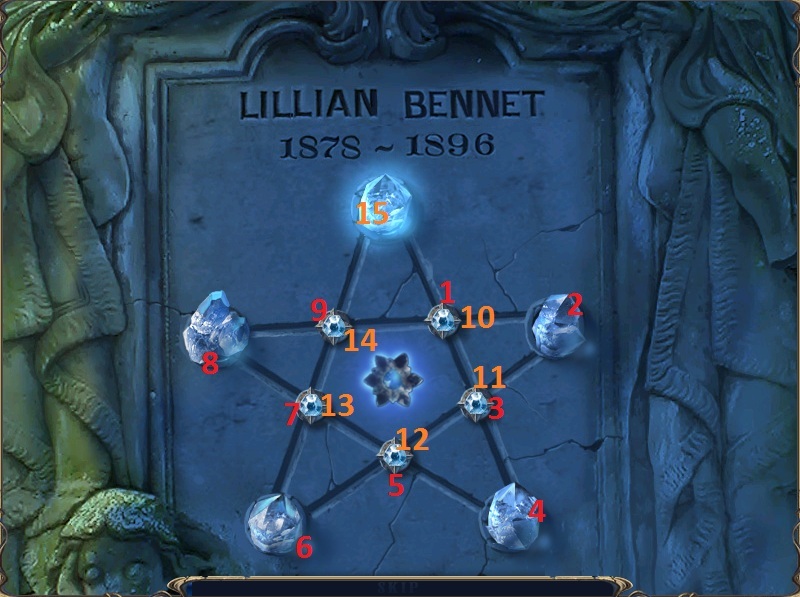
Place the Shining Star in the center to start the star puzle.
To solve this puzzle, the entire star must be connected by reflecting light beams off the gems.
The first gem is already lit, so clicking an adjacent gem will draw a path of light connecting the two of them.
You can only take the same path once. If you make a mistake and need to reset, click one of the lit crystals two times.
There are many possible solutions to this puzzle, but I found that the easiest solution was to follow the outside shape of the star and then do the inner pentagon.
Solution.
After you've solved the star puzzle, click Lillian's tomb again.
Lift the shroud inside the coffin.
Use the Crowbar from your inventory to pry off the wooden boards.
Take the newspaper from the top rung of the ladder.
Leave the graveyard and head across the bridge to the front lawn.
The Front Lawn
Click on the front door of the house.
Slip the Newspaper from your inventory under the door.
Click on the keyhole to zoom in.
Use the Pen from your inventory on the keyhole to push the key out of the lock.
Click the Newspaper again to drag it back and pick up the Door Key.
Use the Door Key on the lock to open the door and enter the Bennet House.
The Bennet House
Collect the coil of Rope and the Angel #5 next to the framed photograph on the small table
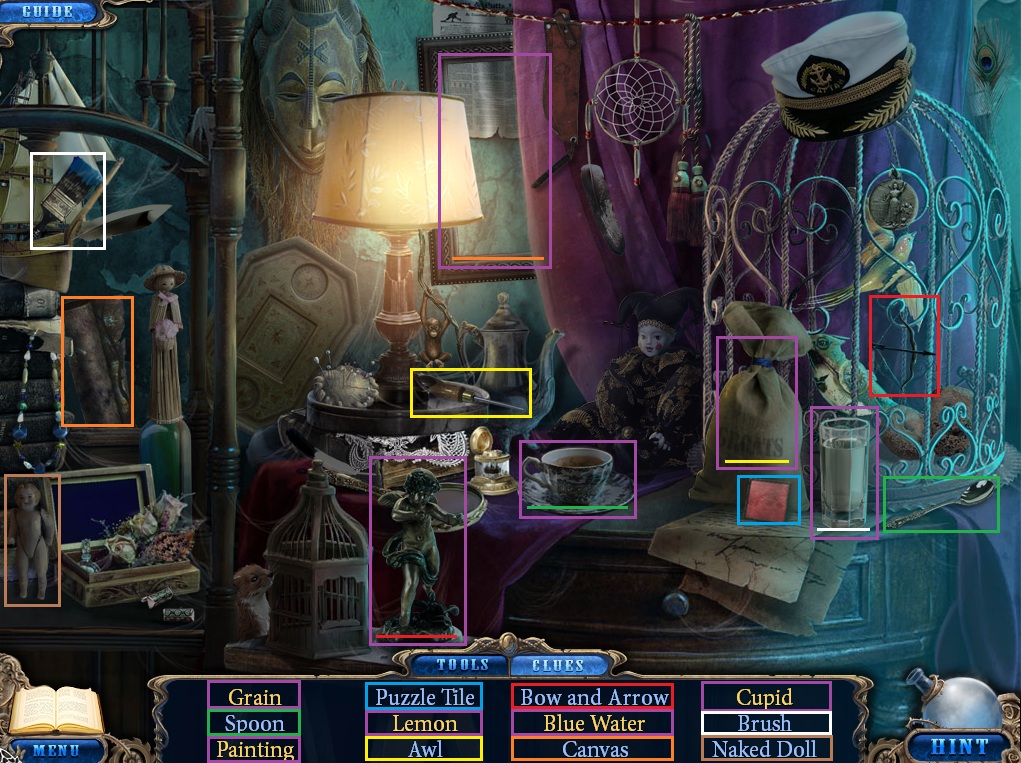
Click the book case on the left to start the hidden object scene.
Screenshot.
Use the Canvas on the picture frame hanging on the wall to make a Painting.
Add the Brush to the glass of water to turn it into Blue Water.
Put the Bow and Arrow in the hands of the figurine to complete the Cupid statuette.
Use the Spoon on the teacup to stir out the Lemon.
Use the Awl on the burlap sack to spill the Grain.
Leave the Bennet house and return to the fountain courtyard.
The Fountain Courtyard
Move right to the train station side and click the broken window to repeat the hidden object scene.
Collect all available items.
Screenshot.
Use the Cheese on the hole in the wall to lure out the Mouse.
Use the Knife on the apple to cut out the Worm.
Add the Sail to the boat to complete the Ship.
Use the Hammer to break the hourglass and take the Sand.
Use the Needle and Thread on the embroidery hoop to sew a picture of the Rose.
Leave the courtyard and go into the alleyway.
The Alley
Click the ladder hanging from the roof of the building next to the photo shop.
Pull the ladder down with the Umbrella in your inventory.
Climb up the ladder onto the roof.
Take the Elevator Handle near the owl.
Click the window to open it.
Tie the Rope from your inventory to the sturdy pipe.
Climb down through the window into the doctor's house.
Chapter 5
The Doctor's House
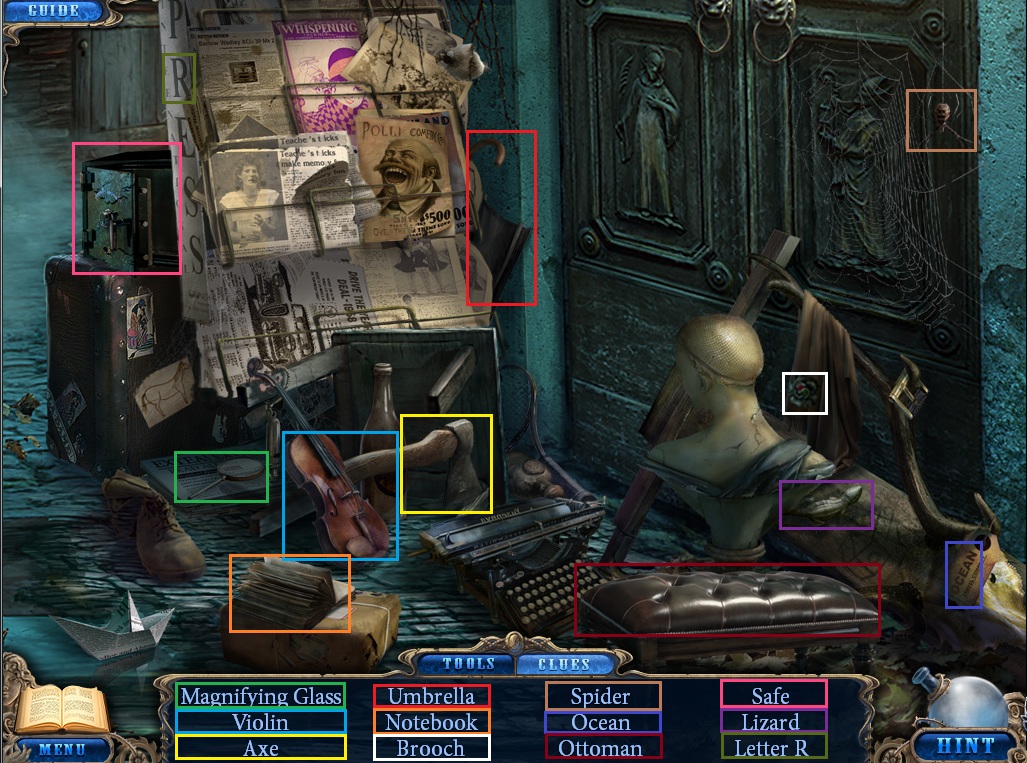
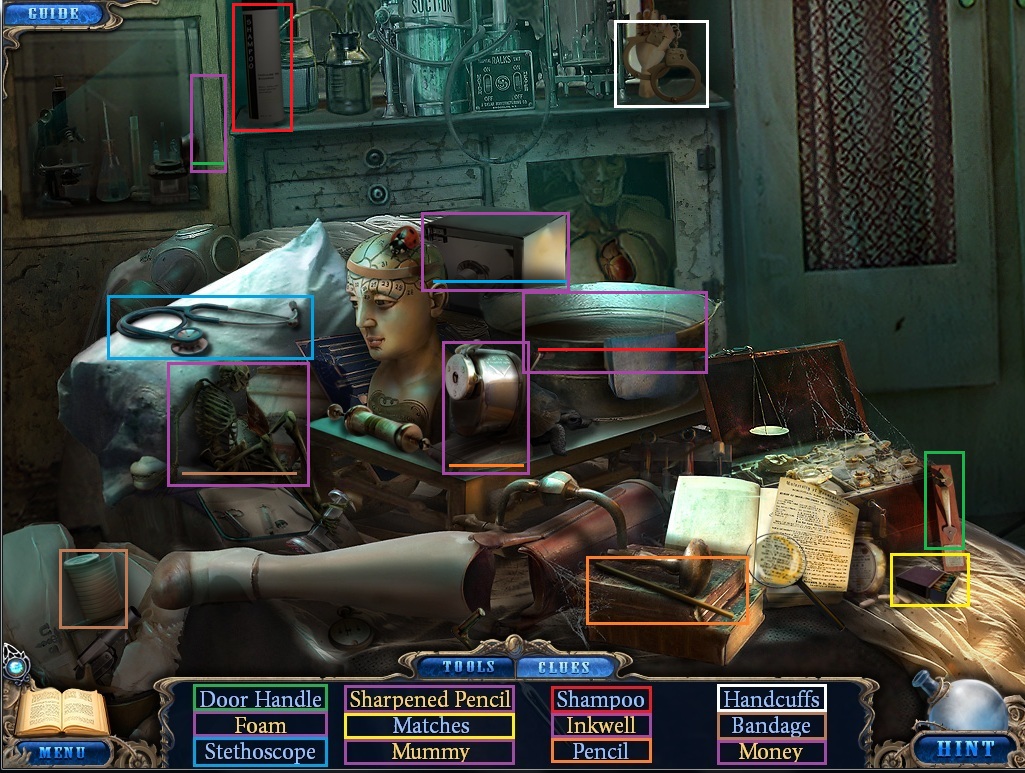
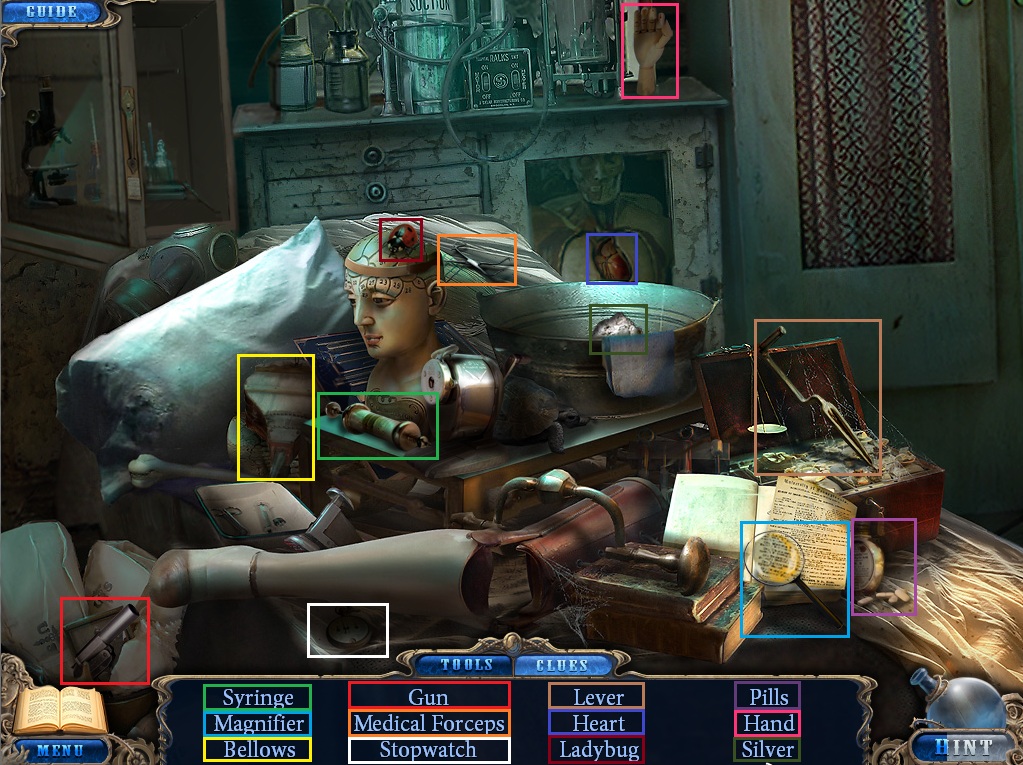
Click the operating table to start the hidden object scene.
Screenshot.
Put the Pencil in the pencil sharpener to get a Sharpened Pencil.
Use the Bandage on the skeleton to prepare the Mummy.
Use the Stehtoscope on the safe to retrieve the Money.
Use the Shampoo on the tub of water to make Foam.
Use the Door Handle on the glass cabinet to open the door and take the Inkwell.
Click the closet to open the doors.
Click the diploma on top of the closet to zoom in.
Take the Acid from behind the diploma.
Click the framed photograph next to the dead bird for a closer look.
Take the Elevator Button from the lower left corner of the frame.
Leave the doctor's home and return to the Bennet House.
The Bennet House
Click the panel in front of the elevator to zoom in.
Add the Elevator Button from your inventory to the round hole above the word "Call".
Push the button to call the elevator.
Step inside the elevator and take the Angel #6 from off the floor.
Click on the panel inside the elevator.
Add the Elevator Handle from your inventory to the center of the panel.
Click the "On" switch and the "Run" switch so that both the red and green are lit, then click the lever to raise the elevator.
Exit the elevator and go forward into Lillian's room.
Click the coffee table to read James' love note and add it to your notebook.
Click the dressing table in front of the vanity mirror.
Take Angel #7 next to the framed photograph.
Leave the Bennet house and go to Rivera's meat farm.
Rivera's Meat Farm
Click the tractor to start the hidden object scene.
Collect all available items.
Screenshot.
Go forward into the slaughterhouse basement.
The Basement Slaughterhouse
Click the table with the pig's head to repeat the hidden object scene.
Screenshot.
Click the door at the top of the stairs on the left.
Use the Acid from your inventory on the padlock.
Go through the open door into James' house.
Click the stove to open the door and take Angel #8.
Click the framed photograph to the right of the stove and take the Doll House Key from inside the frame.
Click the wooden door to zoom in.
Use the Door Handle from your inventory on the door and go through the door into James' bedroom.
James' Bedroom
Click the bookcase to start a hidden object scene.
Collect all available items.
Screenshot.
Click the baseball posters on the wall to tear them away and reveal a hidden door.
Leave the building and return to the Bennet house.
The Bennet House
Click the small bookcase on the left to start the hidden object scene.
Screenshot.
Take the elevator up to Lillian's room.
Click the dollhouse at the foot of the bed to zoom in.
Add the Doll House Key from your inventory to the scorpion's tail on the dollhouse.
Click the dollhouse again to start a hidden object scene.
Collect all available items.
Screenshot.
The hay is difficult to see, but it is with the pig under the stool in the 4th panel.
Leave Lillian's bedroom and return to the front lawn of the house.
The Front Lawn
Click on the birdhouse at the top of the tree.
Use the Feeder from your inventory on the base platform of the birdhouse.
Take the note and the attached key tied to the bird's foot.
Leave the lawn and return to James' bedroom.
James' Bedroom
Click on the secret door for a closer look.
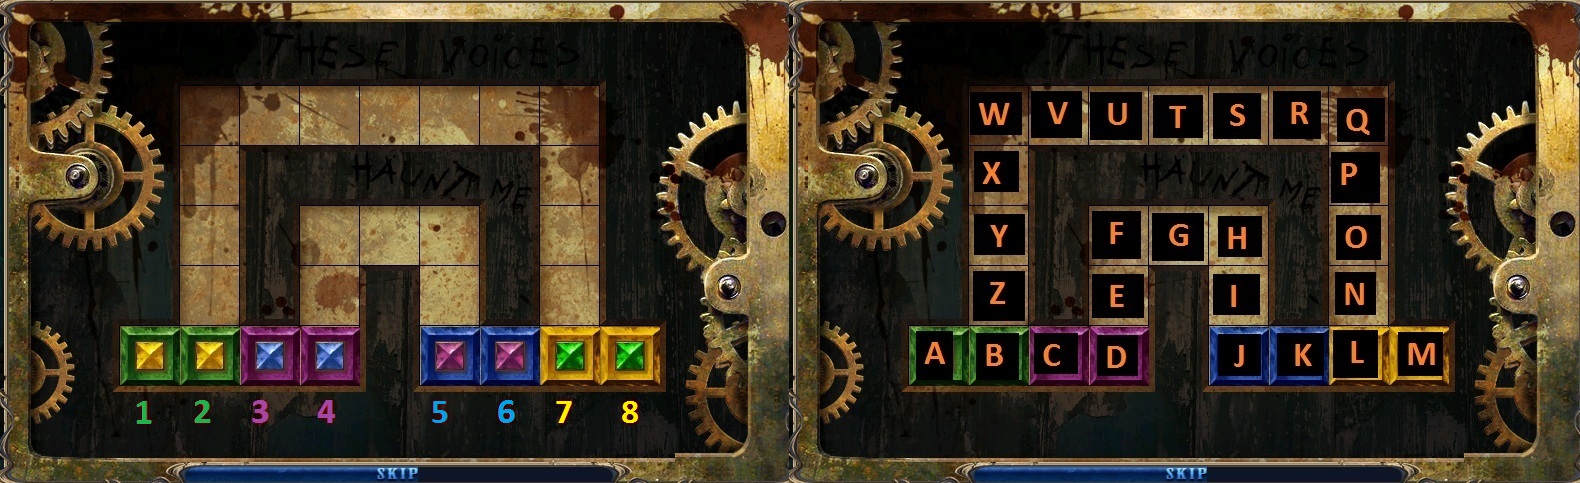
Add the Yellow Tile from your inventory to the panel to start the colored tiles puzzle.
In the following puzzle screenshots the colored tiles are numbered 1 to 8 and the open spaces are lettered from A to Z.
Screenshot.
To solve this puzzle, the colored tiles must be moved to their matching colored squares.
Click and hold a tile to slide it along the open spaces.
Colored tiles cannot pass through other colored tiles.
Move Tile 7 to Space Q
Move Tile 6 to Space L
Move Tile 5 to Space K
Move Tile 4 to Space J
Move Tile 3 to Space F
Move Tile 6 to Space P
Move Tile 5 to Space L
Move Tile 4 to Space K
Move Tile 3 to Space J
Move Tile 5 to Space O
Move Tile 8 to Space N
Move Tile 4 to Space M
Move Tile 3 to Space L
Move Tile 2 to Space K
Move Tile 1 to Space J
Move Tile 7 to Space A
Move Tile 6 to Space D
Move Tile 5 to Space C
Move Tile 8 to Space B
Move Tile 3 to Space Q
Move Tile 4 to Space P
Move Tile 2 to Space M
Move Tile 1 to Space H
Move Tile 4 to Space J
Move Tile 3 to Space K
Move Tile 2 to Space Q
Move Tile 3 to Space M
Move Tile 4 to Space L
Move Tile 1 to Space K
Move Tile 4 to Space P
Move Tile 3 to Space O
Move Tile 1 to Space M
Move Tile 3 to Space J
Move Tile 4 to Space K
Move Tile 2 to Space L
Solution.
Once the puzzle is solved, go through the opened door into the secret room.
James' Secret Room
Click on the small table to the left for a closer look.
Take the Key beside the tin jar.
Click the diary on the overturned chair.
Use the Diary Key from your inventory on the lock.
Click the first page to add James' diary entries to your notebook.
Take Angel #9 from the cut-out space inside the diary.
Click the candlelit shrine to examine it more closely.
Use the Flower from your inventory on the flower-shaped lock on the small chest.
Take the Handle and Lillian's Curl from the chest.
Click the photographs nailed to the right wall.
Take Angel #10 hanging between the photos of Lillian and James.
Leave the secret room and return to James' bedroom.
James' Bedroom
Click the bookcase to repeat the hidden object scene.
Screenshot.
Leave James' bedroom and return to the fountain courtyard.
The Fountain Courtyard
Go right to the train station area.
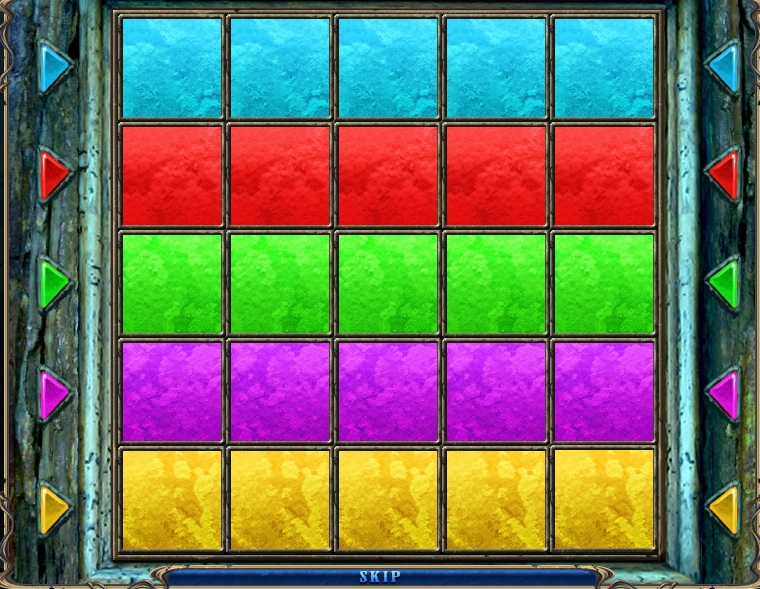
Click the stained glass door to the right.
Add the red Puzzle Tile from your inventory to start the colored squares puzzle.
To solve the puzzle, align the rows of colored tiles to match the arrows on the sides.
Click and hold any tile to drag it horizontally or vertically.
The order of the tiles is randomized every game.
An effective strategy to solving this puzzle is to align the tiles horizontally first and then arrange them vertically.
Solution.
Once you've solved the puzzle, use the Key from your inventory on the revealed lock.
Click the key to turn it inside the lock.
Go through the opened door into the tailor's shop.
The Tailor Shop
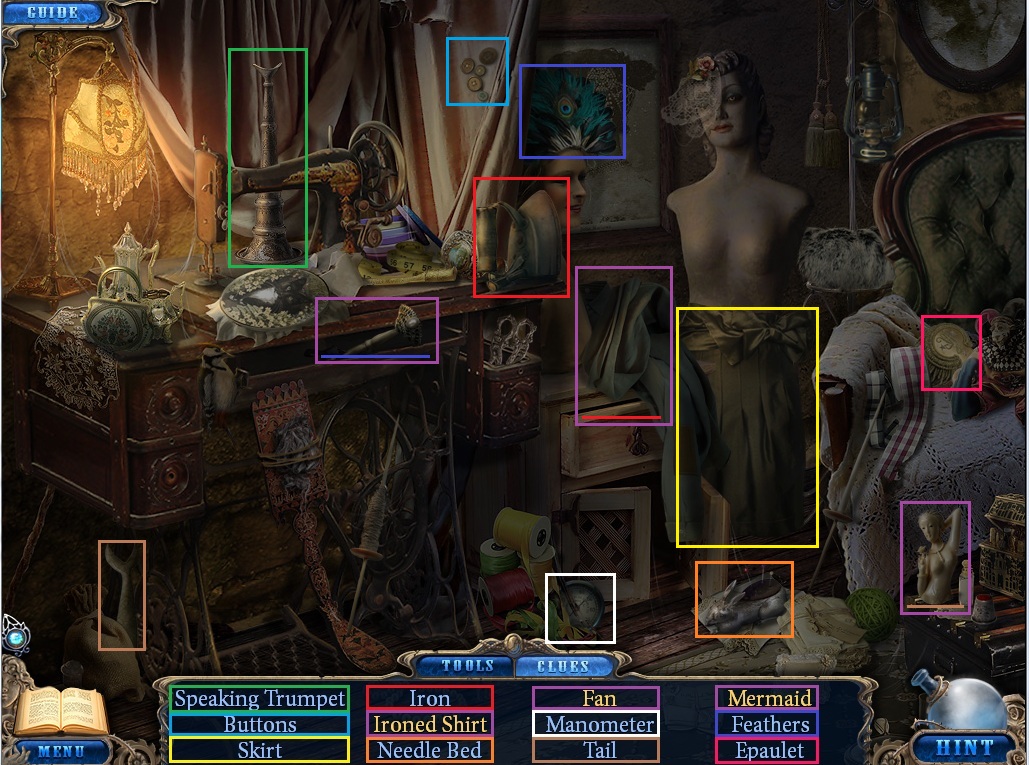
Click the area behind the wedding dress to start the hidden object scene.
Screenshot.
Use the Iron on the folded up shirt by the mannequin to make it an Ironed Shirt.
Add the Tail to the top half of the figurine to complete the Mermaid.
Use the Feathers on the handle sticking out of the open drawer to make the Fan.
Click the Kerosene Lamp in front of the wedding dress to add it to your inventory.
Click the cabinet behind the lamp to zoom in.
Use the Handle from your inventory on the cabinet drawer.
Click the paper to add the Angels vs Demons rules to your inventory.
Take the Telescope Lense and Angel #11 from the drawer.
Click the countertop next to the cash register for a closer look.
Take Angel #12 from behind the doll.
Leave the tailor's shop and head to the gargoyle platform.
The Gargoyle Platform
Click the center gargoyle for a closer look.
Add all 12 Angels from your inventory to the panel to start the Angels vs Demons puzzle.
The rules to Angels vs Demon are in your notebook. This puzzle plays much like a game of checkers.
Placing each angel on the board takes up one turn; a demon will also have a move each turn.
Once all the angels are on the board, you can move them one space at a time along the paths.
Demons can consume angels by moving over them if there is an adjacent empty space.
To solve the puzzle, all demons must be locked in a place where they have no possible moves without losing 6 angel pieces.
The best starting strategy is to fill in the outside square with angels entirely and then reinforcing a straight line in an adjacent row or column.
The demon AI will not always respond identically to each move; the following moves are an example.
Screenshot.
Place an Angel on Space 1
Place an Angel on Space 2
Place an Angel on Space 3
Place an Angel on Space 4
Place an Angel on Space 5
Place an Angel on Space 10
Place an Angel on Space 15
Place an Angel on Space 20
Place an Angel on Space 25
Place an Angel on Space 6
Place an Angel on Space 11
Place an Angel on Space 16
Place an Angel on Space 21
Place an Angel on Space 22
Place an Angel on Space 23
Place an Angel on Space 24
Place an Angel on Space 25
Place an Angel on Space 7
Place an Angel on Space 8
Place an Angel on Space 9
Place an Angel on Space 14
Place an Angel on Space 13
Move the Angel from Space 21 to Space 17
Solution.
Once the puzzle is solved, go down the ladder under the gargoyle and into the mines.
The Mining Shaft
Click the glinting note nailed to the wooden beam for a close up.
Take the Block on top of the paper.
Leave the mines and head to the doctor's house.
Chapter 6
The Doctor's House
Put the Kerosene Lamp from your inventory inside the open closet.
Click the tile square inside the closet to zoom in.
Add the 7 Block from your inventory to the panel to start the numbers puzzle.
To solve this puzzle, all the numbers in each row and column must add to 34.
To move a tile, click one number and then another number to swap their tile positions.
There are multiple possible solutions to this puzzle.
If you have the numbers in any correct order, the tiles will light up and glow bright blue.
Solution.
When you have solved the puzzle, go through the secret passage behind the closet into the occult room.
The Occult Room
Click the Telescope to zoom in.
Add the Telescope Lense from your inventory to the telescope.
While in telescopic view, click the numbers scrawled above the door and take note of their order: 4-5-7.
Leave the telescope and click the cupboard on the right side of the room.
Click the digits 4-5-7 on the lock of the journal to match the numbers you saw above the door in the telescope.
Take the papers and the Chalk inside the journal to add them to your notebook.
Note the symbol with the word "Curl" written inside the journal.
Click the Skull on the candlelit shelf for a closer look.
Take the Grappling hook next to the skull.
Click the demonic tome in the center of the circle.
Flip to the last page and take the ripped half Sheet of paper.
Take the Egg, then leave the close-up view and take the Book as well.
Leave the occult room and go back to the operation room of the doctor's house.
The Doctor's House
Click the operating table to repeat the hidden object scene.
Screenshot.
Leave the doctor's house and return to the mines underneath the gargoyle platform.
The Mining Shaft
Follow the track to the exit tunnel on the left.
Add the Train Car Lever from your inventory to the mechanic inside the mine cart.
Pour the Kerosene from your inventory into the kerosene tank at the front of the mine cart.
Place the Manometer from your inventory to the gauge device left of the kerosene tank's funnel.
Pull the lever to start the mining cart down the track.
Take the Brick on the ground beside the track.
Use the Grappling hook from your inventory on the cave in the rock wall.
Do not go up the rope yet. Instead, go to the left towards the Silvertown train station.
Silvertown Train Sation
Click the Spade next to the bench on the train platform to add it to your inventory.
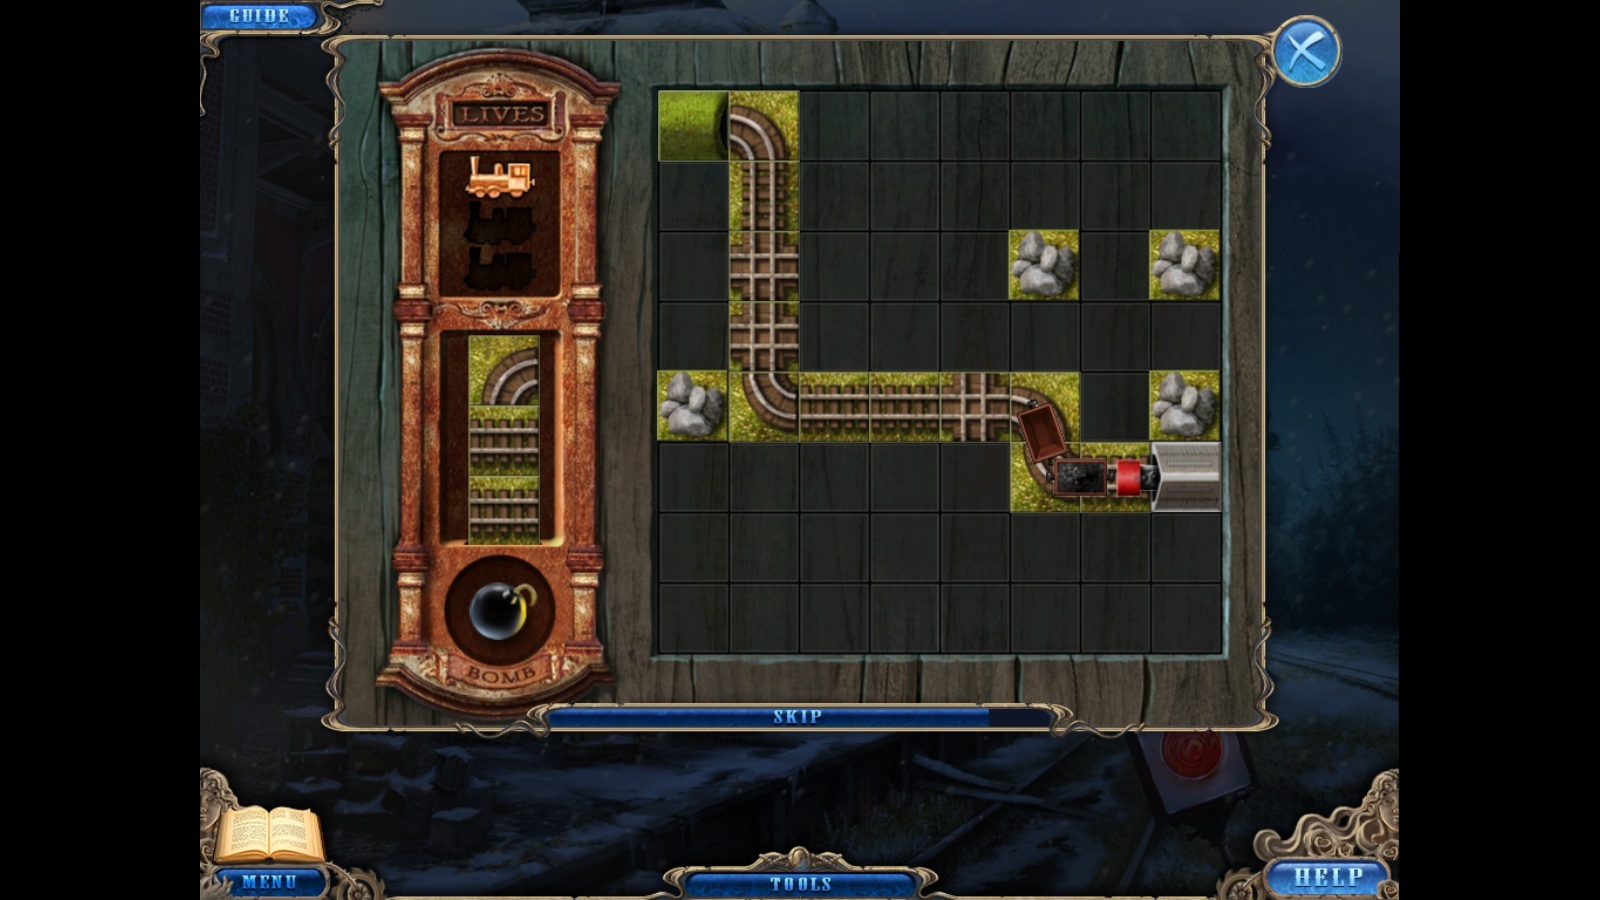
Click the door to the station that isn't boarded up to start the train puzzle.
To solve this puzzle, guide the train from the upper left corner of the grid to the pipe at the lower right side of the grid.
Lay down the track pieces provided in the left window to make a curving path all the way to the tunnel.
You are given 3 lives for a successful attempt. If you lose all lives, the grid is wiped clean of all tiles and you start over with another 3 lives.
The track tiles are randomized each puzzle, so there are multiple potential solutions.
Solution.
Once the train puzzle is solved, go through the open door into the station.
Click the luggage storage door to reveal a hidden object scene.
Screenshot.
Click the ticket office on the right to zoom in.
Take the round Key from the counter of the ticket window.
Use the Saw from your inventory on the boards covering the large window.
Use the Brick from your inventory to break through the window glass.
The path through the broken window leads back to the fountain courtyard in Silvertown.
Go through the window and to occult room in the doctor's house.
The Occult Room
Click the skull on the candlelit shelf.
Use the Key from your inventory on the nose of the skull.
Take the Poppy from inside the skull's mouth.
Leave the doctor's house and return to the train station.
The Train Station
Click the luggage storage area to repeat the hidden object scene.
Screenshot.
Leave the station and return to the area outside of town where the mining cart track ends.
Climb up the rope and into the cave.
The Cave
Click the skeleton at the foot of the stairs on the left to zoom in.
Use the Spade from your inventory on the pile of dirt beside the skeleton to reveal the bottom half of the paper.
Add the top half Sheet of paper from your inventory to the half on the ground.
Click the completed paper to add the ritual instructions to your notebook.
Take the Clover from the bottom of the dug up hole.
Click the ring of skulls at the center of the altar to start the ritual.
Use the Matches from your inventory to light the candles on top of each of the five skulls.
Click on the triangular stone at the bottom of the altar to zoom in.
Fill in the shape carved into the stone with the Chalk from your inventory.
Repeat the same process with the shapes on the left, top, and right side of the altar.
Click on each of the triangular stones to learn what their symbols typify.
The bottom stone is life.
Place the Clover from your inventory on to the bottom stone.
The left stone is dream.
Place the Poppy from your inventory on the left stone.
The top stone is fog.
Place the Silver from your inventory on the top stone.
The right stone is human being.
Place Lillian's Curl on the right stone.
Put the Sagebrush from your inventory into the middle of the altar.
Light the Sagebrush on fire with the Matches from your inventory.
Put the Book of black magic from your inventory into the blue fire.
Place the feathers from your inventory into the fire.
Place the Egg from your inventory into the fire.
Click the skeleton holding the mirror on the right to focus the light beam towards Silvertown.
The End
Posted by: Trinn |
June 2, 2011 3:23 PM
|
June 2, 2011 3:23 PM
Bonus Chapter: Collector's Edition
The Cave
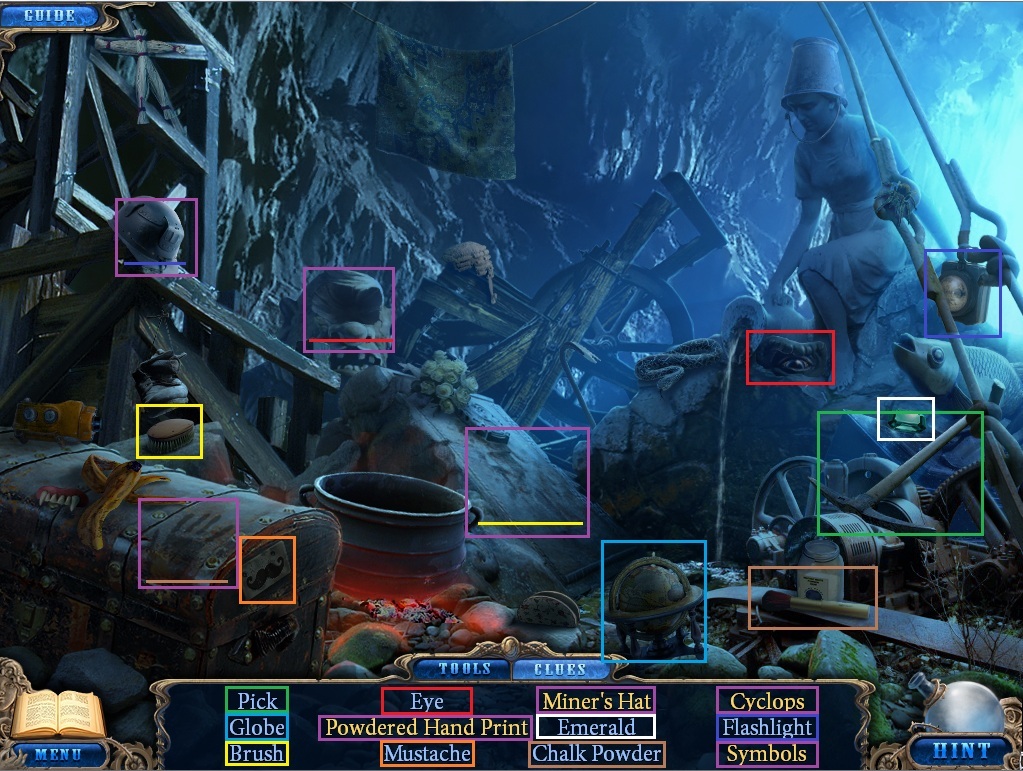
Click the pile of rubble to start a hidden object scene.
Screenshot.
Use the Chalk Powder on the trunk to reveal the Powdered Hand Print.
Use the Brush on the stone slab to reveal the Symbols.
Add the Eye to the stone statue to complete the Cyclops.
Add the Flashlight to the hard hat to complete the Miner's Hat.
Click the skull on top of the rock to push it aside and reveal a Puzzle Piece.
Click the door on the right to zoom in.
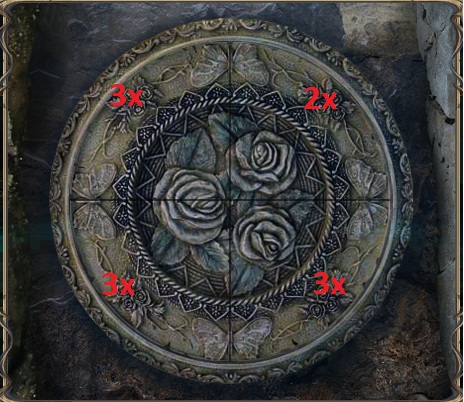
Add the Puzzle Piece from your inventory to the door to start the rose puzzle.
To solve this puzzle, rotate all the pieces to complete the circular picture of four roses.
Click a piece to rotate it until it is centered.
Solution.
Once you have solved the puzzle, click the opened recess in the cave wall to receive the Hook.
Use the mining Pick from your inventory on the pile of rubble blocking the left exit.
Go up the stairs to the edge of the cliff.
The Cliff
Take the Bucket from the ground.
Use the Hook from your inventory on the saw hanging from the tree branch to pull it down.
Use the Handsaw from your inventory to cut down the large tree and form a bridge across the gap.
Move across the makeshift bridge to reach the eternal guard's frozen terrace.
The Frozen Terrace
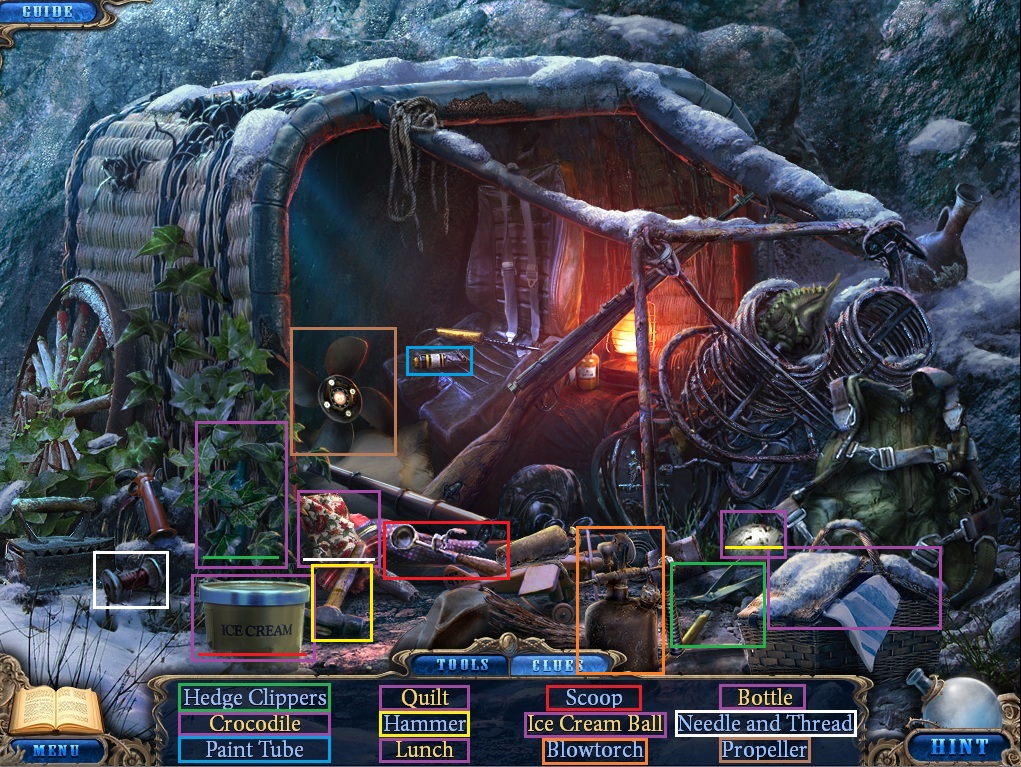
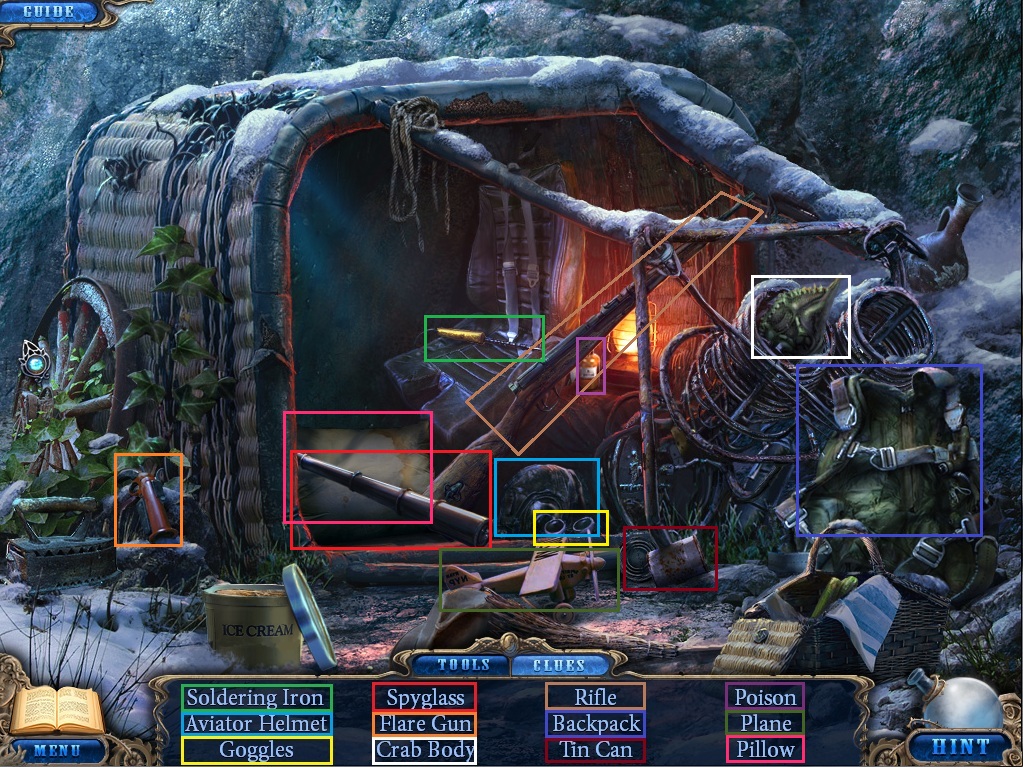
Click the knocked-over basket to start a hidden object scene.
Screenshot.
Click the tub of ice cream to lift the lid.
Use the Scoop on the icre cream to make an Ice Cream Ball.
Use the Needle and Thread on the patchwork to sew a Quilt.
Click the top of the picnic basket to reveal the Lunch.
Use the Hedge Clippers on the vines above the ice cream to reveal the Bottle.
Use the Hammer on the egg to reveal the baby Crocodile.
Leave the terrace and return to the cave.
The Cave
Use the Bucket from your inventory to douse the fire in the center of the altar.
Take the sword from the fire pit.
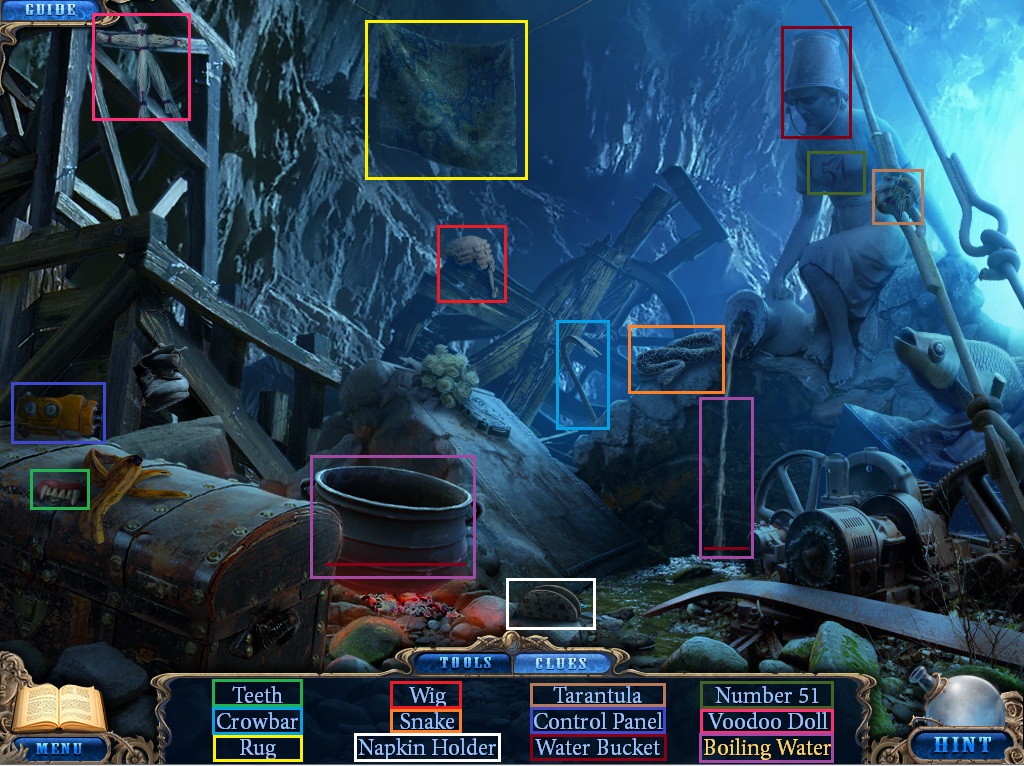
Click the pile of rubble to repeat the hidden object scene.
Screenshot.
Use the Water Bucket on the stream of water pouring from the statue.
Add the water from the bucket to the large pot over the fire to make Boiling Water.
Leave the cave and return to the terrace.
The Frozen Terrace
Click the frozen window of the stage coach.
Use the Blowtorch from your inventory to melt the ice around the door of the coach.
Use the Sword from your inventory on the belts of the stage coach door.
Click the round blue Helicopter to pick it up.
Return to the cliff.
The Cliff
Use the Crowbar on the sewer lid.
Click the uncovered panel for a closer look.
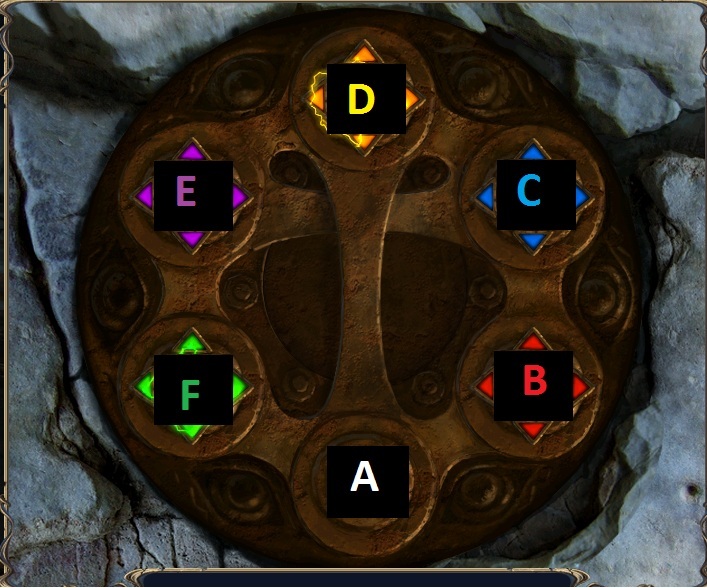
Add the Helicopter from your inventory to the panel to start the helicopter puzzle.
To solve this puzzle, move the colored helicopters to their matching colored helicopter ports.
Helicopters can only move to an empty space along the metal paths.
This puzzle has multiple possible solutions and can be solved in just 7 moves:
Screenshot.
Click Port B
Click Port A
Click Port D
Click Port C
Click Port E
Click Port D
Click Port A
Once the puzzle is solved, take the glasses from the revealed compartment behind the puzzle's panel.
Go across the bridge to the terrace.
The Frozen Terrace
Give the Glasses from your inventory to the ghostly guardian.
Go up the stairs and into the fortress.
The Fortress
Take the pile of grass on top of the rock to the right.
Leave the fortress and return to the terrace.
The Frozen Terrace
Click the fallen basket to repeat the hidden object scene.
Collect all available items.
Screenshot.
Click the small hole at the bottom of the second step.
Place the Grass from your inventory in front of the hole to lure out the mouse.
Click the hole to pick up the Mitten.
Go back up the stairs to return to the fortress.
The Fortress
Click the pile of snow to the left of the pond.
Use the Mittens from your inventory on the left side of the snow bank three times to uncover the paper.
Click the revealed paper to add the crab schematic to your notebook.
Take the numbered tile piece to add the Digits to your inventory.
Click the panel on the side of the windmill.
Add the Digits from your inventory to the panel to start the numbered tile puzzle.
To solve this puzzle, place each block so that all of the digits on the top, bottom and sides match with the adjacent blocks.
Solution.
Once the puzzle is solved, go down the stairs into the area of the drained pond.
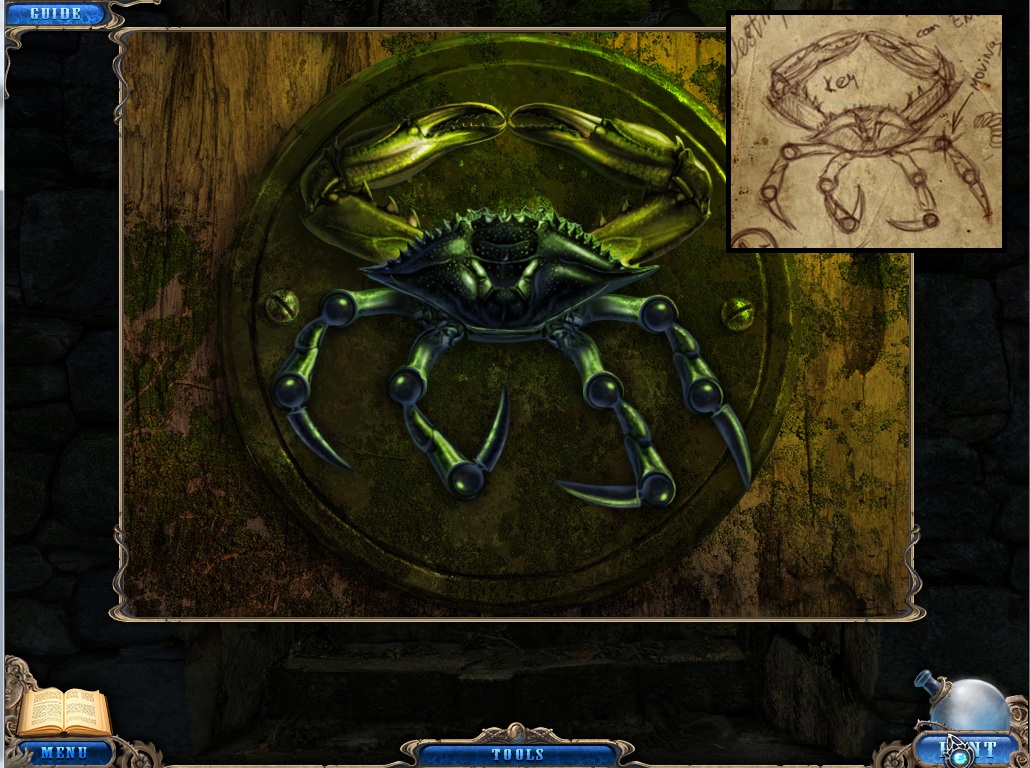
Click the crab figurine on the door to zoom in.
Add the Crab Body from your inventory to the crab mechanic.
Using the notebook as a reference, adjust the legs to match the position of the crab in the picture.
Solution.
Go through the opened door into the catacombs.
The Catacombs
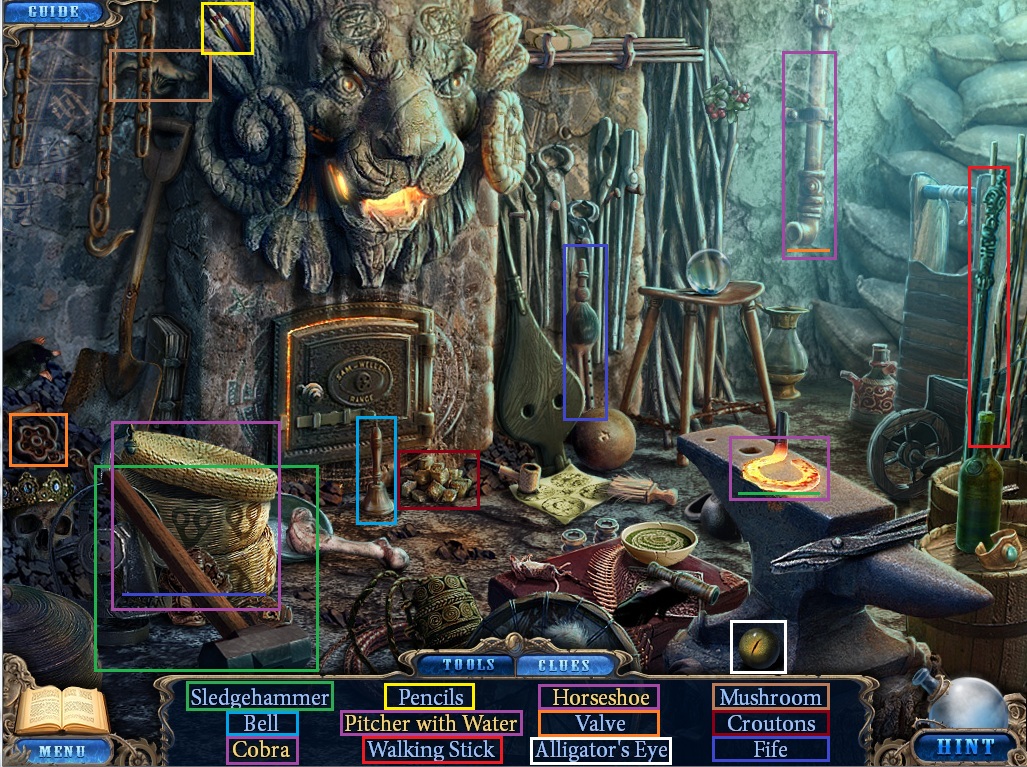
Click the archway up the left staircase to start a hidden object scene.
Screenshot.
Use the Fife on the woven basket to lure out the Cobra.
Use the Sledgehammer on the iron on the anvil to smelt the Horseshoe.
Use the Valve on the pipe then collect the Pitcher with Water.
Go across the rope bridge into the Nelumbo black magic study.
The Nelumbo Study
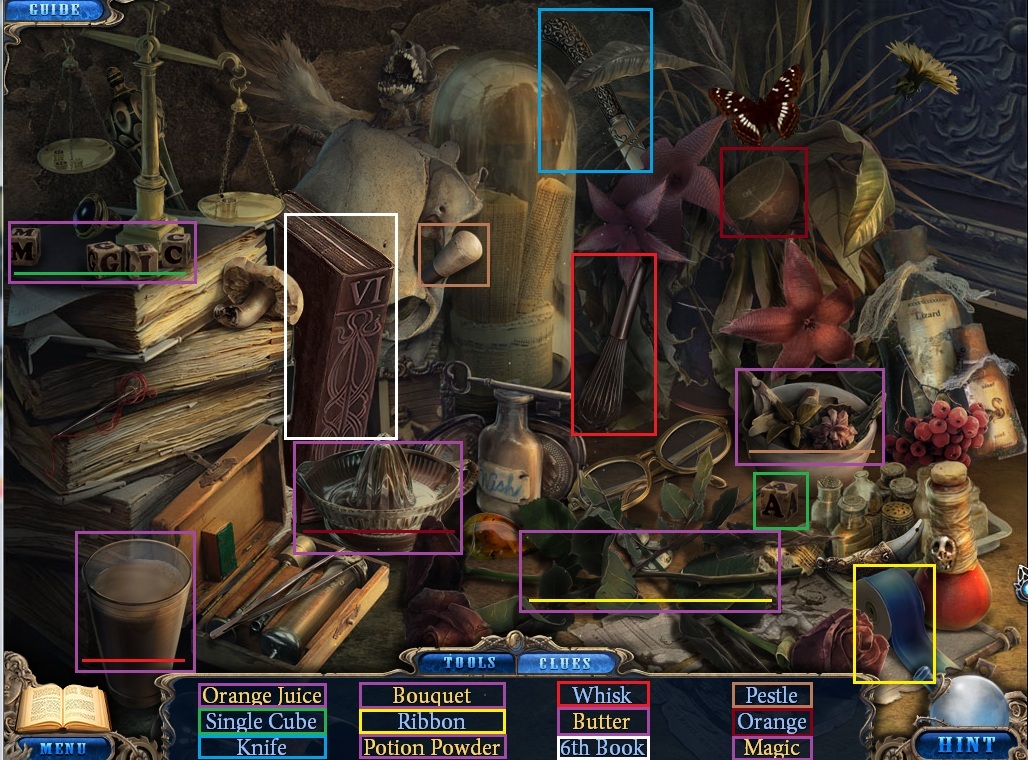
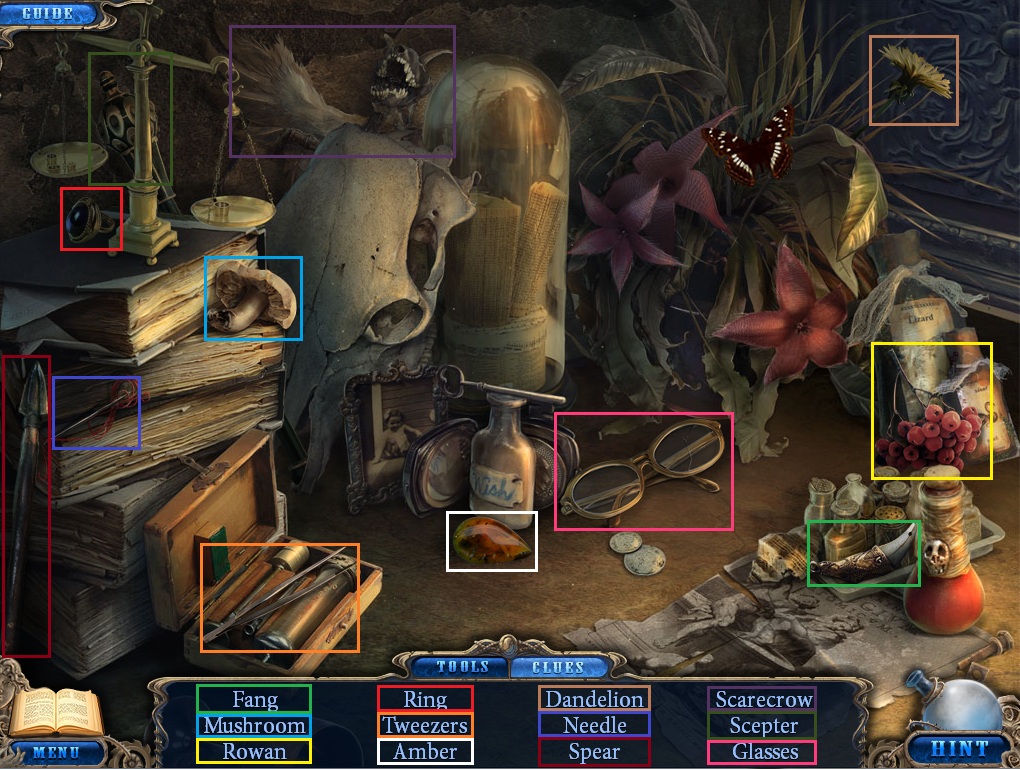
Click the pile of books in the corner of the room to start the hidden object scene.
Screenshot.
Add the letter A Cube to the other blocks to spell the word Magic.
Use the Orange slice on the juicer to make Orange Juice.
Use the Whisk on the glass to whip up some Butter.
Use the Pestle on the mortar to grind the plants into Potion Powder.
Use the Ribbon on the rose stems to make a Bouquest.
Click the alligator skull on the wall for a closer look.
Add the Eye from your inventory to the mounted skull on the wall and take the Rag from the opened mouth.
Leave the study and go back to the catacombs. From the catacombs, go through the passage at the bottom of the stairs into the waterfall room.
The Waterfall Room
Click the ladder against the wall for a closer look.
Use the Rag from your inventory to clean up the oil on the first two ladder steps.
Go up the ladder to start the pipe puzzle.
To solve the puzzle, rotate the pipes so that a path connects from the valve at the upper left to the tube at the bottom right.
Only bronze pipes can be rotated; silver pipes will remain stationary.
Solution.
When the puzzle is solved, the waterfall will be cut off, allowing access to the large door under the skull.
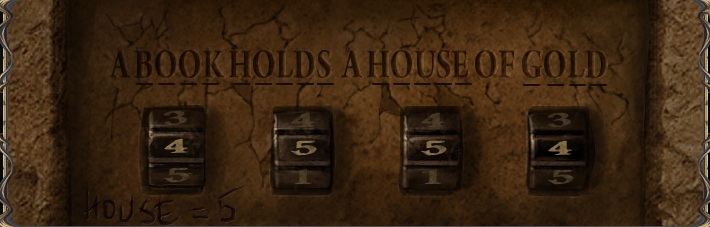
Click the door to zoom in to the word puzzle.
To solve the puzzle, enter the combination to the lock based on the underlined words provided.
One hint is already given: House = 5.
The word "house" has 5 letters.
Following that logic, "Book" has 4 letters, "Holds" has 5 letters, "House" has 5 letters, and "Gold" has 4 letters.
The code for the lock is 4-5-5-4
Solution.
Go through the open door into the library.
The Library
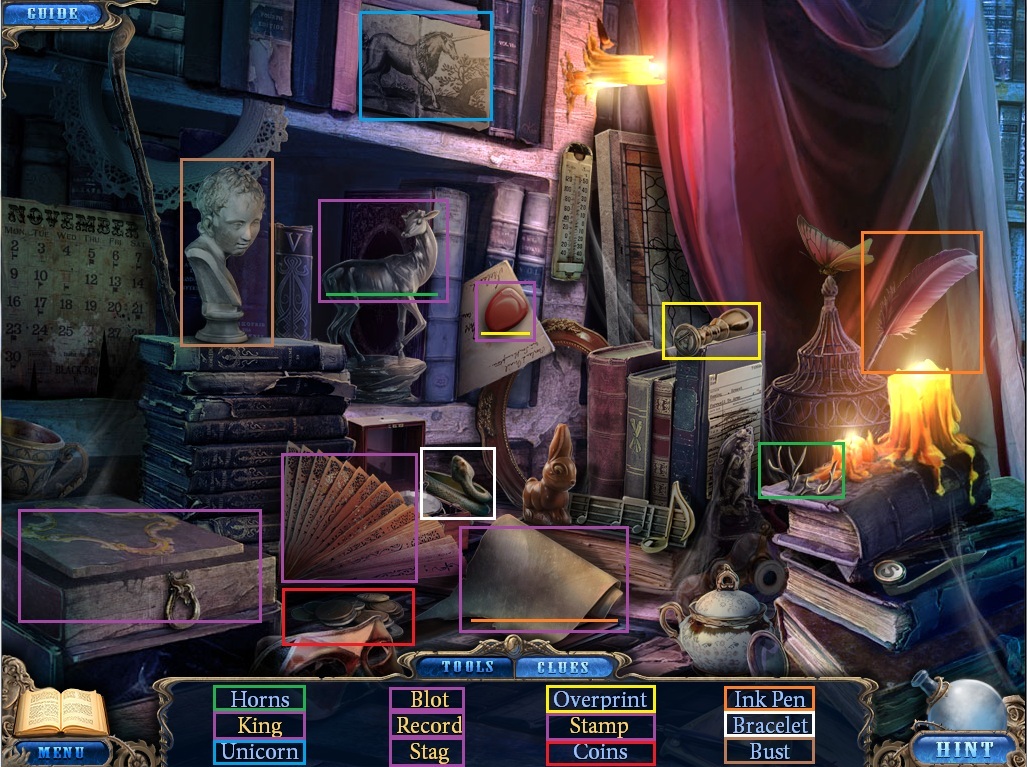
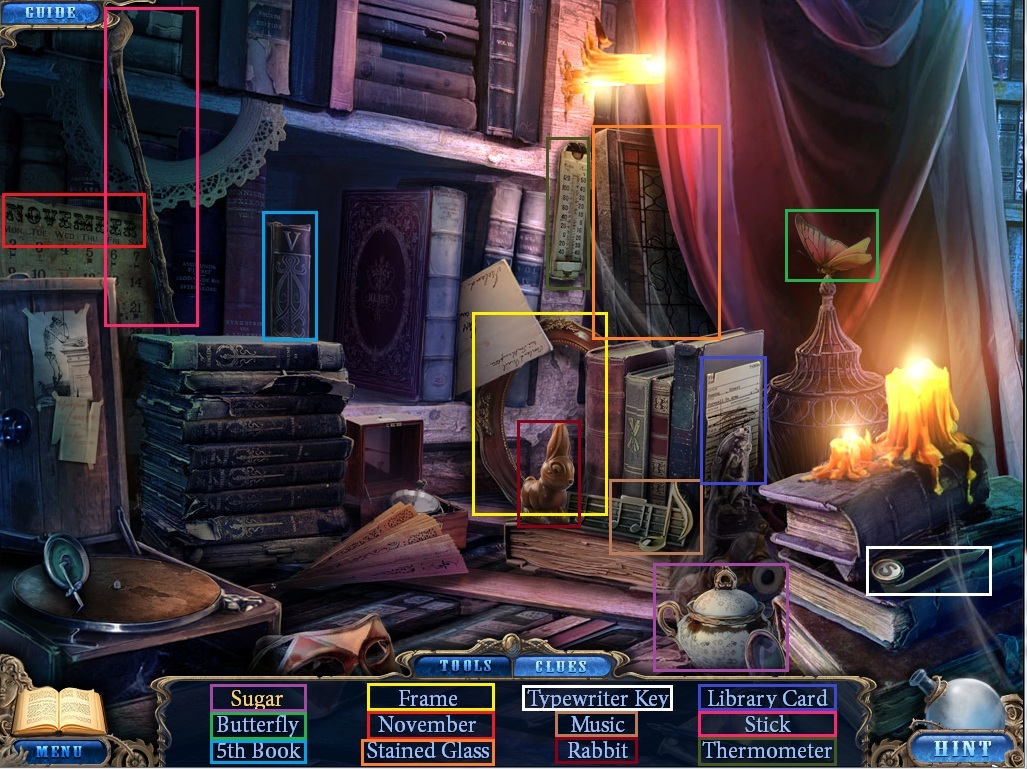
Click the stack of books to start the hidden object scene.
Screenshot.
Use the Horns on the figurine to complete the Stag.
Use the Overprint on the wax seal to create the Stamp.
Click the record player to lift the lid and take the Record.
Click the fan to close it, revealing the King of hearts playing card.
Use the feather quill Pen on the paper scroll to make an ink Blot.
Take the Screwdriver from the floor, near the lower right corner.
Leave the library and return to the catacombs.
The Catacombs
Click the large gorgon statue for a closer look.
Put the Bracelet from your inventory on the wrist of the gorgon statue.
Take the vial of Poison from the gorgon's necklace.
Click the archway at the top of the stairs to repeat the hidden object scene.
Screenshot.
Leave the catacombs and across the bridge into the nelumbo study.
The Nelumbo Study
Click the bird cage hanging from the ceiling.
Use the Screwdriver from your inventory on the three screws at the bottom of the cage.
When the cage is opened, Book IX will fall to the ground. Click it to add it to your inventory.
Click the glittering area underneath the cage to repeat the hidden object scene.
Screenshot.
Leave the study and return to the library.
The Library
Click the stack of books on the left to repeat the hidden object scene.
Screenshot.
Click the cup of sugar to lift the lid and reveal the Sugar cubes.
Click the glass case in the center of the room.
Use the Weight from your inventory to smash through the glass case.
Use the Blowtorch from your inventory to burn the black book.
Click the bookcase in the corner of the room for a closer look.
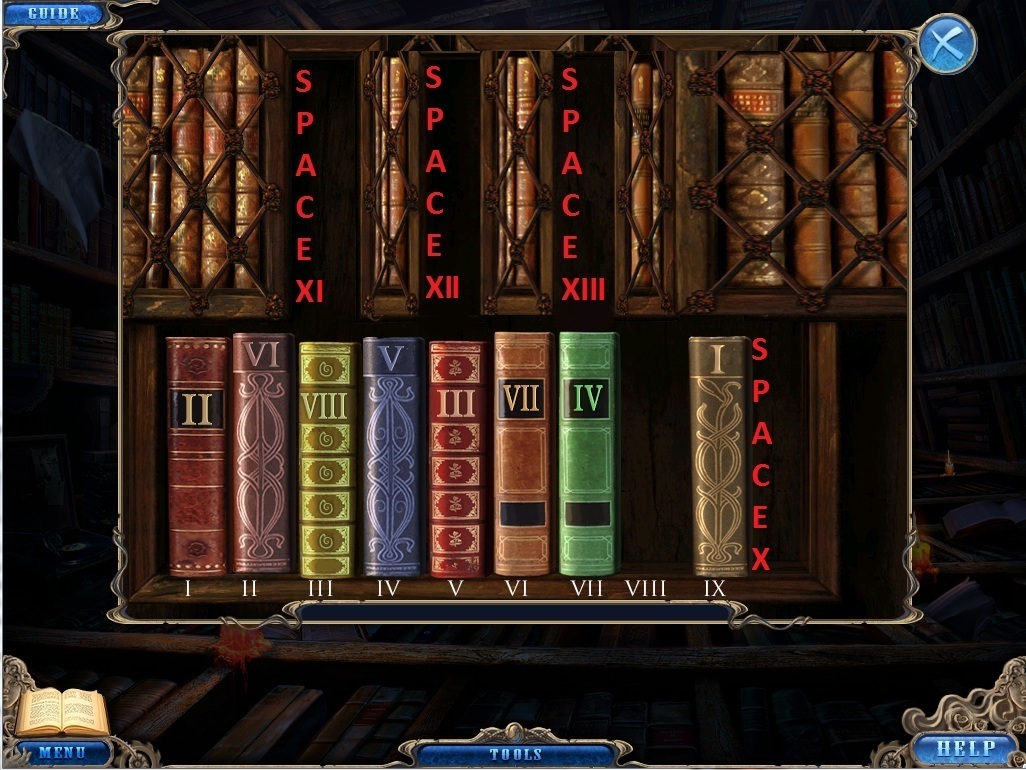
Add Book V, Book VI, and Book IX from your inventory to the bookshelf to begin the book puzzle.
To solve this puzzle, each book with a roman numeral needs to be placed in the space with the matching roman numeral.
Screenshot.
Move Book VIII to Space XI
Move Book III to Space XII
Move Book V to Space III
Move Book VII to IV
Move Book IV to Space V
Move Book IX to Space XIII
Move Book I to Space VI
Move Book IX to Space X
Move Book I to Space XIII
Move Book IV to Space IX
Move Book VII to Space VIII
Move Book V to Space VII
Move Book VIII to Space VI
Move Book VI to Space XI
Move Book III to Space II
Move Book VIII to Space XII
Move Book V to Space III
Move Book I to Space IV
Move Book VII to Space XIII
Move Book VIII to Space VIII
Move Book VII to Space XII
Move Book VIII to Space XIII
Move Book IV to Space V
Move Book VIII to Space IX
Move Book IV to Space XIII
Move Book VII to Space VIII
Move Book I to Space XII
Move Book V to Space VII
Move Book III to Space VI
Move Book I to Space II
Move Book VI to Space XII
Move Book I to Space XI
Move Book II to Space V
Move Book I to Space I
Move Book II to Space II
Move Book III to Space XI
Move Book V to Space III
Move Book IV to Space IV
Move Book VI to Space VII
Move Book IV to Space XII
Move Book V to Space VI
Move Book III to Space III
Move Book IV to Space IV
Move Books V, VI, VII, VIII, and IX all back once into their respective matching spaces.
Once you've successfully solved the puzzle, go through the open door behind the bookcase into the fog control room.
The Control Room
Use the Poison from your inventory on the giant fog snake.
Click the window at the top of the mechanism in the center of the room to zoom in.
Flip the latches on the top and side of the window to release the air pressure from the mechanism.
Click the center of the mechanism to take a closer look.
Use the Spear from your inventory to break the geared device.
Click the Forceps beside the furnace and use them to pick up the Valve at the top of the furnace.
Leave the control room and return to the catacombs.
The Catacombs
Use the Valve from your inventory on the mechanism in front of the rope bridge to flood the chambers.
The End
Posted by: Trinn |
June 2, 2011 3:24 PM
|
June 2, 2011 3:24 PM
The 5 Gem Locations:
Lillian Bennet's tombstone requires 5 diamonds and the Shining Star to start the puzzle.
The Shining Star is found in the Cemetary. Use the Tiara on the angel statue and take the Shining Star from her hands.
Diamond #1 is found at the Tutorial area at the very start of the game. If you completed the tutorial, then you will receive Diamond #1 (called Gem) from the tutorial hidden object scene. If you skipped the tutorial, simply click the Silvertown city sign to zoom in and take Diamond #1.
Diamond #2 is found at Front Lawn. Complete the gnome puzzle and a secret compartment in its chest will open, revealing Diamond #2.
Diamond #3 is found at Rivera's Meat Farm. Complete the hidden object scene and you will receive Diamond #3.
Diamond #4 is found at the Cemetary. Take the stone Rose found in the boat at the Backyard. Use the Rose on the empty space at the top of Susan Bennet's tombstone, revealing Diamond #4.
Diamond #5 is found at the Basement Slaughterhouse. Find the combination of runes from the developed photo, then enter the combination into the panel on the stairs at the slaughterhouse. Take Diamond #5 from the revealed cache.
Posted by: Trinn |
August 11, 2011 9:47 PM
|
August 11, 2011 9:47 PM