
Dark Dimensions: Wax Beauty
Platform: Mac, Windows

![]() Your continuing search for Dark Dimensions, places of such great emotional torment and anguish that they've psychically altered the landscape like the world's largest collection of The Cure memorabilia, leads you to Silvertown, ME. True to form, things are looking dark indeed when you are immediately beset upon by ghostly apparitions pleading for you to "save them from the wax" shortly after your arrival... and I don't think they're talking about a spa treatment. Dark Dimensions: Wax Beauty by Daily Magic Productions is a wonderfully creepy (and just a tad corny) hidden-object adventure that delivers a weird and wonderful experience with twice as many haunting, tortured living wax creations as you need for a sound night's sleep. Pleasant dreams!
Your continuing search for Dark Dimensions, places of such great emotional torment and anguish that they've psychically altered the landscape like the world's largest collection of The Cure memorabilia, leads you to Silvertown, ME. True to form, things are looking dark indeed when you are immediately beset upon by ghostly apparitions pleading for you to "save them from the wax" shortly after your arrival... and I don't think they're talking about a spa treatment. Dark Dimensions: Wax Beauty by Daily Magic Productions is a wonderfully creepy (and just a tad corny) hidden-object adventure that delivers a weird and wonderful experience with twice as many haunting, tortured living wax creations as you need for a sound night's sleep. Pleasant dreams!
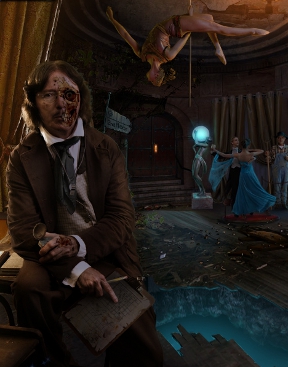 As it turns out, at the rotten core of the whole thing are Luciana Costello and her brother, Sebastian. Luciana dreams of winning her town's beauty pageant and the accompanying scholarship as prize, but her jealous brother seems determined to stand in her way. But how do you get from a little sibling rivalry to a massive earthquake and a creeping shroud of sentient wax that appears to have taken over the town? I mean, I had some pretty epic disagreements with my brother and sister, but we never quite got to the "bitter evilness that condemns an entire village to unholy darkness" stage. Explore the town to uncover the truth behind the mystery, and the strange, sinister wax museum. Just click around to interact, and your cursor will change when you're over a place you can do something with. Find objects, solve puzzles and hidden-object scenes, and do your best to avoid getting immortalised in wax... it isn't as flattering as you might think.
Analysis: Dark Dimensions: Wax Beauty might just be the most hilariously over the top hidden-object horror adventures to date. I mean... they're always a little campy, but one of the first things you see in Wax Beauty, apart from a chasm of hands dismantling a bridge, is a freaking doom gate complete with flocks of bats that looks like it belongs outside of Modor, the Deep Roads, or maybe Shayol Ghul. It's glorious. Story-wise, while nothing that's ever going to climb the bestseller list alongside Stephen King, Wax Beauty at least manages to keep things interesting by pulling out a few unexpected twists and turns as you explore. The series has adopted the new fad of using actual people for their cutscenes, and for the most part, this works... all right despite some awkward pauses. The actual, physical actors tend to look the part and emote well enough, but it looks like their performances were recorded in another language, so the tone of voice and pauses the English voice-overs use don't always fit with what you see the actors emoting.
 The hidden-object scenes tend to have a lot of mini "puzzles" in them, objects that can only be acquired by combining something onscreen. While this does provide a bit of extra lovely brainwork over simply staring at the screen, some of those combos can be a bit... odd, and the frequently dark or skewed perspectives rarely help. Fortunately, while the rest of the gameplay is only standard for an adventure game, it's still a lot of fun. Though it doesn't do anything revolutionary, Dark Dimensions: Wax Beauty still gets the most important thing done right; it entertains you. It's a beautiful game, and the moody, otherworldly locales are packed with tons of great detail that keeps you on your toes as you explore. If you want something really innovative or challenging then you might find Wax Beauty doesn't deliver enough of either category, but as a means to unwind and lose yourself for an evening it's a top-notch adventure for fans of drama and high camp horror. It is unfortunately somewhat on the short side, with an average playthrough potentially lasting between three to four hours. As always, try the demo before you buy, but if you're looking for a spooky, weird adventure, give this one a look. And then give any wax museums you might drive by in the future a pass.
A Collector's Edition is also available. It contains a bonus chapter, art gallery, strategy guide, and more. Remember that Big Fish Game Club Members pay only $13.99 for Collector's Editions (or 2 club credits), and collector's editions count 3 card punches of 6 total needed for a free game.
![]() Windows:
Windows:
Download the demo
Get the full version
Also available: Collector's Edition
![]() Mac OS X:
Mac OS X:
Download the demo
Get the full version
Also available: Collector's Edition


Walkthrough Guide
(Please allow page to fully load for spoiler tags to be functional.)
Dark Dimensions: Wax Beauty
Basic Information
Starting Screen
You can skip the starting cut scene to reach the main menu right away.
You will be asked to enter in a name.
From the menu, you have the choice to click on the options tab.
In the options tab, you can change the volume for music and sound. You can also change the cursor to the normal arrow or change the screen size based on your computer resolution.
There is a help tab, which explains in game information.
You can also access the credit tab, which tells you all the people who helped make the game.
At the bottom right is the tab showing the name you've chosen for your game play. You can click on this tab to create multiple save tabs or to delete played games.
In Game
There are two modes of play:
Casual: Areas that can be investigated, picked up, or start a hidden object scene will sparkle. Hint and skip options recharge quickly. There is no penalty for clicking excessively.
Advanced: There are no indicative sparkles. Hint and skip options recharge slowly. There is a penalty for clicking too many times.
On the bottom left of the screen is your menu button, which will open up the menu much like the starting screen.
There is also a journal that will keep track of information you obtain throughout the game.
At the bottom middle of the screen is your inventory tab that you must hover over with your cursor to reveal.
On the bottom right of the screen is your hint button. Click it in order to use a hint.
Hidden object scenes are randomized.
If an item is written in yellow, then you will have to do extra work to reveal it.
Chapter One: The Park and Mainstreet
Opening the Gate
Try and go towards the left path with the blue light.
Inspect the backpack and click on it to open it.
Pick up the bell, water canteen, and mushroom.
Click on the medallion and place it on the box, then click it to open the box and reveal the unicorn.
You receive a water canteen.
Use the water canteen on the tree stump that's on fire.
Zoom in on the tree stump and pick up the screwdriver and the candle snuffer.
Investigate the sign the crow is sitting on.
Use the screwdriver on all four screws to receive the billboard.
Place the billboard over the chasm leading to the left path.
Go forward.
Inspect the doll and pick up the puzzle piece and the map.
Use the candle snuffer on the candle and pick up the pliers.
Zoom in on the wheelbarrow to the right and pick up the poster.
Go back once and investigate the train tracks.
Pick up the paper from the book. Use the pliers on the track to remove the second puzzle piece.
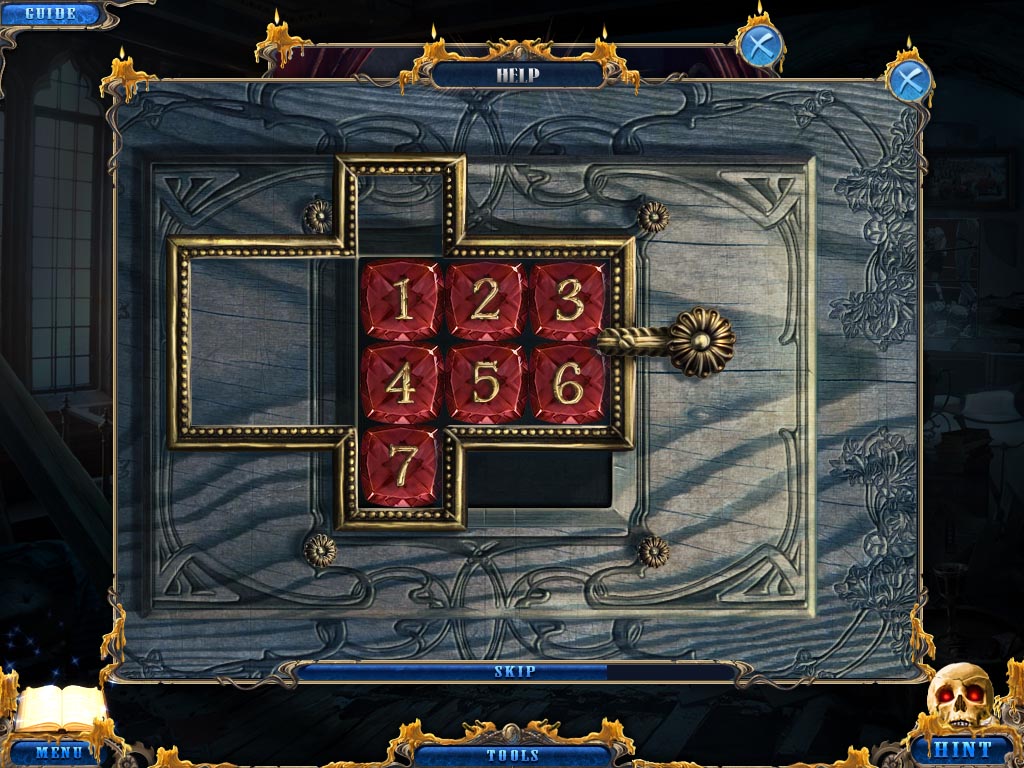
Go forward once more and zoom in on the gate. Place both puzzle pieces on the puzzle to activate it.
Screenshot
Getting the Shovel
Move forward once and pick up the infrared glass.
Click forward twice.
Zoom in on the hand on the floor and remember the code. Pick up the piece of paper as well.
Go left.
Investigate the picnic table and pick up the garden shears. Click on the Beauty Pageant score sheet to take it.
Inspect the bushes to the right of the harp. Grab the little knife. Click on the envelope to open it, then take both the picture and the letter.
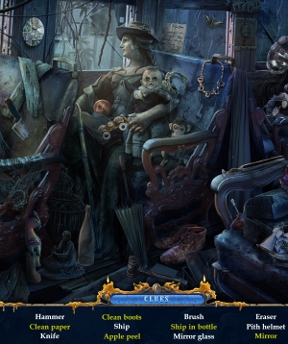
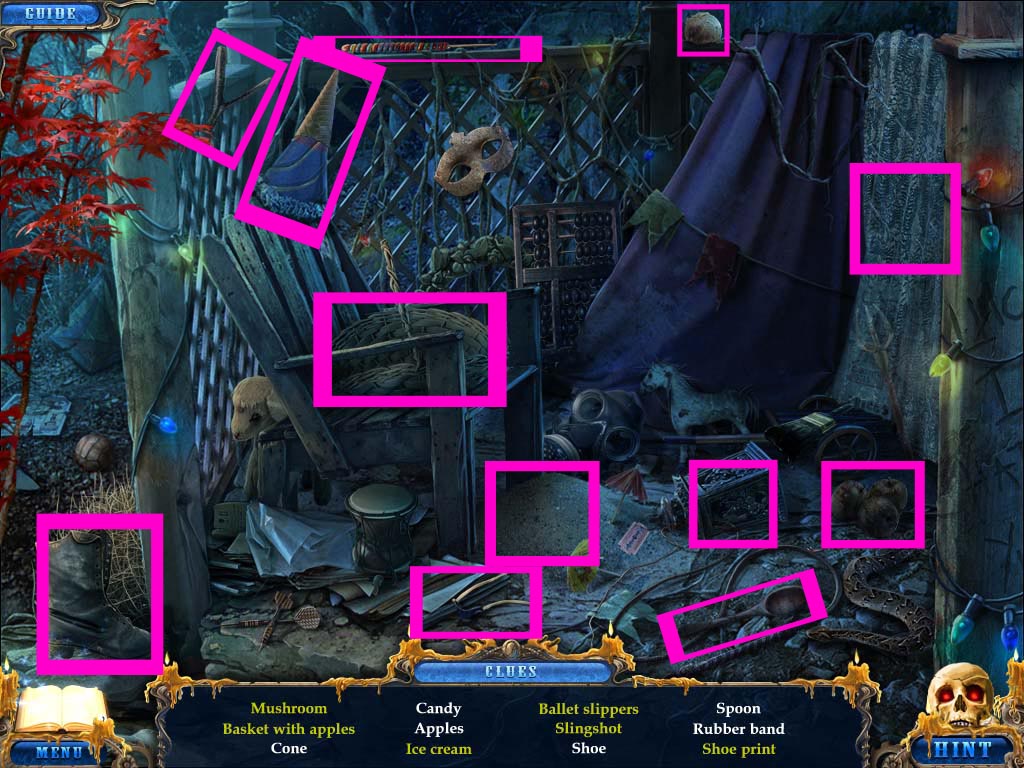
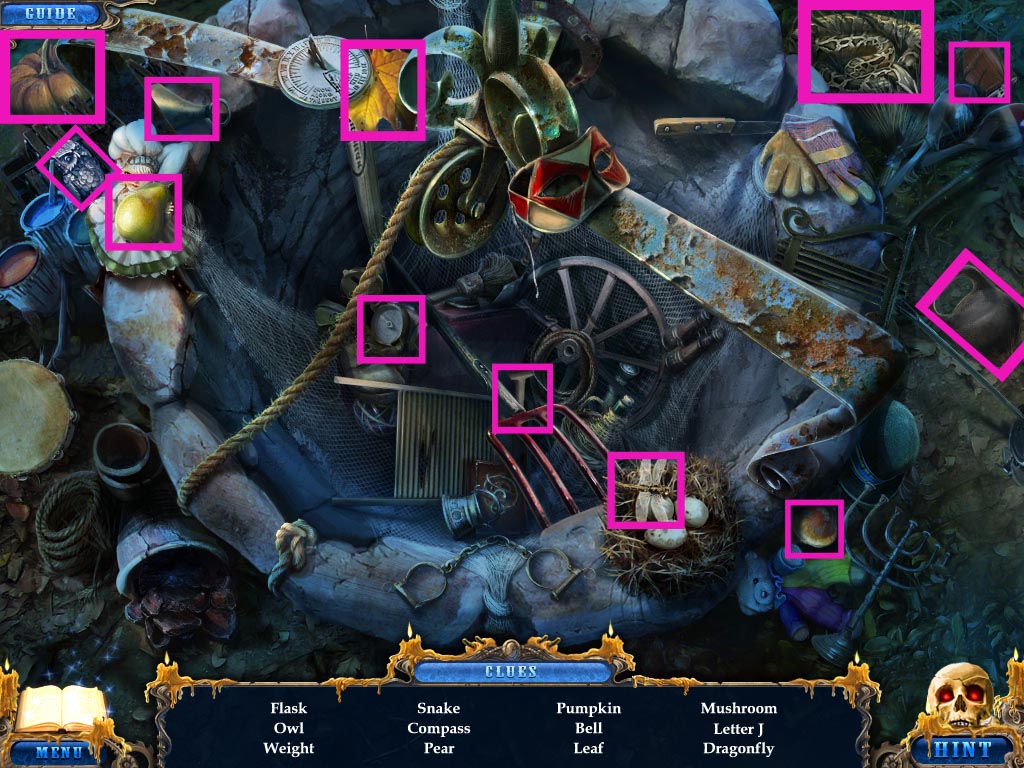
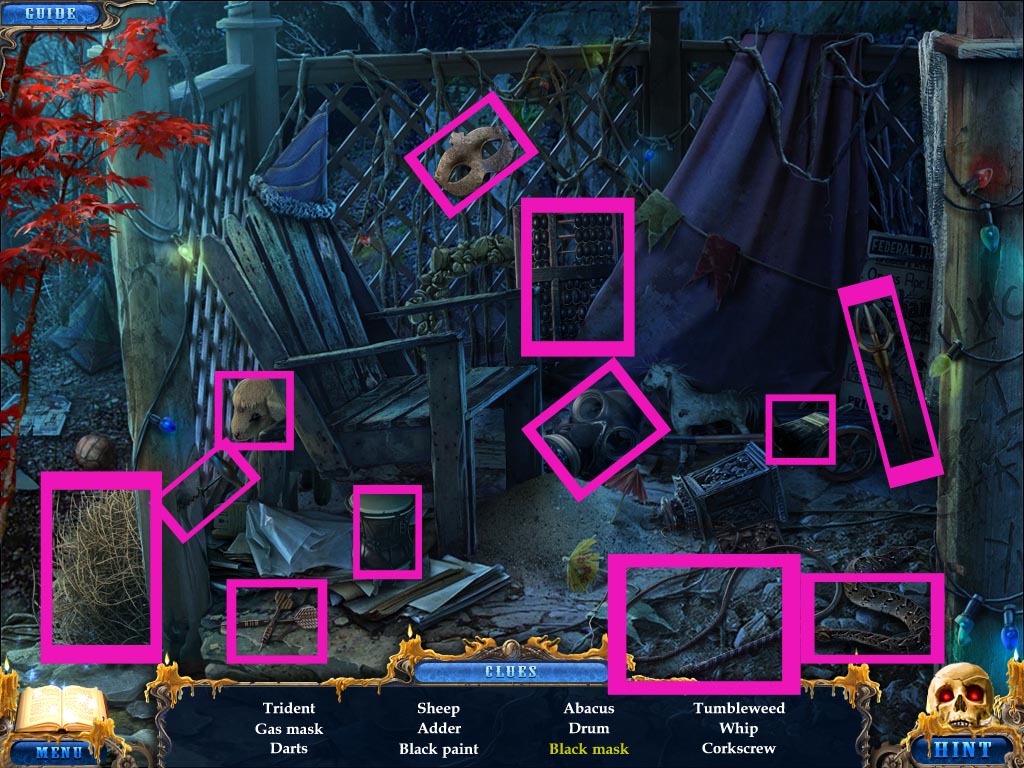
Go back once and use the garden shears on the ivy on the gazebo to reveal a hidden object scene. Click to start.
Pick up the cone and place it on the ice cream scoop to get the ice cream cone.
Click on the shoe and place it on the pile of sand to create the shoe print.
Pick up the apples and place them in the basket on the chair to make the basket with apples. Click to pick that up.
Click on the face of the lantern to open it and reveal the mushroom.
Pick up the rubber band that's on the floor to the left of the pile of sand and place it on the Y-shaped piece of wood to make a slingshot.
Click on the blanket to the right of the purple blanket to reveal the ballet slippers.
Screenshot
You receive a spoon.
Inspect the rock with the mask and use the spoon to scoop out the glass eye.
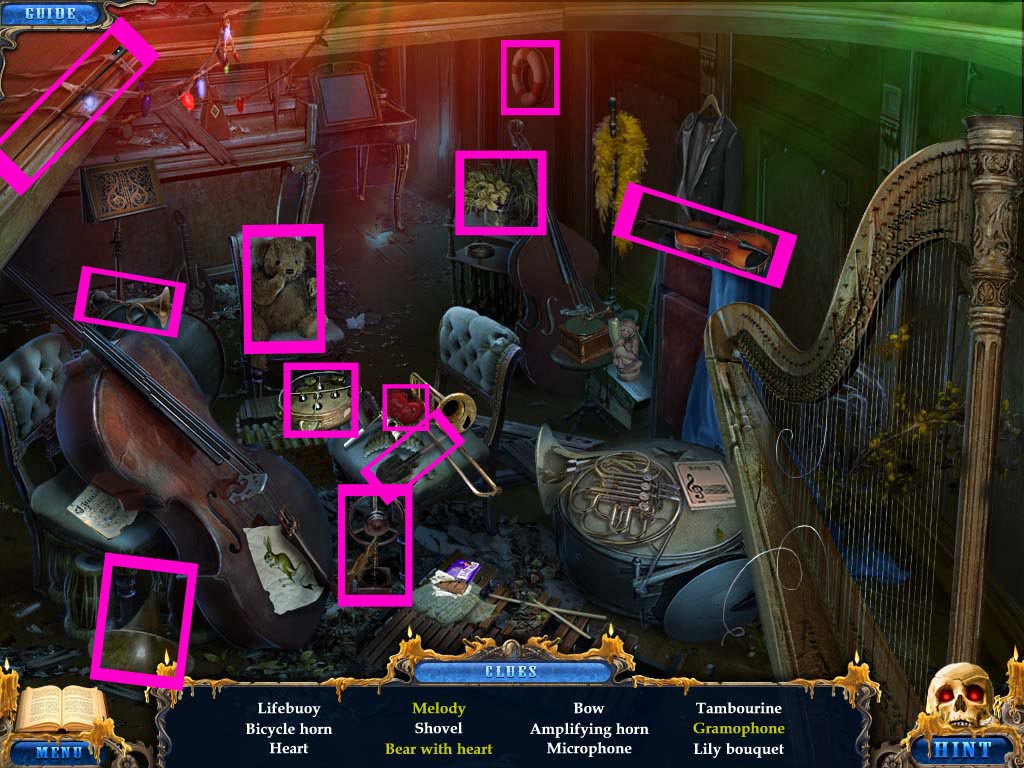
Go left once more and start the hidden object scene.
Pick up the heart that is on the chair with the trombone and place it in the arms of the teddy bear.
Pick up the horn on the floor to the left of the cello and attach it to the machine on the chair underneath the feather boa to make the gramophone.
Grab the bow and use it on the violin to create the melody.
Screenshot
You receive a shovel.
Getting the Mirror
Inspect the area where you got the little knife and click on the poster to reveal a hidden cabinet. Place the glass eye in the circular spot to open it, then pick up the nail puller.
Inspect the drum to the far left of the stage and use the shovel on the dirt in the stand. Pick up the handle.
Zoom in on the column with all the posters to the very left. Click on the poster to reveal a hidden door and place the handle on it.
Pick up the infrared light bulb.
Go back once and inspect the crate to the right of the gazebo. Use the nail puller on each nail individually to open it.
Place the infrared light bulb in the camera/lantern first, followed by the infrared glass.
Pick up the infrared lantern when done.
Inspect the gate and use the infrared lantern on the writhing mass of wax hands.
Enter in the proper code:
8-4-1.
Go forward through the gate.
Zoom in on the ground where the backpack is and pick up the bulb and the letter.
Inspect the wax dog and use the little knife to cut off the muzzle.
Pick up the medallion and also look at the newspaper.
Go forward.
Pick up the drawing on the left sidewalk.
Inspect the table with the two men and pick up the saw, then read the paper column.
Zoom in on the menu to the left of the waiter and pick up the hammer.
Go back once and investigate the trolley cart. Use the hammer twice to shatter the glass window.
Pick up the piece of paper, then turn the lever to reveal a hidden object scene.
Pick up the knife and use it to peel the apple.
Pick up the eraser and use it on the paper in the window behind the woman to erase the writing.
Grab the brush and use it on the boots to clean them.
Pick up the mirror glass and place it in the holder the baby has to create the mirror.
Click on the ship and place it in the bottle.
Screenshot
You receive a mirror.
Getting to the Floating Wax Museum
Zoom in on the statue of Medusa and use the mirror on her.
Go left.
Inspect the bottom of the tree and use the saw on all three roots individually. Pick up the valve.
Go back twice and click on the fire hydrant. Place the valve on the hydrant and click it to stop the flow of water.
Pick up the key.
Start the hidden object scene.
Screenshot
You receive a gramophone.
Go forward once, then go left. Inspect the bottom of the speaker pole and use the key to open the cover.
Pick up the brass pumpkin.
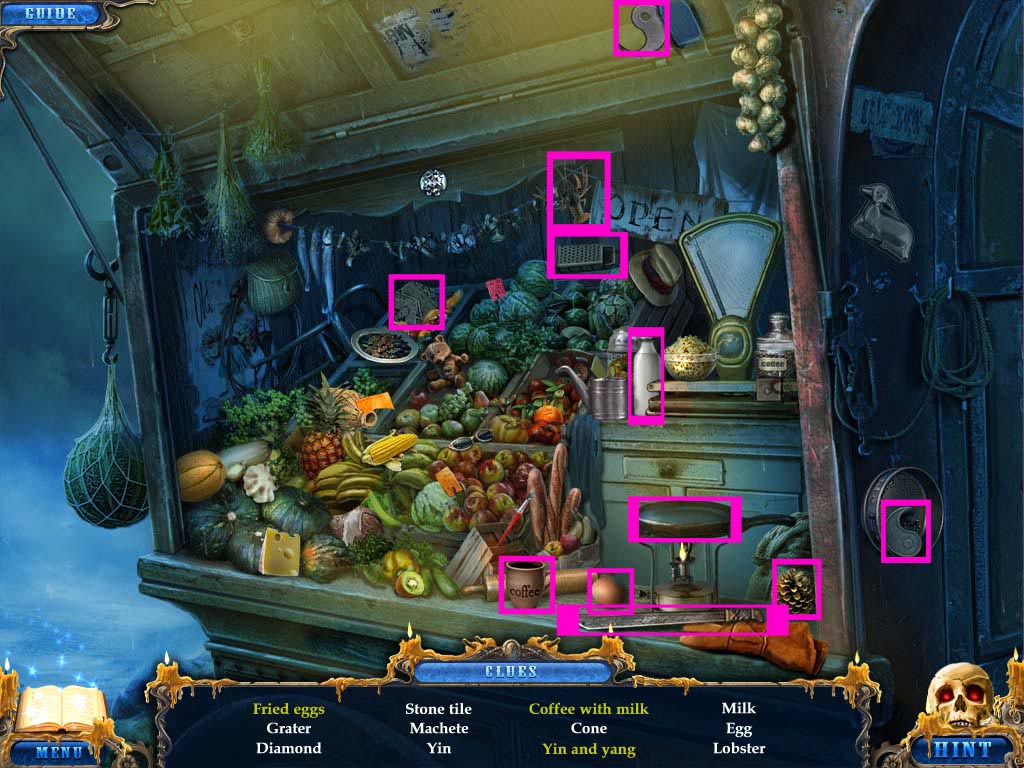
Inspect the wagon and place the brass pumpkin on the scale to reveal a hidden object scene.
Pick up the milk and pour it in the coffee cup.
Pick up the egg and crack it over the skillet to make fried eggs.
Grab the yin and attach it to yang.
Screenshot
You receive stone tile.
Inspect the shutters on the house and place the stone tile in the empty circle to start a puzzle.
You will need to rotate each stone piece until it's in the correct direction. The piece will glow when in the correct direction.
For the second part of the puzzle you can click on pieces to swap them. You click on one and then another to swap.
Screenshot
Zoom in on the shutters once more and pick up the record, then read the letter.
Inspect the bottom of the pole once more where you originally grabbed the brass pumpkin.
Place the gramophone inside, then place the record on top of the gramophone.
Go forward to the floating building.
Getting the Third Medallion
Pick up the hook that's to the right of the statue.
Investigate the wax figurine and pick up the bell clapper and the ring.
Inspect the package and use the little knife to cut the twine. Pick up the acid and read the letter.
Go back twice and use the hook to bring down the kite. Inspect the kite once it's on the ground.
Pick up the glass heart and read the piece of paper.
Inspect the tree and use the acid on the bird cage. Pick up the wax bird.
Go back once and zoom in on the fountain. Place the glass heart in the empty spot.
Place the wax bird in the red water and pick up the W.
Zoom in on the bell in the doorway to the left of the fountain and place the bell clapper in the bell.
Inspect the rubble and pick up the medallion and piece of paper.
Go forward once, then left, then forward once more to the floating building and inspect the stairs. Place the W in the empty spot for it.
Pick up the button, then go back twice.
Zoom in on the menu and place the button in the empty spot. Press it.
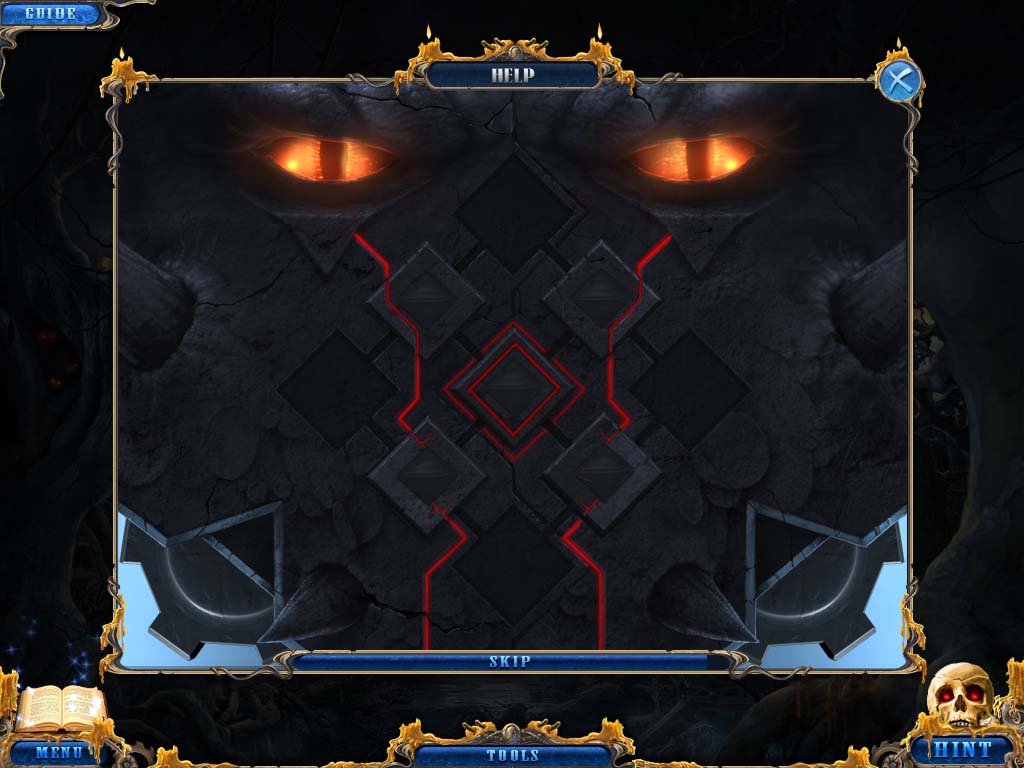
Investigate the sign and place the bulb on it to start a puzzle.
You must click on the little circular bulbs to light the bigger bulbs. They must be turned on in the proper order and you cannot cross wires.
Screenshot
Pick up the medallion, then go left.
Getting to the Cinema Area
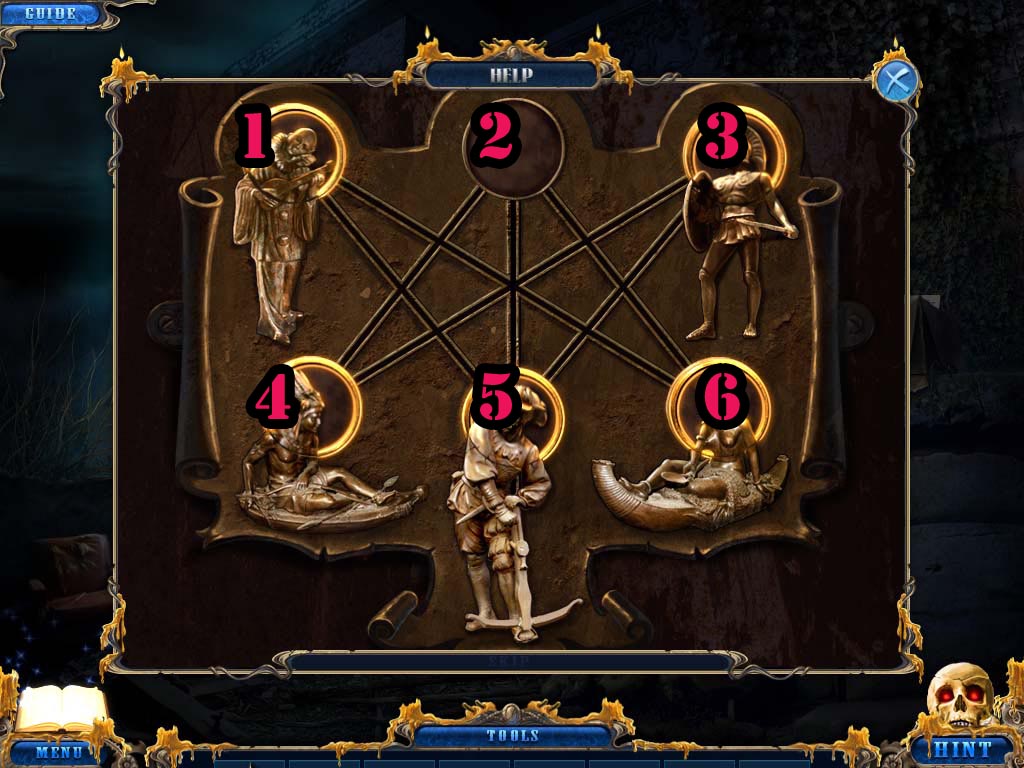
Go forward to the building and zoom in on the door. Place all three medallions on the door to activate a puzzle.
Move the medallion so that the appropriate head is attached to the correct body.
Move the medallion in spot 3.
Move the medallion in spot 4.
Move the medallion in spot 2.
Move the medallion in spot 5.
Move the medallion in spot 3.
Move the medallion in spot 4.
Move the medallion in spot 2.
Move the medallion in spot 5.
Move the medallion in spot 1.
Move the medallion in spot 6.
Move the medallion in spot 2.
Screenshot
Go through the door into the museum.
Inspect the broken vase and pick up the paper and the lighter.
Go back three times and inspect the sandbags at the back of the scene.
Use the lighter on the dynamite.
Move forward.
Chapter Two: The Cinema Area
Get the Date
Inspect the bottom of the gate to the right of the vending machine and pick up the blue tile.
Investigate the red post box and pick up the announcement letter. Enter in the code:
2-6-1-2.
Pick up the newspaper article, the blue tile and the postal office key.
Use the postal office key in the lock to the right to open the door.
Go forward through the door.
Start the hidden object scene.
Take the handset and place it on the cradle to complete the phone.
Use the pencil on the paper with the 10 to create 100.
Pick up the lampshade and place it on the lamp to get the lamp stand.
Grab the clean paper and place it in the typewriter to write out a tale.
Pick up the lens and place it on the camera to complete it.
Screenshot
You receive an elevator lever.
Inspect the briefcase at the back left of the room and pick up the thread. Read the newspaper announcement as well.
Go back once and zoom into the elevator to the left of the newspaper office.
Place the elevator lever on the mechanism. Click on it to go up, then move forward.
Investigate the chalkboard and pick up the dry sponge.
Click on the screen to move it, then click on the wall to reveal a hidden door.
Go back to the elevator and click the switch to go down. Move back once into the street.
Zoom in on the vending machine and place the dry sponge in the holder, then press the button to release water. Pick up the wet sponge.
Return to the elevator and go back up into the apartment once more.
Use the wet sponge on the chalkboard three times.
Pick up the ticket and take note of the date.
Getting the Duster
Go to the elevator and go down. Go into the newspaper office and inspect the wooden item on the right table (a calendar). Put in the date:
June 14th. Tuesday.
Pick up the paper and the tile.
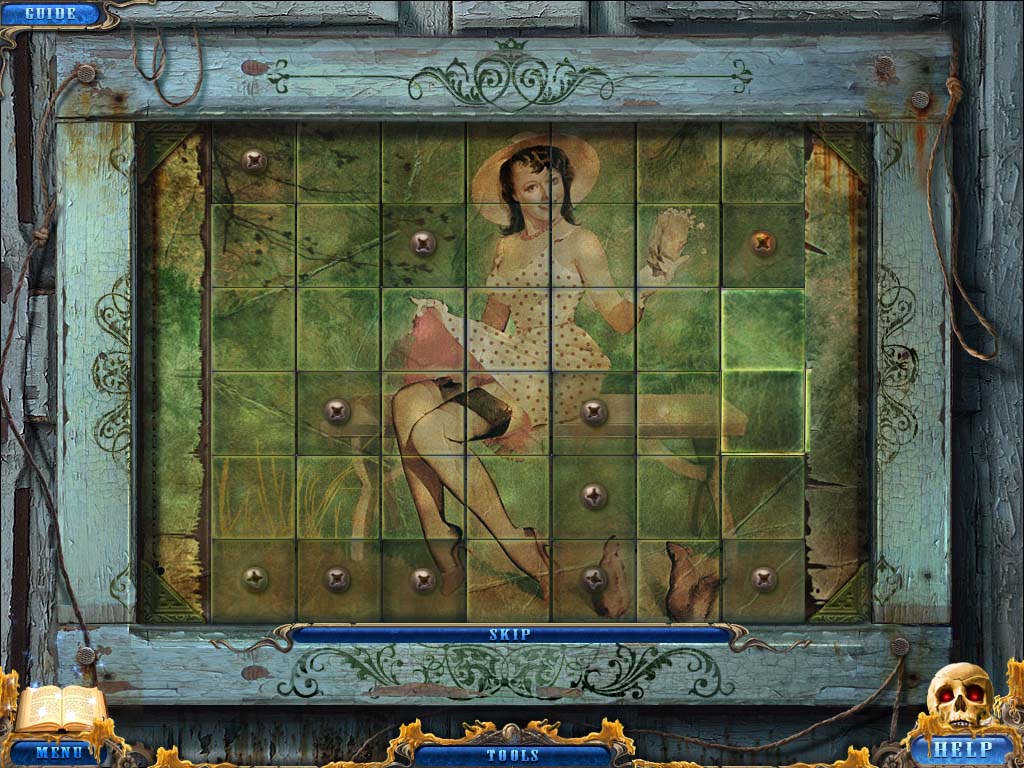
Go back once, then go up the elevator into the apartment. Click on the puzzle on the door and place the tile on it to start the puzzle.
Move the tile pieces to complete the image of a woman.
The image is randomly generated. Clicking on pieces with a screw will move tiles around that tile. Clicking one normal tile will also move multiple others.
Screenshot
Go forward through the door.
Click on the wardrobe to move it out of the way.
Inspect the film reel and pick up the needle that's pinning the picture. Click on the picture as well.
Zoom in on the sewing machine and place the needle and thread on it.
Pick up the oven mitt.
Click on the face of the wax figure. Zoom in on the figure and pick up the paper.
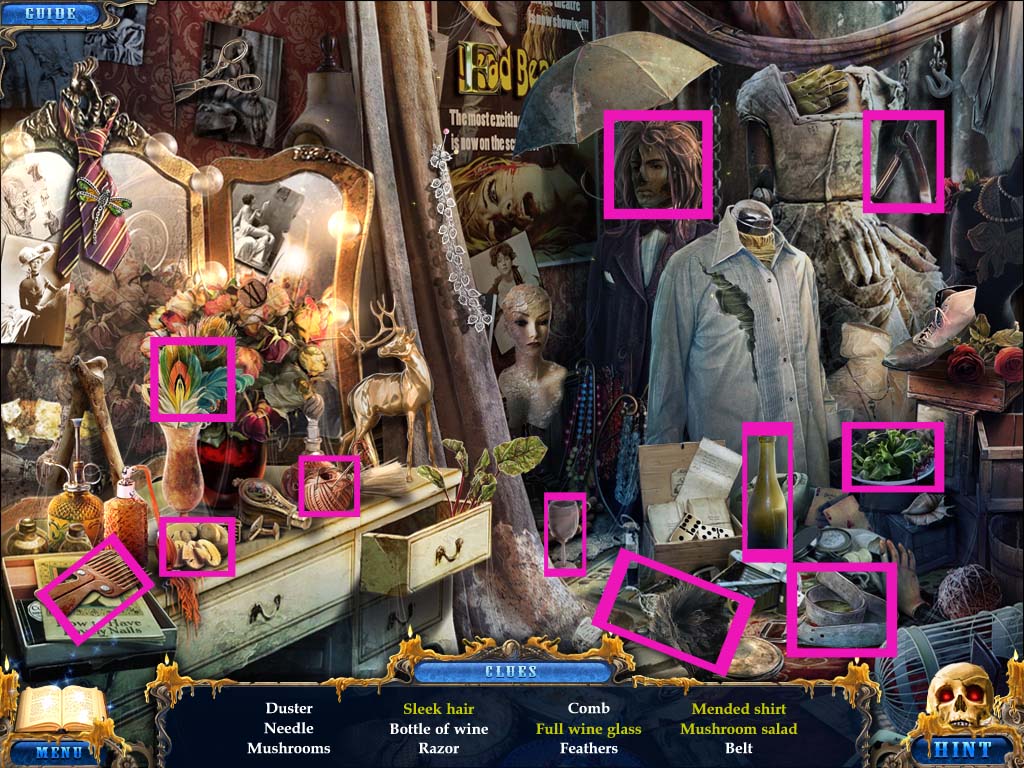
Start the hidden object scene.
Pick up the comb and use it on the hair to make it sleek.
Pick up the bottle of wine and pour it into the glass.
Pick up the ball of thread and needle and use it to repair the shirt.
Grab the mushrooms and place them in the salad.
Screenshot
You receive a duster.
Getting into the Cinema
Go back once and zoom in on the purse sitting on the chair. Use the duster multiple times to clear away the dust.
Click it open and pick up the magnet.
Return to the newspaper office.
Zoom in on the briefcase that you retrieved the thread from originally and use the magnet on the tear. You receive forceps.
Start the hidden object scene.
Screenshot
You receive a camera part.
Go back up the elevator into the apartment and zoom in on the hookah. Use the forceps to remove the coal and pick up the IV tile.
Go forward through the door and zoom in on the camera. Place the camera part on the film reel and click on it.
Pick up the piece of paper and the film.
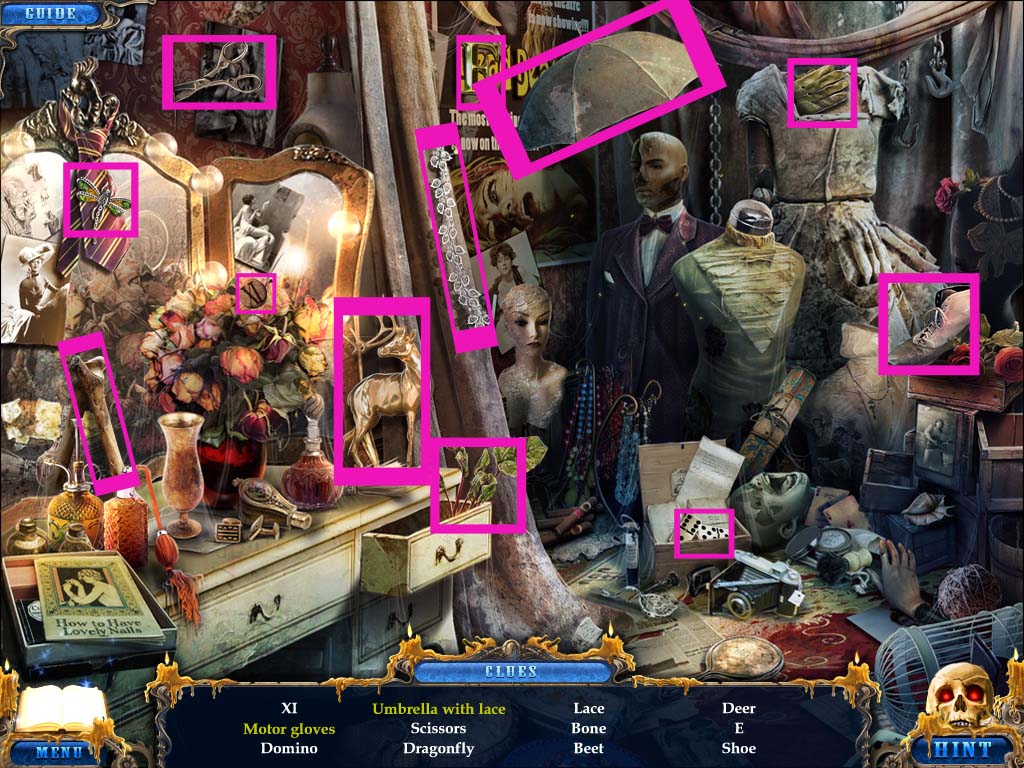
Start the hidden object scene.
Pick up the lace and place it on the umbrella.
Use the scissors on the gloves.
Screenshot
You receive the IX tile.
Go back to the newspaper office and zoom in on the clock. Place the two tiles on the clock face to start a puzzle.
Place the proper tile in the correct time slot. Click on one tile and another to swap the two.
Pick up the head, blue tile, and the two papers.
Inspect the door of the cinema and place the head on the pole between the two snakes.
Go forward into the cinema.
Getting the Gear
Investigate the chandelier and pick up the hex key and the coin.
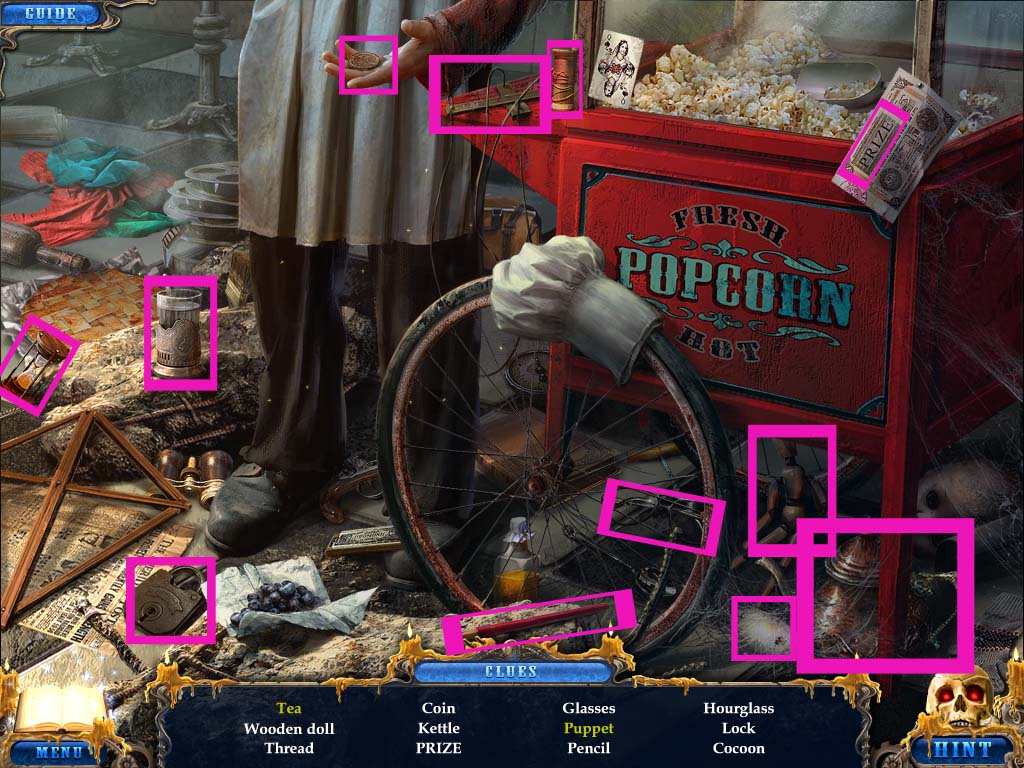
Start the hidden object scene.
Click on the paper to reveal Prize.
Attach the wooden toy to the strings to make a puppet.
Pick up the kettle and pour the tea into the cup.
Click on the hand to reveal the coin.
Screenshot
You receive a coin.
Investigate the ticket booth and place both coins in the slot. Click to retrieve the ticket.
Inspect the door on the first floor and place the ticket in the mechanism.
Go through the door.
Investigate the hatch in the middle of the room and use the hex key to open it. Pick up the clef.
Go back once into the lobby and zoom in on the piano. Place the clef on the bar. Click on it and move it to the right.
Pick up the tumbler and rope.
Inspect the chandelier and place the rope on the hook. Click on it to retrieve the grappling hook.
Go forward into the theatre and use the grappling hook on the balcony with the woman.
Pick up the fire hose.
Go back and zoom in on the top floor door. Use the lighter to burn the film and open the door.
Go through the door. Inspect the wax figurine.
Read the note on the paper cutter, then place the fire hose on the paper cutter. Click on the paper cutter to cut the fire hose.
Pick up the fire hose part.
Go back twice and zoom in on the faucet. Attach the fire hose part to it and click on the lever.
Pick up the gear.
Getting the Radio Button
Go into the theatre, then go through the upstairs door. Zoom in on the cabinet to the right. Place the gear in the empty spot for it.
Grab the monkey and the left medusa face.
Go down once, then go through the bottom door.
Inspect the chair with the chest and place the monkey next to it.
Pick up the winder.
Go back once into the lobby and zoom in on the plane on top of the globe that's above the ticket booth.
Place the winder on the airplane.
Click on the winder once to make the plane move, then pick up the triangular key.
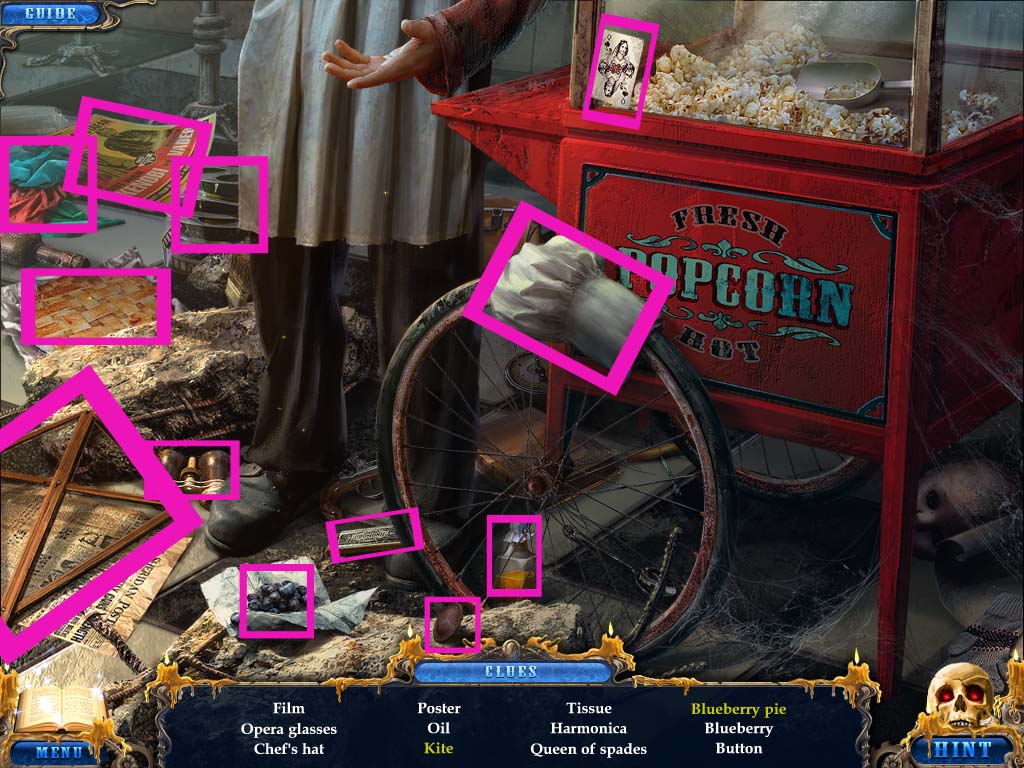
Start the hidden object scene.
Pick up the tissue and place it on the wooden frame to make a kite.
Grab the blueberries and place them on the pie.
Screenshot
You receive a radio button.
Getting into the Undertaker's
Go upstairs and inspect the camera. Place the tumbler in the empty spot for it, then click the switch to turn the camera on.
Use the triangular key to open the cover.
Place the film reel inside, then pick up the button.
Go back once, then go through the first floor door.
Inspect the red box at the front of the stage and place both buttons on the front to start the puzzle.
You have to make sure all the lights turn on by switching colors until like colors and shapes are touching each other.
Screenshot
Once you've gotten all the lights lit up, click on the red button in the center to start the cut scene.
Inspect all the wreckage on the floor and pick up the right medusa face.
Go back three times and inspect the door on the left. Place the right and left pieces of medusa's face on the door.
Go through the doorway.
Chapter Three: The Undertaker's and the Twin's Home
Getting the Chest Head
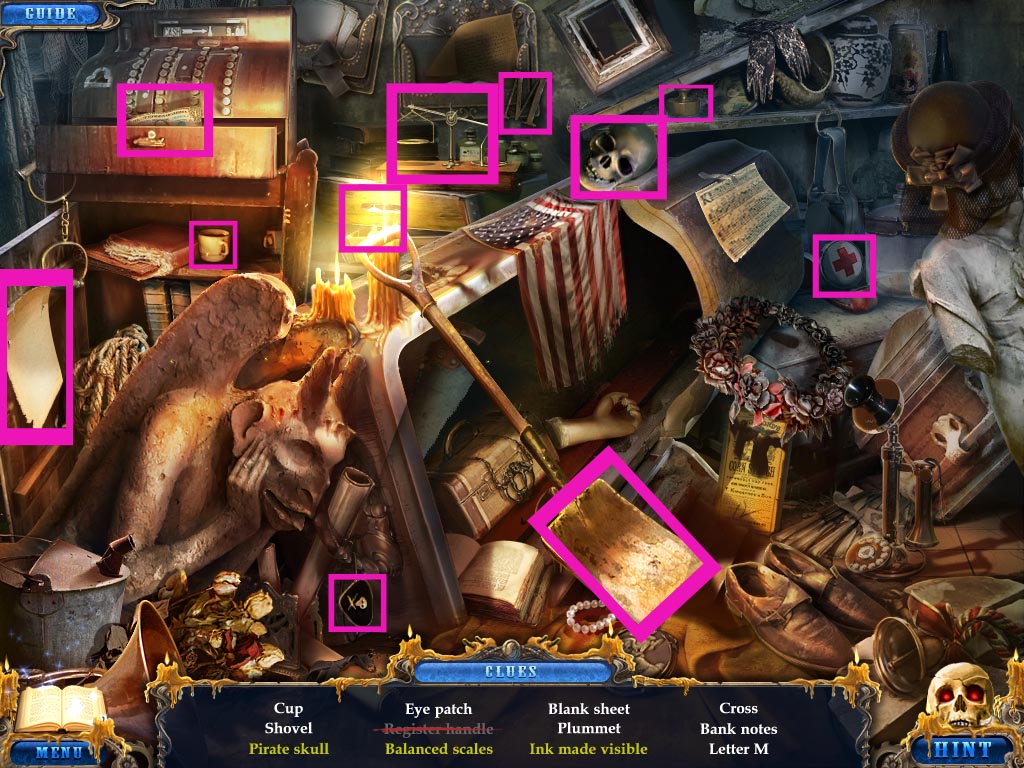
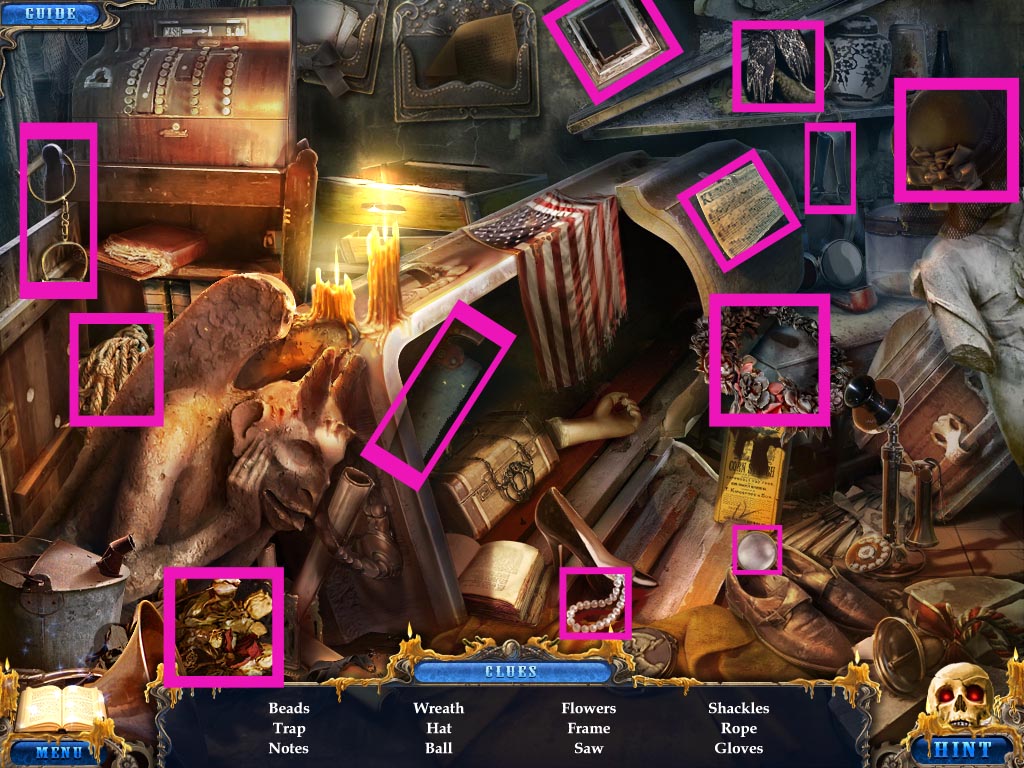
Start the hidden object scene.
Place the eyepatch on the skull.
Pick up the weight and put it on the scale.
Grab the register handle and place it on the register to reveal the bank notes.
Pick up the blank sheet and place it in the holder near the candle to get ink revealed.
Screenshot
You receive an M.
Go forward into the back room.
Inspect the desk to the left and click to open the bottom drawer. Pick up the O and read the paper.
Place the ring in the groove to reveal a compartment underneath. Pick up the hammer.
Zoom in on the surgery table and pick up the ether, then read the letter.
Click on the door of the coffin to receive the coffin door.
Go back into the first room and inspect the shelf with the flowers on it.
Read the letter and use the hammer on the bottle. Pick up the puzzle piece.
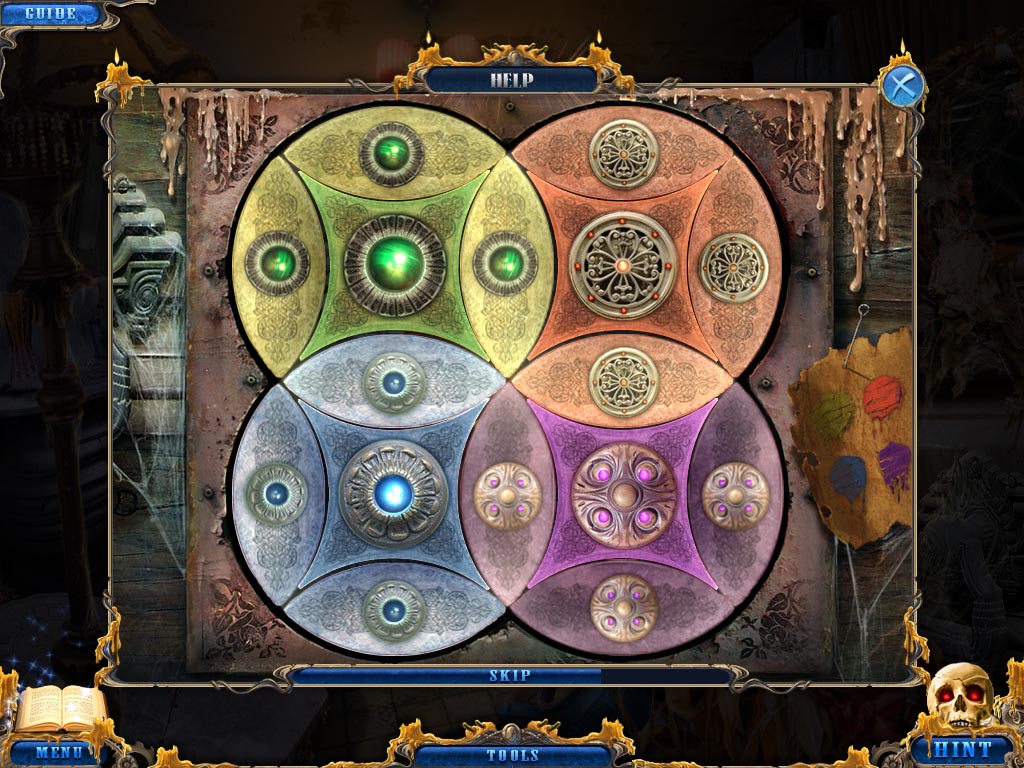
Inspect the square on the platform to the right of the tea cup. Place the puzzle piece on it to start the puzzle.
You must make each circle a solid color. Click the center of the circles to move the pieces and swap.
Screenshot
Pick up the chest head.
Getting the Letter J
Go forward and inpsect the statue on the right shelving. Place the chest head on the figurine.
Click on the figurine to open the box and pick up the scalpel.
Inspect the surgery table once more and use the scalpel on the strap to cut it, then pick up the barbell.
Go back once and zoom into the coffin.
Use the scalpel to cut the cloth material and pick up the binocular slider.
Go back twice to the area with the cable car. Zoom in on the gate next to the barber pole. Use the barbell to lift mechanism and open the door.
Go through the entry way.
Inspect the binoculars and place the binocular slider in the middle line. Focus the binoculars until you can clearly see the name.
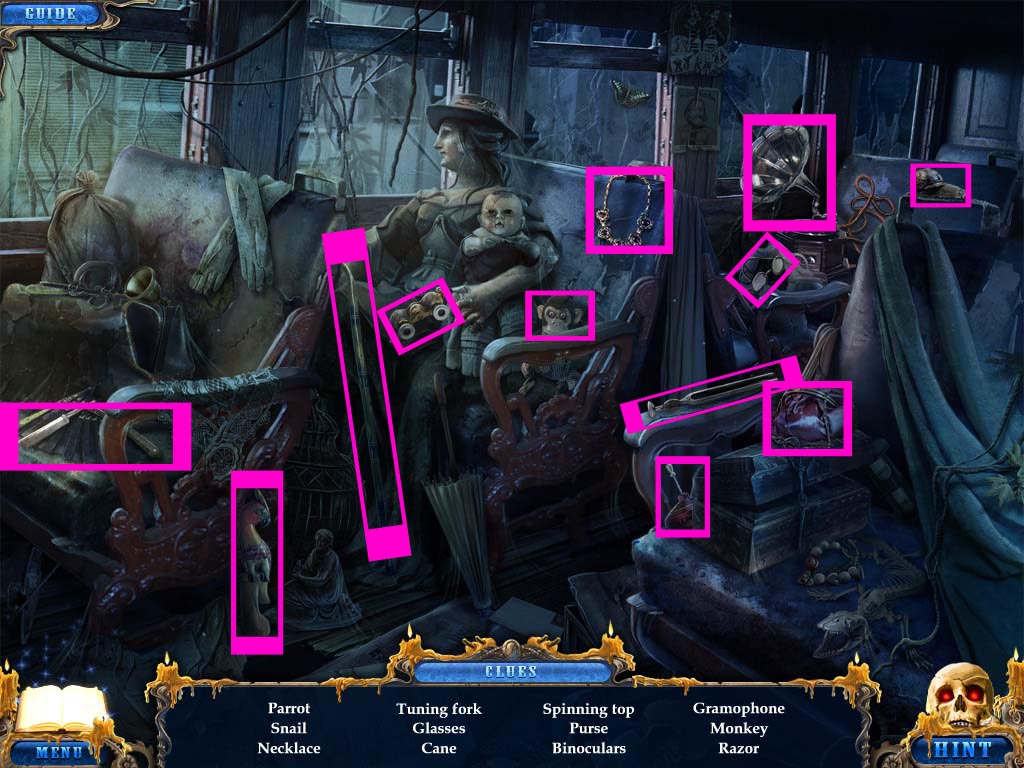
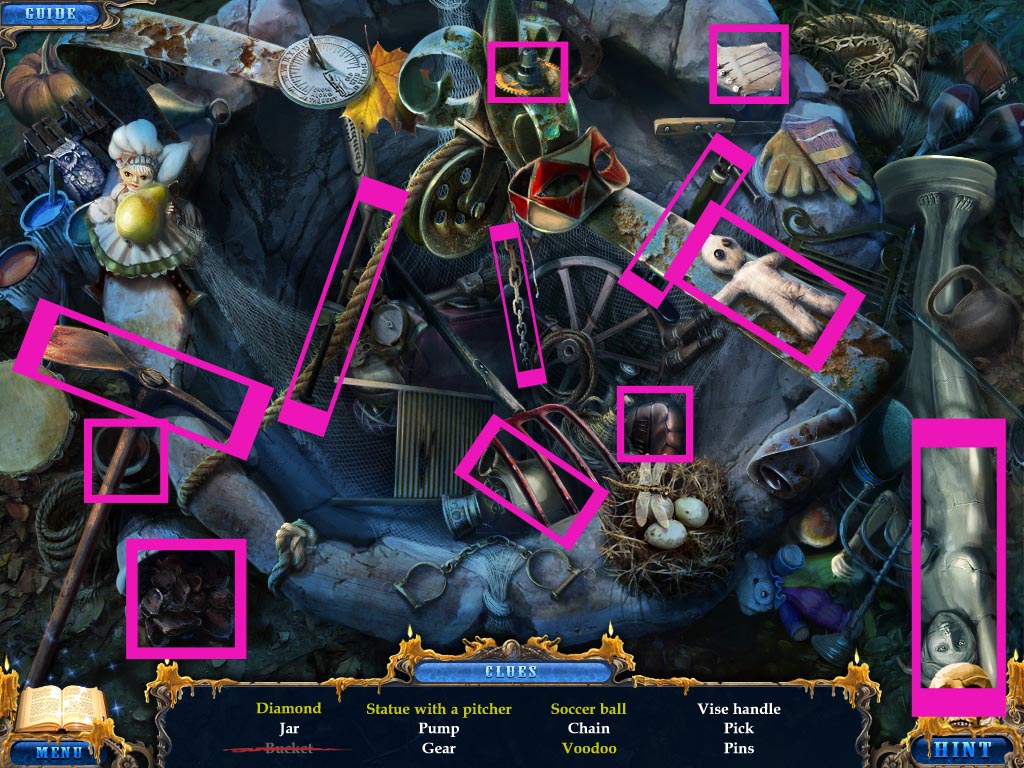
Start the hidden object scene.
Pick up the pump and use it on the deflated soccer ball.
Grab the pins and place them in the doll to make a voodoo doll.
Use the pick on the coal to reveal the diamond.
Pick up the pitcher and place it on the statue.
Screenshot
You receive a vice handle.
Go back once, then move forward. Go left into the Undertaker's and head to the back room.
Inspect the vice and place the vice handle on it, then click to start turning. Inspect it once more and pick up the dolls eye.
Zoom in on the doll and replace the dolls eye in the empty socket.
Pick up the little key.
Go back three times, then go left to the look out point.
Inspect the box with the candles on it and use the little key to open it.
Read the article and pick up the switch and battery.
Start the hidden object scene.
Screenshot
You receive the letter J.
Getting the Key
Go back once then move forward and go into the Undertaker's. Zoom in on the urn.
Place the letters O, J, and M on the empty slots to start the puzzle. Press on one letter and then a second to swap the two. You must spell out the proper name:
Joe Adams.
Read the letter, pick up the liquid fire, and read the newspaper article to the back right of the urn.
Start the hidden object scene.
Screenshot
You receive a ball.
Go forward and investigate the saw. Place the switch in the empty spot and click on it to turn it on.
Place the coffin cover on the table, then pick it up once it becomes firewood.
Go back and head to the look out area once more.
Place the firewood under the bees, then pour the liquid fire on it. Use the lighter to light it all.
Inspect the beehive and pick up the honeycomb and the blue tile.
Investigate the car. Read the piece of paper and pick up the cutter.
Go back, then forward, and then left to the area where the floating museum is. Use the cutter on the barbed wire.
Move forward.
Inspect the wicker basket and use the scalpel to cut the strap. Read the letter and pick up the oil can.
Pick up the gasoline.
Click on the third sheet to the left to reveal the wax maid. Inspect her and read the letter, then pick up the wrench.
Inspect the area by the red ribbon and use the wrench to dismantle the holder, then pick up the rope.
Zoom in on the Hair Salon sign and pick up the blue tile.
Investigate the ladder and use the rope on the broken rung to fix it. Go up the ladder.
Zoom in on the box on the table to the right and pick up the fishing line.
Inspect the door on the right and use the oil can on the door knob. Go into the room.
Click on the guitar and use the fishing line to get the comb.
Investigate the pictures on the wall above the bed and click on the picture of Sebastian.
Pick up the key and read the diary entries.
Getting the Jewelry Box Part
Go back once and click on the left door. Use the key and click on it to unlock the door. Go through into the room.
Pick up the baseball bat.
Click on the pile of stuff to the right of the wardrobe. Pick up the radio knob, the red button, and the paper.
Go back twice and inspect the Hair Salon sign. Place the comb in the indent and pick up the handle.
Go back upstairs and go into the room on the right. Zoom in on the back door wardrobe and place the handle in the hole.
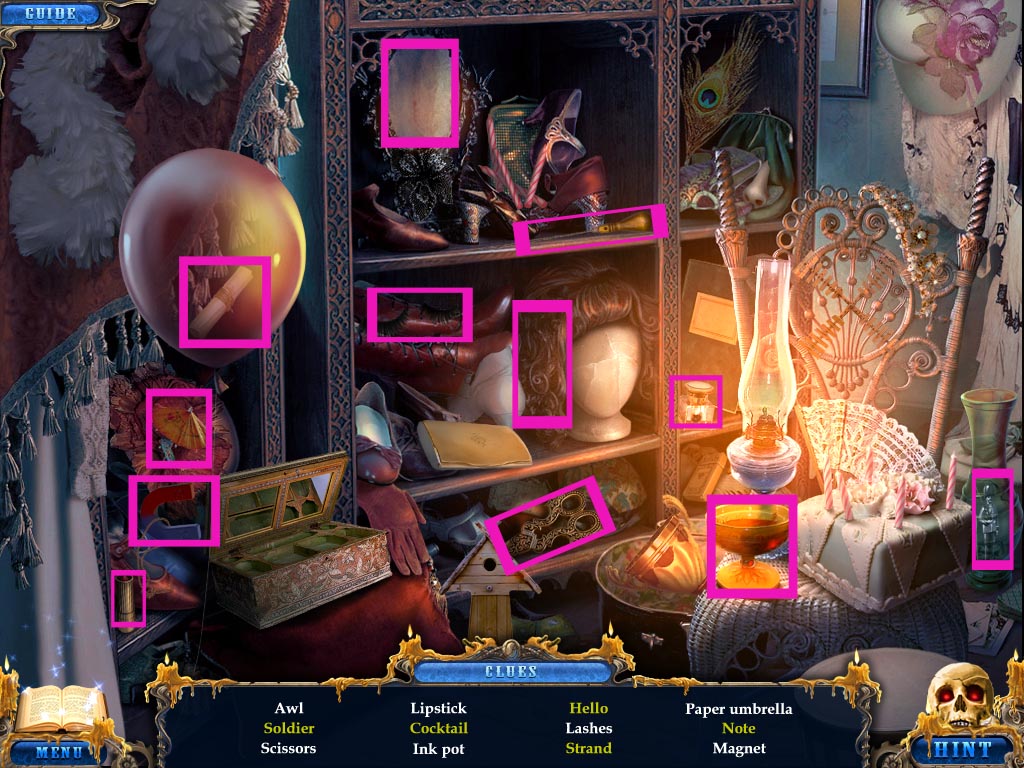
Start the hidden ojbect scene.
Pick up the lipstick and use it on the mirror to write hello.
Get the magnet and use it on the glass vase to withdraw the soldier.
Pick up the mini umbrella and place it in the glass to make the cocktail.
Pick up the scissors and use them to cut a strand of hair from the wig.
Use the awl to pop the balloon and get the note.
Screenshot
You receive an ink pot.
Go back once and inspect the radio. Place the radio knob on the empty spot and click it to turn it on. Scroll the tuning knob so the stations go all the way to the right.
Pick up the latch.
Go through the door on the left and zoom in on the window. Place the latch on the lock and click it to open the window.
Pick up the ink pot.
Go back once and inspect the box on the table where you originally got the fishing line.
Place both ink pots in the two spots on the box.
Pick up the paper knife, then go through the door on the right.
Inspect the vanity and pick up the paper. Use the paper knife to open the locket.
Pick up the jewelry box part.
Getting Lucy's Picture
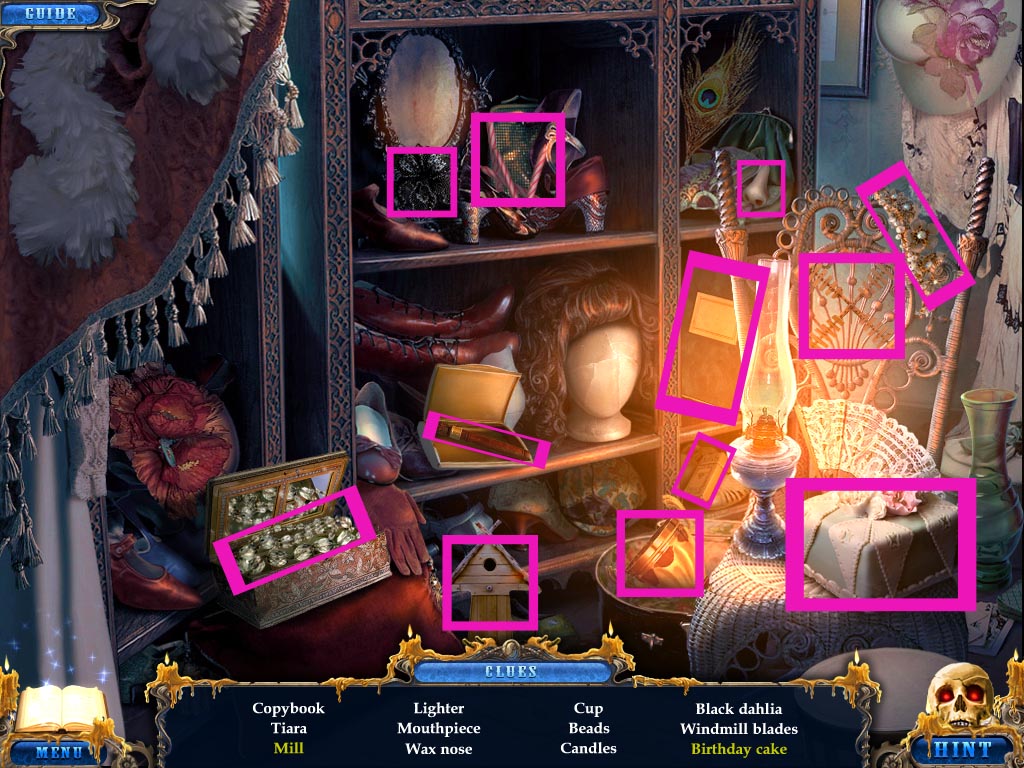
Start the hidden object scene.
Click on the lid of the jewelry box to reveal the beads.
Pick up the windmill blades and add it to the building to create the windmill.
Click on the clutch to open it and reveal the mouthpiece.
Drag the candles to the cake.
Screenshot
You receive a cup.
Go back once, then go through the door on the left. Zoom in on the trophy case and place the cup in the middle spot.
Click on the revealed jewelry box and place the jewelry box piece in the empty spot to start the puzzle.
You must move the numbers so they descend in the proper numerical order.
Click the down arrow.
Click the left arrow.
Click the up arrow.
Click the right arrow twice.
Click the down arrow.
Click the left arrow.
Click the up arrow.
Click the left arrow.
Click the down arrow.
Click the right arrow.
Click the up arrow.
Click the right arrow.
Click the down arrow.
Click the left arrow twice.
Click the left arrow.
Screenshot
Pick up Lucy's picture.
Getting to the Fortune Teller's
Zoom in on the desk to the right with the candle wax dripping and use the paper knife to cut away the wax and open the drawer.
Place Lucy's picture in the left spot and click to open Sebastien's diary. Pick up the page and read it, then pick up the ball.
Go back once and inspect the puzzle on the middle doors. Place both balls on the puzzle to start it.
You must have one ball hop over another to make it disappear. You want four remaining balls at the end of the game. There are multiple solutions.
Zoom in on the dining table.
Pick up the snake half and the key from Sebastien's pocket.
Use the baseball bat three times to break the glass on the clock face.
Click on the piece of paper and read the note from the parents, then click once more and read the note from the psychic.
Pick up the clock arrows.
Go back five times until you're at the gazebo. Start the hidden object scene.
Pick up the paintbrush and paint the mask black.
Screenshot
You receive a corkscrew.
Go left towards the stage and zoom in on the gate towards the back.
Place the key in the lock and click to turn it.
Place the clock hands on the gate and move the hands to be the correct time:
10:40.
Go through the gate.
Chapter Four: The Fortune Teller's and the Wax
Getting the Planet Switch
Click on the robot to make it move.
Inspect the barrel to the left and pick up the red tile.
Investigate the tower and use the corkscrew on the bottle to retrieve the cork.
Pick up the paper and pick up Shiva's fire.
Zoom in on the robot and place the cork in the jagged hole. Place the tank in the normal hole. Put the battery on the holder to the left.
Click on the lever, then press the button to turn it on.
Inspect the house to reveal a puzzle. You must move each circle so that the shapes are fitted into the correct spots. Triangle with triangle, square with square, circle with circle. Moving one ring does not move any others.
Screenshot
Go into the house.
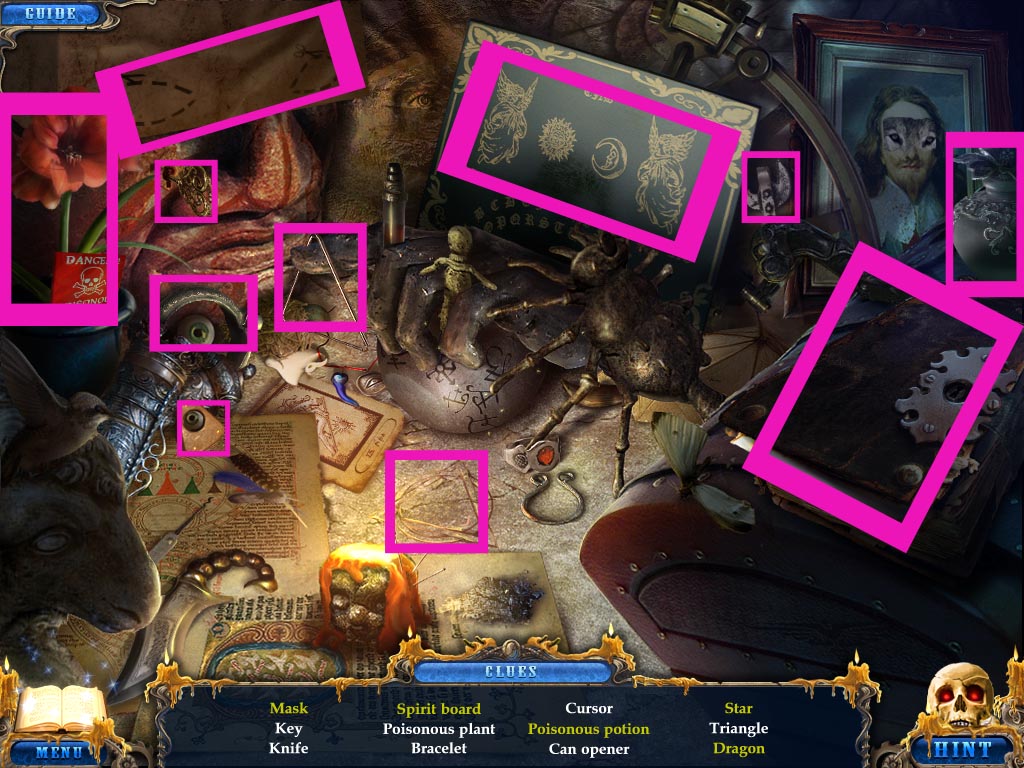
Start the hidden object scene.
Grab the cursor and place it on the spirit board.
Pick up the key and use it to unlock the book and reveal the dragon.
Take the knife and use it to cut out the eye holes in the mask.
Pick up the triangle and place it on the triangle on the ground to create the star of David.
Grab the poisonous plant and place it in the glass vial on the far right.
Screenshot
You receive a can opener.
Go back once, then zoom in on the barrel and use the can opener to retrieve the repellant.
Go forward into the house and click on the spider. Use the repellant on the spider to get rid of it.
Click on the cover to open it, then pick up Shiva's drum and read the note.
Inspect the Shiva figurine and place Shiva's fire in the right hand and Shiva's drum in the left hand.
Pick up the blue tile and the picture of the skeleton.
Investigate the skeleton on the ceiling above the doorway. Move his limbs to reflect the picture of the skeleton you picked up.
Pick up the planet switch.
Getting the First Puzzle Lever
Click on the planetary model and place the planet switch on it. Click on it to move it and watch the planets move.
Inspect the planetary model once more and grab the playing card from the open planet.
Start the hidden object scene.
Grab the pins and place them in the doll to make it a voodoo doll.
Pick up the feathers and place them on the bird body.
Screenshot
You receive a lockpick.
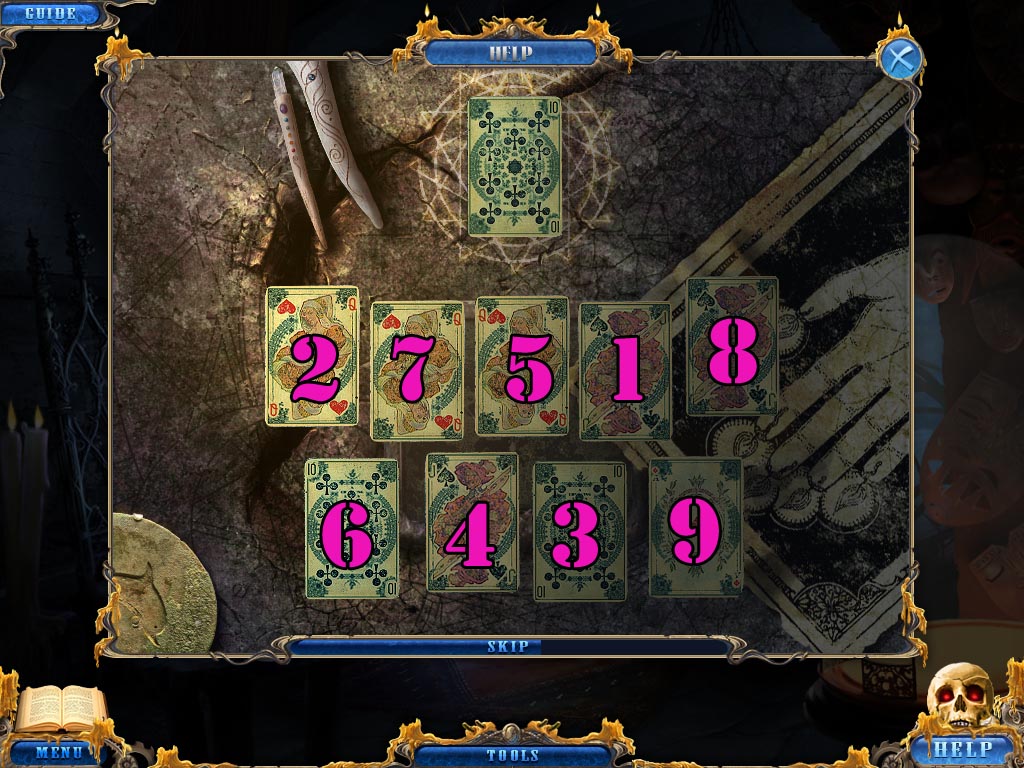
Inspect the pile of cards on the floor to the left of the doorway. Click the paper to remove it and reveal an empty spot. Place the playing card on the spot.
You need to match the cards to the main card shown. Notice the placement of the numbers on the card. The number or letter will be in two separate corners of the four. Match the cards based on where the numbers/letters are placed and by deck type (spades, hearts, diamonds, clubs).
Screenshot
Pick up the old life symbol.
Go back once and inspect the suitcases and luggage next to the tree. Use the lockpick to open the suitcase.
Pick up the hacksaw.
Go forward into the house and inspect the door on the left. Use the hacksaw on the hinge to break it.
Pick up the huge door.
Leave and go to the Wax Museum. Use the huge door to bridge the gap.
Inspect the podium and pick up the puzzle lever.
Getting the Fishing Rod
Place the left snake half in the impression.
Zoom in on the back door and use the oven mitt to open the door. Go through the door.
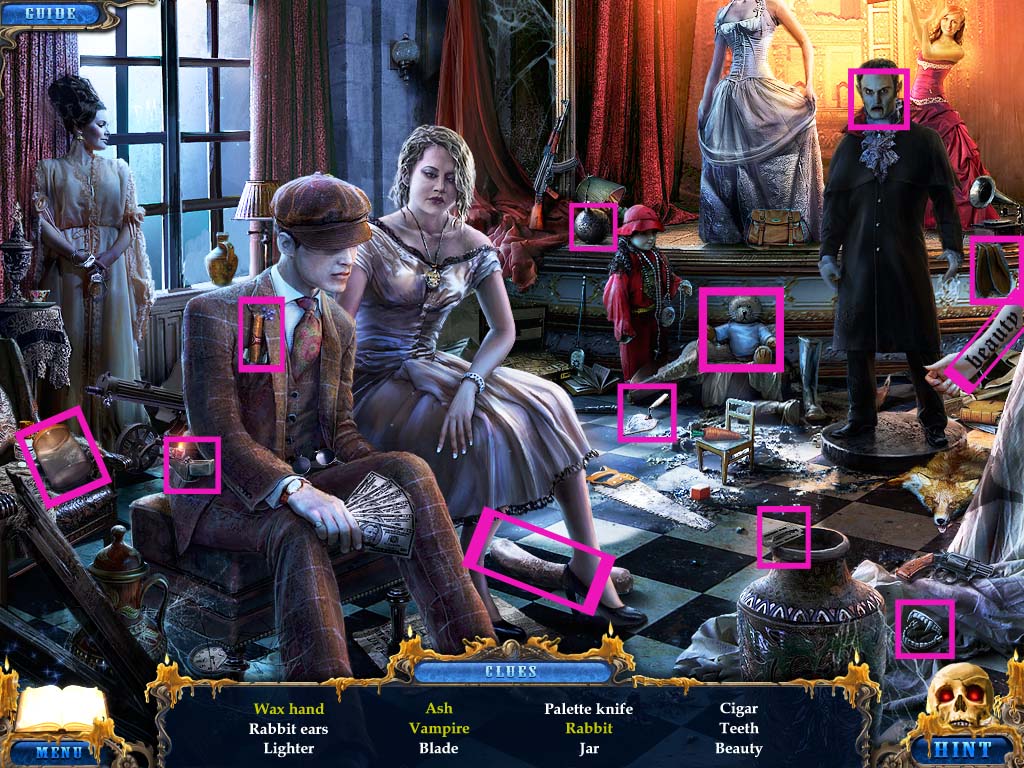
Start the hidden object scene.
Pick up the teeth and place them on the vampire.
Add the rabbit ears to the stuffed animal to make it a rabbit.
Pick up the lighter and use it on the cannonball to create ash.
Use the palette knife to make the wax hand.
Screenshot
You receive a jar.
Look in the purse of the girl and read the newspaper article.
Go back once and investigate the basket the woman is holding. Use the jar to capture the scorpion.
Pick up the awl and read the book.
Go forward and inspect the man in the suit on the right. Use the awl on the stitched pocket to retrieve the eye key.
Inspect the back door and use the eye key on it. Walk through the door.
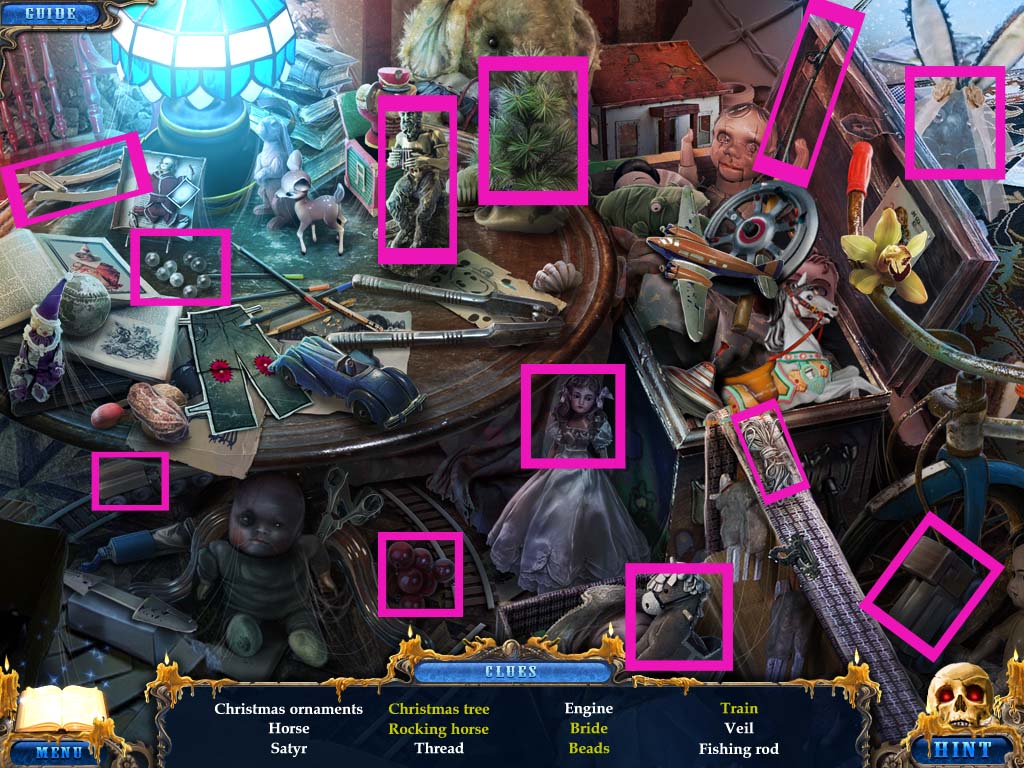
Click on the chest to open it and reveal a hidden object scene.
Pick up the Christmas Ornaments and place them on the tree.
Place the horse on the rocker.
Pick up the thread and use it on the beads.
Pick up the veil and place it on the doll to make her a bride.
Grab the engine and attach it to the caboose.
Screenshot
You receive a fishing rod.
Getting into the Solvent Room
Investigate the outside of the doorway, pick up the empty cup, and read the medical card.
Use the fishing rod to retrieve the scissors. Click on the wheel twice to reel it in.
Zoom in on the portrait and pick up the puzzle lever and the new life symbol.
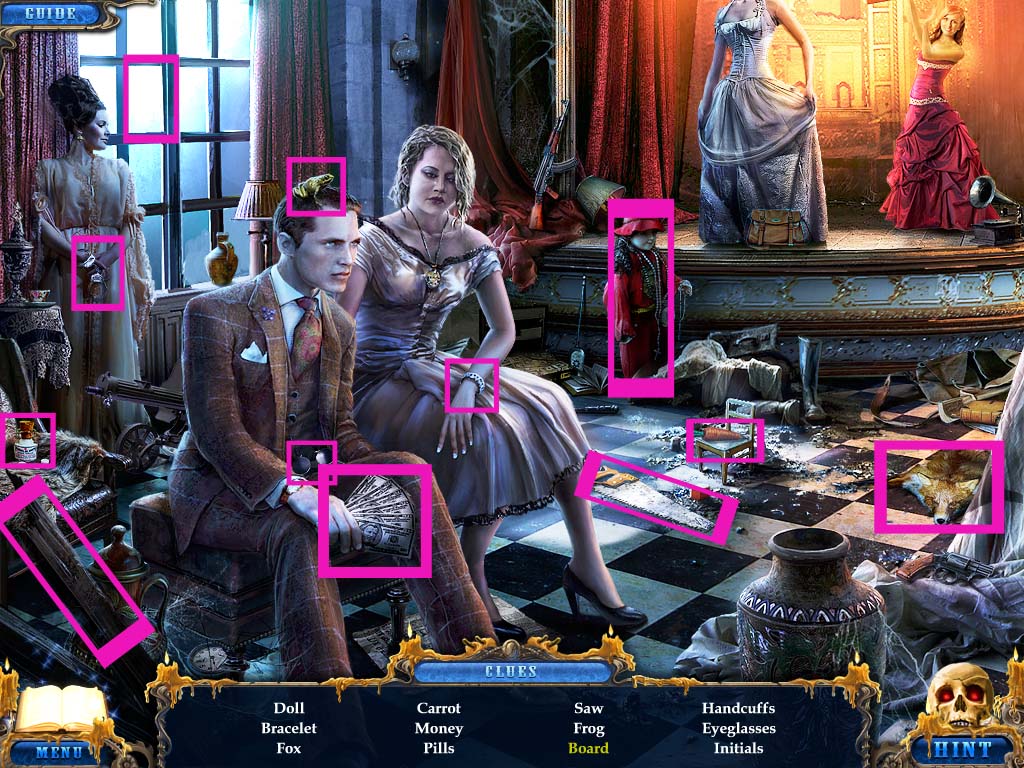
Go back once and start the hidden object scene.
Use the saw to cut the board.
Click on the man's hat to reveal the frog.
Screenshot
You receive a carrot.
Go back once and inspect the hat of the magician. Give the rabbit the carrot.
Pick up the laser pointer.
Investigate the elegantly dressed woman that's dancing and use the scissors to cut the necklace. You receive a round stone.
Go forward twice and click on the curtain to the right to remove it.
Inspect the door and use the laser pointer to remove the wax chains.
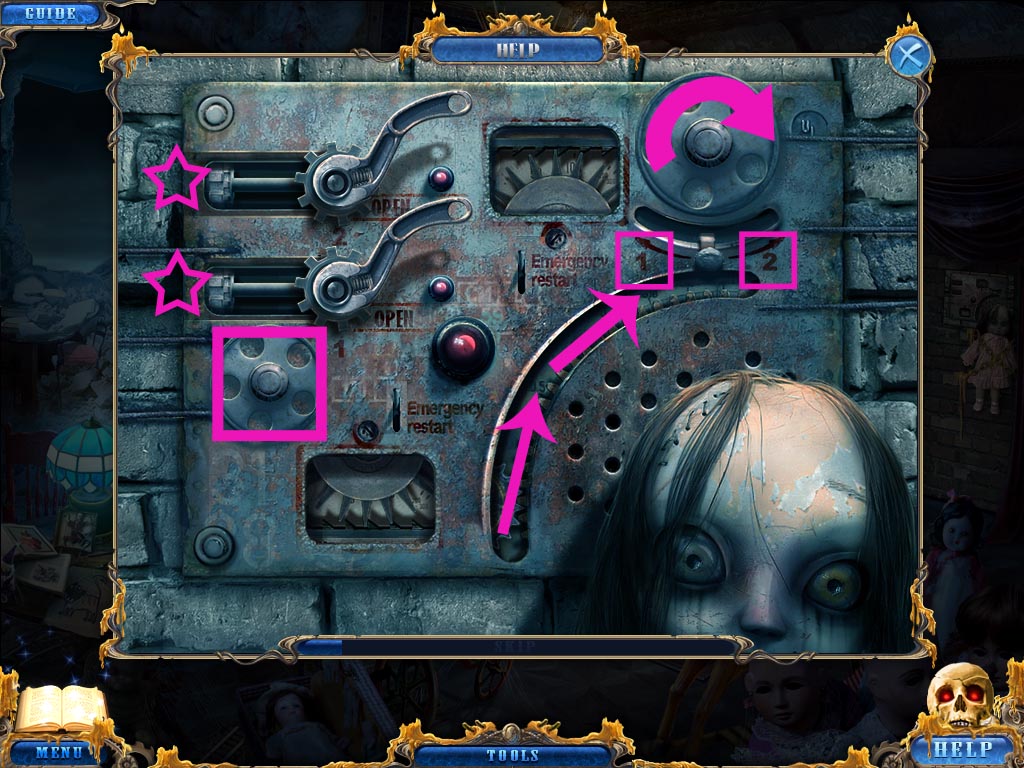
Attach the two puzzle levers on the door to start a puzzle.
The bottom lever of the two levers is lever 1.
The top lever of the two levers is lever 2.
The bolts can be rotated to fit with the lever, and when the bolts are the correct way the light will turn red to the right of the lever.
The gear on the top right rotates clockwise and moves another gear up that you will use to move the bolt on either lever one or lever two.
Screenshot
Go through the door.
Getting into the Greenhouse
Click on the bottle to the right to pick up the empty bottle.
Inspect the wax holder and use the empty cup to make it a cup with solvent.
Zoom in on the machine to the right of the doorway. Place the round stone on the machine, then press the start button. Pick up the triangular stone.
Pick up the red tile.
Investigate the wax figure on the table and use the cup with solvent on the hand. Pick up the lantern.
Go back twice and inspect the fortune teller wax figurine. Place the triangular stone in the triangle slot.
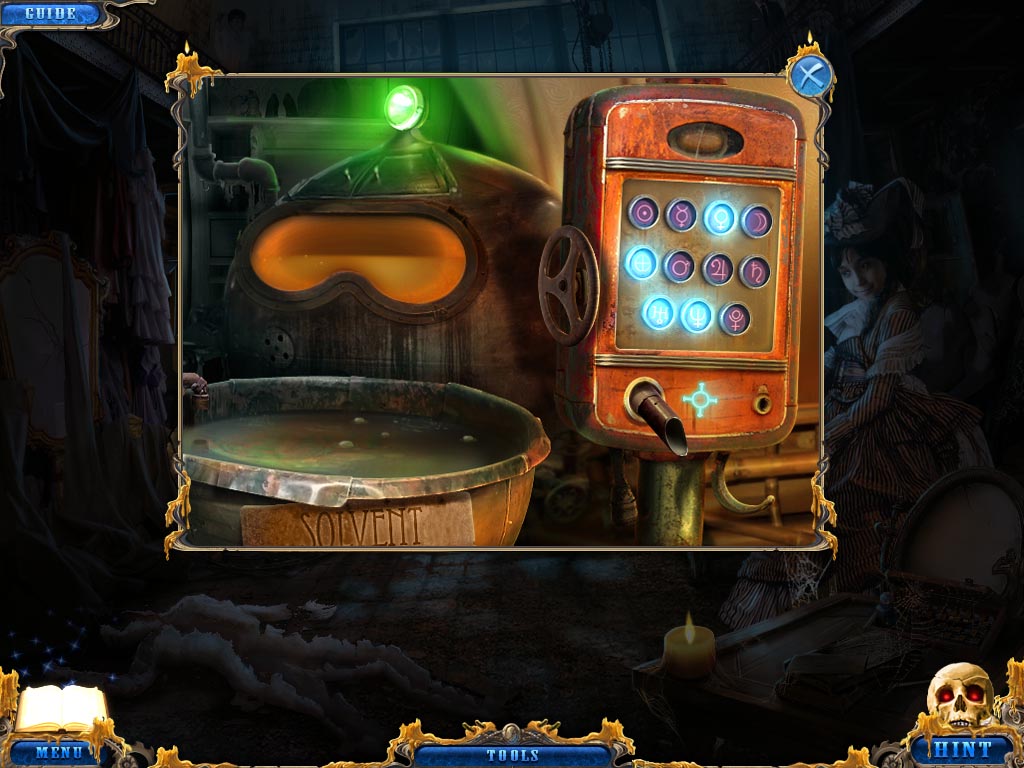
Take note of the code and go forward twice. Zoom in on the wax machine you received the solvent from.
Type in the symbols you saw on the fortune tellers crystal ball.
Screenshot
Place the empty bottle on the tube then click on the valve to fill it.
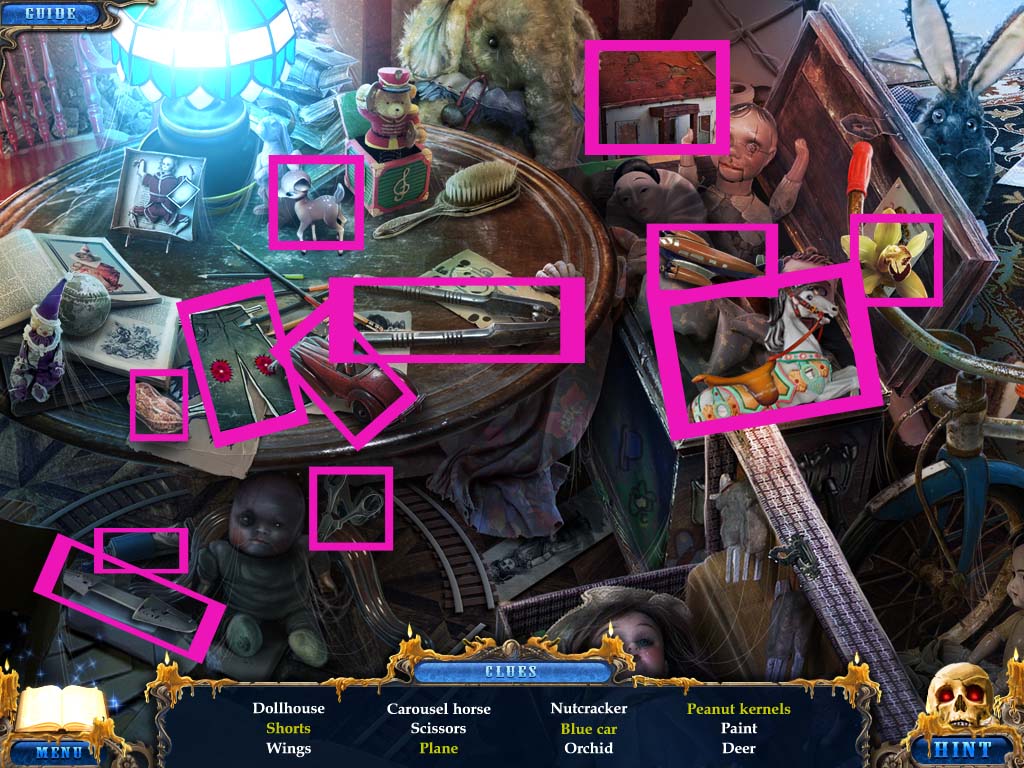
Go back once and start the hidden object scene.
Pick up the scissors and use them on the pants to create shorts.
Pick up the nutcracker and use it on the peanut.
Grab the blue paint tube and use it on the car.
Pick up the wings and attach them to the plane.
Screenshot
You receive a toy horse.
Inspect the carousel on the floor and pick up the paper. Place the toy horse on the track.
Pick up the blue tile.
Go back five times, then move forward once and zoom in on the door with the woman on it.
Place all seven blue tiles and all three red tiles on the board to activate the puzzle.
You must move all the tiles so that each ring has a solid color. Blue should be on the outermost ring, red in the middle, and green in the very center.
Screenshot
Go through the door once you are done with the puzzle.
Chapter Five: The Greenhouse and the Secret
Getting the Safe Handle
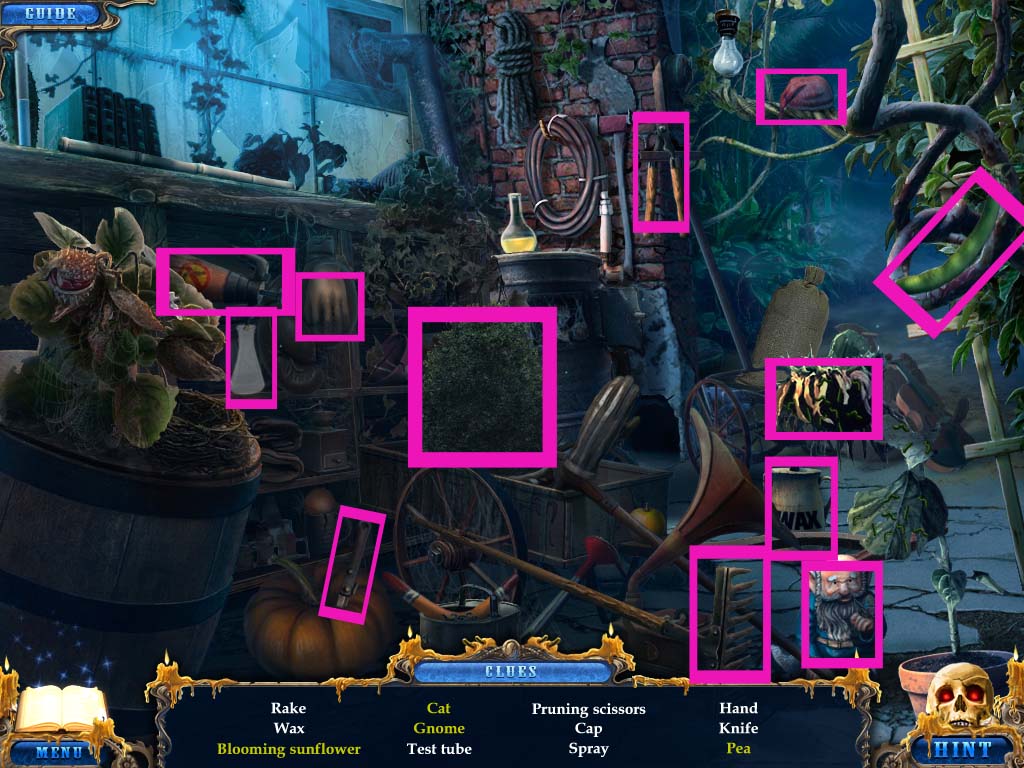
Start the hidden object scene.
Pick up the cap and place it on the head of the gnome.
Use the knife to cut open the pea pod and gather the single pea.
Use the spray on the wilted flower to make the sunflower bloom.
Pick up the pruning scissors and use it on the shrub to make a cat.
Screenshot
You receive a test tube.
Inspect the flower on the right next to the tree and read the note, then use the test tube on the center of the flower. You receive the tube of poison.
Zoom in on the door at the end of the room and pour the tube of poison on the vines.
Go through the door.
Inspect the table to the left and pick up the water and the gloves.
Pick up the large box and the stethoscope.
Inspect the test tubes on the counter top to the right to activate a puzzle.
You want the left and the right test tubes to have water up to the 5 mark.
The tube on the far left is tube one. The middle tube is tube two. The tube on the far right is tube three.
Send the water in test tube one right into test tube two.
Send the water in test tube two right into test tube three.
Send the water in test tube three right into test tube one.
Send the water in test tube one into test tube two.
Send the water in test tube two into test tube three.
Zoom in on the area of the broken test tubes and use your gloves to clear the debris and pick up the safe handle.
Going Downstairs
Click on the safe to bring it up and place the safe handle in the empty circle for it. Place the stethoscope on the safe, then click the dial to turn it.
Click on the door handle when it says the safe is unlocked. Pick up the bunsen burner, Red Lake souvenir, and the lens instructions.
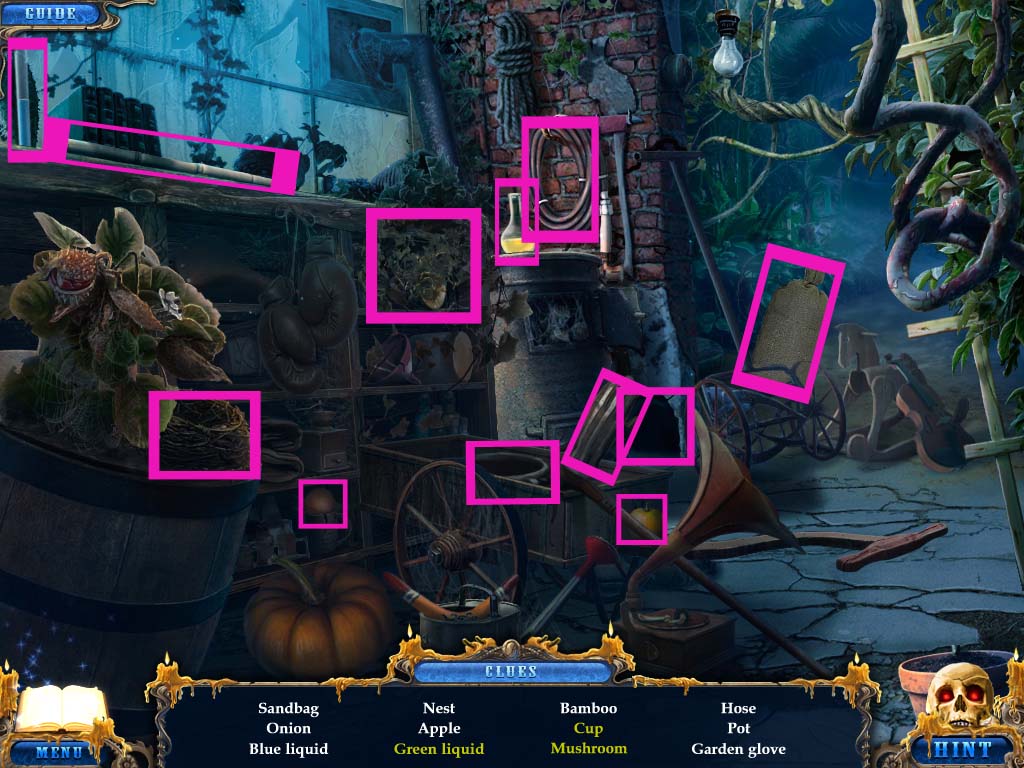
Go back once into the previous room and start the hidden object scene.
Take the garden glove and use it on the ivy to reveal the cup.
Pick up the apple and place it in front of the hole in the wall to have a hedgehog appear with the mushroom.
Pick up the tube of blue liquid and add it to the yellow liquid to make green liquid.
Screenshot
You receive a sandbag.
Click on the figure of the kneeling man and place the large box next to him.
Zoom in on the torch and use the sandbag to put out the fire. Pick up the flute.
Investigate the hole in the tree and use the lantern to light it up. Play the flute to lull the snake to sleep.
Pick up the cobra's egg.
Go forward and inspect the area where you got the water from.
Pour the water into the beaker. Place the bunsen burner underneath the beaker and use the lighter to start the fire. Crack the cobra's egg above the beaker.
Pick up the fertilizer.
Go back once and investigate the wilting venus fly trap. Pour the fertilizer on it, then pick up the right snake half.
Leave the greenhouse and go to the Wax Museum once more.
Inspect the podium and place the right snake half in the outline for it.
Go down the stairs.
Completing the Ritual
Inspect the girl and take the tiara.
Investigate the stand to the far right and use the bottle of wax to fill the caricatures.
Look at the book of rituals and click it twice. Pick up the lens.
Click on the table with the lenses and place the lens in the holder. Light the bunsen burner with the lighter. Click on the left and right magnifying glasses to move them and start a fire.
Zoom in on the skull and place the honeycomb in the empty space for it.
Inspect the left portion of the wall and use the bottle of wax on it.
Place the tiara in the newly revealed spot.
Inspect the top portion of the wall and pour the bottle of wax in it.
Place the ether in the empty spot.
Click on the right portion of the wall and pour the bottle of wax on it.
Place the Red Lake souvenir in the revealed spot.
Inspect the middle of the wall and use the bottle of wax on it.
Place the old life symbol on the fire, followed by the new life symbol.
Posted by: Meaghan |
May 5, 2012 8:19 PM
|
May 5, 2012 8:19 PM