
![]()
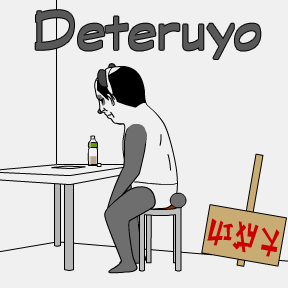 Throughout all the bathrooms, balconies, bedchambers, and any other room that can fit a puzzle of the escape game universe, one name is whispered that is known to summon strangeness incarnate. A name so unusual, we here at Jay is Games aren't allowed to speak it without donning a scarlet bathrobe, drawing on a pencil mustache, and doing our best Vincent Price impersonation. That name... is Detarou! dun, Dun, DUNNNN!! As soon as you're done shivering in your boots, perhaps you can check out Detarou's (dun dun dun!) latest surreal escape game Deteruyo.
It's not a typical feat to take elements of the incredibly bizarre and somehow turn them into a series of coherent clues, but Deteruyo is anything but typical. Detarou fans will be pleased to find healthy doses of obscure cultural and anime references (who wouldn't enjoy a Sailor Moon-esque derri�re transformation?) and a handful of pleasantly challenging puzzles. It should be noted that some of these puzzles are color based, which will likely present additional difficulties to the colorblind. Other minor quibbles appear, such as the unpredictable uses of some peculiar items and a boatful of red herrings. Fortunately, players are assisted by the familiar clean design, simple navigation, and the helpful feature of a changing cursor to indicate active areas. Lovers of the logically odd and oddly logical can expect the entertaining and rewarding feeling after breaking through each of the three endings in another incarnation of Detarou's signature flair.


Walkthrough Guide
(Please allow page to fully load for spoiler tags to be functional.)
Deteruyo Walkthrough
Full End with Stamp
Room 1
Back out to view the rear wall of the room with the Dodoitu poster and the dancing tree man.
Turn left to face the side of the room, where you will see an old man, a grey machine, and three small colored kokeshi dolls.
Click the kokeshi in the corner to zoom in.
Click the red, green, and yellow figures and note that they all flash on and off.
Count how many times each colored doll flashes.
Red - 9
Green - 4
Yellow - 6
Back away from the kokeshi, then click the old man sitting on the bench for a closer look.
Click the old man two more times to lift him off the bench.
Take the uncovered PICKLE from the seat.
Back out and turn left to face the door.
Click the man hanging from the coat rack to zoom in.
Inspect the green jacket hanging beside the man.
Take the RULER out of the coat pocket.
Go back to face the door, then click the trash can by the row of lockers to look inside.
Take the folded piece of paper inside the can.
The paper shows two images, one with a rectangle containing 6 dots and another with a large circle surrounded by four smaller circles, with the upper left circle filled in.
Back out and turn left to face the row of knights and a man in traditional clothing, then click the man for a closer look.
Replace the STICK the man is holding with the RULER from your inventory.
Inspect the STICK now in your inventory, then turn it over to find a series of arrows.
Note that the arrows point from left to right and go in order of Red -> Yellow -> Green -> Yellow and then a smaller red triangle pointing right.
Return to the view of the old man on the bench, then click the grey machine beside him to zoom in.
At the top of this machine are four symbols at each corner, a dial in the middle, and a four digit combination lock inside the dial.
Enter in the combination using the clues from the flashing kokeshi dolls and the arrows on the stick.
Remember that the red doll on the left flashed 9 times, the green doll in the middle flashed 4 times, and the yellow doll on the right flashed 6 times.
Also, the order on the stick reads from left to right: red, yellow, green yellow and has a red triangle identical to the one on the dial.
Enter the numbers 9-6-4-6 and turn the dial to the right, then push the large button to enter in the solution.
Solution.
If the correct solution is entered, the dial will flip around and reveal a SILVER KEY.
Back out and turn left to face the door.
Use the SILVER KEY to open the lock under the door knob, then continue forward to Room 2.
Room 2
Turn to the left wall to face the school girl, then click the girl to zoom in.
Give the girl the PICKLE from your inventory.
After her transformation, take the BRONZE KEY lying on the ground.
Turn right twice to face the right wall.
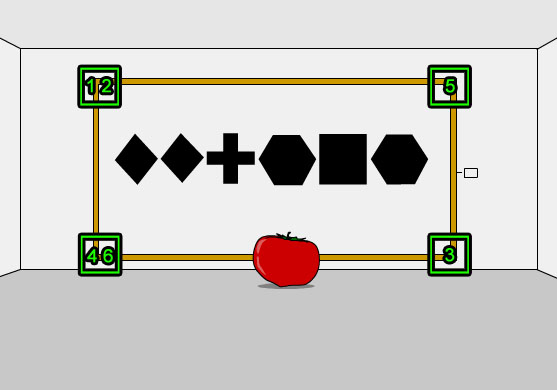
On the wall you'll see a large framed painting showing 6 symbols.
If you touch the corners of the painting, you'll notice it also moves slightly.
From left to right, the symbols are: two diamonds, a cross, a hexagon, a square, and another hexagon.
These symbols are familiar, you've seen them somewhere before...
They're identical to the symbols found at the corners of the grey machine!
Go back to Room 1.
Room 1
Click the top of the grey machine to zoom in.
Now, you know which symbols you're looking for, but how are you supposed to use the machine to find them?
Perhaps something in your inventory could be of use...
Inspect the piece of paper from the trashcan again.
The rectangle with the 6 dots looks an awful lot like the framed painting from Room 2.
And the second image shows a dot at the upper left corner of something that looks a lot like the dial on the grey machine.
Still confused?
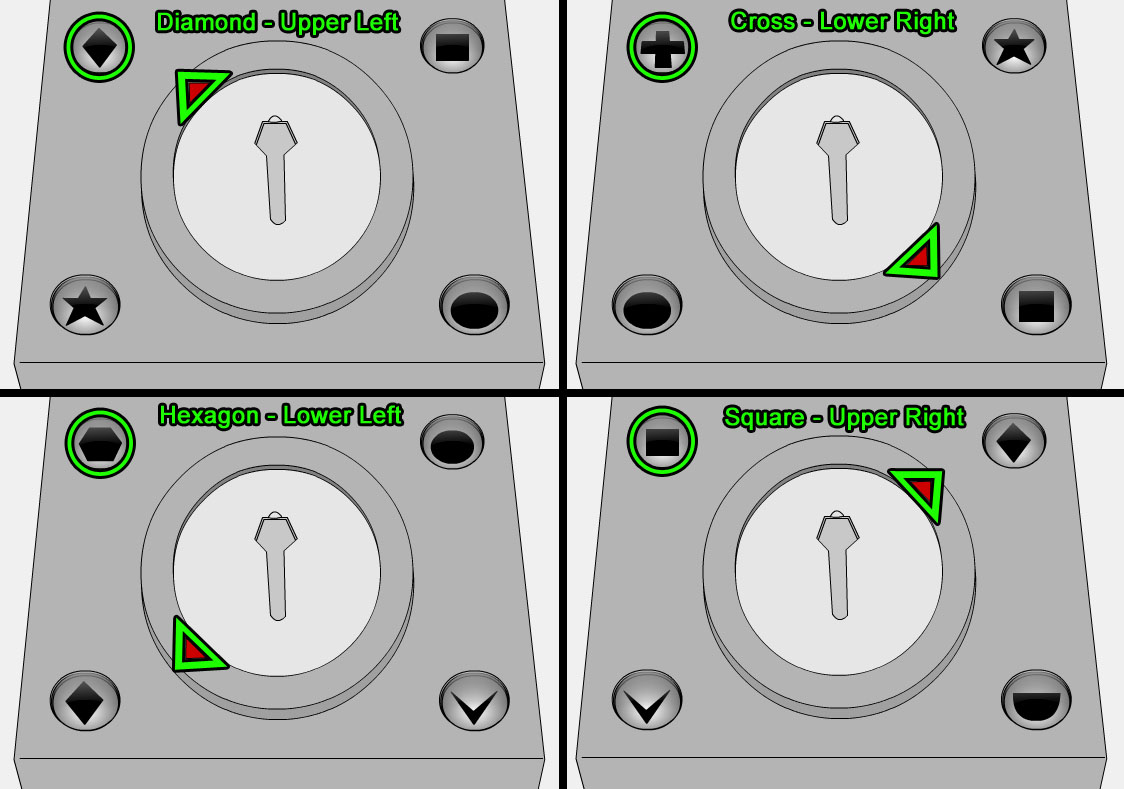
The clues indicate that you need to rotate the dial so that each symbol from the framed painting appears in the upper left corner.
Start by rotating the dial until you see the Diamond symbol at the upper left.
Note that the arrow on the dial is also pointing to the upper left.
Repeat this process of positioning the symbol in the upper left corner and noting the location of the arrow on the dial with the remaining five symbols.
The final order is: Diamond - Upper left, Diamond - Upper left, Cross - Lower right, Hexagon - Lower left, Square - Upper right, Hexagon - Lower left.
Screenshot.
Now that you have the answer, you can return to Room 2.
Room 2
After you enter the room, turn right to face the framed painting.
Click the corners of the painting in the correct order using the clues from the grey machine in Room 1.
Upper left, upper left, lower right, lower left, upper right, lower left.
Solution.
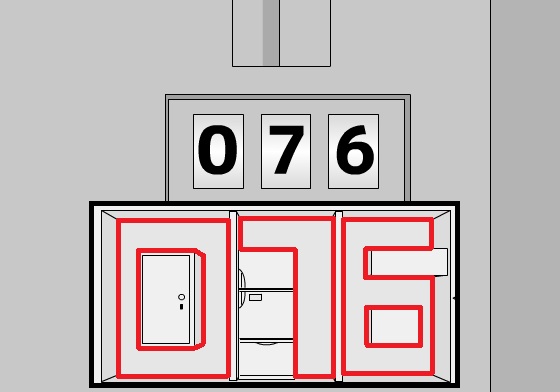
If you hit the corners correctly, the painting will fall over and smush the poor tomato, revealing a wall split into three sections.
Something about that wall looks kind of strange though...
Have you tried looking at "the bigger picture"?
The shape inside each section looks like 3 numbers.
0-7-6
Remember that combination, you'll need to use it soon.
Click the locker in the left wall section to zoom in.
Use the BRONZE KEY from your inventory to open the lock.
Take the WHITE HAND at the bottom of the window leading to the next room.
Note the rows of symbols on the inside of the locker door.
Hmmm, those look familiar.
The three figures are shaped just like those kokeshi dolls in Room 1!
If you read it from top to bottom you'll see that the figures go in order from: middle - left - middle - right - left - left - middle.
That probably has some significance, but what could it mean?
If you remember how the kokeshi were positioned in Room 1, the red figure was on the left, the green was in the middle, and the yellow was on the right.
When you combine that with the order of the figures on the locker door, that now translates to: green - red - green - yellow - red - red - green.
Back out to the full view of the wall sections.
Inspect the fridge in the center section, then click the colored lock in the middle drawer to zoom in.
Use the clues from the figure pattern inside the left locker door to open the colored lock.
The colors on the lock have been rearranged, but the answer is still the same.
Press the buttons in the following order: Green, Red, Green, Yellow, Red, Red, Green.
For the colorblind, it's: Right, Middle, Right, Left, Middle, Middle, Right.
Solution.
If you enter the correct solution the fridge door will open, revealing the GOLD KEY inside.
Inspect the open locker in the left wall section again, then go through the window into Room 3.
Room 3
Click the table in front of the sad panda to zoom in.
Flip the piece of paper and take note of the image that shows a circle over the left door and an X over the right door.
Return to Room 1.
Room 1
Turn to face the row of lockers by the door.
Click the right locker for a close-up.
The lock needs a 3 digit combination to open.
Where have we seen the combination before?
Enter in the numbers seen in the shape of the wall sections in Room 2.
Input 0-7-6, then push the larger button at the bottom to submit your solution.
Solution.
After you open lock, click the right locker door and take the METAL ROD inside.
Inspect the METAL ROD in your inventory.
Add the WHITE HAND to the top of the rod to combine them into the ROD WITH HAND.
Back out and turn right to face the grey machine.
Click the top of the grey machine to zoom in.
Place the GOLD KEY into the key-shaped indent in the middle of the dial.
Take the RED STAMP that falls out of the dispenser at the bottom of the grey machine.
Don't forget to retrieve the GOLD KEY from the dial at the top of the machine.
Go to Room 2.
Room 2
Inspect the mask on the wall above the exit door.
Use the ROD WITH HAND from your inventory to adjust the mask's glasses.
The lock on the exit door will change from Closed to Open.
Go through the unlocked door into Room 4.
Room 4
In this room is an empty hall with a door to the left and a door to the right.
How can you tell which door leads to the exit?
Remember the paper on the table by the sad panda in Room 3?.
The right door had an X over it (It's a trap!) but the left door should be safe.
Turn left to face the left door, then use the GOLD KEY to open the lock.
Exit through the door with the RED STAMP in hand to get the Good Ending.
Normal End
Follow the walkthrough for the Full ending up until the point where you receive the ROD WITH HAND in Room 2.
Do not use the Gold Key on the grey machine to get the stamp.
Instead, skip that step completely and go to Room 3.
Use the ROD WITH HAND on the mask to fix its glasses.
Exit through the door to Room 4, then turn left.
Use the GOLD KEY to open the left door, then exit through the door to get the Normal Ending.
Bad End
Follow the walkthrough for the Full ending up until the point where you receive the ROD WITH HAND in Room 2.
Do not use the Gold Key on the grey machine to get the stamp.
Instead, skip that step completely and go to Room 3.
Use the ROD WITH HAND on the mask to fix its glasses.
Exit through the door to Room 4, then turn right.
Use the GOLD KEY to open the right door, then exit through the door to get the Bad Ending.
Item Locations
PICKLE - Found on the bench by clicking the old man to lift him off the seat.
RULER - Found inside the front pocket of the jacket hanging on the coat rack.
STICK - Held by the man in traditional garb standing between the armored knights. Give him the RULER in exchange for the STICK.
SILVER KEY - After solving Puzzle 1, the dial will flip over and reveal the SILVER KEY in its center.
BRONZE KEY - Found on the floor in Room 2, by the feet of the hopping man-butt-creature.
WHITE HAND - If you open the locker in Room 2, the WHITE HAND is found at the bottom of the window through the locker leading to Room 3.
GOLD KEY - After solving Puzzle 3 (the color lock on the fridge) you can find the GOLD KEY inside the middle section of the fridge.
METAL ROD - Found inside the right locker in Room 1 after solving Puzzle 4.
ROD WITH HAND - Combine the WHITE HAND and METAL ROD in your inventory to complete the ROD WITH HAND.
Puzzle Solutions
Puzzle 1 - Combination Lock on the Grey Machine
Look inside the front pocket of the jacket hanging on the coat rack in Room 1 to find the RULER.
Turn to face the man standing between the knights, then click him to zoom in.
Give the man the RULER in exchange for the STICK.
Inspect the STICK in your inventory to turn it over, where you will see a series of arrows.
From left to right, the stick reads Red arrow, Yellow arrow, Green arrow, Yellow arrow, red triangle.
These colored arrows refer to the red, green, and yellow kokeshi dolls on the pedestal in the corner of the room.
Click the kokeshi dolls for a close-up, then click each doll to count how many times it flashes.
Red doll on the left flashes 9 times, Green doll in the middle flashes 4 times, and Yellow doll on the right flashes 6 times.
Now go to the grey machine and click the top of it for a closer look.
Enter in the number of times each color kokeshi doll flashed, according to the order of the four colored arrows from the STICK.
Don't forget the red triangle! Turn the triangle on the dial so it is pointing to the right, in the same direction as the identical triangle found on the STICK.
Solution.
Push the big button to enter your solution.
If it's correct, the dial will flip over and reveal the SILVER KEY.
Puzzle 2 - Giant Painting of Geometric Shapes
First inspect the geometric symbols on the painting and remember their order from left to right: Diamond, Diamond, Cross, Hexagon, Square, Hexagon.
Look inside the trash can in Room 1 and you'll find a piece of paper with some very important information.
It shows an image with a row of dots that looks a lot like the painting in Room 2 and a second image with a dot in the upper left corner that looks just like the dial on the grey machine.
Go to the grey machine in Room 1, then click the dial at the top to zoom in.
Turn the dial to position each symbol that is also found on the painting into the circle at the upper left corner, one at a time starting with the diamond.
When the diamond is in the upper left corner, the triangular arrow on the dial is also in the upper left corner.
Since the first two symbols on the painting are both diamonds, you now know the first two directions: Upper Left, and Upper Left.
Position the next symbol, a cross, into the circle in the top left corner.
Now the arrow on the dial is pointing to the lower right, so your order so far is: Upper Left, Upper Left, Lower Right.
Turn the dial to move the hexagon into the upper left corner.
The dial should now be pointing to the lower left.
The hexagon is the fourth and last symbol on the painting, so the order now becomes: Upper Left, Upper Left, Lower Right, Lower Left, ????, Lower Left.
Rotate the dial to position the square in the upper left corner.
The dial should point to the upper right, giving you your last direction.
The final order then is Upper Left, Upper Left, Lower Right, Lower Left, Upper Right, Lower Left.
Screenshot.
You now know the correct order, so return to Room 2 and turn towards the painting.
Click the four corners of the painting in the same order as the arrow on the dial that you just found on the grey machine.
Remember it's: Upper Left, Upper Left, Lower Right, Lower Left, Upper Right, Lower Left.
Solution.
If you click the corners in the corrector order, the painting will fall off the wall with disastrous results for the innocent tomato.
Puzzle 3 - Fridge Color Lock
Look at the lock on the fridge door to find that the three colors, Yellow, Red, and Green, are the same three colors as the kokeshi dolls in Room 1.
Inspect the locker in the left wall section and use the BRONZE KEY to open it.
Note that there is a column of figures on the inside of the open locker door that look very similar to kokeshi dolls in Room 1.
If you read the symbols from top to bottom, the order goes: Middle, Left, Middle, Right, Left, Left, Middle.
Return to the lock on the fridge door to input your solution.
Remember that the order of the colors on the lock is not the same order as the colors of the dolls.
When you look at the dolls, from left to right they are in order of Red - Green - Yellow.
The solution to the color lock now becomes: Green, Red, Green, Yellow, Red, Red, Green.
Solution.
If you pressed the right buttons, the fridge door will open and you can take the GOLD KEY inside.
Puzzle 4 - Combination Lock on Right Locker
The answer to this lock can only be found after solving Puzzle 2, the giant painting puzzle.
After that, the answer is staring you right in the face.
Inspect the sections of the wall and look for three distinct shapes.
The left section forms a 0, the middle section a 7, and the right section a 6.
Click the combination lock in the middle of the right locker in Room 1 for a close-up look.
Enter in the numbers 0-7-6, then push the large button to input your combination.
Solution.
If you entered in the right combination, you can now open the locker door.
Posted by: Trinn |
May 4, 2012 1:17 AM
|
May 4, 2012 1:17 AM