
Echoes of the Past:
The Citadels of Time
Platform: Mac, Windows

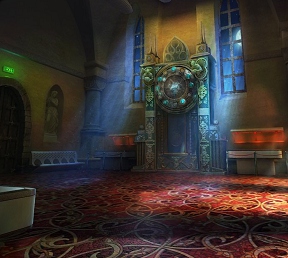
![]() Ding dong the witch is dead! Wait, what? She's still not dead? Not only that, the old hag is back and badder than ever creating havoc in the museum in Echoes of the Past: The Citadels of Time, the latest hidden object adventure hybrid by Orneon and sequel to both Echoes of the Past: Royal House of Stone and Echoes of the Past: The Castle of Shadows. Perhaps it's time to stop hanging out in that darn museum? Just saying.
Ding dong the witch is dead! Wait, what? She's still not dead? Not only that, the old hag is back and badder than ever creating havoc in the museum in Echoes of the Past: The Citadels of Time, the latest hidden object adventure hybrid by Orneon and sequel to both Echoes of the Past: Royal House of Stone and Echoes of the Past: The Castle of Shadows. Perhaps it's time to stop hanging out in that darn museum? Just saying.
 In this, the third time around, the witch is getting really ticked off with your interfering with her plans, and once again she has cast a curse upon the museum, this time freezing various parts of it in time and trapping the inhabitants of the past (the museum was once a castle) as ghostly apparitions. It is up to you to explore this spooky museum, travel back in time, and find all the pieces of the cursed clock to set things right and hopefully defeat the witch yet again. Maybe she'll stay defeated this time around? Please?
Wandering through the museum (and the other parts of the castle trapped in time) is accomplished with the usual click of a button. A handy changing cursor indicates areas to examine, places to go, people to see, and items to acquire. The controls are pretty standard for the usual adventure/hidden object hybrid with one notable exception: the top loading inventory. As most hybrids have the inventory on the bottom of the screen, this can take a bit of getting used to. Acquire items either through picking them up as many useful things are just laying around, by solving hidden object scenes to get that one perfect item, or by solving a large array of mini-games and puzzles. A handy refilling hint feature and the obligatory notebook to keep track of clues round out the adventure experience.
Analysis: Although Echoes of the Past: The Citadels of Time is the same story of the witch and the museum and the castle, it is definitely worth a look-see. The visuals are lovely with amazing little details and animations that really bring them to life. What's even better is how interactive the backgrounds are, with puzzles, games, and other details packed in everywhere you look. Yes, the story has been done before (and not just in the Echoes of the Past series), but it's always gratifying to see it done right.
 A lot of adventuring and hidden object finding is packed within the confines of the five chapters (and bonus adventure if you get the collector's edition) and that, more than anything, is what makes Echoes of the Past: The Citadels of Time a real treat and elevates it past many of the hybrids on the market. The hidden objects scenes are the first of what makes the game so fabulous as they are not completely static and require some interaction to find all of the items on your shopping list. Amusingly enough, you will never see the one item that eventually goes into your inventory until you find everything else you've been ordered to find which cuts down on the "okay, I've found the shovel, so why do I have to find all this other crap?" type of hidden object scene. Best of all are the "reverse" hidden object scenes (a la Enlightenus) in which items you previously found in other hidden object scenes then need to be placed back into another scene, mixing up the gameplay.
The mini-games and puzzles are pretty familiar but done really well, although almost every puzzle is missing pieces that must be found along the way. Considering the sheer volume of games and puzzles, this can be a bit annoying and feel more like padding as the game goes on. A nice feature of the collector's edition is not only the extra adventure but the ability to go back and play some of the mini-games and puzzles over just for the fun of it without the tedious finding of parts to activate them.
While not the perfect adventure hybrid, Echoes of the Past: The Citadels of Time is nevertheless one of the better ones out there, with lots of adventure and gameplay to be had. With two modes (easy and advanced) controlling the amount of hand-holding the game can be fun for amateur and seasoned explorer alike and a great way to spend some time exploring both the modern world and the distant past. With its gorgeous visuals, spooky music, and packed gameplay this is an adventure/hidden object game done right! Perhaps it's best if that annoying witch doesn't stay defeated...
A Collector's Edition is also available. It includes wallpapers, an extra adventure, the ability to play some of the mini-games and puzzles, and a built-in strategy guide. Remember that Big Fish Game Club Members pay only $13.99 for Collector's Editions (or 2 club credits), and collector's editions count 3 card punches of 6 total needed for a free game.
![]() Windows:
Windows:
Download the demo
Get the full version
Also available: Collector's Edition
![]() Mac OS X:
Mac OS X:
Download the demo
Get the full version
Also available: Collector's Edition


Walkthrough Guide
(Please allow page to fully load for spoiler tags to be functional.)
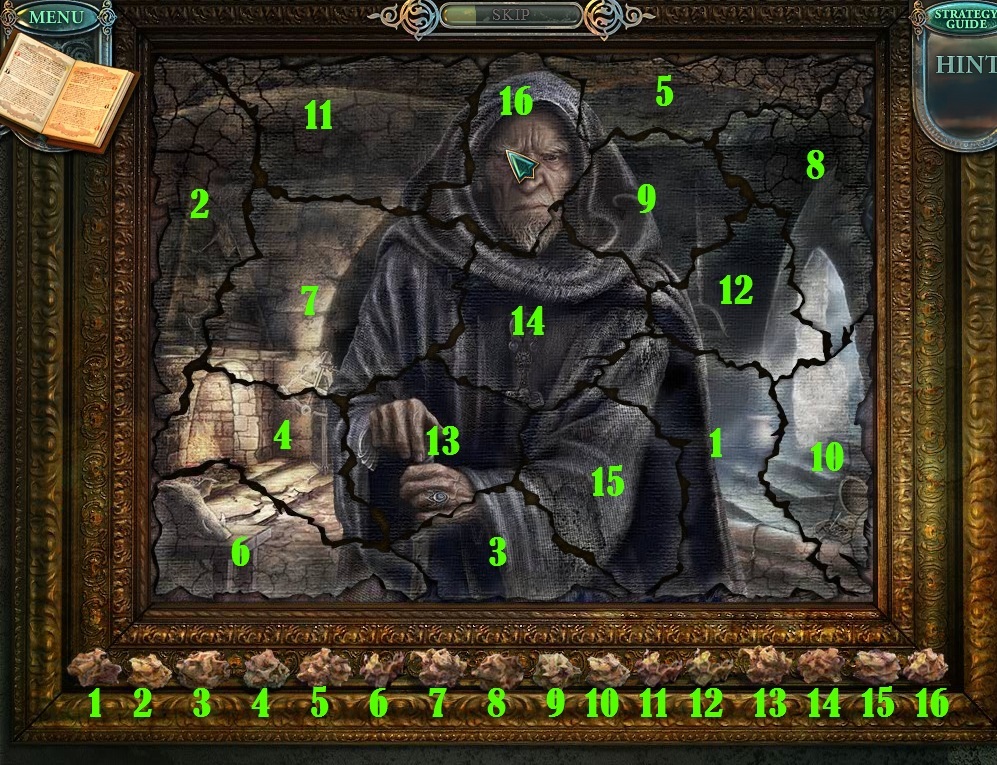
Echoes of the Past: The Citadels of Time Walkthrough Part 1 (General Information and Chapters 1-2)
General Information
NOTE: Many of the puzzles and hidden object scenes are randomized between games, therefore screenshots should be used as a reference, rather than a definitive solution.
At the start of each game, the player has a choice between Regular or Advanced Mode. Regular Mode provides additional hints and highlights active zones with sparkles. Advanced Mode does not indicate active zones.
At the beginning of a new game, you will be prompted to start the Tutorial, which will teach you the basic functions of the cursor and game mechanics.
In the top left corner of the screen is the Book. Important plot information as well as clues to future puzzles are all noted inside your Book.
In the top right corner of the screen is the Hint button. Click the button to receive instructions in a puzzle, highlight any interactive areas in the current scene, or to reveal an item in a hidden object scene.
Hidden object scenes consist of one screen with a randomized list of concealed items that must be found and collected.
At the end of each hidden object scene, you will receive the Final Item, which is then placed in your Inventory.
Your inventory is the bar located at the top of the screen and contains all of the objects you will need to progress through the game. Throughout the walkthrough, these collected items will be indicated in bold.
Chapter 1 - The Prophet
Throne Room
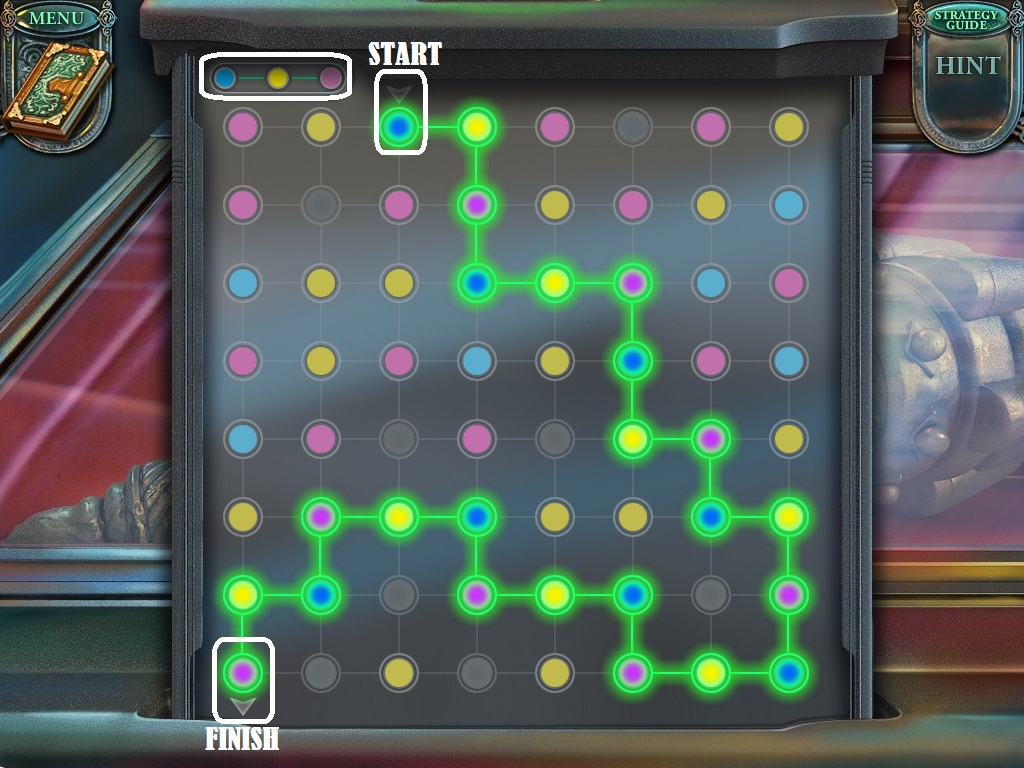
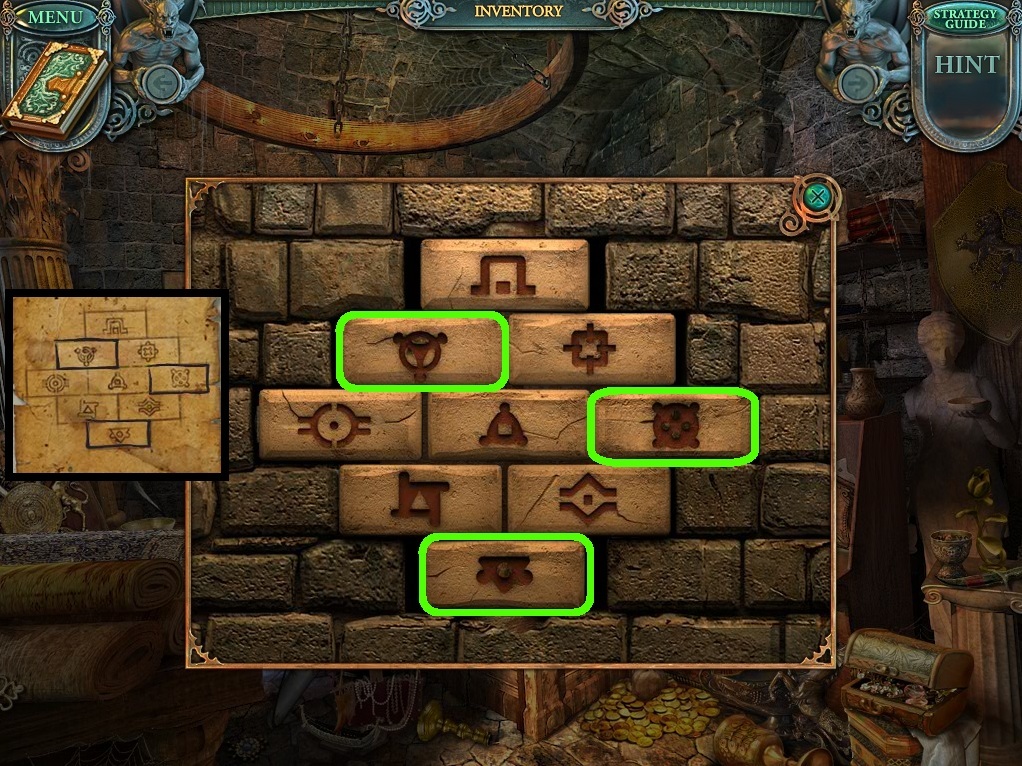
Click the display case to the right of the clock to zoom in.
Push the green button at the bottom of the glass to start the puzzle.
To solve this puzzle, create a path from the point below the arrow at the top of the board to the point above the arrow at the bottom of the board.
Click a circle to trace a line between them, following the order of blue circle to yellow circle to pink circle.
Grey circles cannot be clicked, and only colored circles that follow the Blue-Yellow-Pink pattern and are adjacent either horizontally or vertically can be connected.
Solution.
Once the puzzle is solved, the case will open, revealing the Mace.
Go through the glowing archway on the right to the 11th Century Exhibit.
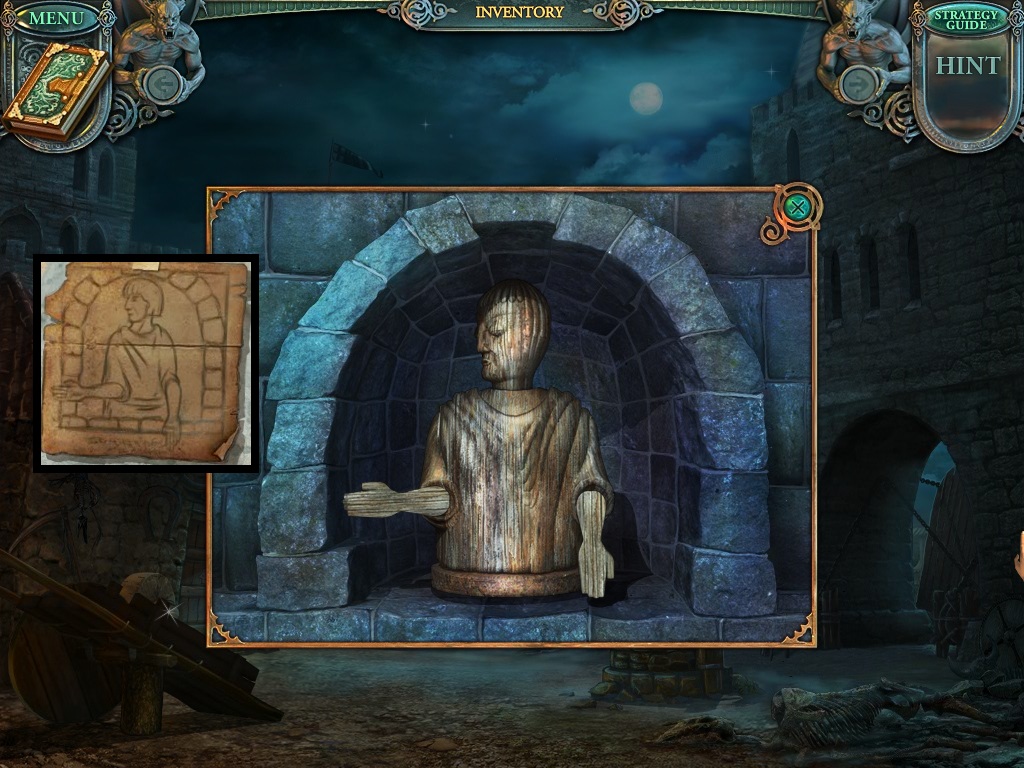
11th Century Exhibit
Click the large display cabinet to zoom in.
Note the position of the figure on the square piece of paper between the two glass cases, then click it to add the diagram your Notebook.
Click the left glass case to open it, then take the Statue Head inside.
Take the Bas-Relief on the ground beside the right gargoyle statue.
Use the Mace (from the case in the throne room) on the empty hands of the left gargoyle.
Click both of the gargoyles on the pedestals to rotate them towards the coat of arms on the wall between them.
Place the Bas-Relief in the recess in the wall.
Go through the revealed passageway to the Prophet's Chamber.
Prophet's Chamber
Click the trunk in the corner of the room to start the hidden object scene.
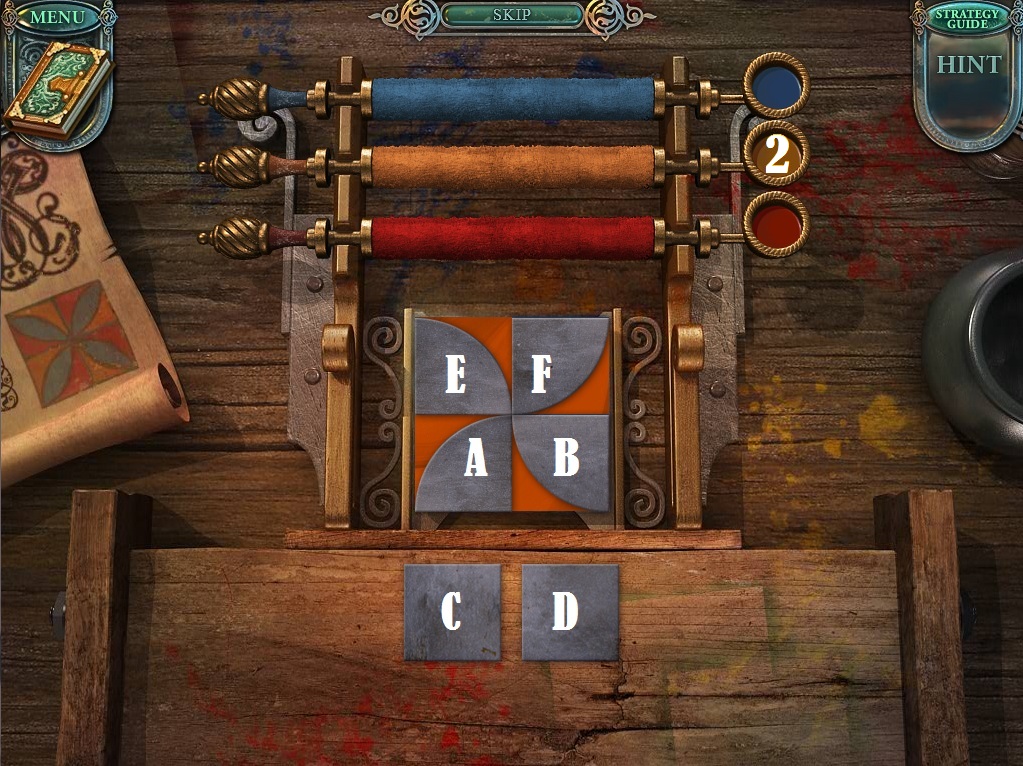
Click the astrological chart (A) draped over the top of the chest three times to complete the image of Ursa Major.
Click the mounted wolf head (B) to open its mouth, then take the Fang inside.
Pick up the bundle of herbs (C) and use it on the mortar and pestle (D) to make the Herbal Powder.
After all other objects have been found, the Final Item is the Statue's Arm (E).
Screenshot.
Once the hidden object scene is complete, you will receive the Statue's Arm.
Exit through the door on the right to the Castle Courtyard.
Castle Courtyard
Click the alcove to the right of the broken staircase to zoom in.
Add the Statue Head (from the cabinet in the Prophet's Chamber) and Statue Arm (from the hidden object scene in the Prophet's Chamber) to the incomplete statue.
Position the head and both arms of the statue to match the image found from the paper at the 11th Century Exhibit.
Screenshot.
After the statue is correctly positioned, take the Smithy Key from its back.
Click the door to the small building on the left to zoom in.
Use the Smithy Key on the keyhole below the door handle.
Go through the open door into the Smithy.
Smithy
Click the top of the wooden toolbox to remove it, revealing the Hammer inside.
Go back outside to the Castle Courtyard.
Castle Courtyard
Click the drawbridge mechanism beside the large archway on the left to zoom in.
Use the Hammer (from the toolbox in the Smithy) on the mechanism to dislodge the piece of wood and lower the bridge.
Cross the lowered bridge to the right to reach the Tournament Grounds.
Tournament Grounds
Click the right booth under the draped curtains to zoom in and take the Chisel.
Click the middle booth to zoom in and take the Pitchfork Handle.
Go back to the Smithy.
Smithy
Click the work bench under the right window to zoom in.
Use the Pitchfork Handle (from the middle booth in the Tournament Grounds) on the pitchfork blade to complete the Pitchfork.
Go back to the 11th Century Exhibit.
11th Century Exhibit
Click the wooden door on the right to zoom in.
Use the Chisel (from the right booth at the Tournament Grounds) on the metal plate to remove it and start the puzzle.
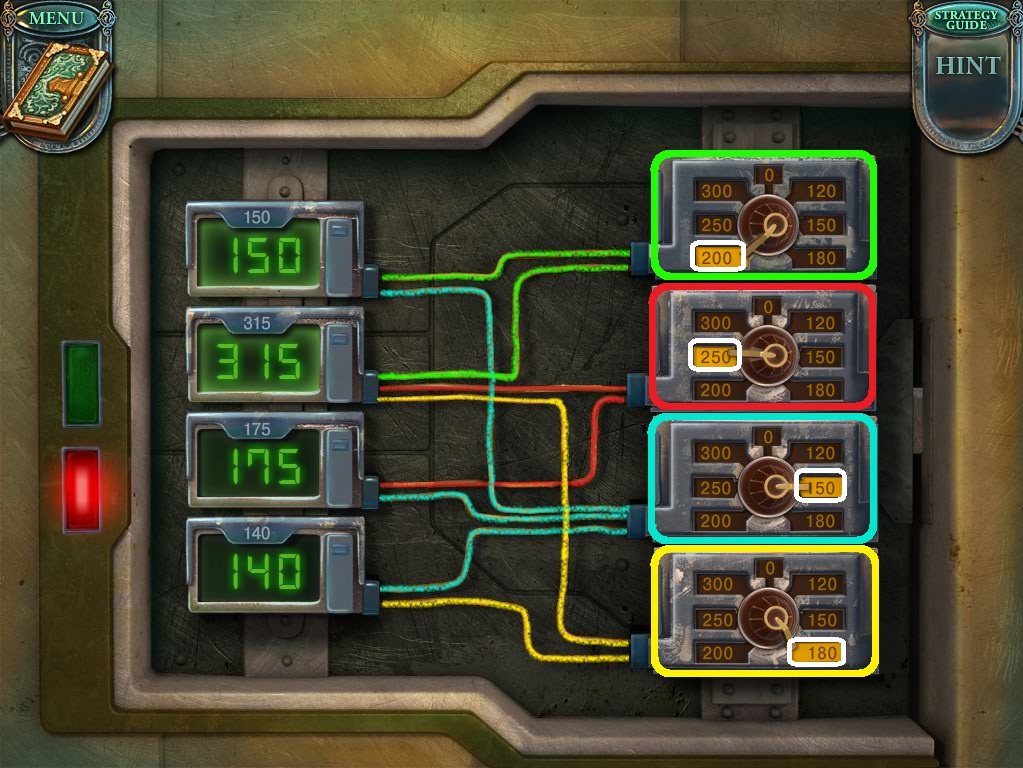
To solve this puzzle, turn the dials to set the numbers in each of the four panels to the amount shown at the top of the panels.
Click one of the four dials to rotate it clockwise to one of the digits around it.
The number shown on the dial will be split between the panels its circuit is connected to.
Solution.
Go through the open door into the Security Room.
Security Room
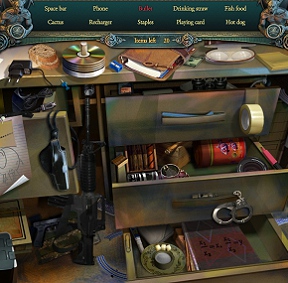
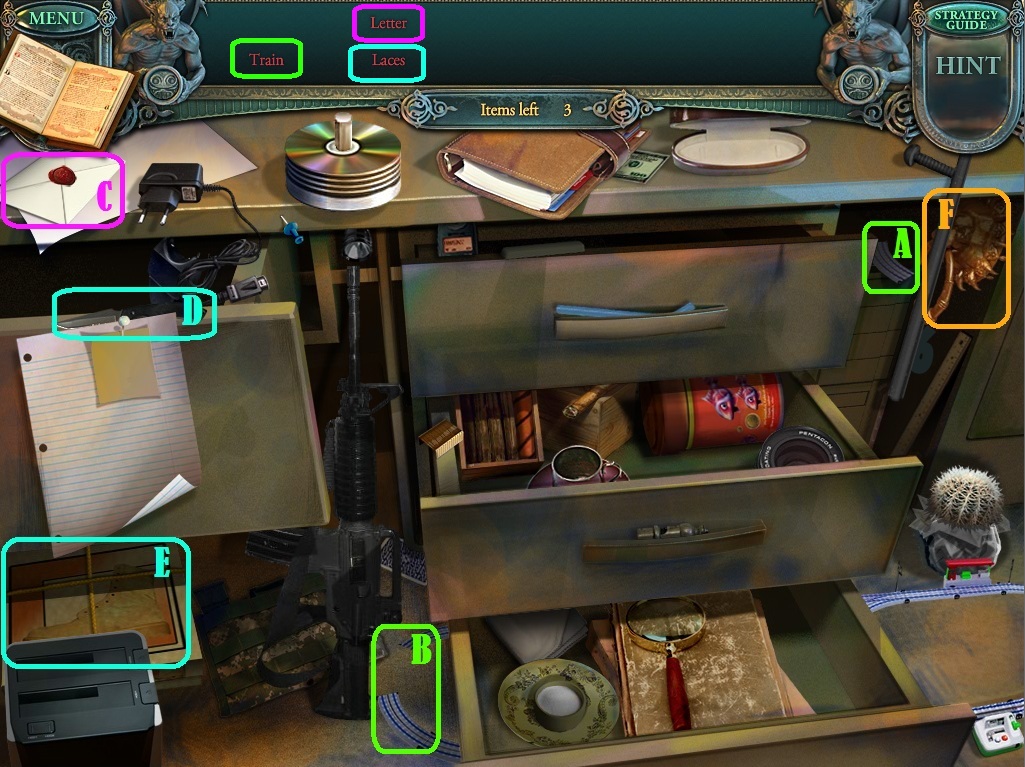
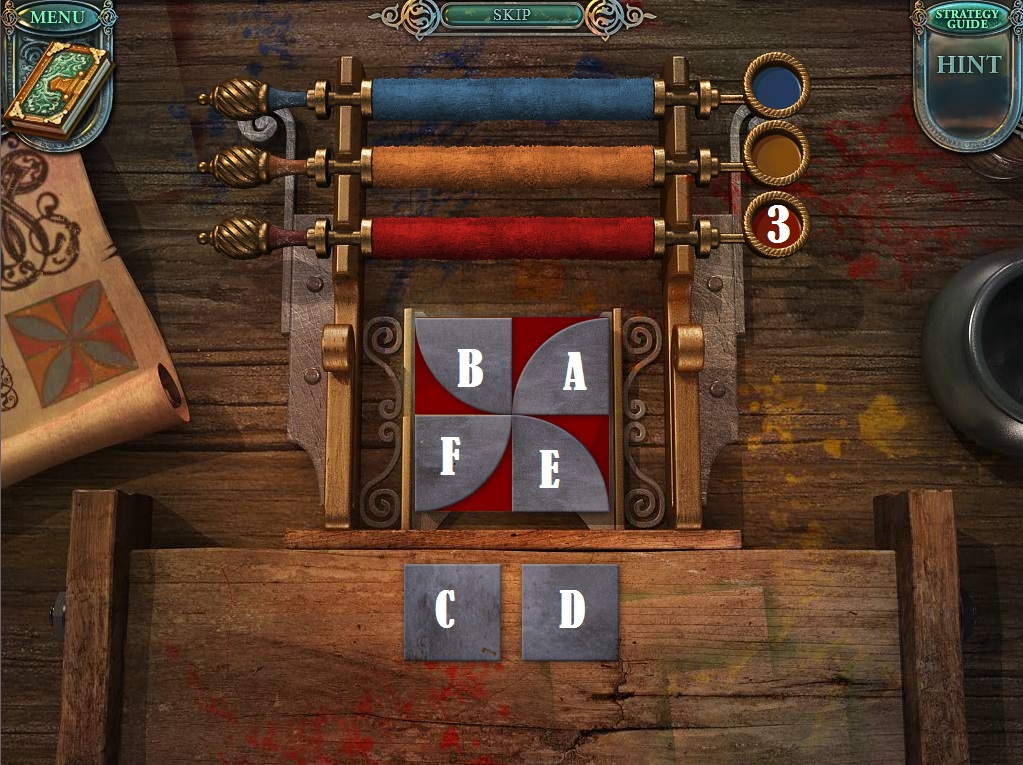
Click the drawers on the right side of the desk to start the hidden object scene.
Put the slices of bread (A) inside the toaster (B) to make the Toast.
Use the pink highlighter (C) on the drawing of the elephant (D) to complete the Pink Elephant.
Click the machine gun (E) to remove the clip, then take the Bullet that falls to the ground.
After all other objects have been found, the Final Item is the Chest Key (F).
Screenshot.
Once the hidden object scene is complete, you will receive the Chest Key.
Take the Soldier (1/4) figurine from the upper right wall shelf above the monitors.
Exit the room to go back to the 11th Century Exhibit.
11th Century Exhibit
Click the large chest in the lower left corner to zoom in.
Use the Chest Key (from the hidden object scene in the Security Room) on the keyhole of the chest.
Take the Magnetic Card and the Arrows inside the opened chest.
Go back inside the Security Room.
Security Room
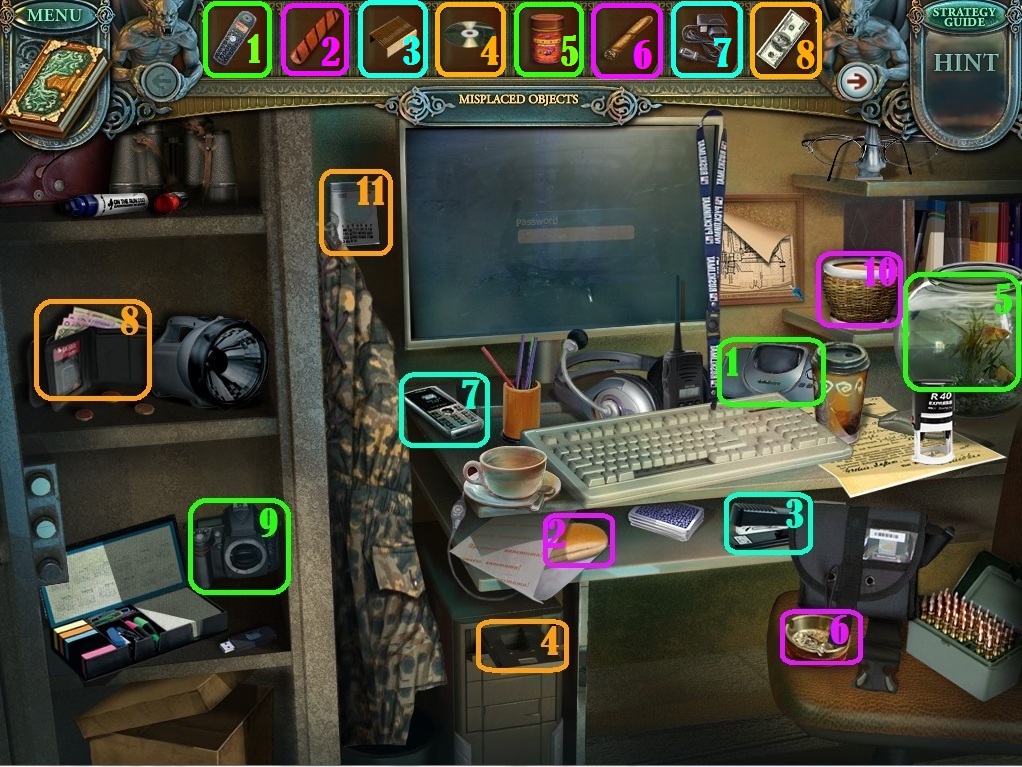
Use the Magnetic Card (from inside the chest at the 11th Century Exhibit) on the card slot at the top of the large, iron safe.
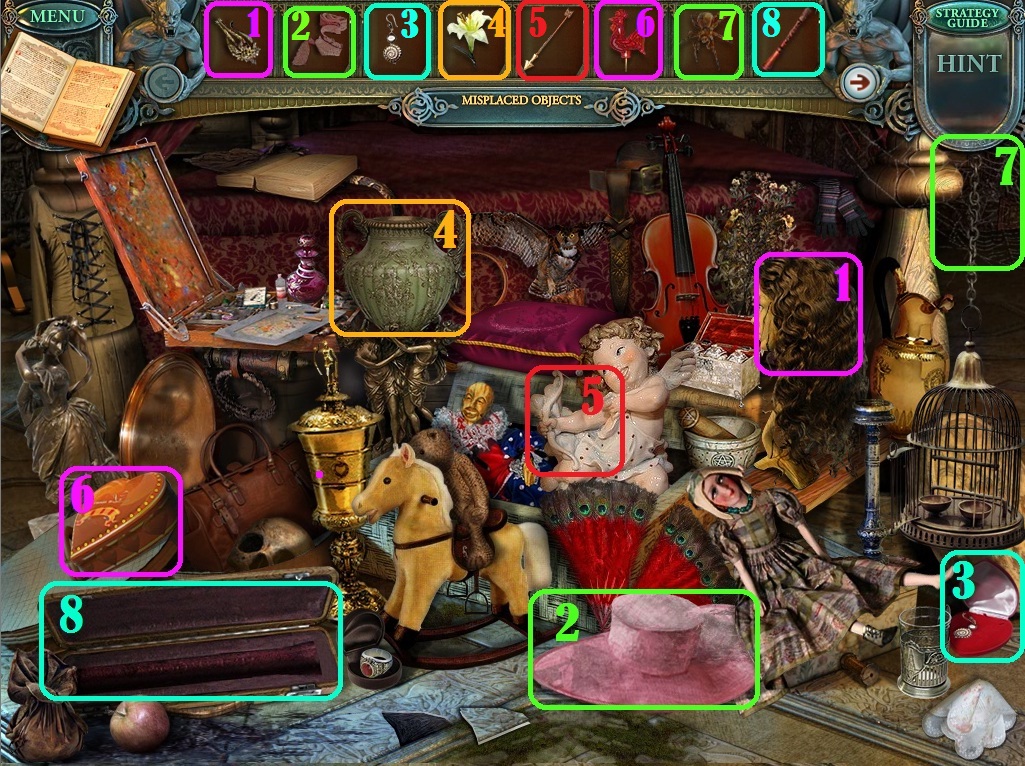
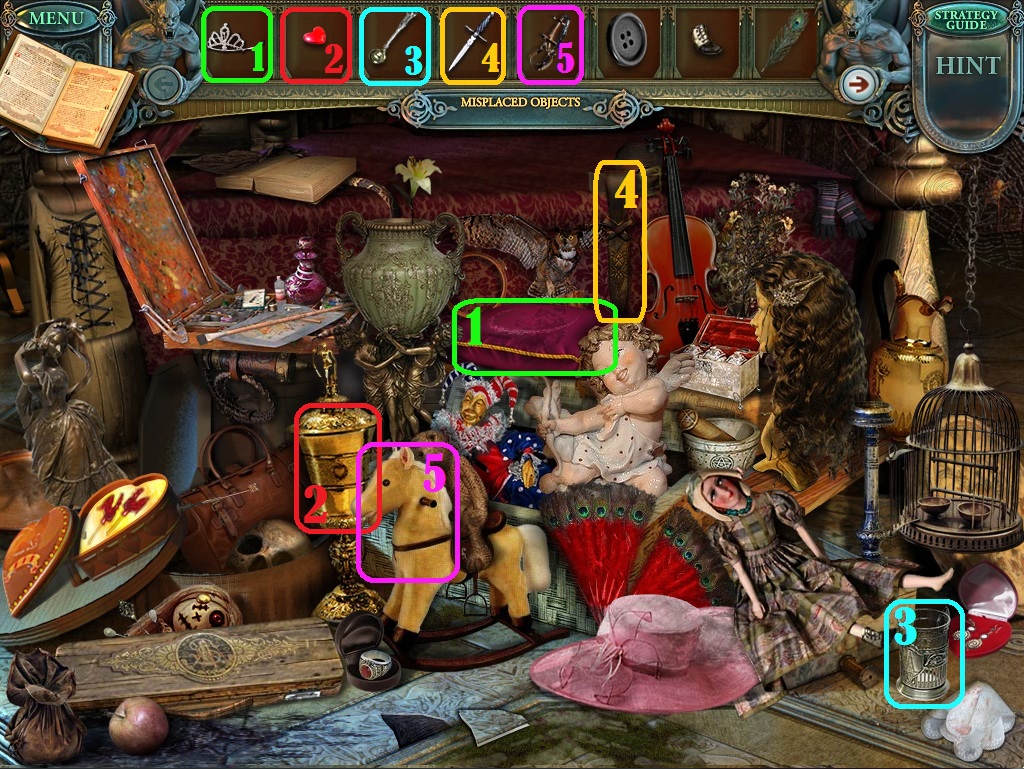
Click the opened safe to start the misplaced object scene.
In this scene, click an item from the list at the top to select it, then use it on the appropriate item in the scene.
Use the Telephone on the receiver.
Use the Hot Dog on the bun.
Use the Staples on the stapler.
Use the Disc on the disc drive of the computer.
Use the Fish Food on the fish bowl.
Use the Cigar on the ashtray.
Use the Recharger on the cellphone.
Use the Dollar on the wallet.
Use the Camera Lens on the camera.
Use the Cactus on the small pot.
Use the Number 6 on the calendar.
Screenshot Part 1.
Screenshot Part 2.
Once the misplaced object scene is complete, you will receive a Strap.
Return to the Tournament Grounds.
Tournament Grounds
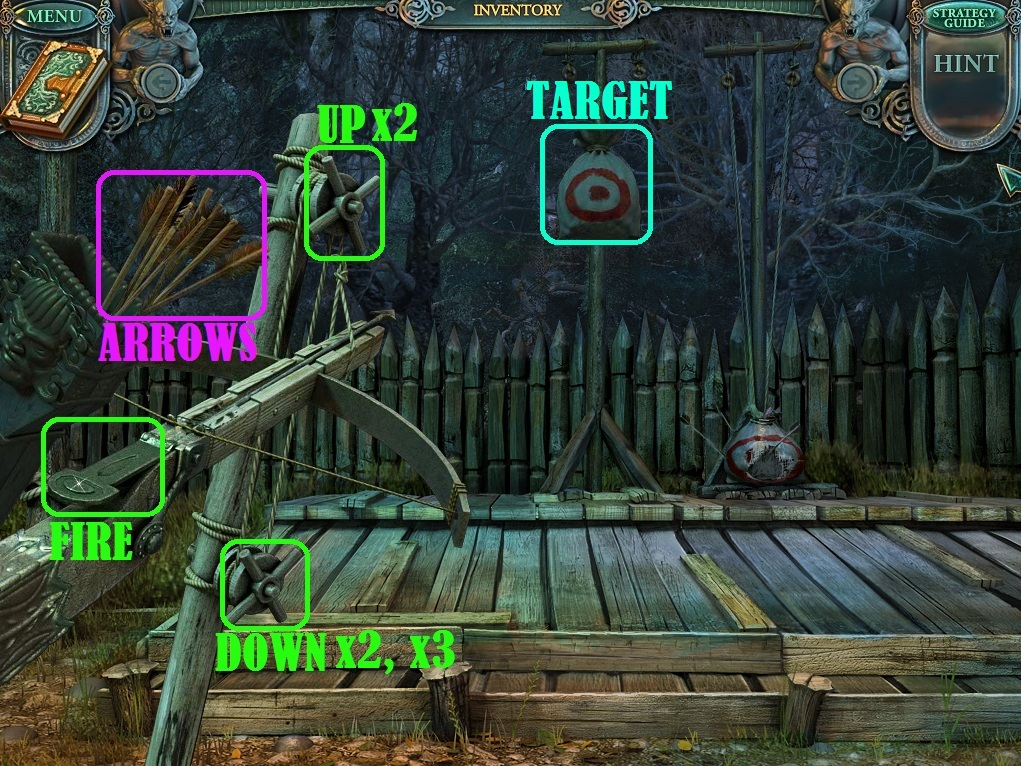
Use the Pitchfork (from the table in the Smithy) on the pile of hay to reveal the Wheel.
Click the crossbow mechanism on the archery target stand for a closer look.
Place the Arrows (from the chest in the 11th Century Exhibit) inside the crossbow.
Click the top crank twice to aim the crossbow, then press the button to fire the arrow at the sack with the target on it.
Click the bottom crank twice to lower the crossbow's aim, then press the button to fire a second arrow.
Click the bottom crank three times to lower the crossbow's aim, then press the button fire the third arrow.
Take the Blunt Knife from the torn sack.
Screenshot.
Go back to the castle courtyard.
Castle Courtyard
Place the Wheel (from the haystack at the Tournament Grounds) on the space at the side of the broken cart.
When the cart rolls away, click the revealed emery stone to zoom in.
Use the Strap (from the misplaced object scene in the Security Room) on the emery stone to repair it.
Use the Blunt Knife (from the target sack at the Tournament Grounds) on the emery stone to make it a Sharp Knife.
Go into the Smithy.
Smithy
Use the Sharp Knife (from the emery stone at the Castle Courtyard) on the ropes tied around the large chest on the floor.
Click the coil of Rope in front of the chest to add it to your inventory.
Click the chest to open it, then take the Lever inside.
Go back outside to the castle courtyard.
Castle Courtyard
Click the broken stairway to zoom in.
Add the Lever (from the chest in the Smithy) to the mechanism on the right side of the stairway.
Click the 2nd and 4th levers to raise all of the stairs.
Screenshot.
Go up the stairs to the gate.
Gate
Click the pile of rocks twice to reveal the Crowbar.
Click the top crank of the lock mechanism to remove the top bar from the gate.
Go back down to the Castle Courtyard.
Castle Courtyard
Click the emery stone for a closer look.
Use the Crowbar (from the pile of rocks at the Gate) on the boulders on the ground to the left of the stone.
Take the Bellows revealed underneath.
Return to the Tournament Grounds.
Tournament Grounds
Click the right booth to zoom in.
Use the Rope (from the rope around the chest in the Smithy) to tie the cloth around the stick.
Click the Unlit Torch to add it to your inventory.
Use the Crowbar (from the pile of rocks at the Gate) to remove the lid from the wooden crate.
Take the Full Oil Can inside the opened crate.
Go back to the Prophet's Chamber.
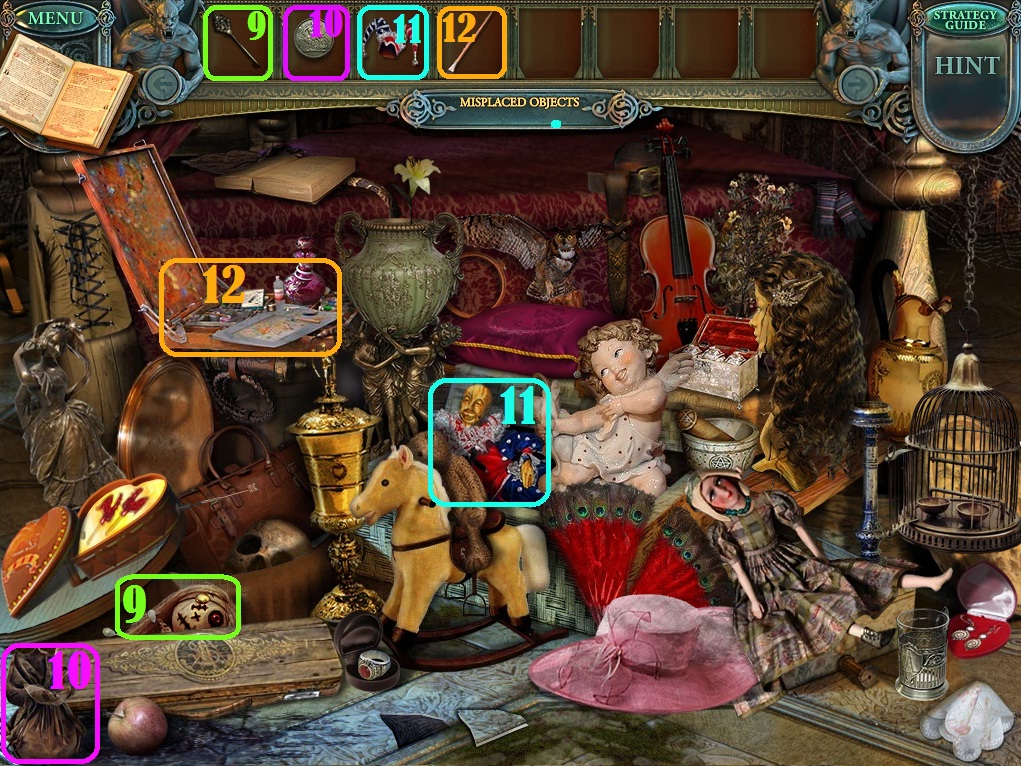
Prophet's Chamber
Click the chest in the corner of the room to repeat the hidden object scene.
Use the axe (A) on the log (B) to make the Wooden Doll.
Use the charcoal (C) on the X at the top of the small box (D) to draw the roman numeral IX for Nine.
Use the small wooden stick (E) on the two sticks on the floor (F) to make the shape of a Triange.
After all other objects have been found, the Final Item is the Metal Tongs (G).
Screenshot.
Once the hidden object scene is complete, you will receive the Metal Tongs.
Use the Unlit Torch (from the third booth at the Tournament Grounds) on the fireplace to make it a Burning Torch.
Return to the Smithy.
Smithy
Click the workbench under the right window to zoom in.
Use the Full Oil Can (from the crate at the Tournament Grounds) on the rusty hinges of the locked box.
Take the large Screw inside the opened box.
Return to the Gate.
Gate
Use the Screw (from the locked box in the Smithy) on the space at the left side of the lower crank mechanism.
Click the repaired crank to remove the bottom bar blocking the door.
When the door splits open, take the Axe sticking out of the left side.
Go back to the Tournament Grounds.
Tournament Grounds
Click the middle booth to zoom in.
Use the Axe (from the open door at the Gate) on the log in front of the table.
Take the chopped Firewood on the ground.
Go back to the Smithy.
Smithy
Click the furnace in the back of the room to zoom in.
Place the Firewood (from the chopped log in the Tournament Grounds) inside the furnace, underneath the pan.
Light the wood with the Burning Torch (from the Tournament Grounds, lit at the fireplace in the Prophet's Chamber).
Add the Bellows (from underneath the boulder in the Castle Courtyard) to the left side of the furnace.
Use the Metal Tongs (from the hidden object scene in the Prophet's Chamber) to pick up the burning hot mold, then click the trough of water at the lower left side of the furnace.
Take the completed Well Handle on top of the trough.
Go back outside to the Castle Courtyard.
Castle Courtyard
Click the well for a closer look.
Place the Well Handle (forged at the furnace in the Smithy) at the right side of the winch at the top of the well.
Take the Gear inside the bucket raised out of the well.
Go back to the Prophet's Chamber.
Prophet's Chamber
Click the clock on the table beside the Prophet to zoom in.
Add the Gear (from the well at the Castle Courtyard) to the spoke sticking out of the wood underneath the metal bowl.
Speak with the Prophet to be returned to the 11th Century Exhibit.
11th Century Exhibit
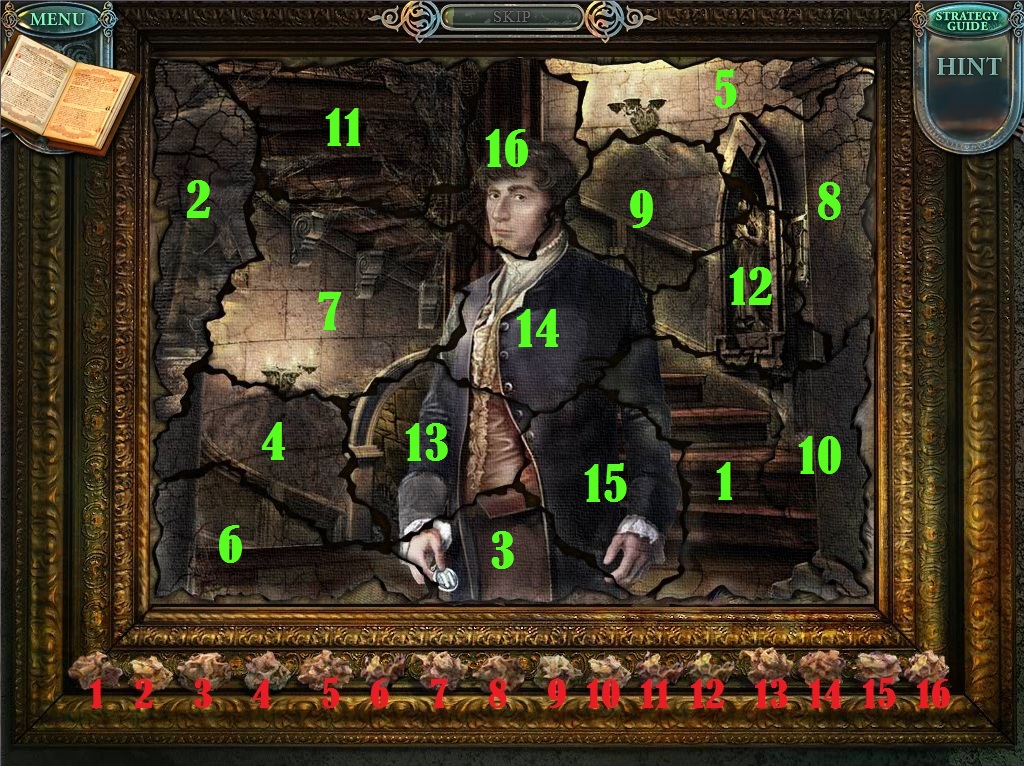
Click the Picture Scraps on the floor under the ruined painting to add them to your inventory.
Click the empty frame on the wall to zoom in.
Place the Picture Scraps inside the frame to start the puzzle.
To solve this puzzle, pick up the crumpled picture scrap at the bottom of the frame and place it in the correct position to repair the painting.
Click a picture scrap to select it, then move it inside the frame. It will unfurl, revealing its full image.
Click an area inside the frame to set it down; if correctly positioned, the scrap will lock in place.
Solution.
Once the puzzle is solved, take the glowing Clock Number at the bottom of the frame.
Go into the Security Room.
Security Room
Click the desk drawers to repeat the hidden object scene.
Place the small piece of track (A) into the space of the toy train track on the floor (B) to reveal the toy Train.
Click the sealed envelope (C) to open it, revealing the Letter.
Use the knife (D) to cut open the shoebox (E), revealing the Laces inside.
After all other objects have been found, the Final Item is the Door Ring (F).
Screenshot.
Once the hidden object scene is complete, you will receive a Door Ring.
Go back to the Throne Room.
Throne Room
Click the large clock in the middle of the room to zoom in.
Add the Clock Number (from the picture scraps puzzle in the 11th Century Exhibit) to the space between 7 and 9 on the clock face.
Click the exit door on the left for a closer look.
Put the Door Ring (from the hidden object scene in the Security Room) into the space at the left door handle.
Click both of the door rings to rotate the lion heads downward.
Go through the open door into the Hallway.
Hallway
Go forward to move to the end of the hall.
Take the Monitor Control Block on top of the left column.
Click the toolbox on top of the bench to zoom in.
Open the toolbox and take the Pliers from the middle right drawer and the Screwdriver from the lower left drawer.
Click the opened display case on the right wall for a closer look.
Click the framed paper with the picture of a knight to add the image to your Notebook.
Click the podium to the right of the gate to zoom in and take the Button (1/2)
Go back once to the front of the hall.
Click the display case beside the right door to zoom in.
Use the Pliers to twist the broken key handle stuck inside the lock.
Take the Comb from the open case.
Go back to the 11th Century Exhibit.
11th Century Exhibit
Click the large opened chest to look inside.
Use the Screwdriver (from the toolbox in the Hallway) on the screws of the two straps to release the Dagger.
Go inside the Security Room.
Security Room
Click the four monitors above the desk to zoom in.
Add the Monitor Control Block (from the column in the Hallway) to the bottom of the broken monitor.
When the screen turns on, note the 3 digit combination shown on the dials: 4-7-2.
Return to the Hallway, then go through the portal in the left archway to reach the Princess's Chamber.
Chapter 2 - The Princess
Princess's Chamber
Go through the open doorway on the left to enter the Bedroom.
Bedroom
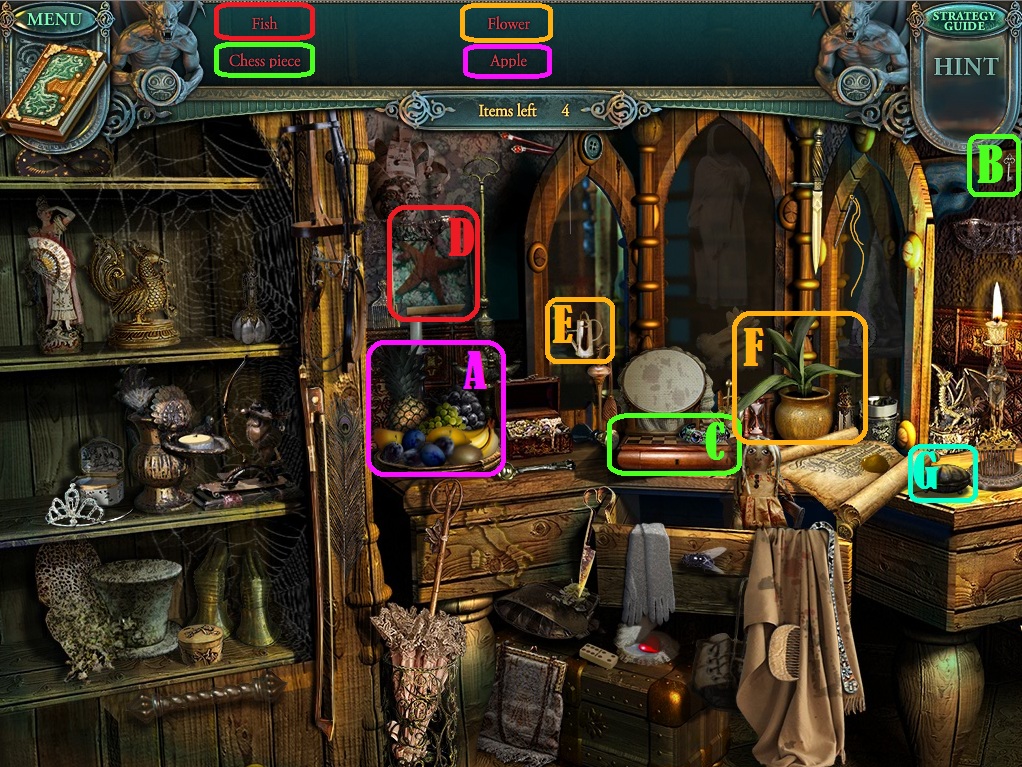
Click the mirrors in the back left corner of the room to start the hidden object scene.
Click the platter of fruit (A) to reveal the Apple.
Use the key (B) on the chess board (C) to reveal the Chess Piece.
Click the picture of the starfish (D), then the seahorse to reveal the Fish.
Use the watering can (E) on the potted plant (F) to reveal the Flower.
After all other objects have been found, click the clam (G) to reveal the Final Item, the Pearl.
Screenshot.
Once the hidden object scene is complete, you will receive a Pearl (1/3).
Click the bed to zoom in.
Remove the pile of pillows to reveal the voodoo doll.
Pull the bell rope on the left side of the bed to drop the Horn on to the mattress.
Click the paper in front of the pillows to add the note to your Notebook.
Go through the archway to travel to the Side Room.
Side Room
Click the puppet theater on the top shelf over the writing desk to zoom in and take the Swords at the bottom of the miniature stage.
Use the Comb (from the display case in the Hallway) on the mannequin's wig.
Take the revealed Pearl (2/3) from the necklance around the mannequin's neck.
Click the pile of junk underneath the desk three times to reveal the Scissors.
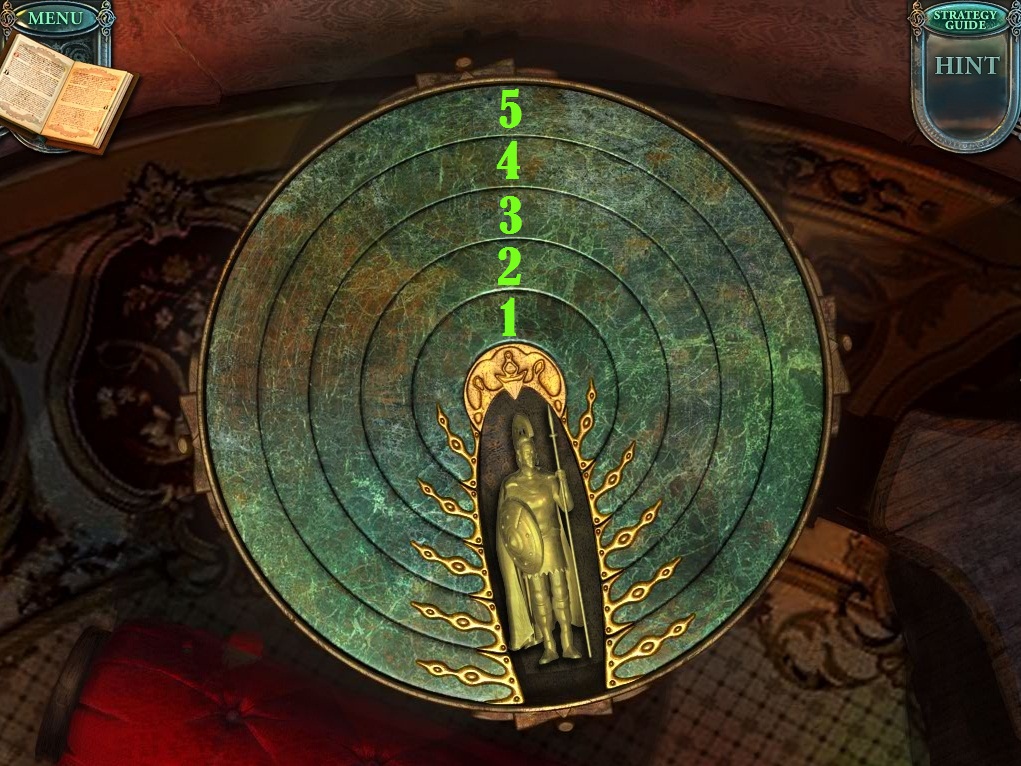
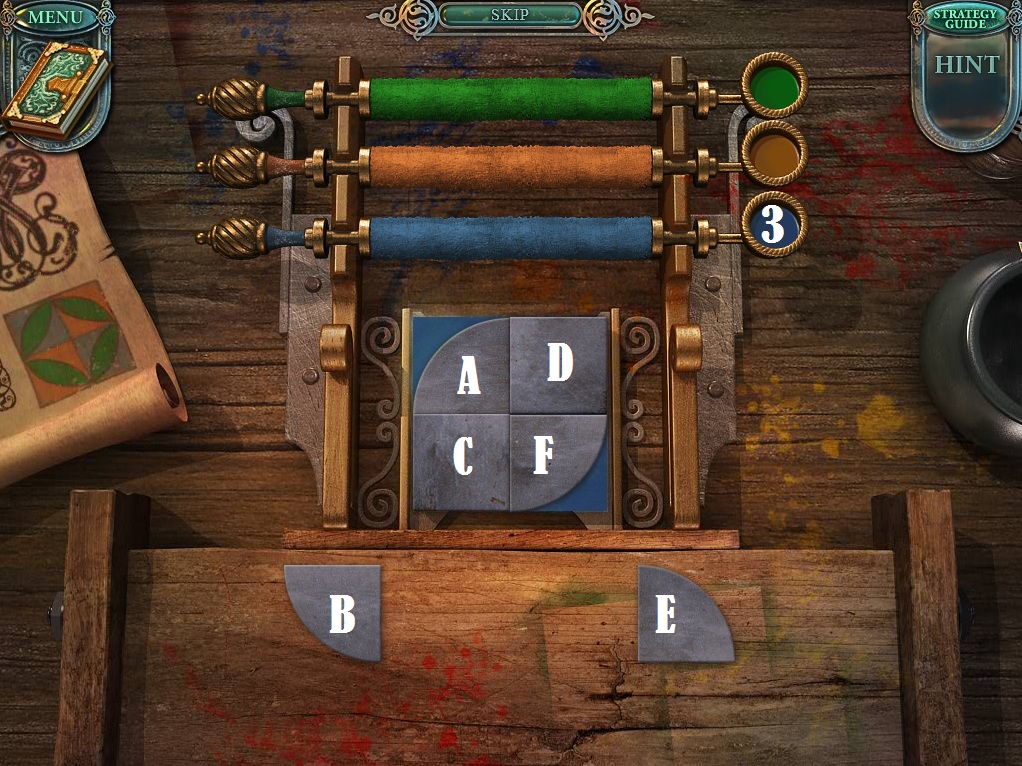
Click the small, round table to the right of the mannequin to start the puzzle.
To solve this puzzle, rotate the discs so that the spaces in each disc is aligned at the bottom of the table to uncover the figurine.
Click a disc to rotate it counter-clockwise; moving one disc can also rotate other discs.
Clicking disc 5 moves discs 4 and 5.
Clicking disc 4 moves discs 3, 4, and 5.
Clicking disc 3 moves discs 2, 3, and 4.
Clicking disc 2 moves discs 1, 2, and 3.
Clicking disc 1 moves discs 1 and 2.
Start by aligning disc 4 and 5 at the bottom by clicking disc 4.
Then align disc 3 by clicking disc 2.
Finally, align discs 1 and 2 by clicking disc 1.
Solution.
Once the puzzle is solved, take the Soldier (2/4) from the space in the table.
Go back to the Bedroom.
Bedroom
Click the bed to zoom in.
Use the Scissors (from under the desk in the Side Room) to cut open the seam of the voodoo doll, then take the revealed Golden Key inside.
Click the jewelry box on top of the wardrobe to zoom in.
Use the Golden Key on the triangular keyhole to unlock the box, then take the revealed Pearl (3/3).
Use the Scissors on the wrapped present at the foot of the bed.
Click the opened present to start the misplaced object scene.
Use the Hairpin on the mannequin's wig.
Use the Ribbon on the pink hat.
Use the Earring on the jewelry box.
Use the Flower on the vase.
Use the Arrow on Cupid's bow.
Use the Candy on the heart-shaped candy box.
Use the Spider on the spider web.
Use the Flute on the instrument case.
Use the Pin on the doll.
Use the Coin on the leather bag.
Use the Harlequin's Hat on the harlequin doll.
Use the Brush on the paint set box.
Screenshot Part 1.
Screenshot Part 2.
Once the misplaced object scene is complete, you will receive Leaves.
Go back to the Hallway.
Hallway
Click the display case beside the right door to zoom in.
Add the three Pearls (1 from the hidden object scene in the Bedroom, 1 from the jewelry box in the Bedroom, and 1 from the mannequin's necklace in the Side Room) to the pearl-covered jewelry box inside the case.
Take the Crown from the open box.
Return to the Princess's Chamber.
Princess's Chamber
Click the door on the right to zoom in.
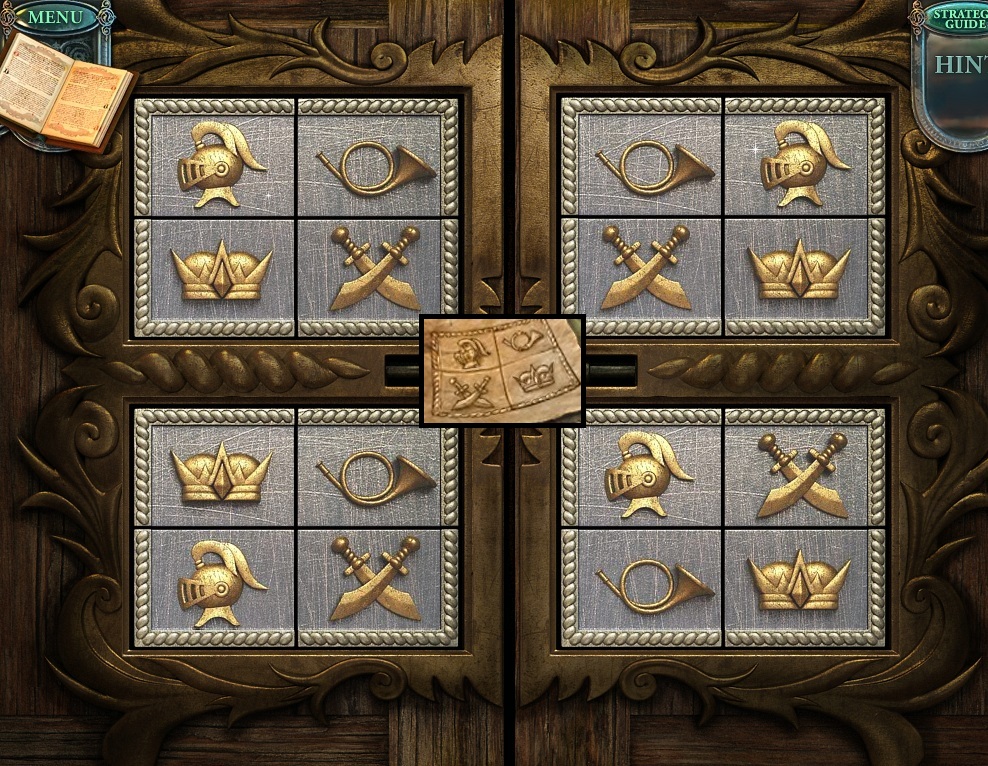
Add the Crown (from the jewelry box in the Hallway), the Swords (from the puppet theater in the Side Room) and the Horn (from pulling the bell rope in the bedroom) to the similarly shaped grey squares to start the puzzle.
To solve this puzzle, arrange the tiles so that there are four different symbols in each of the four squares: one crown, one pair of swords, one horn, and one helmet.
The note found earlier in the case at the hallway shows the tiles must also be positioned so the border of each tile is aligned with the border of the square.
Click a tile to select it, then click another tile to swap their places.
Solution.
Once the puzzle is solved, go through the open door into the Study.
Study
Take the Heraldic Lily leaning against the bottom of the left bookcase.
Click the small box on the right side of the table for a closer look.
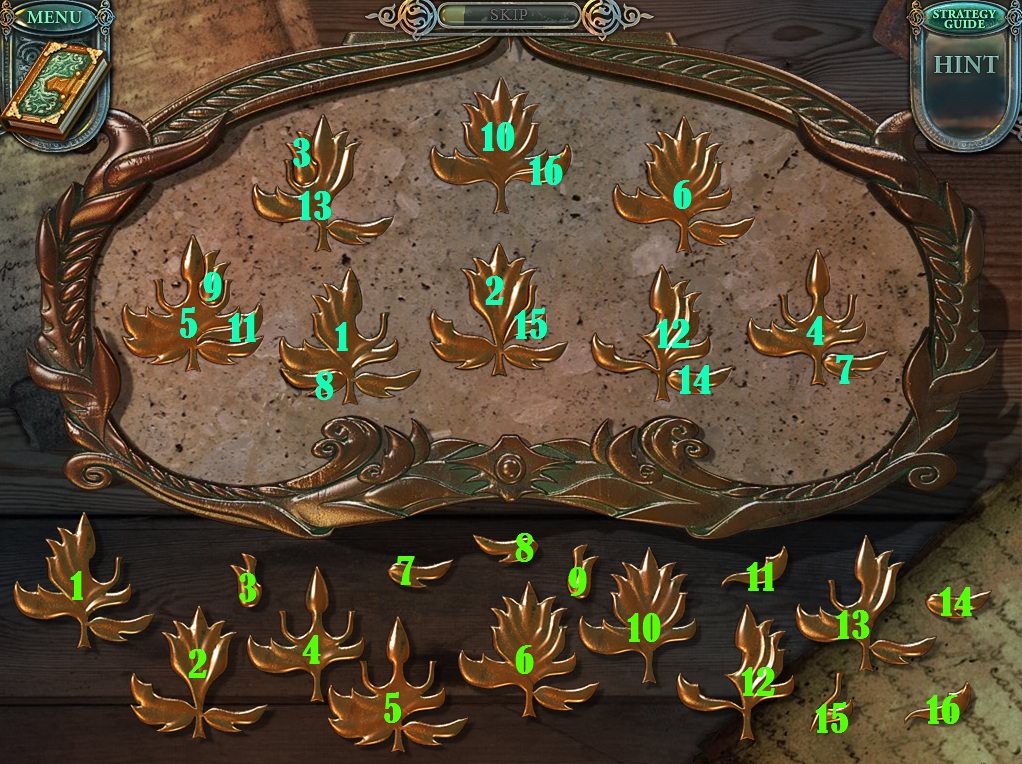
Add the Leaves (from the misplaced object scene in the Bedroom) to the box to start the puzzle.
To solve this puzzle, place all of the pieces of the golden leaves into the relief spaces on top of the box.
Click a leaf fragment to select it, then click a space on the box to set it in place.
Solution.
Once the puzzle is solved, the box will open, reveaing the Metal Plate (1/3) inside.
Next to the puzzle box on the table is an aquarium; click it for a closer look.
Take the Glove above the upper right corner of the table.
Click the drawer under the bookshelf on the right side of the room to zoom in.
Take the red Ball, then click the drawing of a clown to add the note to your Notebook.
Go back to the Bedroom.
Bedroom
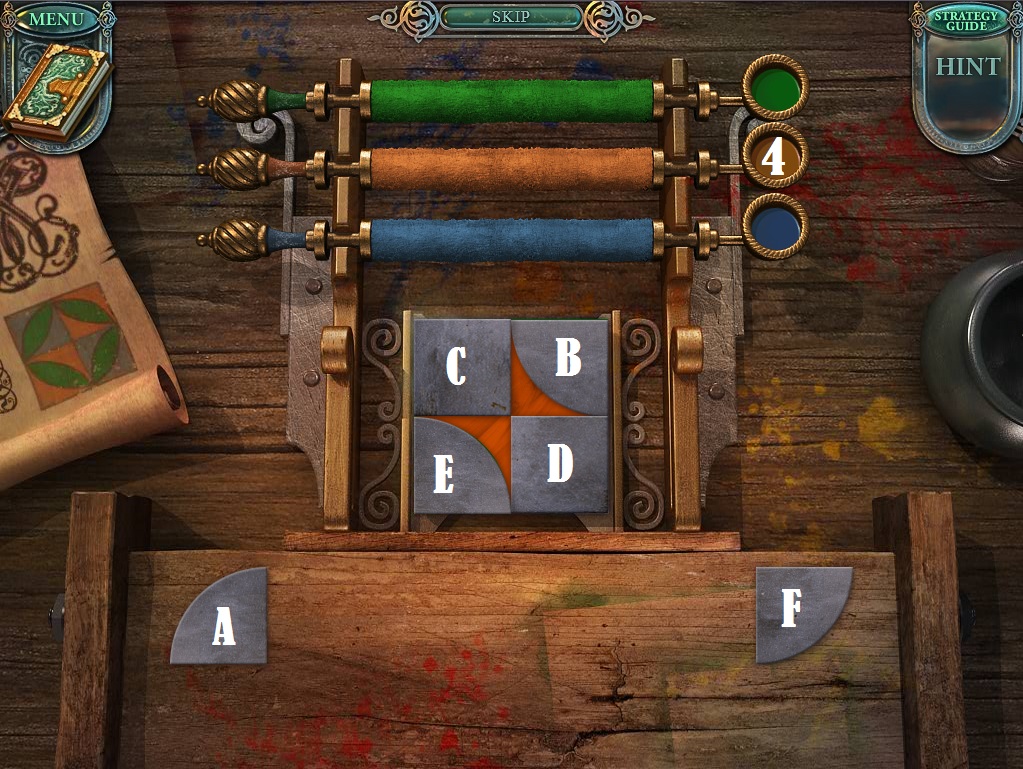
Click the clown mechanism on the table to zoom in.
Add the red Ball (from the drawer in the Study) to the clown's right hand to start the puzzle.
To solve this puzzle, arrange each of the colored balls on the left and right side to match the order shown on the clown's chest.
Click any of the balls in one hand, and it will be moved to the top of the opposite hand.
No hand can carry more than 5 balls or less than 3 balls.
The quickest way to solve this puzzle is to alternate between hands, arranging them in order from the bottom to the top.
Solution.
Once the puzzle is solved, take the Metal Plate (2/3) from the open compartment under the clown.
Go into the Side Room.
Side Room
Use the Glove (from the aquarium in the Study) on the bouquet of roses on the red seat.
Take the revealed Metal Plate (3/3) on top of the seat.
Go back to the Hallway.
Hallway
Click the shield lock on the right door to zoom in.
Add the three Metal Plates (from under the roses in the Side Room, the puzzle box in the Bedroom, and the clown puzzle in the Bedroom) to the three empty sockets on the lock to start the puzzle.
To solve this puzzle, match the tiles on opposite sides of the shield based on similarity.
The shield, cannon, and fort tiles are locked in place, but the similarly colored tiles diagonally opposite to them can be clicked to cycle through their images.
Solution.
Go through the open door into the Armory.
Armory
Click the chest to open it, then take the Anchor and Weight (1/2) inside.
Go through the doorway on the left into the Antechamber.
Antechamber
Click the pile of armor on the ground beside the spears to reveal the Puppet.
Take the Triangular Key on the ground between the bottoms of the spears.
Go back to the Bedroom.
Bedroom
Click the mirrors to repeat the hidden object scene.
Use the stamp (A) on the scroll (B) to make the Certified Decree.
Use the needle and thread (C) on the embroidery (D) to make the Sun.
After all other objects have been found, the Final Item is the Cupboard Handle (E).
Screenshot.
Once the hidden object scene is complete, you will receive a Cupboard Handle.
Go into the Side Room.
Side Room
Click the puppet theater on the top desk shelf to zoom in.
Add the Puppet (from under the armor in the Antechamber) to the left side of the stage.
Take the revealed Button (2/2).
Return to the Armory.
Armory
Click the large cabinet to the left of the window for a closer look.
Add the two Buttons (from the podium in the Hallway and the puppet theater in the Side Room) to the two empty lock latches to start the puzzle.
To solve this puzzle, click the buttons on the latches in the correct order to open the lock.
If a button is pushed correctly, it will stay pressed down; if the button is clicked in the wrong order, all of the buttons will revert to their original position.
Solution.
Once the puzzle is solved, take the Book from the opened cupboard.
Go back to the Study.
Study
Click the cabinet under the right bookshelf to zoom in.
Use the Cupboard Handle (from the hidden object scene in the Bedroom) on the holes at the top of the cabinet.
Take the Pistol inside the open drawer.
Return to the Antechamber.
Antechamber
Hanging from the right wall is a wooden plaque with three missing pieces.
Place the Dagger (from the chest in the 11th Century Exhibit), the Heraldic Lily (from the bookcase in the Study), and the Pistol (from the cupboard in the Study) all into the three spaces on the plaque.
Take the Lock Part from the revealed cache in the wall.
Go back to the Study.
Study
Click the large door for a closer look.
Add the Lock Part (from the cache in the Antechamber) to the space in the lock to start the puzzle.
To solve this puzzle, enter in the correct symbols from left to right by copying the order of the images in the labyrinth.
Start by solving the miniature maze at the top of the lock, tracing a path to the end in the center; note the order of the symbols you cross along that path.
Click the buttons to cycle through the symbols fire, water, stars, cloud, mountain.
Solution.
Go through the open door into the Study Side Room.
Study Side Room
Place the Book (from the cupboard in the Armory) between books II and IV on the book shelf.
Take the revealed Table Part on the wall.
Return to the Armory.
Armory
Click the short, round table in the center of the room to zoom in.
Place the Table Part (from behind the bookcase in the Study Side Room) at the empty space in the middle of the table to start the puzzle.
To solve this puzzle, align all of the rings to complete the image of the map.
Click each of the three inner rings to rotate them clockwise; the outer ring is stationary and cannot be rotated.
Solution.
Once the puzzle is solved, the center of the table will lift, revealing the Ship and Flag Point inside.
Go back to the Bedroom.
Bedroom
Click the pile of junk at the foot of the bed to start the misplaced object scene.
Use the Tiara on the pillow.
Use the Heart on the center of the trophy.
Use the Silver Spoon on the glass cup.
Use the Dagger on the sheath.
Use the Bridle on the rocking horse.
Use the Black Button on the teddy bear's head.
Use the Shoe on the doll's bare foot.
Use the Feather on the fan.
Use the Domino on the stack of dominoes.
Use the Bookmark on the open book.
Use the Fiddlestick on the violin.
Screenshot Part 1.
Screenshot Part 2.
Once the misplaced object scene is complete, you will receive the Part of the Globe.
Return to the Study.
Study
Click the miniature lighthouse display on top of the left bookcase to zoom in.
Add the Ship (from table puzzle in the Armory) to the right side of the display.
Place the Anchor (from the chest in the Armory) on the left toy ship.
Take the revealed Soldier (3/4) figurine inside the lighthouse.
Go into the Study Side Room.
Study Side Room
Click the globe on the right table to zoom in.
Add the Part of the Globe (from the misplaced object scene in the Bedroom) to the empty space on the globe.
Take the revealed figurine Soldier (4/4).
Place all four Soldier figurines (one from the shelf in the Security Room, the second from the table puzzle in the Side Room, and three from the miniature lighthouse in the Study) on to the miniature castle on the table.
Take the Cage Key inside the castle.
Use the Cage Key on the birdcage beside the table, then take the Egg inside.
Go back to the Study.
Study
Click the snake aquarium on the table to zoom in.
Place the Egg (from the cage in the Study Side Room) in the cracked brown dish in the lower right corner.
Take the revealed Drawer Key in the upper left corner of the tank.
Go back to the Side Room by the bedroom.
Side Room
Use the Drawer Key (from the aquarium in the Study) on the locked bottom of the chest of drawers to the left.
Take the Landing Net inside the opened drawer.
Go back to the Bedrom.
Bedroom
Click the fish bowl on the table to zoom in.
Use the Landing Net (from the locked drawer in the Side Room) on the fish bowl to scoop out the Weight (2/2).
Go back to the Princess's Chamber.
Princess's Chamber
Click the grandfather clock to zoom in.
Place the two Weights (one from the chest in the Armory and the second from the fish bowl in the Bedroom) to the two hanging hooks below the clock face.
Speak with the Princess to return to the Hallway.
Hallway
Click the painting on the left wall to start the puzzle.
To solve this puzzle, assemble the painting by swapping the tiles to the correct positions.
Click a tile to select it, then click a different tile to switch their places.
A correctly positioned tile will lock in place.
Solution.
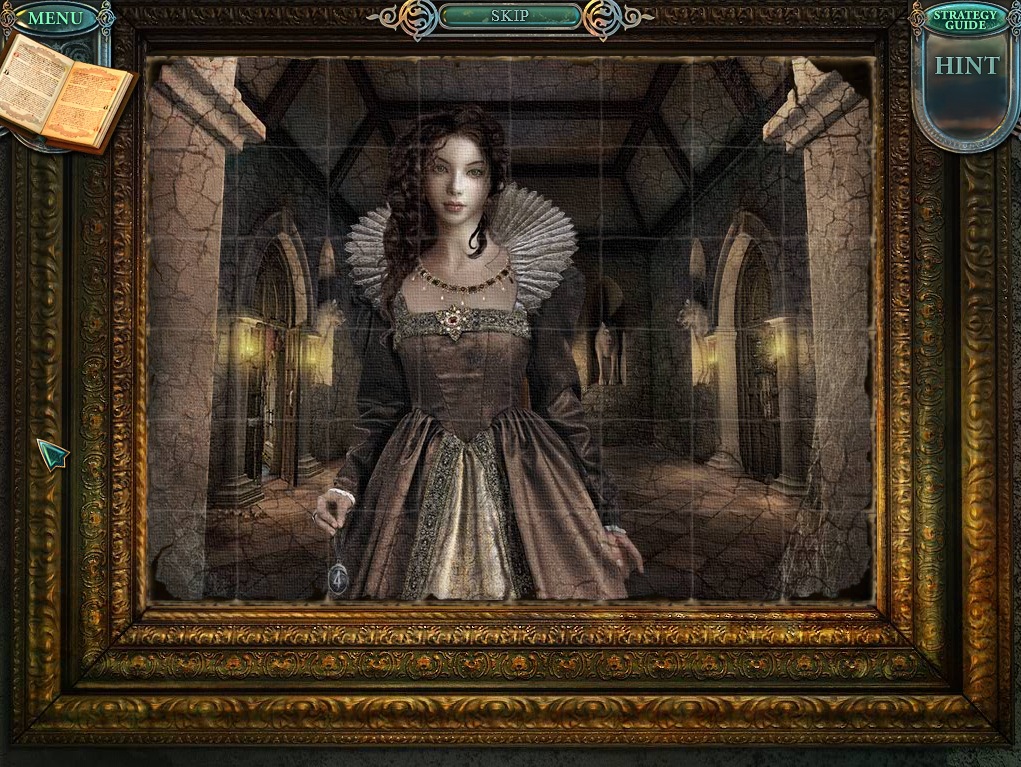
Once the puzzle is solved, take the Clock Number from the pendant in the painting.
Go back to the Throne Room.
Throne Room
Click the large clock to zoom in.
Add the Clock Number (from the painting puzzle in the Hallway) to the clock face between numbers 3 and 5.
Go back to the Security Room.
Security Room
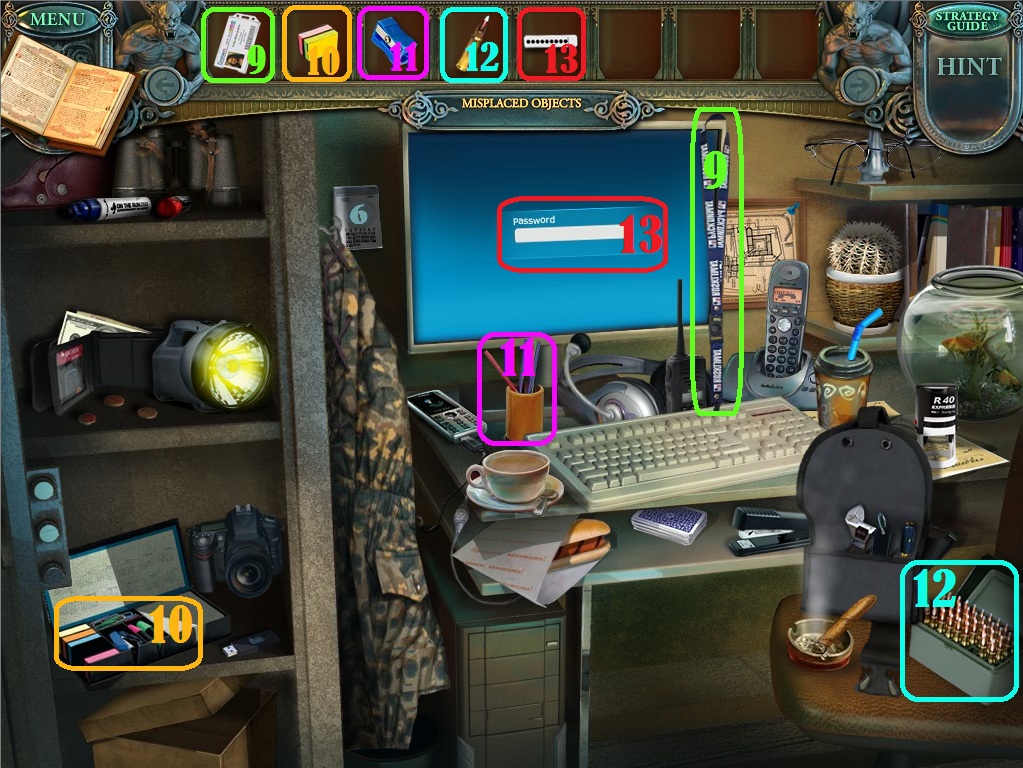
Click the computer beside the open safe to start the misplaced object scene.
Use the Coffee Stick on the china teacup.
Use the Drink Stick on the coffee cup.
Use the Cleaning Rag on the computer monitor.
Use the Card on the playing card deck.
Use the Space Bar on the keyboard.
Use the Thumbtack on the cork bulletin board.
Use the Lamp on the large flashlight.
Use the Book on the bookshelf.
Use the Badge on the laniard.
Use the Sticky Papers on the office supplies box.
Use the Pencil Sharpener on the cup of pencils.
Use the Bullet on the box of ammunition.
Use the Password on the password box of the computer monitor.
Screenshot Part 1.
Screenshot Part 2.
Once the misplaced object scene is complete, you will receive the Handle.
Return to the Hallway.
Hallway
Go forward to the end of the hall.
Click the large double doors for a closer look.
Add the Handle (from the misplaced object scene in the Security Room) to the empty socket on the left side of the lock.
Click the dials to enter in the 3 digit combination found from the monitor in the Security Room, 4-7-2.
Screenshot.
Go through the open door to the Castle Square.
Posted by: Trinn |
October 14, 2011 9:05 PM
|
October 14, 2011 9:05 PM
Echoes of the Past: The Citadels of Time Walkthrough Part 2 (Chapters 3-5)
Chapter 3 - The Prince
Castle Square
Take the Letter C on top of the railing of the stairs.
Take the Stone Head on the left park bench.
Go back to the Antechamber.
Antechamber
Place the Stone Head (from the bench in the Castle Square) into the space on the empty stone mount hanging on the left wall.
Go through the revealed passageway into the Meeting Room.
Meeting Room
Click the scroll on the table to zoom in.
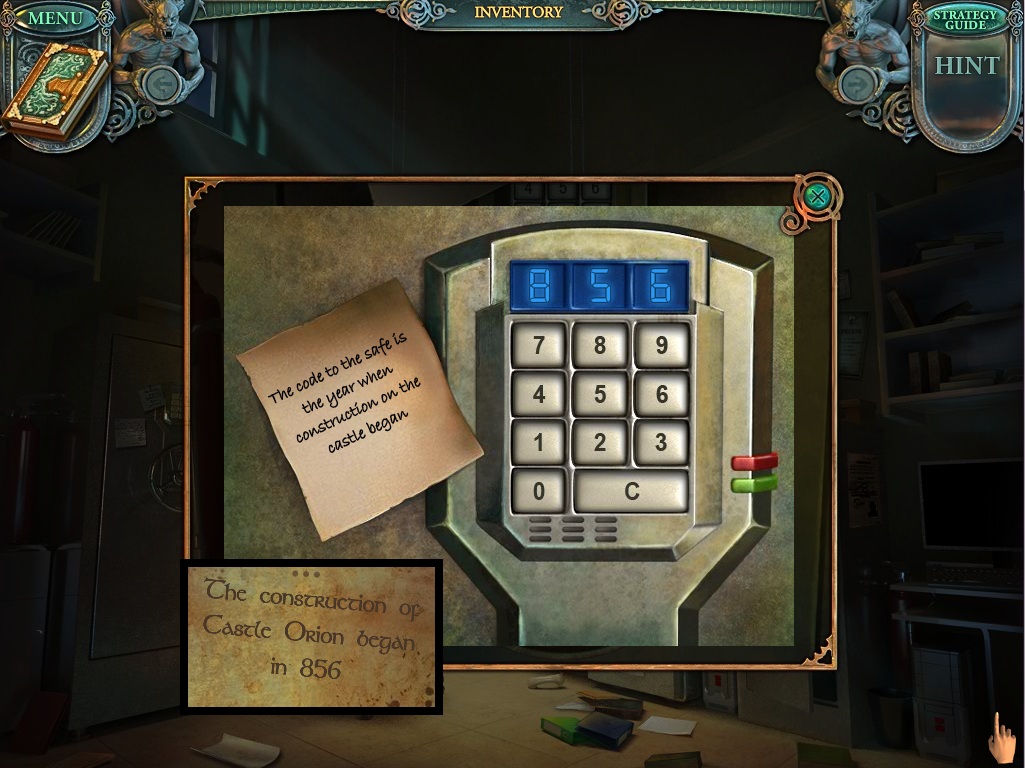
Take the Stone Bas-Relief and note the date the castle construction began, 856.
Click the torture chair to start the hidden object scene.
Click the small leather bag (A) to reveal the Coin.
Use the block of cheese (B) on the mouse hole (C) to reveal the Rat.
Use the hammer (D) to break open the lantern (E), revealing the Burning Candle.
Use the small chunk of coal (F) on the scroll (G) to write the Number 9.
After all other objects have been found, the Final Item is the Hexagonal Bas-Relief (H).
Screenshot.
Once the hidden object scene is complete, you will receive a Hexagonal Bas-Relief.
Go back to the Antechamber.
Antechamber
Use the Hexagonal Bas-Relief (from the hidden object scene in the Meeting Room) on the hexagonal shaped space in the center wall.
When the iron bars lift, click the shield in the recess to start the puzzle.
To solve this puzzle, arrange the image by swapping the tiles to the correct positions.
Click a tile to select it, then click another tile to switch their places.
A correctly positioned tile will lock in place and become lighter colored.
Solution.
Once the puzzle is solved, take the Crown Part from the revealed cache.
Go back to the Hallway.
Hallway
Click the stone relief hanging on the left wall beside the Princess's portrait to zoom in.
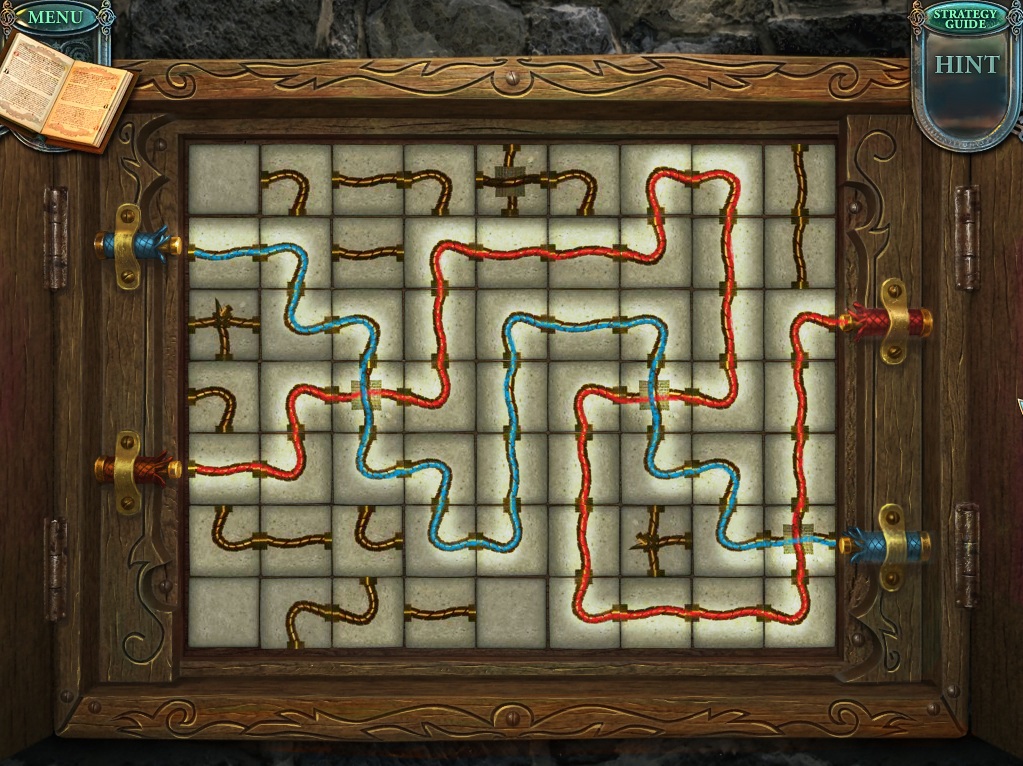
Place the Stone Bas-Relief (from the table in the Meeting Room) in the empty space at the center to start the puzzle.
To solve this puzzle, illuminate all of the tiles by tracing a path along the entire panel.
Click a tile to select it, then click an adjacent tile that follows the color pattern Pink->Yellow->Blue.
Each square can only be clicked once, and once it has been clicked it will glow brightly.
To reset the board, click the pink square in the top left corner.
Solution.
Once the puzzle is solved, the panel will lower, revealing the Safe Handle.
Go back to the Security Room.
Security Room
Click the large safe on the left side of the room to zoom in.
Place the Safe Handle (from the bas-relief puzzle in the Hallway) to the socket below the button panel.
Click the panel above the handle for a closer look.
The note beside the lock states that the solution is the year castle construction began.
Enter in the 3 digit combination found on the table in the Meeting Room, 856.
Screenshot.
Take the Treasure House Key inside the opened safe.
Return to the Armory.
Armory
Click the door on the right to zoom in.
Use the Treasure House Key (from the safe in the Security Room) on the lock.
Go through the open door into the Treasury.
Treasury
Click the red cloth between the rolls of carpets on the left table to reveal the Flag Cloth.
Go back to the end of the Hallway.
Hallway
Click the large display case on the right wall to zoom in.
Place the Flag Cloth (from the rolled carpets in the Treasury) in the space between the hook and the pole.
Add the Flag Point (from the table puzzle in the Armory) to the top of the pole.
Take the completed Flag.
Go through the center door to the Castle Square.
Castle Square
Put the Flag (from the display case in the Hallway) into the knight's empty hand.
Take the revealed Metal Emblem on the armor's chest.
Click the door of the stage coach for a closer look.
Place the Crown Part (from the bas-relief puzzle in the Antechamber) into the empty space between the tiles to start the puzzle.
To solve this puzzle, move the crown parts to their correct positions at the top of the board by dragging away the grey tiles blocking them.
Tiles can be moved to any empty space up, down, left, or right, but cannot move through obstacles such as walls or other tiles.
Click and drag a tile to select it, then release it to set it in place.
Click the Restart button at the top to reset the puzzle board.
Left Crown Solution.
Center Crown Solution Part 1.
Center Crown Solution Part 2.
Right Crown Solution Part 1.
Right Crown Solution Part 2.
Once the puzzle is solved, click the stage coach door to look inside.
Click the gold purse to open it, then take the Metal Blocks inside the bag.
Take the Pendulum Part (1/2) on the left side of the seat.
Click the large double doors at the end of the path to zoom in.
Place the Metal Emblem in to the space in the left relief.
Go through the open door to the Greenhouse.
Greenhouse
Take the Lock Part in the small cart on the square patch of grass.
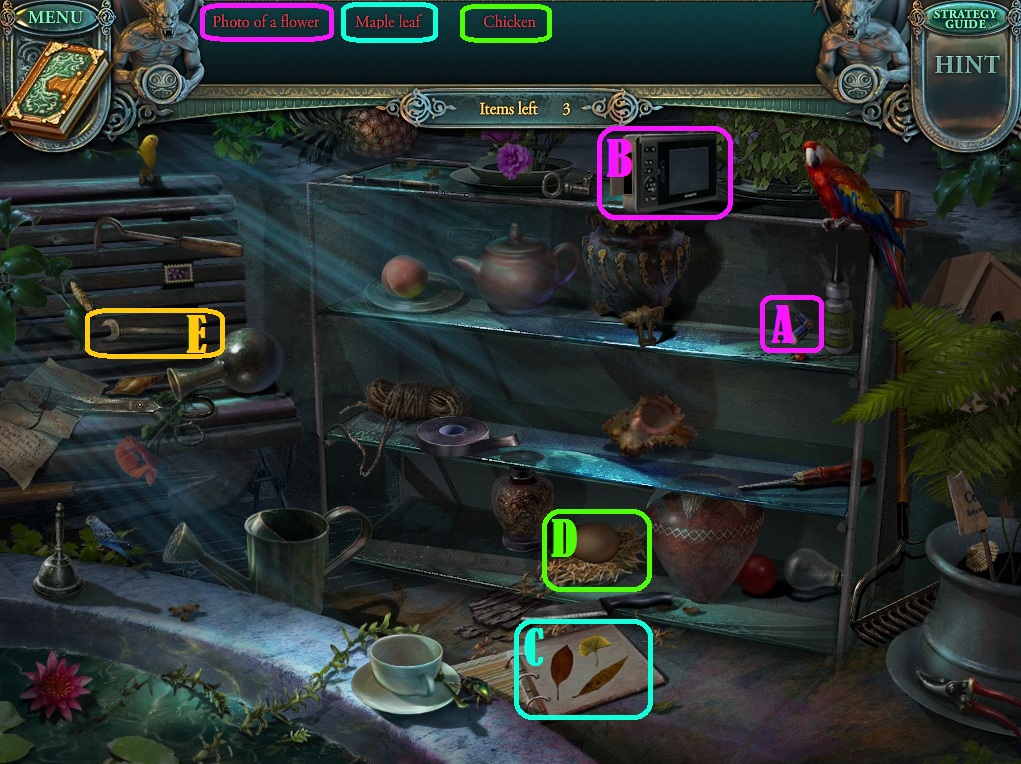
Click the bench and shelves behind the right side of the fountain to start the hidden object scene.
Put the batteries (A) into the digital camera (B), then click the camera to take a Photo of a Flower.
Turn the pages of the album (C) to find the Maple Leaf.
Click the egg (D) to crack it, revealing the baby Chicken.
After all other objects have been found, the Final Item is the Wrench (E).
Screenshot.
Once the hidden object scene is complete, you will receive a Wrench.
Exit the Greenhouse, then take the left path to the Cannon.
Cannon
Take the coil of Rope on the ground beside the park bench.
Go back to the Meeting Room.
Meeting Room
Click the gate to the left of the furnace for a closer look.
Add the Metal Blocks (from the purse in the carriage at the Castle Square) to the lock mechanism to start the puzzle.
To solve this puzzle, push down all 9 of the buttons at the bottom of the lock by stacking the gold blocks on top of them.
Click a block to select it, then click one of the blocks on top of a button to set it in place.
Click the head at the top of the lock to move it down so that its teeth push the stacks of blocks and press all the buttons.
Solution.
Go through the open gate to the Torture Chamber.
Torture Chamber
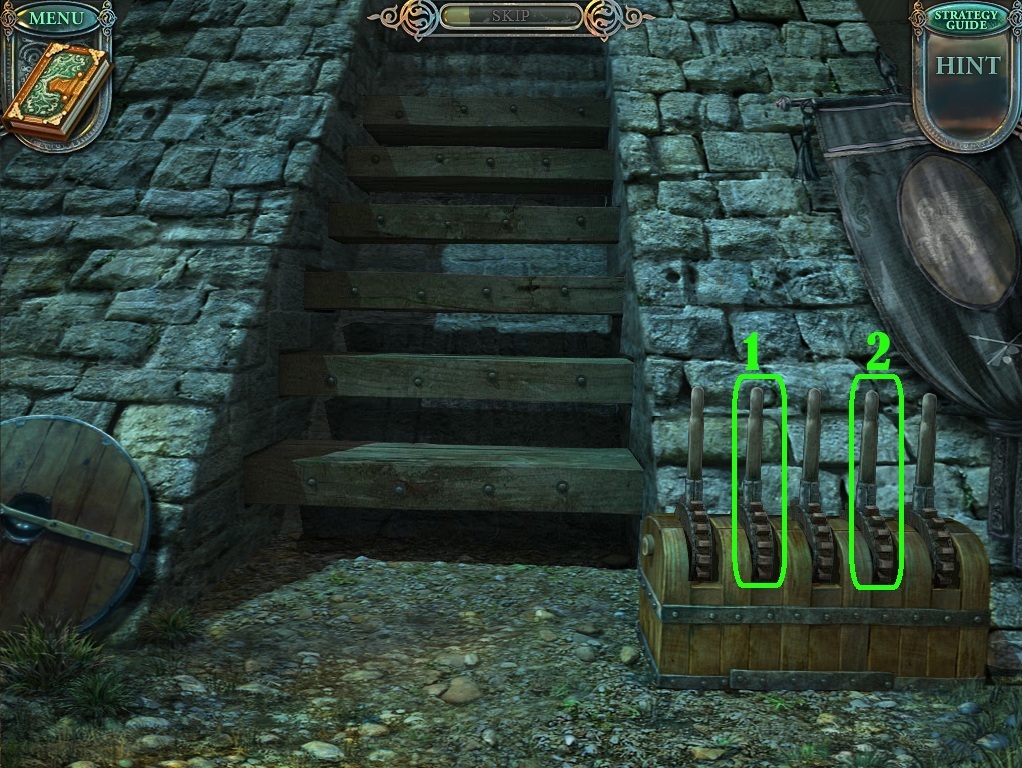
Take the Hack Saw leaning against the base of the wooden beam in the middle of the room.
Click the device on the left with the bones hanging from chains to rotate it.
Take the Quadrangular Key from the middle chain.
Click the pile of junk in the rear left corner of the room to zoom in.
Click the junk again to move it aside, revealing the Broom.
Take the piece of paper to add the diagram to your Notebook.
Click the iron maiden for a closer look.
Use the Wrench (from the hidden object scene in the Greenhouse) on the bolts in the frame.
Take the revealed Golden Statuette from the skeleton's ribcage.
Go back to the Treasury.
Treasury
Use the Broom (from under the pile of junk in the Torture Chamber) on the cobwebs covering the wall beside the cupboard.
Click the wall to zoom in.
Press the three symbols outlined in the diagram from the Torture Chamber.
Screenshot.
When the wall piece flips over, take the revealed Round Key.
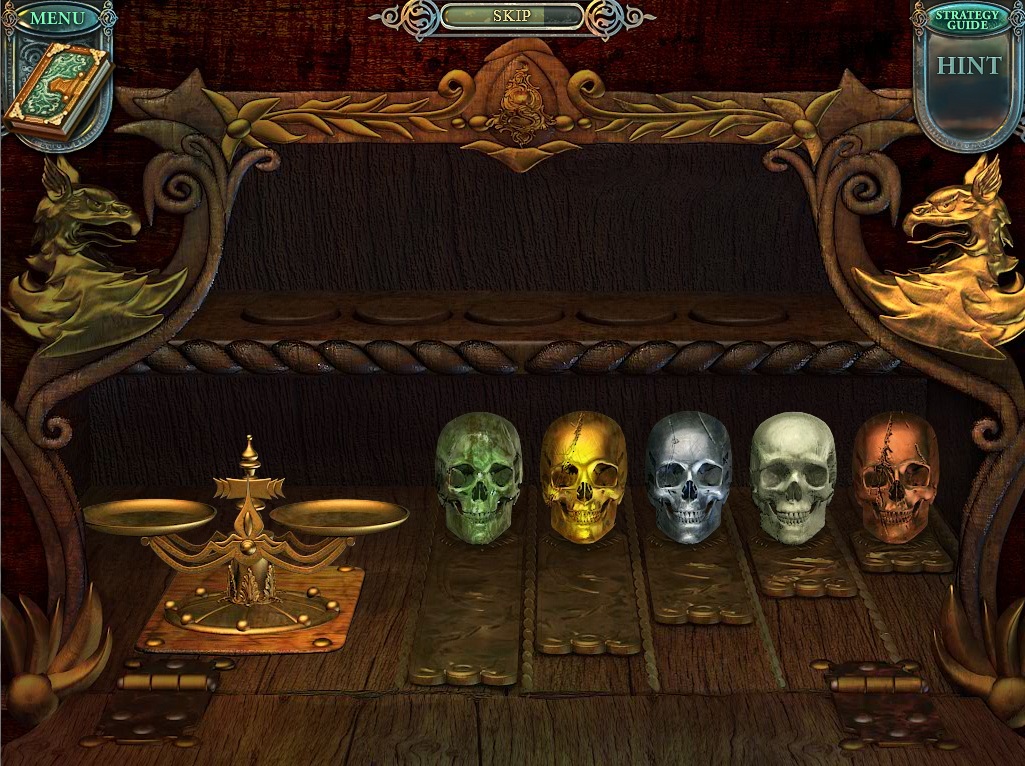
Place the Golden Statuette on the right corner of the cabinet under the bookshelves.
Click the opened compartment to start the puzzle.
To solve this puzzle, place the skulls on the golden stands in order of heaviest to lightest from left to right.
Place the skulls on the scale to measure their relative weight.
Solution.
Once the puzzle is solved, the scale will lift, revealing the Ruby underneath.
Return to the Meeting Room.
Meeting Room
Click the book on the table to zoom in.
Place the Ruby (from the skulls puzzle in the Treasury) into the empty socket on the cover of the book.
Take the Letter H from the opened book.
Return to the Greenhouse.
Greenhouse
Click the door on the right to zoom in.
Use the Quadrangular Key (from the rotating device in the Torture Chamber) on the top keyhole.
Use the Triangular Key (from the ground in the Antechamber) on the middle keyhole.
Use the Round Key (from the flipped wall cache in the Treasury) on the bottom keyhole.
Go through the open door to the Fisherman's Room.
Fisherman's Room
Click the pile of junk on the floor in front of the anchor to reveal the Mitten and the Vice Lever.
Take the Pruning Shears on top of the barrel lid in the bottom right corner of the room.
Go back to the Greenhouse.
Greenhouse
Use the Pruning Shears (from the top of the barrel in the Fisherman's Room) on the vines covering the left wall.
Take the revealed Zodiac Sign (1/2).
Go back to the Cannon.
Cannon
Use the Pruning Shears (from the top of the barrel in the Fisherman's Room) on the shrubbery behind the park bench.
Take the revealed Tin Cover.
Return to the Torture Chamber.
Torture Chamber
Use the Vice Lever (from the pile of junk in the Fisherman's Room) on the vice on top of the right table.
Take the Letter R that drops on to the chair.
Go back to the Meeting Room.
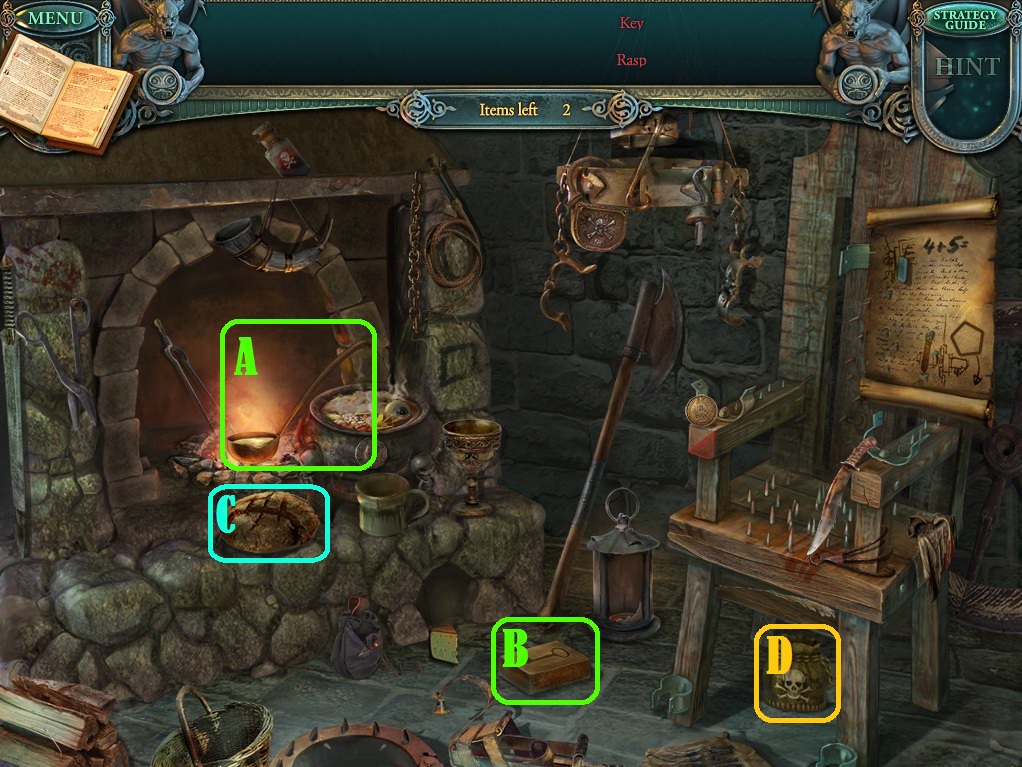
Meeting Room
Click the torture chair to repeat the hidden object scene.
Use the ladle full of molten metal (A) on the mold (B) to make the Key.
Click the loaf of bread (C) to reveal the Rasp inside.
After all other objects have been found, the Final Item is the Empty Powder Bag (D).
Screenshot.
Once the hidden object scene is complete, you will receive the Empty Powder Bag.
Go back to the Antechamber.
Antechamber
Click the cork in the powder keg on the shelf.
Use the Empty Powder Bag (from the hidden object scene in the Meeting Room) on the pile of powder that spills from the keg.
Take the Full Powder Bag.
Use the Hacksaw on the chain around the grate under the shelf.
Take the Cannonball that rolls to the floor.
Return to the Cannon.
Cannon
Use the Full Powder Bag (from the powder keg in the Antechamber) on the barrel of the cannon.
Add the Cannonball (from behind the grate in the Antechamber) to the cannon.
Light the fuse with the Burning Torch to fire the cannon.
Go through the destroyed doorway to the Tomb.
Tomb
Click the base of the center stone coffin to zoom in.
Place the Letter H (from the book in the Meeting Room) on the name plaque space for the letter "H" in Henri.
Place the Letter R (from the vice in the Torture Chamber) on the space for the letter "R" in Henri.
When the name plate lifts, take the revealed Cupboard Handle inside the cache.
Go back to the Treasury.
Treasury
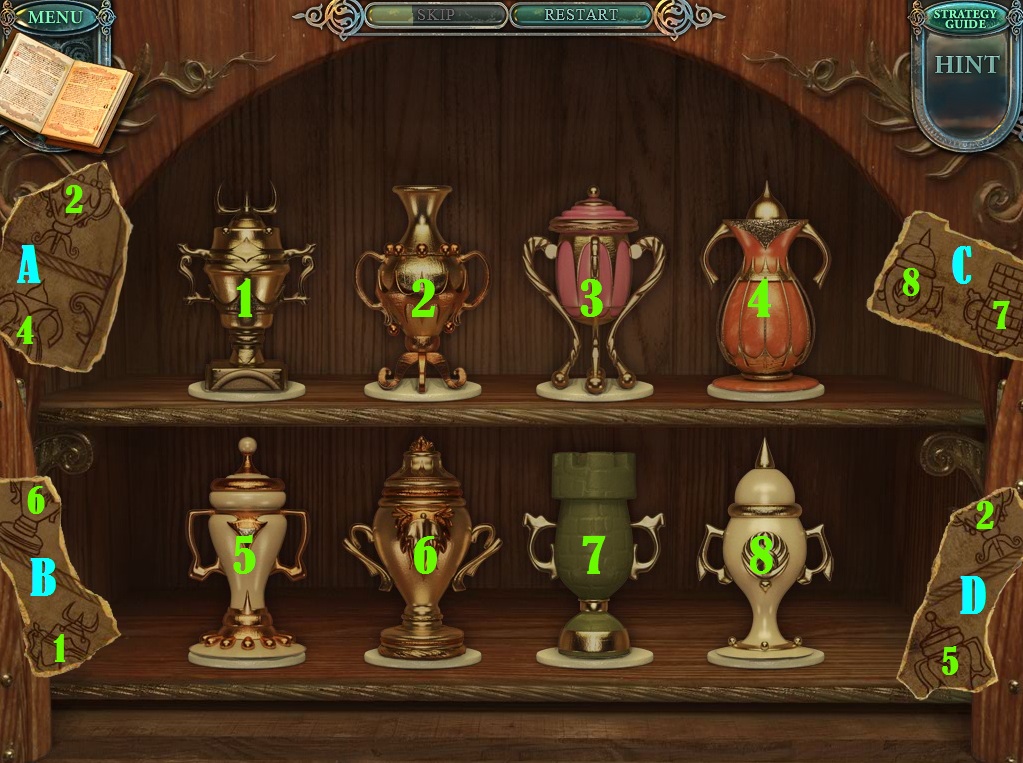
Click the left cupboard for a closer look.
Add the Cupboard Handle (from the middle coffin in the Tomb) to the empty space on the door to start the puzzle.
To solve this puzzle, arrange all of the jugs into the correct positions, using the scraps of paper on the sides of the shelves as a reference.
Click a jug to select it, then click another jug to swap their places.
Press the Restart button to revert all of the jugs to their original positions.
Screenshot.
Scrap A shows Jug 2 on the far right stand of the top shelf and Jug 4 on the far right stand of the bottom shelf.
Scrap B shows Jug 6 on the shelf above and one stand to the left of Jug 1.
Scrap C shows Jug 8 one stand to the left of Jug 7.
Scrap D shows the bottom of Jug 2 and Jug 5 below it and one space to the left; therefore Jug 5 is on the middle right stand of the bottom shelf.
Solution.
Once the puzzle is solved, take the Chest Key above the top shelf.
Use the Chest Key on the large chest in front of the cupboard.
Take the Weights on top of the pile of gold coins.
Return to the Meeting Room.
Meeting Room
Click the lock on the right wall beside the prison door to zoom in.
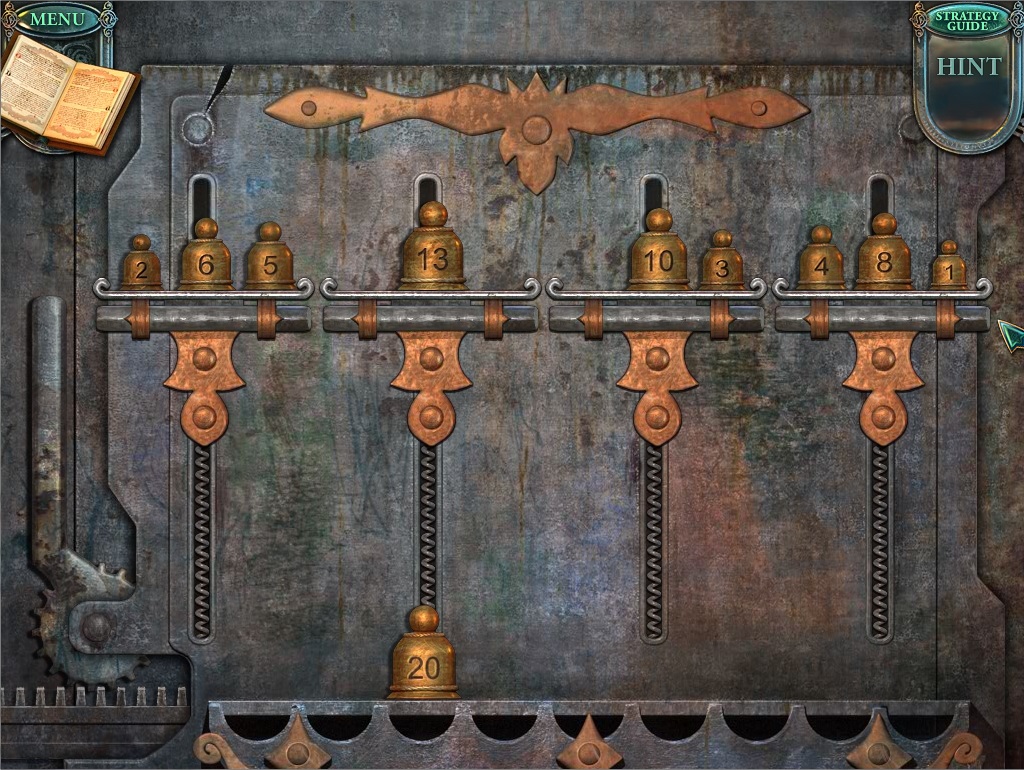
Add the Weights (from the chest in the Treasury) to the box to start the puzzle.
To solve this puzzle, balance all four of the stands using the Weights at the bottom of the lock.
Click a weight to select it, then click a stand to place it on the left, center, or right side of the stand.
The heavier a stand is, the lower it will sink on its spring.
The value of each weight is shown by the number on its front.
Solution.
Take the Pendulum Part (2/2) from the skeleton inside the opened prison cell.
Go back to the Armory.
Armory
Click the clock in the center of the wall to zoom in.
Place the two Pendulum Parts (one from the carriage in the Castle Square and the other from the prison cell in the Meeting Room) into the space in the pendulum under the face of the clock.
Speak with the Prince to return to the Hallway.
Hallway
Click the painting on the right wall to start the puzzle.
To solve this puzzle, rotate the tiles to complete the portrait of the Prince.
Click any tile to pivot it clockwise.
Solution.
Once the puzzle is solved, take the Clock Number from the Prince's hand in the portrait.
Go back to the Throne Room.
Throne Room
Click the large clock to zoom in.
Add the Clock Number (from the Prince's portrait puzzle in the Hallway) to the face of the clock between numbers 5 and 7.
Return to the Security Room.
Security Room
Click the safe on the left side of the room to look inside.
Use the Lock Part (from the cart in the Greenhouse) on the front of the small box to open it.
Take the Snake Symbol inside the open box.
Return to the Greenhouse.
Greenhouse
Click the bench behind the fountain to repeat the hidden object scene.
Click the caterpillar chrysalis on the leaf (A) three times to reveal the Butterfly.
Use the teapot (B) on the teacup (C) to make a Cup of Tea.
Use the knife (D) on the peach (E) to get the Peach Stone.
After all other objects have been found, the Final Item is the Awl (F).
Screenshot.
Once the hidden object scene is complete, you will receive an Awl
Go through the right doorway into the Fisherman's Room.
Chapter 4 - The Fisherman
Fisherman's Room
Click the door on the left to zoom in.
Use the Awl (from the hidden object scene in the Greenhouse) on the round hole at the top of the pin in the door hinge to remove it.
Go through the open door to the Well.
Well
Take the Letter D in the grass on the right side of the path.
Click the well to zoom in.
Attach the Rope (from the ground in front of the Cannon) to the winch of the well.
Go back to the Tomb.
Tomb
Click the left coffin to zoom in.
Place the Letter C (from the stairs in the Castle Square) on the name plaque space for the letter "C" in Richard.
Place the Letter D (from the patch of grass at the Well) on the space for the letter "D" in Richard.
Take the Small Axe from the revealed cache in the left coffin.
Return to the Well.
Well
Use the Small Axe (from the hidden compartment in the left coffin at the Tomb) on the fallen tree blocking the right path.
Continue down the right path to the Boat.
Boat
Click the pile of moss on the ground in front of the stacked crates to reveal the Hook.
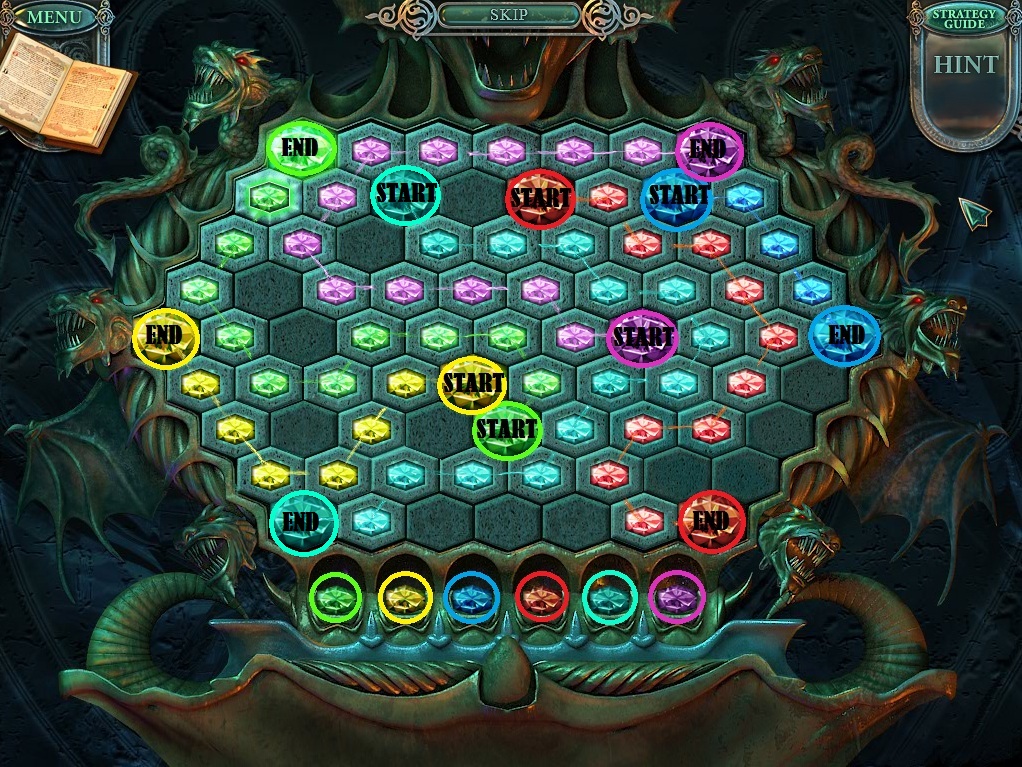
Click the net on top of the three crates to start the puzzle.
To solve this puzzle, arrange the floats so that none of their ropes are crossing.
Click and drag a float to move it, then release it to set it in place.
Floats cannot be placed on top of another float.
Any point at which the ropes cross will be marked with an "X".
Solution.
Once the puzzle is solved, you will receive a Fishing Net.
Follow the path forward to the Lake.
Lake
Take the golden Unicorn Head on the grass to the right of the pot.
Click the small dock on the left side of the shore to zoom in.
Take the Wooden Fish (1/3) on the ground at the left side of the dock.
Use the Fishing Net on the fishing contraption at the end of the dock.
Take the Zodiac Bas-Relief (1/3) and the Door Key
Go all the way back to the end of the Hallway.
Hallway
Click the relief hanging on the right wall beside the flag display to zoom in.
Place the Unicorn Head (from the ground at the Lake) into the space on the right.
Place the Snake Symbol (from the box in the safe at the Security Room) into the space at the bottom to start the puzzle.
To solve this puzzle, click all of the buttons in the color order shown at the top of the panel.
Click a button to light it, then click an adjacent button to the left, right, up, or down that follows the color pattern Green->Pink->Blue->Yellow.
Clicking a button more than once will cause it, and any other lit buttons past it, to revert back to unlit.
Solution.
Once the puzzle is solved, take the revealed Skull
Return to the Tomb.
Tomb
Click the relief on the wall behind the middle coffin to zoom in.
Place the Skull (from the button puzzle cache on the right wall in the Hallway) in to the right skull-shaped space of the relief.
Take the revealed Wooden Fish (2/3) and the Hexagonal Key.
Return to the Boat.
Boat
Click the hatch in the deck of the boat to zoom in.
Use the Hexagonal Key (from the wall cache in the Tomb) on the keyhole to open the hatch.
Take the revealed Resin inside the opened hatch.
Go forward to the Lake.
Lake
Put the Resin (from the hatch of the Boat) into the pot.
Use the Burning Torch on the wood under the pot to light the fire.
Use the Mitten (from the junkpile in the Fisherman's Room) on the boiling pot to add the Tar to your inventory.
Go back to the Well.
Well
Click the well to zoom in.
Use the Hook (from under the moss on the ground beside the Boat) on the rope hanging from the winch to pull up the bucket.
Place the Tin Cover (from the shrubbery next to the Cannon) on the bottom of the bucket.
Seal the bottom of the bucket with the Tar (from the resin melted in the pot at the Lake), then take the repaired Bucket.
Return to the Lake.
Lake
Use the Bucket (from the repaired parts at the Well) on the hook attached to the mechanism on the right side of the shore.
Take the Bucket with Water lifted from the lake.
Go back to the Well.
Well
Use the Bucket with Water (from the winch mechanism at the Lake) on the flames blocking the left path.
Take the Smoldering Wood from the doused pile of charred logs.
Follow the left path to the Pumpkin Patch.
Pumpkin Patch
Click the open barn door to start the hidden object scene.
Use the corkscrew (A) on the bottle (B) to reveal the Letter.
Use the match (C) on the matchbox (D), then use the lit match on the pipe (E) to make it a Lit Pipe.
Use the netting (F) on the stick (G) to make the Landing Net.
After all other objects have been found, the Final Item is the Steering Control (H).
Screenshot.
Once the hidden object scene is complete, you will receive the Steering Control.
Click the scarecrow three times to reveal the Wooden Fish (3/3).
Go back to the Fisherman's Room.
Fisherman's Room
Click the top cupboard of the cabinet to zoom in.
Place the three Wooden Fish (one from the scarecrow in the Pumpkin Patch, one from the ground on the dock at the Lake, and one from the skull relief cache in the Tomb) into the three fish-shaped space of the cabinet door.
Take the Candlestick from the open cupboard.
Go back to the Greenhouse.
Greenhouse
Click the beehive in the tree behind the eagle statue to zoom in.
Use the Smoldering Wood (from the doused pile of wood at the Well) on the hive.
Take the Fishing Line wrapped around the top of the tree trunk.
Return to the Boat.
Boat
Place the Steering Control (from the hidden object scene in the Pumpkin Patch) at the top of the boat's rudder.
Take the revealed Boat Hook.
Go forward to the Lake.
Lake
Use the Boat Hook (from behind the rudder in the Boat area) on the small rowboat floating in the lake.
Click the rowboat to zoom in and take the Part of the Electric Panel.
Go back to the end of the Hallway.
Hallway
Use the Candlestick (from the cupboard in the Fisherman's Room) on the candlestick holder on the left side of the gate.
Go through the open doorway to the Scientist's Stairway.
Scientist's Stairway
Go down to the bottom of the stairs.
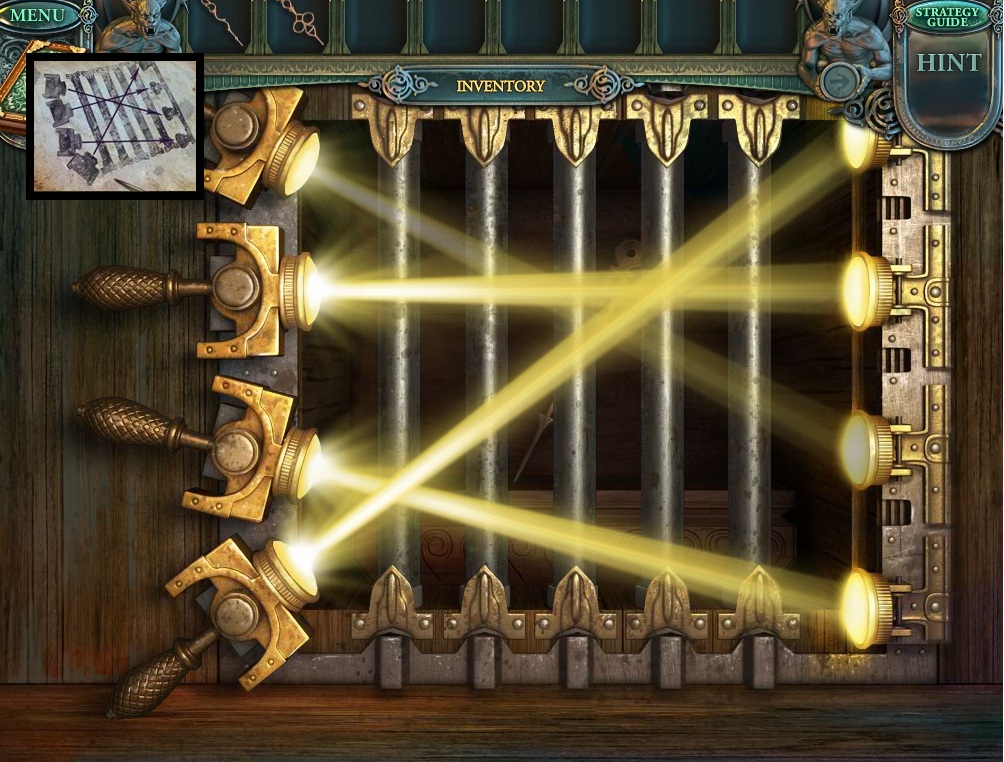
Click the fusebox on the left wall for a closer look.
Add the Part of the Electric Panel (from the bottom of the rowboat at the Lake).
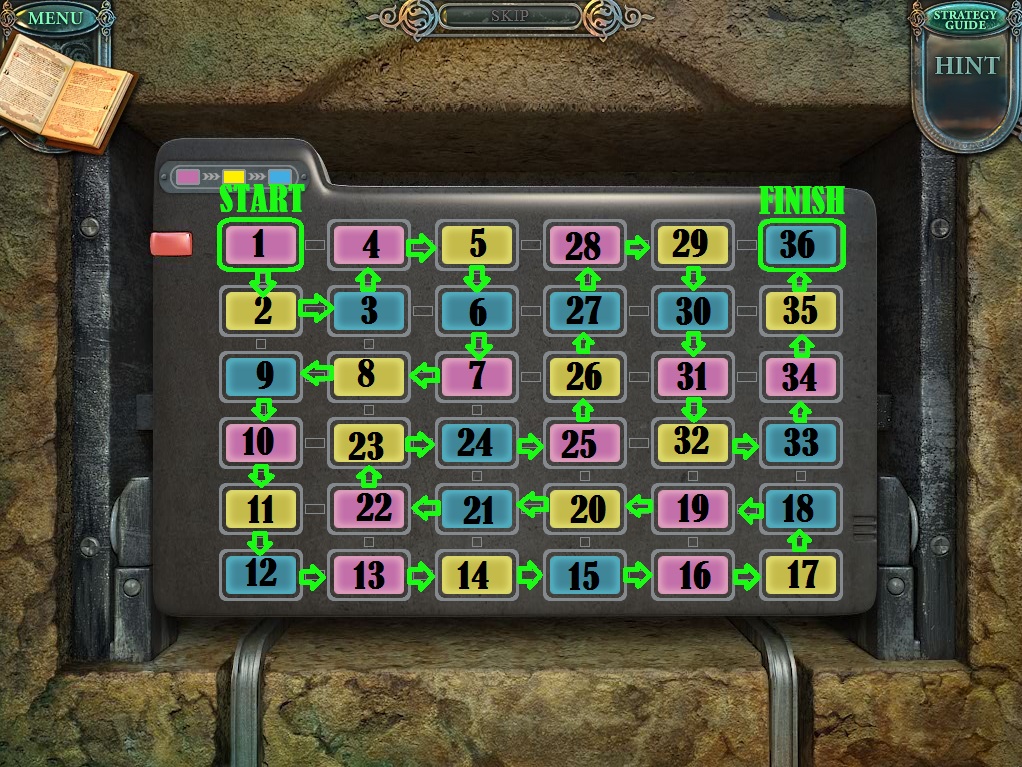
To solve this puzzle, rotate the wire tiles to connect the blue outlet with the blue inlet and the red outlet and the red inlet.
Click a wire tile to rotate it in place.
Connect the ends of the wires to create an uninterrupted path between the colored outlets.
Solution.
Take the Cutting Pliers leaning on the ground on the left side of the tunnel.
Click the door to zoom in.
Use the Door Key (from the fishing net device on the dock at the Lake) on the padlock.
Go up the stairs twice to the landing.
Landing
Take the Gear (1/2) on the column to the left of the banister.
Go through the open door to the Laboratory.
Laboratory
Take the Anti-Rust Liquid on top of the upper left wall shelf.
Click the middle left cabinet under the counter to open it.
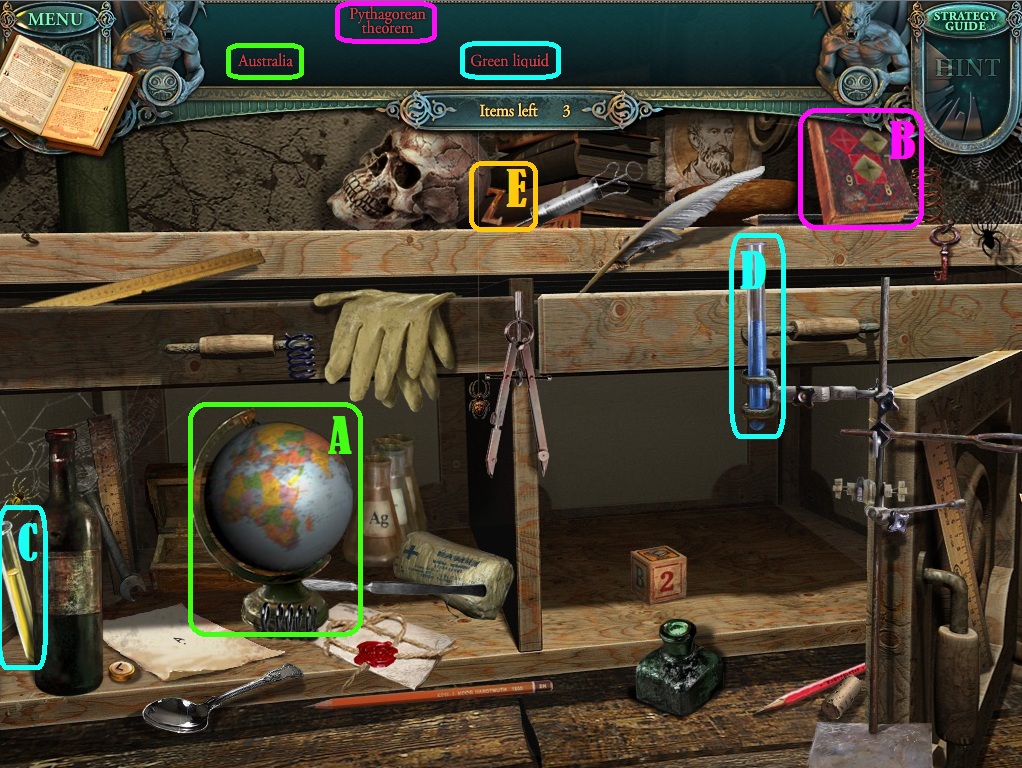
Click it again to start the hidden object scene.
Click the globe (A) to turn it to Australia.
Click the book (B), then turn the pages to find the Pythagorean Theorem.
Use the yellow beaker (C) on the blue beaker (D) to make a mixture of Green Liquid.
After all other objects have been found, the Final Item is the Letter Z (E).
Screenshot.
Once the hidden object scene is complete, you will receive the Letter Z.
Return to the Fisherman's Room.
Fisherman's Room
Click the short cabinet under the open drawer to zoom in.
Use the Anti-Rust Liquid (from the wall shelf in the Laboratory) on the rusted lock.
Take the Sickle inside the open cabinet.
Return to the Pumpkin Patch.
Pumpkin Patch
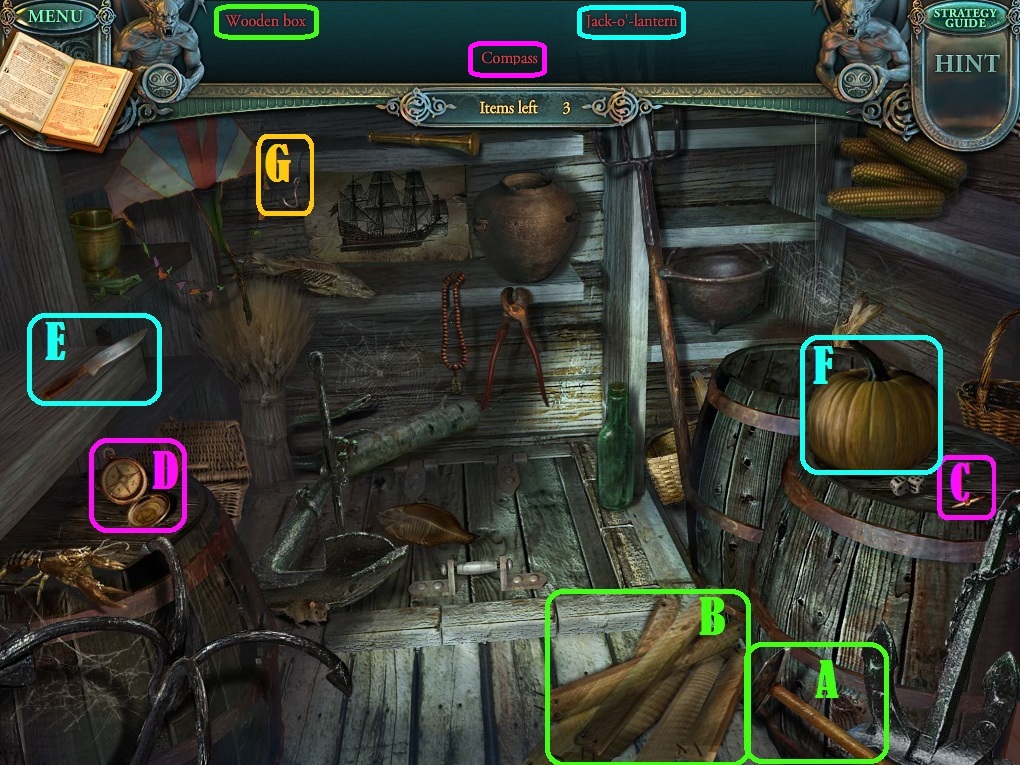
Click the barn door to repeat the hidden object scene.
Use the hammer (A) on the pile of wood (B) to make the Wooden Box.
Use the needle (C) to complete the Compass (D).
Use the knife (E) on the pumpkin (F) to carve the Jack o' Lantern.
After all other objects have been found, the Final Item is the Fishhook (G).
Screenshot.
Once the hidden object scene is complete, you will receive a Fishhook.
Use the Sickle (from the short cabinet in the Fisherman's Room) on the patch of tall grass on the left side of the path.
Take the revealed Spade from the cut grass.
Go back to the Well.
Well
Click the plot of dirt in front of the broken boat to zoom in.
Use the Spade (from the tall grass in the Pumpkin Patch) to dig up the pile of dirt.
Take the Worm at the bottom of the hole.
Go right to the Boat.
Boat
Click the small table under the canopy to zoom in.
Attach the Fishing Line (from the tree in the Greenhouse) to the fishing pole laying on the table.
Add the Fishhook (from the hidden object scene in the Pumpkin Patch) to the line.
Place the Worm (from the dug up plot of dirt at the Well) on to the hook.
Take the completed Fishing Rod.
Go forward to the Lake.
Lake
Click the small dock to zoom in.
Place the Fishing Rod (from the parts assembled on the table at the Boat) on the stand at the right side of the dock.
Take the Fish from the basket.
Go back to the Well.
Well
Click the cat under the boards of the broken fence to zoom in.
Give the Fish (fished from the dock at the Lake) to the cat.
Take the Gear (2/2) on the ground in front of the fed cat.
Go back to the Fisherman's Room.
Fisherman's Room
Click the clock on the table the Fisherman is sitting at to zoom in.
Add the two Gears (one from the cat at the Well, and one from the column at the Landing) to the mechanisms of the clock.
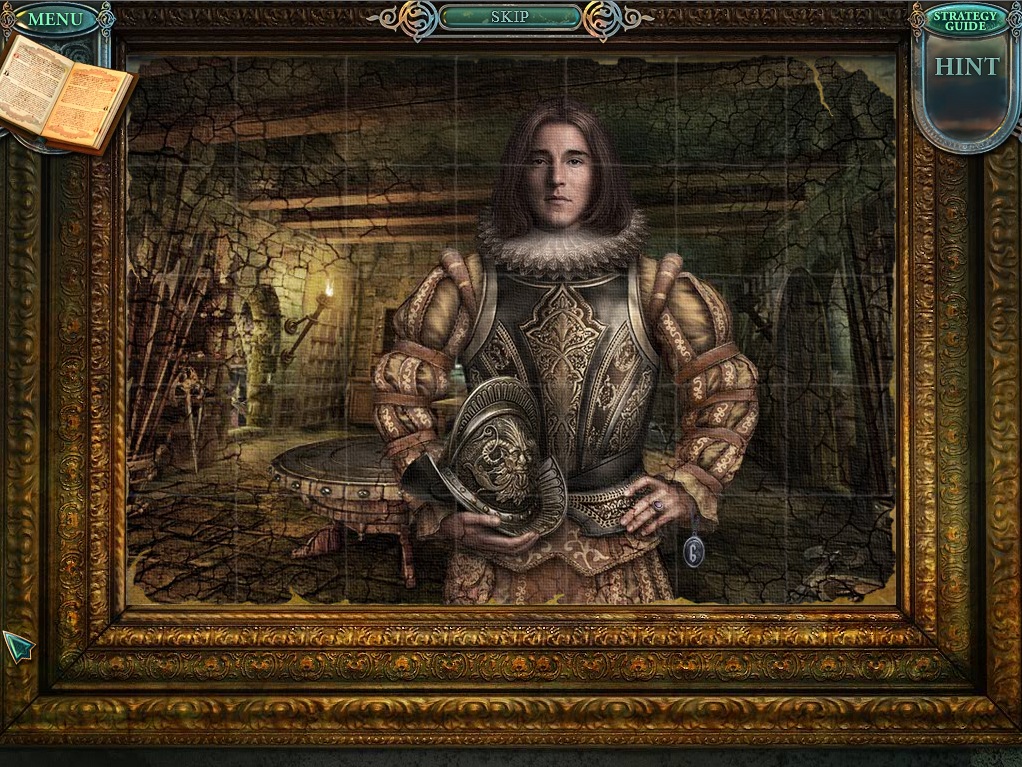
Speak with the Fisherman to return to the Greenhouse.
Greenhouse
Take the Picture Scraps on the ground under the torn painting hanging from the wall.
Click the painting to zoom in.
Add the Picture Scraps to the frame to start the puzzle.
To solve this puzzle, arrange the scraps of the painting to complete the picture of the Fisherman.
Click and drag a piece to move it, then release the scrap to set it in place.
Click a fragment to rotate it clockwise.
When a painting scrap is correctly positioned, it will lock in place.
Solution.
Take the Clock Number from the completed painting.
Click the bench behind the fountain to repeat the hidden object scene.
After all other objects have been found, the Final Item is the Nail Puller (A).
Screenshot.
Once the hidden object scene is complete, you will receive the Nail Puller.
Go back to the Throne Room.
Throne Room
Click the large clock to zoom in.
Place the Clock Number onto the face of the clock, between the numbers 12 and 2.
Go to the Landing at the top of the Scientist's Stairway.
Chapter 5 - The Scientist
Landing
Click the left doorway to zoom in.
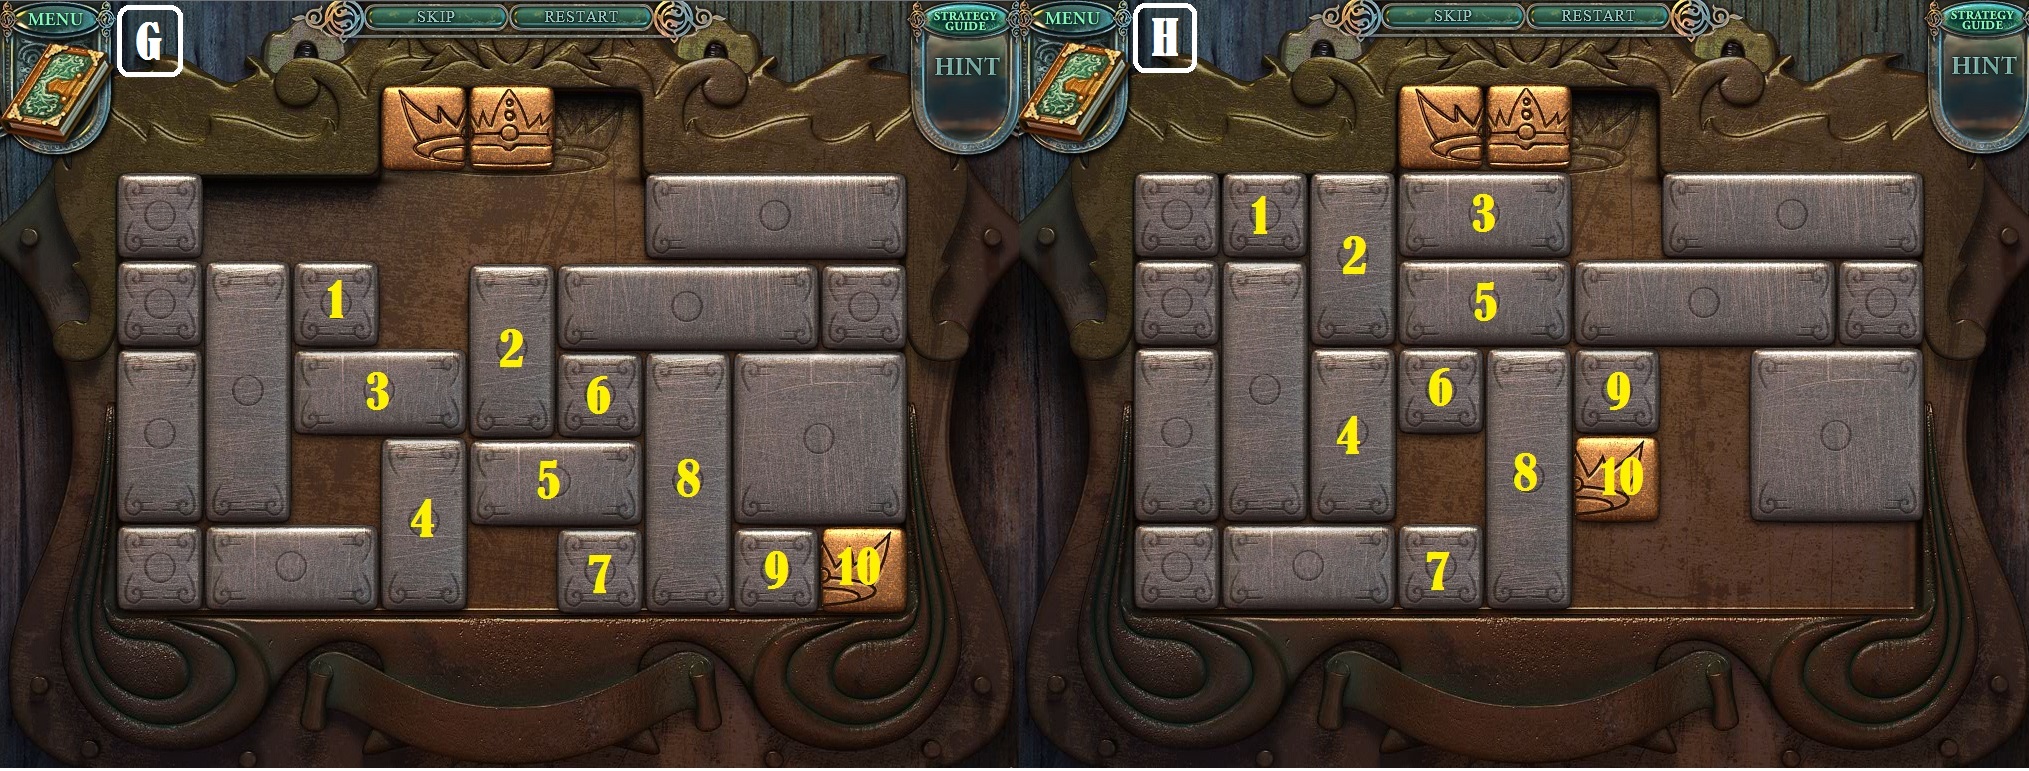
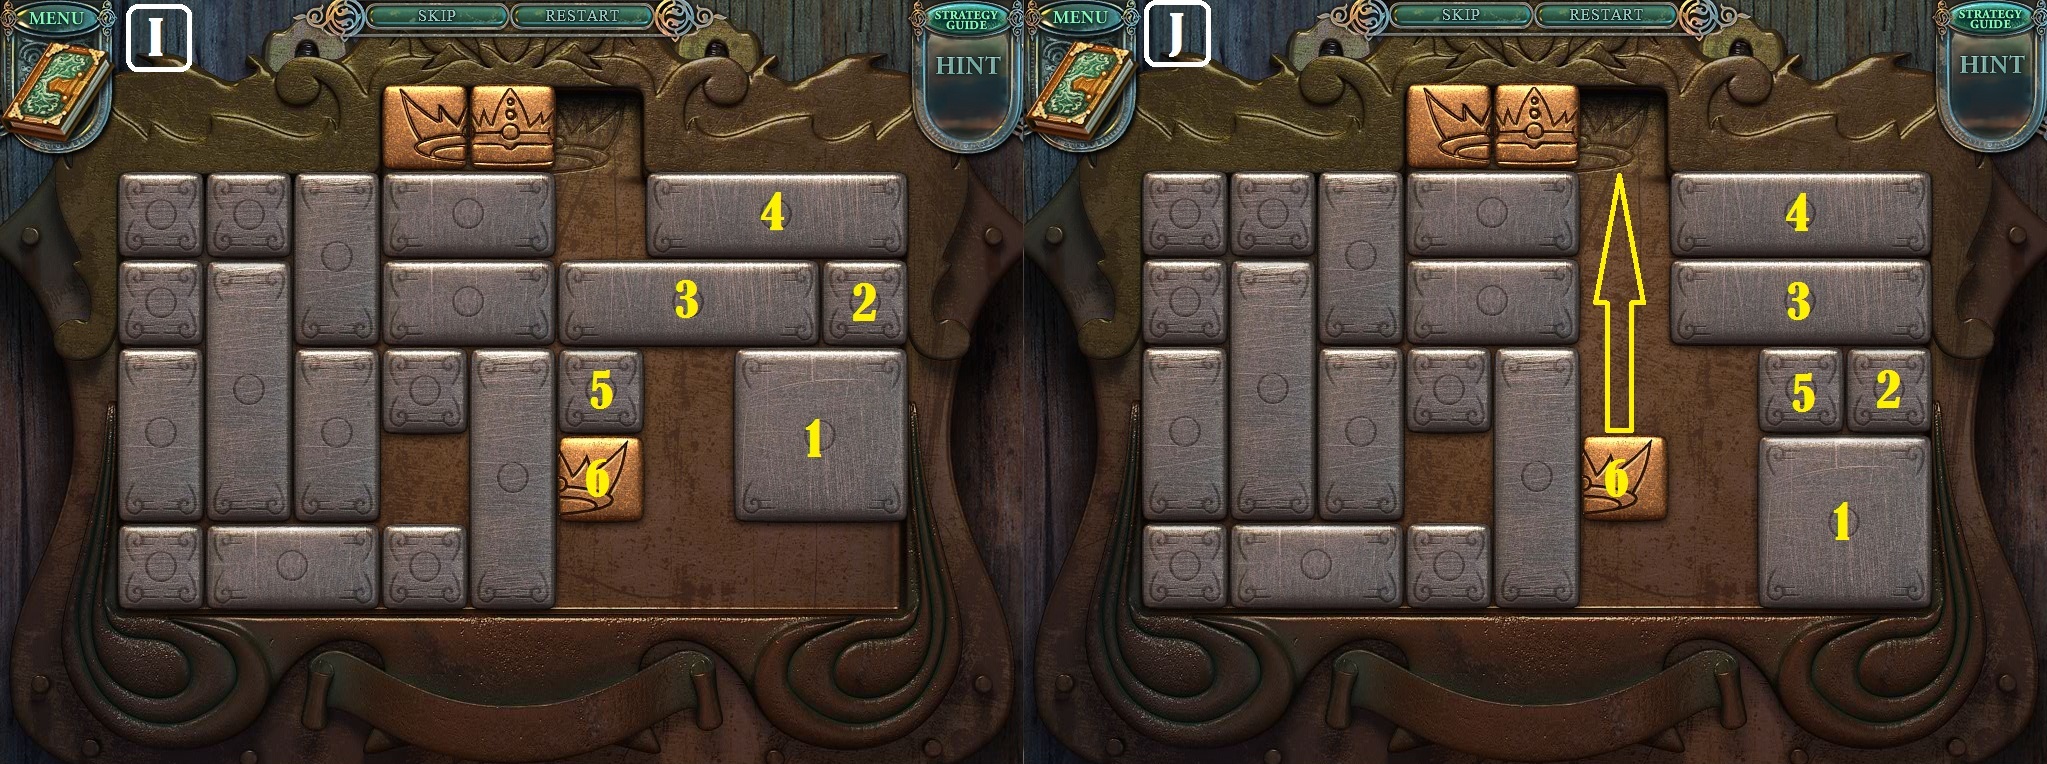
Use the Nail Puller (from the hidden object scene in the Greenhouse) on the boards blocking the doorway to start the puzzle.
To solve this puzzle, arrange the pieces so that each column has the same symbol from top to bottom.
Click a tile to select it, then click a position on the board to place it.
Solution.
Go through the open door into the Observatory.
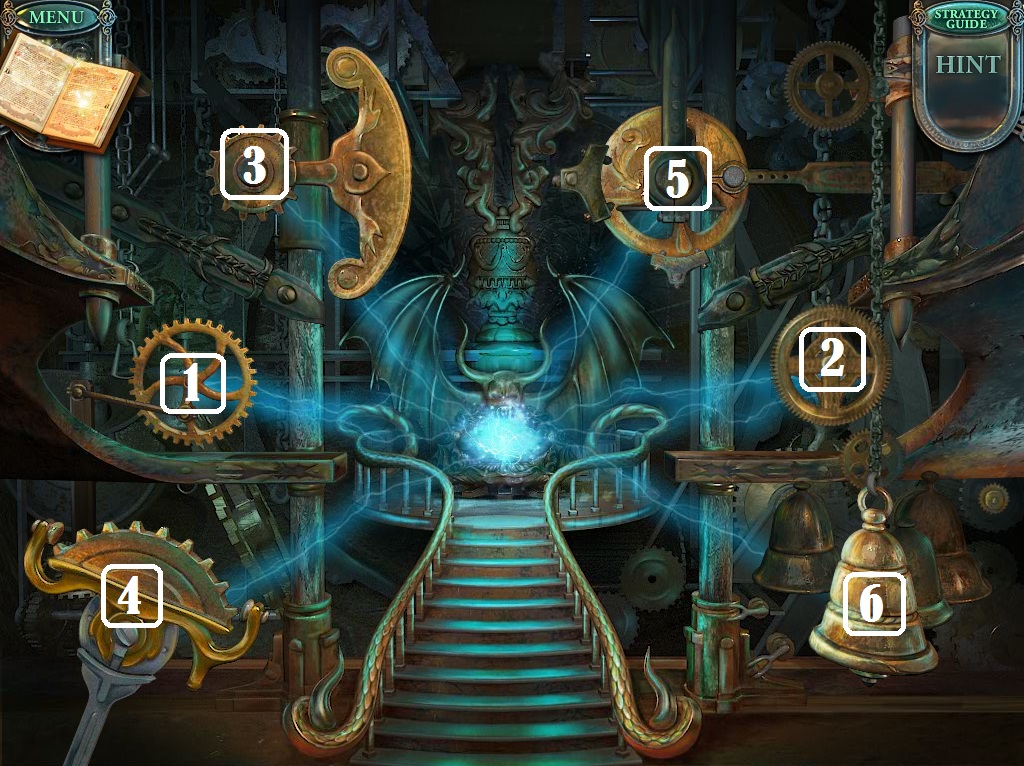
Observatory
Click the telescope for a closer look.
Click the Lens three times to add it to your inventory.
Take the Clock Hand (1/3) from the bottom shelf of the left bookcase.
Take the red Paint from the windowsill of the left window.
Click the scroll on the table to zoom in and take the Ball.
Go back down to the Laboratory.
Laboratory
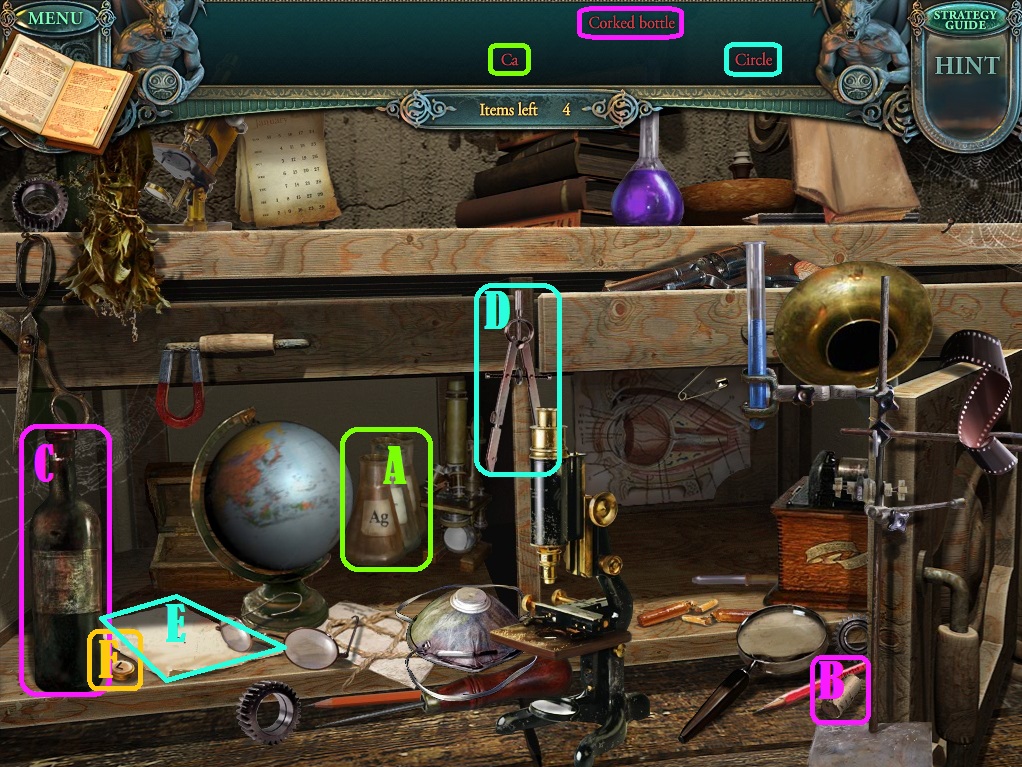
Click the open drawer to repeat the hidden object scene.
Click the labeled beakers (A) to reveal the bottle of Ca.
Use the cork (B) on the glass bottle (C) to make the Corked Bottle.
Use the compass (D) on the piece of paper (E) to draw a Circle.
After all other objects have been found, the Final Item is the Typewriter Key (F).
Screenshot.
Once the hidden object scene is complete, you will receive the Typewriter Key (1/3).
Click the left paint and tile set on the table for a closer look.
Add the red Paint to the bottom paint roller to start the puzzle.
To solve this puzzle, use the paint rolls and the tiles to paint the glass to match the image shown on the left side of the table.
Click a paint roll to cover the entire glass with that color.
Use the tile shapes from the board at the bottom to cover pieces of the glass; covered pieces will not be painted when the paint roll is clicked.
Start by painting the whole glass red with the red paint roller.
Solution Part 1.
Next, cover the bottom left corner with Tile E and cover the top right corner with Tile B.
Paint the glass with the green paint roller.
Solution Part 2.
Again put tiles E and B in the same place, then add tile C to the top left corner and tile D to the bottom right corner.
Paint the glass with the blue paint roller.
Solution Part 3.
Once the puzzle is solved, take the completed Stained Glass (1/3) from the paint set.
Use the Nail Puller (from the hidden object scene in the Greenhouse) on the large chest on the ground.
Take the Carriage Key from the opened box.
Go back to the Castle Square.
Castle Square
Click the carriage to look inside.
Use the Carriage Key (from the boarded up box in the Laboratory) on the locked compartment under the seat.
Take the Pick and the Part of Map inside the opened compartment.
Return to the 11th Century Exhibit inside the museum.
11th Century Exhibit
Click the large display cabinet on the right wall to zoom in.
Use the Cutting Pliers (from the ground at the bottom of the Scientist's Stairway) to snip the alarm wire of the right glass case.
Click the case to open it, then take the Zodiac Bas-Relief (2/3) inside.
Go into the Security Room on the right.
Security Room
Click the map on the back wall for a closer look.
Place the Part of the Map into the space in the center to start the puzzle.
To solve this puzzle, arrange all of the colored tiles so no two tiles of the same color are touching.
Click a tile to select it, then click a different tile to swap their colors.
Solution.
Once the puzzle is solved, the map will lift from the wall, revealing a cache with the Lever inside.
Return to the tunnel at the end of the Scientist's Stairway.
Scientist's Stairway
Use the Pick (from the carriage seat compartment in the Castle Square) on the weak right wall of the tunnel.
Take the Big Gear from the revealed cache in the wall.
Go forward into the Laboratory.
Laboratory
Click the right door to zoom in.
Use the Lever (from the map puzzle in the Security Room) on the bottom gear of the lock mechanism.
Put the Big Gear (from the weak wall cache in the tunnel at the bottom of the Scientist's Stairway) on the empty socket in the middle of the lock mechanism.
Go through the empty door into the Storeroom.
Storeroom
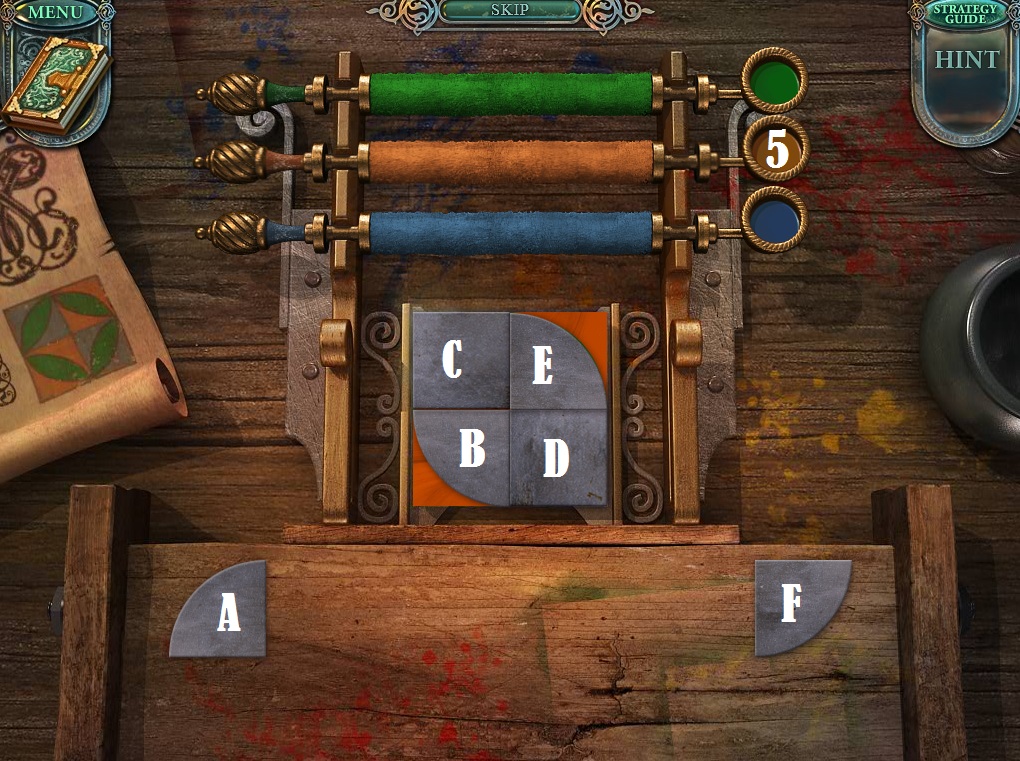
Click the clown figurine on the pedestal of the left gargoyle statue for a closer look.
Place the red Ball on the pile of balls in the clown's hand to start the puzzle.
As before, solve this puzzle by matching the balls to the color order shown on the clown's chest.
Click a ball to move it to the top of the pile of the opposite hand.
The difference this time is that the top ball of both piles cannot be moved.
Solution.
Once the puzzle is solved, take the Tags from the opened compartment at the bottom of the clown.
Click the pipes in front of the open chest on the ground to reveal the Zodiac Bas-Relief (3/3).
Take the Lever on the ground to the left of the chest.
Take the Empty Beaker inside the miniature coffin.
Go back to the Laboratory.
Laboratory
Click the table in front of the far right bookcase for a closer look.
Add the Tags (from the clown puzzle in the Storeroom) on the beakers to start the puzzle.
To solve this puzzle, match the broken tags with the correct labels on each beaker.
Click the top of a tag from the board at the bottom to select it.
Find the label whose shape fits with the broken part of the tag, then click the label to attach them.
If correctly positioned, the tag will connect and lock in place.
Solution.
Once the puzzle is solved, take the bottle labeled H2O.
Click the chemsitry set on the left table for a closer look.
Place the Empty Beaker (from the small coffin in the Storeroom) on the stand in the middle of the set.
Add the H20 to the left beaker with the same H20 label.
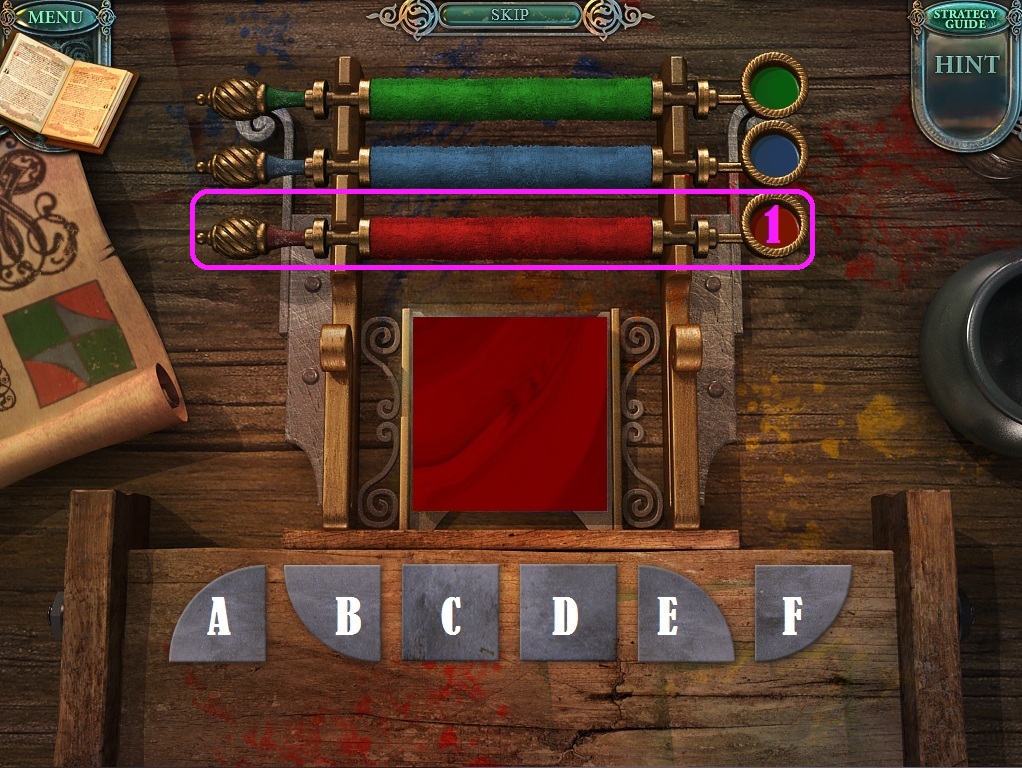
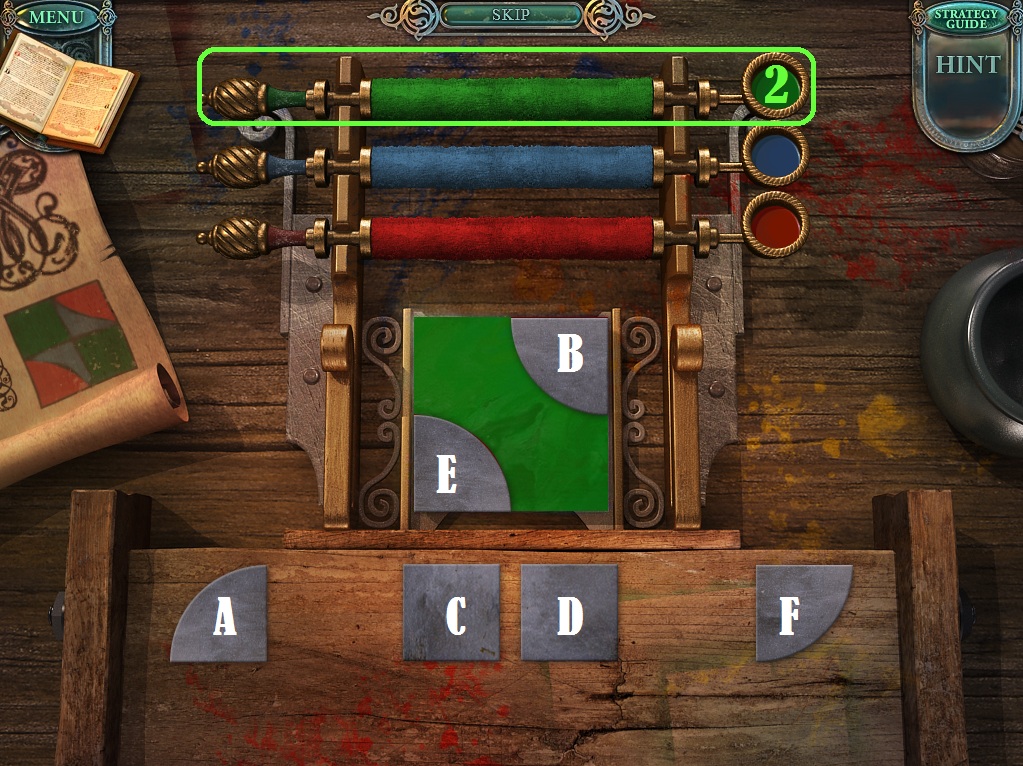
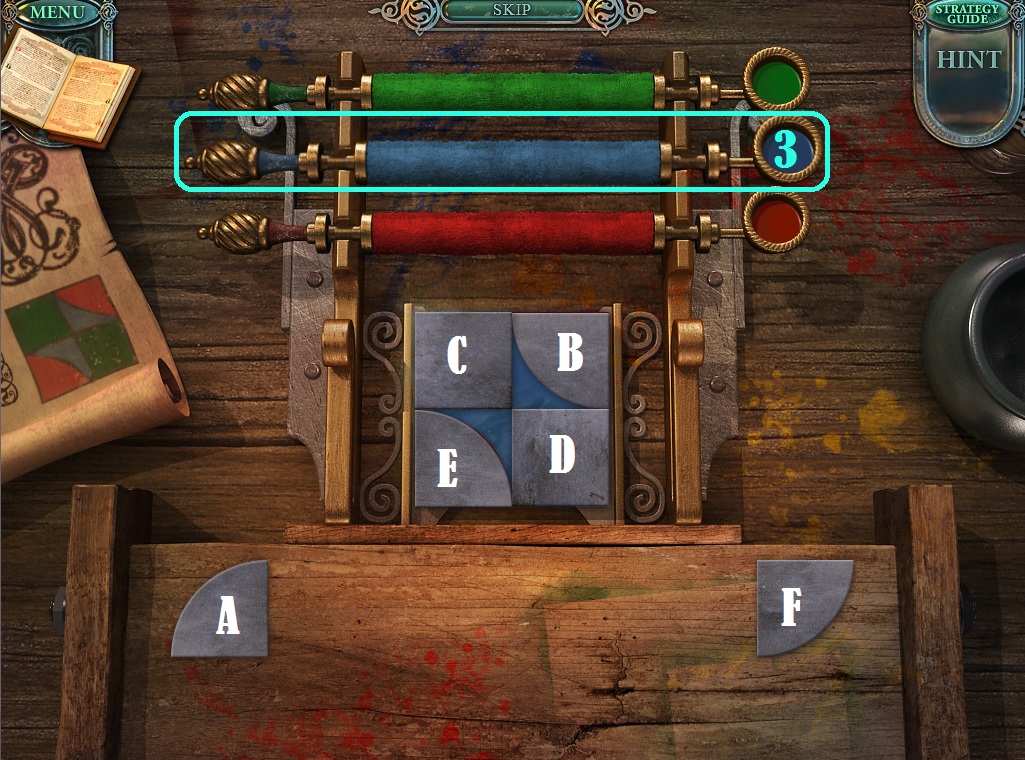
Click the middle paint set on the counter top for a closer look.
Add the Lever (from the floor of the Storeroom) to the side of the bottom red paint roller to start the puzzle.
Just like the previous paint roller puzzle, use the paint rollers and the tiles to paint the glass to match the image shown on the left side of the table.
Click a paint roller to cover the entire glass with that color.
Use the tile shapes from the board at the bottom to cover pieces of the glass; covered pieces will not be painted when the paint roller is clicked.
Start by painting the whole glass blue with the blue paint roller.
Solution Part 1.
Place tile A in the bottom left corner, tile E in the top left corner, tile F in the top right corner, and tile B in the bottom right corner, then paint the glass orange with the orange paint roller.
Solution Part 2.
Place tile F in the bottom left corner, tile B in the top left corner, tile A in the top right corner, and tile E in the bottom left corner, then paint the glass red with the red paint roller.
Solution Part 3.
Once the puzzle is solved, take the completed Stained Glass (2/3) from the paint set.
Go back to the end of the Hallway.
Hallway
Click the large book on the stand beside the left doorway for a closer look.
Place all three Zodiac Bas-Reliefs (one fished from the Lake with the net device on the dock, one from the glass display case in the 11th Century Exhibit, and one from under the pile of pipes on the floor of the Storeroom) into the spaces on the cover of the book.
Take the Planet and the Clock Hand (2/3) inside the open book.
Return to the Landing at the top of the stairs.
Landing
Click the cupboard in the wall to the left of the column.
Click the open cupboard for a closer look.
Place the Planet (from the inside of the book in the Hallway) into the empty space on the upper left side of the board.
Put the Lens (from the telescope in the Observatory) in hole at the center of the board to start the puzzle.
To solve this puzzle, arrange the planet tiles so that they are aligned with their same image in the lens.
Click a planet tile to move it two spaces clockwise along the curved path.
The two tiles in front of the clicked tile will each move back one space.
Solution.
Once the puzzle is solved, take the blue paint Roller from the revealed wall cache.
Go back down to the Laboratory.
Laboratory
Click the paintset on the right side of the counter for a closer look.
Place the blue paint Roller (from the planetary puzzle wall cache at the Landing) into the bottom roller space to start the puzzle.
Just like the previous paint roller puzzles, use the paint rollers and the tiles to paint the glass to match the image shown on the left side of the table.
Click a paint roller to cover the entire glass with that color.
Use the tile shapes from the board at the bottom to cover pieces of the glass; covered pieces will not be painted when the paint roller is clicked.
Start by painting the whole glass green with the green paint roller.
Solution Part 1.
Next, put tile F in the top left corner, tile D in the bottom left corner, tile C in the top right corner, and tile A in the bottom right corner.
Paint the glass with the blue paint roller.
Solution Part 2.
Place tile A in the top left corner, tile C in the bottom left corner, tile D in the top right corner, and tile F in the bottom right corner.
Paint the glass again with the blue paint roller.
Solution Part 3.
Then put tile C in the top left corner, tile E in the bottom left corner, tile B in the top right corner, and tile D in the bottom right corner.
Paint the glass with the orange paint roller.
Solution Part 4.
Finally, place tile C in the top left corner, tile B in the bottom left corner, tile E in the top right corner, and tile D in the bottom right corner.
Paint the glass again with the orange paint roller.
Solution Part 5.
Once the puzzle is solved, take the completed Stained Glass (3/3) from the paint set.
Go up the stairs to the Landing.
Landing
Click the stained glass window between the two candelabras for a closer look.
Place the three Stained Glass pieces (from the paint set puzzles on the counter of the Laboratory) into the three matching spaces on the window.
Take the Zodiac Sign (2/2) from the top window cache.
Take the Typewriter Key (2/3) from the left window cache.
Take the Letter B from the right window cache.
Go back to the Tomb.
Tomb
Click the right coffin name plate to zoom in.
Place the Letter Z (from the hidden object scene in the Laboratory) on the name plaque space for the letter "Z" in Elizabeth.
Place the Letter B (from the right window cache at the Landing) on the space for the letter "B" in Elizabeth.
When the name plate lifts, take the revealed bottle of FeCl3 inside the cache.
Return to the Laboratory.
Laboratory
Click the chemistry set on the left table to zoom in.
Add the bottle of FeCl3 (from the right coffin compartment in the Tomb) to the empty beaker on the right stand with the FeCl3 label.
Take the completed Chemical Solution from the middle beaker.
Go up the stairs to the Observatory.
Observatory
Click the scroll on the table to zoom in.
Use the Chemical Solution (from the concoction made with the chemistry set in the Laboratory) on the blank scroll to reveal the invisible message, which is copied to your Notebook.
Click the zodiac wheel in the middle of the left bookcase for a closer look.
Add the two Zodiac Signs (one from the top window cache at the Landing and one behind the vines in the Greenhouse) to the empty spaces on the wheel to start the puzzle.
To solve this puzzle, arrange the zodiac tiles so that each 3x4 section has no two tiles of the same sign.
The tiles must also be arranged so that their gold border follows the shape of the rectangular frame.
Click a tile from the lines at the bottom to select it, then click an empty space inside the frame to set it in place.
Solution.
Once the puzzle is solved, take the revealed Typewriter Key (3/3).
Click the typewriter to zoom in.
Place the three Typewriter Keys (one from the hidden object scene in the laboratory, one from the left window cache at the Landing, and one from the zodiac sign puzzle) into the empty spaces on the typewriter keyboard.
Take the Part of the Code from the top of the typewriter.
Go back down the stairs to the Storeroom.
Storeroom
Click the large safe in front of the middle archway of the rear wall for a closer look.
Add the Part of the Code (from the repaired typewriter in the Observatory) to the torn paper in the upper left corner of the safe to start the puzzle.
To solve this puzzle, arrange the buttons to match the letters shown on the cipher to spell out the word "Lege Artis".
Click a button and drag it to move it along the track, then release it to set it in place.
The positions of the buttons in the code are indicated with black circles and empty spaces are indicated with white circles.
Solution.
Once the puzzle is solved, take the revealed Safe Handle.
Return to the Observatory.
Observatory
Click the safe at the bottom shelf of the left bookcase for a closer look.
Add the Safe Handle (from the cipher coded safe in the Storeroom) to the third light to start the puzzle.
To solve this puzzle, arrange the lights to match the image shown in the invisible ink scroll on the table.
Click the handle of each of the four lights to move its beam up or down.
Solution.
Once the puzzle is solved, take the Clock Hand (3/3) from the opened safe.
Go down to the Scientist in the middle of the Scientist's Stairway.
Scientist's Stairway
Click the clock in the bag at the Scientist's feet to zoom in.
Add the three Clock Hands (one from the bottom bookshelf of the bookcase in the Observatory, one from the opened book on the stand in the Hallway, and one from the opened light safe in the Observatory) to the face of the clock.
Speak with the scientist to return to the Hallway.
Hallway
Take the Picture Scraps on the ground under the torn painting.
Click the destroyed paiting for a closer look.
Add the Picture Scraps to the frame to start the puzzle.
To solve this puzzle, arrange the picture scraps to repair the painting of the Scientist.
Click one of the crumpled pieces at the bottom of the frame to unfurl it, then click a position inside the frame to set it.
If correctly positioned, the piece will lock in place.
Solution.
Once the puzzle is solved, take the Clock Number from the painting.
Go to the Throne Room.
Throne Room
Click the large clock to zoom in.
Place the Clock Number (from the repaired Scientist's painting in the Hallway) into the space in the face of the clock between the numbers 10 and 12.
Go forward to the inside of the Clock.
Clock
Click the glowing panel inside the gargoyle statue to start the puzzle.
To solve this puzzle, draw a path connecting each colored gem with its matching crystal.
Click one of the small gems at the bottom of the board to select it, then place it in one of the glowing tile squares.
Gems can only be placed in a tile adjacent to a crystal of the same color.
The lines between crystals cannot cross at any point, nor can gems be placed in one of the solid grey tiles without a socket.
Solution.
Once the puzzle is solved, the gargoyle will give power to the parts of the clock mechanism hanging around the room.
Click the six parts in the correct order, using trial and error, to repair the clock.
If a part is incorrectly selected, the Witch's face will flash on the screen.
If a part is chosen in the right order, it will start to function.
Screenshot.
The End
Posted by: Trinn |
October 14, 2011 9:07 PM
|
October 14, 2011 9:07 PM