
![]() Now here's something you don't see every day: an adventure/hidden object game that tries to tell a story. A real story. And succeeds. Not only does Elixir of Immortality know how to weave an intriguing plot, it knows how to do it with pictures, setting, and presentation instead of loads of words. You won't find blocks of text or terrible voice acting in this game. All that's to be had is a delicious tale of intrigue, a lot of fantastic mini-games, and scenery so packed with so much mystery you'll want to wade in and start messing around with things yourself.
Now here's something you don't see every day: an adventure/hidden object game that tries to tell a story. A real story. And succeeds. Not only does Elixir of Immortality know how to weave an intriguing plot, it knows how to do it with pictures, setting, and presentation instead of loads of words. You won't find blocks of text or terrible voice acting in this game. All that's to be had is a delicious tale of intrigue, a lot of fantastic mini-games, and scenery so packed with so much mystery you'll want to wade in and start messing around with things yourself.
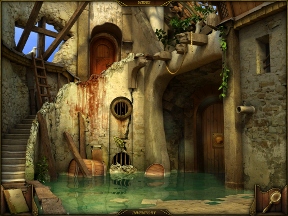 It all starts with a cloaked figure, a "hired hand", and a cliff. Forced to drink the elixir of immortality, the poor lad downs it and is immediately shot, proving his potion to be a failure. Now, you, the detective, are the new hired hand, and as the game begins, you're thrown in a dripping cellar with no light as the doors are sealed shut. Will you be the next to meet your fate on the cliff?
So, let's get out of here, shall we? You think you saw a lantern in the boat, so move the cursor to the sparkling location and click it to enter a hidden object scene. Elixir of Immortality makes great use of sub-zones within scenes, allowing you to peer deeper into portions of the environment, filling out the world and providing lots of additional puzzles to complete. The game comes with what could possibly the best feature of any hidden object game: a magnifying glass that will show you all the clickable hotspots on the screen. Calling that "useful" is like calling pizza "kinda tasty".
You'll spend most of your time moving back and forth between areas looking for puzzles to solve and hidden object scenes to search through. These sections are more adventure-centric and encourage you to experiment with inventory items (found during the hidden object portions) to open doors, crank gears, move blocks of stone, and more. Elixir of Immortality is very creative with inventory item usage, and this part comes forward as the central mechanic in the game, leaving the object finding and mini-games as secondary bonuses.
 Analysis: Elixir of Immortality is a story-driven adventure at heart, not a hidden object game. The meat of the experience comes from soaking in the thick layers of intrigue, rolling around in mystery like it's your job. And it kinda is, seeing as how you're a detective and all. Not only are you curious as to what's going on in this strange castle, you're pretty darn motivated to uncover the truth, because if you don't, you'll find out how un-immortal you are.
As far as the gameplay goes, I was immensely pleased to see the focus shifted away from object finding to inventory and mini-game puzzles. Sure, finding a pair of pliers in a messy scene is fun, but doing something purposeful with said pliers is even cooler. And when you do put them to use and an awesome mini-game about shifting bits of a key to match the tumblers in a lock appears, it's a little slice of sunshine and lollipops in the dim world that is Elixir of Immortality.
What is possibly the game's only downside is length. Four hours is an average completion time, give or take a bit. While the game doesn't seem short by any means (the length feels about right), I'd rather have a four hour game of well-integrated awesome than a seven hour game of "meh". Vogat Interactive, the same folks who created Reincarnations: Awakening, knows how to avoid the latter.
Elixir of Immortality puts on a fantastic show. From the wonderful scenery art to the suspenseful tale of mad science and cloaked figures, it's one of those rare games that takes hold of your curiosity and pulls you along until you're staring at the end credits.
![]() Windows:
Windows:
Download the demo
Get the full version
![]() Mac OS X:
Mac OS X:
Download the demo
Get the full version


Walkthrough Guide
(Please allow page to fully load for spoiler tags to be functional.)
Elixir of Immortality Walkthrough
General Tips
On the Main Screen you can choose your profile, play or exit, view credits, check out more games by Vogat Interactive, and select your options.
Options include Effects and Music volume, full screen with a choice of wide screen or window mode, and you can choose to have a custom cursor or not.
The game has no timer and can be played in Casual or Advanced mode.
Casual mode provides a tutorial, lots of sparkles, and the hint and skip buttons recharge faster.
Advanced mode has fewer sparkles and the hint and skip buttons recharge slower.
The Menu can be accessed at the top of the screen and will give you an opportunity to change any option, resume the game or go to the Main Menu.
At the bottom of the screen is your Diary which not only tells what has occurred during the game but lists the tasks you currently need to accomplish.
Waving your cursor over it will show the tasks but you need to click on it to read the entries.
The center bar has your Inventory items which can be used individually or sometime need to be combined with other items.
The magnifying glass at the far right will so you the active zones in a scene that you need to check out.
Areas that require a close up view will be marked with the round green cursor.
Hidden Object scene are random but you will come away with 1 or more key objects.
For Hidden Object scenes you will get a list of items in place of your Inventory and the magnifying glass will turn into a candle hint button which when you use it will show an hourglass as it refills and once again turns into a candle.
The game doesn't have actual chapters but locations, people and incidents which will be titled for you to choose where you need help as will the Mini Games.
Walkthrough
Arrival on the Island
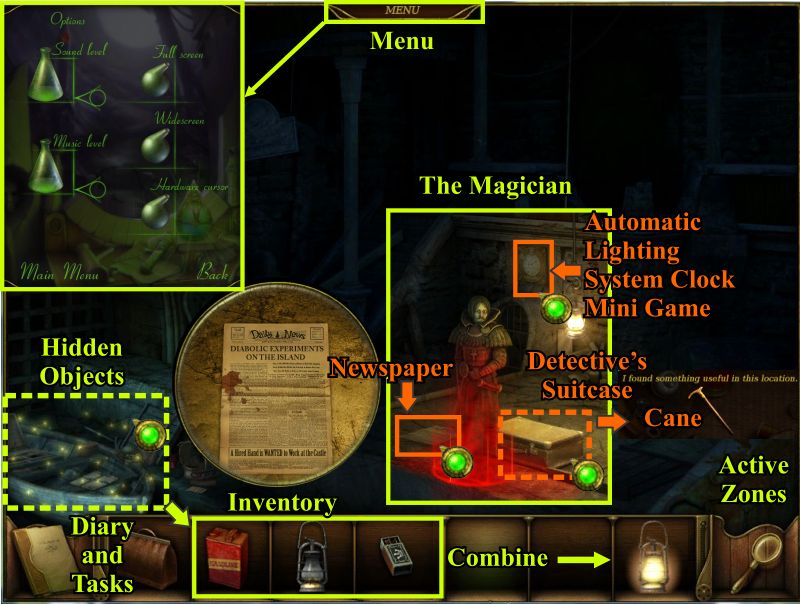
Dock and the Magician
When you are dropped off at the Dock it is completely dark so you need to click on the boat at the left and play the Hidden Object scene to get something to light it.
Put the gas in the lantern, light it with the matches, and place the lit lantern on the hook.
An image of the Magician will construct itself and you will learn there is an automatic lighting system.
Read the newspaper on the ground, complete the suitcase Hidden object scene to get the cane, and click on the clock for a mini game.
Screenshot
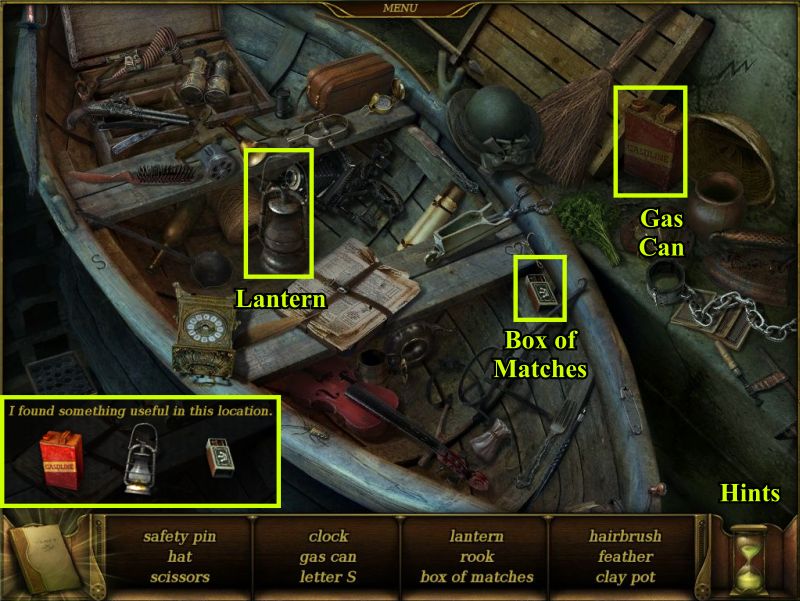
Hidden Object Scenes
Most Hidden Object scenes will not be marked because they are random but you will be told the key objects you will receive for your Inventory.
In the first Hidden Object scene in the boat you will come away with a lantern, box of matches and a gas can.
Screenshot
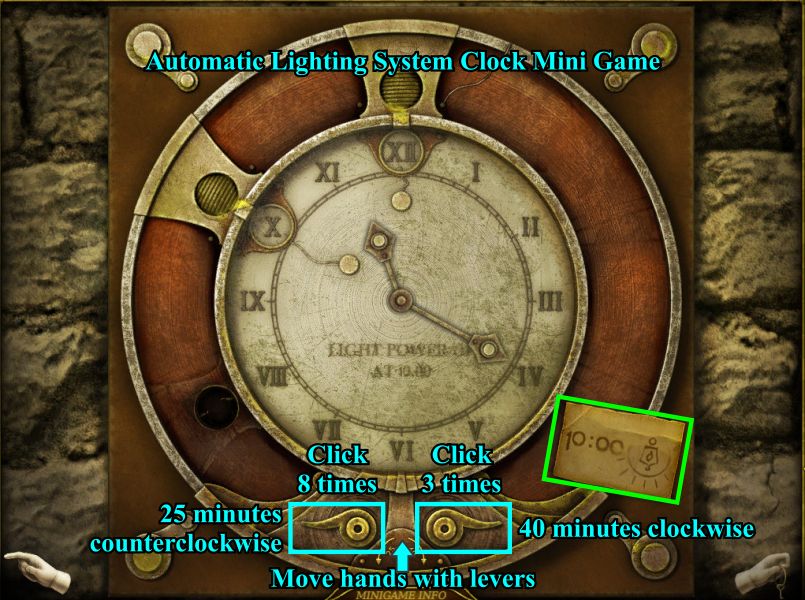
Automatic Lighting System Clock Mini Game
Since the lights automatically come on at 10:00, your goal is to set the clock to that time.
The 2 levers at the bottom move the hands of the clock.
The left lever moves the hands 25 minutes counterclockwise and the right lever moves them 40 minutes clockwise.
Click 8 times on the left lever and 3 times on the right lever and the lights will come on.
Screenshot
Your current tasks are to find a way to unlock the Dock door so you can look for the Employee Quarters.
Click on the drain and use your cane to open it so you can get the lock pick.
Click on the exit to bring up a close up of the lock and place your lock pick on it to get a mini game to open the door.
Screenshot
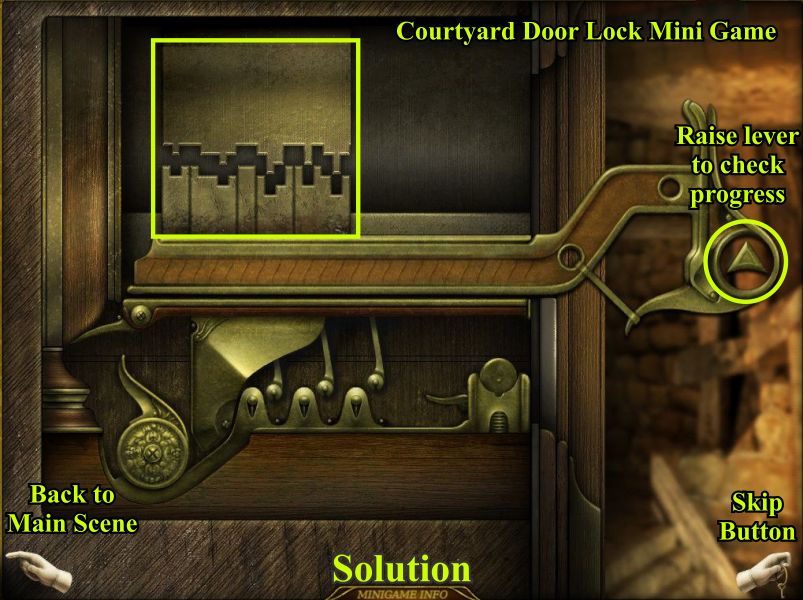
Courtyard Door Lock Mini Game
Your goal is to arrange the lower tumblers so they match the grooves in the upper plate.
The lever on the right can be used to check your progress.
Swap the plates until you get the configuration shown in the solution and then enter the Courtyard.
Screenshot
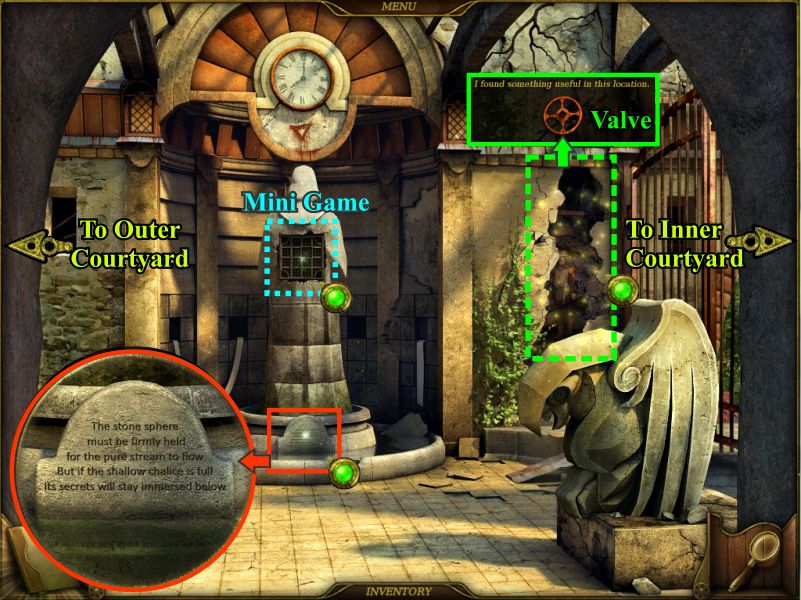
Castle Courtyard
The Castle Courtyard consists of three sections: the actual Courtyard area where you first enter, the Outer Courtyard which is to the left and the Inner Courtyard which is to the right.
Click on the statue's plaque to read it and play the Hidden Object scene to get the valve.
Click on the grate on the statue's back for a mini game.
Screenshot
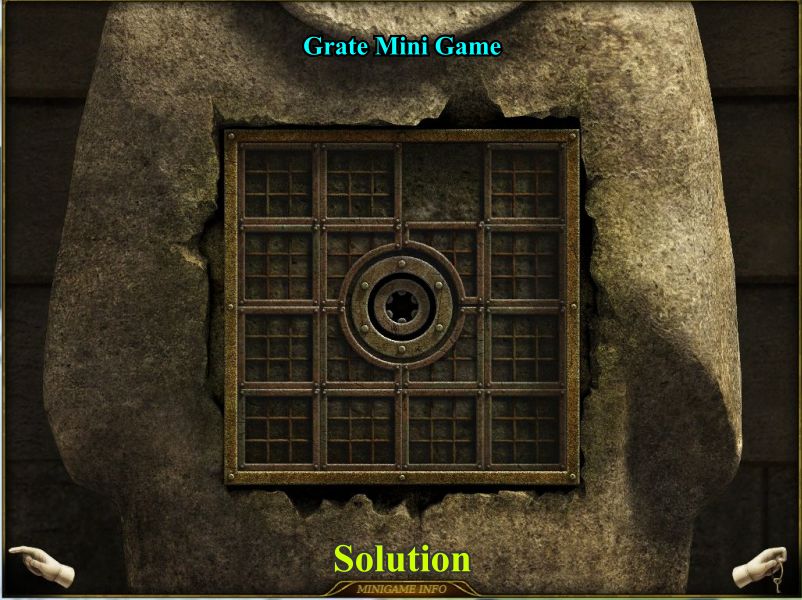
Grate Mini Game
Your goal is to slide the grate pieces so that the center is not covered by any grating as shown in the solution.
Screenshot
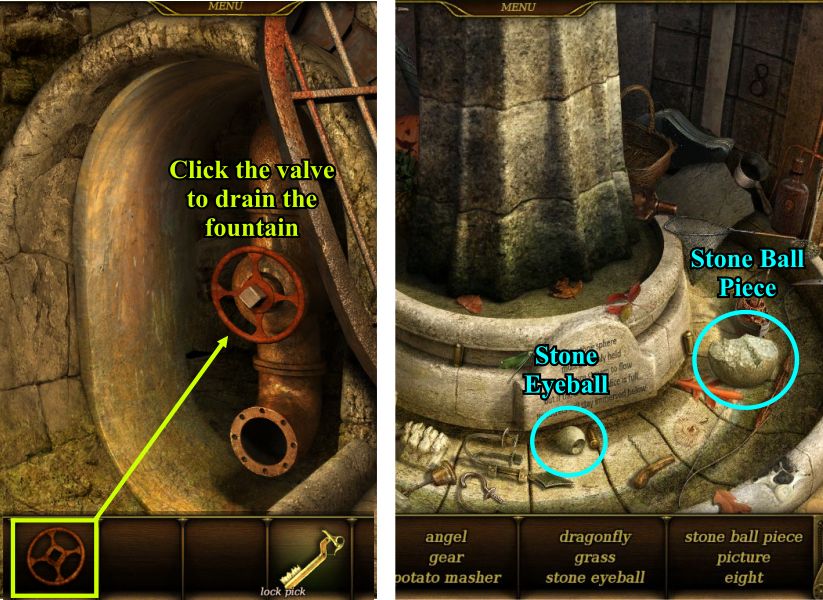
Go back to the Dock and click on the drain.
Place the valve and click on it to drain the fountain.
Go back to the fountain and click on the sparkles for a Hidden Object scene to get the stone eyeball and stone ball piece.
Screenshot
Click on the gargoyle for a close up and place the stone eye to get another sphere piece.
Screenshot
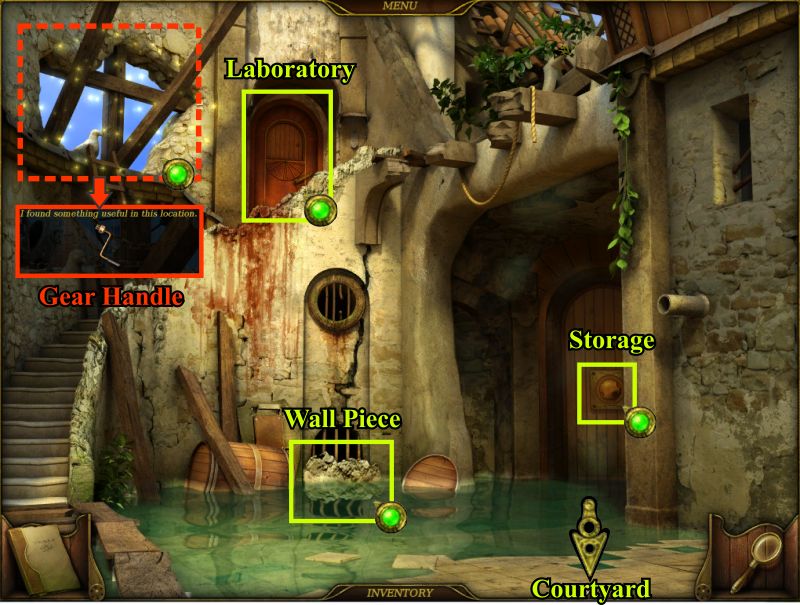
Go left to the Outer Courtyard and click on the Hidden Object scene to get the gear handle.
Check the rest of the active area and return to the Courtyard.
Screenshot
Click on the grate and place the handle then click to turn it so the statue will turn around.
Combine the 2 sphere parts into a ball and give it to the statue.
The statue and sink a little and the gate to the Inner Courtyard will open so enter.
Screenshot
Click on the Hidden Object scene to get the doorbell.
You finally found the Employee Quarters but it is locked just like the rest of the active areas except the Park Entrance so go there.
Screenshot
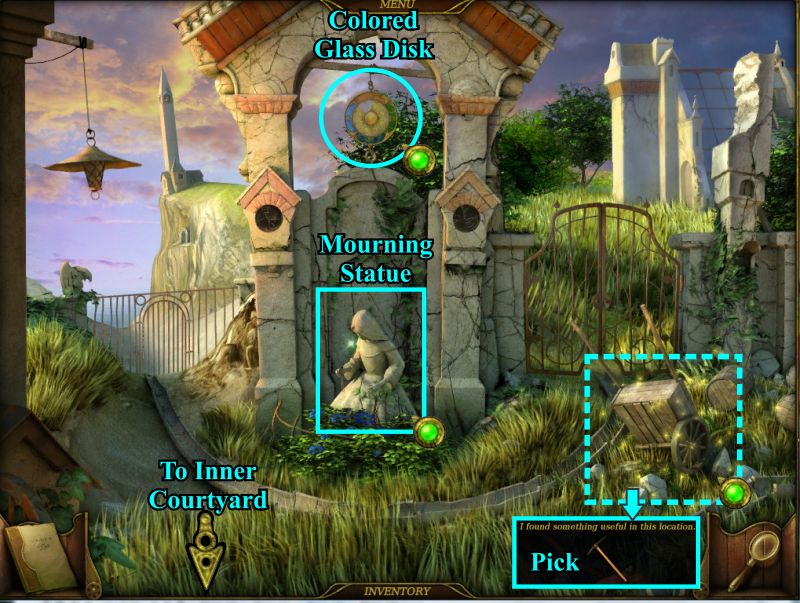
Play the Hidden Object scene to get the pick.
Check out the statue and disk above her for information and go back to the Outer Courtyard.
Screenshot
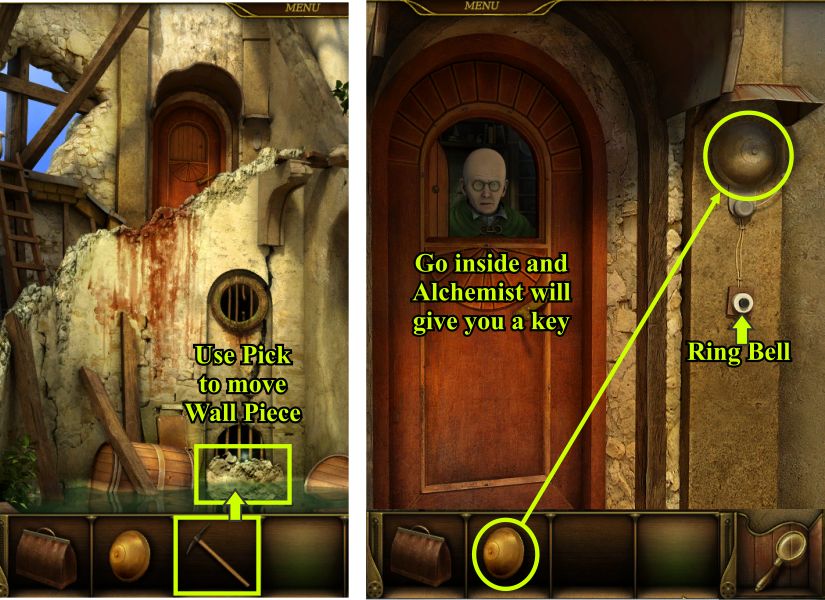
Use the pick to move the wall piece and drain the water.
Click on the Laboratory door and place the doorbell where it belongs and ring the bell.
The Alchemist comes to the door and asks you to follow him so go inside and talk to him to get the cross key.
Screenshot
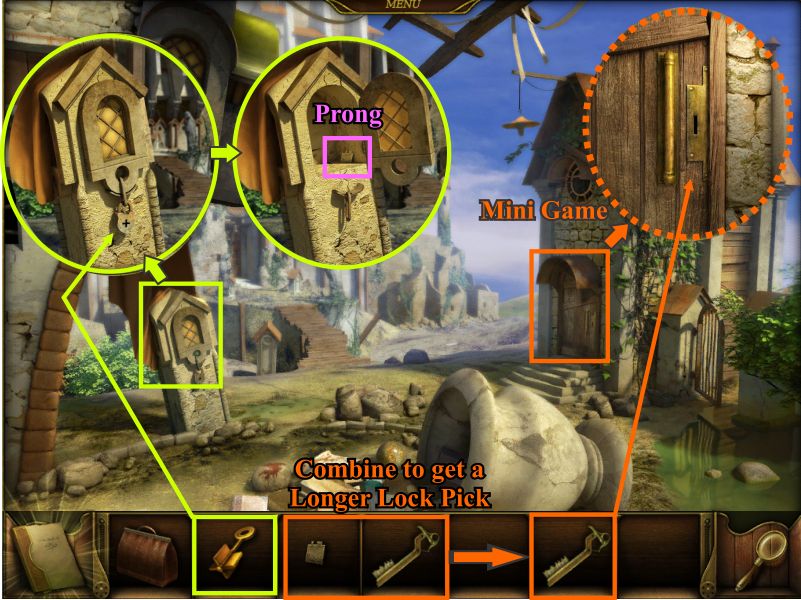
Return to the Inner Courtyard.
Click on the safe and use the cross key to get the prong inside.
Combine the prong with your lock pick to get a longer lock pick.
Click on the Employee Quarters lock and use your lock pick to bring up a mini game.
Screenshot
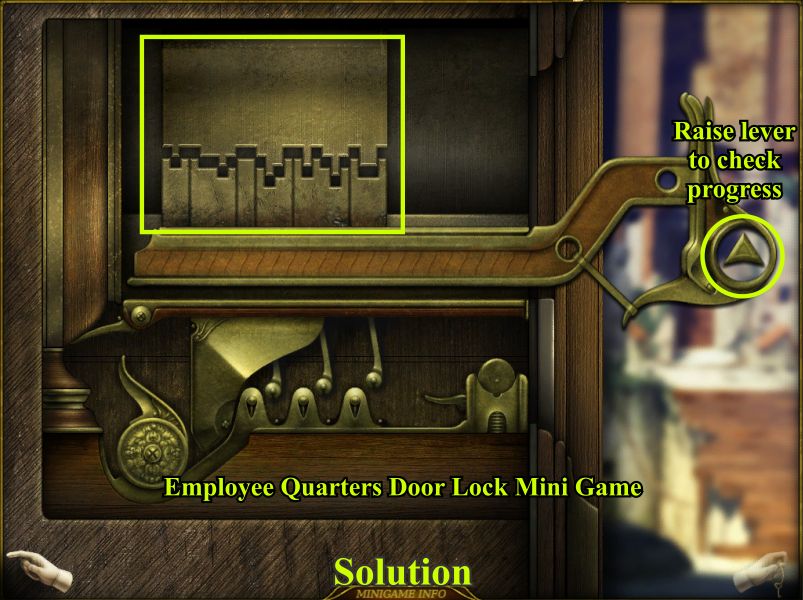
Employee Quarters Door Lock Mini Game
This game works the same as the last lock so match up the teeth and open the door.
Screenshot
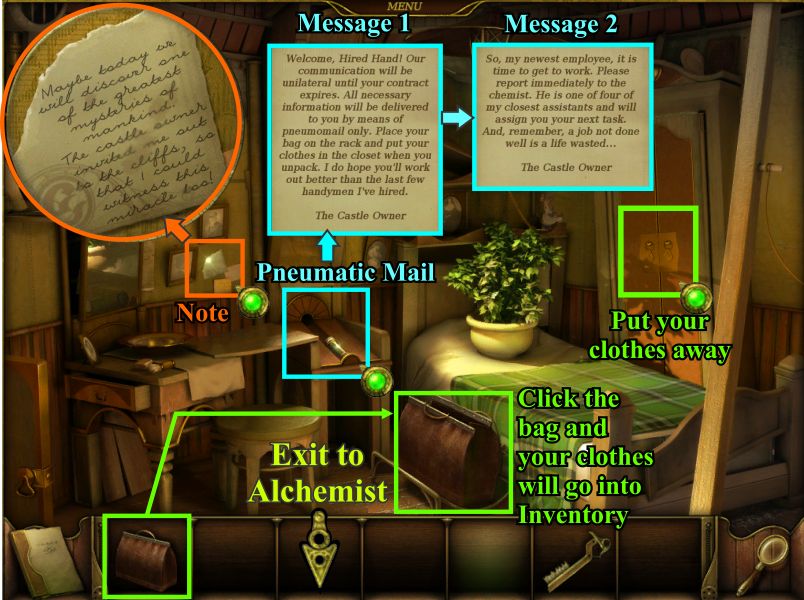
Employee Quarters
Check the note on the board, pick up your first pneumatic mail message and put your bag on the rack.
Click on your bag and the contents will go into Inventory so click on the closet to put the clothes away.
Screenshot
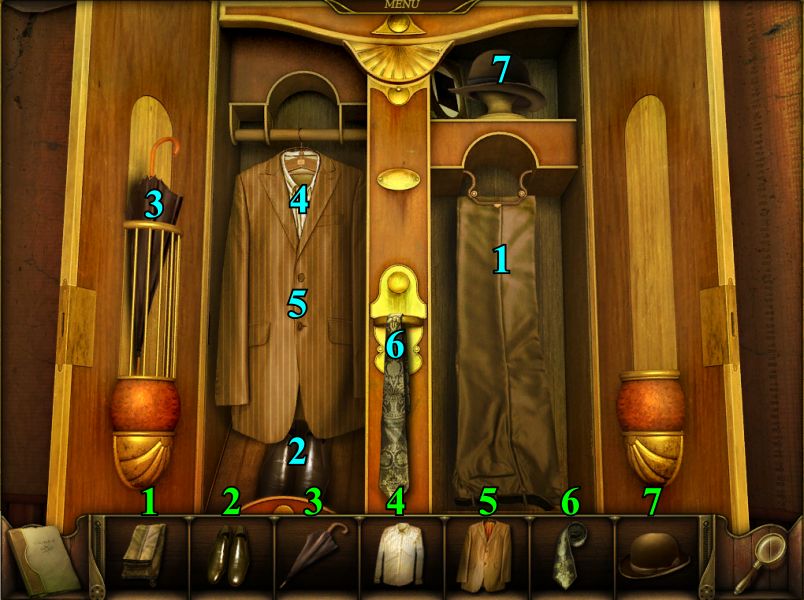
Arrange Your Clothes in the Closet
Place the numbered items as shown.
Read the second message and go to the Outer Courtyard to see the Alchemist.
Screenshot
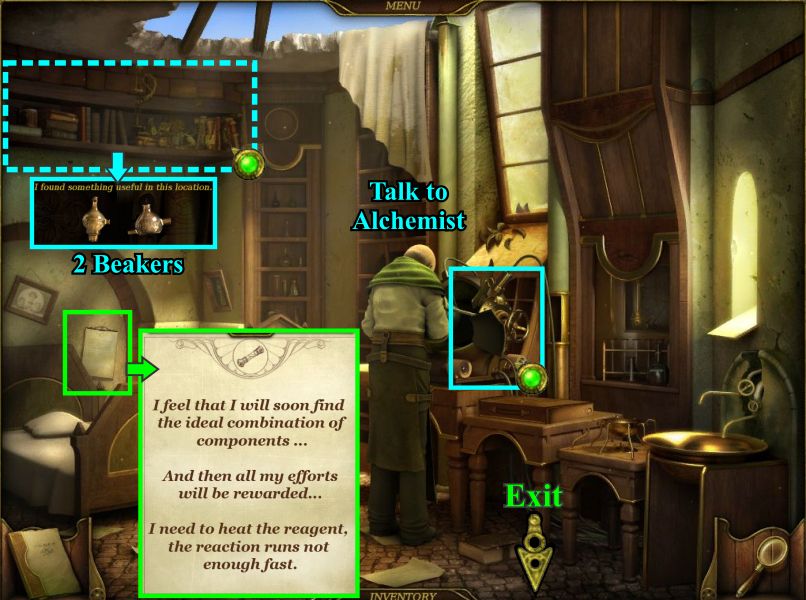
First Assignment: The Alchemist
Talk to the Alchemist, check out his machine, read the note on the wall and play the Hidden Object scene to get 2 beakers.
Screenshot
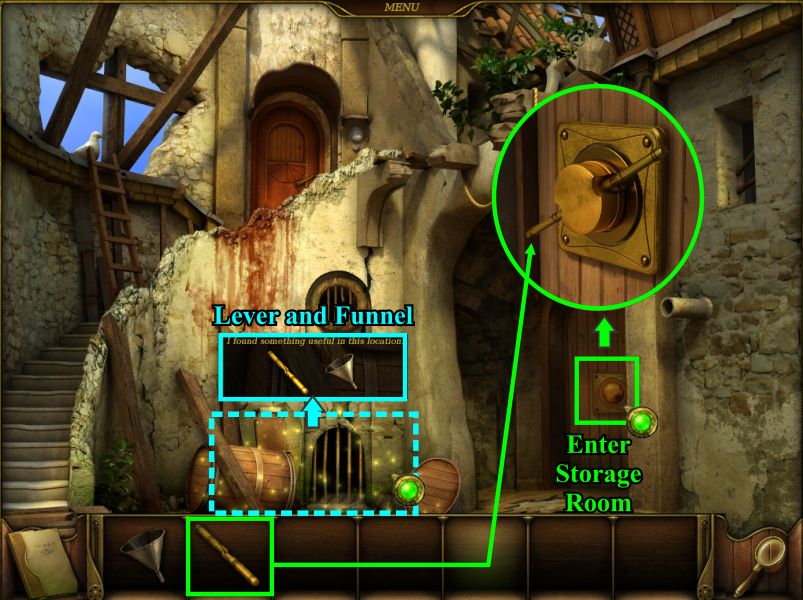
Go downstairs and play the Hidden Object scene at the drain area to get a lever and funnel.
Click on the Storage lock and place the lever then click to turn it and enter the Storage room.
Screenshot
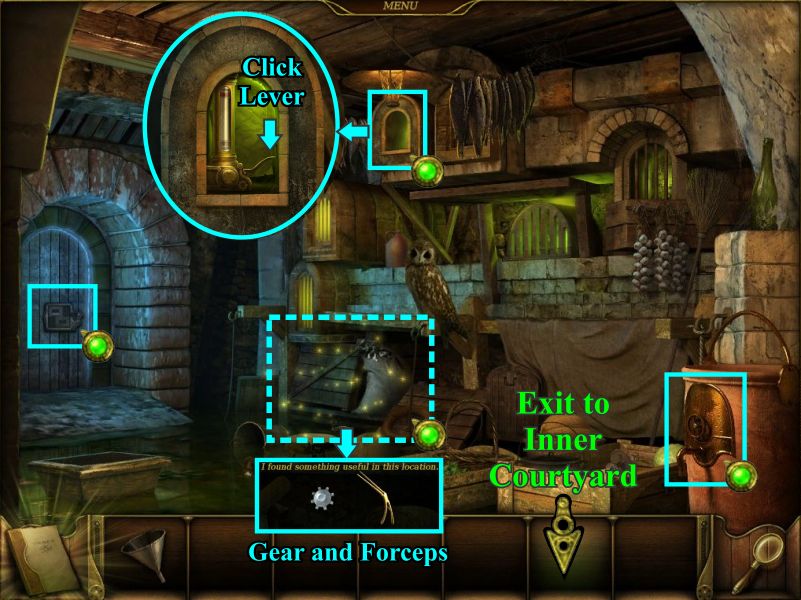
Storage Room
Place the Hidden Object scene to get a gear and forceps.
Check the pneumatic mail system and click the lever to deliver the unsent mail to your quarters.
Check the locked door to the Freezing Chamber and look at the kerosene tank.
Screenshot
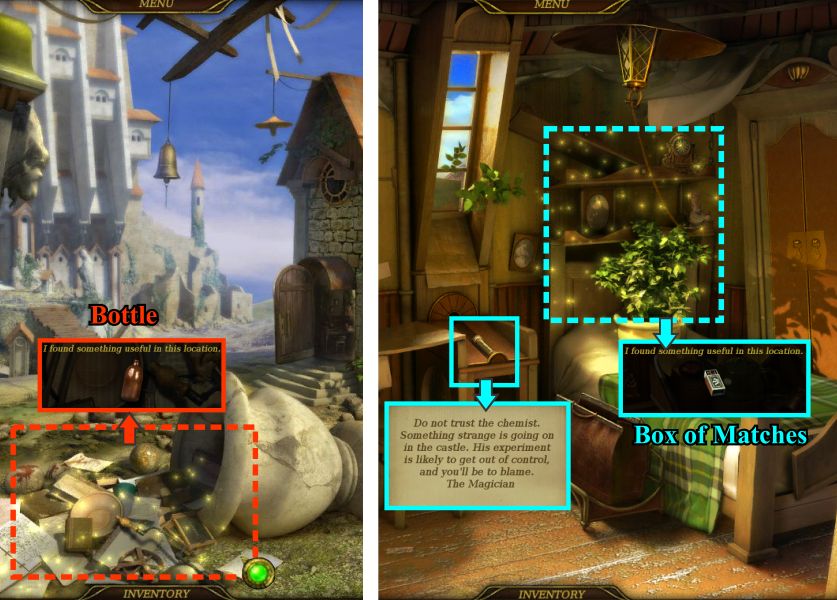
Go to the Inner Courtyard and play the Hidden Object scene to get the bottle for the kerosene.
Go into the Employee Quarters to check your mail and play the Hidden Object scene to get a box of matches.
Screenshot
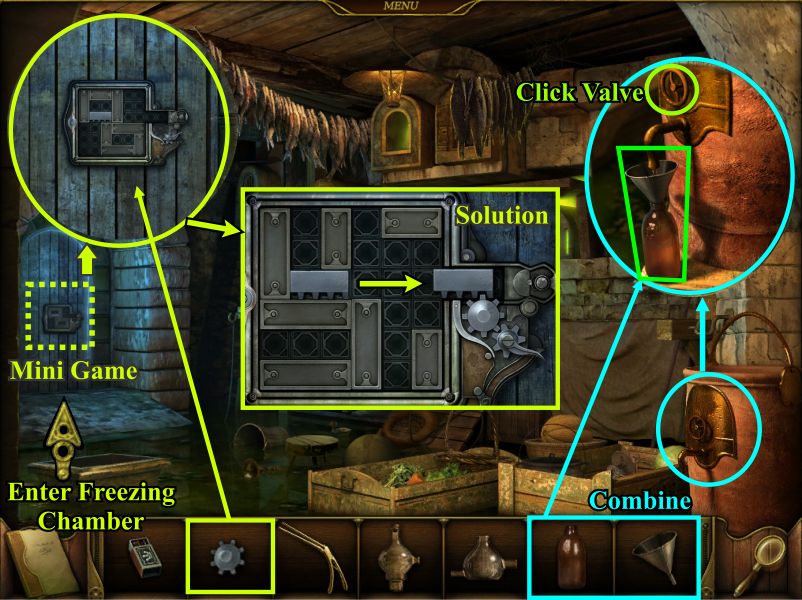
Storage Room and Freezing Chamber
Go back to the Storage and combine the funnel and bottle.
Click for a close up of the kerosene tank and place the bottle with funnel under the spout.
Click on the valve to fill the bottle and then take the bottle for your Inventory.
Click on the Freezing Chamber door lock and place the gear in the close up to begin a mini game.
The solution to opening the door is shown and the way to complete it is in the following screen shot.
Screenshot
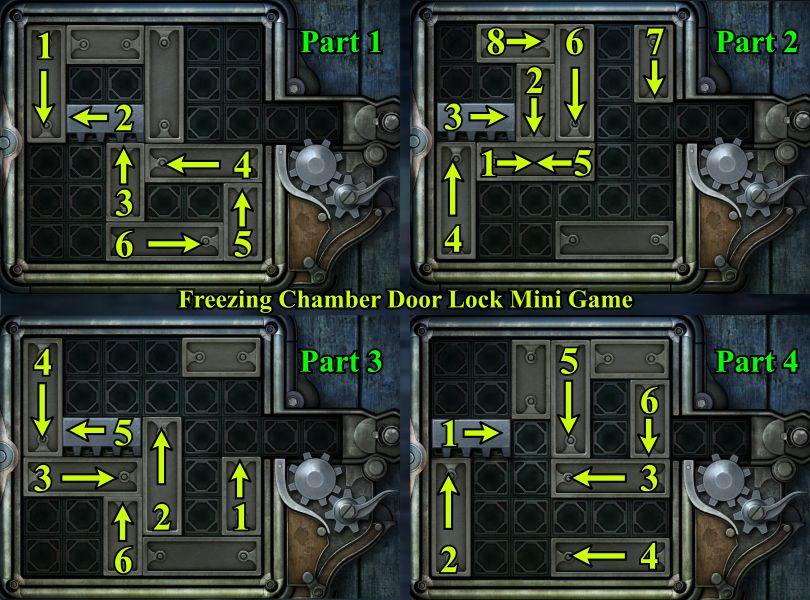
Freezing Chamber Door Lock Mini Game
Slide the lock pieces as shown in each of the 4 parts and the bar with the teeth will be free to get to the gears on the right.
Screenshot
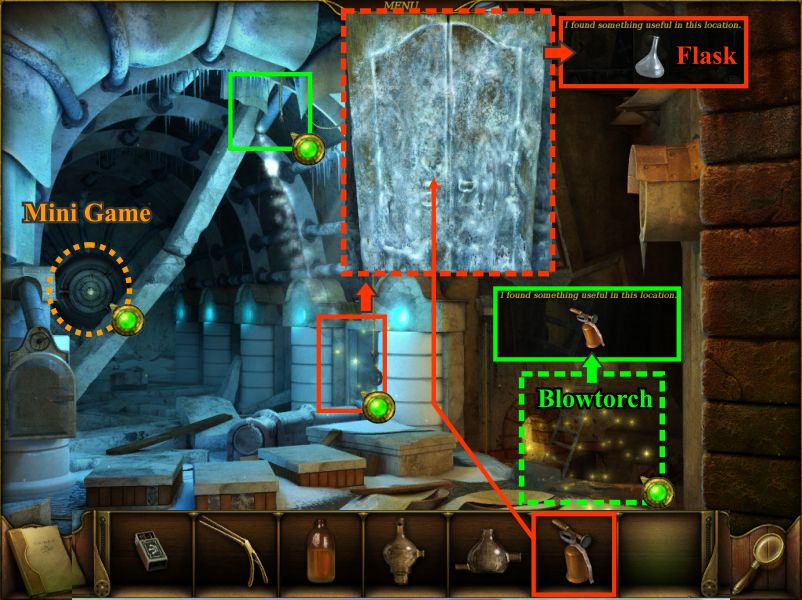
Play the Hidden Object scene to get the blowtorch to use on the frozen doors.
Click to bring up the close up and use the blowtorch 5 times to defrost the doors so you can click on them for a Hidden Object scene and get a flask.
Note there is a missing pipe near the ceiling and click on the area at the left for a mini game.
Screenshot
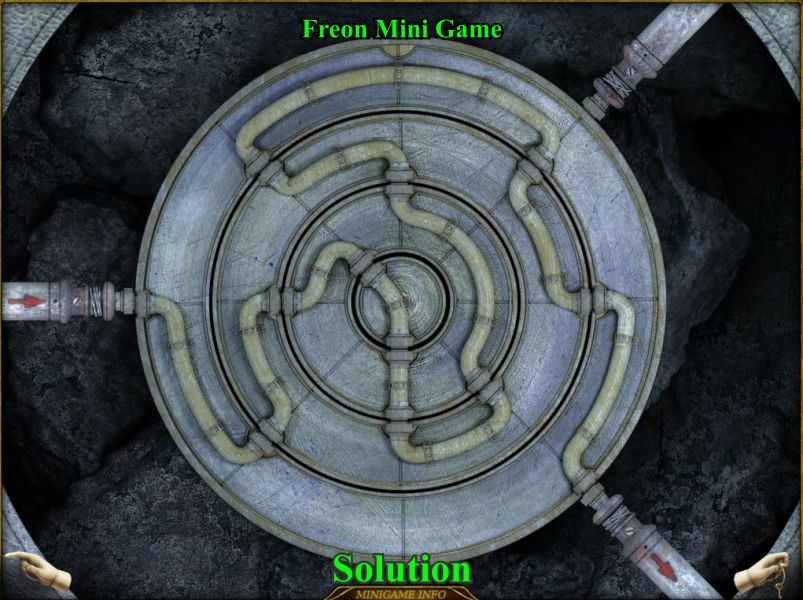
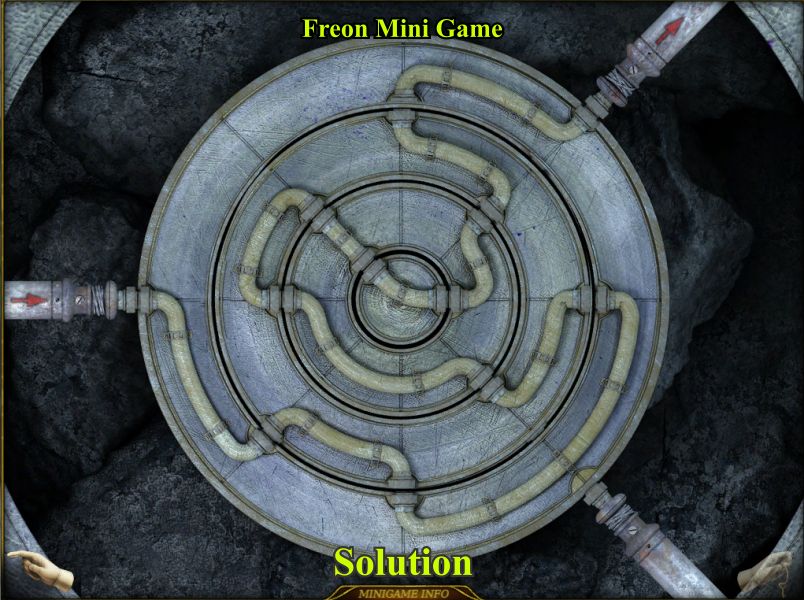
Freon Mini Game
You goal is to connect the pipes from the incoming Freon at the left so that it will flow out on the lower right pipe as shown in the solution.
Screenshot
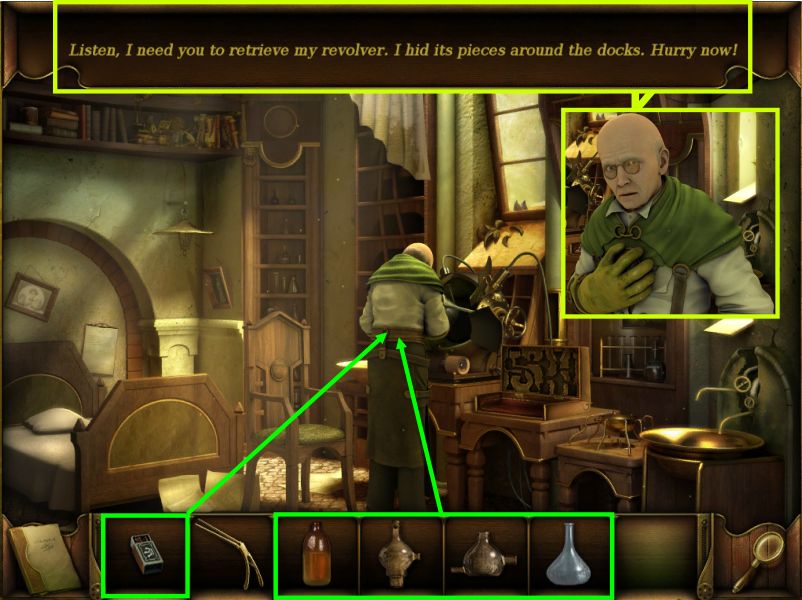
Revolver
Now that you have everything the Alchemist wanted, go back to see him.
Give him the matches, kerosene, 2 chemical beakers and the flask.
He asks you to go find the parts of his revolver hidden around to docks.
Screenshot
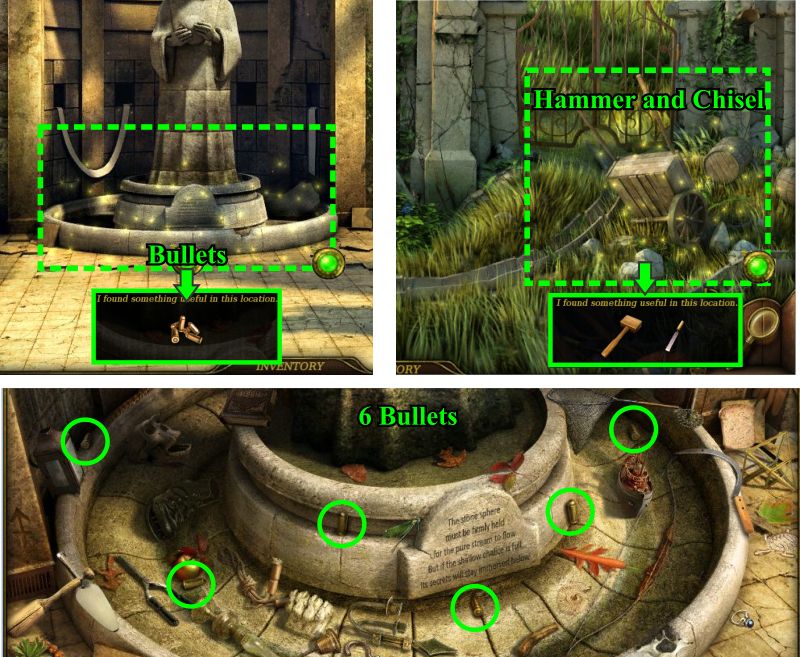
Go to the Courtyard and place the Hidden Object scene at the fountain to get the 6 bullets.
Go to the Park Entrance and play the Hidden Object scene to get the hammer and chisel.
Screenshot
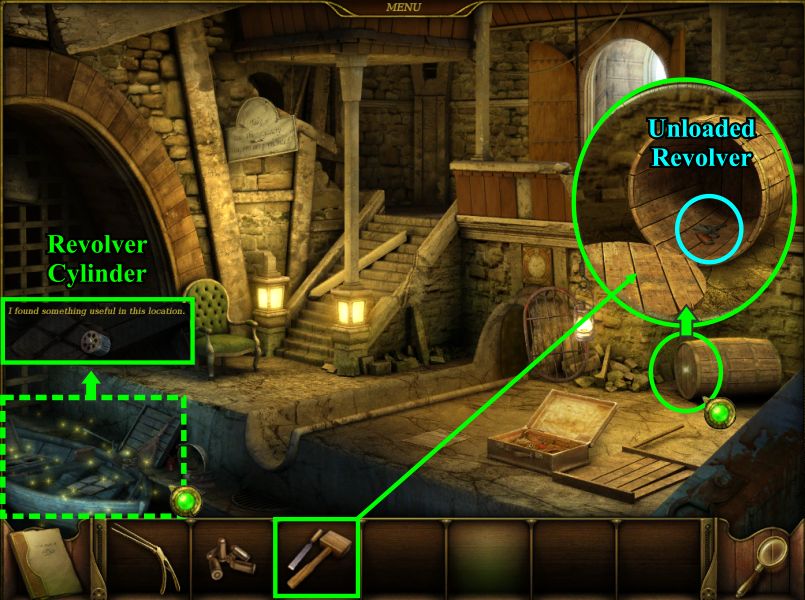
Go to the Dock and place the Hidden Object scene to get the revolver cylinder.
Click on the barrel and use the hammer and chisel to get the unloaded revolver.
Screenshot
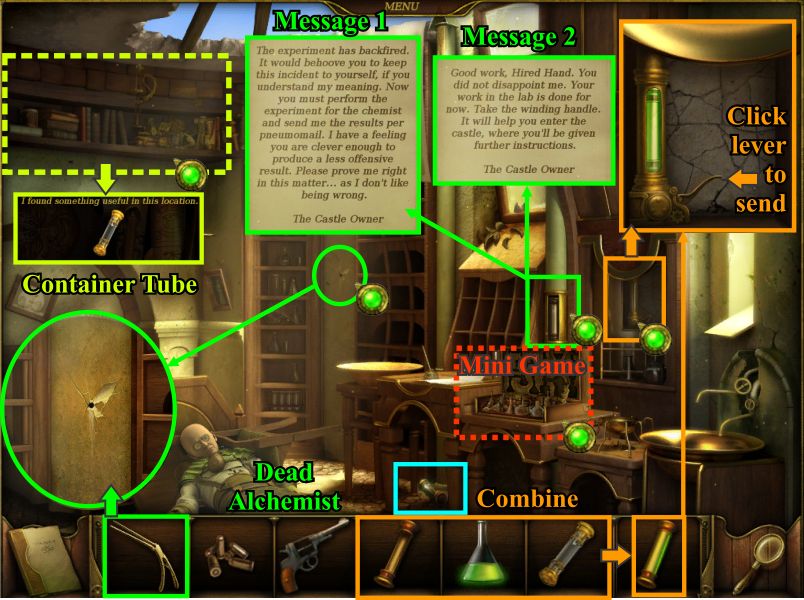
Death of the Alchemist
Go back to the Alchemist only to find out he is dead.
Click on the wall and use your forceps to remove the silver bullet.
There is a message from the Castle Owner that says he wants you to perform the experiment.
Play the Hidden Object scene to get a container tube and collect the tube on the ground by the desk.
Once you have the chemical combine the flask then with empty tube and then with the sending tube.
Click on the sending tube and place the chemical tube in it and click the lever to send.
Go back to the Courtyard and you will hear a noise so go back to the Alchemists and see that his body has been removed.
Don't forget to read the second message which will give you a winding handle to get into the Castle.
Screenshot
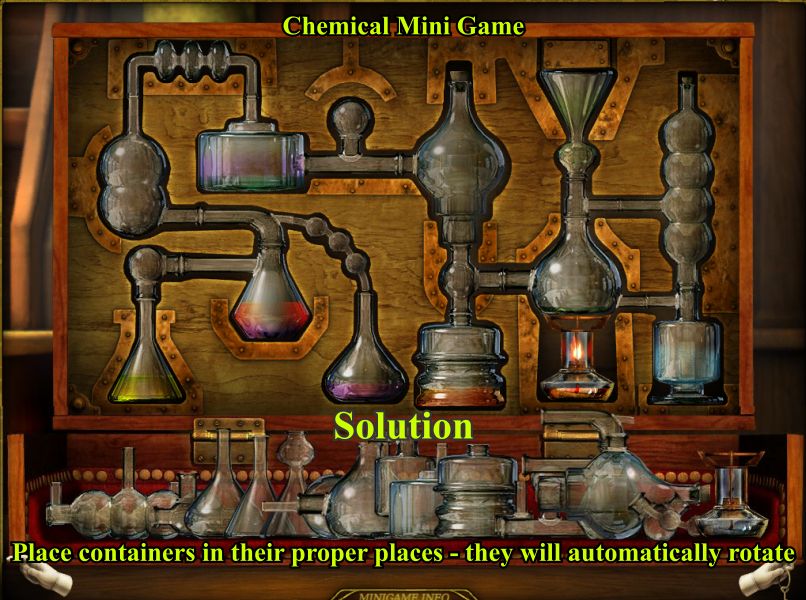
Chemical Mini Game
Arrange all the glass containers in the proper spaces.
They will automatically rotate to the needed shape when you pick them up.
When they are all arranged the chemicals will heat up and interact and you will get a flask of green liquid to send to the Castle Owner.
Screenshot
Open the Castle Door
Click on the right winding mechanism for a close up and place your winding handle and click to turn it.
The statue on the right will turn to face you.
Take the mask and click on the secret panel for a close up to take the gears.
Open the secret panel in the left statue and place the gears.
Click on the left winding mechanism for a close up, your handle and click to activate it so that the left statue will turn his back to you the bridge to the door will complete.
Click on the stone face above the door for a close up.
Enter the 2 Greek symbols from the right winding mechanism (delta and pi) and place the mask over the face.
Screenshot
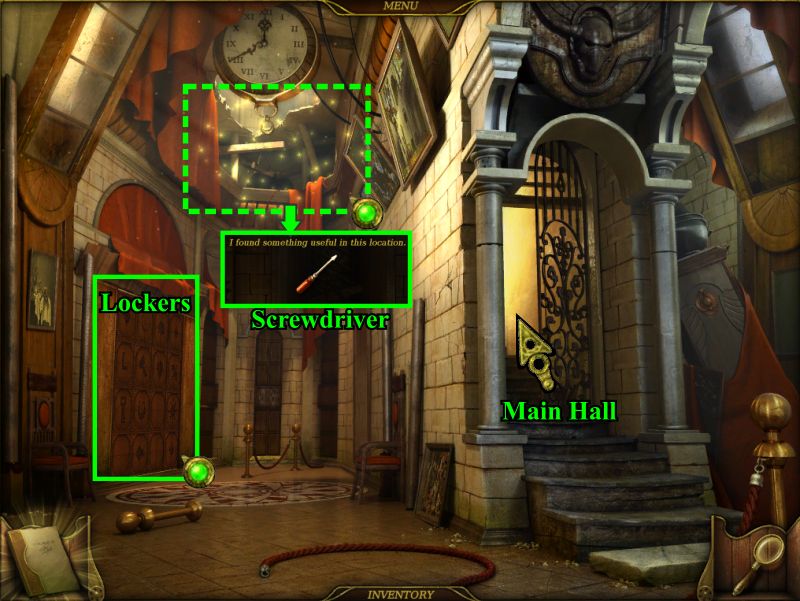
Castle Hall
Play the Hidden Object scene to get a screwdriver, note that the lockers are locked and go to the Main Hall.
Screenshot
Meet the Physicist
Talk to the Physicist who is trying to repair the elevator and needs a screwdriver and some wire.
Note that the Library door is chained shut and the indoor campfire before leaving to go see the Botanist in the Park.
Screenshot
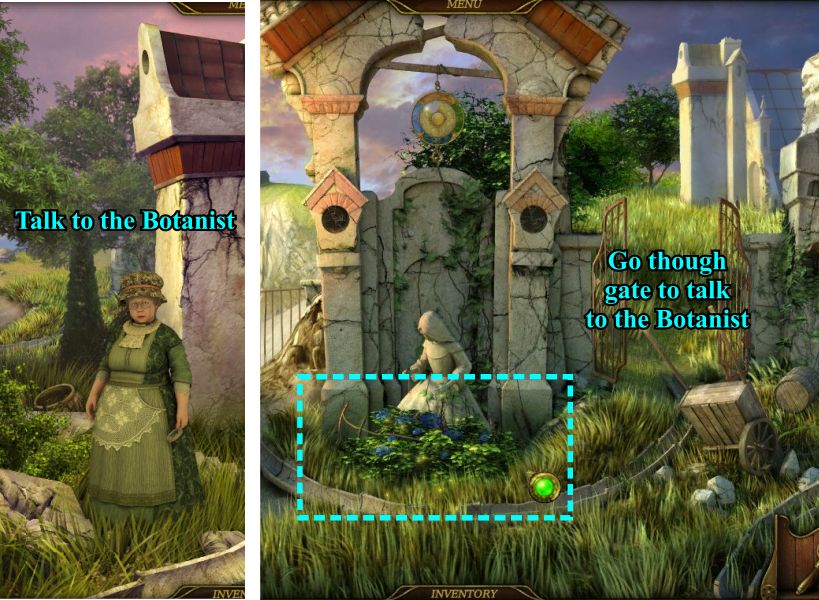
The Botanist's Reptilian Experiment
Talk to the Botanist who gives you a jar to bring her some frozen reptiles.
Click on the statue for a Hidden Object scene.
Screenshot
Collect all the reptiles shown and take the jar to the Freezing Chamber.
Screenshot
Storage and Freezing Chamber
On your way stop to play the Hidden Object scene in the Storage to get the wire for the Physicist and go into the Freezing Chamber.
Play the Hidden Object scene to get the pipe so you can place it as shown to stop the leak.
Screenshot
Check on the Dead Alchemist and click on the mini game to fix the Freon.
Now that the Freon is fixed, click on the chamber so you can place the reptiles in it and freeze them.
Open the door, place the jar inside, close the door and turn the valve.
When they are frozen open the door and take the jar of frozen reptiles back to the Botanist who will give you half of a heart.
Screenshot
Freon Mini Game
Once again the Freon needs to be connected so that it now flows from the left side to the top right side as shown in the solution.
Screenshot
The Physicist
Go back to see the Physicist, give him the screwdriver and wire and once the repair is done he tells you to get in the elevator.
He gives you the elevator key to his room that you need to place according to the paper on the wall and then press the red button.
Screenshot
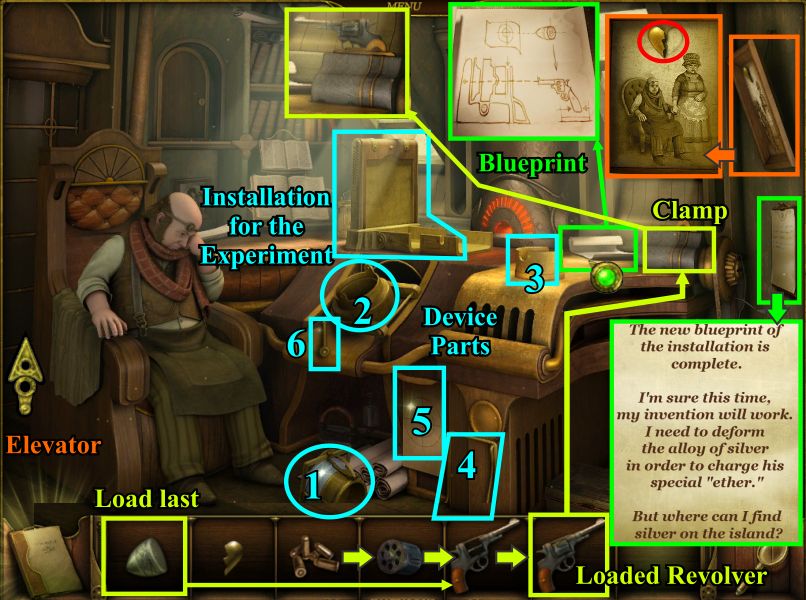
Physicist's Experiment
When you get to his room talk to him and he asks for your help in building an installation for his experiment.
Read the blueprints and the note on the wall.
Click on the picture of the Physicist and his ex-wife the Botanist and note the other heart half.
Place all the device parts as numbered on the Installation area.
Then put the bullets in the cylinder, the cylinder in the empty revolver to get a loaded revolver.
Lastly, place the silver bullet in the gun and the gun on the clamp.
Click on the gun to fire it and you will get the key to the kitchen so you can get him some soup.
Screenshot
Soporific Soup
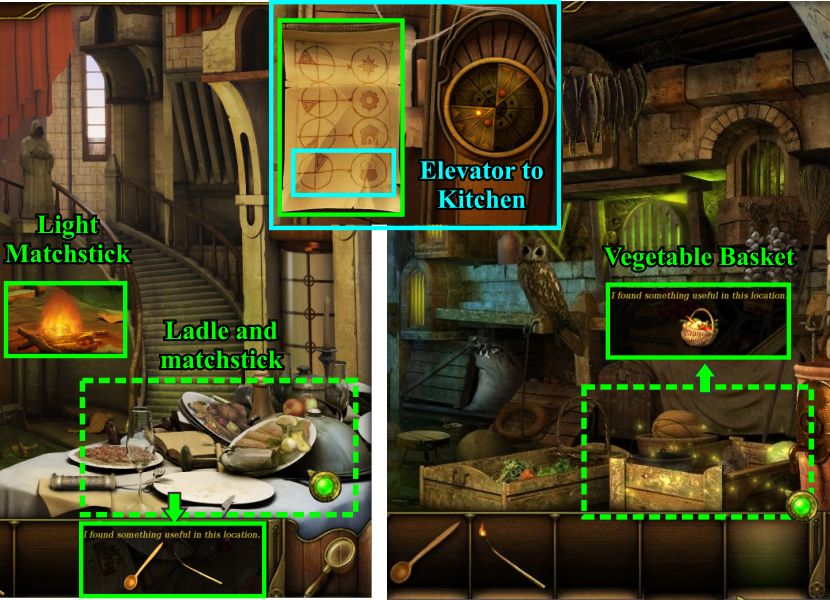
Go into the elevator and press the key with the red button to get to the Main Hall.
Play the Hidden Object scene to get the ladle and matchstick.
Light the matchstick in the fire and head to the Storage room.
Play the Hidden Object scene to get the vegetable basket and go back to the Castle.
Get in the elevator and install the key for the Kitchen and press the red button.
Screenshot
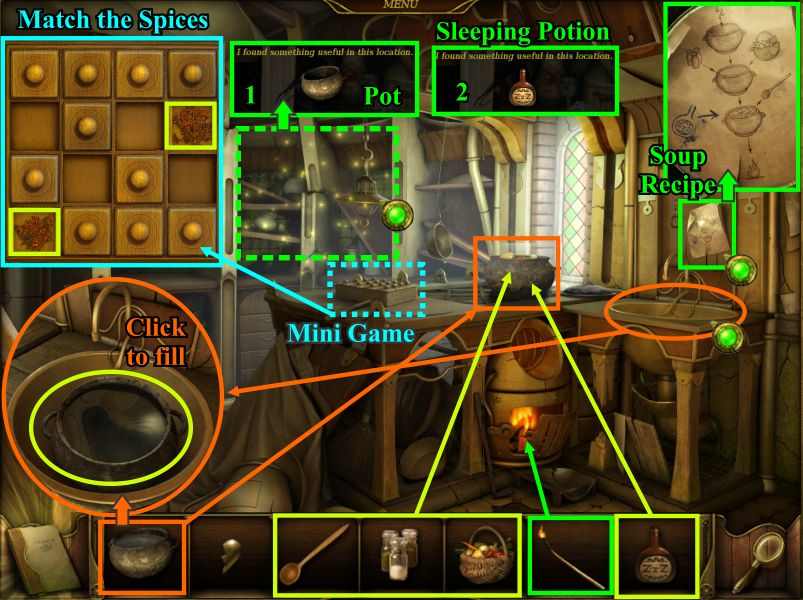
In the Kitchen
Play the Hidden Object scene to get the pot.
Place the pot in the sink and click on the faucet to fill it with water.
Place the pot full of water on the stove and light the fire chamber with your lit matchstick.
Click on the spice rack for a mini game and match the spices until the drawers are empty.
Put the vegetable basket and spices in the pot.
Play the second Hidden Object scene to get the sleeping potion.
Add the sleeping potion to the pot and stir.
Collect the pot and get in the elevator and click the key to go to the Physicist.
Screenshot
Give the Physicist the soup and when he is asleep click on the picture and take the heart half.
Take the elevator to the Main Hall and go to the Lockers.
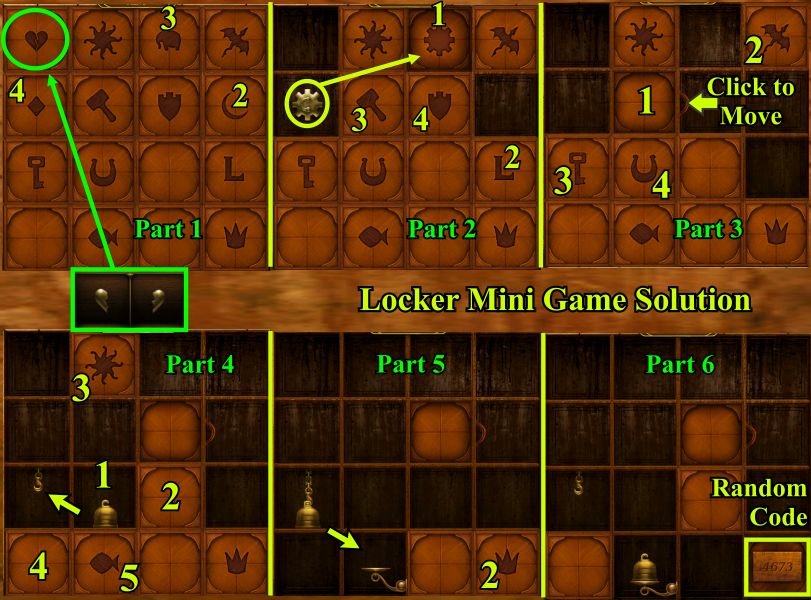
Locker Mini Game
Click on the locker to bring up a mini game and place the 2 broken heart pieces in the upper left corner.
The heart will change into a crescent moon so pick it up and place it on its shape to get an elephant.
Keep placing the shapes you get until there is a blank tile which needs to be moved by clicking on the tab to the right of it.
Continue place each item until you get a bell which need to go on the hook to the left that stayed when you moved the horseshoe and it will open another tile.
Keep placing until you see half of a scale then place the bell on it to reveal you random code for the Cryptex.
Screenshot
The Cryptex
Go to the Main Hall and pick up the Cryptex on the table for a mini game.
Use the arrow to enter your number from the Locker mini game.
Collect the plant bud and click on the broken chandelier for a Hidden Object scene to get the pump handle and go find the Botanist.
Screenshot
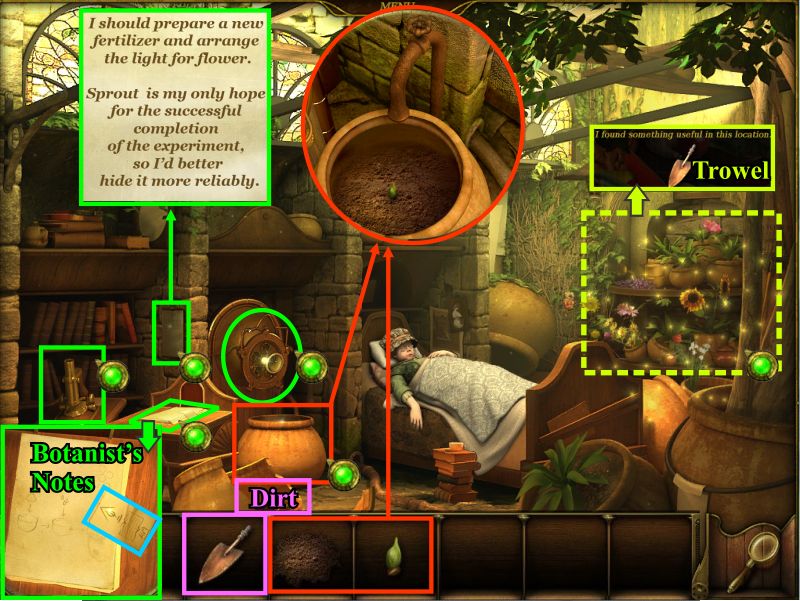
Poisoned Botanist
Go to the Park in search of the Botanist who is now in the green house and has apparently been poisoned.
The plant bud you have is the only thing that can save her so play the Hidden Object scene to get the trowel.
Read her notes and take the piece on the insert in the lower left corner.
Examine the microscope and plant light to see they are missing parts.
Use the trowel to get some dirt out of the broken pot and click on the available pot for a close up.
Put the dirt and plant bud in the pot.
Screenshot
The Shore
Go to the Park Entrance and through the gate on the left to the Shore.
Talk to the Magician and give him the note from the Botanist to get the keys to the Library.
Check out the chest and play the Hidden Object scene to get the telescope.
Screenshot
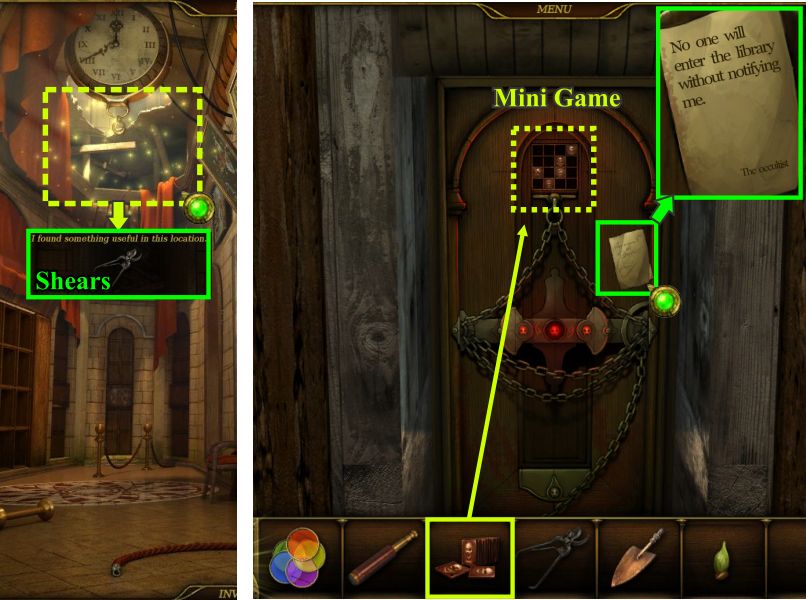
Castle Library
Enter the Castle Hall and play the Hidden Object scene to get the shears.
Go to the Library and read the note on the door.
Place the keys on the door to bring up a mini game to open the door.
Screenshot
Library Door Lock Mini Game
Some of the skull tiles are already in place so your goal is to arrange the rest of them to create a logical chain as shown in the solution.
Horizontal Row 1 has curved ruffs, Row 2 has "V" shaped ruffs, Row 3 has none, and Row 4 has straight ruffs.
Screenshot
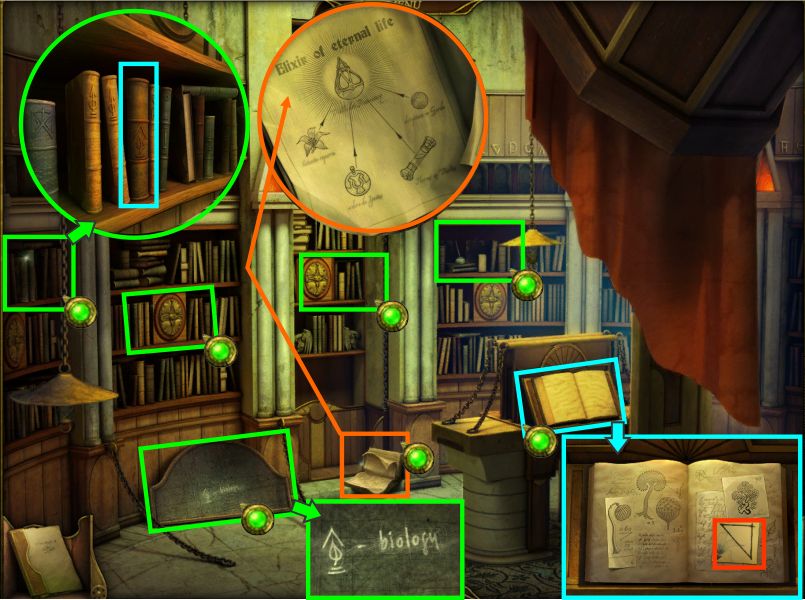
Check the chalkboard for the book you are looking for.
Check the close ups of all the shelves or just select the one in the screen shot to get the book you need.
Take the scrap of paper from its close up view and check the ancient book on the floor to read the page about the Elixir of Eternal Life.
Screenshot
Physicist's Box Mini Game
Take the elevator back up to see the Physicist and talk to him.
Give the Physicist the telescope and he will give you a microscope lens if you help him with his experiment so click on the box for a mini game.
Complete the first part as numbered and go to Part 2.
In order to move the ball to its destination you need to use the up, down, left, right levers in the lower right corner.
Screenshot
Part 2 of the Box game will take you to your final destination.
Leave and go to the Park.
Play the Hidden Object scene to get the glass shard.
Place the pump handle on the pump and click it to start the water flow.
Screenshot
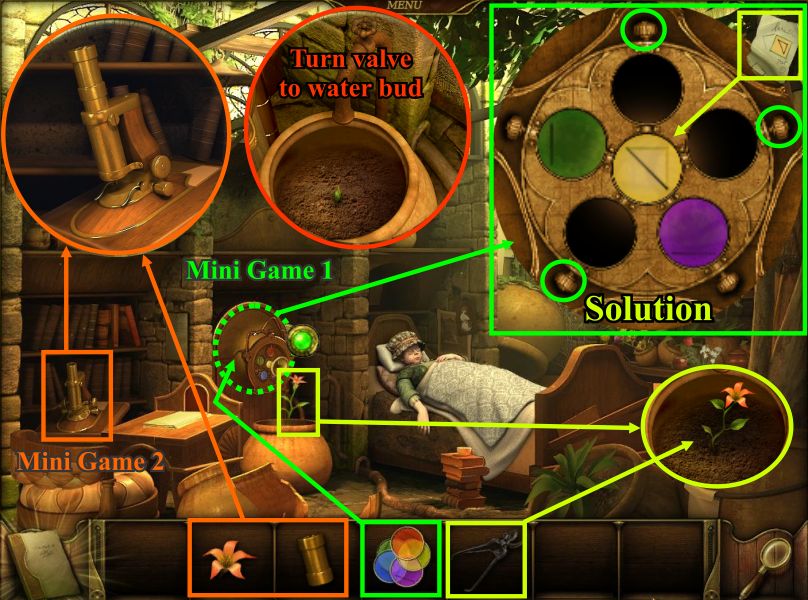
Glass Disks Mini Game
Go to the Park Entrance and place the glass shard on the colored glass disk for a mini game.
Arrange the inner circle so that the glass shards correspond to their proper element on the outer circle by swapping the shards.
When you have completed the game you will get the colored disks for the plant light.
Screenshot
Plant Light Mini Game
Go back to the Greenhouse and bring up the close up of the pot to water the bud by turning the valve.
Place the colored disks on the plant light for a mini game.
Once the plant bud grows use your shears to cut off the flower.
Click on the microscope for a close up and place the lens and flower on it for another mini game.
Screenshot
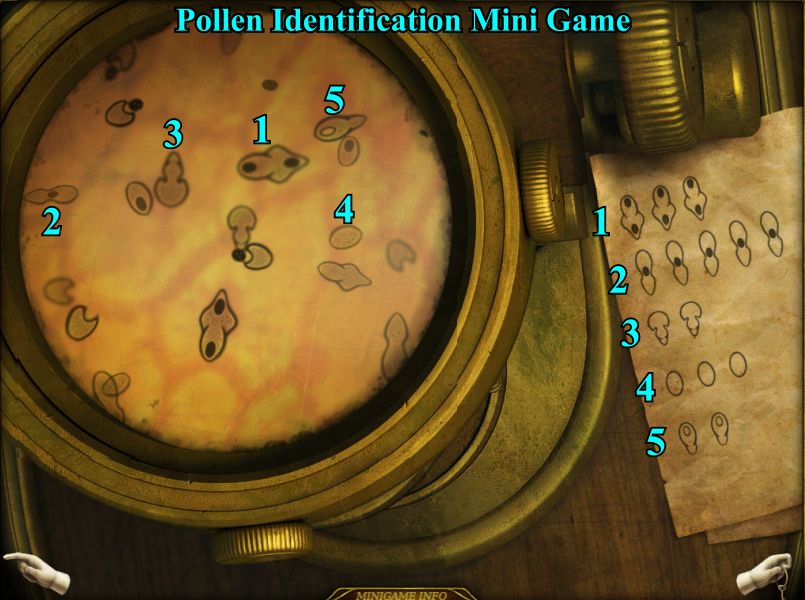
Pollen Identification Mini Game
The Botanist's note is on the right to so the different types of pollen.
Your goal is to capture 3 of the first one, 5 of the second, 2 of the third, 3 of the fourth, and 2 of the fifth to complete the game and get the remedial flower.
Screenshot
Death of the Botanist
When you finish identifying the pollen the Botanist has disappeared and the Magician is sitting on her bed with mail from the Castle Owner.
The mail says to give the magic flower to the Magician and return to your quarters because your work there is done so give him the remedial flower.
When you get to your quarters there is mail from the Magician who says to meet him at the Shore.
The Shore and Grotto
Go to the Shore talk to the Skeleton who demands the Master's seal on the contract and payment for the box he delivered before he will give it to you.
The Magician left the light on for you so enter the Grotto.
Play the Hidden Object scene in the pit to get the Golden Coins.
Notice there is something stuck in the statue and go to the Tunnel on the right.
Screenshot
The Tunnel
The delivery mechanism is missing a bell and the Master's Room is locked.
Play the Hidden Object scene to get the sealing wax and exit back to the Grotto.
Screenshot
Magician's Tower
Take the left exit to the Magician's Tower.
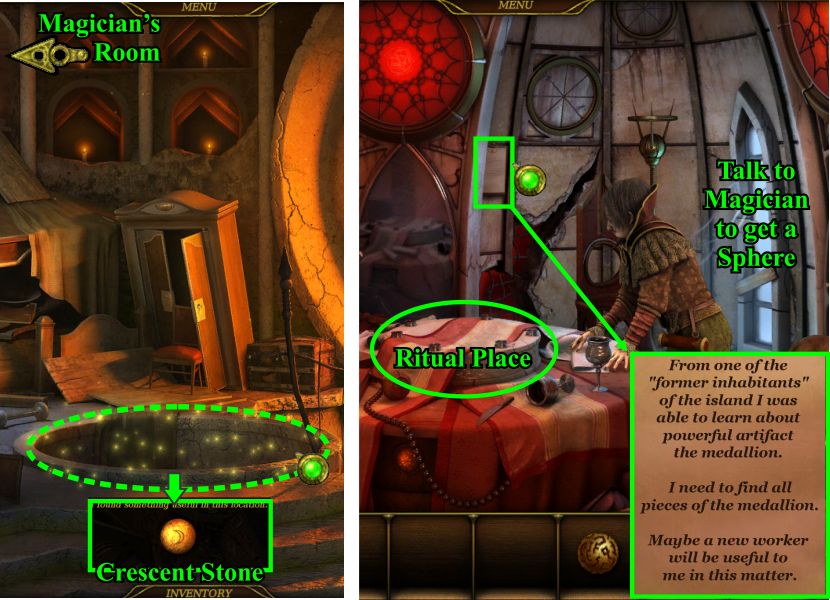
Play the Hidden Object scene to get the Crescent Stone and enter the Magician's Room.
He gives you a sphere that needs to be charged.
Read the note on the wall and not the ritual place.
Screenshot
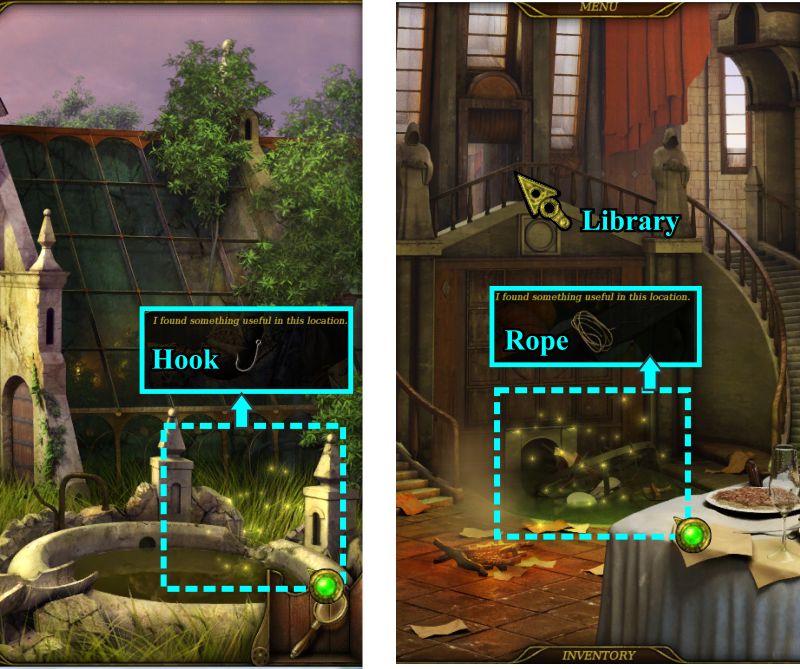
Go to the Park and play the Hidden Object scene to get the hook.
Go to the Castle Main Hall and click on the broken chandelier for a Hidden Object scene to get a rope.
Screenshot
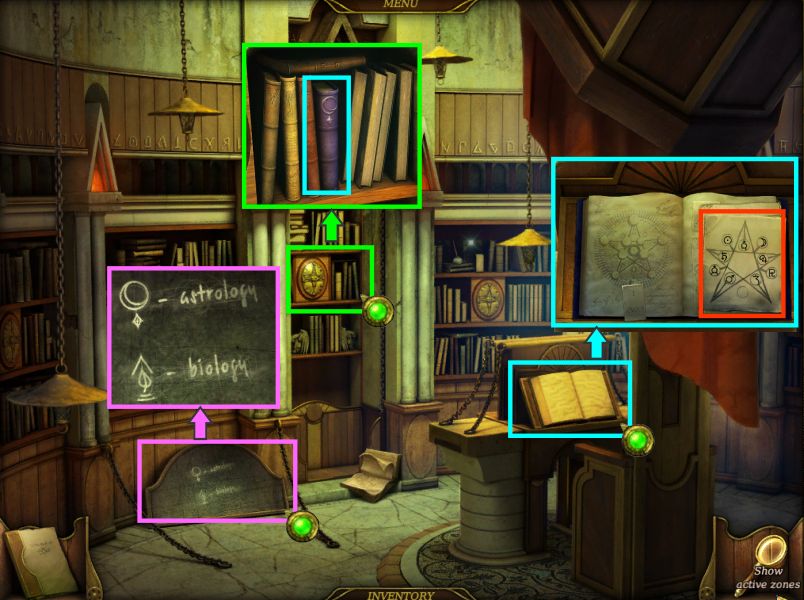
Enter the Library and click on the chalkboard to note the book you are looking for.
Click on the shelf shown in the insert and choose the book that is marked.
Click on the open book on the stand and take the piece shown in the insert.
Screenshot
Death of the Physicist
Click on the elevator to enter and find the dead Physicist.
Take the Observatory key from his hand and place it with the rest of the keys.
Click on it and enter the Observatory.
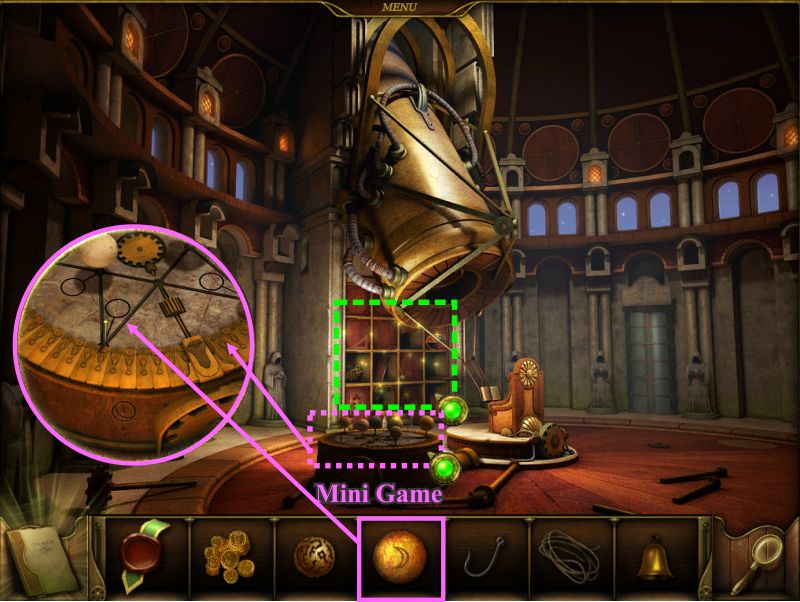
The Observatory
Click on the boxes for a Hidden Object scene to get the bell.
Check the plants under the boxes and place the crescent stone there to bring up a mini game.
Screenshot
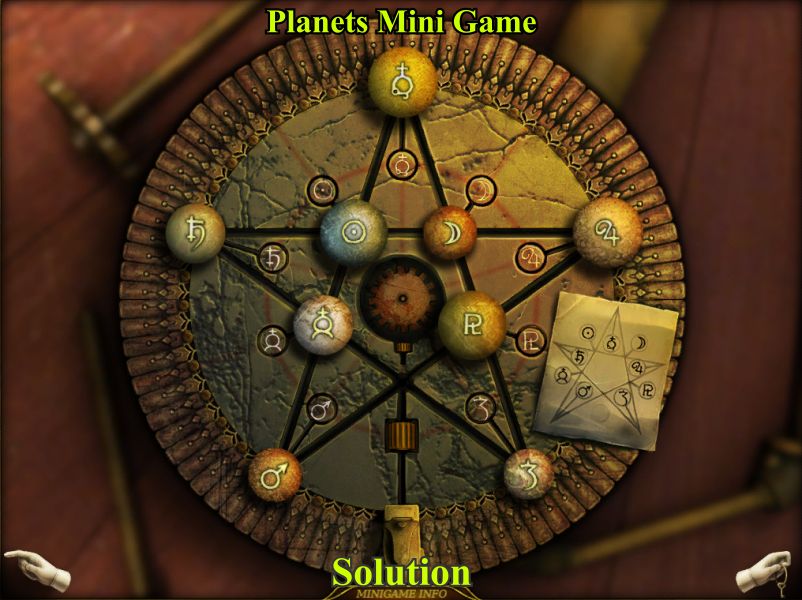
Planets Mini Game
Your goal is to arrange the planets according to the symbols on the Magician's note.
Slide the planets to an empty intersection and then rearrange them as shown on the paper from the book and on the inner circle of the game.
Screenshot
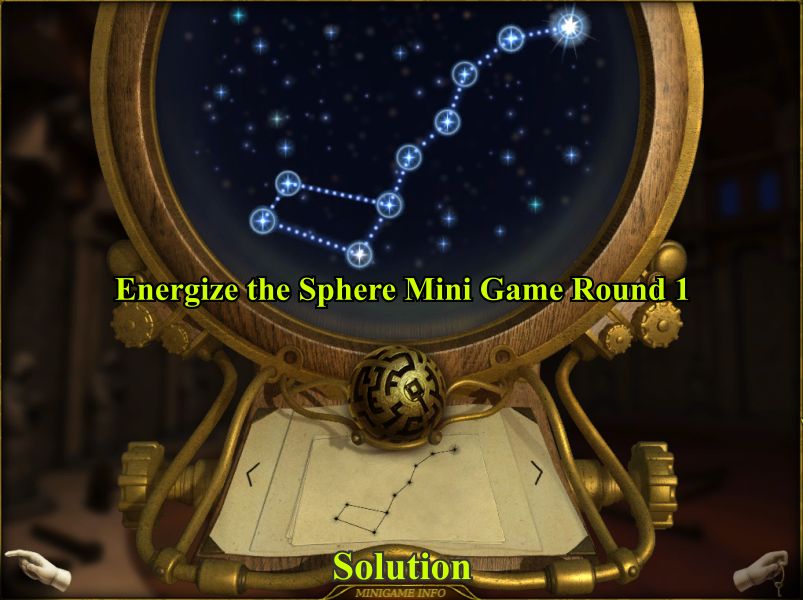
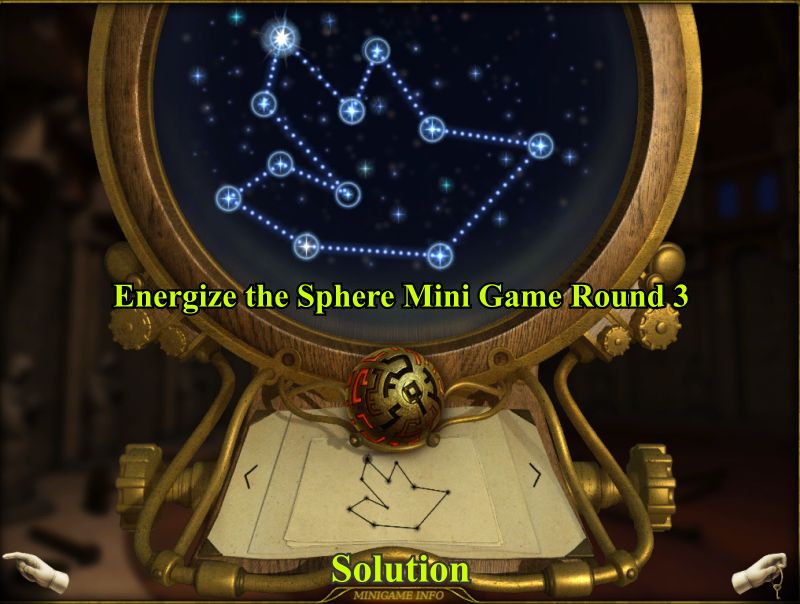
Energize the Sphere Mini Game
There are 4 rounds in the game with different patterns.
Connect the stars to form the pattern shown below the sphere.
The connection to the last start is automatic.
If you make a mistake, click on one of the arrows next to the drawing and the click the other one to come back to it.
Screenshot
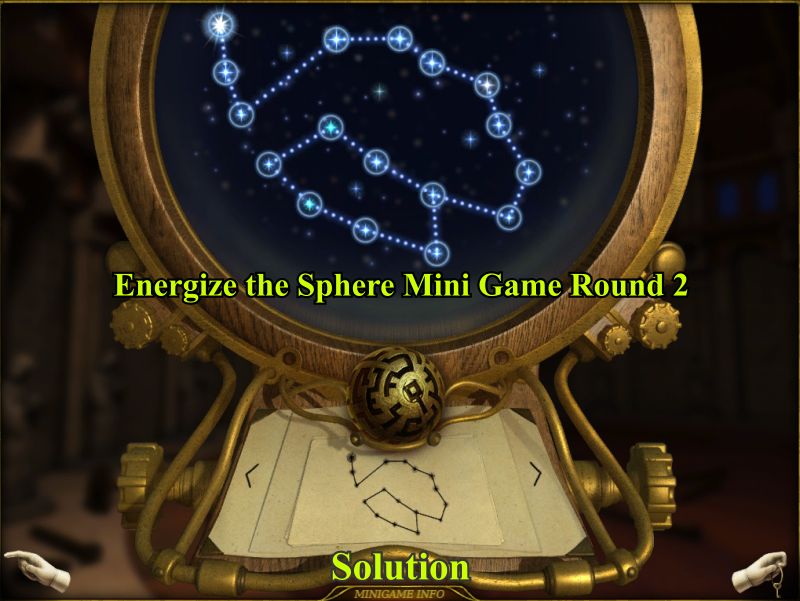
For Round 2 note that you need to past the star on the left to connect to the fourth star.
Screenshot
Round 3 can be connected in either direction but be sure to make the long connection on the right and past the star to the right.
Screenshot
Round 4 also has a star on the right that is ignored.
When you have completed all 4 rounds the sphere will be fully energize and go into your Inventory.
Screenshot
The Shore, Grotto and Tower
Go back to the Shore and enter the Grotto.
Click on the headless statue for a close up.
Combine the hook and rope in your Inventory and use it to pull out the seal ring.
Go into the Tunnel on the right and place the bell in the delivery system.
Click on the bells as shown in the diagram below them and collect the rose when the door opens.
Go back outside to see the skeleton and give him the coins.
Combine the seal ring with the sealing wax and click on the contract to place it.
Screenshot
The Medallion
Chest Lock Mini Game
The skeleton will give you some metal pieces for the chest next to him so click on it and place the metal pieces to bring up the mini game to open it.
There is more than one solution but your goal is to place the pieces in the top of the chest so that they are all used and fit together.
One of the solutions at the bottom shows the medallion piece that is inside.
Screenshot
Go back to the Park Entrance and click on the statue for a close up.
Place the rose in her open hand and she will release the medallion piece for you to take.
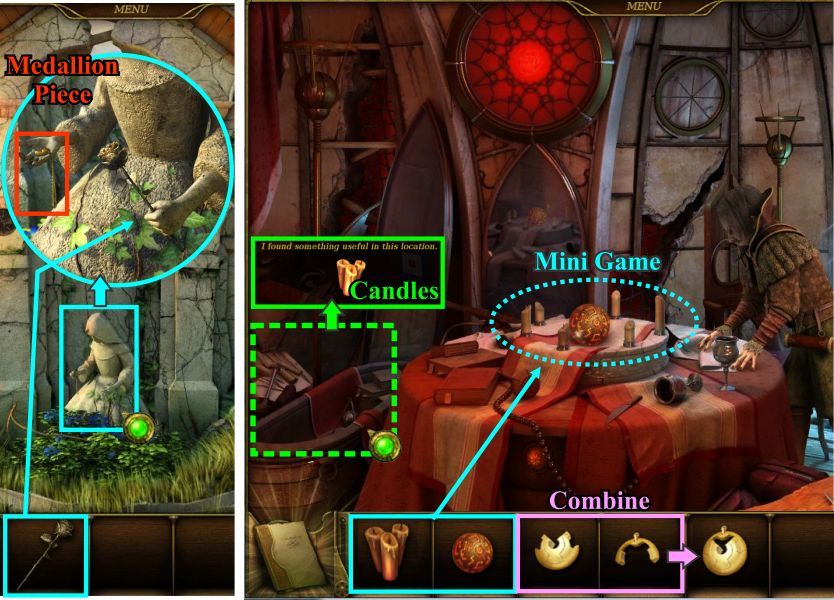
Go back to the Shore and up the Tower to see the Magician.
Play the Hidden Object scene to get the candles.
Place the candles and sphere on the ritual place for a mini game.
Screenshot
Ritual Mini Game
Your goal is to connect all the candles as shown in the Diagram.
If you make a mistake, there is a reset button to the left.
There is more than one way to make the connection but one solution is shown in the screen shot.
Screenshot
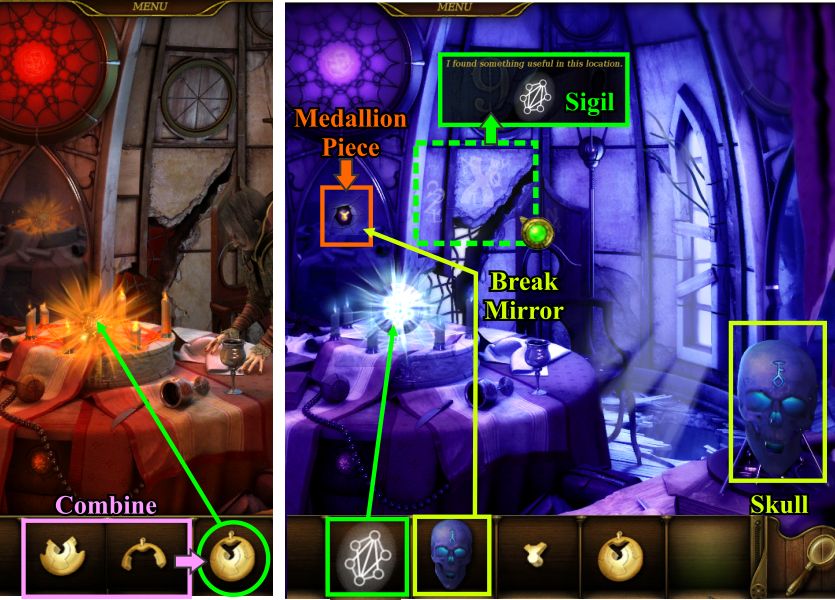
Through the Portal
Combine the 2 medallion pieces and us it on the sphere to activate the portal.
Go through the portal and play the Hidden Object scene to get the sigil which will open the portal to get you back.
Pick up the skull and use it the break the mirror to get the last piece of the medallion.
Place the sigil on the sphere and return to the real world.
Screenshot
Death of the Magician
Upon your return you find that the Magician is dead.
Click on the coffin for a Hidden Object scene to get the oilcan.
Combine the 2 medallion pieces you have and read the mail in the tube.
Go downstairs and click on the pit for a Hidden Object scene to get a wrench.
Screenshot
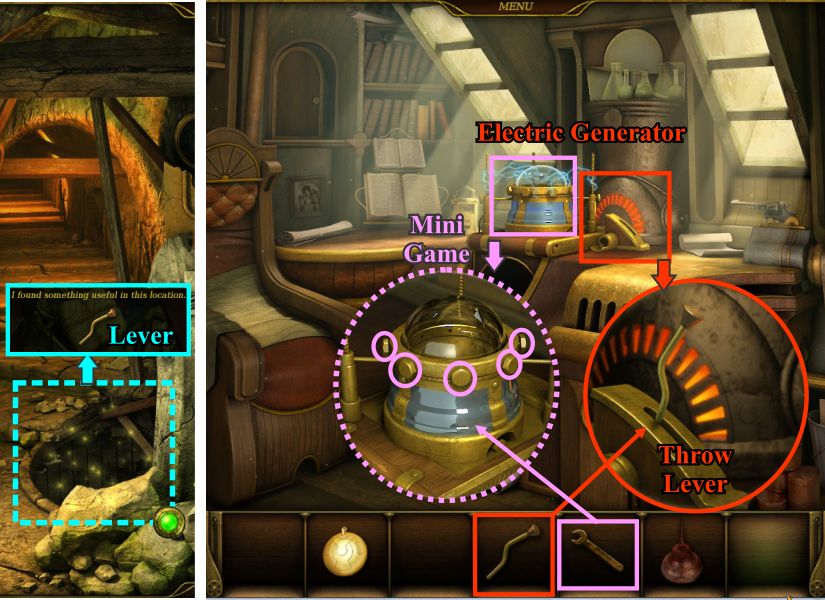
Physicist's Device
Go down to the Grotto and click on the pit there for a Hidden Object scene to get a lever.
Go to the Castle Main Hall, enter the elevator and press the button for the Physicist's room.
Click on the right part of the electric generator for a close up and place your lever.
Click the lever to shut off the electricity so you can get to the left part of the generator.
In the close up use your wrench on each of the 5 bolts to remove them and begin the mini game.
Screenshot
Charge the Iron Ball Mini Game
There is a left and right knob to rotate the board in order to move the ball through the maze to its destination.
To follow the path click on the knobs as shown in the screen shot: R, L, R, R, R, L, L, L, R, R, L, L, L, R, R, L.
Screenshot
Master of the Castle
Go to the Tunnel in the Grotto and through the door to find the Alchemist there pointing a gun at you.
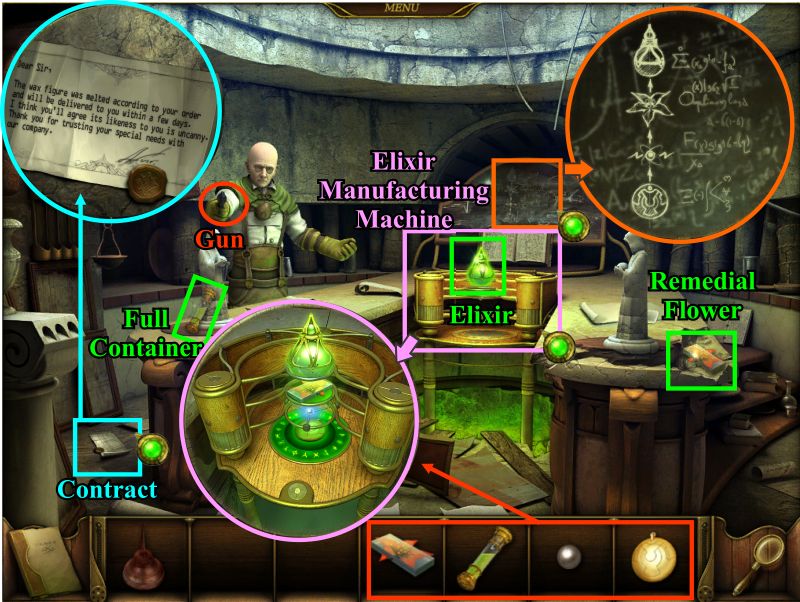
Collect the full container and the remedial flower.
Read the contract and chalkboard and then click on the Elixir Manufacturing Machine.
Place the 4 ingredients in the machine to create the Elixir: remedial flower, container, iron ball and medallion.
Collect the Elixir and drink it and the Alchemist shoots you.
Screenshot
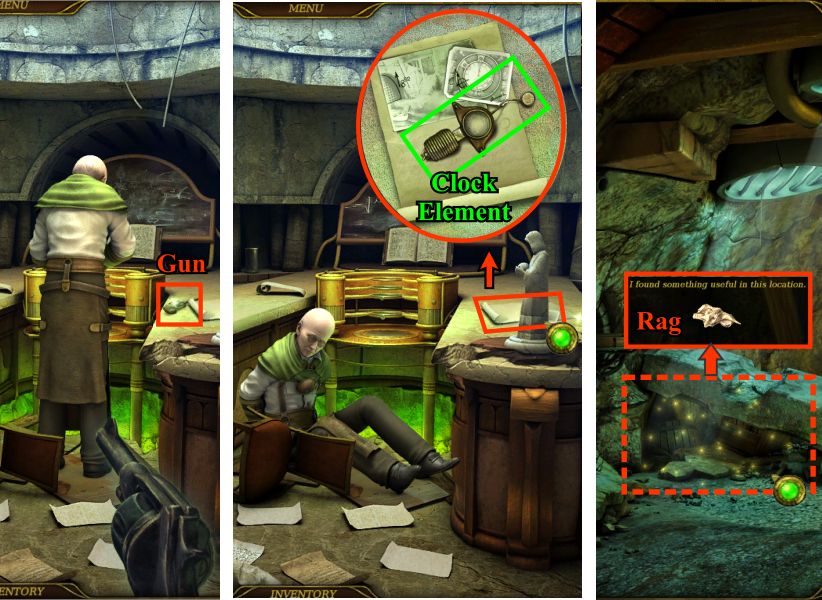
The Alchemist thinks he killed you so leaves the gun on the table.
Take the gun and capture the Alchemist.
Click on the paper behind the statue and pick up the clock element.
Go out the door to the Tunnel and play the Hidden Object scene to get a rag.
Screenshot
Born Again Scientists
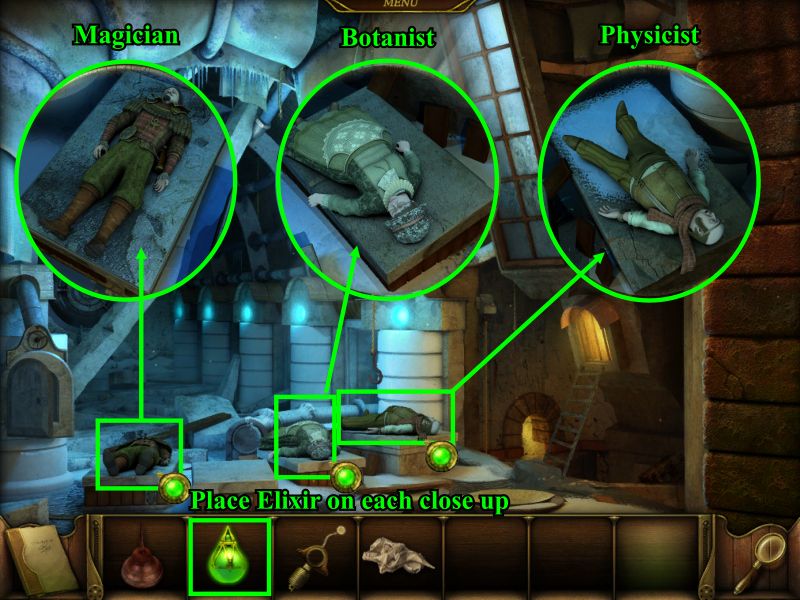
Head off to the Freezing Chamber with the Elixir.
Click on each of the bodies for a close up and give them some Elixir.
After they come to life again, everybody heads for the Dock.
Screenshot
Departure
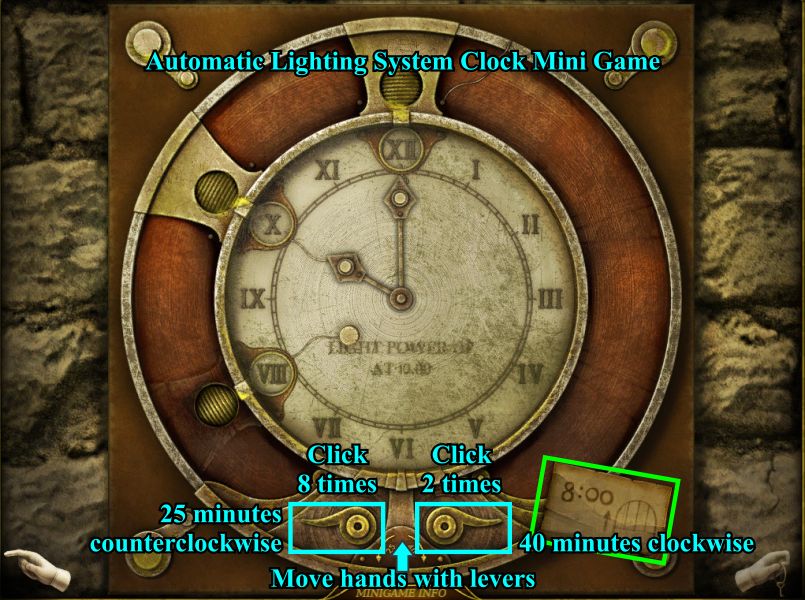
Click on the clock and place the element there for a mini game which will open the gate to the Lighthouse.
Screenshot
Automatic Lighting System Clock Mini Game
Your goal is to set the clock to 8:00 so click the left lever 8 times and the right lever twice.
Take the canal to the Lighthouse.
Screenshot
The Lighthouse
Play the Hidden Object scene to get a flint.
Take note of the rotation mechanism which is missing something.
Go up the stairs on the right to the Lighthouse.
Click for a close up of the post to the left and pick up the gear.
Go back downstairs and click on the rotation mechanism to put the gear in it and start a mini game.
Screenshot
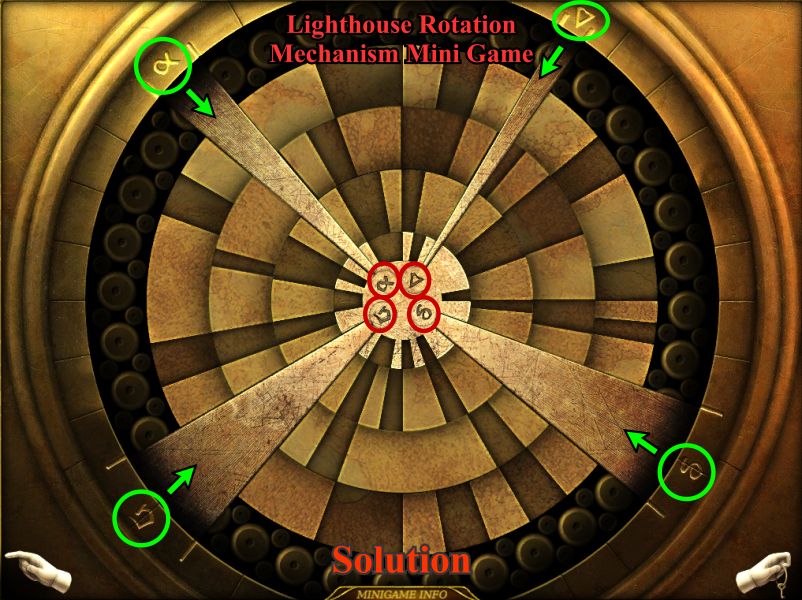
Lighthouse Rotation Mechanism Mini Game
You goal is to rotate the rings so the spikes drop down to reach their corresponding symbols in the inner circle.
Start from the outer circle and work your way to the center.
Each time you click on a circle it will rotate 10 degrees.
Screenshot
The Lighthouse is Lit
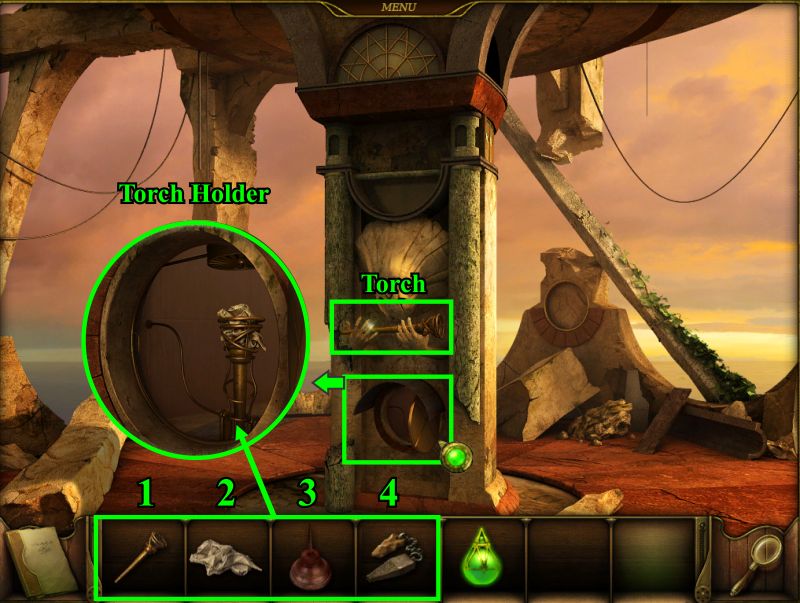
Go back upstairs to the Lighthouse and pick up the torch.
Click on the torch holder for a close up and put the torch, rag, oil, and light it with the flint or combine them first in the same order and then place the torch in the holder.
The captain has been signaled so go back to the Dock and wait for the boat.
Screenshot
Special thanks to Jazz for this kicking walkthrough!
Posted by: grinnyp |
August 23, 2010 2:14 AM
|
August 23, 2010 2:14 AM