
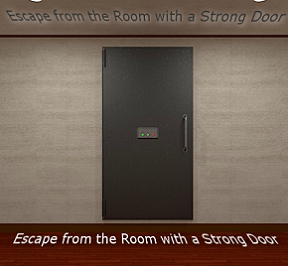
Escape from the Room with a Strong Door
![]() Long before pretentious hipsters and others got hold of them, tapas were basically bar snacks, small, salty bites meant to simultaneously soak up a little alcohol while making you thirsty for more. Small bites is what we're talking about here, little nibbles meant to whet the appetite. When it comes to room escapes, the tapas master (metaphorically speaking here) is Hottategoya, and they are here to tease our palates with a refeshing little bite called Escape from the Room with a Strong Door.
Long before pretentious hipsters and others got hold of them, tapas were basically bar snacks, small, salty bites meant to simultaneously soak up a little alcohol while making you thirsty for more. Small bites is what we're talking about here, little nibbles meant to whet the appetite. When it comes to room escapes, the tapas master (metaphorically speaking here) is Hottategoya, and they are here to tease our palates with a refeshing little bite called Escape from the Room with a Strong Door.
Yes, Escape from the Room with a Strong Door is the perfect equivalent of a bowl of beer nuts, an addicting little nibble that makes us hungry for more. The game is pretty stripped down, involving a stark room with the aforementioned strong door, one piece of furniture, a wastebasket, and two pictures on the wall. Using the usual bars to navigate the room you must solve the three puzzles contained within using only your wits and the two (yes, just two!) inventory items you can find. Even for Hottategoya (Escape from the Room with 3 Medals, Chikarou 5) this is pretty bare stuff, yet pretty entertaining.
The downsides, aside from the too short length are that the puzzles are all in color which can make life difficult for certain segments of the population if they find themselves locked into this quiet little room. Despite the shortness, Escape from the Room with a Strong Door is a well-designed and delicious appetite stimulator, leaving the gamer hungry for more.


Walkthrough Guide
(Please allow page to fully load for spoiler tags to be functional.)
Escape from the Room With a Strong Door Walkthrough
Lock 1
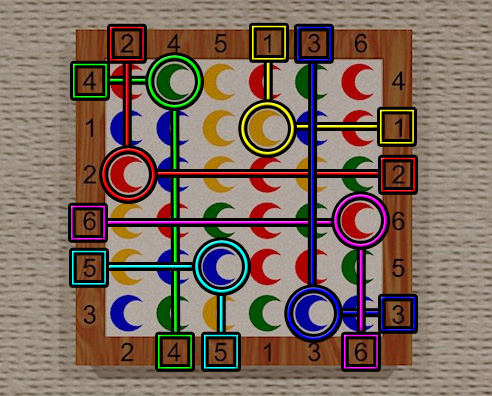
You start facing the locked exit door. Turn left once towards a framed picture on the wall with multi-colored moons.
Click the picture to zoom in.
Take a look at the numbers from 1-6 on the frame beside each row and column of colored moons.
Back out and turn left twice to face the small bookshelf. Click the bookshelf for a closer look.
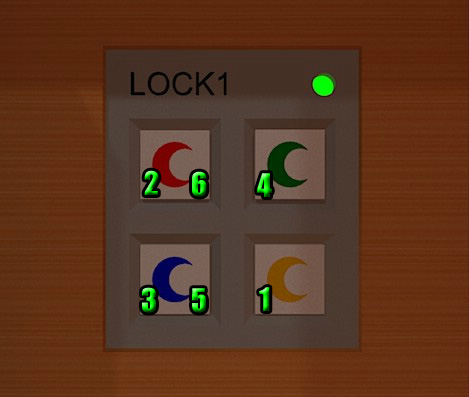
Move the stack of books on the third shelf down to reveal Lock 1. Click the lock to zoom in
Note how the buttons on the lock have the same colored moon symbols as the ones from the picture. Now you only need to find the order to press them.
Go back to the moon picture and use the numbers on the frame like a set of coordinates to find the correct order of moons.
Start at 1,1 - look for the point where row 1 intersects with column 1.
Where they cross you will find a yellow moon.
Repeat the process to find the remaining moons.
1,1 is Yellow
2,2 is Red.
3,3 is Blue.
4,4 is Green.
5,5 is Blue.
6,6 is Red.
Screenshot.
Return to the lock in the bookcase.
Press the colored moon buttons in the order you found from the picture to open the lock: Yellow - Red - Blue - Green - Blue - Red.
Screenshot.
When the lock is open, you'll hear a clicking sound and the light will switch from red to green.
Lock 2
Back up once to the full view of the bookshelf, then click the top of the bookshelf to zoom in.
Pick up the note with the colored triangles.
Inspect the item in your inventory to see that inside each triangle is a number split in half. Keep that in mind, it will come in handy very soon!
Back out twice then turn right once to face the trash can.
Click the trash can for a closer look, then click it again to move it aside, revealing Lock 2 in the floor.
Inspect Lock 2 and note that above each number is a colored diamond.
From the middle shape, you can tell that each diamond is made by combining two triangles.
Now you can use the triangle note in your inventory to find the correct combination.
The first shape is a blue diamond, so visualize the two blue triangle halves combined to make a complete number.
Blue + Blue = 8.
The second shape is a red triangle on the left side and a blue triangle on the right side.
Red + Blue = 3.
The third shape is made of two yellow triangles combined.
Yellow + Yellow = 5.
Now that you've found all three numbers, enter the combination 8-3-5 to open the lock.
Screenshot.
When the lock is open, you'll hear a clicking sound and the light will switch from red to green.
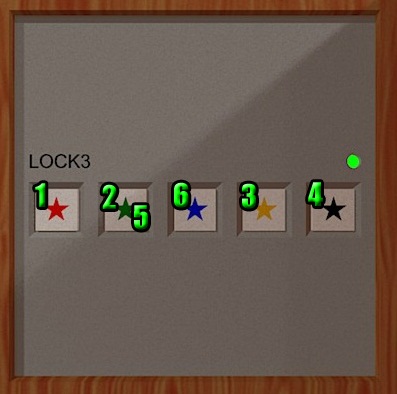
Lock 3
Back up once to view the trash can again, then click the top of it to look inside.
Take the piece of paper at the bottom of the bin.
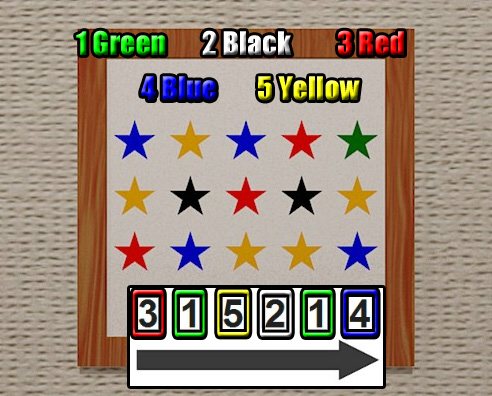
Inspect the paper in your inventory and note the star above the row of numbers.
Back up twice for a full view of the wall, then click the framed picture of colored stars hanging on the wall to zoom in.
First count the number of stars of each color.
There are 5 yellow stars, 4 blue stars, 3 red stars, 2 black stars, and 1 green star.
Next, take a look at the star note in your inventory again and take another look at list of numbers at the bottom: 3-1-5-2-1-4.
Substitute the numbers on the note with the colored star in the picture that has the same amount.
For example, the first number is 3 and there are 3 red stars, so Red = 3.
Continue that process to find the color represented by each number.
The final order is Red (3) - Green (1) - Yellow (5) - Black (2) - Green (1) - Blue (4).
Screenshot.
Back up and turn right once to face the moon picture again.
Click the picture once to zoom in, then click it again to remove it from the wall and reveal Lock 3.
Press the buttons in the order you found from the star picture to open the lock.
Screenshot.
When the lock is open, you'll hear a clicking sound and the light will switch from red to green.
Move back twice and turn right to face the exit, then click the door to escape.
Thanks to Trinn for the walkthrough!
Posted by: Mike |
September 20, 2012 11:13 AM
|
September 20, 2012 11:13 AM