
Face Noir
Platform: Windows

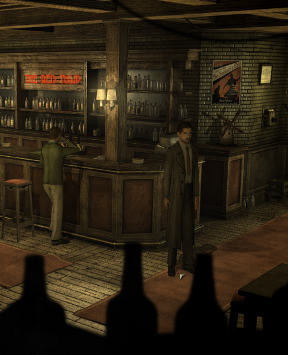
![]() It's tough being a P.I. Especially during the great depression when there's never enough cash to go around. Explore the dreary streets of New York City during the depression era in the beautifully atmospheric adventure game Face Noir, from Mad Orange. You play Jack del Nero, an ex-cop turned private eye. An anonymous phone call in the middle of a stormy night leads to you being falsely charged with murder. With a police chief determined to see you behind bars, how can you clear your name?
It's tough being a P.I. Especially during the great depression when there's never enough cash to go around. Explore the dreary streets of New York City during the depression era in the beautifully atmospheric adventure game Face Noir, from Mad Orange. You play Jack del Nero, an ex-cop turned private eye. An anonymous phone call in the middle of a stormy night leads to you being falsely charged with murder. With a police chief determined to see you behind bars, how can you clear your name?
 Point-and-click to make Jack walk or to investigate objects. Right click to change the mouse icon for different interaction choices. Mouse over the top of the screen to make the inventory bar appear. Alternately if you visit the options menu, you can change to a 3-D type inventory in which case you hit the [spacebar] to open your inventory. You can examine any items you pick up, or try to use them with each other or objects or people on the screen. If you are having a hard time finding all of the hot spots, press [F1] or click the question mark button next to your inventory. This is a nice feature as it allows the background items to blend in while eliminating pixel hunting. You can also click through conversations if needed.
Analysis: Face Noir does an excellent job at immersing you in the game world. There are interactive close up scenes which let you feel more involved in the action. For example instead of just clicking a switch to flip it, you may have to use the motion of your mouse to push the switch in the right direction. While the animation is nothing to write home about, the detailed backgrounds are lovely. The grimness of each scene helps you feel like you are there, and the soundtrack is worthy of any noir film. As you examine your surroundings, you pick up clues that help you later in the game. During certain conversations or scenes the screen will pop into detective mode. Here you have to pick out the two clues relevant to the situation in order to make a deduction about things. It really forces you think like a detective and is a unique concept I haven't seen implemented before.
 The very linear gameplay can be frustrating at times. Occasionally your next move may seem obvious, but there will be one other little thing the game wants you to do before it lets you move on. So don't automatically assume you can't do something later just because you couldn't do it before. The voice acting and dialog overall are good, but they definitely have rough patches along the way. Jack's back story is slowly revealed as you play, which is just one of the intriguing mysteries in the game. Despite a few flaws, Face Noir is quite an adventure, and one that will draw you in if you'll let it.
![]() Windows:
Windows:
Download the demo
Get the full version
Get the full version (part of the #IndieSupport Bundle)
![]() Mac OS X:
Mac OS X:
Not available.
Try Boot Camp or Parallels or CrossOver Games.


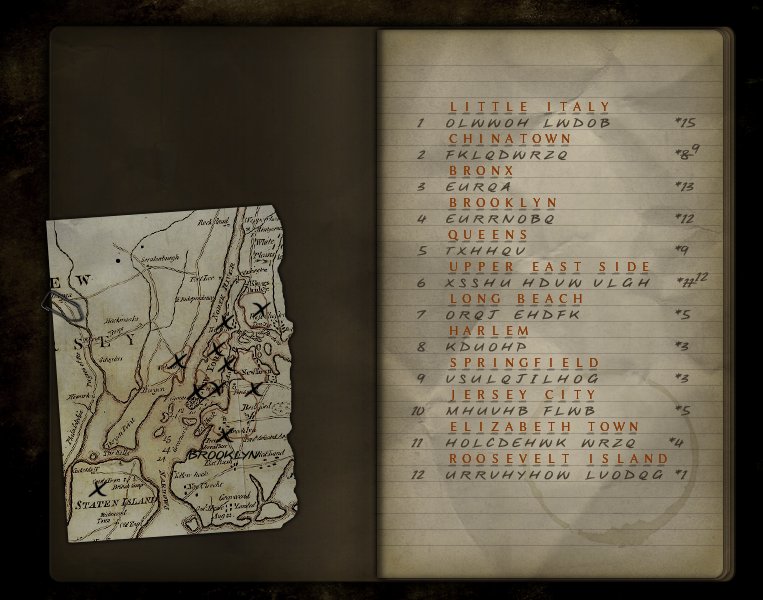
Walkthrough Guide
(Please allow page to fully load for spoiler tags to be functional.)
Face Noir walkthrough
Last Heaven Hotel
Enter the hotel. Talk to the cagey manager.
Give him money. He'll talk, but has nothing to say. Head outside.
Take a look at the movie poster under the marquee to refresh your memory.
Go back inside the hotel and talk again to the clerk. Say you have a question.
Thinking mode! Connect "Susan's passion" with "Hotel guest."
Go upstairs and listen in on Room 313.
Look at the little panel next to the trash can near the floor.
Click and hold the left mouse button, then click the right button to jam it open.
Click and drag to open the panel, then use the thermostat for Room 313 to turn up the temperature.
Go outside and into the alley. Notice the open hotel room window.
Use the lockpicks in your inventory on the gate to open it. Click and drag the left pick until it clicks. Keep doing so until the lock opens (or just skip this minigame).
Examine the dumpster at the far end of the alley. It has brakes, but you need to redirect it before you release them.
Pick up one of the metal bars near the service entrance to the theater. Use it with the grate furthest from the dumpster.
Use the dumpster to send it near the fire escape. Use it again to climb up.
Use your camera with the open hotel window. Aim your shot to get your evidence.
Use the ladder to climb down the fire escape, then leave the alley. Use your car (parked near the theater). Oops, out of gas.
Go inside the hotel and ask the manager for a phone. You now get to fix his phone.
Go outside and examine the utility box near the alley entrance. Sabotage! You need something to repair the wire. Go back into the hotel. Take a candy from the candy dish on the table in front of the desk.
Go back outside, examine the box, and use the candy on the cable. The wrapper should do the trick.
Go back inside and ask the manager about the phone again.
The Red Tulip
Go inside the Red Tulip. Walk up to the barfly, who will start a conversation. It's Smiley, the oily Lorre-esque toad! Finish the conversation with him and note the interesting phone call he'll receive at midnight.
Go to the end of the bar and talk to Greta. You need a darkroom to retrieve your film before returning your camera.
Go outside and use the camera on the dark alley to get your film.
Go inside and give the camera to Greta. She's not in the mood to serve drinks, because of Smiley's unctuous presence and because there are no tunes.
Look at the newspaper on the bar table (it's the same as the one at Last Heaven Hotel). Note the article about telephone service.
Talk to Smiley. Connect "Smiley's appointment" with "Storm outages." Smiley leaves.
Use the radio. Click and drag the knobs to operate it. Turn it on, set the radio to FM and the tuner to the middle of the dial until music starts.
Talk to Greta. Show an interest and ask about the tavern, and about Greta's past. Then ask for a drink and say "Not even for a fan of the Flying Dutchgirl?"
Jack's apartment
Stumble around in the dark and use the proper hotspot to find the switch. Use the "?" tool in your inventory if you can't find where the hotspots are.
Look around the apartment/office if you'd like. The envelope under the door is an eviction notice.
Use the bed to fold it away, then enter the door behind it.
The gun is in the lockbox, on the shelf above the mop and pail. You need a combination. It's written somewhere in the office, outside the darkroom.
Look at your investigator's license, hanging on the wall to the right of the bathroom. Note the investigator's number.
8172
Use the lockbox and enter the combination by clicking and dragging the numbers. Take the gun.
You still need bullets: they're on the shelf next to the door, opposite the shelf your gun was on. Use the shelf and pick them up.
Leave the apartment, exit the lobby (to the left of the desk), and go down the alley where there's a parked cab. If you go the wrong way, just go up the street from The Red Tulip.
Talk to the cab driver. He's on break and tells you to call the cab company.
Take his advice: Go home and use your phone to call the cab company.
The agent says that the only driver in the area has gone missing. That's odd.
Go back to the cab driver and tell him what the cab company receptionist told you.
Say "something's fishy." Connect "Cab driver on break" with "Missing cab driver."
Success! And it only took blackmail and a blind eye towards malfeasance.
Melville Port
Walk to the right towards the port entrance. Jack is rightly suspicious.
Look at the phone for a clue.
After the cutscene, try using the phone to call the police. The line's been cut.
Continue down the port entrance. It's too dark to see, but there is a utility box to the right of Jack.
Use it. Click and drag to open the box. Using the switch does nothing, but there is a flashlight in the door; pick it up.
The flashlight has no batteries. Go back to the dock and check out the buoy. You need a way to reach it.
Go back to where the cab was and look at the crates. Pick up what's inside: It's a piece of piping.
Use the piping with the red bucket of pitch, to the right of the phone.
Use the pitch-filled piping with the stick on the ground, on the right side of the screen.
Pick up your new hooked stick. If you can't, it's because you haven't done all the steps above.
Use the stick on the buoy. Use the buoy to get the batteries for your flashlight.
Go back to the port entrance and use the flashlight on the darkness.
Hoboken Police Department
You have to answer Malone's questions. Honesty is good, plausibility is better. If you get it wrong, Malone will just ask you again. The answers:
It was a guy with some information about one of my cases.
Information on a person I'm looking for.
I took a cab.
I paid the cab driver to say nothing.
No, no one was there.
I took a look around.
I heard some noise.
MacLeane's body.
At this point you can pretty much deny away. Malone is going to keep you locked up until he "finds" his evidence.
Just wait a few moments until you hear from the guard that someone's paid your bail.
First check the personal effects box near the door. Open it and claim your stuff, including Sean MacLeane's flask. Then head for the door.
Talk to the desk officer and ask who paid your bail.
Head upstairs. Watch the conversations and cutscenes.
Talk to Victoria. Exit and go downstairs.
Talk to the cab driver. When you hit a wall, go upstairs and talk to Victoria. Ask about the driver.
Go downstairs and talk to Chon. Make a deal, and connect "Chon the whiner" with "Chon won't talk."
Ask about the cab. You'll get a very partial license plate number.
Talk to the desk officer and ask about the cab. Find out you need a particular form, the license plate number, and the investigator in charge's signature.
The officer has a list of license numbers, but you'll have to get rid of him. Ask to speak to Malone.
The officer leaves. Use the entrance to the desk to take a look at his list.
Remember what Chon said when you asked him about his license number:
The only license number that ends in CI is RP834CI. Look at it to get the number
When the officer comes back, you can choose to speak to Malone, but you don't have to.
You still need a name for the head investigator. Look at the plaque behind where Chon is sitting.
Look at the name of the head investigator: Paul Sanders
Now go upstairs. Use the rack of forms near the top of the stairs.
Select the form you need:
B26 (since it was seized in an investigation, as the desk officer mentioned)
Now pick a name to sign:
Paul Sanders, the name on the award plaque
Go downstairs to give the form to the desk officer. He balks, so give him some money to pacify him.
Talk to Chon. Watch the cutscene.
Melville Port
Walk right. Watch the cutscene.
Use your lockpicking tools on the car nearest Chon's cab. Play the minigame, or skip.
Turn the radio on. Set the frequency dial to the right frequency. If you looked at the large officer assignment board upstairs at the police station, you know who's the officer on patrol at Melville Port. You can ask Chon to take you back to the station, or just look at the answer below:
Glasser - Soul, frequency 376
Hit the "transmit" switch, ask the officer to come home, then ask him to do something. Connect "The Police Radio" with "The Indifference of the Police."
Watch the cutscene as Jack sneaks by.
The main port is lit up. Use the utility box to the right of Jack, open the box, and pull the switch. Watch the conversation.
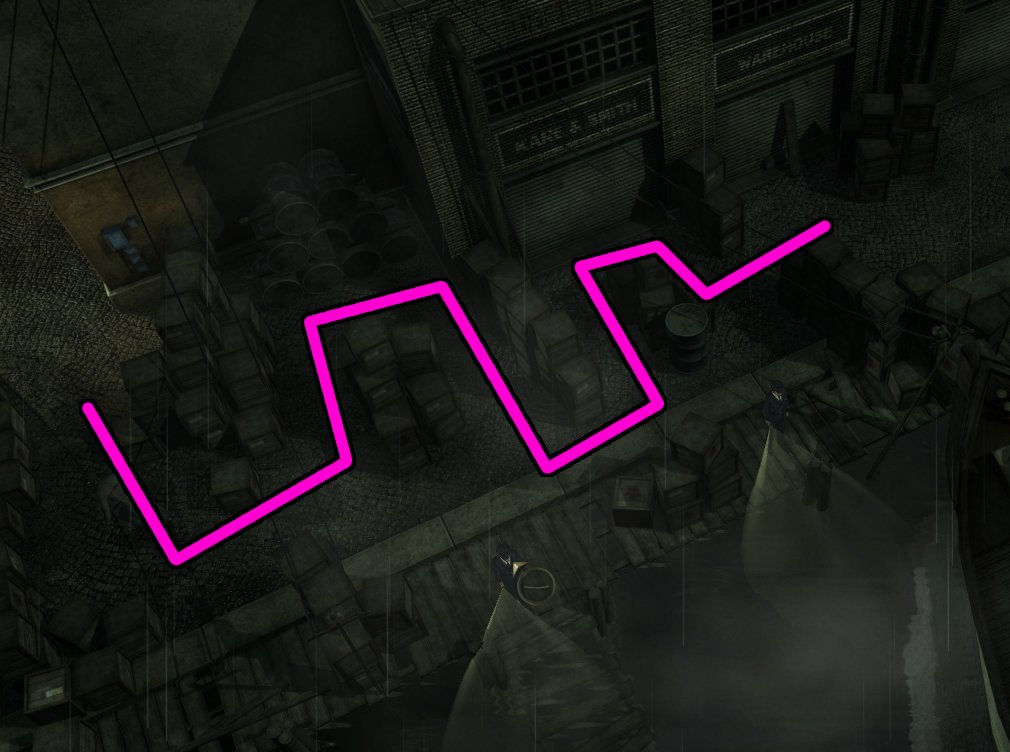
Follow the maze and avoid the guards. Jack takes a little while to get moving, but you only need to click once. If you get caught, the scene resets; saving periodically also might be helpful here.
Wait for the first guard to stand by the water to move. Wait for the second guard to face the maze exit at the top of the screen to move behind the crates, then to move back to the water to exist the maze. Solution
Follow the narrow pier to the water to get to Sean's body. Use the body to get the cash and the dord. Watch the cutscene.
Use the dord in Jack's hand. Connect "Sean's good luck charm" with "Follow the lord."
Put the dord away. Note the metal spike sticking out from the dock near Sean's body. You can't get it now.
Leave the pier and exit right to Noah's Shipyard. Use the open crate (not the closed ones) at the end of the dock. Take the wire from the doll.
Go back to Sean's body. Use the wire on the metal spike to retrieve it.
Go back to Noah's Shipyard and use the door. Use the spike for the missing part of the sign.
Noah's Shipyard
Jack enters from the back of the shipyard. Remember Sean's clue to "Follow the dord."
Try using the dord in the shipyard.
You need to calm the little girl down. What have we seen lately that might do that?
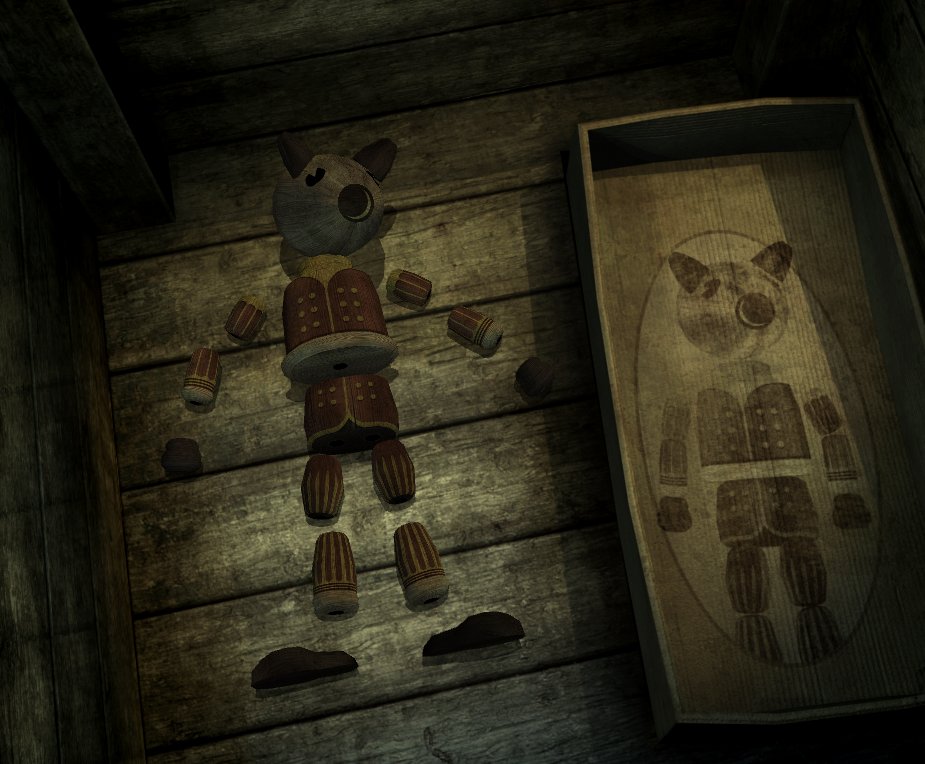
Go outside the shipyard and use the open crate with the doll.
Build a doll: Drag pieces to their proper hotspots with the left mouse button, and rotate them as needed with the right.
The picture in the box should give you some clue as to what the doll must look like.
Symmetrical pieces are identical, except for the feet.
This puzzle can be very finicky: You have to rotate the pieces so they are all aligned (I found the hands particularly vexing). Just keep at it and you'll get it eventually.
Solution
Jack will confirm when you have a solution. Use the wire that you got from the doll crate originally to put the doll together. Take the doll inside the shipyard, go to the crates, and use the doll on the girl.
Now you need to get the girl across the other side of the shipyard. Notice the pulley with the planks across the water. Try to use the control panel near the causeway to operate it: it's busted.
Look at the machinery just to the left of the control panel (it's in a similarly-shaped console that I thought was part of the control panel). Use your flashlight with it to see.
Use your keys on each of the screws to unscrew them.
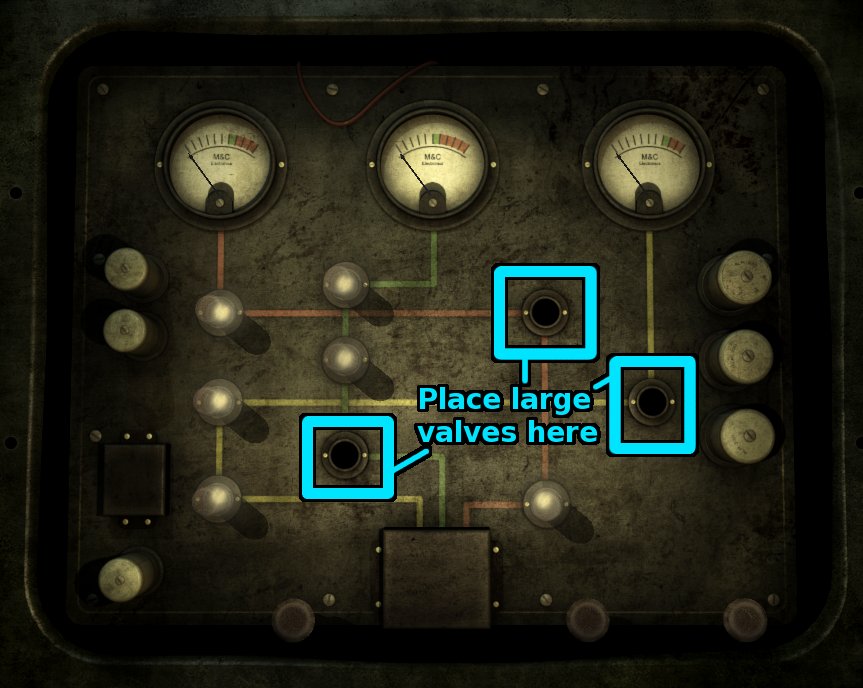
You need a valve. Use the tiny red toolbox (to the left of the "B" on the pulley) to get a one.
Use the crane machinery again. Play the minigame.
The goal is to get the three meters pointed to the green zone.
Note that there are six small valves and three large ones. Each colored path gets one large valve and two small ones.
Discovering where the large valves go is a matter of trial and error.
Solution
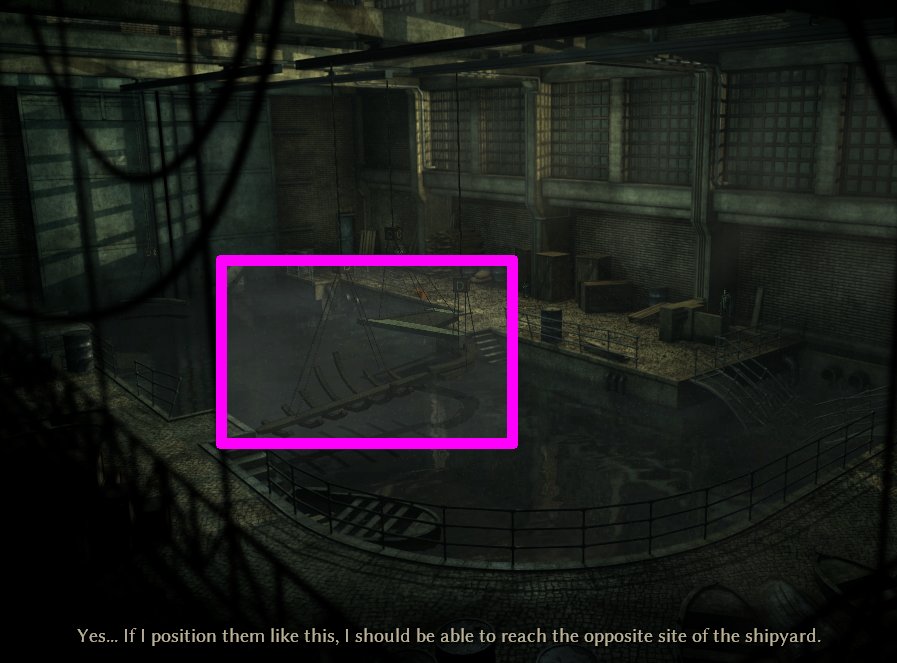
Now that the machinery should be working, use the control panel.
Click the buttons to operate the pulleys. Click "B" or "C" to switch control between them. You can move the pulley up or down, move it along its horizontal track, or rotate it.
To complete the path to the other side of the shipyard, use the curved piece attached to pulley "D", which you can't control (It's also hard to see).
Solution
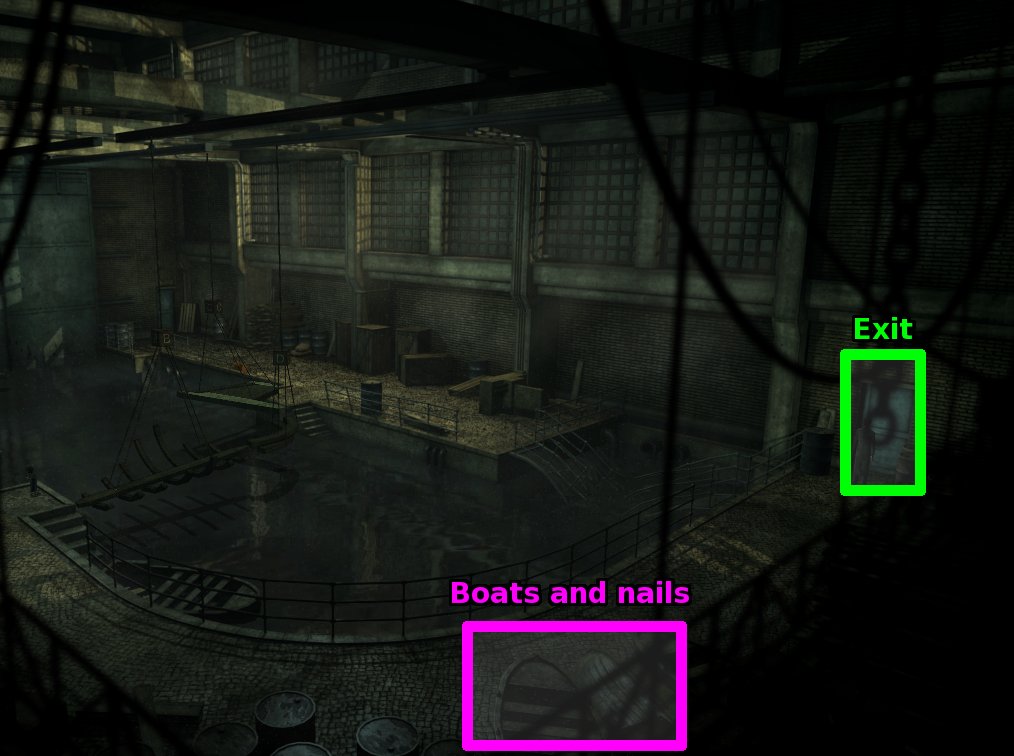
Use the planks you just positioned to cross. Walk towards the door on the other side.
On the way, check out the disused pile of rotting boats (They're near the bottom of the screen, at the curve in the path. They're hard to see).
Screenshot
Use it and click on a nail to try to remove it. Click and hold with the left mouse button, and right-click until the nail comes out, or until Jack says it's not moving.
Walk toward the blue door. Use the nail on the barrel that's in the way to lighten it so it can be moved.
Exit through the door.
The Red Tulip
Use the door to the bar twice to knock. Watch the cutscenes.
Melville Port
You're playing as Sean now. Go talk to the harbormaster in his office. You need papers. If you look in your inventory, you'll know what to do.
Give your papers to the harbormaster
The harbormaster asks for the name of your ship. Again, if you look in your inventory, you'll know what to do.
The name of the ship is "Saint Marie," written on the napkin in your inventory
Watch the cutscene.
The Red Tulip
Back to Jack. Leave the Red Tulip and head back to your place Up the alley is quickest.
Talk to Slovanski the landlord, or just walk past him.
He wants the back rent. Luckily you've made some money tonight: Give him the cash you took from Sean's body.
Ask Slovanski about the police, then about the heat.
Go inside your apartment. Use the folding bed (near the darkroom door, currently folded up into the filing cabinet).
Melville Port
Sean again. Go to the entrance of Noah's Shipyard on the right side of the screen.
Use the door to the Shipyard. This ought to seem familiar: Left-click the "Faith" spike and keep right-clicking until it loosens.
Use the spike on the padlock. Watch the cutscene.
Jack's Apartment
Back to Jack, who seems to be experiencing clairvoyance. Leave the apartment.
Read the note on Slovanski's desk: He's upstairs.
Go up the stairs and down either hallway. Talk to Slovanski.
He's too busy with the radiator. Go back one screen and look at the vertical pipe near the radiator. Use it.
Go back to Slovanski and talk to him. Ask him about the detective and say "I have a question."
Connect "The hitman with the scar" to "Inspector Ballard."
Leave the apartment building and go down the alley. You'll see Chon's cab go by. Go inside the bar and ask Greta about Chon.
If you do everything in this section, Chon's cab should then show up in its original parking spot up the street. Use the cab to talk to Chon: Ask to be taken to the police department.
Hoboken Police Department
You're looking for Victoria, but she's not in her office. Ask the desk officer where she is.
Ask to speak to Malone. Head to the interrogation room: the entrance is to the left of the desk behind the stairs.
Ask about Sgt. Diaz, then ask about your visitor. You have a lead!
Go outside and ask Chon in his cab to take you home to Essex Street. Go to your office and use the phone book: It's the second shelf from the bottom to the left of the door.
Look at M, then pick out the most unusual Moore in the book:
Violetta Moore
Use the phone and ask the operator to dial Moore's number. Ask about the Black Lilly and about names: You get a lead on Samuel Cutter.
Go back to Chon's cab to head to the police department.
The archives are downstairs, but you can't get in. You can ask the desk officer about the filing system if you'd like.
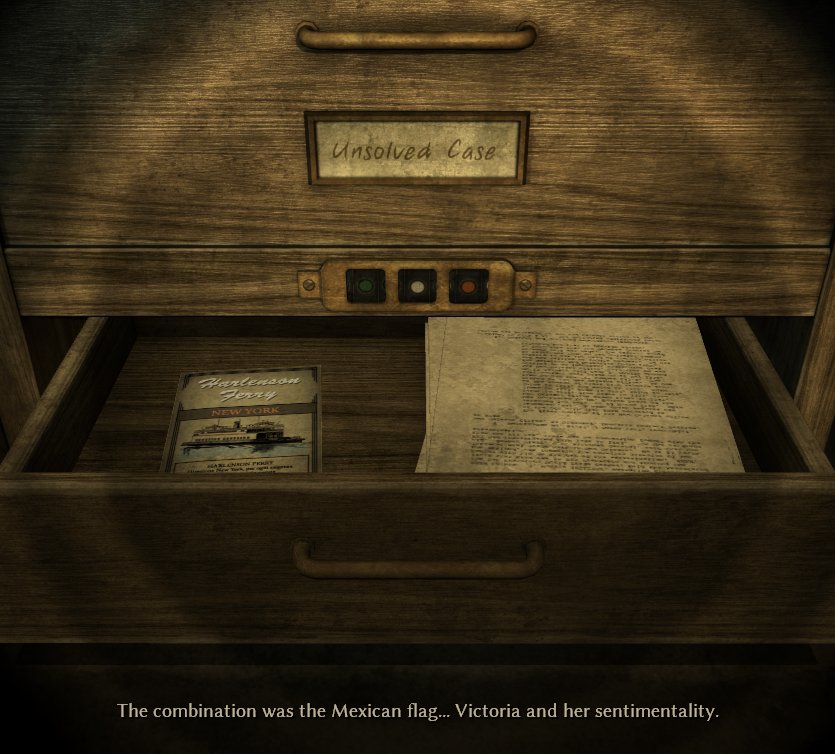
Head upstairs. Since Victoria was your best chance of letting you access the archives, and since she's out, you'll have to break in: Use the lockpicks on Victoria's door and play the minigame (or just skip it).
Use the flashlight on Victoria's desk drawers to take a closer look.
It's a color-coded lock. No, you're not going to find any colored-dots anywhere to give you a clue, but if you know a little about Victoria (or just look around her office), you'll have an idea of what the code is.
Dark green, white, and red, the Mexican flag. The colors can be kind of hard to distinguish. Solution
Take a look at the flyer, the card is underneath it.
Go downstairs to the archive and use the card with the card reader to the left of the door.
Use the little console to the left of the big police poster: It's a mechanical database.
Type in Samuel Cutter's name: Click letters to type, use the red switch to flip between first and last name, and hit the spyglass button to search.
The shelf you need is labelled with the first three numbers of Cutter's file. Use the shelf you need to see the file: It's the shelf behind the numbered sign.
612
Read through Cutter's file, being sure to flip all the way through the last page. Examine the page to get a new lead.
Go back to the database and look up Patrick Olsen. Use the proper shelf to get his file.
608. Again, it's the shelf behind the numbered sign.
Look at the pages of the file. Curious stuff.
Since the file doesn't say much of what happened, you need another source of information, also in the archives:
Use the newspapers along the back wall. Look up: 1933, November, 05.
You get a new lead: August Zindler, at the Civic Museum. Head outside and get Chon to take you there.
Civic Museum
The museum is of course closed and locked up. Walk left, then around the building to the alley.
Use the door at the end of the alley; it's open!
Look at the big map on the near right wall; it's a map of Persia.
Look at the name on the top right corner: It's Prof. Zindler's name, which tells you what office you need to find.
You can't just go wandering through the museum looking for the Islamic exhibits, but luckily some of the exhibits have been moved to the main atrium:
Specifically, they're in the crates that are all over the place. Look at the crates to check out their labels. Use the flashlight on the labels if you can't see.
The crate behind the T-Rex is the one you need: Samarra, Iraq, Room 13
Check the Islamic map again to confirm Jack's hunch. Click on Samarra, in the middle of the map.
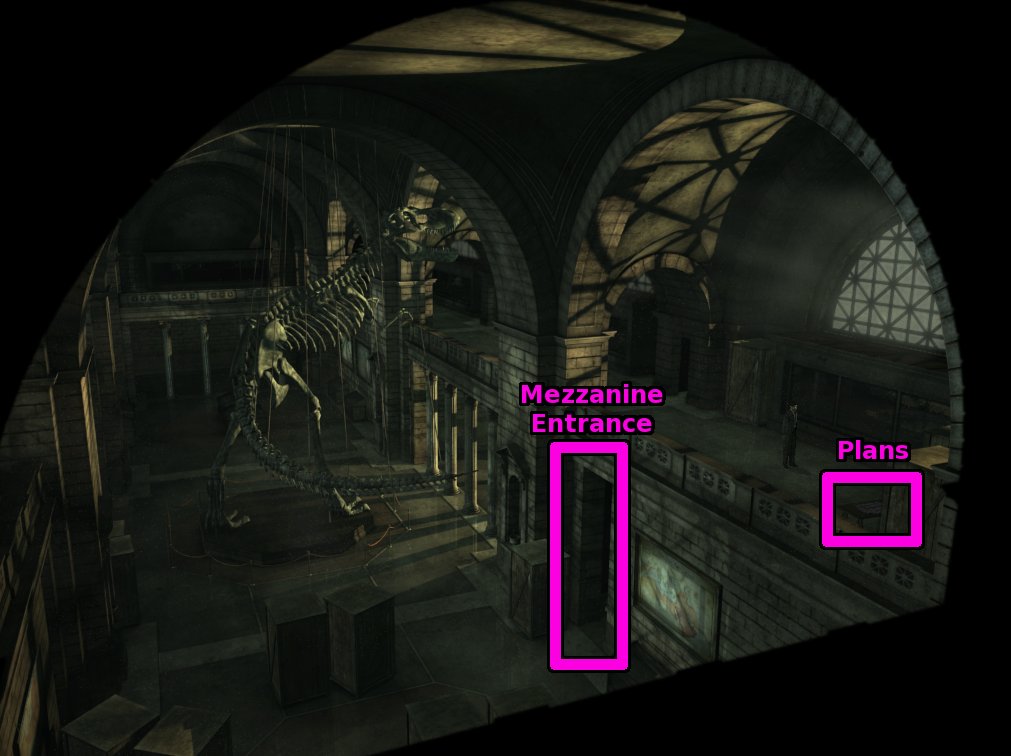
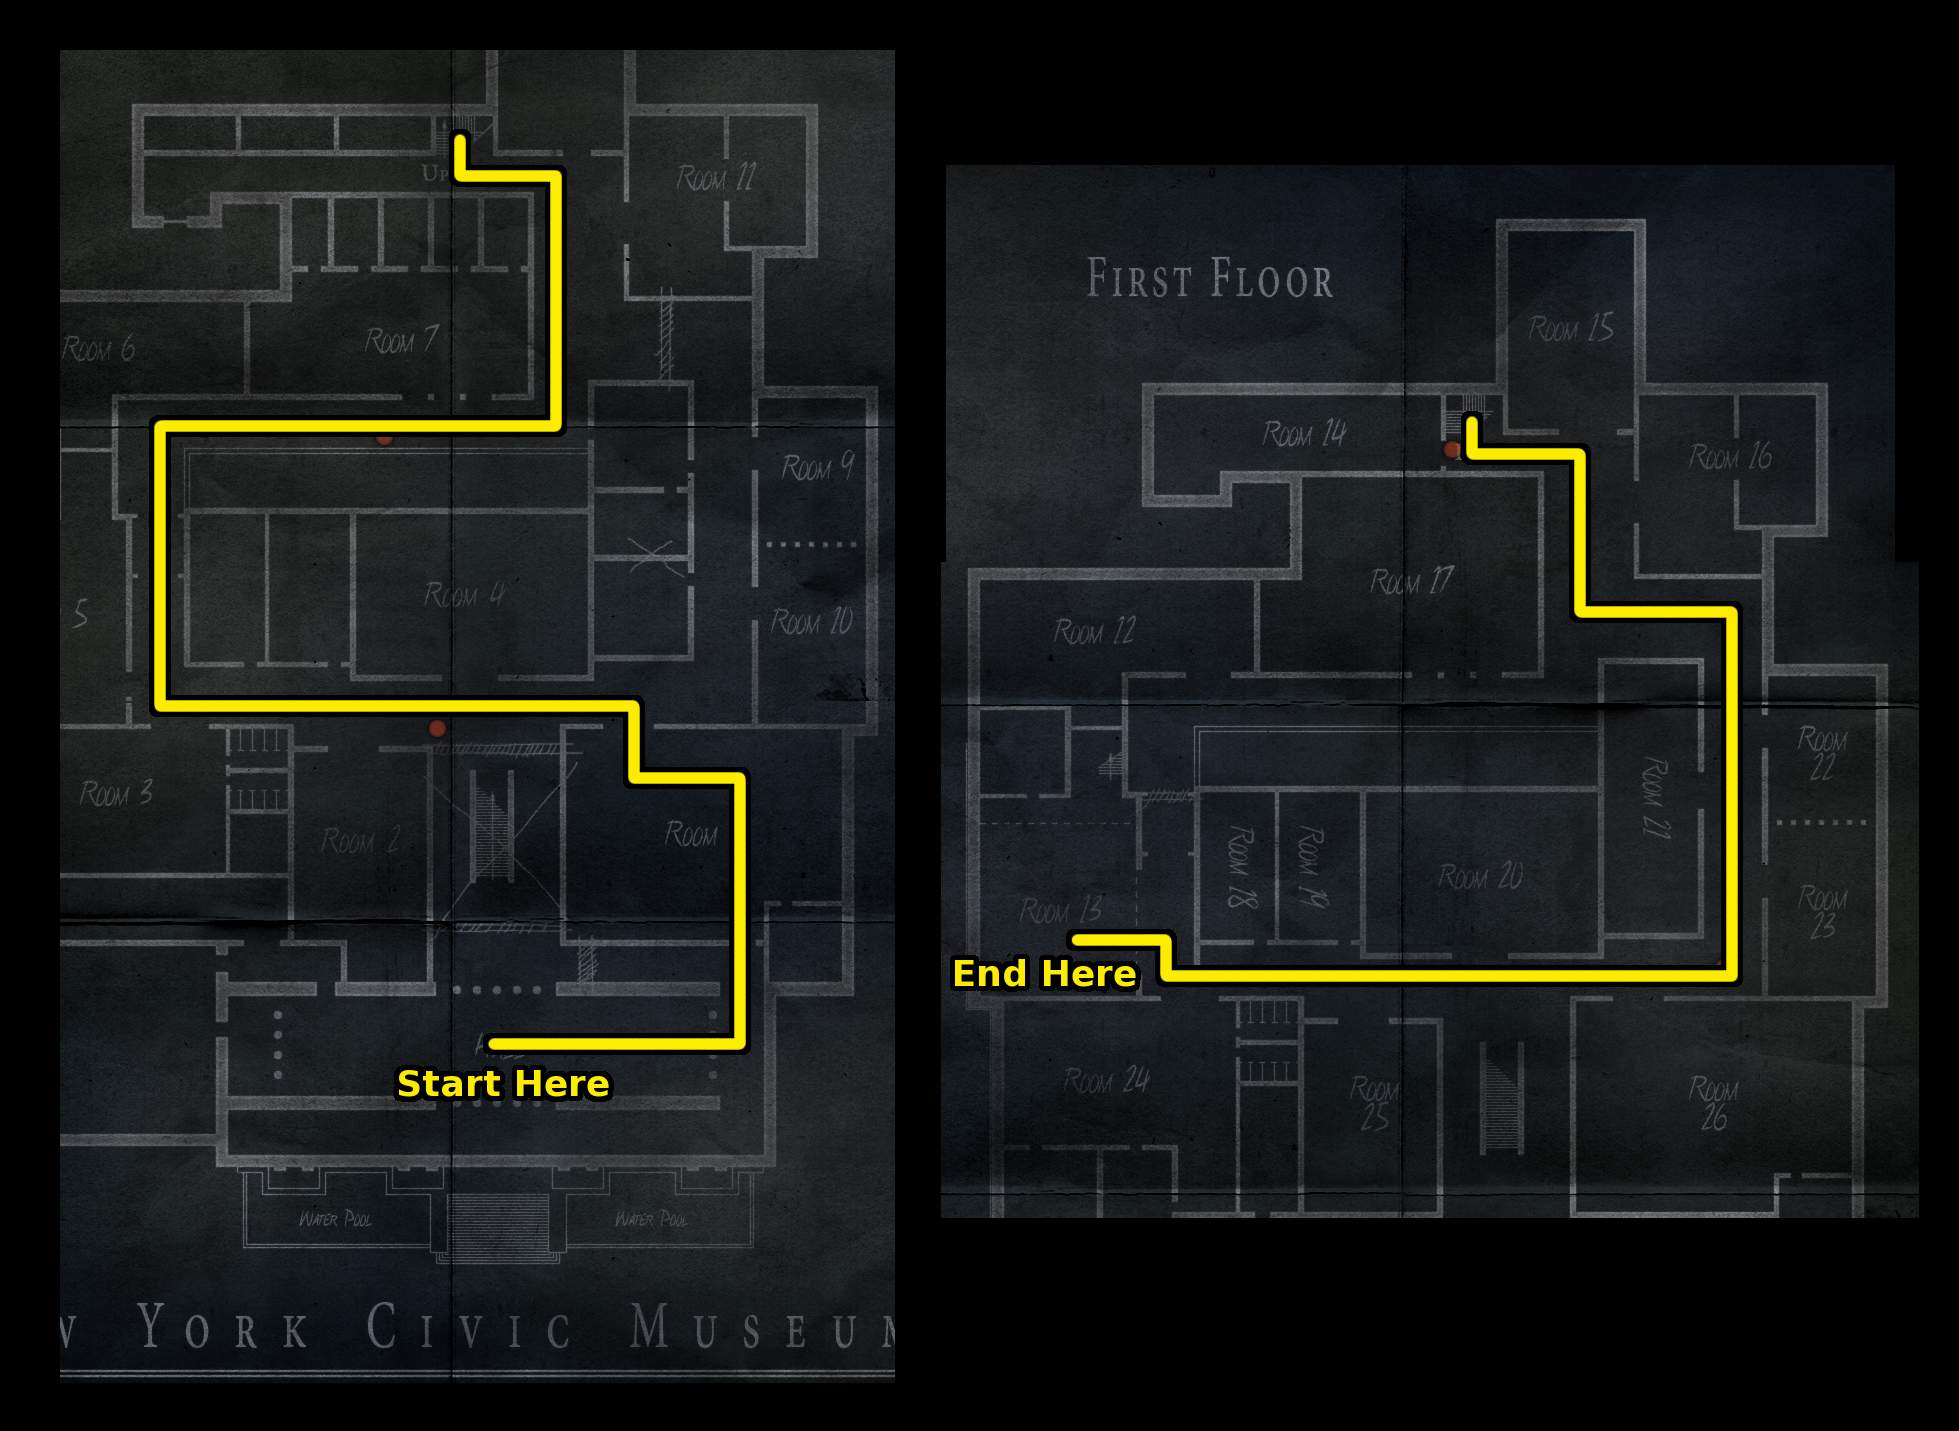
Go through the entrance to the left of the map to get to the upstairs mezzanine. At the near end of the mezzanine are some plans on a table, though they're hard to see.
Screenshot
Look at the plans. This place is a maze! The red dot represents Jack. Navigate by clicking: You can only click places that arena line of site to Jack.
Solution
Once you make it to Room 13, go to Zindler's office: The door is to the left, framed by the foreground scaffolding. Note the empty crate.
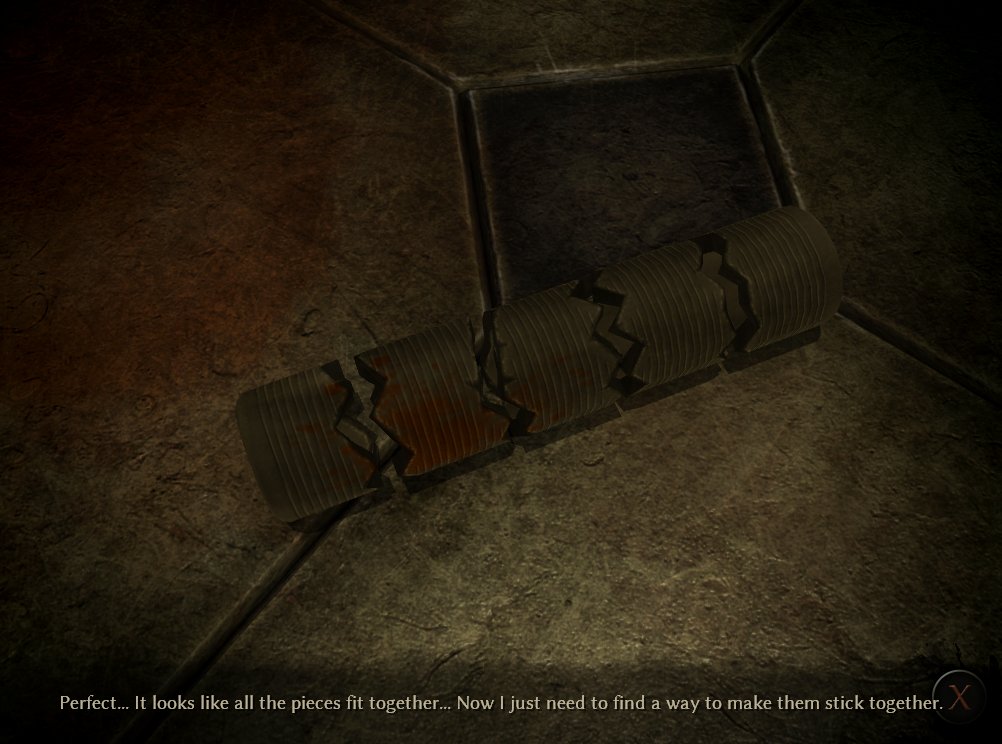
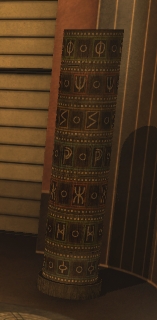
Watch the cutscene. Look at the object near Zindler's hand.
Assemble the pieces of the wax cylinder. Click and hold to move the pieces, and right click to rotate them. The blood splatter is useful for figuring out what piece goes where.
Solution
Jack says when the pieces are positioned properly. Use the lighter to fuse them together.
Use the dictaphone, on the table to the right of Zindler. Use the cylinder with the machine, then flick the power switch to the left of the mouthpiece.
Exit the office, go right and exit the exhibit hall, then leave the museum and head for Chon's cab. Ask him to take you to the police station.
Hoboken Police Department
Go downstairs, use the card on the cardreader, and enter the archives.
Use the database to look up Michelle Nicholas. Use the proper shelf to find the file.
607. Again, it's the shelf behind the numbered sign.
Look at all the pages of the file, being sure to read the last one.
Go outside and ask Chon to take you home (Essex Street).
Jack's Apartment
Go to your apartment and talk to Slovanski. Ask Slovanski about Michelle Nicholas. You can then ask him about Apt. 607, but he won't let you in.
Go upstairs and down the hall. Use your lockpicks on Room 607. Play the minigame, or just skip.
Go left and use the sheet. Watch the scene.
Melville Port
Talk to the harbormaster. Ask why the police shut down the port.
The harbormaster has been going through grog, so maybe you can find a bottle nearby.
Look in the trash can near the harbormasters office.
Ask Chon to take you to Essex Street.
The Red Tulip
Before going to the bar, go to Jack's place up the alley. Go upstairs.
Use the bottle you just got from the port on the steam pipe to get a bottle label.
Go outside and down the alley, then enter the bar.
Ask Greta if she has any grog. Use the liquor shelf to see for yourself.
Use the label on the shelf to get a bottle of "grog."
Go outside and up the street. Ask Chon to take you to the port.
Melville Port
Give the bottle to the harbormaster. Ask who boarded tonight.
Use the sacks under the lamppost across from the harbor office to investigate.
Pick up the cigarette butt. Use the butt to "think about it."
Connect "The smoking guy with a gun" to "the smell of hashish."
Pick up one of the decorated pieces of paper.
Assemble the cigarette wrapper. Click and drag to place the pieces; hold the left mouse button and right-click to rotate.
Solution
Talk to Chon. Go to Essex Street.
Go inside Jack's office. Use the phone book (on the shelf to the left of the door) to look inside.
Click "Book Shops," then click "The Little Peninsula."
Go outside. Ask Chon to take you to 65th Street.
The Little Peninsula
You can't go in the front way; instead, go down the alley to the left.
Look at the crates. Interesting!
Use the callbox to the right of the door and hit the "Warehouse" button. Ask for a book.
Use the mailbox (Jack won't tamper with it until he talks to the bookstore worker). Your lockpicks won't work, but maybe there's another way to break in.
Use the credit-card-like Detectives License on the mailbox
Click and drag the mailbox door to open it, then take the piece of mail.
Use the mail in Jack's hand to "think about it."
Connect "The telephone bill from the Little Peninsula" with "Greta's Tour."
Leave the alley, and tell Chon to take you to Essex Street.
The Red Tulip
Go up the street and enter the bar. Ask Greta about Edward Marsetti.
Ask about Smiley. Ask about why he's always at the Red Tulip. Then ask where he might be. Then ask for a favor.
Connect "Smiley's crush" with "Smiley's job." Watch the cutscene.
In Jack's office, use the phone to answer it. Leave the apartment and go to the Red Tulip.
Talk to Smiley. He's coy if you ask about his job.
Check out the bottle near Smiley: blueberry juice. Use Sean's flask with the bottle.
Use Smiley to find a clue.
Go to Chon's cab and ask to go to 65th Street.
The Little Peninsula
Go into the alley and use the buzzer. Press the Warehouse button.
Ask for a book, then ask for the book title written on Smiley's note:
The Art of Chess
Talk to the bartender. Ask about the stage, and where Marsetti is.
Go left to the stage to see a familiar face. Go left again and talk to the guy.
Ask what he's doing here to learn that Marsetti is in his office.
Leave to the left and talk to the bartender again.
Mention that you heard Marsetti is at the club. Then ask about the bartender's love of cinema.
Use Howard's business card on the bartender.
Go up the hallway to the right of the bar. Talk to the bouncer.
Talk to Marsetti. Ask him all the questions, especially about movies.
Go downstairs and to the left. Talk to Howard. Ask about Marsetti's offer. He refuses, but we have some leverage on him:
We need to finally develop Jack's film from the beginning of the game. You may have noticed Jack needs a red light bulb before he can do any developing.
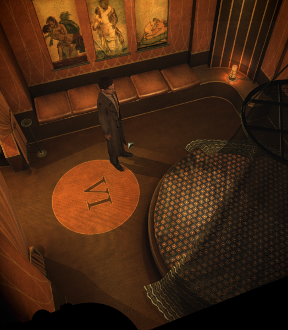
And as it happens, we're at a brothel, where red lights are found. Go upstairs and into Room VI. Use the red light bulb in the corner.
Press the buttons to unlock the light so they're all depressed.
Use Greta's handkerchief to take the hot bulb.
Leave the club and ask Chon to take you to Essex Street.
Jack's Apartment
In Jack's apartment, use the foldaway bed to fold it up, then use the door behind it to get to the darkroom.
Use the lightbulb with the hanging light. Use the film with the developing equipment.
Leave the apartment and ask Chon to take you to 65th Street.
The Little Peninsula
Go down the alley and use the buzzer.
Go to the left and use the developed photograph with Harvey.
Watch the conversation. Use "Spicy photographs" with "Marsetti and the silver screen."
Watch the cutscenes. Go upstairs and use your lockpicks on the office door. Play the minigame, or just skip it.
Use the disk on Marsetti's desk. Click and drag the disks to enter the proper combination:
The symbols on the totem match those on the lock. Align the symbols in the column so they match those on the totem.
Note the P-shaped symbol is fixed in the middle and is also the middle symbol on the totem. Each disk accounts for two symbols, each the same distance above or below this middle symbol.
Solution
A safe is revealed, but you can't open it. First, pick up a glass from the round table.
Use the safe, then use the glass with the safe.
Click and drag the combination lock to turn it. When you hear it click, stop until you hear a click, then turn the lock in the opposite direction. Keep doing this until the safe unlocks.
The combination is 60, 30, 70, 50, 80
Click and drag to open the safe. Pick up the cash, then the notebook. It's in code, and you don't know how to decode it yet, so put it away.
Uh-oh, Marsetti's coming back. Use the closet to hide. Watch the cutscene.
Before leaving, use the spear leaning between the shield and liquor cabinet to get a spearhead.
Use the window to the right to escape.
Use the sign, then use the spearhead on the weak point. Hold the left mouse button and click the right until the sign falls down.
Use the fire escape to the left. Watch the cutscene.
Ask Chon to take you to Essex Street.
Jack's Apartment
If you haven't yet, talk to Slovanski about the Congregation of Five. Ask how he became a member.
Use the notebook from Marsetti's office to "think about it." Connect "The encrypted booklet" with "Slovanski's old man."
Use the notebook with Slovanski.
Use the notebook to decode it.
Click a letter and click another to decode that letter. Click the underscore "_" to delete.
If Slovanski's advice is anything to go by, this code is pretty simple. Once you decrypt one letter, all the others are easy, as each letter is simply shifted by the same degree.
I suggest looking at double letters and trying various possibilities, as there are only a few letters in English that are ever doubled.
Each letter is shifted three spaces to the left. Solution
Watch the cutscene.
Hoboken Police Department/Ellis Island
Go inside and talk to the desk officer, or just walk past him. He gives you a note. Take a look at it.
Go back out and ask Chon to take you to Essex Street. Either go to Jack's office or Greta's bar and use the phone.
Ask the operator to dial a number, and pick the number on the note:
555-7589
Watch the conversation, then talk to Chon.
At Ellis Island, walk to the right, then talk to Malone.
Watch the cutscene.
Essex County Gas Station
You're Sean again, this time much further back than last time. Watch the cutscene.
Take the documents Smiley left you on the counter.
Go outside and to the right. Lucky for you, there a photography set where it says "The Bunion derby." It's not working, of course.
Look at the cornfield behind the set.
Go inside and talk to the clerk. Ask about the photo set: he won't turn it on for you. Also ask about the cornfield to get an idea of how to distract him.
Take the ash tray from the table near the sleeping girl.
Go outside. Use the lantern hanging on the post to the right of the car. Use the fuel cap below the wick to see that the lantern is empty.
Look at the left pump; it's for kerosene. Use the bucket below the pump and use it with the lantern so it has fuel.
Use the cornfield behind the set to get some corn.
Use the lantern. Use your cigarettes and lighter to light the lamp.
Use the metal ash tray from inside with the lamp, then use the corn with the ash tray.
Go inside. When "the yokel" leaves, use the switchbox on the wall behind the counter.
Click and drag to open it. Click and drag the "Bunion Derby" switches so they're flat, just like the "Main" switches above them.
Go outside and use the camera (on the pedestal on the right side of the set). Your name is John Ford!
Go inside and talk to the sleeping girl.
Chinatown Distillery
Jack again. Watch the conversations. It doesn't particularly matter how you answer.
Use the small control panel directly behind Jack. Use the black switch, then push the red buttons in the proper order to start the machine.
Push the northwest, southwest, northeast, and southeast buttons
Use the box on the small table on the other side of the room to get your belongings.
Look at the white item on the table; it's Greta's telltale handkerchief.
Use Sean's flask on the handkerchief to disinfect it, then use the tape from your bindings to make a bandage.
Jack talks to Chon: Ask him questions, then dismiss the conversation.
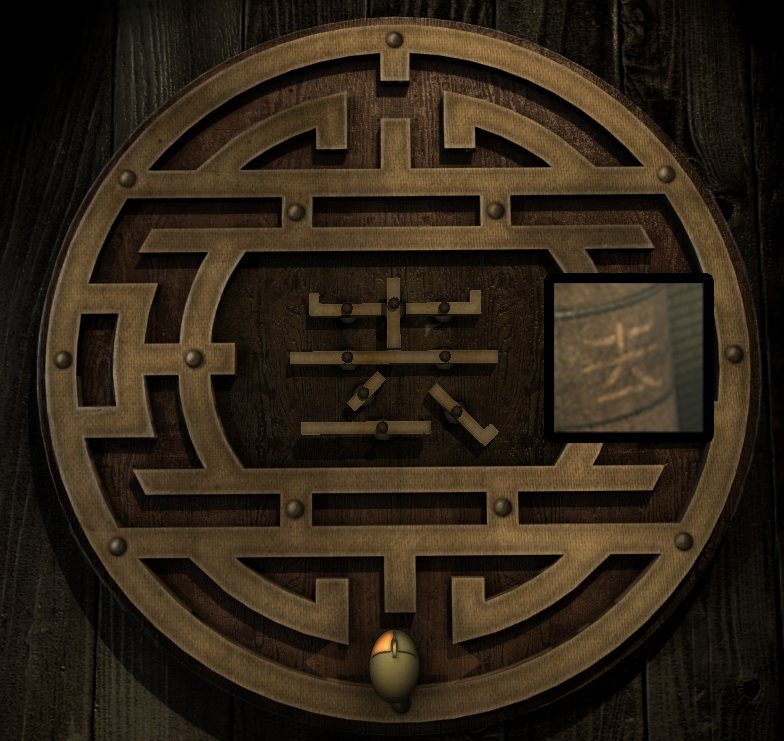
Use the symbol on the green wall to the right. Click and drag the little metal pieces so they are in the proper shape:
They should look like the character on the distillery tank. Solution
Exit through the secret passage.
Use the pile of junk behind the railing along the back wall to get rope.
Use your flashlight on the dark passage to the right:
You need to find the exit, but first you need to turn on three valves in the maze of sewers. This raises the water so you can cross the path to the exit
Follow the pipes, and you won't get lost. The pipes all meet at the exit, and terminate at the valves you need on the other end.
When you get to a valve, use it. Click and hold the left mouse button, then rapidly right-click until the valve opens.
Do this for all three pipes, then head to the exit.
If you've done everything right, the water should be high enough to cross. Use your rope with the barrel to make a floating bridge, then use the bridge to push it in the water and go across.
Go up the stairs. Talk to Chon, who is standing near the distillery entrance upscreen.
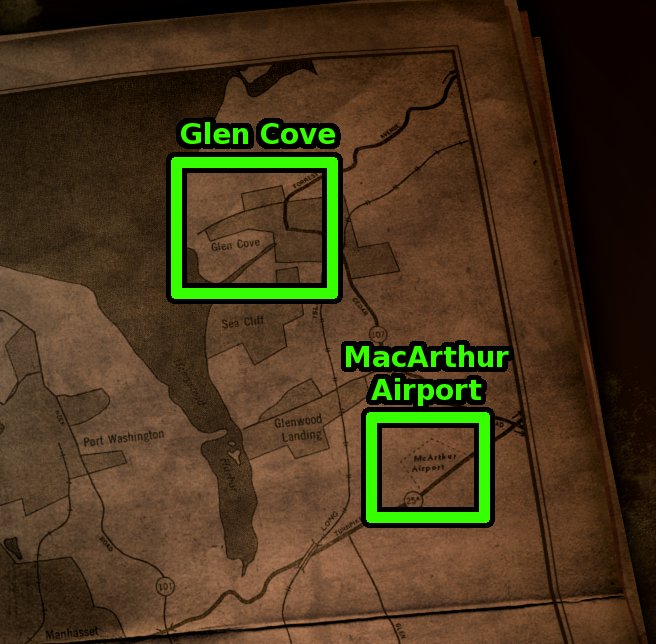
Ask Chon where the girl went. Pick "Maybe I know where the car with the girl is headed."
Connect "A cruise on the East River" with "The airport."
Ask Chon for his map. The airport is in the upper right corner; click on it. Solution
MacArthur Airport
Pick up the crowbar from under the window of the building to the right of Jack.
Use the flashlight with the table inside the building (through the rightmost window)
Use the downspout between the two windows to attract Oscar's attention.
Light's out! Get your gun, then use the rope with Oscar.
Go through the airport entrance.
Look in the window to the right of Jack. Watch the conversation. Use the window again to talk to Greta.
Use the crowbar on the door. Watch the conversation.
Civic Museum
Flashback to Sean again. Go around the corner to the back entrance.
The door's locked; use Sean's gun to open it.
Enter the museum and go around to the back entrance on the left. Use the door to Zindler's office, on the other side of the exhibit hall.
Watch the cutscene. Go through the door behind Sean to get to the lower level.
When Oscar is looking left, move to behind the crates in the middle of the room. When he turns right, exit the way you came in.
Leave the alley and use the car.
MacArthur Airport/Destiny
Jack again. Watch the conversations.
Use one of the tanks under the stairs and use it with the door.
Use the gun with the tank.
Watch the familiar cutscene.
And now it gets weird. Walk to the right. Talk to Sean in the diner.
Go back to the left. Use the floating clock, then use it again to turn back time.
Watch the conversations. To be continued in Face Noir II!
Posted by: Mike |
July 18, 2013 4:59 PM
|
July 18, 2013 4:59 PM