
Fetch
Platform: iPad
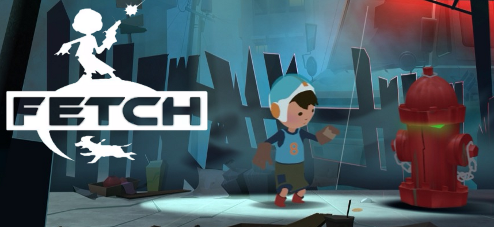
![]() Fetch is the story of a boy, his dog, and a bunch of arcade games living in a futuristic sci-fi world where robots and mega-corporations rule. A point-and-click adventure at its heart, Fetch is littered with so much gorgeous artwork and creative elements that its world springs to life, making it feel almost like a free-to-roam sandbox game.
Fetch is the story of a boy, his dog, and a bunch of arcade games living in a futuristic sci-fi world where robots and mega-corporations rule. A point-and-click adventure at its heart, Fetch is littered with so much gorgeous artwork and creative elements that its world springs to life, making it feel almost like a free-to-roam sandbox game.
 Tap the screen to walk around the world or to interact with objects and bits of scenery. A great number of things are placed simply to be toyed with, like knocking signs around, popping bubbles, or nudging debris on the ground. Not everything is just window dressing, though, and you'll need to work with plenty of puzzles by flipping switches, lowering ladders and the like. You'll run across dogs that need to be rescued as well as collars to collect, achievements to get, and arcade games to play, all while attempting to rescue your dog and figure out why this Embark company is kidnapping so many puppies!
Fetch throws a lot of great ideas into a single pot, which would normally spell doom for a casual mobile game. That certain'y isn't the case here, of course, as the experience is nearly flawless from beginning to end. The production values are also extremely high, which really isn't a surprise considering the game was developed by Big Fish Games. Even with its dystopian setting, Fetch is a completely captivating game that keeps you in a constant state of craving to see what the next puzzle will bring!
NOTE: This game was played and reviewed on the iPad 3. Game was available in the North American market at the time of publication, but may not be available in other territories. Please see individual app market pages for purchasing info.


Walkthrough Guide
(Please allow page to fully load for spoiler tags to be functional.)
Fetch Walkthrough
Achievements
First Love (1/50) - "Found your first love."
In the opening scene of the Prologue, tap Bear (the dog) to pet him.
Construction (2/50) - "Activate the construction equipment."
At the first scene of the Prologue, tap the excavator, the crane, and the large grey pulley in the background to turn on the machinery.
Hammer Time (3/50) - "Push in all the nails."
Examine the poster on the wall in the first scene of the Prologue.
Tap the six large nails on the poster and the wall to hammer them down.
That Was Easy (4/50) - "Loosen all of the staples."
At the Prologue opening scene, inspect the same poster on the wall where you found the nails for the Hammer Time achievement. Tap the 5 staples on the right side and the two staples on the left side of the wall to remove them.
Continue right to the next scene. Tap the poster on this wall as well to zoom in, then remove the 5 staples on the right side and the 2 staples on the left side again.
Mad Men (5/50) - "Pressed all the billboards."
The first billboard is found at the first scene of the Prologue. Tap the monitor at the far left side of the street.
Move right to continue to the next scene. Tap the six large billboard screens in the background to turn all of them on.
That's A Wrap (6/50) - "Popped every bubble."
Open the cardboard box you receive as a prize for successfully completing the Alien Shooter arcade game. After removing the Embark Space Laser, tap all of the bubbles on the bubble wrap to pop them.
Planetary Defense Force (7/50) - "Beat Alien Shooter."
Use the arcade machine in the second scene of the Prologue to play the game Alien Shooter. Follow the instructions in the walkthrough below to complete the minigame.
You'll Shoot Your Eye Out (8/50) - "Enter the hydrant."
After you've acquired the Embark Space Laser from the Alien Shooter arcade game, tap the fire hydrant to enter it.
Grate Expectations (9/50) - "Find the dog tag in the grate."
When you reach the bridge in the sewer (where the first mouse is sitting on top of the pipe) tap the grate in the ceiling to the left of the pipes to release the dog tag.
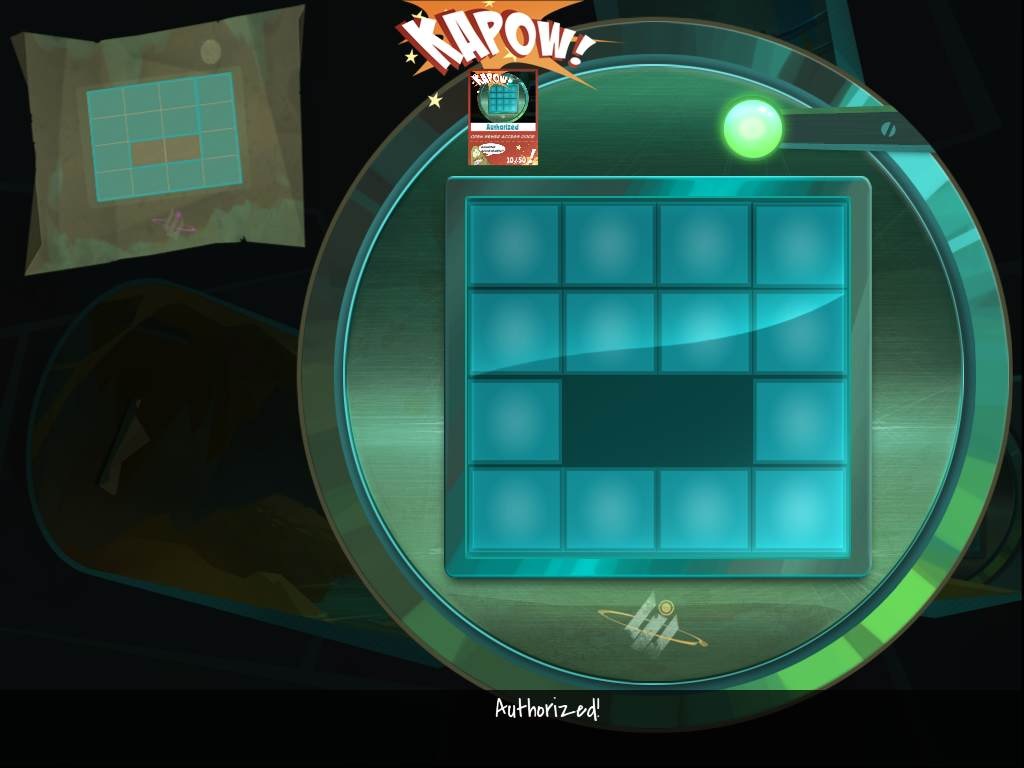
Authorized (10/50) - "Open sewer access door."
When you reach the sewer access door, recreate the pattern of squares from the image found on the blue prints at the left end of the tunnel to open the door.
Animal Lover (11/50) - "Rescued the poodle in the tunnel."
Once you arrive at the tunnel past the sewer access door, open the cage to release the pink poodle.
Over The Rainbow (12/50) - "Beat Rainbow Snake time."
Use the arcade machine on the platform in the sewer to play Rainbow Snake Time. Follow the instructions in the walkthrough below to complete the minigame.
I'm In A Band (13/50) - "Make the first mouse sing."
Once all three blind mice are reunited, tap the monitor beside them to start the puzzle. Solve the first stage of the puzzle by adjusting the sliders to align the wavelengths.
I Saw That (14/50) - "Drop the hanging crate."
After you pick up the Saw by the Sewer bridge, move one room to the right to reach the hanging crate. Inspect the red rope, then slide back and forth from side to side to saw through the rope.
Breaking Up The Band (15/50) - "Launch the crate."
When the song from the three blind mice in the Sewer puts the robot to sleep, pull the red lever beside the robot to activate the spring mechanism and launch the crate.
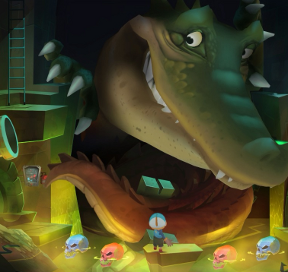
The Great Escape (16/50) - "Rescue the alligator."
Use the golden key from the Sewers to unlock the alligator's shackle.
Turd Place (17/50) - "Surprise the three parrots."
At the opening scene of Skull Island, tap the three parrots sitting on the vine above the cannon.
What Would Voodoo? (18/50) - "Find the witch doctor."
Also at the first scene of Skull Island, tap the empty eye socket in the skull repeatedly until the witch doctor pops out.
Terror Of The High Seas (19/50) - "Win 1,000 gold in one game of Pier Pressure."
Enter the skull room at Skull Island. Play the arcade game Pier Pressure on the Hard mode difficulty, destroy ships and stack combos to earn a lot of points and gold.
Crimson Tide (20/50) - "Sink two submarines in Pier Pressure."
Again, play the arcade game Pier Pressure inside the skull room at Skull Island. Fire the cannons at the submarines by aiming at close range when they pass in front of your ship to destroy them. Each submarine requires 3 shots to destroy. Don't worry if you don't destroy one on its first path through, it'll come back again and you can finish it off.
My Hero (21/50) - "Rescue Iris from the P1R4T3."
After earning at least 500 gold from the Pier Pressure arcade machine at Skull Island, approach the robot pirate (aka P1R4T3) to pay him the ransom. Tap Iris once the pirate is gone to free her.
Gigantus Coconutus (22/50) - "Feed the bird."
At the scene with the catapult on the shore of Skull Island, tap the coconuts in the tree to feed them to the bird.
One More Thing (23/50) - "Take a ride on the tram."
When you reach the piranha river and pirate shop at Skull Island, step in to the basket and pull the switch above your character's head to ride the zip line down to the shore of the island.
Everything Must Go (24/50) - "Buy everything in the vending machine."
At the pirate shop at Skull Island, purchase all of the items from the vending machine using the coins you won playing the Pier Pressure arcade game. The total cost for both dog collars, the rubber ball, heart, rocket, and foot stool is $4,000. You do not need to buy the fortune cookies.
It's Working! (25/50) - "Play the organ correctly."
In the organ room at Skull Island, simply complete the organ minigame to earn the achievement.
Winning Combination (26/50) - "Beat invaders with all power-ups."
Reely Big Shark (27/50) -"Feed the shark."
That's A Moray (28/50) - "Find the hidden eel."
Epoch Battle (29/50) - "Saved both cavemen."
Geode Job (30/50) - "Unearth both fossils."
Prologue - The City
Tap the large claw machine hanging at the upper right corner of the screen to remove the pile of junk blocking the sidewalk.
Move right to continue to the next scene.
Inspect the arcade machine in the middle of the sidewalk to start the minigame "Alien Shooter".
Instructions:
When the aliens pop out from behind the rocks, quickly tap them to shoot.
Destroy any meteors they throw at you before they hit your character. If your character is struck by a meteor, the minigame will reset.
The aliens will attack in 5 waves, getting slightly stronger each round.
You can press the green paw button at the top of the screen to pause at any time.
Tips:
You can hit the aliens much more quickly if you use multiple fingers to tap across the screen, often before they even have a chance to throw a meteor.
Press the red button at the bottom of the rocket to exit the minigame.
After the minigame is complete, a truck will deliver your prize inside a cardboard box on the sidewalk. Tap the box to zoom in.
Hold the tape at the top of the box next to the tab that says "Pull," then swipe downward to peel off the tape.
Take the Embark Space Laser from the opened box.
Follow Bear to the right to enter the next scene.
Pick up the dog tag on the ground beside the fire hydrant. Tap it again when your character examines it in his hand to add Bear's Dog Tag (1/42) to your collection.
Tap the fire hydrant to shoot it with your water gun.
Chapter 1 - The Sewers
Part 1
Tap the dog catcher robot's net to escape, then tap your character when he falls to the ground to stand back up.
Pull up the ladder at the lower right section of the room and climb down to enter the next scene.
Tap just under the ladder to drop down to the floor.
Hit the blinking yellow button at the left side of the tunnel to turn on the lights.
Pick up Rocky's Dog Tag (24/42) on top of the pile of filth to add it to your collection.
Examine the paper pinned to the wall at the left end of the tunnel and note the pattern of the squares in the image.
Move to the doorway at the right end of the tunnel to zoom in.
Slide or tap the small screen to toggle the squares on or off.
Select the correct squares to recreate the pattern you saw on the blueprints a moment ago, making sure to leave the two spaces in the center blank.
Use the paper at the upper left side of the screen for a reference.
Screenshot.
After the puzzle is solved, move right through the opened door.
Pick up Kona's Dog Tag (33/42) on the ground to the left of the cage.
Open the cage to release the pink poodle.
Walk right to the sewer bridge.
You can inspect the blue paper on the wall by the entrance to view a map of the area. The solid white areas are doorways connecting between rooms and the dotted circles indicate the locations of the four water valves.
Tap the grate at the top of the ceiling to drop a dog tag into the water. You'll be able to pick it up later.
Tap the valve to the left of the ladder to zoom in.
Turn the valve to the left towards the circle that is half full of fluid to lower the sewer water level.
Climb down the ladder until you reach the platform at the edge of the water. Step on the the platform and walk right to the Rainbow Snake Time arcade machine.
Instructions:
Feed the colored fish to the rainbow snake to earn points
The snake will automatically swallow fish that are near its mouth, or you can fling them into its mouth by swiping the fish.
You gain bonus points for throwing fish based on the distance of the fish from the snake.
Hopas are the three-eyed electric creatures that will damage the snake if devoured. Swipe them to fling them away from the snake.
When you receive a bomb warning, quickly tap the three bombs before they hit the snake or the minigame will end.
The rainbow bar at the top of the screen indicates your progress through the minigame. When the snake icon reaches the end of the bar, the game will end.
Tips:
If you see any rainbows, feed them to the snake for a super powerup! After a rainbow powerup is over, the snake will change to whatever colored fish it devours next.
Keep a close eye on the snake's color to see what kind of fish it wants to eat (i.e. if the snake is red, feed him red fish and fling green or blue fish away from him).
Feed the snake the correct color fish to stack up combos for extra points; feeding the snake the wrong fish will break your combo.
After the minigame is complete, tap the Coin at the bottom of the "Winner" banner to add it to your inventory.
Climb back up the ladder to return to the bridge.
Examine the left valve again, then turn the valve to the right towards the circle that is full of fluid to raise the water level.
Walk across the platform that floats to the top of the water and tap the right valve to inspect it.
Turn this valve to the left towards the empty circle to lower the water level all the way down, which will carry you on the platform to the bottom floor.
Part 2
When you reach the bottom, pick up Scruffy's Dog Tag (3/42) on the ground at the far left side of the room.
Go through the tunnel on the right to reach the hungry skull bridge.
Inspect the panel on the wall by the entrance for a close-up view.
Read the instructions, then tap the red button at the bottom of the panel to insert the Coin and begin the minigame.
Instructions:
Tap the skulls in the water to extend them upwards into the air and catch the fish inside their mouths.
Feed 8 blue fish to blue skulls and 8 red fish to red skulls.
Be careful to avoid eating any bombs or you will lose one fish from your score!
The blue and red tabs at the top corners of the screen keep track of how many fish you have caught of each color.
Tips:
It's usually easier to catch the fish with the two skulls on the right side of the water rather than the left side to give yourself a couple extra seconds to time your catch and to avoid eating any bombs when they first pop out of the pipe.
Pay attention to the height of the fish, as a fully extended skull will usually be too tall to catch it. Instead, wait a little longer for the fish before tapping the skull so that they can collide as the skull is moving about half way up or tap a little early to catch it as the skull is coming back down.
Once the minigame is complete, you can safely hop across to the platform in the middle of the water. After the cutscene, walk through the tunnel on the right to the next area.
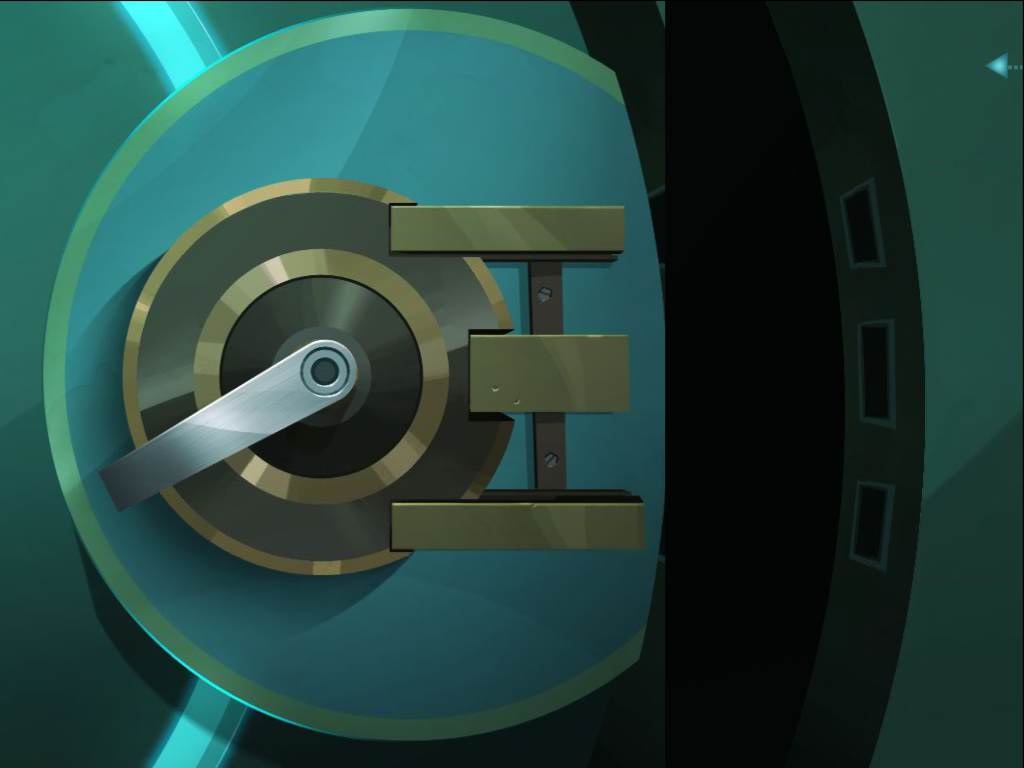
Climb up the stairs, then inspect the round door to the right of the singing rat.
Rotate the disc so that the rounded half is on the left side (with the door knob pointing to the lower left) and the cut-out half is on the right side.
Slide the three metallic bars along the tracks and into the cut-out sections to unlock the door.
Screenshot.
Continue through the opened door into the next room. Climb down the ladder and follow the robot towards the gate at the right side of the room to start the cut scene.
Climb back up the ladder, then inspect the valve on the pipe near the left exit to zoom.
Turn the valve to the right towards the circle half-full of fluid to raise the water level.
This will also lift the two crates up with the water, allowing the singing mouse to walk across and leave the room. Note the white square outlines beside the floating crates that indicate there are still two crates missing.
Walk left twice to travel to the upper level of the hungry skulls bridge which is now flooded with water.
Hop across the skulls to reach the platform in the middle of the water, then go left again to reach the ladder on the other side.
Collect Charlie's Dog Tag (28/42) beside the base of the ladder to add it to your collection.
Climb up the ladder to reach the hanging crate.
Tap the dog tag hanging from the round grate near the ceiling to drop it down to the area below. You'll be able to retrieve it later on.
Walk left to reach the blocked side of the sewer bridge.
Pick up the Saw leaning against the wall.
Tap the lever beside the raised bridge to zoom in.
Drag the lever from the orange vertical setting on the right side of the switch to the green diagonal setting at the middle of the switch. The mouse sitting on the pipe will run down the slightly elevated bridge and leave the room to join the other rats.
Use the lever again, this time sliding it to the horizontal purple setting on the left side of the switch to lower the bridge completely. Now you can cross the bridge at any time if you need to.
Walk right to return to the hanging crate at the edge of the platform.
Now that you have the Saw from the bridge area, you can tap the rope for a closer look.
Swipe from side to side across the rope to saw through it and drop the crate down below.
Climb back down the ladder, then hop over the skulls to the right again again to find the three blind mice reunited.
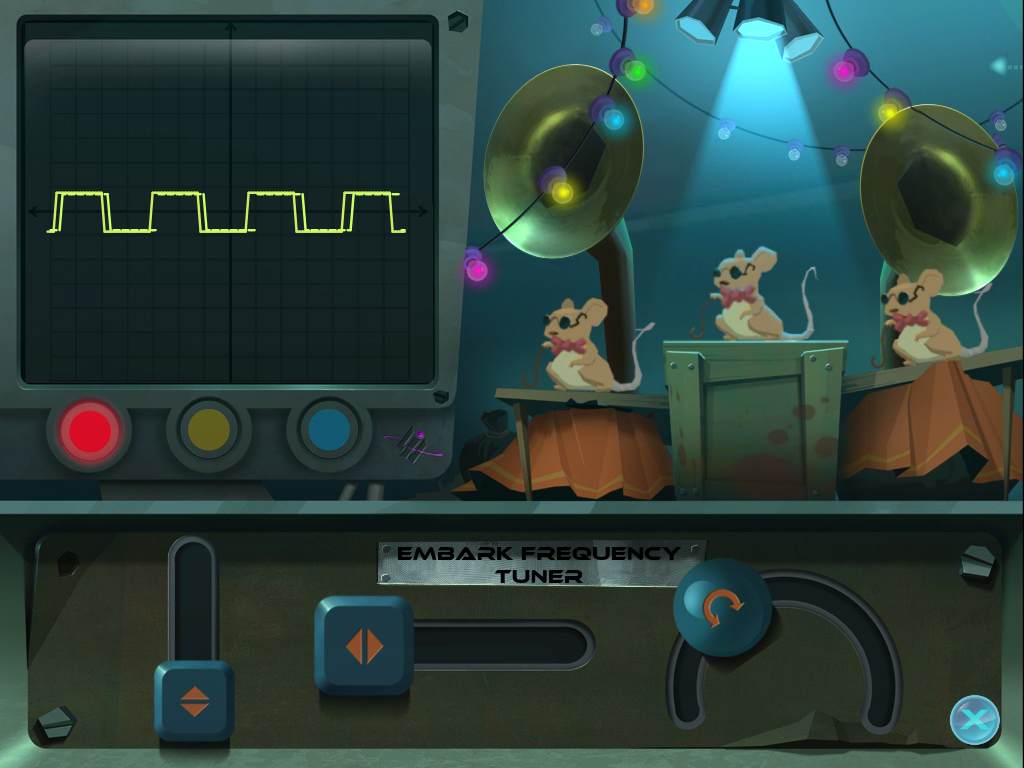
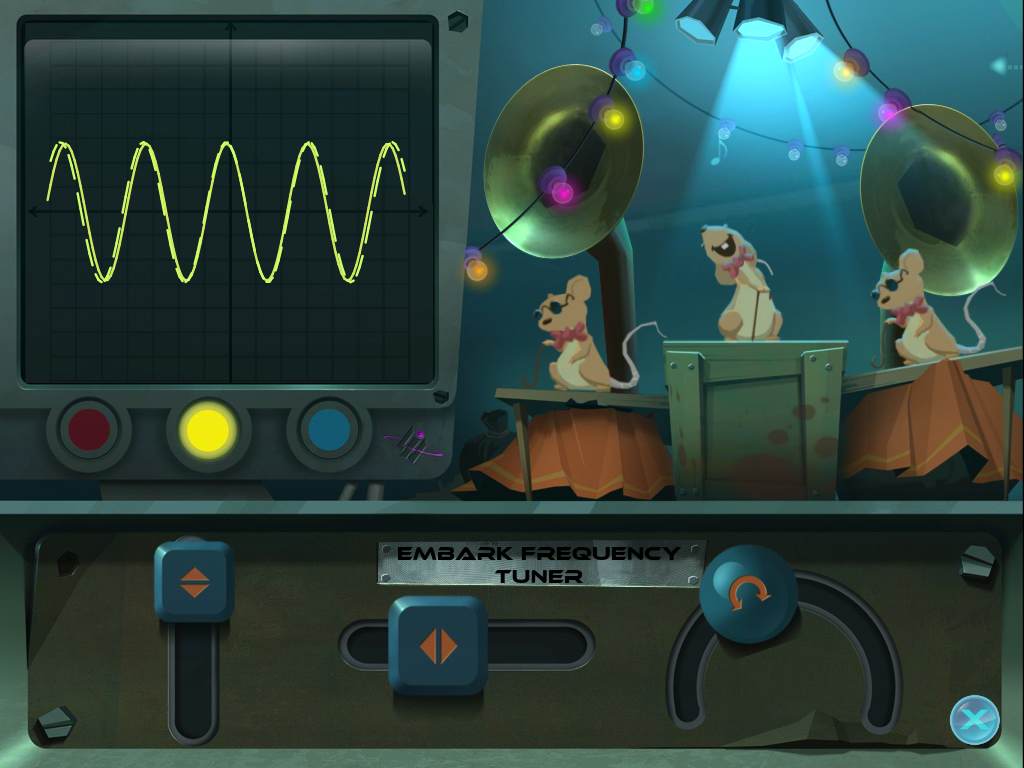
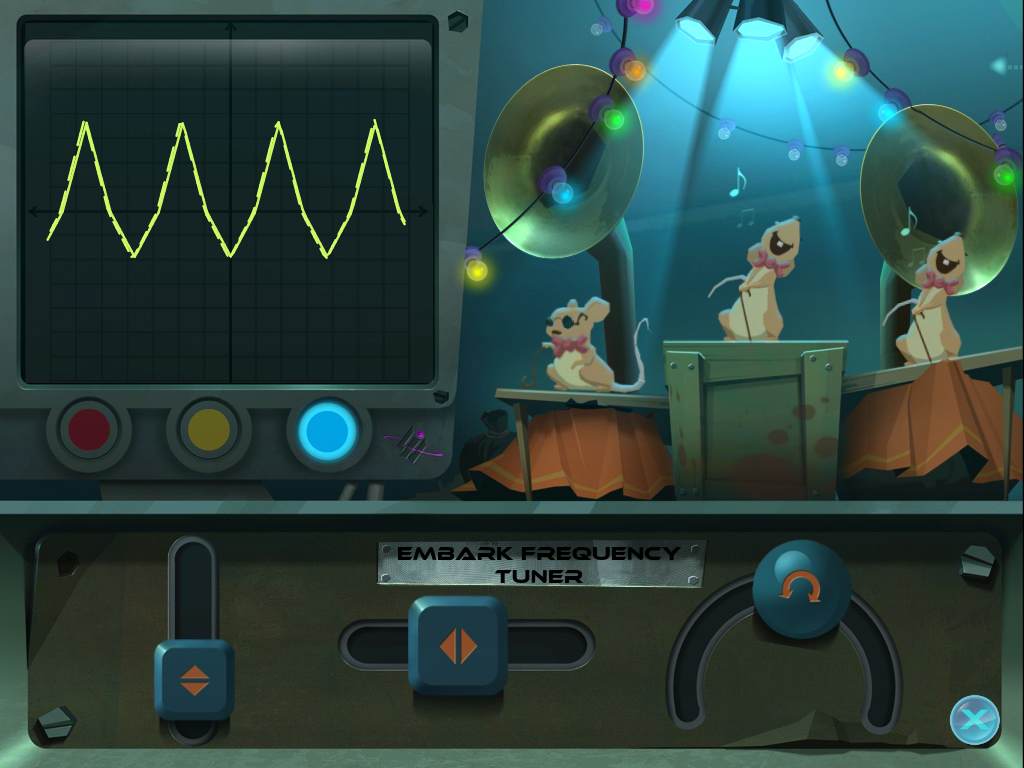
Tap the flashing screen to the left of the mice to start the puzzle.
Adjust the sliders at the bottom to match the two wavelengths on the monitor.
Tap and drag the knobs in each slider to move them, then watch the monitor to see how the slider movements affect the frequencies.
The yellow dotted line indicates the goal wavelength and the solid line represents the current wavelength. If the solid line is red, it is very out of tune with the goal wavelength. A yellow line means it is closer to matching the right wavelength.
Solution Part 1.
Solution Part 2.
Solution Part 3.
Once the puzzle is solved, the mice's lullaby will put the robot guard to sleep.
Part 3
Continue through the exit on the right to return to the key room. Note that you're still missing one last crate before you can reach the key.
Tap the red valve on the pipe near the entrance to zoom in.
Turn the pipe towards the empty circle on the left to lower the sewer water level.
Go back through the left door to return to the singing mice, then walk down the stairs.
Pull the red switch above the sleeping robot to activate the spring mechanism, which will launch the crate on the upper level to the room on the right.
Open the cage in front of the spring mechanism, then collect Guinness's Dog Tag (5/42) inside.
Climb back up the stairs and go through the right exit to return to the key room.
Inspect the red valve again; this time, turn it to the right towards the half-filled circle to raise the sewer water level and the floating crates.
With all four crates now in position, you can move to the platform on the opposite side of the crates and pick up Mollie Ollie's dog tag (6/42).
Pick up the Gator Key hanging in front of the archway.
Return to the valve on the left and turn it towards the empty circle at the left side to lower the water level one last time.
Move left, go down down the stairs, then walk left again to return to the lower level of the hungry skulls bridge. From there, go all the way left across the skulls to the the other side of the room.
Pick up Salvador's Dog Tag (4/42) on the ground by the edge of the water.
Hop across the skulls to the platform at the middle of the water.
Tap the lock on the alligator's tail to use the Gator Key.
Chapter 2 - Skull Island
Part 1
Tap the hole in the sand where the boy fell in to climb back out.
If you approach the pirate, he'll demand 500 gold from you. You don't have any money yet, so you'll have to return later.
Use the plunger on the detonator at the far left side of the scene to fire the cannon and blast open the door to the skull room.
Tap the vine tied to the platform in front of the skull room to loosen it.
Climb up the vine, move left to the platform, then go through the opened doorway into the skull room.
Pick up Zander's Dog Tag (30/42) on the floor at the left side of the room.
Inspect the arcade machine for a closer look.
Select your difficult, Easy or Hard, then tap the screen to start a game of Pier Pressure.
Instructions:
Aim and fire your slingshot to destroy enemy ships.
Tap and hold the screen to aim the target reticule, then release to launch a cannon ball.
Tap to destroy incoming bombs before they can hit your own ship. Shots from enemy ships travel at a horizontal path, while submarine missiles will drop down vertically.
The icon at the upper left corner indicates the damage your ship has taken. If you take too much damage, your ship will sink.
When you reach the giant skull, target your shots at the eyes. The red circles inside the eyes represent how many remaining shots are required to destroy it (each shot will remove one circle).
Tips:
Start by destroying the landmines directly in front of your ship to clear the path and stack up a few points for a combo.
When the ships start to approach, aim towards the center and at the farthest range to destroy the ships before they can move to the side or get near you.
You earn extra points for destroying those ships on the horizon as well as for the ships that are at very close range.
Submarines also give a lot of points when destroyed, and as a bonus, the explosion from a destroyed submarine will also take out any nearby enemy ships within the blast range.
Time and aim your shots carefully to stack combo points as high as possible, missing a single cannon will break your combo. Destroying incoming enemy fire also earns you combo points.
The best way to stack the most combo points is by detonating as many enemy cannons fired at you as possible at the end fight scene against the skull. Alternate between firing a few shots and then destroying the cluster of incoming bombs, but don't forget to keep an eye on the countdown timer if you're playing on Hard mode.
After the arcade is complete, open the treasure chest that is lowered to the floor and take out all the gold coins inside to reveal a note at the bottom.
You can use your Visor tool (the icon at the upper right corner) to view how much money you've earned from Pier Pressure. Look for the number above the button that says "More Games."
Exit the room and then climb down the vines to return to ground level.
Approach the robot pirate, who will attack you and take 500 gold from your inventory.
Tap your character to stand back up, then tap Iris to free her.
Inspect the message in a bottle on the sand that Iris is pointing to.
Iris will paint you a Megaphone on the paper. Tap to add it to your inventory.
Follow Iris to the right to enter the next scene.
Once you enter the scene, read the message that's pinned to the tree by the sword.
Note a few important details found on the page: A drawing of a large bird eating a coconut, the written reminder that a sword can be found stuck in a rock across the piranha river, and the post script message that says "have a heart."
Open the left cage to free the dalmatian puppies. Open the right cage to free the black dog.
Take Caroline's Dog Tag (37/42) that's hanging from a nail near the bottom of the zipline post.
Continue moving right to the shore of the island.
Pick up Ollie's Dog Tag (36/42) on the ground to the left of the catapult.
Tap the coconuts in the tree to drop one to the ground. The yellow bird sitting in the palm tree will fly down and eat the coconut. Feed the bird three coconuts to make it roll on to the catapult.
Step on to the catapult with the bird. Tap the microphone hanging from the tree to lower it. When the bird shouts out, the catapult will launch you into a nearby canoe.
Part 2
Tap your character at the front of the canoe to stand up. While in the canoe, tap the boat to make the three blind mice row it forward. Pay attention to your surroundings for any Dog Tags while travelling in the boat.
Find Lexy's Dog Tag (14/42) in the left eye of the first skull at the start of the scene.
Next, find Jake's Dog Tag (15/42) being held by the crab on the rock to the left of the parrot sign.
Tap the parrot sign to lower it, revealing Moke's Dog Tag (13/42) on the leaf behind it.
Row all the way to the right to enter the cave. After a short cut scene, the robot will lock you inside.
Pick up the Grappling Hook hanging from the rock wall beside the front of the canoe.
Collect Milo's Dog Tag (29/42) on the ledge at the far right side of the room.
Complete the minigame to escape the cave.
Study the panel on the wall with a pattern of red and green lights.
Also note the speakers in the wall that have a "Bark!" text speech that is colored either red or green.
If, for example, a speaker give a red "Bark!" shout, when you tap it, it will clear one red light on the panel below.
Tap the speakers in the same color order as the pattern in the panel on the wall to clear all of the red and green lights.
Hit the speakers in the following order: Red - Green - Red - Red - Green - Green - Red.
The position of the speaker doesn't matter so long as they are the correct color.
Screenshot.
The laser wall blocking the exit will disappear once the puzzle is solved. Tap the exit to leave the cave.
Tap the broken rope at the upper right corner of the scene to throw the grappling hook upwards.
Climb up the rope hanging from the grappling hook to climb up to the tree branch.
Move left across the vines and collect Callie's Dog Tag (9/42) hanging at the end of the branch.
Go right across the vines, drop down to the ledge, then continue right to the pirate shop.
Inspect the vending machine at the bottom of the pirate vendor's stall.
Your current amount of gold from the Pier Pressure arcade game is visible at the top right corner of the machine.
There are several important items here and a few unnecessary items (the ball and the two fortune cookies) just for fun and for the Everything Must Go achievement.
You can purchase two collars to add to your collection. Item A1 is Hannah's Dog Tag (7/42) and A2 is Rorschach's Dog Tag (8/42).
Buy the foot stool (item B3) for 500 coins, this is the only absolutely necessary item. The heart (B1 - $500) and the rocket (B2 - $500) are also useful for later, although they not required, but it is recommended to purchase those as well if you can afford them.
Purchase an item from the machine by identifying its purchase code, then hitting the appropriate buttons at the bottom of the machine. Finally, press the "OK" button above the coinslot to confirm your purchase.
The cost of the item will be subtracted from the gold in your inventory.
If you need more gold from the arcade game or if you just want to travel back to the first section of Skull Island, you can ride the zip line basket.
Step inside the basket and pull the lever at the top to ride the basket back to the shore. When you're ready to head back, just step inside the basket and pull the lever again.
Tap the area on the ground below the vines to place the Foot Stool from the vending machine.
Climb up the foot stool and move to the right across the vines, then drop drown to reach the other side of the piranha-filled river.
Take the Sword from the rock above the "Keep Out" sign.
Climb back up to the vines, move left, and drop down to return to the left side of the river.
Talk to the pirate at the stall to give him the Sword from your inventory.
In exchange, pick up the Skeleton Key that falls to the ground at the bottom of the zipline post.
Climb across the vines to reach the right side of the river one more time. Drop down and use the Skeleton Key to open the door in the skull's mouth.
Part 3
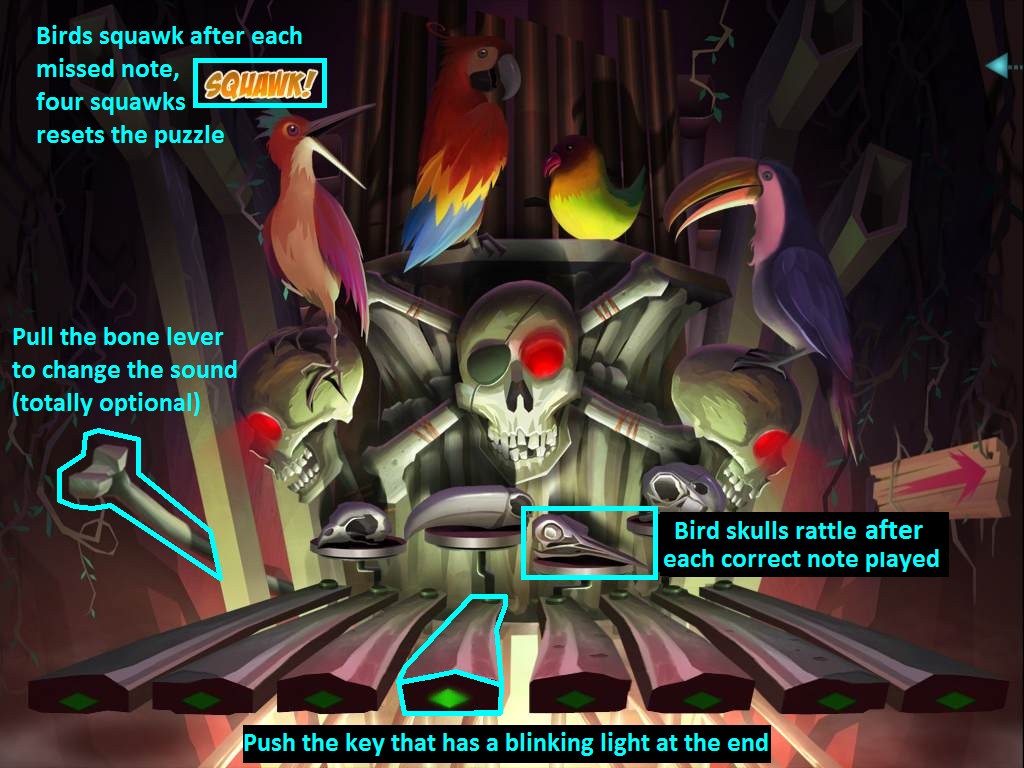
Go through the opened skull door to enter the organ room.
Pick up Malcolm's Dog Tag (26/42) wrapped around the stump near the lower left corner of the room.
Inspect the organ for a closer look.
Push any of the four incorrect keys to fall into a hole in the floor.
Tap the hole to climb out, then tap the big yellow bird in the wall to make it spit a coconut into the hole, plugging up the trap.
Examine the organ again, now you can complete the puzzle without any interruptions.
Press the correct keys on the organ that are indicated by a blinking green light.
The skulls at the bottom of the organ will rattle when a correct key is played. Conversely, birds at the top of the organ squawk when an incorrect key is played. If you make four mistakes and all of the four birds squawk, the puzzle will reset.
You can pull the bone lever at the left side of the organ to change the sound of the instrument.
Example.
After the puzzle is solved, push the red button that appears in the center skull's left eye to lower the cannon.
Approach the cannon to start the minigame Ship Invaders.
Instructions:
Destroy the six waves of robot pirates while dodging their attacks. Attacks from enemies appear as blinking bombs, red triangles, and pink circles.
Swipe left or right to move the cannon, which fires automatically only while the cannon is in motion.
Collect power-ups that fall to the ground: the double cannon allows you to fire two shots simultaneously, the coin provides a big boost to your score, and the heart restores one of your lives.
Each enemy you destroy adds to your streak counter which amplifies your score, but being hit by an enemy will reset your streak.
Tips:
If you purchased the rocket and the heart from the vending machine, they can help you greatly at this game. The rocket is an automatic attack fired from your cannon that hones in on enemies, allowing you to focus on dodging enemy fire. The heart adds an extra life to your tally at the upper right corner, allowing you to withstand one additional hit.
To get a high score, focus on dodging attacks to keep your streak counter high and make sure to quickly grab coins.
Detonate barrels of TNT by firing at them with your cannons to cause a large explosion that can take out any nearby robot pirates.
After the game is complete, climb up the ladder and collect the three dog tags on the platforms.
CJ's Dog Tag (11/42) is on the bottom tier, Izzy's Dog Tag (10/42) is on the middle tier, and Cora's Dog Tag (12/42) is on the upper tier.
Climb past the top of the ladder to start the cut scene.
Chapter 3 - The Museum
Tap the boy to drop down from the parachute.
Enter the diving bell at the top of the stairs to start the ride.
The ride will take you through several different exhibit stages. Each stage contains a different set of challenges as well as secrets that you can uncover.
Part 1 - Prehistoric Ocean
In the first scene, tap the dangling light and the glowing blue circles to shoot them as well as any other fish or creatures that swim by to add points to your score at the upper right corner.
You will receive a diminishing amount of points for hitting the targets.
When the snakes appear in the next scene, tap the head of the snake to destroy it before they swim up or down and out of the scene.
Secret: Look at the lower left corner to find a miniature black snake. Shoot it repeatedly to destroy it.
Shoot the jellyfish in the third scene for points.
Secret: Four slow-moving large fish will swim from one side of the screen to the other. Rapidly tap the big fish repeatedly to free the small fish held in their stomachs.
When the ride comes to a stop, attack the dangling light several times to get swallowed by the large fish.
Shoot at the fish's eye to damage it (it will turn red when hit) until the fish spits you out.
Pieces of the ceiling will cave at this point, causing Max's Dog Tag (41/42) to appear at the upper left side of the tunnel. Tap to collect it before you enter the next area.
Part 2 - Coral Reef
Shoot the giant octopus's tentacle to add the gear it's holding to the tram mechanism.
If you shoot the coral sections around the area, you will earn points and release fish that you can also attack for more points.
Secret: Shoot all 6 of the coral sections.
Also tap to shoot the UFO when you see it flying around the top of the scene.
Collect Duke's Dog Tag (17/42) that drops down from a fishing line at the top of the screen.
Secret: Tap the shark that's swimming at the top of the water to make it jump up and bite at the air. Time the shark's jump (tap just a little before the fish actually reaches the shark) to catch the flying fish as it passes by.
Open the treasure chest to reveal a second gear, then use the crab to pick it up.
Tap the hermit crab hiding in the rock at the lower left corner of the screen to move it to middle of the scene.
Tap the crab another time to move it to the treasure chest, then tap it again to make it pick up the gear.
Shoot the crab once again to make it carry the gear to the rock at the middle of the ocean floor.
Tap the hook to lower the fishing line down, then shoot the crab one last time to make it attach the gear to the hook.
Shoot the fishing hook once to raise the line upwards, which will add the gear to the mechanism.
When the blue whale appears, simply shoot it to make it release the last gear which will float in a bubble to the upper right area of the water.
Pop the bubble around the gear to add it to the mechanism and move on to the next scene.
Part 3 - Prehistoric Man
Tap the cavemen to make them attack the triceratops before it reaches the villagers.
The rear caveman will throw his spear for a long ranged attack while the front caveman will thrust his spear for a short ranged attack.
If you take too long, the triceratops will advance on the cavemen and the minigame will reset from the beginning of this scene.
Use the rear caveman to launch spears at the triceratops to push it back and over the edge of the cliff.
Secret: Shoot the pteradactyl that flies out from behind the right side of the volcano.
Secret: Tap the lower right section of the volcano repeatedly to reveal an egg inside a hidden cave. Shoot the egg to crack it open, then tap the last piece of eggshell on top of the bird's head.
Shoot the lower left wall section of the volcano as well to find a second cave. You will automatically receive Lola's Dog Tag (40/42).
Once the triceratops falls, the basket carrying you will lower to the next scene.
Part 4 - Medeival Period
Tap the red windows in the tower to make the archers shoot at the sieging black knights.
The sections in the circular window at the center of the castle wall will fill every time a black knight is destroyed by an archer.
You can tap the knights to shoot them with your laser to stop them in place, which also earn points.
Do not let the black knights reach your castle! They will light the castle on fire and burn it down, forcing you to restart.
Secret: Open the grey windows to find Iris.
Secret: Tap the catapult beside the upper left tower of the castle to launch the Dog Tag.
Collect Asha's Dog Tag (16/42) after it lands on the platform at the upper right side of the scene.
When the evil king arrives, you can tap him for points before the dragon destroys him.
As you transition to the next scene, tap the grey windows to find Iris and earn a large amount of points.
Posted by: Trinn |
March 30, 2013 11:29 PM
|
March 30, 2013 11:29 PM