
G.H.O.S.T. Chronicles:
Phantom of the
Renaissance Faire
Platform: Mac, Windows
![]() Ah, the Renaissance Faire. It's an excuse for grown men to walk around in tights, and for women to wear elaborate corsets that were designed with the apparent misconception that breathing is a luxury, not a necessity. There are the minstrels playing lutes, the exciting joust tourneys, the phantoms, the bad English accents, and all without the annoyances of things like poor bathing habits and the Black Plague. Wait a minute, phantoms?
Ah, the Renaissance Faire. It's an excuse for grown men to walk around in tights, and for women to wear elaborate corsets that were designed with the apparent misconception that breathing is a luxury, not a necessity. There are the minstrels playing lutes, the exciting joust tourneys, the phantoms, the bad English accents, and all without the annoyances of things like poor bathing habits and the Black Plague. Wait a minute, phantoms?
 Yes, phantoms. In the hidden object game G.H.O.S.T. Chronicles: Phantom of the Renaissance Faire, you play a ghost hunter called in to aid a renaissance faire/theme park that has seen better days. First, one of its esteemed owners, Margaret, dies. Not long after that her husband and co-owner, Robert, also passes on. But before Robert's untimely death he remarried, dooming the fate of the Spears' family park to a legal battle between Robert's widow and his son. If all that daytime TV drama weren't enough, the poor faire appears to have become the residence of a particularly nasty spirit that has disrupted the day to day lives of the park and her employees.
Now you must track down the ghost, if indeed the phantom is a real ghost, and help put a stop to the strange goings on that have plagued the renaissance faire. To do this, you'll need to hunt down plenty of hidden objects and solve a number of item based puzzles. Keep on the look out for fairies while you roam the grounds of the faire for these little nymphs will aid you on your quest. Depending on the difficulty level you select, they will either give you hot or cold type clues, or just hover around particularly elusive objects.
Investigate the grounds thoroughly and help put its employees and more benign spirits at rest. If you keep your wits about you and exercise your keen object finding skills you should be able to hunt down the trouble-making spirit and perhaps even settle once and for all the fate of the renaissance faire.
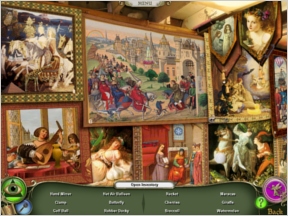
 Analysis: While Phantom may have a strong adventure game element going for it, perhaps its strongest point is the core hidden object game itself. Note to other would-be makers of hidden object games: this is how you hide objects! I tend to be picky when it comes to this genre of games, and Phantom gets it right from the start.
Instead of shrinking items down impossibly small, or using objects so obscure you wouldn't be able to tell what you're looking at even if it smacked you in the face and called you a rude name, there just doesn't seem to be any end to the cleverness with which the items are hidden here. I can't count how many times I've used hints only to chuckle at how well I had been tricked. Everything from color manipulation to a solid understanding of lines and contours is used to camouflage items in plain view making these items a particular treat to look for.
This alone would make a game that is satisfying to me, but Phantom holds so much more for the discerning object finding enthusiast. On top of the exceptionally well hidden objects, the item based puzzles that are becoming a staple of the genre are themselves quite clever and intuitive, and in at least one instance had me tempted to perform an experiment in my kitchen sink. This element of the game is just challenging enough to keep your gray matter chugging without causing it to steam up or flame out in frustration.
Also, Phantom just looks beautiful. Have you ever been to a theme park and wondered what it would be like to roam around after hours with the attractions all to yourselves? Somehow Phantom manages to capture that feel perfectly. No, the images aren't breathtakingly beautiful, but instead they portray a kind of quieter, meeker elegance that exudes the feel of getting to see something magical from behind the scenes.
Rounding out a solid package is the story telling. As you make your way through the park, you'll meet a host of characters, alive and otherwise, that stitch together the animosity riddled strife that hangs over the renaissance faire. The ghosts genuinely feel put off by the new mischief making spirit, whilst the living inhabitants gossip with an almost morbid glee about the melodramatic plot regarding the park's ownership. Strong writing and good voice acting seal the deal here.
There are a few things that hold Phantom back, though. For one, character animation is almost laughable, and you get the feeling that the developers should have either chosen static images or gone with full animation instead of trying to find a happy medium between the two (because the medium that was found was anything but happy). Also, while the story telling during the game is quite exemplary, the same could not be said at the beginning and end of the game. You are essentially dumped into the game with little explanation, and the ending was something of a let down.
But though the ending was a disappointment, that can't detract from the fact that the game itself is a blast. Excellent adventure elements and hidden objects done right make this a great game for item hunting enthusiasts.
![]() Windows:
Windows:
Download the demo
Get the full version
![]() Mac OS X:
Mac OS X:
Download the demo
Get the full version


Walkthrough Guide
(Please allow page to fully load for spoiler tags to be functional.)
G.H.O.S.T. Chronicles: Phantom of the Renaissance Faire Walkthrough
General Information
There are two modes to play: easy which includes a tutorial and additional hints throughout the game, and hard which skips the hints and the tutorial.
Move the mouse pointer to scroll across the screen.
Areas that can be entered will throw a shower of sparks when your mouse pointer travels over them.
Areas that have been completed will state "area complete" when you scroll over them.
A green direction arrow will appear to allow you to travel forward, backward, and down side streets into areas that are not visible. Just click when the arrow appears and you will travel in that direction.
Although some of the items are always in the same place no matter how many times you play, many of the hidden objects are placed randomly or the lists of objects to find are random. This walkthrough will address the permanently placed items, hidden items, and objects that need manipulation.
Some objects are hidden and will only be revealed if a list of items is completed or an action is taken.
Make good use of the magnify filter, some objects can be hard to spot.
If an area sparkles and says "there is a strong psychic aura" there is an object hidden there that can only be revealed when a list is completed. Use the "psychic eye" filter to see what is hidden there.
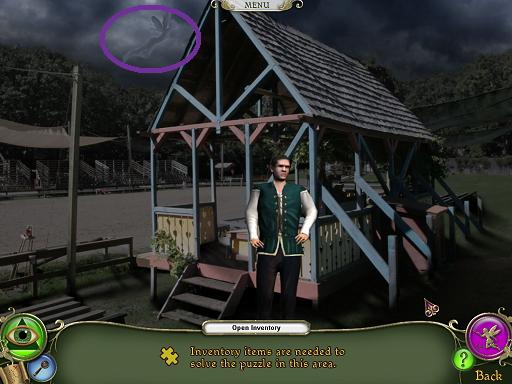
Find fairies in the scenes for additional hints. According to the game there are 68 fairies scattered throughout the areas. Some areas have no fairies at all, some have one, most have two, and some have three.
When you enter a scene if there is a person there always click on them. They will give you information about what is going on with the park or information about the scene. When they are done talking click them again, they sometimes have additional information about what needs to be done.
In addition to hidden objects some scenes contain information in the form of newspapers or letters. Click on them to read.
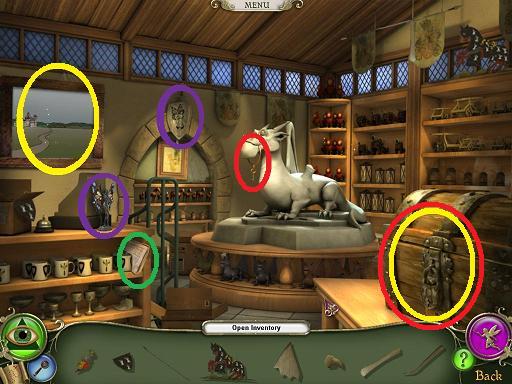
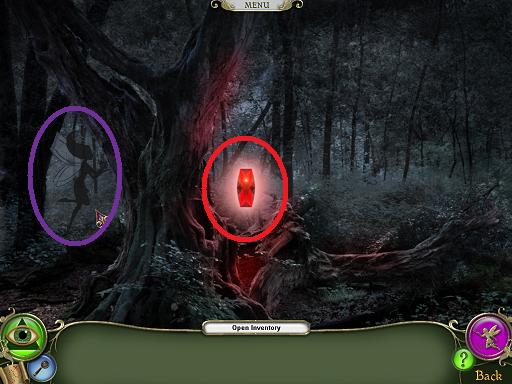
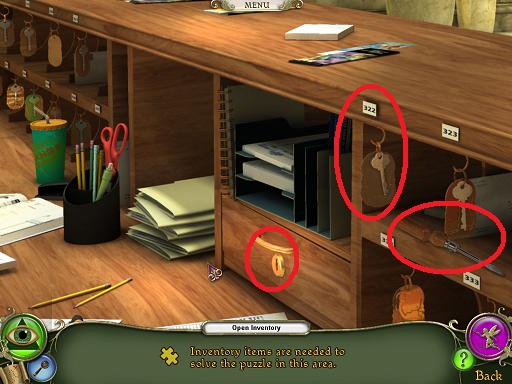
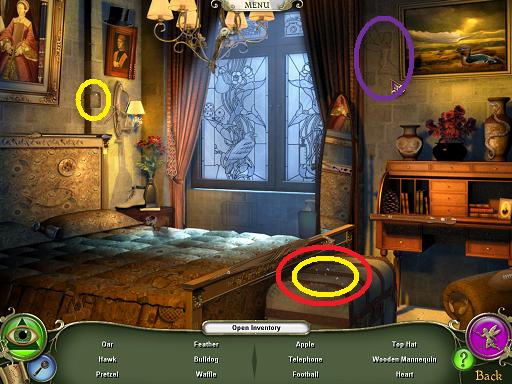
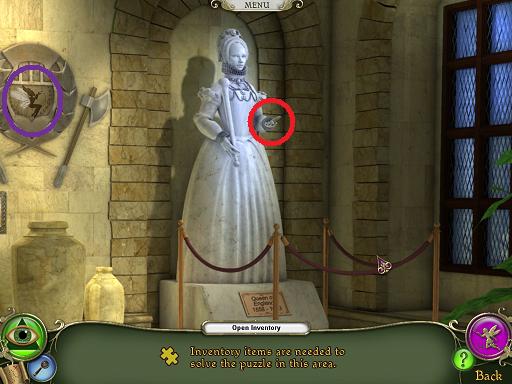
In the screenshots colors indicate the following:
Purple - Fairies
Red - Objects to take or manipulate (inventory)
Yellow - Areas that are hiding objects
Green - Information (newspapers, articles, etc.)
Main Street
Your ultimate goal is to get over the bridge which is between the Corn Cob and the Bakery. To do this you will have to accumulate a hammer, nails, and wood to repair the bridge.
Scroll to the left and enter the Souvenir shop.
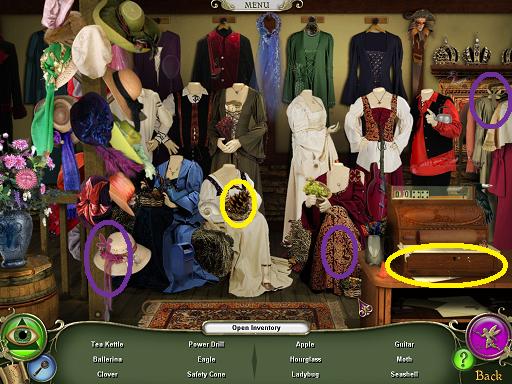
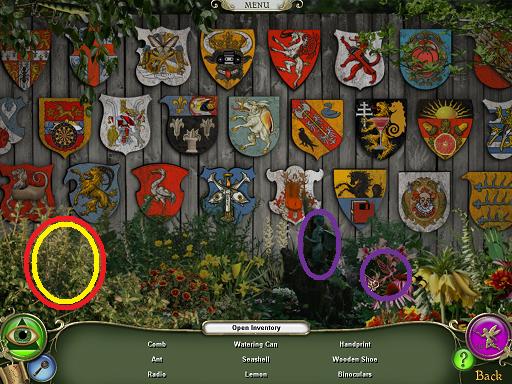
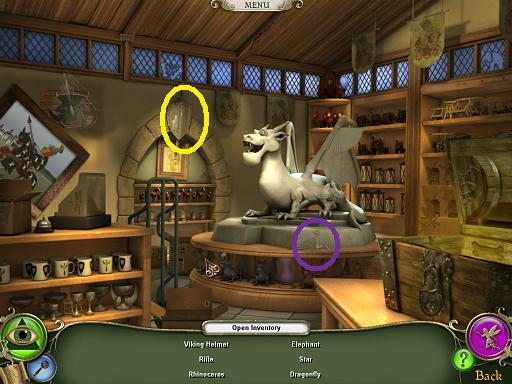
Souvenir Shop
screenshot
Read the newspaper.
Find the fairies (2).
Find the items to complete the dragon. Once the dragon is complete take the keys.
Open the chest with the keys. This will reveal the last piece to complete the knight picture.
When the picture is completed it will fall away to reveal a spider. Take the spider (ewww).
Go back to the street.
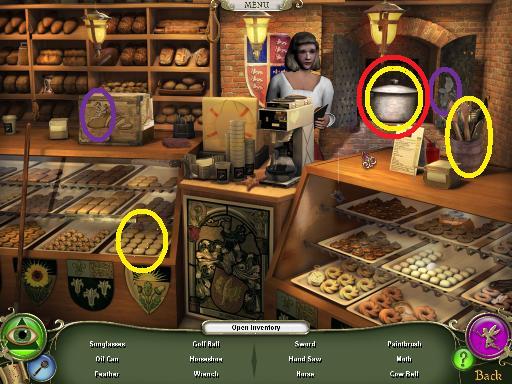
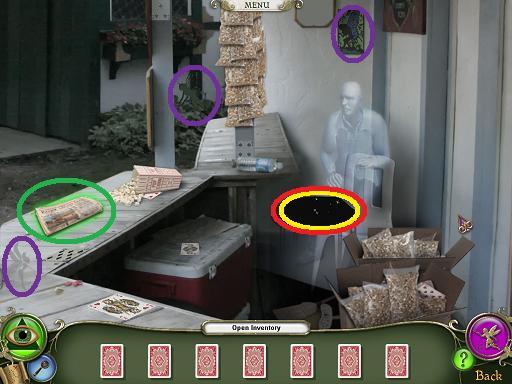
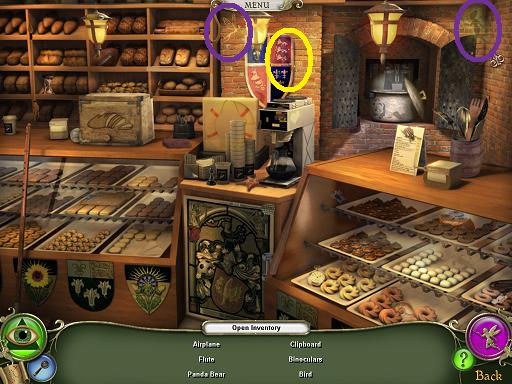
Scroll to the right, skipping the wishing well and the Corn Cob until you reach the Bakery. Enter the bakery.
Ye Old Bakery
screenshot
Find the fairies (2).
Complete the right hand list to reveal tongs in the utensils. Take the tongs.
Complete the left hand list to reveal an oven mitt under the cookies. Take the mitt.
Use the mitt to open the hot cooking pot.
Use the tongs to fish out the spout.
Go back to the street.
Scroll further right to Merlin's Spells. Enter.
Merlin's Spells
screenshot
Find the fairies (1).
Complete the right list to reveal a symbol in the shelf of books.
Take the symbol and place on the gray book. This will reveal the left list.
Complete the left list to open the book and reveal a hose. Take the hose.
Go back to the street.
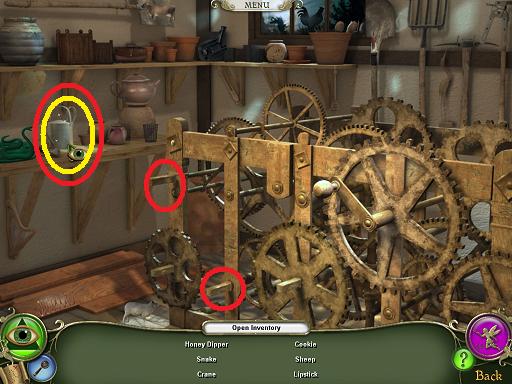
Scroll left to the Corn Cob.
Corn Cob
screenshot
Find the fairies (1).
Take the axe head.
Take the bucket.
Place the spider on the web. This will cause the tree to leak sap.
Place the spout in the hole in the tree leaking sap.
Place the bucket on the spout and let fill with sap. Take the bucket back.
Place the bucket of sap on the axe handle.
Place the axe head on the handle. This will reveal a pulley wheel.
Take the pulley wheel.
Go back to the street.
Scroll left to the Wishing Well.
Wishing Well
screenshot
Find the fairies (1).
Place the pulley on the pump.
Place the hose on the pump.
The well will drain to reveal a hammer. Take the hammer.
Go back to the street.
You now have the hammer. Arrows will now appear leading you down the left and right streets.
Click on the left arrow.
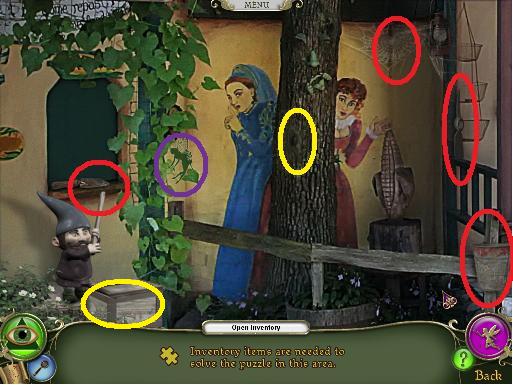
Left Cul-de-Sac
scroll all the way to the left. Click on the wood wall behind the cottage.
Wall
screenshot
Find fairies (1).
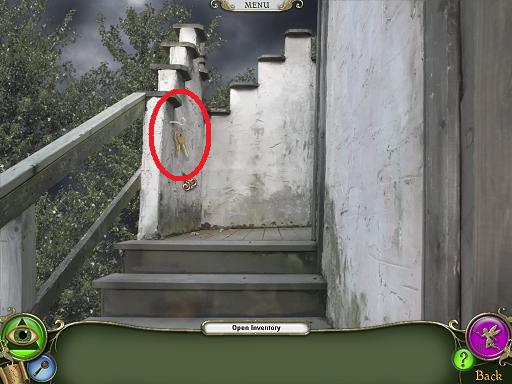
Take key on windowsill.
Go back to the street.
Scroll all the way to the right until you reach the Chocolate shop.
Enter Chocolate shop.
Queen's Chocolates
screenshot
Find the fairies (3).
Read the newspaper.
Find cards.
Talk to the ghost. There is still one card missing.
Go back to street.
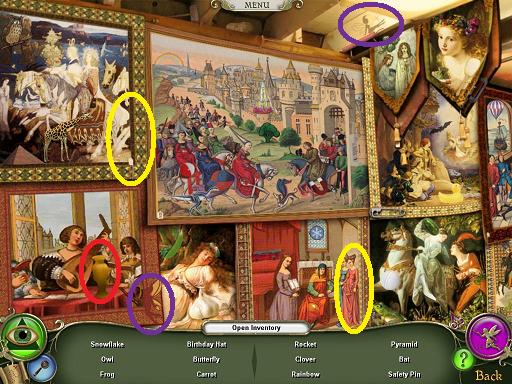
Scroll left to the Tapestry Shop.
Tapestry Shop
screenshot
Find the fairies (2).
Complete the left list except for the butterfly (missing).
Complete the right list except for the rocket (missing).
Go back to street.
Scroll left to the Gnome Home.
Gnome Home
screenshot
Find the fairies (3).
Take the seeds from the rack on the left.
Read the article.
Find the objects (spout for watering can will be missing).
Once the objects are found the gnome will dig a hole revealing a rock. Take the rock.
Back to the street.
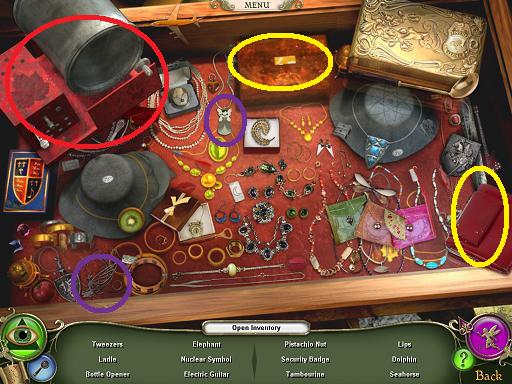
Scroll left to the Jewelry Store and click on it.
Use the key in your inventory to unlock the door.
Enter the store.
Medieval Jewelry
screenshot
Find the fairies (2).
Complete the left list to open the jewelry box. Take the tumbler rod.
Complete the right list to move the wallet. Take the belt.
Put the pulley rod and belt onto the rock tumbler.
Put the rock from your inventory into the repaired rock tumbler. A diamond will be revealed. Take it.
Go back to the street.
Scroll right to the gnome home. Enter.
Gnome Home
Plant the seeds in the hole where the rock was dug up.
Give the diamond to the boy gnome on the porch.
The girl gnome on the porch will move to reveal the missing spout. Take it.
The gnome in the tree will water the seeds. A flower will grow.
Take the flower.
Back to the street.
Scroll right to the Tapestry Shop.
Tapestry Shop
screenshot
Put the flower in the vase in the lower left painting. A butterfly will appear.
Take the butterfly to complete the left list. A rocket will appear.
Take the rocket to complete the right list. A card will appear.
Take the card.
Go back to the street.
Scroll right to the Chocolate Shop
Queen's Chocolates
screenshot
Give the card to the ghost.
Take the crowbar.
Go back to the street.
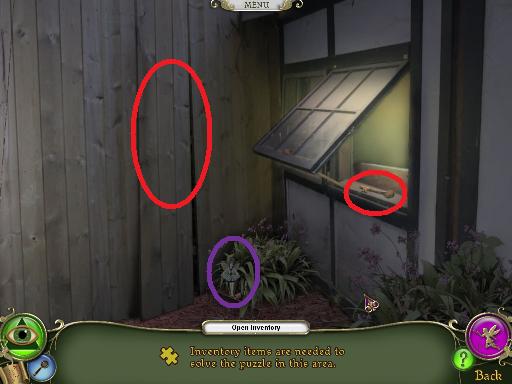
Scroll all the way left back to the wall.
Wall
screenshot
Use the crowbar on the loose part of the wall.
Take the planks.
Go back to the street.
When you move the mouse towards the bottom of the screen a green arrow appears pointing backwards. Click.
Main Street
You are back on the main street. You now have the hammer and the planks. All you need are nails!
Scroll right until a green arrow appears pointing to the right. Click.
Castle Road
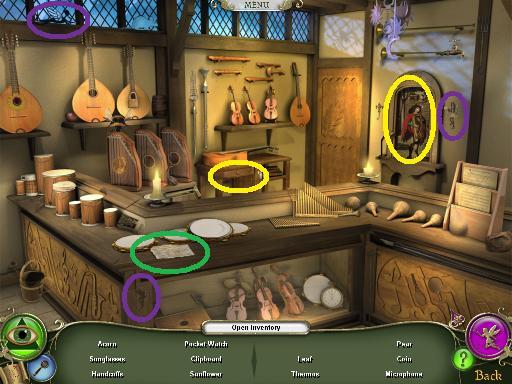
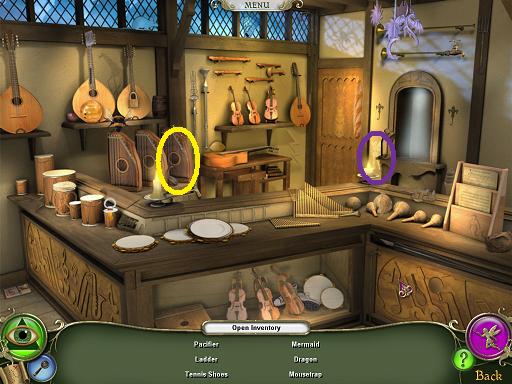
The first store on the left is a Music Shop. Click to enter.
Music Shop
screenshot
Find the fairies (3).
Read the article.
Complete the left list to open the drawer (reveals a microphone).
Complete the right list to open the painting. Take the cannon.
Go back to the street.
Click on the building just to the right of the Music Shop.
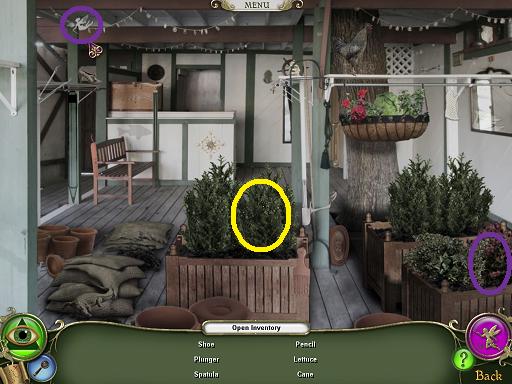
Porch
screenshot
Find the fairies (2).
Take the shovel.
Go Back to the street.
Scroll all the way to the right to reach the clothing store.
Ye Clothier
screenshot
Find the fairies (3).
Complete the left list to reveal an apple.
Complete the right list to open the cash register.
Take the sacks.
Go back to the street.
Scroll left until a green arrow appears pointing to the right. Click.
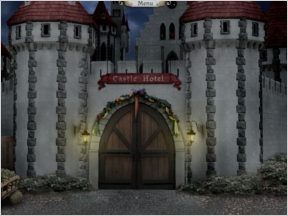
Castle Hotel Courtyard
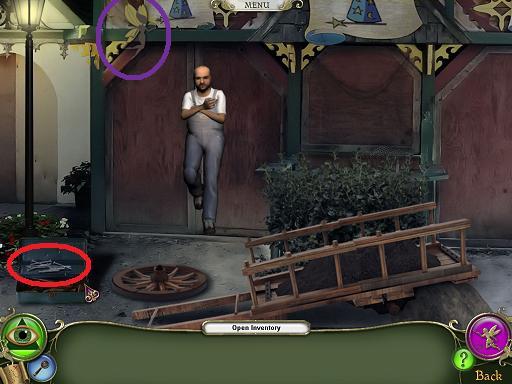
Scroll to the left and click on the groundskeeper.
Groundskeeper
screenshot
Find the fairies (1).
Talk to the groundskeeper, he will ask for your help.
Go back to the courtyard.
Scroll right to the Hotel Doors. Click on them.
Hotel Doors
screenshot
The doors are locked, you cannot get in at this time.
Find the fairies (2).
Go back to the courtyard.
Scroll all the way to the right to reach the Armory.
King's Armory
screenshot
Find the fairies (2).
Find all the listed objects except the white flag.
Take the cannon from your inventory and place on the pirate ship.
Take the white flag from the merchant ship, this reveals a sledgehammer at the base of the suit of armor.
Go back to the courtyard.
Go the area just left of the armory.
Trebuchet
screenshot
Place the sacks on the trebuchet platform (where you would place a stone).
Use the shovel on the dirt to the right of the platform.
Use the sledgehammer on the Trebuchet pin (just left of the platform).
Fire!
Go back to the courtyard.
Go back and see the groundskeeper.
Groundskeeper
screenshot
Talk to the groundskeeper, he thanks you for moving the dirt.
Take the nails.
Move the mouse cursor to the bottom of the screen until a green back arrow appears. Click. Move the cursor to the bottom of the screen and click again. You are now back at the Main Street.
Main Street
You should now have all the items necessary to fix the bridge.
The bridge area is just to the right of the Corn Cob. Click on it.
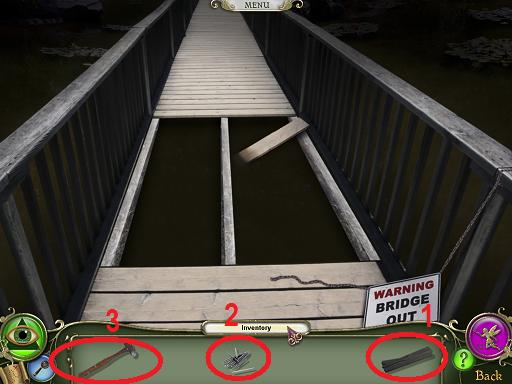
Bridge
screenshot
Place the boards on the hole in the bridge.
Place the nails on the boards.
Use the hammer on the nails.
The bridge is repaired! When you move your cursor to the far end of the bridge a green arrow appears. Click.
Theater District/Nottingham Gate
Theater Road
Scroll left until you see the theater.
Go into the theater and talk to the ghost.
Go back to Theater Road.
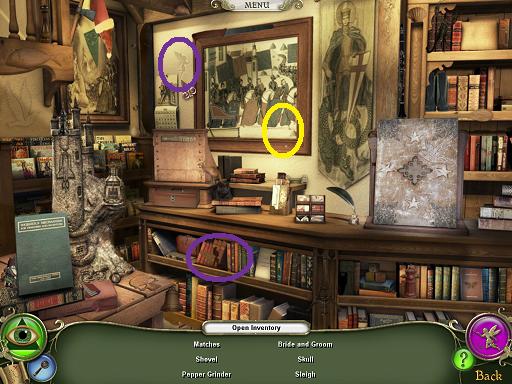
Scroll right to the Portrait Shop.
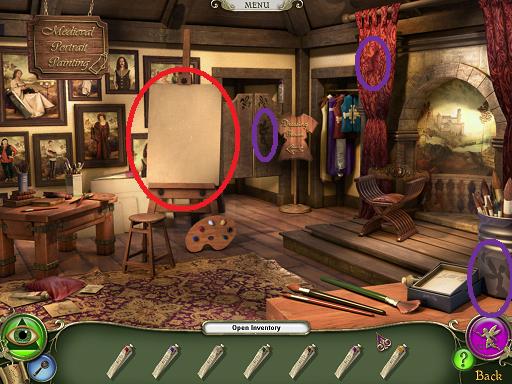
Portrait Shop
screenshot
Find the fairies (3).
Find the paint tubes.
When all tubes are found the portrait will be complete.
Take the portrait.
Go back to the road.
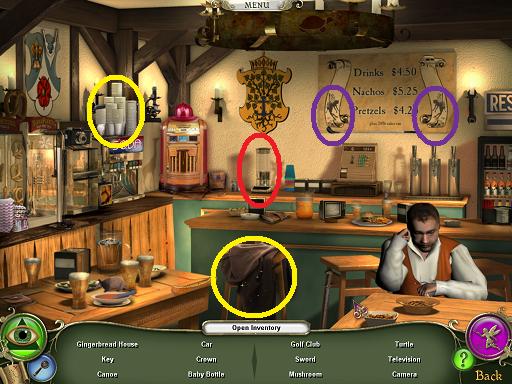
Scroll to the far right until you reach the tavern.
Enter the Tavern.
Tavern
screenshot
Find the fairies (2).
Talk to the man at the table.
Complete the left list and a mushroom will be revealed behind the cups.
Complete the right list and you will find a pineapple under the coat. Take the pineapple.
Talk to the man again, he will ask for a pineapple smoothie.
Make him a smoothie using the blender on the counter.
Give the man the smoothie and take the money he gives you.
Go back to the road.
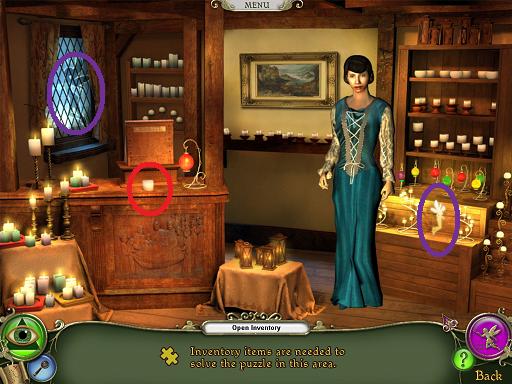
Scroll left to the Candle Shop. Go in.
Candle Shop
screenshot
Find the fairies (2).
Give the lady the money to get the candle. Take the candle.
Go back to the road.
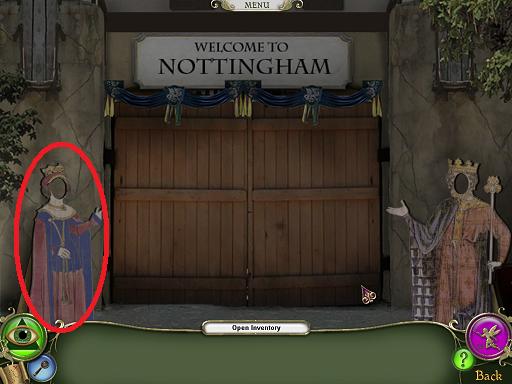
Scroll left until you see the sign to Nottingham. Your mouse pointer will turn into a green arrow pointing towards Nottingham. Click.
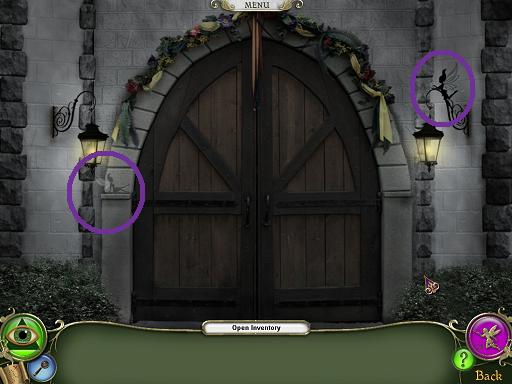
Nottingham Gate
screenshot
Click on the gates of Nottingham.
Take the queen cutout on the left.
Back up to the courtyard.
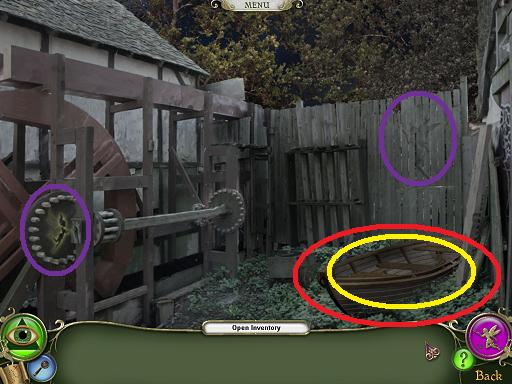
Scroll to the far right until you see some mill machinery. Click on it.
Mill yard
screenshot
Find the fairies (2).
Take the boat.
Under the boat is a white rock, take it.
Go back to the courtyard.
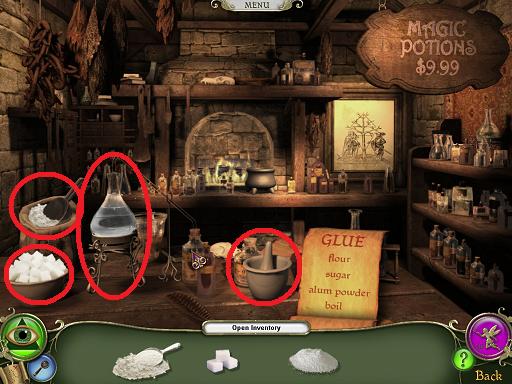
Scroll to the far left until you see the apothecary (white building). Go in.
Apothecary
screenshot
There are no fairies to find.
Find the flour and the sugar.
Put the white rock (alum) in the mortar and pestle then click on it.
Place the candle under the beaker.
Take the beaker of liquid (glue).
Go back to courtyard.
Move the mouse pointer to the bottom of the screen until it becomes a back arrow. Click.
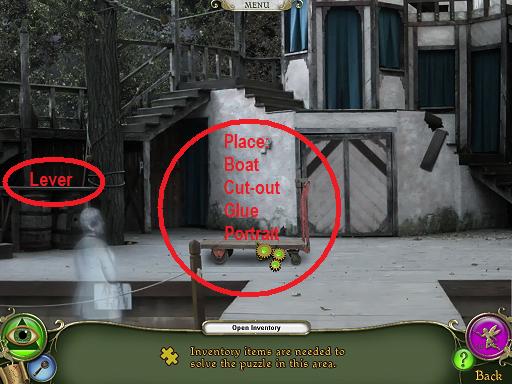
Scroll left to the Theater and enter.
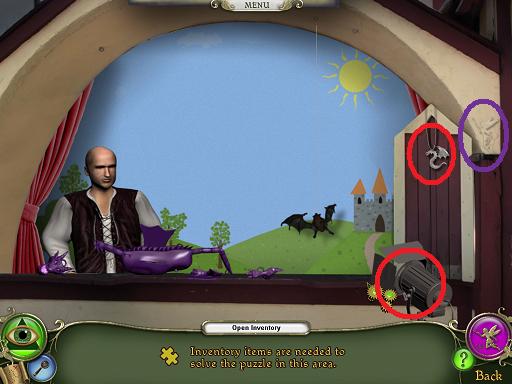
Theater
screenshot
On the stage is a rolling cart. Put the boat on the cart.
Now put the Queen cutout in the boat.
Put the glue on the hole in the cutout.
Put the portrait on the cutout.
The "Queen" will now roll off the stage and the play is over.
The ghost will leave. Click on the stage to enter.
Stage
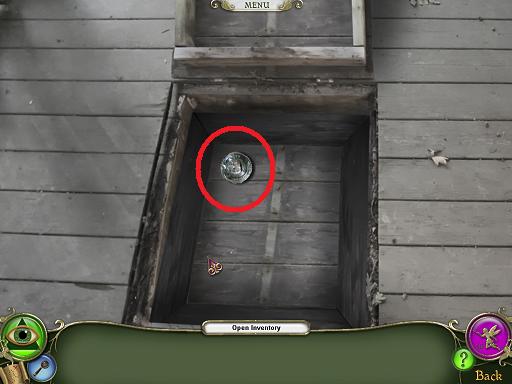
Scroll left to the stairs which are closed for repair. Click on the barrels by the stairs.
Take the lever and back up to the stage.
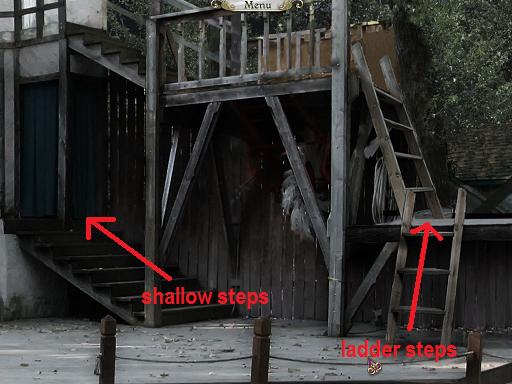
Scroll to the far right. There are two sets of stairs here, a shallow set to the left and a steep set to the right. screenshot
Go up the shallow steps on the left.
Now go forward, then left, then forward.
You should now be on an outside stairway. Take the keys hanging there. screenshot
Go back all the way down to the stage.
Now go up the steep steps, then go up again. Click on the locked door. screenshot
Use the keys to unlock the door, then put the lever on the trap door release.
Go back all the way to the stage.
Now go back up the shallow steps. Go forward, then left, then left again.
You should now be standing at an open trapdoor. Take the object in the trapdoor (fuse). screenshot
Exit the area.
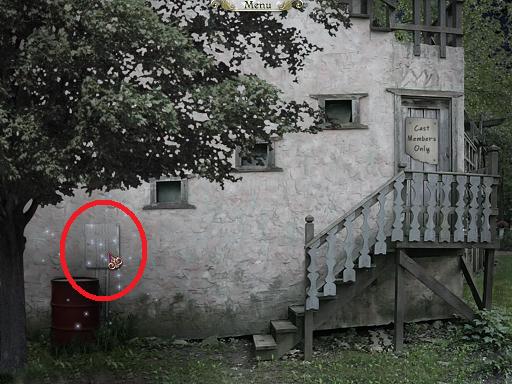
Go back one step and then go right. You should now be outside the theater. screenshot
Click on the fuse box on the lower left.
Put the fuse in the fuse box.
When you exit the scene you will end up at the Nottingham Gate, which is now open. Go through the gate.
Nottingham
Scroll left to the Skill Games booth. Enter.
Skill Games
screenshot
Talk to the guys at the booth.
You will be unable to take anything at this time.
Go back to Plaza.
Scroll to the right until you see a fence with shields. Click on it to enter.
Shield Wall
screenshot
Find the fairies (2).
Find all the items.
When the list is complete a shield will fall out of a bush on the left. Take the shield.
Go back to the Plaza.
Scroll to the left until you see the jousting sign.
Your mouse pointer should become a green arrow. Click.
Jousting Area
On the left is the stables, click on it.
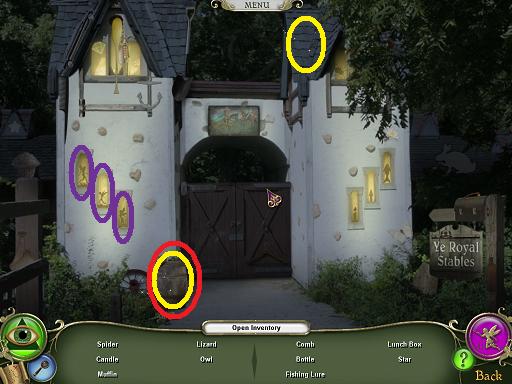
Stables
screenshot
Find the fairies (3).
Complete the right list to expose the owl on the roof.
Complete the left list and a horse will appear. Take it.
Go back to Jousting area.
Scroll right until another building lights up with sparkles. Click on it.
Stable boy
screenshot
Find the fairies (1).
Talk to the stable boy.
Give the shield to the stable boy.
Go all the way back to the plaza.
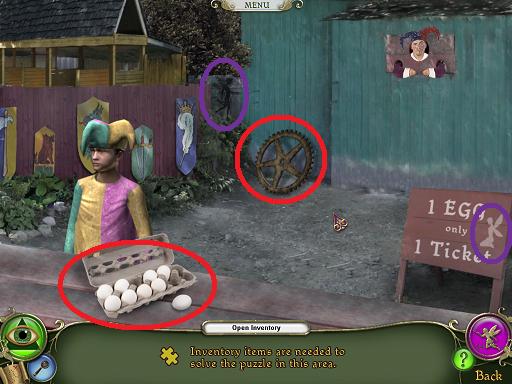
Go back to the Skill Games booth.
Skill Games
screenshot
Notice that one of the guys has gone.
Find the fairies (2).
Take the eggs.
Go back to the Plaza.
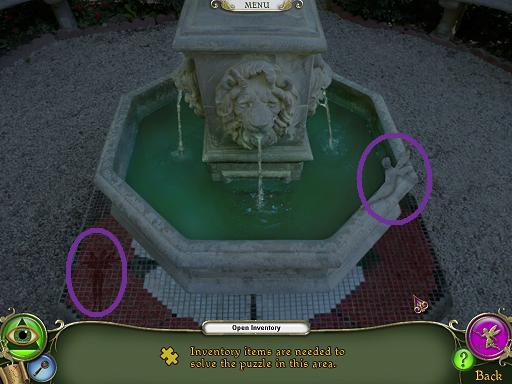
Scroll right until you see the Truth Fountain. Click on it.
Truth Fountain
screenshot
Find the fairies (2).
Put the eggs in the fountain.
Take the egg that floats to the top (it is rotten).
Go back to the plaza and then back to Skill Games.
Skill Games
screenshot
Throw the rotten egg at the guy in the fence.
When he leaves take the gear.
Go back to the plaza.
Scroll right to the house between the shields and the fountain. Click on it.
Gear House
screenshot
There are no fairies to find.
Find the items.
Take the light bulb.
Go back to the Plaza.
Scroll left to the Puppet Show. Click on it.
Puppet Show
screenshot
Find the fairies (1).
Talk to the puppet guy.
Place the light bulb in the floodlight.
Place the horse in front of the light.
Take the dragon amulet.
Go back to the plaza.
Scroll to the far right to the psychic. Go in.
Psychic
screenshot
Find the fairies (2)
Find the items for her rock.
Place the dragon amulet on the rock.
A gear will appear in the chair. Take it.
Go back to the Plaza.
Go back to the gear house and place the two gears on the machine. It will start running.
Scroll right to the Sherwood Forest Gate which is now open.
Go through the gate.
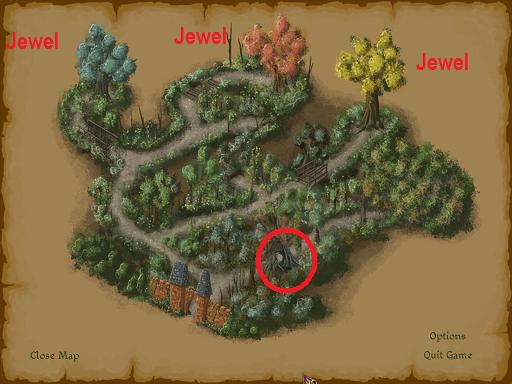
Sherwood Forest
screenshot
Look at the map. There are three colored trees, and at each one you will find a jewel.
Yellow Jewel
Go left.
Go straight 3 times.
Go right.
Cross bridge.
Find the fairy and take the jewel. screenshot
go back 5 times to the welcome sign.
Blue Jewel
Go left.
Go forward.
Go left.
Go forward.
Go left.
Cross bridge.
Find the fairy and take the jewel. screenshot
Go back once until you reach a crossroads with a small map sign.
Red Jewel
Go right.
Go left.
Cross bridge.
Find the fairy and take the jewel. screenshot
Go back 6 times to the welcome sign.
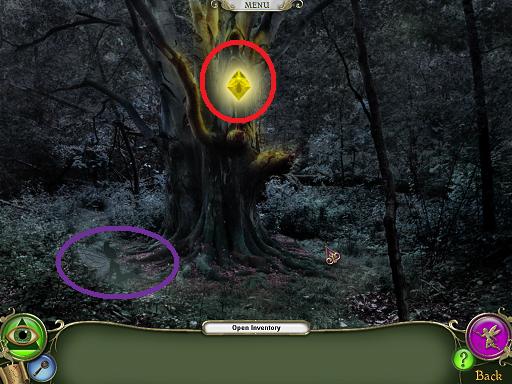
Getting Out
Click on the right where the tree is sparkling.
Place the gems in the appropriate slots. screenshot
Take the path to the right and keep going forward until you reach the hotel employee entrance.
Go into the hotel.
Castle Hotel
Front Desk
screenshot
Click on the drawer behind the front desk for a close up.
Take the screwdriver and use it on the drawer. Read the register and take the 322 room key. screenshot.
Click on the hallway where it sparkles.
Hotel Room
screenshot
Find the fairies (1).
Find the items on the left list to reveal the heart.
Find the items on the right list to open the chest.
Take the marble orb from the chest.
When you exit the scene you will be back at the Front Desk.
Front Desk
Click on the marble statue. screenshot
Find the fairies (1).
Place the orb in the Statue's hand. This opens a secret passageway.
Enter the passageway.
Meet the ghost of the former owner and get your last task. Find the will!
When you exit the scene you will end up back on the Main street.
End Game
Main Street
Scroll left and enter the Souvenir Shop.
Souvenir Shop
screenshot
Find the fairies (2).
Find the items.
Take the will piece that is revealed.
Exit to street.
Scroll right to the Bakery.
Ye Old Bakery
screenshot
Find the fairies (2).
Find the items.
Take the will piece that is revealed.
Exit to street.
Scroll right to Merlin's Spells.
Merlin's Spells
screenshot
Find the fairies (2).
Find the items.
Take the will piece that is revealed.
Exit to street.
Click on the road that leads off to the right.
Music Shop
screenshot
Find the fairies (1).
Find the items.
Take the will piece that is revealed.
Exit to street.
Click on the building right next to the Music Shop.
Porch
screenshot
Find the fairies (2).
Find the items.
Take the will piece that is revealed.
Exit to street.
Go further down the street to the right.
Scroll right to the Armory.
Armory
screenshot
Find the fairies (1).
Find the items.
Take the will piece that is revealed.
Exit to street.
Go to the Hotel.
Go up the secret passage.
The ghost is happy you found his will.
The end!
Posted by: grinnyp |
July 10, 2009 6:19 PM
|
July 10, 2009 6:19 PM