An adventure of epic proportions. Perfect for young readers.

The Happy Escape 7


  • Currently 4.6/5
  • 1
  • 2
  • 3
  • 4
  • 5
Rating: 4.6/5 (90 votes)
Comments (39) | Views (20,783)

The Happy Escape 7

DoraIt's codes and coins galore in Tesshi-e's latest escape game The Happy Escape 7, which has you scouring a room for ten Happy Coins hidden by a friend. Only she hasn't just tucked them into bowls and windowsills and under pillows. She's created an entire series of elaborate puzzles and codes you'll need to crack first. And squeaky hammers. And hippos. Because that's what real friends do. That's actually going in my letter to Princess Celestia this week. To play, just click to interact and use the bars that appear when you mouse over the edges of the screen to move around the room. There's no changing cursor, but a few locations will pop up with an arrow to indicate you can click to look around the side of something. When you're carrying an item in your inventory, clicking it once will highlight it for use in the game, or you can select "about item" for a close up view that can allow you to combine and manipulate. Pay close attention to your environment, because there are some seriously fiendish clues hiding around.
Happy Escape 7Annoying song or not, I think we can both agree that what Pharell was really singing about was a new Tesshi-e game. After all, what's happier than a Happy Escape with Happy Coins? This latest in the series might also be one of the cleverest, with a big emphasis on cracking codes, though you'll do a fair amount of "use X on Y" too. Some of which, incidentally, seems like a bit of a stretch when it comes to how intuitive it is, but hey, that's why I don't make escape games. It's harder than it sounds, since you'll need to figure out what codes go where, and also how to decipher (or even spot) a code to begin with. At first glance, the room seems almost sparse compared to other Tesshi-e games, but once you start looking around you'll realise there's a lot more going on than it seems. It's a very smart game, if not exactly a showstopper when it comes to visual design, but the soundtrack is catchy, and I could swear I've heard it somewhere before, so if one of you figures it out you'll probably save my sanity. Few things can put a smile on an escape game fan's face like a solid showing from Tesshi-e, and The Happy Escape 7 is definitely the sort of brain food the developer is best known for.

Play The Happy Escape 7

Walkthrough Guide


(Please allow page to fully load for spoiler tags to be functional.)

Walkthrough

You start facing the main door and the piano. Zoom in on the piano; it’s locked and the coin in the stand is screwed in. Look at the little heart. It looks like it takes a code. It doesn’t — it gives a code. Click on each of the boxes. Each one skips a number — so, the first one cycles through 0 1 2 3 5 6 7 8 9, skipping 4. The code overall is 4 7 2. Back up to the room.

Turn right. Zoom in on the low green bookshelves. Click on the centre books, and you’ll get a picture of a squeaky hammer turned into a water pistol. Now turn your head onto its right side and look at the shelves — they spell the code 2 3 6. Back up to the room.

Go right so that you’re facing the windows, then focus on the fruit on the glass table. Click around in the fruit bowl to get the happy coin. Back up to the room.

Turn right. Focus on the low cabinet, specifically the green thing atop it, which is a squeaky hammer. Pull the lever on it. Use the code from the squeaky-hammer-hint bookshelves, 236. Take the squeaky hammer.

Don’t back up yet! Pull the lever a couple of times to spill out a battery. Now back up to the room.

Zoom in on the lower shelves with the red bits. Those are hearts. Input the heart code, 472, to get a big hammer. Back up to the room.

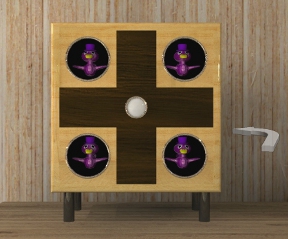
Zoom in on the plus-box on top of the cabinet. Click on the right side to see a battery panel and insert the battery. Go back to the box front. Click the button to see it say “Hit by the squeaky hammer!” and pop out the happy birds in the following pattern: upper left, bottom right, upper right, bottom left, upper right.

Don’t go yet: push the button again with the squeaky hammer highlighted in your inventory, then click on the birds as they pop out — they will light up. At the end, the box gives you a happy coin. Now back up to the room.

Turn right twice so that you’re facing the 236 bookcases. This time, zoom in on the picture above the shelves that says “Plus.” The corners move; click on them in the order from the plus box, UL BR BR UR BL UR. You get a happy coin and a diagram of an arch of numbers — screenshot that. Now back up to the room.

Turn right and zoom in on each of the windows in turn. Each one has a star in a pane. Use the diagram you just got to get the number 2 4 6 9. Back to the room.

Turn right, zoom in on the left side of the low cabinet, and enter that code in the four-digit code box. Get an electric drill, a happy coin, and a diagram like a sideways S. Note the pattern. Back up to the room.

Zoom in on the centre of the cabinet above the hearts. There’s a square of nine clickable boxes. Click them in the order of the S-diagram, starting with the dot and ending with the arrow. Get a happy coin and a rubber band. Back to the room.

Turn right so you’re facing the piano, but zoom in on the barrel instead. Whack the barrel with the big hammer (not the squeaky hammer). The lid splits. The barrel is full of water and there’s a key on the underside of the loose half of the split lid. Get it and back up to the room.

Now zoom in on the piano and unlock its keyboard with the key. Get a happy coin and a little saw. Note the pattern of musical notes printed above the keyboard. Back up to the room.

Turn left and zoom in on the right side of the cabinet. This last compartment has four levers on it. The pattern of notes from the piano tells you where these go. Open it, get the screwdriver and a little key. Back up to the room but don’t go anywhere.

Click on the plant in the corner. It’s bamboo. Use the saw to get a branch of bamboo. Cut that branch so that you have what looks like a short tube. Now back up to the room again.

Turn right twice. Click under the bed. Use the remaining leafy end of the bamboo to fetch the box and use the small key on it. There’s a cloth in there.

You’re not done with the box: when you take the cloth the box closes, but reopen it a couple of times and click on the bottom lining to get a happy coin and the code 4 5 3 6 5.

Now you’ll make the water pistol you saw in that book a while back. Use the electric drill on the short bamboo tube to drill a hole in the bottom. Now put the cloth on the bottom of the squeaky hammer and secure it with the rubber band. Focus on the bamboo tube and apply the squeaky-hammer-with-cloth to get a water pistol. Go back to the barrel to fill it. Now back to the room, face the 236 shelves, zoom in on the blue box on their upper left, and zoom in on the left of the box. Apply the water pistol. The ball will roll out of the box. Get the ball and open it for another happy coin.

Back to the room. Go to the piano. Zoom in on the screwed-shut stand atop the piano and use the screwdriver to get the ninth happy coin. And back to the room …

Turn around so you’re facing the windows. Zoom in on the HappyCoin hippo. Open the drawer below. The box inside the drawer has shapes on the buttons, shapes that respectively have six, four, five, and three sides. Those are broken: instead read them across as three, four, five, and six (the six and three are reversed). Use the code 45635 on the “real” order of the buttons to get the last happy coin.

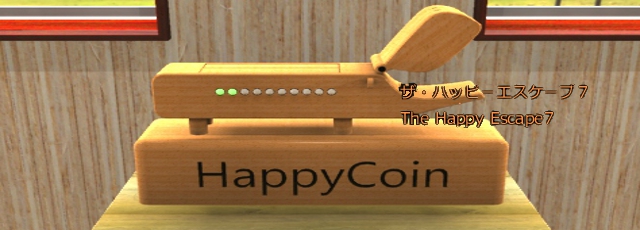
Back to the hippo. Put the coins in its mouth and each light will light. After the tenth coin, the hippo opens and you get a gold happy coin and the key. Back to the main door by the piano and you’re free.

39 Comments

shipoopie August 6, 2014 10:30 AM

So far all I have is one of the coins. From:

the fruit bowl.

Can't seem to fit any clues to any puzzles yet.

Reply
shipoopie August 6, 2014 10:33 AM

Woah. I took a pretty big logical leap with what turned out to be the code for the squeaky hammer.

I thought the green bookshelves were up and down clues for the 9 white squares puzzle but turns out instead they're numbers laying on the side. I don't know how come my brain decided to think that way. WOWEE!

Reply
shanisek August 6, 2014 10:35 AM replied to shipoopie

Try looking

at the bookshelf... sideways.

I am also stuck.

I have the rubber band, the squeaky hammer, the electric drill, and 5 happy coins. I fed the coins to the hippo. I can't reach the box under the bed, or open the box in the drawer under the hippo, and I can't find a heart-based clue anywhere.

Reply
Patreon Contributor Questioner August 6, 2014 10:42 AM replied to shanisek

The heart code (on the lower drawer):

The heart on the piano has to do with the code...

Reply
shanisek August 6, 2014 10:50 AM replied to Questioner

Thanks! Exactly the push I needed. Escaped!

Reply
shipoopie August 6, 2014 10:57 AM replied to shanisek

I figured that the heart drawer code had something to do with

the heart on the piano but setting them both to the same thing isn't working no matter what I come up with.

Reply
shipoopie August 6, 2014 10:58 AM replied to shanisek

Oh I see now.

Reply
Alkalannar August 6, 2014 11:02 AM

This sounds like part of a Suikoden soundtrack. Suikoden V perhaps? Someplace you spend a lot of time.

Reply
shipoopie August 6, 2014 11:27 AM replied to shanisek

Yay!

I got out with the happy coin. WOOOO!

I went back and tried to win without the happy coin and I think it's impossible. There's another item you need that you can't get at without first picking up the happy coin.

About the left cabinet

It could use a clue saying that the stars are associated. It was the only 4 number code in the game sure but there was also a four lever lock that I kept trying to open with the stars.

About the heart on the piano, I feel like it's the sort of thing you can only accidentally figure out.

Reply
prairiegal August 6, 2014 11:40 AM

I'm stuck at the same place shanisek was a while ago. to the list of things I CAN'T do, I'd add

open the piano bench, barrel, or right cabinet (the one with the 4 levers).

Reply
Alkalannar August 6, 2014 11:51 AM

How do you translate the stars to numbers?

The obvious way (starting at lower-left as 0 and going clockwise increasing) is not correct.

Reply
baileydonk August 6, 2014 11:53 AM

Alkalannar, you need to solve the

wobbly picture

first. Do you have the

battery

? You'll need to put that somewhere to get the clue to the

wobbly picture

.

Reply
baileydonk August 6, 2014 11:57 AM

I'm only missing one coin... and I don't see any more puzzles that need solving!

Reply
Alkalannar August 6, 2014 11:57 AM replied to baileydonk

No. I have a squeaky hammer and one coin, and a lot of frustration.

No battery, so no wobbly puzzle solution.

Reply
baileydonk August 6, 2014 12:03 PM

Don't know how much of a hint you want for the battery...

play around a bit with things on the cabinet.

Reply
CJTressler August 6, 2014 12:07 PM

@bailey

There are 2 that it took me a while to find
The first one is hiding

on the piano keyboard

The second is

in the Mr Birdy contraption

push the button and hit the birdys with the squeaky hammer

Hope this helps!

Reply

I'm out, but I never found a 'lock use' for the low bookcase shelf that spells out 236 sideways.

Reply
Alkalannar August 6, 2014 12:15 PM replied to baileydonk

There we go. Wobbly picture solved.

Reply
BlueBird August 6, 2014 1:53 PM replied to Corona

Corona, I think you must have forgotten as that is the code for

the squeaky hammer!

A great game!

Reply
Alkalannar August 6, 2014 1:55 PM

I now have a giant hammer, rubber band, squeaky hammer, and an electric drill.

The barrel is open.

Baffled and stymied.

Must not ragequit.

Reply

Corona, please use the spoiler tag. How did you escape without making use of that, btw?

Really liked this one, I think Tesshi-e's upped his game. Took me a while to get going before everything clicked. Finally had to look here for the last coin -- after using everything, I was sure there was a coin out in the open that I was overlooking.

Ended up being the whack-a-birdies. I'd hit the button with the squeaky hammer, but not the Mr. Birdys themselves. Cool puzzle, he got me!

Reply

Lol, and of course I bone up the spoiler tag myself, a mod please fix? I swear I tried to preview, but the page just sat there and did nothing, so I eventually hit Submit. And when I hit Submit, it again did nothing, then after 20-30 seconds, the page refreshed and there my comment was. :'(

Reply

Walkthrough

You start facing the main door and the piano. Zoom in on the piano; it’s locked and the coin in the stand is screwed in. Look at the little heart. It looks like it takes a code. It doesn’t — it gives a code. Click on each of the boxes. Each one skips a number — so, the first one cycles through 0 1 2 3 5 6 7 8 9, skipping 4. The code overall is 4 7 2. Back up to the room.

Turn right. Zoom in on the low green bookshelves. Click on the centre books, and you’ll get a picture of a squeaky hammer turned into a water pistol. Now turn your head onto its right side and look at the shelves — they spell the code 2 3 6. Back up to the room.

Go right so that you’re facing the windows, then focus on the fruit on the glass table. Click around in the fruit bowl to get the happy coin. Back up to the room.

Turn right. Focus on the low cabinet, specifically the green thing atop it, which is a squeaky hammer. Pull the lever on it. Use the code from the squeaky-hammer-hint bookshelves, 236. Take the squeaky hammer.

Don’t back up yet! Pull the lever a couple of times to spill out a battery. Now back up to the room.

Zoom in on the lower shelves with the red bits. Those are hearts. Input the heart code, 472, to get a big hammer. Back up to the room.

Zoom in on the plus-box on top of the cabinet. Click on the right side to see a battery panel and insert the battery. Go back to the box front. Click the button to see it say “Hit by the squeaky hammer!” and pop out the happy birds in the following pattern: upper left, bottom right, upper right, bottom left, upper right.

Don’t go yet: push the button again with the squeaky hammer highlighted in your inventory, then click on the birds as they pop out — they will light up. At the end, the box gives you a happy coin. Now back up to the room.

Turn right twice so that you’re facing the 236 bookcases. This time, zoom in on the picture above the shelves that says “Plus.” The corners move; click on them in the order from the plus box, UL BR BR UR BL UR. You get a happy coin and a diagram of an arch of numbers — screenshot that. Now back up to the room.

Turn right and zoom in on each of the windows in turn. Each one has a star in a pane. Use the diagram you just got to get the number 2 4 6 9. Back to the room.

Turn right, zoom in on the left side of the low cabinet, and enter that code in the four-digit code box. Get an electric drill, a happy coin, and a diagram like a sideways S. Note the pattern. Back up to the room.

Zoom in on the centre of the cabinet above the hearts. There’s a square of nine clickable boxes. Click them in the order of the S-diagram, starting with the dot and ending with the arrow. Get a happy coin and a rubber band. Back to the room.

Turn right so you’re facing the piano, but zoom in on the barrel instead. Whack the barrel with the big hammer (not the squeaky hammer). The lid splits. The barrel is full of water and there’s a key on the underside of the loose half of the split lid. Get it and back up to the room.

Now zoom in on the piano and unlock its keyboard with the key. Get a happy coin and a little saw. Note the pattern of musical notes printed above the keyboard. Back up to the room.

Turn left and zoom in on the right side of the cabinet. This last compartment has four levers on it. The pattern of notes from the piano tells you where these go. Open it, get the screwdriver and a little key. Back up to the room but don’t go anywhere.

Click on the plant in the corner. It’s bamboo. Use the saw to get a branch of bamboo. Cut that branch so that you have what looks like a short tube. Now back up to the room again.

Turn right twice. Click under the bed. Use the remaining leafy end of the bamboo to fetch the box and use the small key on it. There’s a cloth in there.

You’re not done with the box: when you take the cloth the box closes, but reopen it a couple of times and click on the bottom lining to get a happy coin and the code 4 5 3 6 5.

Now you’ll make the water pistol you saw in that book a while back. Use the electric drill on the short bamboo tube to drill a hole in the bottom. Now put the cloth on the bottom of the squeaky hammer and secure it with the rubber band. Focus on the bamboo tube and apply the squeaky-hammer-with-cloth to get a water pistol. Go back to the barrel to fill it. Now back to the room, face the 236 shelves, zoom in on the blue box on their upper left, and zoom in on the left of the box. Apply the water pistol. The ball will roll out of the box. Get the ball and open it for another happy coin.

Back to the room. Go to the piano. Zoom in on the screwed-shut stand atop the piano and use the screwdriver to get the ninth happy coin. And back to the room …

Turn around so you’re facing the windows. Zoom in on the HappyCoin hippo. Open the drawer below. The box inside the drawer has shapes on the buttons, shapes that respectively have six, four, five, and three sides. Those are broken: instead read them across as three, four, five, and six (the six and three are reversed). Use the code 45635 on the “real” order of the buttons to get the last happy coin.

Back to the hippo. Put the coins in its mouth and each light will light. After the tenth coin, the hippo opens and you get a gold happy coin and the key. Back to the main door by the piano and you’re free.

Reply
Patreon Donator Reka August 6, 2014 2:24 PM replied to Alkalannar

I think I'm stuck at pretty much the same point as Alkalannar.

Why isn't the large hammer long enough to reach the box under the bed? And/or how hard would it be to move the bed? I know, I know...

Reply
Patreon Donator Reka August 6, 2014 2:38 PM replied to Alkalannar

Thanks, Tullia! I was missing the

key under the barrel lid. Once I got that, everything kind of flowed.

Reply
elle August 6, 2014 4:18 PM replied to schram

Fixed!

;)

Reply
shjack180 August 6, 2014 5:21 PM

lol I am loving the references to MLP in your last couple of reviews, Dora.

Reply

Wait, how were we supposed to know that the hexagon and triangle were reversed? I read the walkthrough back to front and I still have no idea how I was supposed to figure that out on my own.

Reply
Patreon Donator Reka August 6, 2014 11:20 PM replied to Sylocat

I didn't notice any need to reverse anything.

Reply

Sylocat,

I entered the code as I thought it should be entered and that didn't work for me. It seemed weird to me that the buttons effectively read 6 4 5 3 from left to right, so I tried it reading them as 3 4 5 6 and it worked. Maybe I messed up and they really are 6 4 5 3 — Reka says she didn't have to reverse anything — but I thought I tried it twice the way the buttons were marked and it hadn't worked, then I tried it once the reversed way and they did.

Reply
earthandairandrain August 7, 2014 1:53 AM replied to tullia

Tullia,

Reka is right, there's no need to reverse anything. The last step of your walkthrough says

the code is 45635, but it's actually 45365, so you just have to click the buttons in that order: square, pentagon, hexagon, triangle, pentagon.

Reply
earthandairandrain August 7, 2014 1:57 AM replied to earthandairandrain

And of course I mis-typed the shapes' order. AARGGHH! It's

square, pentagon, triangle, hexagon, pentagon.

Reply

Solutions Guide
This isn't really a walkthrough - it assumes you've already started playing, and are merely stuck somewhere. The solutions are listed in roughly the order I figured them out, but there is definitely some variation possible.

Fruit

There's a happy coin in plain view in the fruit bowl.

Squeaky hammer

Look closely at the bookshelf-like-thing on the opposite side of the room.

When you pull the lever on the squeaky-hammer-holding gizmo, what happens? Imagine doing the same thing to the bookshelf.

The shelves form the numbers 236 if you "stand them up" in the same direction as the squeaky hammer gizmo.

Get: the squeaky hammer, and if you're observant, a battery.

Hearts

The heart on the piano is the clue to the drawer with hearts.

Cycle through the numbers on the piano heart: notice anything odd? Something missing?

The code is the missing numbers.

472

Get: the big hammer.

Wobbly picture

The picture says "Plus" and has some Mr. Birdies. Is there a plus sign associated with Mr. Birdies in the room?

Yes, it's the square box on the low cabinet, opposite the wobbly picture. Notice that the box needs a battery (turn it to the right to see the battery compartment). You can get a battery from the same place you got the squeaky hammer.

After getting the hammer, move the lever back up; the battery should spill out.

After putting in the battery, press the button in the center and observe the Mr. Birdies.

TL, BR, BR, TR, BL, TR

Wobble the picture as indicated.

Get: a happy coin and a diagram with numbers.

Mr. Birdies

Notice how it says "hit by the squeaky hammer" when you press the middle button, even if you don't have the squeaky hammer highlighted? That's a bit of Japanese-English that actually means, "Hit the Mr. Birdies with the squeaky hammer."

Hit each Mr. Birdy with the squeaky hammer as they emerge, so they light up.

Get: a happy coin.

Piano

Attack the barrel with the big hammer. (If you don't have the big hammer, go figure out the hearts.) Examine the lid of the barrel carefully.

The key to the piano is underneath the lid.

Get: a happy coin, a saw (odd place to store a saw, no?), and a picture of some musical notes.

Levers

The clue is underneath the piano lid.

The lines are the possible positions, and the notes are where to put each lever, so (counting from the top) 4 3 4 2. (Note that the levers start at 1, not at 0.)

Get: small key, screwdriver

Screwed up

To get the happy coin from the picture frame on the piano, you (obviously) need a screwdriver. To obtain said screwdriver, solve the levers.

Left door

The left door of the low cabinet needs a 4-digit clue. It really ought to have a star on it somewhere, because it has to do with the stars on the windows.

Notice that the arched windows each have a star on one pane. The key to translating those positions to numbers is behind the wobbly picture.

2469

Get: an electric drill, a happy coin, and a diagram.

3×3

The clue to the top drawer, with the 3×3 buttons, is in the back of the left door of the same cabinet.

Press the buttons in the sequence indicated, i.e. starting with the top center, then top left, middle left, bottom left, middle center, top right, middle right, bottom right, and finally bottom center.

Get: happy coin, rubber band.

Under the sea, ahem, sorry, the bed

You need something long to reach the box under the bed. Like, for example, a bamboo pole.

You don't have a bamboo pole, but you do have a bamboo plant and a saw. Perhaps you should introduce the two to each other?

Use the saw to cut off a stalk of bamboo, and use that to get the box from under the bed.

Use the small key to open the box. (If you don't have the small key, go figure out the levers.)

Get: a small piece of cloth. But wait, there's more!

Lift the false bottom of the box.

Get: a happy coin and a 5-digit code.

Water

We need some way to get water from the barrel to the contraption near the wobbly picture (the one that says "water" in prominent letters). There's a clue on the bookshelf: it shows a picture of the squeaky hammer transformed into a water gun.

In the picture, the handle of the hammer is wedged into something green. Bamboo is green.

Keep playing around with the stuff you have (bamboo, saw, drill, cloth, rubber band) until you've assembled the water gun. (If you don't have the saw, you need to figure out the piano. If you don't have the drill, you need to open the left door. For the rubber band, you need to open the 3×3 button drawer. For the cloth, get the box from under the bed.)

Cut off a small piece of bamboo from the stalk you've already obtained. Turn it around and drill a hole using the electric drill. Now, look at the squeaky hammer and wrap its handle with the small cloth. Secure it with the rubber band. Look at the bamboo again and add the hammer.

Once you have the water gun, go get some water from the barrel, then go shoot something.

Go to the water contraption and turn it to the left so you see the hole. Use the water gun on the hole.

Get: a happy coin.

Shapes

In the drawer underneath the hippo, there's a box with four buttons. Press the buttons to see that they have shapes on them: a hexagon, a square, a pentagon, and a triangle, in that order.

Underneath the false bottom of the box under the bed, there was a five-digit code: 45365. Notice how those numbers correspond to the shapes: 4 is a square, 5 is a pentagon, 3 is a triangle, and 6 is a hexagon.

Press the buttons in the sequence indicated by the code. (2nd button, 3rd button, 4th button, 1st button, 3rd button.)

Get: a happy coin.

Hippo

Feed your coins to the hippo. Once you've put in all 10, the top will open and you can get the gold happy coin and the key. (You can't exit this game without a happy coin.)

Reply
bafilius August 7, 2014 2:20 PM

I just grabbed the potted plant in the corner and smashed it through one of the rectangular windows.

Reply

I love Tesshi-e's escape games. It's always a blast!

Reply

Thank you Tesshi-e for ONE HUNDRED escape games!!

Reply
Carny Asada August 9, 2014 3:38 PM

Wow, this sucker was surprisingly hard! I would have never figured out the heart puzzle without help.

Reply
JetSetVegas August 27, 2014 5:58 PM

This game was a bit more difficult than your normal Tesshi-e game. It really required you to use your head and pay attention. I had to look at the walkthrough more than I like to and I wanted to be mad at Tesshi-e for making me :) but I couldn't. The puzzles were logical, and they even helped with pixel spots. Good job guys. I'll be ready next time!

Reply

So - this is it? No more games from Tesshi-e??
100 games reached - I want 100 more! :-)

Reply

^ Scroll Up | Homepage >

Leave a comment [top of page]

Please consider creating a Casual Gameplay account if you're a regular visitor here, as it will allow us to create an even better experience for you. Sign-up here!
  • PLEASE UNDERSTAND SITE POLICIES BEFORE POSTING COMMENTS
  • You may use limited HTML tags for style:
    (a href, b, br/, strong, em, ul, ol, li, code, spoiler)
    HTML tags begin with a less-than sign: < and end with a greater-than sign: >. Always. No exceptions.
  • To post spoilers, please use spoiler tags: <spoiler> example </spoiler>
    If you need help understanding spoiler tags, read the spoiler help.
  • Please Preview your comment before posting, especially when using spoilers!
  • No link dropping, no domains as names; do not spam, and do not advertise! (rel="nofollow" in use)
chrpa Jayisgames needs your help to continue providing quality content. Click for details Hi! Weekday Escape and Weekday Puzzle are here! First we have two new cans from tomoLaSiDo and then two small rooms from isotronic. That's all for this...  ...
6,365 Views
0 Comments
chrpa Jayisgames needs your help to continue providing quality content. Click for details Welcome to Mobile Monday! We have another beautiful game from Nicolet and it's a winter game as it should be. Tasuku Yahiro have released another of their...  ...
8,746 Views
2 Comments
chrpa Jayisgames needs your help to continue providing quality content. Click for details We've got a new game from Rinnogogo's magical world and this time it really is magical.. Not only do you get to meet cute animals that express themselves...  ...
chrpa Jayisgames needs your help to continue providing quality content. Click for details After a few weeks of patient waiting, we have been rewarded - the new game from Ichima Coffeedo is here. We got a wonderful new game - it's...  ...

HELP Jayisgames.com

Recent Comments


Display 5 more comments
Limit to the last 5 comments

Game of the week


Dark Romance: Vampire Origins Collector's Edition

Your Favorite Games edit

add
Save links to your favorite games here. Use the Favorites editor.

Monthly Archives