An adventure of epic proportions. Perfect for young readers.

Heavy Room


  • Currently 3.4/5
  • 1
  • 2
  • 3
  • 4
  • 5
Rating: 3.4/5 (96 votes)
Comments (7) | Views (7,545)

Heavy Room

ellePerhaps, when discussing escape-the-room games, things tend to get a little heavy. In the best of ways, of course, over the weighty matter of puzzle logic and intuitive design and which game designer has the best hair. Wait, not that last part. What isn't disputed, though, is how much we enjoy the opportunity to lighten up the load of the day with a good escape. Heavy Room by Triple Rock is a great example of this.
Heavy RoomIn case you're new to the escape game conversation, here's the gist of it: the door is locked, you're stuck inside, so click the edges of the screen to move around and start looking for signs and clues to decipher the exit code. Your cursor will change over interactive areas and items you can pick up. The text is in Japanese but if you don't read it, don't worry. Examine everything at hand, employ deductive reasoning and, with a small measure of effort, you'll figure you way through all four rooms and out the final door. It's possible to quip that the layout's convoluted or the puzzles easily brute-forced, yet it's hard to mind that much when the theme is cohesive and the game is overall enjoyable to play. Simple, quick and perfectly logical, Heavy Room is balanced just right for an anytime mini-escape.

Play Heavy Room

Walkthrough Guide


(Please allow page to fully load for spoiler tags to be functional.)

Heavy Room Escape Walkthrough

Room 1

  1. You begin facing locked double doors.

    • Pick up the BALL.

  2. Examine the panel to the left of the door and see that you need a 3-digit code.

  3. Turn left. Here is a pulley coming down from the other side of the wall.

    • If you can find a way to activate the pulley, you could see what's behind this metal plate.

  4. Turn left again. Here is white door; it is also locked. Look at the panel next to it:

    • it's a series of 6 lines that can changed to arrows.

  5. One more left turn and you're facing another locked door...

    • The panel next to the door is asking for a weight in kilograms.

  6. Hmm. There's a peephole in the door--peer through it:

    • three trees in different poses. Make a note of what you see.

  7. Go right and examine the panel of 6 lines:

    • Change the lines into the proper up/down arrow sequence, then press the square button on the right to unlock the door.

    • SOLUTION:

      The branches of the trees tell all...

      UP-UP-DOWN-DOWN-UP-DOWN

  8. Back up, open the door and go through to room two.

Room 2

  1. The first thing you see when you walk into room two is a big block that's too heavy to carry.

  2. Turn left and you see another door (it's also locked)...

    • The panel next to it needs a 3-digit code.

  3. Left again and here is the door you just came through.

    • Note its color and the number painted on it.

  4. One final left and you'll find the other end to that pulley in the first room.

    • Place the BALL in the pulley basket and it will weigh it down.

  5. Turn right and return to the first room.

  6. In order to open the door to room three, you'll need to retrieve the item behind the metal plate. So, after entering room one from the second room, turn left...

    • The weight of the ball pulled up the plate so you can get a SCREWDRIVER. Give it a lookover.

  7. Turn left, go into room two, turn left again, and examine the panel next to this locked door:

    • Enter the correct 3-digit code and press the square button to unlock the door.

    • SOLUTION:

      The answer's on the screwdriver...
      4 3 4

  8. Back up, open the door, and go through to room three.

Room 3

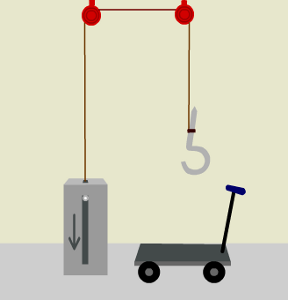
  1. When you enter room three, you'll see another pulley system, this one with a hook on the end and a control box on the other.

    • Take the CART.

  2. Turn left and take in the view of the rooms map.

    • From the details, you can determine you're located in the upper left quadrant of the map. It's useful information to help you keep your bearings for now on, but far from essential at this point.

  3. Back up and turn left to face the door you came through.

    • Now you can see this one's color and number; make a note of it.

  4. Go through the door to room two and turn left to see the heavy block again.

    • Put the HEAVY BLOCK on your CART.

  5. Turn left and go back through the door to room three.

  6. Place the CART with the block under the pulley system. The hook will automatically latch onto the heavy block but you still need a lever for the control box.

    • Since you no longer need it, you can now examine the handle of the cart. Using the SCREWDRIVER, remove the HANDLE from the cart.

    • Put the HANDLE on the pulley's control box and then click it to lift the heavy block.

    • Now you can look underneath the block to get another clue; note what you see.

  7. Turn around, go through the pink door to room two, then turn right and go through the orange door to room one.

Room 4 and Exiting

  1. After entering room one from room two, turn right to face the door with the peephole in it and examine the panel:

    • Enter the correct 2-digit number and press the square button to unlock the door to room four.

    • SOLUTION:

      The weight of the heavy block, as found when you lifted it up with the hook and pulley system, should go here...
      83 kg

  2. Back up, open the door and enter room four. Here you see the three trees you saw through the peephole.

  3. Nothing else is in this room, but if you turn around twice, you'll get the last clue needed for your exit code. Note what you see.

  4. Then, go back through the green door and into room one.

  5. After leaving room four, turn right and you'll be facing the exit doors again. Zoom in on the panel...

    • Enter the correct 3-digit code and click the square button to unlock the double doors.

    • SOLUTION:

      The answer is determined by the colors and numbers on room two and three's doors plus the clue on room four's door (which is to subtract two's number from three's number)...

      5 6 1

  6. Back up, open the exit doors and escape!

Congratulations!

Thanks to elle for the walkthrough!

7 Comments

Heavy Room Escape Walkthrough

Room 1

  1. You begin facing locked double doors.

    • Pick up the BALL.

  2. Examine the panel to the left of the door and see that you need a 3-digit code.

  3. Turn left. Here is a pulley coming down from the other side of the wall.

    • If you can find a way to activate the pulley, you could see what's behind this metal plate.

  4. Turn left again. Here is white door; it is also locked. Look at the panel next to it:

    • it's a series of 6 lines that can changed to arrows.

  5. One more left turn and you're facing another locked door...

    • The panel next to the door is asking for a weight in kilograms.

  6. Hmm. There's a peephole in the door--peer through it:

    • three trees in different poses. Make a note of what you see.

  7. Go right and examine the panel of 6 lines:

    • Change the lines into the proper up/down arrow sequence, then press the square button on the right to unlock the door.

    • SOLUTION:

      The branches of the trees tell all...

      UP-UP-DOWN-DOWN-UP-DOWN

  8. Back up, open the door and go through to room two.

Room 2

  1. The first thing you see when you walk into room two is a big block that's too heavy to carry.

  2. Turn left and you see another door (it's also locked)...

    • The panel next to it needs a 3-digit code.

  3. Left again and here is the door you just came through.

    • Note its color and the number painted on it.

  4. One final left and you'll find the other end to that pulley in the first room.

    • Place the BALL in the pulley basket and it will weigh it down.

  5. Turn right and return to the first room.

  6. In order to open the door to room three, you'll need to retrieve the item behind the metal plate. So, after entering room one from the second room, turn left...

    • The weight of the ball pulled up the plate so you can get a SCREWDRIVER. Give it a lookover.

  7. Turn left, go into room two, turn left again, and examine the panel next to this locked door:

    • Enter the correct 3-digit code and press the square button to unlock the door.

    • SOLUTION:

      The answer's on the screwdriver...
      4 3 4

  8. Back up, open the door, and go through to room three.

Room 3

  1. When you enter room three, you'll see another pulley system, this one with a hook on the end and a control box on the other.

    • Take the CART.

  2. Turn left and take in the view of the rooms map.

    • From the details, you can determine you're located in the upper left quadrant of the map. It's useful information to help you keep your bearings for now on, but far from essential at this point.

  3. Back up and turn left to face the door you came through.

    • Now you can see this one's color and number; make a note of it.

  4. Go through the door to room two and turn left to see the heavy block again.

    • Put the HEAVY BLOCK on your CART.

  5. Turn left and go back through the door to room three.

  6. Place the CART with the block under the pulley system. The hook will automatically latch onto the heavy block but you still need a lever for the control box.

    • Since you no longer need it, you can now examine the handle of the cart. Using the SCREWDRIVER, remove the HANDLE from the cart.

    • Put the HANDLE on the pulley's control box and then click it to lift the heavy block.

    • Now you can look underneath the block to get another clue; note what you see.

  7. Turn around, go through the pink door to room two, then turn right and go through the orange door to room one.

Room 4 and Exiting

  1. After entering room one from room two, turn right to face the door with the peephole in it and examine the panel:

    • Enter the correct 2-digit number and press the square button to unlock the door to room four.

    • SOLUTION:

      The weight of the heavy block, as found when you lifted it up with the hook and pulley system, should go here...
      83 kg

  2. Back up, open the door and enter room four. Here you see the three trees you saw through the peephole.

  3. Nothing else is in this room, but if you turn around twice, you'll get the last clue needed for your exit code. Note what you see.

  4. Then, go back through the green door and into room one.

  5. After leaving room four, turn right and you'll be facing the exit doors again. Zoom in on the panel...

    • Enter the correct 3-digit code and click the square button to unlock the double doors.

    • SOLUTION:

      The answer is determined by the colors and numbers on room two and three's doors plus the clue on room four's door (which is to subtract two's number from three's number)...

      5 6 1

  6. Back up, open the exit doors and escape!

Congratulations!

Thanks to elle for the walkthrough!

Reply
KingofTown April 29, 2013 11:19 AM

Oops, escaped before I was 'supposed' to.

After getting the first 2 numbers for the exit (pink and orange door), I was just going to walk through the green entries until I got out. I didn't know that was going to be the exit!

I kind of like that one designer (no idea on the name) that puts the "I don't know how to solve this puzzle yet" on puzzles where you have not yet found the key. It prevents this kind of brute force method.

If you want to explore the whole puzzle, don't try to enter the color coded exit door until you know all 3 numbers!

Reply

@KingofTown, you're thinking of Tomatea.

I had a similar gripe with the Baba Yaga game so I agree, it's preferable to not be able to randomly force the puzzle before finding the clue. Luckily I didn't jump the gun with this game. Very short and sweet.

Reply

Personally, I like being able to brute-force puzzles, or at least to try and solve them before finding all hints. Perhaps having two or three digits per clue would've prevented premature solving by all but the most determined players.

I get really annoyed by games that say "I don't have all the clues" and completely block off the puzzles. This tactic cuts down on the openness and explorability of the games.

Reply
Headroom April 30, 2013 4:43 AM

Et voil������...
Short, easy, logical... just the perfect game to make you think your brain is still operative !

Paris : a bit colder and grey

Reply

Lol, unintentionally brute forced my way out after getting 2 out of 3 numbers.

Reply
kellogshappymeal May 3, 2013 10:04 PM

Pretty sure no one forces you to brute force a puzzle.

I do like the Tomatea response , only to let me know I haven't overlooked the clue .

Reply

^ Scroll Up | Homepage >

Leave a comment [top of page]

Please consider creating a Casual Gameplay account if you're a regular visitor here, as it will allow us to create an even better experience for you. Sign-up here!
  • PLEASE UNDERSTAND SITE POLICIES BEFORE POSTING COMMENTS
  • You may use limited HTML tags for style:
    (a href, b, br/, strong, em, ul, ol, li, code, spoiler)
    HTML tags begin with a less-than sign: < and end with a greater-than sign: >. Always. No exceptions.
  • To post spoilers, please use spoiler tags: <spoiler> example </spoiler>
    If you need help understanding spoiler tags, read the spoiler help.
  • Please Preview your comment before posting, especially when using spoilers!
  • No link dropping, no domains as names; do not spam, and do not advertise! (rel="nofollow" in use)
chrpa Jayisgames needs your help to continue providing quality content. Click for details Hi! Weekday Escape and Weekday Puzzle are here! First we have two new cans from tomoLaSiDo and then two small rooms from isotronic. That's all for this...  ...
6,365 Views
0 Comments
chrpa Jayisgames needs your help to continue providing quality content. Click for details Welcome to Mobile Monday! We have another beautiful game from Nicolet and it's a winter game as it should be. Tasuku Yahiro have released another of their...  ...
8,746 Views
2 Comments
chrpa Jayisgames needs your help to continue providing quality content. Click for details We've got a new game from Rinnogogo's magical world and this time it really is magical.. Not only do you get to meet cute animals that express themselves...  ...
chrpa Jayisgames needs your help to continue providing quality content. Click for details After a few weeks of patient waiting, we have been rewarded - the new game from Ichima Coffeedo is here. We got a wonderful new game - it's...  ...

HELP Jayisgames.com

Recent Comments


Display 5 more comments
Limit to the last 5 comments

Game of the week


Dark Romance: Vampire Origins Collector's Edition

Your Favorite Games edit

add
Save links to your favorite games here. Use the Favorites editor.

Monthly Archives