
House of 1,000 Doors:
The Palm of Zoroaster
Platform: Windows
![]() Revealing a few more of the 1000 doors offered in the title of the series, House of 1000 Doors: The Palm of Zoroaster drops you back in said house to put you through another series of puzzles and adventure quests as the indomitable author/spirit soother, Kate. Offering the same quality of product as the previous installment, Alawar has brought us another great hidden object/adventure hybrid, just in a more sinister, unsettled portrayal of the house.
Revealing a few more of the 1000 doors offered in the title of the series, House of 1000 Doors: The Palm of Zoroaster drops you back in said house to put you through another series of puzzles and adventure quests as the indomitable author/spirit soother, Kate. Offering the same quality of product as the previous installment, Alawar has brought us another great hidden object/adventure hybrid, just in a more sinister, unsettled portrayal of the house.
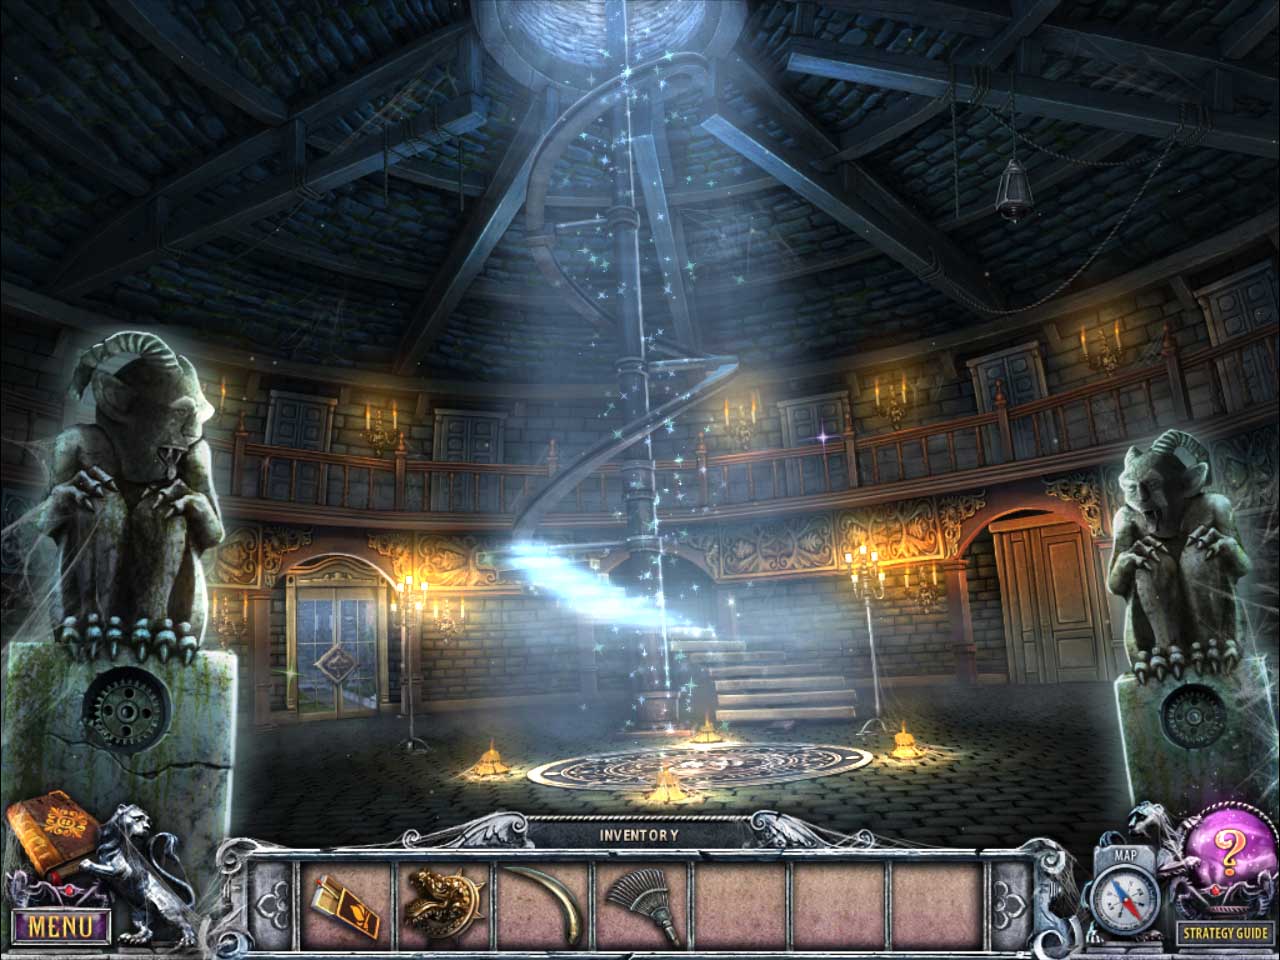
 Kate finds herself dropped in the strange yet familiar place in the House of 1000 Doors, but now, something is different. It is no longer in its immaculate condition filled to the brim with rooms that one could describe as 'stuffy'. The house is now under attack by evil fire spirits which plague not only itself, but also many of the locations around the world that it is connected to. Right the destruction around you and squash the evil emanating from the Palm of Zoroaster to once again make a safe haven of the house.
Having the same game mechanics as Family Secrets, use your mouse to move through the locations and interact with the scene. Aside from the normal cursor, the mouse changes to three other forms to let you know how you can use a particular area/object. There's the regular cursor with a spinning tail, which means this is an area to use another object, the hand, which indicates the ability to pick up an object (whether to put in your inventory or to use somewhere else on screen), and the pointing arrow which will take you to a new place all together. Along with the first two cursors mentioned, hidden-object scenes also have the magnifying glass which will open a subscreen to search through. The scenes themselves are fairly interactive, having several objects that need to be revealed or put together in some way.
 Analysis: Alawar has put together another great tale of the House of 1000 Doors. Keeping the backstory and gameplay that worked so well in Family Secrets, they expand upon it with a darker feel to this familiar setting. As before, this is a game where you can play around with the supernatural without the worry of jump scares or overly frightening scenery. It sticks to the formula that made the first game so enjoyable, but sometimes it's so close, The Palm of Zoroaster feels more like an expansion rather than a true sequel.
It's great to see this title keep up the high quality the series started in, and the addition of using the map to transport to other locations is much appreciated. Let this be a lesson to adventure game developers out there (hybrid or otherwise): lots of backtracking does not equal fun, give players some way to instantly transport to where they want to go! It's also nice to see that they've kept indicators on the map to tell you which locations you're able to perform actions in. While you still have to figure out what those actions are, coupled with the teleportation ability, this feature makes for a smooth playing experience.
In the collector's edition you'll experience about an extra hour and a half of fun, plus the added benefit of carrying the story out to a more explained ending (cliffhangers, why?). And if you can also help out a resident of the house, all the better! House of 1000 Doors: The Palm of Zoroaster provides hours of hidden object and adventuring fun in a well told and compelling story. When the ghosts of a supernatural story are in need of a savior, you can't help but want to right the wrongs that stopped them from resting in peace.
A Collector's Edition is also available. It contains a bonus chapter, art gallery, strategy guide, and more. Remember that Big Fish Game Club Members pay only $13.99 for Collector's Editions (or 2 club credits), and collector's editions count 3 card punches of 6 total needed for a free game.
![]() Windows:
Windows:
Download the demo
Get the full version
Also available: Collector's Edition
![]() Mac OS X:
Mac OS X:
Not available.
Try Boot Camp or Parallels or CrossOver Games.


Walkthrough Guide
(Please allow page to fully load for spoiler tags to be functional.)
House of 1,000 Doors: The Palm of Zoroaster
Basic Information
From the options tab you can change the screen resolution.
You can also adjust the volume, sound effects, and music.
You may change the cursor between the in game cursor or the regular arrow.
There is a bonus chapter only available in the Collector's Edition.
You must beat the whole game to access the Extras tab.
In this game you will have a map. Areas where you have something to do will be shown with an exclamation point. Each zone is labeled, and you can travel to that zone by clicking on the spot.
In the bottom left of your screen is your notebook, which will record important information; and your menu button, which you can access at any time. This acts as a pause button as well.
In the bottom middle is your inventory screen, which you can access by hovering your cursor over it.
In the bottom right of the screen is your rechargeable hint button and your map (once you reach it).
On the screen, if you hover your cursor over an item that can be picked up the cursor will change to a hand.
If your cursor hovers over an object or area that can be inspected, the cursor changes to a magnifying glass. It also does this for hidden object scenes.
If you hover over an area that requires an action to be done, the back of the cursor will start to rotate.
There are two modes of difficulty:
Casual: The hint recharges one minute after each use, and areas of interest will sparkle.
Expert: The hint recharges two minutes after each use and there are no indicative sparkles to show active areas.
There is a tutorial at the beginning that you have the option to decline.
Chapter One: House of 1,000 Doors
Getting the Car to Start
Click on the car to investigate it.
Click on the sun visor and pick up the key.
Get out of the car and zoom in on the faucet area. Pick up the razorblade.
Pick up the bucket that's on the ground.
Investigate the locker and use the razorblade on the rope.
Pick up the sponge.
Inspect the chair and pick up the valve, then click on the newspaper.
Investigate the faucet once more and attach the valve. Place the bucket underneath it and click the valve.
Pick up your bucket of water, then zoom in on the windshield.
Pour the bucket of water on the shield, then use the sponge.
Enter the car once more and place the key in the ignition to go.
Getting into the Garden
Behind the left tire of the car is a Beyond Object: Pick it up.
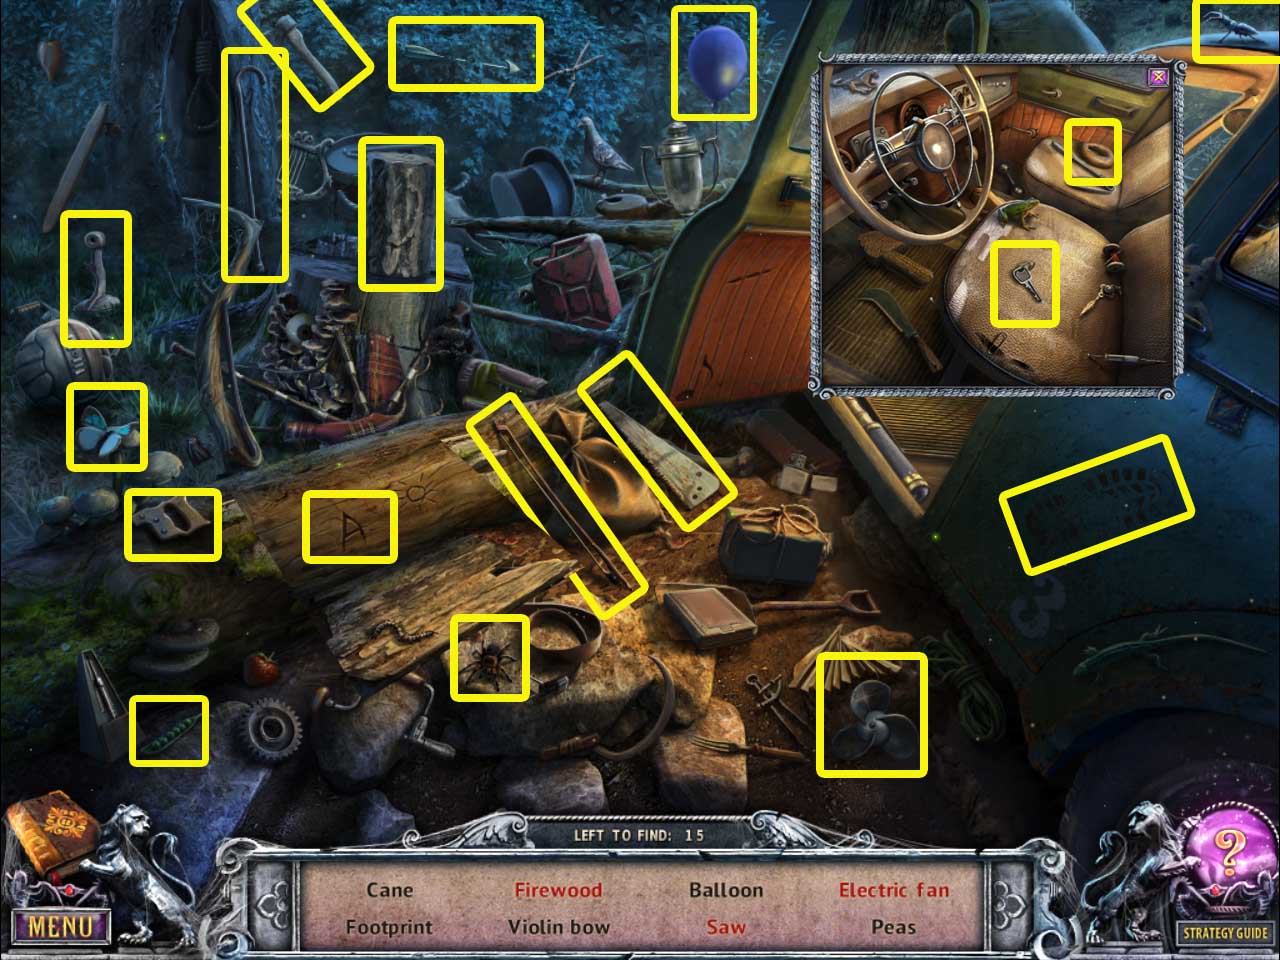
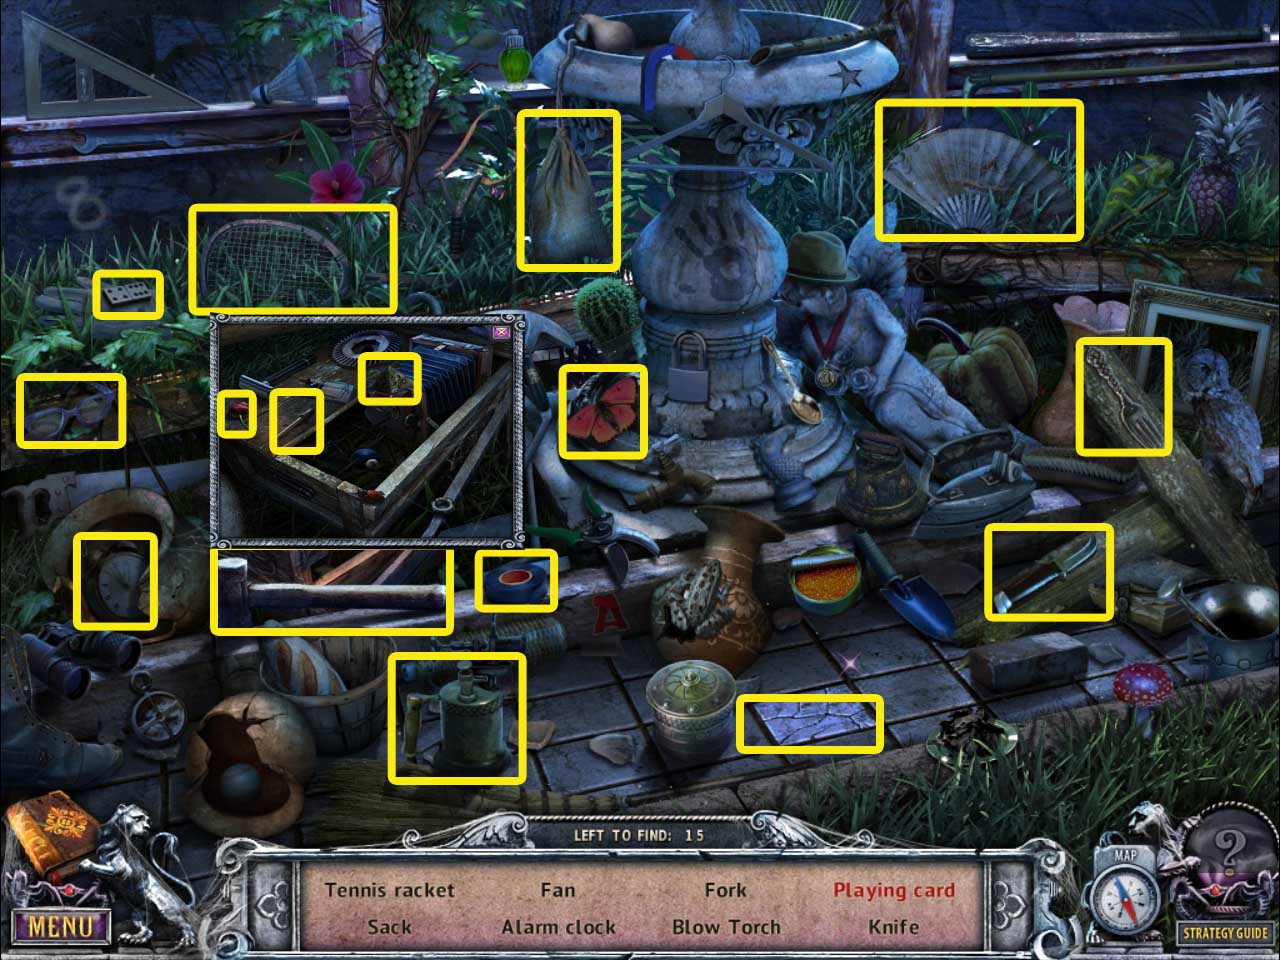
Start the hidden object scene.
Pick up the fan blade and place it on the fan stand to create a fan.
Pick up the saw blade and attach it to the handle to create the saw.
Grab the axe and use it on the log to create firewood.
Investigate the inside of the car to get the key and the bagel.
Click on the fallen tree to reveal the A.
Screenshot
You receive the trunk key.
Pick up the planks in the bushes to the right.
Pick up the crank that's in the water.
Investigate the car trunk and use the trunk key.
Grab the hammer and the nails.
Investigate the dock and place the planks down, then use the nails and the hammer.
Place the crank on the wheel at the end of the dock.
In the bushes to the left is a Beyond Object. Pick it up.
Pick up the map.
Click on the map to go forward to the Courtyard.
Pick up the pruning shears.
On the floor to the left of the statue is a Beyond Object. Pick it up.
Investigate the planter to the right, pick up the elephant tusk, and look at the paper.
Use the pruning shears on the ivy that covers the statue, then pick up the rose.
Zoom in on the gate to your left and place the rose in the empty spot.
Go through into the Garden.
Getting the Crowbar
Pick up the matches the teddy bear is holding.
Grab the Beyond Object from the tree branches above the teddy bear.
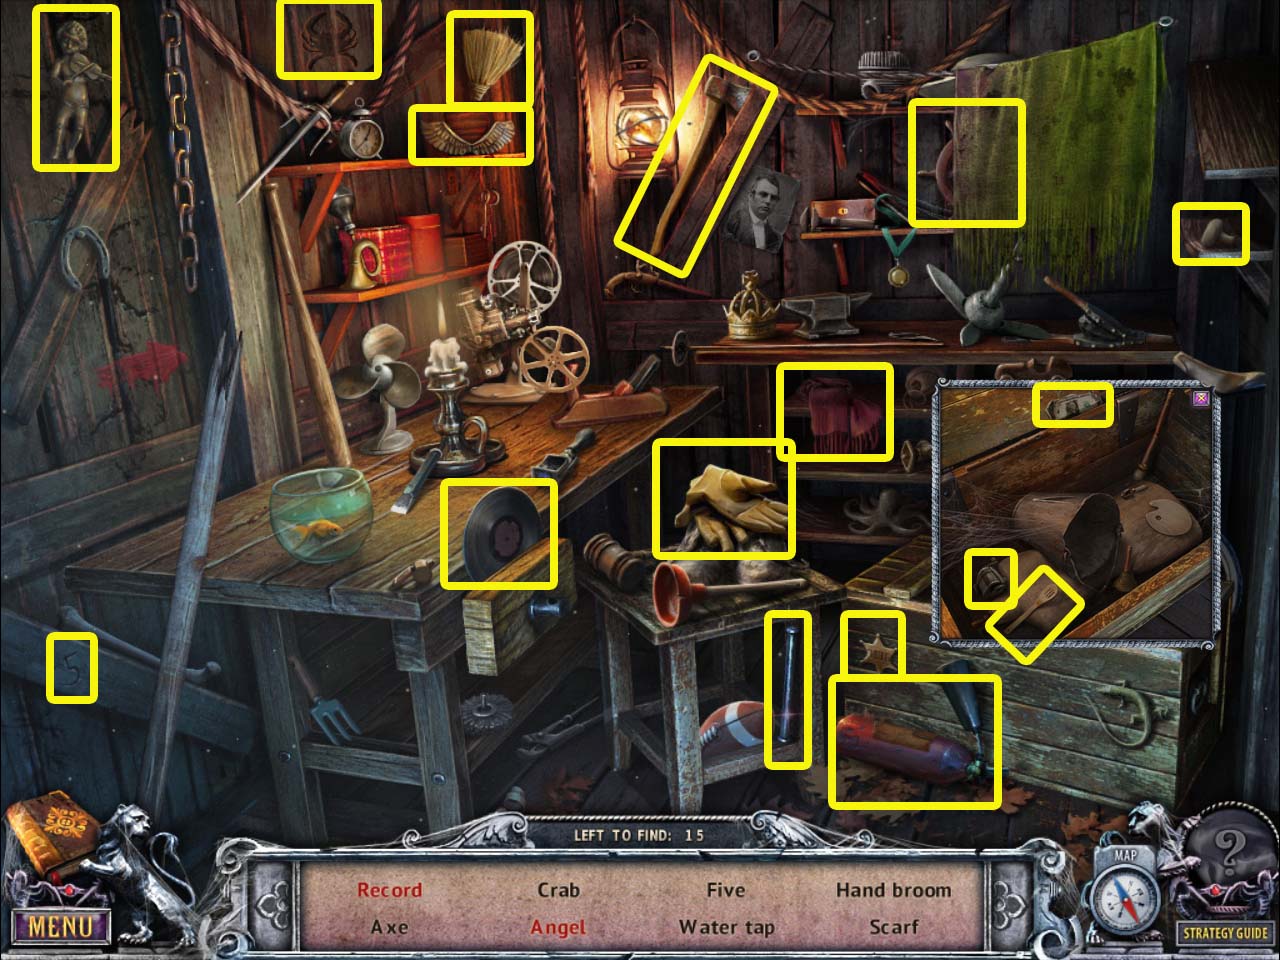
Click on the door of the shed to start a hidden object scene.
Pick up the handle and attach it to the crank that's holding the record.
Grab the wings and attach it to the cherub to create an angel.
Investigate the chest to pick up the dollar bill, pencil sharpener, and spoon.
Screenshot
You receive a fire extinguisher.
Investigate the bench the man was previously sitting on and pick up the dragon head.
Go back to the courtyard.
Use the fire extinguisher to put out the burning tree.
Inspect the tree/fountain and pick up the shovel and the flashlight. Also, pick up the journal.
Go forward into the garden once more and zoom in on the planter to the right of the bench.
Use the shovel to dig in the soil, then pick up the gear.
Open your map and click on the seashore to return there and start the hidden object scene.
Open the book to reveal the flask.
Grab the air pump and use it on the deflated ball.
Open the bark of the tree to reveal the centipede.
Inspect the car for the dumbell.
Roll up the car window to reveal the heart.
Screenshot
You receive a ladder.
Inspect the hole in the tree and use the flashlight to light it up.
Pick up the eye.
Return to the garden.
Use the ladder on the edge of the cobblestone path to create a bridge to the house. Go forward into the house.
On the candelabra at the top left is a Beyond Object. Pick it up.
Grab the crowbar.
Getting to Tibet
Return to the courtyard and use the crowbar on the out-of-place brick on the path.
Pick up the second eye.
Return to the passage and zoom in on the demon on the door at the very end of the hall.
Place both eyes into the empty sockets.
Go forward into the main hall.
Pick up the rake.
Hanging from the rafters on the right is a Beyond Object. Pick it up.
Go to the garden and use the rake on the pile of leaves.
Pick up the organ key.
Go back to the main hall and place the gear in the empty slot of the gargoyle statue to your left.
Move the gargoyle faces so that they're facing each other.
Screenshot
Go upstairs.
On the bottom of the column to the right of the organ is a Beyond Object shifting between column and bone. Pick it up.
Investigate the keyboard part of the organ and replace the missing organ key.
Grab the Tibet key.
When zoomed in on the keyboard of the organ, to the left against the wall is a Beyond Object shifting between a card and a panflute. Pick it up.
Return to the passageway and inspect the first painting to the left and use the Tibet key on it.
Chapter Two: Tibet
Getting the Chisel
Click on the ghost, and he will vanish.
On the left corner of the building to the left is a Beyond Object dragon statue. Pick it up.
Click on the newspaper on the ground.
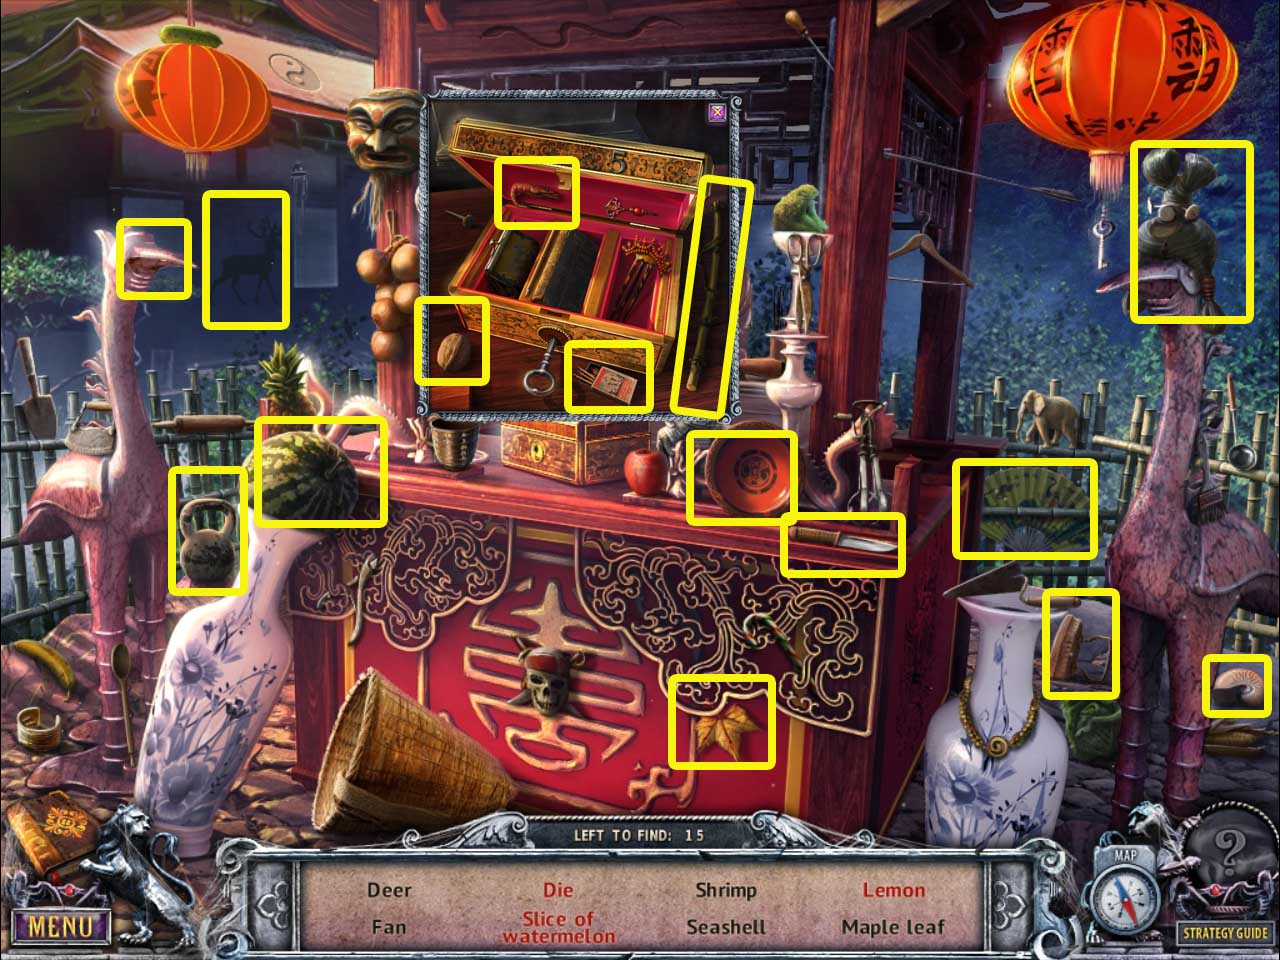
Start the hidden object scene.
Pick up the knife and use it on the watermelon.
Grab the key from the Chinese lantern and use it to open the jewelry box. Inspect the inside of the box to find the reed, shrimp, nut, and 5.
Click on the bowl to reveal the lemon.
Click the mouth of the bird statue to the left to reveal the die.
Screenshot
You receive a reed.
Go forward to the Temple entrance.
Pick up the rope.
On the paneling above the doorway to the temple is a Beyond Object changing between plating and a tray. Pick it up.
Inspect the door of the temple and place the dragon head on the circle to the left.
Investigate the steps to the right and pick up the trap part.
Give the reed to the animal in the tree and pick up the locket it drops.
Return to the garden. Investigate the statue of the woman and place the locket on her.
Pick up the mouse figurine.
Start the hidden object scene.
Pick up the film reel and place it on the machine on the left desk to create the film projector.
Pick up the fishing wire and use it on the goldfish in the bowl to get the fish.
Investigate the chest to pick up the flute, zipper slider, bell, and tweezers.
Screenshot
You receive a chisel.
Getting the Chime
Return to the Tibet square.
Inspect the well to the left and place the chisel against the padlock, then pick up the rock and use it to hit the chisel.
Place the rope against the rim of the well.
Pick up the stone disc and the sphere, then look at the paper.
Return to the main hall.
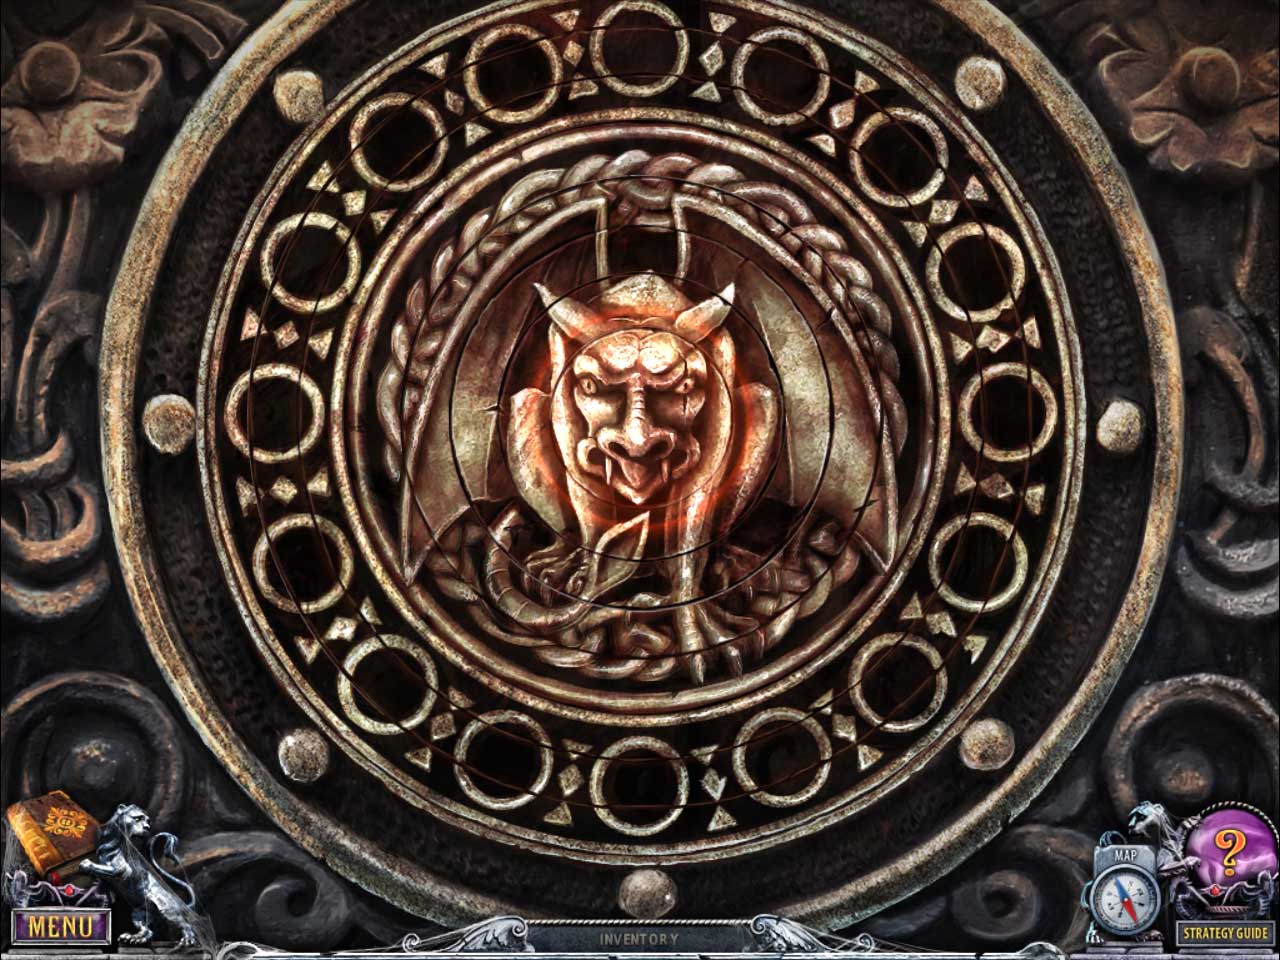
Click on the circle in front of the staircase and place the stone disc on the floor.
None of the rings affect each other when turned, so there's no penalty or trick to do: simply form the image of a dragon.
Screenshot
The ring will glow when placed in the correct spot.
Investigate the platform and pick up the key.
Click on the door to the right and use the key on it then enter.
Pick up the telescope/bottle from the left edge of the mantel. This is the Beyond Object.
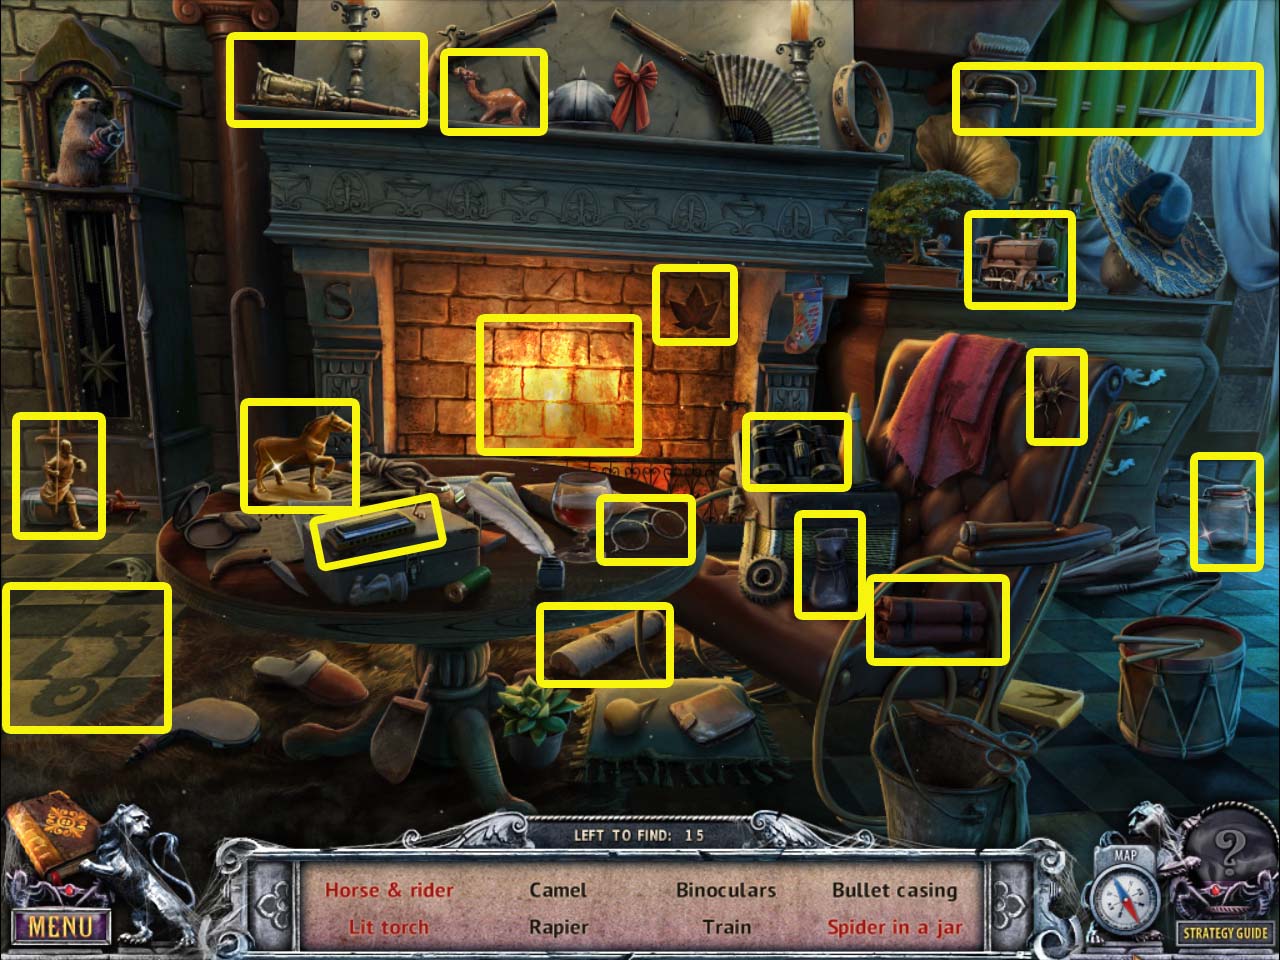
Start the hidden object scene.
Pick up the jar and scoop the spider into it.
Place the soldier on the horse.
Pick up the torch and place it in the fire to light it.
Screenshot
You receive a pouch.
Inspect the taxidermied elephant and place the elephant tusk on it.
Investigate the hidden compartment and pick up the pickaxe.
Click on the dresser beneath the elephant and pick up the doll, which is the Beyond Object.
Inspect the grass beneath the bear and use the trap part on the trap. Pick up the chime.
Getting the Firewood
Go to the Tibet Square and investigate the entrance door of the building to your left.
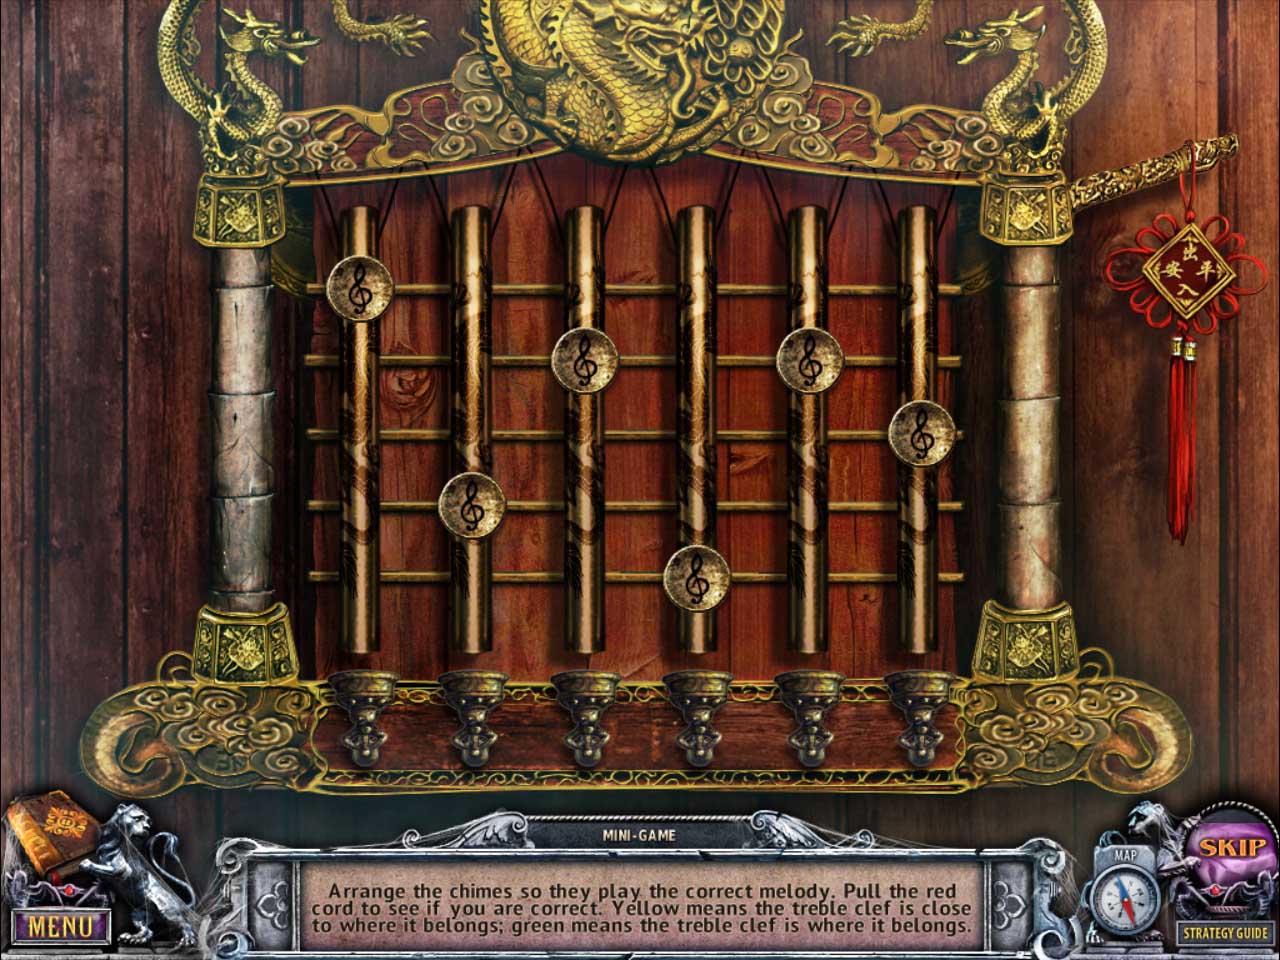
Place the chime on the door to start a puzzle.
Move the chimes up or down. If the music note is close to where it needs to be, it will turn yellow. If it's in the correct spot, it will turn green. Pull the red chord to test it after you finished assembling.
Screenshot
Once the puzzle is complete, enter the building.
On the very top of the left wall is a Beyond Object, appearing as an envelope.
After speaking with the ghost, inspect the vase to the right. Click on it to break it and pick up the rooster figurine.
Click on the dresser to the left to start a puzzle.
You must move all the wooden discs to the other side. A smaller disc can go on a larger disc, but a larger disc can never go on top of a smaller disc.
Pick up the horse figurine, then pick up the record/fan that's to the left of the dresser. This is a Beyond Object.
Click on the table in the back right of the room and pick up the cleaner. Read the rolled-up scroll on the floor.
Investigate the table in front of the ghost and pick up the chopsticks and the ram figurine.
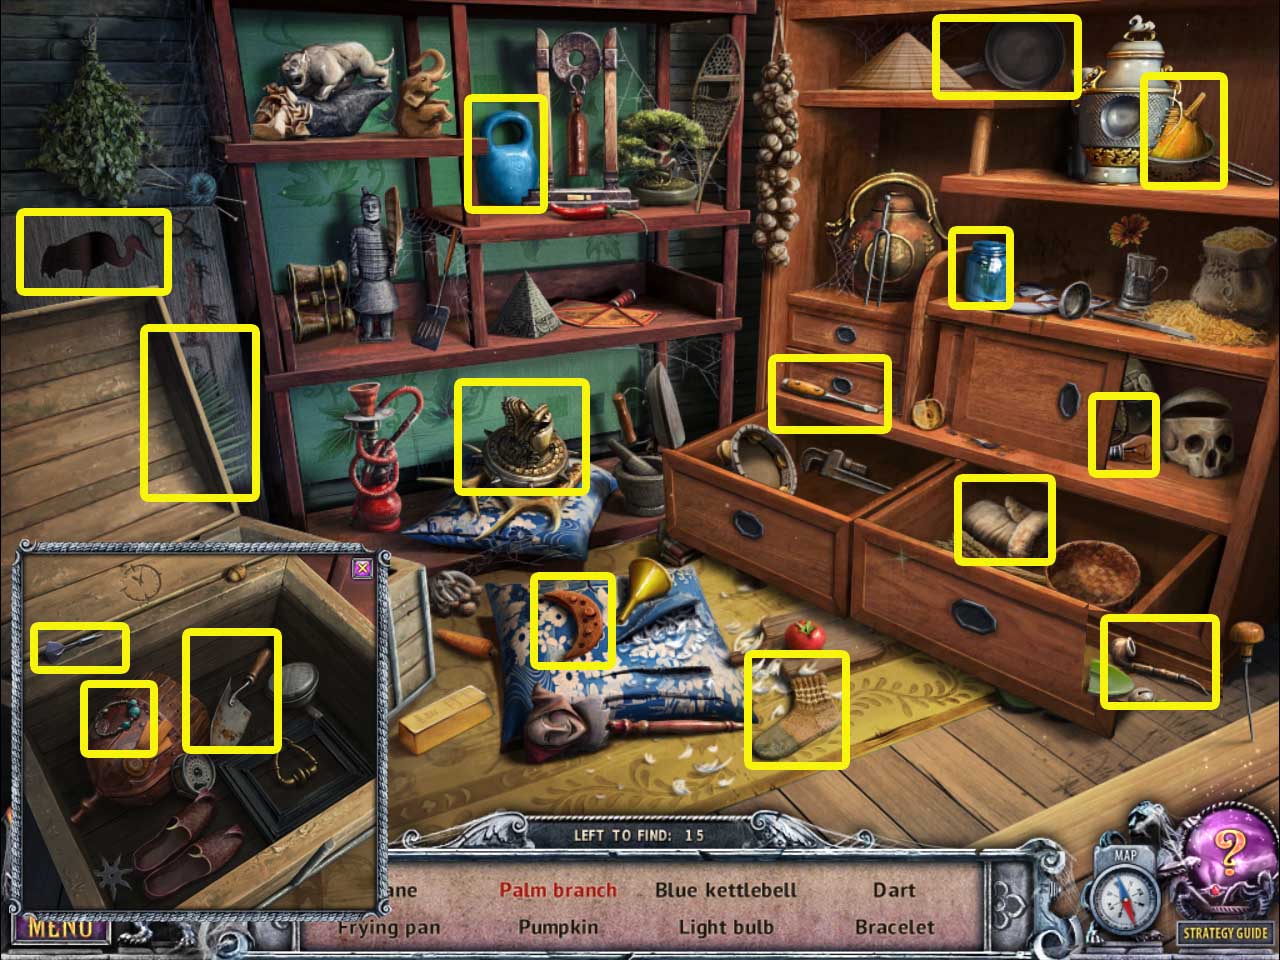
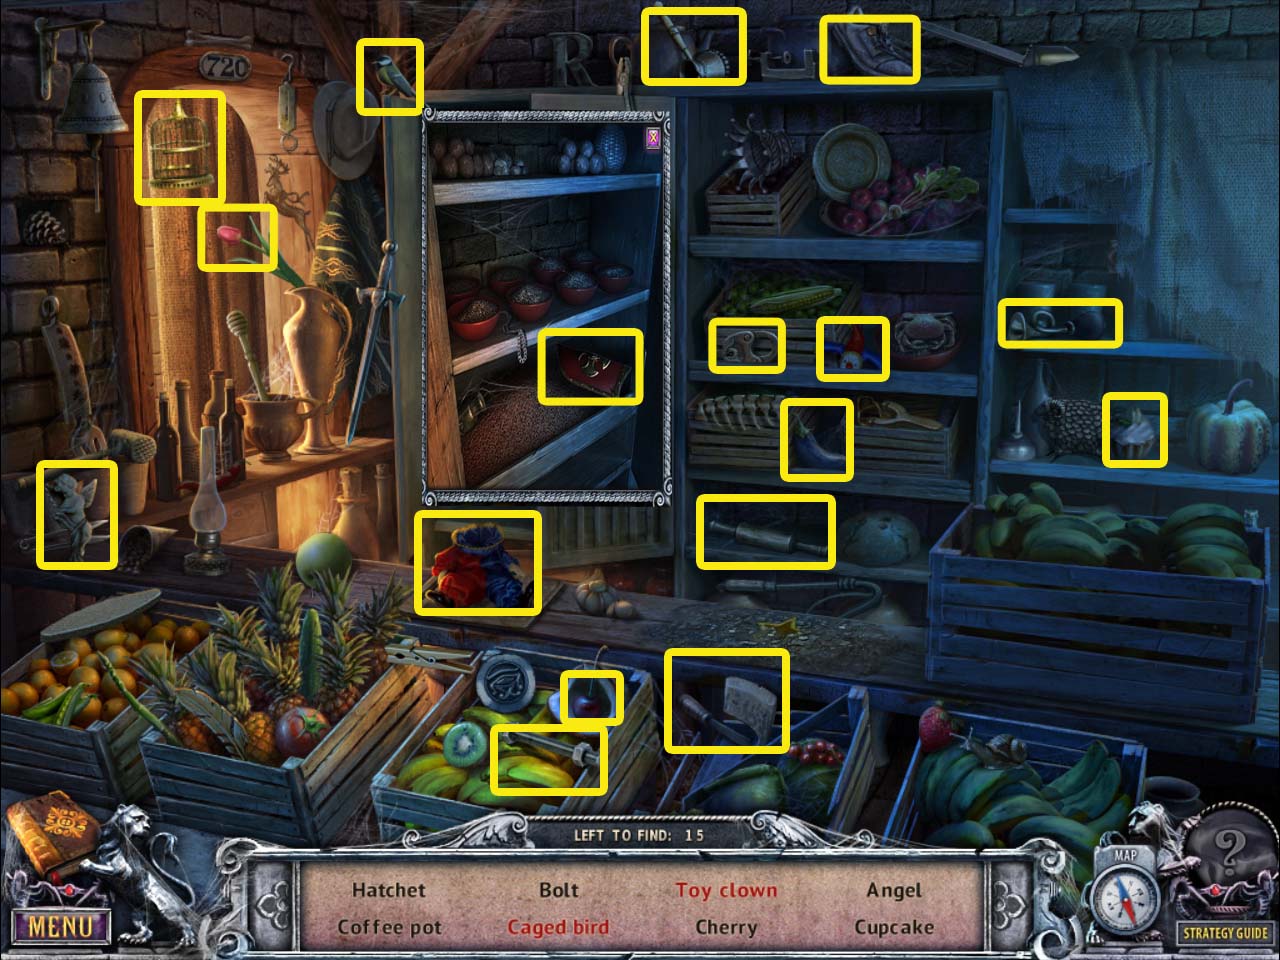
Click on the doors at the back of the Shofuso to reveal a hidden object scene, then start it.
Click on the urn on the top right shelf to reveal the pumpkin.
Pick up the paintbrush dipped in blue and use it on the kettlebell.
Open the drawers to retrieve the light bulb and the oven mitt.
Pick up the brush and clean off the board to reveal the crane.
Open the chest and inspect it to get the shovel, dart, and bracelet.
Screenshot
You receive a dragon head.
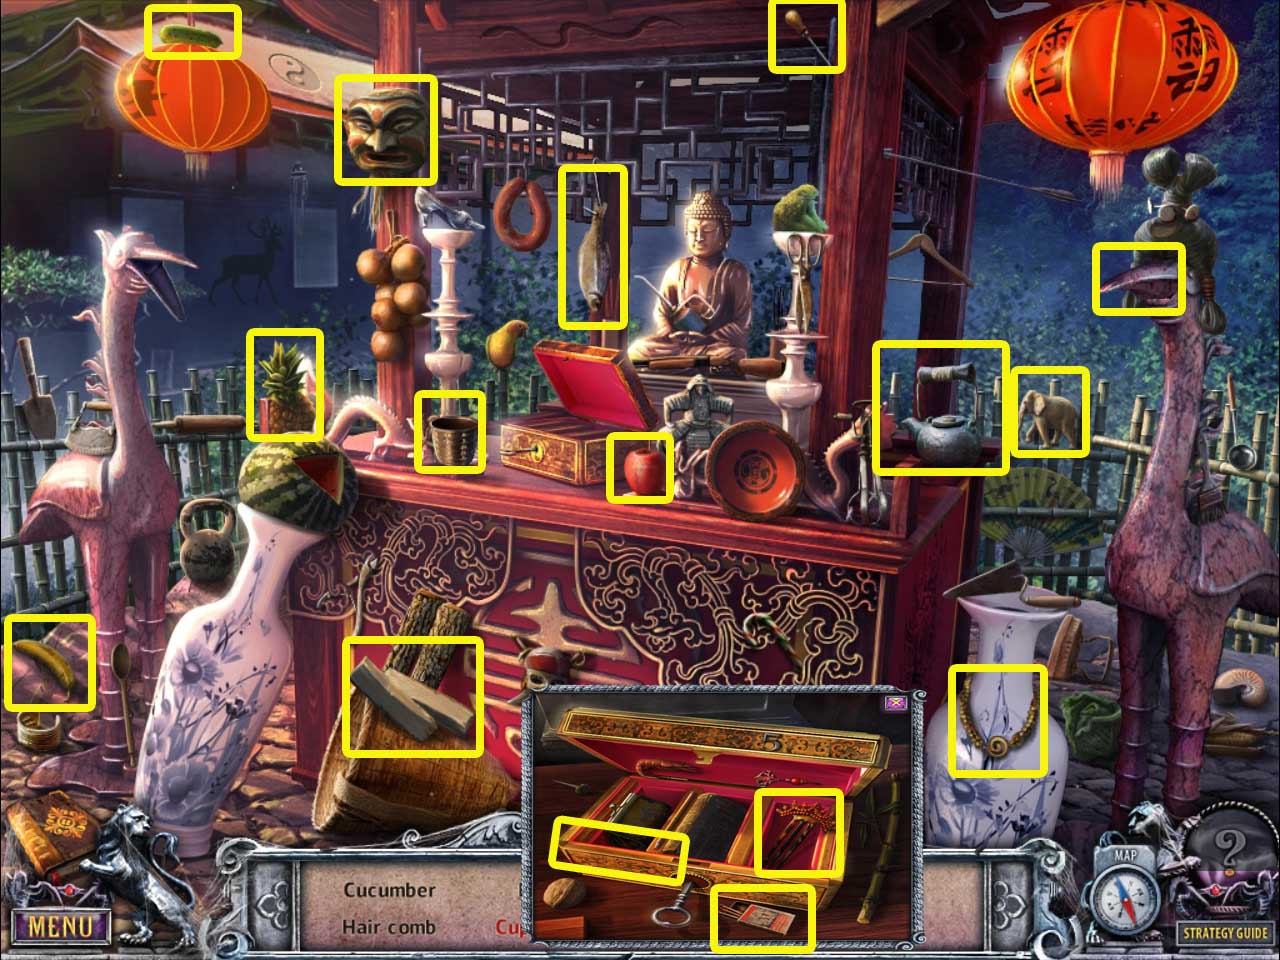
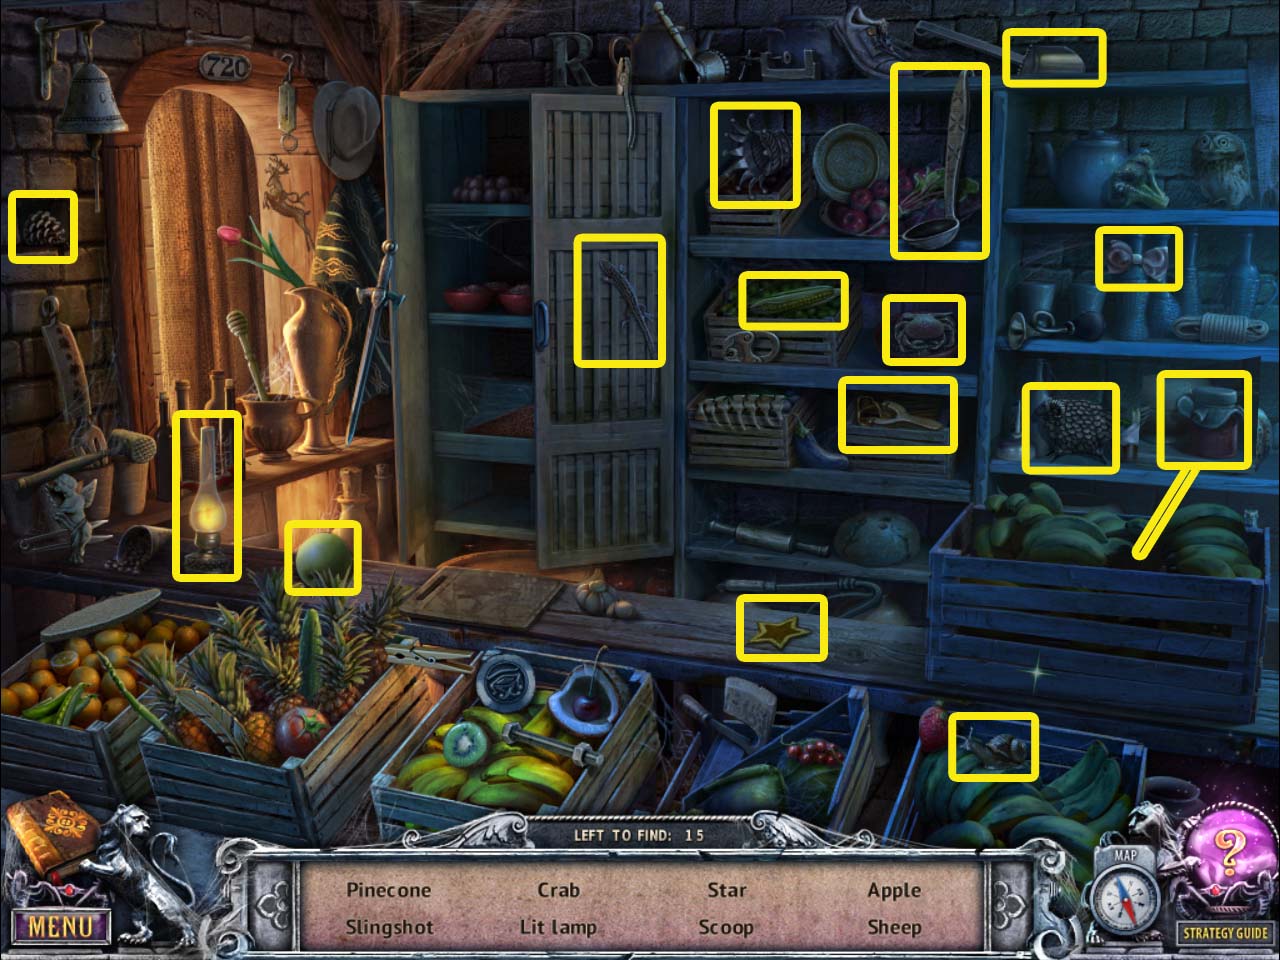
Go outside to Tibet square and start the hidden object scene.
Investigate the jewelry box to get the hair comb, pencil, and matches.
Pick up the tea kettle and pour it in the cup.
Click on the mouth of the bird statue to the right to reveal the coin.
Screenshot
You receive firewood.
Getting the Hay
Go to the temple entrance and place the sphere in the claws of the dragon on the right.
Use the pickaxe on the spot where the beam of light is falling.
Investigate the spot and pick up the rabbit figurine.
Inspect the grass to the right with all the petals on it and place the cherry blossom petals in the pouch.
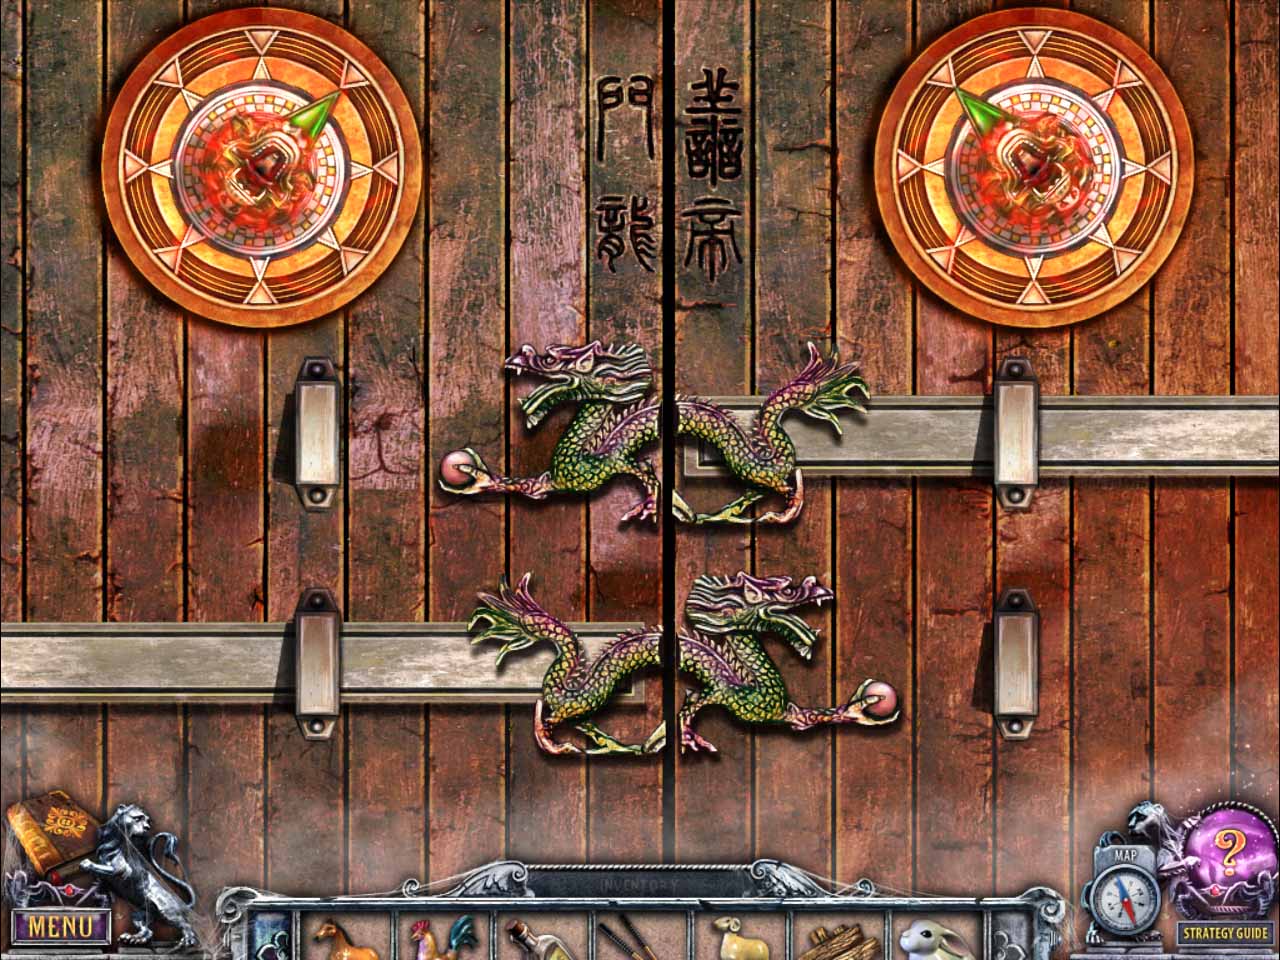
Zoom in on the door and place the dragon head on the spot to the right to start the puzzle.
You must turn the dragon heads in the correct position.
Screenshot
Enter the building and pick up the Beyond Object that's next to the dragon face on the wall close to the ceiling.
Investigate the figurine by the window and pick up the tiger figurine.
Use the cleaner on the ink stain to reveal three faces.
Click on the paper on the ground to read the text.
Investigate the samurai and rotate their faces to match the image of faces you just saw. After placing them correctly, pick up the puzzle piece.
Screenshot
Laying along the arch on the right side of the middle display is a Beyond Object.
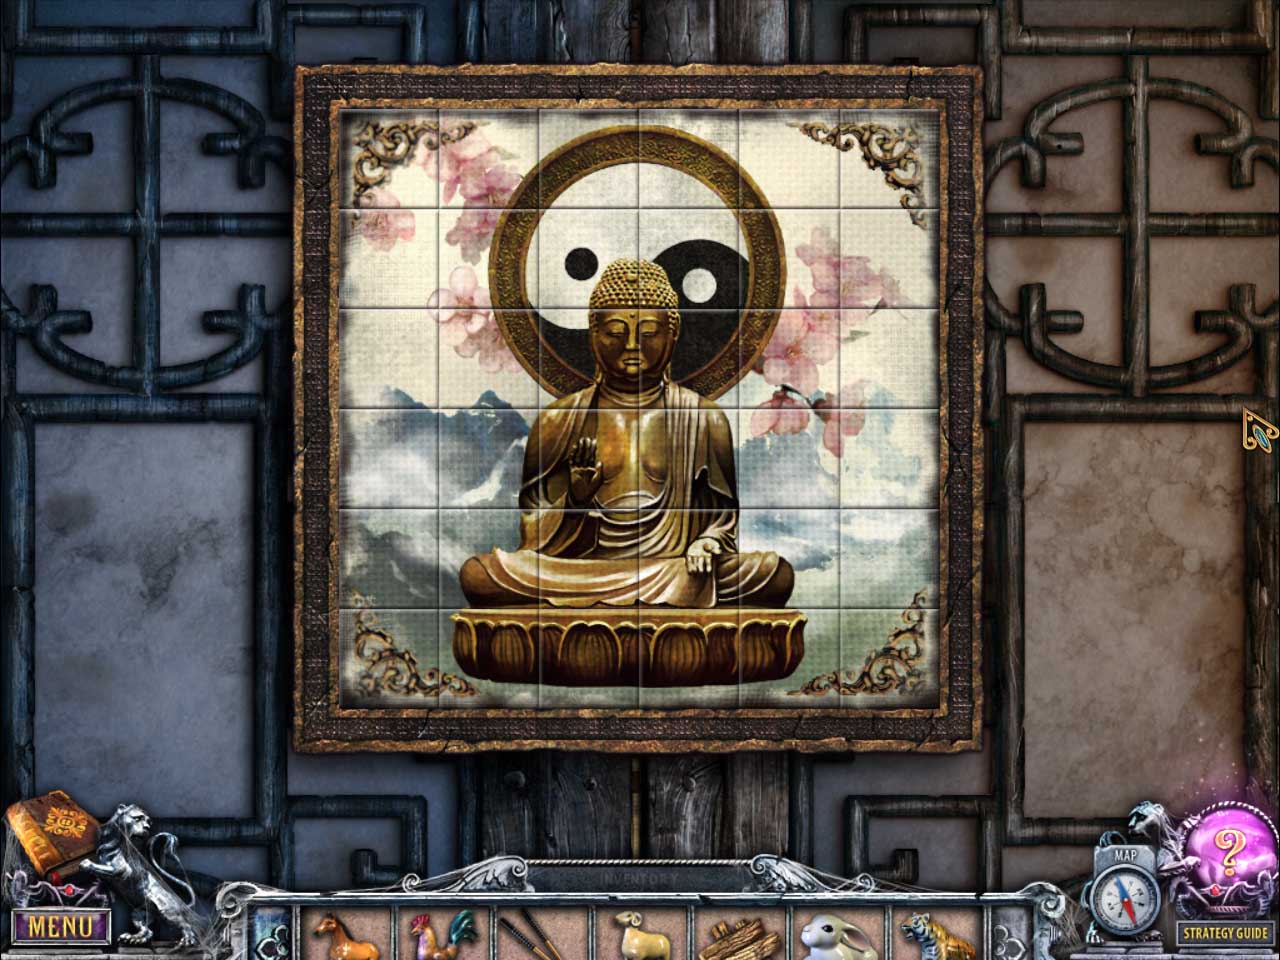
Investigate the back door and place the puzzle piece on the board to start the puzzle.
You must move the pieces to form a picture. Click on one piece and then another to swap them. The easiest method is to do the edges then work toward the middle.
When a piece is placed in the right spot, it will get dark and won't be able to be moved.
Screenshot
Once the puzzle is done, go through the door.
Pick up the hay.
Getting the First Heiroglyph
Grab the Beyond Object located on the bottom left of the dragon statue.
Investigate the yin yang on the ground before the guy and place all the animal figurines in the empty spots.
At the top left of the screen is another Beyond Object to be picked up.
Click on the skeleton to topple him over, then read the letter in his hands.
Go back to the Shofuso and click on the table.
Place the cherry tree petals into the teapot.
Investigate the kettle in the back left and place the firewood in the firepit followed by the hay then light it with matches.
Once the kettle spouts steam, pick up the hot water.
Zoom into the table once more and pour the hot water into the tea pot, then cover it with the lid.
Pick up the tea, then hand it to the ghost.
You receive the gong stick.
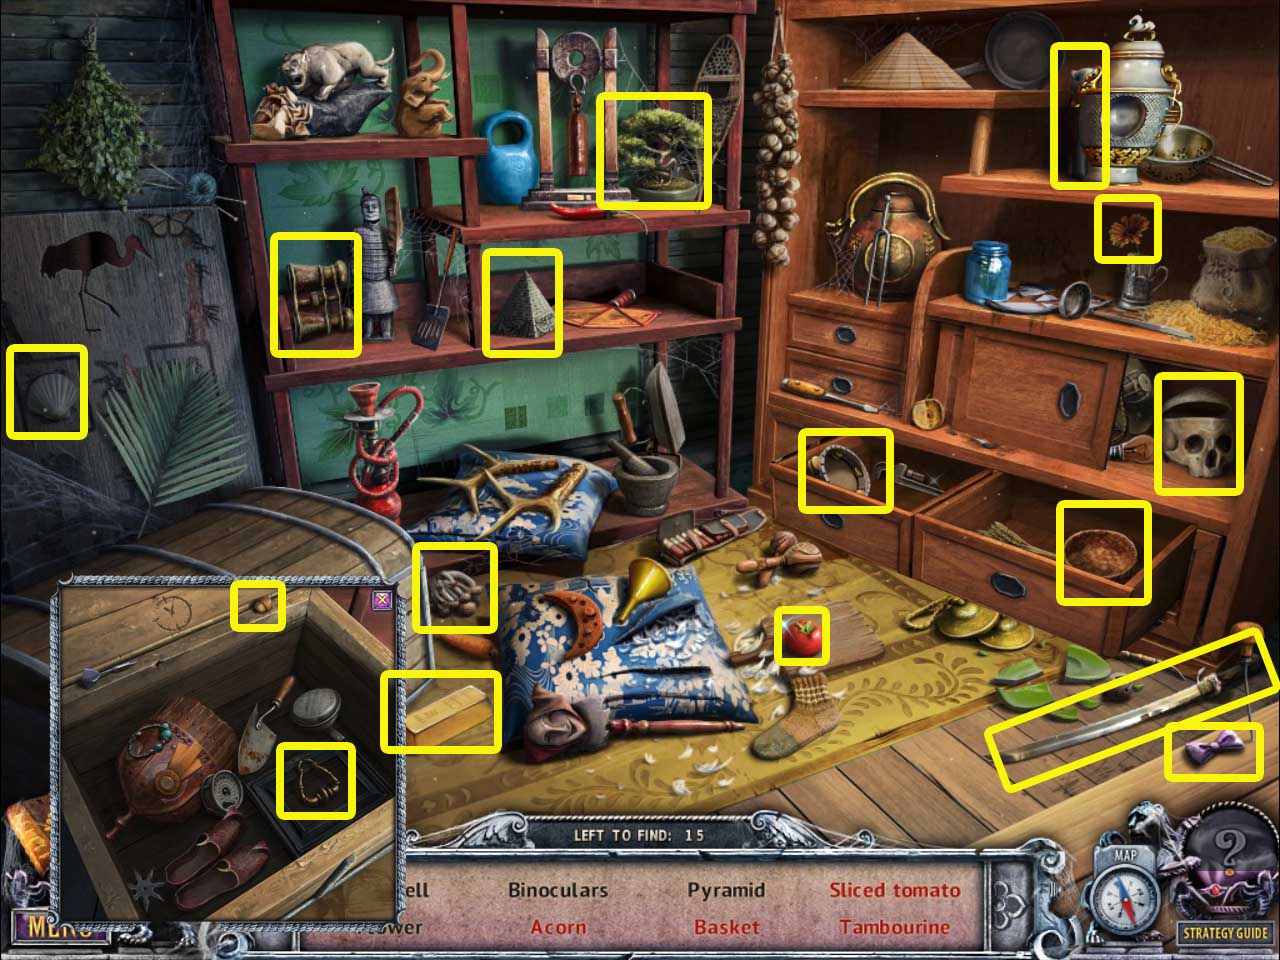
Start the hidden object scene that has appeared.
Use the sword to cut the tomato.
Open the drawers to get the tambourine and the basket.
Look into the chest to receive the acorn, medal, and door handle.
Move the urn/vase to reveal the cat and attach the bow to it.
Screenshot
You receive a door handle.
Open your map and go to the trohpy room.
Click on the dresser at the back and attach the door handle.
Play the memory match puzzle, then pick up the hieroglyph.
Screenshot
Getting to India
Go to the Hall of Buddha.
Hit the gong with the gong stick.
Investigate the Buddha and place the hieroglyph in his hand.
Pick up the Africa figurine and the ball of yarn, which is a Beyond Object.
Return to the trophy room and examine the globe. Place the Africa figurine in the appropriate spot.
Pick up the pig figurine and read the letter.
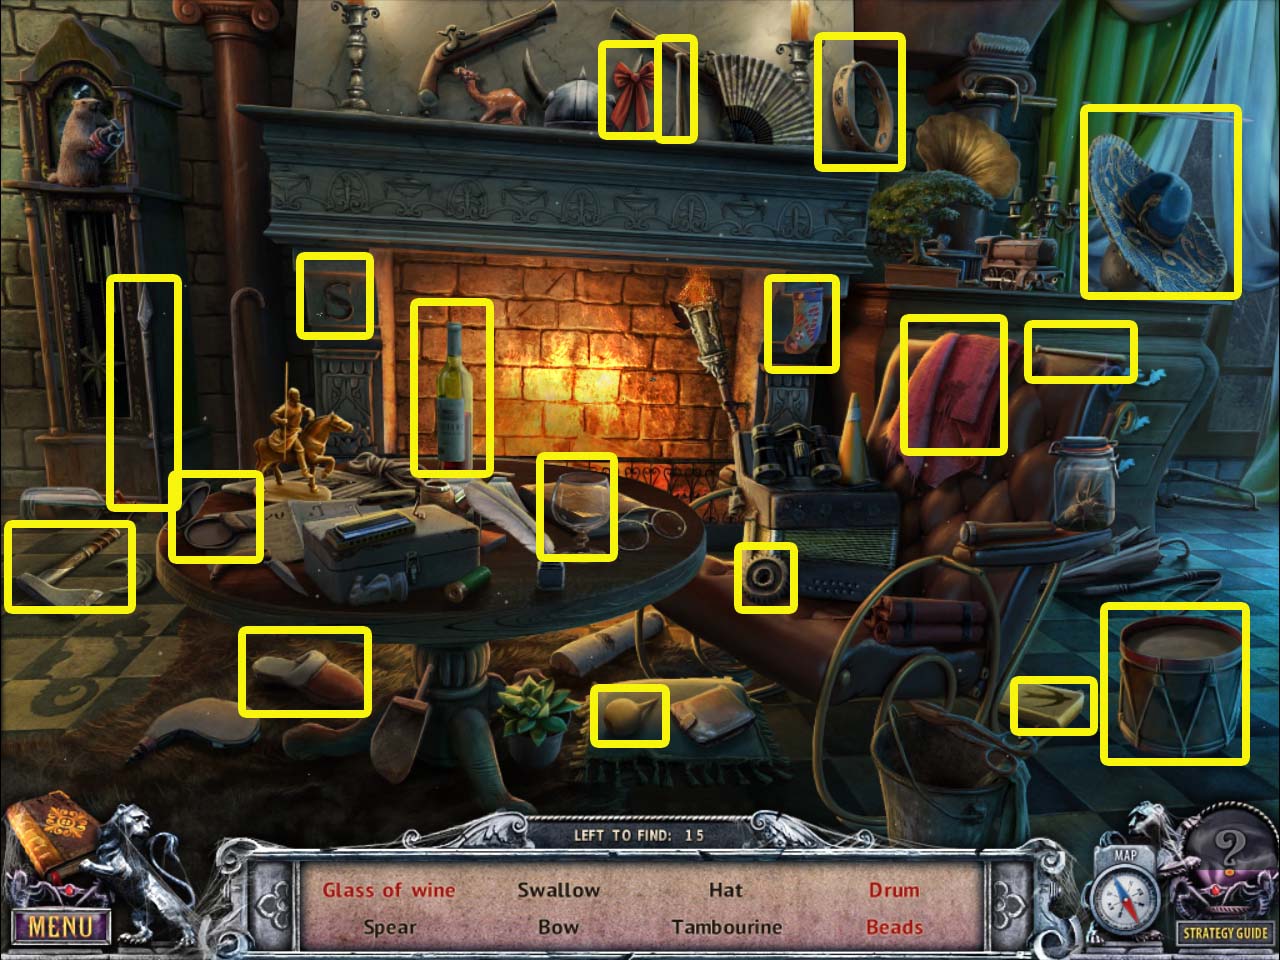
Start the hidden object scene.
Pick up the bottle of wine and pour it in the cup.
Click on the blanket on the chair to reveal the beads.
Add the drumsticks to the drum.
Screenshot
You receive an axe.
Return to the Hall of Buddha and examine the yin yang on the floor. Place the pig figurine in the empty slot.
Pick up the hieroglyph.
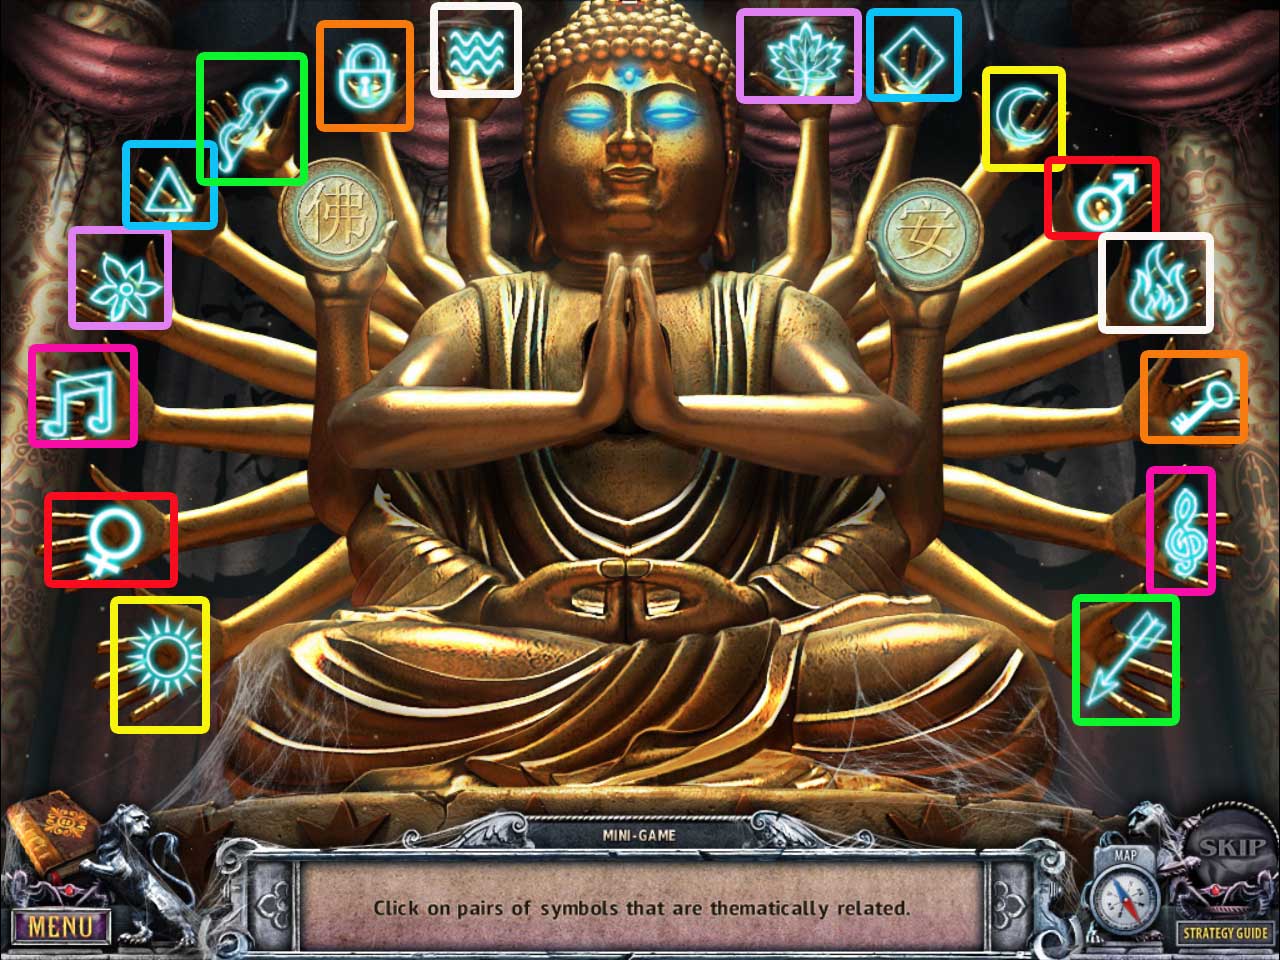
Inspect the Buddha and place the second hieroglyph in the other open palm of the Buddha.
A puzzle will start. You must pick pairs of symbols that represent similar things.
Screenshot
Pick up the skull.
Go to the organ and zoom in. Place the skull in the second compartment.
You receive the India key.
Go back to the passageway and investigate the painting hanging on the right nearest you. Use the India key to open it up and go through.
Chapter Three: The Ruined City
Getting into the Greenhouse
Pick up the weight and the journal to the right of it, which is a Beyond Object.
Go forward toward the hut.
Underneath the hut on the right is the Beyond Object, a drum that changes to reeds.
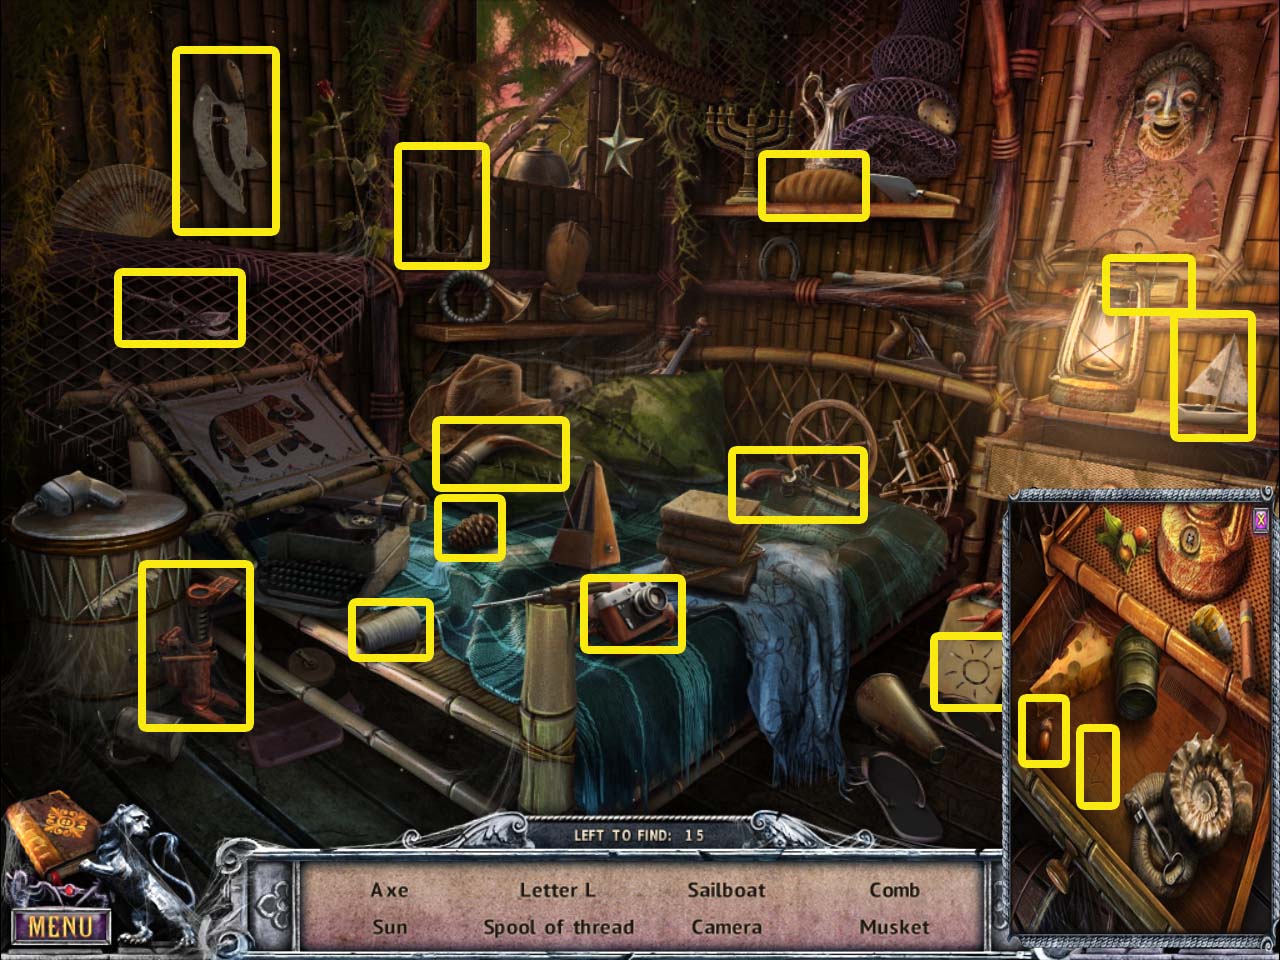
Click on the door of the hut to the right to initiate a hidden object scene.
Pick up the pencil and use it on the paper to draw the sun.
Click on the pillow to reveal the musket.
Click on the picture of the elephant to reveal the axe.
Open the drawer of the nightstand table and investigate it to find the comb and the two.
Click on the lantern to move it and reveal the sailboat.
Screenshot
You receive a jack.
Go forward toward the bridge.
Pick up the Beyond Object that's on the bottom of the trunk of the left tree. It looks like a wrench then morphs.
Click on the lid on the post to the left of the bridge, then pick up the resin.
Pick up the weight on the right side of the bridge.
Place both weights on the left bridge post, then head back to the Ruined City.
Zoom in on the broken column and place the jack under it, then click it to make it lift the column.
Pick up the flower and bowl, then click on the paper to read it.
Open your map and return to the main hall.
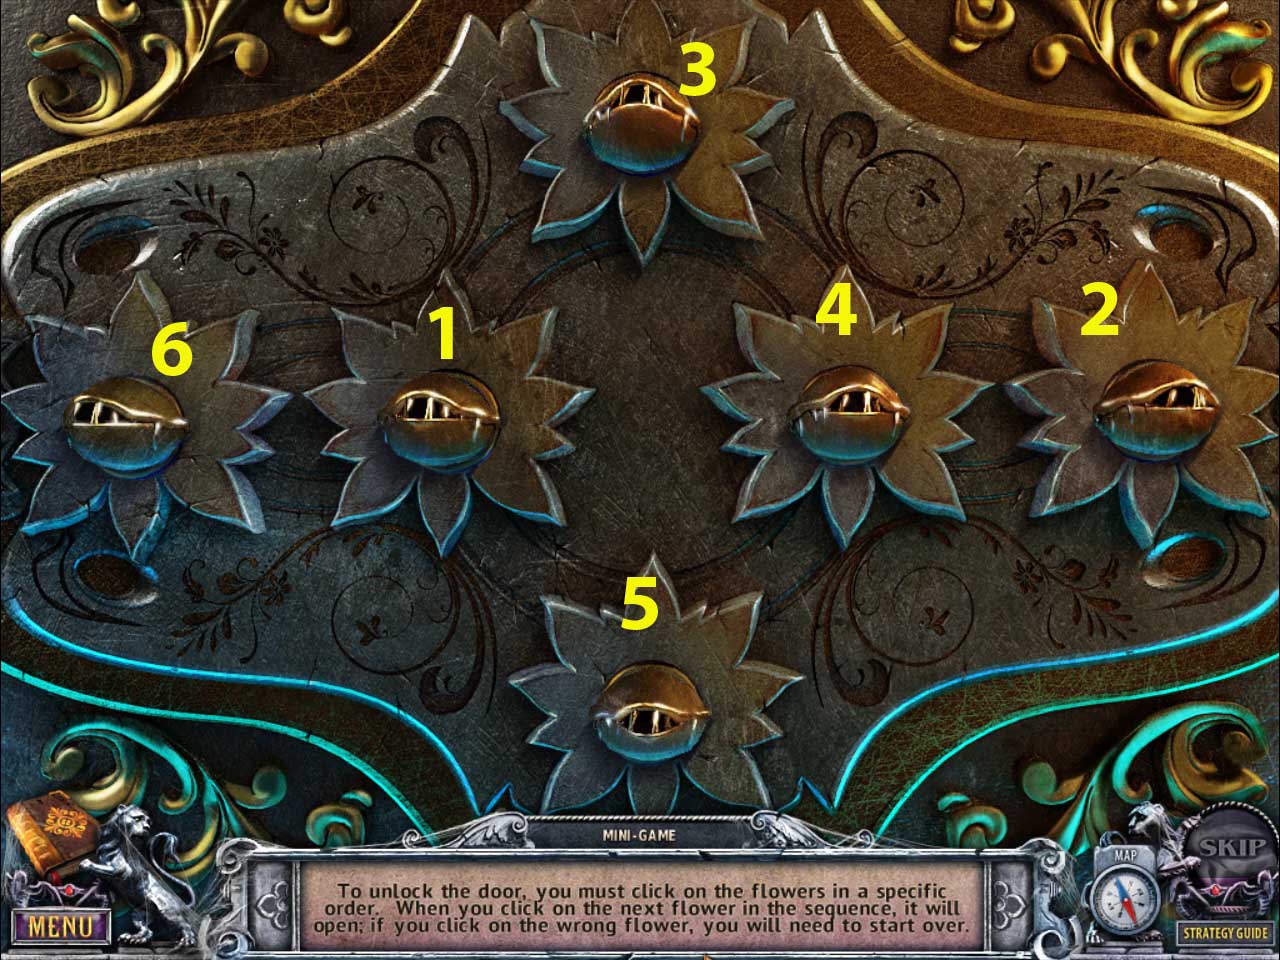
Click on the door to the left and place the flower on the door to start the puzzle.
You must click the flowers in the correct sequential order.
Screenshot
Go through the door and into the greenhouse.
Getting the Burning Torch
Pick up the button and the pot.
Return to the Ruined City.
Click on the tiling on the building to the left.
To the left is a Beyond Object shifting between a spyglass and a pen.
Place the button on the empty triangle slot to start a puzzle.
You must move the symbols to the right order for each row.
Screenshot
Pick up the weight and click on the paper.
Return to the bridge and place the final weight down.
Pick up the grappling hook.
Go across the bridge to the waterfall.
Against the dock on the left side is a Beyond Object shifting from a lantern to a cheese grater. Pick it up.
Investigate the basket on the dock.
Click on the cloth inside the basket, then place it on the stick to receive a torch.
Zoom in on the palm tree on the hillock and use the axe to chop it down.
Inspect the other side where the tree has fallen.
Pick up the blue gem.
Return to the hut and click on the fire.
Place the pot on the hook, then place the resin inside. Put the torch in the melted resin, then stick the torch with resin in the fire.
You receive a burning torch.
Getting Past the Venus Fly Trap
Go back to the Ruined City and investigate the tunnel on the building to the left. Use the burning torch to light it up.
Start the hidden object scene.
Pick up the tube of glue and use it on the broken cup to get a fixed tea cup.
Click on the large rock to reveal the tea pot.
Pick up the bottle opener and use it on the wine bottle to get the cork.
Pick up the matches and use it on the lantern to create the lit lantern.
Investigate the well to get the lever, 5, diamond, and leaf.
Screenshot
You receive the lever.
Return to the waterfall and zoom in on the waterfall where you picked up the blue gem.
Place the lever in the missing spot of the box and click on it.
Go forward into the cave behind the waterfall and speak with the ghost.
Pick up the green gem and the Beyond Object that's on the top of the column to the left.
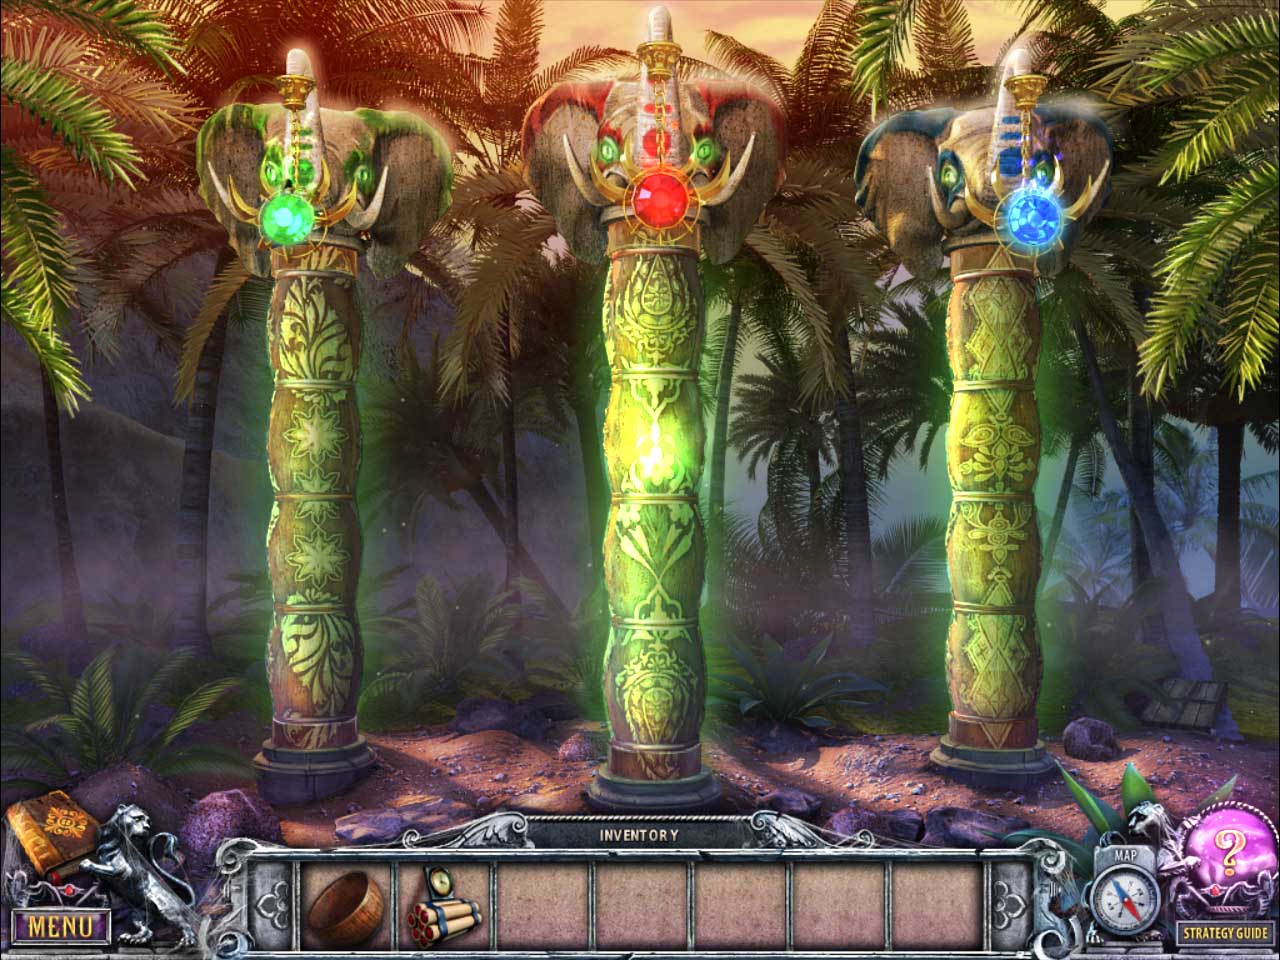
Return to the hut and zoom in on the elephant totems. Place the green gem and the blue gem on the green and blue colored elephants.
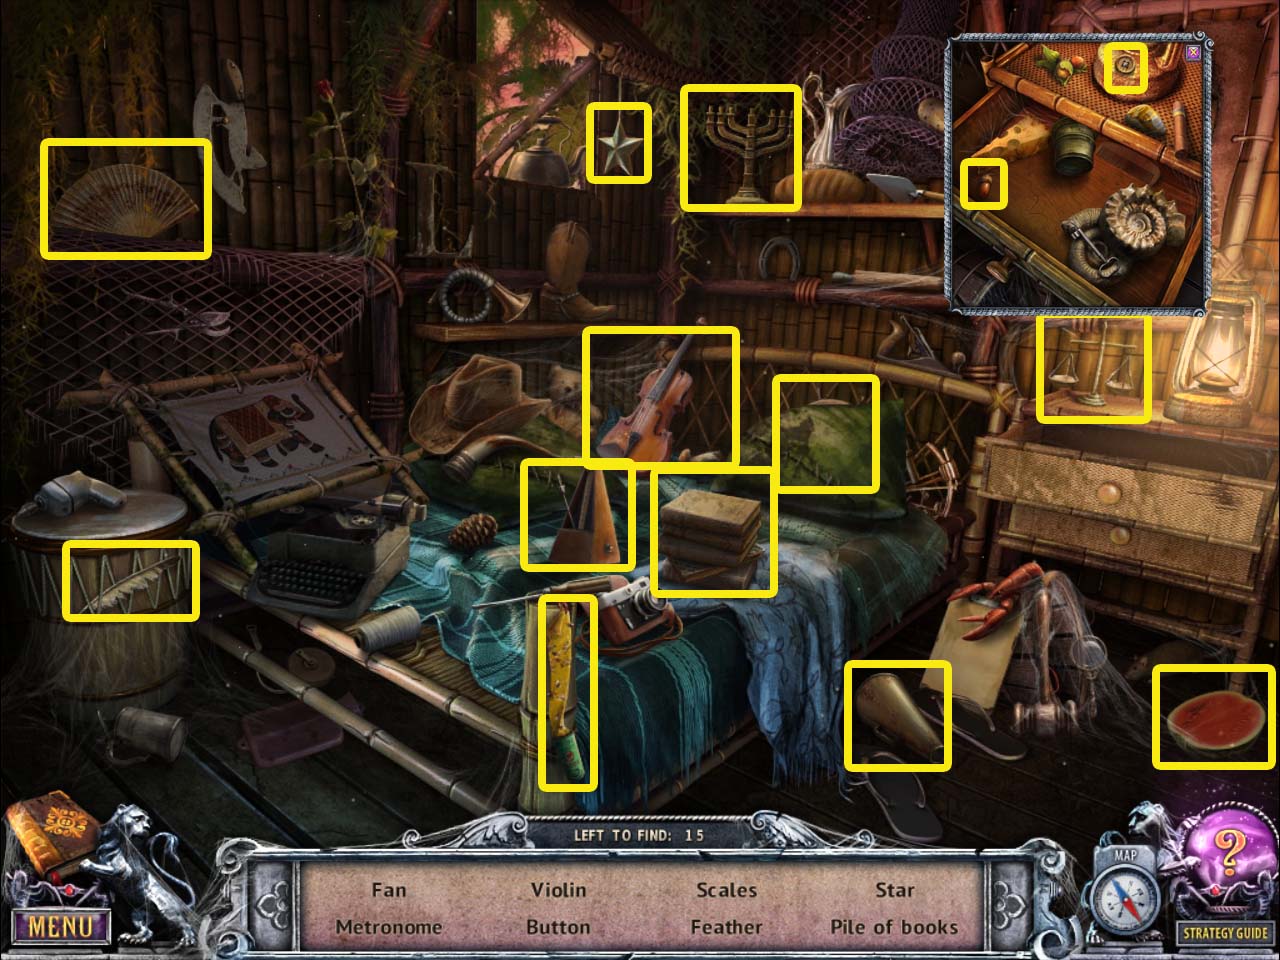
Start the hidden object scene.
Move the pillow to reveal the violin.
Collect the three books and place them on the other two to create a pile of books.
Move the lantern to reveal the scales.
Inspect the drawer to find the acorn and button.
Screenshot
You receive flypaper.
Open your map and go to the greenhouse.
Zoom in on the venus flytrap flower and give it the flypaper.
Getting the Boomerang
Pick up the Beyond Object that's in the windowsill to the right. It changes between a statue and an owl.
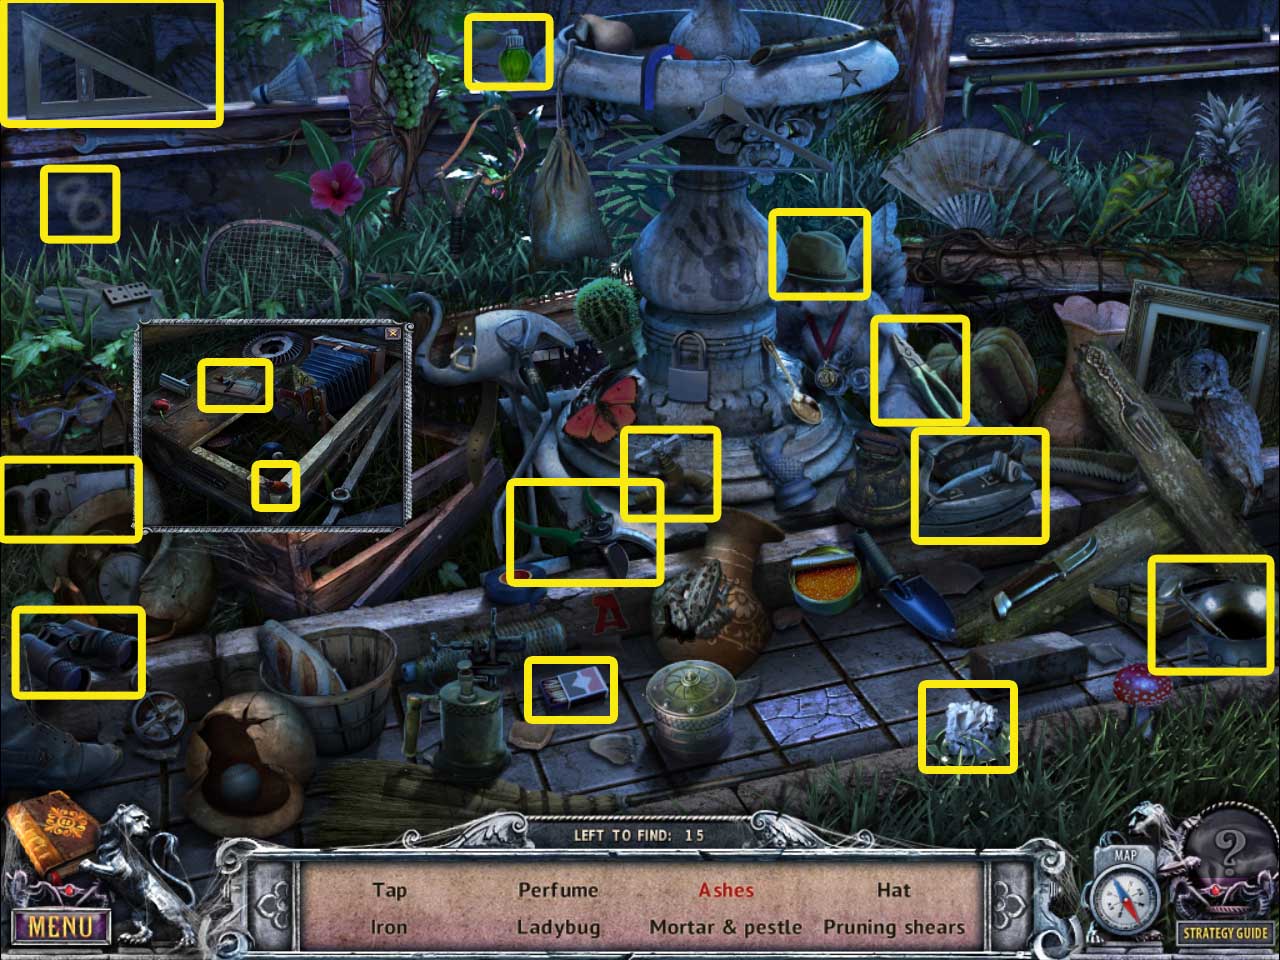
Start the hidden object scene.
Investigate the crate to get the ladybug and mousetrap.
Pick up the matches and use them on the paper to get ashes.
Screenshot
You receive pliers.
Use the grappling hook on the crossbeam, then investigate the golden object to pick up the coin.
Go forward and pick up the pinecone/shell, which is a Beyond Object.
Investigate the fountain and pick up the Beyond Object that's on the rim on the left side.
Inspect the birdhouse and use your chopsticks to get the coin.
Go to the hut and zoom in on the trunk to the right.
Use the pliers on each of the nails to pull them out.
Click the lid to open the trunk, then pick up the dynamite.
Go to the treasurey and inspect both elephants one at a time. Place a coin on each of the elephants.
Examine the area across the pathway and pick up the red gem, then read the scroll.
Go back to the hut and inspect the elephants. Place the red gem on the red elephant to initiate a puzzle.
For each totem, you must rotate the individual blocks to create the proper image.
Screenshot
Pick up the boomerang.
Decoding the Text on the Slab
To the right side of the elephant totems is a Beyond Object shifting between a plank of wood and a satchel.
Move back, then investigate the tree with the bananas on it. Use the boomerang to get them down and receive bananas.
Go back to the waterfall and place the bananas on the ground where the banana peels are.
Once the monkeys have been distracted, investigate the boulders and place the dynamite on them.
Go back and click on the detonation device.
Go into the cave.
Talk to the ghost.
The Beyond Object is among the stalagtites on the right side, shifting between a ship wheel and a wagon wheel.
Pick up the mirror and the dictionary.
Investigate the skeleton and click on his hand to open the fingers. Pick up the gem. Read the scroll.
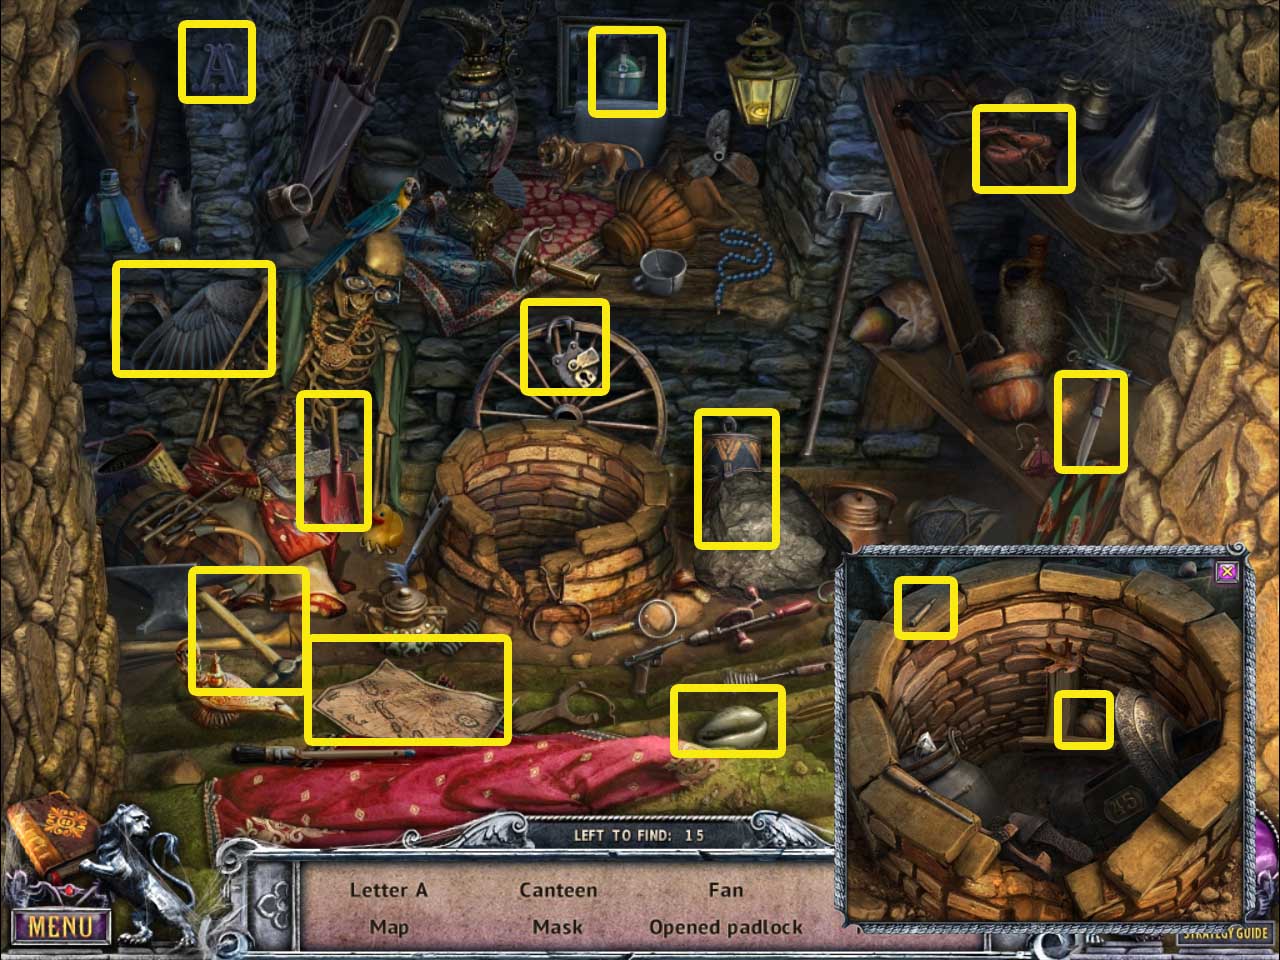
Return to the Ruined City and start the hidden object scene.
Click on the painting to reveal the canteen.
Inspect the well to get the plug, bullet, and baseball.
Pick up the key and place it in the padlock to get the opened padlock.
Grab the map fragment and place it on the torn map to restore the map.
Move the rock to get the mask.
Screenshot
You receive a knife.
Investigate the archway you removed the broken column from, then place the dictionary on the slab to decode it.
Chapter Four: Treasures of the Ancient City
Getting the Knight
Use your map to go to the greenhouse.
Zoom in on the bee hive and use your knife to cut it open. Place the bowl beneath it to catch the honey.
Go forward into the backyard and click on the tiles on the stairs to start the puzzle.
You must press the tiles in the correct order.
Fire, sun, then bird.
Pick up the puzzle piece.
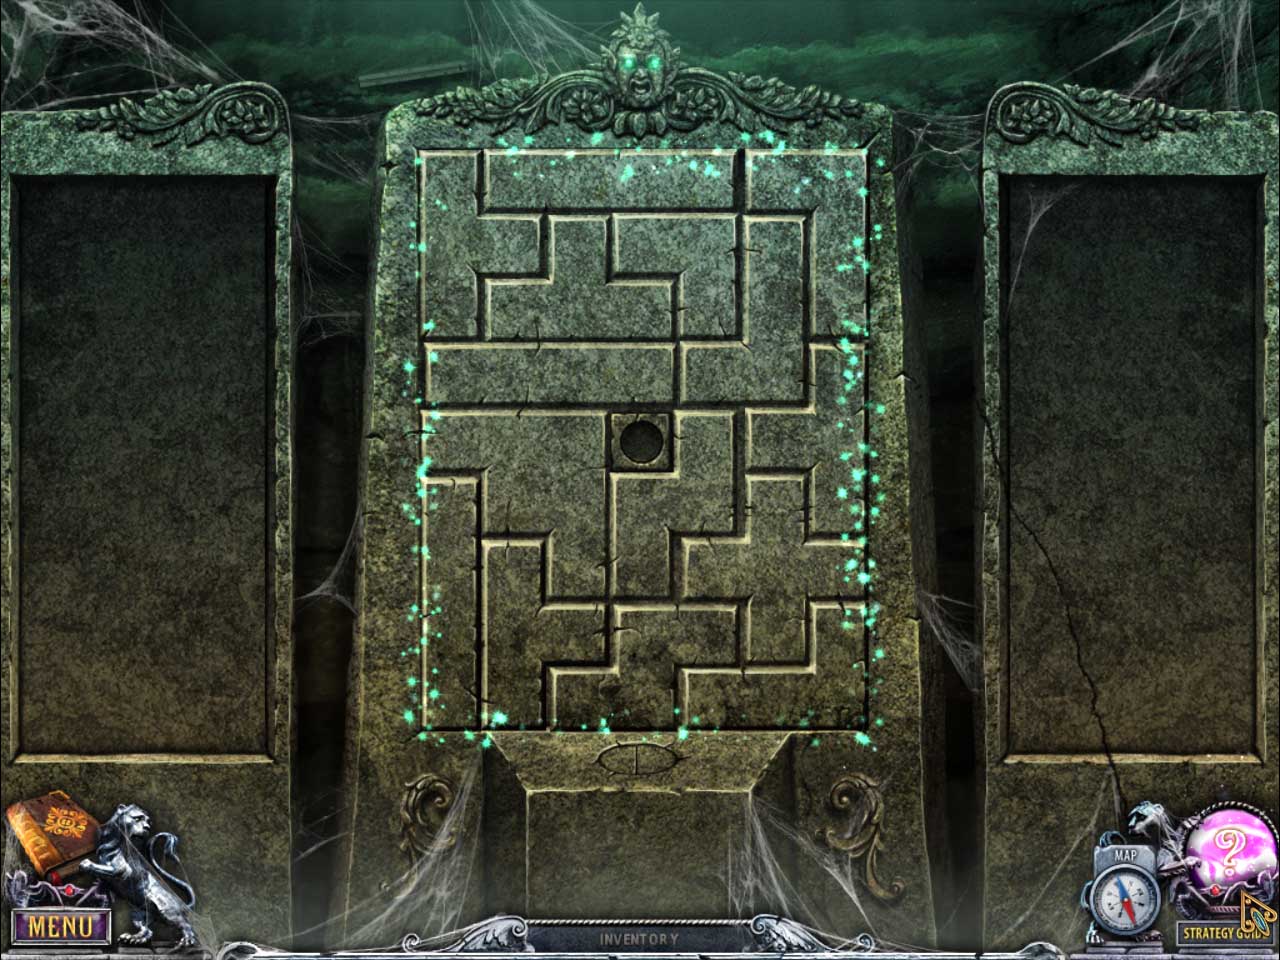
Return to the cave and click on the puzzle on the back wall.
Above the puzzle is a Beyond Object a little to the left that changes between a chisel and a thermometer.
Move the tile pieces much like a stationary tetris, and at the end place the puzzle piece in the middle.
Screenshot
Pick up the knight.
Unlocking the Jerusalem Painting
Investigate the hanging metal holder and place the gem in it.
Zoom in on the wall where the light is shining and pour honey on it. Then place the mirror on the honey.
Inspect the area where the light beam is now pointed at. This will start a puzzle.
You must arrange the mirrors so that the light beam hits the gem on the elephant.
Screenshot
Pick up the bishop.
Go to the treasury.
Investigate the chessboard to the right and place the knight and the bishop on the board.
Zoom in on the newly revealed elephant and pick up the skull.
Go to the organ and zoom in. Place the skull on the third square.
Pick up the Jerusalem key then go back to the passageway.
Inspect the painting on the back left and use the Jerusalem key to open the lock, then go into it.
Chapter Five: The Paladin's Bishop
Getting Bread
Above the cage on the wall is a Beyond Object shifting between a bird and a butterfly.
Investigate the ivy on the left wall and click at it three times to reveal the Via Dolorsa sign and a puzzle missing a cross.
Inspect the ground below the ivy vines. Pick up the sieve and the cross.
Click on the newspaper on the ground to read it.
Move forward to the town square.
Pick up the Beyond Object to the right of the broom that's shifting between a sandal and a normal shoe.
Pick up the broom.
Go forward through the arch to the mountain passage.
On the stump to the left is a Beyond Object posing as a horse shoe.
Investigate the frond and grass patch and pick up the cross.
Inspect the well and pick up the magnet on a rope and tap.
Click on the pile of sand and use the sieve on it. Pick up the cross.
Go into the castle and click on the ghost to speak with him.
On the chandelier is a Beyond Object shifting between a wing and a shell.
Pick up the shepherd's staff and the bucket.
Investigate the table with the candle on it and pick up the cross.
Zoom in on the vases to the left and pick up the sickle.
Examine the broken vase pieces on the floor by the ghost and use the broom to sweep them around, then pick up the cross.
Start the hidden object scene.
Click on the painting to reveal the target.
Pick up the knife and use it on the sausage to get a slice of sausage.
Investigate the basket to get the donut, leaf, and fish hook.
Screenshot
You receive bread.
Getting the Eyedropper with Oil
Go back to the mountain pass and zoom in on the well. Use the sickle to cut the brush and pick up the cross.
Use the shepherd's staff to pick up the cross hanging from the tree.
Go to Via Dolorosa and give your bread to the pigeons. Zoom in on them and pick up the key.
Use your map to go to the greenhouse and start the hidden object scene.
Pick up the hammer and use it on the cracked tile to reveal the playing card.
Investigate the crate to get the eye dropper, cherry, and pyramid.
Screenshot
You receive an eyedropper.
Go forward into the backyard and examine the pond.
Use the magnet on a rope to get the eagle.
Open the doors of the fountain and place the tap on the spot missing one to start the puzzle.
You have to turn each tap until all of them are on.
Turn the first two taps to the right.
Turn the third tap left.
Turn the fourth tap right.
Turn the last two taps left.
Screenshot
Pick up the cross.
Return to Via Dolorosa and click the hanging light to make it drop and break. Zoom in on the light and use the eyedropper on the oil.
You receive an eyedropper with oil.
Getting the Dream Powder Recipe
Investigate the cabinet to the right and use the eyedropper with oil on it, then use the key to open it.
Start the hidden object scene.
Pick up the cage and place it on the bird to get the caged bird.
Pick up the clown head and place it on the body to fix the clown.
Investigate the cupboard on the left to find the half of a shield.
Screenshot
You receive half of a shield.
Open your map and travel to the trophy room.
Zoom in on the shield on the wall above the fireplace and place the other half of a shield on it.
Pick up the newly revealed sword.
Open your map and travel to the house (castle) where the ghost is and give him the sword.
Start the hidden object scene.
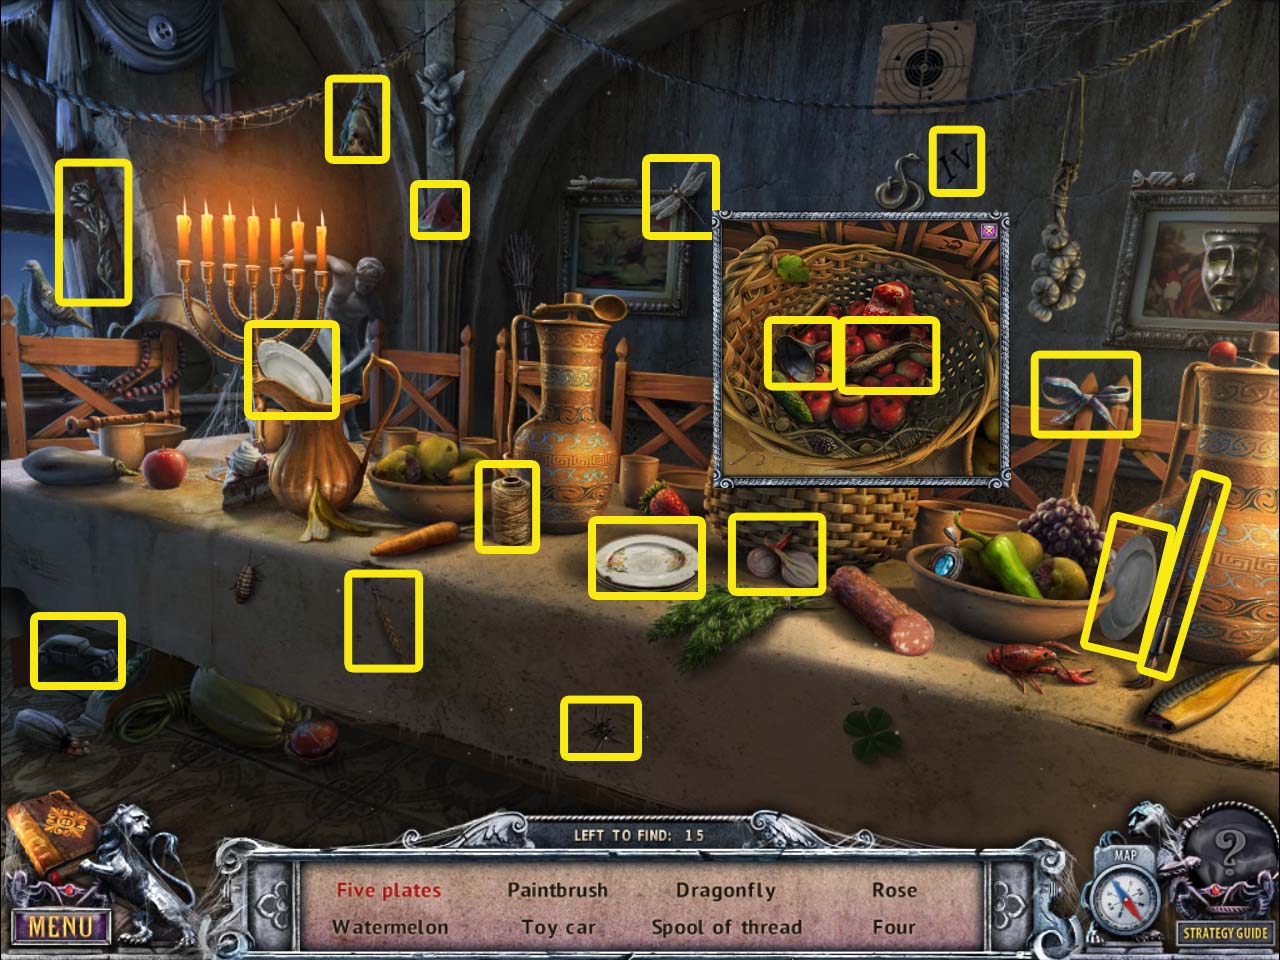
Inspect the basket for the funnel and dream root.
Pick up the two missing plates and add it to the stack to have five plates.
Screenshot
You receive dream root.
Read the dream powder recipe the ghost left on the bench.
Chapter Six:Underground Temple
Getting the Dream Powder
Go to the mountain pass and click on the mushroom patch to start a matching puzzle.
Pick up the remaining mushroom.
Go to Via Dolorosa and investigate the cross sign. Grab the oblivion flower above the sign.
Start the hidden object scene.
Click on the matches and use them on the lamp to get a lit lamp.
Click on the burlap cloth to reveal the bow.
Pick up the sponge and wipe away the grime on the counter to reveal the star.
Click on the crate full of bananas to reveal the jam jar.
Screenshot
You receive a ladel.
Return to the house and investigate the vases on the left. Click on the lid of the bigger vase.
Use the ladel to pour wine from the big vase to the small vase to the left.
Pick up the jug of wine.
Inspect the table with the candle.
Place the oblivion flower, dream root, and mushroom in the bowl.
Use the pestle to grind the items in the bowl. When finished, pick up the dream powder.
Getting the Star of David
Zoom in on the table that's to the right of the hidden object area. Pick up the cross, then put the jug of wine on the table.
A puzzle will start where you must pour four cups worth of wine into the left jug and only three into the right.
Pour wine into the left jug.
Pour the wine from the left jug into the right jug.
Pour the wine from the right jug into the main jug that's holding all the wine.
Pour the remainder of what's left in the left jug into the right jug.
Fill the left jug with wine.
Pour the left jug of wine into the right jug. Now you have four cups in the left jug.
Pour the dream powder into the left jug of wine.
Pick up the goblet of wine and go to the town square.
Give the goblet of wine to the guard, zoom in on him, then take the cross.
Go to Via Dolorosa and examine the cross sign. Place all the crosses in their correctly shaped spots on the sign.
Investigate the top of the arch and pick up the cross shaped key.
Go to the town square and zoom in on the temple door. Use the cross shaped key on it to open it then go through.
On the floor to the right of the stand with the star of David is a Beyond Object; a flower morphing into paper.
Pick up the scythe and chain.
Go to the mountain pass and inspect the well.
Place the chain and the bucket on the well then click on the lever to drop it down.
Pick up the bucket of water.
Go to the Via Dolorosa and examine the pipe. Use the bucket of water on it.
Pick up the Star of David.
Getting the Madagascar Key
Return to the inside of the temple and zoom in on the candelabra. Place the Star of David in its spot.
Go down into the dungeon.
At the very top left of your screen is a Beyond Object shifting from a flower to a crest.
Pick up the painting and read the note.
Zoom in on the shield in the back and place the eagle on it. Pick up the revealed pearl.
Return to the house and examine the wall with the painting.
At the top of the wall to the left is a Beyond Object changing between an acorn and a jingle bell.
Place the painting on the wall to the left to start the puzzle.
Click on the things in one painting that are similar in the second painting.
Pick up the crown and read the letter.
Return to the dungeon and inspect the skeleton. Place the crown on the skull.
Place the pearl in the crown.
Look into the coffin and pick up the skull.
Go to the organ and place the skull on the remaining square.
Pick up the Madagascar key.
Return to the passageway and inspect the remaining picture.
Place the Madagascar key in the lock and click. Go through the painting once it opens.
Chapter Seven: Madagascar
Revealing the Airplane Hidden Object Scene
To the left of the lizard on the rock is a Beyond Object shifting between a snail and a whistle.
Go forward through the shark jaws to the beach.
On the crates to the right is a Beyond Object shifting between a canteen and a hat.
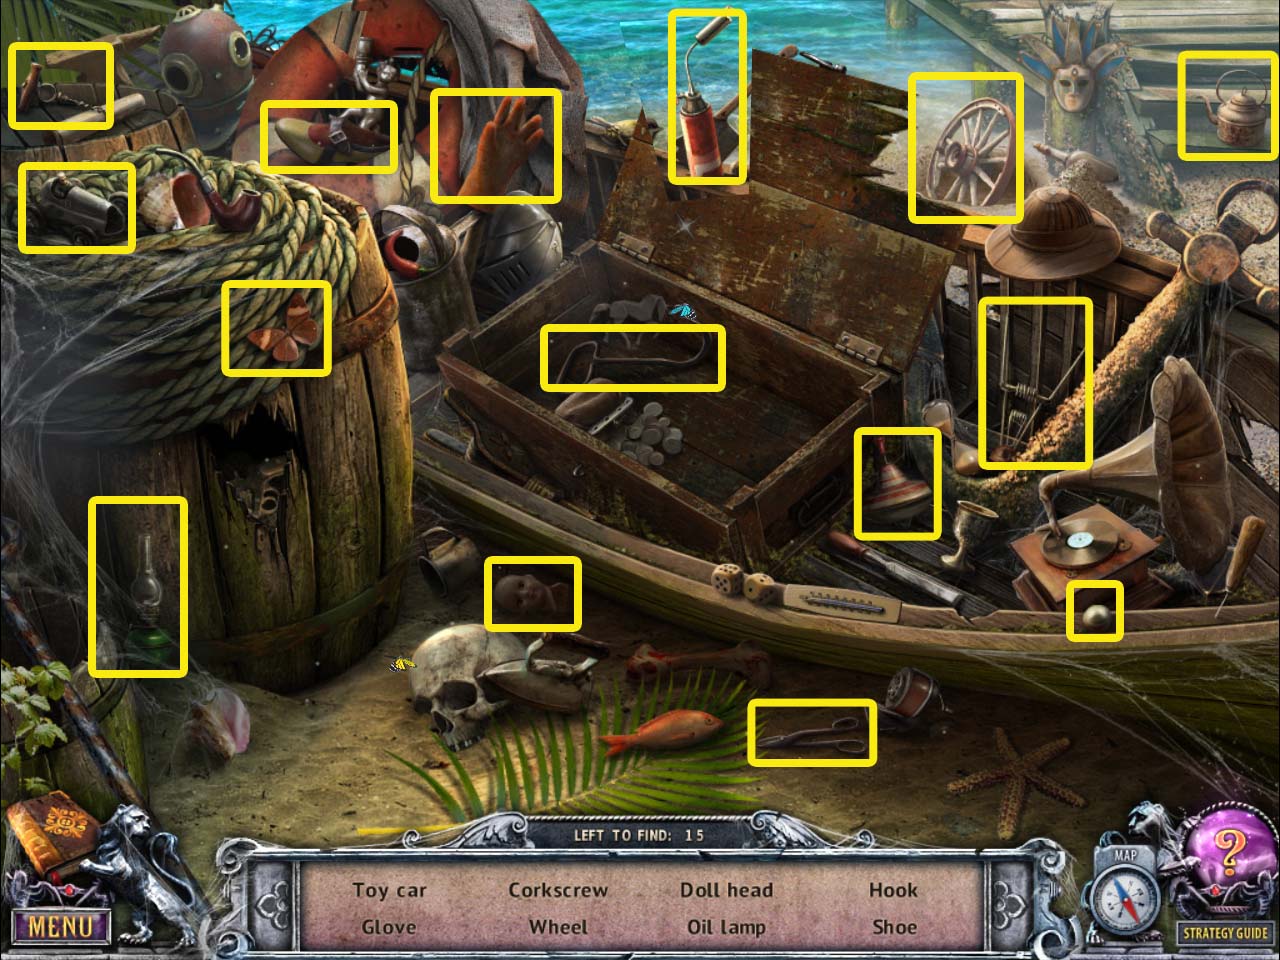
Inspect the marooned boat and pick up the pirate skull.
Start the hidden object scene.
Pick up the wheels and add them to the toy car.
Click on the canvas cloth to reveal the shoe.
Click on the chest to open it and reveal the hook.
Grab the shovel and use it to dig the wheel out of the sand.
Screenshot
You receive a blow torch.
Go forward up to the pyramid.
On the rock to the left of the snake is a Beyond Object.
Pick up the oar.
Investigate the palm fronds to the left of the slab of rock, then click the fronds to reveal a dire warning.
Inspect the cannon and pick up the harpoon.
Click on your map and go to the plane crash.
Use the scythe to cut the ropes holding the skeleton.
Pick up the parachute, then investigate the skeleton to read his journal.
On the right side of the path in the foliage and rocks is a Beyond Object that morphs between a crate and a bag.
Zoom in on the door of the airplane.
Use the blow torch on the door to open it and reveal a hidden object scene.
Sailing to the Pirate Ship
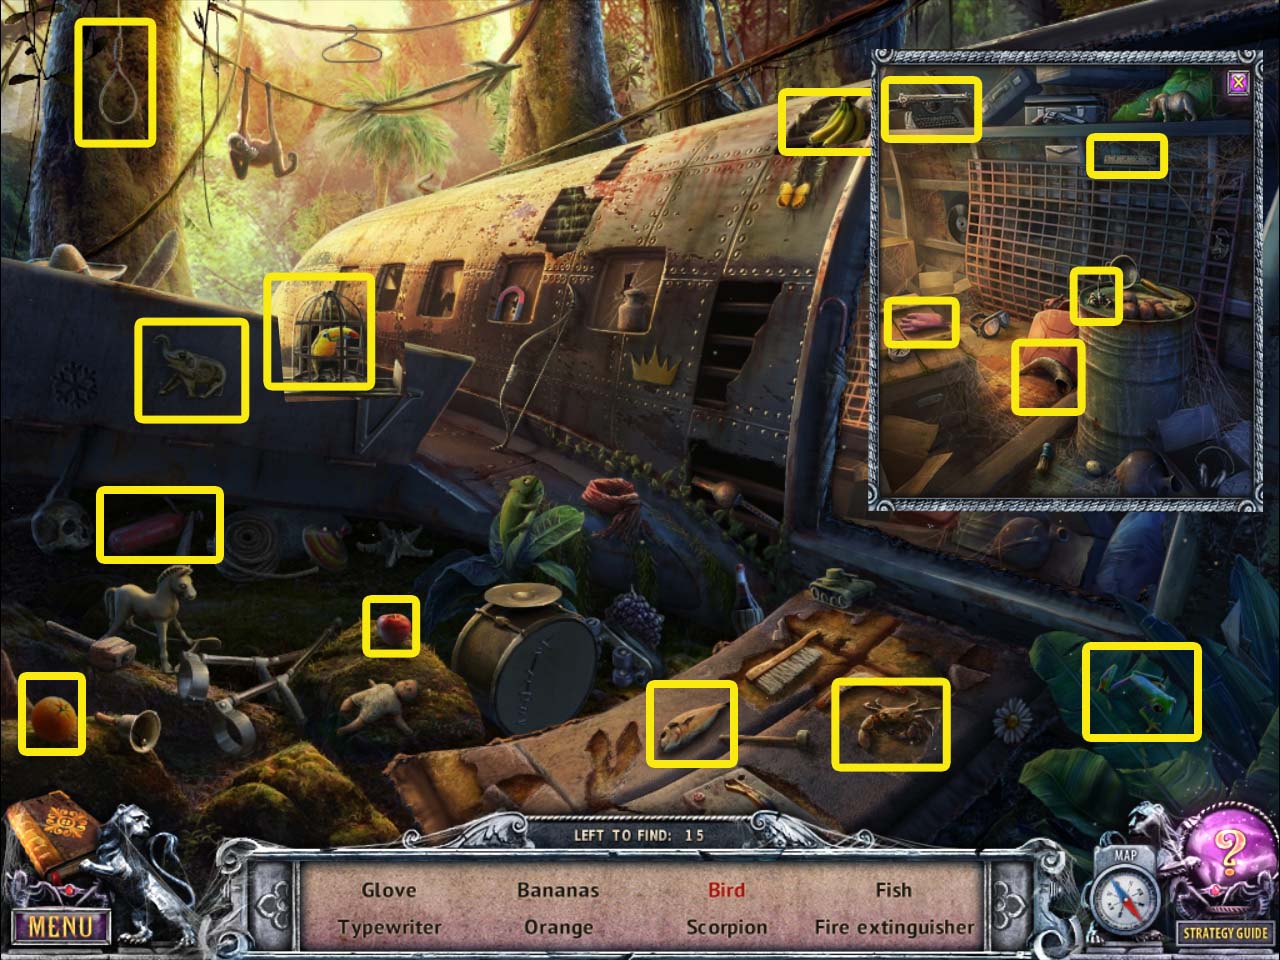
Start the hidden object scene.
Click on the wing flap to reveal the fire extinguisher and elephant.
Pick up the bolt cutters and use them to get the bird out of the cage.
Investigate the inside of the plane to retrieve the typewriter, glove, scorpion, ruler, and horn.
Screenshot
You receive a ruler.
Return to the jungle and investigate the door of the building. Use the ruler on the door to open it.
On the right wall is a Beyond Object that shifts between a clock and a compass.
Pick up the oar.
Click on the hanging jar to drop out the gear, then zoom in on the table to pick the gear up.
Examine the door and place the pirate skull on it, then click the handle to open the door.
Investigate and pick up the meat.
Inspect the shark and click on the tooth three times to receive a tooth.
Go to the beach.
Investigate the cage at the end of the dock. Place the gear on the mechanism.
Click on the lever, then place the meat at the top of the cage once it's lowered into the water.
Press on the lid of the cage to shut it on the shark once it's inside the cage.
Examine the boat.
Place the parachute and both oars on the boat.
Sail to the pirate ship.
Chapter Eight: Pirates
Getting the Matches
To the left of the netting is a Beyond Object changing between a peg and a broken bottle.
Investigate the rope mechanism to the left of the cannon and use the harpoon to reel in the buoyed item.
Open the chest and pick up the puzzle piece.
Go into the Captain's cabin.
On the left side of the barrel is a Beyond Object that changes between a flood light and bag.
Pick up the ramrod.
Inspect the table with the figurine and the birdcage. Place the tooth in the spot on the figurine.
Pick up the puzzle piece.
Investigate the Captain's desk and pick up the musket and the feather.
Open the map and travel to the beach.
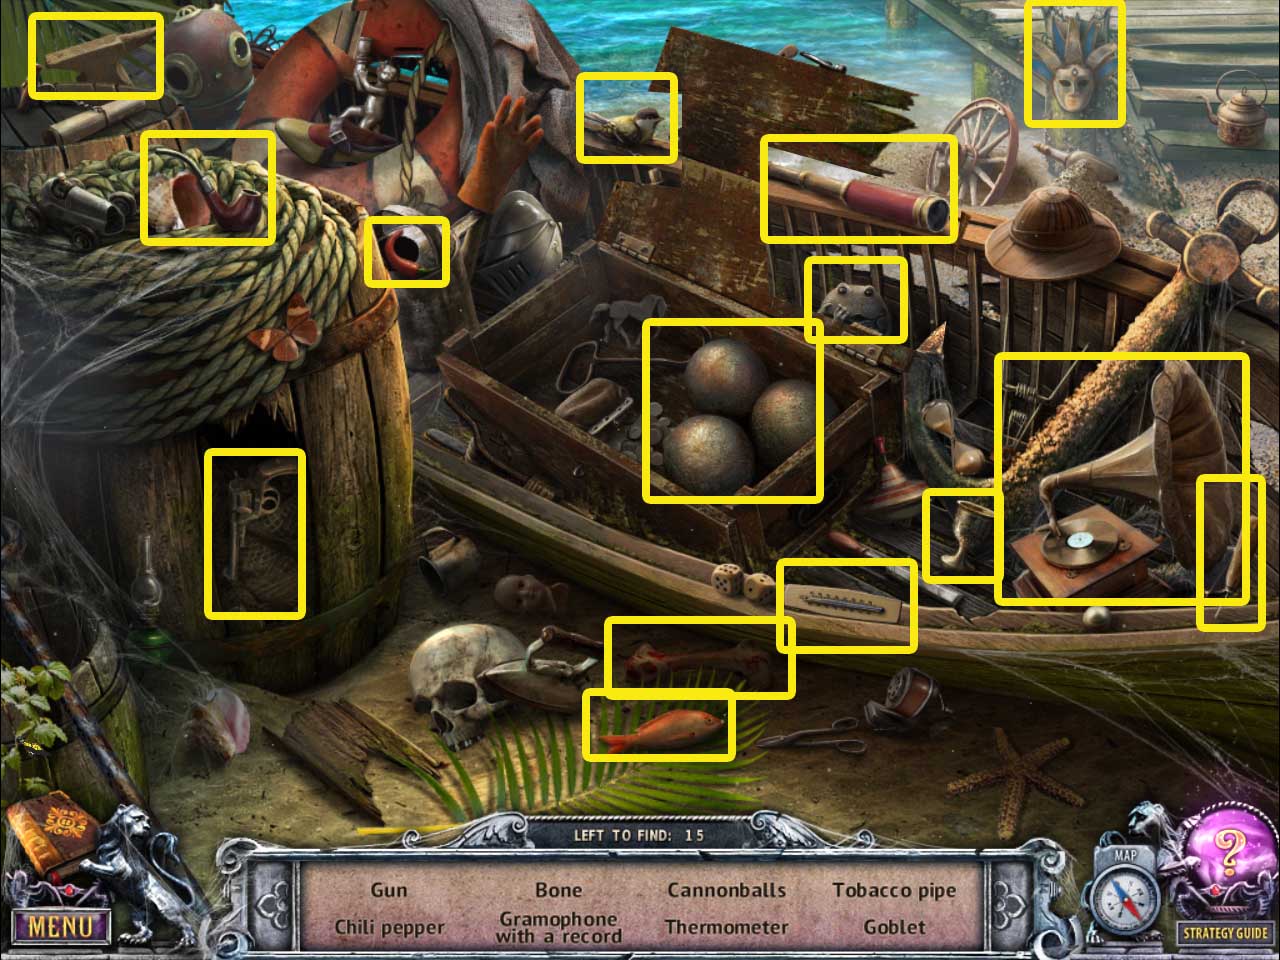
Start the hidden object scene.
Open the crate to get the cannonballs.
Pick up the crowbar and use it on the barrel to get the gun.
Pick up the record and place it on the gramophone.
Screenshot
You receive cannonballs.
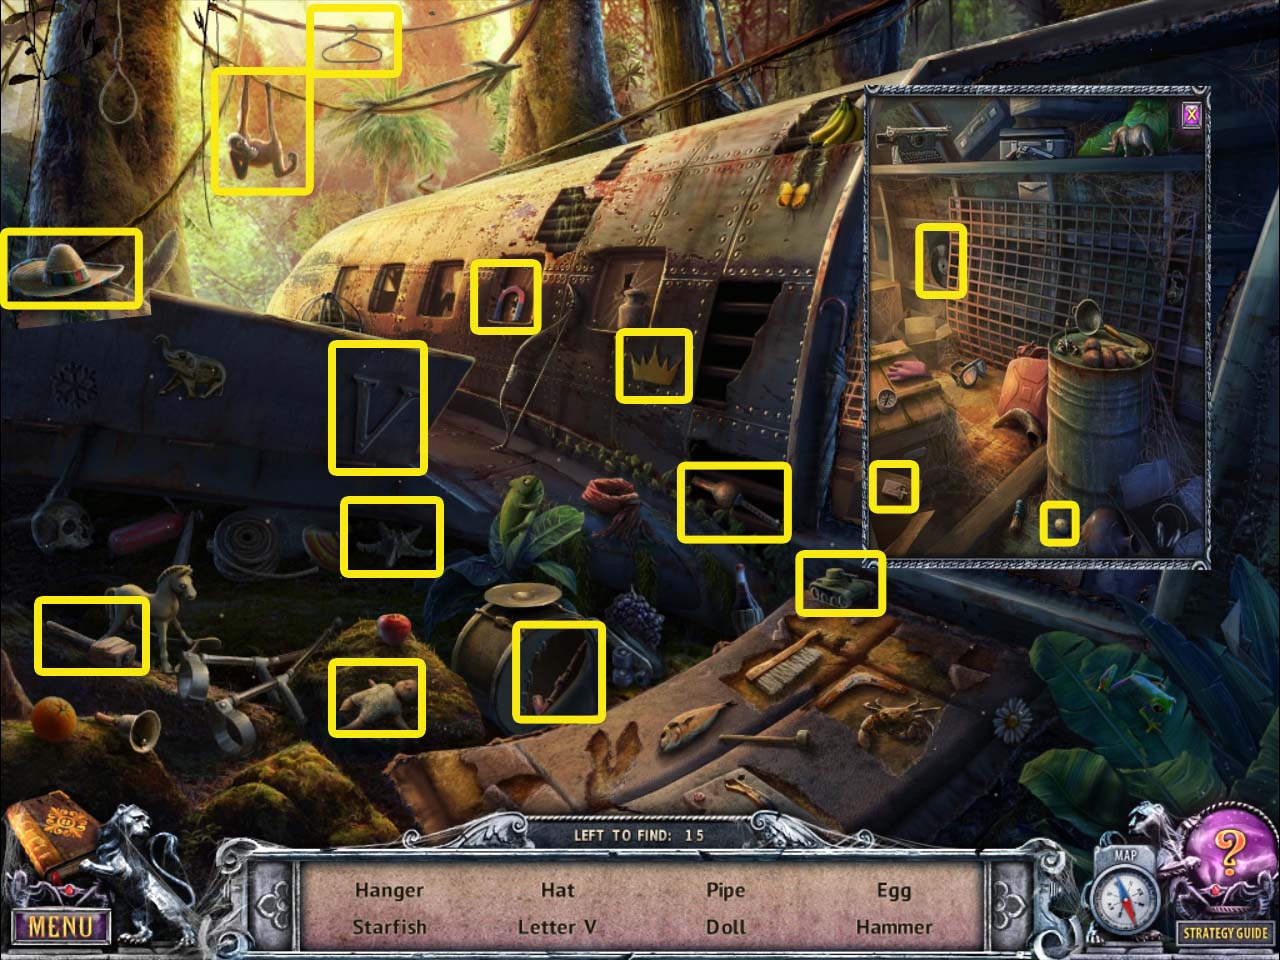
Head to the plane crash and start the hidden object scene.
Click on the wing flap to reveal the starfish and letter V.
Pick up the knife and use it on the drum to reveal the pipe.
Examine the inside of the plane to retrieve the record, egg, and matches.
Screenshot
You receive matches.
Getting the Lever
Zoom in on the spot where the skeleton is and use the feather to dust off the dirt on the rock to reveal writing.
Go to the tavern.
Inspect the chest and use the musket to shoot open the padlock.
Click on the lid to open it, then pick up the corkscrew.
Investigate the barrel with the cork in it and use the corkscrew to dislodge it.
Pick up the gunpowder.
Return to the pirate ship and click on the cannon.
Place the ramrod, gunpowder, and cannonballs next to the cannon.
Use the matches to light the fuse and shoot at the entrance of the pyramid.
Go to the pyramid once the door has been blown to smithereens.
On the large gear is a Beyond Object changing between a star and a starfish.
Pick up the sabre.
Go back to the pirate ship and investigate the nets. Use the sabre to cut them open and pick up the almonds.
Go into the Captain's cabin and zoom in on the birdcage. Place the almonds inside the cage.
Pick up the ship wheel from the cage.
Click on the ship on the chest at the back of the cabin and place the ship wheel on the steering column.
Grab the lever, then head back to the pyramid.
Getting the Fireball to the Organ
Place the lever in the mechanism encircled by the candles, then click it to pull.
Investigate the top of the steps.
Pick up the puzzle piece.
Go to the tavern and click on the picture at the back left of the room.
Place all three puzzle pieces on the picture to start the puzzle.
Swap pieces by clicking one and then a second to change their spots. Start from the middle and work outward.
Screenshot
Grab the glove and read the paper from the cache behind the portrait.
Go to the pyramid and go to the top of the steps.
Press the buttons in the correct order based on the code you saw at the plane crash site.
Use the glove to grab the fireball.
Go to the organ and click on the top part of it.
Place the fireball on the tray.
Posted by: Meaghan |
April 6, 2012 10:26 PM
|
April 6, 2012 10:26 PM