
![]()
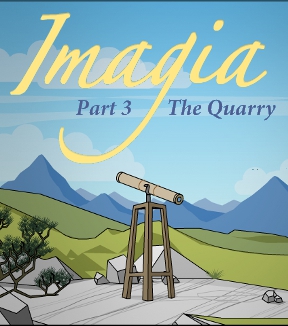 By now most of us are familiar with the Imagia series of point-and-click adventures that are beautifully ambient and yet seemingly aimless. Welcome to another mysterious and intriguing installment, Imagia 3: The Quarry. Kayzerfish's latest epsiode appears unrelated to the first two chapters apart from the glorious graphics and secrets to be found. There is a little bit of a difference this time around however... you find yourself in a lush but lonely valley and quarry complete with idyllic waterfall and smattering of flowers. You are going to need some special help to get away from here, and you will get a little closer to finding out who you are in the process.
Consistent with the first two Imagia games, the controls are simple and straightforward; use your mouse to click on items and to navigate between scenes. Hover your mouse and the cursor will change if there is something to be collected or an area to be explored. Clicking on items will add them to the inventory which runs down both sides of the main game screen. Some objects will need to be combined for further use, and mousing over items in the inventory will show their definitions. Your main goal is ultimately to discover a means of transportation using the items and objects around the quarry, but there are also secrets to be discovered as well as some extra items to be collected along the way. And there is a save feature which can be accessed at the lower left side of the screen.
 Analysis: The mystery, intrigue and secrets continue in this latest installment, and it's difficult to pin down exactly what is happening in the world of Imagia. But one can hardly be perturbed by the seeming lack of continuity in the story, because the gameplay and puzzle solving is so engrossing, and you can't help but feel that the open ended nature of Imagia games can only lead to more. It's also nice to have a definite goal to work towards, as you will soon discover.
The beauty of Imagia is immediately obvious with crisp and gorgeous imagery that is somehow congruent with the natural world. The delight of the sounds of bird calls and waterfalls carry us to places that are nestled in our memories yet keep us engrossed in the world of Imagia that we are exploring. And the occasional strains of peaceful and atmospheric music, reminiscent of the Myst series of games, lend a sense of comfort and joy to the whole journey. It's also especially gratifying when a game offers exploration and puzzles that really get you thinking.
So we may be left with more unanswered questions and a sense that little is resolved but these beautiful games surmount any need for resolution. Imagia 3: The Quarry may just be another tidbit to tantalise a gamer's tastebuds, but I seriously get the feeling that there will be more imaginative and delightfully intriguing Imagia to come...


Walkthrough Guide
(Please allow page to fully load for spoiler tags to be functional.)
Imagia 3: The Quarry Walkthrough
General Information
There are 6 secrets and 18 flowers hidden within the game.
You will know when you found a secret, a yellow glow will appear and you will hear a chime.
You can complete the game without discovering most of the secrets or finding all of the flowers.
This walkthrough will include the locations of all of the flowers and all of the secrets within the gameplay.
There will also be a separate section just for flowers and secrets.
Notice the changing cursor. Even if you can't click on something yet, if you see a changing cursor, you may be able to use an object on it.
The cursor will also change at the sides, top, and bottom of the screen to indicate that you can move in that direction.
Good luck!
Main Walkthrough
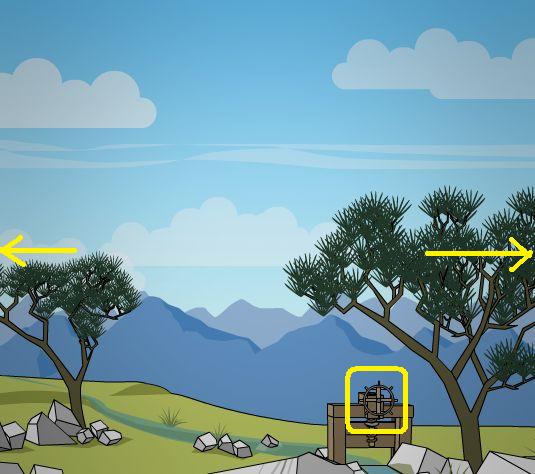
Up Top Exploration
You begin at a lovely stream. There is some sort of mechanism here, but although you get a changing cursor clicking on it accomplishes nothing.
Just to the right of the machine is a pile of rocks. Click on the pile of rocks twice to reveal a mallet. Take the mallet.
Hover your cursor to the right until it changes to a hand and click to move right.
Screenshot.
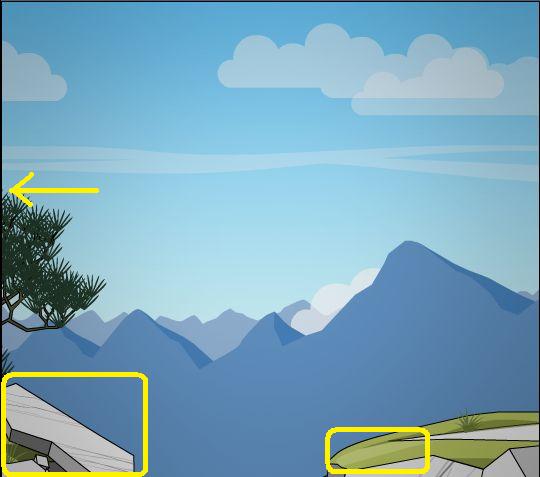
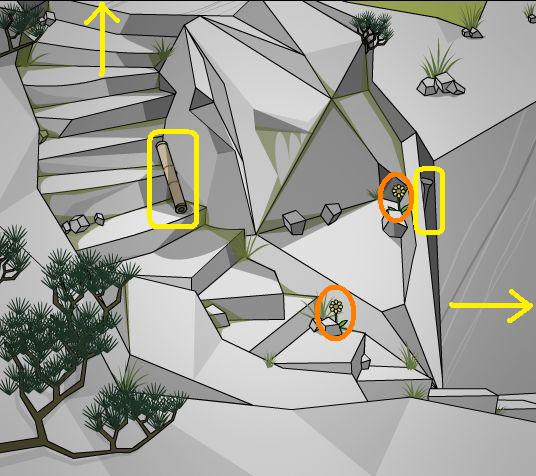
You are now at the edge of a precipice. On the left is a large rock, precariously balanced. On the right you can see a faint groove in the grass.
Click on the large rock and it will slide down the cliff.
Once the rock is gone you will see another groove in the grass on the left side. Looks like we need to find something to act like a bridge before we can go further.
Go left to the stream, then left again.
Screenshot.
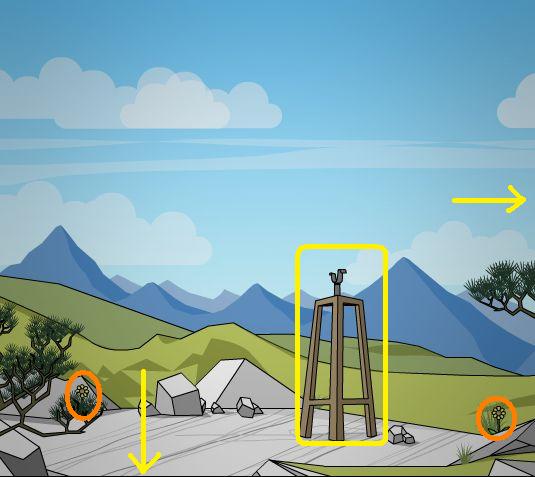
Here you will find some sort of stand, probably for a telescope. However, the telescope appears to be missing.
There are also two yellow flowers in the scene, to the left and right of the stand. Take them (flowers 1 and 2).
Hover your cursor at the bottom left of the scene and click to go down.
Screenshot.
The Quarry Floor Exploration
You have come down some stairs to the quarry floor.
Laying on the stairs you will find a telescope, take it.
In a rock notch to the right you will find a chisel, take it.
There are two flowers here, one on the stairs, one on the right just to the left of the chisel (flowers 3 and 4).
Once you have picked up all of the items go right.
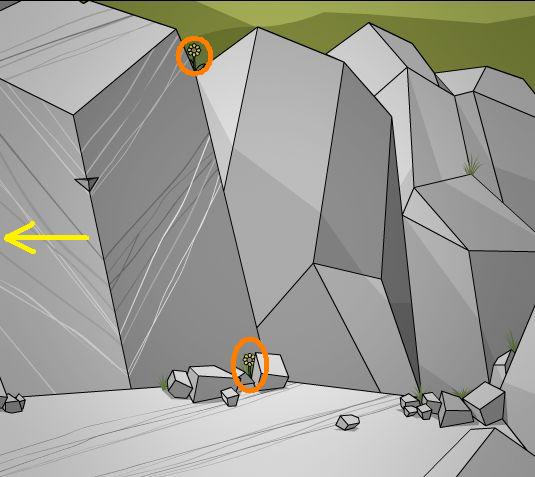
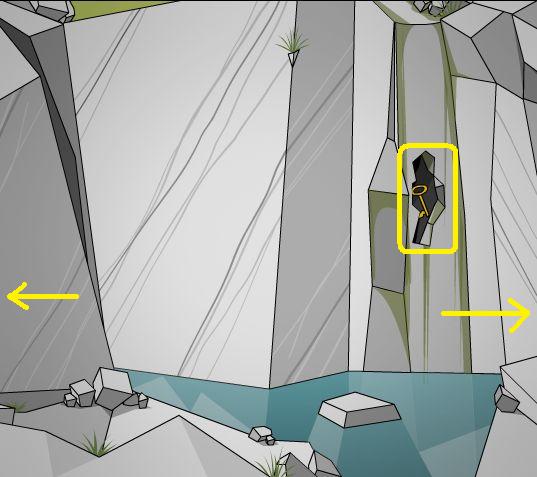
Screenshot.
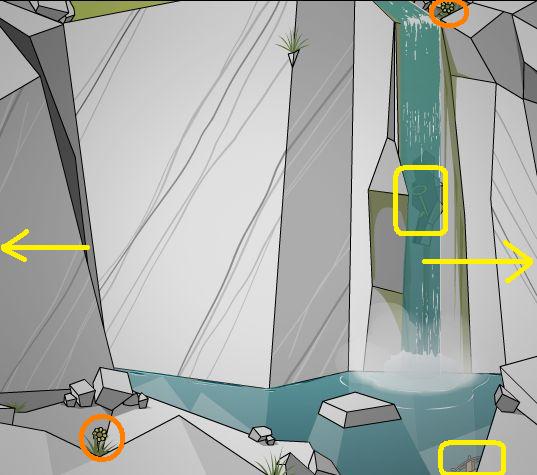
You have just found a lovely waterfall. Notice the key behind the falling water, but you can't take it yet.
In the lower right of the scene, submerged in the water, is a wooden wheel, take it.
There are two flowers in the scene, one on the left on the rocks, one above the waterfall in the upper right (flowers 5 and 6).
Once you've taken the wheel and the flowers, go right.
Screenshot.
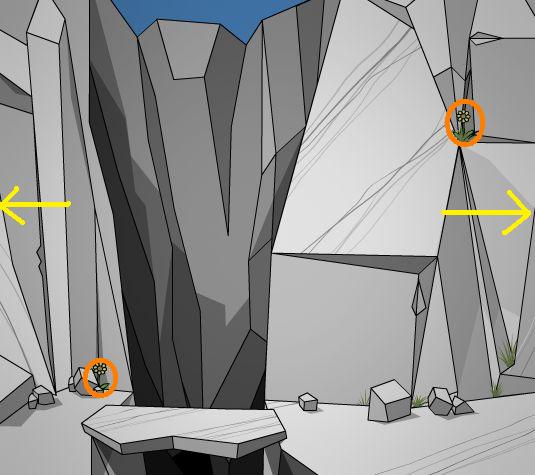
You are now at another chasm. Isn't it nice that the large rock you dislodged from above is now creating a walkway over the chasm?
There are two flowers here, one on the lower left, one in the rocks in the upper right (flowers 7 and 8).
Once you take the flowers go right.
Screenshot.
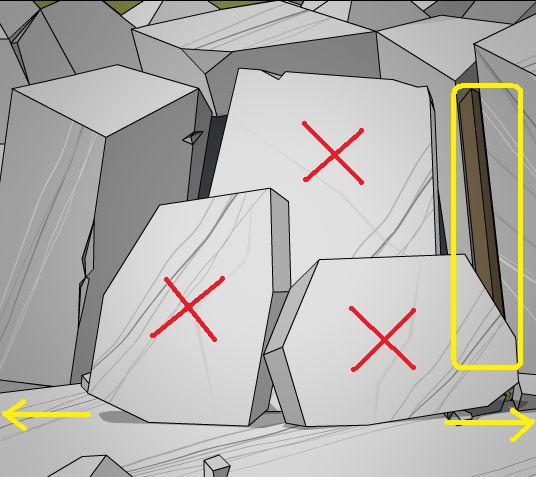
You are now at an area that looks like a cave entrance, but the way is blocked by 3 large blocks. Your cursor changes to a hand on the blocks, but you can't do anything with them at the moment.
Just to the right of the blocks, in a niche in the wall, is a large plank of wood. Take the wood.
Go right.
Screenshot.
You have now reached a dead end.
There are two flowers here (flowers 9 and 10).
Once you take the flowers, it's time to solve some puzzles.
Screenshot.
Up Top Puzzles
From the dead end, go left four times until you are at the stairs, then go up.
Place the telescope on the stand. It will be horizontal at first.
Click on the left side of the telescope and you will see what looks like a unicorn with its horn cut off.
Click on the right side of the telescope and it will point to the mountains.
Click on the right side again and you will see the mountains in the telescope (secret 1).
Back out of the telescope view.
If you click on the base of the telescope it will slide to the left, revealing a faint circle.
Go right.
Screenshot.
You should now be back at the stream. Use the wooden wheel on the wooden device on the stream.
Once the wheel is on, click on it to turn and the device will cut off the stream.
Go right.
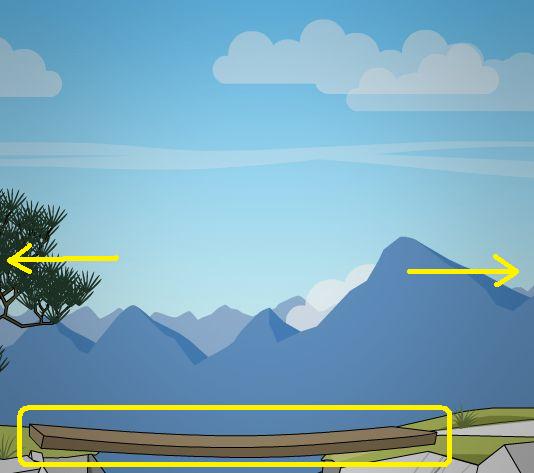
Screenshot.
You are now back at the gap. Use the large wooden plank on the notches over the gap to create a bridge.
Once the bridge is in place go right.
Screenshot.
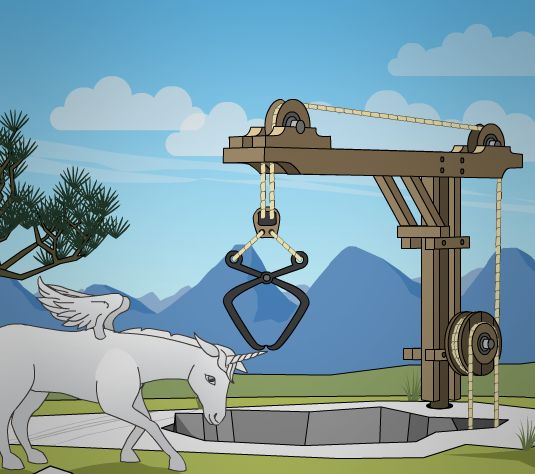
You have now found a poor mutilated unicorn. Notice he is missing both wings and his horn.
If you click on the unicorn he will explain that he would like his wings and his horn, and he will point to the right.
To the right of the unicorn is a pile of rocks. Click on the rocks twice to uncover a gold florin. Take the coin.
Go right.
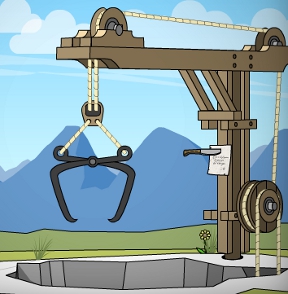
Screenshot.
You have now found a crane with a grabber over a hole in the ground.
Pinned to the crane with a knife is a note. Click on the note to take it and read it, then click on the knife to take it.
If you accidently click on the knife first the note will fall into the hole. Don't worry, we can retrieve it later.
Click on the note in your inventory to read it.
The note says to ride Bruno to the garden. Presumably Bruno is the crippled unicorn.
Looks like we'll need some unicorn first aid.
At the base of the crane is a flower (flower 11).
Once you have the note, the knife, and the flower it's time to solve some problems on the quarry floor.
Screenshot.
The Quarry Floor Puzzles
From the crane, go left four times to the telescope, then go down to the stairs.
Once you are at the base of the stairs, go right.
Notice that the waterfall has stopped. You can now take the key.
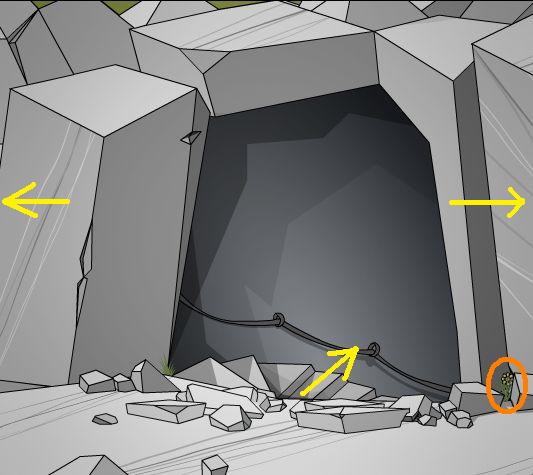
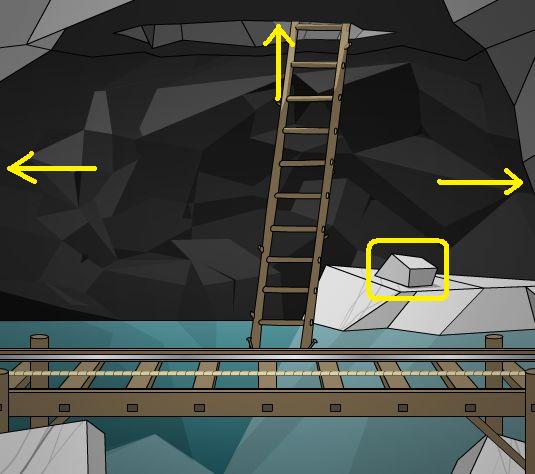
Go right twice to the cave entrance.
Screenshot.
In your inventory click on the chisel to pick it up.
Once you have the chisel, place it on the mallet in your inventory. This will combine the two.
Use the combined chisel/mallet combo on each of the three large rocks blocking the entrance. It will take 3 hits on each rock to break them down.
Once the rocks are gone you will find a flower in the lower right of the scene (flower 12).
Click on the cave entrance to enter.
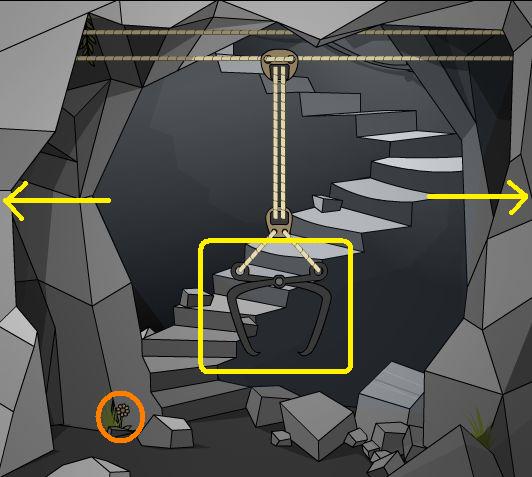
Screenshot.
Cave Upper Level Exploration
You are now on the upper level of the cave at the base of the stairs. Here you will find another grappling hook.
There is a flower on the floor near the base of the stairs (flower 13).
Go right.
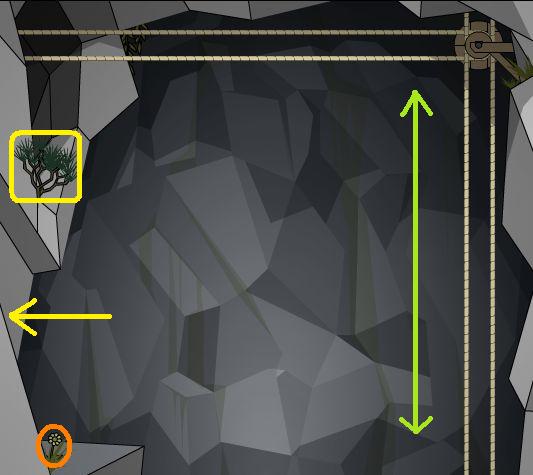
Screenshot.
Here you are at a dead end. If you look closely at the pulley system, you will see ropes going up. This is where the grappling hook from up top connects with the cave's grappling hook pulley system.
If you accidently took the knife first up top, you will find the note in the small tree growing in the upper left of the wall. If you already have the note you don't have to worry about it.
There is a flower here in the lower left (flower 14).
Go left twice.
Screenshot.
You have found the controls for the grappling hooks. These control the cave grappling hook. On the left console are two levers: the lever on the left opens and closes the hook, the lever on the right raises and lowers the hook.
The right console controls the horizontal movement of the cave grappling hook. Click on the left side of the wheel and the hook will enter the room. Click on the left side of the wheel again and it will move to the left.
There is a hole in the floor with a ladder leading down.
Go left.
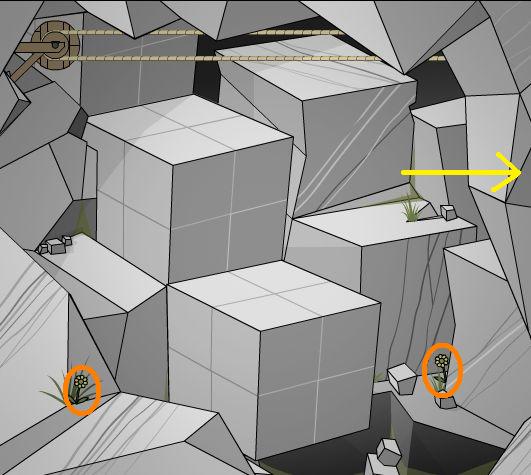
Screenshot.
You are in a strange room with very square looking blocks. Notice the waterfall on the right.
On the lower left is a flower (flower 15).
Go left.
Screenshot.
You are in another room with square blocks, this one without a waterfall.
This is also a dead end, you cannot go any further left.
There are two flowers here (flowers 16 and 17).
Once you've got the flowers, it's time to explore the lower level.
Screenshot.
Cave Lower Level Exploration/Puzzles
Go right twice until you are at the controls for the grappling hook.
Click at the bottom of the screen to go down the hole.
You are now at the base of the ladder. Notice the track running through the scene.
To the right of the ladder is a small rock. Click on it to move it and take the revealed item (gold florin).
Go right.
Screenshot.
You can now see the sled on the track. Go right.
Screenshot.
You have reached a dead end and the end of the tracks. Notice the ropes going up.
This indicates that the sled is also tied into the grappling hook controls, and that there is an opening above.
Go left twice to the ladder, then left again.
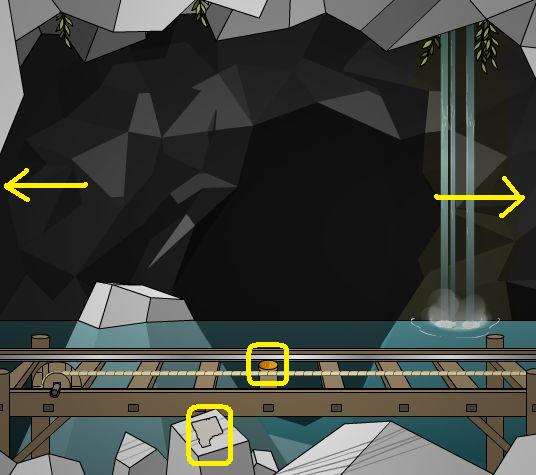
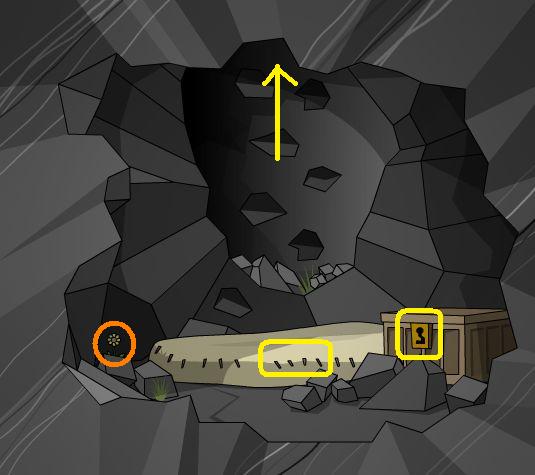
Screenshot.
You are at the base of a waterfall. On a rock in the foreground is a piece of paper, take it.
Once the paper is in your inventory, click on it and you will see blocks with patterns on them and items like a unicorn horn. Instructions!
On the tracks is a gold florin, take it. Note: If the sled is in this scene, go back up the ladder and move the grappling hook left or right then come back again and you will see the coin.
Go left.
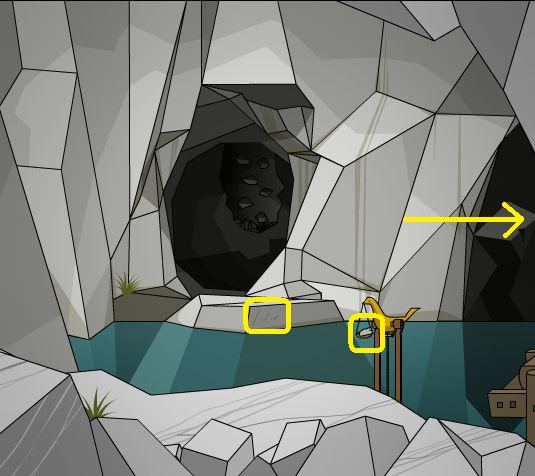
Screenshot.
You are now in a cul-de-sac. There is an entrance in front of you across the water. There is a small gold bird figurine holding a scale. Notice the note in the scale.
Take the note and it will attach itself to the one in your inventory. More instructions!
You now have instructions for a horn, a wing, and a hand.
Click on the bird for a close up.
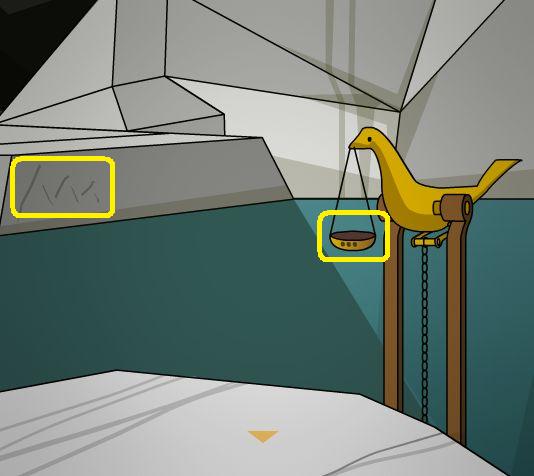
Screenshot.
Notice that the scale the bird is holding has three dots on it. You will also see the symbol for a mountain on the rock across the water.
If the gold bird wants three items, what can we give it?
How about the three gold florins in our inventory?
Place the three gold florins (coins) in the dish one by one. Notice that stepping stones will appear with each coin added.
Once all three coins are placed you can click on the mountain symbol and travel across the water.
Screenshot.
You are in an alcove, with handholds leading upwards. There is a flower here (flower 18). At this point you should have all 18 flowers.
There is mattress in front of the alcove. Hover your cursor to find a clickable spot, then use the knife from your inventory on that spot to slice it open.
Take the revealed item (another scrap of paper). You should now have directions for a foot.
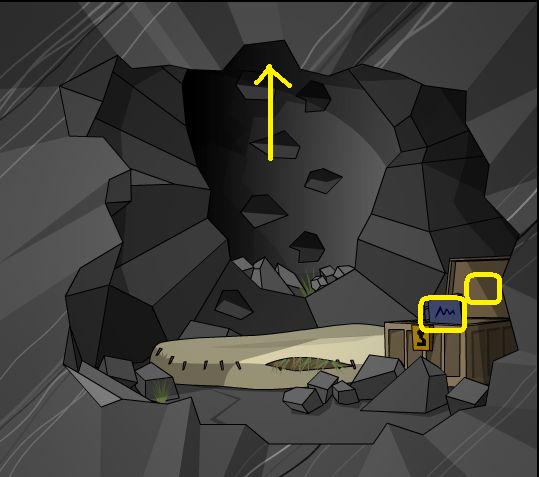
Use the key (from the waterfall) on the box on the right to open it.
Screenshot.
There is a blue book inside the box, take it. It will combine with the note pieces in your inventory.
There is a faint square on the inside of the box lid, click on it.
A secret compartment will be revealed. Take the note that is inside (secret 2).
This note (secret 2) will not join the book, but will show instructions for a ram's head and the head of a man.
Screenshot.
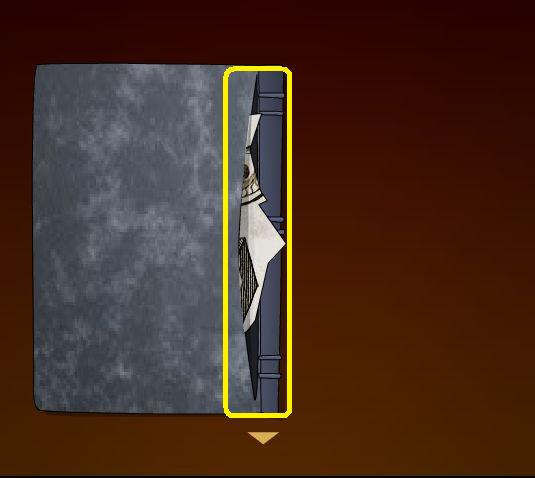
Click on the book in your inventory for a close up.
Click on the right side of the book to open it. Notice you are now only missing one scrap of paper.
Click on the right side of the book to close it so that you see the back of the book.
There is a clickable area on the back of the book near the spine. Use the knife on this area to reveal a scrap of paper.
Take the paper (secret 3).
Screenshot.
Your blue book should now be complete, with instructions for a horn, two wings, a hand, a foot, and a female head.
Close down the book and go up the alcove.
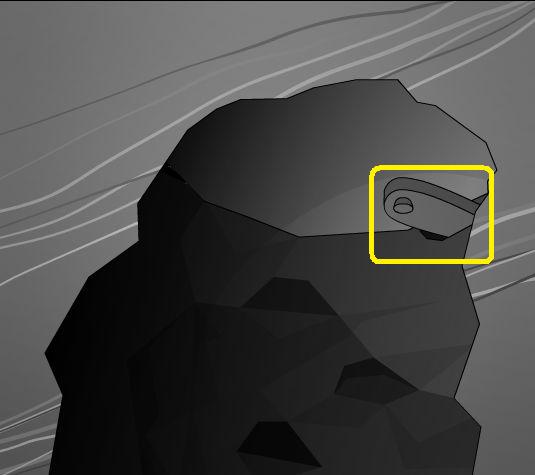
Keep going up until you get to the top. There you will find a trap door.
There is a lever on the door, click on it to release the door.
Once the lever has moved, click on the door to open it. Note: This will not work if you did not move the telescope stand to the left.
Screenshot.
Go through the trap door and you will find yourself standing by the telescope up above.
Time for some unicorn first aid!
Carving
If you are still at the telescope, you need to get to the room with the blocks. Go down the hole, down three more times, back to the gold bird, right twice to the ladder, then up the ladder.
Once you are at the grappling controls, go left to the block room.
Note: You can use the blocks either in this room or the one to the left, it doesn't matter. Just remember which one you used so you know where to send the grappling hook.
This walkthrough will presume you use the block room with the waterfall.
Now you need to carve some replacement parts for Bruno.
Three of the secrets are also carvings: the female head, the male head, and the ram's head.
When carving the objects look closely at the drawings. Some of the blocks have diagonal lines in certain areas, some have vertical or horizontal.
Hit a square once and you get diagonal lines. Hit a square again and the lines will shift, but it will also affect other squares.
Bruno's replacement parts only require one hit per square, the secrets require a certain combination of hits.
Let's start with the secrets first.
The Ram's Head
Some of the squares in the ram's head need to be hit twice, some once.
Pick up the mallet/chisel combination from your inventory.
Follow the sequence in the screenshot below.
Screenshot.
You have found secret 4!
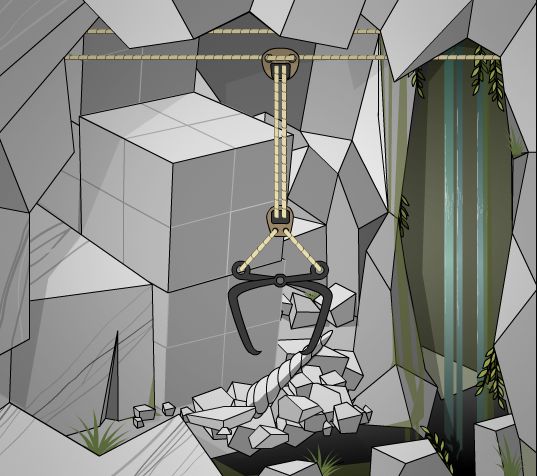
Click on the head and the blocks will fall down, covering it.
You now have a fresh block to start anew.
The Female Head
The female head is one of the easiest to do.
As indicated by the screenshot below, simply hit the one square five times.
Screenshot.
You have found secret 5!
Click on the head and the blocks will fall down.
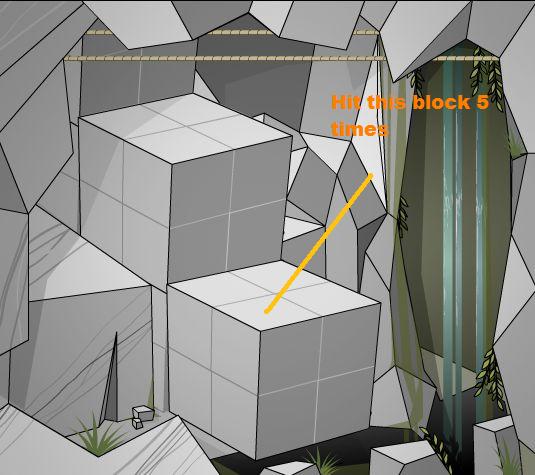
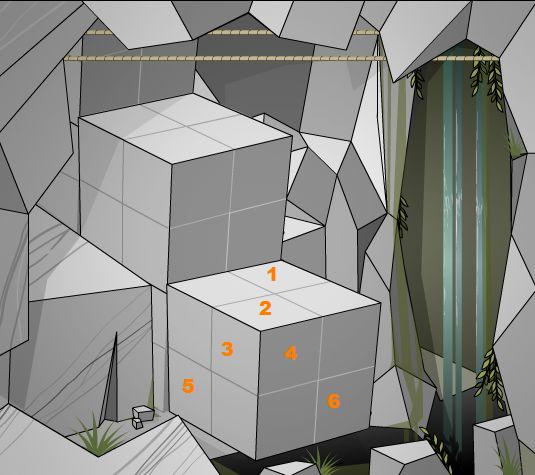
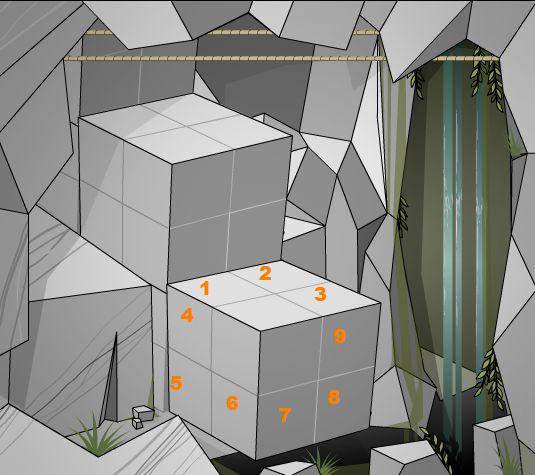
The Male Head
With the male head you will only be working with the blocks on the top of the cube.
The first three blocks only need to be hit once, then the fourth block needs to be hit five times.
Screenshot.
You have found secret 6!
Click on the head and the blocks will fall down.
Fixing Bruno
Once you've carved all of the extra stuff (the three secrets, and you can do the hand and foot if you want, but they are not useful), it's time to carve the stuff to help Bruno the crippled unicorn.
You should still be in the block room, and you should still have the mallet/chisel selected.
Start with the horn. Each square for the horn only needs to be hit once.
Screenshot.
Note: when carving Bruno's parts the order is not important, just that you create the pattern with only one hit per square.
There should now be a unicorn horn sitting there.
Go right to the control room.
The grappling hook should be here. If it is not, use the wheel until it appears.
Once the hook is in the control room, move it once to the left using the wheel.
If you go left to the block room you will see the hook hovering over the completed horn.
Screenshot.
Go right to the control room.
Use the left lever on the left control panel and push it down.
Use the wheel once to the right to bring the grappling hook to the right.
The grappling hook should be in the room where you are, and it should be holding the unicorn horn.
Screenshot.
At this point the sled is directly beneath the hole here. You could use the right lever to lower the grappling hook, but you don't need to.
Use the left lever to open the hook and the horn will drop down to the sled.
Use the wheel to move the grappling hook to the left TWICE (as far left as it will go).
Although you can't see it from here, the upper grappling hook has lowered all the way to the lower level, and the sled has moved all the way to the right.
Use the left lever to close the grappling hook (you won't be able to see the effect).
Use the wheel to move the grappling hook as far to the right as it will go.
If you do this correctly, Bruno will get his horn.
Screenshot.
Go left to the block room.
Use the book to create one of the wings, then follow the same steps to move the wing down to the sled then up to Bruno.
That is, pick up the wing, move the hook to the control room, open the hook, move the hook twice to the left, close the hook, move the hook 3 times to the right.
Each time you repeat the sequence (after carving the wing) Bruno will get his wings.
Here are the patterns for the wings.
Screenshot.
Screenshot.
The End
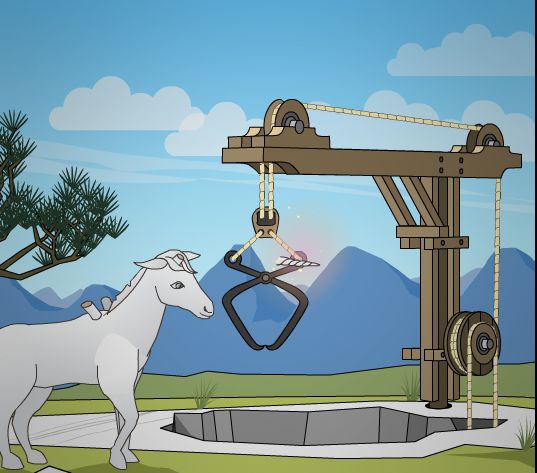
Once Bruno has all of his parts, go right to the stairs, then up the stairs.
Go left three times to the outside stairs then up to the telescope.
Go right four times to Bruno. Click on Bruno once and he will bow down.
Click on Bruno again and he will fly you away.
Screenshot.
Congratulations!
The Secrets
There are six secrets to be found.
They are:
Looking through the telescope at the mountains.
Finding the paper in the back of the book (using the knife).
Finding the paper in the secret compartment in the box.
Carving the ram's head.
Carving the woman's head.
Carving the man's head.
Specific instructions for carving each head (with screenshots) can be found in the main walkthrough.
The Flowers
There are 18 flowers in the game, collect all to make a perfect bouquet.
There are two flowers in the scene with the telescope stand.
There are two flowers in the outside stairs to the quarry floor.
There are two flowers in the waterfall scene (quarry floor).
There are two flowers at the chasm (quarry floor).
There are two flowers at the dead end (quarry floor).
There is one flower at the cave entrance (hidden by the blocks).
There is one flower at the upper crane by Bruno the unicorn.
There is one flower at the base of the stairs into the cave.
There is one flower at the dead end on the right upper level of the cave (where the second crane comes down).
There is one flower in the block room with the waterfall.
There are two flowers in the second block room.
There is one flower in the alcove behind the gold bird.
Posted by: grinnyp |
June 28, 2011 12:53 PM
|
June 28, 2011 12:53 PM