
Inbetween Land
Platform: iOS, Mac, Windows

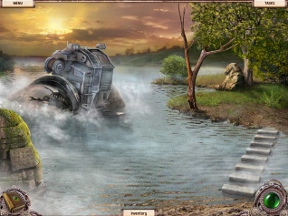
![]() A strange hovering island has appeared over the city, and your friend Mary has gone missing. What could a loving friend do? My instincts, after possibly one too many horror movies, would kick in and tell me to call the cops and get as far away from the town as possible. Clearly that wouldn't make for a very good game, so instead of a frightened lead character, Specialbit Studios made their heroine of tougher stuff. In the new hidden object puzzle adventure game Inbetween Land, you're going to make like the brave little toaster and go on an adventure!
A strange hovering island has appeared over the city, and your friend Mary has gone missing. What could a loving friend do? My instincts, after possibly one too many horror movies, would kick in and tell me to call the cops and get as far away from the town as possible. Clearly that wouldn't make for a very good game, so instead of a frightened lead character, Specialbit Studios made their heroine of tougher stuff. In the new hidden object puzzle adventure game Inbetween Land, you're going to make like the brave little toaster and go on an adventure!
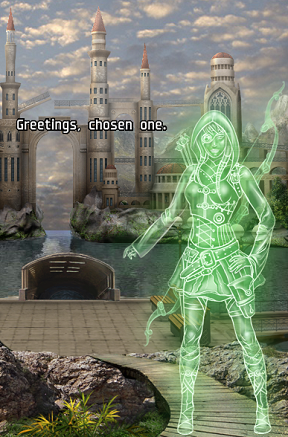
 Here's the rundown: Your BFF Mary has been acting a little odd lately, and one day she vanished like a bag of chips (i.e. without your awareness). You head to the orphanage where you both grew up to see if the old lady there has a clue where Mary might have gone. You soon learn Mary had a weird obsession with the floating island that appeared over the city. After some investigating, you manage to open a portal to the island, but instead of calling in the scientists for some serious research, you hop through without a second thought. Inside is a desolate but stunning city inhabited by an extraterrestrial race that desperately needs your help. Fortunately, helping them means helping Mary, so everybody wins!
Use the cursor to pick up objects or start the various puzzles you run into while exploring. Hovering over active areas gives you a clue as to what actions can be performed. The hidden object scenes in Inbetween Land are fragmented, meaning you'll pick up pieces within a scene to build an item you'll use to gain access to more pieces. The end result is a key item that will allow access to new areas you can roam through!
 Analysis: Inbetween Lands is structurally very similar to most casual adventure games out there, featuring a hint button, a difficulty selector, and plenty of puzzles to sit and ponder over. Where it really stands out, though, are in the visuals. The cutscenes look like they were taken out of a comic book, while the landscapes look as if you walked into a steampunk fantasy, sans the owls and krakens. There are a few things that may seem odd, though, for a game so well-crafted, the most prominent being the lack of a map and the overall short length, both likely due to the fact that there isn't much backtracking and practically no way to get lost.
Ultimately, Inbetween Land feels like a mish-mash of multiple genres and at times may seem like it took some cues from the last Indiana Jones movie. The creative puzzles and decadent artwork make it a very a special find. The addition of the fragmented hidden object scenes is a pleasant change of pace from the usual list of random items. Inbetween Land is a quirky but entertaining game that may not take you days to finish but will have you wanting to play again if only to look at the alluring landscapes!
![]() Windows:
Windows:
Download the demo
Get the full version
![]() Mac OS X:
Mac OS X:
Download the demo
Get the full version


Walkthrough Guide
(Please allow page to fully load for spoiler tags to be functional.)
Inbetween Land Walkthrough
The Orphanage
Open the closet on the right, look inside, and pick up the Slipper.
Look under the bed and throw the Slipper at the rubber bone.
Take the Car Key from inside the closet.
Go outside, use the Car Key to open the car door, and click on the car again to drive away.
Look at the potted plant in the window and pick up the Leaf and Soil.
Open the door on the left and enter the Library.
Look at the poster on the wall by the window, peel back the corner, and take the Lock Block.
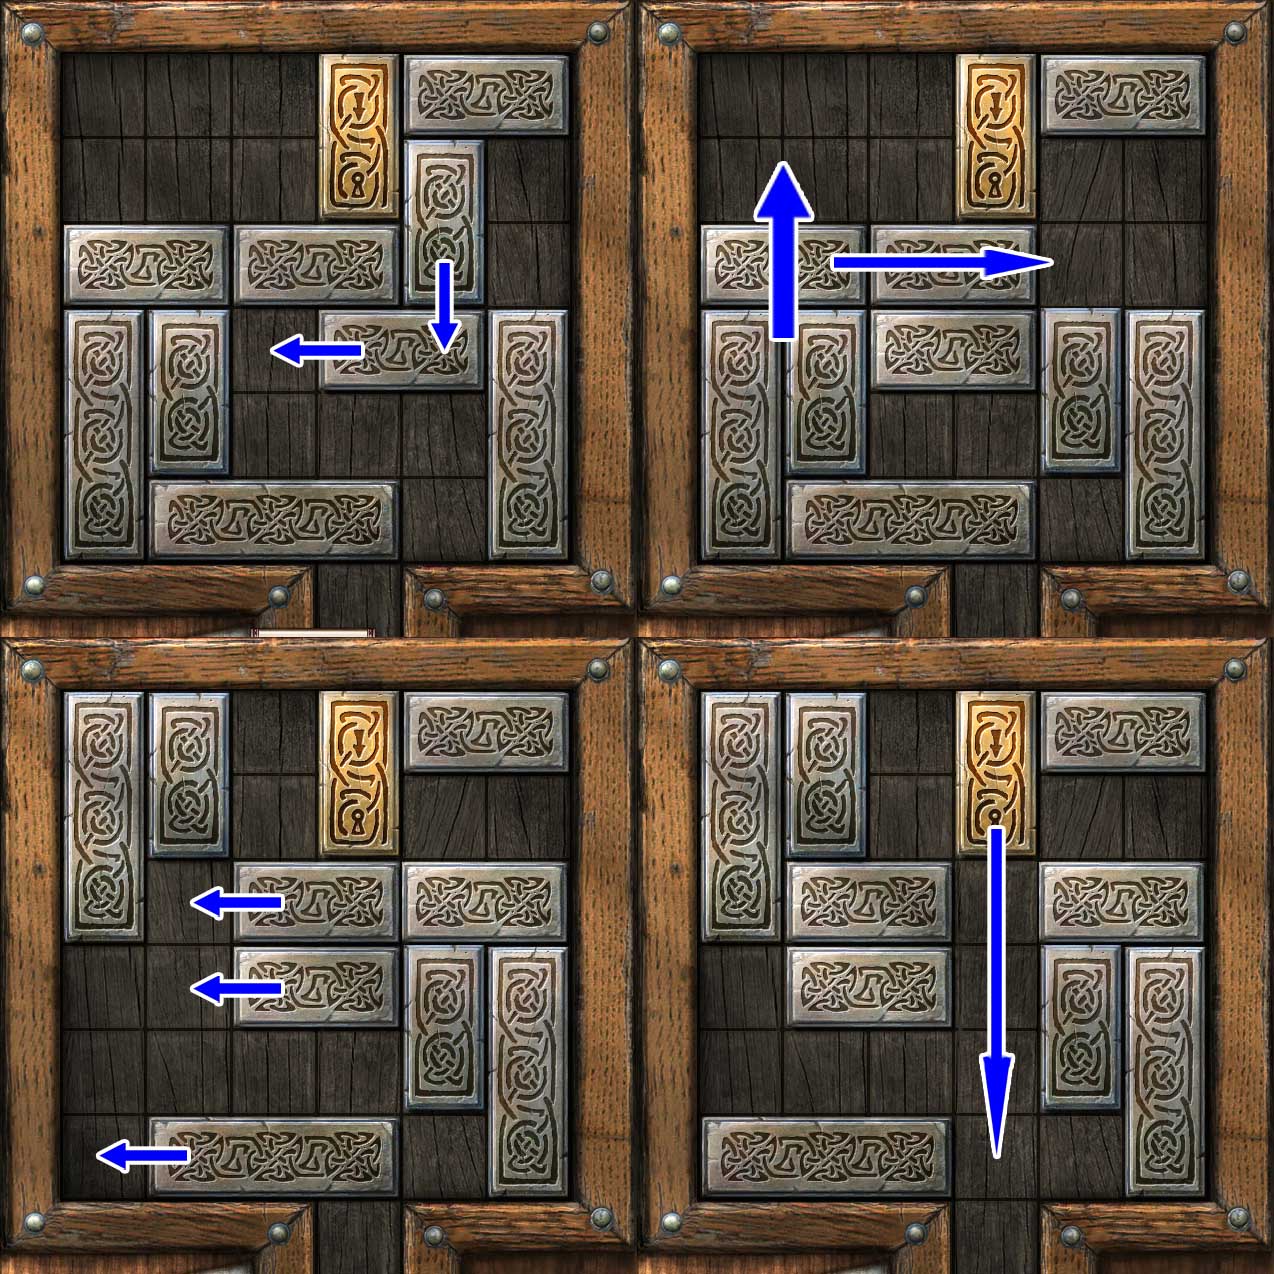
Look at the keybox on the wall to the right and use the Lock Block to start the puzzle.
Drag the blocks to move the golden block through the opening at the bottom.
Horizontal blocks can be moved left and right; vertical blocks can be moved up and down.
Screenshot
Take Mary's Key from inside the box.
Go back to the Corridor, open the door on the right, and enter the Kid's Room.
Pick up the Water Jug on the left.
Look at the chest under the bed, use Mary's Key to open it, and take the Spinning Top and the journal.
Look at the open drawer on the right and take the Pinwheel and the Matches.
Look at the bedside table, take the Candle, open the drawer and pick up the Chalk.
Combine the Matches and the Candle to obtain the Burning Candle.
Use the Chalk on the floor four times to draw the symbols.
Place the Leaf, Soil, Water Jug, Pinwheel, Spinning Top, and Burning Candle on the symbols on the floor and click on the Spinning Top to start the ritual.
Outside the Temple
Move back to the Park.
Look at the trashcan on the right and pick up the Handle.
Look at the fountain and take the Valve and the Coin.
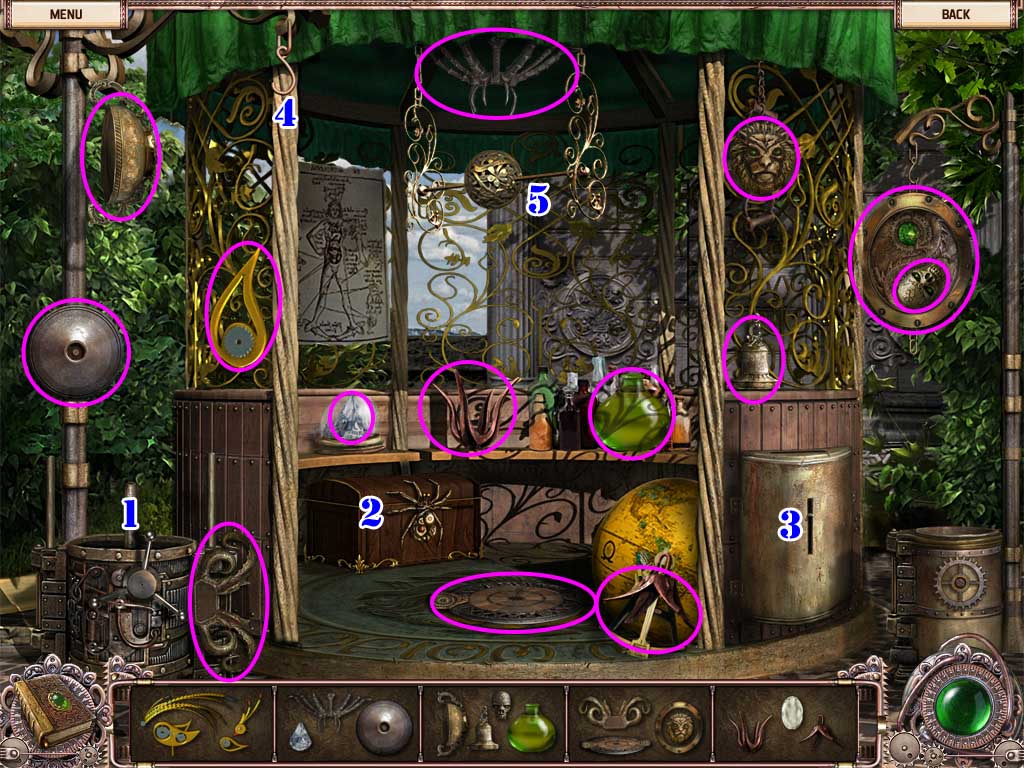
Look at the gazebo on the left and click on it to start the puzzle.
Rotate the circles to get the colors to match the borders.
This puzzle is randomized.
Solving the puzzle will start the hidden object scene.
Place the Metal Lid on the mechanism on the left, turn the handle, and take the Lantern piece that appears on the right.
Use the Acid to get rid of the spider, open the chest, and pick up the Clockwork Bird piece.
Use the Shield to weigh down the lever on the right and pick up the Clockwork Bird piece.
Put the Lantern on the hook, peel back the poster, and take the Clockwork Bird piece.
Place the Clockwork Bird on the perch and take the Gear.
Screenshot
You will receive a Gear.
Walk back to the Temple Entrance and look at the ticket terminal.
Put the Gear in place, insert the Coin in the slot, pull the lever, and take the Ticket.
Use the Ticket to open the door and enter the Temple Hall.
Inside the Temple
Enter the elevator, pick up the Empty Canister, and press the button on the right to go to the Main Hall.
Look at the floor in the hall, take the Flint, and open the door.
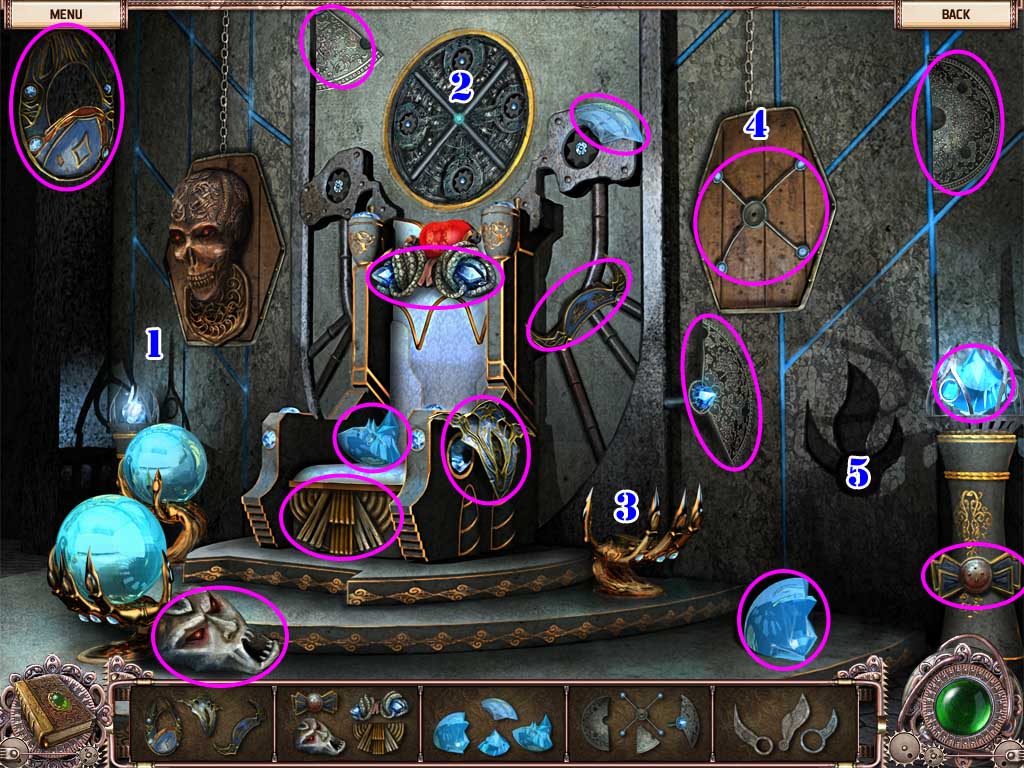
Look at the throne on the right to start the hidden object scene.
Place the Mask on the skull and take the Code Key piece that appears.
Put the Shield in the circular slot above the throne and pick up the Code Key piece that appears.
Put the Sphere in place on the third pedestal.
Place the Mask on the wall and take the Code Key piece that appears.
Use the Code Key on the slot on the wall to open it and reveal the Key.
Screenshot
You will receive a Key.
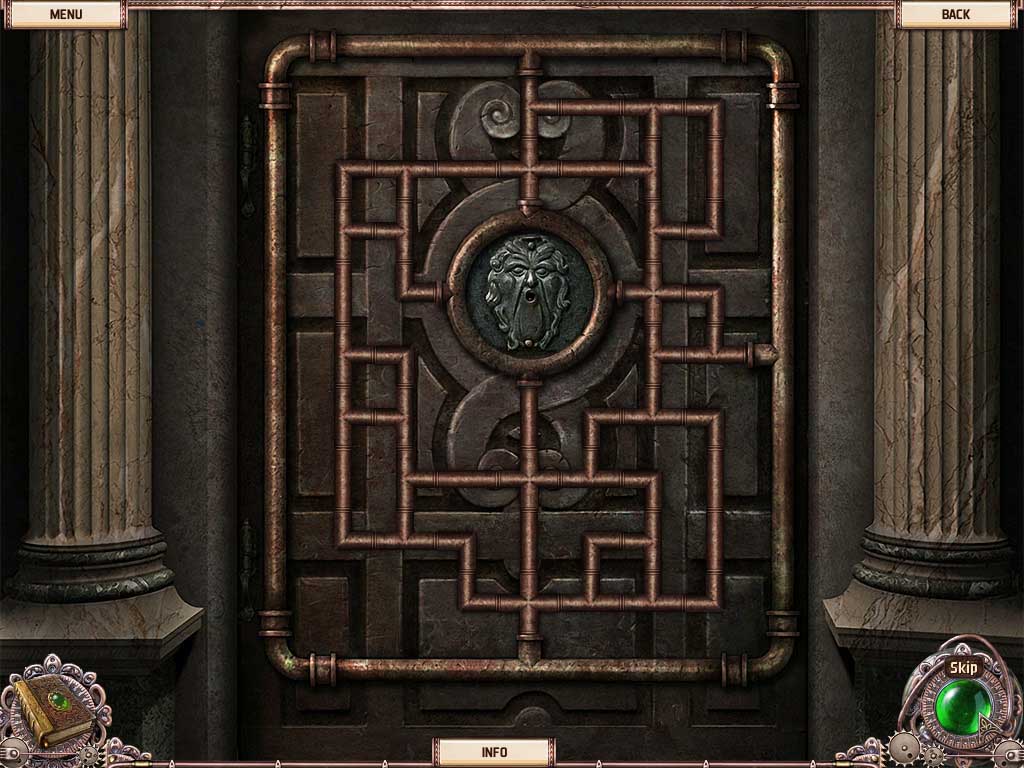
Look at the pipes on the wall to the left to start the puzzle.
Rotate the pipe framents to make a closed circuit.
Screenshot
Use the Key to open the door to the Utility Room.
Look at the suit of armor on the left side of the Utility Room, pick up the Oiled Rag on the arm, place the it in the torch, and use the Flint to light it.
Pick up the Torch and use it to light the candles on the chandelier.
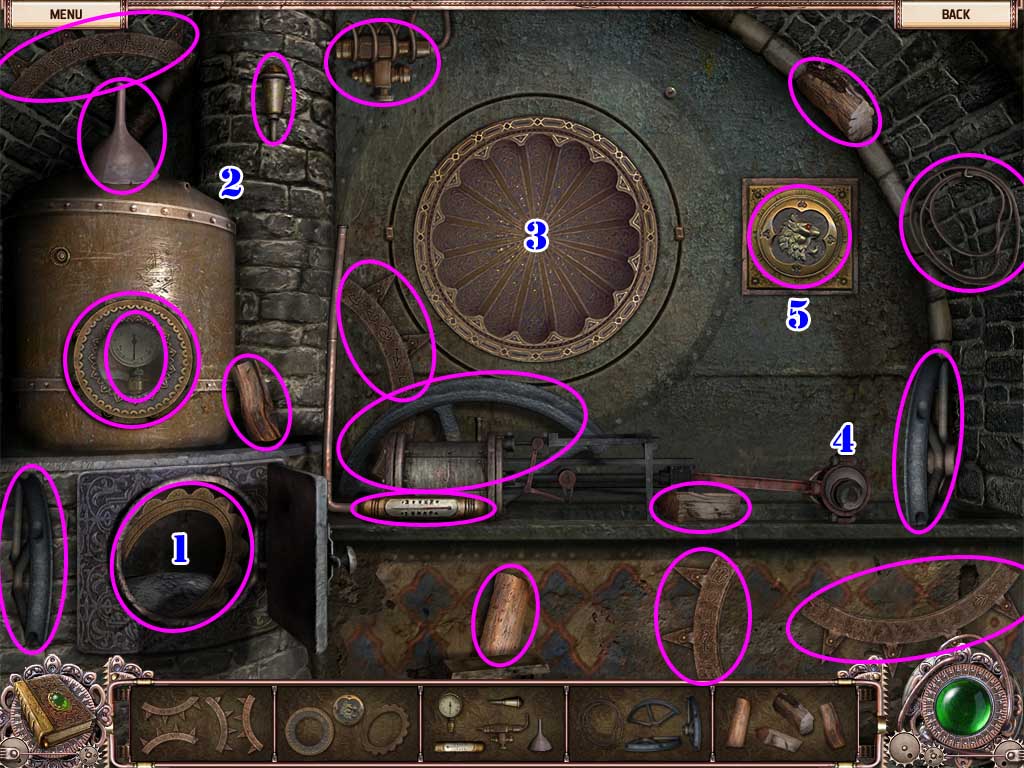
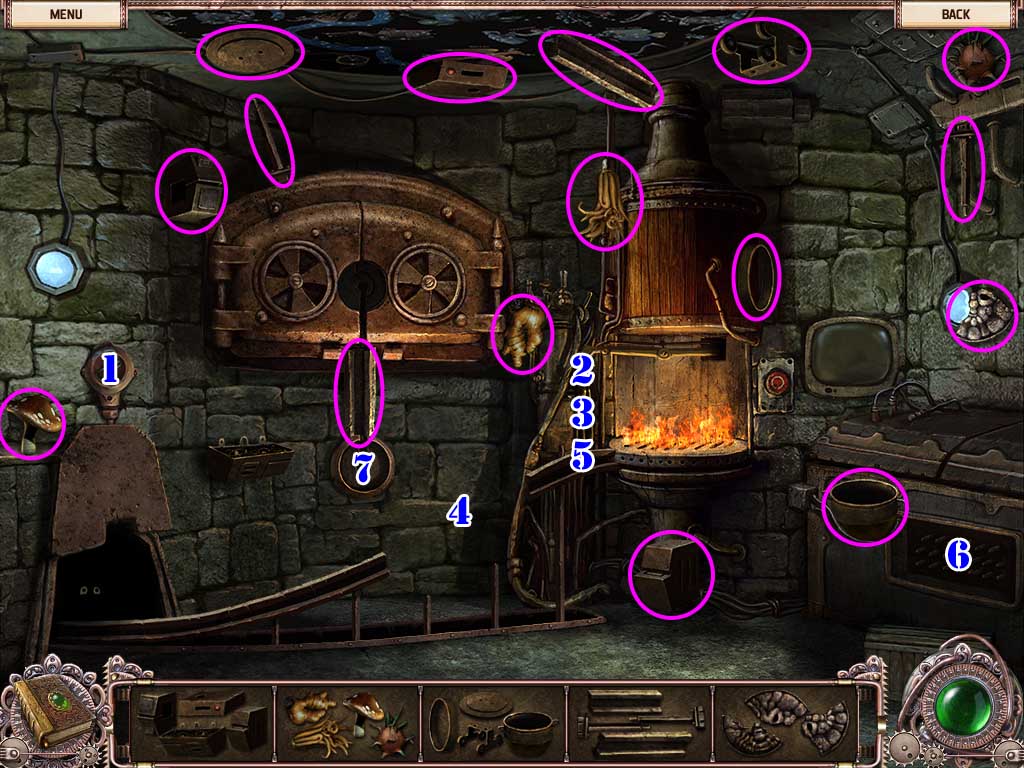
Look at the machine on the left to start the hidden object scene.
Put the Firewood into the furnace.
Place the Valves on top of the furnace.
Put the Lion Shield and Cog into place on the wall.
Place the Wheel into the machine on the right.
Pick up the Key that appears.
Screenshot
You will receive a Key.
Look at the bookcase on the right and pick up the Hammer, Rod, and Rope.
Look at the well on the floor, unlock it with the Key, and take the Chain.
Look at the chain above the well and attach the Chain.
Look back at the well and use the Rod to attach the chain to the grate.
Use the Rope on the chandelier, use the Hammer to break off the Wheel of the cart, pick it up, and attach the Wheel to the rope.
Pick up the Ladder in the corner on the right, look at the well, and use the Ladder to descend.
Follow the tunnel until you reach a door and a chest.
Open the chest, take the Enamel Tile, and go through the door.
Look at Mary's hand and pick up the Violet Crystal.
Return to the elevator and press the middle button for the Temple Hall.
Gargoyle Park
Look at the door on the left and use the Enamel Tile to start the puzzle.
Rotate each puzzle piece to assemble the picture.
Screenshot
Go through the door to the Gargoyle Park.
Look at the gargoyle on the left, open the compartment below the gargoyle, turn it with the Handle (found in step 2-2), and look at the scroll in the gargoyles hand to learn the location of the secret compartment.
Return to the Temple Hall, open the secret compartment in the floor, and take the Stone Disk.
Go back to the Gargoyle Park, look at the fountain, use the Valve (found in step 2-3) to drain the fountain, and use the Stone Disk in the middle of the fountain to start the puzzle.
Rotate the circles to assemble the shapes on the outer edges.
Screenshot
Look at the statue on the far right, open the compartment, and take the Gear with Gem.
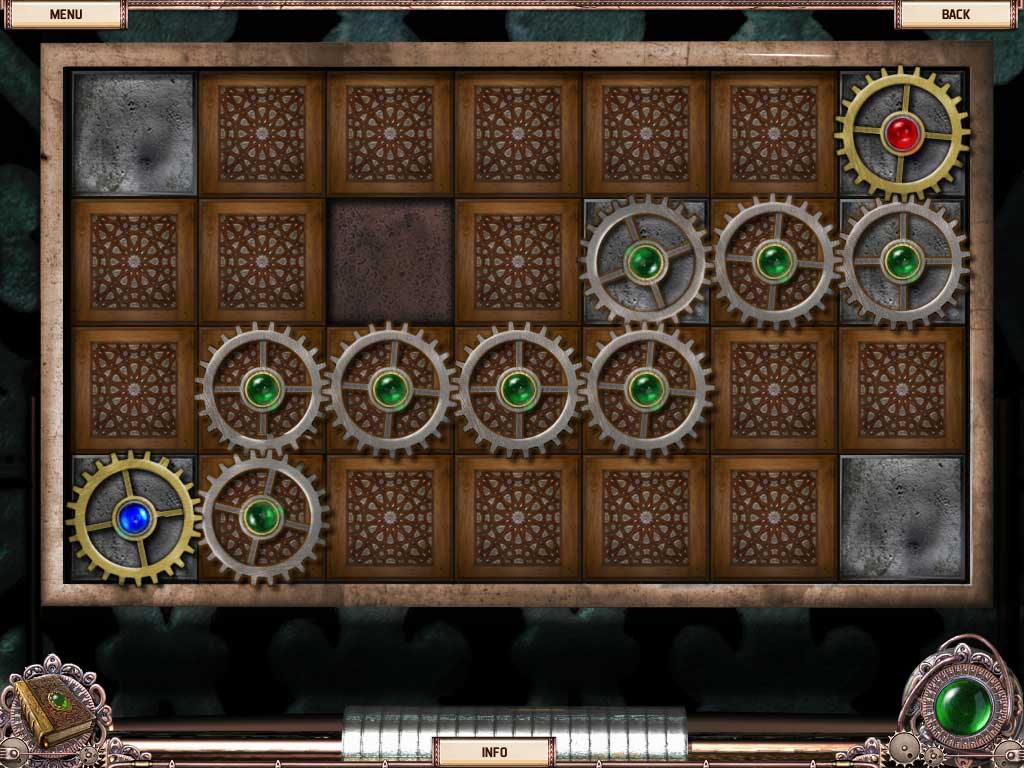
Return to the elevator, press the left button, look at the gears that appear, and put the Gear with Gem into place to start the puzzle.
Slide the tiles to connect the gears between the blue and red gears.
Shown is one of many possible solutions.
Screenshot
Press the button on the left to go to the Gallery.
The Gallery
Go up the stairs to the right, look at the florescent gas machine, pick up the Protective Glove, hook up the Empty Canister to fill it, and take the Canister with Florescent Gas.
Walk forward, click on the telescope, look at the broken lens on the floor, and use the Protective Glove to pick up the Lens Fragments.
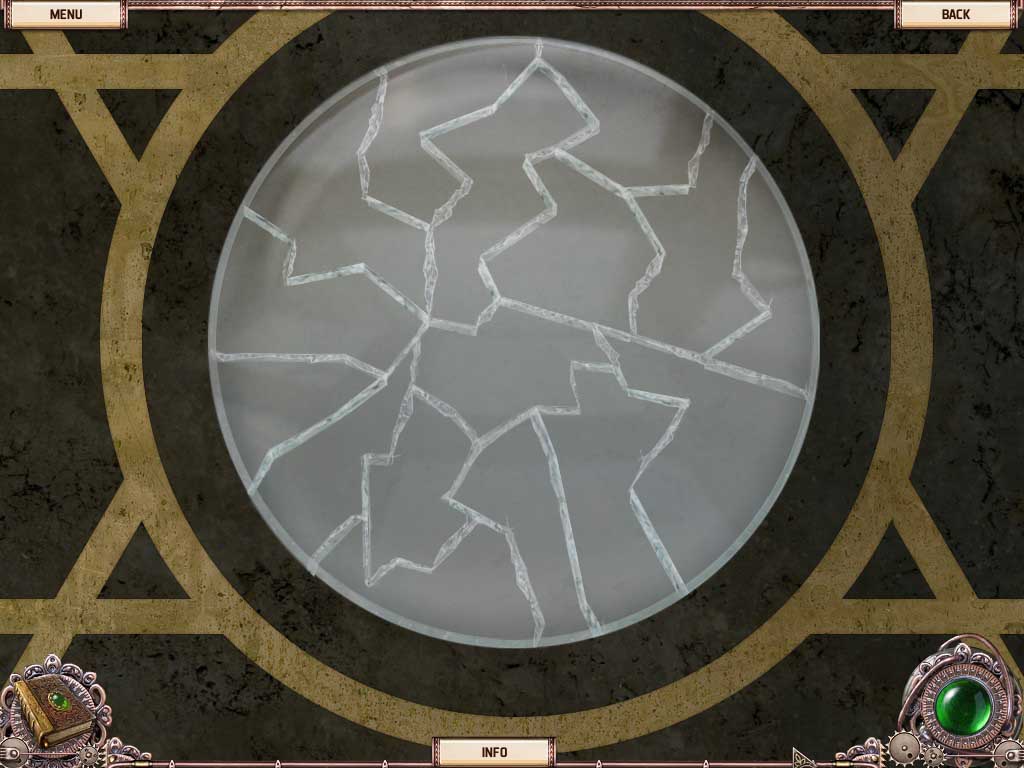
Look at the table on the right and use the Lens Fragments to start the puzzle.
Assemble the glass puzzle pieces.
Screenshot
Click on the button to use the lasers to repair the lens, then pick up the Telescope Lens.
Look at the telescope, put the Telescope Lens into place, and look through it.
Click to zoom in on the robot and note the symbols.
Walk back to Gallery and go forward to the Teleport.
Look at the panel on the wall to the left, use the Canister with Florescent Gas on the buttons, press the highlighted buttons, and take the Circuit Board.
Look at the panel in the middle of the room, use the Circuit Board to fix it, and press the three highlighted buttons from left to right.
Go through the teleport to the Robot.
The Robot
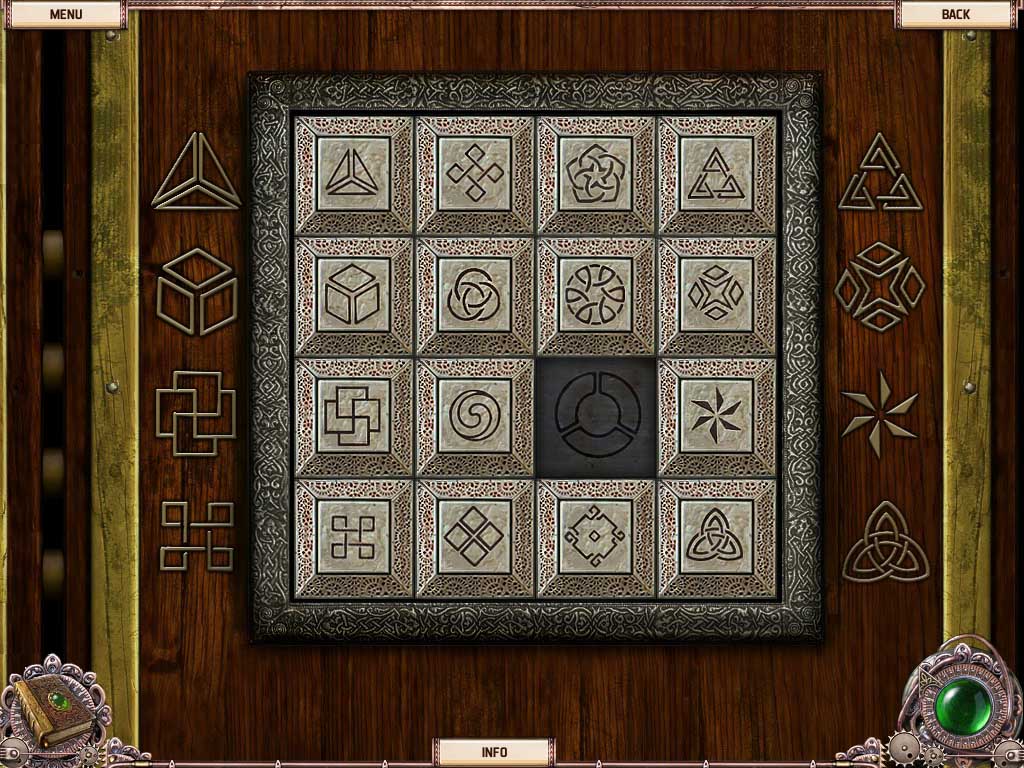
Click on the stone tablet on the left to start the puzzle.
Repeat the sequences shown by pressing the stone buttons.
This puzzle is randomized.
Look at the tree on the right and use the Hammer to knock the branch down.
Enter the robot and click on the buttons in the light on the right to start the puzzle.
Light up all the buttons.
Press all of the marked buttons, in any order.
Screenshot
Look at the dials on the machine to the left and turn them each until the lights turn green.
Look at the cords on the right and connect the unplugged cables.
Look at the moniter, select Search, and change the view mode with the buttons on the right until you locate the crystal.
Enter the instructions for the crane so that it picks up the crystal.
Up: 3. Left: 5. Down:4
Pick up the Yellow Crystal.
Exit the robot, look at the space in the stone to the left, and take the Piece of Hall Door.
Exit the teleport, return to the Elevator, and take it to the Temple Hall.
The Library
Look at the door on the right and use the Piece of Hall Door to start the puzzle.
Place the counters according to the markings along the borders.
The spots for the inner counters are marked on the background of the lock.
Screenshot
Go through the door to the Cliff.
Look above the door to the left and pick up the Prism and the Key.
Look at the door to the left, open it with the Key, and enter the Library Hall.
Go up the stairs to the Library and look at the colorful bookcase on the left to start the puzzle.
Swap the books from the two upper shelves so that the "sum" of their colors in each column matches the color of the book on the lowest shelf.
This puzzle uses the Cyan-Yellow-Magenta color scale:
Cyan + Yellow = Green
Cyan + Magenta = Blue
Yellow + Magenta = Red
Screenshot
You will receive the Tripartite Key.
Look at the box on top of the bookcase to the right and take the Glass Gear on top and the Chips inside.
Walk back to the Library Hall, look at the globe, and use the Tripartite Key to open it.
Pick up the Rag, press the lever in the middle of the globe, and go down the stairs on the right to the Basement.
Look at the mirror on the left and clean it with the Rag.
Put the Prism in place hanging from the ceiling.
Look at the buttons on the wall, open the panel, and put the Glass Gear into place to start the puzzle.
Create a path for the gears that covers all the empty squares without doubling back on itself.
Screenshot
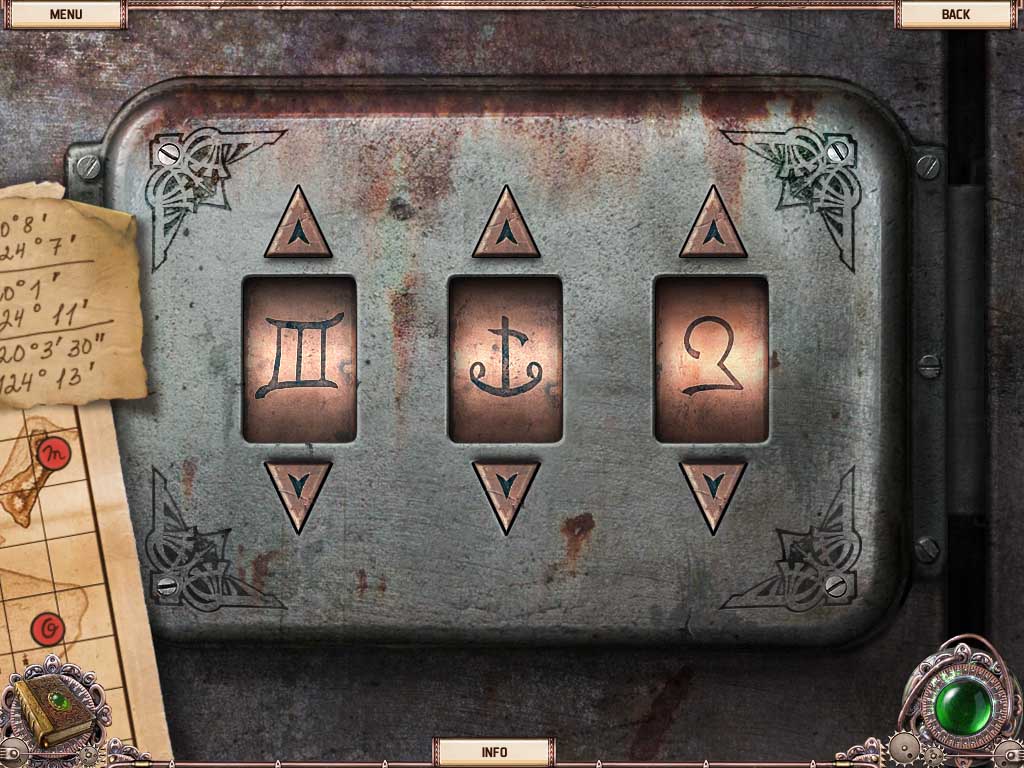
Look at the device on the table and line up the three handles over the symbol in the upper right.
Look at the skull on the wall, press the two glowing buttons, and take the Music Box Piece.
Completing the Music Box
Walk back to the Library Hall, look at the box on the left, and use the Chips to start the puzzle.
Figure out the pattern and place the correct counters into the empty slots to complete the sequence.
Screenshot
You will receive Numbered Tiles.
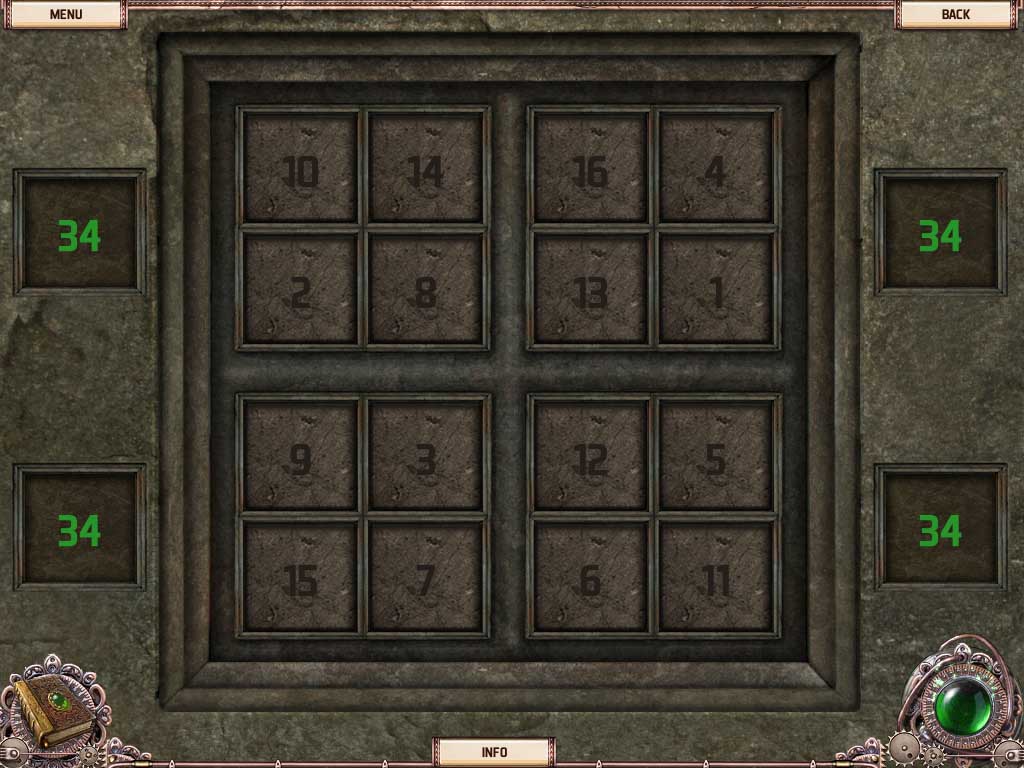
Return to the Basement, look at the numbers on the door, and use the Numbered Tiles to start the puzzle.
Swap the number buttons so that the sum of each square is 34.
Shown is one of many possible solutions.
Screenshot
Go through the door to start the hidden object scene.
Flip the switch to activate the rail.
Put the Bowl on the rail next to the fire.
Put the Food in the bowl.
Connect the Rail Fragment to the rest of the rail.
Click on the bowl of food to get a Sun Symbol piece.
Connect the Battery to the machine on the right and take the Sun Symbol piece.
Place the Sun Symbol in the machine behind the rail to obtain the Musical Cylinder.
Screenshot
You will receive a Musical Cylinder.
Go upstairs to the Library, look at the music box, and use the Music Box Piece and the Musical Cylinder.
Look at the top of the music box and pick up the Bell Clapper.
Exit the Library to the Cliff, go onto the Bridge to the right, and pick up the Rope.
Return to the Cliff, look at the bell, attach the Bell Clapper and the Rope, and ring the bell.
Look where the bell fell and pick up the Board.
Return to the Bridge, place the Board across the gap, and go forward to the Lake.
The Lake
Walk back to the Bridge and pick up the Board.
Go back to the Lake and go forward into the Tunnel.
Look at the bins on the ground, pick up the Welder, turn the knob on the left, and pick up the Lake Water.
Go back to the Lake, go left to the Broken Street Light, place the Board across to the aircraft, and go inside.
Walk forward into the cockpit, look at the pilot skeleton, take the Pilot's Key, and look at the note in his pocket.
Look at the empty seat, open it, and look at the map.
Walk back, look in the trunk, open the toolbox with the Pilot's Key, and pick up the Wrench.
Look at the hatch on the floor and pick up the Winch Hook.
Look at the hanging cable, hang the Winch Hook, and use the Welder to fix it.
Attach the winch to the hatch on the floor to open it, then look at the door below it to start the puzzle.
Input the correct code using the coordinates from the looter's map.
Screenshot
Pick up the Lock Piece and the Power Supply.
Walk back, look at the fallen street light, and remove the Magnetic Core with the Wrench.
Go back to the Lake, go right to the Pumping Station, look at the fan, and pick up the Metal Pole.
Look at the darkened power box, open it, and place the Power Supply inside.
Return to the cockpit of the crashed airplane and break the window on the right with the Metal Pole.
Combine the Metal Pole with the Magnetic Core to obtain the Tube with Magnet.
Use the Tube with Magnet to retrieve the Propeller.
Return to the Pumping Station, look at the fan, and put the Propeller into place.
Go back to the Tunnel, look at the control panel to the left of the door, pull the large lever on the right, and go through the door to the Tower Courtyard.
The Tower
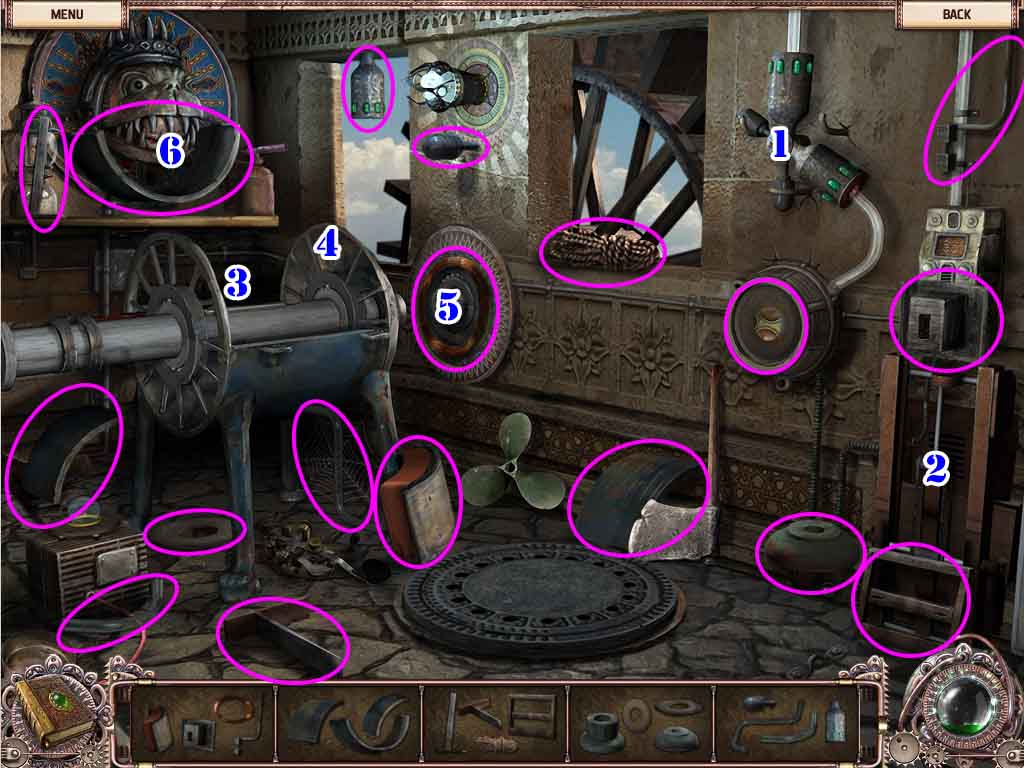
Go up the stairs on the right to the Tower Corridor. Look at the painting on the left to pick up the Chain and the Tube Fragment.
Look at the painting on the right, pull the chain, and take the Gear.
Look at the door with the intricate lock, put the Chain, Tube Fragment, and Gear into place to open it, and step forward into the Control Room.
Look at the large machine in the middle of the room to start the puzzle.
Rotate the valves so that the arrow rests on the green marker.
Use the first valve three times.
Use the second valve once.
Use the third valve twice.
Look in the metal chamber that appears to the right and take the Crown.
Return to the Tower Courtyard and walk forward to the Generator Room to begin the hidden object scene.
Connect the Tubes to the hoist platform on the right.
Put the Hoist into place on the right, use it to open the hatch, and take the Clutch piece.
Place the Coil in the generator.
Put the Cover on top of the generator.
Attach the Clutch between the generator and the wall.
Take the Skull from the statues mouth.
Screenshot
You will receive a Skull.
Look at the statue with the shield, put the Skull and Crown into place, and take the Green Crystal.
Look at the statue's feet and take the Scepter.
Go back to the control room, look at the window, take the Lighter by the lever, click on the lever until it breaks, replace it with the Scepter, and pull it.
Walk back to the the Tower Corridor, go up the stairs to the right, open the door, and cross the bridge to the Laboratory.
The Laboratory
Look at the table and take the Horned Flask and the Elongated Flask.
Look at the shelves behind the table and pick up the Conical Flask, Two-Horned Flask, and Round Flask.
Go up the stairs to the Upper Floor and look at the table. Take the Cylindrical Flask, move the papers, and take the Twisty Flask.
Look at the oven against the back wall, open it, and pick up the Symmetrical Flask and the Empty Scoop to the left.
Pick up the Bubble Flask from the table on the right.
Return to the Tower Courtyard. Look at the vase on the left and use the Empty Scoop to fill it with sand and obtain the Scoop of Sand.
Go back to the Upper Floor of the Laboratory, look at the oven, put the Scoop of Sand in place, and press the "Power" button and then the "Cool" button.
Open the oven and take the Triangular Flask.
Go downstairs, look at the microscope on the table, and put the Lake Water (found in step 9-3) in the petri dish to begin the puzzle.
Collect the required number of microbes as indicated by the counters.
If you click on an incorrect microbe, the counter resets.
Microbes must be exact matches.
You will receive the Emerald Bacteria, Amber Bacteria, and Crimson Bacteria.
Look at the jellyfish tank on the left, open the top, put the Emerald Bacteria in the tank, and take the Emerald Venom.
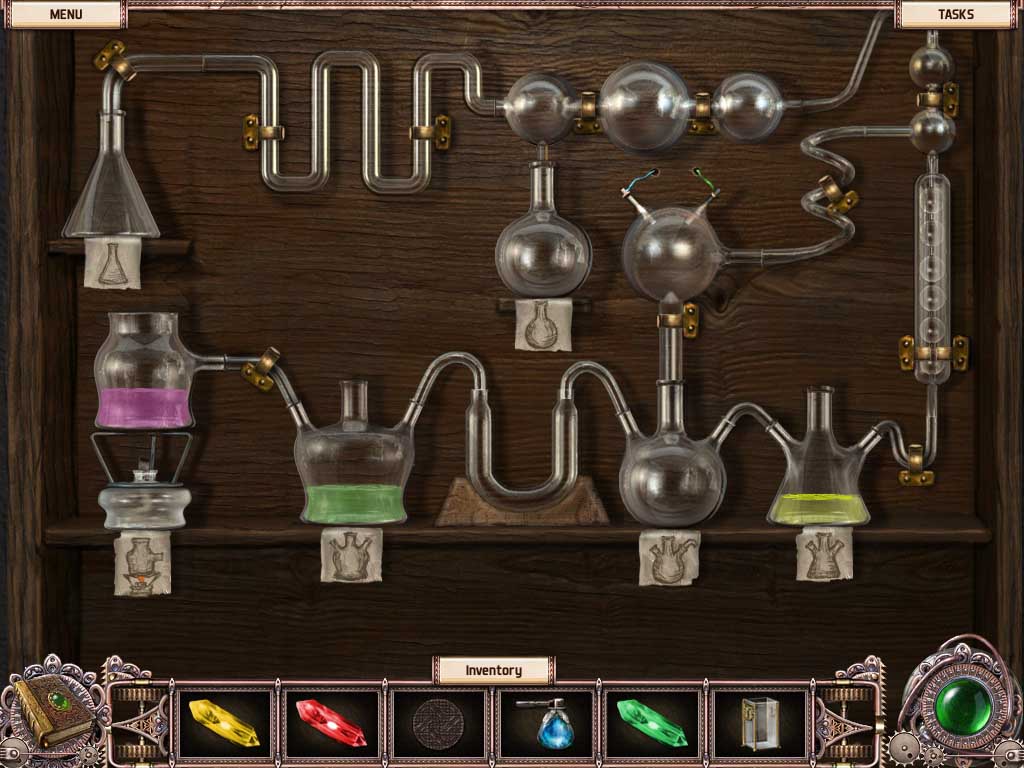
Look at the shelves on the right, put all 10 Flasks into place, and pour the Emerald Venom into the Two-Horned Flask in the middle.
Screenshot
Go back to the jellyfish tank, put the Empty Vial back, place the Amber Bacteria in the tank, and pick up the Amber Venom.
Return to the flasks and pour the Amber Venom into the Triangle Flask on the right.
Put the Empty Vial back by the tank, place the Crimson Bacteria in the tank, and pick up the Crimson Venom.
Return to the flasks, pour the Crimson Venom into the flask on the left, and light the burner with the Lighter.
Pick up the Solvent, go upstairs to the Upper Floor, use the Solvent on the door, and go through it.
Look at the large stone circle to start the puzzle.
Drag the prisms so that the beams light up all the lamps.
Shown is one of many possible solutions.
Screenshot
Pick up the White Crystal and go through the portal to the Main Hall.
The Crystals
Look at the mechanism in the middle of the room, place all the Crystals in it, and take the Battery.
Look at the door on the left side, use the Lock Piece to open it, and go through the door to the Tunnel.
Look at the broken mask on the floor and pick up the red Mask Eye.
Follow the Tunnel forward twice, look at the mask on the wall, put the Mask Eye into place, and take the Cross-Shaped Plate.
Go left to the Engine Room and use the Cross-Shaped Plate to start the puzzle.
Place all the puzzle pieces so that they cover the entire cross-shaped grid.
Screenshot
Walk forward, look at the machine, open the cover, and push the button.
Put the Battery in place on the left.
Thanks to cheeko for the walkthrough!
Posted by: Mike |
September 2, 2012 11:23 PM
|
September 2, 2012 11:23 PM