![]() Escape games need some challenge to necessitate an "escape" rather than a mere "leaving", but the promise of cagey puzzles isn't enough to lure us inside in the first place, and locked doors alone won't keep us hanging around. That trick requires more appealing methods, such as an intriguing premise or stunning surrounding or, as in Yona Yona Games' Kagome, a charming character: the little blue bird. Here, your goal is both your freedom as well as that of your feathered friend. A sprinkling of puzzles bars the way: simple enough to overcome by logic even as a smattering of misdirection forces just enough diligent thinking to make that door key well-earned.
Escape games need some challenge to necessitate an "escape" rather than a mere "leaving", but the promise of cagey puzzles isn't enough to lure us inside in the first place, and locked doors alone won't keep us hanging around. That trick requires more appealing methods, such as an intriguing premise or stunning surrounding or, as in Yona Yona Games' Kagome, a charming character: the little blue bird. Here, your goal is both your freedom as well as that of your feathered friend. A sprinkling of puzzles bars the way: simple enough to overcome by logic even as a smattering of misdirection forces just enough diligent thinking to make that door key well-earned.
 Play is standard fare for the genre, although some amusing details and a clean design make up for any shortfalls. Namely, the untranslated narrative could spark disappointment if not a sort of fomo for those who can't read Japanese. Because of a stagnate cursor, try to be mindful where you click. I'm not agreeing it's a pixel hunt, only that haphazard clicking just anywhere on an item is unlikely to turn up needed clues. There's no save feature but can be replayed quickly if you want to catch both endings. In Japan, Kagome is a child's singing game somewhat like Ring-Around-the-Rosie and this room escape has a similar jubilant sing songy spirit, which should lighten yours.


Walkthrough Guide
(Please allow page to fully load for spoiler tags to be functional.)
Kagome Walkthrough
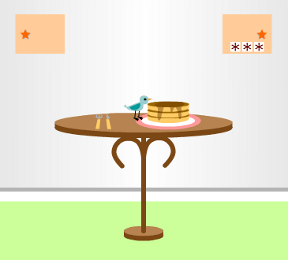
When you begin, you're facing a table with a cake on it. On the wall are two safes: one needs a 3-shape code and one is missing a handle.
Turn left—now you see a long counter/cabinet with various items on and in it. Take a closer look at everything...
On the countertop is a TV (sans remote) and stamp pad (without stamp or paper).
In the left side of the cabinet are some books. Look through for a story (written in Japanese) and a clue.
In particular, make a note of the illustration on the first page of the blue bird book.
The middle doors are locked, so note which kinds of codes you need then move on.
Zooming in on the righthand shelves of the cabinet turns up a couple useful items:
Take the STAR KNOB from the Humpty Dumpty figurine.
Look inside the pink bin to get SCISSORS.
Now turn back to the wall with the two safes. Examine the safe on the left which is missing a knob:
Put the STAR KNOB (from the Humpty Dumpty figurine) in the hole, then open the safe.
Take out the TV REMOTE.
Once again go left and look at the TV.
Use the TV REMOTE to turn on the television.
Examine the picture of the three flowers closely to find a puzzle solution.
Turn right twice—here's a locked cupboard with some cubbies stacked on top and a caged blue bird. Notice that, when you click the button in the middle of the cubbies, the orange panel slides open? Something is missing there.
Also, that flower on the cupboard looks familiar. Zoom in for a better look...
Click on the levers by the flower cupboard to move their positions up or down until each is at the correct height.
EXPLANATION/ANSWER:
The answer is on the TV; look at the highlighted leaves on the flower stems. Number the positions from bottom to top, 1-5:
2-5-4
Or, starting from the middle: 1 click, 3 clicks, 4 clicks.
When correct, you'll hear an unlocking noise and the levers will be immobilized.
Now you can open the flower cupboard to the right of the levers:
Take out the TURTLE.
Examine the turtle in your inventory:
click the underside of the turtle to turn it over and make a note of the clue written there.
Turn right again to face the exit door. A wobbly picture hangs to its left and a mobile hangs to its right. Examine the mobile:
Use the SCISSORS to cut the cage key off the mobile.
Back up and pick up the KEY from the floor.
Go back to the bird cage:
Use the KEY to unlock the birdcage.
The bird will hop out and give you a note. Take the NOTE and read it for a clue.
Turn around and examine the doors on the left side of the cabinet:
Enter the correct 3-digit number to unlock the doors.
Use both "blue bird" clues to find the answer...
EXPLANATION:
Inside the blue bird book, it tells you to subtract first blue, then yellow, then red. But from what? The shape on blue bird's note.
ANSWER:
2 6 4
When correct, you'll hear an unlocking noise and the clue will grey-out of your inventory.
Open the doors to see what's inside.
Get the BAND CAPTAIN DOLL.
Turn around and go back to the stacked cubbies.
Put the BAND CAPTAIN DOLL in the middle cubby.
The orange panel opens to reveal a button with a musical note on it. Press it.
Pay attention to where the band captain doll points his baton.
After listening to the band play, go over to the wobbly picture by the door...
Click on the corners of the picture in the correct order to knock it off the wall.
EXPLANTION/ANSWER:
After the band captain starts moving (when he's standing still, he's not really pointing), note the order in which he points to each corner of his cubby...
BR-TL-TR-BL-TR
BR=bottom right, TL=top left, etc..
Another panel is revealed here, but so far you can't operate it without a keycard.
Back up and look at the picture on the floor. Turn it around to see what's behind it:
Take the GREEN CARD with circles cut out of it.
If you haven't noticed already, the happy little blue bird is hopping all around the room, following you wherever you go. So, turn back to the TV cabinet view. Here, the blue bird is hopping around on the stamp pad...
The little guy left foot prints all over the counter.
Place the GREEN CARD on the counter, noting which prints are shown through the cut-out circles.
Back up and examine the doors on the right side of the cabinet:
Click each button to turn the "arrows" to point in the correct direction.
EXPLANATION/ANSWER:
Think of the footprints highlighted on the counter by the green card as arrows...the heels should point:
1st-NORTHWEST
2nd-NORTHEAST
3rd-EAST
When correct, the cabinet doors unlock.
Open the righthand cabinet doors to see what's inside:
Take out the CRANE FIGURINE.
Examine the crane figurine in your inventory; look at the underside of its base:
Note the clue you see there.
Return to the cake table view and examine the last puzzle—the safe on the right side of the wall.
To solve this puzzle, put together several clues from around the room.
Click each box to change the shapes until the correct three shapes show.
EXPLANATION:
The clue from under the turtle shell tells you "SEN" or south, east, north. The base of the crane explains the layout of the room in relationship to the door; the door is on the east wall. It also tells you to look at the blue bird...see where he's sitting depending which direction you're facing?
ANSWER:
On the "S" wall, blue bird is on a rectangle. On the "E" wall, he's on a pentagon. On the "N" wall, he's on a flat-bottomed oval. So input those shapes into the code box (fortunately/unfortunately this is made easier since, once you get first two shapes correct, just keep clicking the last until it unlocks).
RECTANGLE-PENTAGON-FLATSIDE OVAL
When correct, the safe unlocks.
Now turn around to face the door. Examine the panel to its left:
Use the CARDKEY on the card slot to open the panel and take out the DOOR KEY.
Now turn around, use the KEY on the door...
At which point, you can walk through the door to leave.
-OR-
Turn back to the cake table, see that your feathered friend is full on cake...
Pick up the BLUE BIRD.
About face and escape with the blue bird!
Have a happy day!
Posted by: elle |
September 19, 2013 2:56 PM