
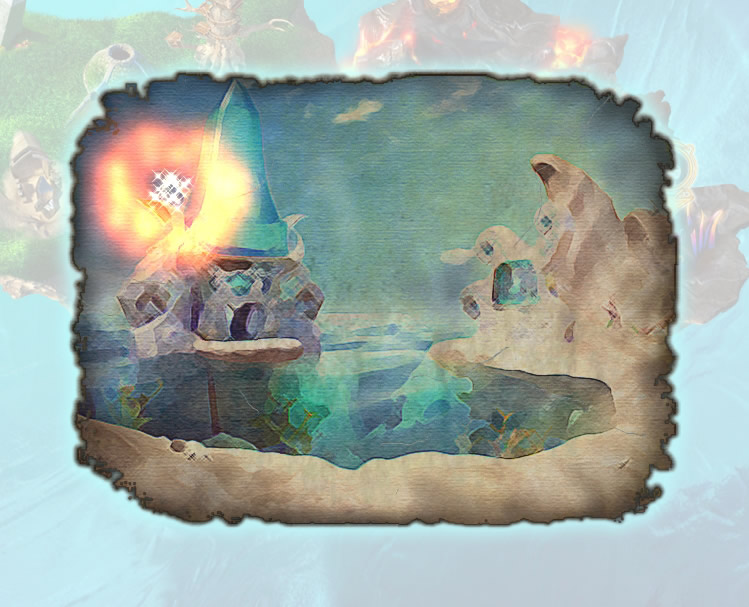
![]() Sandlot Games is known more for its strategy games than anything else, what with titles like Tradewinds and Westward to its name. Now the studio is bludgeoning its way onto the hidden object game scene with Kuros, a beautiful and unique object finding adventure that will remind you in more than one way of the Dream Chronicles series.
Sandlot Games is known more for its strategy games than anything else, what with titles like Tradewinds and Westward to its name. Now the studio is bludgeoning its way onto the hidden object game scene with Kuros, a beautiful and unique object finding adventure that will remind you in more than one way of the Dream Chronicles series.
 You wake up in a strange magical world knowing not who nor where you are. Upon exploring this mystical place, the holes in your memory are filled in one bit at a time by the eccentric host of characters you meet. Your name is Katya, and the world you are exploring is none other than Kuros, a realm kept in balance by glyph stones that keep the elements in harmony.
You soon learn that all is not well and this is far from paradise. Someone has thrown the elements out of balance and launched an offensive against those who have sworn to protect the glyph stones. Now the inhabitants of Kuros turn to you to help them restore order and track down the culprit that threatens the fate of their world.
You'll find that your time on Kuros will be very busy indeed. In order to explore more of the world, you'll have to search the various scenes for cleverly hidden map fragments. Once all the fragments for a given area have been discovered, piece them together and open up new areas. You'll also put your object finding skills to the test to solve puzzles, many of which open up even more puzzles! As if this wasn't enough, keep your mind on restoring the glyph stones, a task that will require the use of your magic wand and your ability to carve the sacred glyphs you'll find all over the place.
Analysis: It's clear that Sandlot Games wanted to make sure its first venture in the world of hidden object games was a strong one. Indeed, Kuros roars out of the gate determined to prove it is anything but a conventional object finder.
There are no lists of random objects in Kuros, everything you hunt for plays a strong part in the game. Finding map fragments is perhaps the most conventional object seeking task. Outside of that, you'll find some of your item hunts will loosely resemble those in Totem Tribe. That is to say, you'll often be sent to track down numbers of like items across a broad area (or, in this case, across multiple scenes, sometimes spanning the entirety of Kuros itself).
In other instances, object seeking resembles gameplay found in Flux Family Secrets. Hotspots which are ultimately part of puzzles will summon blacked out images of items you'll have to find in the immediate scene. Once these items are found and put in their correct slot you can proceed with the puzzle. By getting creative and mixing up the hidden object mechanic, Kuros keeps the core of its gameplay fresh and engaging even if conventional object finding may have grown a little old with you.
 Backing up the item hunts is a strong supporting cast of puzzles. From lining up paths of piping to punching your way through Guitar Hero-esque organ playing, these puzzles may not be exactly the most original we've seen, but they are exceptionally well-executed. These stand-alone puzzles are further bolstered by a very light item-based puzzle element. In both cases, most of the challenges you will be tasked with are not all that difficult and serve as a nice way of changing the pace as opposed to acting as nigh-impassable obstacles.
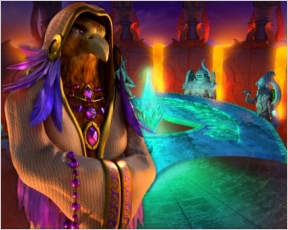
Rounding out what makes Kuros work so well is the cast itself, or, more accurately, the storytelling dynamic. The plot behind Kuros is rich and hints at unplumbed depths waiting to be discovered. This mystical planet brims with life thanks to the eccentric characters you'll meet, from the nearly-blind Farseer to the catastrophically clumsy Librarian. Each character (with perhaps one or two exceptions) is brilliantly voiced. The voice of Katya deserves special mention here. Her lines may test the boundaries of believability with the way the shocking is dealt with nonchalance. But the voice somehow manages to sell it with a near-perfect blend of awe and cynicism. While we don't spend too much time with the characters in this story, it's hard to walk away from Kuros without the feeling that new friendships have been forged.
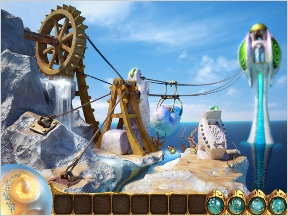
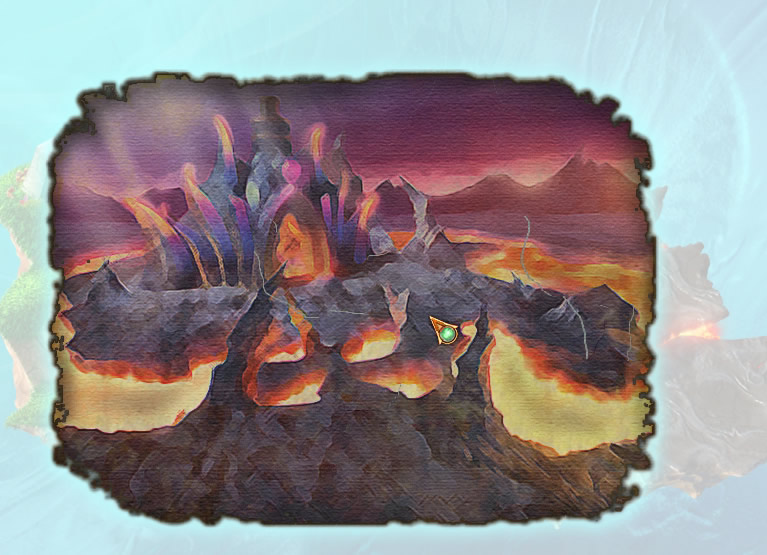
Yes, Kuros inherits its personality from its inhabitants, but it has a physical beauty all its own. From a kindly forest setting that promises the beginnings of fairy tales to chilling windswept snow-capped peaks, the look of Kuros is surreal enough to be fantasy, but real enough to take your imagination on an amazing ride.
While overworld navigation is easy enough, navigating whilst in a scene can be a pain. The hotspots that let you leave any one given setting are often unintuitive, bizarre, or far too obtrusive, taking up most of the main playing field. Another annoyance is the fact that you'll have to manually enter every item you pick up into your inventory. This may seem small, but when you are searching for objects over the span of several settings this can be a rather trying hindrance. Kuros would have also been helped by a slightly more generous hint system. The irony of the matter is that you must find special items to gain hints, and these are some of the most fiendishly hidden objects in the game. This strikes me as counter-intuitive because if you are having a hard time finding one of the objects you need, chances are you'll have a harder time finding one of the items needed to help you find it.
The last problem plaguing Kuros is somewhat bittersweet: it's just too short. And while Kuros has its flaws, even with those taken into account it's clear that Sandlot came up with something pretty special here. As I neared the end I did so with a slight twinge of sadness. I was just getting started. Hidden object veterans should power through this title in an afternoon, but you'll wish you had at least twice that time.
Kuros has what some may call rookie mistakes, but the ingenuity and craftsmanship that went into making this game shine amazingly bright. In the end it's sad to leave Kuros behind for the mundane world, but we do so with great hope that we'll have the opportunity to return soon (and hopefully for a little longer next time).
![]() Windows:
Windows:
Download the demo
Get the full version
![]() Mac OS X:
Mac OS X:
Download the demo
Get the full version


Walkthrough Guide
(Please allow page to fully load for spoiler tags to be functional.)
Kuros - Walkthrough
Wood Glyphstone
In the very first scene, just click at the left side for the moment.
Click the bag and find the needed items.
Click each item into the correct bubble.
Use the tool you will see at your mouse pointer after finding all and click the bag with it.
Hover your mouse over the right side of the screen to come to the next location
Items
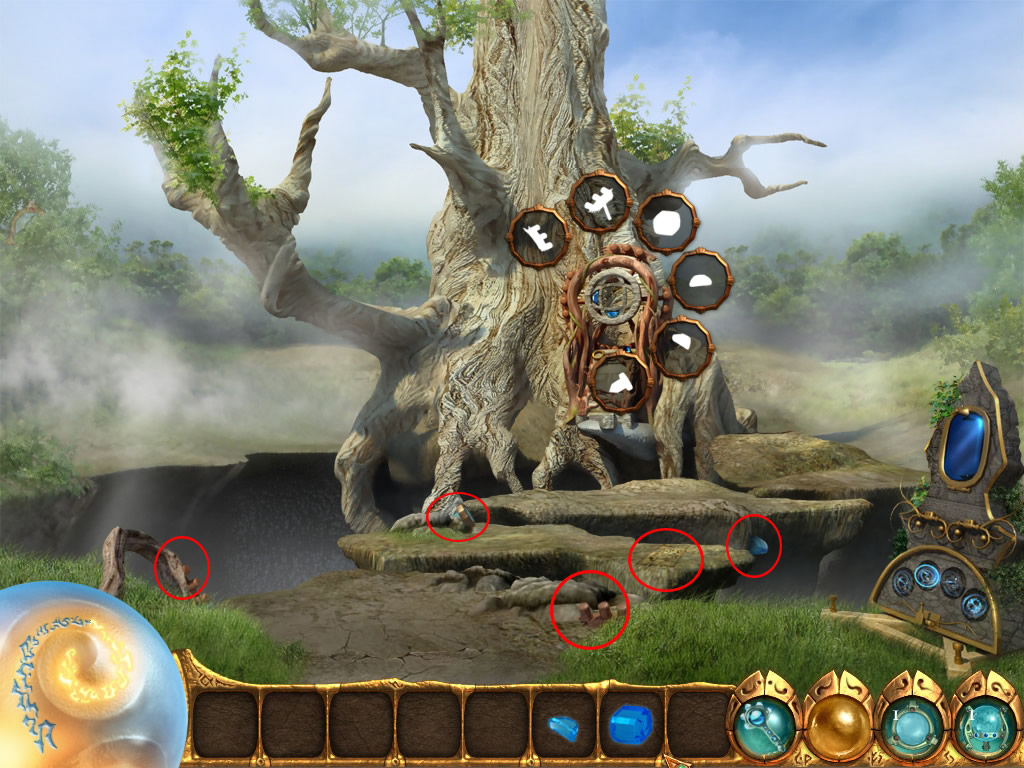
Wood Shrine
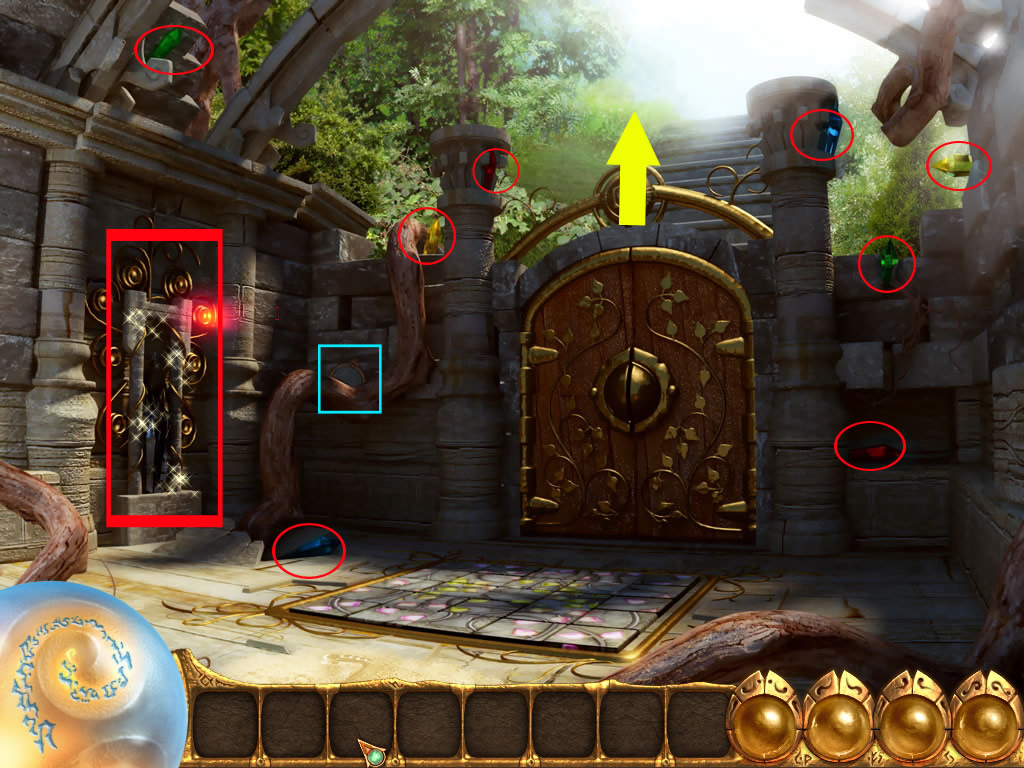
The gate is closed, you have to find a way out.
Collect the eight gems in the scene.
After clicking to pick it up, you have to click it into your inventory at the bottom of the scene.
Left next to the gate at the horizontal part of the trunk you see a chromatic lens.
Click to collect it, this is a hint.
When you click it, it will show you a random hidden object.
You will find them in some scenes, so always have a look at it.
Items
Have a look at the shiny thing to the left. Colored lights show up.
Write down or remember the places of the different colors, then click that thing.
Place the gems you've just collected in the empty slots, according to the light up order you saw.
When you place a gem wrong, the puzzle will close and you have to do it again.
Solution with Screenshot
Seen from bottom left (1) to bottom right (8)
1 = red, 2 = green, 3 = yellow, 4 = blue, 5 = green, 6 = red, 7 = yellow, 8 = blue
Puzzle Solution
Now click the tiles on the floor.
By clicking you can turn each tile around.
Do this, till you have a fitting pictures.
The tiles do not lock, when they are in the right position.
Puzzle Solution
Now the gate is open, but we still have to find one part of the map
Have a look at the first step behind the gate.
When you found it, click the arrow to move on.
To find out where to go, you will first have to assemble the map pieces.
The puzzle opens automatically
Drag them to the right place and they will lock
Puzzle Solution
Click on the map the green hill "Ancient Barrow"
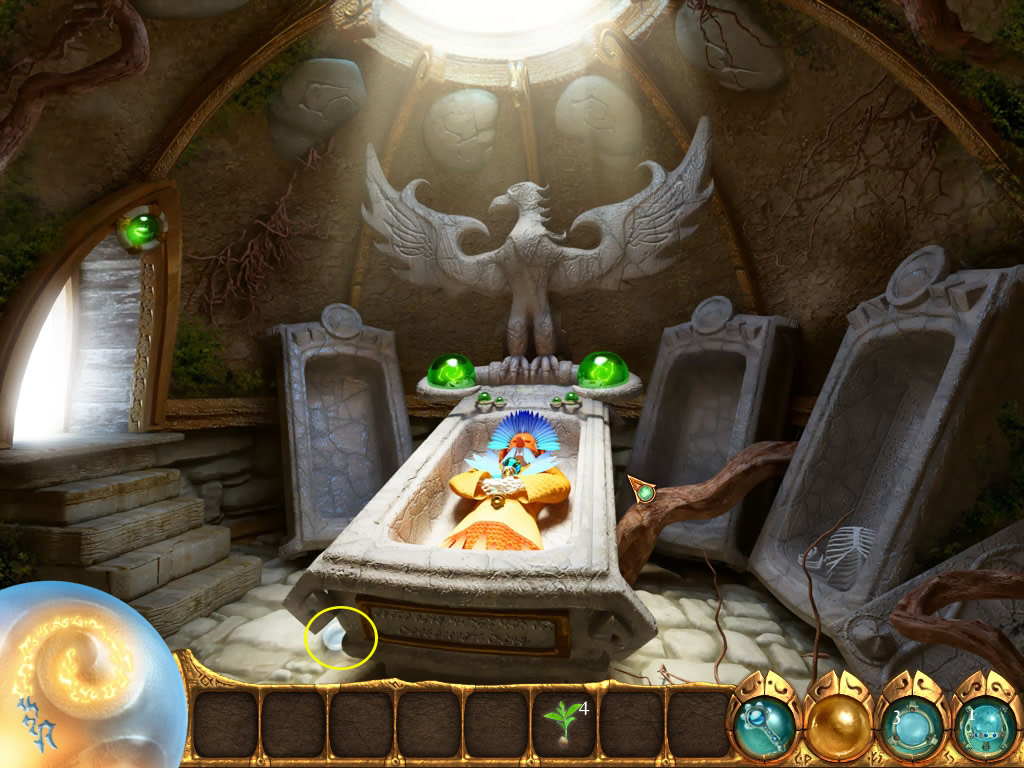
Ancient Barrow
Talk with the tree - where ever you click after, you will brought inside the barrow.
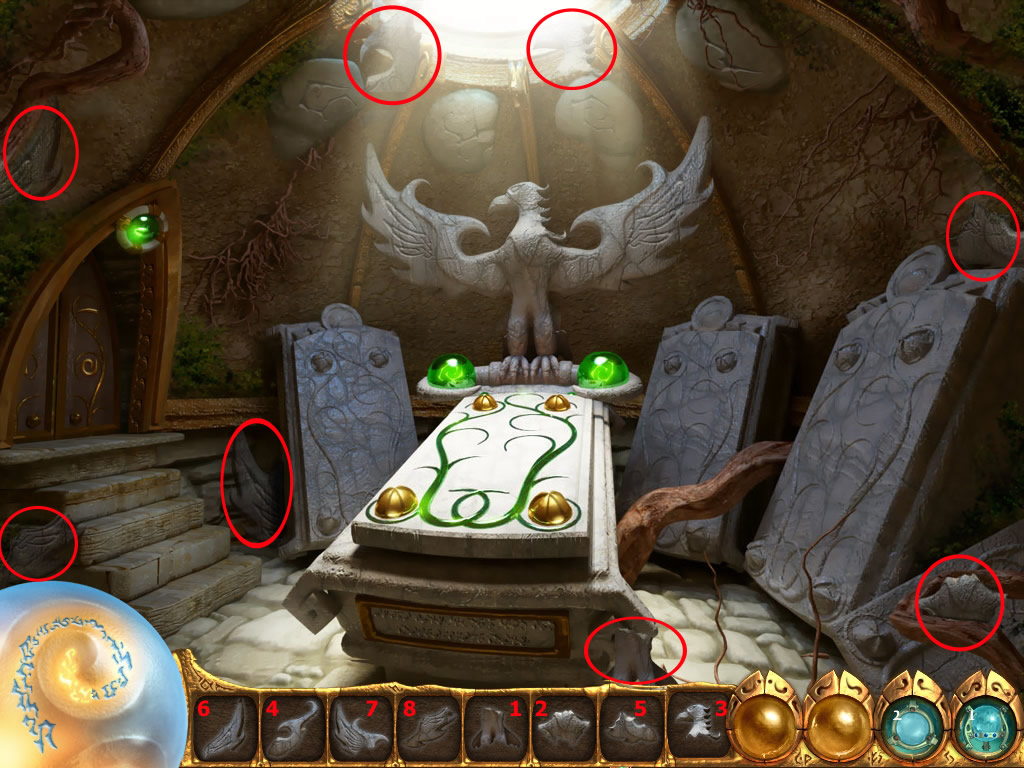
Find eight pieces of a statue.
The foot piece is already standing behind the head end of the sarcophagus.
Place the other pieces in the correct order and rebuild the statue.
Items and order
Now the sarcophagus is open. Click inside and a circle with bubbles open.
Find the objects and place them in the bubbles.
The wand is finally yours.
Items
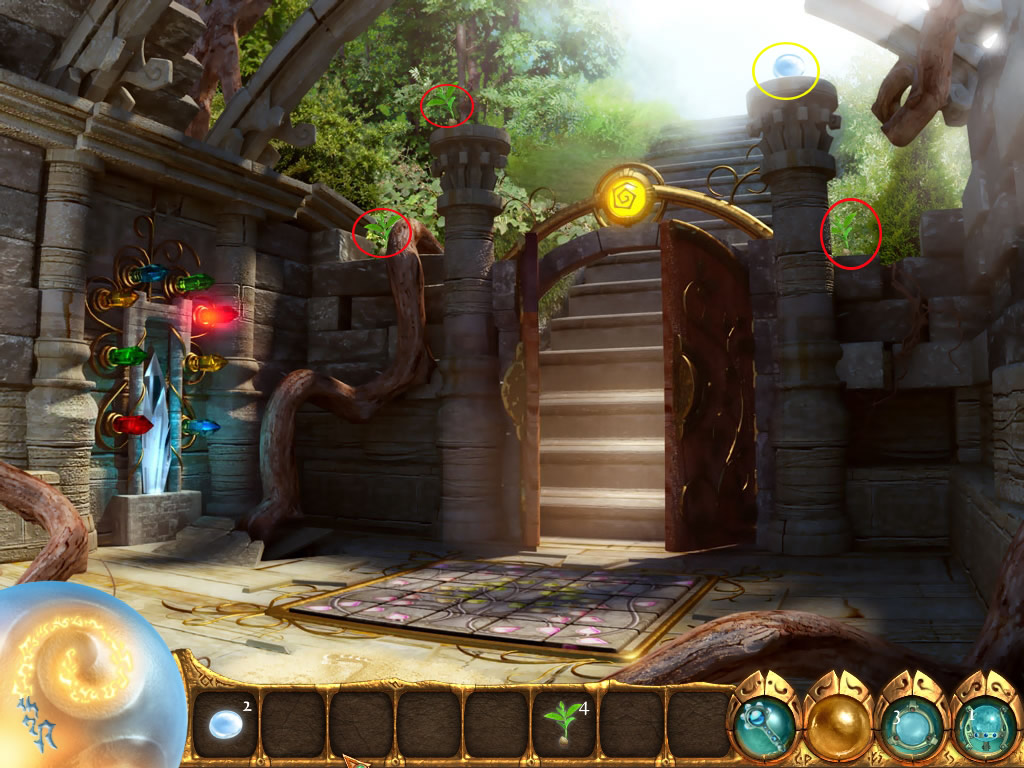
Click the door and follow the tutorial instructions.
Now you can leave through the door.
After talking with the tree, first get the chromatic lens, blending in with the tree trunk left side, middle.
Now use the arrow to the right.
You will have to assemble the map pieces, before you can move on.
Puzzle Solution
Before you enter the new location, go back to the glyph stone on the left side of your map.
Low right corner, in the grass, you will find a scrying orb. It takes place in your inventory.
This is a hint for puzzles inside the game. You will find several of them in different locations.
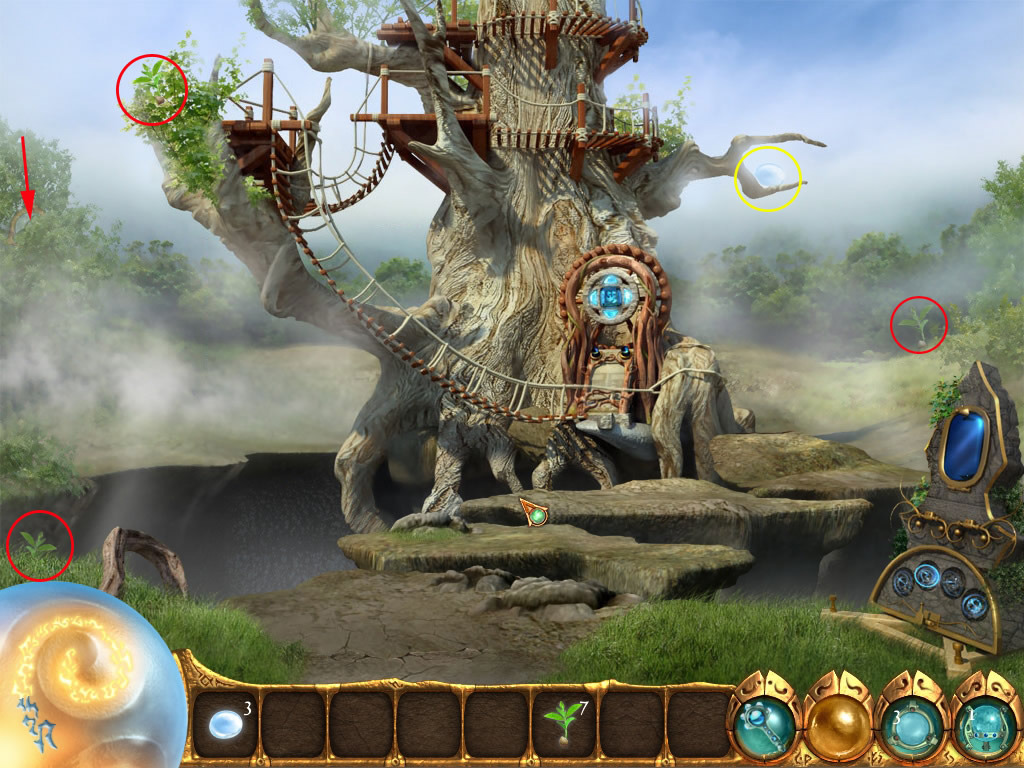
Go back to the map and choose the tree right up "Oracle's Hermitage"
Oracle's Hermitage - outside
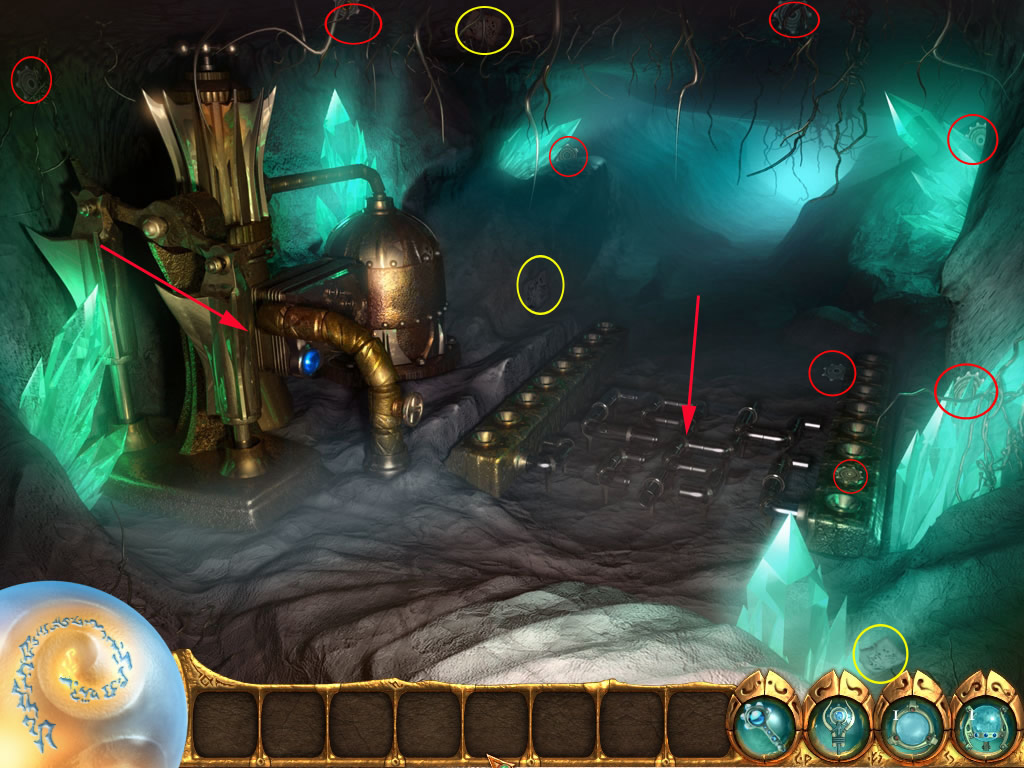
Grab the things, laying around, then click the stone machine in the low right corner.
Items
A puzzle will open. Click two tiles and they will swap places.
You will see the original pictures the hole time right upper corner in a good size, so that there is no really difficulty at all.
After finishing the first, you see, that a stone is "growing" out of the grass.
You will see items also, it's up to you, if you collect them at once, or wait till you finished the complete way over the abyss.
All in all, you have to click the machine three times, solving three different swap-puzzles.
Collect all the items and click the device at the tree.
A bubble-circle opens.
Place all items inside there.
Items
Now click it again and a puzzle will open.
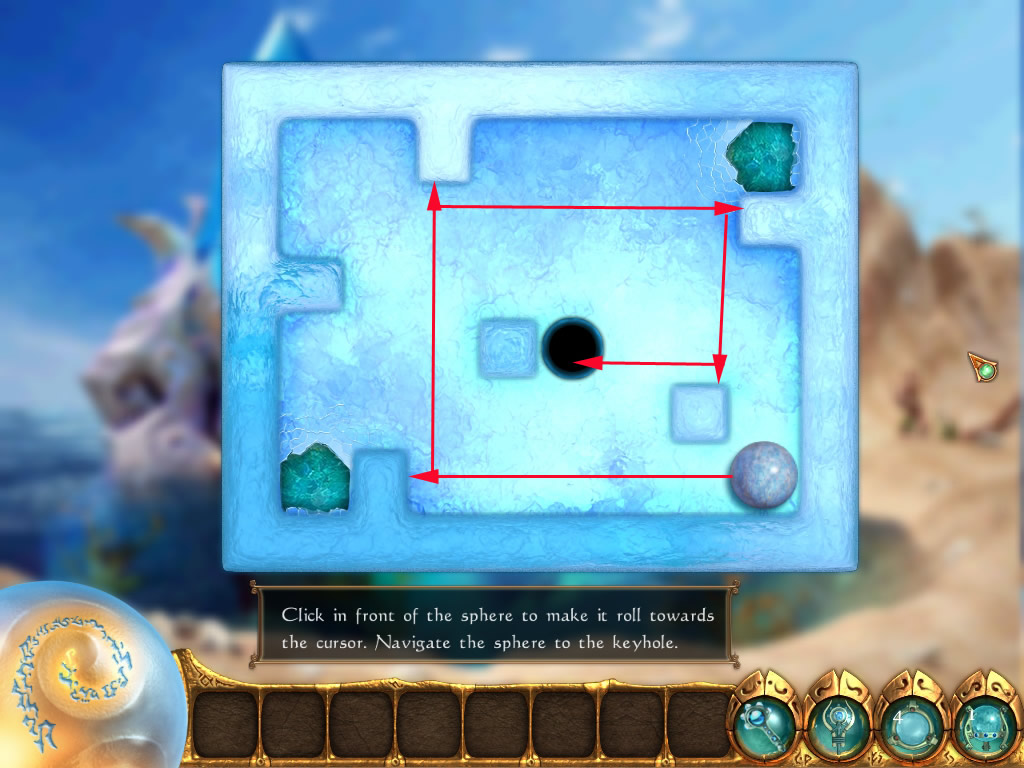
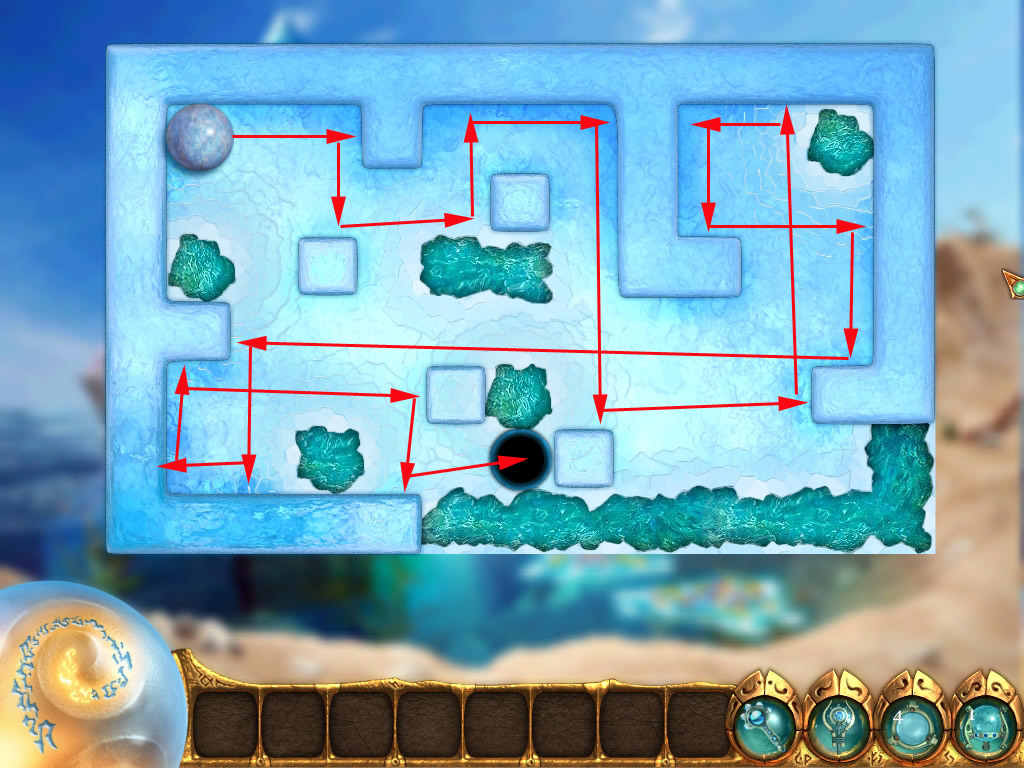
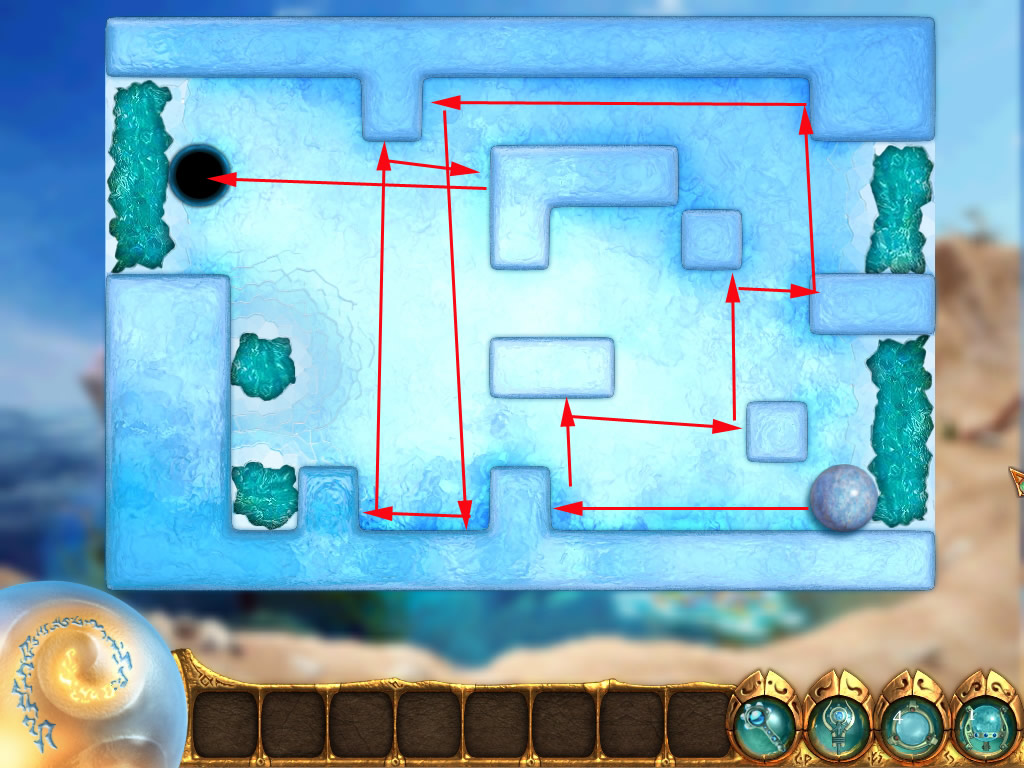
You have to bring the sphere into the hole by direct it with arrows, which appear, when you come near the ball with your mouse.
The sphere will always roll, till a part of the wall or another barrier will stop it.
After solving the puzzle a part of a rope bridge will appear.
Click the device again - you will have to solve four puzzles.
For the solutions please have a look at the screenshots.
Puzzle 1
Puzzle 2
Puzzle 3
Puzzle 4
Now go with your mouse on the top of the screen and use the yellow arrow to enter the Hermitage.
Oracle's Hermitage - inside
Its dark, but your wand is giving you a little lite.
Use the wand to find spheres and claw hands to put them in. They will give you light.
The screenshot shows you the locations of all you need.
Items
Now look around. You will find map pieces and music sheets.
Get a music sheet out of your inventory and place it on the organ.
A mini game opens.
Four drops will come down - you goal is it to click the key at the bottom after the drop came over the horizontal line.
Puzzle Example
As this, you will play a little melody, which opens one of the closet door.
Inside the closet doors you will find items.
You can collect them or leave them inside, till you played all six melodies.
Now click the telescope, a bubble circle will appear.
Place the objects in the bubbles and use the key, you found to open the window behind the telescope.
Items
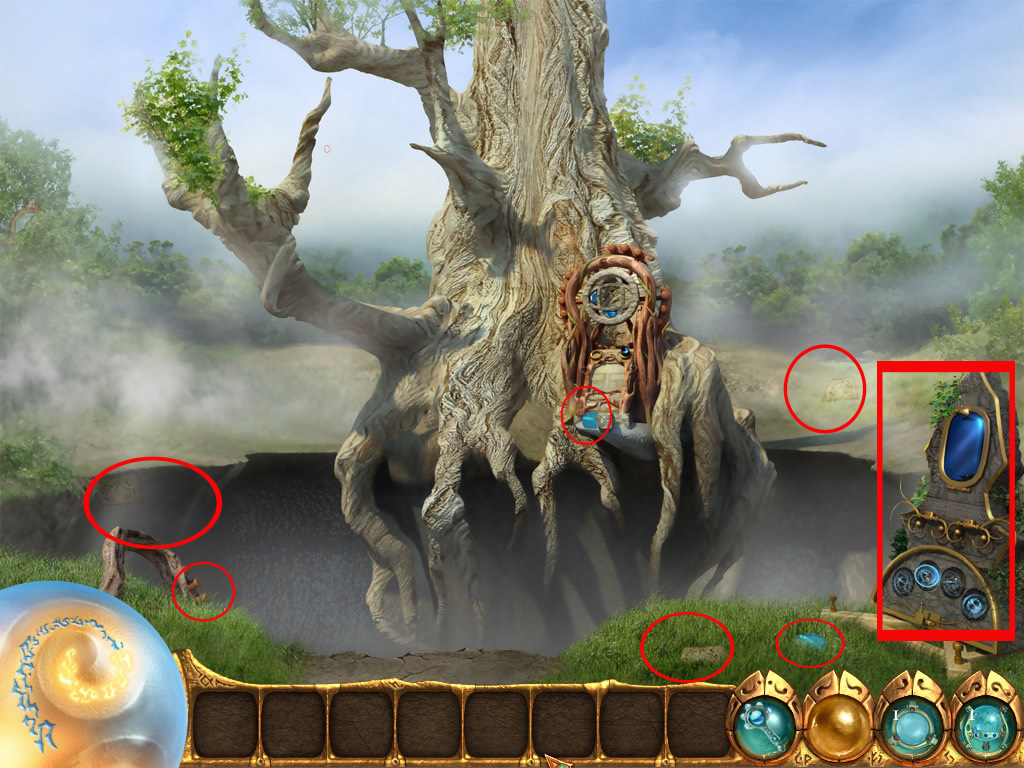
Now click the telescope, you will see a glyph stone, but not the one you already saw.
Map piece location
Get the map piece from the middle of the glyph stone.
Leave the Hermitage and have a look at the outside of the tree. You will see two more map pieces.
Map pieces
Before you can go further on now, you will have to assemble the map pieces
Map
Now go to the map and choose the wooden glyph stone.
Wooden Glyphstone
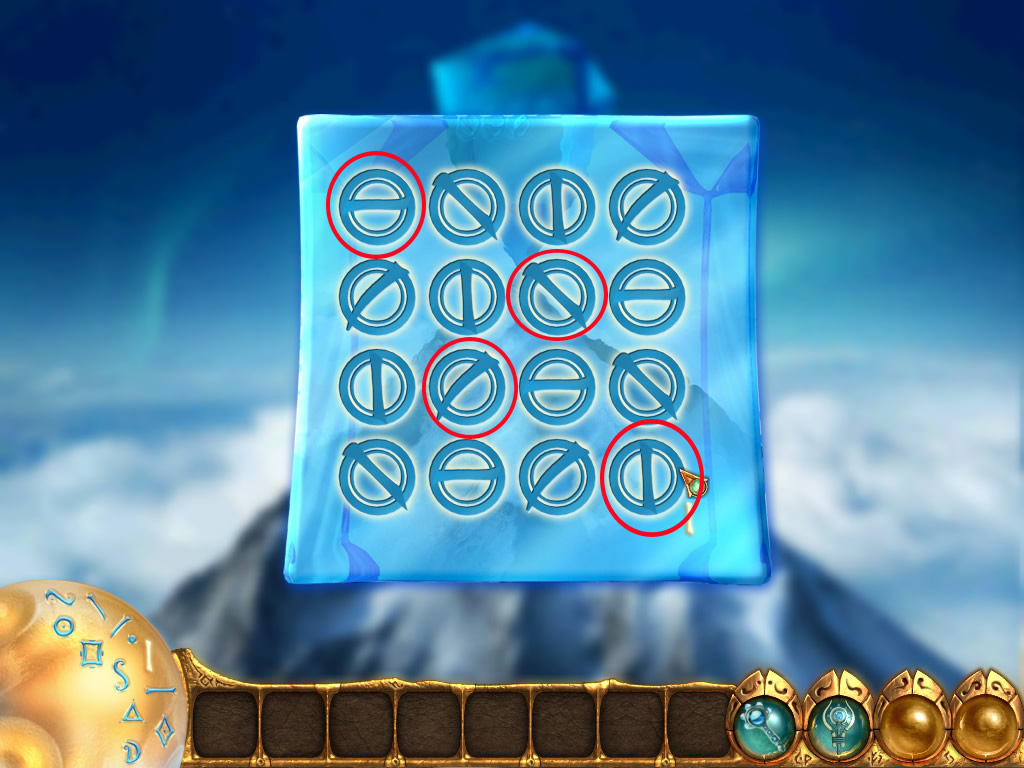
Use your magic wand first to make all roots disappear by clicking on it.
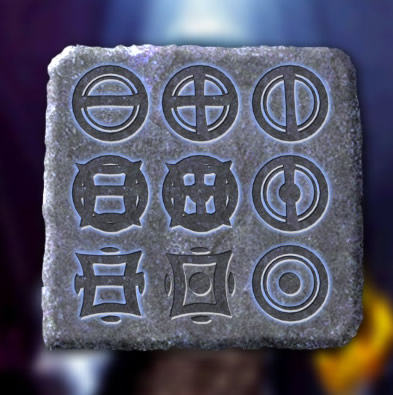
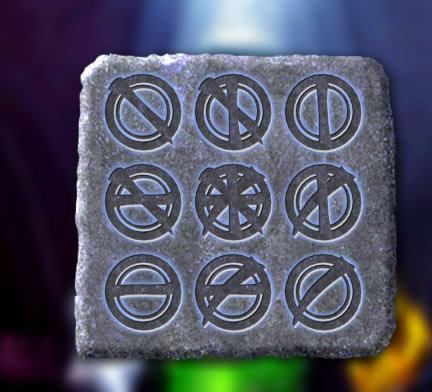
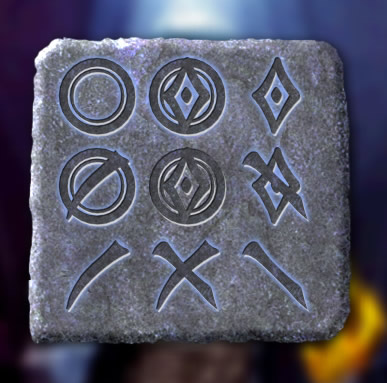
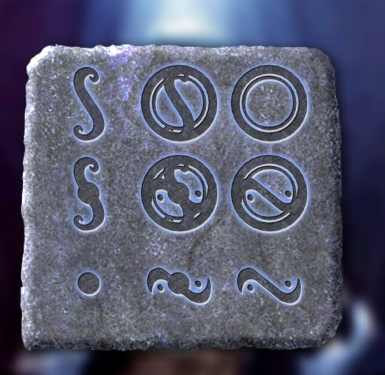
Now use the magic wand to choose the right signs for drawing the missing symbols.
Each row is missing one symbol.
Find out, how it has to look.
When you know what is missing, look for the right signs at the left.
Click a sign and click it on the empty spot.
It does not matter, in which order you do it.
Making more than three mistake will cause a restart.
When you click another one, it will automatically change.
Puzzle solution
A new location has opened on the map. Go there.
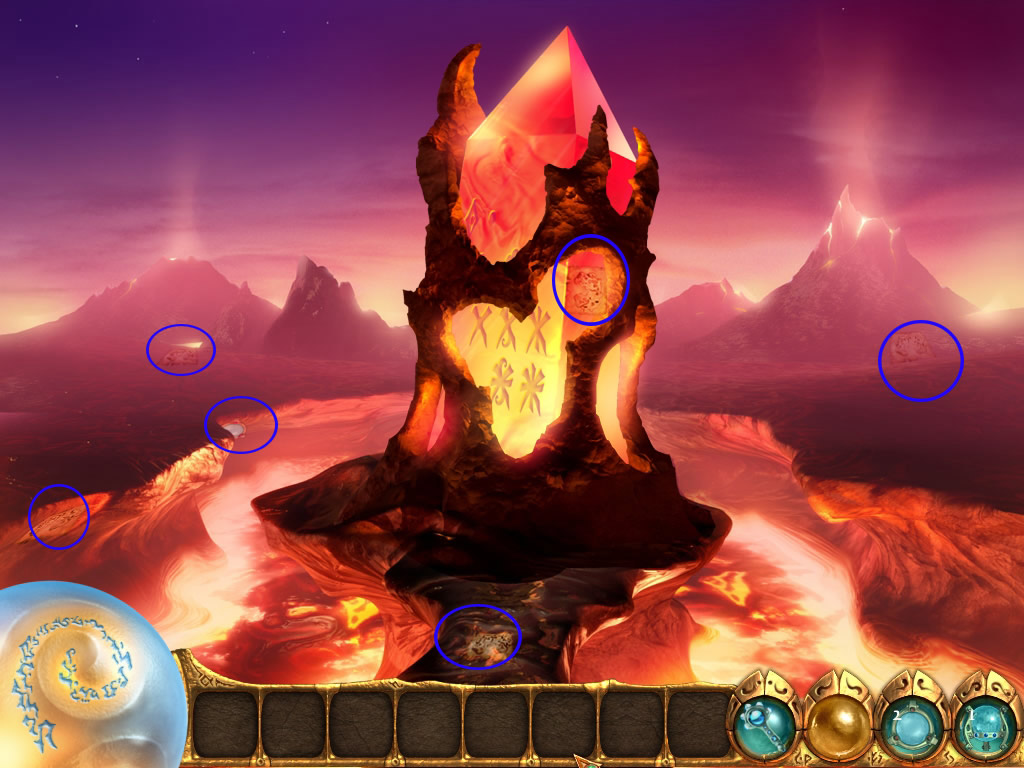
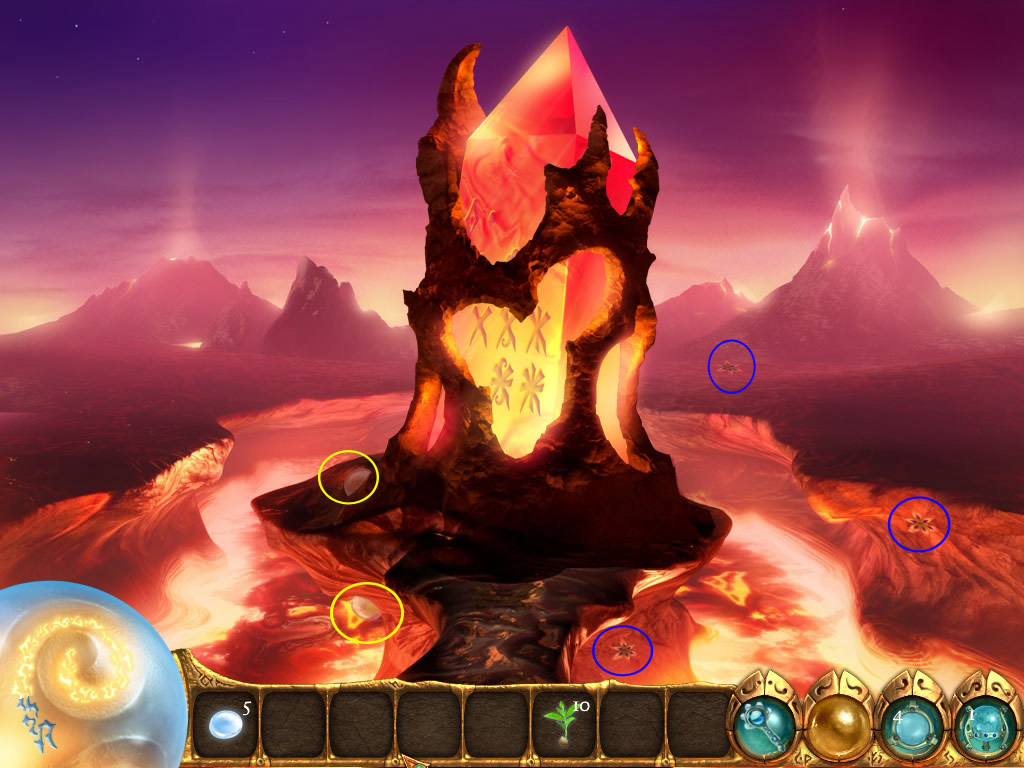
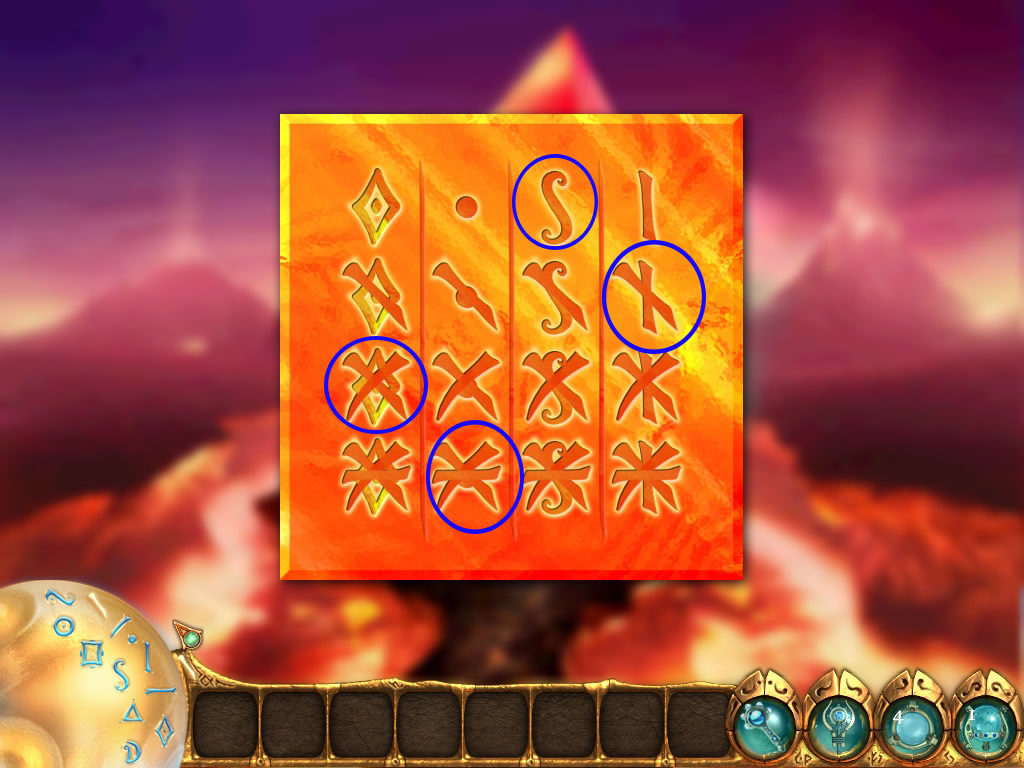
Fire Glyphstone
Look for 5 map pieces, after that return to the map.
Map pieces
You have to assemble your next location.
Map
Go to your new location: Hall of Brotherhood
Hall of Brotherhood
Look for five map pieces, then use the arrow to go to the map.
Map pieces
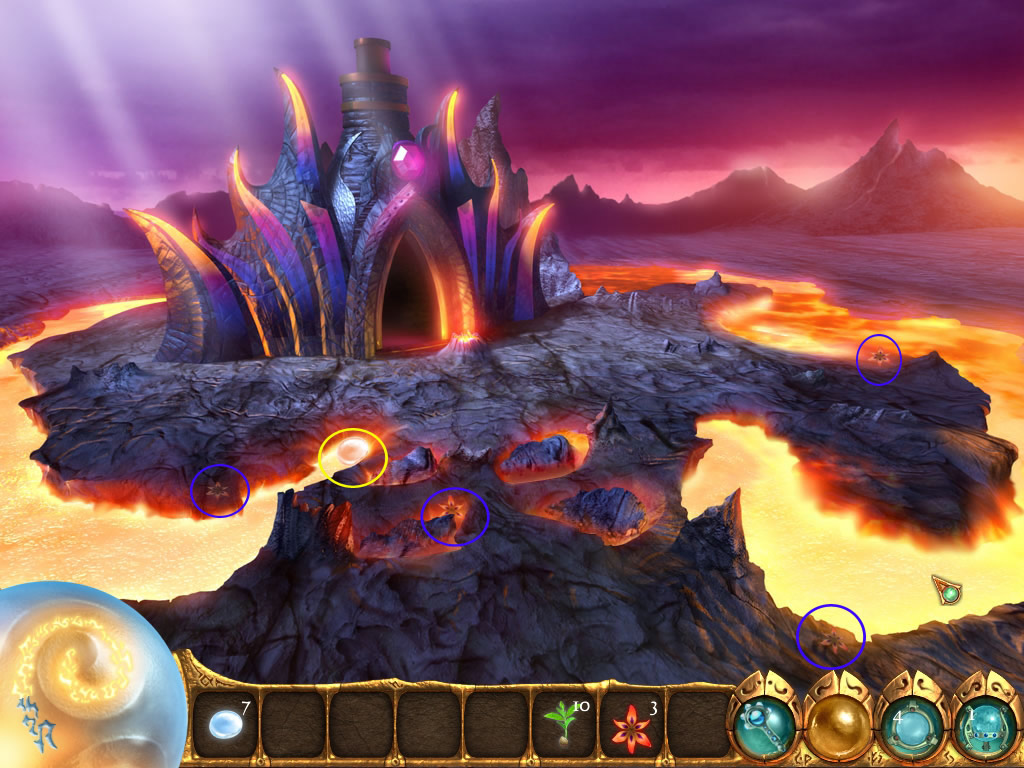
Go to your new location: Heart of Burning Power
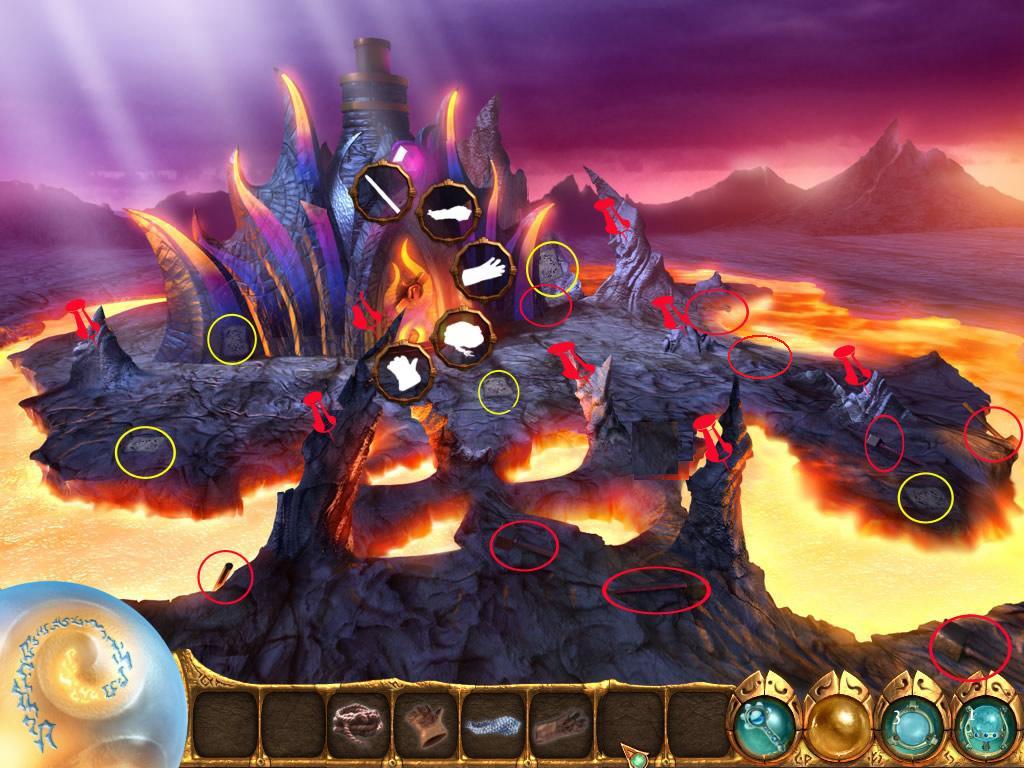
Hearth of Burning Power
You need to find a way to reach the door, but swimming is no option.
Look for the four hammers, located at the lower part of the scene.
Use them to smash the rocks, that are in the way.
Now find four more hammers and smash the other rocks.
You will find items in there.
Collect also five map pieces.
Click the door and a bubble-circle opens.
Place the items in there.
Map pieces
Click the door and you will get a pop up window for a closer look.
You will have to open the lock.
To do so, you need to bring the inner and outer lock in the middle into a vertical position.
But when you click on of the locks, the other one also moves, but not in the same way.
Click both locks, till you found the right solution.
It seems to be random, but I had it twice, that I needed to click the outer lock 3 times and 2 times the inner lock.
The door is open, you may enter.
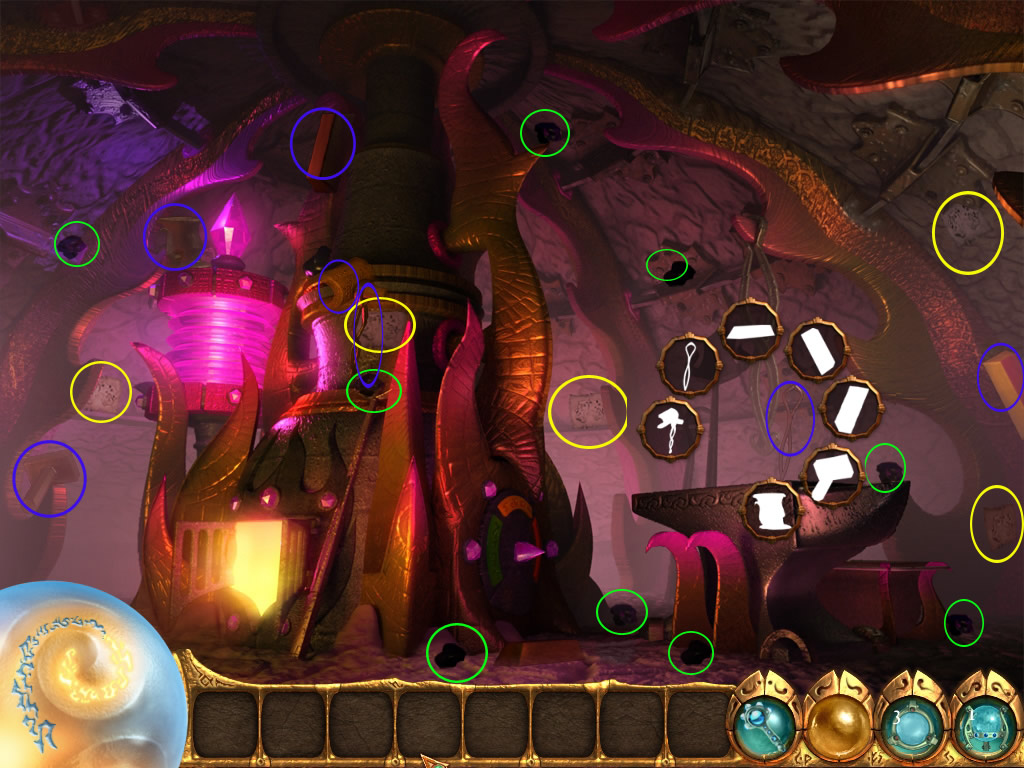
Hearth of Burning Power-inside
Find 9 pieces of coal and place them in the oven.
Find 5 map pieces.
Click the chimney to fix the cracks - a pop up window opens.
Use your magic wand to draw the glyphs.
Just make sure that you stay inside the outer lines.
If you done it well, the glyph will get another color.
Puzzle Solution
When you are done, click the anvil - a bubble-circle will open.
Look for the supplies and place them in the according bubbles.
Click the anvil for another mini game.
You need to click the appearing red dots with the hammer.
It does not matter, if you miss once a while, just do it, till the bar at the bottom of the pop up window is full.
You made an iron rod.
All items
Click the arrow to leave.
You will have to assemble your new location.
Map
You are not able to go there yet, go back the Hall of Brotherhood.
Hall of Brotherhood
Give the oracle the rod.
You learn, that you now have to visit Oakbread in the Ancient Barrow for more needed items.
Go to the map and choose the Ancient Barrow.
Ancient Barrow
Oakbread is willing to give you the needed supplies in trade for:
10 Seeds of Renewal - growing everywhere in the woods.
10 Fire bloom Flowers - growing only in the Hearth of Fire.
10 Kurosion Crystals - laying around everywhere.
You have to go back to nearly all locations:
Ancient Barrow - outside
Ancient Barrow - inside
Woodshrine
Hermitage - outside
Hermitage - inside
Fire Glyph
Brotherhood
Hearth of Fire - outside
Hearth of Fire - inside
After finding all, bring it back to Oakbread.
He will give you the needed items.
Return to the Hall of Brotherhood and after this to the Fire Glyphstone
Fire Glyphstone
Remove the stones around the Glyphstone and draw the missing symbols.
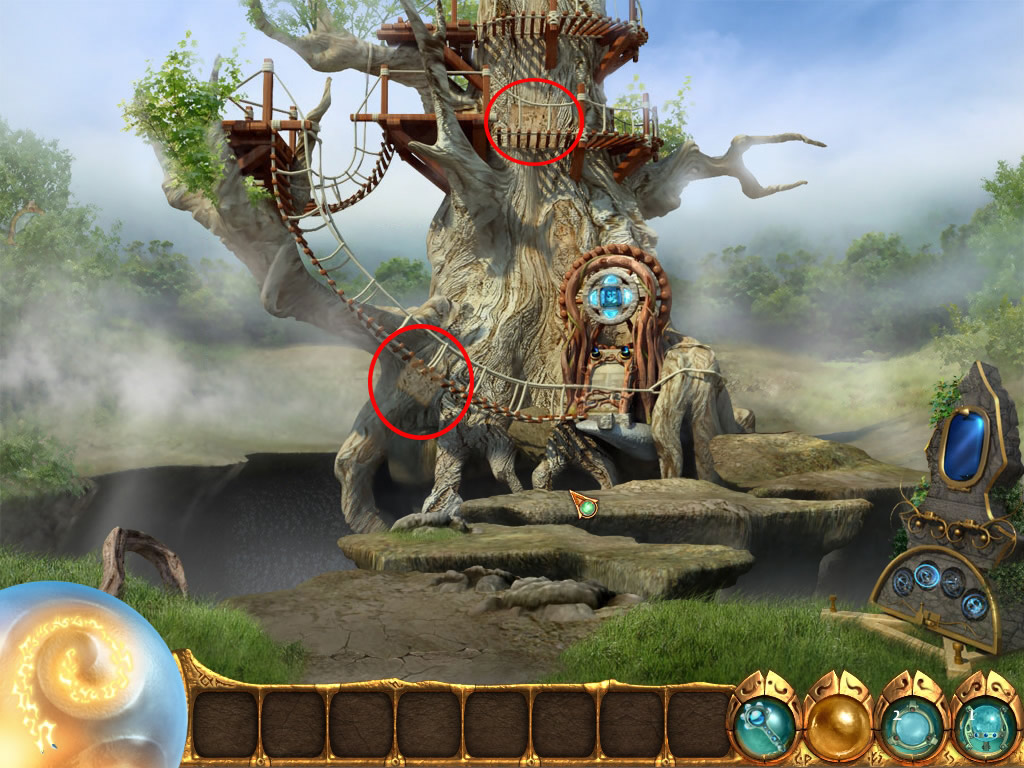
Hermitage - outside
You will be teleported to your next location, the water realm.
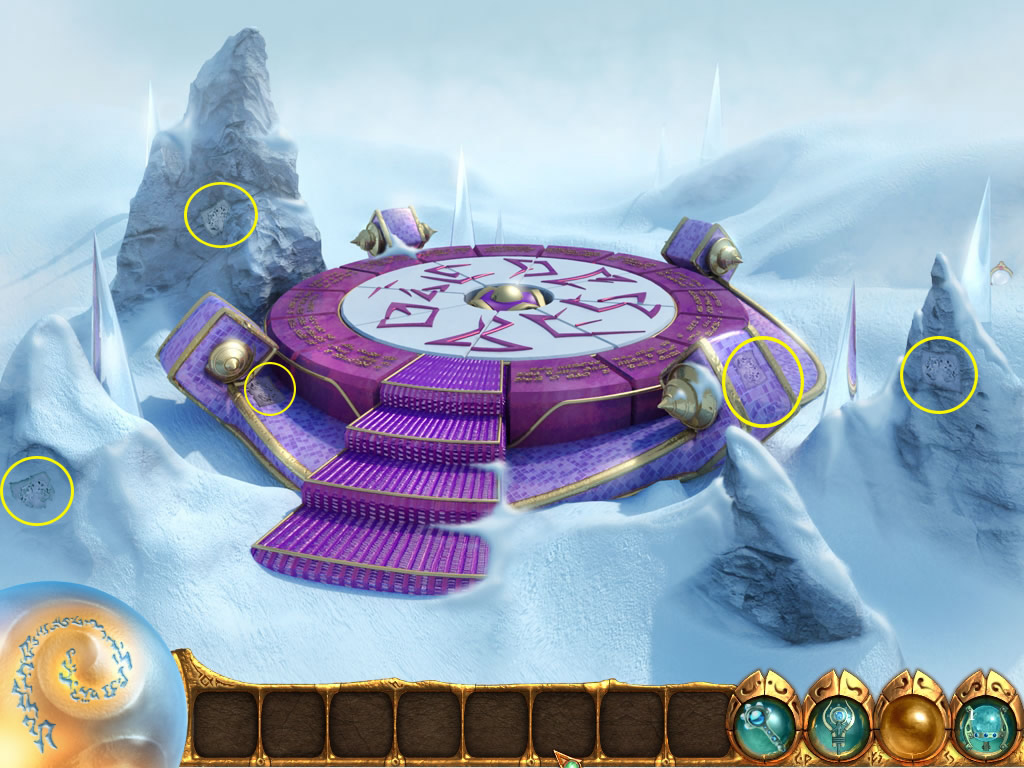
Water Glyphstone
Find the five map pieces.
Go to the map and enter the Frozen Obelisk.
Frozen Obelisk
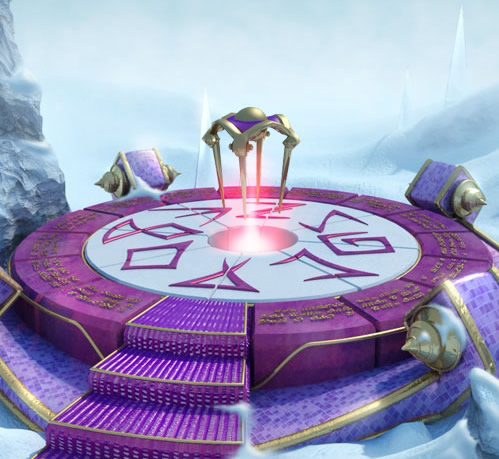
Click the machine at the back right side and find the items for the circle-bubbles.
After that you will have to play the sphere game again.
Pull the lever of the machine and a puzzle appears.
After solving the first puzzle a part of a way over the waters appears.
You will have to solve four puzzles
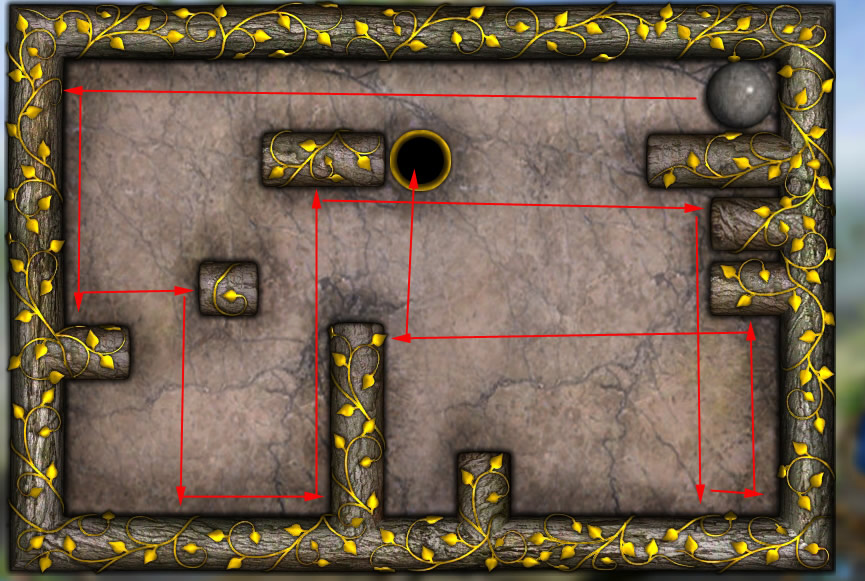
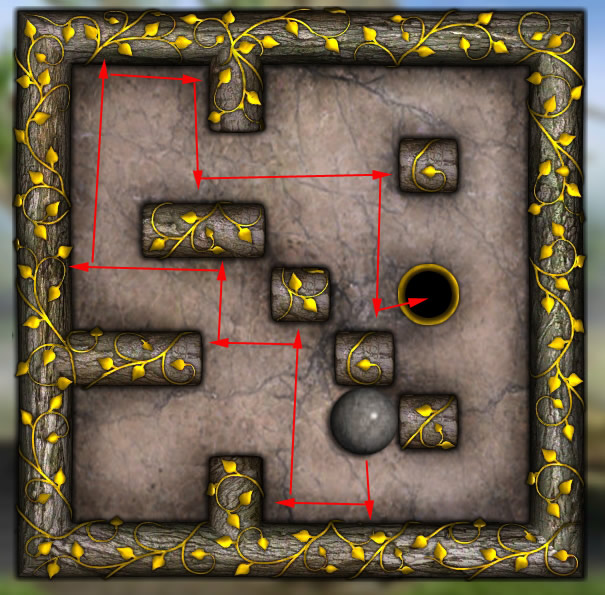
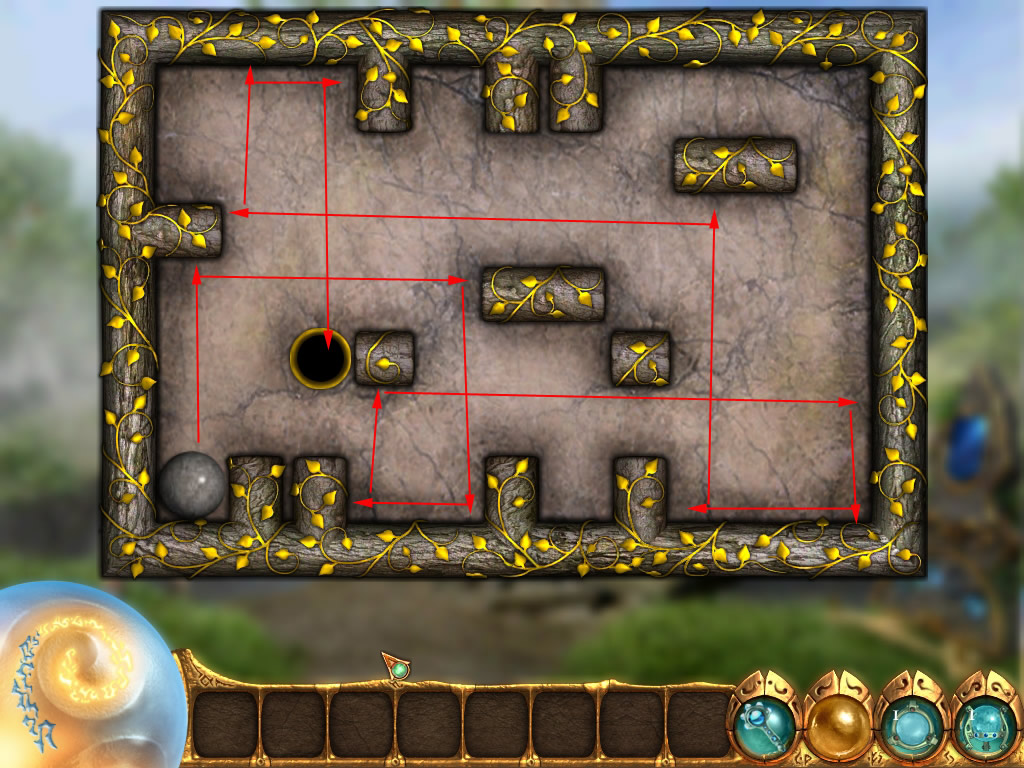
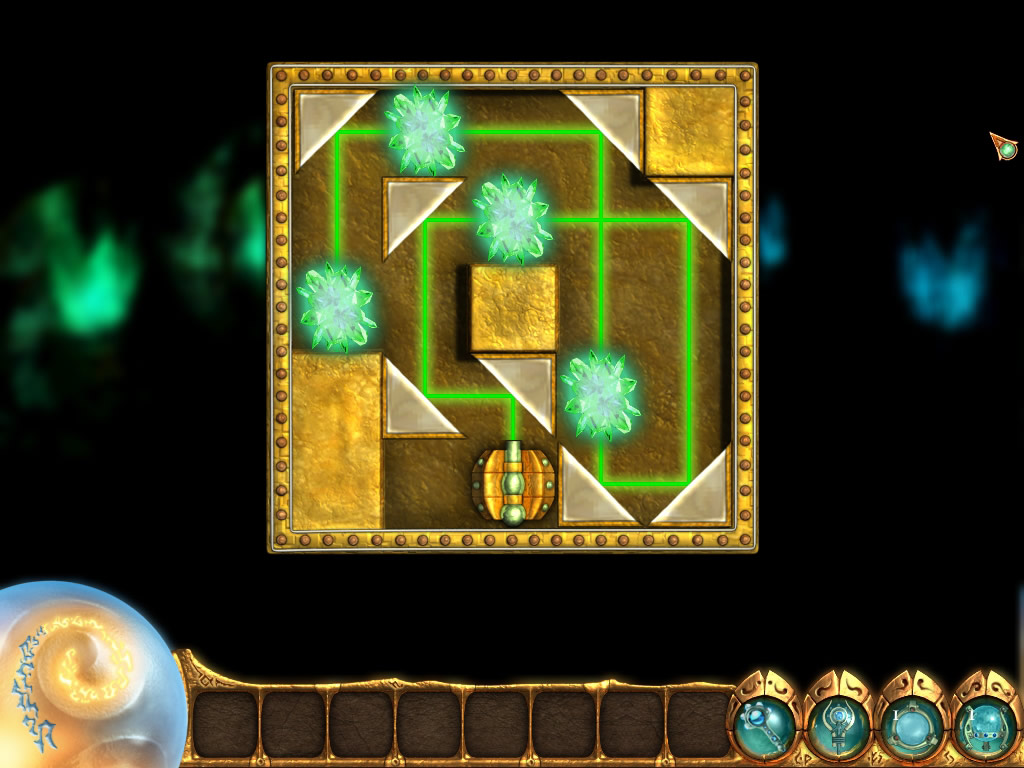
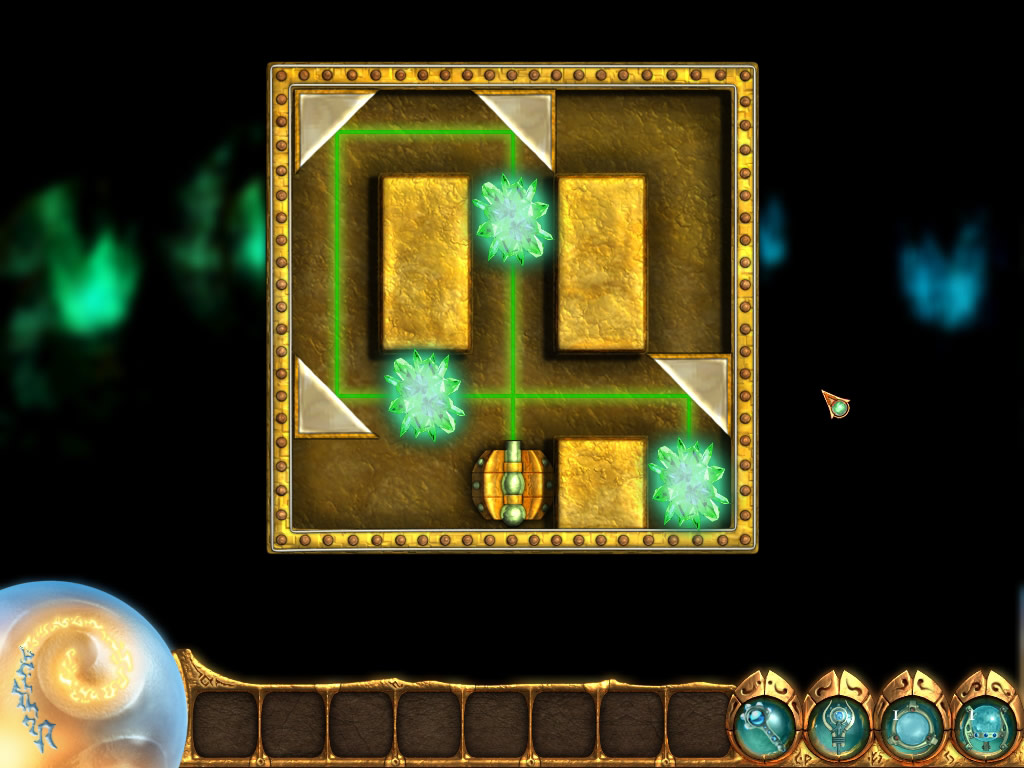
Puzzle Solution 1
Puzzle Solution 1
Puzzle Solution 1
Puzzle Solution 1
Now find the four map pieces and get the frozen fifth in the middle of the obelisk with the scepter.
Click the jar at the bottom of the obelisk and leave the location.
Items
You will have to assemble your next location
Map
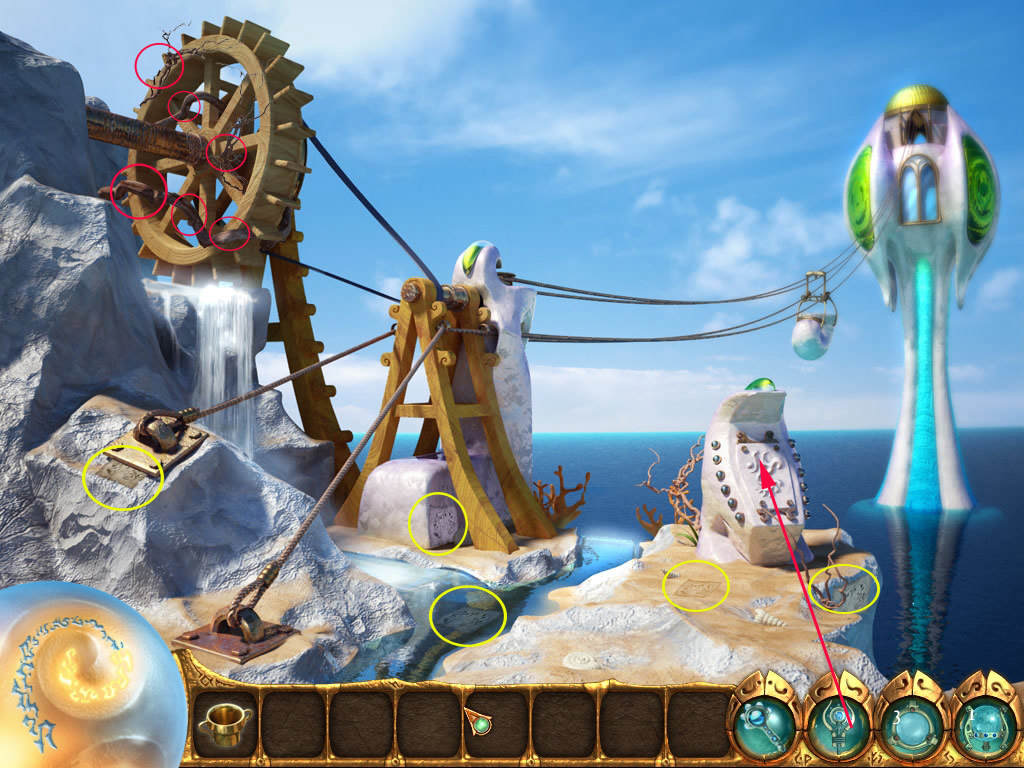
Move on to Farseer's Tower
Farseer's Tower - outside
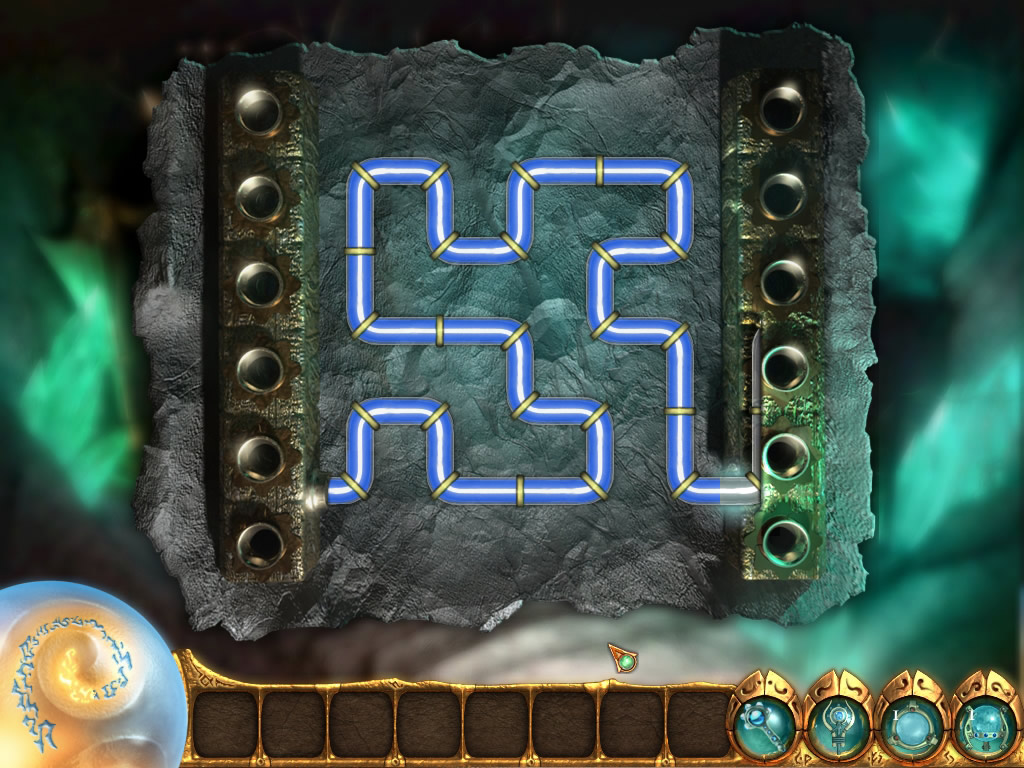
Click the water wheel and find the items for the circle-bubbles.
Look also for your map pieces.
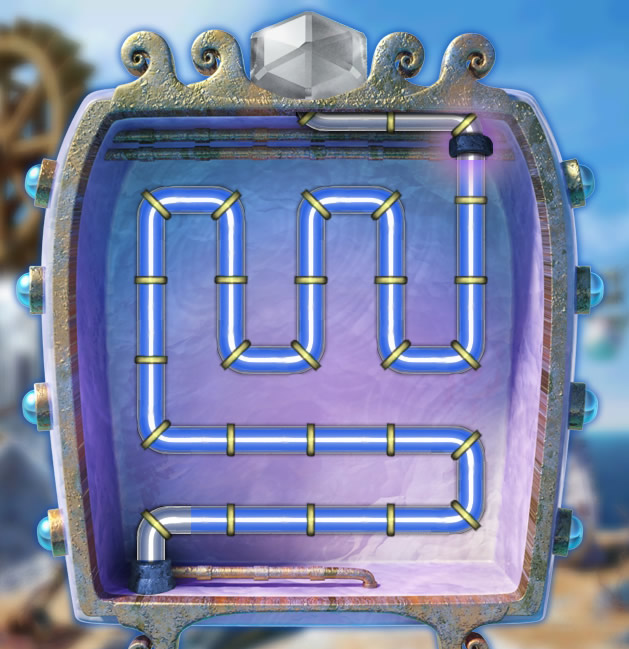
When the water is running, click the device right with your scepter.
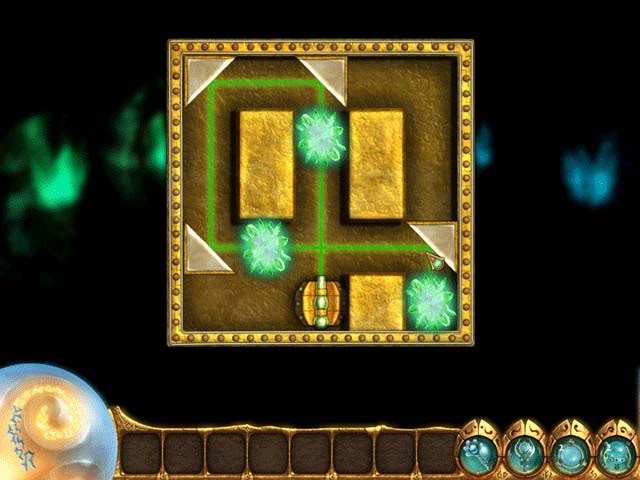
A mini game opens - turn the pipe parts till all tiles are connected and the water can flow.
The little cabin arrives and you can click it to move to the tower.
Puzzle Solution
Items
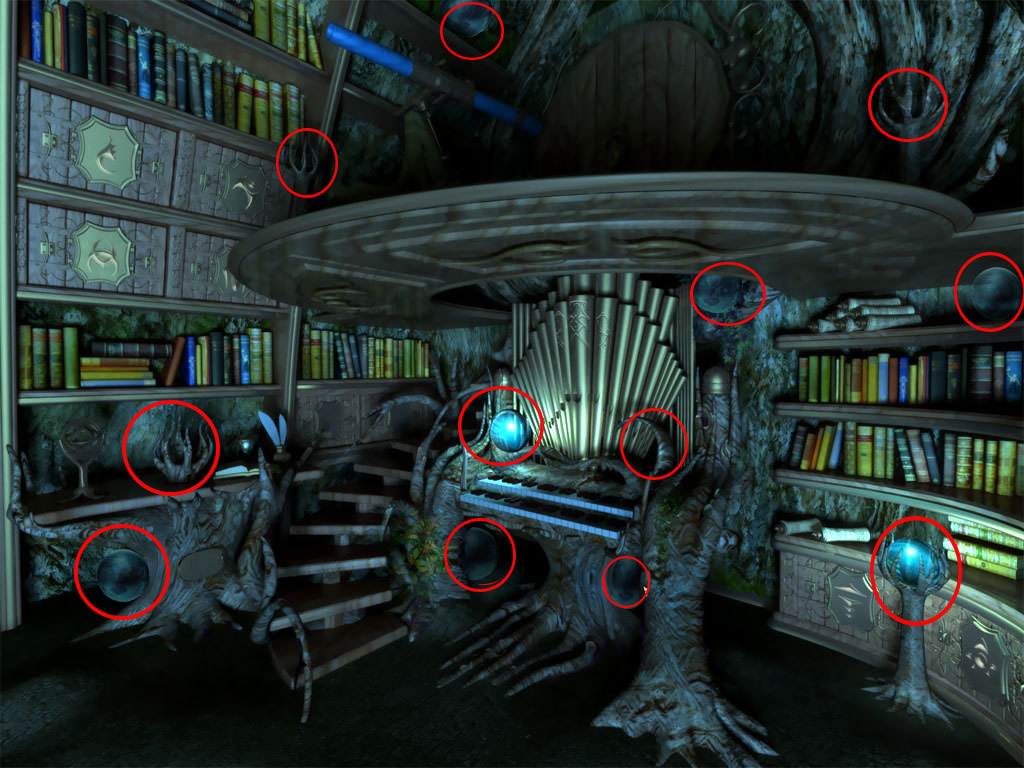
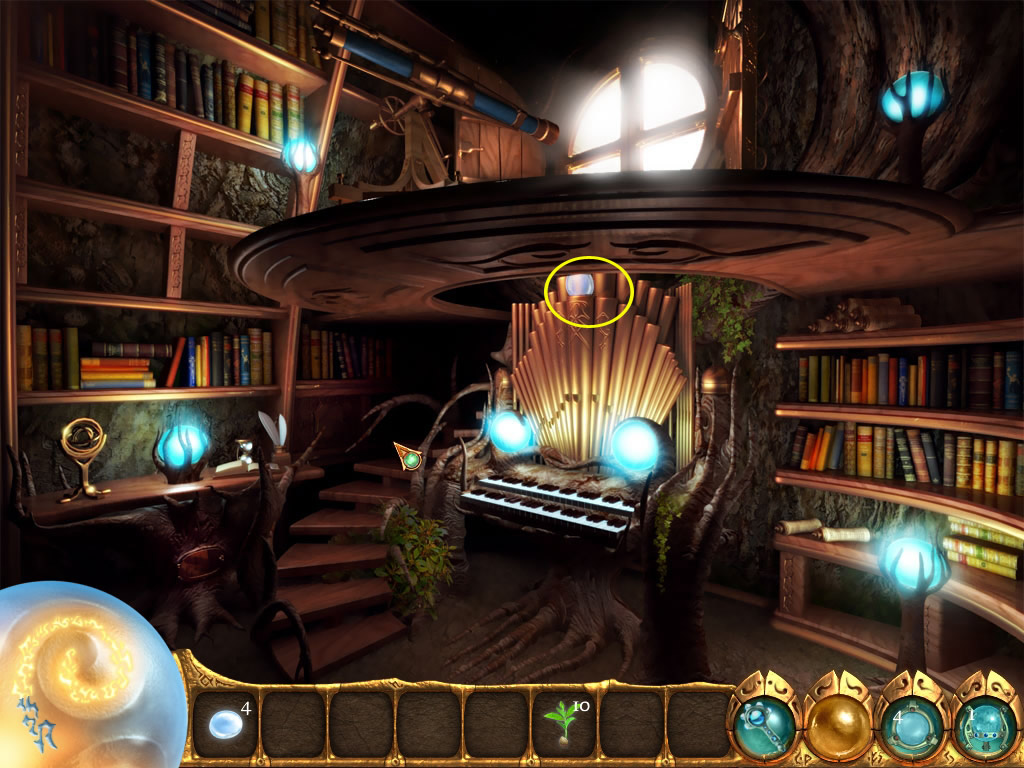
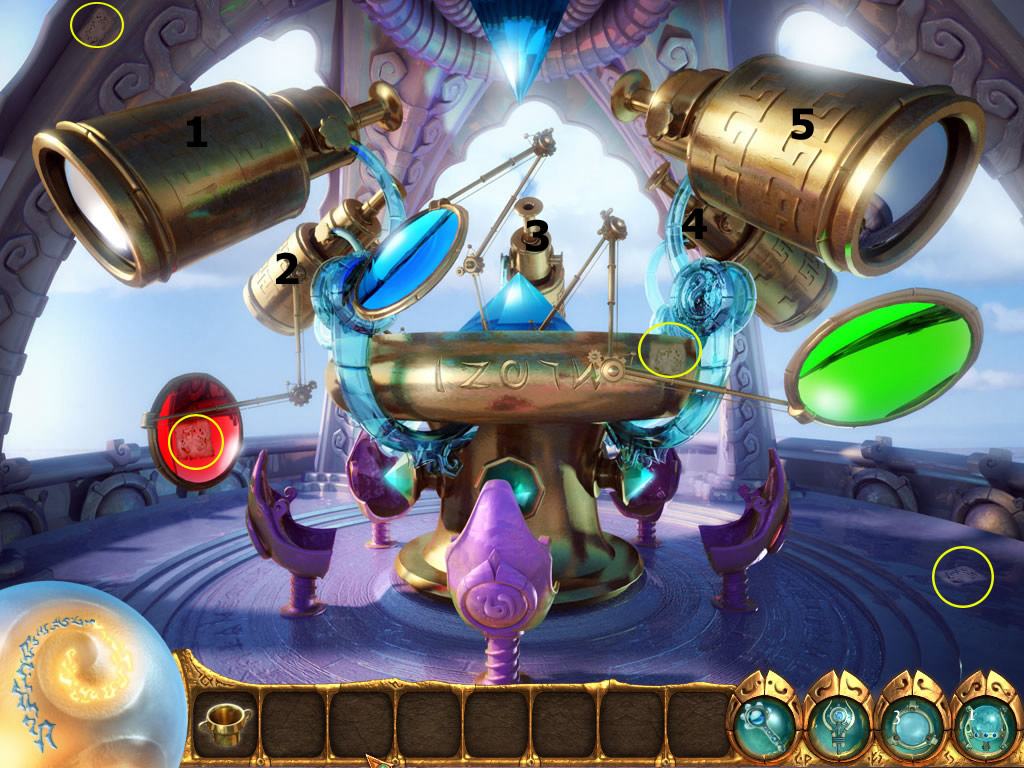
Farseer's Tower - inside
Find the four map pieces - the fifth you will be rewarded with, when you finished the following challenge.
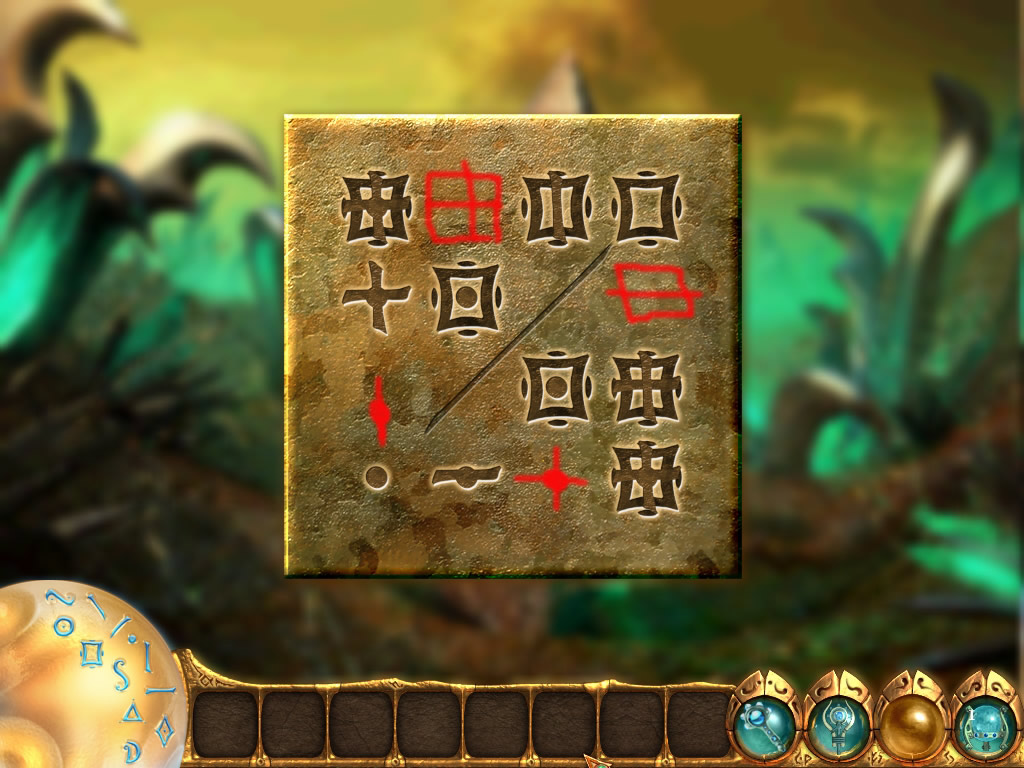
Click the left telescope (1 in the screenshot) and a mini game window will open.
You see a lens with a picture inside.
At the right you see three colored buttons.
When you click one of the button, the color will appear inside the lens.
Find the right color or combination of colors to make a glyph appear.
After a glyph appeared, click it.
The lens will be closed and the glyph appears in the room.
Take your wand and draw the lines of the wall, till it appears at the table in the middle.
For 1: blue and yellow.
Seen clockwise: 2: blue, pink and yellow.
3: blue.
4: pink.
5: blue and pink.
Map Pieces
Go back to the frozen obelisk.
Farseer's Tower - inside
Fill the jug in the water and place it back at the bottom of the obelisk.
The water freezes, get it out and place it at the broken spot.
Go to the Water Glyphstone
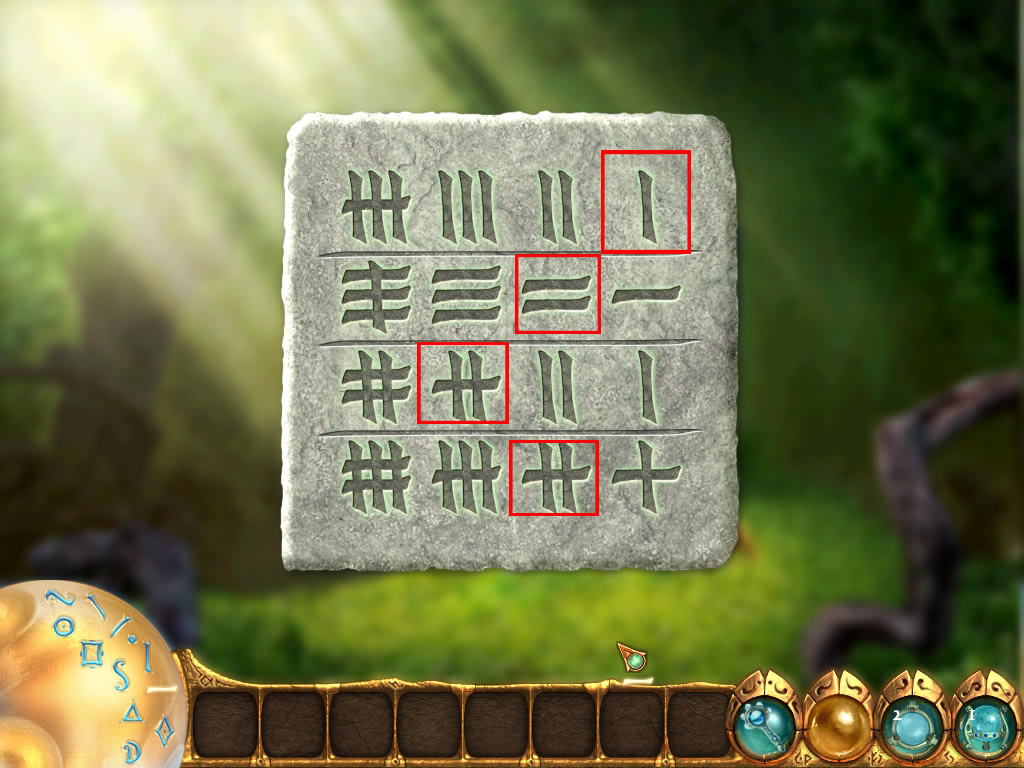
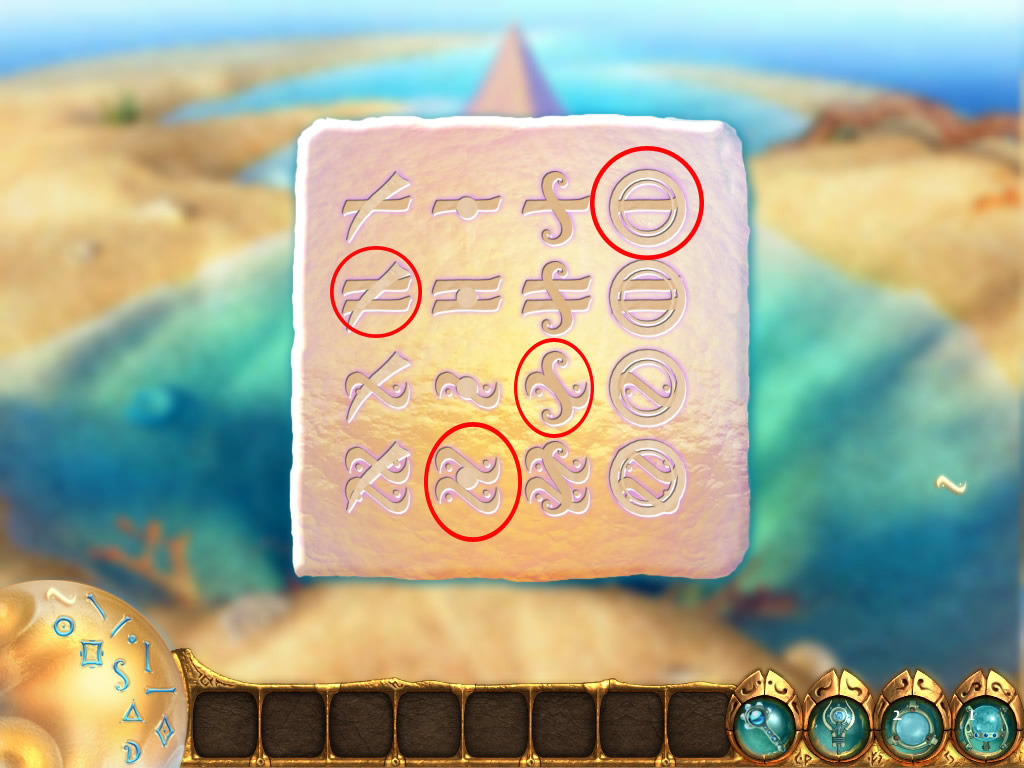
Water Glyphstone
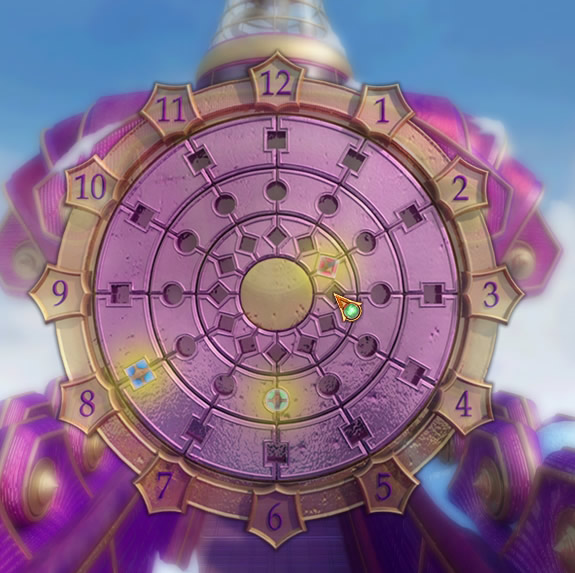
Click the glyph stone with your wand, till it is completely out of the water.
Find the right signs for your glyphs.
Puzzle Solution
Metal Glyphstone
You can't do any here right now, go back to the map and choose the obsidian Hold.
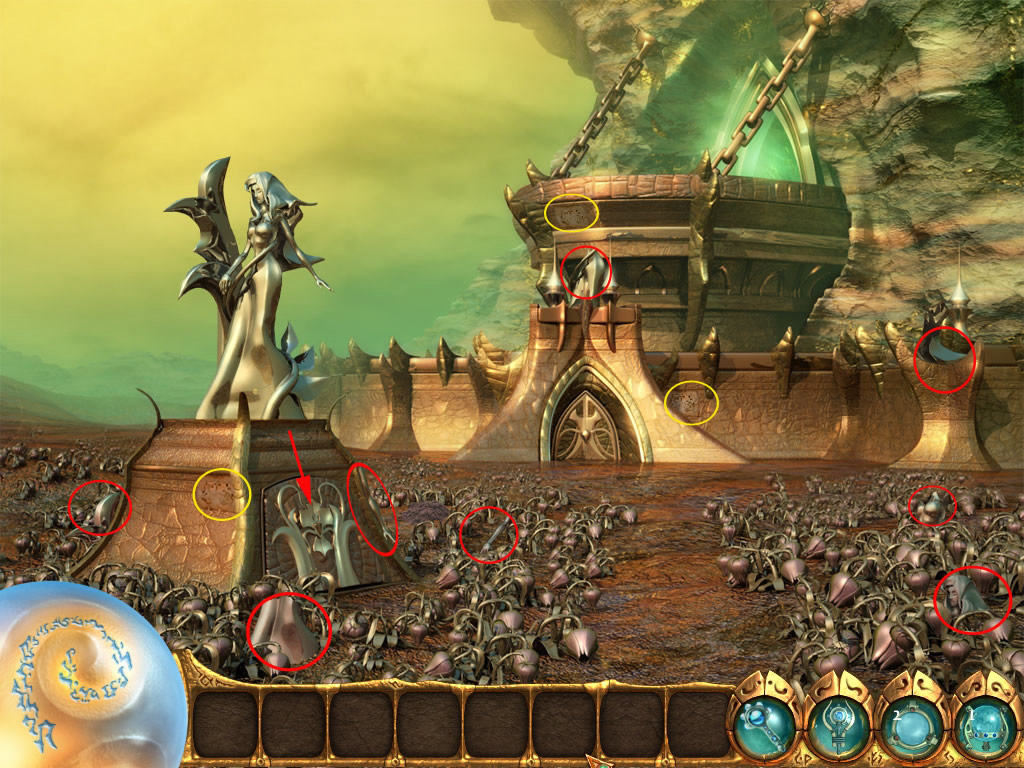
obsidian Hold - outside
The guardian wants you make his lilies bloom again.
Also find 3 map pieces.
Look for 8 pieces of a statue and reassemble the statue on the pedestal again.
Items
When you are done, a door at the pedestal will open.
Click the open door.
obsidian Hold - Machine Room
Find eight gears and three map pieces.
Items
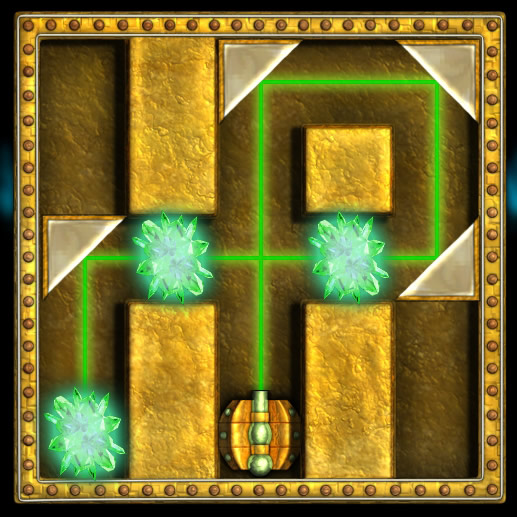
Click the machine at the left - a mini game opens.
Place the gears, so that all gears are moving, including the one upper left and lower right side.
Puzzle Solution
Now click the pipes left side and turn all pipe tiles, till the water can flow from one side to the other.
Puzzle Solution
Leave the machine room
obsidian Hold - outside
The Guardian wants a silver Lilly as proof.
With your scepter you can get one.
Click it onto the guardian.
Now you are allowed to enter the obsidian Hold
obsidian Hold - inside
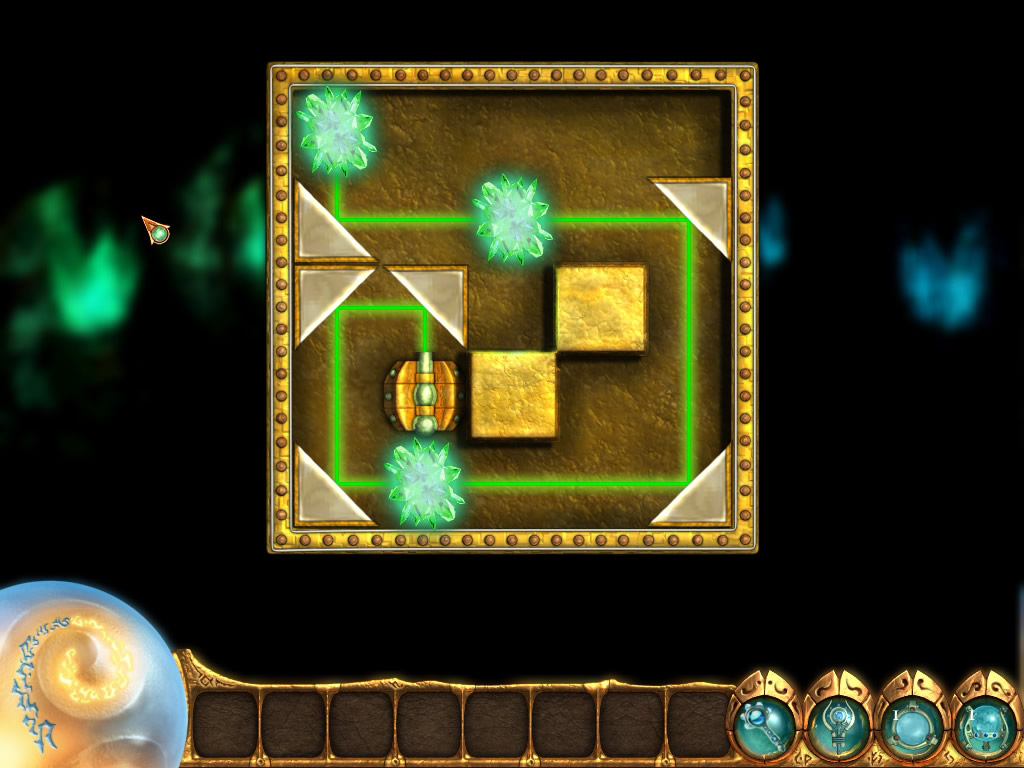
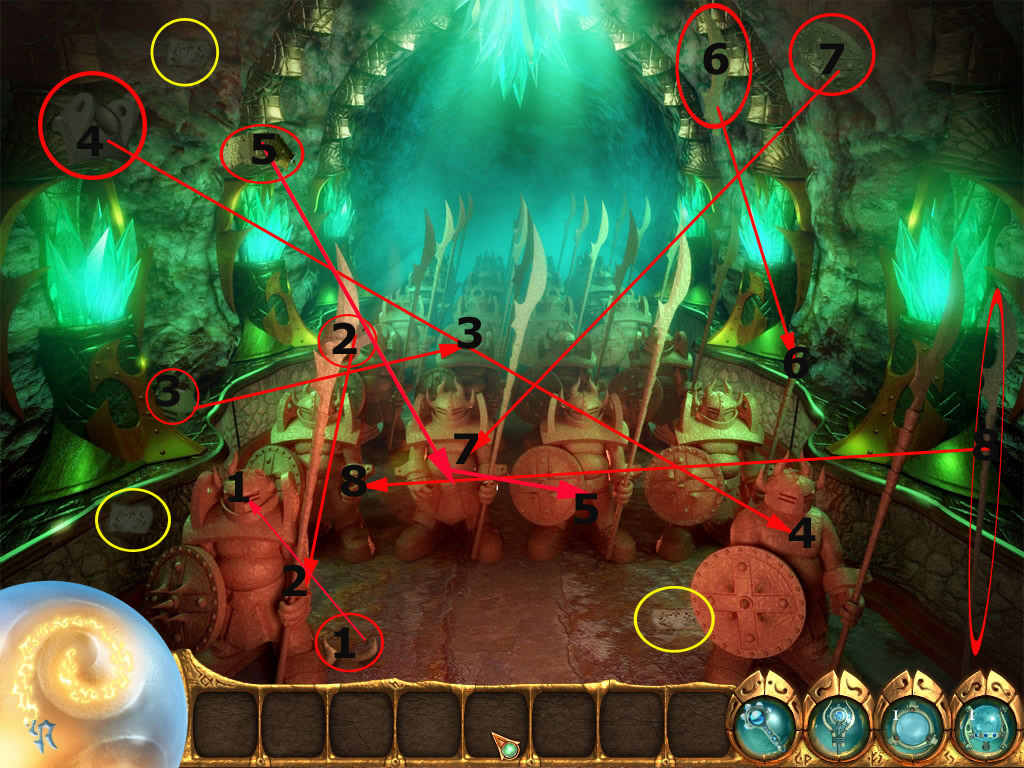
Click the crystals - each one contains a mirror game.
Place the mirrors, so that the beam will light all crystals on the board.
Solutions are seen from left to right.
Puzzle Solution 1
Puzzle Solution 2
Puzzle Solution 3
Puzzle Solution 4
Puzzle Solution 5
Puzzle Solution 6
Look for the pieces, the guardians are missing and replace them after.
Also find three map pieces
Items
You will get a map piece as reward.
Move to the Metal Glyphstone.
Metal Glyphstone
Draw the missing symbols
Puzzle Solution
You will be teleported to the Aether Glyphstone.
Aether Glyphstone
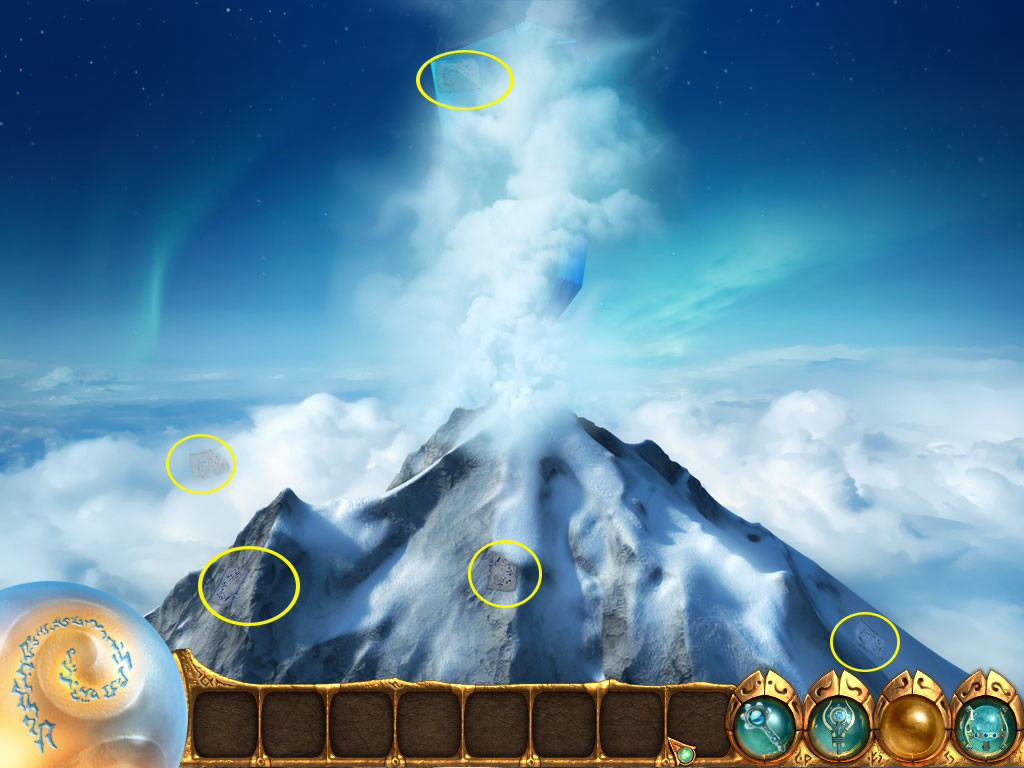
Collect the five map pieces.
Map Pieces
Go to the map and choose The Wheel of Time on the Map
The Wheel of Time
Collect the five map pieces
Map Pieces
Click the wheel.
You have to reassemble the wheel by clicking to tiles to swap places.
Puzzle Solution
Click the wheel again and find the nine differences.
Find them on the right side and replace that item on the left side
Puzzle Solution
Move on to the location Library of the Old Ones
Library of the Old Ones - outside
Find the five map pieces.
Click the bag and find the items.
Items
The key appears at the low left side.
To get the other two keys just visit Farseer in the water- and the Guardian in the metal realm.
Click the clock at the gate and place the keys in the according slots.
Puzzle Solution
Now you can enter the library
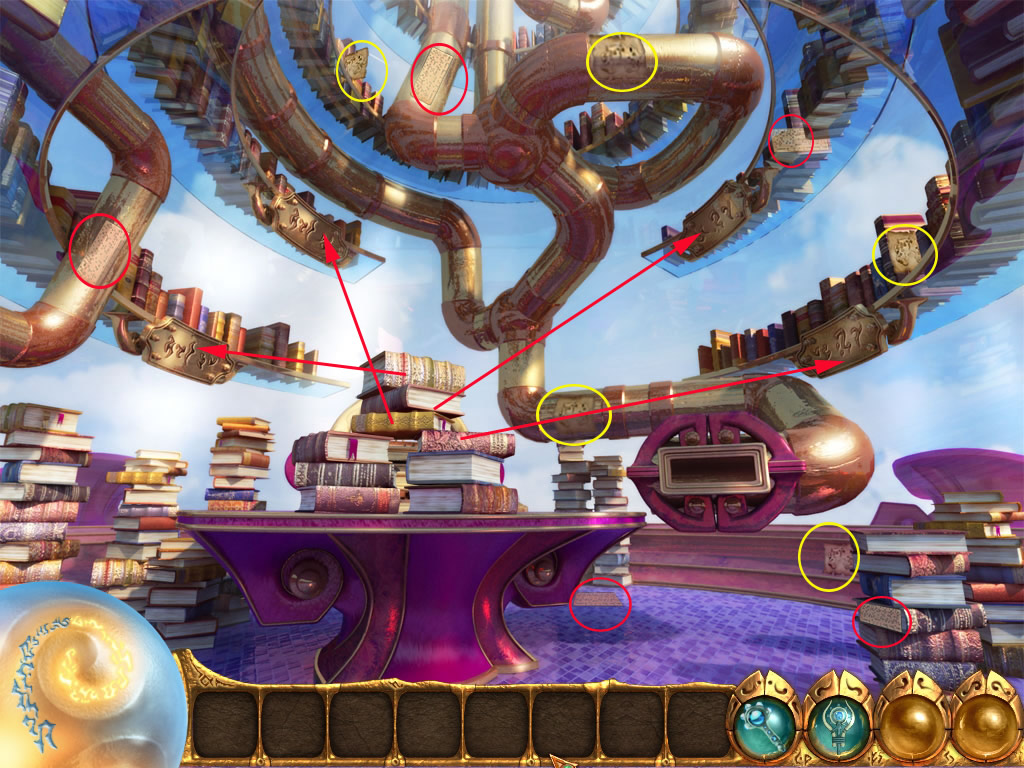
Library of the Old Ones - inside
Find the five map pieces.
Find also five punch cards.
Now click the books on the table and click them onto the metal plates, according to the letters on the plate and the name of the book author.
Your have to start with the book on the top and work downwards.
Items
When all books are gone you revealed a slot for the punch cards.
Place a punch card at the slot and a mini game opens.
Click the buttons under the row, when a ball is coming down.
Click them in the exactly order.
When you managed it, a book will fall down, but before you will get the right one, you have to play all five punch cards.
Puzzle Example
Go to the Aether Glyphstone.
Aether Glyphstone
Draw the right symbols.
Puzzle Solution
Move on to the Acropolis Glyphstone
Acropolis Glyphstone
For each of the stones, you will first have to find 8 items.
You will find the items all over in the different realms.
The crystals will be found in the water realm.
The mushrooms will be found in the wood realm.
The carbon will be found in the fire realm.
The snowflakes will be found in the aether realm.
The bars will be found in the metal realm.
Click a stone and you will have the glyph puzzle, you know from all glyph stones.
Solutions are seen from left to right, 1 is the one in the middle, bottom of the screen:
Puzzle Solution 1
Puzzle Solution 2
Puzzle Solution 3
Puzzle Solution 4
Puzzle Solution 5
Now you have to draw the symbols for the final glyph stone
Lean back and enjoy the end.
As always thanks to Kayliegh for doing an awesome walkthrough.
Posted by: Kero |
July 3, 2009 6:02 PM
|
July 3, 2009 6:02 PM