
![]() You find yourself in the dark. But rather than being eaten by a Grue, you instead find yourself confronted by Linkage, the latest escape game by Mya of Neutral.
You find yourself in the dark. But rather than being eaten by a Grue, you instead find yourself confronted by Linkage, the latest escape game by Mya of Neutral.  There's a couch... and a big screen television... some, uh, fluid on the floor... and a photo of a puppy! Why... this isn't sinister at all! Why on Earth would anyone want to escape from here?... what?... bathroom? *sigh* If you must. But getting out isn't going to be easy.
Control, however, is easy; click on the screen to interact or pick up items, and use the arrows at the edges of the screen to change your orientation in the room. If an item is in your inventory, you can mouse over it and click the little magnifying glass icon that pops up for a closer look. And believe me, you're going to be contemplating that adorable little rag-tag assortment of items with furious intensity if you want to solve this one and escape. There's no real instruction so it's up to you to fire up your own grey matter and make like your ancestors, only instead of creating fire you're sobbing incoherently and trying to force answers out of a fuchsia teddy-bear by trying to combine it with a battery and a piece of paper. If it all gets too much for you and you need a break, there's even a save function built into the game. Awwww, shucks, Neutral. We love you too.
Analysis: If you're like me and only enjoy a casual flirtation with the genre, you'll probably spend a while wandering around bewildered, clutching random items and prodding at symbols and switches. What Neutral's games do best is actually encourage experimentation and discovery in a way that most other titles in the genre do not. With the lack of any real direction, the moments of EUREKA, when they happen, are that much more satisfying, and are rarely obscure. If you've played any of Neutral's games before, like fan-favourite Vision, then you've come to expect that sort of thing, but newcomers are going to find this a real treat. The game is cleanly designed, lovely to look at, and playful in its execution. Following the trail of clues is a lot of fun, and the difficulty is challenging, but not enough so that escape novices like myself will feel as though we're running headlong into a brick wall.
The downside, of course, is that there's no changing cursor for those of us who hope to rely on sweeping the cursor slowly from one side of the screen to another looking for a hotspot we might have missed. The game is rarely unfair, however, and if you keep your eyes peeled for things that look out of the ordinary you probably won't have to resort to pixel hunting; look around and you'll notice items peeping around around corners. There are so many places to investigate in the room that you'll want to forget what your mother always told you and be as nosy as possible, peering under chairs, behind furniture, and everywhere else you can think to look. There was one instance where I was prowling around, looking for what to do next, when a new perspective on an area I'd examined multiple times suddenly revealed a hidden key, and I was ridiculously delighted by this. Not only because it meant that I had another piece of the puzzle, but because it was actually hidden in such a logical location.
In the ancient language, Neutral probably means "creator of clever, engaging puzzles" or "bringer of rad-ness". Linkage is another stellar game coming from an already well established pedigree, and if you've been hankering for a meaty chunk of escape to sink your teeth into, it will definitely provide. With clever puzzles, smart design, and of course a puppy (that is the most important), Linkage is a wonderful way to spend your time.


Walkthrough Guide
(Please allow page to fully load for spoiler tags to be functional.)
Linkage Walkthrough
Notes:
This game contains some randomized numbers. I explain how to get the numbers and do the math. You must do these things yourself in order to find the codes.
To examine things in your inventory, click on the magnifying glass in the upper right corner of the object.
To combine items, examine an item, then click on the item you wish to combine with it and use it on other item.
You will need to write things down in order to complete puzzles. A piece of scrap paper and a pen is probably the easiest.
The view you start out with will be referred to as "computer view". The view to its right is "couch view". The view to its right is "tiny door view". The view to its right is "large door view".
Beginnings to Acquiring the Magnet
Turn left from the start, to the large door view. Click on the floor under the desk to view underneath. Click the left hand drawer to open it. There is a key taped to the bottom of the drawer. Take it.
Back out and click on the slot in the door on the right. Take the white remote and back out.
Examine the back of the remote and write down the number in the blue diamond, making a note that it came from a blue diamond so you'll recognize it.
Click on the brown device with three colored buttons on the wall. Grab the black stick with the orange tip on top.
Examine the stick and click on it to extend it.
Turn left twice to the couch view. Click under the couch, then grab the star.
Click the clock over the red couch, then click the right side of it to turn it over. Click the battery hatch, then click it again to open it, and take the battery.
Go to the computer view. Use the taped key on the top-right drawer on the entertainment center to get a scraping knife.
Look at the plant over the entertainment center, grab the brown triangle behind the leaves.
Go to the tiny door view. Scrape the red paint on the floor in front of the door to reveal an empty red diamond with a number in it. Write this number down. Zoom out.
Zoom into the plaque with the heart, club, spade and diamond. Click on the red diamond and write down this number as well.
Go to the computer view and look behind the entertainment center. Use the extended pole to take the paper. It will give instructions to use the three numbers you wrote down (you did write them down, right?). Be careful with your order of operations. You must first divide the solid red diamond number by two. Then, multiply the blue and hollow red diamond numbers. Then, take these two numbers and add them together. Write that number down.
Go to the large door view. Click on the grate to the left of the tiny door and enter in the number you just solved for on the red padlock. Take the padlock, open the grate, and get the book and the magnet sticking to the grate. Read the notebook for clues.
Mid-section: Magnet to Wrench
Go to the computer view and click on the pink bear to move it, revealing a hole. Take the loose string from the pink bear.
Tie the magnet to the string by clicking the magnet, examining the string then clicking it.
Use the magnet on a string on the hole and click twice to get the key from the hole under the bear.
Use this key to open the left cabinet on the entertainment center.
Move the paint can and take the square block. Put the star on the top shelf. (The clue to do this is in the blue notebook.)
Look in the hole - the star says EXILES on top. If you looked at it upside down, it's an equation: 5371 x 3 which equals 16113.
Enter 16113 into the blue safe in the entertainment center, then open it. Take the wooden doll inside.
Go to the couch view. Go to the box on the red couch and insert the block, figurine and triangle. Take the blue key.
Go to the large door view. Use the blue key on the right drawer on the desk. Get the mouse and keyboard from it.
Click on the floor under the desk to view underneath again. Open the right hand drawer and take the folded white note taped to the under side of the drawer.
Go to the computer view. Zoom partially into the monitor (the desk should be visible) and place the mouse and keyboard on the desk.
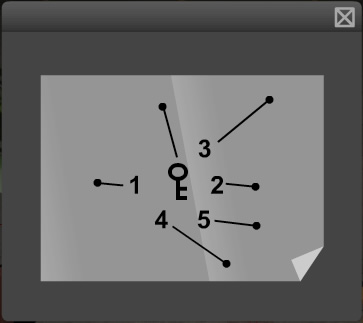
Zoom fully into the monitor and turn it on. Click the image. Scroll until you come to a top down view of the room with a black key in it. Use the unfolded white note and overlay it on the screen. The numbers are pointing to various locations of hearts throughout the room.
Go back to the large door view and zoom in on the box with hearts on it on the desk. Push the hearts according to the clues from the computer: red, yellow, blue, red, green. Then push the bottom button to open the box and take the flags.
Go to the couch view. Put the flags on the figurine in the box.
The framed abstract art to the right of the tiny door in the tiny door view is the clue for how to manipulate the flags. Y = Yellow, B = blue, and button = button at the belly of the wooden doll. Left letter is the left flag color, and right letter is the right flag color. YY button, YB button, BY button, BB button, then press the button again. The top of the figurine will pop off.
Close the box then push the button on the front for a key.
Zoom out and look behind the potted plant to pick up a knob.
Go to the large door view and use the metallic key on the door. You must try the knob, even though it won't seem to do anything. Zoom out. Look in the slot again and take the green slotted card.
Use the green slotted card on the fourth page of the blue notebook, lining up the clubs. The number is 3572.
Go to the computer view and zoom into the bottom right hand drawer. Enter the code (3572) to unlock it. Open it and get the wrench.
Ending: Wrench to Escape
Go to the tiny door view and use the wrench to remove the nut from the small door. Click on the door twice to remove it totally. Get the USB drive.
Go to the computer view and zoom into the monitor and click on the left side to view a USB port. Plug the USB drive into the computer.
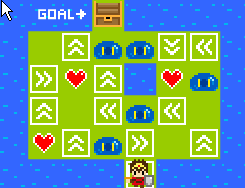
Zoom fully into the monitor and turn it on, and click on the game icon. Make a path leading through the slimes and to the treasure chest to get the CD. Here is a screenshot of a correct solution. When you beat the game, the computer will eject a CD.
Examine the CD and click it to flip it over.
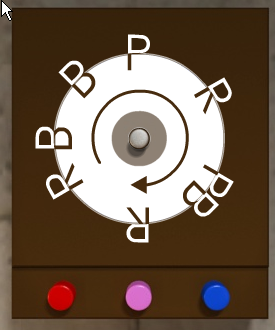
Go to the large door view, and zoom into the device with colored buttons over the desk. Use the CD on the device and click on it to rotate it until it makes letters. Here is a screenshot of the CD correctly rotated.
The letters represent the colors, with R = red, B = blue, and P = purple. Click the colored buttons in this order: RBBPRPBR. Take the screwdriver.
Use the screwdriver on the back of the remote to remove the cover. Put the battery in the remote.
Go to the tiny door view. On the right side of the fireplace-like jutting, there is a small plastic mount. Put the remote in the mount and press the button. This will move the painting down, revealing an alcove.
Put the padlock on the chain then push the button. Look below the painting to get the spade box.
Go back up to the alcove. Push the button again to lower the chain then zoom out. The wall on the left side will have partially lifted, and a battery is visible in the crack. Zoom into the crack and take the battery.
Take the remote from the wall mount, examine it and get the battery.
Go to the couch view and zoom into the clock and examine the back. Put both batteries in the clock and close the clock. Push the triangle button once and the hands will all move to 12'o'clock, forming a spade.
˘Put the knob in the hole on the spade box.
Push the triangular button on the clock again and watch the movement of the hand carefully. Rotate the knob clockwise and counterclockwise on the spade box to mimic the hand's movement: cw4, ccw 2, cw 7, ccw 6, cw 12. Take the key from the box.
Go to the tiny door view. Go to the alcove and press the button to raise the chain and weight.
Zoom into the tiny door area. Use the key from the spade box to unlock the trapdoor, and then open it.
Go back to the alcove and push the button again to lower the chain and weight all the way down, which will open the door to the left. Exit through it and congratulations, you've escaped!
Updated: 12/09/10
Posted by: joye |
November 10, 2010 11:59 PM
|
November 10, 2010 11:59 PM
Alternate Linkage Walkthrough
Turn left from the start, key under the desk, need to click under it to see the bottom side of the left hand drawer.
Look at the door near the desk, check the mail slot to get the remote.
There's a blue diamond with a number on the back.
Click the wall-mounted device over the desk, then grab the pole thing on top of it. Examine the pole thing and click it to remove the cover and extend it.
Turn left twice from the desk screen to get to the red couch. Click under it, then grab the star.
Click the clock over the red couch, then click the ride side of it to turn it over. Click the battery hatch, then click it again to open it, then get the battery.
Use the key on the top-right drawer on the entertainment center to get a scraping knife.
Move the bear on the entertainment center to get the string. Note the hole.
Look at the plant over the entertainment center, grab the brown triangle behind the leaves.
Turn toward the room with the small door. Scrape the red pool in front of the door to reveal an empty red diamond with a number in it. On the card suit mural above this, you can move the filled red diamond to reveal another number on the back. (These are randomized each game.)
Look behind the entertainment center, use the pole thing to get the paper. Do the math here to open the padlock near the desk.
Take the padlock, open the grate, get the book and magnet.
Tie the magnet to the string by clicking the magnet, examining the string then clicking it.
Use the magnet on a string to get the key from the hole under the bear.
Use this key to open the left cabinet on the entertainment center.
Move the paint can for the block. Put the star on the top shelf.
Look in the hole - the star says EXILES on top. It's upside down - 5371 * 3. 16113. This opens the blue safe on the entertainment center. Inside is the figurine.
Go to the box on the red couch and insert the block, figurine and triangle. You'll get the blue key. This opens the right drawer on the desk. Get the mouse and keyboard from it.
Click under the desk, get the note that's taped to the underside of the right drawer. Examine the note in your inventory and click it to unfold it.
Use the mouse and keyboard on the monitor on the entertainment center.
Use the monitor again and turn it on. Click the image. Scroll right twice. Use the unfolded note to make it an overlay, then overlay it on the screen. This tells you the order to push the hearts on the heart box on the desk in - red, yellow, blue, red, green. You'll get the flags.
Put the flags on the figurine in the box.
Use the mural near the desk to figure out the order to put the flags in, pressing the button where there's a circle. YY button, YB button, BY button, BB button, then press the button twice. The top of the figurine will pop off.
Check the plant near the red couch to find the peg.
Close the box then push the button on the front for a key.
This goes in the door near the desk. Put it in then check the slot.
You'll get a green club card. Use this with the book to get the code for the locker on the entertainment center. Open it and get the wrench.
Use the wrench to remove the nut from the small door. Then use the peg to open it twice. Get the USB key, plug it into the computer. Use the computer to play the game. Make a path leading through the slimes and to the treasure chest to get the CD.
Examine the CD and click it to flip it over.
Put the CD on the mounted device above the desk, then click it a few times to turn it so the bottom parts of the letters align with the top. Click the colored buttons in the indicated order, giong counter-clockwise, to get the screwdriver. Use the screwdriver on the back of the remote to remove the cover. Put the battery in the remote.
Put the remote in the mount above the small door. This'll move the painting. Put the padlock on the chain then push the button. Look below the painting to get the spade box.
Push the button again to lower the chain then check the floor to the left of the door for a battery.
Take back the remote and get the battery.
Put both batteries in the clock.
Put the knob in the hole on the spade box.
Push the triangular button on the clock twice. This'll show you the order to move the knob on the box: 4, 2, 7, 6, 12.
Inside is a key. Put the key in the hatch inside the small door. Make sure the chain is up, then open the hatch. Put the chain back down again after it's open to open the way out.
Updated: 12/09/10
Posted by: corygalliher |
November 11, 2010 12:00 AM
|
November 11, 2010 12:00 AM