
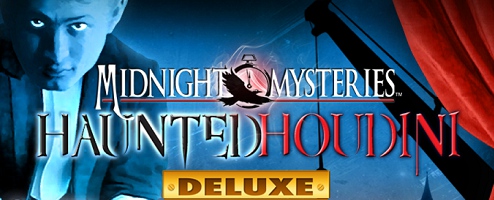
Midnight Mysteries:
Haunted Houdini
Platform: Mac, Windows
![]() Once again, an unquiet ghost needs help! Who they gonna call? Why, you, of course! Especially since this is a rather famous ghost, the legendary magician Harry Houdini. It's time for another hauntingly good mystery to solve in Mumbo Jumbo's Midnight Mysteries: Haunted Houdini, a fantastic adventure/hidden object hybrid where you, ghost detective that you are, must figure out why poor Harry and his wife Bess have not been able to meet in the afterlife. You know, there's some weird irony going on here, playing a game talking to the ghost of Harry Houdini who was a notorious skeptic on the subject and who became famous for debunking mediums, spiritualists, and others who claimed to talk to ghosts.
Once again, an unquiet ghost needs help! Who they gonna call? Why, you, of course! Especially since this is a rather famous ghost, the legendary magician Harry Houdini. It's time for another hauntingly good mystery to solve in Mumbo Jumbo's Midnight Mysteries: Haunted Houdini, a fantastic adventure/hidden object hybrid where you, ghost detective that you are, must figure out why poor Harry and his wife Bess have not been able to meet in the afterlife. You know, there's some weird irony going on here, playing a game talking to the ghost of Harry Houdini who was a notorious skeptic on the subject and who became famous for debunking mediums, spiritualists, and others who claimed to talk to ghosts.
 Our story begins with the ghost of poor Bess, still looking for her husband after all these years. Why is his spirit still trapped? Is it punishment for his disbelief? Or is there a darker story to be found, one in which Houdini did not die a natural death, caused by his enemies from the world of spiritualism? The journey takes you from the Houdini house in Harlem on an incredible journey through time as you visit England, France during the battle of the Somme, and a theater in Detroit where Harry performed his last magic act. Along the way you will speak to many spirits, some friends, some enemies of the controversial magician as you uncover the clues that will solve the mystery and eventually unite poor Ehrich (that was his real name, you know) with his beloved Bess.
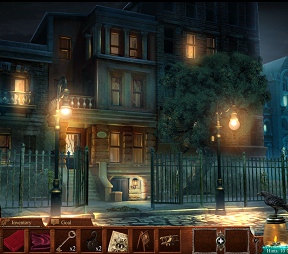
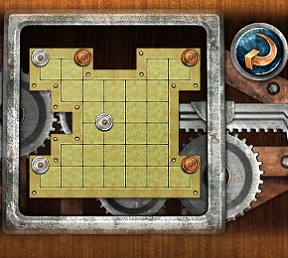
Midnight Mysteries: Haunted Houdini, like the others in the Midnight Mysteries series, plays like a standard point-and-click adventure with a changing cursor guiding you through the various items that can be examined or picked up and places to explore. The bottom-loading inventory of items that you acquire along the way has a lovely "plus" feature where you can place two previously unrelated items together, combining them to make something useful (like putting together a paintbrush with charcoal to create a primitive fingerprinting kit). The game is composed of equal parts problem solving (involving exploration and use of those found objects), classic hidden object scenes (where you can acquire even more items for your inventory), mini-games, and puzzles.
 Also included in the game are three modes of play (casual, advanced, and expert) along with variable types of hints depending upon the mode of play. Light sparks or curtains of light along with useful descriptions accompany the casual mode. The usual hint feature is both a refilling hint timer and an instant hint giver based on the player finding ravens hidden in every scene. The hint timer also has a third feature, showing a silhouette of an item without costing a hint. There's a notebook that keeps track of the story and clues and even a built-in strategy guide to help you along your way. Alongside the regular gameplay are some side quests, trophies that can be won for certain actions and an "unlimited" hidden object mode that can be unlocked by finding a certain number of four leaf clovers which are hidden everywhere in the game.
Analysis: Mumbo Jumbo has brought the goods again with the fourth in the Midnight Mystery series, creating an interesting mystery surrounding one of the most fascinating and mysterious characters from the last century. As expected the visuals are stunning, the story is intriguing, and the atmosphere creepy as befits the title. Unusually, however, the title character himself is not around much (his spirit is trapped, after all), so you will learn quite a bit about the life and times of Harry Houdini from the folks who surrounded him, both friend and foe.
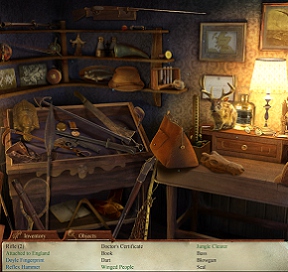 It's nice to see that the quality of the series has not suffered in this fourth installment. The hidden object scenes are a nice mix of list items, items found from clues, and items that require interaction. The puzzles range from easy to difficult and are a nice balance that doesn't overwhelm the basic story. Best of all are the "magic tricks", places in the game where you simply participate in some fun card tricks that don't require anything from you but amazement at how it is done. And although it is pretty well documented how Houdini died (peritonitis caused by a ruptured appendix), the game does an amazing job at raising doubts and including the possibility that he was actually murdered as has been recently proposed.
Midnight Mysteries: Haunted Houdini is being marketed as a "Deluxe" edition, rather than a "Collector's" edition, which means you get a complete story and a very useful built-in strategy guide for the price of a regular game, rather than something double the price stuffed with extras that you might not necessarily want. Even without any "extra" chapters you should find a goodly amount of gameplay within, along with the fun of the "unlimited" hidden objects modes or going back to play in different modes or to earn the various trophies. That's a lot of bang for the buck, and quite worth it.
What's not to love? The three modes of play make the game attractive to a wide variety of hybrid enthusiasts, the story is intriguing, the gameplay amusing, the visuals stunning, and the overall experience is one that freaks out and delights in equal measure. Midnight Mysteries: Haunted Houdini proudly carries the series banner forward and provides great entertainment at a reasonable price. Give it a try and prepare to be both entertained and enlightened.
![]() Windows:
Windows:
Download the demo
Get the full version
![]() Mac OS X:
Mac OS X:
Download the demo
Get the full version


Walkthrough Guide
(Please allow page to fully load for spoiler tags to be functional.)
Midnight Mysteries: Haunted Houdini Deluxe
General Info, Chapters 1-4
General Information
Gameplay
There are three levels of difficulty.
Casual:
Tools hovered over the proper area will emit sparkles.
There is a skip option for any puzzle.
The hint option recharges very fast, and you can collect ravens.
Advanced Mode:
Tools do not sparkle, even if they're hovered on the proper area.
The skip and hint options takes twice as long to recharge.
Expert Mode:
There are no ravens in this mode, so you will rely entirely on the rechargeable hint option.
There is no skip option available.
Absolutely no sparkles for tool objects being used.
When at rest on a screen, your cursor will be a skeletal hand.
The cursor will change to a blue grasping skeletal hand if you hover over an item you can pick up.
If you try to use the wrong tool, the hand will turn red.
If the cursor turns into an eyeball, that means the area needs to be looked at more closely.
The cursor will take the shape of an arrow when you scroll over an area that leads to another room.
Two blue gears indicate that you need to use a tool on that specific object.
If there is blue radiating from an area, that indicates a hidden object search.
A box with ellipses indicates you an speak to the entity before you.
When clicking around, if you click fruitlessly on objects too many times a black cat will appear and hiss at you. This action immobilizes any ability for a few seconds.
Hints, Tips, and Clovers
On your bottom right screen, there is a raven atop a lantern. You collect ravens through the game to get free hints.
During a hidden object scene if you're unsure what an object looks like, click on it in the list, and a silhouette of it will show in the lantern.
On the bottom left screen, there is a counter for clovers. Clovers can be collected to unlock Unlimited Hidden Object Mode: To do this, collect 40. There are 70 clovers overall in the game.
Also on the bottom left:
Your journal, which records all the information you've learned up to your stopping point. If you need help remembering where to go, or who it is that's a suspect this is where you turn to.
The strategy guide will give you the clues you need to check if you missed something you needed to pick up, where the clover is, or where the raven is.
At the centered bottom of your screen is you inventory list. To scroll through, use the left and right silver arrows to the respective sides of the list.
At the far right are two boxes and a plus sign. Place an object in each square and hit the plus sign. If they're meant to be combined, sparkles will appear along with victory music and a new tool.
At any time you can access the main menu, which will allow you to turn off the music and sound effects, choose between windowed or full screen, and turn animated cursors on or off. You can also view the credits.
When doing a hidden object scene, items written in green are clues as opposed to the actual item. Items written in blue are hidden from sight and must be revealed to be picked up.
The hidden object scenes are randomized; The only item that stays the same each time is the final item you have to find, and the interactive areas to find items in.
Achievements
There are sixteen different achievements that you can obtain in this game.
Houdini Protègè: Complete Story Mode.
Perfect: Complete Story Mode without using any hints.
Scaredy Cat: Complete Story Mode with no black cat scares.
Ornithologist: Collect all the ravens in story mode.
Hypnotic Eyes: Unlock unlimited hidden object mode.
Golden Greek: Solve all the puzzles in story mode.
Irish Rover: Collect all 70 clovers in story mode.
Black Hole: Compelte each hidden-object game in story mode without the lantern.
Pigeon: Conjure a pigeon.
Locksmith: Get into Houdini's house without a hint.
Gardener: Find the ESP cards in the garden in one try.
Death Defying: Escape from Houdini's coffin in one try.
HOG Wild: Complete a hidden object scene in less than a minute.
Magic Wand: Find every hidden object in all unlimited hidden object mode scenes.
Goals
Your overall goal is to find out why Houdini's spirit seems trapped and kept away from Bess.
In the meantime, you will have smaller goals that upon completion will thrust you into the next level.
Walkthrough Colors
A green circle represents a clover.
Interactive items and inventory items in a hidden object scene are outlined by yellow.
A purple circle indicates a randomized item in a hidden object scene.
An orange star shows a place you need to investigate.
Red boxes are for places where an object needs to be used.
Items outlined in blue should be picked up and will go in your inventory outside of hidden object scenes.
Pink boxes indicate a raven.
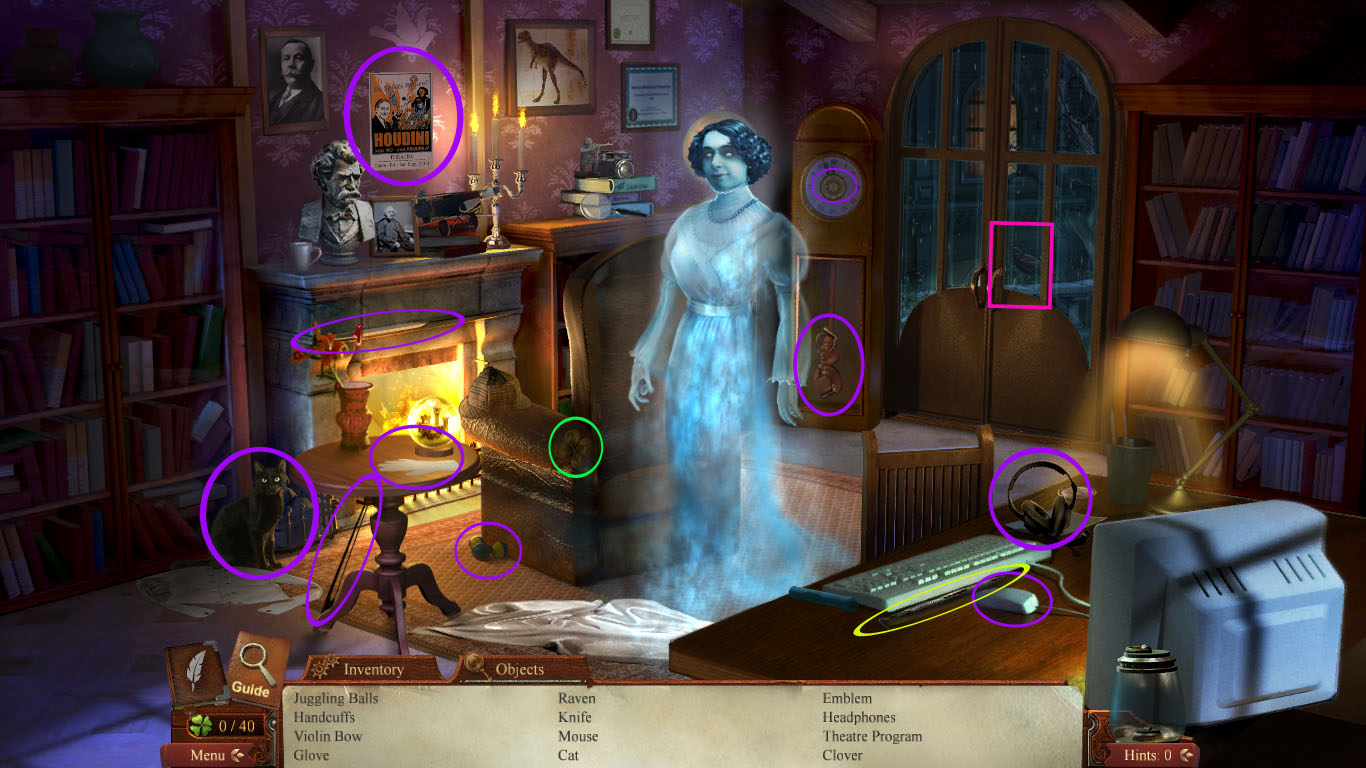
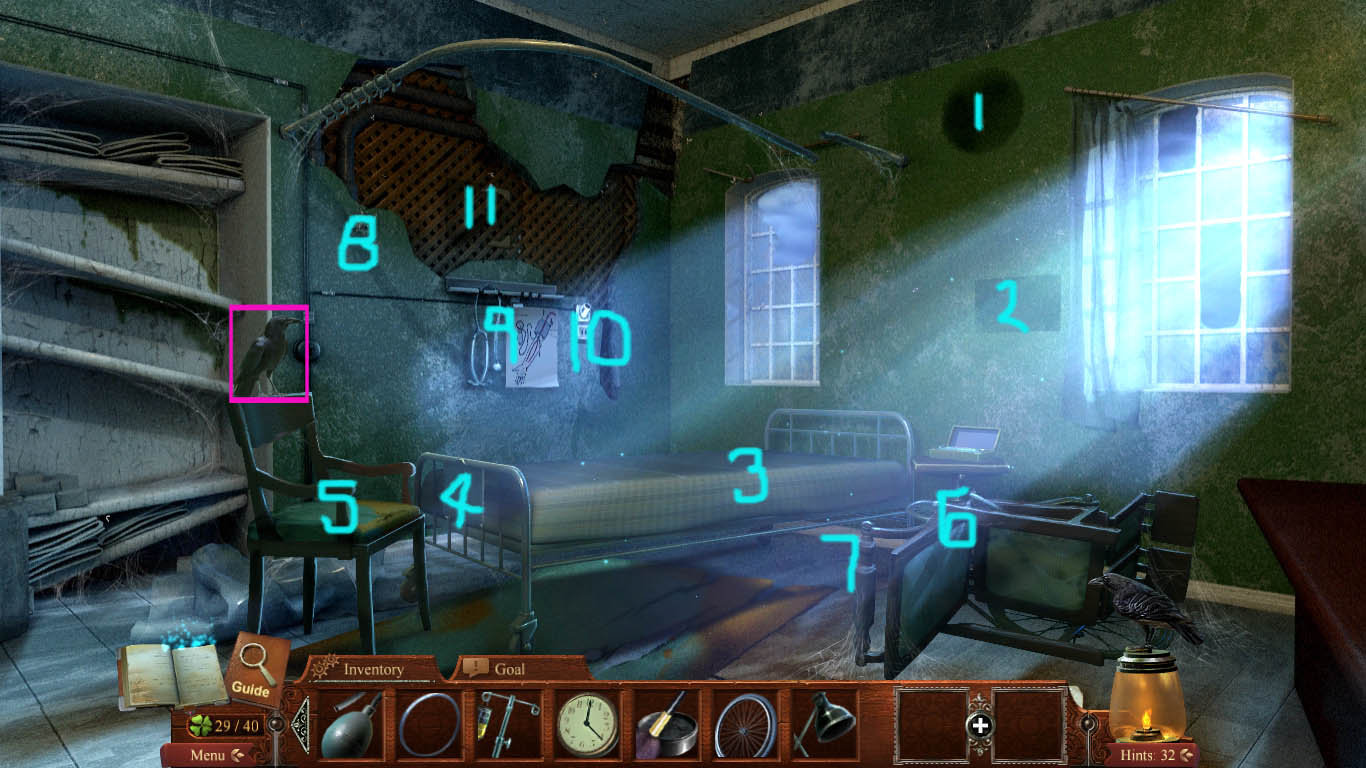
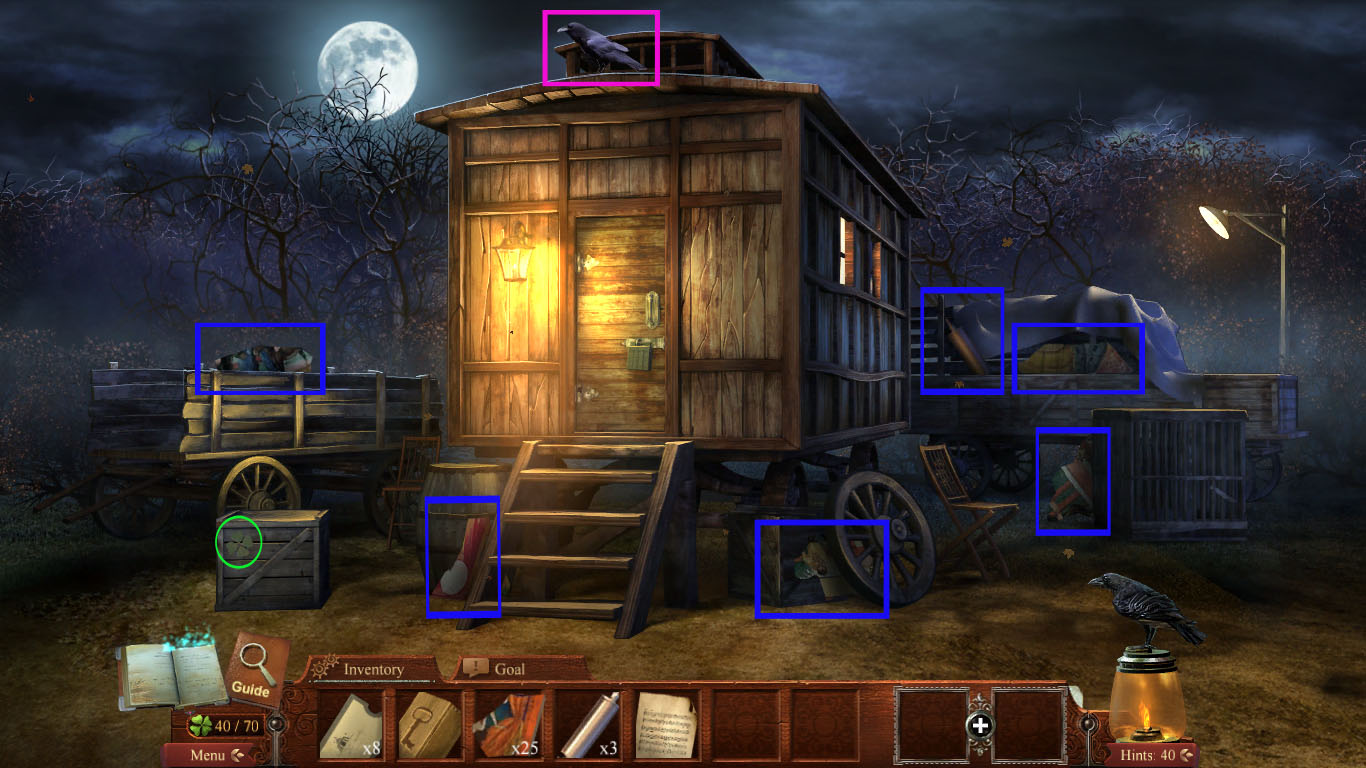
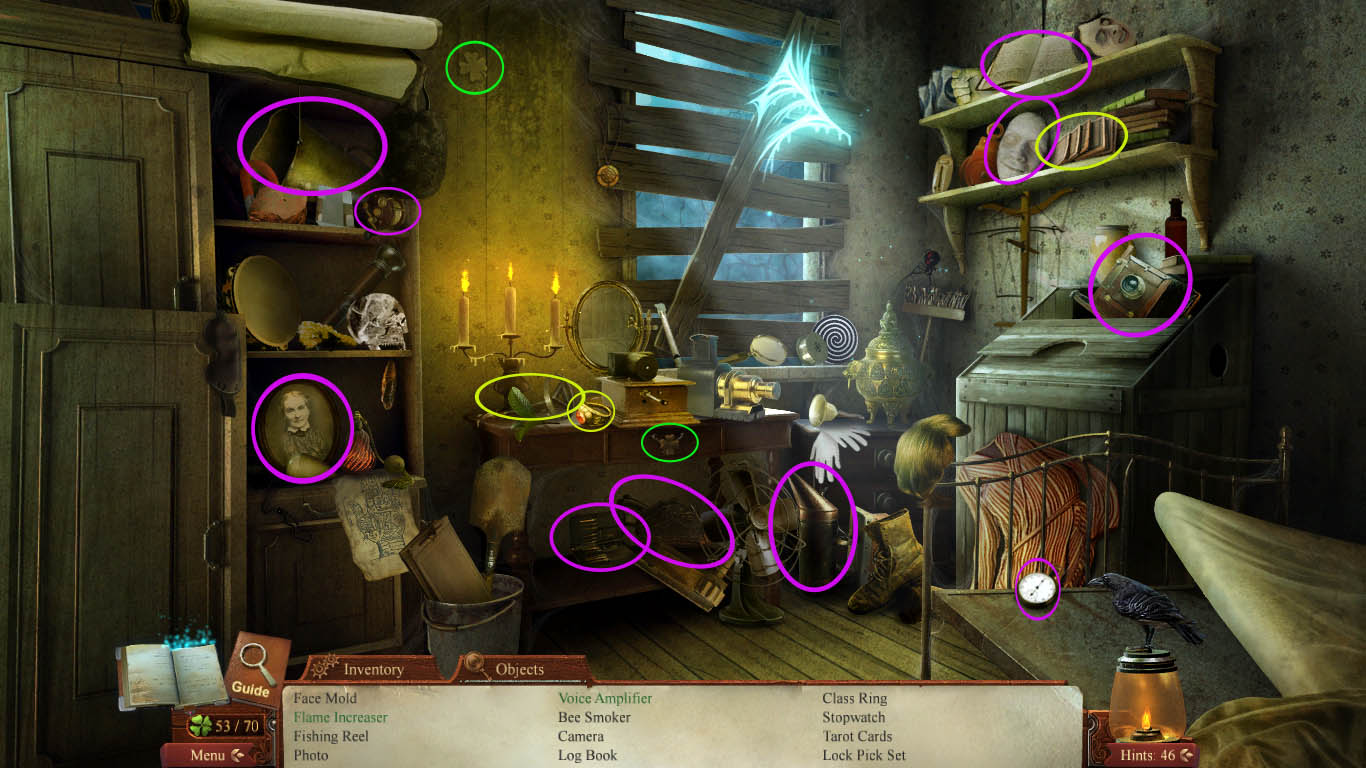
Chapter One: Houdini's Home
Parlor
The ghost of Houdini's wife will speak to you and ask you to give her a deck of cards.
Pick up the empty card case on the table to the left.
Grab the cards off the top of the monitor.
From your inventory, combine the deck case and the cards, and you will receive a Box of Cards.
Click on the Box of Cards and click on the ghost of Bess.
A bunch of cards will fly out: Pick any one you want, and it will show a King, then start a hidden object scene.
Juggling Balls: On the floor to the left of the armchair.
Handcuffs: On the pendulum of the grandfather clock.
Violin Bow: Leaning against the left side of the table holding the flower vase.
Glove: On the table, next to the snow globe.
Raven: Click open the doors leading to the balcony, right in front of you on the ledge is the raven.
Knife: Hiding along the fireplace, it is directly above and to the left of the fire slightly obscured by the flowers.
Mouse: Not mouse the animal, but mouse used for computer. Located between monitor and keyboard.
Cat: On the floor, left of the fireplace and table.
Emblem: The very middle of the clock face where the hands are attached.
Headphones: To the right of the keyboard.
Theater Program: Above the fireplace, in between the portrait and the dinosaur picture. It says Houdini on it.
Dental Pick: Located along the top of the keyboard.
Screenshot
Speak to Bess once more. Ask her questions, and afterward you'll be transported.
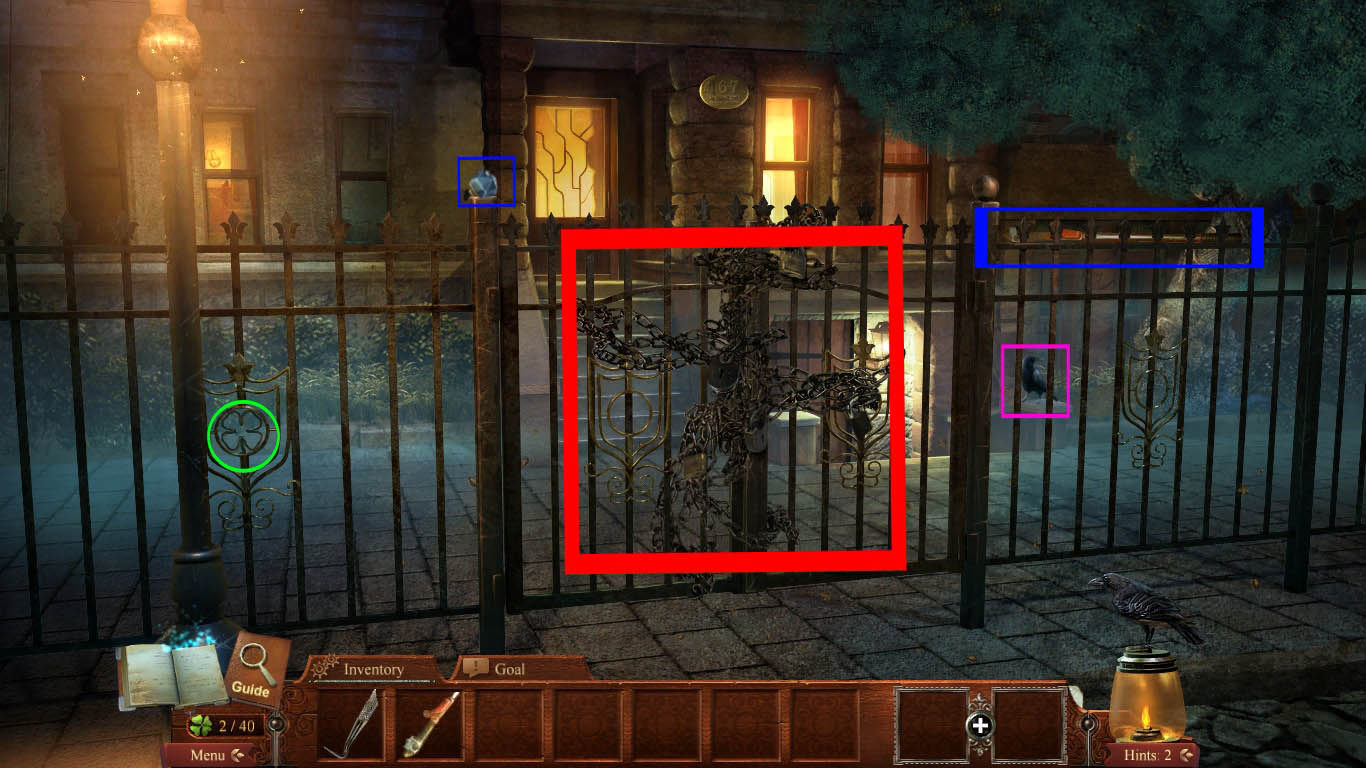
Street Outside of House
Starting on the street, you will want to grab the bolt cutter half on the left side of the fence.
Grab the clover.
Grab the raven.
After grabbing these items, move cursor towards the gate and click to go forward.
Screenshot
Sidewalk in front of Gate
Grab the clover.
On the top left post of the locked gate entrance is a doorknob: pick it up.
To the right of the locked gate, on the top of the fencing is the other bolt cutter half. Grab it, then combine the two halves.
Pick up the raven.
Use the bolt cutter to break the chains on the gate.
Screenshot
Investigate the plaque with 167 on it.
Investigate the door and attach the doorknob.
To unlock the door:
Count to the left once and click that button.
Count six buttons to the left and click that button.
Count seven buttons to the right and click that button.
Screenshot
Enter the Foyer.
Foyer
Grab the birdcage that's at the back of the room.
Pick up the deck of cards on the table to your left.
Pick up the raven that's in the picture frame above Thurston's head.
Pick up the clover in the bouquet of flowers.
Give the deck of cards to Thurston and go along with his card trick.
Once he disappears, numbers will show up on the stairs. Click on the 3 and the 10. You will receive the number 1.
Combine the 3 and the 1 to make a custom key.
Go up the stairs.
Once on the landing upstairs, click on the raven atop the poster.
Investigate the Houdini poster. Grab the lock diagram hidden underneath.
Investigate the door to your right.
Grab the clover that's taken the place of the screw on the top right.
Click your custom key and click on the lock.
Enter the room.
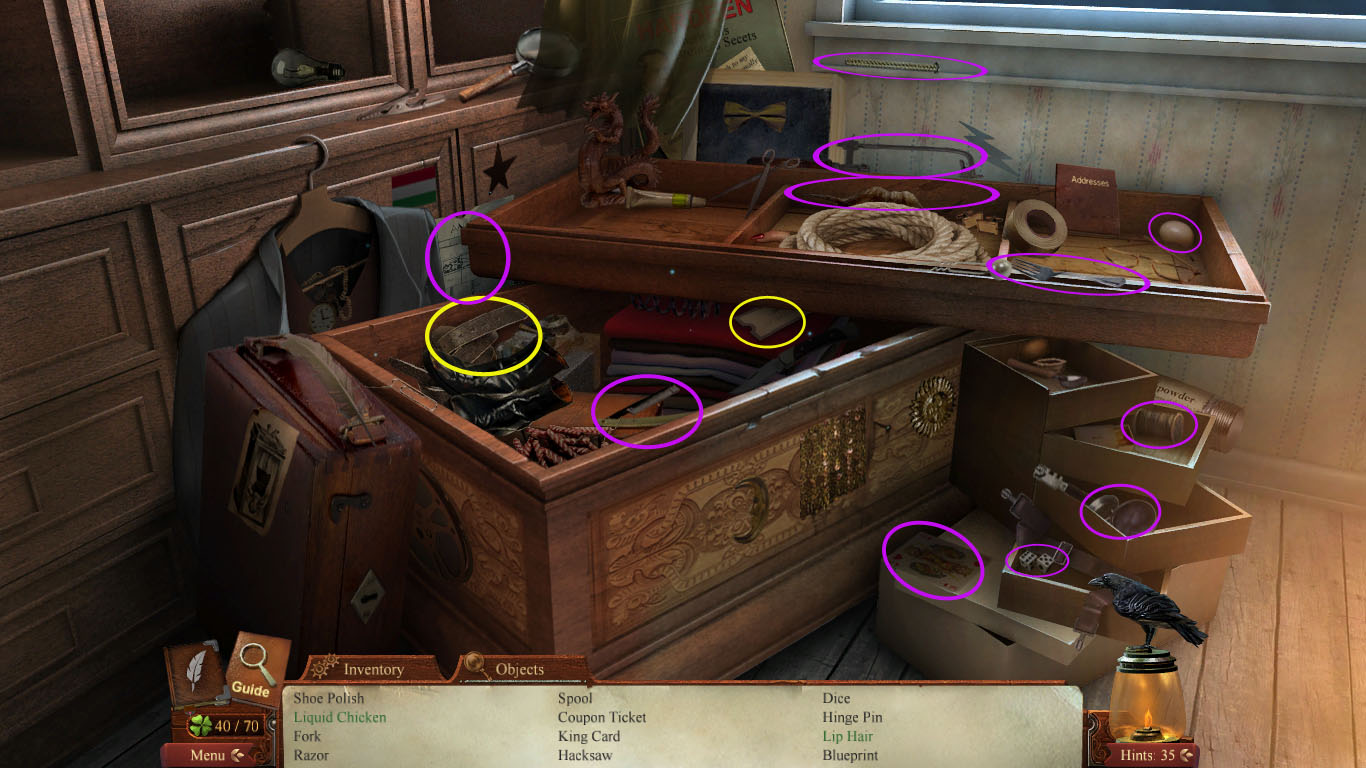
Study
Pick up the clover on the desk to the right of the telephone.
Pick up the raven outside the window, middle right window pane.
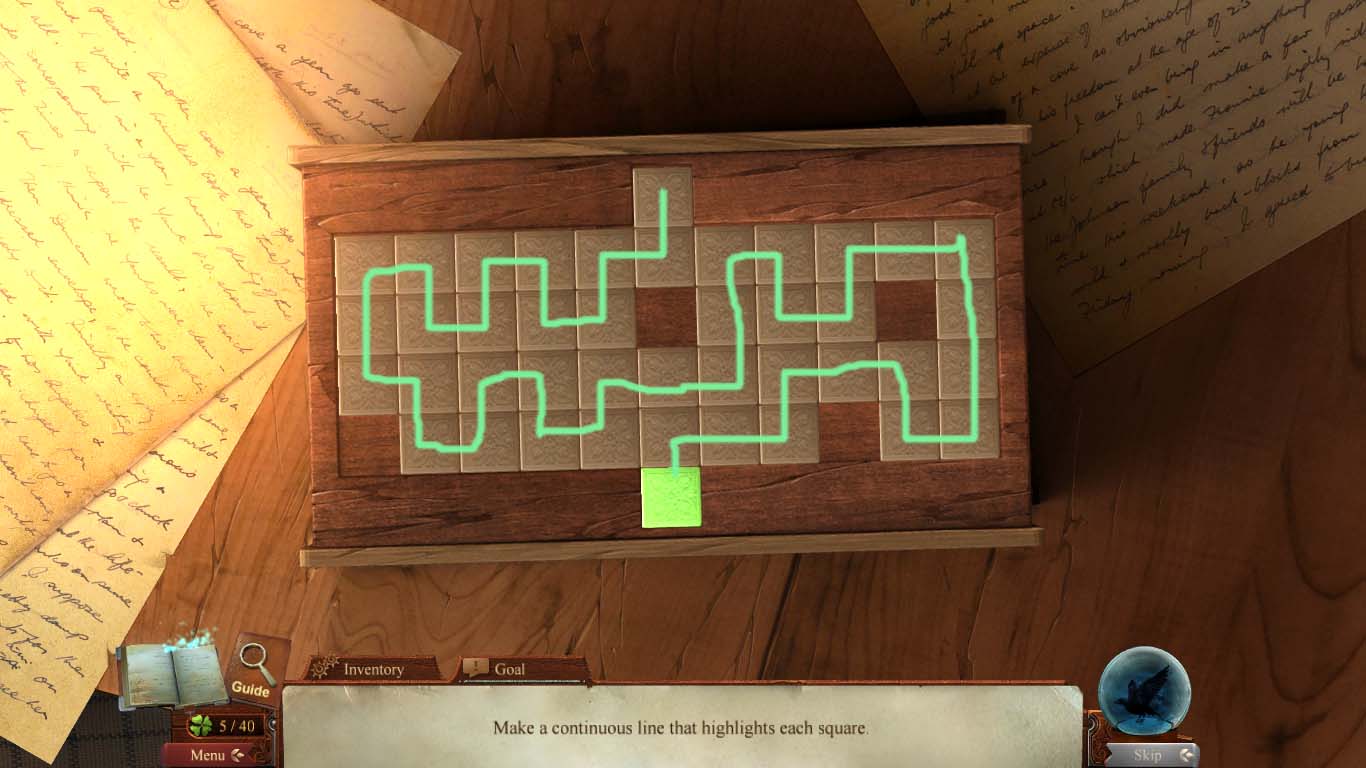
Click to investigate the desk.
Click on the box and solve the puzzle. Grab the key upon completion.
Screenshot
Click the clover on the lampshade.
Click on the raven on the cover of the red book on the shelf.
Pick up the airplane.
Grab the picture frame.
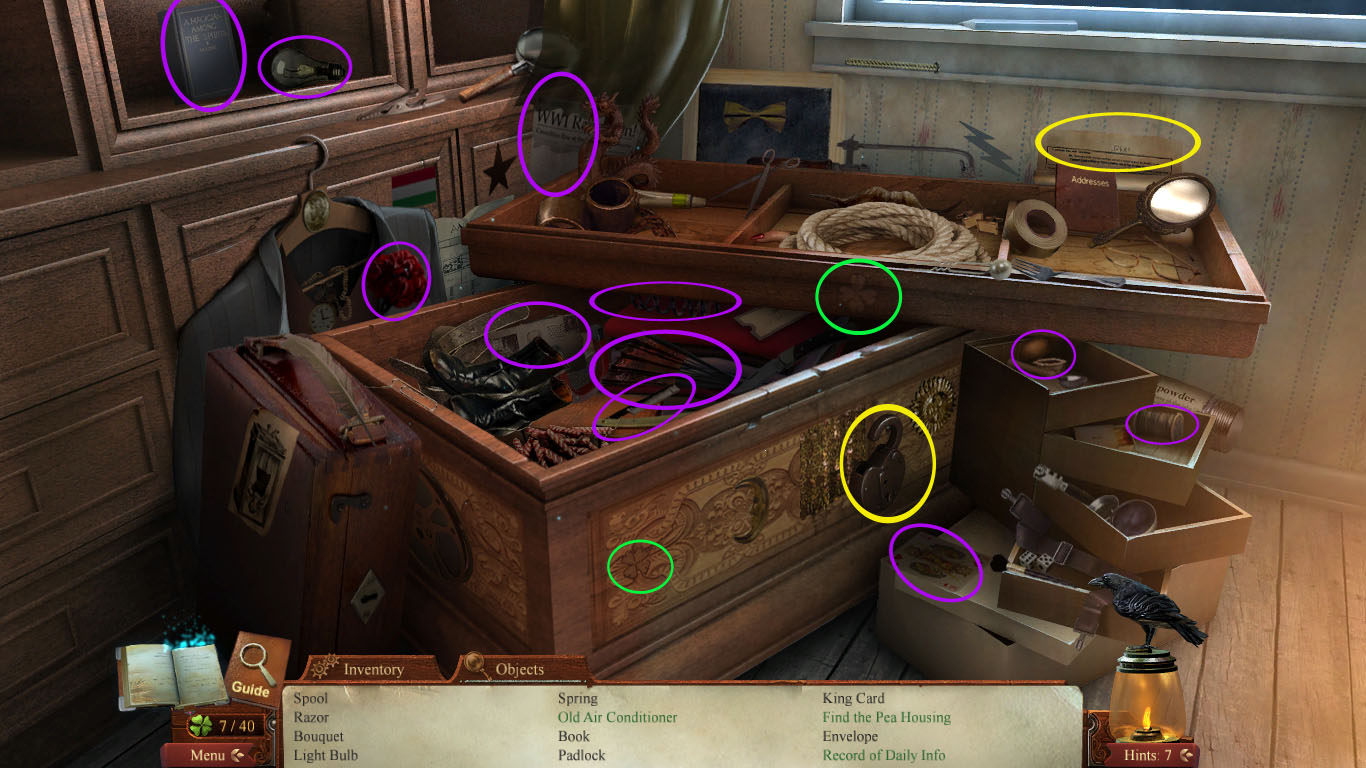
Go back to the middle of the room and click on the hidden object scene to the left.
There are two clovers: pick both up.
Spool: Second compartment drawer to the right of the matches.
Razor: In the chest to the left of the fan.
Bouquet: In the jacket.
Lightbulb: In the middle shelving above the jacket, to the right of the book.
Spring: In the chest on the red blanket.
Old Air Conditioner: The old fashioned fan to the right of the boots in the chest.
Book: In the middle shelving above the jacket.
Padlock: On the chest above the King's card.
King Card: On the box corner to the right of the chest.
Find the Pea Housing: Walnut shells in the top drawer of the shelving compartment.
Envelope: In the chest behind the boots.
Record of Daily Info: Newspaper behind the dragon figurine.
Poster: Located behind the chest lid to the right of the lightning bolt on the wall.
Screenshot
After finishing, head to the parlor.
Parlor
Once in the parlor, grab the curtain.
The raven is on the mantel to the right of the lamp.
Investigate the fireplace mantel.
The statue of the woman has a clover in her hair.
Scroll over the candlestick to the left and grab it.
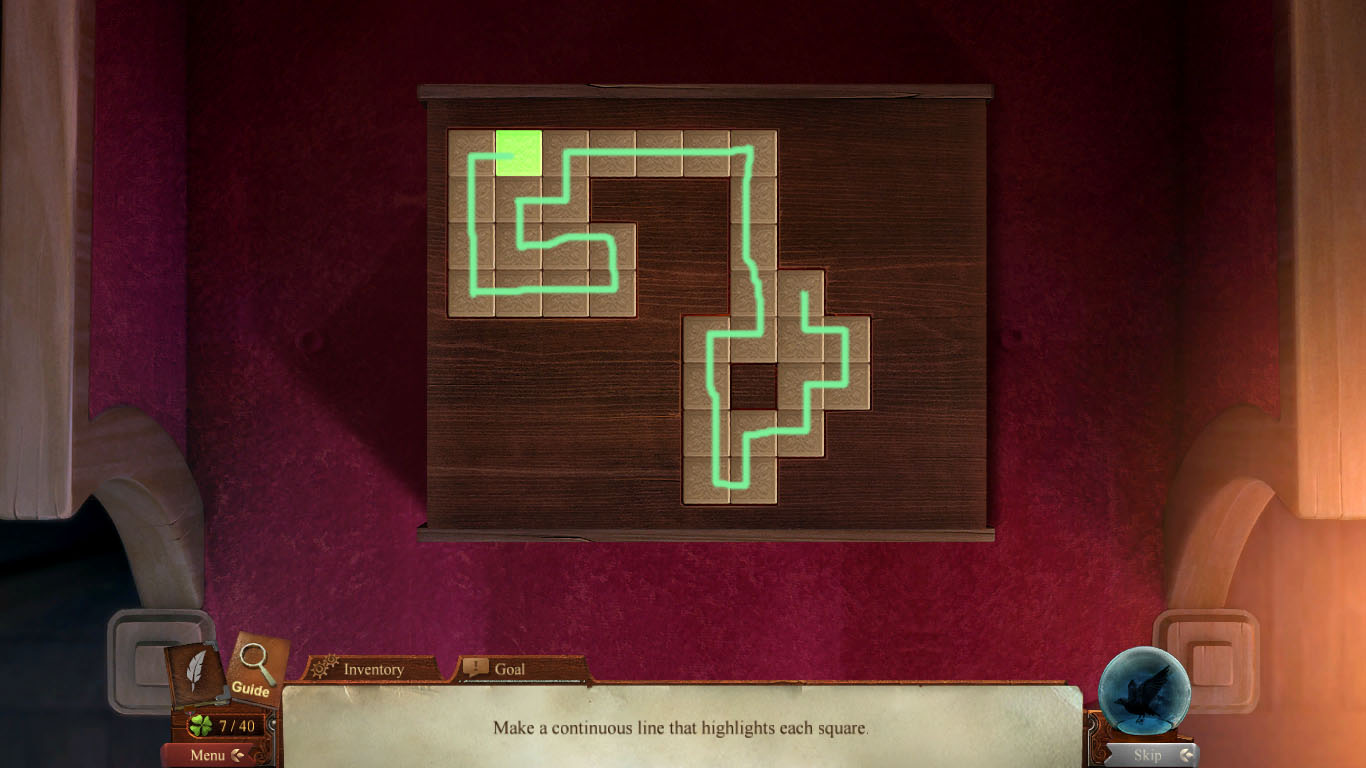
Investigate the chair with the puzzle box on it and complete the puzzle.
Screenshot
Recieve a key after completing puzzle.
Ignore the table in the parlor for now, go back outside to the front of the house.
Workshop
Use the dental pick to open the lock on the workshop door.
Use the lock diagram to help solve the lock puzzle.
Click on the fourth pin first.
Click on the third pin second.
Click on the fifth pin last.
Go inside the workshop and pick up the raven perched on the stage light.
The clover is in the middle of the crossed boards to the bottom left of the stage.
Grab the padlock hanging from the pulley to the right of the chest.
Put the poster on the easel.
When the ghost appears, use the first padlock on the chains.
Use the second padlock to lock the chest.
Give Houdini the curtain you grabbed from the parlor.
Click on Bess to continue the trick.
Use the first key to open the padlock on the chest.
Use the second key to unlock the padlock on the chains.
Pick up the dog fang.
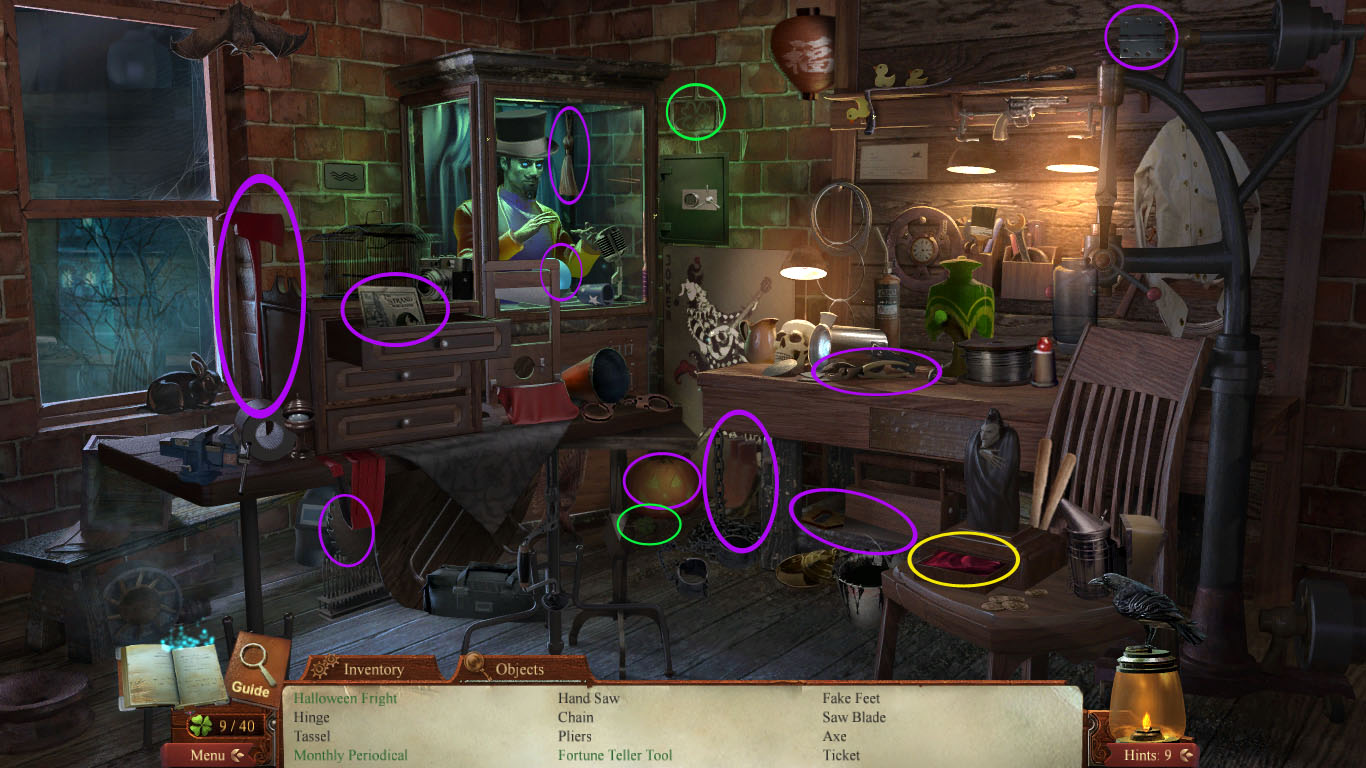
Click to the left of the screen to start the hidden object scene.
Halloween Fright: The pumpkin on the floor in the corner.
Hinge: Top right of the screen.
Tassel: The rope to the right of the fortune tellers face.
Monthly Periodical: The paper in the top drawer of the cabinet.
Hand Saw: Underneath the table on the right, in front of the toolbox.
Chain: Hanging from the left side of the table on the right.
Pliers: On the table to the right in front of the stage light.
Fortune Teller Tool: The crystal ball.
Fake Feet: To the right of where the pumpkin was.
Saw Blade: Underneath the table on the left in the middle.
Axe: On the wall to the right of the window.
Ticket: On the wall above the table to the right underneath the ducks.
Get the magic scarf from the drawer of the box on the chair.
Screenshot
Combine the bird cage and the magic scarf to create a pigeon.
Go back to the parlor.
Parlor
Click on the table in the parlor.
Place the candle holder on the star shape.
Place the airplane on the shape to the left of the star shape.
Place the picture frame on the three boxes
Put the dog fang on the shape to the right of the portrait.
Place the dove on the final shape remaining.
Click on the floating blanket. Pick up the revealed sword.
Chapter Two: Sir Arthur Conan Doyle's Manor
Outside Gates
Investigate the gate lock.
Pick up the clover on the lock.
The raven is at the top of the building on the right side of the roof.
Go inside the gatehouse.
Inside the Gatehouse
The raven in the room is at the top of the arch on the wall on the left side, to the right of the lantern.
Pick up the crate on the floor to the left.
Grab the pliers on the wall to the right, in between the table and the shelf.
Investigate the skeleton.
In place of where the top button on the shirt would be is the clover. Pick it up.
Grab the book the skeleton has in it's hand.
Grab the railroad tie.
Leave the gatehouse and return outside.
Outside Gates
Use the pliers on the hinges of the gate.
Enter the grounds.
Manor Grounds
Grab the barrel on the left side of the house on the ground.
Pick up the railroad tie.
The raven is amongst the branches to the top right of the screen.
The clover is near the chimney, almost to the top of the brickwork.
Go the the Manor Entrance.
Manor Entrance
Grab the railroad tie on the left side of the left window.
Grab the other railroad tie located on the top of the right side of the roof.
Grab the barrel on the porch to the left side of the archway.
The clover can be found on the bottom right of the archway beam.
The raven can be found on the bottom left archway beam.
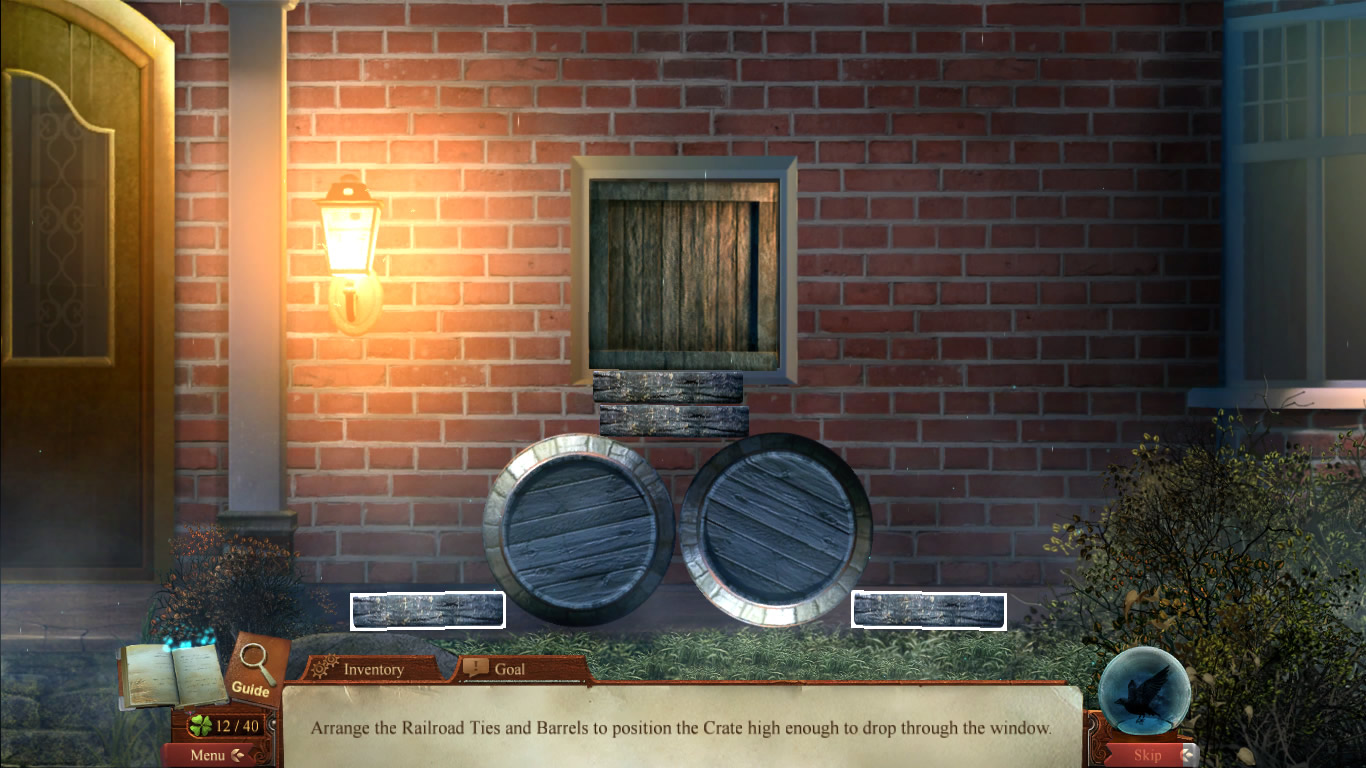
Investigate the right window.
Click on either the barrels, railroad tie's, or the box to place all of them on the ground under the window.
Place one of the railroad tie's to the left side of the porch.
Place another railroad tie to the right side of the porch.
Put the two barrels in between the two railroad tie's so that the gap between the two is located under the window.
Stack the remaining two railroad tie's on top of the two barrels.
Last, place the box on the very top so that it's centered with the window and can slide in.
Screenshot
Watch the box slide in.
Entry Room
The raven is perched on the shelving above the fire.
The clover is attached to the plant on the table in the hallway.
Pick up the crystal ball from the broken crate.
Grab the fountain pen to the right of the duck on the table.
Go into the sitting room, located through the door at the end of the hallway.
Sitting Room
After speaking to the ghosts, give the fountain pen to Lady Doyle.
Pick up the ghost message and give it to Houdini.
Grab the plus sign card.
Pick up the circle card located on the settee in front of the desk.
Grab the water card from the right of the plant on the windowsill.
On a branch outside the window is the raven: click it.
Grab the star card from the second shelf with books on it.
The clover is in the metalworking of the fireplace grate on the left side.
Grab the square card from the top right side of the mirror above the fireplace.
Return to the entry room.
Entry Way
Click on the door to the right.
Place the ESP cards in the correct slots.
North slot: Star card.
West slot: Circle card.
South slot: Squiggle lines card.
East slot: Square card.
Center slot: Plus sign card.
A new puzzle will pop up: Turn to the left or the right to move the ball.
Turn left
Turn right
Turn left twice.
Turn right.
Turn left twice.
Turn right twice.
Fall on circle.
Turn left three times.
Turn right.
Turn left twice.
Turn right twice.
Turn left.
Hit squiggle lines card.
Turn left twice.
Hit star card.
Turn right.
Turn left.
Turn right three times.
Turn left twice.
Turn right twice.
Turn left.
Turn right.
Turn left three times.
Turn right.
Hit the plus sign card.
Go into the den.
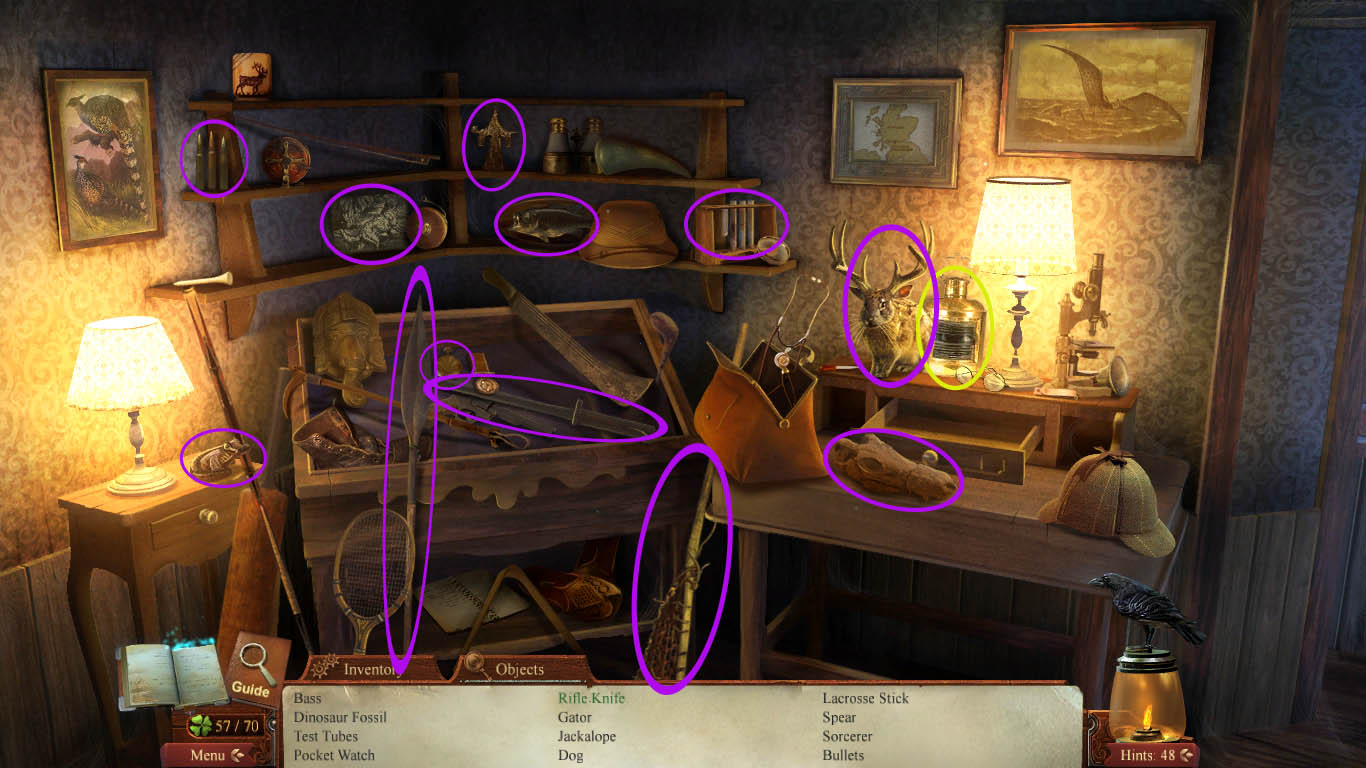
Den
The clover is located in the middle of the pillow on the lounge chair.
The raven is found atop the antlers of the deer head on the wall.
Click on the hidden object scene.
There are two clovers: One located under the picture of the pterodactyl. The other is located on the display table, to the right of the tennis racket.
You can investigate the bag on the table to open up and find hidden items.
The single drawer on the table holding the bag can also be investigated to open and reveal a hidden object.
Book: On the right table, behind the Sherlock Holme's hat.
Dart: On the top of the right shelf, under the rifle.
Seal: On the second shelf, right side. Toward the right end of the shelve.
Blood Pressure Monitor: Located in the box to the right of the doctor's bag.
Doctor's Certificate: Located behind the rabbit on the right table. In between the antlers.
Gun's Magnnifier: Scope located on the top left shelving.
Reflex Hammer: Inside the doctor's bag.
Whaling Weapon: Harpoon on the display desk, to the left of the doctor's bag.
Doyle Fingerprint: Open the drawer underneath the rabbit to reveal a paper with the fingerprint.
Rifle 1: On the top wall above the right shelving.
Rifle 2: Underneath the display desk, to the right side.
Blowgun: Underneath the display desk, resting on the tennis racket.
Winged People: Fairies. The picture is found on the right shelving, second shelf left side.
The safe handle is located on the second left shelf to the right side, behind the violin bow.
Screenshot
Give Doyle the sword.
Investigate the paper he drops to the floor.
Chapter Three: WW1 Trench and Boston
Bunker
The clover is located on the box to the right, next to the lantern.
The raven is located on the right side of the artillery gun on the right side of the trench.
Grab the dog tags next lying next to the corpse on the left side.
Give the tags to Kingsley Doyle.
Go forward into the path leading to the bunker.
Bunker Door
The clover is on the top of the wall to your immediate left.
The raven is sitting on the light to your right.
Investigate the poster on the door.
Go into the bunker.
Bunker
The raven is located on the back metalwork of the bottom bunk.
Grab the shovel from the top left space on the shelf above the desk.
Investigate the briefcase on the top bunk.
The clover is to the left of the briefcase handle.
Change the numbers on the briefcase to 13.
Grab the badge.
Go back to the trench.
Trench
Use the shovel on the ground where Kingsley Doyle had been hovering above prior.
Investigate the barrel.
Grab the ghost club card and the note.
Return to the bunker.
Bunker
Once in the bunker, click on the ghost club card, then the locked door to gain entry.
Go into the secret passageway. Click to go further.
Secret Passageway
The clover is on the wall plank to the left of the bottom door hinge.
The raven is on the right side of the wall, hidden behind the skinniest board.
Click on the ghost club card and click on door to get past.
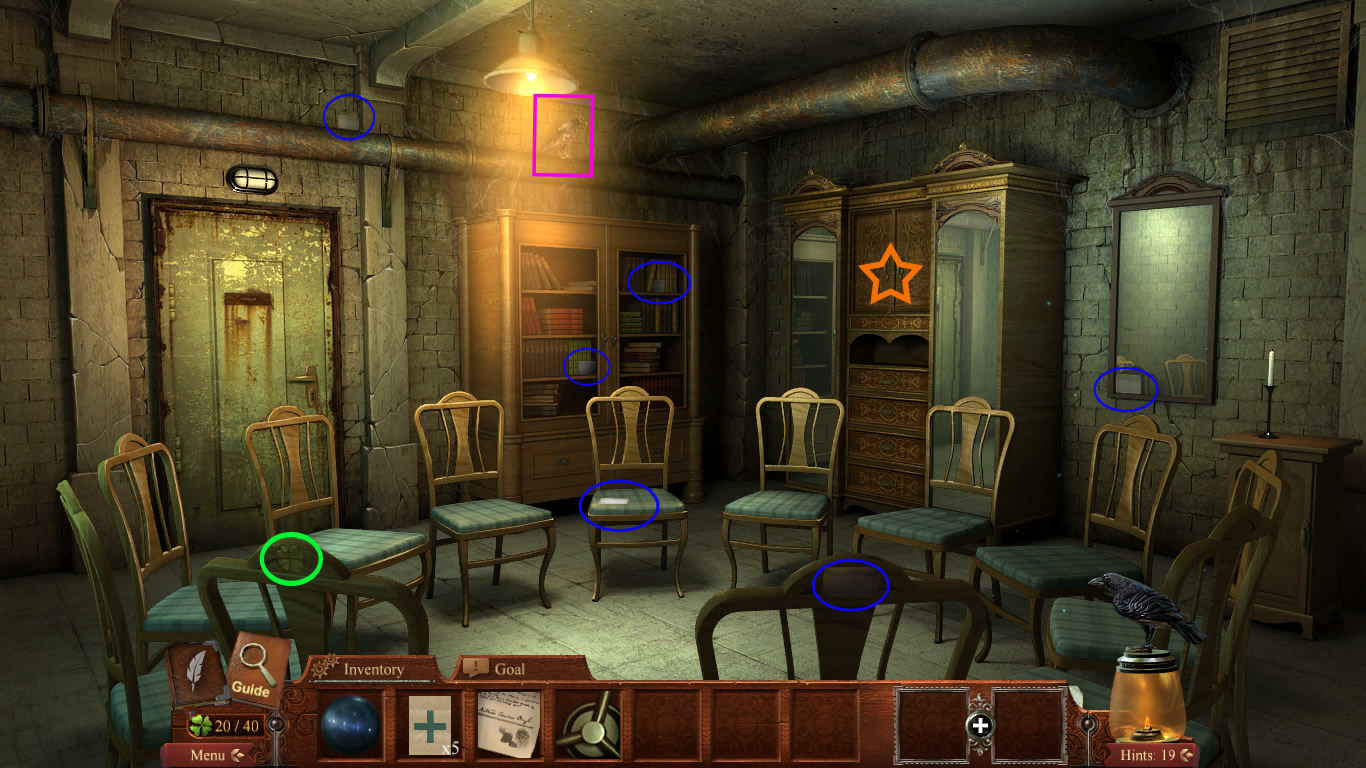
Meeting Room
The clover is found on the back of the chair to your immediate left.
The raven is on the right side of the piping on the left wall of the room.
Collect all the ghost club cards.
On top of the left pipe, located in the middle.
On the back of the chair that's to the right of the chair that had the clover on it.
On the bottom right corner of the mirror on the right side of the room.
On the chair seat directly ahead of line of sight.
Left side of the book case, second shelf from the bottom. On top of green books.
Right side of book case, top shelf. On top of yellow books.
Screenshot
Click on the dresser to the right of the book case.
Click on dressers doors.
Attach the safe handle to the empty spot on the safe.
Solve puzzle:
Click the 1D button that's below the the safe handle.
R stands for right.
L stands for left.
D stands for down.
U stands for up.
The number is how many times you go in that direction and press that button, then repeat process.
Screenshot
Once the safe is open, grab the ghost club card and the key.
Use the key to open the door.
Séance Room
The raven is on the right side of the chandelier.
The clover is underneath the candelabra on the center wall to the left of the curtained doorway.
Grab all the ghost club cards in the room.
On the left side of the chandelier.
In between the rungs on the chair closest to you on the left side.
To the left of the left candelabra of the center wall, in the topmost box.
In the bottom box on the left of the candelabra on the right side of the center wall.
On the right wall where the blue paint meets the woodwork. Near spiderwebs.
Investigate the séance table.
Place the ESP cards on the table.
When Mina arrives, give her the crystal ball.
Go through the door that was previously curtained.
Garden
Speak with Mina's brother to start the minigame.
Row One: Card placed in third box.
Row Two: Card placed on fifth and eighth box's.
Row Three: Card placed on first and third box's.
Row Four: Card placed on fifth box.
Row Five: Cards placed on the third and eighth boxes.
Row Six: Card placed on the first box.
Row Seven: Cards placed on fifth and seventh boxes.
Row Eight: Card placed on second box.
Screenshot
Upon getting all the ESP cards, return to the séance room.
Séance Room
Talk to Mina, then put the ESP cards on the table.
No matter what number you choose, make sure when you do the final counting you click on a star card.
Click on the crystal ball to be transported to Montreal.
Chapter Four: Montreal
Magill Theatre Entrance
The clover is on the box.
The raven is above the plaque that reads "Magill College Theatre Department."
Grab the battery that's on top of the fire hose box.
Grab the ladder stand.
Enter the dressing room.
Dressing Room
The clover is hidden on the purple dress on the top of the chest.
The raven is hidden in the rug, on the right side.
Grab the charcoal that's on the easel.
Investigate the box on the vanity.
Pick up the letter opener that's in front of the box.
Use the letter opener to open the envelope you see in the mirror.
Grab the doctor's note.
Go back to the easel and use the charcoal on it.
A ghost will appear: give him the doctor's note
Grab the diamond stud tooth.
Return to the vanity and use the diamond stud tooth to open the box.
Grab the cuff links.
Go to the next room.
Back Room
The clover is on the bottom left corner of the mirror.
The raven is perched on the skull.
Pick up the flashlight next to the skull.
Pick up the steps from the back right corner of the room.
Combine the ladder stand and the steps to make a ladder.
Combine the battery and the flashlight housing to create a flashlight.
Click on the ladder and put it under the trap door.
Go up.
Trapdoor
Use the flashlight to see.
Put the cuff links in the bottom hole.
The left puzzle box:
Press the smallest red square first.
Click the red rectangle with the up arrow sign and click it once more when it's connected to the other red rectangles.
Click any of the yellow rectangles.
Click on any of the blue rectangles.
The right puzzle box:
Click on the smallest red square that's the closest to the inside underneath the blue squares.
Do the same thing for the one under the green squares.
Now that they're touching, click any of the blue rectangles or squares.
Repeat the same with the green squares.
Once the red rectangle has connect to the small red squares, hit any of the red's to make it vanish.
After unlocking the door, head up.
Stage
The raven is located on the clock face.
The clover is in the bottom square of the clock.
Talk to the ghost, then pick up the axe.
When the box is taken out of the tank, break it open with the axe.
Talk to Bess and receive the admittance letter.
Climb into the box.
Presented with a lock once more, use the flashlight to light the area.
Use the paper fastener to open the cover and reveal the puzzle.
Solving the puzzle:
Click on the single blue square.
Click on any of the green squares or rectangles.
Click on any of the red pieces.
Train Compartment One and Two
Click on the ghost you see in the first train compartment.
Once in the second train, compartment talk to the ghost.
The raven is a silhouette on the back of the train seat to the right.
Pick up the train ticket on back of the train seat to your left.
Grab the green IV> from the top of the opened suitcase.
Pick up the blanket from the right side of the screen, behind all the fallen luggage.
Grab the pillow that is to the left of the suitcase holding the IV.
Pick up the coat hanger hanging under the storage space on the left side.
Go back to the room you started in.
The clover is on the metal panel to the left of the oxygen tank.
The raven is on the ceiling to the left of the first aid kit.
Pick up the oxygen tank.
Pick up the guillotine blade.
Pick up the first aid kit.
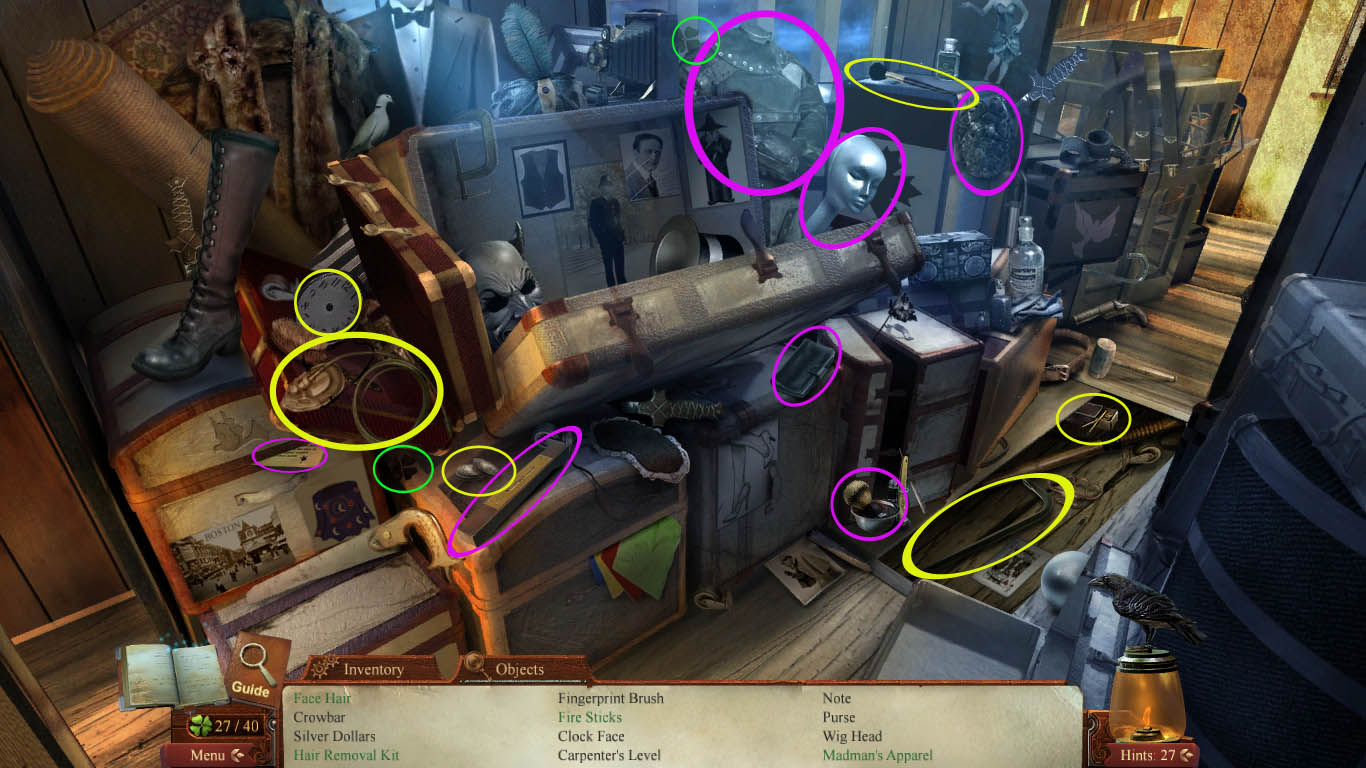
Click on the hidden object scene.
There are two clovers: One is underneath the red suitcase. The second is on the left shoulder of the straight jacket.
The red suitcase is an interactive item.
The floorboards that are already slightly out of place are also an interactive item.
Face Hair: Hanging from the box to the right with the sword sticking out of it.
Crowbar: Under the floorboards to the left of the King's card.
Silver Dollars: On top of the chest that has the handkerchiefs sticking out.
Hair Removal Kit: Brush with cup for shaving cream, located on the floor in front of the chest that's on it's side with the lid slightly ajar.
Fingerprint Brush: On top of the box that also had the face hair on it.
Firesticks-Matches: found under the floorboards at the top left corner.
Clock Face: In the red suitcase, to the left of the monkey wrench.
Carpenter's Level: On the closed chest to the left of the blindfold.
Note: Corner is sticking out of the chest with the boot on top of it.
Purse: On the chest that is under the open suitcase with the devil mask in it.
Wig Head: To the left of the box the fingerprint brush and face hair were on.
Madman's Apparel: The straight jacket the second clover was found on the shoulder of.
Oxygen Mask: In the red suitcase in front of the brush and wrench.
Screenshot
Combine the oxygen tank and oxygen mask to create a resuscitator.
Go to forward until you are at the coupling compartment.
Coupling Compartment
The raven is on the left side near the railing.
The clover is on the wall to the right of the railroad tongs.
Pick up the punch that is to the left of the raven.
Pick up the railroad tongs.
Combine the ticket and the punch.
Go forward.
Luxury Compartment
Give the punched ticket to the railroad conductor ghost.
The raven is perched on the seat to your right.
The clover is in the intricate wall pattern, located directly under the paper hanging from the wall.
Investigate the cabin.
Use the hanger to open the door.
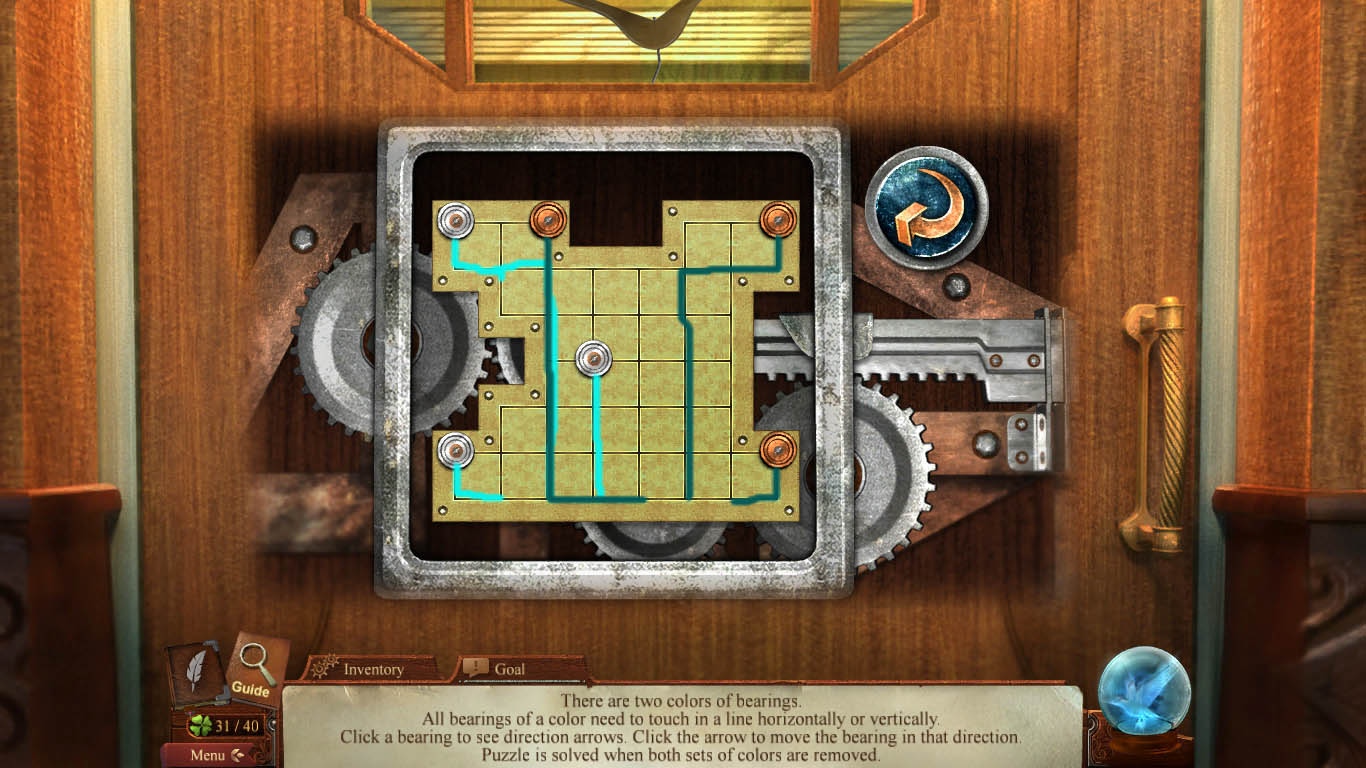
A puzzle will appear:
You can start with either the silver or the bronze bearings.
Bronze Bearings
Click on the bronze bearing at the top right. Move it left. Click on it again to move it down. Leave it there.
Click on the bronze bearing at the top left. Move it down. Click again and move it right.
Click on the bronze bearing at the bottom right. Move it down. Click again and move it left.
Silver Bearings
Click on the silver bearing at the top left, move it to the right. Click again and move it down.
Click on the bearing in the middle, move it down.
Click on the bearing on the bottom left, move it down. Click again and move it right.
Screenshot
Enter the room.
Houdini's Cabin
Investigate the paper on Houdini's chest.
The raven is on top of the baggage storage to the right of the red bag.
The clover is hidden on the button indents of the seat, top row three over.
Pick up the note on the seat.
Place the resuscitator in the far left blank space.
The first aid kit and IV are next.
Then the blanket.
Finally, the pillow on the far right empty space.
Go back to the coupling compartment.
Coupling Compartment
Use the crow bar to open the metal plates.
Use the railroad tongs on the coupling pin.
Cut the break lines with the guillotine blade.
Return to Houdini's Cabin.
Houdini's Cabin
Investigate Houdini's ghost.
Posted by: Meaghan |
February 8, 2012 5:18 PM
|
February 8, 2012 5:18 PM
Midnight Mysteries: Haunted Houdini Deluxe
Chapters 5-12
Chapter Five: Grace Hospital and Graveyard
Waiting Room
Grab the IV stand.
Combine the IV stand with the IV bag.
Pick up the doctor's coat.
Grab the blood pressure cuff.
Grab the doctor's bag.
The raven is at the top of the stairs perched on the banister, look to left of column.
Investigate the nurse's stand.
The clover is on the left wall of the medicine cabinet.
Grab the medical chart.
Pick up the doctor's diploma.
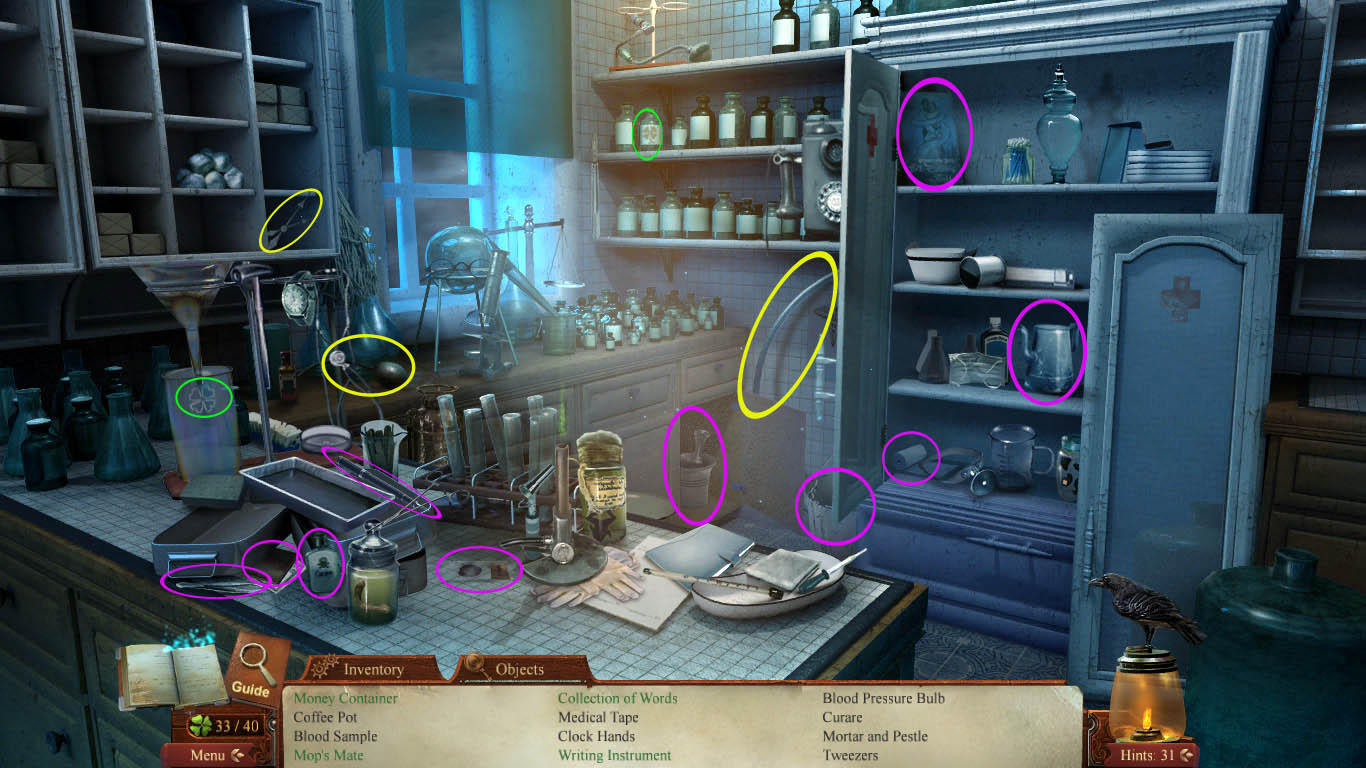
Go to the hidden object scene.
There are two clovers: The first is on the beaker behind the stack of trays. The second is on a medicine bottle along the second shelf to the right of the window.
The cabinet to the right is interactive.
The far right cupboard door is interactive.
Money Container: Wallet found under trays, in front of beaker with clover.
Coffee Pot: Found in cabinet, on the second shelf from the bottom.
Blood Sample: To the left of the surgical gloves.
Mop's Mate: Bucket found to the right of the open cupboard door.
Collection of Words: The book on the top shelf of the cabinet, on the left side.
Medical Tape: Bottom shelf of the cabinet, on the left side.
Clock Hands: Located in the cubicles on the wall, bottom cubicle on the far right.
Writing Instrument: A pen, in a tray to the left of a tray stacked on top of it.
Blood Pressure Bulb: On the counter to the left of the window.
Curare: The little bottle to the left of the stack of trays.
Mortar and Pestle: In the interactive cupboard.
Tweezers: To the left of where the bottle of curare was.
Metal Hoop: Against the wall to the left of the cabinet.
Screenshot
Combine the clock face and the clock hands.
Combine the blood pressure cuff with the blood pressure bulb.
To get through the doors, use the Admittance Letter.
Hospital Room
Pick up the swing light.
Pick up the wheelchair wheel.
The raven is perched on the chair.
Start putting the room back together:
The clock goes on the circlular stain on the wall.
The first aid kit goes underneath the clock, along the square stain.
The blanket and the pillow both go on the mattress.
The medical chart is placed at the foot of the bed, on the frame.
The doctor's bag goes on the chair seat.
Attach the wheelchair wheel to the wheelchair.
The IV unit goes to the right side of the bed.
The doctor's coat is placed on the hook to the right of the broken shelving case.
The blood pressure device is placed along the picture on the wall showing how to use it.
The swing light is placed on the wall to the right of the blood pressure device.
The doctor's diploma is placed in the square above the shelf holding the blood pressure device.
Screenshot
Once done, investigate the table to the right of the bed.
There is a clover on the box, in the middle of the bottom casing.
Combine the charcoal and fingerprint brush.
Dust the syringe with the fingerprint kit.
Use Doyle's fingerprint to compare the two.
Use the hoop on the levitating body.
Grab the candle.
Inside the Coffin
Combine the candle and the matches.
Use the lit candle.
Use the resuscitator to breathe.
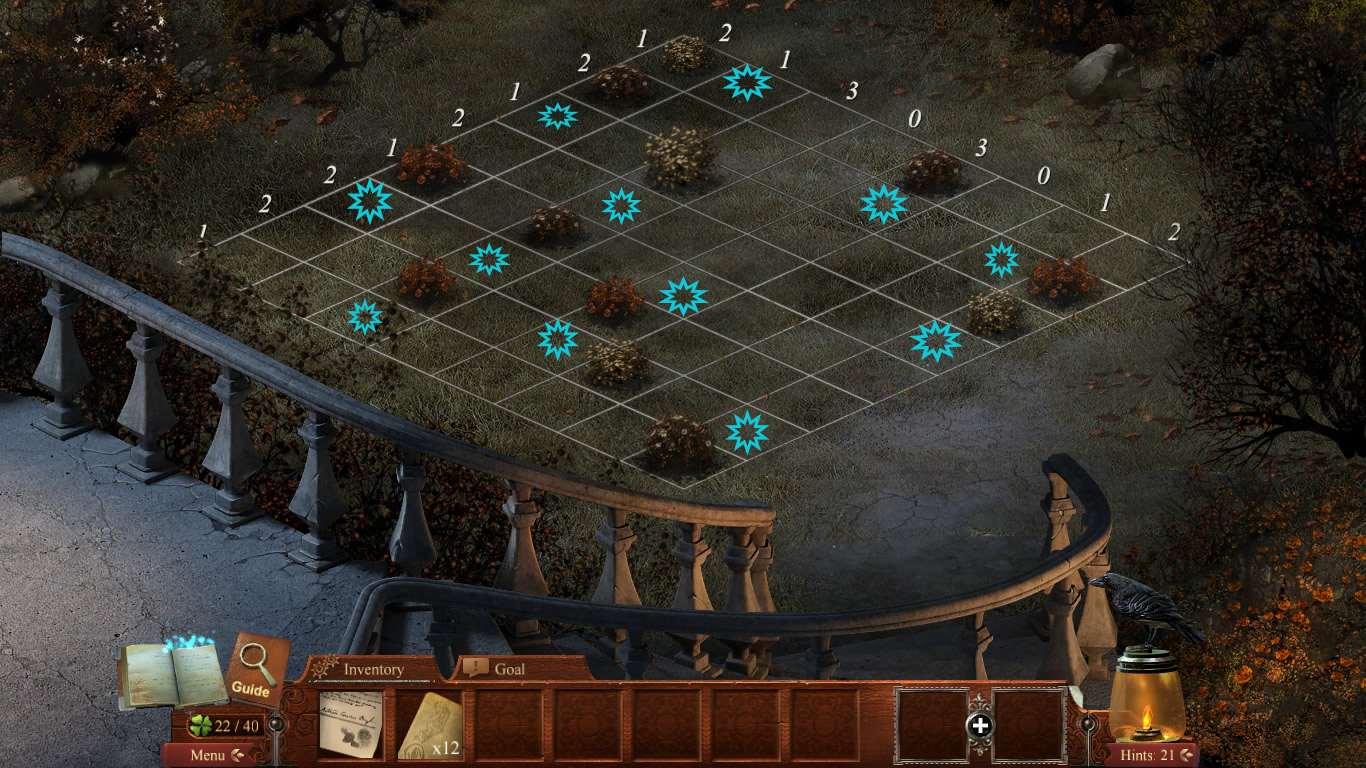
Click on the poster to reveal the puzzle. This puzzle changes with each play through.
You have to find the small buttons. Each row says how many buttons are in it, diagonally and horizontally.
Buttons will never be touching each other, so you are guaranteed at least one space between each one.
You must find each button within 35 clicks, or else you will have to start over.
Above the air tank it will tell you how many of what size buttons there are.
The smaller button is a two square long button.
The medium button is a three square long button.
The longest button is a four square long button.
Climb out of the coffin and go to the next room. Continue up through the trapdoor.
Graveyard
The clover is on a cross on the right side that's on top of a gravestone.
The raven is atop the arch, on the right side.
Go to the right to view Houdini's grave.
Investiate the gravestone on the ground to the left.
The clover is on the grass below the gravestone.
Investigate Houdini's grave.
The raven can be found astride the statue's shoulder.
Chapter Six: Houdini's House
Parlor
Grab the key next to the lamp on the fireplace mantel.
Investigate the newpsaper on the table.
Leave the room.
Foyer
The raven is in the poster of Houdini on the wall to the left.
The clover is on the tablecloth for the hall table.
Grab the funeral program on the table under the Houdini poster.
Grab the key hanging from the lamp at the back of the room.
Give Bess the funeral program.
Go up the stairs.
Grab the key on the ball at the top of the banister.
Enter the study.
Study
Grab the key that's on the chair when you first enter the study.
Investigate the desk.
Grab the key that's leaning against the lamp.
Investigate the book shelf.
The clover is on the spine of the second book. It's violet.
Grab the key from the shelf above the books.
Investigate the hidden object scene.
Shoe Polish: In the drawer above the dice.
Liquid Chicken: An egg, in the top right corner of the chest lid.
Fork: Along the outside wood of the chest lid.
Razor: In the chest, to the right of the boots.
Spool: In the drawer above where the shoe polish was.
Coupon Ticket: On the stack of cloth in the dresser, to the right side.
King Card: On the box that's underneath the box of drawers.
Hacksaw: To the left of the lightning bolt on the wall.
Dice: In the bottom fold out drawer.
Hinge pin: Underneath the windowsill, but above the lightning bolt.
Lip Hair: The moustache that's atop the coil of rope.
Blueprint: On the wall to the right of the coat jacket.
Straps: In the chest behind the boots.
Screenshot
Head to the outside walkway.
Entrance Gate
Grab the key hanging from the left side of the gate.
Grab the hacksaw from the overhang above the workshop door.
Back up more to the street.
Grab the key on the street, to the left of the lamp post.
Go to the workshop.
At the workshop door, grab the key jammed in the door.
The raven is perched on the banister to the left.
The clover is in the metalworking of the lamp.
Worshop
Go to the hidden object scene.
Chinese Lantern: Hanging to the left of the row of ducks.
Duck Targets: On the top shelf, right side.
Axe: To the right of the window.
Bee Smoker: On the chair seat, right side.
Coins: On the chair seat, towards the front.
Magician's Rings: Hanging above the skull.
ESP card: On the wall to the left of the fortune teller's box.
Welding Mask: On the floor underneath the table to the left.
Marie Antoinette's End: The guillotine in front of the fortune teller's box.
Lamp: On the desk to the right, green lampshade.
Fancy Head Covering: Hat on top of fortune teller's head.
Wrench: In the toolbox on the wall, behind where the lamp was.
Logger's Saw Handles: On the chair seat, behind the statue.
Screenshot
Combine the logger's saw handles and the saw blade.
Give the keys to Bess to start the trick.
Use the straps.
Use the saw blade.
Chapter Seven: The Circus
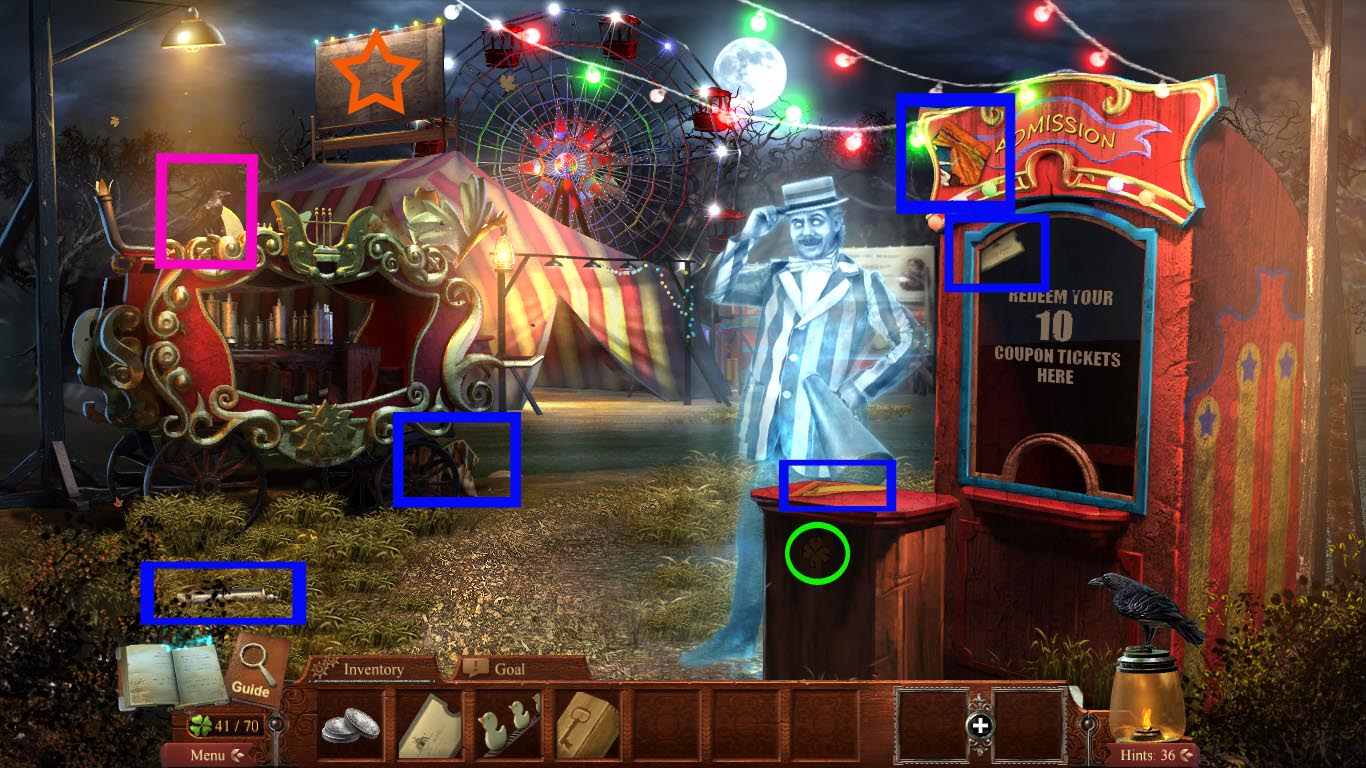
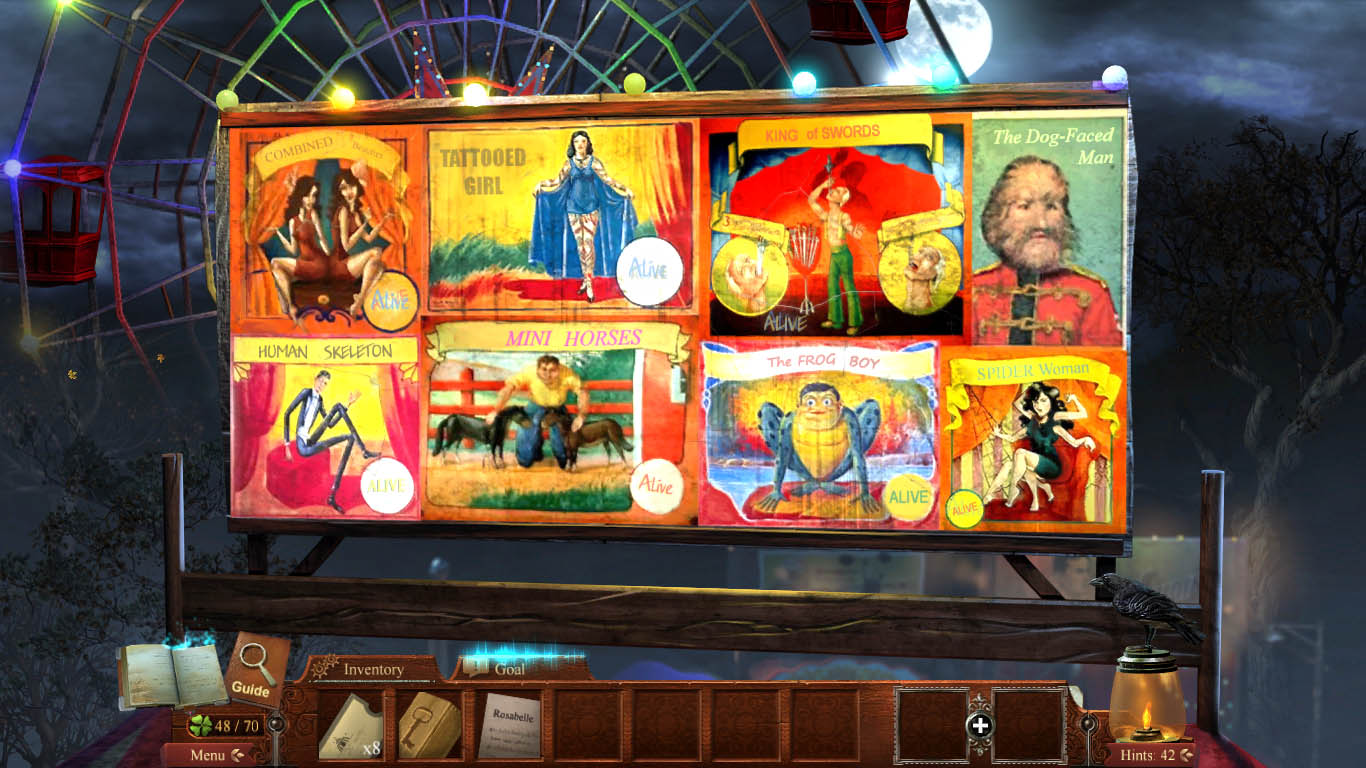
Circus Entrance
Give the silver dollars to the ghost.
Investigate the billboard.
Pick up the four billboard pieces.
Pick up the calliope pipe.
The clover is on the podium stand.
The raven is perched on the top left side of the calliope stand.
Grab the three billboard pieces: One on the top left of the admissions booth, the second on top of the admissions podium, and the third behind the right wheel of the calliope stand.
Pick up the coupon ticket from the top left of the admissions window.
Screenshot
Go to the tent.
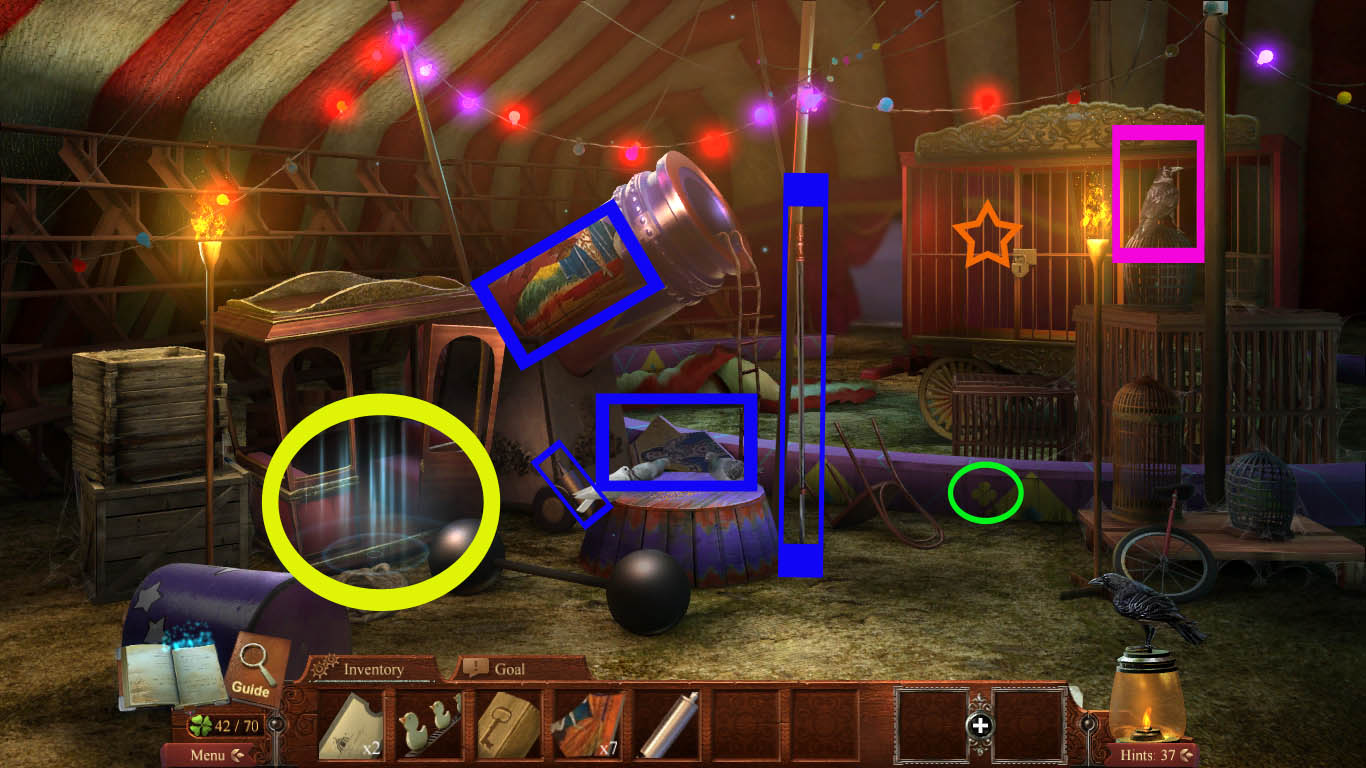
Circus Tent
The clover is along the purple circus ring, to the left of the second green triangle.
The raven is perched on the bird cage.
Pick up the two billboard pieces: The first is behind the pigeons. The second is along the cannon.
Pick up the spiked litter rod leaning against the pole to the right of the pigeons.
Grab the calliope pipe leaning against the wheel of the cannon.
Investigate the cage
Use the spiked litter rod to grab the coupon ticket.
Grab the billboard piece.
Screenshot
Return and click on the hidden objects scene.
There are two clovers: One is on the bottom of the seat. The second is in the far right window frame above the turban.
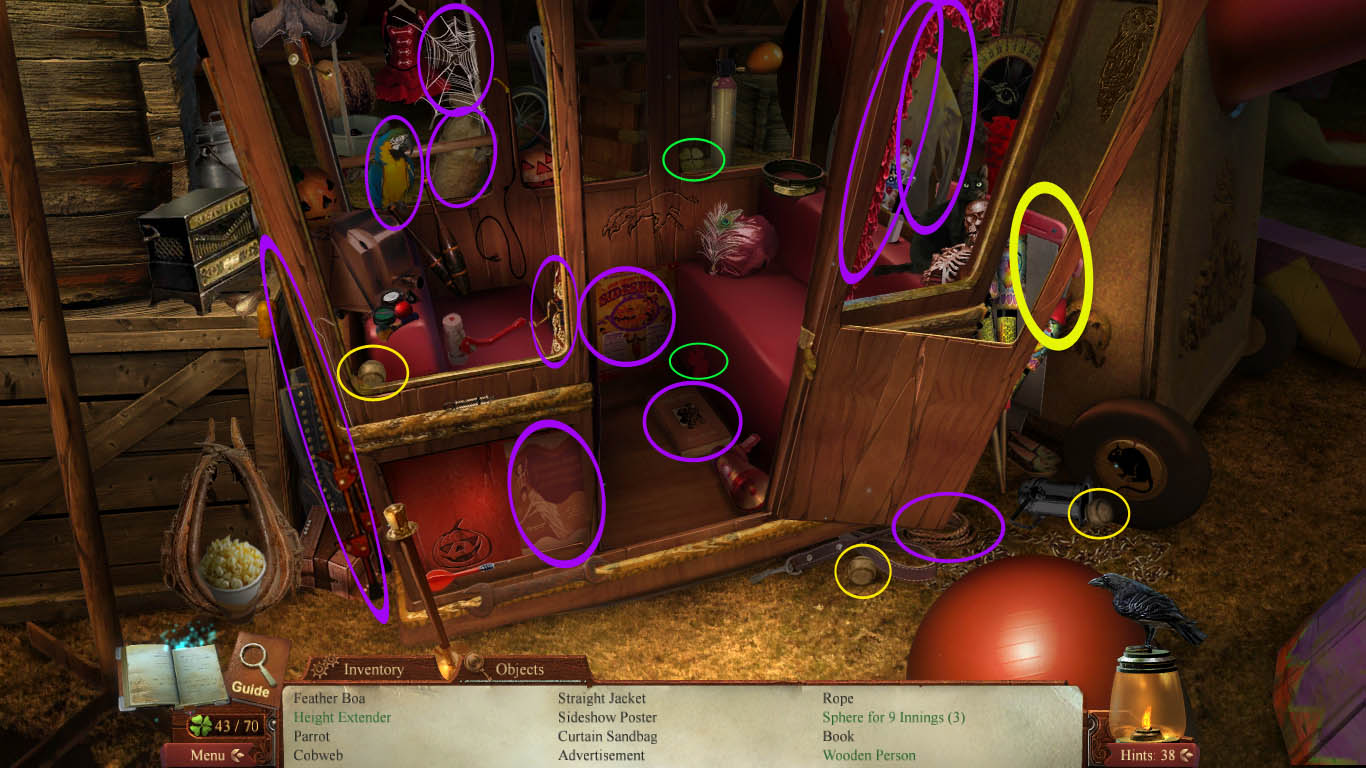
Feather Boa: Hanging along the frame to the right of the open door.
Height Extender: Stilts leaning against the left side of the frame.
Parrot: Perched in the far left window.
Cobweb: Top right of the far left window.
Straight Jacket: On the wall behind the cat.
Sideshow Poster: On the inside of the carriage under the drawing of the hand.
Curtain Sandbag: Along the bottom right corner of the far left window.
Advertisement: On the wall, to the right of the pumpkin drawing.
Rope: Underneath the open door.
Sphere for Nine Innings (3): Baseballs. The first is in the front left window, left bottom corner. The second is under the open door. The third is on the floor next to a stage light.
Book: On the floor of the carriage behind the megaphone.
Wooden Person: Doll to the bottom right corner of the front left window.
Magic Trick Blades: To the right of the cat, behind the rocket cluster.
Screenshot
Leave the tent and head to the midway.
Midway
The clover is on the middle of the ferris wheel.
The raven is on the branch to the left of the picture of Bess.
Click to investigate the stage.
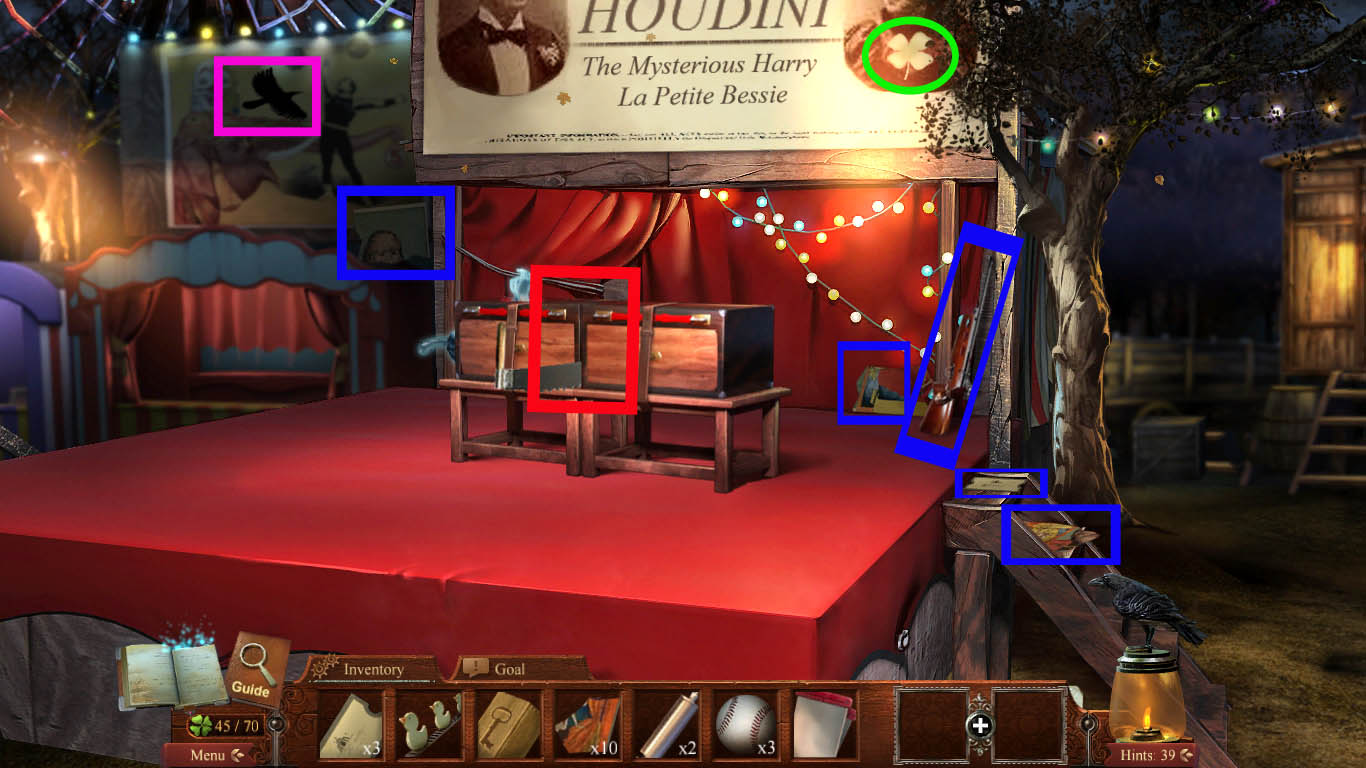
Stage
The clover is on Bess in the billboard above the stage.
The raven is on the billboard to the right of the stage.
Grab three billboard pieces. The first is on the steps, the second underneath the lightbulbs, and the third is on the bottom right of the left billboard.
Grab the rifle, underneath the lightbulbs.
Use the magic trick blades on the box.
Grab the sheet of music.
Screenshot
Head to the game area.
Game Area
Grab the raven, on the lamp post to the left of the billboard.
The clover is on the bottom right of the billboard.
Pick up the billboard pieces: The first is obscuring the face of the clown on the billboard. The second is in between the milk bottle toss and the duck shoot.
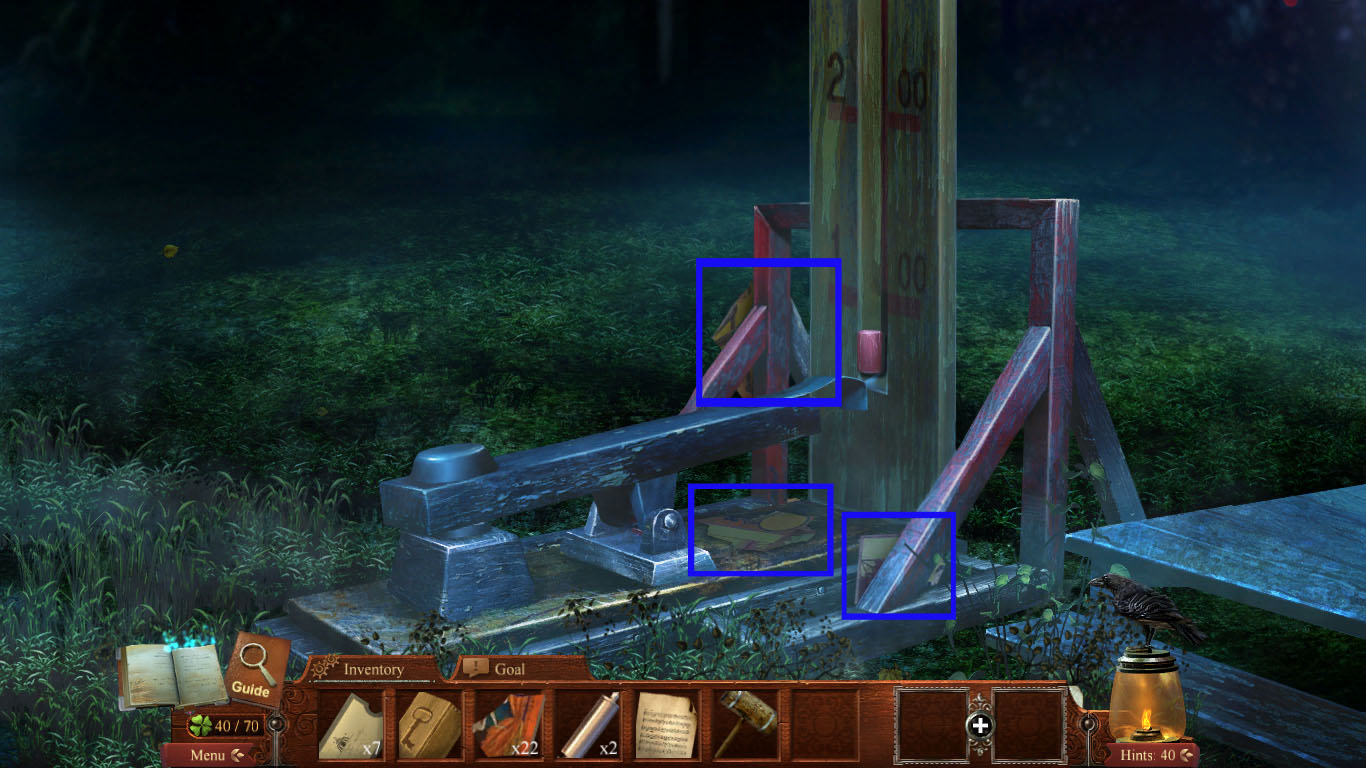
Grab the sledgehammer in the hand of the strong man on the billboard.
Click on the Test of Strength game.
Use the sledgehammer to hit the board and ring the bell.
After ringing the bell, grab the coupon ticket and the calliope pipe.
Grab the three billboard pieces.
Screenshot
Go to the fortune teller and grab the two billboard pieces.
Go to the Milk Bottle Toss and put the baseballs on the counter.
Grab the two billboard pieces.
Knock down the milk bottles. For the middle set, throw when the meter is lower. For the left and the right, throw when the meter is on the higher end. Always aim for the spot between the bottom and middle row.
Take the circus tickets.
Screenshot
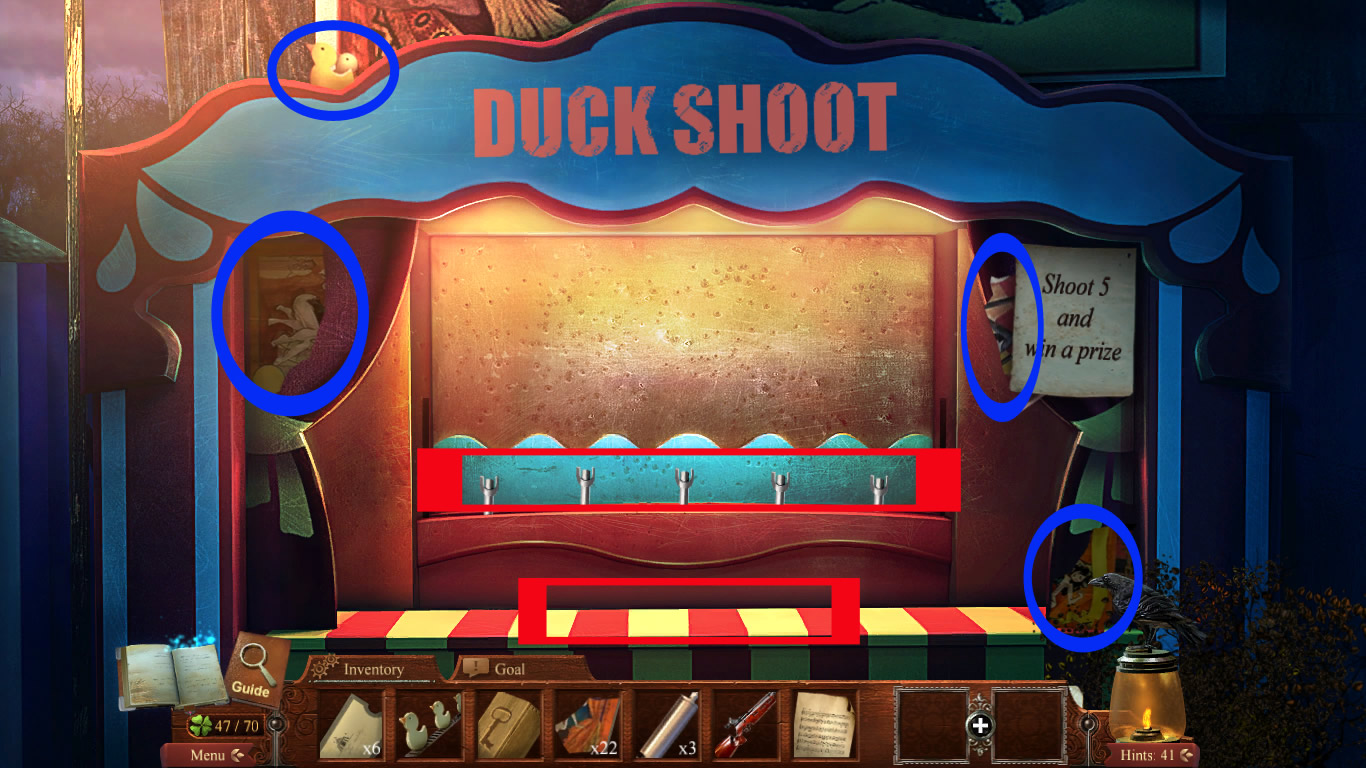
Go to the duck shoot.
Grab the billboard pieces.
Grab the duck targets.
Attach the duck targets to the posts.
Put the rifle on the counter.
Put the target on the ducks and shoot.
Take the coupon ticket.
Screenshot
Wagon
Grab the raven.
Grab the clover.
Pick up all the billboard pieces.
Grab the calliope pipe.
Leave and head to the Calliope.
Screenshot
Calliope
Grab the raven.
Grab the clover.
Grab the two billboard pieces.
Place the calliope pipes on the calliope.
Investigate the calliope.
Place the sheet music on the top of the keyboard.
Take the revised music sheet.
Screenshot
Go to the billboard.
Billboard
Put all the billboard pieces on the billboard.
The best way to reconnect the billboard is by getting all the corner pieces put in place first.
Pick up the circus ticket.
Return to the wagon.
Screenshot
Wagon
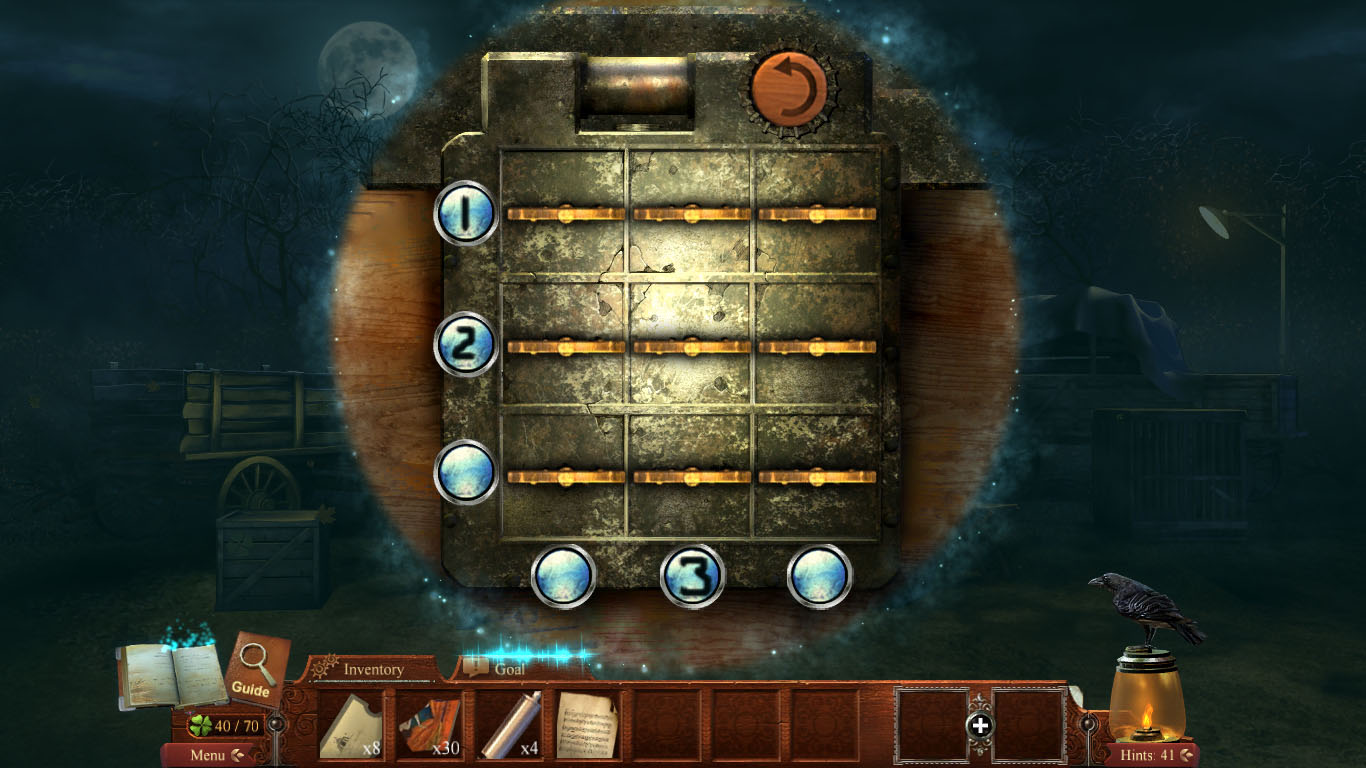
Investigate the wagon, then place box of keys on the puzzle.
Click on the top left button first.
Hit the bottom middle button second.
Hit the middle left button last.
Screenshot
Enter the wagon.
Give Rosabelle music sheet to Houdini.
Pick up the deck of cards and give them to Houdini.
After the card trick, investigate the portrait on the wall.
Grab the coupon ticket.
The raven is in the windowsill.
The clover is in the middle of the all the window panes.
Leave the wagon and go back to the circus entrance.
Circus Entrance
Give the coupon tickets to the admittance box.
Take the token.
Return to the game area.
Game Area
Give the token to the fortune teller.
Click on the book.
Chapter Eight: Houdini's Home
Parlor
Grab the clover at the bottom of the picture.
Pick up the document from the table.
Combine Rosabelle and the Believe notebook.
Give the code to Doyle.
Leave the room.
Foyer
The clover is on the wall to the left of the base of the stairs.
The raven is a silhouette to the back of the room.
Head up the stairs to confront Ford.
Study
Investigate the book case.
Grab the Under the Pyramid's book.
Grab the clover.
Talk to Ford.
Chapter Nine: Mina's Home
Séance Room
Speak with Mina.
Pick up the upholstery button.
Investigate the door on the left.
Put your two cards next to the lock.
Based on your cards, push the two locks in to match them. Top lock is the heart card, the other is the diamond card.
Go into the Fortune Room.
Fortune Room
Grab the clover.
Grab the raven.
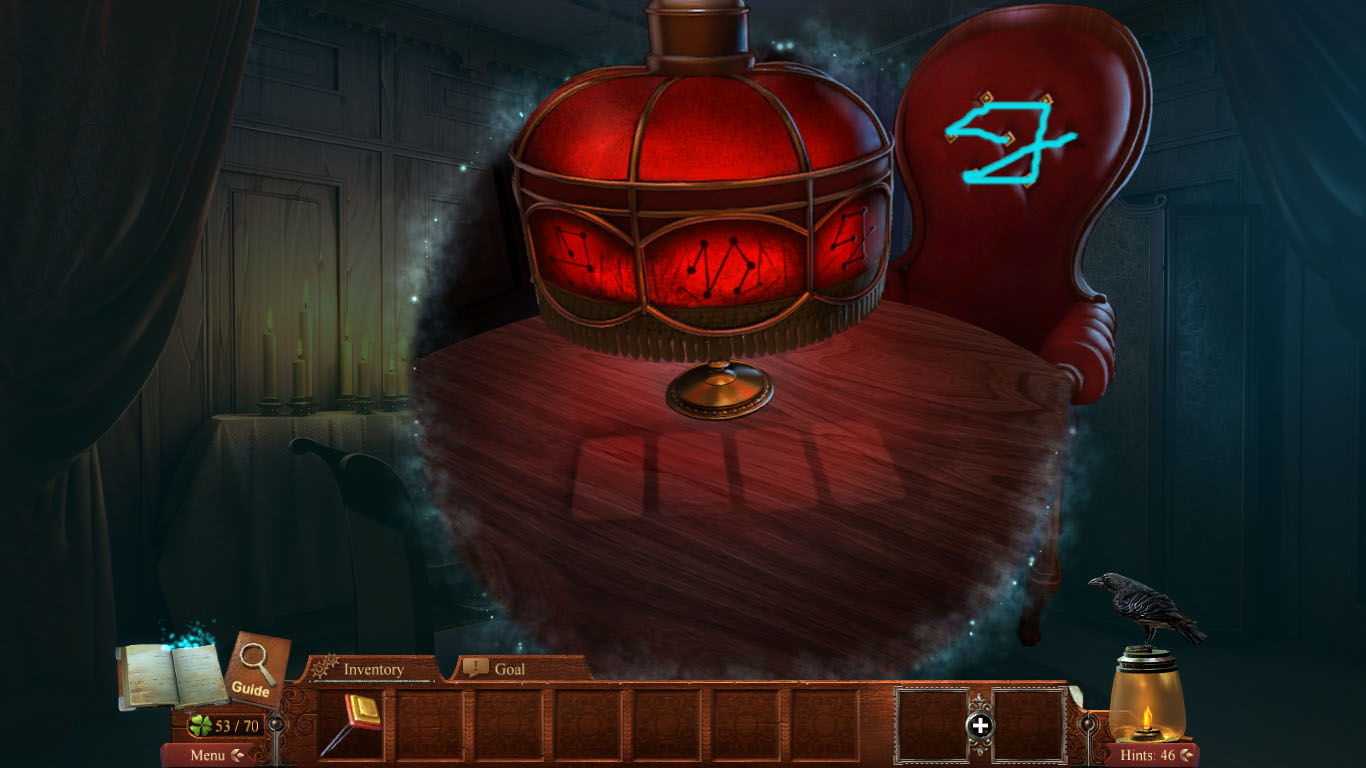
Investigate the crystal ball.
Place the upholstery button in the chair.
For the puzzle, press the buttons in the outline of the third figure on the lamp shade.
Screenshot
Click on the hidden object scene.
Grab the two clovers: The first on the wall to the left. The second is on the handle of the table drawer.
Face Mold: On the right wall, on the second shelf.
Flame Increaser: Fire bellows underneath the table behind the fan.
Fishing Reel: Top shelf of the cabinet to the right side.
Photo: Bottom shelf to the right.
Voice Amplifier: Megaphone, top shelf on the left side.
Bee Smoker: To the left of the boot on the floor.
Camera: In the right cupboard that was an interactive item.
Log Book: Top shelf on the right wall.
Class Ring: On the table underneath the mirror.
Stopwatch: Underneath the mattress on the bed frame.
Tarot Cards: On the right wall, second shelf.
Lock Pick Set: Underneath the table, in the case.
Brand: On the table under the candelabra.
Screenshot
Give the tarot cards to Mina.
Investigate the crystal ball.
Chapter Ten: Doyle's Manor
Manor Grounds and Entrance
Grab the raven from the top of the building near the chimney.
Pick up the clover from under the second window to the right.
Go forward to the manor entrance.
Give the brand to Doyle.
Enter the manor.
Manor
Click on the raven perched atop the door frame.
Click on the clover on the tilted photo frame on the wall above the hallway.
Investigate the fireplace.
Pick up the blowgun.
Head into the den.
Den
Investigate the hidden object scene.
Bass: On the third shelf, right side.
Dinosaur Fossil: On the desk to the right of the doctor's bag.
Test Tubes: On the shelving to the right. Third shelf far right.
Pocket Watch: On the display desk to the right of the elephant mask.
Rifle Knife: Bayonet, on the display desk to the left of the machete.
Gator: Figurine on the side table to the left of the display desk.
Jackalope: The rabbit with the antlers.
Dog: Picture on the left shelving, second shelf. Towards the center.
Lacrosse Stick: Leaning against the desk holding the doctor's bag.
Spear: To the right of the tennis racket.
Sorcerer: Figurine on the middle side of the right shelf.
Bullets: Middle shelf on the left side.
Lantern: To the left of the lamp underneath the picture of the pterodactyl.
Screenshot
Leave the manor grounds and go to the gatehouse.
Gatehouse
Investigate the skeleton.
Pick up the dart.
Combine the dart and the dart gun.
Go to the bog.
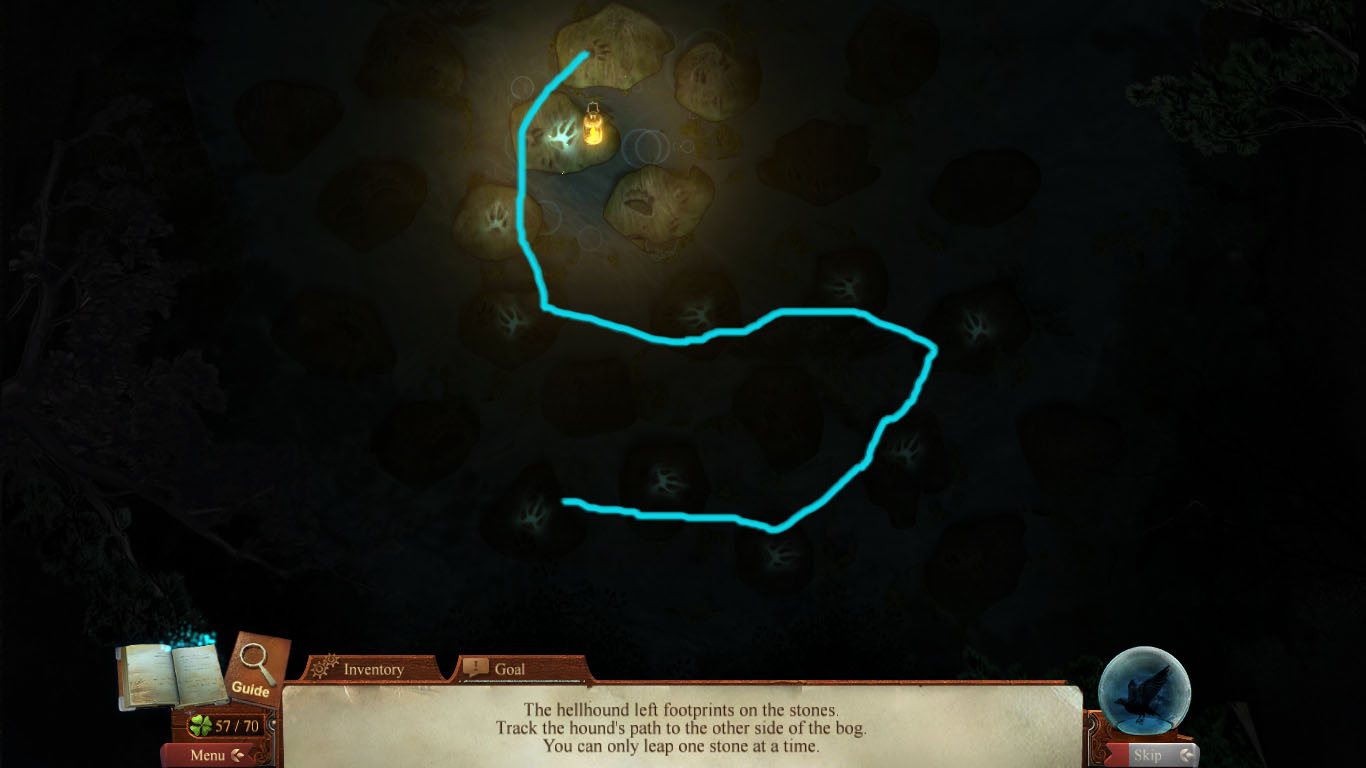
Bog
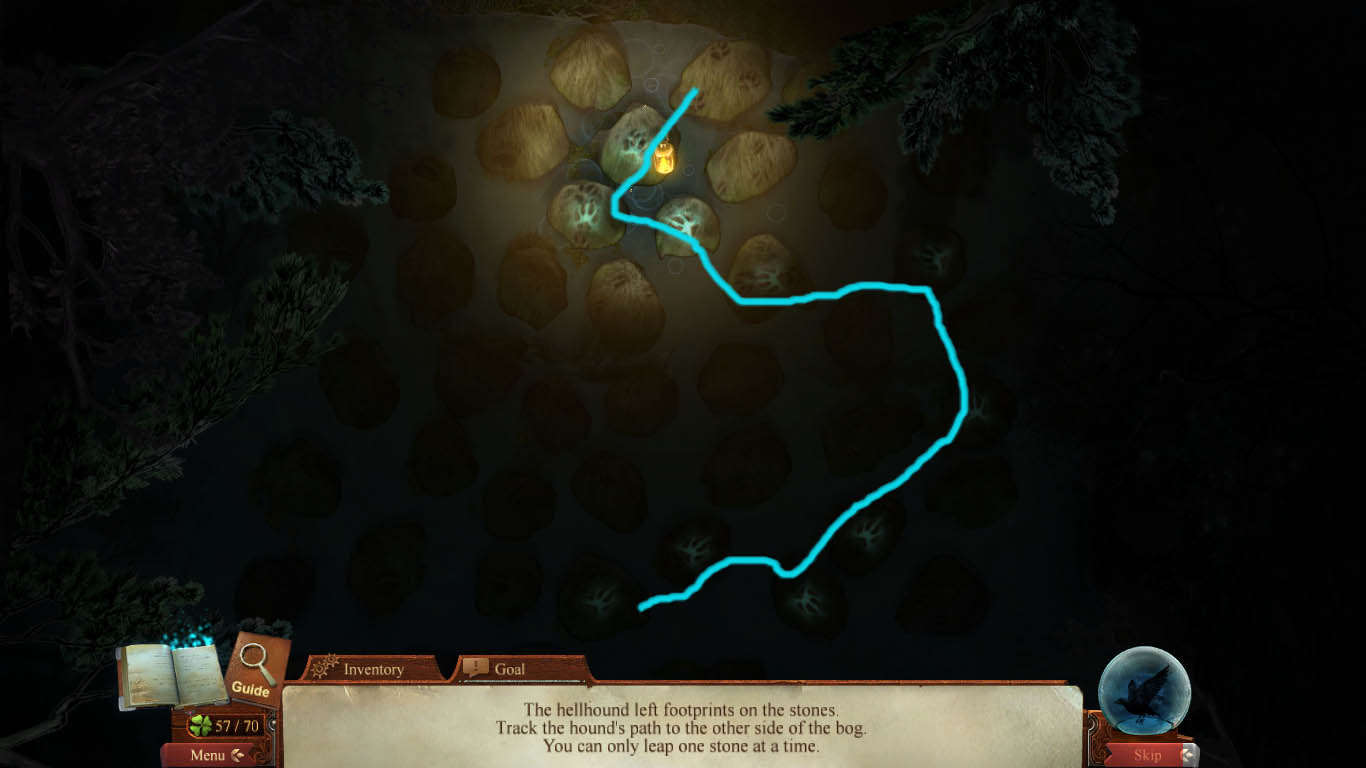
Use the lantern to light the area.
Follow the paw prints.
Screenshot
Screenshot
Screenshot
Screenshot
Once at the end of the bog, use the dartgun on the hellhound.
Click on the clover on the left stone of the henge.
Click on the raven perched on the top of the stone henge.
Investigate the water.
Investigate the skeleton.
Click on the bottle.
After the skeleton falls, grab the numbered tile.
Head back above water and speak to Doyle.
Pick up the Roi de Baton.
Chapter Eleven: Mina's Home
Séance Room
Trail back and go into the ghost club room.
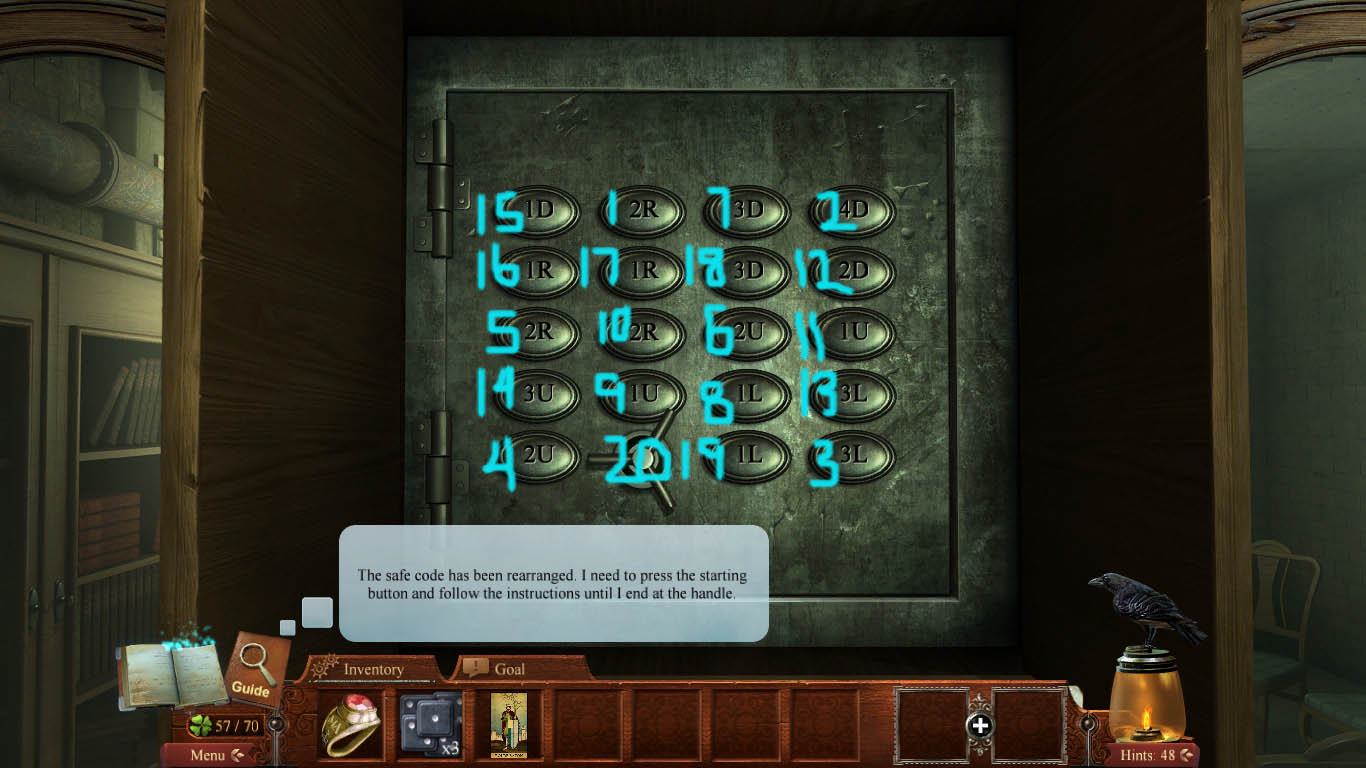
Ghost Club Room
Go to the dresser.
Follow the puzzle, using the same method as before.
Start at the very top on the 2R.
Pick up the copper.
Pick up the crystal.
Screenshot
Go to the living room, the door to the right in the séance room.
Living Room
Show the class ring to the ghost.
Grab the clover from the back of the chair to the right.
Grab the raven perched on the chandelier.
Investigate the middle window.
Pick up the spirit board pointer.
Place the crystal on the chandelier.
Use the spirit board pointer on the spirit board on the floor.
Take the spirit code.
Click on the desk.
To open the desk, you must open the desk drawers in the proper sequence. The chairs in the séance room show which drawers to open (chairs pulled out) and which drawers stay shut (chairs pushed in).
Left side: The top two and bottom drawers must be pulled out.
Right side: The middle two drawers must be opened.
Once the desk is opened, click on the clover.
Pick up the pencil.
Click on the séance code and click on the desk.
Place the tiles in the order of the séance code.
Top: 6-3-0-7-1
Bottom: 5-2-9-4-8
Pick up the notebook.
Use the pencil on it.
Pick up the secret society card.
Return to the Séance Room.
Séance Room
Use the secret society card to get in the left doorway.
Fortune Room
Investigate the crystal ball.
Place the Roi de Baton card on the table.
Pick up all the number tiles around the room.
The first is on the table with the candles on it.
The second is on the table with the crystal ball.
The third is on the red chair.
The fourth is at the top of the right wall.
Go to the living room once more.
Living Room
Click on the rug.
Investigate the floor.
Once the puzzle is revealed, place the number tiles on it.
The amount of moves a tile can make is marked on the tile.
You must use the entirety of the moves before the tile can be done.
The left tile puzzle:
The tile with one move: Move to the indent right.
The tile with two moves: Move down twice.
The tile with three moves: Go to the right, then up, then left.
The tile with four moves: Go to the right, up, then left twice.
The right tile puzzle:
Move the left side tile with two moves on it down once.
Move the tile with three moves to the left, then move it up once. Move it back down into the indent.
Move the tile on the left with one move remaining into the top center indent.
Move the tile on the right with two moves remaining down twice into the indent.
Click on the body in the casket.
Chapter Twelve: Graveyard and Resolution
Graveyard
Go to the casket underground.
Investigate the casket.
Place Houdini's body in the casket.
Return to the top of the graveyard.
Houdini's Home
Click on the paper on the table.
Investigate the box.
Grab your reward!
Screenshot
Posted by: Meaghan |
February 8, 2012 5:20 PM
|
February 8, 2012 5:20 PM