

![]() One fateful April day back in 2008 Tesshi-e debuted on the room escape scene with a simple game, Mild Escape. Ever since then on the anniversary of that first game the hapless player of Tesshi-e's games — our famous unknown protagonist -- goes back to that same town and opens that same door in order to reminisce about days gone by and of course escape another room. This year Tesshi-e marks their anniversary with the fantastic Mild Escape 4, now with bells and whistles you couldn't have imagined if you've ever played that first game.
One fateful April day back in 2008 Tesshi-e debuted on the room escape scene with a simple game, Mild Escape. Ever since then on the anniversary of that first game the hapless player of Tesshi-e's games — our famous unknown protagonist -- goes back to that same town and opens that same door in order to reminisce about days gone by and of course escape another room. This year Tesshi-e marks their anniversary with the fantastic Mild Escape 4, now with bells and whistles you couldn't have imagined if you've ever played that first game.
 Unlike with last year's anniversary game, Mild Escape 3, we now know the back story thanks to Idahhh's fantastic English translations. Change the language at the beginning of the game before you hit the intro and you'll feel a little nostalgic as the camera pans down a flat, two dimensional cartoony wall to the door that started it all. Once inside the space you must point and click your way around the room, investigating every nook and cranny, picking up everything you can find, and solving a few puzzles in order to escape. This is all classic Tesshi-e involving the use of found objects, the combining of objects, sharp observation, and puzzle solving.
Navigation is either by bars at the sides of the screen or clicking on certain areas that look interesting for a closer look. Inventory control is its usual marvel of efficiency and although there's still no changing cursor the clickable areas are pretty obvious which cuts down on the pixel hunting. Tesshi-e has added a new control called the "function" button, which allows the player to pull up a menu allowing them to save the game, restart, or even change the language mid-stream, very helpful for those who forget to change the language at the beginning and find themselves stuck in the Japanese version of the game (or vice versa). The puzzles are a nice mix of logic, math, and color and we can be very extremely grateful that the "wobbly picture" puzzle is nowhere to be found this time around.
Analysis: Tesshi-e games have improved tremendously from three years ago, when they were composed of fairly basic room escape components. Now we see all the bells and whistles of the larger escape games by designers like Neutral. With the addition of the function button to the mix Tesshi-e now has everything except a changing cursor, and frankly it's almost not needed.
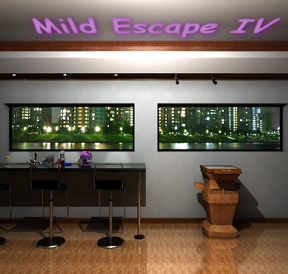
The visuals just get more stunning every time you play a Tesshi-e game and Mild Escape 4 is no exception. Seriously, I want to live in Tesshi-e's world where beautiful spaces like this with fantastic nighttime views exist every place you go. The music is a rather familiar upbeat tune, but the handy mute button is always available. The puzzles are tricky and fun and a nice mix of different types. And of course you have the regular and the happy coin escape also so prevalent in their work.
Basically there are only two things keeping Tesshi-e from launching to the level of designers like Neutral or Place of Light: The puzzles while amusing, varied, and fun are still a little on the simple side; and although you hardly need the changing cursor one would be helpful in a couple of places. Some sort of floating text for the color puzzles to aid those with visual problems would also be nice. But these are extremely minor nitpicks indeed.
Frankly, though, you'd really have to search hard to find anything wrong with Mild Escape 4. Challenging, amusing, easy on the eyes and ears, with simple intuitive controls, you're looking at a near perfect classic one-room four-wall escape game, wrapped up in an anniversary bow. Perfect for the mid-week break, Mild Escape 4 is everything you could want in a room escape and more. So let's tip a glass to the past and enjoy the present as Tesshi-e takes us down memory lane with a fantastic anniversary present.


Walkthrough Guide
(Please allow page to fully load for spoiler tags to be functional.)
Mild Escape 4 Walkthrough
General Information
Remember to examine everything you pick up, there may be something hiding inside or behind.
There will be directions for the colorblind.
There are two ways out, with or without the happy coin.
Good luck!
Exploration
You begin the game facing the door out. To the left of the door is what looks like a light switch. To the right is some sort of alcove.
Click on the light switch twice for a close up.
Okay, if there's a switch there it's covered by a plate that is screwed down. Back up twice.
Click on that strange alcove to the right of the door.
There's an odd mechanism here, filled with small and large blue balls, and one red ball. There's a lever beneath that tilts the mechanism up and down. There's a clue that says "get red".
Back up.
Turn right.
You are now facing a bar on the left and an odd wooden table on the right.
Click on the bar for a close up.
There are a couple of drinks, a bottle, an ice bucket, and an odd purple machine here.
Click on what looks like the whiskey drink (in a tumbler, right in front of the bottle and the ice bucket).
When you click on the whiskey it lifts up, so click on the coaster that was below it. A clue! O 207! Wonder what it means?
Use the back up bar at the bottom of the screen to put down the whiskey.
Click on the ice bucket for a close up.
In close up you can see that there is a glass of pockey to the left of the ice bucket (for those who don't know, that's a Japanese candy type thing. Chocolate covered sticks.).
Between the ice bucket and the glass of pockey is a small purple object, take it (suction cup).
If you click on the ice bucket you will see that there is lots of ice.
Back up once.
Click on the purple machine to the right for a close up.
The machine has a slot for a coin and a lever that you can pull. Since we don't have a coin, back up twice.
Click on the strange wooden table to the right for a close up.
There's a can opener under glass on the table, and some sort of four button controller. Back up.
Turn right.
You should now be facing a bright blue couch. To the left are some cupboard doors in the wall, to the right (above the couch) are four octagonal shaped cubbies.
Click on the doors on the left for a close up.
Once the doors are in close up click on them again to open them.
We have another strange machine here, this one metallic. Looks like it has slots for four cards.
Look closely at the base of the machine, there is a copper-colored circle there. Click on it. Yay, we have a coin! Back up.
Click on the cubbies above the couch for a close up.
If you click on the upper left cubby, you will find a bottle of wine with a cork in it.
In the upper right cubby is a can.
In the lower left cubby is a picture. Once you have the picture in close up, click on the side to turn it around.
A clue! Triangle 118!
Put down the picture and click on the lower right cubby for a close up.
This appears to be some wooden beads on poles, almost like an abacus.
If you click on a stack of beads they will go up and you can see letters underneath.
The left stack of beads has 7 beads and shows the letter N.
The next stack of beads has 4 beads and shows the letter P.
The next stack of beads has 6 beads and shows the letter O.
The next stack of beads has 2 beads and shows the letter E.
Back up twice.
Turn right.
You are now facing a low cabinet with a large picture above it.
There are three sets of doors in the cabinet.
The left set of doors has a four digit code lock and the word "Open".
The middle set of doors has a four button lock that involves colors and has the word "light" with arrows on either side of it.
The right set of doors has a three digit code and a circle plus a triangle plus a square as a clue.
On top of the cabinet are three items. Click on the left item for a close up.
This appears to be a picture of card suits. Back up.
Click on the middle item for a close up.
The middle item is a safe that appears to need both a key and a combination. Back up.
Click on the right item for a close up.
Yet another strange machine. This one appears to need a key and has something stuck in the top. Back up.
Turn right.
Time to solve some puzzles!
The Left Cabinet Doors
Turn left to face the low cabinet, then click on the left set of doors for a close up.
These doors needs a four digit code and have the clue "Open".
Where have we seen those letters before?
The answer is the weird abacus/beads thing in the lower right cubby above the sofa.
Each pole had a different number of beads and clicking on them revealed letters.
The left stack of beads has 7 beads and shows the letter N.
The next stack of beads has 4 beads and shows the letter P.
The next stack of beads has 6 beads and shows the letter O.
The next stack of beads has 2 beads and shows the letter E.
If you put the letters in the order OPEN, then you get a code of 6427.
Once you have entered the code click on the doors to open them.
Inside you will find a card (take it) and a clue, a square and the numbers 333.
Once you've taken the card back up.
The Right Cabinet Doors.
You should still be facing the low cabinet.
Click on the right side doors for a close up.
This door needs a three digit code and has a clue that is circle + triangle + square.
Where have we seen those shapes before?
We have seen those shapes in three different places.
The circle we saw on the coaster under the whiskey and had the numbers 207.
The triangle we saw on the back of the picture in the lower left cubby and had the numbers 118.
The square we saw in the left cabinet and had the numbers 333.
Add all three numbers and you get the code, 658.
Once you enter the code click on the doors to open them.
Inside you will find a corkscrew and a clue on the back wall.
Do those symbols look familiar?
Take the corkscrew and back up.
Opening the Wooden Table
Turn right (or left) twice to face the bar and the wooden table.
Click on the table for a close up.
Those symbols on the buttons look very familiar!
You should have found the clue for these buttons inside the right cabinet.
The symbols indicate which button you should push in what sequence.
The sequence is: upper left, lower left, lower left, upper right, lower left, lower right.
If you push the buttons correctly the glass top of the table will rise up and you can take the can opener. Take it.
Back up.
The Wine Bottle and the Can
If you are still facing the bar, turn right.
Click on the cubbies for a close up, then click on the wine in the upper left cubby.
Use the corkscrew on the bottle and get a stick.
Click on the can in the upper right cubby and use the can opener on it.
Once the can is open click inside and get another card.
Back up.
Getting the Red Ball
Turn left (or right) twice to face the door.
Click on the alcove to the right of the door for a close up.
Look closely at the machine with the balls.
There are tubes that lead inside, maybe if we had something long and thin we could reach in there?
But there's a problem, the red ball doesn't line up with any of the tubes, and the clue would seem to indicate that we need the red ball.
Well, we have a stick in our inventory, but could we use that to pull something out of the tubes?
Perhaps if we modify it?
Pull up the stick from your inventory.
Put the suction cup on the end of the stick that doesn't have the cork.
Put the stick back in your inventory.
Pull the lever so that the machine is tilted down and to the left, and a blue ball is right in line with the lower left tube.
Use the stick with the suction cup on the lower left tube to get the blue ball.
Now put the blue ball in the upper right tube to put it back in the machine, this time to the right of the red ball.
Flip the lever so that the machine is pointing down and to the right. The red ball should now be lined up with the lower right tube.
Use the stick to get the red ball.
While you have the red ball in close up, examine it carefully. It appears to have a seam.
Click on the red ball to open it and get a club key.
Back up.
The Purple Machine
Turn right to face the bar.
Click on the bar for a close up, then click on the purple machine for a close up.
Drop your coin in the slot and pull the lever.
A note will come out of the machine, take it.
The note says "cool". That's probably a clue.
Where have we seen something "cool" in this room?
Back up once, then click on the ice bucket for a close up.
Use the note on the ice and it will reveal another clue, four zodiac symbols.
Since the cards we've been finding have zodiac signs on them, this may be a clue for the cards.
Back up twice.
Getting the Screwdriver
Turn left (or right) twice to face the low cabinet.
Click on the right object (the strange machine that needed a key) for a close up.
Use the club key on the machine and take the now released object (screwdriver).
Back up.
The Middle Cabinet
Now that you have the screwdriver, turn right to face the door.
Click on the panel to the left of the door twice for a close up.
Use the screwdriver to remove the panel.
There are three buttons here, the top one is lit.
Click the middle button to turn the lights of, then back up.
Turn left.
Notice the colored lights on either side of the low cabinet.
On the left is green on top and yellow on the bottom.
On the right is red on top and blue on the bottom.
Turn right and click on the light switch for a close up again.
This time click on the bottom button and back up.
Turn left and you will see that (a) the colored lights are off, and (b) there is a clue on the large painting over the cabinet.
The clue is heart + club and diamond + spade with an arrow indicating the safe in the middle of the cabinet.
Turn right to face the door, click on the light switch, and click on the top button to turn the lights on.
Turn left to face the cabinet.
Click on the middle cabinet doors for a close up.
This door appears to need a color code. Above the code key is the word "light" with arrows on either side of it.
Does this have something to do with the colored lights?
Yes, it does.
The clue indicates that the top and bottom colors should switch, so the buttons should be yellow over green on the left, and blue over red on the right.
For the colorblind: Click the top left button once, don't click the bottom left button, click the top right button three times, and the bottom right button twice.
Once you have entered the code click on the cabinet doors to open them.
Inside the cabinet you will find another card and a spade key.
Back up.
The Safe
Click on the safe in the top middle of the cabinet for a close up.
This safe needs two things, a key and a number code.
The spade key is probably the key, but what is the code?
There are two parts to the code, (a) the code we saw on the picture when the lights were out (heart + club and diamond + spade), and (b) the picture on the left of the cabinet with the card suits.
If you look at the picture again, you will find that there are four hearts, three clubs, three diamonds, and two spades.
4 + 3 = 7, and 3 + 2 = 5. So the code for the left dial is 7, and the right dial is 5.
Turn the dials on the safe so that the numbers for the code line up with the white line in the middle.
Once that is done use the spade key on the safe.
Click on the handle to open the safe.
Take the fourth (and last) card from the safe and back up.
Regular End
Turn left to face the couch.
Click on the black doors to the left of the couch for a close up.
Click on the doors to open them.
Time to figure out the weird machine.
I'm sure it has something to do with these zodiac cards we've been picking up since there are four of them, and four slots in the machine.
The clue to the order of the cards is on the "cool" note.
When you put the note on ice you got four symbols that represent signs of the zodiac.
If you don't know the signs, you can pull up each card from your inventory and click on the top of the card. This will flip the card and you can see the symbol on the back.
The order to put the cards in, from left to right: Libra, Scorpio, Aquarius, Pisces.
If you put the cards in the slots in the correct order, a heart key should drop down from the machine.
Take the heart key and back up.
Turn right (or left) twice to face the door.
Click on the door for a close up and use the heart key on the door.
You are out and you have a lovely jeweled key necklace to show for it!
Happy Coin Escape
Follow the regular escape until you get the heart key from the weird machine.
Take the heart key, then remove the four cards from the slots.
Back up, then turn left (or right) twice to face the door.
Click on the light switch to the left of the door for a close up.
Click on the bottom button to turn out the lights.
Back up and turn left.
You will see a clue of zodiac symbols projected on the large picture.
Make a note of the symbols, then turn right to the door.
Click on the switch for a close up then click on the top button to turn the lights on.
Back up and turn left (or right) twice to face the couch.
Click on the black doors for a close up then open them.
Place the cards back in the machine in the new order: Pisces, Libra, Scorpio, Aquarius.
The Happy Coin will appear! Take the happy coin and back up.
Turn right (or left) twice to face the door.
Click on the door for a close up then use the heart key to open the door.
Happy Coin will bring happiness to you!!
Posted by: grinnyp |
May 4, 2011 3:03 AM
|
May 4, 2011 3:03 AM