
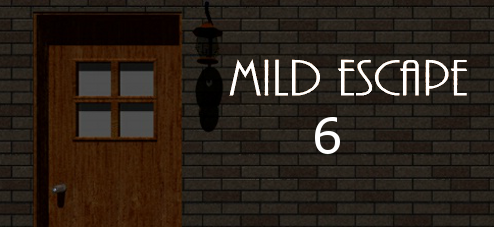
![]() Of all the fabulous things to be found in the world by wandering down a mysterious alley perhaps the best (at least to room escape fans) is the mysterious door in a brick wall that kicked off the output of one of our favorite game designers, Tesshi-e. Each year on the anniversary of that first game the alley, brick wall, and door reappear like magic to transport us to yet another strange room with a plaintive piano tune wafting in the background, a room full of wonder and mystery and lots and lots of puzzles. Come celebrate room escaping done Tesshi-e style with Mild Escape 6.
Of all the fabulous things to be found in the world by wandering down a mysterious alley perhaps the best (at least to room escape fans) is the mysterious door in a brick wall that kicked off the output of one of our favorite game designers, Tesshi-e. Each year on the anniversary of that first game the alley, brick wall, and door reappear like magic to transport us to yet another strange room with a plaintive piano tune wafting in the background, a room full of wonder and mystery and lots and lots of puzzles. Come celebrate room escaping done Tesshi-e style with Mild Escape 6.
 Mild Escape 6 is bursting with cool stuff to look at and problems to solve. All the tropes we've come to expect are contained in this delightfully dense point-and-click puzzle with the exception of Tesshi-e's habit of forcing us to construct a useful device out of odds and ends, like cyber MacGuyvers. Some fans will rejoice while others who actually enjoy trying to make a boat out of a plastic bottle, rubber bands, sticks, and other assorted items will have to suffer their disappointment in silence. Seriously, after all the complaining about the car made from a cell phone we don't want to hear it. The haunting melody, crisp visuals, and engaging puzzles of Mild Escape 6 are a great way to show fans appreciation for sticking with the designer for so long. and the excellent and logical puzzle design enhanced with an accurate English translation and the newer feature of using text to point out any colors makes to game accessible to all who enjoy being locked into an unknown room by strangers and having to solve their way out. You know, crazy folks like us room escape fans.
Thanks to Na and Cyberjar88 for sending this one in!


Walkthrough Guide
(Please allow page to fully load for spoiler tags to be functional.)
Mild Escape 6 Walkthrough
General Information
Examine every item you pick up, some items may be hiding other items or clues.
The clicking on a color-based clue will get you text of that color. The same holds true for color-based puzzles.
There are two endings, regular and happy coin.
Good luck!
Exploration
You begin facing a wall with a door. This is the door out and yes, it is locked.
To the right of the door is a strange looking clock, click on it for a close up.
Look closely at the face of the clock, the number 9 has been replaced with a club symbol.
There are two buttons below the face of the clock, the right button controls the hour hand and the left button controls the minute hand.
Below the two buttons are four small lights, then a single button. At the base of the clock is the pendulum, which you can move to the left or right with arrows that apear when you hover the cursor. Back up.
To the right of the clock is a shelving unit. There are two shelves, a lower one holding what looks like dolls, and an upper shelf. Click on the lower shelf for a close up.
Yep, dolls (or figurines). From left to right you have a green doll, a yellow one, a cyan one, and a red one. Notice that each doll has a hat that is a different height. The shortest is the cyan, the next largest is the red, the next largest is the green, and the largest is on the yellow doll.
Back up, then click on the upper shelf for a close up.
Up here we have a Mr. Birdy in a glass case. The case has four buttons and a lever. Back up.
Notice on the floor is some sort of sunken area. Click on it for a close up.
The sunken area is covered by glass. On the left is a small item, click on it for a close up.
Yep, there's a key there underneath the glass. Too bad we can't reach it.
Back up twice and turn right.
You are now facing a wall with two windows overlooking a gorgeous city-scape.
The left window is tall and narrow, click on it for a close up.
There appears to be some sort of wooden frame sitting in the window, but it's hard to make out the details against the view.
There appears to be a shade rolled up at the top of the window-frame, click on it for a close up.
You can see a ring on the shade, but you can't reach it to pull the shade down. There is also a hook up there on the top part of the sill.
Back up and click on the shorter, wider window on the right.
You are now in a close up of the other window, as well as a close up of a grouping of couches around a glass table.
There is some sort of item at the end (back) of the glass table, click on it for a close up.
Looks like a 4 of diamonds in a frame. Back up twice and turn right.
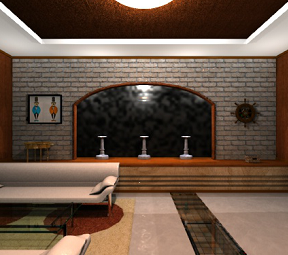
You are now facing a back wall. There is a long, low shelf against the wall. In the middle is an alcove with three pedestals. You can click on the pedestals for a close up, but they are empty. Looks like stands for Mr. Birdy figurines.
There is an item on the low shelf on the left (below the picture), click on it for a close up.
The item is a large compass. Note that the needle is pointing to the left, which is North. East is towards you, South is to the left, and West is forward. Back up.
Click on the picture for a close up. In addition to being a picture of two men (cyan on the left and orange on the right), it is the classic wobbly picture puzzle. Back up.
To the right of the alcove is something on the wall that looks like a ship's wheel. Click on it for a close up.
Yep, it's a ship's wheel, and it appears to be concealing a clue. However, it is bolted down and we don't have a wrench, so back up.
Below the ship's wheel, on the right side of the low shelf is an item, click on it for a close up.
Here we have a box that requires a three digit code. Back up.
Note that the sunken area or whatever it is in the floor extends this way. Click on the sunken area for a close up.
There's a Mr. Birdy there, but it is under glass. Back up and turn right.
This wall has some sort of cabinet on the left, and a set of double doors on the right. Click on the doors for a close up.
Locked, what a shock. Notice, though, that there is some sort of panel to the left of the door, click on it for a close up.
Click on the panel to open it.
The panel has four levers, red, cyan, yellow, and green.
Back up twice.
Click on the cabinet for a close up.
The cabinet has two parts, the upper part has glass doors, and the lower part appears to have two drawers and three doors.
Click on the upper (glass-doored) part of the cabinet for a close up.
Of course the glass doors are locked. Looks like we need a key. Back up once.
If you click on each of the drawers for a close up, you will see that the left needs a key and the right needs a four digit number code.
If you click on the lower wooden doors part of the cabinet you will see that the doors are blocked by a wooden stick which is screwed down to the cabinet. Looks like we need a screwdriver.
Back up and turn right.
You should now be facing the door out. Time to solve some puzzles!
The Double Doors
Turn left to face the wall with the cabinet and the double doors.
Remember the panel on the wall to the left of the doors?
Click on the doors for a close up, then click on the panel for a close up.
Click on the panel again to open it.
That panel has four levers, red, cyan, yellow, and green.
Where have we seen those colors before?
Those are the same colors as the dolls on the shelf to the right of the door out.
Remember that those dolls all had hats, and each hat was a different size.
The position of the levers is dictated by the size of the hat each doll was wearing.
The blue doll had the smallest hat, so the blue lever should stay at the bottom.
The red doll had the next largest hat, so the red lever should go up one click.
The green doll had the next largest hat, so the lever should go up two clicks.
And the yellow doll had the largest hat, so the yellow lever should go all the way to the top.
Once you've set the levers back up once and then click on the doors to open them.
You should see a picture of men in cyan and orange suits through the open doors, click on the picture to go through the door.
You are in an alcove with a picture of men in cyan and orange suits. There is a switch on the right wall, but clicking it doesn't do anything.
You can turn left to see the stairs going down, or you can hover your cursor over the left side of the picture to get an arrow pointing down. Either way, you can look at the stairs, but you can't go down because it is too dark. You may be eaten by a grue.
Back up until you are out of the alcove and back to the long view of the wall with the cabinet and double doors.
The Wobbly Picture Puzzle
That picture in the alcove has the same type of guys as the wobbly picture puzzle.
Maybe it's a clue?
Turn left to face the wall with the pedestals and the alcove.
Click on the picture on the left for a close up.
Yep, same cyan and orange guys in this picture.
So how do we use the clue from the alcove?
The positions of the guys in the alcove picture is the clue.
The color of the guy's suit indicates which side of the wobbly picture puzzle to click (cyan left, orange right).
The tilt of the figure shows which corner (upper or lower) to click. For the cyan guy the upper left corner tilts him left, the lower left corner tilts him right. For the orange guy the upper right corner tilts him right, the lower right corner tilts him left.
Using the picture in the alcove you get the sequence: upper left, lower right, lower left, lower right, upper right, lower left.
After you click the corners in the correct sequence the picture will lift up.
Inside is an alcove. In the alcove is a corkscrew, take it.
There is also a switch plate here. There is a switch on the left, and a hole on the right where another switch can be placed.
Click on the left switch to turn it on and then back up to the long view of the wall.
The Alcove and the Stairs
Turn right to face the double doors.
Click on the double doors for a close up, then click on them to open them.
Go through the doors. Click on the switch on the right wall and lights will turn on.
Turn left to face the stairs and click on them to go down.
Go forward once and you will find a Mr. Birdy on a small table. Take the Mr. Birdy.
Hover your cursor to the "front" and a curving arrow will appear. Click on the arrow to go around the corner.
You are now at a dead end. There is a pipe in front of you that goes from floor to ceiling.
Click on the pipe for a close up. There is a bolt here where you can install something. Back up.
There is a small red alcove on the right wall, click on it for a close up.
The alcove has a glass cover. Inside is a golden bottle. To the left of the alcove is a swipe card slot.
Back up and turn right or left to turn around.
Once you are facing the small table, hover your cursor to get an arrow then click to go forward.
You are now facing the stairs up.
There is an open gate here that leads to the stairs.
Look closely at the stairs, you can see the number 7 and a spade symbol.
At the base of the stairs, on the right, is an object on the floor, take it. You now have the elusive screwdriver!
Click at the top of the stairs twice to go up, then click on the scene to exit the alcove.
You should now be facing the wall with two windows.
The Bottom Cabinets
Turn right (or left) twice to face the wall with the cabinet and the double doors.
Click on the cabinet for a close up, then click on the lower (wooden) doors for a close up.
Click on the stick holding the doors closed for a close up so you can see the screws.
Use the screwdriver to remove the screws and take the stick.
While the stick is in your inventory, click on the right side of it for a close up and notice the word "start" on it.
Close down the stick into your inventory and back up once, so that you can see all three doors at the same time.
Click on the left door to open it. Looks like there are some wine bottles.
Click on the middle door to open it. More wine bottles. There is also some sort of formula here, heart-spade-club x diamond.
Click on the right door to open it. Yet more wine bottles...
In the lower right slot of the right cabinet door there is an item that is not a wine bottle, take it (key card).
While the key card is in close up click on it to turn it over. The other side is a 5 of hearts.
Close down the key card and back up twice to the long view of the cabinet and the double doors.
Now what?
The Four Digit Drawer
Click on the cabinet for a close up, then click on the right drawer for a close up.
This cabinet needs a four digit code. Luckily, we've seen the clues!
The clues are the card suits and numbers scattered around the room: 9 of clubs (clock), 5 of hearts (back of key card), 4 of diamonds (on the glass table), and 7 of spades (on the stairs).
The other clue is the formula seen on the inside of the middle wine cabinet, heart-spade-club x diamond.
That gets you a formula that is 579 x 4, which equals 2316.
Enter the code into the lock and click on the drawer to open it.
Inside the drawer is a hook, take it and back up to the long view.
The Three Digit Code Box
Turn left to face the wall with the alcove and the pedestals.
Click on the box on the right (below the ship's wheel) for a close up.
This little box needs a three digit code.
And we just saw the clue in the wooden cabinets!
The clue is the cabinets themselves, the grid patterns formed by the wine shelves.
Note that each shelf was divided into alcoves.
The pattern is the empty alcoves. Draw an imaginary line in the cubbies that do not have wine in them, and you will see three numbers form.
The numbers are 6, 7, and 5.
Enter the numbers into the box and the lid will open.
Inside is a giant suction cup, take it and back up.
The Left Drawer
Turn right (or left) twice to face the exit door.
Click on the sunken area in the floor for a close up.
Note the smaller glass area on the right.
Use the suction cup on the right side of the glass to remove it.
You can now access the sunken area, but you can't reach the key.
Maybe there is something useful in your inventory?
Pull up the wooden stick from your inventory.
Attach the hook to the right side of the stick.
Now use the stick/hook combination on the key.
You should now have a key with a triangle on it!
Back up and turn left to face the wall with the double doors.
Click on the cabinet to the left of the doors for a close up, then click on the left drawer for a close up.
Use the triangle key on the locked drawer.
Inside is a wrench, take it.
Back up three times to the long view.
The Clock Puzzle
Turn left to face the alcove/pedestal wall.
Click on the ship's wheel on the wall for a close up.
Use the wrench to remove the wheel.
You now have a clue, the numbers 1440 and the letters GRRG.
Back up and turn left (or right) twice to face the exit door.
Click on the clock for a close up.
We now have the clues for the clock!
The numbers 1440 are the first clue, it is a time (in military, or international time). 14:40 is 2:40 pm.
Use the right button twice to put the hour hand on the 2, and the left button 8 times to put the minute hand on the 8 (2:40).
Once the time is set you have to figure out how to move the pendulum.
The clue is in the letters GRRG.
The letters are also colored, green and red.
Remember the dolls of that color (on the shelf)? The green one was on the left and the red one on the right.
So the clue would indicate to move the pendulum left, right, right, and left.
Note that the little colored lights beneath the two buttons lit up when you moved the pendulum.
Now push the button below the lights and the pendulum will open up, revealing a key.
Take the key (circle key) and back up.
The Glass-Doored Cabinet
Turn left to face the wall with the double doors.
Click on the cabinet for a close up.
Click on the upper (glass) door section of the cabinet for a close up.
Use the circle key to open the cabinet.
Inside you will find a bottle, take it.
There's something inside the bottle, but it is corked. Lucky you have that corkscrew!
Use the corkscrew on the bottle, then click on the open bottle to get a switch.
Close down the bottle into your inventory.
Note the clue inside the cabinet, the word "Birds" and the letters WES.
Back up to the long view of the wall.
Opening the Glass Birdy Case
Turn left (or right) twice to face the window wall.
Remember that shade in the left window?
Click on the window for a close up, then click on the top of the window for a close up.
Use the stick/hook combination on the ring on the shade to pull it down.
Back up once and you can now see the pattern in the frame. But it looks like something is missing?
Click on the top of the window again for a close up.
Use the stick/hook combination on the hook at the top of the window frame, then back up.
Okay, now the frame seems complete, but what does it mean?
This is a "Ghost Leg" puzzle (amidakuji).
The trick is to start at the top, and go down until you hit an intersection.
At the point you hit an intersection, you go in that direction (left or right) until you hit a vertical line, then you go down again.
You keep tracing down until you hit the bottom of the ghost leg.
The trick is knowing where at the top to start.
In this case it is easy, because we saw the word "start" on the stick, which we hung from the hook in the window.
Therefore the starting point is the second line in from the left, at the top.
Number each line (from left to right) 1 through 4.
Start at the top of line 2 and trace down.
You will hit an intersection and go right to the third line, then go down.
You will hit an intersection and go right again to the fourth line, then down.
then left to the third line, then down, then left to the first line, then down, then right to the third line, then down.
Using the numbers of the vertical lines, this gives you a code of 234313.
Back up and turn left to face the out door.
Now click on the top shelf of the shelving unit to see the device with the Mr. Birdy in it.
There are four buttons on this device, and we just got the code for the buttons from the ghost leg puzzle.
Click the buttons in the correct sequence then hit the lever on the left.
The case should open and you can take Mr. Birdy.
Back up.
The Last Mr. Birdy
Turn left to face the double doors.
Click on the double doors for a close up, click again to open them, then go through.
Turn left and go down the stairs.
Go forward until you are at the area with the pipe.
Click on the pipe for a close up, then place the ship's wheel on the bolt.
You will get a nice cut-scene showing water flooding the sunken area of the floor, and moving the Mr. Birdy down to the open section.
Back up, turn around, go up the stairs and forward back into the main room.
Turn left to face the out door.
Click on the sunken area for a close up and take the last Mr. Birdy.
Back up, then turn left (or right) twice to face the alcove wall.
Click on the wobbly picture puzzle for a close up.
Click on the picture to open it.
Place the switch you got out of the glass bottle into the right switch space.
You can flip the switch, but it won't stay on.
Back up, then click on the alcove for a close up.
Place the three Mr. Birdy figurines on the three pedestals.
Back up, then click on the wobbly picture for a close up.
Flip the right switch again, this time it will stay on and the Mr. Birdys will glow green.
Back up and click on the alcove for a close up.
The Mr. Birdy figurines will now rotate on the pedestals.
Do we know how we want them to rotate?
The clue was in the cabinet with the glass doors.
The word "Birds" and the letters WES.
Remember, according to the compass North is to the right, west is to the back, south is to the left, and east is pointing towards you.
Rotate the birds to match the WES directions.
The left bird should be facing away from you, the middle bird should be facing you, and the right bird should be facing to the left.
The back wall will slide up, revealing some hungry hippos and a slot that looks like a bottle.
The Gold Bottle
That slot looks like the bottle we have in our inventory. It also looks like the gold bottle down in the cellar.
You can try putting the glass bottle you have in the slot, but nothing happens. Looks like we have to retrieve the gold bottle.
Back up and turn right to face the double doors.
Go through the doors, down the stairs, and forward until you get to the pipe.
Click on the red alcove to the right to see the gold bottle.
Use the key card on the slot to the left of the alcove to open the glass.
Take the gold bottle and back up twice.
Turn around and go forward to the stairs. Oops, looks like taking the bottle closed the gate.
Turn around and go back to the alcove.
Use the key card to open the glass. You can try placing the glass bottle inside, but it's too light.
Replace the gold bottle, back up twice, turn around, and go back up the stairs to the main room.
We need to make the glass bottle heavier so we can use it to substitute for the gold one.
Turn left to face the out door.
Click on the sunken area in the floor for a close up.
The water is still flowing there. Use the glass bottle on the water to fill it up.
Back up, turn left, and go through the double doors.
Go down the stairs and forward to the alcove.
Use the key card to open the alcove, take the gold bottle, and replace it with the glass bottle full of water.
Back up twice, turn around, and go back up to the main room.
Getting Out (Regular End)
Turn right to face the alcove wall.
Click on the back wall for a close up.
Click on that bottle-shaped notch for a close up, then place the gold bottle.
Back up once, then click on the left hungry hippo for a close up.
Click the button to the right of the hippo and his mouth will open, revealing a key.
Take the key (heart key) and back up twice.
Turn right (or left) twice to face the out door.
Use the heart key to unlock the door, then click again to open it and escape.
Getting Out (Happy Coin End)
Follow the regular end until you get the heart key.
While the key is in close up, click on it to turn it over and see the clue 3E.
The clue pertains to the Mr. Birdys, you need to turn them so that all three are facing east (towards you).
Once the Mr. Birdys are all facing forward, click on the hungry hippo on the right for a close up.
Click on the button to the left of the hippo and his mouth will open.
Take the happy coin and back up twice.
Turn right (or left) twice to face the out door.
Use the heart key to unlock the door, then click again to open it and escape.
Happy Coin will bring happiness to you!!
Walkthrough by Grinnyp!
Posted by: Dora Breckinridge |
May 6, 2013 9:05 AM
|
May 6, 2013 9:05 AM