
Monkey GO Happy Roundup 6
By Arceus
|
January 12, 2018
Comments (3) | Views (8,776)
 Happy New Year! And with this new year comes new monkey adventures. Read on below for more information and links.

Gather up snowflakes for a fairy and read a strangely color-coded note in this first puzzle.
Do you wanna build a snowman? No? Well how about cannibalize him for parts instead, to cheer up your monkey in a second wintry scene.

For the third stage, you're in something resembling a toy factory. You have to help the little girl near the entrance to make the monkey happy this time!
Finally, visit a house with a fancy, decorated Christmas tree. The last stage in this puzzle asks you to find a way to open several interesting combinations.


looking forward to the walkthrough :)
Here it is!
Monkey GO Happy Roundup 6 (Stage 145–148)
Stage 145: Fairy Christmas
Exploration
You start off facing a tree. No, it's a house with a diamond-shaped hole in the door, as well as holes that cycle through letters when clicked! Pick up the 5 snowflakes around the screen and the Mini Monkey at the top.
Turn left to find a tree that's not a house, with the same letter displays and a curious note attached to it. There is a house though, and the hole on its door is outlined in red. In front of it, a fairy asks you for 20 snowflakes. (Hope they don't melt!) Pick up the purple gem, 5 snowflakes and Mini Monkey.
Purple
Use the purple gem on the house in the first screen, and then use the clue from the note to unlock it.
The purple word on the note is the name
Maxx, so enter that in the letter displays (M, A on the first screen and X, X on the second).Then push the purple gem to open the door.
Exploration 2
Inside the house, there's a locked chest with a diamond-shaped hole on its front, outlined in yellow. Pick up 4 snowflakes and 2 Mini Monkeys around the room, then climb the stairs.
Upstairs, there's a boy who wants a present, as well as a safe with a grid of nine buttons that change color to black and red, and a clue on the wall with a grid of nine card suits. Pick up 3 snowflakes and 2 Mini Monkeys.
Binary
Use the wall clue to unlock the nine-button safe.
The usual colors for playing cards are red for Diamonds and Hearts and black for Clubs and Spades.
So the card suits on the wall correspond to the
R(2) B(1) R(2)

B(1) B(1) R(2)

R(2) R(2) B(1)
Click the buttons that many times, then open the safe to get an unwrapped present, a snowflake, a red gem and a Mini Monkey.
Red
Place the red gem in the door of the other house, then use the clue from the note to unlock it.
The red word is
mass, so enter those letters and then open the door.There's not much inside, just a yellow gem and a Mini Monkey.
Yellow
Place the yellow gem on the chest, then use the clue from the note to unlock it.
The yellow word is
xmas, so enter those letters to open the chest and get a snowflake, ribbon and Mini Monkey inside.Present
Use the ribbon to wrap the present (using the Combine Items button), then give it to the boy upstairs. As he walks away, he leaves behind a snowflake on the floor.
Ending
Give all 20 snowflakes to the fairy, who floats upward surrounded by them. Pick up the last Mini Monkey from the ground.
Your bonus clue from this stage is (w with 4 vertical strokes) = 2.
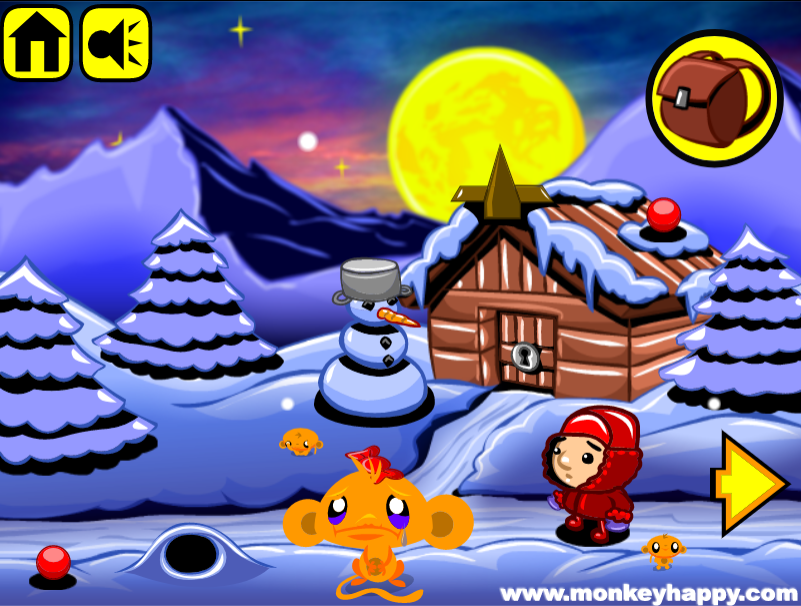
Stage 146: Moonlit Christmas
Exploration
You're in the snowy mountains oddly similar to Stage 143, but this time there's a snowman outside a hut among the trees and a boy dressed in red who wants a sled, as well as a device in the front snow-mound that displays dice faces. Pick up the button part from the roof, the pot and branch from the snowman, 3 ornaments which are bright red orbs, and 2 Mini Monkeys, then click the trees to tip them over and find another 3 ornaments.
Go right to a screen with a church, which has some unusual decorations and a girl standing outside who wants a pot. There are three more dice devices here. Pick up the other button part from the roof, 3 ornaments and 2 Mini Monkeys, then click the trees to find another 2 ornaments.
(Current total: 11 ornaments, 4 monkeys)
Satisfaction
Give the pot to the girl, who walks off wearing it on her head. Pick up the key from the ground.
Then use the key to unlock the hut on the first screen.
Inside, there's a boy who points sadly at an empty space right above a stand on the floor. There are various clues on the left and right walls, including one painted on a panel in the left wall. There's also a trapdoor in the floor and a mousehole in the right wall. Pick up the round key in the left corner, the ornament in the right and the 2 Mini Monkeys around the room.
Reach
Use the branch in the mousehole to retrieve an ornament.
Boost
Place the key in the church door, then use the clues on the front of the church to unlock it.
The time shown on the clock is 12:20, but the numeric hint under the dial tells you to add one to each number.
So click the dice devices until they show 2, 3, 3, 1 dots, then push the key to open the door.
Inside, you find a tree-shaped hole in the back wall. There's also two columns, each having four crosses, but the left one is partially obscured by a Christmas tree. Pick up 2 ornaments and a Mini Monkey.
Stand
Use the tree on the stand in the hut, and the boy runs over to it, leaving an ornament behind.
If you click on him again, you'll find that he's now asking for twenty ornaments.
Fours
Use the clue from the left wall panel to open it.
The clue tells you that each of the crosses in the church should be white, and that each dice device should be set to 4.
But there's a catch…
You have to add one to each 4, so each dice device should actually show 5 dots.
Once you have both the color and dot codes set, go back to the hut and open the panel to find an ornament and Mini Monkey.
Shapes
Combine both button parts, and then place the resulting button on the back wall of the church, then use the shape clues to unlock it.
The clues on the walls of the hut tell you to observe the colors of the corresponding shapes on the church's stained glass windows (visible from outside).
For the left set, the colors are Square=White, Triangle=Purple, Circle=Yellow, Diamond=Red, so click the crosses 0, 1, 4, 2 times more(from white) to get the correct colors.
For the right set, the colors are D=Purple, S=Red, T=Yellow, C=White, so click the crosses 1, 2, 4, 0 times more (from white).
Once you have all the colors set, push the tree button to open the back wall. Behind, you find two statues holding a baby (statue), but there's also a sled, ornament, and Mini Monkey… and something else that looks out of place.
Pick up the crowbar leaning on the left statue.
Fun
Give the sled to the boy on the first screen, who rides away and leaves an ornament behind.
Functional
Use the crowbar to pry open the trapdoor and find an ornament beneath.
Full
Give all 20 ornaments to the boy in the hut. He decorates the tree with it, and the last Mini Monkey appears atop the tree!
Bonus clue for this stage: (4 vertical lines 2 horizontal lines) = 2.
Stage 147: Red Christmas
Exploration
The elf girl (or is that just dress-up?) points at the stopped assembly line in this red room, connected to a device beside you that's missing something. Pick up the 3 Mini Monkeys around the room.
Go left, to find some exposed clockwork cogs missing. There's a lever next to it and a device with twisty paths on its four buttons, a clue on the ceiling and a safe on the left wall with four round buttons. Pick up the 2 Mini Monkeys here.
Go right twice to find a very similar room, which also has clockwork with cogs missing, a lever, a path device, a ceiling clue, a wall safe and 2 Mini Monkeys.
Cross
Use the clues from the ceiling clues to unlock the wall safes.
The clue from the left room reads
SEWENS→, and that last arrow means it's a clue for safe in the right room.The letters themselves indicate directions, with N=North being up.
So go to the right room and click the DRLRUD buttons on its wall safe, opening it up. Take 2 gears, a lever bit and a Mini Monkey from inside.
Similarly, the clue from the right room starts with a left arrow that indicates that it's for the safe in the left room.
The numbers in this clue also indicate directions, with 12=12 o'clock being up.
So go to the left room and click the LRUDLR buttons on its wall safe, which opens up so you can take another 2 gears, lever bit and Mini Monkey..
Connect
Use two gears in each of the clockwork sections in the left and right rooms, then arrange the paths above them to power the factory up.
Each button displays a total of five different patterns. To connect the paths on the left device, you need to click the buttons 2, 4, 3, 1 times. Pull the lever when you're done.
Similarly, connect the paths on the right device by clicking the buttons 1, 3, 4, 2 times, and then pull the lever there.
With the paths in both side rooms lit up, combine the two lever bits, place the assembled lever in the hole in the starting room, and push it down.
The assembly line roars to life and wraps the adorable bears into presents beneath a Merry Xmas sign, while the girl dances around the last Mini Monkey.
Bonus clue from this stage: (squarish U) = 4.
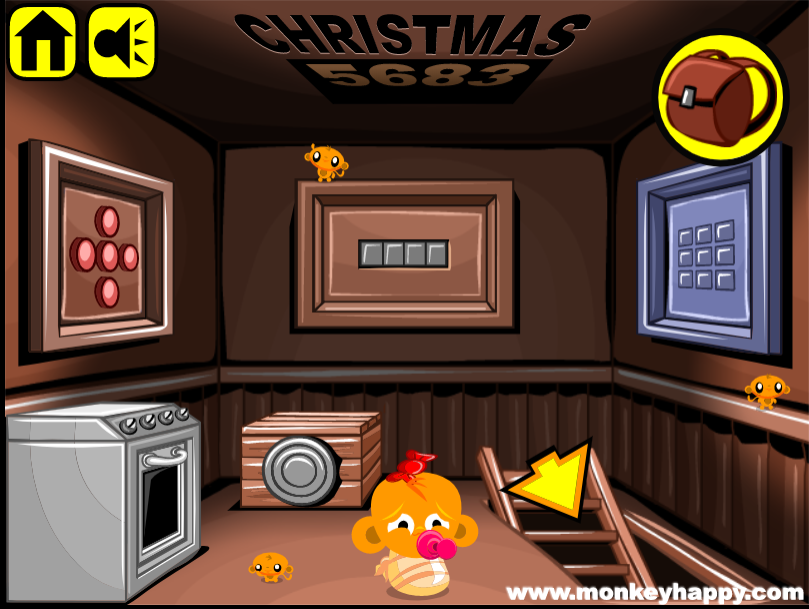
Stage 148: Cosy Christmas
Exploration
This room is simple: a Christmas tree all set up, a tray next to the fireplace and two clues with digits on the walls. Pick up 2 Mini Monkeys.
Climb the ladder to a room with an oven and a locked crate with several letter rings on its lock. There are also wall safes with five, four and nine buttons, but the buttons on the four-button safe cycle through different letters. A clue on the ceiling declares that it's Christmas, and includes four digits beneath. Pick up 3 Mini Monkeys.
Five buttons
Use a clue from downstairs to unlock the five-button safe.
The digits 1 to 6 occur in the CRCUDL positions, so push those buttons to open the safe. Take the cookie dough and Mini Monkey from inside.
Four letters
Use the ceiling clue to unlock the four-letter safe.
The 5th, 6th, 8th, 3rd letter of CHRISTMAS spell the word STAR.
So enter that in the safe to open it and find a baking tray and Mini Monkey inside.
Bake
Combine the cookie dough and baking tray, then put it in the oven and close the door.
It bakes instantly, so remove the cookies from the oven.
Keypad
Use the other clue from downstairs to unlock the nine-button safe.
From left to right and inside out, the digits on the wall are 8157.
Those digits indicate the bottom, top-left, middle, bottom-left buttons on the keypad, so press those buttons to open a safe and find a glass and a Mini Monkey.
Call
There's no clues left, so just unlock the five-letter crate upstairs by spelling a thematic name.
Rotate the disks until they spell SANTA, then click the ✓ button to open the crate.
Take the milk from inside.
Pour
Combine the milk and glass. Now you have cookies and a glass of milk, so place both on the tray beside the fireplace, and Santa saunters right through followed by a Mini Monkey. But another Mini Monkey appears on screen, sitting on the lit star of the tree.
Bonus clue for this stage: (squarish U#) = 2.
Bonus Stage 37
The clues from all four stages combine to form the code 2242, so enter that in the box and pull the lever to open it!
Awesome as usual KK. Thanks for the walkthrough.
Update