
Monkey GO Happy Roundup 9
By Arceus
|
February 19, 2018
Comments (2) | Views (7,188)
 Four more monkey puzzles await you in the ninth installment of our roundup! Check them out below.
First up, a chieftain has lost his...marbles? Oh wait, they're beads! Venture into an underground temple to help complete the monkey's quest!
Mazes are a favorite of the MonkeyGOHappy series, and this one is one of my favorites so far! You'll need to navigate through pipes, crack the code, and of course collect a small everyday item to complete this stage.
It's raining hard despite the swirly-streaked sky as the monkey must appease a pirate with a stack of bullets, and help out a snail.
Old McMonkey had a farm? Well not exactly, but you'll need a horseshoe, cowboy hat and more to solve this puzzle...


Monkey GO Happy Roundup 9 (Stage 157–160)
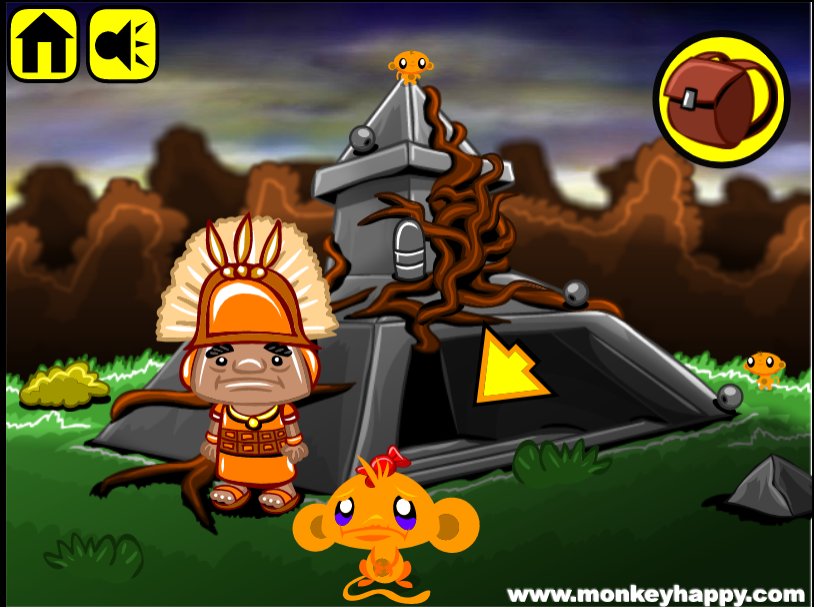
Stage 157: Bead Temple
Exploration
This roundup starts off with you standing outside a stone pyramid covered in vines/roots. The temple's chieftain asks for 30 beads. Thankfully you can already see 4 beads lying around among the 2 carved stones, rope and 2 Mini Monkeys, and you can click the tufts of grass and the rock in the lower-right corner to find another 4 beads.
Head down the steps, and you're immediately greeted by a sea of gray. Gray bricks, yes, but among them there's gray statues with cavities in their torsos, a gray button on the wall, and devices on the arches that light up in gray. Read the note on the stairs for a somewhat helpful clue, then push aside the two stone blocks on the ground and pick up a total of 7 beads, 1 stone and 2 Mini Monkeys.
Moving on to the right, you find a very similar screen, now with two wall lights instead on one. There are two semicircular holes on the wall above a panel with an interesting sun symbol. Push the stone block, then pick up the stick and blade on the ground, as well as 5 beads, a stone and 2 Mini Monkeys.
(You should now have 20 beads and 4 monkeys.)
The statues
The bottom (and top) of the note tells you how to activate the statues.
The left figure has a symbol that also appears at the top above four dots, so place the stone with four lines in the statue. To match the dots on its headwear in the note, light up the middle spot above the statue by clicking it.
Press the button to make the statue sink into the ground. A fountain with 2 beads and a Mini Monkey appears in its place.
Do the same for the right statue, placing the stone with two lines in it, and then lighting up the left and right spots above it, and then pushing the button to make it disappear. Take the 2 beads and Mini Monkey that replace it.
The sun symbol
The remaining clues on the note tell you how to open the sun panel.
The alternating triangular frieze tells you that only the odd-numbered devices from the left should be lit up.
So click each device to toggle them, making the currently dark ones light and the light ones dark.
The sun symbol also has a clue, in the form of light-colored regions that form the digits 1 and 3. Place the stone with one line in the left slot abvoe the sun panel, and the stone with three lines in the other slot.
Push the button on the panel to open it, and take the snuffer, 2 beads and Mini Monkey from inside.
Hot
Use the snuffer to put out each fire in the temple, and pick up a total of 3 beads from them.
Overgrown
Combine the stick-and-blade with the rope in your inventory by using the Combine Items button.
Use the resulting axe to hack at the roots on the outside of the pyramid. Inside, there's the last bead.
Collector
Give all 30 beads to the chieftain, who dances around to celebrate, and pick up the last Mini Monkey from his feet.
Your bonus clue from this stage is //U=4.
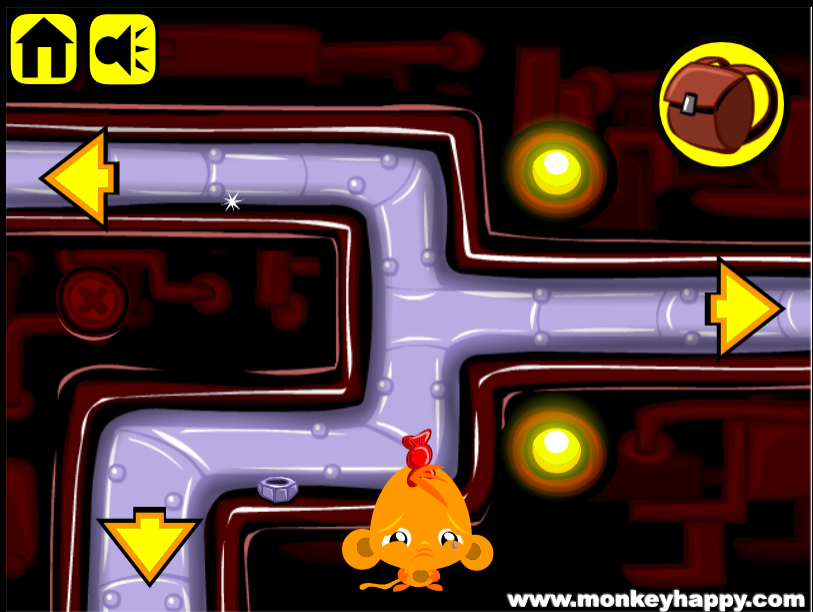
Stage 158: Pipe Maze
Exploration
The red color scheme stops at the outside of the pipes, so it's easier to see the device with a hole in the wall. Pick up the nut and Mini Monkey from the ground, and then remove the screw just outside the lower-right corner of the room to find another nut.
Go left to find a fork in the path, where you can remove a screw on the left side and pick up 2 nuts and a Mini Monkey.
Go left again to find another fork. One path is now blocked off by an electrical spark, but you can still remove a screw and pick up 2 nuts and a Mini Monkey.
Go down to find a circular room with a screen which switches between numbers. You know the drill by now, so remove the screw and take the 2 nuts and Mini Monkey.
It's a dead end, so backtrack all the way to the first fork, and go down. Read the clue in the lower right, and then continue. Unscrew, 2 nuts, Mini Monkey.
Go right. Finally, something new! The rectangular room has a panel next to the number screen that you can open up. After removing the screw, you should now be able to pick up 2 nuts, a pair of wire cutters, and 2 Mini Monkeys.
Go back left and down. It's less obvious, but this is another fork with one path blocked off, and another clue in the lower left. You can still remove a screw and pick up 2 nuts, but there's no monkey here.
Go right to an octagonal room with a number screen. Remove the screw and take 2 nuts.
(You should have a total of 16 nuts and 7 monkeys.)
Snippy
You have a wire cutter now, so bring it to each spark barrier to shut it off.
Behind the spark barrier at the top-left fork, there's another room with a number screen and charger box in it. Remove the panel and screw, then pick up 2 nuts and a Mini Monkey.
Below the spark barrier at the bottom fork, a robot asks for 20 nuts. Remove a panel next to the number screen and the screw in the upper left, then pick up 2 nuts and a Mini Monkey.
Twenty
Bring all the nuts to the robot, who glides aside so you can take an uncharged key.
Escape
Combine the key and charger to get a charged key, then place it in the room where you started.
It doesn't work yet, because you have to use the clues around the maze to set the number screens correctly before you can leave.
The symbols above 1, 2, 3, 4, 5 dots on the first clue also appear above the circle, rectangle, (dome-shaped) hexagon, octagon and triangle on the other clue.
So go to the bottom room with the robot, and set the number screen there to 3.
Go up and right, and set the number screen there to 4.
Go left, up, and right, and set the number screen there to 2.
Go left, up, left, left, and set the number screen there to 5.
Go right and down, and set the number screen there to 1.
Go back to the first room, and push the key to open the door. Pick up the Mini Monkey standing on the dancing alien.
Bonus clue from this stage: /U/=2.
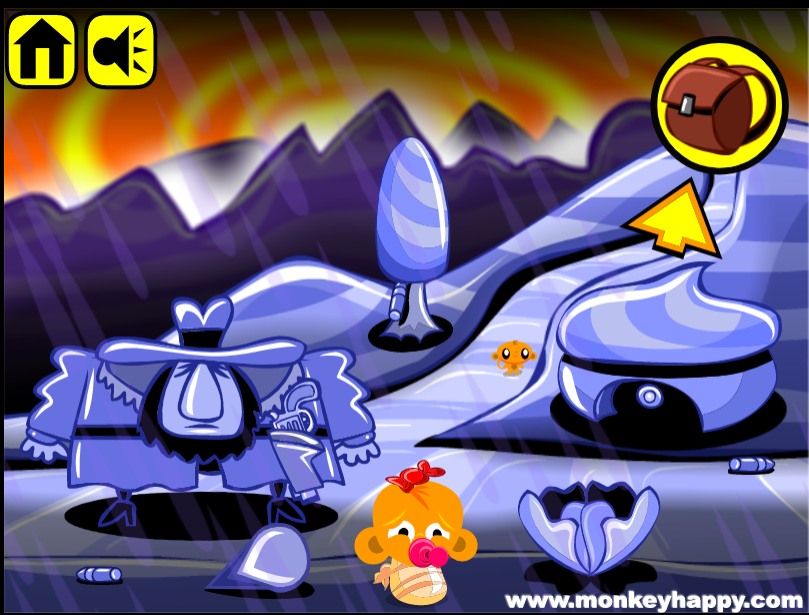
Stage 159: Raining Bullets
Exploration
This very broad guy wants 30 bullets, so you start by clicking the tree in the background and the bush in front, but the building on the right refuses to do anything right now. All you get from this screen is an arrow pointer, 5 bullets and a Mini Monkey.
Proceed up the hill, where a snail looks kind of sad. The house at the top is locked, so all you can do is click the clouds, bush, tree and mound, and pick up the crank handle on its roof, broken wheel on the ground, 6 bullets around the screen and a Mini Monkey.
(Check that you have 11 bullets and 2 Mini Monkeys.)
Turn
Go back down the hill and use the crank handle on the small building in front. The crank raises the entire structure off the ground, revealing a key and Mini Monkey.
Unlock
The key fits in the house on the hill, and you can proceed down into more tunnels!
Exploration 2
There are more of these swirly mound caps, three of them on this screen including the walls. So click them to remove them. There are also two round devices here which flash and buzz when clicked. Pick up 8 bullets (3 of them hidden on the ladder) and a Mini Monkey.
Go right. This room has another one of those flashing devices, but also a large locked door with a round keyhole, marked with a downward pointer. Open the panel at the top-left, then pick up the stick (in the lower-right corner), 5 bullets and 2 Mini Monkeys.
Go left twice. This room has devices that look familiar but don't work yet, and a round hole in the wall beneath them. Pick up a leaf, 4 bullets and a Mini Monkey.
(Current bullet count: 28)
Cover
Leave the tunnels, and give the leaf to the snail, who leaves behind a trail of slime as it rushes down the mountain.
So pick up the snail goo with your stick, and use it (by combining) to repair the broken wheel.
Beeps
Go back in the tunnels. Place the fixed wheel in the large keyhole, and the arrow in the hole in the other room, and use the clue from the flashing devices to solve the puzzle.
The symbols under the devices in the room with the arrow also appear over the devices that flash 5, 2, 6 times.
So click the arrow so it points left, then click that device 4 times until it shows 5 C-shaped macaronis.
Then click the arrow so it points up and click the device 6 times to display 2 shapes.
Then click the arrow so it points right and click the device once to display 6 shapes.
Then click the arrow so it points down, matching the marker over the other door. Push the wheel to open the shutter, and take 2 bullets and 2 Mini Monkeys from inside.
Loaded
Give all 30 bullets to the man who wants it, and as he endlessly fires celebratory shots, pick up the Mini Monkey from his feet.
Bonus clue from this stage: (line over U) = 5.
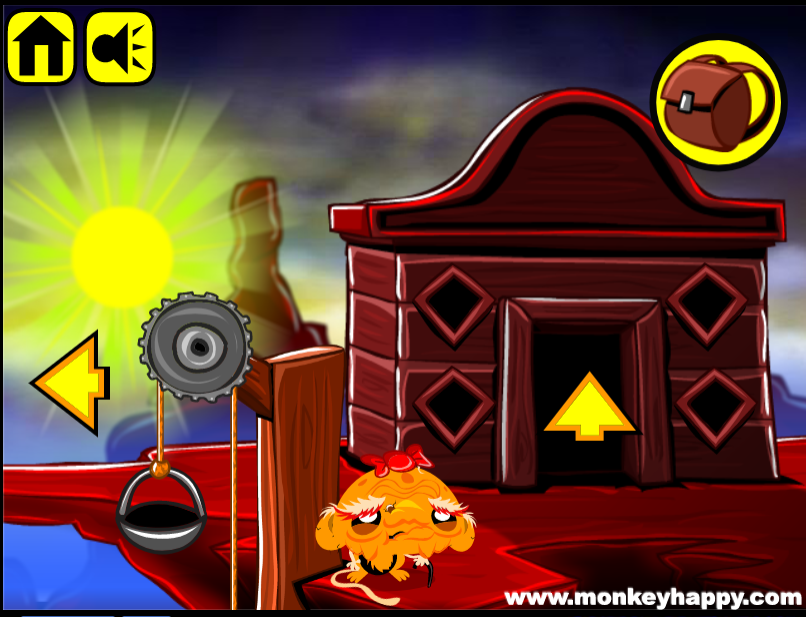
Stage 160: Western Baldie
Exploration
This hunter really needs his cowboy hat, but you won't be finding it in this room, which has a hole surrounded by dials on the back wall, as well as a locked cupboard over a table holding an unlit oil lamp. Pick up the Mini Monkey, and move the table to find a horseshoe.
Back out of the house, which has four diamond-shaped buttons around its front door. There's also a pulley on the left that you don't know how to use. Pick up 5 rocks colored a vivid red, then push the log in the corner aside and pick up all 3 Mini Monkeys.
Head left across the narrow bridge to find a man in dire need of toilet paper. Ignore him and read the note on the side of the outhouse, then push another log aside and pick up 5 rocks, 3 Mini Monkeys and a torn hat in really bad shape.
Swap
The note tells you that the pulley should be operated with a weight of 10kg.
You have 10 rocks, which is close enough. Put them in the left pan, and up rises the other holding a key and Mini Monkey.
Cabinet
Unlock the cupboard with the key to find a box of matches and Mini Monkey inside.
Luck
Place the horseshoe in the hole in the wall, and use the other clues from the note to unlock the shutter.
The dots on the horseshoe in the note come in two different sizes, with the larger ones on the upper-left and lower-right.
So click the corresponding diamond devices on the outside of the house once to display a large diamond, and the other ones twice to display a smaller diamond.
Now for those horizontal and vertical lines.
The three digits on the note read 715.
Represented as a time on an analog clock, the hour hand would point to 7 and the minute hand to 3.
So click the left and right dials 7 and 3 times to set them to the correct positions.
Push the horseshoe to open the panel and find… nothing?
It's just too dark to see inside. Light your oil lamp with the matches and use it to light the inside.
Now you can see and pick up the needle and thread.
Return
So you sew the hat back into shape and give it to the hunter. He walks away and leaves behind toilet paper for some reason.
So give the toilet paper to the other man who breaks into a creepy grin. Maybe you should just take the Mini Monkey from his feet.
Bonus clue from this stage: (U with two lines beneath)= 5.
Bonus Stage 40
This bonus stage involves something new: math!
Work through the equations in the top left (4+2=6), bottom left (5×5=25) and top right (6+25=31) to get the last code: 3131.
Enter 3131 in the box to open it!
kk
on the first one, I picked up every bead based on the walkthrough, but I only got 28. I looked at every screen carefully but I can't see the 2 that I missed.
I hope you can help.
Update