An adventure of epic proportions. Perfect for young readers.

Must Escape: The Clock Tower


  • Currently 3.2/5
  • 1
  • 2
  • 3
  • 4
  • 5
Rating: 3.2/5 (812 votes)
Comments (10) | Views (17,004)

Must Escape: The Clock Tower

DoraNothing good ever happens in clock towers. Either you wind up getting poisoned by a mutated super soldier while you're trying to escape a city, or you're dealing with supernatural serial killers. But it's not all thrills and chills, and in Self-Defiant's point-and-click escape game Must Escape: The Clock Tower, all you have to do is find your way back out of one. Just click whenever your icon changes to interact, and use the arrows to look around or move to new locations.
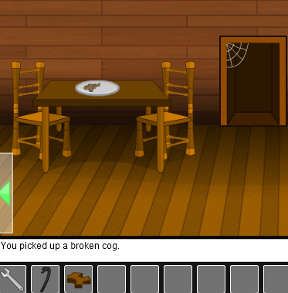
Must Escape: The Clock TowerMust Escape: The Clock Tower is best described as short and sweet, though a bit of extra polish in some areas to take care of typos would have helped overall. Most will simply find it a brisk warmup than a really substantial challenge, with fairly obvious clues and most puzzles amounting to fixing things. It's like you're role-playing as a mechanic. At one point, you'll be transporting objects between scenes with your cursor, however, which is fairly neat, and with a satisfying chunk of puzzles that'll make you feel like a time lord if not a brainiac. Must Escape: The Clock Tower has few frills, but will kickstart your brain and prepare you the next time you wander into an abandoned building and somehow manage to get lost on five floors where the only way to go is straight up or down. No, I'm not judging you. Aloud.

Play Must Escape: The Clock Tower

Walkthrough Guide


(Please allow page to fully load for spoiler tags to be functional.)

Must Escape the Clock Tower Walkthrough

From the Start to Passing the Bars

  1. Your first view is of the back of the clock.

    • Note that you can click on it but nothing happens. A gear is missing.

  2. Turn right. Now you see a wooden door, a trunk and a glimpse of a gear turning behind the wall. There's a cog at the top of the wall that you can't reach.

    • Click on the trunk until it's under the cog.Now you can click the cog but realize it's bolted down.

    • The door is locked and needs a silver key. But, you can peak through a knothole to see what's on the other side.

  3. Turn right to see some barrels and the stairs leading down.

    • Note that you're on the 5th floor.

    • Also take notice of the date on the barrels.

  4. Go down to the 4th floor. Now you see a little cupboard under the stairs.

    • It's jammed and there isn't a keyhole.

  5. Go left. Here you see bars blocking your progress further west, more cogs in the wall, a bench and a red box.

    • Something is missing on the wall near the other cog plus the lever is stuck.

    • The box needs a 4-digit code to open...

      • Enter the correct code and get a WRENCH.

      • SOLUTION:

        The date on the barrels upstairs...

        1972

  6. Return to the 5th floor and go left to the scene with the door and the bolted down cog.

    • With the trunk in place under it, reach the COG on the top of the wall and use the WRENCH to undo the bolt.

      • Take the COG off the wall.

  7. Go back downstairs and then left, back to the bars and lever.

    • Attach the COG to the wall where it was missing.

    • Pull the lever to open the bars.

Exploring Floors 3-1 plus Repairing the Cog

  1. After opening the bars, continue left and go downstairs to the 3rd floor. The stairs down here also have a cupboard under them.

    • Open the cupboard door and get a CROWBAR.

  2. Another trip back upstairs and then right to the jammed-up cupboard under the 4th floor stairs...

    • Use the CROWBAR to open this cupboard door.

      • Pick up a boot and examine it, clicking its bottom until you find the key hidden under the sole.

      • Take the SILVER KEY.

  3. Head back to the locked up wooden door on the 5th floor.

    • Use the SILVER KEY to open the door

  4. In this new room is a cluttered workspace where some repair work can be done. Explore the area a bit...

    • In the middle of the workspace is a gear, but it's missing parts (you'll need 2 PIECE OF COGS to fix it).

    • To the left of that is a piece of wood that might be useful, but it's stuck.

    • Look in the box under the table, slightly to the right of the broken gear, and you'll find a box full of nuts and bolts...

      • Move aside the nuts and bolts until you find a PIECE OF COG (1/3). Take it.

    • You need to find more pieces.

  5. On the shelf above the workspace is a green box...

    • You need a 3-color combination to open this box.

    • SOLUTION:

      Three pictures on the wall to the right of the shelf provide the colors. The diagram hanging to the left of the shelf hints at the order: small to large...

      BLUE-YELLOW-GREEN

    • When correct, click the grey rectangular button to open it.

      • Get the GLUE.

  6. Return downstairs to the 3rd floor and go right where there's a really hot flame inside the stove and another locked door (this one with a black keyhole.)

  7. Keep going right and you'll find the stairs to the 2nd floor. Head down and the first thing you see is a bookcase full of colorful books. There's one white book, though...

    • The white book needs a four color combination to be opened.

    • SOLUTION:

      Put the white book back on the shelf and observe. When on the shelf, you can see four colors on the white book's binding (even though you need to get squishy eyed to notice them well)....

      GREEN-RED-YELLOW-BLUE

    • When you get the book open, you can take the second PIECE OF COG (2/3).

  8. Go left from the bookshelves. Here is a table with some half-eaten meal left behind.

    • Move the plate aside to get the last PIECE OF COG (3/3).

  9. To spare your legs, before running back upstairs, let's explore the lowest floor first...Go left. Make a passing note of the crates and how you can carry them. Then, continue downstairs and all the way to the right. Here's a door needing a gold key and a coat hanging by the door.

    • Look inside the coat pocket to find a BLACK KEY.

  10. Also look at the bar up on the ceiling...There's a PIN but you need a way to reach it.

    • Go back to the second floor landing. Grab one of the CRATEs that are stacked next to the stairwell. Return with it to the door area on the first floor.

    • Place the first crate under the PIN and you realize you need another....

      • Go get another crate and come back. Then a third time (feeling short yet?)

    • Finally, with the 3 stacked crates, you can reach the PIN and take it!

  11. Go back to the stairs here on the first floor and, before heading back up, peek in the cupboard...

    • The cobwebs are so bad, you can't reach the key. Remember to look for a means to get rid of them.

  12. Go back to the 3rd floor and the door by the stove.

    • Use the BLACK KEY to go inside this door.

  13. It's a lovely bedroom. Searching around you find that the wardrobe needs a blue key. Okay! More to do still.

  14. Go all the way back up to the top floor and go inside the workroom.

    • Place all 3 PIECES OF COG into the gear mold.

    • Then, use the GLUE to hold it all together.

      • Take the repaired COG.

Using the Repaired Cog, Getting the Blue Key, and Repairing the Clock

  1. Remember the missing cog by the table? Return to the 2nd floor and go left.

    • Place the repaired COG on the wall by the table.

    • Pull the lever.

    • A toolbox will come down so you can...

      • take the HAMMER and the SCREWDRIVER.

  2. Return again to the workroom on the 5th floor. It's time to get that piece of wood...

    • Use the HAMMER on the piece of wood.

      • Pick up the WOODEN ROD.

  3. Now take your wooden rod down to the stove on the 3rd floor.

    • Open the stove, put the WOODEN ROD in the fire and you'll have a TORCH.

  4. Continue down to floor 1 with your torch and look in the cupboard under the stairs...

    • Use the TORCH to burn away the cobwebs.

      • Get the BLUE KEY.

  5. What else will your torch help with? From the bottom of the stairs, go right to see a tapestry on the wall...

    • Use the TORCH to light the candles on either side of the tapestry.

      • With the candles lit, the tapestry lifts up to reveal a panel.

    • Use your SCREWDRIVER on the four screws holding the panel in place.

      • Behind the panel is a MEDIUM GEAR. Take it.

  6. Now you have a blue key and a medium gear. Time to do a few more tasks... Go first to the bedroom on the third floor.

    • Use the BLUE KEY to open the wardrobe.

      • Get the BIG GEAR.

  7. Now take your two gears, and the pin you go earlier, up to the clock on the 5th floor, all the way back to where you started this escape.

    • Set first the MEDIUM GEAR on the horizontal rod of the clock.

    • Next, place the BIG GEAR over that.

    • Finally, use the PIN to hold it all in place.

      • With the clock repaired and the gears turning, a GOLD KEY drops down. Pick it up.

  8. The gold key is your key to escape. Go all the way back downstairs to the first floor's door.

    • Use the GOLD KEY and you're out!

    Congratulations! You esaped the clock tower!

Thanks to elle for the walkthrough!

10 Comments

Must Escape the Clock Tower Walkthrough

From the Start to Passing the Bars

  1. Your first view is of the back of the clock.

    • Note that you can click on it but nothing happens. A gear is missing.

  2. Turn right. Now you see a wooden door, a trunk and a glimpse of a gear turning behind the wall. There's a cog at the top of the wall that you can't reach.

    • Click on the trunk until it's under the cog.Now you can click the cog but realize it's bolted down.

    • The door is locked and needs a silver key. But, you can peak through a knothole to see what's on the other side.

  3. Turn right to see some barrels and the stairs leading down.

    • Note that you're on the 5th floor.

    • Also take notice of the date on the barrels.

  4. Go down to the 4th floor. Now you see a little cupboard under the stairs.

    • It's jammed and there isn't a keyhole.

  5. Go left. Here you see bars blocking your progress further west, more cogs in the wall, a bench and a red box.

    • Something is missing on the wall near the other cog plus the lever is stuck.

    • The box needs a 4-digit code to open...

      • Enter the correct code and get a WRENCH.

      • SOLUTION:

        The date on the barrels upstairs...

        1972

  6. Return to the 5th floor and go left to the scene with the door and the bolted down cog.

    • With the trunk in place under it, reach the COG on the top of the wall and use the WRENCH to undo the bolt.

      • Take the COG off the wall.

  7. Go back downstairs and then left, back to the bars and lever.

    • Attach the COG to the wall where it was missing.

    • Pull the lever to open the bars.

Exploring Floors 3-1 plus Repairing the Cog

  1. After opening the bars, continue left and go downstairs to the 3rd floor. The stairs down here also have a cupboard under them.

    • Open the cupboard door and get a CROWBAR.

  2. Another trip back upstairs and then right to the jammed-up cupboard under the 4th floor stairs...

    • Use the CROWBAR to open this cupboard door.

      • Pick up a boot and examine it, clicking its bottom until you find the key hidden under the sole.

      • Take the SILVER KEY.

  3. Head back to the locked up wooden door on the 5th floor.

    • Use the SILVER KEY to open the door

  4. In this new room is a cluttered workspace where some repair work can be done. Explore the area a bit...

    • In the middle of the workspace is a gear, but it's missing parts (you'll need 2 PIECE OF COGS to fix it).

    • To the left of that is a piece of wood that might be useful, but it's stuck.

    • Look in the box under the table, slightly to the right of the broken gear, and you'll find a box full of nuts and bolts...

      • Move aside the nuts and bolts until you find a PIECE OF COG (1/3). Take it.

    • You need to find more pieces.

  5. On the shelf above the workspace is a green box...

    • You need a 3-color combination to open this box.

    • SOLUTION:

      Three pictures on the wall to the right of the shelf provide the colors. The diagram hanging to the left of the shelf hints at the order: small to large...

      BLUE-YELLOW-GREEN

    • When correct, click the grey rectangular button to open it.

      • Get the GLUE.

  6. Return downstairs to the 3rd floor and go right where there's a really hot flame inside the stove and another locked door (this one with a black keyhole.)

  7. Keep going right and you'll find the stairs to the 2nd floor. Head down and the first thing you see is a bookcase full of colorful books. There's one white book, though...

    • The white book needs a four color combination to be opened.

    • SOLUTION:

      Put the white book back on the shelf and observe. When on the shelf, you can see four colors on the white book's binding (even though you need to get squishy eyed to notice them well)....

      GREEN-RED-YELLOW-BLUE

    • When you get the book open, you can take the second PIECE OF COG (2/3).

  8. Go left from the bookshelves. Here is a table with some half-eaten meal left behind.

    • Move the plate aside to get the last PIECE OF COG (3/3).

  9. To spare your legs, before running back upstairs, let's explore the lowest floor first...Go left. Make a passing note of the crates and how you can carry them. Then, continue downstairs and all the way to the right. Here's a door needing a gold key and a coat hanging by the door.

    • Look inside the coat pocket to find a BLACK KEY.

  10. Also look at the bar up on the ceiling...There's a PIN but you need a way to reach it.

    • Go back to the second floor landing. Grab one of the CRATEs that are stacked next to the stairwell. Return with it to the door area on the first floor.

    • Place the first crate under the PIN and you realize you need another....

      • Go get another crate and come back. Then a third time (feeling short yet?)

    • Finally, with the 3 stacked crates, you can reach the PIN and take it!

  11. Go back to the stairs here on the first floor and, before heading back up, peek in the cupboard...

    • The cobwebs are so bad, you can't reach the key. Remember to look for a means to get rid of them.

  12. Go back to the 3rd floor and the door by the stove.

    • Use the BLACK KEY to go inside this door.

  13. It's a lovely bedroom. Searching around you find that the wardrobe needs a blue key. Okay! More to do still.

  14. Go all the way back up to the top floor and go inside the workroom.

    • Place all 3 PIECES OF COG into the gear mold.

    • Then, use the GLUE to hold it all together.

      • Take the repaired COG.

Using the Repaired Cog, Getting the Blue Key, and Repairing the Clock

  1. Remember the missing cog by the table? Return to the 2nd floor and go left.

    • Place the repaired COG on the wall by the table.

    • Pull the lever.

    • A toolbox will come down so you can...

      • take the HAMMER and the SCREWDRIVER.

  2. Return again to the workroom on the 5th floor. It's time to get that piece of wood...

    • Use the HAMMER on the piece of wood.

      • Pick up the WOODEN ROD.

  3. Now take your wooden rod down to the stove on the 3rd floor.

    • Open the stove, put the WOODEN ROD in the fire and you'll have a TORCH.

  4. Continue down to floor 1 with your torch and look in the cupboard under the stairs...

    • Use the TORCH to burn away the cobwebs.

      • Get the BLUE KEY.

  5. What else will your torch help with? From the bottom of the stairs, go right to see a tapestry on the wall...

    • Use the TORCH to light the candles on either side of the tapestry.

      • With the candles lit, the tapestry lifts up to reveal a panel.

    • Use your SCREWDRIVER on the four screws holding the panel in place.

      • Behind the panel is a MEDIUM GEAR. Take it.

  6. Now you have a blue key and a medium gear. Time to do a few more tasks... Go first to the bedroom on the third floor.

    • Use the BLUE KEY to open the wardrobe.

      • Get the BIG GEAR.

  7. Now take your two gears, and the pin you go earlier, up to the clock on the 5th floor, all the way back to where you started this escape.

    • Set first the MEDIUM GEAR on the horizontal rod of the clock.

    • Next, place the BIG GEAR over that.

    • Finally, use the PIN to hold it all in place.

      • With the clock repaired and the gears turning, a GOLD KEY drops down. Pick it up.

  8. The gold key is your key to escape. Go all the way back downstairs to the first floor's door.

    • Use the GOLD KEY and you're out!

    Congratulations! You esaped the clock tower!

Thanks to elle for the walkthrough!

Reply
Shudog May 8, 2013 6:40 AM

Oops, accidentally down-voted this. Quick fun! Art could've been better, and I had some

this would be Towering Inferno

moments, but it's a cute, original puzzle.

Reply
feliciac May 8, 2013 8:40 AM

Needed some of the hints this time round (excellent walkthrough by the way!) and there was a small bug whereby I had applied the glue but it still came up with the same pre-glue message. Good fun though!

Reply
Headroom May 8, 2013 9:01 AM

God... my feet are sore after going up and down all those stairs !

Paris : rain

Reply
throwawayx3t May 8, 2013 5:28 PM

Nice little escape game. Much, much easier, much shorter, and far less moody than his other games I've played. Still fun though.

Reply
soulsteamer May 9, 2013 10:01 PM

don't open the black door if you value your cog!

Reply
https://www.google.com/accounts/o8/id?id=AItOawmZ96e6kUWpCjajB6hkgLCuvKgcQp5c_p8 May 19, 2013 8:38 PM

Really messed up. Glue bug doesn't allow this to finish. Tried in 2 diff. browsers.

Reply
barbara May 20, 2013 11:52 AM

Hey! I wanted to do something with the empty frame that popped up when I clicked on the chest of drawers in the bedroom.

Too bad there wasn't a way to teleport between the floors though. Right right down left left down ... gets old fast.

Fun puzzles.

Reply
LaraSkadi May 22, 2013 2:14 PM

Yeah, I got the same glue bug.

I fixed the cog and the glue disappeared, but the lines that should indicate the fixed fissures turned back to their original broken state and it keeps asking me to use the glue that no longer exists.

Which is annoying considering I can only finish it replaying it, and to do so I'd have to walk all over again.

Reply

Almost got it by myself... I had problems with figuring out the green box combination, so couldn't get the glue.

Reply

^ Scroll Up | Homepage >

Leave a comment [top of page]

Please consider creating a Casual Gameplay account if you're a regular visitor here, as it will allow us to create an even better experience for you. Sign-up here!
  • PLEASE UNDERSTAND SITE POLICIES BEFORE POSTING COMMENTS
  • You may use limited HTML tags for style:
    (a href, b, br/, strong, em, ul, ol, li, code, spoiler)
    HTML tags begin with a less-than sign: < and end with a greater-than sign: >. Always. No exceptions.
  • To post spoilers, please use spoiler tags: <spoiler> example </spoiler>
    If you need help understanding spoiler tags, read the spoiler help.
  • Please Preview your comment before posting, especially when using spoilers!
  • No link dropping, no domains as names; do not spam, and do not advertise! (rel="nofollow" in use)
chrpa Jayisgames needs your help to continue providing quality content. Click for details Hi! Weekday Escape and Weekday Puzzle are here! First we have two new cans from tomoLaSiDo and then two small rooms from isotronic. That's all for this...  ...
6,365 Views
0 Comments
chrpa Jayisgames needs your help to continue providing quality content. Click for details Welcome to Mobile Monday! We have another beautiful game from Nicolet and it's a winter game as it should be. Tasuku Yahiro have released another of their...  ...
8,746 Views
2 Comments
chrpa Jayisgames needs your help to continue providing quality content. Click for details We've got a new game from Rinnogogo's magical world and this time it really is magical.. Not only do you get to meet cute animals that express themselves...  ...
chrpa Jayisgames needs your help to continue providing quality content. Click for details After a few weeks of patient waiting, we have been rewarded - the new game from Ichima Coffeedo is here. We got a wonderful new game - it's...  ...

HELP Jayisgames.com

Recent Comments


Display 5 more comments
Limit to the last 5 comments

Game of the week


Dark Romance: Vampire Origins Collector's Edition

Your Favorite Games edit

add
Save links to your favorite games here. Use the Favorites editor.

Monthly Archives