
Mystery Legends: The Phantom of the Opera
Platform: Mac, Windows
![]() What would you do for the person you loved? What if you found out they didn't love you back? As the saying goes, there's a fine line between love and hate. Mystery Legends: The Phantom of the Opera is a hidden-object adventure that is a grim, creepy, adaptation of the classic story, and is an absolute blast. With top-notch production values and a heavy emphasis on story, this is the game every other title in the genre wishes it could be.
What would you do for the person you loved? What if you found out they didn't love you back? As the saying goes, there's a fine line between love and hate. Mystery Legends: The Phantom of the Opera is a hidden-object adventure that is a grim, creepy, adaptation of the classic story, and is an absolute blast. With top-notch production values and a heavy emphasis on story, this is the game every other title in the genre wishes it could be.
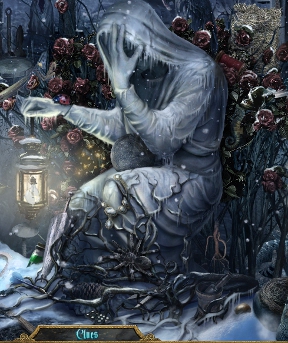
 Christine was once a celebrated opera diva, but she hasn't performed in years. Her daughter Evelina is fascinated by her mother's stories of the stage... but she doesn't suspect that the past doesn't always stay in the past. When Evelina receives a letter from a stranger, she awakens to find herself in the crumbling remains of the very same Parisian Opera House from her mother's early career. How did she get there? Who is the mysterious voice that hisses at her from the shadows? And why does he seem so convinced that she betrayed him?
As Evelina, you'll search through the Opera House, looking for clues and trying to find a way out. In most cases, points of interest will sparkle to grab your attention, and the cursor will change if you move it over something that can be interacted with. Like most hidden-object titles, you'll search through scenes for items you need to solve puzzles. Move your cursor over an item on your list to see what the silhouette looks like, or click on the hint mirror when it's fully charged to reveal a random object. If you can't progress, try going back to places you've already visited; sometimes getting a new objective will unlock new hidden-object scenes, or draw your attention to a specific item that could now be of use. Although the puzzles do offer you the ability to skip them if you wait long enough, Evelina's journal keeps track of valuable clues you might be able to use to solve them.
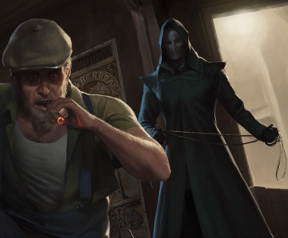 Analysis: While we tend to see a lot of games with horror themes, most casual releases seem to shy away from making them serious about it. They try to lighten things up with corny dialogue or other humour. But while it's not what you would call outright scary, Phantom of the Opera takes the whole experience seriously, and sets out to engross you in the story and raise the hairs on the back of your neck. At its core, this is a story about what happens when love turns into obsession, and the desire to posses something no matter who you destroy in the process. The narrative is revealed in the notes Evelina finds laying around, and the flashbacks that are presented when the Phantom appears.
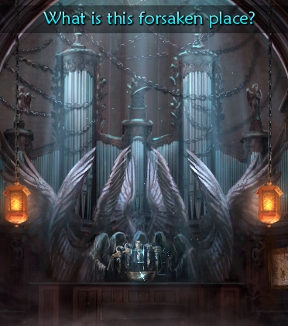
Phantom of the Opera is no slouch in its presentation, either. The environments are incredibly well designed, the art work is absolutely gorgeous, moody and full of dark, bruised purples and frosty blues that help complete the atmosphere. As you play, the Phantom rages at you unseen, alternately cursing you and insisting he can force you to love him. Not only is it unsettling, but combined with Evelina's comments as she explores, it makes the whole place feel much more alive and involving by keeping the protagonist and antagonist from becoming faceless, mute entities. The Opera House itself is a great setting, so fallen into decay that it almost seems like another world.
 One of the only real downsides to the game is that you'll be doing a lot of footwork. The Opera House and the surrounding area is big, and while the map the game provides probably won't be necessary to find your way around, it can still be frustrating to slog your way back and forth just to use one item, or to resort to poking your head in all the rooms to see if anything's changed. The rest of the game is also so moody that the cluttering of random, unrelated items in the hidden-objects scene, while admittedly a staple of the genre, feels out of place. Aiiieeeee, the Phantom! I must search this graveyard for a hamster, a bulldog, and a parasol, post-haste!
Fortunately, on a technical scale the hidden-object scenes are generally quite well done, and aren't just challenging because the hint button takes so long to recharge. Some of the objects are a bit more obscure than what you might be used to, ranging from specific Egyptian deities to uncommon plants to pieces of musical instruments... and prepared Absinthe. (Trust me, all the sugar in the world won't fix that stuff.) The puzzles you'll encounter are likewise solid, requiring you to both fire up the old gray matter as well as be observant. It's always nice when a game treats you like you're capable of knowing more than which way to put your pants on in the morning.
Visually stunning and engrossing, Mystery Legends: Phantom of the Opera, is one of the best games I've played in a long time, regardless of genre. The ending is a little unsatisfying considering all the build up, and definitely leaves the doors wide open for a sequel. For most players, the game will probably clock in at around four to five hours, more if you take your time; it's a respectable length, but you'll probably wind up wishing there was more to it, if only because it's so well done. At the very least you should check out the demo. You'll be glad you did.
A Collector's Edition is also available. It contains a built-in strategy guide, a soundtrack, a bonus chapter, and a digital version of the original Phantom of the Opera book. Remember that Big Fish Game Club Members pay only $13.99 for Collector's Editions (or 2 club credits), and collector's editions count 3 card punches of 6 total needed for a free game.
![]() Windows:
Windows:
Download the demo
Get the full version
Also available: Collector's Edition
![]() Mac OS X:
Mac OS X:
Download the demo
Get the full version
Also available: Collector's Edition


Walkthrough Guide
(Please allow page to fully load for spoiler tags to be functional.)
Mystery Legends: Phantom of the Opera - Walkthrough
General
Your hint recharges slowly - but in hidden object scenes, you can click the object and see its silhouette at the right side.
The silhouette hint works also, when the "normal" hint did not fully recharge yet.
When your cursor changes to a magnifier, you should may have a closer look.
When your cursor shows a tiny grabbing hand, you can pick up an object.
When your cursor shows a gear, you can interact with things.
When your cursor shows a question mark, you will get information, mostly stored in your book.
Look at it when you are looking for puzzle solutions.
Mini games can be skipped after the skip-button is fully charged.
Your book on the right side will contain pictures, documents, and helpful hints to solve the puzzles you will come along.
It also holds a map. The map shows you where you are right now (yellow x) and where are tasks for you (red exclamation mark).
Hovering over the rooms without clicking will show you the name of the location.
You will always have to walk everywhere - you can't use the map to click yourself from one room to the other.
The walkthrough shows the shortest way through the game. You can do a lot of things in a different order - the result will always be the same.
Inventory List
Absinthe - Cottage, potion puzzle
Absinthe Bottle (2x) - 1. Manager's Office, right statue, 2. Library, book puzzle
Anis Star Bucks - Conservatory Hallway, watered and pruned plant
Ants - Understage Landing, floor
Ballerina - Actor's Alley, hidden-object-scene
Black Candles - Furnace Room, music-stand-puzzle
Black Rose (4x) 1. Dining Salon, urn puzzle 2. Sarcophagus, Stage Lifts 3. Crypt Entrance, statue above entrance 4. Crypt, tomb-puzzle
Book (2x) 1. Cottage, floor, 2. Library, hidden-object-scene
Bow and Arrow - Top Roof - Statue
Box of matches - Grand Foyer, hidden-object-scene
Bucket - Conservatory, floor
Bucket with water - Cottage Grounds, well
Canopic Jar (4x) 1. Art Rotunda, on the floor, 2. Manager's Hallway, broken window puzzle, 3. Understage Landing, floor
Chess pieces (4x) 1. Library, melted candle 2. Diner Salon, broken table 3. Prop Storage Room, on drum 4. Women's change room, shelf right side
Coin - Christine's Room, table far left
Crank - Stage Lifts, table
(Snake) Dagger (5x) - 1. Costume Alley, underneath red cloth 2. Women's Change Room, stool 3. Roof Top, hidden-object-scene 4. Industrial Alley, desk right side 5. Worship Cellar, hidden-object-scene
Embalming Fluid - Worship Cellar, hidden-object-scene
Finest spirit - Library, book puzzle
Flash light - Cloak Desk
Flute - Graveyard, hidden-object-scene
Gardening Shears - Conservatory, hidden-object-scene
Gramophone Horn - Orchestra Pit, hidden-object-scene
Grappling Hook - Understage Landing, Pharaoh Statue
Half mask (2x) - 1. Opera Box No 5, hidden-object-scene 2. Ballroom, ballroom-puzzle
Half of crest (2x) - 1. Dining Hall, left statue, 2. Manager's Office, hidden-object-scene
Heart (5x) - 1. Catherine's Room, mannequin 2. Conservatory Grounds, tree top left 3. Library, middle book shelf 4. Top Roof, wall above horse 5. Crypt, tomb right side
Hook - Industrial Alley, hanging down from ceiling
Jar (empty) - Spy Booth, back shelf
Key for Elevator - Orchestra Pit, stairs after giving phantom the black rose.
Library key - Manager's Office, cuckoo clock
Light bulb - Cloak Closet
Mask (4x for Crypt) - 1. Prop Stage Room, hidden-object-scene 2. Conservatory Grounds, right side in the snow 3. Top Roof, hidden-object-scene, 4. Christine's Room, far right on the floor
Mask (2x for Christine's Room) - 1. Elevator Lobby, Yorick 2. Women's Change Room, mannequin after gramophone-puzzle
Mirror - Sewer, ground after solving water puzzle
Mop - Conservatory, hidden-object-Scene
Money - Manager's Office, chess puzzle
Music Sheet - Library, hidden-object-scene
Music Stand - Orchestra Pit, left side
Nail clipper - Powder Room, chair
Opera Glasses - Christine's Room, table, low left
Powder puff - Actor's Alley, hidden-object-scene
Record - Women's Change Room, at the mirror after black-rose puzzle
Sack (from Sewer) - Sewer, far right
Salt - Dining Saloon, hidden-object-scene
Sand sack - Conservatory Hallway, floor
Screwdriver - Cottage, hidden-object-scene
Skull - Furnace Room - trolley low right corner
Shovel - Graveyard, right side
Statue of Horus - hidden-object-scene Orchestra Pit
Stone - Conservatory, floor
Sun disc - Prop Stage Room, hidden-object-scene
Symbol (Music) Cards (4x) - 1. Art Rotunda, behind painting 2. Spy Booth, top left shelf 3. Understage, on white sack 4. Prop Stage Room , Jack-in-the-box puzzle
Telescope - Actor's Alley, on the crate, right side
Thermometer - Cottage Grounds, huge right window
Ticket - Grand Foyer, hidden-object-scene
Torch (dry) - Worship Cellar, right side next to cloth
Torch (lit) - Furnace Room
Worm - Conservatory, floor
Urn (5x) - 1. Manager's Hallway, table far right, 2. Manager's Office, safe, 3. Ballroom Hallway, floor 4. Diner Salon, hidden-object-scene 5. Diner Salon, behind chair
Grand Foyer/Cloak
Go to the right and pick up the flashlight from the desk.
Grab the poster at the lower left wall - it is a newspaper article and goes into your book. You can open your book to read it.
Click the large poster at the wall - the one which says "Don Juan" - there is a date circled at the low right corner. The information will be stored in your book.
Enter the cloak closet through the red curtains.
It is too dark to see, so use the flashlight from your inventory.
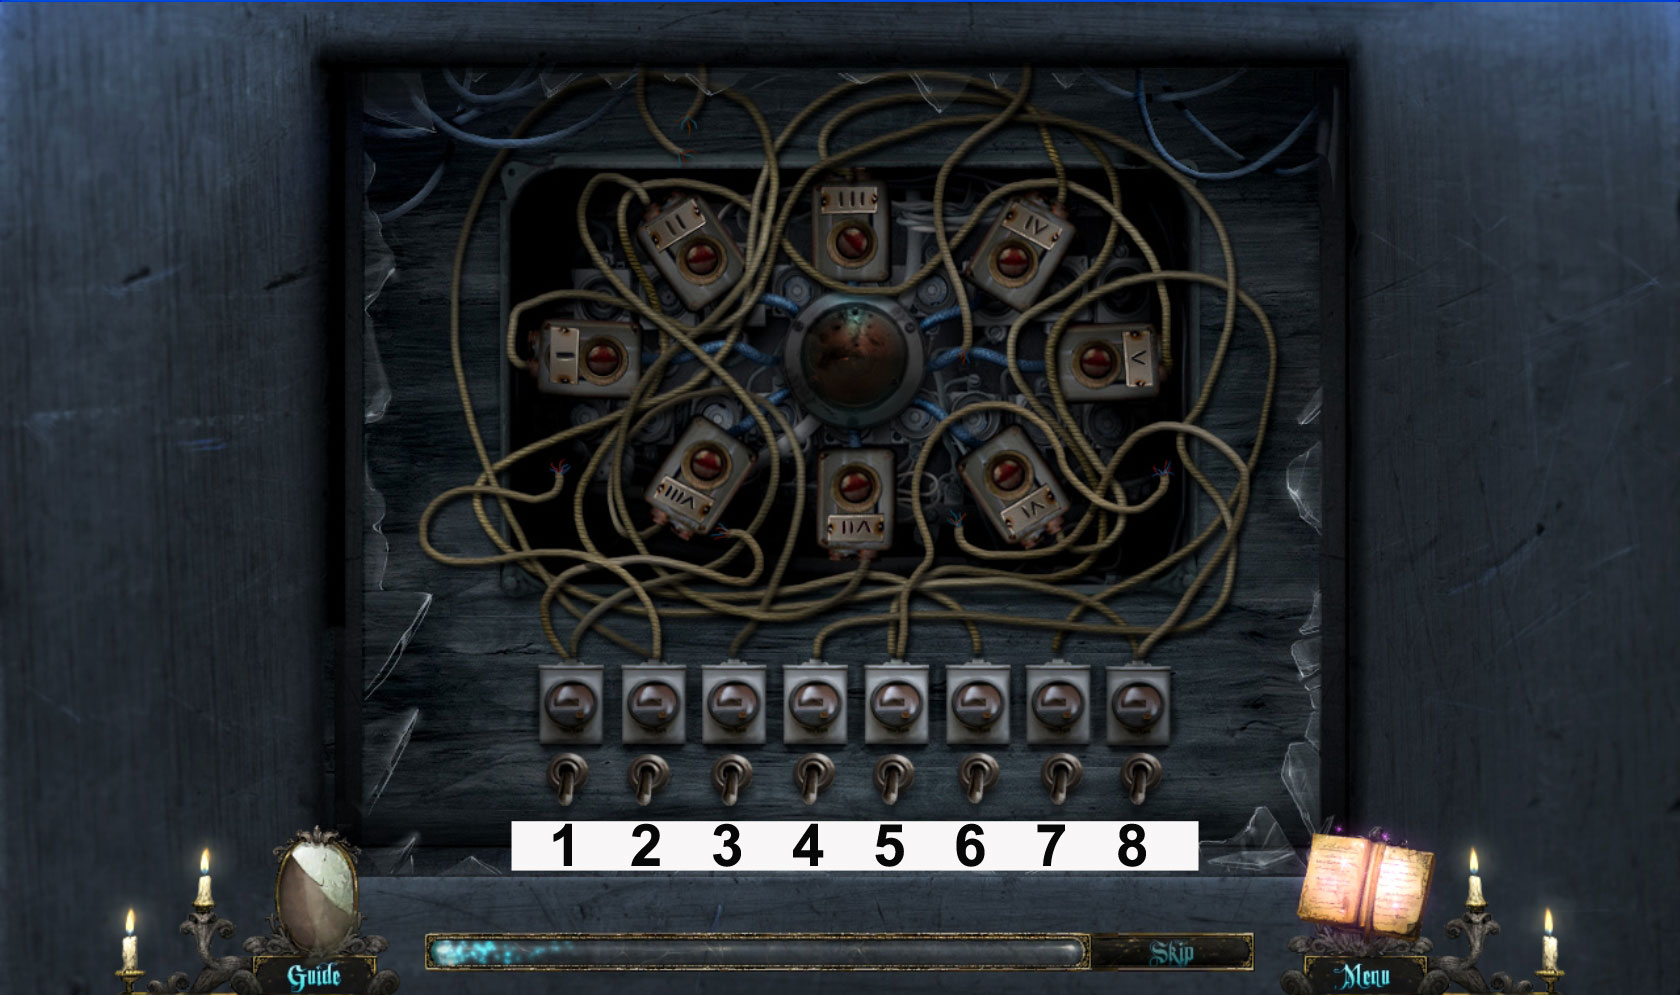
Click the wooden power box at the back wall.
In the closer look you will see a mini game.
The power has to be restored by flipping the switches at the bottom.
The switches have to be clicked in the correct order, but no switch will restore the power of the light bulb directly above.
Your goal is it to find the right order.
A wrong flip will reset all light bulbs and you will have to start all over.
The correct order is:
Seen are the switches from left to right, numbered 1-8, click: 5,7,6,4,1,8,2,3
Now you have light - grab the light bulb from the shelf left above the power box.
Leave the cloak coat and return to the Grand Foyer.
Click the open Billet booth on the left side and play the hidden object scene.
The ticket you will find on the right side of the desk and will go into your inventory.
Click the male figure at the right side, left next to the curtains.
Place the ticket into his hand and he will open the curtains for you.
Go straight ahead to enter the Auditorium Landing.
Auditorium Landing/Dining Hall
Enter the right entrance to the Dining Hall.
Grab the half of a crest from the statues hand on the left.
On the left you have the door to the Dining Salon.
Go to the right into the Manager's Hallway.
Manager's Hallway
Grab the urn on the table far right.
Click the middle window - there is something laying in the snow, but you can't reach it yet.
Click the door to the right.
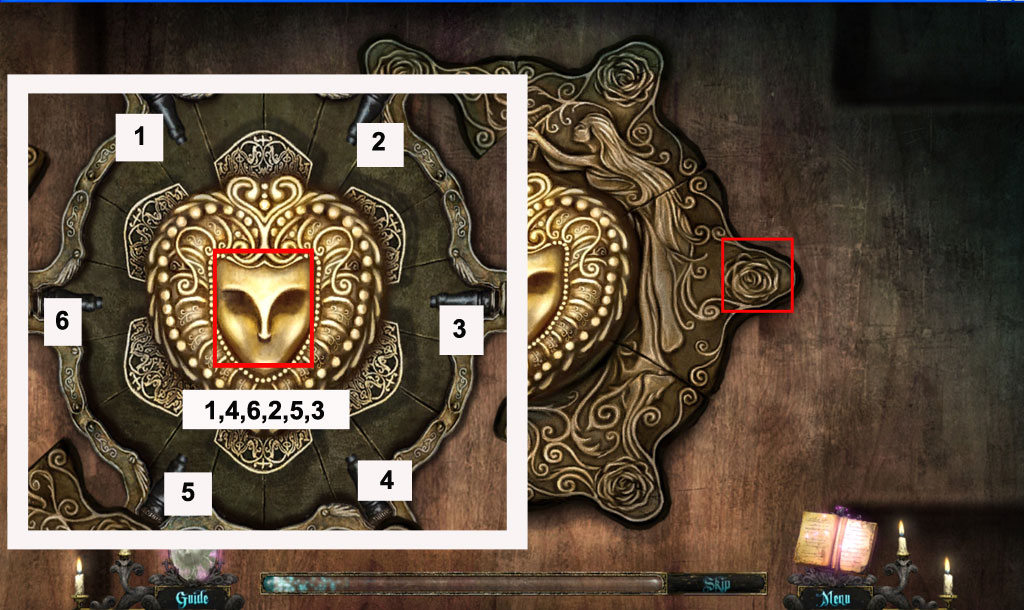
You will get a closer look to solve a mini game.
Your goal is to open the lock.
Click one of roses and the rose parts will flip to the side.
Click the black pins at the end of the springs.
If it locks, it is ok and you can click the next one.
You will need to click the pins in the right order; clicking a wrong pin will reset all springs.
When all springs are locked, click the face in the middle and the door will open.
The right order you can find in the spoiler or see screenshot:
Screenshot
Seen from 1 (top left) to 6 clockwise, you need to click in the following order: 1,4,6,2,5,3
Enter the Manager's Office.
Manager's Office
The statue on the right is holding an Absinthe bottle in her hands.
Click it to get a closer look and take the bottle.
Click the desk in the far left corner.
You will get a close up of the lamp.
Click the lamp shade - the bulb is missing.
Place the light bulb from your inventory into the socket.
Now that there is light, you can play the hidden object scene at the desk.
The half of a crest (top shelf, middle) will go into your inventory.
Click the chess table (far right) - there is a drawer, but it will not open yet.
Click the "Green Fairy" poster at the right side of the back wall.
There is nothing else you can do right now, so leave the Manager's Office and go straight ahead to the Art Rotunda.
Art Rotunda
Click the grandfather clock at the right side - it stopped at 9:20.
The door to the library is looked locked and you do not have a key yet.
Click the painting standing on the right side on the floor.
It moves to the side and the you can pick up a symbol card.
Go to the right to the Conservatory Hallway.
Conservatory Hallway/Conservatory
From the ground, far right, you can pick up a sack with sand.
Notice the wilted plant to the left.
Go straight ahead and enter the conservatory.
Note the loose stone on the ground - but you don't have a tool to pry it up yet.
Click the statue at the right - information will be copied into your book.
Pick up the bucket standing to the left side on the floor.
Click the door and place the two parts of the crest into the empty space.
The door opens.
Go through the door the Conservatory Grounds.
Conservatory Grounds/Cottage Grounds/Cottage
Pick up a twig (left side) in the snow.
Notice the X in the snow, right side - a note will be made in your book.
Click the grave stones at the right.
Each of them shows a year and a special attribute of the grave's "owner".
Go straight ahead.
Place the bucket on the well to the right and click the crank at the right side once to let the bucket go down and once to get it back.
Take the now-full bucket of water.
Enter the cottage.
Pick up the book laying on the ground to the left side.
Click the rinsing tank to play the hidden object scene.
You will receive the screwdriver for your inventory (left side of the rising tank).
Leave the Cottage and go back to the Conservatory.
Conservatory/Conservatory Hall
Click the loose stone on the ground and pry it up with the screwdriver.
Grab the worm that was underneath the stone and the stone itself.
Play the hidden object scene at the left side and you will receive gardening shears (find them at the right side at the wall).
Go to the Conservatory Hall.
Use the bucket with water on the wilted plant.
Prune it afterwards with the gardening shear.
You will receive Star Anis Buds.
Head back to the Manager's Office.
Manager's Office
Click the cuckoo clock.
Click and drag the clock hands with the left mouse button and change their positions to 9:20 - the time you saw on the grandfather clock in the Art Rotunda.
The cuckoo comes out of its door - grab the key he is holding in the beak.
Head back to the Art Rotunda.
Art Rotunda/Library
Click the library door and use the key to open the door.
Enter the library.
Click the huge book (low left corner) and a note about Egyptian gods will go into your inventory.
In the low right corner you see three candles - click the right one and it will melt.
Grab the chess figure that appears.
Pick up the canopic jar from the floor in front of the right statue.
Click the book shelf between the two statues - two books are missing.
Leave the closer look and click the book shelf, right side.
Play the hidden object scene - you will receive a book (found top shelf on the right).
Click the other bookshelf again.
Your goal is to arrange the books so that you can open the compartment behind the books.
Remember the date, circled on the Don Juan Poster in the Cloak - you can find the poster in your book.
All books show a number.
Move the books by swapping two at a time.
The correct order of the books is the date of Don Juan premiere:
03251896
The books move aside - click the little grate and take the empty Absinthe bottle and the bottle of finest spirit.
Leave the Library and go to the Cottage Grounds.
Cottage Grounds/Cottage
At the huge right window outside of the cottage, you can see a thermometer in the low left corner, right above the fire wood.
Click it and pick it up, when you get in the closer view.
Enter the cottage and click the fire place.
The recipe for Absinthe you can find in your book - it was the "Green Fairy" Poster in the Manager's Office.
First place the finest spirit in the cauldron, followed by the worm and the twig.
Now place the thermometer at the right back side of the cauldron and put in the Star Anis Buds at last.
As soon as the Star Anis Buds touch each other, they turn red.
Click to make them move.
You will have to do this until the content of the cauldron is a strong light green.
The Buds won't be seen anymore - the Absinthe is ready.
Fill your empty Absinthe bottles from your inventory with the Absinthe.
Go to the Conservatory.
Conservatory/Manager's Hallway/Manager's Office
Play the hidden object scene in the Conservatory.
You will get a mop for your inventory.
Head over to the Manager's Hallway.
Click the middle window and smash it with the stone.
Pick up the canopic jar out of the snow.
Enter the Manager's Office.
Place one of the Absinthe bottles in the hands of the two statues.
As soon as both hold the bottles, the Green Fairy picture will move and reveal a safe.
Click the safe.
You will need to find the five buttons which will unlock the safe.
You see roman and latin numbers. Find the five buttons with numbers, which are unique.
The number can be roman and latin.
Click them and another click at the handle (right side) will open the safe.
The buttons can be found here:
1 = 3rd row, 5th button seen from left.
II = top row, 5th button seen from left.
III = 2nd row from bottom, 4th button seen from right.
V = 2nd row from top, 2nd button seen from right.
7 = 4th row from top, 3rd button seen from left.
Screenshot
Get the urn out of the safe.
Go to the Audience Landing and enter the right entrance.
Ballroom Hallway/Dining Salon
Get the sack with sand out of you inventory and place it on the ground.
Get the urn in front of the chair (far left).
Go to the Dining Salon.
Grab the chess piece from the table on the floor.
Play the hidden object scene at far left table.
You will get another urn for your inventory (top middle).
Click the chair laying on the floor (right side) between the windows.
It will move and you will find another urn.
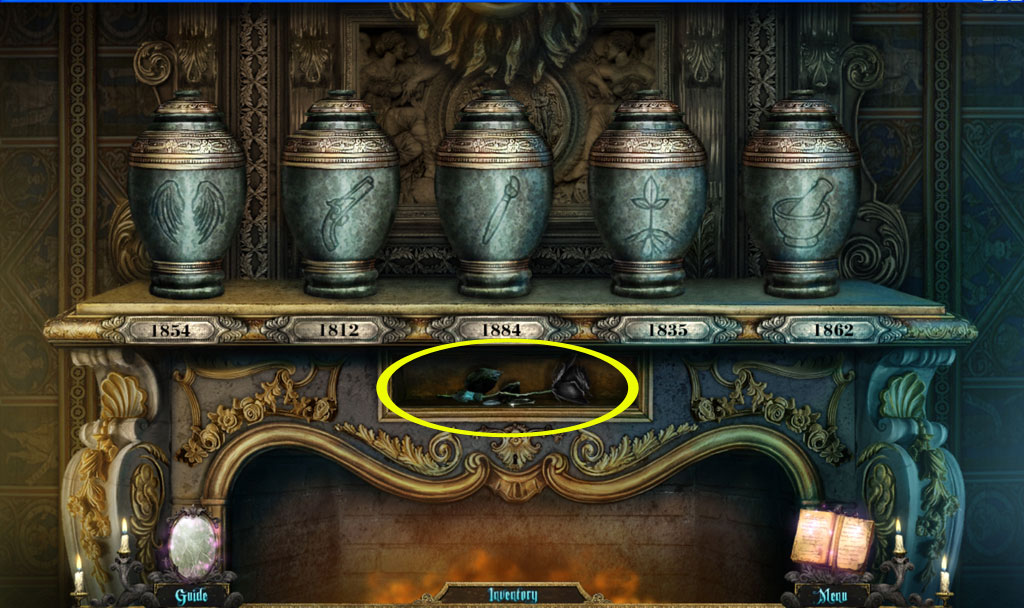
Click the fireplace mantle and place the urns onto it.
Each urn shows a symbol and is standing above at metal plate with a year engraved.
Remember the gravestones at the Conservatory Grounds.
Each one showed a Date and a special ability of the dead person.
Try to find out which symbol on the urns fit to the ability and place this urn above the metal plate with the year of death of this man.
You can swap urns by clicking two at the time.
When all urns are in the right position, the glass underneath will open and you can pick up the black rose.
The solution and a screenshot can be found in the spoiler:
1812 - the important word was aim - pistol
1835 - loved his garden - plant
1854 - Rest in peace - angle wings
1862 - He was into science - mortar and pestle
1884 - His vision was important - brush
Screenshot
Go back to the Ballroom Hallway and enter the Powder Room to your right.
Powder Room/Spy Booth
Use the mop from the inventory to get rid of the water on the floor.
Now pick up the nail clipper from the chair (left side).
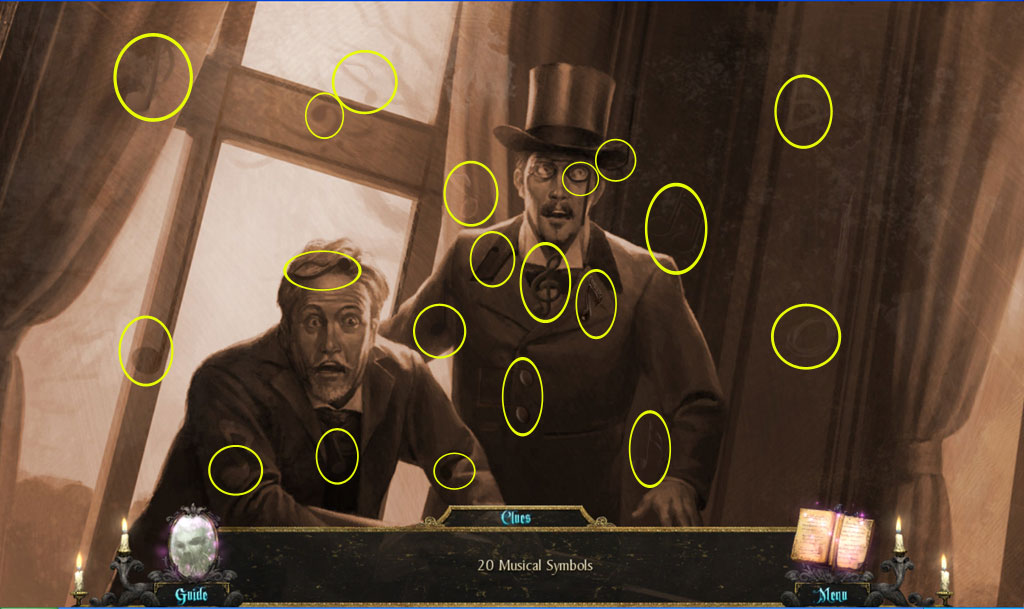
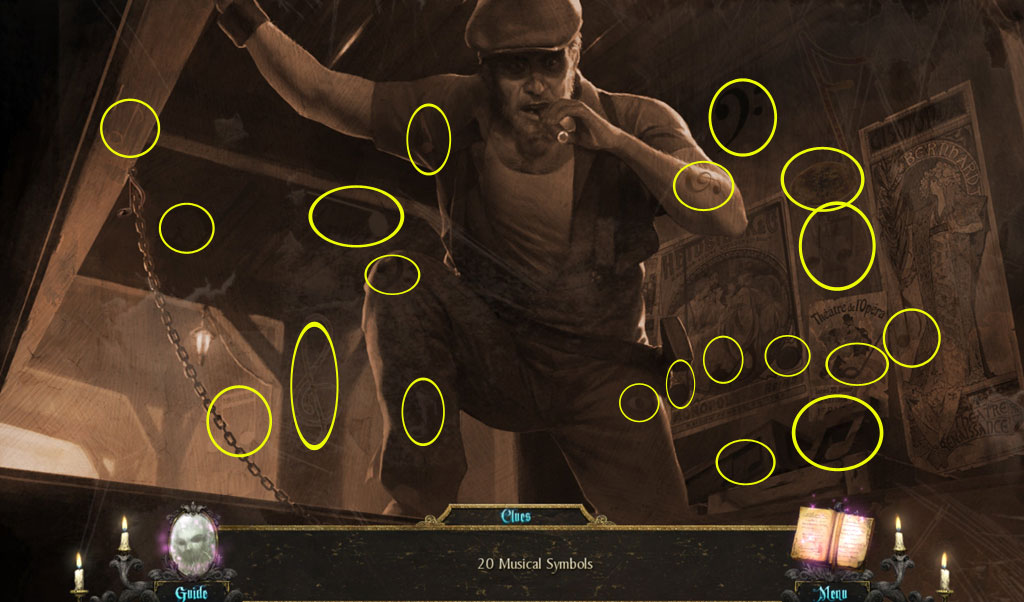
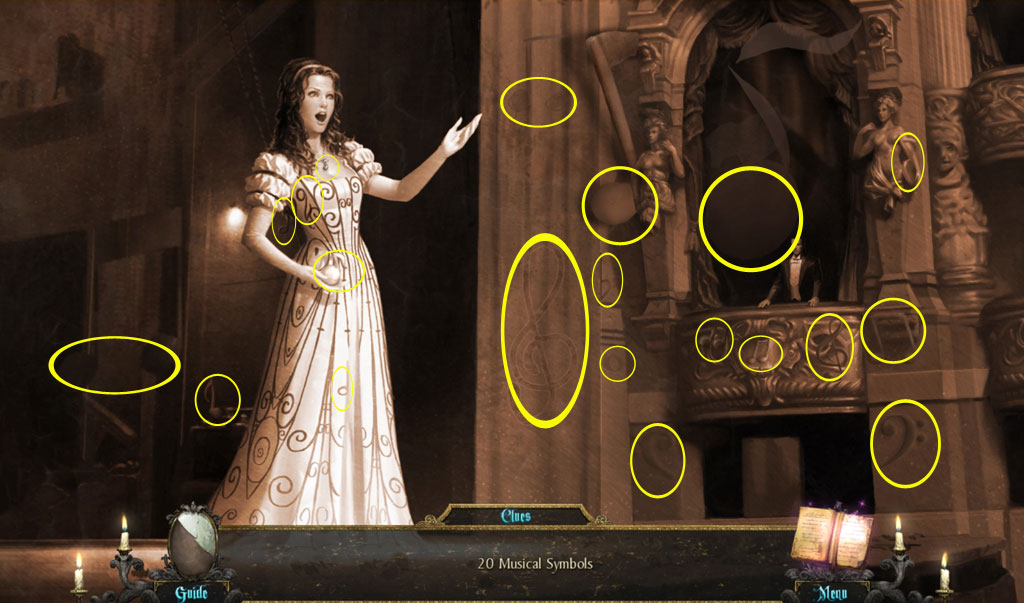
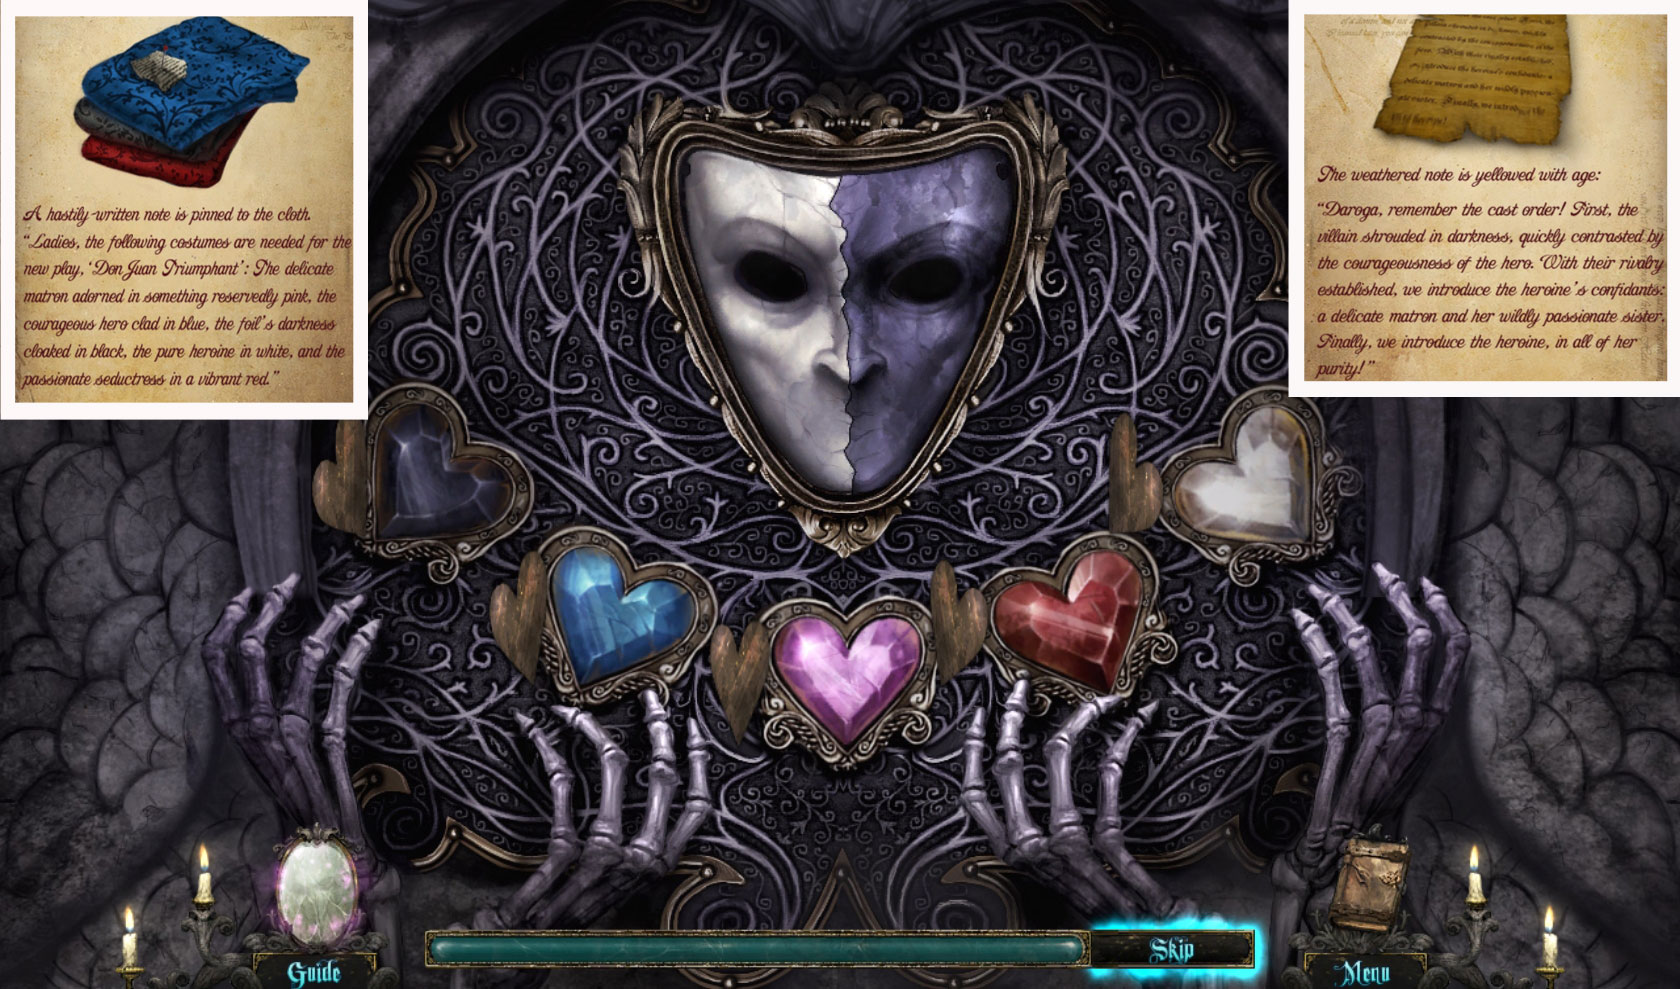
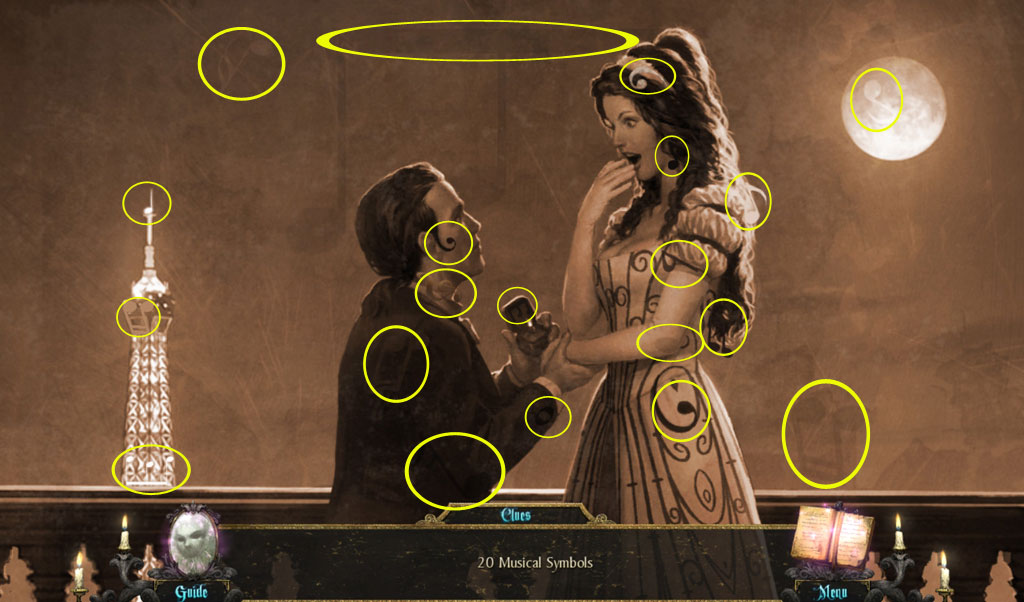
Give the black rose to the phantom in the mirror at the wall (far middle).
Find the 20 musical symbols.
Screenshot
Enter the Spy Booth through the broken mirror.
Click the shelf on the top left; it is loose and will fall, and you can grab a symbol card.
Click the stack of newspapers on the right in front of the shelf to get some information for your book.
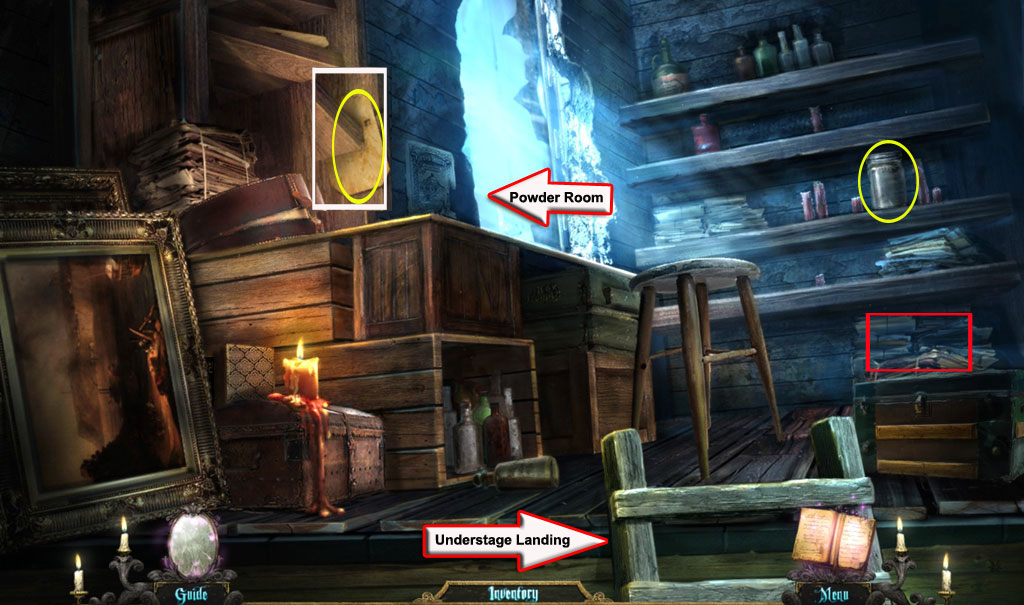
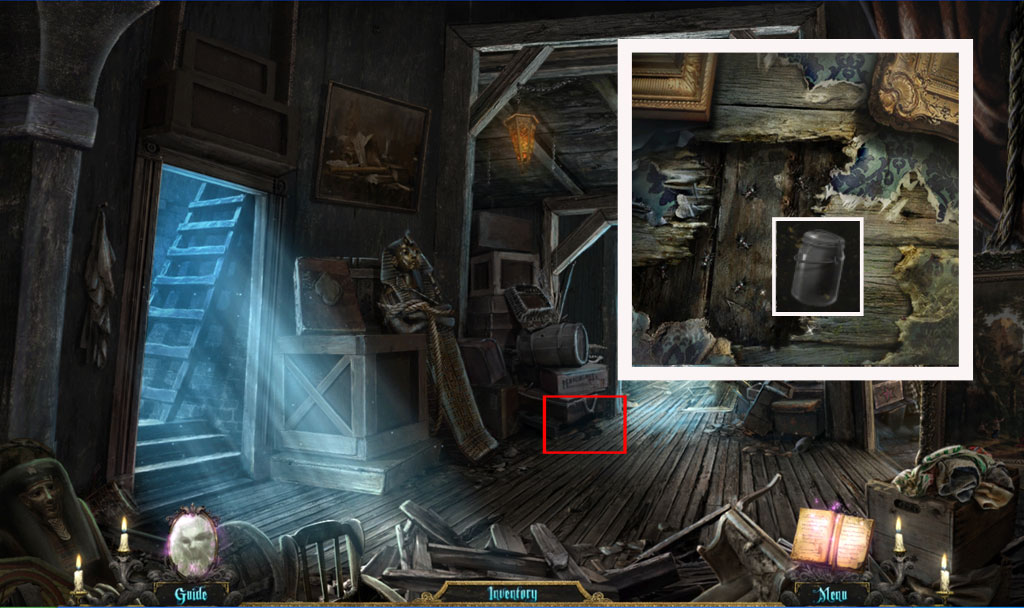
Pick up the empty jar from the back shelf, right side.
Use the ladder in the low middle to enter the Understage Landing.
Screenshot
Understage Landing/Prop Stage Room/Understage
Pick up the Canopic Jar from the floor (right side) and enter the Prop Stage Room at your right.
Grab the chess piece from the drum, low right corner.
Leave the room again and go straight ahead to the Understage.
Pick up the symbol card on the white sack (left side).
Play the hidden-object-scene on the right - you will get a canopic jar.
Go straight ahead to the Elevator Lobby.
Elevator Lobby, Stage Lifts
Click Yorick to get information for your book - he should hold something in his hand.
Go to the right to enter the Stage Lifts.
Grab the crank from the table (low left) and go back to the Prop Stage Room.
Prop Stage Room/Understage
Place the crank at the Jack-in-the-box on the left and click the crank four times.
A grim reaper comes out - get the symbol card out of his hand.
Return to the Understage
Click the door on the left.
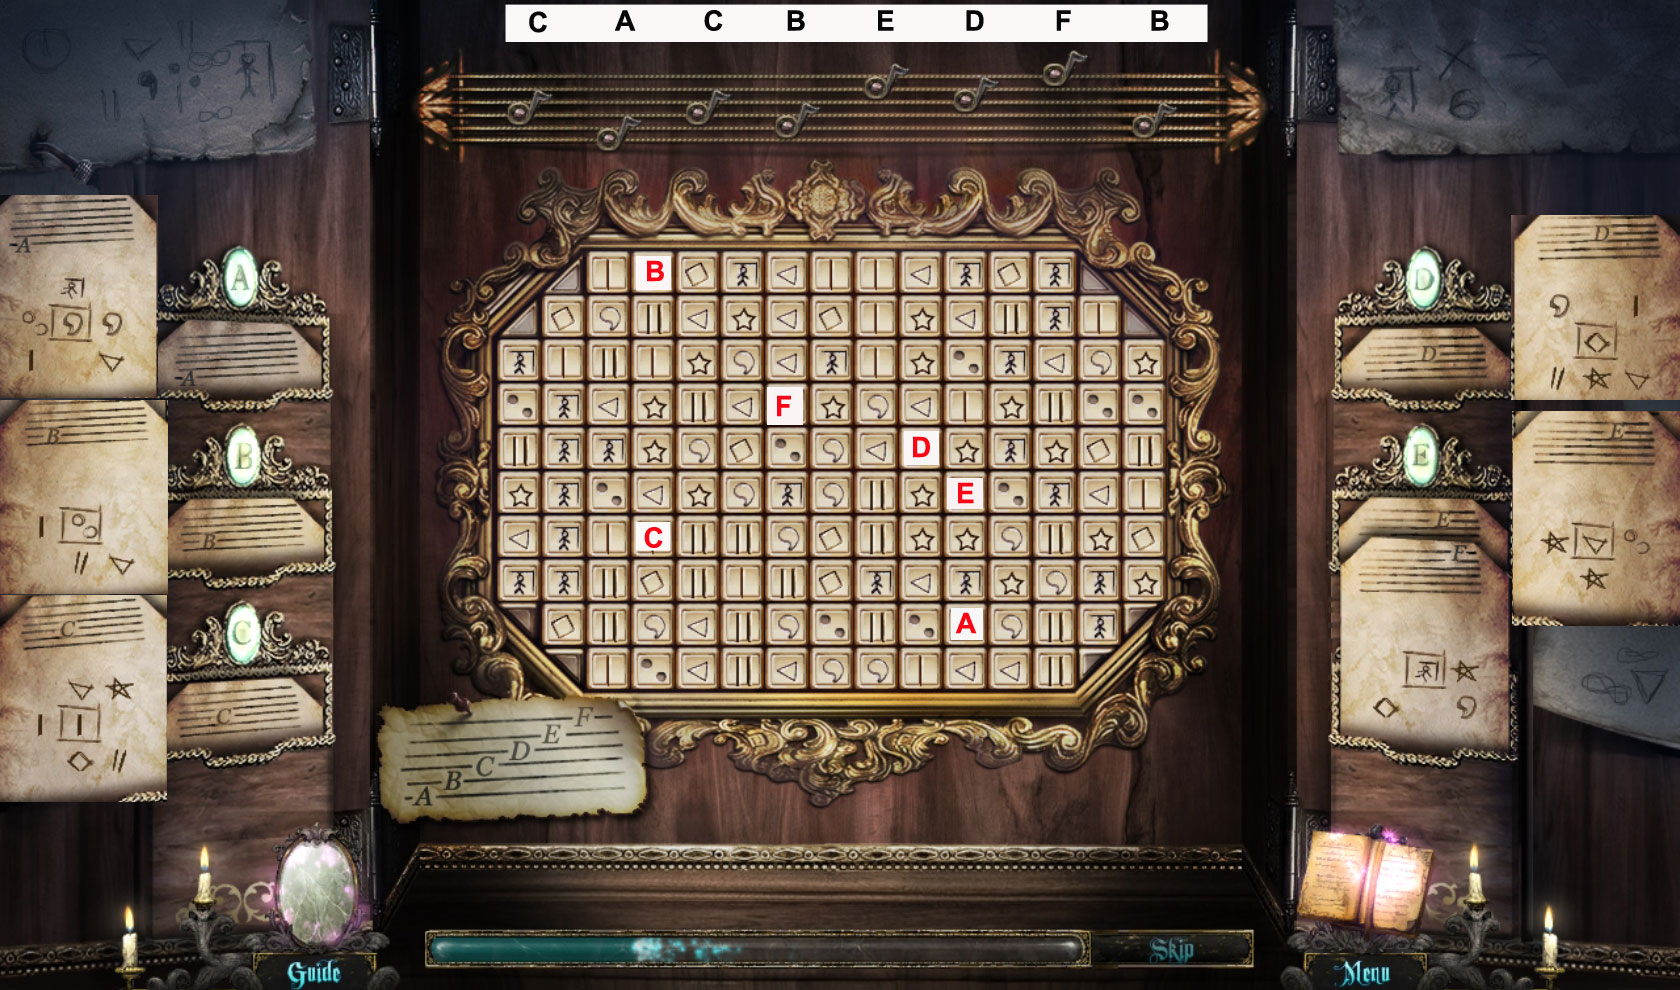
Place the four symbol cards into the empty slots.
Clicking one of the cards will make them raise and you can see the symbols on them.
On the top you see a line of notes.
At the bottom, you see which notes (A, B, C, D, E, F) are located on what string.
You can see that the first note you have to play is the note on the third string, C.
Click the C-Card and look at the objects.
Each card has one symbol marked with a square, surrounded by other symbols.
You will have to find the square-marked symbol in the middle of the board, which is surrounded by the exactly exact same symbols that the card shows.
While the main symbols will be found on many places, the exact one can only be found once on the board.
Do this with all notes in the order of the top line.
When you click the right symbol, the note on top will be lit.
When you make a mistake, nothing happens.
The solution and a screenshot can be found in the spoiler.
After clicking all symbols, the door opens.
Enter the Orchestra Pit.
The note order is:
C A C B E D F B
Screenshot
Orchestra Pit/Understage Landing/Prop Stage Room
Grab the music stand at the left side.
Play the hidden object scene - you will receive a statue of Horus.
Go to the Understage Landing.
Click the floor in front of the crates next to the Egyptian statue.
In the close up, use the empty jar from your inventory to get the ants (just click).
Screenshot
Go right into the Prop Stage Room and play the hidden object scene.
You will receive a sun disc (can be found middle on the floor)
Go to the Stage Lifts.
Stage Lifts
Open the lever panel (right side) with the screwdriver.
Place the jar with ants on the taffy to clean the gears.
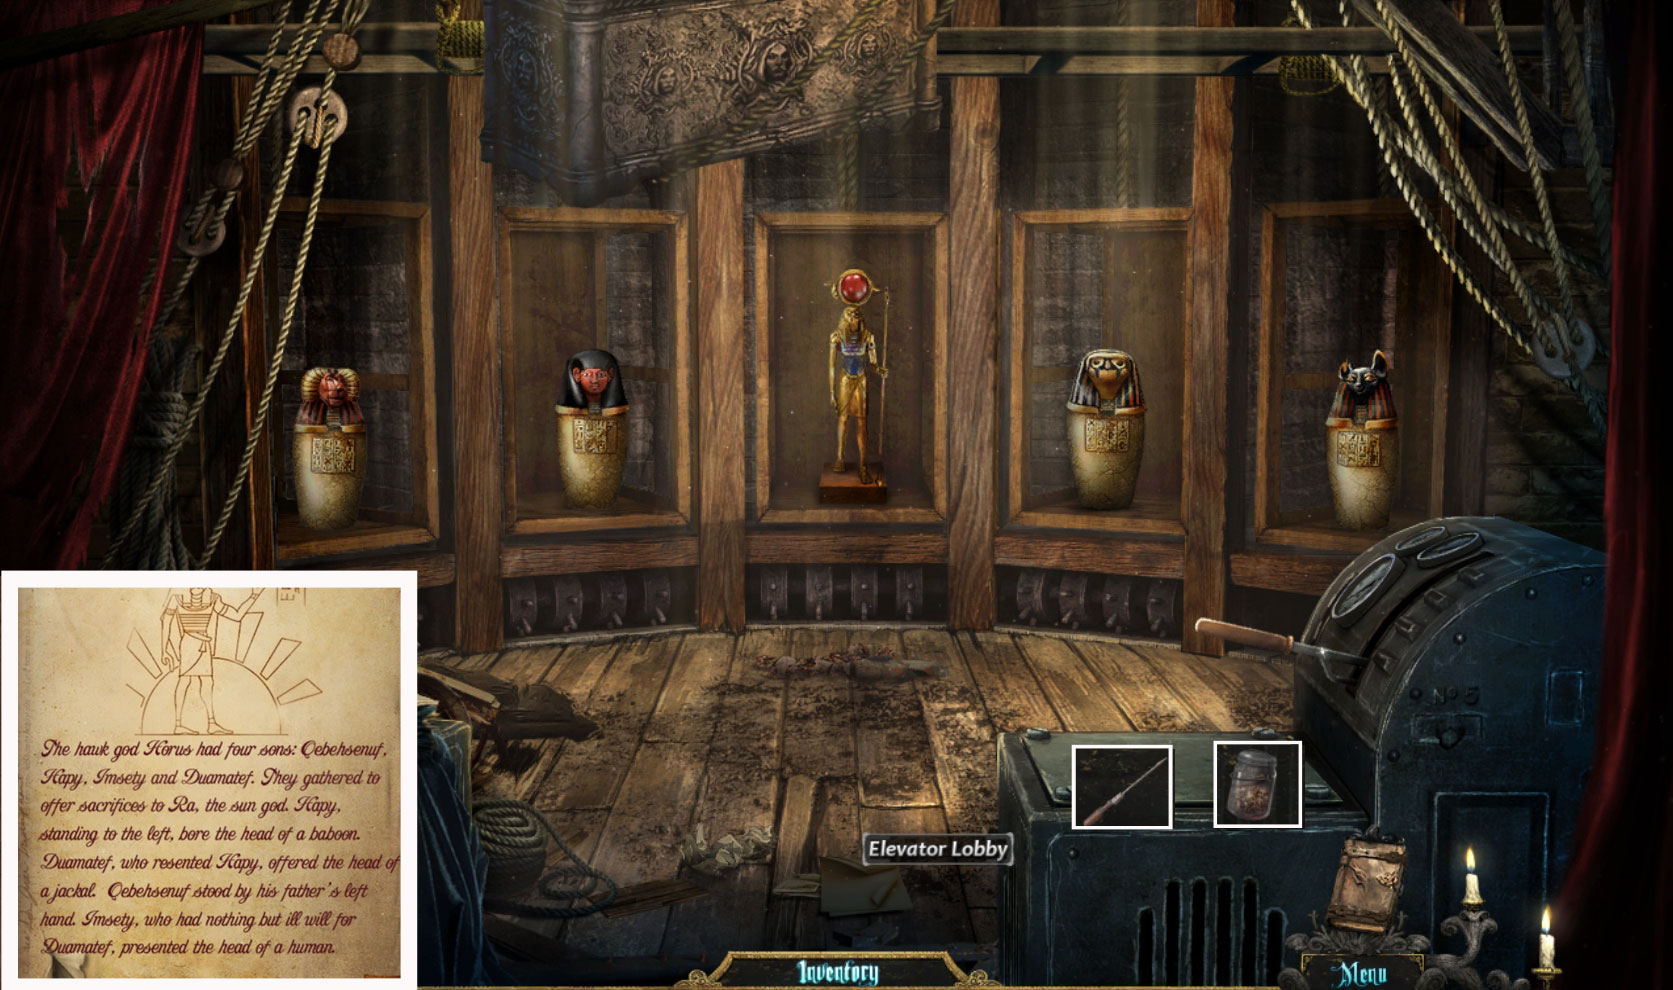
Now place the four canopic jars and the statue of Horus into the right lifts.
You can find a clue for which jar goes where in your book; it is the page about Egypt you obtained in the Library
You can find the solution and a screenshot in the spoiler.
From left to right place:
Hapty, Imsety, Horus, Qebehsenuef, Duamutef
Screenshot
Click the lever at the lever panel (right side) and the sarcophagus will come down.
Click the lid of the sarcophagus and place the sun disc from your inventory into the slot.
It will open - take the black rose out of the hands.
Go to the Orchestra Pit.
Orchestra Pit
Give the black rose to the phantom in the mirror at the right wall.
Find the 20 musical symbols.
Screenshot
Pick up the key you will find on the stairs in front of the mirror after the cut scene.
Go to the Elevator Lobby.
Elevator Lobby/Elevator
Use the key at the elevator lock and click the wheel (right) next to the elevator door.
Enter the elevator.
Click the lever (right side) to activate a mini game.
You will have to flip the switches in the right order.
Find out which switch turns on which lamp and click the them in the order I - VIII.
Flipping the wrong switches will reset all switches and you will have to start over.
Solution and a screenshot you can find in the spoiler.
Click the switches (seen from left to right):
4, 1, 5, 8, 6, 7, 2, 3
Screenshot
Click the lever again and leave the elevator to enter Actor's Alley.
Actor's Alley/Costume Alley
Play the hidden object scene at the left side - you will obtain a powder puff (right side).
Pick up the telescope from the crate on the floor (right side).
Click the poster with the star constellation - information will be stored in your book.
Go straight ahead to Costume Alley.
Click the red cloth on the sewing table (left side) and pick up the snake dagger.
Click the colored cloth on the sewing table (far right) - some information will go into your inventory.
Enter the Women's Change Room to your right.
Women's Change Room/Roof Top
Pick up the snake dagger from the stool on the left.
Grab the chess piece from the front shelf (right side), third board seen from the top, left side.
Leave the room and go two times forward to the Roof Top.
Play the hidden-object-scene at the horse statue (right side) and you will obtain a snake dagger (right side of the nest).
Click the note on the ground - the information will go into your inventory.
Place the telescope onto the telescope stand and click the telescope for a closer view and to activate a mini game.
Your goal is to find the star constellation you saw on the poster in Actor's Alley, a picture of it you will find in your book.
Use the arrows bottom, top, left and right.
The solution you will find in the spoiler.
When you start, use the arrow down.
When you see the constellation you will need to play a little with up/down/left/right to find the exact position where the constellation highlights.
When you did it, the closer view will close and you can see a light beam, pointing onto the snow pile on the right.
Use the powder puff with it - the snow is angle dust. It will automatically go back into your inventory.
Go down to the Actor's Alley.
Actor's Alley/Industrial Alley/Furnace Room
In Actor's Alley use the powder puff at the mirror at the right side.
A hidden note will be revealed and stored in your book.
Go straight ahead to Industrial Alley and grab the snake dagger from the desk right side.
Enter the Furnace room.
Click the oil canister on the far left - it will fall over and spill gasoline.
You will need the gasoline later.
Click the coal in the trolley (low right).
This will reveal a skull - pick it up.
Click the door.
You will remember this kind of lock from the Manager's Hallway.
Click one of roses and the rose parts will flip to the side.
Click the black pins at the end of the springs.
If it locks, it is ok and you can click the next one.
You will need to click the pins in the right order; clicking a wrong pin will reset all springs.
When all springs are locked, click the face in the middle and the door will open.
The right order you can find in the spoiler.
Seen from 1 (top right) to 6, click:
1,2,3,6,5,4
The door opens.
Go to the Industrial Alley.
Industrial Alley/Sewer
Grab the hook, hanging at the chain in the middle of the Alley.
Enter the Sewer.
Pick up the big sack (far right) at the wall.
Place the hook at the rope end hanging down on the left side and then use the sack with the hook.
The Sewer opens, the water is gone.
Pick up the mirror from the ground.
Go straight ahead to the Worship Cellar.
Worship Cellar/Furnace Room
Pick up the torch next to the red cloth, right side on the ground.
Play the hidden-object-scene at the altar - you will obtain a snake dagger.
Return to the Furnace Room.
Dip the dry torch into the gasoline on the floor (if you did not do yet, please now click the gasoline canister (left side) on the floor to let the gasoline spill out).
Click the torch at the burning fire (far right) and the lit torch will go back into your inventory.
Head back to the Worship Cellar and use the stairs (left side) to the church.
Church/Graveyard
It is dark, so get out the lit torch.
Now you can see a bit more - light the lanterns in the church, 3 on the right, 3 on the left side.
Click the scroll at the left wall - information will be stored in your book.
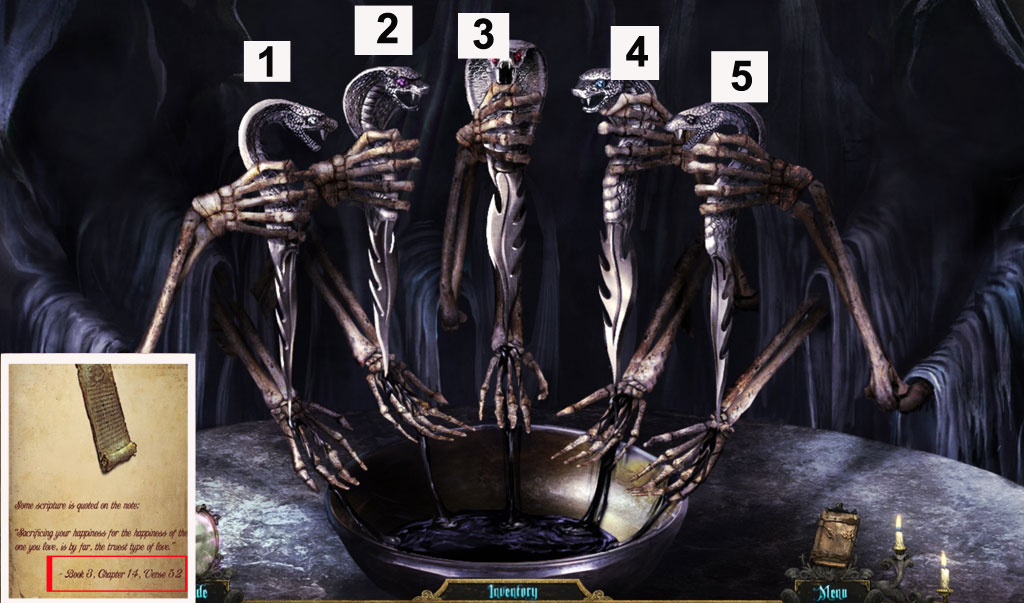
Click the altar (far middle) and a mini game will be activated.
You will have to do the altar ritual to open a secret passage.
Give each skeleton hand one of the daggers from your inventory.
Clicking one of the daggers now will make it pour black blood.
All five daggers have to be clicked in the right order.
If you click wrong, all daggers will stop pouring blood and you will have to start over.
The scroll from the church wall will give you hints about the right order.
For the solution and a screenshot please see spoiler.
Seen from left to right, click:
3, 1, 4, 5, 2
Screenshot
The ritual opened a passage at the right side of the church.
Enter the graveyard.
Grab the shovel at the left side in front of the chairs.
Play the hidden object scene at the statue on the far right - you will receive a flute.
Go one step forward to the Crypt Entrance.
Crypt Entrance/Worship Cellar/Women's Change Room
Use the shovel to get the black rose from the statue above the Crypt Entrance.
Head back to the Worship Cellar.
Play the hidden-object-scene to get embalming fluid (on the altar table).
Go back to the Women's Change Room and give the phantom in the mirror on the left side the black rose.
Find the 20 musical symbols.
Screenshot
Get the record from the crack in the mirror after the cut scene.
Go to the Elevator Lobby.
Elevator Lobby/Orchestra Pit
Place the skull on Yorick's hand - his head will turn.
Pick up the Tragedy Mask from his face.
Enter the Orchestra Pit.
Play the hidden-object-scene to obtain a gramophone horn.
Next stop is the Understage Landing.
Understage Landing/Prop Stage Room
Click the Pharaoh on the left side and use the embalming fluid at the staff.
Pick up the staff and a grabbling hook will go into your inventory.
Go right into the Prop Stage Room and play the hidden-object-scene in the back.
You will get a mask (far middle).
Head all the way back to the Library
Library/Conservatory Grounds
Play the hidden-object-scene to receive a music sheet.
Go to the Conservatory Grounds.
Use the shovel on the marked X right side in the snow.
You will find a mask.
Go back and enter the Manager's Office.
Manager's Office
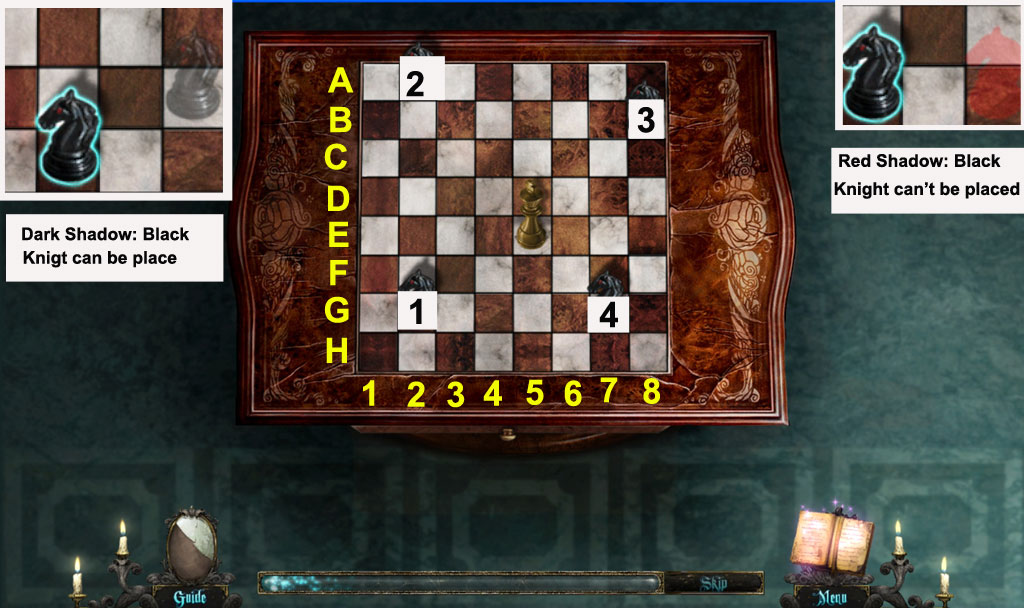
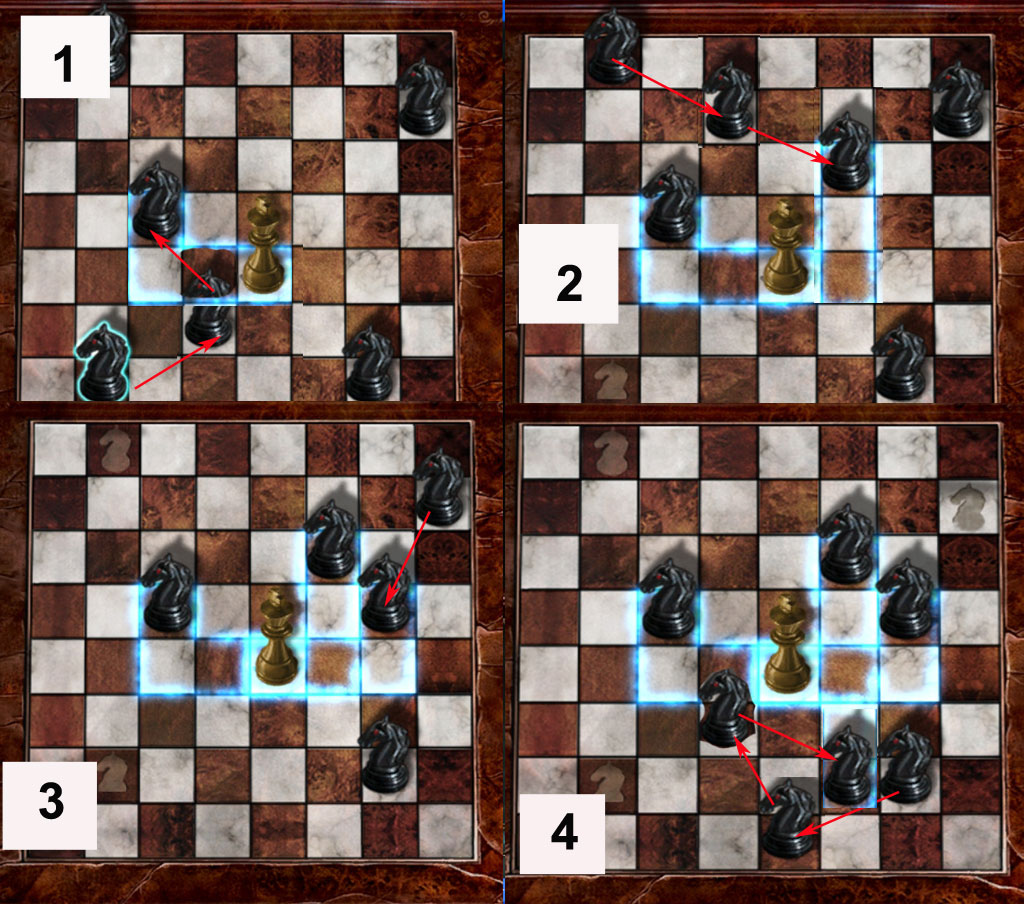
Click the chess table and place the four black knights in the empty slots.
You goal is to reach the king in the middle with all four black nights in a 'L' - pattern.
The only way for a black knight to move is also in a 'L" pattern of 4 tiles.
For the non-chess-players among us, there is a help.
When you move a knight, you can see a red shadow when you can't place a knight on a tile, and a black shadow when you can.
If a knight stands at the right point, the 'L' will be highlighted.
The solution and a screenshot with all steps you will have to made with each knight, you will find in the spoiler.
There are several solutions possible. I'm not a chess player, so I apologize if this these are not the shortest ways.
The first screenshot shows the chessboard marked with letters and numbers.
We marked the horizontal row from left to right 1-8, and the vertical rows from top to bottom A-H
Screenshot
Black Knight 1 (low left)
Start at G2 -> F4 ->D3
Black Knight 2 (top left)
Start at A2->B4->C6
Black Knight 3 (top right)
Start at B8->D/
Black Knight 4 (low right)
Start at G7->H5->F4->G6
The following screenshot shows you the steps of each knight.
Screenshot
When all four knights are in position, the table drawer opens and you can pick up money.
Go to the Dining Salon.
Dining Saloon/Grand Foyer
Play the hidden-object-scene - you will get the salt for your inventory.
Go to the Grand Foyer.
Play the hidden-object-scene to obtain a box of matches.
Go back to the Women's Change Room.
Women's Change Room/Top Roof
Click the gramophone (far left) and place the gramophone horn and the record onto it.
Click the crank (right side) one time.
Give the hand mirror to the mannequin right next to the gramophone.
She will turn her head and you can grab the Comedy Mask from her face.
Go to the Top Roof.
Play the hidden-object-scene at the bird nest (right side) to get a mask.
Use the salt at the statue (left side) and grab the bow and arrow.
Go back to Costume Alley.
Costume Alley/Christine's Room
Click the door to your right.
Place the flute in the middle, the tragedy mask at the left and the comedy mask on the right.
To open the door, the right holes have to to be opened/closed.
Each mask opens/closes the holes, shown on the ribbon.
Which holes have to be open and which closed, you can see on the note in your book about the statue in the conservatory.
Move the masks up and down to open and close the holes.
There is no solution possible as every move will effect the holes.
Try to bring the tragedy mask 2x up and the comedy mask 1x down.
Mostly it works.
The door opens. Enter Christine's Room.
Get the mask from the floor on the far right, next to the drawer.
Grab the opera glasses from the table (low left corner) and the heart from the mannequin's necklace (left side).
Go to the Furnace Room .
Furnace Room/Crypt Entrance/Crypt
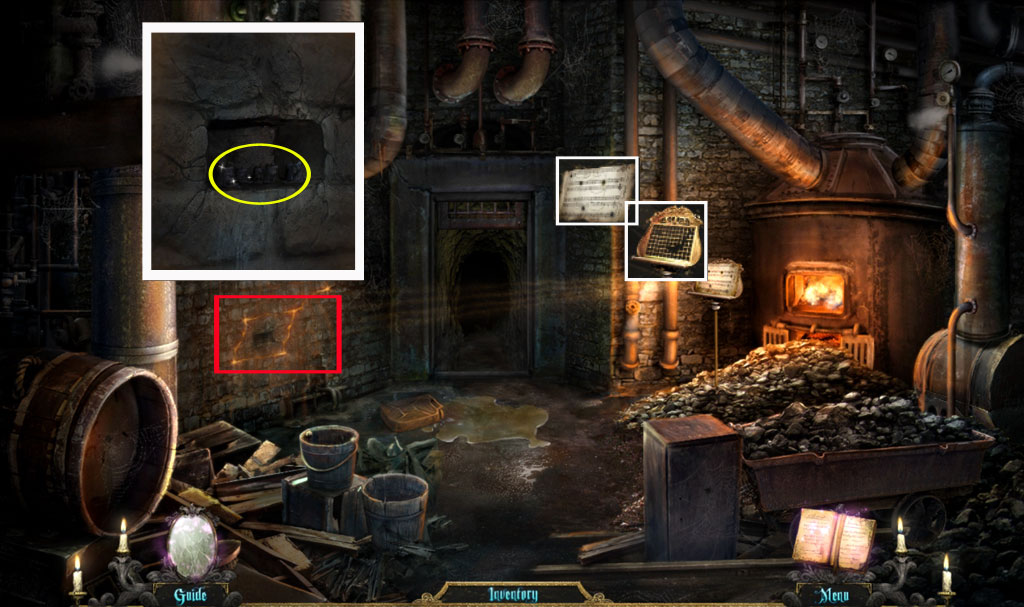
Place the music stand on the pole in front of the furnace.
Click the music sheet on the music stand.
The fire will send a light beam on the left wall and reveal a pattern.
Click there and the picture of the pattern will go into your book. You will also get a closer look at the stones.
Remove the middle stone with a click and get the black candles out of the compartment.
Screenshot
Go further to the Crypt Entrance.
Place the four masks into the empty slots. Click the door to open.
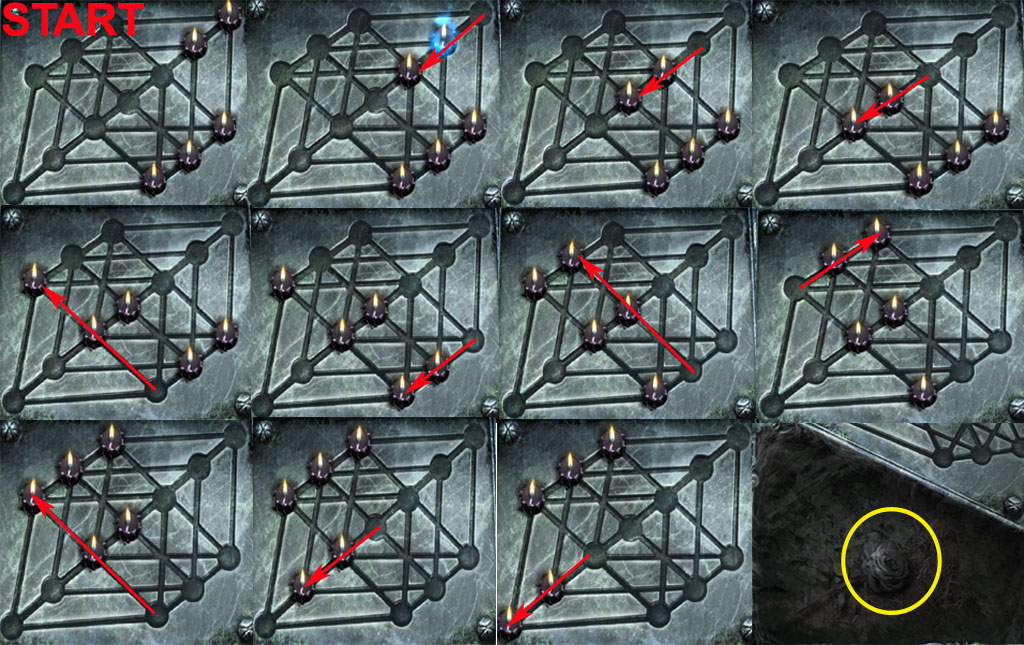
Enter the Crypt and click the tomb.
Place the black candles on it and light them with the matches.
Look into your book to see the pattern the light in the Furnace Room made.
You will have to redo this pattern with the black candles.
Candles can only move along a straight line and by jumping over another candle.
For a step by step solution please the screenshot.
Screenshot
When the pattern is restored, the tomb opens and you can pick up a black rose.
Go to Actor's Alley.
Actor's Alley/Christine's Room
Play the hidden-object-scene at the trunk (left side) to obtain a ballerina.
Go to Christine's Room and click the box on the drawer far left.
In the closer view place the ballerina into the slot.
Click the box lid again.
Grab the coin from the lid inside the box.
Go to the Auditorium Landing.
Auditorium Landing/Opera Boxes
Place the grabbling hook at the gargoyle hanging from the left balcony above the middle door.
Climb up to the opera boxes.
When you are up, use the opera glasses to look to the right.
It is a short cut scene. After this you will see a little butler statue standing on the ground to the left, next to the door in front of you.
Place the money from your inventory on his plate.
The door opens and you can play a hidden object scene.
A half mask goes into your inventory.
Go to the Ballroom (Ballroom Alley - straight forward).
Ballroom/Conservatory Grounds
Click the monkey on the music box (far left).
Put the coin from your inventory into his cup.
The Phantom and Christine are coming down.
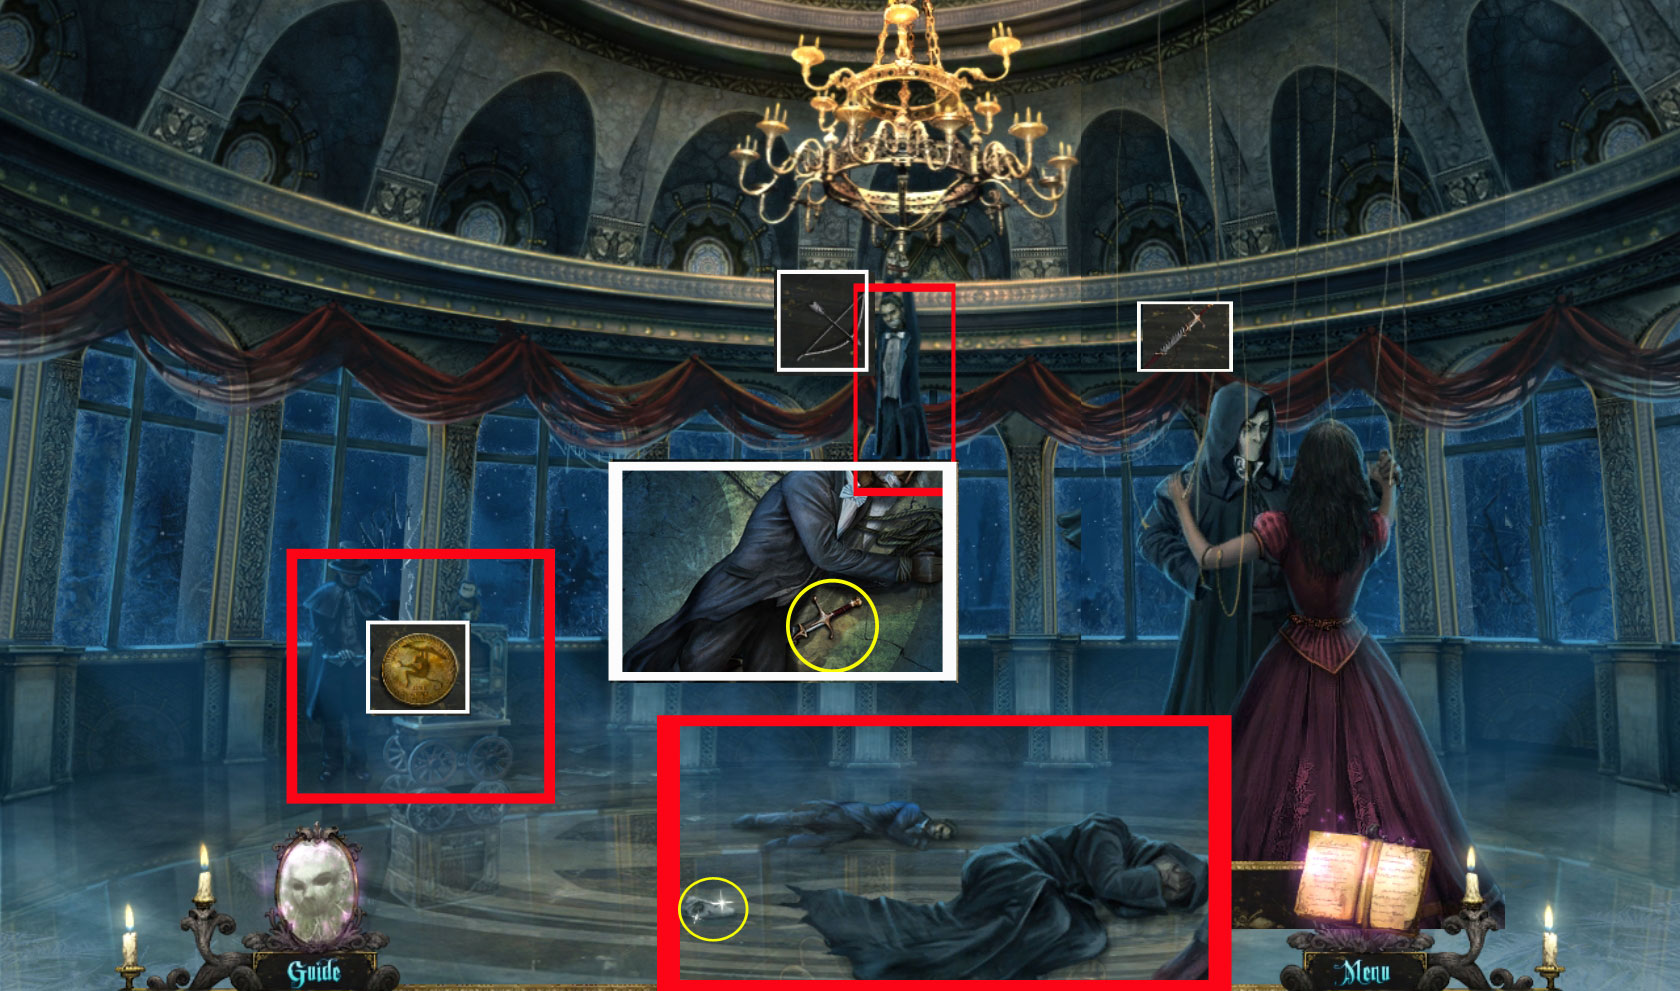
Use bow and arrow from your inventory at Raoul, hanging at the chandelier far middle.
He falls down.
Click him to grab the sword.
Use the sword to cut the strings from the Phantom and Christine.
The Phantom falls on the ground and loses his half mask.
Pick it up.
Screenshot
Go to the Conservatory Grounds.
Grab the blue heart from the trees (top left).
Go to the Library
Library/Roof Top/Crypt
Pick up the pink heart from the bottom board of the middle bookshelf.
Go to the Top Roof
You will find the pink heart at the wall, left above the horse.
Go to the Crypt.
Grab the red heart from the first tomb (right side).
Go to Christine's Room.
Christine's Room
Click the door.
Place the two half masks into the slots.
The hearts will open.
Place the five hearts also into their slots.
You will have to bring put them into the correct order.
Two notes in your book will give you the needed hints.
One was found in Actor's Alley on the sewing table (far right). The other one is the yellow note from the elevator.
To swap the hearts, click two of them at a time.
For the correct order and a screenshot please see spoiler.
The correct order is: black, blue, pink, red, white.
Screenshot
The door moves away and the Phantom in the mirror appears.
Give him the last black rose.
Find the 20 musical symbols.
Screenshot
Enter the broken mirror
Enjoy the END
Thanks to Claudia for the Walkthrough!
Posted by: Mike |
October 24, 2010 9:28 AM
|
October 24, 2010 9:28 AM