
Nemo's Secret: Vulcania
Platform: Mac, Windows

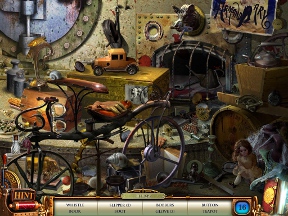
![]() Are you ready for a light science fiction adventure with some nautical flair? Nemo's Secret: Vulcania is an adventure/hidden-object hybrid featuring just that, with a hint of Jules Verne thrown in because it's always a good idea! With some unique puzzles and animated hidden-object scenes, Odian Games' sequel to Nemo's Secret: The Nautilus offers a refreshing hybrid game without the usual murderers and supernatural spooks. It's enough to make anyone want to hop ship and have a spin at the wheel.
Are you ready for a light science fiction adventure with some nautical flair? Nemo's Secret: Vulcania is an adventure/hidden-object hybrid featuring just that, with a hint of Jules Verne thrown in because it's always a good idea! With some unique puzzles and animated hidden-object scenes, Odian Games' sequel to Nemo's Secret: The Nautilus offers a refreshing hybrid game without the usual murderers and supernatural spooks. It's enough to make anyone want to hop ship and have a spin at the wheel.
Your friend, Captain Nemo, is an inventor with utopian aspirations. What he didn't count on was for his partner, Dr. Dardell, to turn on him. Dardell, an antagonist from the classic era when bad guys instinctively twisted their mustaches, is intent on using the technology they've developed for his own purposes. It's up to you, Alice, to travel to Vulcania Island in the Atlantic Ocean to save Nemo, but you're not going at it alone as his flying robot friend is there to assist. If only the evil Dardell weren't one step ahead of you at every turn.
 With a changing cursor at your command, explore Vulcania as you get to the bottom of what's happened to the captain. The inventory bar at the bottom conveniently hides when not highlighted but can optionally be locked in the up position. There is a large array of puzzles to solve, some are variations of what you may have encountered elsewhere, others are original to this game, and there is only one instance when a puzzle concept is used more than once, which is always a plus.
The hidden object scenes are not only interactive, but also animated, giving you the feel of searching through an actual location and not just a stale, stationary picture. You are only given eight objects to find at a time, and once you've found the objects of a particular column in the list, it will then show you the next few items. The total number is displayed to the right of the list, and if you're playing in normal mode, clicking the name of an item will display the silhouette of that object to aid you. Unlike most hidden-object games where you acquire one of the objects you have just found, in Vulcania, once you've completed the list, you are then tasked to find an additional item that requires you to interact with the scene.
 Analysis: What Nemo's Secret: Vulcania invitingly offers is a fun storyline with some Jules Verne-inspired science fiction (Captain Nemo is, after all, a Verne character). Puzzles are varied, ranging from hidden-object scenes to mini-games to gathering the correct items to fix a mechanism. Vulcania is a good-sized island, but no map is necessary as the developers have done a great job of slowly giving you access to new areas, allowing you time to become familiar with where you are before moving on. This is an important consideration since you are often traveling back and forth.
Unfortunately, for a game that has you reassembling several machines, there's only a small hotspot for each part, requiring you to know exactly where the object needs to be used. To counter this, though, the hint system works very well, showing you a miniature screenshot of the location to which you need to go, as well as where to use what object.
For a game inspired by Jules Verne, they certainly have done him justice both in the story and in the writing, which is featured in your notebook. The pages are updated every time you encounter something important, so to truly experience everything Nemo's Secret: Vulcania has to offer, you'll need to read it regularly. Even without reading it, you're in for an adventure, so take a leap and dive right in!
![]() Windows:
Windows:
Download the demo
Get the full version
![]() Mac OS X:
Mac OS X:
Download the demo
Get the full version


Walkthrough Guide
(Please allow page to fully load for spoiler tags to be functional.)
Nemo's Secret: Vulcania Walkthrough
General Tips/Information
The hint system is very helpful, giving you a mini screenshot of the area you need to go as well as where exactly to use an object.
It can be helpful to either read the story in your notebook or read your task list if you're not sure what to do next.
Each hidden-object scene is used twice, so if you're stuck, revisit those areas.
The walkthrough below attempts to give you the route with the least backtracking as well as the shortest solutions for the puzzles.
Main Walkthrough
GOAL: Escape the Grotto
Nautilus Helm
Collect the cylinder and wire off the ground.
Examine the broken lever and use the wire to fix it.
Pull the lever and head downstairs.
Nautilus Room
Collect the crowbar on the ground.
Collect the hook off the wall.
Head through the door.
Bathysphere Hold
Collect the oil can from across the water.
Examine the objects on the ground by the lamp.
Collect the switch and click the picture to add it to your notebook.
Head back to the helm.
Nautilus Helm
Use the oil can (from across the water in the bathysphere hold) on the door.
Open it and click on the flying robot.
Head outside.
Dock
Examine the pillar in the water.
Use the hook (from the wall in the Nautilus room) on the stuck object.
Collect the cable.
Examine the wooden box on the walkway.
Use the crowbar (from the floor in the Nautilus room) to pry it open.
Collect the flipper, then head across the walkway.
Control Room Entryway
Head through the open door.
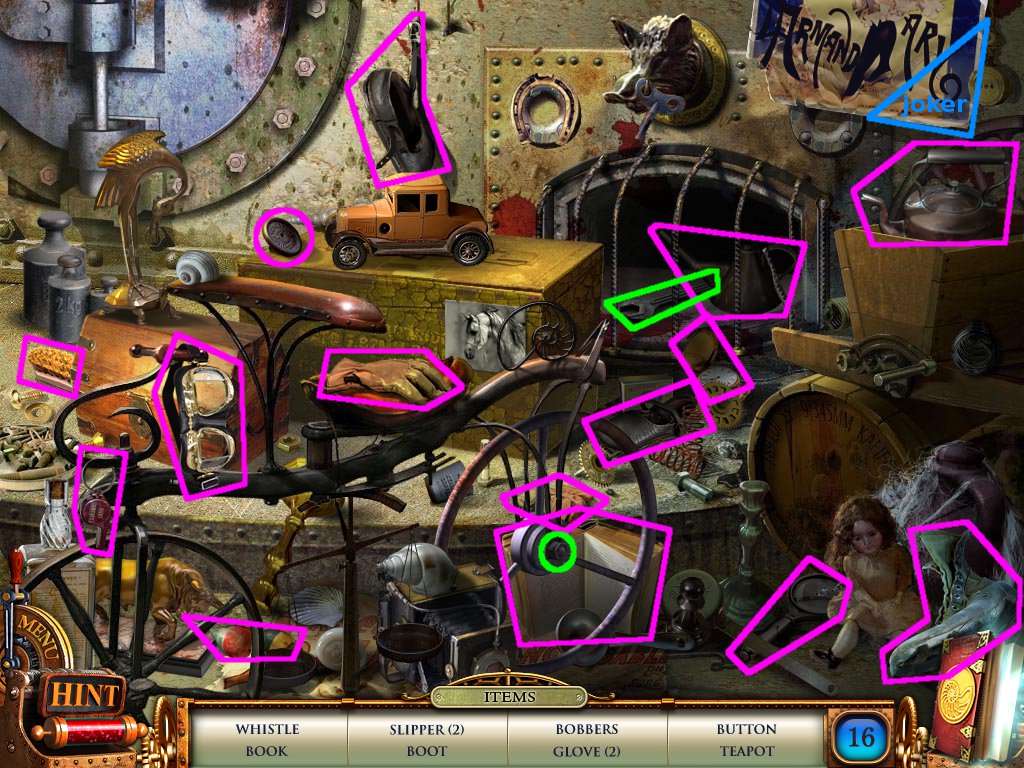
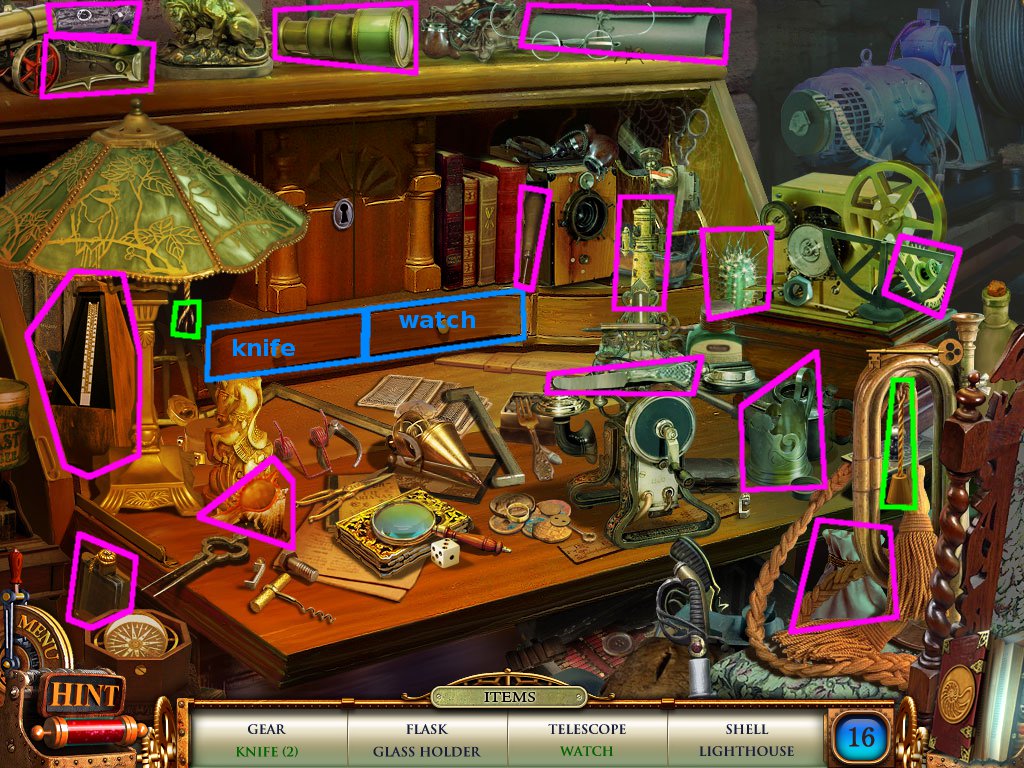
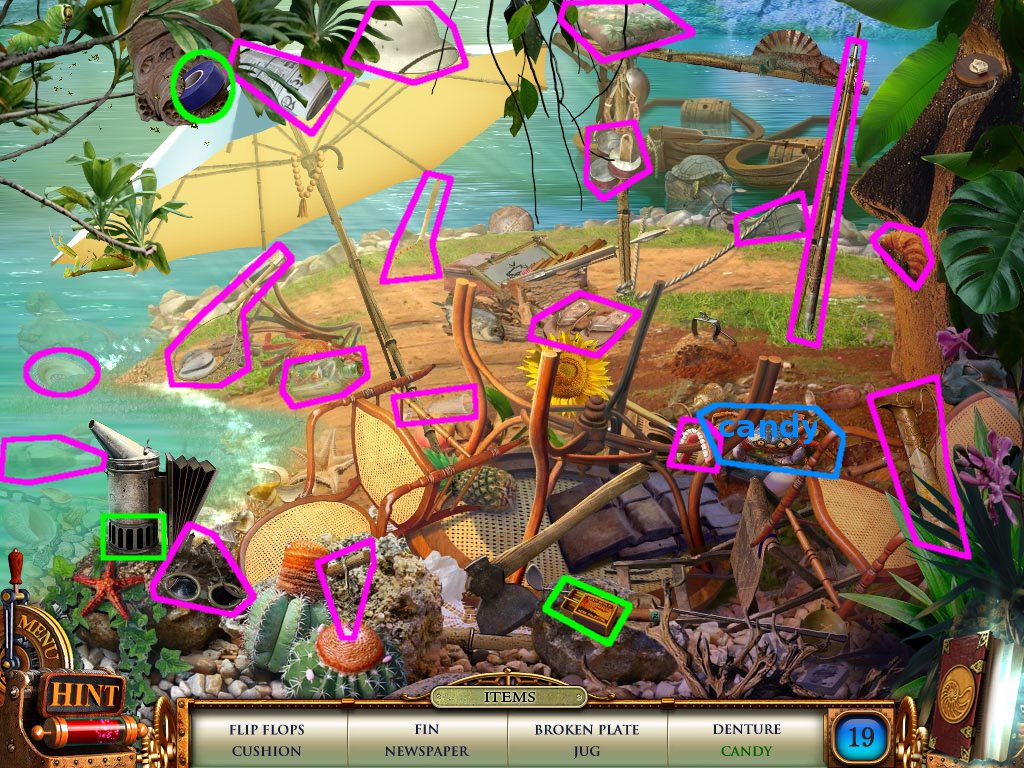
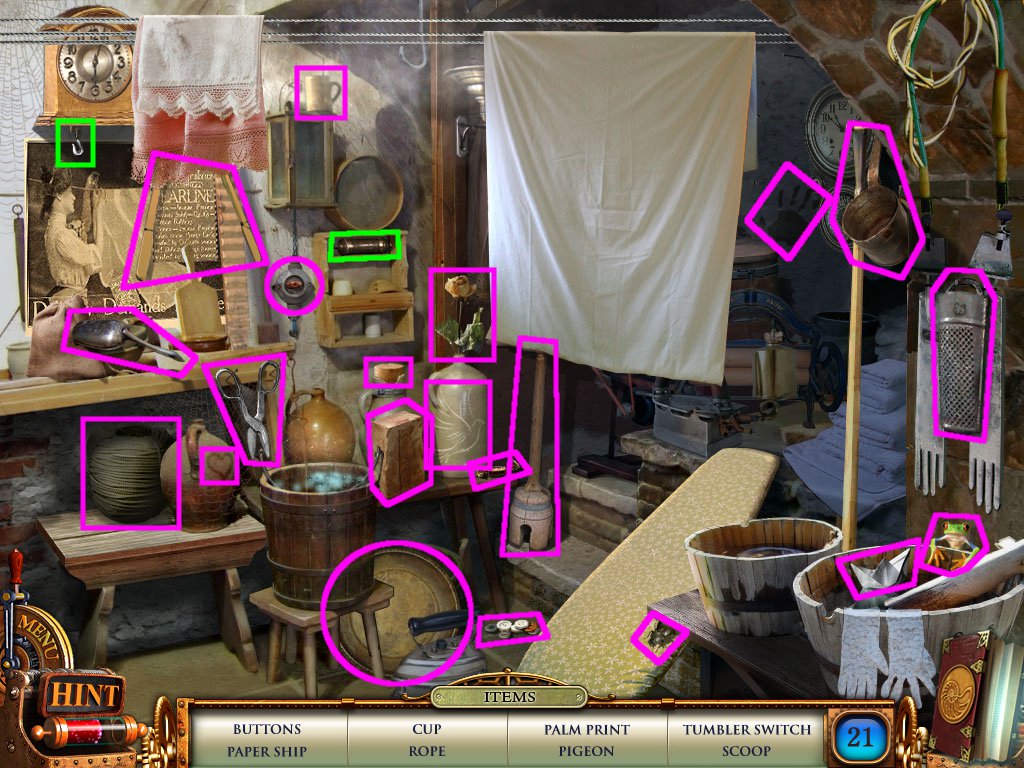
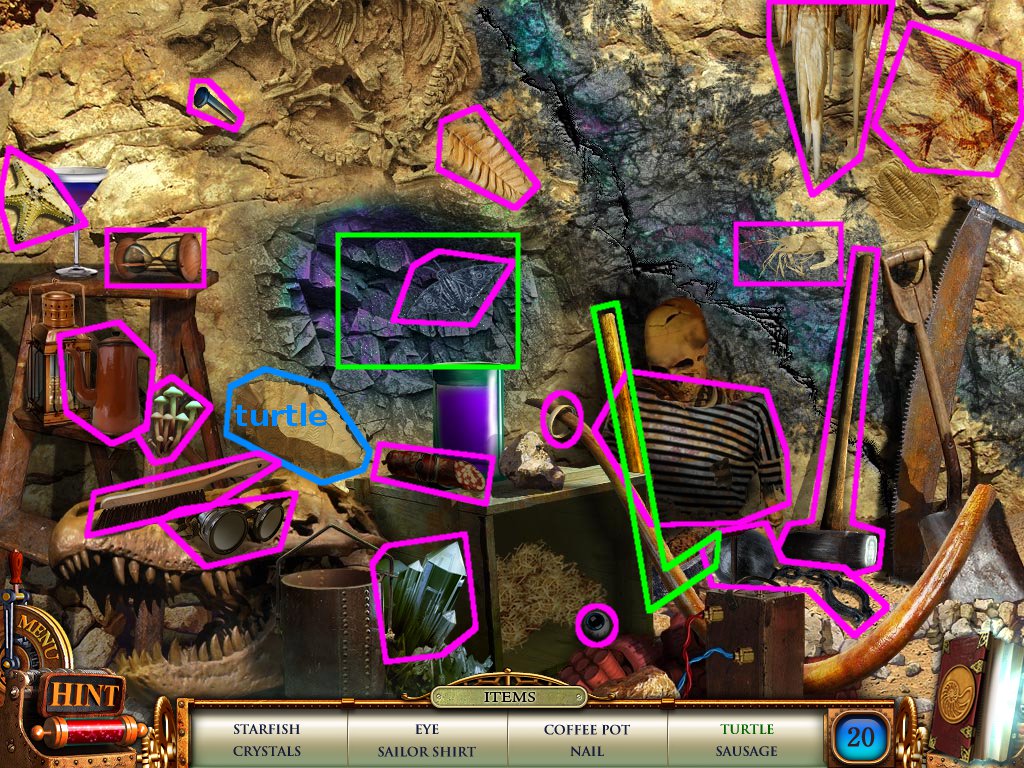
Solve the hidden-object scene using the screenshot below for help.
Areas in blue are for items requiring interaction (item names are by the areas), and areas in green are for the task at the end.
Screenshot
You acquire a valve.
Examine the phone and use the cylinder (from the floor of the Nautilus helm).
Use the valve on the door and head through.
Control Room
Examine Dr. Dardell.
Collect the lever on the chair and the ladder to the right.
Examine the paper on the ground.
Collect the voltmeter and click the paper to put it in your notebook.
Examine the elevator mechanics in back.
Use the cable (from the pillar at the dock) on the loose ends.
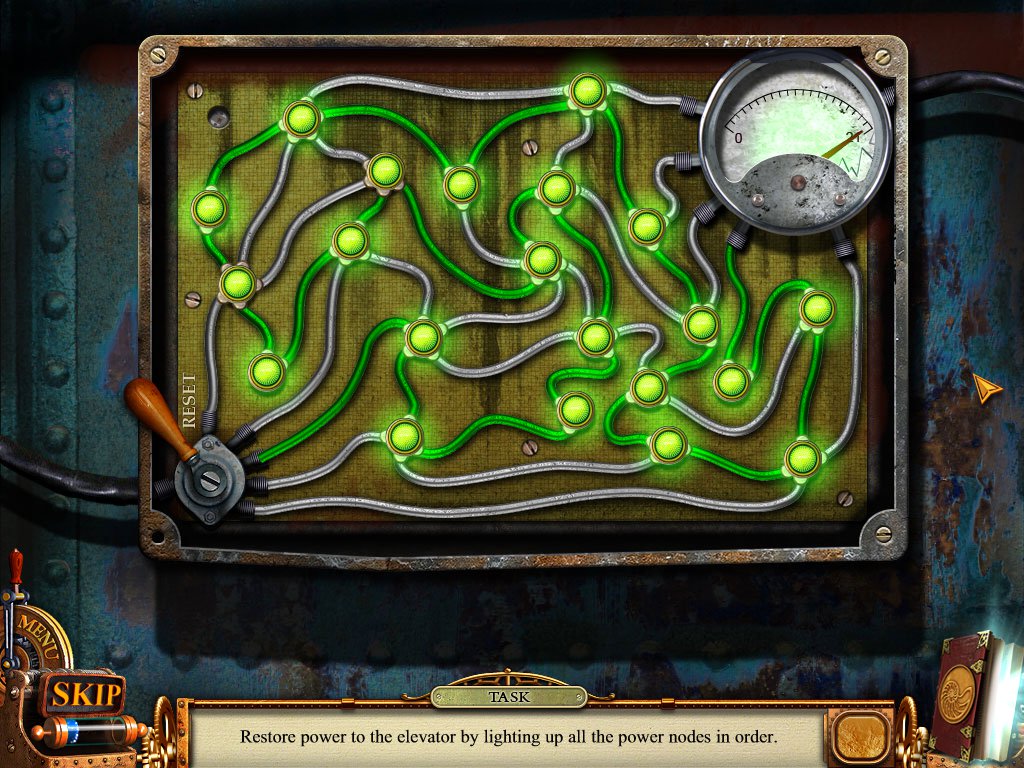
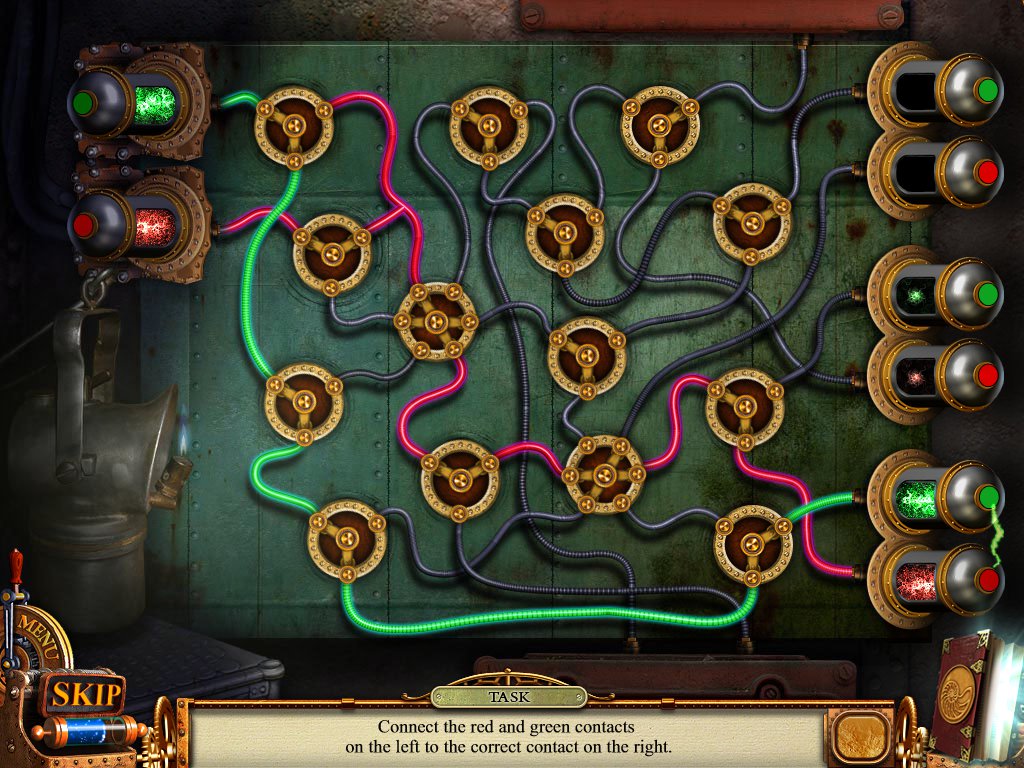
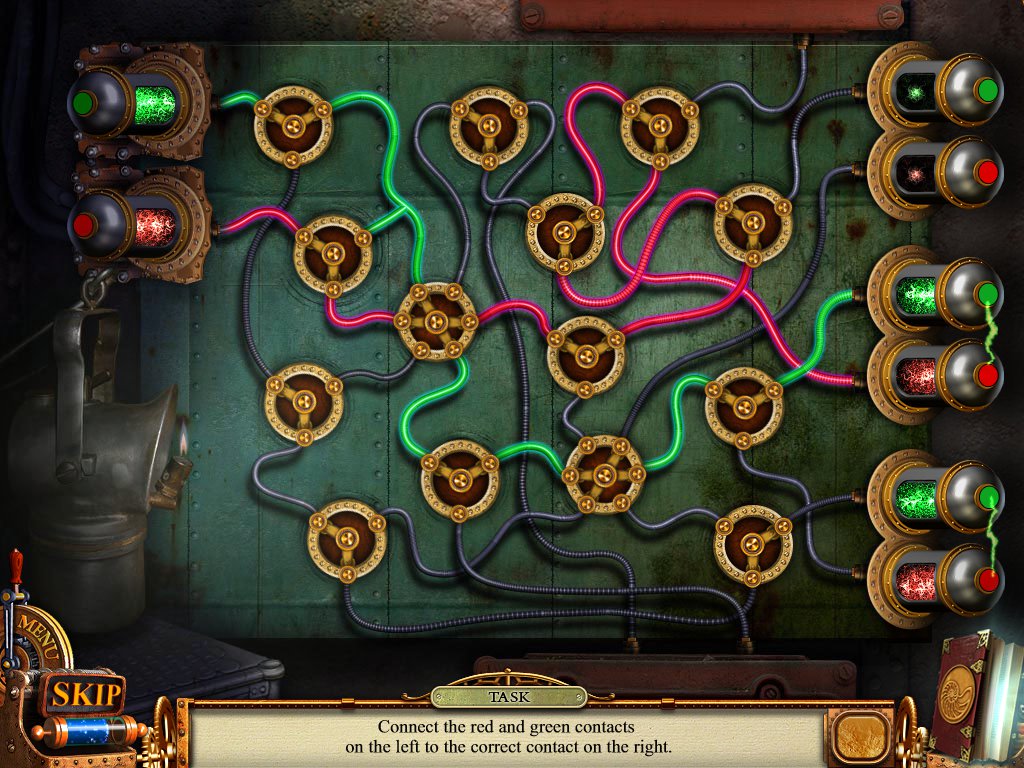
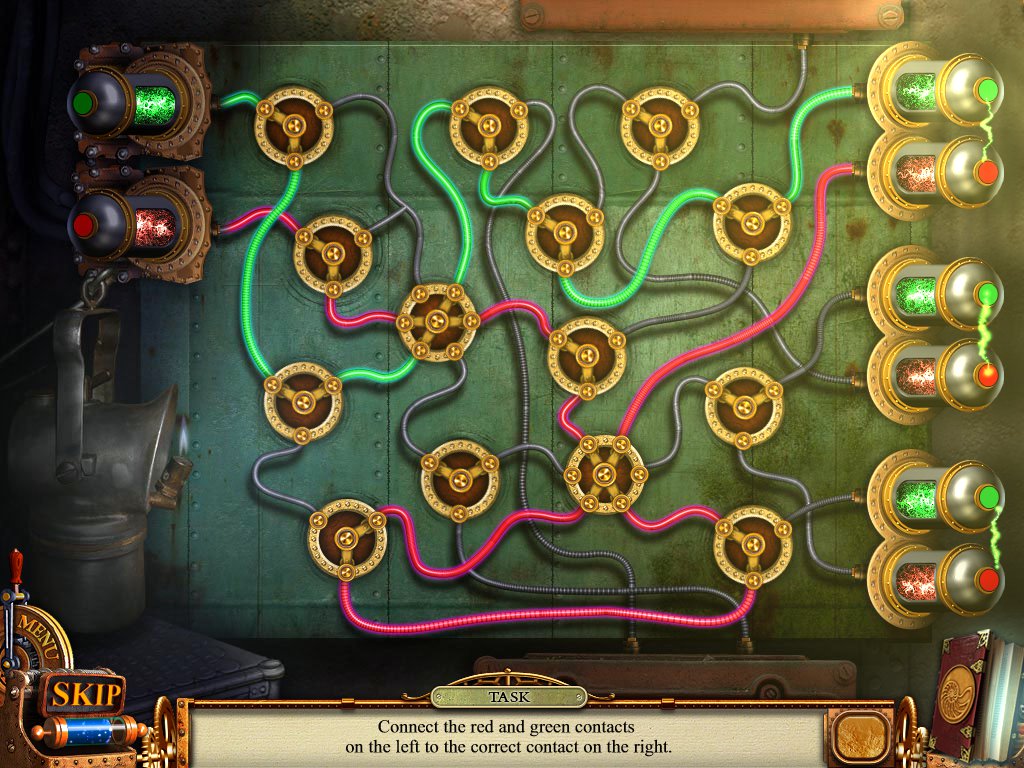
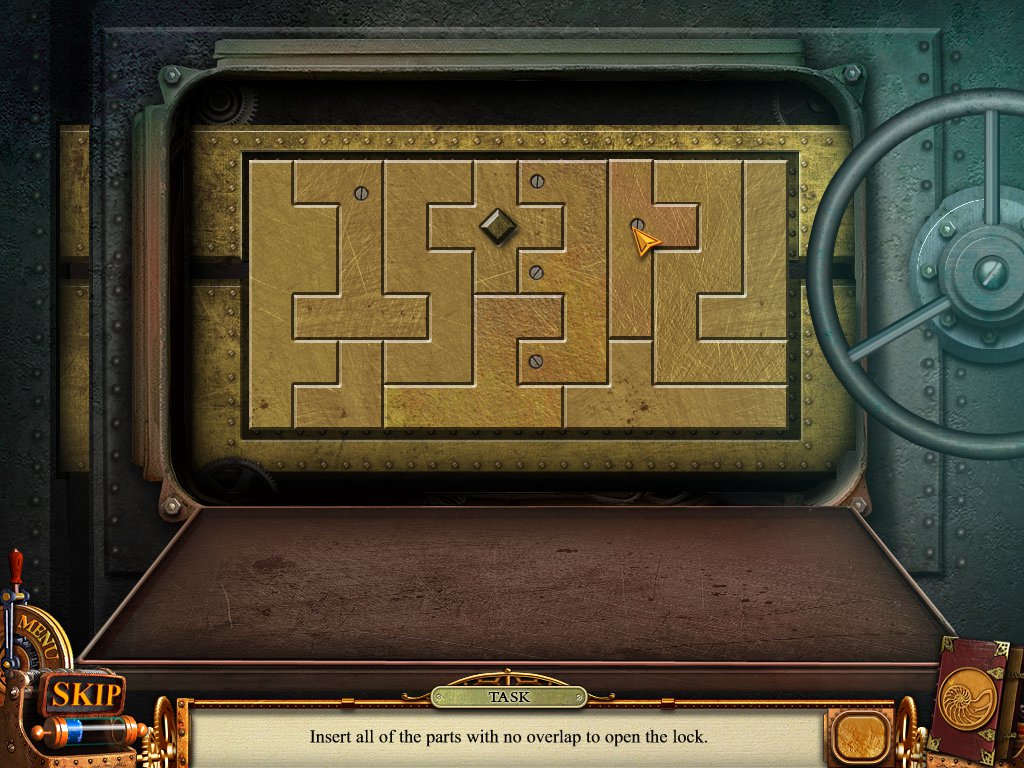
Examine the panel to the right.
Use the voltmeter on the opening.
Solve the power node puzzle by clicking the wires to connect all the nodes in one line.
Use the screenshot below for the solution.
Screenshot
Enter the elevator.
Elevator
Use the crowbar (from the ground in the Nautilus room) on the spiderbot.
Examine the drawers and open the top one.
Click the picture to add it to your notebook, then collect the knob.
Examine the floor controls and use the lever (from the chair in the control room) on the 3rd floor slot.
Pull the 3rd floor lever and head outside.
3rd Floor Landing
Examine the robot parts and collect the button and electron tube.
Back up and examine the telescope.
Use the knob (from the drawer in the elevator) on the slot.
Solve the focusing puzzle.
One knob controls vertical focus, the other controls horizontal focus.
One method of solving these is to focus on one aspect of picture and line the two images up with one knob, and then the other.
If that doesn't work well for you, then simply look at the picture in general and turn the knobs to make the picture look more clear.
Pull the lever on the left after completing each image (the light will turn green).
Click the flying robot, then head back to the control room.
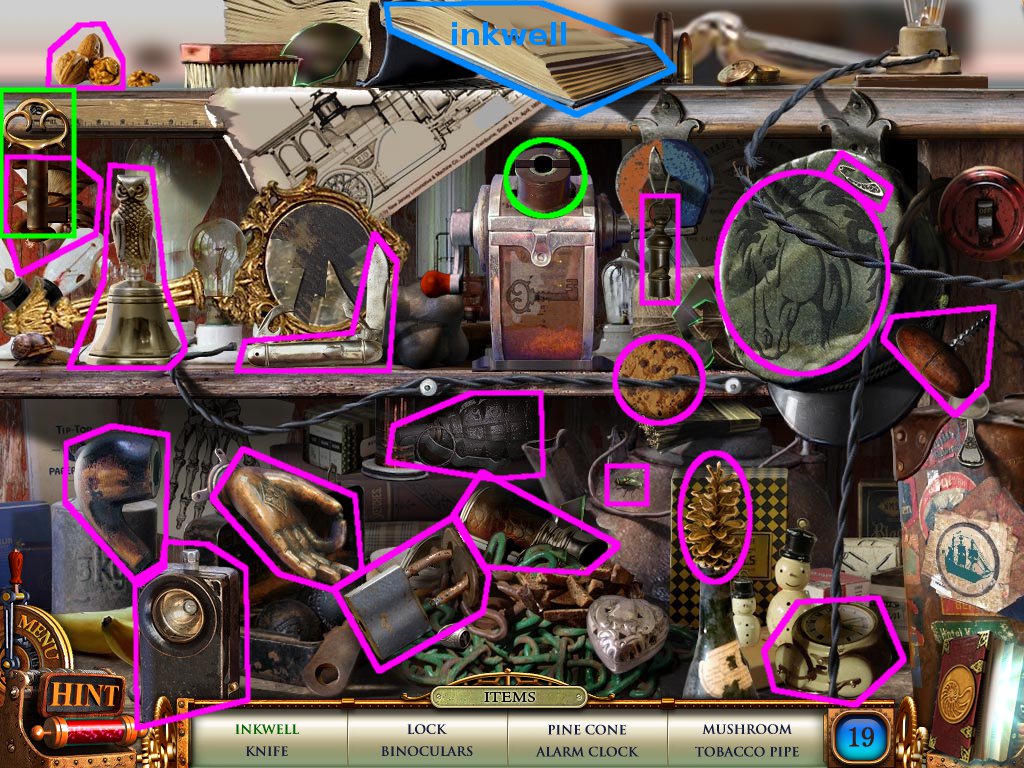
Control Room
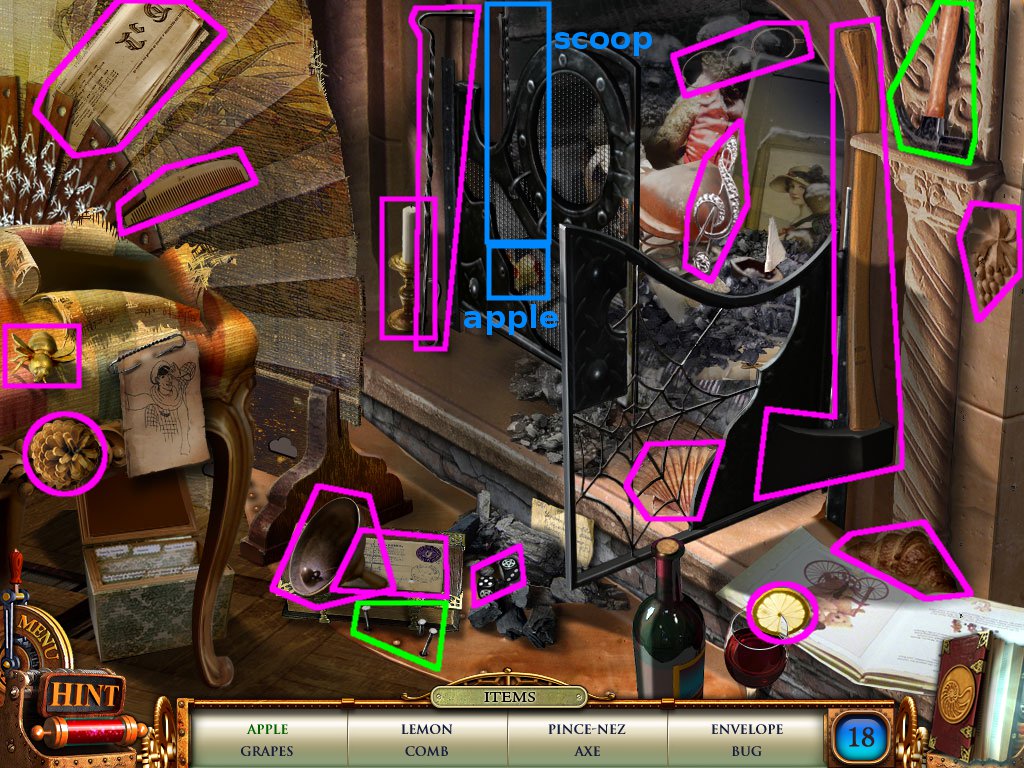
Solve the hidden-object scene using the screenshot below for help.
Areas in blue are for items requiring interaction (item names are by the areas), and areas in green are for the task at the end.
Screenshot
You acquire part 1.
Examine the device on top of the desk.
Use the button (from by the robot parts on the 3rd floor landing) on the slot.
Solve the symbol match puzzle by clicking a button to slide it into the open slot.
The two symbols that need to be matched up are etched next to the corresponding slots.
The solution:
Considering each slot is numbered like so:
[1][2][3]
[4][5][6]
1, 4, 5, 2, 3
6, 5, 2, 1, 4
5, 2, 1, 4, 5
6, 3, 2, 1, 4, 5
Collect the code key.
Back up to the entryway.
Control Room Entryway
Examine the gate and use the code key (from the device on the desk in the control room) on the slot.
Solve the key match puzzle by clicking each arrow to get the picture to match the printout.
Several of the sections affect other ones, so consider the order you match them.
An optimal order to match the sections (numbered 1-5, left-to-right):
5, 1, 4, 3, 2
Enter the tunnel entrance.
Tunnel Entrance
Collect the saw on the right.
Examine the panel under the window.
Use the switch (from the ground in the bathysphere hold) on the opening.
Solve the switch order puzzle.
There's little strategy here: you must simply figure out the correct order.
There are roman numerals etched next to a few of the switches to get you started.
The solution:
Considering each switch is numbered like so:
[1][2] [3][4]
[5][6][7][8][9]
8, 5, 2, 9, 6, 3, 1, 7, 4
Collect the robot's eye and robot's propeller.
Examine the flying robot and use the electron tube (from the robot parts on the 3rd floor landing), robot's eye and robot's propeller to fix it.
Collect the windshield, then back up to the entryway.
Control Room Entryway
Click the flying robot.
Collect the screw propeller between the doors.
Head up to the 3rd floor landing.
3rd Floor Landing
Examine the robot parts and use the saw (from the tunnel entrance) on the arm.
Collect the claw.
Head back to the Nautilus room.
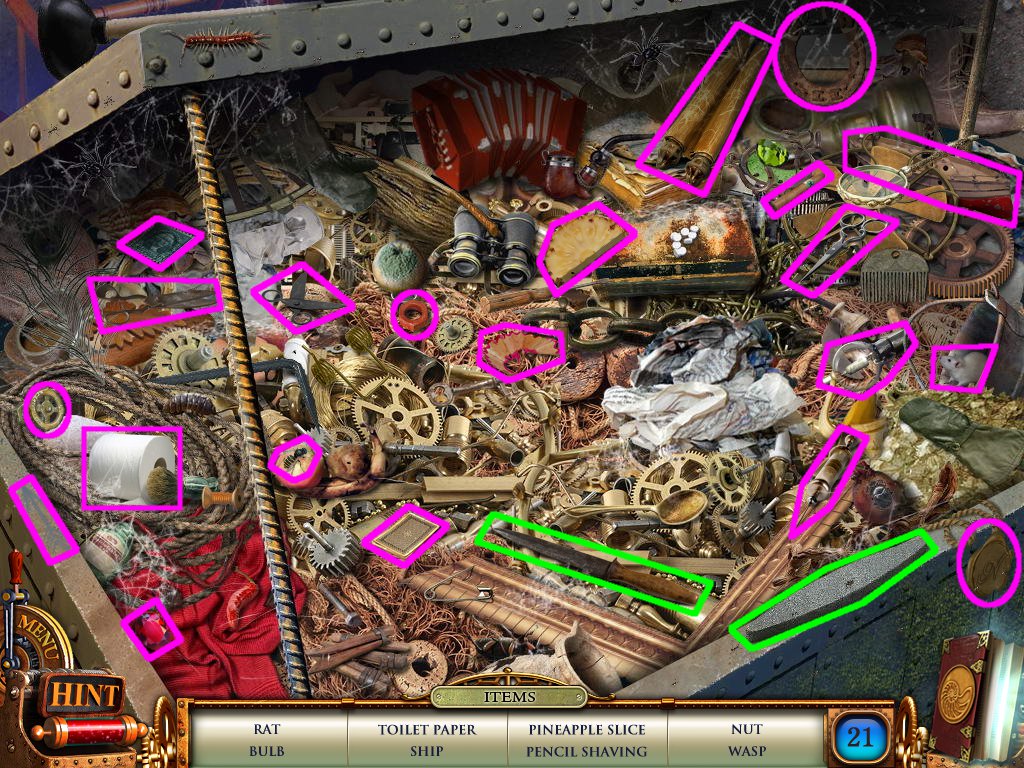
Nautilus Room
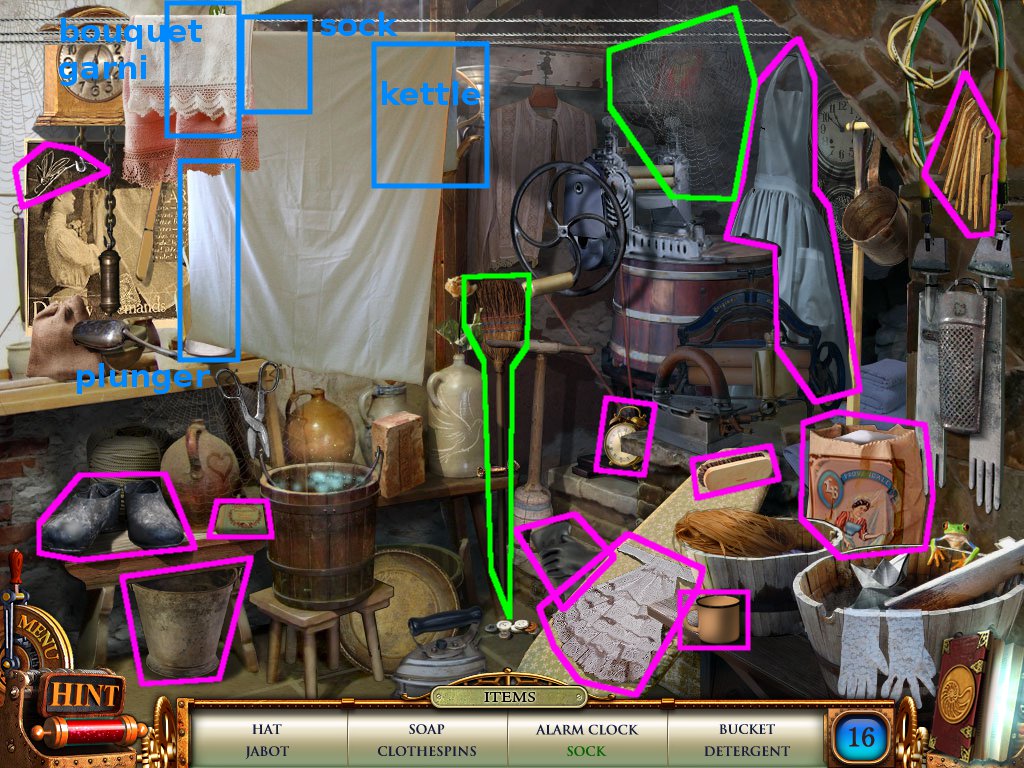
Solve the hidden-object scene using the screenshots below for help.
Areas in blue are for items requiring interaction (item names are by the areas), and areas in green are for the task at the end.
The first screenshot is for the items directly visible; the second is for when the door is opened.
Screenshot 1
Screenshot 2
You acquire a knight.
Head into the bathysphere hold.
Bathysphere Hold
Solve the hidden-object scene using the screenshot below for help.
Areas in blue are for items requiring interaction (item names are by the areas), and areas in green are for the task at the end.
Screenshot
You acquire the lantern.
Collect the door from the upper level.
Now repair the bathysphere with: the flipper (from the box on the dock walkway), ladder (from the control room), windshield (from the tunnel entrance), claw (from the robot parts on the 3rd floor landing), door, lantern and screw propeller (from the control room entryway).
Use the sketch in your notebook as a reference for where to put each part.
Click the open bathysphere door to exit the grotto.
GOAL: Find a Way under the Hotel
Lagoon
Click the flying robot.
Solve the hidden-object scene using the screenshot below for help.
Areas in blue are for items requiring interaction (item names are by the areas), and areas in green are for the task at the end.
Screenshot
You acquire insulating tape.
Collect the rod by the rope and the connector on the canopy.
Examine the rock sphere, make note of the symbols and back up.
Eamine the door.
Solve the symbol combo puzzle by clicking the symbols until only the ones on the rock are depressed.
Each symbol affects a total of three symbols: itself and two others.
The solution:
Press the top right symbol, the bottom left symbol, then the far left symbol.
Enter the hotel.
Hotel Lobby
Collect the sledgehammer and examine the postcard.
Click it to put it in your notebook.
Open the door on the right and collect the board.
Head downstairs.
Hotel Basement
Examine the light switch and use the insulating tape (from the hidden-object scene in the lagoon) on the wires.
Flip the switch.
Collect the machete, hammer and wrench off the floor.
Examine the newspaper and click it to put it in your notebook.
Open the drawer and collect the handle.
Head back to the lagoon.
Lagoon
Solve the hidden-object scene using the screenshot below for help.
Areas in blue are for items requiring interaction (item names are by the areas), and areas in green are for the task at the end.
Screenshot
You acquire a lantern.
Examine the rock and use the sledgehammer (from the hotel lobby).
Collect the screwdriver.
Examine the plant under the window and use the machete (from the hotel basement).
Collect the wagon wheel.
Now collect the cylinder from the skeleton and the empty oil can from the arches.
Re-enter the hotel.
Hotel Lobby
Examine the phone and use the cylinder.
Examine the doors on the left and use the handle (from the drawer in the hotel basement).
Enter the hotel room.
Hotel Room
Solve the hidden-object scene using the screenshot below for help.
Areas in blue are for items requiring interaction (item names are by the areas), and areas in green are for the task at the end.
Screenshot
You acquire an emerald.
Solve the hidden-object scene again using the screenshot below for help.
Areas in blue are for items requiring interaction (item names are by the areas), and areas in green are for the task at the end.
Screenshot
You acquire nails.
Collect the nippers in front of the dresser.
Examine the step below the chaise and use the lantern (from the hidden-object scene in the lagoon) on the metal bottom.
Collect the carbide lamp.
Head back down to the hotel basement.
Hotel Basement
Examine the radio and use the screwdriver (from the rock in the lagoon).
Collect the lockpick and battery.
Head back up to the hotel room.
Hotel Room
Examine the dresser and use the lockpick (from the radio in the hotel basement).
Collect the cable and handwheel.
Go back downstairs to the basement.
Hotel Basement
Use the nippers (from the hotel room) on the chain.
Open the cabinet door and examine the oil canister.
Use the empty oil can (from the arches in the lagoon) and handwheel (from the dresser in the hotel room).
Turn the handwheel and collect the oilcan.
Head back upstairs.
Hotel Lobby
Collect the ladder from the staircase.
Examine the doors on the first landing and use the oilcan (filled in the hotel basement).
Solve the hidden-object scene using the screenshot below for help.
Areas in blue are for items requiring interaction (item names are by the areas), and areas in green are for the task at the end.
Screenshot
You acquire a tile.
Enter the hotel room.
Hotel Room
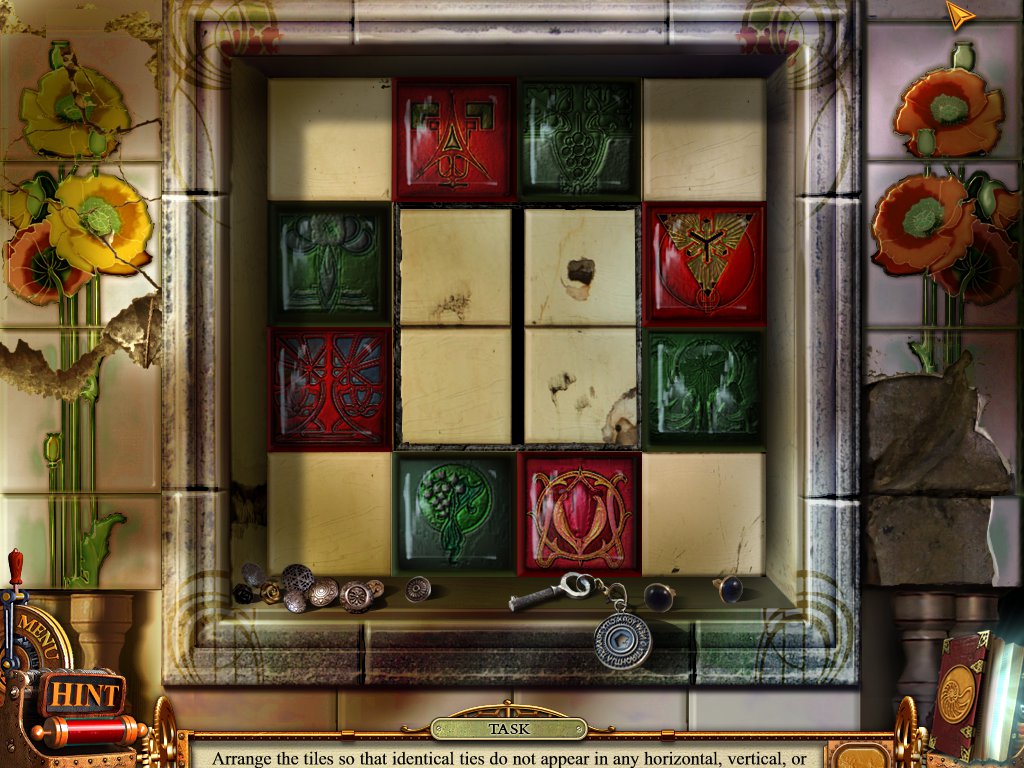
Examine the tilework above the mantle and use the tile (from the hidden-object scene in the lobby).
Solve the tile puzzle by clicking a tile, then clicking an empty square to move it.
Tiles of the same color cannot be lined up vertically, horizontally or diagonally (even the short diagonals).
Use the screenshot below for a solution.
Screenshot
Collect the ball and head back to the lobby.
Hotel Lobby
Solve the hidden-object scene using the screenshot below for help.
Areas in blue are for items requiring interaction (item names are by the areas), and areas in green are for the task at the end.
The sheet is pre-moved to allow the most visibility to the items on the list.
Screenshot
You acquire a chain.
Go down to the basement.
Hotel Basement
Examine the man hole cover and use the ball (from the hidden-object scene in the hotel lobby).
Solve the ball puzzle by placing a ball in a hole, then choosing which direction to slide it.
The goal is to get all seven balls into some configuration on the eight holes available, but when you place a ball down, it then has to be moved to an adjacent hole.
A solution (there are several methods):
Place a ball in any hole and slide it in either direction.
Place the next ball so that you can slide it into the hole that you placed the first ball in.
Continue this pattern of sliding each subsequent ball into the hole that the previous one was originally placed.
Head down the man hole.
Cable Car Stop
Examine the panel on the wall and use the carbide lamp (assembled in the hotel room) on the counter to the left.
Solve the contact puzzle by rotating each connector so the correct colors travel along the wires to the correct contact.
The contacts must be connected in order, bottom to top.
Use the screenshots below for the answer for each set.
Bottom Set
Middle Set
Top Set
Use the cable (from the dresser in the hotel room) on the disconnected wires.
Examine the section of rail just behind the rail car and collect the lever.
Use the wrench (from the hotel basement) on the two sets of nuts and collect the rail.
Use the rail on the missing section in front of the car.
Use the connector (from on the canopy in the lagoon) on the topmost part of the rail car.
Now use the wagon wheel (from under the window in the lagoon), then the rod (from by the rope in the lagoon) on the empty axle.
Enter the rail car.
Use the battery (from inside the radio in the hotel basement) in the slot behind the light.
Now use the lever (from behind the rail car) on the center.
Pull the lever to head to the cavern.
Cavern
Click the flying robot, then collect the lever.
Use the ladder (from the staircase in the hotel lobby) below the rungs.
Head up to the cable car platform.
GOAL: Get to the 2nd Floor
Cable Car Platform
Examine Dr. Dardell.
Collect the horn.
Head back down.
Cavern
Solve the hidden-object scene using the screenshot below for help.
Areas in blue are for items requiring interaction (item names are by the areas), and areas in green are for the task at the end.
Screenshot
You acquire an amethyst.
Use the horn on the bats, then on the flying robot.
Collect the black sheet, then head back up the ladder.
Cable Car Platform
Use the black sheet (from behind the bats in the cavern) on the hole.
Examine the panel and use the lever (from the cavern) on the slot.
Solve the color pie piece puzzle by selecting the right combination of colors to match the inner part of the circle.
After selecting the colors with the levers, pull the handle on the right to rotate the circle.
The solution:
Purple: middle red and middle blue
Blue: dark blue and middle green
Green: dark green and middle blue
Push the start button.
Examine the boards and use the board (from the righthand doors in the hotel lobby), nails (from the hidden-object scene in the hotel room) and the hammer (from the floor of the hotel basement).
Collect the gangway, then use it between the platform and cable car.
Enter the cable car.
Collect the brush on the left and use it on the dusty panels.
Pull the handle to travel to the 2nd floor landing.
2nd Floor Landing
Click the flying robot.
Collect the handle, then push the button to call the elevator.
Enter the elevater.
Elevator
Examine the floor controls and pull the 1st floor lever.
Examine Dr. Dardell.
Back up to the control room entryway.
Control Room Entryway
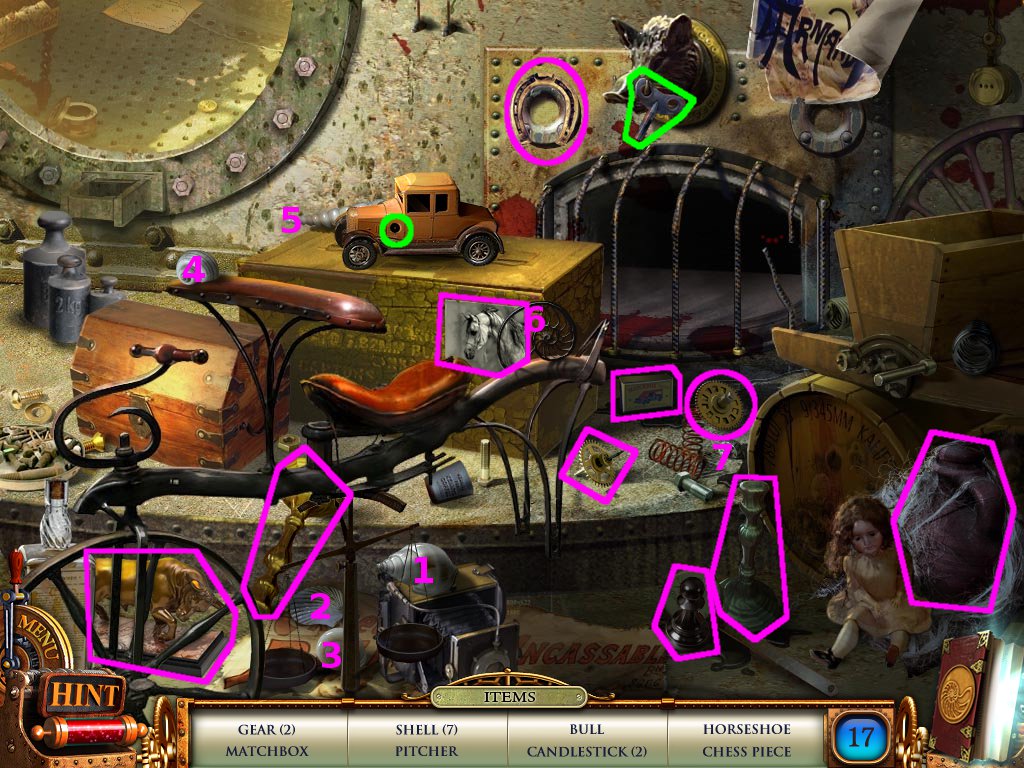
Solve the hidden-object scene using the screenshot below for help.
Areas in blue are for items requiring interaction (item names are by the areas), and areas in green are for the task at the end.
The shells are numbered 1-7 instead of being outlined.
Screenshot
You acquire a knob.
Click the flying robot.
Enter the tunnel entrance.
Tunnel Entrance
Examine the chain in the lower right and click the note to put it in your notebook.
Examine the chessboard in back and use the knight (from the hidden-object scene in the Nautilus room) in the empty corner.
Solve the knight-swap puzzle by clicking a knight, then placing it in an available, highlighted square.
The goal is to flip the knight positions so the colors match what's indicated in the corners.
A solution:
Assuming the spaces are numbered 1-9 like so:
[1][2][3]
[4][5][6]
[7][8][9]
The solution lists the number the piece is currently on, then the number it should move to.
7-2, 1-8, 9-6, 3-4, 6-1
4-9, 2-7, 8-3, 1-8, 9-2
3-4, 7-6, 8-3, 2-7, 4-9, 6-1
Collect the Time Wheel.
Click the flying robot.
Use the emerald (from the hidden-object scene in the hotel room) and amethyst (from the hidden-object scene in the cavern) on the Time Wheel.
Head down to the Nautilus room.
Nautilus Room
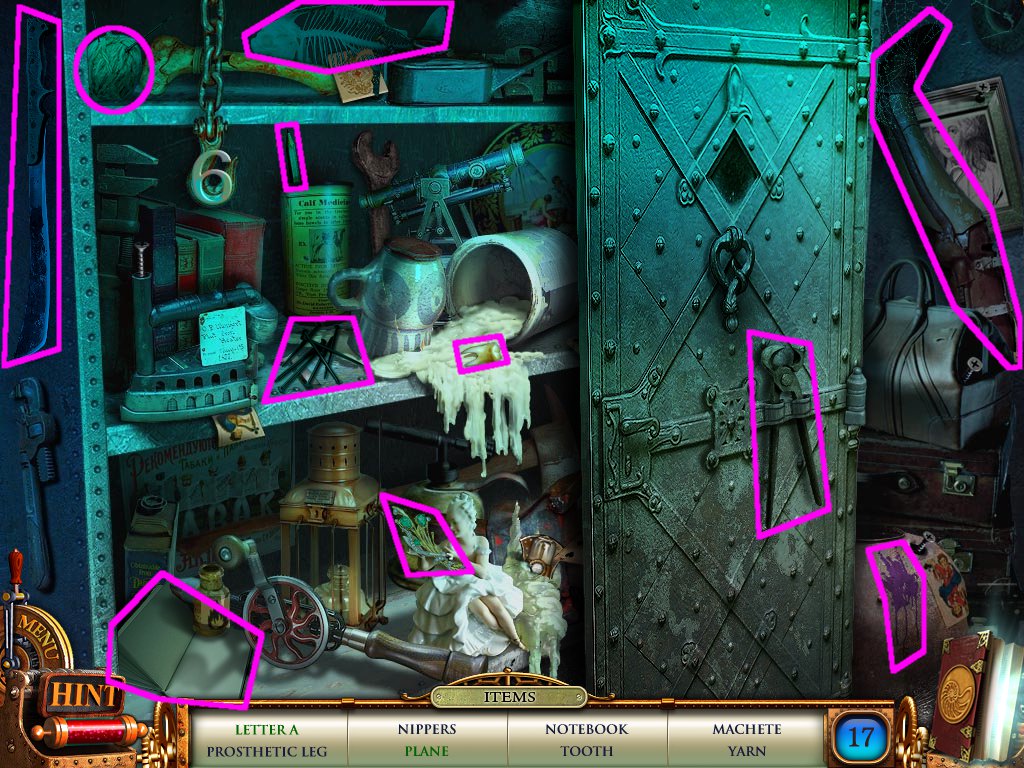
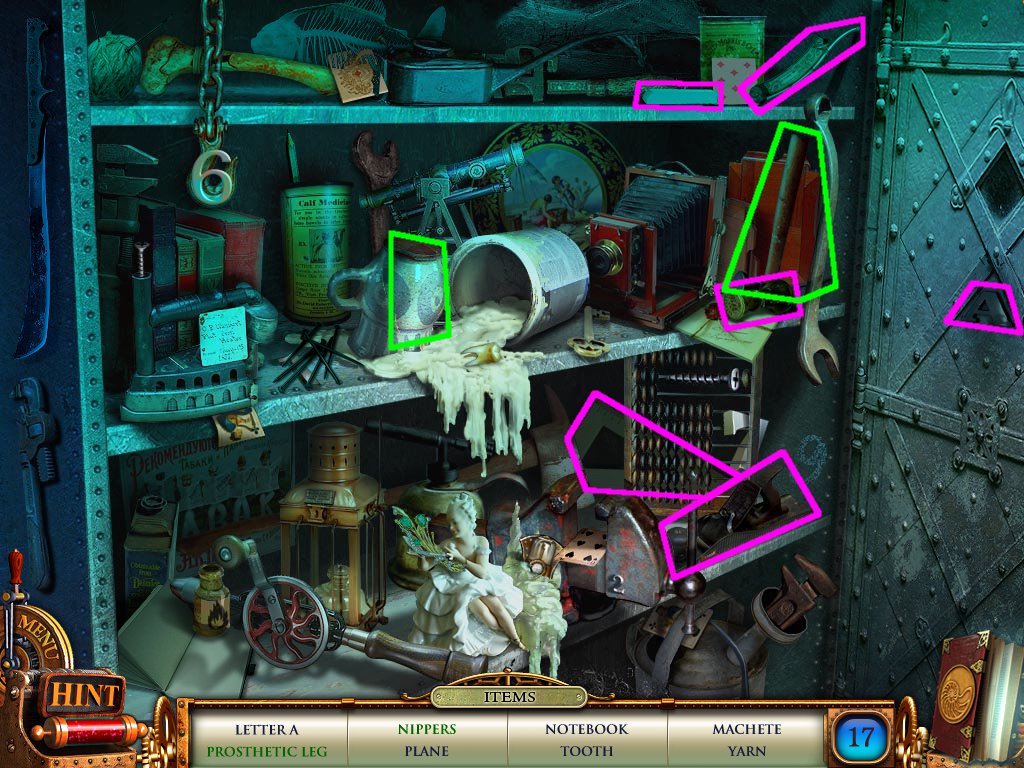
Solve the hidden-object scene using the screenshots below for help.
Areas in blue are for items requiring interaction (item names are by the areas), and areas in green are for the task at the end.
The first screenshot is for the items directly visible, the second is for when the door is opened.
Screenshot 1
Screenshot 2
You acquire a fuse.
Enter the bathysphere hold.
Bathysphere Hold
Examine the panel on the wall and use the knob (from the hidden-object scene in the control room entryway).
Open the doors and collect the respirator and razor.
Examine the hat on the ledge and use the razor.
Collect the code, then head up to the control room.
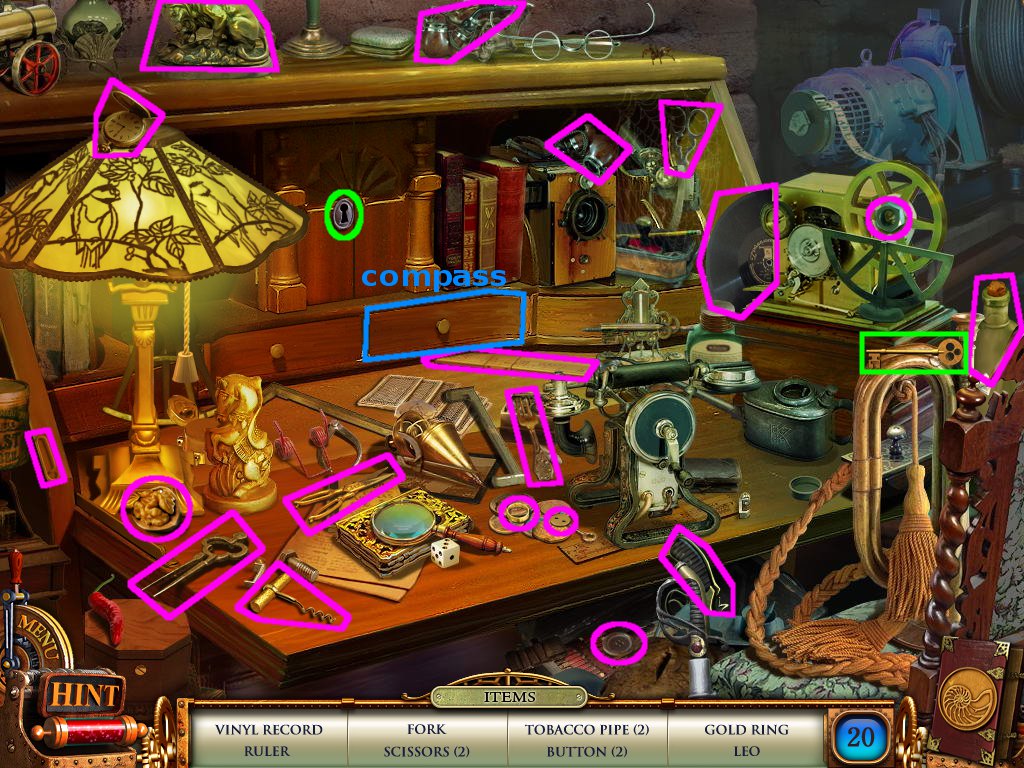
Control Room
Solve the hidden-object scene using the screenshot below for help.
Areas in blue are for items requiring interaction (item names are by the areas), and areas in green are for the task at the end.
Screenshot
You acquire a staff.
Take the elevator up to the 3rd floor landing.
3rd Floor Landing
Examine the telescope and use the code (from the hat in the hold).
Solve the focus puzzle to reacquire the code.
One knob controls vertical focus, the other controls horizontal focus.
One method of solving these is to focus on one aspect of picture and line the two images up with one knob, and then the other.
If that doesn't work well for you, then simply look at the picture in general and turn the knobs to make the picture look more clear.
Pull the lever on the left after completing each image (the light will turn green).
Head down to the tunnel entrance.
Use the respirator (from the panel in the bathysphere hold) on the doorway to enter the tunnel.
Tunnel
Press the switch on the red box in front of you.
Collect the rope at the robot's feet.
Go back to the bathysphere hold.
Bathysphere Hold
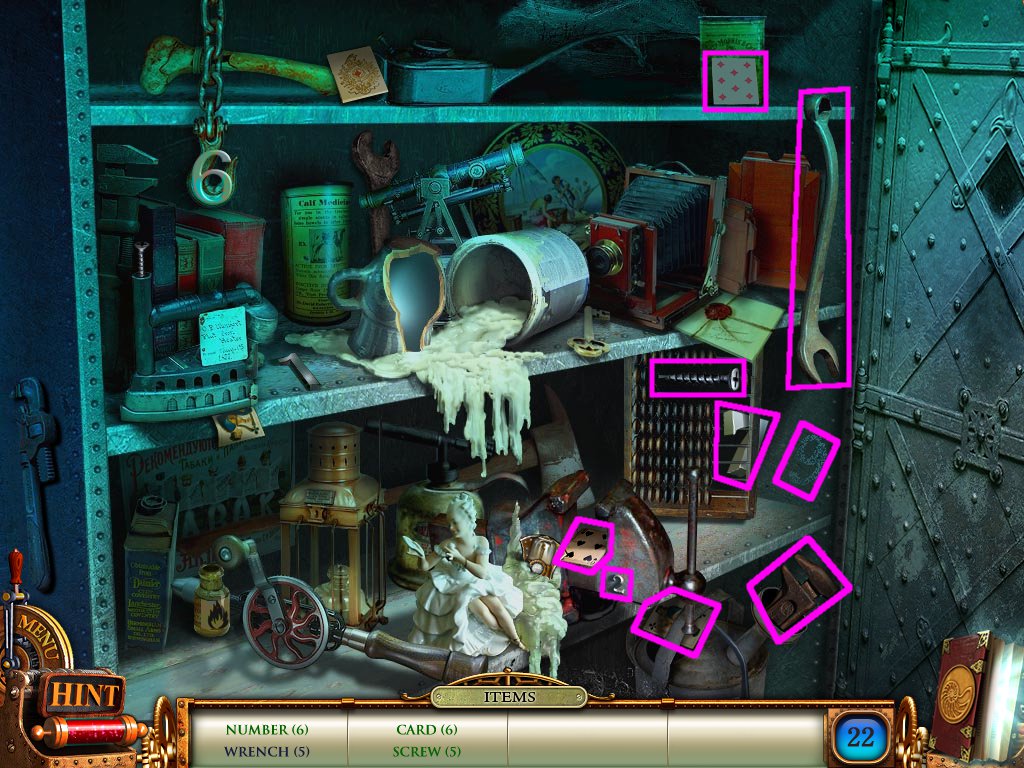
Solve the hidden-object scene using the screenshot below for help.
Areas in blue are for items requiring interaction (item names are by the areas), and areas in green are for the task at the end.
Screenshot
You acquire a wrench.
Collect the handle by the wheel.
Examine the magnet by the stairs and use the rope (from the tunnel).
Collect the magnet, then examine the water.
Use the magnet to collect the flange pipe.
Head up to the tunnel entrance.
Tunnel Entrance
Examine the large rock to the left of the walkway and use the flange pipe (from the water at the bathysphere hold).
Now use the handle and collect the nail puller.
Examine the man hole cover and use the nail puller.
Collect Part 2.
Head right from the tunnel to enter the cavern.
Cavern
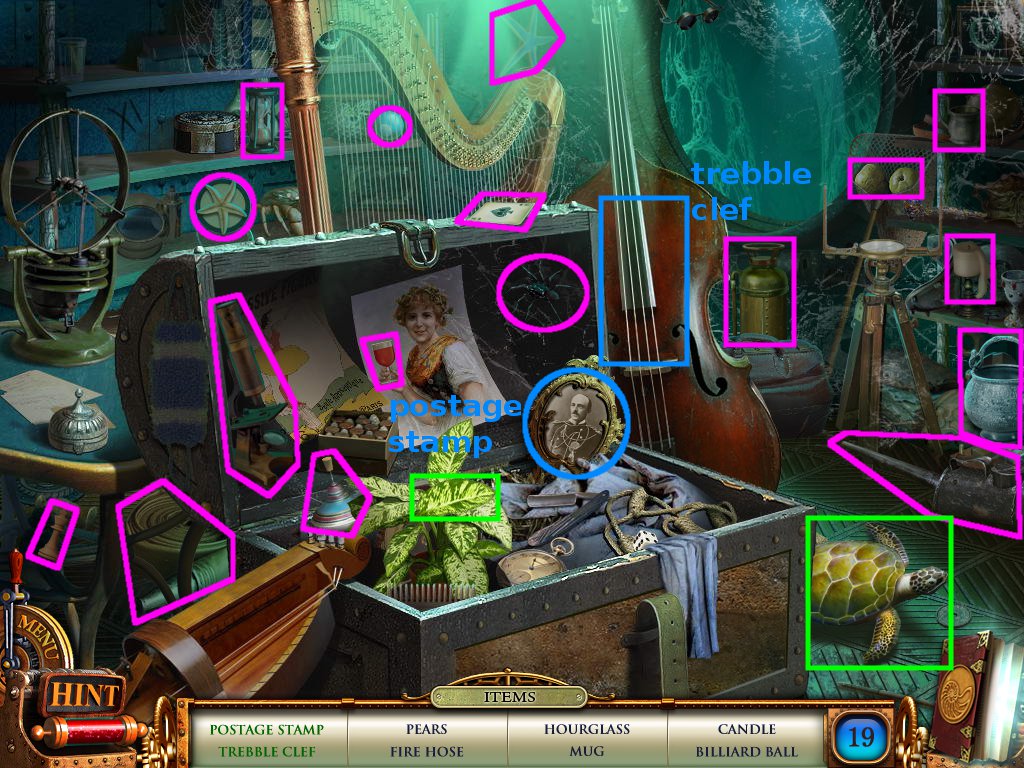
Solve the hidden-object scene using the screenshot below for help.
Areas in blue are for items requiring interaction (item names are by the areas), and areas in green are for the task at the end.
Screenshot
You acquire a ruby.
Put the ruby in the Time Wheel.
Now go to the bathysphere hold.
Bathysphere Hold
Examine the door on the upper level and use Part 1 (from the hidden-object scene in the control room) and Part 2 (from the man hole cover in the tunnel entrance).
Solve the pieces puzzle by clicking a piece and placing it in the correct spot.
Pieces cannot be rotated, so they must be placed as is.
The screenshot below has the solution.
Screenshot
Enter the transporter room.
Transporter Room
Examine and click the note to put it in your notebook.
Collect the oven lever by it.
Examine the safe and use the code (deciphered at the telescope on the 3rd floor landing).
The solution:
[3][5]
[6][9]
Collect the lever, tip and cylinder.
Head up to the control room entryway.
Control Room Entryway
Examine the phone.
Use the cylinder (from the safe in the transporter room).
Go to the tunnel.
Tunnel
Examine the overturned cart and use the wrench (from the hidden-object scene in the bathysphere hold).
Collect the coupler.
Examine the drawer and use the tip (from the safe in the transporter room).
Collect the jackhammer, then click the note to put it in your notebook).
Go back and into the elevator.
Elevator
Examine the floor controls.
Use the lever (from the safe in the transporter room).
Head to the 2nd floor landing.
2nd Floor Landing
Examine the bridge mechanics and use the fuse (from the hidden-object scene in the Nautilus room).
Solve the fuse puzzle by clicking the three controls buttons below.
The goal of the puzzle is to get all five fuses upright (convex side up).
Notice that the slot narrows on the right side, which, along with the shape of the fuses, creates the difficulty.
A solution:
Assume the fuses are numbered 1-5, left-to-right.
The direction indicated refers to where the top of the fuse (convex side) is pointed.
The exact buttons to push are not given, just the result.
5 up, 4 up, 5 left, 3 up, 5 up
4 left, 5 left, 2 up, 5 up, 4 up
5 left, 3 left, 5 up, 4 left, 5 left
1 up, 5 up, 4 up, 5 left, 3 up, 5 up, then shift the fuses right
Head across to the train station.
GOAL: Free Captain Nemo
Train Station
Click the flying robot.
Collect the valve handle, cable and bucket (in the bushes).
Examine between the two cars and collect the rag.
Use the coupler (from the overturned cart in the tunnel).
Enter the engine car and examine the trash on the floor.
Collect the lighter and click the note to put it in your notebook.
Collect the spiral tube from above the furnace.
Head back and go through the cavern to the cable car platform.
Cable Car Platform
Use the chain (from the hidden-object scene in the hotel lobby) on the loose end to the right.
Collect the robot's hand.
Go back down to the cavern.
Cavern
Examine the robot and use the robot's hand (from the cable car platform).
Solve the wire match puzzle by using the arrow buttons to manipulate the columns of wires.
The goal is to match up the wire colors.
The challenge of the puzzle is that certain movements of the columns can affect the movement of other columns.
A solution:
Line up these columns in order, numbered 1-5, left-to-right: 4-5-2-1
Collect the key.
Head into the tunnel.
Tunnel
Use the bucket (from the train station) on the coal tray.
Examine the robot and use the jackhammer (assembled at the drawer in the tunnel) and cable (from the train station).
Pull the lever on its head.
Collect the bucket and head back to the tunnel entrance.
Tunnel Entrance
Examine the robot head and use the key (from the robot hand, opened in the cavern).
Collect the sapphire and put it in the Time Wheel.
Go to the transporter room.
Transporter Room
Examine the table and use the lighter and spiral tube (both from the engine car).
Re-collect the lighter.
Head back to the train station.
Train Station
Enter the engine and use the valve handle (from the train station) to the right.
Use the oven lever (from the transporter room) on the nut above the right door.
Pull the lever, then put the bucket (filled in the tunnel) and lighter (filled in the transporter room) in the furnace.
Use the rag (from between the train cars) on the window.
Pull the handle, then turn the valve.
Head in the building to the office.
Station Office
Solve the hidden-object scene using the screenshot below for help.
Areas in blue are for items requiring interaction (item names are by the areas), and areas in green are for the task at the end.
Screenshot
You acquire a key.
Collect the glass cutter on the left side of the desk.
Examine the chair, collect the cylinder and click the note to put it in your notebook.
Examine the signal mechanism on the desk and use the staff (from the hidden-object scene in the control room).
Solve the staff puzzle by clicking a staff, then choosing one of the highlighted, available moves.
The goal is to get the staffs in the correct column, as indicated by the color below.
A solution:
Moves are given based on how many of what color staffs to move. Where the staffs are coming from is only indicated when there is more than one choice.
1 red to right, 2 greens to above, 3 left reds to middle, 2 greens to left, 3 middle reds to left
2 greens to above, 3 left reds to middle, 2 greens to left, 1 right red to left, 2 blues to above, 2 blues to middle
1 red to right, 4 blues to right, 2 reds to above, 1 red to left, 4 blues to middle, 3 reds right
Go to the transporter room.
Transporter Room
Examine the glass cabinet and use the glass cutter (from the station office).
Collect the rail disc.
Head back to the train station, stopping on the way at a phone to use the cylinder (from off the chair in the station office).
Train Station
Examine the railway post and use the handle (from the 2nd floor platform) on the side socket.
Now use the rail disc (from the glass cabinet in the transporter room) and turn the handle.
Enter the engine, pull the handle and turn the valve to travel to Dardell's den.
Dardell's Den
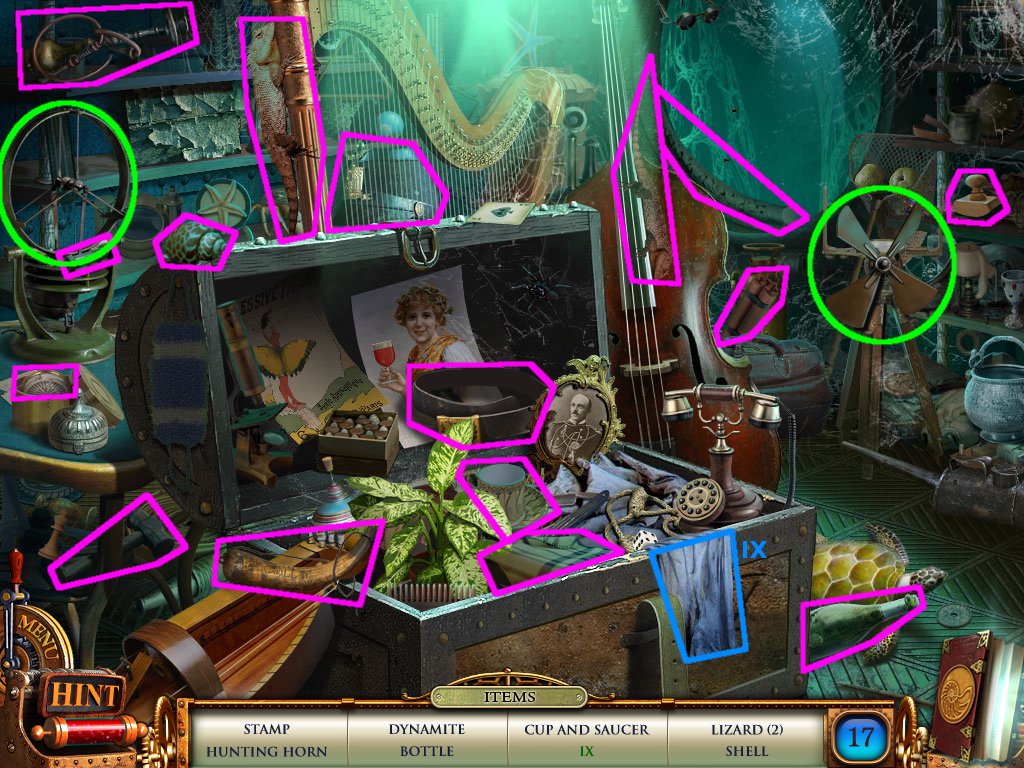
Solve the hidden-object scene using the screenshot below for help.
Areas in blue are for items requiring interaction (item names are by the areas), and areas in green are for the task at the end.
Screenshot
You acquire a knife.
Examine the motorcycle and use the key (from the hidden-object scene in the station office).
Collect the bearing.
Head back to the 2nd floor landing.
2nd Floor Landing
Examine the suitcase and use the knife (from the hidden-object scene at Dardell's den).
Collect the weight and tweezers.
Go to the station office.
Station Office
Examine the coat and use the tweezers (from the suitcase at the 2nd floor landing) to collect the x-ray key.
Solve the hidden-object scene using the screenshot below for help.
Areas in blue are for items requiring interaction (item names are by the areas), and areas in green are for the task at the end.
Screenshot
You acquire a mirror.
Head back to Dardell's den.
Dardell's Den
Solve the hidden-object scene using the screenshot below for help.
Areas in blue are for items requiring interaction (item names are by the areas), and areas in green are for the task at the end.
Screenshot
You acquire a dial.
Examine the door and use the x-ray key (from the coat in the station office) over the bulbs.
Solve the symbol code puzzle by clicking the dial to rotate it, then clicking the numbers to change them.
The number-symbol combination on the x-ray key must be matched on the dial before it will accept the correct number.
The correct number is found by matching it to the pink symbol.
The solution:
5818
Enter the factory.
Factory
Examine the paper on the steps and click it to put it in your notebook.
Examine the vise and use the bearing (from the motorcycle at Dardell's den).
Now use the weight (from the suitcase on the 2nd floor landing) to collect the balls.
Examine the machine and use the dial (from the hidden-object scene at Dardell's den).
Turn the dial.
Use the balls on the robot.
Enter the tower.
Tower
Examine Dr. Dardell.
Use the mirror (from the hidden-object scene in the station office) on Dardell.
Examine the bracelet and back up.
Click the flying robot and collect the paper knife.
Re-examine the bracelet and use the paper knife to collect the amber.
Put the amber in the Time Wheel to collect it.
Examine Nemo, then head back to the transporter room.
Transporter Room
Examine the Time Wheel stand and use the Time Wheel.
Solve the colored gem puzzle by pressing the arrow keys to realign the gems.
This is possibly the hardest puzzle because you can easily get yourself completely off track. Because of this, don't be afraid to reset the puzzle.
A solution:
Right, right, up, right, right, up
left, up, right, down, right, up
Congratulations, you've beat the game!
Posted by: Kyh |
December 19, 2011 11:01 AM
|
December 19, 2011 11:01 AM