
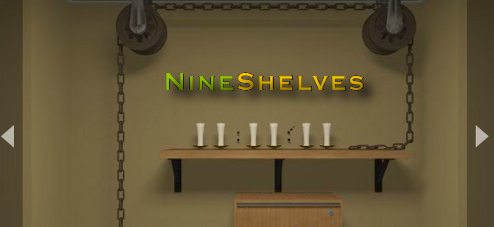
![]() Everything about Robamimi's elegant escape game Nine Shelves seems designed to lull you into soothing complacency. Sure, you could click around to gather items and solve puzzles using clues and brain power... but listen to those birds. That delicate piano. Check out that... uh... shelf full of random junk. That chain and... pulley system? Well... okay. So maybe this place doesn't have everything a person needs to get by, unless you're some evolved life form that can subsist entirely on relaxing background music, but it does have some sleek and sly puzzles to go with its lovely atmosphere, and that's good enough for me.
Everything about Robamimi's elegant escape game Nine Shelves seems designed to lull you into soothing complacency. Sure, you could click around to gather items and solve puzzles using clues and brain power... but listen to those birds. That delicate piano. Check out that... uh... shelf full of random junk. That chain and... pulley system? Well... okay. So maybe this place doesn't have everything a person needs to get by, unless you're some evolved life form that can subsist entirely on relaxing background music, but it does have some sleek and sly puzzles to go with its lovely atmosphere, and that's good enough for me.
 My favourite types of escape games are the ones that forgo any real setup and just drop you in a place filled with puzzles, with a greater focus more on deduction and reasoning than simply cobbling items together to get past obstacles. Not everyone appreciates this admittedly random approach to the concept, and it does mean that the sheer variety of puzzles and items can be a bit baffling at first since none of them are really intended to function as they would in real life. While some things are clearly stated or otherwise obvious in their use or meaning, others require more interpretation, and the included hint function is only slightly helpful. There's only one way out, and it sort of makes me wonder if Robamimi isn't secretly a Bond villain, but Nine Shelves is a lovely, relaxing way to get a break from your day... provided you're the sort of person who finds clutching a flower pot, a swim mask, and an iron weight to your chest while moaning "what does it mean" relaxing.
Thanks to Cyberjar88 for sending this one in!


Walkthrough Guide
(Please allow page to fully load for spoiler tags to be functional.)
Nine Shelves Walkthrough
General Information
Examine everything you pick up, items may be hiding clues or other items.
Pay close attention to your surroundings, clues are everywhere!
Just because you've used an item once doesn't mean you're done with it. If the item is still active in your inventory, you are going to need it again.
Some clues can be used again in different ways.
Feel free to use the hint button, it can be very helpful.
Don't forget to change languages before you begin.
There is only one end.
Good luck!
Exploration
You begin by facing the titular nine shelves, a three by three cubby style bookcase.
To the left of the bookcase is a small panel in the wall. Looks like we need a gold or yellow key.
Let's explore the cubbies.
The upper left cubby has books in it, along with a helpful nameplate that says "books" in case we didn't know what they were.
Note that the books are of different heights.
The upper middle cubby is padlocked, looks like we need another key.
The upper right cubby has a closed door, which won't open.
Let's check out the middle row of cubbies.
The middle left cubby has the nameplate "Enter" and an enter key for a keyboard which you can take.
The middle middle cubby has the word "Clock" and a clock that has a digital time (15:36:42). That might be useful.
The middle right cubby has a "Dish" and a clue, "use G in the dark".
Now check out the lower row of cubbies.
The lower left has the nameplate "Fire" and a Zippo lighter. Take the lighter.
The lower middle has "Goggles" and a pair of goggles. Take them.
The lower right has a pair of connected hooks and the nameplate "Hook". Take the hooks.
Turn right.
You are now facing a real odd setup. There is a chain and pulley system which doesn't attach to anything. One end of the chain hangs above a manhole cover, the other is lying on a shelf. On the shelf are six candles, separated by pegs in the wall. Below the shelf is a low cabinet that needs a blue key.
Turn right.
You are now facing a wall with some interesting drawings. The drawings look like scuba gear and a few other things.
Also on the wall are two holes, one in the upper right, and one in the lower left. I wonder if they're connected?
Below the drawings is a brick planter with dirt inside.
To the right of the planter is a tall, narrow cabinet with three drawers. Each drawer has its own puzzle.
The top drawer has a 3 x 3 grid and a clue, A > I.
The middle drawer has three buttons that show both letters and numbers, and an odd-shaped blank space to the right.
The bottom drawer has six sliders with four different heights.
Turn right.
You are now facing an odd shape on the wall. There are buttons on the odd shape in various places, and there are arrow buttons on either side of it that don't seem to do anything.
Turn right.
You are now back where you began. Time to solve some puzzles!
The Books
Let's take a look at those books in the upper left cubby of the 3 x 3 bookshelves.
There appear to be six different books, and four different heights.
Why does that sound familiar?
Remember the bottom drawer of that tall, narrow cabinet?
That puzzle had six sliders of four different heights.
Turn right (or left) twice to face the wall with the pictures.
Click on the cabinet for a close up, then click on the bottom drawer for a close up.
Let's set the sliders to match the relative heights of the books.
Imagine a numbering system for the books, the shortest books would be the lowest number (1) and the tallest books would be the biggest number (4).
Now picture that number scale going from bottom (1) to top (4).
The books on the shelf would number 2, 1, 3, 3, 4, and 2 (second lowest, lowest, second highest, second highest, highest, second lowest).
Set the sliders to match the relative heights of the books, with lowest being the bottom and highest being the top. Use the numbers to match the lines where the buttons stop.
Once the sliders are set, hit the enter button and the drawer will open. Congratulations, you have a flower pot! If you examine the flower pot while it is in close up you will see that it has a hole in it.
Take the flower pot and back up twice.
The Candles and the Clock
Turn left to look at the shelf with the candles.
You know, when you look at the candles in this long view, the pegs in the wall separating the candles look like colons.
Just like the digital time on the clock in the cubby shelves.
I wonder if the time on the clock might be a clue to the candles?
The time on the clock is indeed a clue.
Remember the time, 15:36:42?
That is the order to light the candles.
Use the lighter in your inventory, and light the candles in numerical order, going from lowest to highest.
Light the far left candle (1), the far right candle (2), the second from the left candle (3), the first from the right candle (4), the first from the left candle (5), and the second from the right candle (6).
If you lit the candles in the correct order, the "clear" button will disappear from the wall and you will hear a click.
Click on the pegs on the right (where the arrow on the wall is) for a close up and you will see that the top peg has popped out. Click on the peg to take the hidden key.
Back up twice.
The Locked Cubbies
Turn left to face the 3 x 3 bookshelves.
Let's take a look at the top middle cubby, the one with the padlock.
Click on the top middle cubby for a close up.
Use the key you just acquired from the candles on the padlock.
Congratulations, you now have a padlock!
Click on the door of the cubby to open it.
Inside you will find an iron dumbbell and the word "Iron". Take the dumbbell.
Notice that there is a red button on the inside of the cubby, on the right. Click on it for a close up.
Click on the button to push it in, then back up twice.
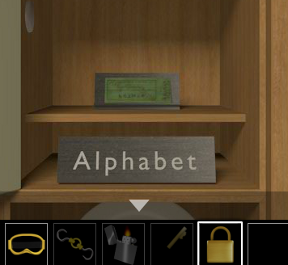
Now click on the top right cubby for a close up.
You should now be able to open the door on this cubby. Inside you will find the word "Alphabet", and a ticket. Click on the ticket for a close up.
The ticket appears to be for a movie called "Alphabet". Note the ticket number, which is a mix of letters and numbers, K62MZ8.
Back up twice.
The Tall Cabinet Drawers
You should have already managed the bottom drawer of the tall cabinet, now it's time to get the top two drawers open.
Turn right (or left) twice to face the wall with the pictures.
Click on the cabinet for a close up, then click on the middle drawer for a close up.
First things first, notice the black shape to the right of the buttons?
Does that look like the "enter" key you picked up earlier?
Place the "enter" key on the shape.
Now let's solve the puzzle. These buttons show a mix of letters and numbers.
Where have we seen that before?
The ticket number on the movie ticket is a mix of letters and numbers.
But it is a six digit number, K62MZ8, and there are only three buttons.
The clue is the word "Alphabet", the name of the movie and what is on the nameplate in the cubby.
That clue tells you it only wants the letters from the ticket number.
The letters are KMZ, so enter them into the buttons.
Once you've set the buttons correctly, hit the "enter" button.
The drawer will open and inside you will find some rope. Take the rope and back up once.
Now click on the top drawer for a close up.
This puzzle is the 3 x 3 button grid with the clue A > I.
You should remember where you've seen a 3 x 3 grid in the game, since it dominates one wall.
Yes, the 3 x 3 bookshelves.
But how does it relate?
Each cubby has a nameplate with a word.
Each word starts with a letter that ranges from A to I.
So the clue would seem to tell you to push the buttons in order from A to I that would match the 3 x 3 bookshelves.
The order is: Upper right button (A - Alphabet), Upper left button (B - Books), Middle middle button (C - Clock), Middle right button (D - Dish), Middle left button (E - Enter), Lower left button (F - Fire), Lower middle button (G - Goggles), Lower right button (H - Hook), and Upper middle button (I - Iron).
When you hit the buttons correctly, you will hear a click and an odd symbol will appear on the buttons.
Yes, the symbol looks like that symbol on the wall with all the buttons.
Back up once and click on the drawer to open it.
Take the clay from inside and back up twice.
The Flowerpot and the Manhole
Let's take a moment and see what we have in our inventory.
We have the flowerpot, the goggles, the iron dumbbell, the hooks, a padlock, some clay, and a rope.
Let's look at the pictures on the wall. Three of the pictures are of scuba gear: the goggles, flippers, and an oxygen tank.
The other two pictures are more obscure. One looks like it should have rope tied around it, the other might be a light of some sort.
You know, we may have enough items in our inventory to do something with that manhole cover.
turn left to face the candles.
Click on the manhole cover for a close up.
Use the hooks to attach the chain to the cover.
Back up, then click on the end of the chain that is on the shelf.
Now we just need a counterweight!
Place the iron dumbbell on the chain.
Use the padlock on the dumbbell/chain combo to attach it.
Yay, we've opened the cover!
Click on the manhole for a close up.
Notice that there is something hanging from the handhold at the top, take it (gold key).
Okay, looks like we may need to escape through the sewers. I guess we need to find the rest of the scuba gear, then.
Is there anything in the room we would need water for?
How about that brick planter? Maybe if we water it something would happen?
So how do we get the water out?
We have a flowerpot, but it has a hole.
But we also have some clay!
Pull up the flowerpot from your inventory, then use the clay on it to plug the hole.
Hmmm, we still can't get water, it is too far down.
Use the rope on the flowerpot, then use the rope/flowerpot combo on the open manhole to get water.
Back up and turn right.
Click on the brick planter for a close up, then use the flowerpot full of water on it.
Okay, now we have wet dirt. Click on the wet dirt and you will get a mudball.
Back up once.
That mudball looks like the perfect size to drop in one of those holes in the wall.
Click on the hole in the upper right of the wall and use the ball on it.
The ball will roll down to the lower hole, and it will push down a key. Take the key and back up.
The Blue Key
The key you just got is silver, with a blue keychain on it.
Turn left to face the candles.
Click on the low cabinet below the shelf for a close up.
Yep, we need a blue key here. Use the key you just got from the wall on the cabinet.
Yay, inside is an oxygen tank and a clue, F.A.C.E.Books.
Take the oxygen tank and back up.
The Goggles
Turn left to face the 3 x 3 bookshelves.
Remember that little panel to the left of the bookshelves?
Click on it for a close up.
Looks like we need a gold key. Fortunately, we have one.
Use the gold key on the panel to open it.
Hey, a light switch!
Click on the switch to turn off the lights, then back up.
You should just be able to see the 3 x 3 bookshelves in the dark.
Now what?
Remember the clue on the dish, "Use G in the dark"?
Click on the middle right cubby for a close up.
Use the goggles on the dish and you will see a clue!
Note the shapes carefully, then back up.
Click on the panel to the left of the bookshelves for a close up, then turn the lights back on.
Back up.
The Strange Symbol
Turn left to face that strange symbol on the wall.
Look at it closely.
Notice where the buttons are.
If you compare the clues you got from the dish, you can see which buttons to push.
Look at the dish clues. The first clue is a line that goes left, then up and ends in a dot. That would correspond to the button in the upper left of the symbol.
The second clue is a line with a dot to the right, that would correspond to the middle right button.
The third clue is a line to the right, then down to a dot, which would match the lower right button.
The fourth clue is a line that goes left to a dot, which would match the middle left button.
The last clue is a dot in the middle of a vertical and a horizontal line. That would match the button in the dead center of the pattern.
Push the buttons in the order you got from the dish clues and the panel will slide to the right.
Inside you will find a flashlight, take it.
Back up and the panel will slide back.
Click on the symbol again for a close up.
Note that the right arrow button is now red, and will make the panel slide to the right.
But how do we make it slide to the left? The left button doesn't work.
Is there another clue as to how to use the symbol?
The second clue is in three parts.
The first part is the 3 x 3 button puzzle we solved earlier. When we solved it, a picture of that symbol appeared over the buttons.
The second part are the letters in the 3 x 3 bookshelves.
The third part is the clue on the oxygen tank, F.A.C.E.Books.
Picture the 3 x 3 grid with the letters.
Now impose a picture of the symbol over it. The buttons on the symbol will still coincide with the letters on the grid. (Upper row from left to right, B I A; middle row from left to right, E C D; bottom row from left to right F G H.)
The clue is the capital letters from the F.A.C.E.Books, so the code is F A C E B.
That would be the bottom left button, the upper right button, the middle-middle button, the middle left button, and the upper left button.
Now push the buttons in the order of the second clue and the panel should slide to the left.
Inside you will find the flippers. Take them and back up.
Getting Out
Okay, we have the goggles, the flippers, the oxygen tank, and the flashlight.
Let's get out of here!
Turn right (or left) twice to face the candles.
Click on the open manhole for a close up.
Hmmm, it's very deep.
Hey, remember that picture on the wall? The one that said "rope"?
That picture looked a lot like the open manhole, with the handle across the top.
Maybe we need to tie the rope to the handle to lower ourselves down?
Pull up the flowerpot from your inventory.
Take the rope.
Use the rope on that handle across the top of the manhole.
Now click on the manhole to escape. Hope there's no rats!
Enjoy the swim to that gorgeous cave/grotto.
Posted by: grinnyp |
August 10, 2013 12:12 PM
|
August 10, 2013 12:12 PM