
![]()
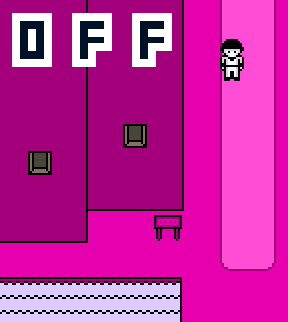 If you're looking for a free indie RPG that's a little... different... you might want to try Unproductive Fun Time's surreal and unsettling OFF. Recently translated from its native French, the game follows you and The Batter, a stoic slugger whose goal is, he says, to "purify" the land of spectres and phantoms. With the help of an enigmatic and somewhat suspicious toothy cat, you'll travel through the Nothingness to such wondrous places as the Meat Fountains of Alma, to the labyrinthine library of Bismark and beyond, and pack you full of ghosts, profanity, puzzles, and nightmare fuel in the process.
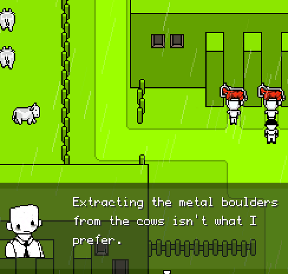
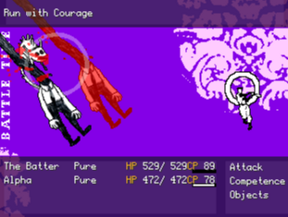
Use the [arrow] keys to move around, the [spacebar] to interact, and hit [ESC] to open the menu. Battles are turn based in the most traditional fashion, with characters attacking in turn once their action bar fills up. If you don't feel like manually handling each battle yourself, you can just select the "Auto" option and your heroes will beat on their enemies as they see fit. As you level up, your characters will learn more moves ("Competence") that can help in battle, and, of course, you can find the obligatory, if somewhat disdainful, item merchant who will sell you not only more curative items, but better arms and armor to boot. You can find floating boxes that will restore your health and save your progress, but only the red ones will allow you to teleport to another Zone by returning to the Nothingness.
 Analysis: OFF is a weird game. I mean, seriously. Imagine a giant laboratory with beakers bubbling away, distilling games like Earthbound, Killer 7, Baroque, and maybe a little bit of Stephen King and Peter Straub's Talisman, and the roiling, unsettling liquid they combine to make might look a little like this. The characters and landscapes you visit are bizarre to say the least, and the way you're thrust into them with no explanation or warm-up is more than a little disorienting in a way that can frustrate some players. The unique mythology you see peeking through in the conversations and designs is absolutely fascinating, however, and if you're a fan of surreal, introspective stories where what you know is only part of a bigger mystery you'll definitely want to check this one out. From its swanky and stellar original soundtrack by Alias Conrad Coldwood, to its unusual concepts and strange character designs, OFF feels like its own unique creature in ways few games rarely manage.
 The downside? Apart from a healthy dose of solid, clever puzzles, it really does feel like OFF's unique story and concept is struggling to carry the gameplay at times. Unless you grew up gaming in the '80s and '90s like I did and are just used to it, random battles are the smelly, lurking, unwashed convention goer of the gaming world, and OFF has a lot of them. The auto-attack is actually surprisingly adept at handling nearly any encounter, including boss battles if you're sufficiently leveled, but it definitely gets tedious when all you really want to do is find out more about the story and the universe it lives in.
Which is, by the way, seriously worth doing. OFF isn't for everyone, but if it gets its hooks into you you're going to love the off-kilter journey it takes you on. Although the core gameplay is rarely as immediately compelling as the story and the people and places that live in it, OFF is an unexpected diamond in the rough for a particular sort of person. It's definitely worth a look, and a listen, and a thought or several if you don't run for the hills after the first Zone. It's something you can find yourself mulling over, and shows that there's still a lot of creativity (and creepiness) to be found in the simplest of RPG titles yet.
(Note: You may need to copy several font files from the OFF folder to your system's font directory. For a more detailed explanation, see our guide.)
![]() Windows:
Windows:
Download the free full version
![]() Mac OS X:
Mac OS X:
Not available.
Try Boot Camp or Parallels or CrossOver Games.


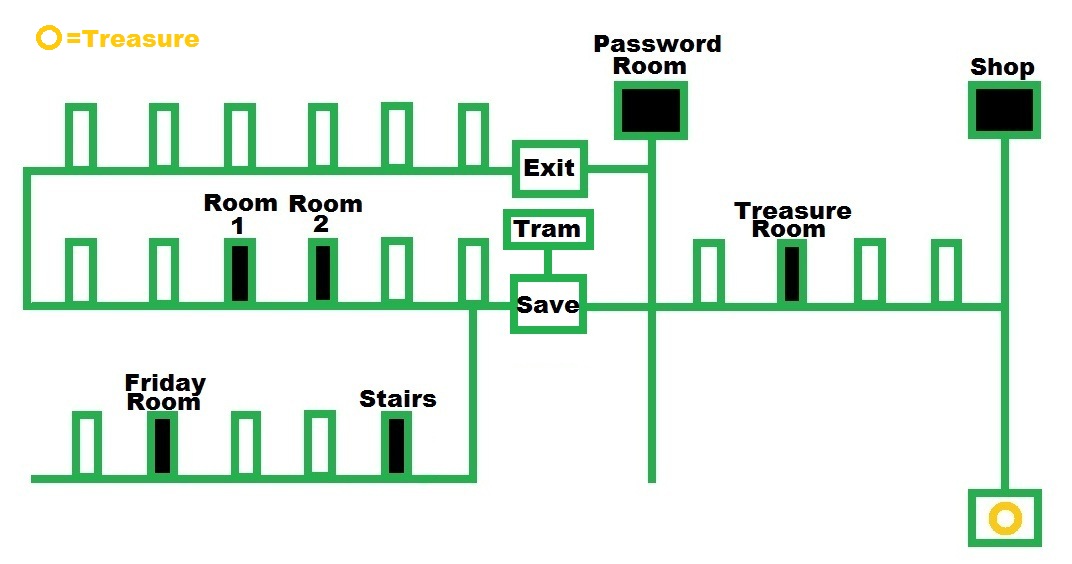
Walkthrough Guide
(Please allow page to fully load for spoiler tags to be functional.)
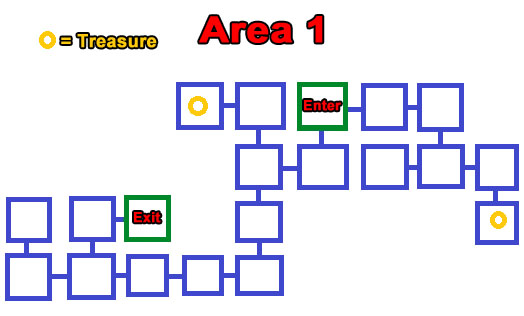
OFF Walkthrough Part 1 (Zones 1-3)
Zone 0
Island
Use the arrow keys to move your character the Batter up to the next area.
After speaking with the Judge, open the chest at the upper left corner of the island.
The chest on the right side is currently blocked off, but you'll be able to reach it soon.
Go up the ladder to the roof of the small building to speak with the Judge again.
He will offer to show you a combat tutorial which will teach you all the basic elements of battles.
Follow the Judge up the ladder to the roof of the tall building, then go down the stairs at the left.
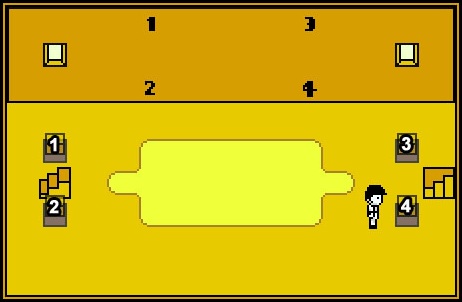
Inside the Building - Room 1
Speak with the Judge for a clue on how to solve the puzzle in the room.
Note that there are four floating blocks in the room (and three solid blocks blocking the exit).
There are also the numbers one to four written on the wall in this order:
1 3
2 4
To solve the puzzle, activate the blocks in the same location as the numbers on the wall from 1 to 4.
That is, first hit the upper left box, then the lower left box, then the upper right box, and finally the lower right box.
When a floating box is hit in the correct order, it will become faded and begin to shake.
Screenshot.
Go down the unblocked stairs on the right into Room 2.
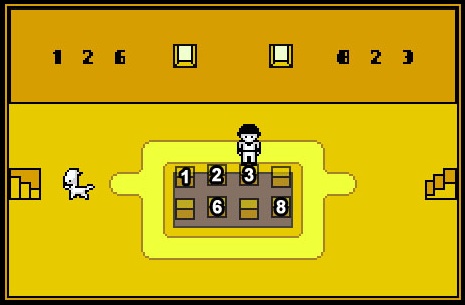
Room 2
Speak with the Judge again to receive another hint for the floating block puzzle in this room.
Note that there are eight boxes in the center of the room and six numbers written on the wall, the highest of which is 8.
1 2 6 8 2 3
Imagine that the top row of boxes is numbered 1 to 4 from left to right, and the bottom row is numbered 5 to 8.
With that in mind, hit the boxes that correspond with the code written on the wall.
If you're still confused:
Hit the far left box on the top row, box 1.
Hit the middle left box on the top row, box 2.
Hit the middle left box on the bottom row, box 6.
Hit the far right box on the bottom row, box 8.
Hit the middle left box on the top row again, box 2.
Hit the middle right box on the top row, box 3.
Screenshot.
Go down the unblocked stairs on the left into Room 3.
Room 3
There are floating blocks in this room, but where is the code?
For now, go back out to the Island.
Island
Open the now unblocked chest to the right of the doorway you just exited from.
Go inside the small room at the center of the island.
It's the code you were looking for earlier!
4 4 8
2 8 7
C
Commit the code to memory and return to Room 3.
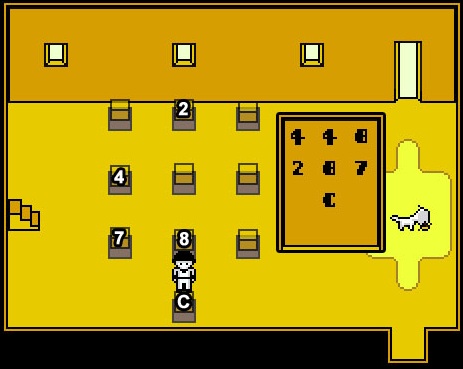
Room 3
Imagine that the rows of blocks are numbered like the buttons on the key pad.
In the top row are blocks 1, 2, 3.
In the middle row are blocks 4, 5, 6.
The bottom row are blocks 7, 8, 9.
Press the blocks in the correct order using the number clue from the small room in the Island.
The letter C in the clue refers to the lone center block at the very bottom.
Hit the left box in the middle row, 4.
Hit the same box again, 4.
Hit the middle box in the bottom row, 8.
Hit the middle box in the top row, 2.
Hit the middle box in the bottom row, 8.
Hit the left box in the bottom row, 7.
Hit the single box at the very bottom, C.
Screenshot.
Exit through the opened door at the back of the room to reach the save point.
After you speak with the Judge, you will receive a Leo Card to grant you access to the next zone.
Hit the red cube to save your game and travel to The Nothingness.
From The Nothingness, move down and enter Zone 1.
Zone 1
Elsen
Note there is a save point at the lower right side of the island at the start of the zone.
Continue up to the Elsen tram station.
Enter the tram through either door and travel to the Damien station.
Damien
Go down and right to speak with the miner.
Enter the building at the top.
Open the chest at the upper left corner of the room.
Exit the room, then continue down the stairs into the tunnel.
After speaking with the Judge, pick up the white circle at the back of the room to add the Add-On Alpha to your team.
Go back up the stairs and talk to the miner again.
Continue through the now-unblocked path to the right and go down the stairs to the Main Mine.
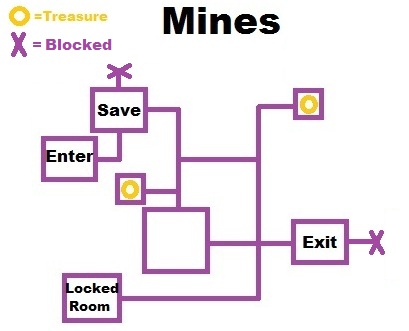
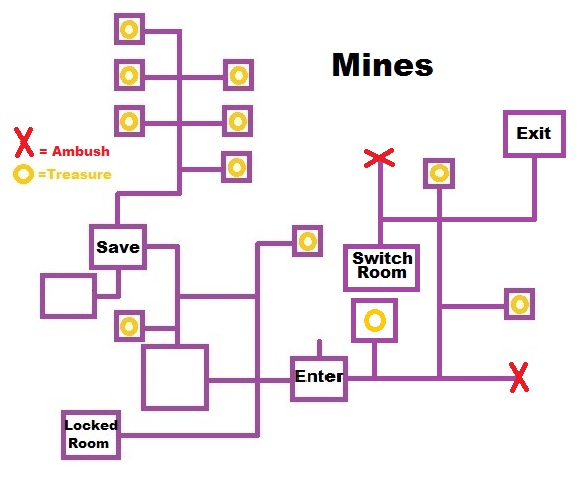
Main Mine
Mines Map.
Go right and up to find the mine save point.
You will be ambushed by a pack of ghosts when you reach the center of the room.
Exit the room to the right to reach the hallway.
Continue down and take the first left to find a treasure chest.
From there go up, right, up, and right again to find another treasure chest.
Go all the way down the ladder and to the end of the hall on the left.
One of the torches (the second from the left) isn't lit; press the hidden switch at the lamp to unlock the secret door.
Continue left into the unlocked room.
Open the chest at the upper left corner of the room, then exit back to the hall.
Go up the ladder, then take the first right and continue up the next ladder to reach the surface of Pentel.
Pentel
When you reach this area, one of the miners will approach you to ask for your help in clearing the barns of spectres.
Follow the path to the right to reach another save point.
Enter the barn directly above you.
While inside the building, the text window at the top will count down how many of the 5 spectres are remaining.
Move up to enter the next room and fight the first spectre.
Go back and down to enter the room on the left to find the next two spectres and engage them in combat.
Enter the upper right room to find the fourth spectre.
Go back down, then continue to the upper left room and down the stairs to the basement.
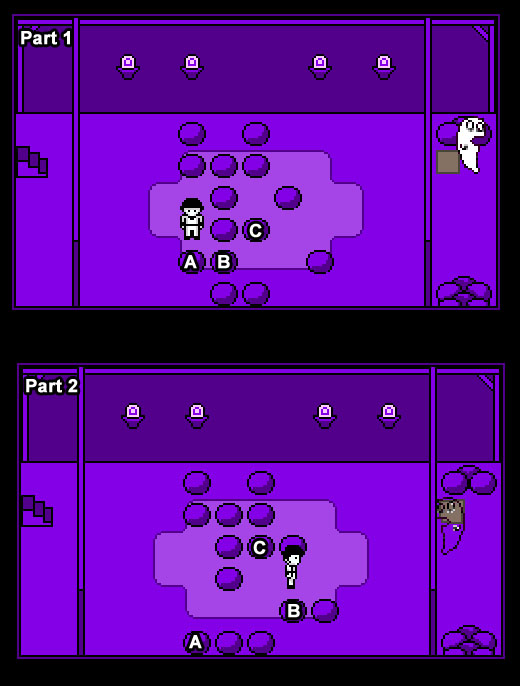
Push the stones away to clear a path to the last spectre.
Refer to the screenshot below for the following solution.
Push stone A down.
Push stone B right.
Push stone C up.
Screenshot.
Destroy the last spectre and use the grey square tile to teleport back to the barn's entrance.
Exit the building and speak with the man outside.
Return to the mines and go all the way back to the save point.
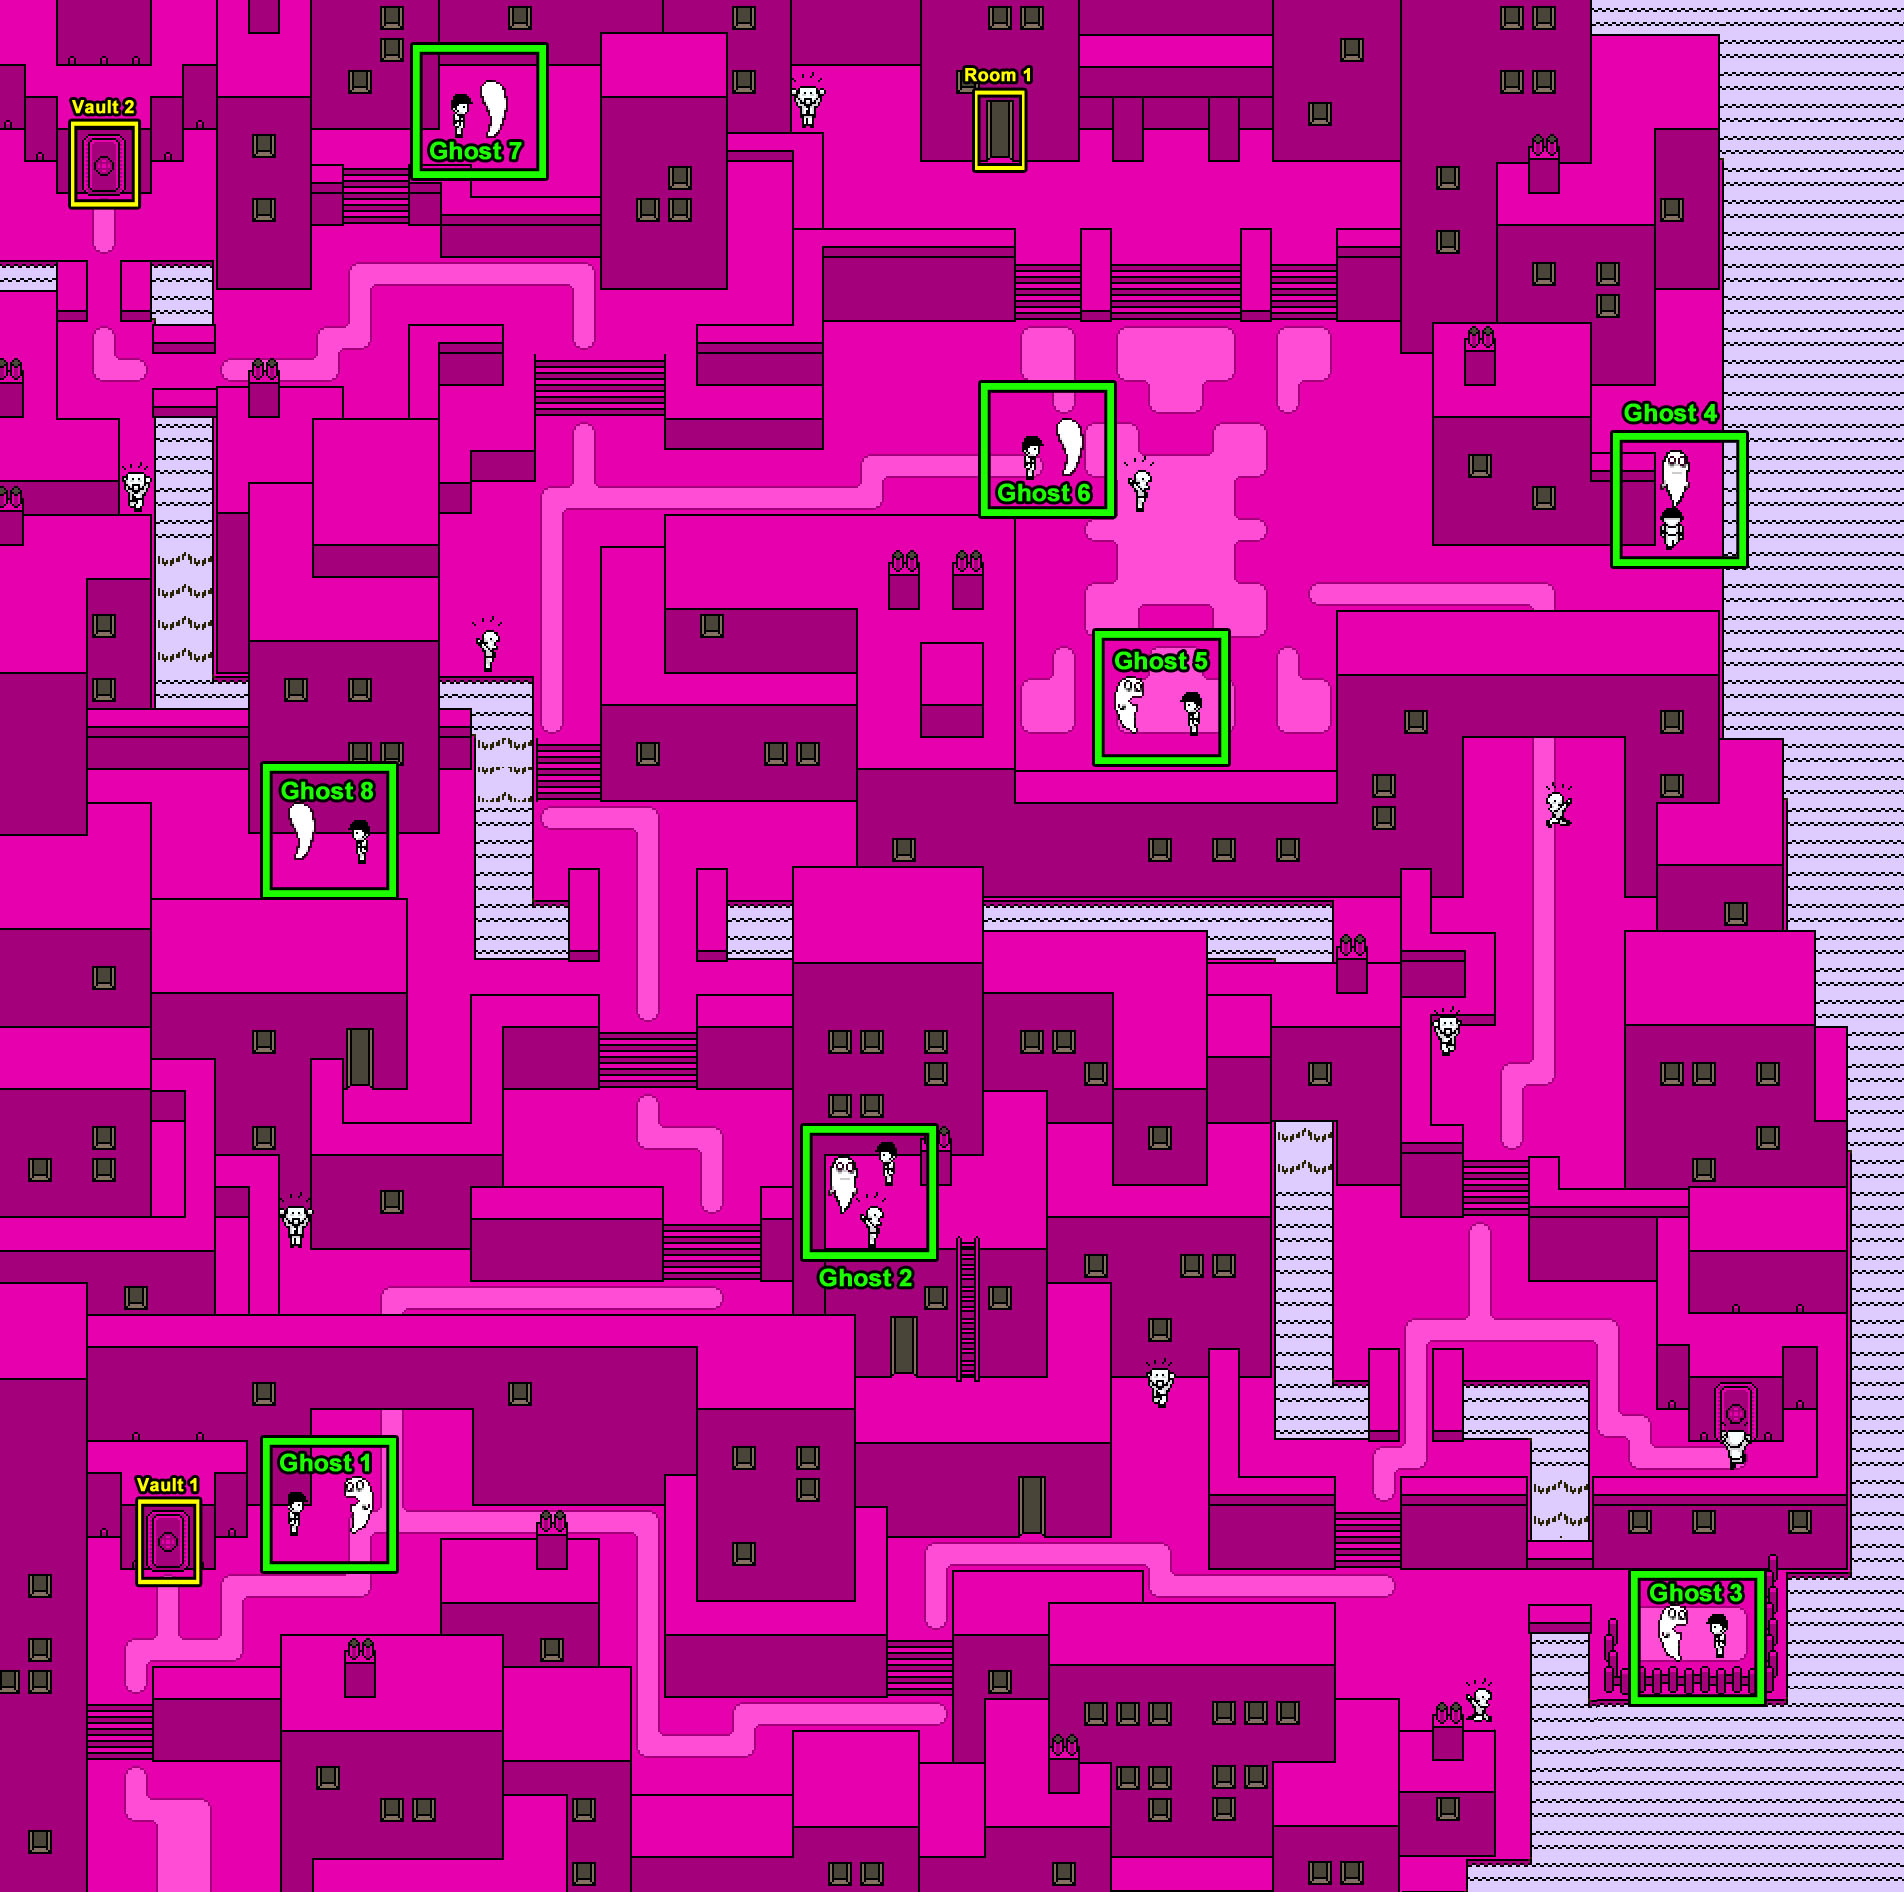
Main Mine
Mines Extended Map.
When you reach the save point, you'll find the north path has been unblocked.
Continue upwards to the new area.
At the end of each hall here is a treasure chest.
Inside each of the six chests are orbs that allow you to permanently increase your character's stats.
When you approach a chest, you will be attacked by a group of spectres.
After you have looted each chest, return to the ladder at the etrance from Pentel.
Continue through the newly unblocked passage to the right to reach the next area of the mines.
Go up at the first intersection to find a treasure chest.
Move back down and continue right, then turn up and right again to find another treasure chest.
Go back to the left, then move all the way up to find a third treasure chest.
Move down, left, and down again to enter the switch room.
Turn the switch OFF in the middle of the back right wall.
This will unblock the path to the exit.
Go up and all the way right to find exit, then move up to find a room with a yellow save cube.
Talk to the man standing in the middle of the room, Zachary, to view the item shop.
At the item shop you can buy and sell items and equipment for your team.
Exit through the door at the top of the room to reach the entrance to Shachihata.
Shachihata
Basement
After speaking with the man in the basement, use the elevator to travel to the Roof.
Use the arrow keys to set your designated floor - 99999, then press enter or spacebar to travel to that floor.
Roof
Speak with the Judge and ask him for a clue to find the postal service room.
"In one of the four rooms on the ground floor, all the employees seem to be trained to a particular set of instructions. Additionally, if there was a choice to be made, I would prefer the lower-case over the upper-case."
Use the elevator to travel to the Ground Floor - 00001.
Ground Floor
Now that you have the Judge's clue, finding the correct floor in this room is actually pretty simple.
If you speak to the men standing at the desks at the desks, they will rattle off two series of numbers.
In only one of the four rooms do the men all say the same numbers.
In the lower left room they all say "Form 2584, stamp 10258.
Go to the elevator and enter in the first number (0)2584 to find the Lost Property Office with two treasure chests.
Enter in the second number 10258 to travel to the Postal Service.
Postal Service
Go into the right room section to speak with the man and engage him in combat.
After he's defeated, continue down the stairs to the next floor, Area 1/2.
Read the note on the paper to the left of the stairs.
"First version: They are six feet under, wrapped in hot metal and liquid plastic."
Move left to the middle room section.
Read the note on the upper left table.
"Second version: They are eight, and they have long beards. They watch what is happening from their high silver spheres."
Move left to the left room section.
Go down the stairs to the next floor to find a treasure chest, then take the stairs back up to Area 1/2.
Move right to the middle room section and take the stairs up to Area 2/3.
Read the note on top of the right table in the middle row.
"Third version: A sole big insect, whose mandibles spit meat."
Move left to the left section of the room.
Read the note on top of the right table in the top row.
"Fourth version: They are four, each one attributed to an element. They protect their respective crystals."
Move right to the right room section and take the stairs up to a blocked off section of Area 3/4.
Read the note on the table at the bottom of the room.
"Fifth version: Five, like the fingers on a hand. Their lungs produce primordial smoke."
Return to Area 2/3, then move to the left section and take the stairs up to the main room of Area 3/4.
Read the sixth note on the table to the left of the elevator.
"Last version: There are but two, in a secret zone."
Talk to the man standing to the right of the elevator.
Tell him you must pass, and he will ask you for the code.
To discover the clue, find the six numbers from the all the notes in the postal service.
The first number is in the first version, second number in the second version, etc.
"They are six feet under" = 6.
"They are eight" = 8.
A sole big insect" = 1.
"They are four" = 4.
"Five, like fingers on a hand" = 5.
They are but two" = 2.
Give him the complete code 6-8-1-4-5-2 to start the battle.
After defeating the man in combat, enter the elevator to reach The Director's Office.
The Director's Office
You can heal your team and save the game at the yellow save box in the first room.
Continue down into the office.
Speak with the Dedan to gain access to the tram in Alma.
Return to the elevator and descent to the ground floor, then go straight down to exit the building.
Follow the path right and up to the tram to ride to Alma.
Alma
Quiz Room
Follow the path up and go through the door to enter the room.
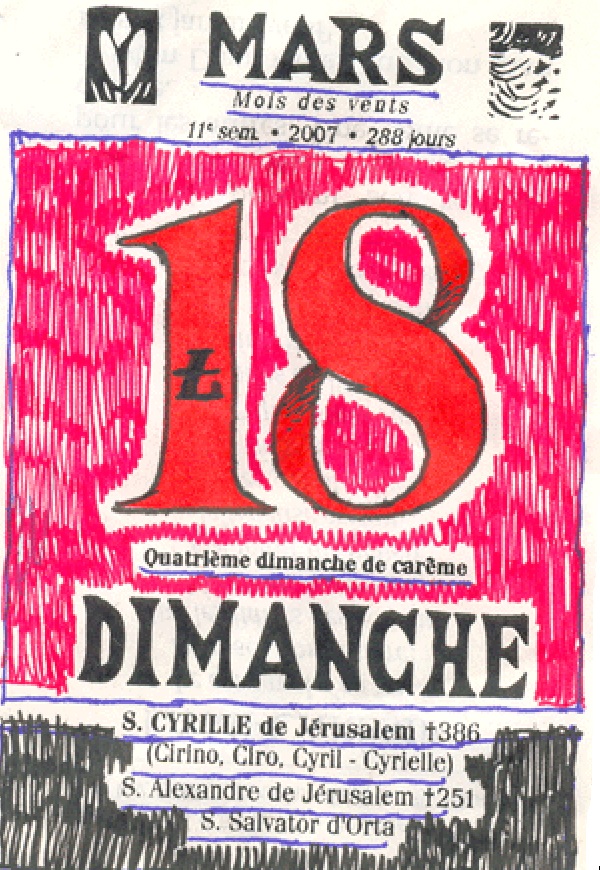
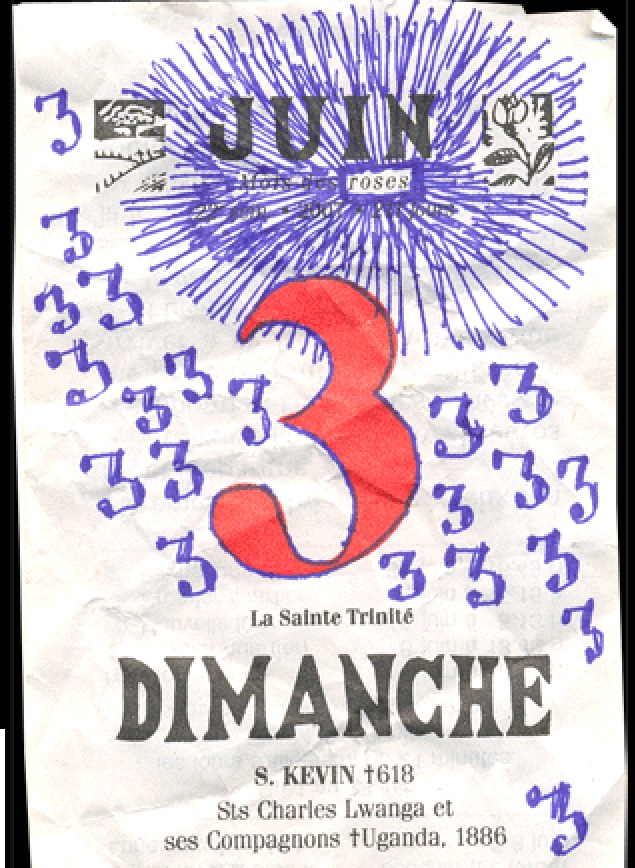
Examine the three pages of the calendar on the back wall for a closer look.
The first page is March 18th, the second is June 3rd, and the third is February 11th.
March 18 Screenshot.
June 3 Screenshot.
February 11 Screenshot.
After studying the calendar pages, speak to the man blocking the door to answer a series of questions about the calendar pages.
Question 1: The second came from Jerusalem and...
Look at the March 18 page to find the answer.
You'll see three names at the bottom and their three cities of origin.
The first is S. Cyrille de Jerusalem, the second is S. Alexandre de Jerusalem, and the third is S. Salvator d'Orta.
Answer: The third from Orta.
Question 2: The Holy Trinity (La Sainte Trinite) is made up of...
Study the June 3rd page to find this answer.
Under the large red number 3 are the words for Holy Trinity in French: La Sainte Trinite.
The word "roses" is outlined very clearly at the top of the page.
Answer: Roses.
Question 3: Notre-Dame first appeared on the...
Study the February 11 page to find the answer.
Inspect the area under 11 to view the words "Sixieme dimanche dans l'annee (sixth Sunday in the year), Notre-Dame de Lourdes".
Answer: Sixth (Sixieme)
Question 4: How many threes are there in June?
Count every three on the June page, including the large red 3 in the center and the 3 at the lower right corner.
Answer: 22
Question 5: Cyrille, Kevin &...
Study all three pages to find the answer.
Under the word "Dimanche" on each poster is a name highlighted in bold.
On March 18th it's S. Cyrille, on June 3rd it's S. Kevin, and on February 11 it's S. Jonas.
Answer: Jonas
Questoin 6: If you turn the month March (Mars) upside-down, what number can you read?
Study the March 18 page to find the answer.
When the page is turned upside-down, the number 8 stays the same, but the black "L" inside the number 1 now looks like a 7.
Answer: 87
If you answer all of his questions correctly, the man will attack you.
After defeating him in combat, exit through the door at the top of the room.
Meat Fountains
Move up to speak to the worker and engage him in combat.
Continue up to find a yellow save cube and Zachary's item shop.
Go up and left to the west waterfall.
Defeat to the man standing to the right of the waterfall.
Step on the pedalo recovery point where the man was standing to call a pedalo (the white bird that allows you traverse the red rivers).
Board the pedalo and ride it up to the top of the large waterfall.
On your way up, you'll see a series of boxes with two numbers inside, one white number and one black number.
Note the list of numbers as you pass them.
1 4
2 9
3 8
4 2
When you reach the land at the end of the red river, disembark and fight the man standing on the next pedalo recovery point.
Continue right to reach the floating blocks area.
Fight the man standing on the next pedalo point, but do not board the pedalo.
Instead, go right again to the east end of the platform.
Defeat the next man standing on the pedalo point, then use the recovery point to call the pedalo.
Ride the pedalo down to the bottom of the east waterfall.
Note the series of black and white numbers continue as you head down.
6 5
5 6
Disembark on the island at the lower right side of the waterfall to find a treasure chest.
Hop back on the pedalo to ride it left, down, and then right to find the last four numbers.
7 9
8 C
Go back on land and walk to the west waterfall, then ride the pedalo up to the end of the red river.
Disembark and continue right on foot to the floating blocks.
Call the pedalo to ride around the floating blocks and solve the puzzle.
Use the numbers you've seen around the red rivers to find the correct order of the boxes.
The white number refers to the order in the sequence (white 1 is first, white 2 is second, white 3 is third etc).
The black number indicates the corresponding floating box.
Like the last floating blocks puzzle, imagine the blocks are positioned as if on a number key pad, with C at the very bottom, like so:
1 2 3
4 5 6
7 8 9
C
The final combination is: 4-9-8-2-5-6-9-C
Screenshot.
Go all the way back down to the save cube, then go up through the unblocked door to the maze.
Maze
Go right to the Judge's room to speak with him.
Move back up to the main hub of the room.
To escape the maze, move Left, Up, Right, Right, Down, Left, Up, Up.
If you take a wrong turn, you'll be sent back to the Judge's room; simply return to the hub and start over to reach the exit.
When you exit the maze, loot the treasure chest on the right and use the red cube on the left to heal or save your game, then continue up through the door to Dedan's office.
Climb all the way up the stairs to find and battle Dedan.
After Dedan's defeat, you will be returned to The Nothingness.
From The Nothingness, move up and right then enter Zone 2.
Zone 2
Outer Area
At the starting area of zone 2 is a red cube where you can save your game.
From there, move up twice to the south side of the Library, then move left to the west side.
Go down the bottom path of the west side to reach the shore.
Talk to the man standing alone on the right.
Pay him 100 Credits to receive Page 33 in your inventory. If you check this page in your inventory, it's the 8 of Hearts.
Move right to return to the west side of the library, then go through the open door to enter the library.
Library
First Floor
Go all the way down and through the door at the bottom to reach the reception area.
Talk to the man standing behind the desk to gain access to the upper levels of the library.
Climb up either stairway to reach the second floor.
Second Floor
Around this area you can speak to the two men in the room and read some of the books in the bookcases.
Most the bookcases are false, but the bookcases are indicated by a light colored section of the floor in front of it.
Read the book in the left bookcase at the upper right corner of the room.
Inside the book is an image of all the cardinal directions and their corresponding arrows, identical to the symbols on the walls outside of the library.
Remember these symbols if you're ever confused while traveling around the Outer Area.
Go up the stairs to the Third Floor.
Third Floor
Go to the upper right room.
Inspect Page 33 (the page you purchased at the Outer Area) in your objects list.
Note that the pattern on the blotted page looks just like a playing card, specifically the 8 of hearts.
If you read the book in the bookcase at the upper right corner of the room, you'll see the page of the book is a 7 of hearts.
Insert Page 33 - 8 of Hearts from your inventory into the book.
Loot the chest at the lower right corner of the same room.
Move to the upper left room.
Take Page 33 - Queen of Spades in the middle of the wall to the left of the blocked doorway.
Go to the lower right room.
Read the book in the bookcase on the left side to view the left page with an ace of spades pattern.
Insert Page 33 - Queen of Spades into the book.
Take Page 33 - 3 of Clubs from the wall at the upper left corner of the room.
Go to the upper left room.
Read the book in the bookcase at the upper right corner of the room to view the left page with a 2 of clubs pattern.
Insert Page 33 - 3 of Clubs into the book.
Take Page 33 - 5 of Diamonds from the space in the wall between the two middle bookcases
Go to the lower left room.
Loot the chest in the middle of the top section of the room.
Read the book in the bookcase at the lower left side of the room to view the left page with a 4 of diamonds pattern.
Insert the 5 of Diamonds into the book.
Go back down to the First Floor.
First Floor
Speak with the man at the desk to let him know that all the pages are in order.
In return, he will give you access to the fourth floor.
Return to the Third Floor, then continue up through the door to reach the Fourth Floor.
Fourth Floor
At the middle of the stairs you can use the yellow cube to heal your party and save the game.
Continue up the stairs to reach the first room.
Speak with Japhet to engage him in combat.
After his defeat, pick up the white circle in the middle of the room for Add-On Omega to join your party.
Exit the Library to go back to the Outer Area.
Outer Area
Speak with the judge to the right of the exit.
Go left twice to reach the north side of the area (indicated by the two arrows pointing up), then go down and into the Shopping Mall.
Shopping Mall
First Floor
Speak with Zachary to view the item shop.
There is a yellow save cube here if you wish to heal your party or save your progress.
Continue through the door on the right and head down the stairs to the Second Floor.
Second Floor
Shopping Mall Map - Area 1
Go down, left, up, and left again to find a treasure chest.
Return to the entrance, then head right twice, down, right, and down to find a second treasure chest.
Go back to the entrance again and head down, left, down twice, left three times, up, and right to find the exit.
Between the two flights of stairs is another yellow cube where you can heal your party or save your progress.
Continue down the left stairs to the Third Floor.
Third Floor
Shopping Mall Map - Area 2
After you walk through the entrance door, head down, right, up twice, left twice, up, and right twice to find a room with a treasure chest containing the Monday special item inside.
From the chest room, go left twice, down, and right four times.
You should arrive at a doorway leading to a room with a lost man inside.
From there, go right, down, left twice, and down again to find a treasure chest.
Move back up, right three times, up twice, left three times, up, left twice, and up again to find another treasure chest.
Now go down, right five times, up, and left to reach the exit.
Speak with the Judge in the area between the stairs, then continue down the left stairs to return to the First Floor.
First Floor
Use the pedalo recovery point to the right of the door to call a pedalo.
Go out the door to the item shop, then exit to the Outer Area.
Outer Area
Go down to reach the north side, up to the west side, and then down again to return to the shore.
If you used the pedalo recovery point at the First Floor of the shopping mall, a pedalo should be waiting for you at the water's edge.
Ride the pedalo left to the open sea and continue heading left until you find a small island.
Land on the island and go down the stairs to discover a treasure chest.
Return to the pedalo and go right to reach the main island by the shore, then disembark and head down the stairs.
Continue forward and up to the end of the hall to reach the Park.
Park
Main Room
Pop the balloon in front of you to receive an item.
Continue up to the park entrance.
At the center of the main room is a yellow cube where you can heal your party and save your progress.
Go north to the Balloon Game Room.
Balloon Game Room
When you enter the room, the man at the booth will challenge you to a game.
The rules of the game are simple:
Each player takes turns popping 1, 2, or 3 balloons.
Whoever is left the last balloon loses.
The key to winning this game is to leave only 5 balloons for your opponent, whoever has the turn when there are only 5 balloons left is guaranteed to lose.
After you beat the man at the balloon game, he will attack you.
Defeat him in combat to receive a Necktie.
You will be automatically returned to the Main Room; continue right to the Plastic Pools.
Plastic Pools
Use the pedalo recover point at the right wall to call a pedalo in the plastic river.
Board the pedalo and try moving over the dark square in the middle of the water.
Note how the track point carries your pedalo along a controlled path in the water.
Move right to the main area of the plastic pools.
Plastic Pools Screenshot.
Hug the wall as you move right and then up to the first island at point A.
Land on the island and pop the balloon to find treasure, then board the pedalo.
Continue left, down, and up, being careful to avoid as many of the track points as possible until you reach the crossroads.
From here, move left and down to find the next island at point B.
Pop the balloon to find the treasure, then get back on the pedalo to move up and all the way right.
You will be carried just a little past the balloon at point C on the tracks.
Move one space to the right, then hug the wall as you move up, right, and down to the island at point C.
Pop the balloon to find the treasure, then get back on the pedalo and hug the wall up, left, and down to return to the point you were at a moment ago.
At this point it gets a little tricky; keep an eye out for the track points in the water.
Position yourself at point D and move up to ride the track to the wall at the back.
Move through the clear path in the water until you reach point E.
If you cross over the right track point, it will carry you only a few steps to the left.
Go through the clear path in the water, being careful to avoid track points, and down to the island at point F.
Pop the balloon to find the treasure, then move all the way up to touch the back wall.
Hug the wall left and down to the next crossroads, stopping at point G.
Move one space left and one space down to navigate safely around the track points in the water.
Go through the clear path in the water to the island at the upper left corner at point H.
Turn the switch OFF, then ride the pedalo to the bottom wall (but not into the exit on the right!).
Go through the clear path in the water to reach the last island at point I.
Pop the balloon to find the final treasure, then exit by moving to the wall at the lower right corner.
Land the pedalo back at the entrance, then leave the Park and return to the shore of the Outer Area.
Outer Area
Go right to reach the west side of the library.
Move up to the south side, then go up again to the east side.
Go down to find the residential area entrance.
Follow the path right to find a yellow cube where you can heal your party and save the game.
Wear the Necktie in your inventory from the Balloon Game Room.
The blockade in front of the north path will disappear.
Continue up to the Residential Area.
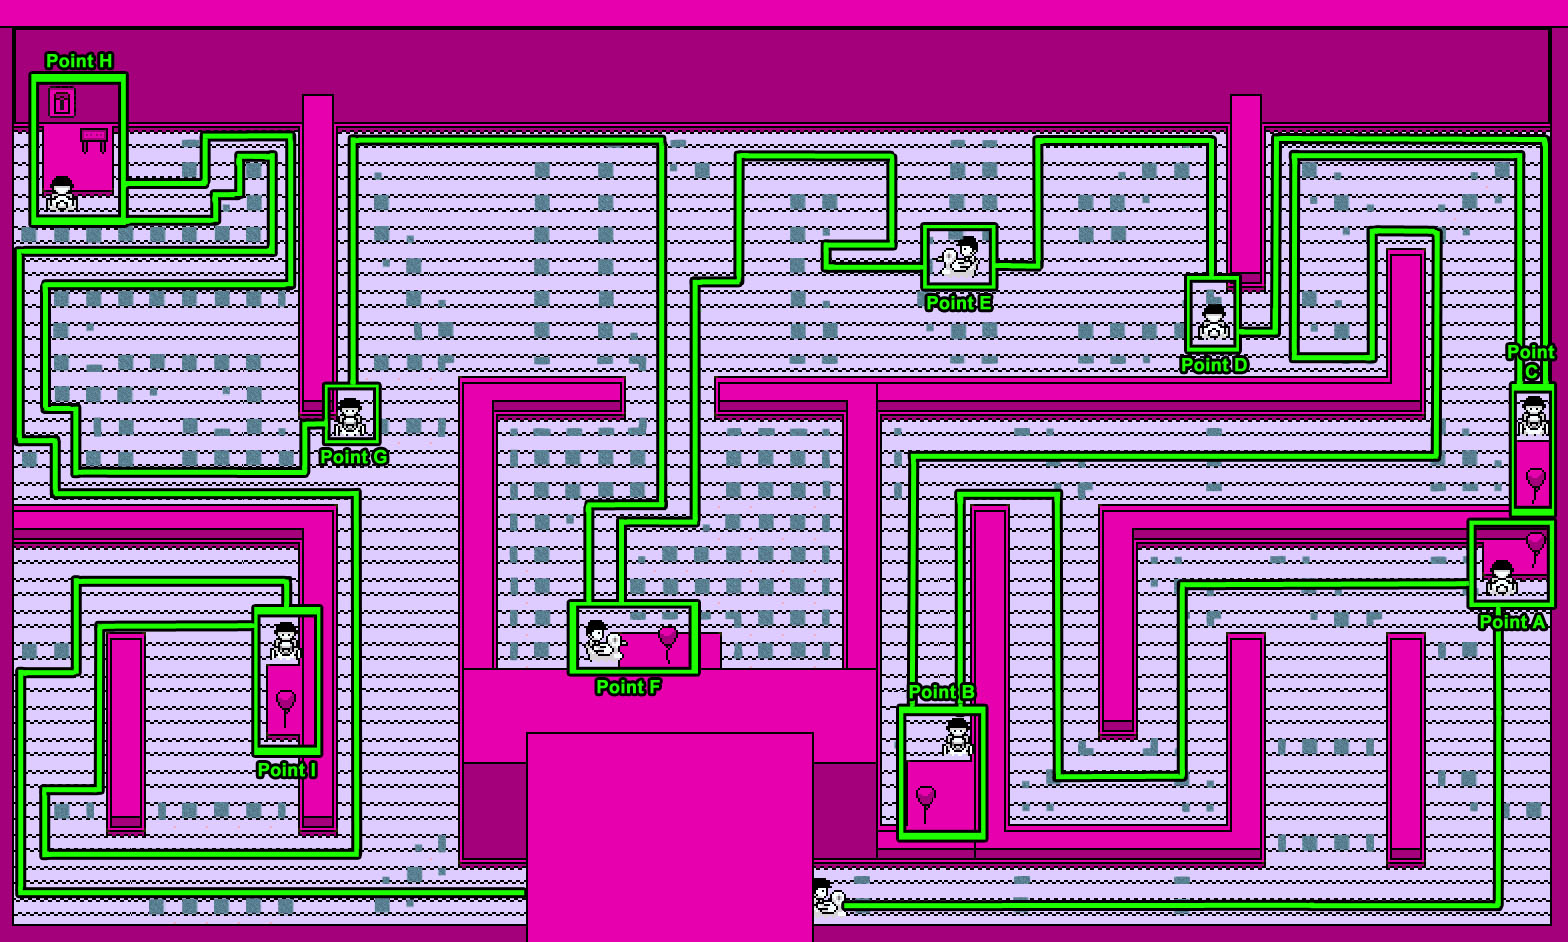
Residential Area
When you enter the zone, Japhet will spawn several ghosts around the town.
A four minute timer will count down while you explore the town.
The ghosts will move a few steps around, but will stay in the same general area. Refer to the screenshot below for their locations:
Screenshot.
Before you kill all the ghosts, head to the courtyard where you can find Ghosts 5 and 6, then go up the stairs and into the door on the left.
Enter Room 1 and ask the man hiding in the corner for the code to the southwest bunker, 1402.
Go to Vault 1 at the southwest corner of the town, just ahead of the entrance.
Enter in the code 1402 to open the door and go into the vault.
Attack the man who runs to the corner, then loot the treasure chest in the upper right corner.
Go to the fenced area by Ghost 3 at the southeast section of the town.
Talk to the panicking man to learn another vault code: 1805.
Go to Vault 2 at the northwest area of town and enter in the second code.
Enter the vault and loot the treasure chest at the lower right corner of the room.
Defeat any remaining ghosts, and you will be returned to the entrance outside.
Return to the Fourth Floor in the Library.
Library
Fourth Floor
Now that the Residential Area has been cleared, the path to the stairs at the back go the room is unblocked.
Go up the stairs to the Fifth Floor.
Fifth Floor
Read the book in the bookcase at the upper right corner of the room.
Note the numbers at the bottom of the left and right page, 1 and 4.
Continue left to the fifth floor balcony.
Go right and enter the next room through the door at the end of the balcony.
Read the book in the bookcase at the upper left corner.
Note the numbers at the bottom of the pages again, 2 and 9.
Move left to the lower left section of the room.
Read the book in the bookcase below the middle wall section.
Note the numbers at the bottom of the pages, 3 and 9.
Go to the upper left section of the room.
Read the book in the bookcase to the right of the door.
Note the numbers at the bottom of the pages, 4 and 7.
Move to the upper right section of the room.
Read the book in the bookcase at the top right corner.
Note the numbers at the bottom of the pages, 5 and 1.
Exit through the door near the upper left section of the room.
Go up the stairs to the landing between the two stairways.
Read the book in the right bookcase.
Note the numbers at the bottom of the pages, 6 and 6.
Continue up the stairs to the Sixth Floor.
Sixth Floor
Again, go up the stairs to the landing.
Read the book in the left bookcase this time.
Note the numbers at the bottom of the pages, 7 and 4.
Exit through the door on the right to the sixth floor balcony.
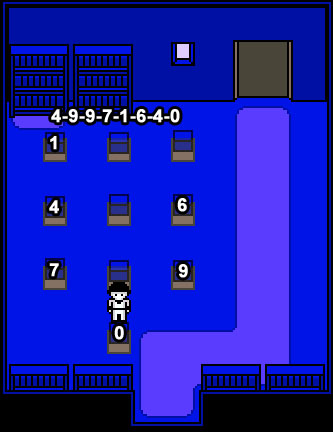
Go through the large door on the left to enter the floating blocks room.
Read the last book in the bookcase at the upper left corner of the room.
Note the numbers at the bottom of the pages, 8 and 0.
Hit the floating boxes in the correct order, using the clues from the eight books you've read.
The number on the left page refers to the sequence of the numbers (1 is first, 2 is second, 3 is third, etc.).
The number on the right page indicates which of the blocks should be hit.
Just like before, imagine the blocks are organized like the numbers on a key pad.
1 2 3
4 5 6
7 8 9
0
If you combine the information from all the pages, the correct order is:
4-9-9-7-1-6-4-0
Screenshot
After the puzzle is solved, exit through the unblocked door at the top of the room.
Continue up the stairs to the balcony of the Tower.
Tower
Use the red save cube at the upper left corner to heal your party and save your progress.
Speak with Zachary on the opposite end of the balcony to view the item shop.
Climb up the ladder to the top of the tower to start the boss encounter with Japhet.
After Japhet's defeat, you will be returned to The Nothingness.
Go down and press enter to travel to Zone 3.
Zone 3
Area 1
Entrance
Head up and enter through the door to the entrance of the factory.
Take the Stamped Note on the left side of the wall.
Go through the door on the left, then continue left to A-1.
A-1
You can use the Stamped Note in this room by pressing the shift key.
Pay attention to the series of numbers and their colors.
The key to traveling around this room is to move between the blocks in the correct order and the correct color.
If you make a misstep, you will be ambushed by a group of enemies and teleported back to the entrance.
Refer to the map below for a visual guide to safely travel around the room.
A-1 Map
Take the white path first to the door at the upper left corner of the room.
Start by moving left to the black 1 square.
Continue left and stop at the white 1 square.
Move up to the white 2 square.
Go left to the white 3 square.
Continue down between the two left tables to the white 4 square.
Go down to the right side of the crates at the white 5 square.
Move left to the left side of the crates at the white 6 square.
Travel all the way up to the corner of the upper left table at the white 7 square.
Go left to the wall and up to the white 8 square.
Move up the wall again and then right to the white 9 square.
Enter through the doorway directly above you to reach the West Dorms.
West Dorms
Walk down the end of the hall to start the cut scene.
After they kill the man, defeat the group of enemy spectres.
Move two rooms down to find a treasure chest.
Exit the dormitory to return to the start of the A-1 area (you can retrace your steps, or simply walk out of line for a quick battle to teleport you back to the start).
A-1
This time take the black path the door at the upper right corner of the room.
Just like before, stick to the correct path between the tiles, or you will be ambushed and teleported out.
Move left to the black 1 square.
Continue up to the black 2 square, just under the standing man.
Go left to the black 3 square below the far right table.
Move left and up around the corner of the table to the black 4 square.
Continue up to the black 5 square above the third chair.
Go right to the black 6 square beside the right wall.
Move up to the black 7 square below the right window.
Go left to the black 8 square, then go left and up through the doorway into the Kitchen.
Kitchen
Speak with Zachary, who is standing in the corner of the room.
Zachary will tell you your next destination, the East Dorms, and ask you to take the monorail to the Treatment Rooms of Area 2.
Exit the room, then retrace your steps to the black 5 square.
A-1
Continue left to the brown 6 square.
Move left and up to the brown 7 square.
Go left and down to the brown 8 square.
Move left to the brown 9 square.
Continue up to the brown 0 square, then go through the open door to the East Dorms.
East Dorms
Move up to the end of the hall.
Pick up the Add-On Epsilon to add it to your party.
Go right into the last room to find a treasure chest.
Exit the room and return to the Entrance, then continue through the right door to the monorail.
Enter the monorail and take it to Area 2.
Area 2
Outer Area
Exit the monorail and go up the stairs to the outer area.
Speak with Zachary to receive a free item.
If you enter the right building, you can find a yellow save cube and Zachary still in character as the Judge.
If you enter the middle building to see Zachary as himself and view the item shop.
Enter the left building to reach Treatment Room 1.
Treatment Room 1
Go to the three switches on the right side of the room.
Flip all three switches so that they are in the OFF position, which will unblock the single switch.
Go to the single switch on the left side of the room.
Turn that switch OFF as well.
Return to the three switches on the right side of the room.
Turn ON the right switch under the letter C to open access to Room 2.
Treatment Room 2
First flip the switch at the top right corner of the room.
Next, go to the switch at the top left corner of the room.
Turn the switch OFF to gain access to the treasure chest by the crates at the lower left corner of the room.
This switch also blocks or unblocks the exit door leading to Room 1.
Return to the switch at the upper right corner to activate it again, which will put 4 blocks in front of the top door.
Go to the switch in the middle of the room.
Hit the switch to unblock the path to the exit.
If you try to go through the door, the security test will ask for a passname.
Put in any incorrect answer to receive a clue, "Director's note: Pay attention to thugs".
Note that the silhouette in the clue looks identical to the enemies you've been fighting around the room.
Wander around the room until you engage in combat with one of the "thugs".
Use The Batter's "Wide Angle" competence ability while in combat to identify the mob's name.
Go back to the top exit door and enter the name into the security code.
Von Gacy
Go up into the Sugar Vault.
Sugar Vault
After the cut scene upon entering the room, the three workers will attack you.
Defeat them in combat to clear the room, and Zachary will enter to direct you to Area 3.
Before leaving, loot the treasure chest in the lower right corner of the room.
Fight your way out of the treatment plant to the Outer Area, then return to the monorail and ride it to Area 3.
Area 3
Factory Entrance
Leave the room and go up the stairs to the outer area of the factory.
Climb the ladder all the way up to the top of the tower.
Jump down into the hole to start the mini-game: Game of the Mortal Fall.
"Catch ten Add-Ons before the timer runs out so the Batter won't crash with a bloody noise.
Be careful about the phantoms! If you touch three of them, you lose. Press Enter to begin!"
Use the arrow keys to move around the pipe and collect 10 white rings, while avoiding phantoms.
You must be in the center of the ring before it expands to collect it.
The Add-On counter at the upper left corner will track your progress, as well as your health points.
If you can make it safely to the bottom, you will land at the Furnace.
Furnace
Go down the stairs into the sugar oven room.
Speak with the man in front of the oven, then return upstairs.
Jump into the hole in the wall to travel to the subway.
Subway
Approach the monorail to speak with Zachary.
Enter the monorail and select Area 4.
When the vehicle tops, exit through the door to go out onto the tracks.
Talk to the man blocking the train to engage him in combat.
After he is defeated, return inside the monorail and talk to Zachary again to travel to Area 4.
Area 4
Use the map below to navigate around the halls of Area 4:
Halls Map.
Entrance
Leave the room through the south door to reach the first room of Area 4.
You can save your progress and heal your party at the yellow cube, then head right to the East Area of the halls.
East Area
Move right to the second door, then open the door to go inside the Treasure Room.
Defeat the man inside the room, then loot the treasure chest to find a Music Box.
Leave the room and continue all the way to the right and then all the way down to find a second treasure chest.
Walk all the way up to the end of the hall to find the Shop.
Enter the room and speak with Zachary to view the item shop.
Return to the save cube at the Entrance, then continue left to the West Area.
West Area
Go left past the first two doors, then open the third door to enter Room 2.
Move to the right side of the desk and push it through the wall.
Exit the room, then go left and open the fourth door to enter Room 1.
Read the paper on the desk to view an "important clue".
Note that there are four X's and beside each X is a character's name with the first letter highlighted in red.
The top X is Zacharie, the right X is The Batter, the bottom X is The Director, and the left X is The Judge.
Exit Room 2, then go right and down the hallway.
Avoid or defeat the man patrolling the hall, then open the first door on the left to reach the Stairs.
Go down all the flights of stairs to find Zachary in character as the Judge.
Do not give him your Music Box in exchange for the clue; instead, I will give it to you for free!
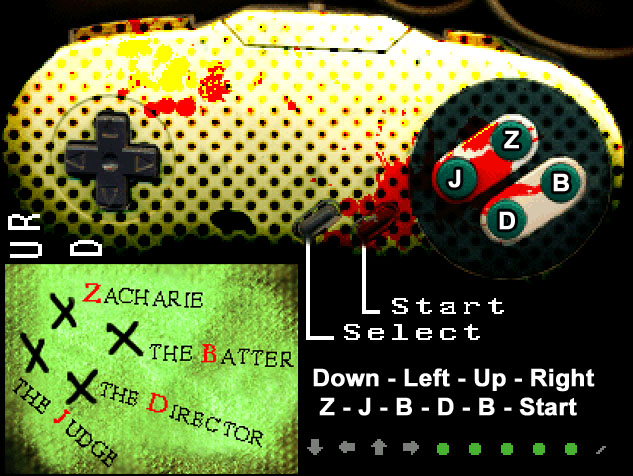
"In the game folder, your browser will find the file 'Read me'. Its name is not innocent, I'd suggest an active, assiduous reading."
Leave the room and go three doors left.
Open the door to enter the Friday Room.
Approach the blank space at the top of the room to hit an invisible wall.
Press enter or spacebar to open the invisible chest and receive the Friday card, an equipable Special item.
Return to the save cube at the Entrance, then continue right to the East Area.
East Area
Go up to the top of the hallway.
Open the door to enter the Password Room.
Walk to the left side of the room and inspect the game controller on the table.
This is point where Zachary's clue is needed
Open the READ ME.txt in the game's folder.
Scroll down to the 5th question of the FAQ to find the secret code: Down - Left - Up - Right - Z - J - B - D - B - Start.
Use the note from Room 1 to determine which of the four green buttons are Z, J, B, and D.
Solution.
If the code is entered correctly, you will gain access to the lower levels.
Exit the room and go left to the next area, then head down the now-unblocked stairs to the Enoch's Floor.
Enoch's Floor
Head right to the end of the hallway and into the floating blocks room.
Read the combination of numbers written on the wall and hit the boxes in the correct order to open the doorway.
This twist to this puzzle is that the floating blocks are now arranged upside down.
Thus, the order of the blocks now looks like this:
C
9 8 7
6 5 4
3 2 1
With that in mind, enter in the combination: 5-3-6-2-5-8-C.
Solution.
Go through the open door to the next room.
Use the red cube in this room to save the game and heal your party if necessary.
Continue forward, then navigate to the end of the two platforms to reach the Enoch's room.
When you approach the Enoch for the first encounter, he will be at full power and impossible to defeat.
Select "Attack" and wait for The Batter's turn, then choose to Flee.
Attempts to flee may fail at first, but repeat it and eventually you will escape outside the room.
After you take a step, the Enoch will appear and chase after you.
Run down to the bottom of the platform, taking as few turns as possible to maintain your distance.
If he catches you before you can escape, simply Flee from him in battle and run away again.
Return through the purified halls to the monorail station for the final encounter with Enoch.
To get there, go left and up the stairs, then go left again and all the way around the white halls to the exit door on the right; exit through the door at the top of the stairs to reach the monorail.
After the boss is defeated, you will be returned to The Nothingness.
While you now have access to The Room, you can also travel to the four purified Zones.
Posted by: Trinn |
June 9, 2012 6:04 PM
|
June 9, 2012 6:04 PM
OFF Walkthrough Part 2 (Purified Zones and The Room)
The Purified Zones
Purified Zone 1
"???" Station
At the start of the purified zone is a red save cube where you can heal your party, save your progress, or return to the Nothingness.
Enemies in the purified areas are much stronger, so be sure to save and heal often.
The layout of purified zones is also often changed, so exploring familiar areas may lead to new results.
Go up to reach the train tracks, then follow the tracks left to find a treasure chest.
Follow the tracks back to the middle and continue right to the next station.
Damien Station
Go down and right to find the stairs leading into the underground mines.
Continue right and up to find a yellow save cube and a treasure chest.
Go down and left to find a treasure chest.
Walk up and right, then up and right again to find a second treasure chest.
Go all the way down to the bottom of the long vertical hall, then all the way left to find a treasure chest in the hidden room.
Go right, up, and right again to reach the exit to the surface of the Barns.
Barns
Push the stones out of the way at the entrance.
Move the stones at the top of the right path to find a treasure chest.
Go to the fenced off building at the left and move away the stones to reach the entrance.
Push the lower right stone two times to the left.
Push the upper right stone up once.
Push the upper left stone left once.
Go through the open door into the room to find a red save cube.
Exit through the door at the top of the room, then move away the stones to get back to the path.
Take the road up to station, then follow the tracks right to the Postal Service Building.
Postal Service Building
Go down and left to find the entrance to the building.
Walk to the back of the room to find a treasure chest.
Return to the station and follow the tracks right to Alma Station.
Alma Station
Enter the building via the door on the right.
Exit through the back door and follow the road up to find a yellow save cube and a treasure chest.
Move right to the east waterfall to find a pedalo station and use it to call for a pedalo.
Go back to the middle area, then continue left to board the pedalo at the end of the platform.
Ride the pedalo left and up the west waterfall.
When you reach the top of the waterfall, go right until you find a building between two small waterfalls.
Land the pedalo and go through the open door to discover a red save cube and two treasure chests.
In the right treasure chest is The Grand Finale, the element of Plastic.
Use the red cube to return to The Nothingness and travel to the Purified Zone 2.
Purified Zone 2
Outer Area
At the start of the purified zone is a red save cube where you can heal your party, save your progress, or return to the Nothingness.
Follow the path up to the south side of the library building, then continue left to the west side.
Go down to reach the shore, then walk left and down the stairs.
Travel through the tunnel and around the fenced area to find a treasure chest.
Return to the south side of the library and move through the door to go inside.
Library
Climb the stairs all the way to the very top floor to find another treasure chest.
You can walk back down to the south entrance of the library, or use the red save cube to teleport to the start of the zone and walk back from there.
From the south entrance, go into the library and take the door to the left into the hall.
Walk down to the end of the hall, then exit through the door in the middle of the back wall to reach the shopping mall at the north side of the building.
Shopping Mall
In the first room of the shop is a yellow cube where you can heal your party or save your progress.
Go through the door on the right, then continue through the next door on the left into the cat room.
Loot the chest in the middle of the room then go back down the stairs on the left.
Continue through the right door to enter the maze.
Take Path 1 to find the first treasure chest:
Right, down, left twice, up, left twice, up.
From there, take Path 2 to the second treasure chest:
Down, right twice, down, right twice, up, right, down twice, right, down, left twice, up.
Finally, take Path 3 all the way to the exit.
Down, right twice, up, left, up twice, right, down, right, down three times, left twice, down, left, up, left three times, down, and right.
Go through the door to exit to the hall.
There is a yellow cube here where you can heal your party or save your progress.
Go down the hall and up the stairs into the vault.
Exit through the door at the bottom of the room to reach the Residential Area.
Residential Area
From the entrance at the northwest vault, go right and continue down two flights of stairs.
Follow the left wall just above the third flight of stairs to find the open door to another room.
Enter the room and note the four digit number written on the wall: 1709.
Go back outside to the third flight of stairs; from there follow the road and go:
Down, left, down, right, down, right, and up.
You should stop at an open door in the middle of the southern part of town.
Enter the room and go out the door to the left, then climb up the ladder onto the roof to find a treasure chest.
Go back out to the street and move right to reach the vault in the southeast part of town.
Use the code 1709 to open the vault door and go inside.
Go down the stairs to find a red cube and two treasure chests.
Open the right treasure chest to find The Grand Diagonal, the element of Metal (2/5).
Use the red cube to travel back to The Nothingness and into the Purified Zone 3.
Purified Zone 3
Area 1
Go up into the building and through the left door into Area 1.
Enter the right door at the back of the room to find a treasure chest.
Go back out and move left to the door at the upper left corner of the room.
Enter the room and walk through the door at the back of the room to Area 2.
Area 2
Move up, right, and then down to enter the monorail station.
Go down the stairs and through the right door to find a treasure chest.
Exit the building and go through the open door on the left into the first treatment room.
Move through the door in the upper right corner to reach the second treatment room.
Next, go through the door at the top left corner to enter the sugar room.
Loot the treasure chest in the upper right corner.
Exit through the door at the middle of the back wall.
Go up and right to Area 3.
Area 3
Go up and right to the base of the tower.
Climb the ladder all the way to the top, then jump down the hole into the furnace.
After you land at the bottom, jump through another hole in the middle of the wall.
This time, you will land by a red save cube at a monorail station.
Enter the monorail and travel to the only destination, "???".
When you arrive at the next station, leave the room to enter Area 4.
Area 4
Go left to the west halls area.
Move down and then left to the very end of the hall to find a treasure chest.
Return to the entrance to the west hall, then go left, up, and right all the way to the second-to-last door.
Open the door to find a treasure chest.
Go right to the upper room between the two halls, then go down the stairs.
Continue right down the end of the hall to the room with a yellow save cube.
Exit through the door at the lower right to enter The White Room.
The White Room
The White room is a big open area that infinitely loops around unless you move in the right direction.
Starting at the door, head to the lower right corner of the room in a diagonal line.
Eventually, you will come to another small room with a closed door.
Go inside the room to find a red save cube and two treasure chests.
Open the right chest to find The Grand Spectral, the element of Smoke (3/5).
Use the red cube to return to The Nothingness, then travel to the Purified Zone 0.
Purified Zone 0
Walk up and through the open door into the middle building (with the numbers written on the wall).
Go down the stairs in the middle of the floor, then through the door at the end of the hall to enter the sugar room.
When you enter the room you will begin the encounter with Sugar, a very powerful boss.
After she is defeated, you will receive The Grand Chocolatier, the Sugar element (4/5).
Exit the building and go into the right room to find Zachary's item shop.
Continue through the door at the back of the room and up to the red save cube.
Return to The Nothingness, then enter The Room.
The Room
Chapter 5 - The Room
Walk up and through the door at the end of the hall into the main room.
Go through the door on the left into the bedroom.
Inspect the calendar pages on the back wall.
Exit the room, then go through the door at the lower right to be teleported back into the bedroom.
This time, read the note on the back wall, then exit the room to be transported back to the red cube at the starting area.
Go up to the hallway to attack the incoming horde of teddy bears.
After they're defeated, continue up to the main room, then re-enter the bedroom.
Exit through the new door at the back of the room to enter the drawn hallway.
The hallway is just an endless loop, so you can simply go back through the exit to teleport back to the red cube at the starting area.
Exit through the north door to end the chapter.
Chapter 4 - I Had Three Friends
The Room
Go up the hallway into the main room, then through the left door into the bedroom.
Exit out the door at the back of the bedroom.
Walk through the door at the end of the hallway to view the drawn map.
Move the arrow over the west red circle to travel to the Tall Mister.
Tall Mister
Go through the open door to enter the cabin.
Speak with Dedan, and he'll ask you find the date for him.
Leave the area to return to the drawn map.
Move the arrow over the east red circle to travel to the Big Mister.
Big Mister
Talk to Enoch, stuck in the hole. He'll ask you to find someone who can help pull him out.
Leave the area to return to the drawn map.
Move the arrow over the north red circle to travel to The Room.
The Room
Go down the hall and into the bedroom.
Take the calendar sheet from the wall.
Exit the bedroom through the top door, then go up the hall to return to the drawn map.
Move the arrow over the west red circle to return to the Tall Mister.
Tall Mister
Go through the open door to enter the cabin.
Show the calendar page from the bedroom to Dedan.
In return, he'll give you a book with an unreadable cover.
Leave the cabin and go down the road at the bottom to return to the drawn map.
Move the arrow over the north red circle to travel to The Bird.
The Bird
Walk to the end of the cliff and speak with Japhet.
Give Japhet the book from Dedan, and in exchange he'll agree to help you.
Go down to return to the drawn map.
Move the arrow over the west red circle to return to the Tall Mister.
Tall Mister
Go through the open door to enter the cabin.
After speaking with the characters, leave the area to return to the drawn map.
Move the arrow over the sun in the upper right corner.
Travel to "Mama" to end the chapter.
Chapter 3 - The World in a Window
At the start of the chapter, you will be presented with a false menu screen.
Hit Continue to "load" the first save block at the top to travel to Block 1.
Block 1
Walk up the hall into the main room.
Avoid the red spots on the ground that will damage your team.
Go into the bedroom through the large door in the middle.
If you didn't already give it to Zachary, use the Music Box from your inventory in this room to reveal a hidden treasure chest.
Open the chest to find a Perfect Symbol.
Exit to the main room, then continue through the next door on the bottom left.
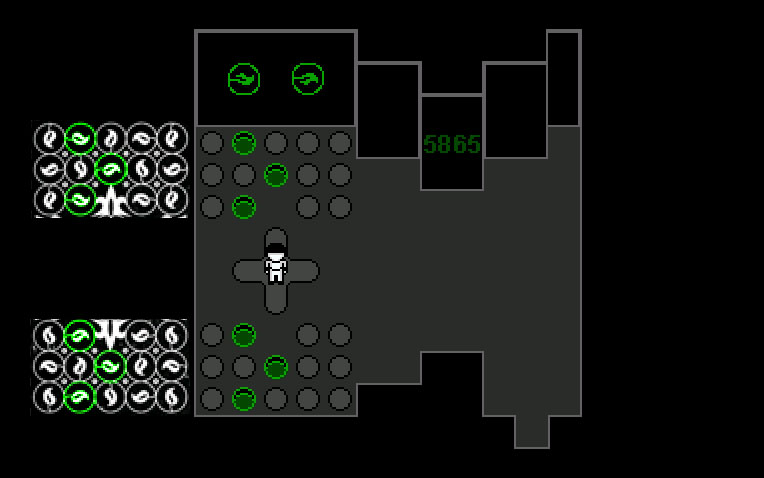
Move to the center of the platform to talk to the giant.
Four large numbers (8946) will appear in the middle of the screen: simply repeat them to the giant when he asks for a "random number".
Enter the next room through the door on the right.
At the top of the room is a ball in the upper left corner, a series of crates, and a hole at the bottom of the rectangle.
In the middle of the room are nine cross symbols.
When you walk on top of the cross symbols, the ball will follow the direction of your movement.
Walking up will move the box up, walking right will move the ball right, etc.
The ball will stop if it hits a barrier like a crate or one of the walls of the rectangle.
Use your movements on the crosses to direct the ball into the hole.
Move down, right three times, up, right twice, down three times, and then left.
After the ball lands in the hole, note the four numbers along the back wall, 3755.
Go back to the main room and then out through the door at the upper right corner.
In the following rooms, you will be asked a series of questions that you will have only one chance to answer correctly (go back to the red save cube at the start just in case!).
Talk to the man in the room for the first question.
Question 1: What day is it today?
Answer: Sunday the 18th of March
If you answer correctly, you will receive a Mysterious Symbol.
Continue out the left door then into the next room on the left.
Talk to the man for the second question.
Question 2: Which station can I find metal in the stomach of cattle at?
Answer: Pentel
If you answer correctly, will receive an Aura of Power.
Leave the room then continue up and to the next room on the right.
Talk to the man for the third question.
Question 3: Which of these books cannot be read at the library?
Answer: Directions
If you answer correctly, you will receive The Eighth Colour.
Exit the room and continue up to the end of the hall.
In the middle of the back wall are two leaves inside a circle pointing to the right and an object in between them.
Inspect the object on the wall to view the design on the back of a playing card.
Note the rows of leaves inside the circles identical to the ones on the wall.
Remember the positions of the leaves that point to the right in each row.
Go left to enter the next room.
Talk to the man in the center of the room for the final question.
Question 4: Can you give me the secret code to the warehouse?
Answer: Von Gacy
If you answer correctly, you will receive a Bleeding Symbol.
Go all the way back to the save point at the start of the level.
Exit back through the door to view the false menu screen again, then load Block 2.
Block 2
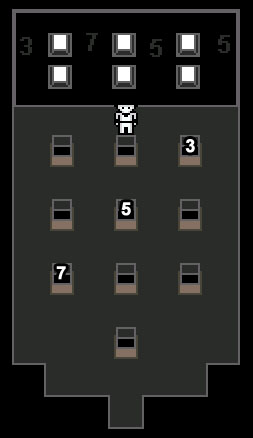
Go down the hall of shadowy men into the main room, then continue up through the door at the top right corner.
On the left side of this room are rows of floor tiles identical to the card pattern and the leaf symbols seen back at the Load Slot 1 area.
Push the buttons on the floor that are in the same position as the right-pointing leaves on the back of the card.
You must be standing directly on top of the button you want to push down.
If you make a mistake, simply exit and then re-enter the room to reset the tiles.
Solution.
If the buttons are pushed correctly, a hidden number will appear on the middle wall.
Return to the save room, then exit back through the door to return to Block 1.
Block 1
Go back to the main room and through the lower left door to return to the giant.
Tell the giant the number you found on the wall by pushing the buttons at Block 2
5865
If you give him the correct code, you will receive the Sagittarius Card.
Return to the save room, then exit back through the door to view the false main menu and load Block 3.
Block 3
Walk up the hall into the main room.
Continue through the door at the upper right corner.
Go up the next hall and through the door to reach a room full of floating blocks
Imagine the blocks are positioned like the numbers on a key pad like so:
1 2 3
4 5 6
7 8 9
0
Hit the blocks in the order of the numbers found after solving the rolling ball puzzle at Block 1.
3-7-5-5
Solution.
Exit the room and go all the way down the hall to return to the save zone.
Go back up through the door to end the chapter.
Chapter 2 - Boxxer's Adventures
Main Room
Go up the hall and into the main room.
Enter the bedroom through the large door to the left.
Read the comic book lying in the middle of the floor to start the minigame.
Panic in Ballville
Follow the road to the right three times.
Use the arrow keys to direct Boxxer and avoid the incoming Ballman clones.
Boxxer will go into combat with any clone that runs into him.
When you reach the end, the final battle with the clone army will begin.
Use the Boxx Bomb competence ability to wipe out all the enemies simultaneously.
Exit the room to return to the final save point (this is the last time you can save in the game!).
Speak with Zachary and view the items from his shop.
Purchase the Grand Brachial, the Meat element (5/5), at the bottom of the list.
Use the red cube to return to The Nothingness, then travel to Zone 0.
Zone 0
Go up and into the right building.
Speak with Zachary if you've collected all five secret elements.
Accept his offer for a rare object and choose between two items: the Ashley Bat (the strongest weapon for the Batter) the Aries Card (which allows you to view the 3rd ending).
Make your choice, then go up to the red save cube and travel to The Nothingness.
Teleport to The Room, then exit through the door at the top to reach Chapter 1.
Chapter 1 - The Queen
Go up the hall and exit through the door at the end.
Continue up the stairs to the Queen's platform to start the boss encounter.
After her defeat, exit the room to end the chapter.
Chapter 0 - The Batter
Go down the hall into the main room.
Enter the bedroom through the door to the left.
Approach the child to start the boss encounter.
After the child is defeated, the room will be cleared.
Exit through the door at the top, then continue up the hallway.
When you reach the room at the end of the hall, you will be approached by The Judge.
At this point, you will have a choice between two endings: The Batter Official Ending or The Judge Special Ending.
Make your choice to start the final battle.
Posted by: Trinn |
June 11, 2012 12:36 PM
|
June 11, 2012 12:36 PM