
Phantasmaburbia
Platform: Windows

![]() You know what the worst part of dealing with ghosts is? It's not how scary they are or how they keep you up all night with their anguished moaning. No, the worst part is the ectoplasm. That stuff gets all over everything. If you don't want all your worldly possessions covered in slime, you might just want to ghostbust by proxy in Phantasmaburbia, an RPG by Greg Lobanov, creator of Dubloon, Assassin Blue, and a variety of other titles.
You know what the worst part of dealing with ghosts is? It's not how scary they are or how they keep you up all night with their anguished moaning. No, the worst part is the ectoplasm. That stuff gets all over everything. If you don't want all your worldly possessions covered in slime, you might just want to ghostbust by proxy in Phantasmaburbia, an RPG by Greg Lobanov, creator of Dubloon, Assassin Blue, and a variety of other titles.
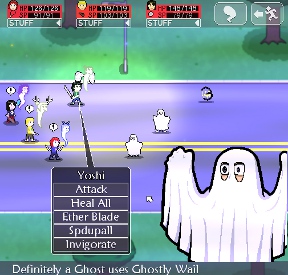 Phantasmaburbia stars four kids and their spirit companions who are tasked with saving the town of Owl Creek from an extradimensional invader. Much of your time will be spent running around exploring ghostly locations and finding goodies using a top-down view. When you encounter a roaming enemy, you'll use your mouse to battle ghosts, spirits and demons using a battle system styled after the ATB combat seen the Final Fantasy series.
The battle system is simultaneously simple and complex — you can succeed through grinding and brute force, yes, but smart play will get you further with fewer issues. There's also an action element at play during combat: several of your characters' attacks and many enemy attacks involve short mini-games to enhance or reduce damage, so you'll need to stay on your toes. There's an elemental system, stat buffs and debuffs and other nuances to consider as well, but things stay quick and snappy and battles rarely feel like a slog. Since enemies are clearly visible while exploring, it's even possible to avoid confrontation altogether if you're not feeling up to it.
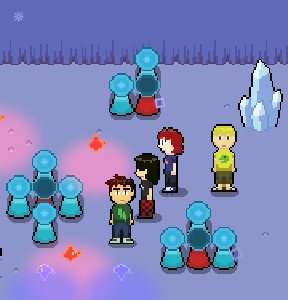
Battle's not all that's going on here, though. Each spirit companion has a unique ghost power, ranging from telekinesis to possession, and you'll put these to work solving puzzles throughout the game. While they're not a walk in the park, pains were clearly taken to keep the puzzles from becoming overwhelming as well. It's not uncommon to walk into a room that seems painfully complex at first glance but which turns out to be fairly simple upon closer examination. There's a definite balance struck between difficulty and accessibility where you'll never find yourself stuck for days in a single room because you just can't figure it out.
 Analysis: The presentation of Phantasmaburbia is fantastic. Everything's got an endearing Saturday morning cartoon style and the spooky music suits the action, while the writing was clearly inspired by classic games like EarthBound. The enemy designs are great as well — you'll fight everything from a standard white ghost to a "standard" man in a white ghost costume (dubbed "Definitely A Ghost") to elementally supercharged animals. Battle animations are simple but functional as well. You won't see any hour-long spells here, but there's also more going on than colored blobs flying around.
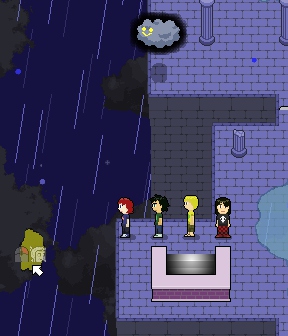
The plot helps reinforce that Saturday morning feel as well. This isn't a horror game, but things are just surreal and spooky enough to stay true to the setting and keep the proceedings interesting. Our heroes and their spirit companions are believable and interesting; nobody grates on the player and nobody steals the show from the rest of the cast at the expense of everyone else. Perhaps the best aspect of the plot is that it's not really forced down your throat. Cutscenes are frequent but never turn into endless, snore-inducing walls of text. You're told what you need to be told, given an idea of where to go next, offered a taste of plot if you want it and allowed to enjoy the game on your terms.
 The most enjoyable aspect of Phantasmaburbia, and perhaps its most surprising, is the game's depth. This is a game that doesn't go the increasingly popular indie route of relying solely on nostalgia to sell itself; you're getting value for your money here. For instance, the second act of the game involves exploring a variety of dungeons based on the game's elemental pairings. When you go through a dungeon, its opposite is closed off. It's entirely possible to replay the game and see the other dungeons, which feature substantially different structures, enemies and puzzles. This sort of feature, combined with the game's various optional side quests and collection quests, go a long way to keep the game fresh. The first playthrough will likely last around 9 hours and there's a good chance you'll want to play again to see what you missed.
All in all, Phantasmaburbia is a pleasant surprise. The name of the game during development was clearly "fun"; Banov has taken the Japanese-style RPG and strained out the bits that simply don't add fun to the genre like random battles, painfully difficult puzzles and agonizing walls of incomprehensible plot. What we're left with is the essence of a great game. It's fun, it's deep and it's a game that anyone would do well to try, even those who aren't necessarily RPG fans.
![]() Windows:
Windows:
Download the demo
Get the full version
![]() Mac OS X:
Mac OS X:
Coming soon!
Try Boot Camp or Parallels or CrossOver Games.


Walkthrough Guide
(Please allow page to fully load for spoiler tags to be functional.)
Phantasmaburbia walkthrough
Yoshi Intro:
When the game starts, you'll need to name the main character. You can input your own name or select Don't Care, which will cycle through several names. We'll refer to him as Yoshi, the first default name.
After entering a name, you'll take control of Yoshi. Head two rooms east and get the Katana off the wall, then head downstairs and one room north, where you can grab a First Aid Kit. These heal all your HP at once - save them, as you'd much rather use them later in the game when you've got a lot more HP that needs healing!
Head back south from the kitchen, then one room east. You'll fight your first battle against a Small Spirit and meet Yoshi's ancestor Moshi, who will enable you to fight against ghosts. The Small Spirit won't fight back, so you'll easily win and reach Level 2.
There's lots of exposition next - talk to Moshi, then grab the ringing phone, then head back out one room west, then south to go outside. More exposition here. Once it's over, hit the Save Point in the driveway and note how the garage light comes on when you get near; isn't attention to detail great?
You're heading east now. There are more ghosts, like Small Spirits, Wisps and Roadents on the way that you should take the time to fight. None of them are especially dangerous thanks to their tendency to skip their own turn, and at Level 3 Yoshi learns Heal Lite, which will be vital for tougher battles. Make sure you grab the collectible Roaming Spirit one screen east of Yoshi's house as well.
Two screens east, you'll see a large ghost guarding a Spirit Tunnel. This is your first boss fight, and you'll want to be at least level 4 for it.
Boss: Shade
Unlike your previous opponents, the Shade actually poses a threat, so you'll want to keep an eye on your HP and use Heal Lite as necessary. It uses basic attacks and Dark Shot, both of which do around 6-8 damage.
You'll learn to summon Moshi during this battle. This ability is free and heals you while damaging the enemies, but it takes awhile to charge and isn't any more effective than regular attacks even if you do well at the minigame. The Shade will skip turns every so often, but this isn't something you should count on. If you're Level 4, you shouldn't need to use your First Aid Kit, so save it for later.
Spirit Tunnel 1:
You'll learn how to use Moshi on the field here: just right-click on a rock to break it. Break the rock to your east and fight the new enemies if you'd like. The Fears will buff other enemies' defense with Defup, but it's not very effective, so don't worry about it. Angers are a little more dangerous since they'll buff attack power with Powup, so prioritize them in combat. If you've been levelling diligently Yoshi can reach Level 6 here and learn Soul cut, which...isn't actually that great since it uses up SP you could be using for Heal Lite.
The path is straightforward, but make sure to take all the enemies out and grab the First Aid Kit and Shark Tooth from the chests. The Shark Tooth counterattacks enemy physicals, so be sure to equip it. You'll bust a rock to open a light bridge, which leads to a save point and stairs down. When you go down, Yoshi and Moshi will come across the most powerful spirit yet...
Sophie Intro:
We switch to a new heroine, whose name is Sophie by default. Step out of Sophie's room into the hall and head into the door to the west. Open the glowing box on the west wall to get the baseball bat. Head back to Sophie's room for some exposition, then head back out into the hallway and go downstairs. The north door has a First Aid Kit, so grab it and then head outside for another scene.
Sophie's spirit doesn't remember what it is; to help it, you'll have to take out the enemies in the area around Sophie's house. There are Shadlings and Catdavers around, both of which die in a couple bat swings. Catdavers can buff their speed, but it doesn't help them much. There are also Spooklights around that will zap you with Light Shot, so watch out for them.
Sophie's your physical attacker and as such can't heal herself like Yoshi can; you'll want to be careful and take advantage of the healing from Save Points to avoid wasting First Aid Kits. At level 3 Sophie learns Cirghoul, which you'll need for the upcoming boss. Try to reach level 4 or so, then head south one screen and east one screen from Sophie's house to find the entrance to a Spirit Tunnel. The entrance is guarded by another boss, though.
Boss: Mischite (x4)
This is much easier than Yoshi's boss. The Mischites outnumber you 4 to 1, but they tend to waste turns switching places with each other, not to mention you're much more powerful than they are and they're arranged perfectly so that you can hit three at once with Cirghoul. You'll also learn Sophie's summon here. It features a more difficult minigame than Yoshi's summon, but debuffs the enemies as well as doing damage, which will come in handy. Once you've won, head down to the Spirit Tunnel.
Spirit Tunnel 2:
After some exposition, Sophie's spirit will explain how to possess animals. This is handy for hitting switches - try it now with the rabbit. The enemies in this Spirit Tunnel are tough. You'll run into some new enemies here, the worst of which is the Ghoulutton. This monster will eat other spirits to heal itself, so it's best to take them out before it can do so instead of wasting effort doing damage that will just be healed anyway.
Use the rabbit to hit the switch, then head east across the resulting bridge. Continue east and defeat the enemy to reach a box with some SP-restoring Chocolate. Afterwards, head south, then possess the deer across the pit and use it to hit the switch to make another bridge. There's a couple enemies and a save point here, so feel free to partake then possess the deer again and use it to hit the south switch. Head south across the new bridge, stand on the switch, then possess the rabbit across the southern pit and have it take your place on the switch so you can head down yet again.
More switch madness! Stand on the west switch, possess the rabbit across the west pit and bring it over, step off the switch and walk to where the rabbit was, then set the rabbit on the switch. Cross over, defeat the enemy and get the Lost Doll, an accessory which gives a nice +5 Max HP. Head back to the central island, then stand on the east switch. Have the rabbit cross the bridge and stand on the switch. This will create a bridge for you to walk across; if the enemy tries to cross the southern bridge, step off the switch you're on to instantly kill it!
Head east across the bridge for even more fun with switches. Stand the rabbit and deer in the central area on the two west switches. Head north to the northwest island. Next, hit the two south switches and walk to the end of the bridge, then move an animal from the lower left switch to the upper right and walk to the northeast island. Stand on the switch, then move an animal from the upper right switch to the upper left. Have an animal walk across the resulting bridge to the northeast island, then have the other animal stand on the lower left switch. Have the animal at the northwest island cross the bridge to the northeast and switch places on the switch with Sophie. Put an animal on the upper left switch. Finally, have Sophie head south. Whew!
There's a save point here. Use it, make sure Sophie's around level 7 and engage the boss guarding the staircase...
Boss: Straybark
Straybark uses several attacks. It's got a basic tendril attack that doesn't do significant damage. It can also use a multi-tendril attack where you play a minigame; if you're successful at keeping the tendrils away you don't take any damage. Finally, it can summon Life Sprouts and Death Sprouts. These don't have many HP, but if you let them live, they'll heal Straybark or do damage to Sophie. To win, just focus on beating Straybark down with damage. Don't bother using Powdown: it doesn't last very long and isn't hugely effective anyway. Instead, save your HP for using Cirghoul when Straybark summons Sprouts to both kill the Sprouts and harm the boss. Continue with this pattern, and you shouldn't even need to heal before Straybark goes down.
Head up the stairs after beating Straybark and you're done with Sophie for now...
Pat Intro:
When you're put in control of Pat, head to the southwest and get the Lucky Game out of the console. Head west into the hallway, then into the first door to the north. Continue north into the closet and get the gun from the shoebox, then head back out to the hall.
After some exposition, you'll meet Pat's spirit White Owl. You can explore the rest of the top floor if you want, but there's nothing there. Instead, head downstairs. You'll fight your first battle with Pat there; note his hilarious normal attack which involves throwing his gun at the enemies! After finishing, use the save point, then head one room north. You'll find the entrance to a Spirit Tunnel. Grab the First Aid Kit on the counter before you go.
Spirit Tunnel 3:
You're introduced to White Owl's skill here - it's telekinesis, or TK, and revealing invisible objects. This tunnel's full of weaker enemies like Catdavers. They aren't very difficult to deal with, but Pat's fragile, so stay near a save point until you've gotten some levels. Also, make sure to equip the Lucky Game you picked up earlier for a Luck boost. You'll want to stack Pat up with lots of Luck since he's your spellcaster.
Use telekinesis to put the pot on the switch, then cross to the north island. Grab the pot again with telekinesis and swing it around to the right of the island you're standing on to find a bridge heading further north. There are more enemies to deal with, but at level 3 Pat learns Ghostnade, which does impressive damage to all enemies in the battle. It'll help you deal with the stuff in here.
At the end of the north path you'll hit another save point. Use telekinesis to the west to find path to the island, which has a first aid kit. Then use it to the west.
Time for a puzzle! TK the pot to the upper right button, then cross west. TK it onto the lower left button, then head south, then TK it onto the lower right button and head south again to find a Mirror. This is similar to the Shark Tooth, but works on magic attacks.
Once you've got it, head back north. TK the pot to the lower left switch, head north, TK it to the lower right switch, head north again, TK it to the lower left and head west, TK it to the upper right and head south, then TK is to the upper left and head west.
TK the pot off the switch here and follow the bridge west. Use the save point, then TK the pot over to the island you're standing on. Use TK to reveal a path south - follow it, bringing the pot along. Set the pot on the lower right switch, then head to the end of the bridge to find another pot to TK. Bring it back and put both pots on the left switches, then head west across the resulting bridge.
Bring the pots over with you and put one on the switch. Use TK to reveal a path north to the chest - stand on it, move the pot off the switch, then go up and grab the chest to get a First Aid Kit. Head back to the bridge intersection and put the pot back on the switch, then head west. Look familiar? You're where Sophie just was! Use the save point, then use TK to the west to reveal a bridge leading to the map for this area and another island. Make sure Pat is at Level 6, grinding a bit if necessary, then equip the Mirror and use the staircase down...
Boss: Shadultima
You're fighting this one with both Pat and Yoshi! Its attacks include Dark Wave, which deals three hits to a character for around 9 damage total, Dark Shot which deals around 6 damage and is reflectable and an easily-avoided minigame attack. It can also use Fragment to summon minor enemies, but you'll likely take these out with summons without even thinking about it.
Have Yoshi attack and use Heal Lite when HP runs low. Don't bother with Soul Cut; it's too costly. Pat should spend his turns lobbing Ghostnades until he runs out of SP, then attack. You obtain Pat's summon during this fight, which is similar to Yoshi's except it restores SP instead of healing. You also learn to perform both summons simultaneously, which actually does decent damage and carries both special effects to heal and restore SP. If you have Pat, use Luckup before a combined summon to do some impressive damage.
After the boss, there's some exposition, then we're on to the next character...
Clair Intro:
Name Clair and her dog, Winston. Take the Lucky Pen from the southeast corner of Clair's room and the Chocolate from next to Clair's bed. Leave Clair's room, then head downstairs and take the north door to get to the kitchen. You'll fight Clair's first ghost, but one attack should take it out.
After the following scene, you'll meet Clair's spirit Jason and end up back in her room. Head back downstairs and leave through the south door. Head north one screen on the street to reach the same Spirit Tunnel entrance that Yoshi used. Hit the Save Point and return to the south map to grind for a bit; Clair is your most fragile character yet and is actually incapable of beating two enemies at once until she hits Level 3.
Once Clair hits level 3 and learns Polterslice, you're a bit more free to wander around. Polterslice does a ton of damage, more than any other attack you've obtained. Smash some ghosts while cackling gleefully if you'd like, then head down to the Spirit Tunnel. You're unable to follow Yoshi since Jason can't smash rocks, but you do find out what he CAN do: swap your places with animals. Head back upstairs.
Now that you have Jason's power, you can get past the barrier to the east. Switch places with the cat, then proceed. You'll meet Sophie and she'll join your party. You might want to move the Lucky Doll over to Clair to account for her frailty. When you're ready, head to the haunted house to the north.
Boss: Shadomega
This is the toughest boss yet - hopefully you took some time to grind Clair up, as Sophie can't handle this herself! Shadomega has three parts, a body and two arms, and they're arranged so that Cirghoul can hit all three at once. It uses Dark Stream, a basic single-target attack, Blackwave, whichs damages the entire party and a slightly more difficult version of Shadultima's minigame attack. Once you've taken out the arms it switches tactics and starts using Terror Screech to debuff your characters before regrowing its arms. After beating on Shadomega for a while, it'll use "A devestating attack!" to drop both your characters to 1HP, but it'll dissipate shortly thereafter.
After the battle, head north into the haunted house - turns out it's Pat's house! There's a save point you can use inside. The Spirit Tunnel entrance in the kitchen still works, but without TK you can't really get anywhere, so follow the smoke upstairs and to the north door instead. After a scene, Yoshi and Pat will show up...but Pat will leave moments later, leaving you to fight...
Boss: The Demon
...but it's not much of a fight. After a few turns where you're incapable of harming the Demon, it uses an unknown attack and leaves the battle. Your characters gain a massive amount of Spiritual Energy, enough to gain several levels.
After the scene, head outside and go downstairs. Step outside. The Demon levels Pat's house and Sophie's spirit, Helen, is able to manifest. The town is sent into the Spirit World as well, so there will be new enemies to fight. Head west and swap with an animal to get past the barrier. One last scene, then you're able to move on.
Watch out for the new enemies, such as the Horseless Headmen and Big Spirits. Headmen can cause Rage, which causes the afflicted character to sometimes attack allies instead of enemies. You've got a more complete party now, so they won't be as difficult, but you can still be taken by surprise. As you level, you'll eventually reach a point where your characters have more than 4 skills. When this is the case, new skills will be added to the character's skill menu and you can equip and remove them to stay within the 4-skill limit.
Head into the Spirit Tunnel here, the one Yoshi first used way back at the start of the game. Head south and switch with the rabbit to get a Headband and First Aid Kit. We'll be coming back again later, but for now this is all you need so head back up. Head west twice, then switch places with the rabbit and head west again. There's a save point here along with the entrance to the Voltaic Spirit Tunnel.
Voltaic Spirit Tunnel:
When you enter, Pat will rejoin. He didn't get the nice boost from fighting the Demon, so you might want to take him back out to level him up a bit. With your entire party now together you can also use a combo with the entire party. This deals significant damage, heals, restores SP, buffs your characters and debuffs the enemies. It's a fantastic way to open a battle, but isn't great for general use because all the charging and minigames take forever.
Head north from the save point, then use TK to reveal a path further north. There are new enemies here, like Boltergeists and Bootubes. Most of them do Bolt damage for obvious reasons. They're all pretty weak, though, especially if you took the time to level Pat up a bit. Bootubes deal damage to the entire party at once, though, so watch out for that. Also be ready for Shock, a new status ailment that keeps you from casting.
There's an electric rig set up here. Use Helen to possess the red rig pieces and connect the left rig to the right. Once the rig is complete, the door leading north will open. It will stay open if you break the rig again, so don't worry about that. North of the rig, you'll find a pot and switch. Do the obvious with TK to make a bridge leading further north. Head as far north as you can, then set the pot next to you, then move it further north onto the switch. At the end of the resulting bridge, switch places with the deer to get across. You'll hit a save point.
Head west, switching places with the rabbit, then follow the path to a cave. Inside, take the enemy out, grab the map, then fix the rig with Helen. You'll need to connect the generator to both switchboxes. The solution is symmetrical and you can't mess it up, so it's a pretty easy puzzle. Finishing will open a door leading to the Volt Key.
Head back to the save point, then east. Switch places with the animal, then follow the path to the cave. Take the enemy out and fix the other rig. The gray pieces of this rig are affected by Jason's switch places ability, but in practice it's about as easy as using possession to move rig pieces around. Stand where you want a place to go, then switch it in. As before, you need to connect the generator to both switchboxes. When you're done, you'll open a door hiding a Spellbook, a handy accessory for heavy casters like Clair and Pat that restores SP when you cast. Clair's likely shaping up to be your healer, so it's a great choice for her.
Head back to the save point and go north. The Volt Key will open the door. Use Possession to fix the rig on the left side, which will let you proceed past the lightning wall. Step in, then proceed north. Use TK to reveal a bridge leading to a scene and another save point.
Head west, switch places with the animal to the north, and follow the path to a cave. Use Helen to move the red pieces inside the first rig. Then switch places to get the gray piece in place, then stand beneath it, switch again, walk one step north, switch again, then switch again while standing where it needs to be. Walk past the first gate and use Helen to fix the second rig on the right side. This reveals a Key Piece. Leave afterwards and head back to the save point.
Next, head southwest, using TK to reveal a bridge. Do so again at the end of the path to reach a cave and a First Aid Kit. This cave is easy enough: it's full of monsters and you should destroy them all. Problem solved. Doing so gets you a stat-boosting DEF Spirit.
Back to the save point yet again. This time we're going northeast. Switch places with the animal, then follow the path to an SP-restoring Enerdrink. Switch back to the main island and use TK to find a path east. Follow it to a cave.
Move the leftmost red block to break the electric gate, then walk past it and fix it again to break the metal gate. Step past that, then move the red block again to fix the rig heading east. Possess the block this frees and put it where the first block used to be. Go stand where the second block was. Next, bring the first block west and north to fix the topmost rig using it and the topmost red block. You'll reach the second Key Piece and fit the two together to get a Volt Key.
Head back to the save point again and head north. Follow the path to reach a down stairscase, at the end of which you'll find...
Boss: Dangeki-no-Usagi
This rabbit uses Boltstorm and Boltball to make you regret being conductive along with a simple minigame attack. It also summons Boltbombs when you hit it: normal Boltbombs explode when their timers fill up, while glowing unstable Boltbombs blow up when you hit them. Yoshi's Embog can slow the boss down, so do that and use multitarget attacks like Pat's Ghostnade and Sophie's Frentazmy to take out the stable bombs while hurting the boss. Summons are very effective here, since they'll take out the bombs as well as doing sizable damage to the boss. When it starts summoning unstable Boltbombs, you'll want to be a little more discerning in what you target and focus on single-target attacks.
Winning will get you the Bolt Spirit. You can assign it to one of your characters as you'd like - I chose Pat. This will enhance their combat abilities with the Spirit's element, in this case Bolt, and teach them the Boltstorm skill. It also gives your spirit adorable bunny ears. Once you're done, hit the green Save Point-looking thing to return to the entrance.
Head one screen east, check the southern part of the area for a garbage can with a POW Spirit in it, and keep going east. South, east, south, switching with an animal to get across the barrier. You'll find another Spirit Tunnel. Check the nearby trash cans for a First Aid Kit and some Coffee before going in. You might want to take a moment to share out your First Aid Kits; if you've been conserving them as I suggested you'll probably have quite a few!
Bright Spirit Tunnel:
Head east to the end of the path and switch places with the deer, then with the rabbit to the east. Possess the rabbit afterward and have it stand on the switch to make a bridge leading to a cave. Inside the cave, TK the light ball so it illuminates all the dark crystals in the northeast corner, and it will open a door leading upstairs.
There are enemies to fight here, including Seraphites and Lumiknights, but they don't pose much of a threat. They're so easily killed that this area makes for pretty decent grinding, in fact! There's also Lightshades, terrifying (?) possessed lamps that switch elements from Light to Dark whenever you hit them. Head east and switch places with the deer to the north, then head downstairs. Exit the cave, follow the path and switch places with the deer. You'll reach a save point and a map.
Use Moshi to smash the east wall and head that way. Enter the cave. Here, the purple towers need to be in darkness while the yellow towers need to be lit. Use Helen to possess the lightning bugs and make that happen. This will reveal a door heading north. In here, use TK to move the lamps around and guide your way. At the end of the dark path, you'll reach a staircase that leads to a Bright Key.
Head back to the room with the dark and light towers and head east. Possess the deer to the east, then head downstairs. Murder all the enemies in here. This will reveal a box with a Silver Coin, a fantastic accessory that heals HP when a physical skill is used. It works nicely on Sophie.
Head back to the save point, then go north. The Bright Key will open the gate. Follow the chain of animals north using Jason to switch between them. You'll reach another save point and an Enerdrink. Head west from here to a cave. It's a similar light-and-dark tower puzzle - use the fireflies to illuminate the northern three light towers, the light orb to illuminate the lower three light towers and the dark orb to shade the dark tower on the right. This will open a door leaidng to a dark path.
Possess the fireflies to find your way around in here. Use the light orbs and fireflies to illuminate all the light towers - again, using the light orbs on groups and fireflies on single towers. This opens another door leading south to the second Bright Key. Head back to the save point from here by heading east, then switching with a deer, then heading north.
Head east now. There's tons of enemies in the cave you'll find, so destroy them all. You'll find an SP spirit. Head back to the save point again, then go north. You'll find...
Boss: Light Kotori
The Light Kotori appears with a pair of Frightshades. Until you take them out you won't be able to hurt the Kotori, but it should only take one attack to do that. It attacks with a variety of Light-based attacks, the worst of which is Lumine which damages the whole party. When you've taken out the Frightshades, the Kotori will use Light Restore to bring them back a bit later, so you'll have to kill them again. This isn't a very difficult fight if you stay on top of healing and keep the Kotori slowed with Embog.
When you've won, you'll get the Light Spirit and can give it to whoever you'd like - I chose Sophie. This will empower the character's offensive abilities with Light and teach them Lumine, along with giving their spirit wings.
After some scenes, you'll unlock the ability to break the white barriers on the map. Head two screens north, then go east. You'll be at the ruins of Pat's house - grab the speed-boosting Dog Collar near the Spirit Tunnel. Continue east past the ruins of Pat's house, then north after you grab the roaming spirit on the east side of the crossroads. Going another screen north will lead you to a new Spirit Tunnel.
Ethereal Spirit Tunnel:
There are a couple new mechanics at play here. First, green streams will push you in the direction they're flowing. You'll also find green Save-Point-looking things - these are teleporters. Finally, you'll find switches that Moshi can hit with his field skill to make land disappear and appear. Enemies here include Ghasts, who Weaken (reducing your physical attributes) and Curse (immobilizing you) along with being immune to magic attacks. You'll also fight Revenacuums, which suck up your SP, and Spookees, which use Berserk to do a lot of physical damage at once.
Take the stream south from the entrance to a cloud, then head west using the switches. You'll find the Ether Key in a chest. Head back to the cloud and use the teleporter, then use the Ether Key to get through the gate. Follow the path and use the teleporter, then continue east to a cave. The cave has you using Moshi on a switch to proceed past colored barriers. It's also got some enemies that you'll almost inevitably have to fight. At the end, curve back around to hit the switch one last time and exit.
Switch places with the animals on the clouds to make your way northeast. Make sure you use TK to reveal a bridge leading to an Enerdrink on the way. You'll reach another save point.
Head north from the save point and switch places with the rabbit. Enter the cave. There are several streams here - take the left stream heading north to get the map and hit a switch with Moshi. Then take the right stream to get another Ether Key, hit the switch again, and take the stream back down. Head back to the save point.
Hit the teleporter to warp to a cave. Inside is a rig - did you miss those? Arrange the rig so the stream carries you east across the pit. You'll get a LCK Spirit. Head back to the save point, go through the east gate and use the teleporter.
You'll encounter new enemies here, namely Mr. Nado, which is a tornado with 80's shades and a sweet 'stache. Yes, really. It uses Embog to slow you. Enter the cave for a horrifying stream puzzle. You'll need to TK an urn around to block streams and avoid being thrown into a pit, which will send you back to the start.
First, move the urn to block the stream heading west so you don't get thrown off when you use the southbound stream. This will let you bring another urn up. Use the teleporter on the urn to block the southbound stream so you stop at the middle island. Then block off both the westbound and eastbound streams that would throw you off from using the second southbound stream.
The next room is another stream puzzle. Use the urns in a "ladder" motion, blocking off two streams at a time, to proceed east. Let yourself be thrown by the fourth stream from the left, though. You'll get an ally-reviving SmellSalts. Head east again and out the door to another save point surrounded by three teleporters.
Take the north teleporter first. It's time for the Rig Puzzle From Hell. Blue blocks are vulnerable to place-switching, red to possession. Reference the first attached screenshot to unlock a prize, then reference the second to actually reach it. It's a Key Piece. Head back to the save point.
Southwest teleporter next. Take the topmost stream, then the bottom stream pointing east, then stand above the stream pointing east and take the stream pointing down. Walk around the edge of the area to get the second Key Piece and form an Ether Key. Head back to the save point again.
Head East from the save point to find a cave full of monsters. Take them all out to get a Stache, which gives buffs when physical abilities are used. This is great for Sophie.
Go back, save and use the southeast teleporter to reach a gate, which the Ether Key will open. This leads to a cave with another stream puzzle. Use the screenshot for this one. It will take you to a save point and some stairs down, leading to...
Boss: Air Chuchip
Air Chuchip uses Shield to buff itself and halve your damage. Sophie's Powupall and Pat's Luckupall can help counteract this. It also uses Gust to shove your characters around into more advantageous positions for its area-effect Cyclone attack and minigame attack Air Rend. It's vulnerable to Embog, so as always that's a good choice for Yoshi, while Clair and Pat need to stay on top of healing and damage respectively. This battle's tough, and it might take a couple tries before you get it - the key is learning how to avoid Air Rend.
You'll get the Air Spirit after this. I gave it to Yoshi. It teaches Cyclone, gives you wind-element attacks and puts antlers on your spirit. After leaving, you'll notice that the Demon is collecting the spirits opposite to yours - yikes!
Head west, grab the roaming Spirit, west again then north for another, then east to run into an old friend...
Boss: Shadomega (Optional)
This boss hasn't really changed since the last time you fought it. The main difference is that now you have someone with the Light Spirit. Lumine does a number on Shadomega and can take its arms off with one cast. Just pummel it, and you'll win without trouble.
Go back west, then south, then west from there two screens. Grab the Roaming Spirit, then head north to reach the Wala. Grab the Tiger's Eye from the chest here. When you've found all the Roaming Spirits, you'll bring them back here for a reward. Head back south, then west. Use the animals to creep up north, where you'll find a Spirit Tunnel and save point. Before you go in, go grab the HP Spirit from the northwest corner. Proceed east a screen and grab the Old Book near the stump. We're going to use this before entering the tunnel.
Head all the way back to the Ethereal Spirit Tunnel entrance. Then go north, grabbing the Roaming Spirit to the east side of this screen and Temperband on the west side, north again and west. You'll arrive at the Library. Go one west from here to find a Roaming Spirit and a Wristband first, then head back and go inside.
Public Library:
The Textspooks here resist Air, so your character with the Air Spirit won't be accomplishing much, but it doesn't really matter as they're not too dangerous. There are five books in here represented by glimmering spots - find them and use them. This will open the way downstairs in the upper right...though this bit is actually bugged and you can just walk through the east part of it anyway. Whoops! Downstairs, you'll be attacked by a ghost librarian.
Boss: Ms. Kauffin (Optional)
A joke. Hit her once and down she goes.
Since you have the library book, she'll leave and you can select a stat of your choice as a reward. This stat will be boosted for all your characters. HP or DEF is a good option. You also get access to the game's bestiary on the desk and a Pipe Key from the chest. When you're done here, head back to the Volcanic Spirit Tunnel.
Volcanic Spirit Tunnel:
From the entrance, head north. Switch with the deer and enter the cave. There are new enemies here, such as the Blighters, which deal nasty group damage and also burn your characters. The biggest threat here are the Bangshees, which explode for massive damage after three turns and are often accompanied by Nightmares which speed up this process by giving the Bangshees their turns. In the cave, place two ice wisps next to the top and bottom cold generators, then two ice wisps to the left and right of the left and right cold generators, respectively. Take the heat orbs and place them to the lower left and lower right of the left and right cold generators in order to warm the heat generators that the ice wisps have disabled, while not re-disabling the cold generators. This should activate all the generators and open the door. Head north.
Grab the map from the box in the next room and head north. Use the save point here. The brown blocks act as doors that open when hot enough. Use the fire wisp to open the blocks on the west, then proceed that way. Use the wisp to open the blocks, then stand on the switch, possess the rabbit and bring it across the bridge, and use it to hold the switch down while you cross the bridge and bring the wisp along. Use the wisp to open the blocks, then stand on the switch. Walk the rabbit across the resulting bridge to the west and then switch places with it to get over there. Enter the cave.
Ice wisps will freeze lava into stone you can walk over when placed near it. With that in mind, possess the ice spirit and use it to make a bridge across the lava to the west. Walk the rabbit across the bridge. You can't get the fire wisps across the lava bridge because they reheat the lava and make it impassible, so use the rabbit and your characters to make a light bridge using the switches and get them across that way. Arrange the wisps so that the ice wisp is activating the blue ice mound and the fire wisps are reheating the heat generators. Head through the north door when done.
In this room, use the wisps as a sort of "stepping stone" to get across the lava field. Set up ice wisps next to the ice generators as necessary. It's tedious but not difficult. Make sure to enter the northwest room and kill all the enemies there for a Spike Band, which lowers enemy stats when you use POW attacks. It's a great choice for Yoshi or Sophie. Finish the puzzle in the lava field room and exit to get the first Volcano Key, then hit the switch to get back to the save point.
Use the fire wisp to open the east block and head east. Switch places with the deer on the island in the lava field, then with the bunny in the northeast corner. Follow the path around the edge of the lava field for a F. Aid Kit and an Enerdrink. If you've been judiciously saving consumables you probably have plenty of these already! Head through the door to the north.
Fire wisps, as we've noticed, will open brown blocks, but ice wisps will close them again. Use the fire wisp to make a path to the switch to the north, then park the rabbit on it. Walk the ice wisp over the resulting bridge and park it next to the cold generator to open the door. Go through to another lava field. Here, use the ice orb to make bridges across the lava field, but keep in mind that you can't set the ice orb down on any bridges you make - it must sit on solid ground. Head to the southwest island, then use the orb to the west and the orb you've been using to make a path to and across the ledge against the northern wall. Exit to the south for the second Volcano Key. Head back and use the two ice orbs to make a path to the southwest door.
This leads to a simple wisp-and-orb puzzle - place the ice orb to the lower left of the lower leftmost ice generator, one fire wisp two squares right of it and the other fire wisp two squares up and one squares left of it. Problem solved. Head back to where you got the Volcano Key and switch places with the deer to get back to the save point quickly, then head north. Use the ice wisp to activate the cold mound, head north and stand on the far edge, then use the fire wisp to activate the heat mound. Head past the brown blocks and activate the cold mound again. Cross and head north.
Use the ice wisp to get you across the lava, stand on the switch, and put the fire wisp next to the ice mound past the bridge. Stand on the bottom-most switch and put the ice wisp next to the ice mount at the bottom. Easy. You get the last Volcano Key. Head back to open the door heading north and go up the stairs. Here, head all the way south to get another F. Aid Kit and Smelling Salts, then head through the door to the north.
Move the closest eastern ice wisp north one space, then cross the resulting bridge. Stand on the northwest switch and move the fire wisp up north. Head back south, then stand on the southwest switch. Move the eastern fire wisp up, next to the eastern heat generator, then stand on the southeast switch. Move the western fire wisp up next to the western heat generator of that pair. Finally, move the initial ice wisp you used to make the bridge back south. The door opens. Head upstairs and save, make sure your characters are around Level 40 for this next battle, then head through the northern gate.
Boss: Flame Kitsune
There's five of this boss, but only one attacks or takes damage. All others are completely unaffected by your abilities and are a waste of time. You can easily determine which is the real boss by watching the animation for the Melt Beam or Flame Stream attacks or by using area-effect or all-effect skills; Pat's Ghostnade is perfect for this since it's cheap.
When you know which boss is real, cast a weakening skill like Weaken or Embog on it so you'll be able to tell which boss to attack at a glance. Keep the boss weakened to avoid problems and use your most powerful single-effect skills to prevail. Sophie's Revenassail is your best option here. Clair and Yoshi need to be on healing duty as the boss' Inferno ability does enormous damage; having Clair use Shield All helps a lot, too.
After you've beaten on it for awhile, it'll copy your party members onto the illusory Kitsunes - when you hit the wrong Kitsune you'll hit your party member instead! At this point, stop using area-effect or all-effect skills. This boss seems to have fewer HP than the previous ones, so as long as you avoid attacking yourself you should be fine.
Winning earns you the Spirit of Heat, which will automatically go to your final party member (in my case Clair). As expected, it enhances your attacks with Heat and teaches Inferno. Use the green save point to leave...
You wake up as Yoshi - head downstairs and fight the smaller ghost. You might notice that you've been given an enormous stat boost; enjoy it while it lasts! When you step outside, Clair will rejoin as well. She has a similar massive stat boost. Head back to the Volcanic Spirit Tunnel, keeping in mind that you don't have your spirits with you and can't use their abilities such as switching places. When you arrive, your party will reform; everyone now has ridiculous stats, so most regular enemies can no longer touch you in battle. Your spirits are returned to you as well. Head to the Central Spirit Tunnel, then go to the new staircase in the northeast corner of the map.
The World Beyond:
You're in the home stretch now! Head north and go down the staircase.
If you've been following this guide, you chose Bolt from the Bolt/Rain pairing, so the first area of the World Beyond is Rain-based.
Switch places with the blue block while standing at the junction between the white and black streams. This will complete the circuit and make a bridge. Go across to find...
Boss: Kelpie; switch and bridge puzzle
So this is fun: the Kelpie resists any attacks made by characters other than your Bolt-user, in our case Pat. They're going to have to be your primary damage dealers. Have the others use buffing and debuffing skills to ensure they're dishing out as much pain as possible. It doesn't have much HP, not to mention your supercharged stats will keep you going for quite a while, so this fight isn't too difficult.
After the battle, stand at the leftmost junction and switch the piece on the island to the west into it, then cross the bridge. Next, switch that same piece into the topmost junction. Switch the other piece into the next junction to the lower right of that one. Cross the bridge, switch the first piece into the leftmost junction at this rig to make a bridge. Switch the piece on the island and bring it back to the main island using the bridge.
Next, use the correct piece to fix the rightmost junction. Bring that piece across to the eastern island with you. Switch with the piece on the bottom island to complete the junction here, switch back with the piece you brought with you to get back, switch with the piece on the right island to get it somewhere you can reach, and switch pieces until you've got the vertical and horizontal pieces on the eastern island. Bring your pieces with you to the north island and use the horizontal, right-corner and vertical pieces to fix the right side of the rig here and access the stairs. Whew!
The next area is Dark-based. Head west from the save point, then TK the light orb to the west back to you to reveal a bridge. cross it to find...
Boss: Vardoger; light orb puzzle
This boss is almost comically weak. It steals your moves and uses them against you...but it doesn't really have much going for it other than that. Your light-based character is terrifyingly effective here. It should be Sophie - have her use Booster followed by Revenassail to deal massive damage to it. If you throw up buffs and debuffs first, it's quite possible to win this battle without taking any damage!
Once you've crushed the Vardoger, head to the main island he was blocking off. use TK to reveal bridges to the four islands surrounding it. The idea here is to use the light orbs to scout around and find out if each of the various orbs around the area need to be dark or light.
To save you the trouble: the middle two orbs need the two left orbs lit, the right two dark; the island shaped like an upward-pointing arrow needs dark orbs; the downward-pointing island needs lit orbs; the round island needs the top orb lit and the bottom orb dark. Head toward the door when all this is done and it'll open. Head through the door, down the stairs, watch the scene and go down the next set of stairs.
The next area is Earth-based. Walk along the path to find...
Boss: Hantu Galah; stream puzzle
This guy is HUGE. His combat style reflects that, as he's big on dealing lots of straightfoward damage. He's easy to beat if you can mitigate this: use Clair's Shield All and Heal Max abilities to keep your Wind-element character alive. He's also very slow, so Yoshi's Spdupall is amazingly effective in making him miss. In our case, the Wind character will be Yoshi. Have Sophie use Booster on Yoshi and have him follow up with Ether Blade. It'll only take three or four shots of this combo to finish the pole giant off.
It's time for a good old-fashioned stream puzzle! If you smash a colored rock, all rocks of the same color are destroyed. If you smash a grey rock, only that rock is destroyed. If you step on a button, all rocks come back. Importantly, you can smash rocks while moving in a stream.
Smash the blue rock to the east, hop in the stream and smash the grey rock on an island to the west on the way down. You'll end up at the second island. Next, hop in the stream heading east, smash the blue rock on the eastern island once you've passed by it, then smash the second gray rock to the south. You'll be at a third island. Step on the button then enter the stream heading east. Once you've passed the second blue rock, smash that and the second green rock quickly, then the grey rock to the north, then the third grey rock. You'll end up at the stairs.
The next area is ice-based. Possess the fire wisp to the east to open the ice wall, then move it away and use the ice wisp to freeze a path over the river. Cross to find...
Boss: Holiday Spirit; fire and ice wisp puzzles
Seasonal! This guy eats pretty much any skill that's not a damaging attack, so don't bother with those. Instead, just smash him to bits with your strongest attack skills, and you'll pretty much bypass his gimmick. Inferno is remarkably effective here, so use it. Probably the easiest of the bosses in the World Beyond, since if you don't fall for his trick he doesn't have much to use against you.
After the fight, take the fire wisp all the way south and set it next to the fire mound, then put the animal on the east button. Move the fire wisp away from the mound, then put the ice wisp at the opposite ice mound and stand on the west button. Bring the fire wisp south, then bring the ice wisp south next to the ice mound. Cross the river and put the fire wisp next to the fire mound to continue south and reach...another puzzle!
Possess the ice wisp to the east and put it next to the ice mound. Cross the river. Stand on the western button and bring the animal up past the river, then set it on the eastern button. Take the ice wisp back up top, set it near the ice mound, cross the river again, move the wisp away and stand on the north button. Move each fire wisp to one of the islands, then set one of the fire wisps up next to the north fire orb. Cross the river again with the help of the ice wisp. Move the other wisp to the south fire orb. The door opens - use the ice wisp to cross the south river and get to the stairs.
You're at the end. Save here and note the green save point you can use to leave. Follow the path at the end to reach the staircase where the final battle awaits.
Boss: The Demon
There are two targets here: the Demon and its Sworrd. They use a variety of multitarget attacks, so have Yoshi at the ready with Heal All and Clair with Shield All to keep things going smoothly.
The Demon has a pretty neat minigame attack where you'll need to drag party members away from sword slashes; this does a lot of damage if you aren't careful, so watch out. It can also throw the Sworrd into the ground. This is your cue to smash it with everything you've got, since if you don't it'll unleash a huge attack.
As the fight goes on, the Demon will charge the Sworrd with various elements, and you'll only be able to damage it with that element's weakness; it'll also begin charging itself the same way, so keep an eye on the cracks in its body to see what you'll need to use. Since Pat's attacks won't be useful for the majority of the battle, have him use Spirtall constantly to keep your SP up.
Later still, it'll start using elemental shields - hit them with the same element to dispel them. There'll also be a few story scenes as you fight. During one of these, it'll throw up a shield of all elements and you'll be unable to hurt it. Just focus on staying alive and using Spirtall here. You'll know when you can attack again. Hit it with one attack from each of your elements to finish the game.
Skills:
Yoshi:
Lvl 3 - Heal Lite (Minor heal)
Lvl 6 - Spirit Cut (Minor damage, physical)
Lvl 11 - Speedup (Boost ally SPD)
Lvl 12 - Spddown (Reduce enemy SPD)
Lvl 15 - Heal Pro (Major heal)
Lvl 18 - Embog (Slow an enemy)
Lvl 21 - Spdupall (Boost all allies' SPD)
Lvl 24 - Spiritblast (All damage, physical)
Lvl 27 - Invigorate (Revive an ally)
Lvl 30 - Spddownall (Reduce all enemies' SPD)
Lvl 33 - Refresher (Ally regenerates HP)
Lvl 36 - Heal All (Medium heal to all allies)
Lvl 39 - Ether Blade (5 hits, physical)
Sophie:
Lvl 3 - Cirghoul (Area damage, physical)
Lvl 6 - Powdown (Reduce enemy POW)
Lvl 9 - Heal Lite (Minor heal)
Lvl 11 - Illuminate (Reveals enemy stats)
Lvl 15 - Enrage (Enrage target enemy, causing them to attack allies)
Lvl 19 - Powup (Boost ally POW)
Lvl 21 - Frentazmy (4 hits, physical)
Lvl 24 - Cure (Cure status effects)
Lvl 27 - Powerdownall (Reduce all enemies' POW)
Lvl 30 - Powupall (Boost all allies' POW)
Lvl 33 - Booster (Double ally's next physical damage)
Lvl 36 - Sleep (Put an enemy to sleep)
Lvl 39 - Revenassail (Huge damage, physical)
Pat:
Lvl 3 - Ghostnade (All damage, magical)
Lvl 6 - Luckup (Boost ally LCK)
Lvl 9 - Spirise (Restore ally SP)
Lvl 12 - Deluck (Reduce enemy LUK)
Lvl 15 - Spectsnipe (Major damage, magical)
Lvl 18 - Luckall (Boost all allies' LCK)
Lvl 21 - Spirisoar (Restore more ally SP)
Lvl 24 - Hauntening (Haunt target enemy, damaging them after attacks)
Lvl 27 - Deluckall (Reduce all enemies' LCK)
Lvl 30 - Baspooka (4 hits, magical)
Lvl 33 - Spirtall (Restore all allies' SP)
Lvl 36 - Aura (Thorns effect on an ally, damaging attackers)
Lvl 39 - Phantomb (Huge area damage, magical)
Clair:
Lvl 3 - Polterslice (3 hits, physical)
Lvl 6 - Defup (Boost ally DEF)
Lvl 9 - Cure (Cures status ailments)
Lvl 13 - Defdown (Reduce enemy DEF)
Lvl 15 - Shield (Halves damage for ally)
Lvl 18 - Heal Max (Full heal)
Lvl 21 - Defupall (Boost all allies' DEF)
Lvl 24 - Haloffense (Area damage, magical)
Lvl 27 - Defdownall (Reduces all enemies' DEF)
Lvl 30 - Enervation (Weaken target enemy, reducing physical stats)
Lvl 33 - Invigorate (Revive an ally)
Lvl 36 - Shield All (Halves damage for all allies)
Lvl 39 - Puissanshee (Huge all damage, magical)
Spirits:
Bolt - Boltstorm (5 hits, bolt, magical)
Light - Lumine (All damage, light, magical, causes Sleep)
Air - Cyclone (All damage, wind, physical)
Fire - Inferno (Huge damage, fire, magical)
Posted by: corygalliher |
November 10, 2012 7:13 PM
|
November 10, 2012 7:13 PM