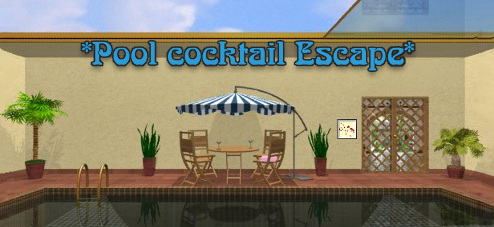
![]() Somewhere in the world right now, it's the perfect time to stretch back on a chaise lounge poolside, a refreshingly colorful drink near at hand and halcyon blue skies blanketing your view. That's why this is the perfect time for Pool Cocktail Escape from TomaTea. Whether you're escaping the weather or just basking in it, this escape-the-room game presents the optimal mix of thinking and relaxing to make your midday break feel like a luxury minibreak.
Somewhere in the world right now, it's the perfect time to stretch back on a chaise lounge poolside, a refreshingly colorful drink near at hand and halcyon blue skies blanketing your view. That's why this is the perfect time for Pool Cocktail Escape from TomaTea. Whether you're escaping the weather or just basking in it, this escape-the-room game presents the optimal mix of thinking and relaxing to make your midday break feel like a luxury minibreak.
 Just point and click your way around, looking for picture tiles, useful objects and clues to solve puzzles until the exit key is found. In this tropical resort setting, you'll discover all the features you appreciate in a TomaTea creation: a glowing cursor to guide you toward active spots, the "I have no clue" messaging to lead you away from unsolvable puzzles, plus the gorgeous atmospheric aesthetics for which TomaTea has come to be known.
As for flaws in this superlative environment, besides it being a place you'd rather stay than escape, the navigation is not a smooth turn left or turn right square room situation. So pay attention to how, at only certain angles, you can access areas that earlier seemed inactive, making your way around to a different perspective to look in something seen but out of reach before. You'll encounter many conventional puzzles including color codes, counting, tile collecting and jumbled picture sorting. Although TomaTea tends to be predictable, thus easier for anyone familiar this designer, that means TomaTea can always be relied on for a pleasant escape game experience, one that will take you away from it all, even if only for five minutes at a time.


Walkthrough Guide
(Please allow page to fully load for spoiler tags to be functional.)
Pool Cocktail Escape Walkthrough
Exploration, Gathering Clues and Collecting Objects
When you start out, you're facing a mural of dolphins leaping from the sea.
Seal that image in your memory for future reference.
Click on the water to dive into the pool.
Notice the unusual tile design on the pool's back wall?
There's also something at the bottom of the pool. Dive a little deeper:
Get the TILE PIECE (1/9)
and the TONGS.
Then, back up twice.
Did you notice that, when you hover your cursor over the grate, to the right of the pool, it lights up?
Zoom in on the grate.
Use the TONGS to get the paper stuck down below the grate:
Open the paper for a CLUE.
--2-
3-1-
----
-4--
Back up.
Turn to your right to face the lemon tree and two lounge chairs.
Zoom in on the lemon tree...
Pick up TILE PIECE (2/9)
and pick a LEMON off the tree.
Back out then zoom in on the chaise on the left...
Lift up the cushion to find another TILE PIECE (3/9).
Back up again.
Before looking at the "puzzle wall" of lockers and towel cubbies, turn around twice to see the umbrella-canopied table.
Move closer to the table to see what's on it:
Take TILE PIECE (4/9) from the chair on the right.
Ignore the two martini glasses but grab the pousse-cafe (deep, long-stemmed) COCKTAIL GLASS.
Back away from the table and zoom in on the latice-work gate area:
Pick up TILE PIECE (5/9) by the potted palm.
Look at the picture to the left of the gate and make note of what it's showing you.
Back up again.
Turn left to face the other end of the pool, some towel cubbies and lockers...
Zoom in on the lockers on the right.
Grab TILE PIECE (6/9) from the towel on the middle shelf.
There are six lockers, each with a different code. Two are available to solve right now...
Dolphin Buttons
Examine the middle locker to the right of the tile picture.
Click on its lock to start the puzzle:
There's a left button and right button. Click them in the correct sequence then click the smaller button to unlock the door.
The dolphins on this lock are your hint.
SOLUTION:
Look at the dolphins on the wall mural; which way are they facing? Match the direction the dolphin is headed to the images below each corresponding button. That's the order in which you click the buttons...
LEFT-LEFT-RIGHT-LEFT-RIGHT-RIGHT
After inputing proper sequence and clicking the little button to enter it, the locker door swings open for you:
Get the bottle of GALLIANO,
a KNIFE,
and TILE PIECE (7/9).
5x5 Grid Design
If you're at the lockers on the right side of the tile picture, you can click the left edge of the screen twice to move left.
In this way, examine the middle locker to the left of the tile picture and zoom in on its lock:
Here is a 5x5 grid of buttons. Click to select a button and it will darken slightly.
Your goal is to create the correct pattern on the grid then click the little gold button to unlock this door.
SOLUTION:
Recreate the image that's underwater on the pool wall...
--x--
-xxx-
xx-xx
-xxx-
--x--
After entering the proper design and clicking the gold button, the locker opens...
Get the bottle of BRANDY,
a box of COCKTAIL STICKS AND PICKS...
open the box to get a COCKTAIL PICK
then look under the lid for a clue.
Colorblind Help:
Blue Star, Red Heart, Green Diamond, Yellow Circle
Lastly, get TILE PIECE (8/9).
Colors and Shapes
From the left side of the lockers, click the right edge of the screen twice to move to the right side of the lockers.
Then, examine the lock on the rightmost locker door...
This has four colored buttons. As you click through them, they change in color as well as shape...
Colorblind Help:
As you click the buttons, they change colors four times before changing to a new shape. The colors go in this order...
RED (0 clicks, 4 clicks, 8 clicks...etc)
BLUE (1 click, 5 clicks...)
GREEN (2 clicks, 6 clicks...)
YELLOW (3 clicks, 7 clicks...)
The goal is to change the buttons to both the proper color and the correct shape. Then, click the little gold square below to enter the solution.
SOLUTION:
Note how the arrows on the picks point to certain spots? That determines the order for the shapes and colors...
GREEN DIAMOND - BLUE STAR - YELLOW CIRCLE - RED HEART
Once you unlock this locker, it opens up so you can get:
a bottle of GRENADINE syrup
and the last TILE PIECE (9/9).
Jumbled Tiles Picture
Slide left from the "Colors and Shapes" locker to lay your eyes on the incomplete tile picture.
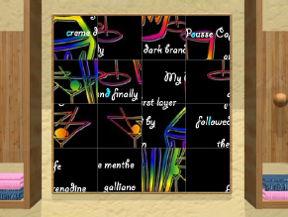
Take the 9 TILE PIECES and place them on the board.
Now, arrange the tiles until the picture is complete.
To move a tile, click once to select it, then click again on the tile you want to switch it with.
SOLUTION:
Screenshot: tile picture solution
When the picture is complete you get another clue:
Pay attention to where the blue letters are located on the tiles...
--o-
l-c-
----
-d--
A 4-Letter Word
From the tiles picture, move left and zoom in on the leftmost locker.
Two clues are needed before you can access this puzzle:
One is in the completed tile picture.
The other is gained by using the TONGS.
Unlock the door by entering the correct 4-letter word.
Change the letters by clicking the arrows above or below the letters.
Click the smaller button on the bottom to "enter" the word.
SOLUTION:
Use TONGS on the grate on the right side of the pool while you're facing the dolphins mural to get a PAPER. On it, notice the numbers on various spots of a 4x4 grid. Coordinate those numbers to the blue letters in the completed tile picture. You probably guessed what the word is already...
C O L D
From inside this opened locker you can get:
a bottle of CREME DE MENTHE
and a STRAW.
A 4-Color Code and a Cocktail
To get the code to the last locker on the left, you need to make a cocktail.
Here are the items you need before you can begin:
a COCKTAIL GLASS
a LEMON
KNIFE, to cut the lemon
GALLIANO
BRANDY
GRENADINE
CREME DE MENTHE
a STRAW
a COCKTAIL PICK
(The last item needed to complete the apertif, a tiny parasol, is obtained by opening this locker).
Now, start making the cocktail. The tile picture provides the recipe.
Follow the recipe 'til you get the four needed colors...
Open the COCKTAIL GLASS in your inventory so you can pour in the ingredients....
First, use the GRENEDINE
Then, add the CREME DE MENTHE
Next comes GALLIANO
And, last, add the DARK BRANDY
When you get the cocktail made, you can access the puzzle for the third locker on the left:
Change each square to the correct color, then click the input button below to unlock the door.
SOLUTION:
RED-GREEN-YELLOW-ORANGE
Colorblind Help
The colors go in this order...
YELLOW (0 clicks and 4 clicks)
RED (1 click)
GREEN (2 clicks)
ORANGE (3 clicks)
When the locker opens...
get the PARASOL.
Also, take a look at the picture of the cocktail taped inside.
4-digit Number for the Exit Key
Now that you've seen how the completed cocktail should be presented, add the last items...
Open the LEMON in your inventory and use the KNIFE x2 to cut it into a slice.
Add the LEMON SLICE to the FILLED GLASS
Then add the STRAW, COCKTAIL PICK and PARASOL.
Move right and examine the first of the lockers on the right side:
You need a 4-digit number to unlock this door.
Use the hints from the completed cocktail and from the picture by the lattice gate to figure out the code.
SOLUTION:
The picture by the gate tells you to count the red sections on each item in this order: lemon, straw, cocktail pick, and parasol. That gives you this number...
3316
Input the correct number and click the little square to enter it. The door will open:
Get the KEY.
Back up, turn right, and zoom in on the latticed gate:
Use the KEY to unlock the gate.
Great success on your poolside escapade!
Posted by: elle |
February 13, 2013 4:45 AM